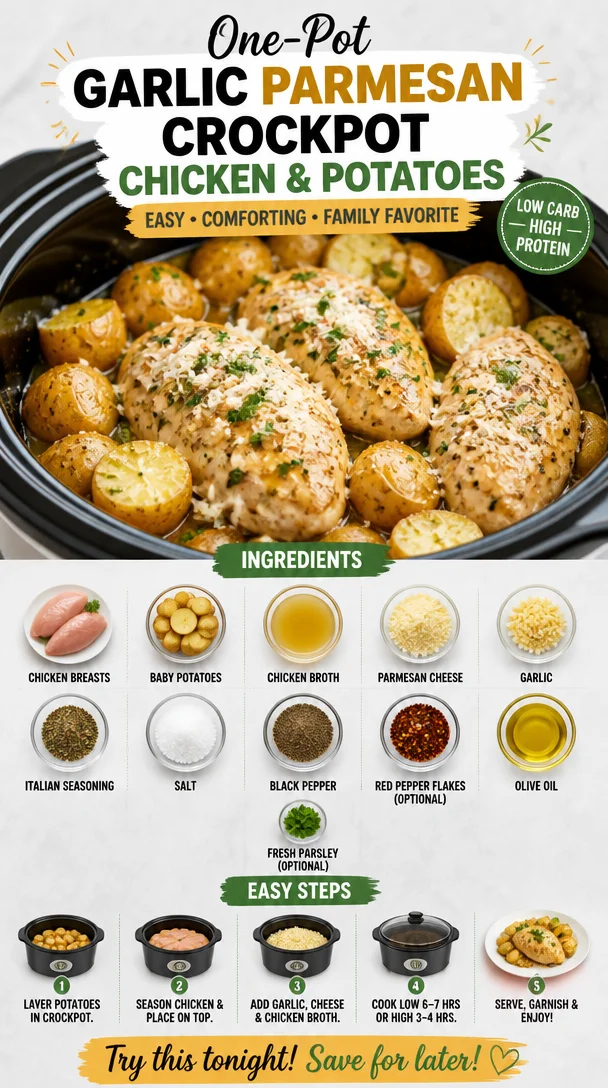
One-Pot Garlic Parmesan Crockpot Chicken & Potatoes
Garlic Parmesan Crockpot Chicken and Potatoes: An Incredible Ultimate Recipe
Welcome to Clean Plate Cravings, where the kitchen is a sanctuary filled with fresh ingredients, comforting aromas, and delightful flavors. Today, I’m super excited to share a dish that’s been a game-changer in my home: Garlic Parmesan Crockpot Chicken and Potatoes. It’s one of those recipes that just makes my heart sing, and with fall creeping in, it’s the perfect cozy dish to prepare on a busy day.
Imagine coming home after a long day, the aroma of garlic and herbs wafting through your home, instantly lifting your spirits. This dish encapsulates that dreamy feeling. Slow-cooked to perfection, the chicken turns out so tender it practically falls apart at a gentle nudge with a fork, while the baby potatoes soak up all those mouthwatering flavors. You won’t believe how simple it is to whip up, making it a favorite not just for me, but for everyone I’ve shared it with.
Growing up, my family would gather for slow-cooked meals on special evenings. My mom had this magical way of simmering flavors that created memories around the dinner table. I remember one specific Sunday when we had roast chicken with garlic and potatoes. I was just a kid then—full of energy and a little too chatty for my own good. I can still picture the clattering of pots, the warmth of the kitchen, and my mom’s laughter as we waited for dinner. That day, I learned two things: the power of good ingredients and the joy of sharing a meal with loved ones.
So, let’s dive into this recipe and create memories of your own!
Ingredients
Here’s what you will need to make this spectacular dish:
-
4 boneless, skinless chicken breasts
Tender chicken that soaks up all the delicious flavors. You can substitute with thighs for a juicier option, just remember to adjust the cooking time slightly. -
1.5 pounds baby potatoes, halved
These little nuggets are perfect for slow cooking. They hold their shape well. Don’t have baby potatoes? No worries! Quarter normal-sized potatoes or use sweet potatoes for a twist. -
1 cup chicken broth
This adds moisture and depth. Homemade broth is the best if you have it, but store-bought works just fine. For a vegetarian option, you can use vegetable broth. -
1/2 cup grated parmesan cheese
This wonderful cheese adds rich umami flavors. Feel free to swap in pecorino romano for a sharper taste. -
4 cloves garlic, minced
Garlic brings a beautiful aroma and flavor to any dish, but if you’re in a pinch, garlic powder can work (just use about 1 teaspoon). -
1 tablespoon Italian seasoning
A blend of herbs that instantly makes everything taste gourmet! If you don’t have ready mix, you can use individual herbs like oregano, basil, and thyme. -
1 teaspoon salt
Essential for flavor balance. -
1/2 teaspoon black pepper
Adds a subtle kick. Feel free to adjust according to your taste preference. -
1/2 teaspoon red pepper flakes (optional)
For those who like a little heat, this step is the perfect kick! Leave it out if you want a milder flavor. -
2 tablespoons olive oil
Gives your dish a lovely richness. You can also use avocado oil for a subtle taste. -
Fresh parsley for garnish (optional)
Adds a pop of color and freshness. You can substitute with fresh cilantro for an exciting twist!
Step-by-Step Instructions
Now let’s get down to business and make this meal!
-
Prepare Your Ingredients
Before we dive into cooking, let’s prep. Rinse your baby potatoes and halve them—this helps them cook evenly. Mince your garlic; nothing beats fresh garlic! -
Sear the Chicken (Optional)
Although this step is optional, I highly recommend it! Heat a tad bit of olive oil in a skillet over medium-high heat, and sear each chicken breast for about 2-3 minutes on each side until golden. This adds a lovely depth of flavor! -
Add Ingredients to the Crockpot
Toss the halved baby potatoes into the bottom of your crockpot. They need to be layered first to prevent them from getting too mushy. Then, lay the seared (or raw, if you skipped that step) chicken breasts on top. -
Mix the Sauce
In a bowl, whisk together the chicken broth, garlic, Italian seasoning, salt, pepper, and red pepper flakes. Finally, pour this mixture over your chicken and potatoes, ensuring every piece is coated with that garlicky goodness. -
Cook It Low and Slow
Cover your crockpot and set it to low for 6-7 hours or high for 3-4 hours. The slower cooking provides tender, juicy chicken! Stir occasionally if you can, but it’s not necessary. -
Final Touch
About 15 minutes before you’re ready to eat, sprinkle the grated parmesan cheese over everything. Cover the crockpot again and let that cheese melt into a gooey masterpiece.
And voilà! Your kitchen will smell heavenly, and everyone will be eagerly awaiting dinner.
Serving Suggestions
To plate, scoop a generous serving of the chicken and potatoes onto a vibrant plate. Drizzle any sauce from the bottom of the crockpot over the top for added flavor. Finish it off with a sprinkle of freshly chopped parsley for a burst of color. This dish pairs beautifully with a simple green salad or steamed vegetables!
Recipe Variations
Here are a few fun ways to switch things up:
-
Herb-Infused: Add fresh herbs like rosemary or thyme for a fragrant twist. Simply toss them in with the garlic!
-
Cheesy Broccoli Addition: Stir in some broccoli florets in the last hour of cooking for extra veggies and flavor.
-
Lemon Zest: A little lemon zest added right before serving can brighten the flavors.
-
Creamy Spin: Add a splash of heavy cream or sour cream toward the end for a creamy sauce.
-
Spicy Kick: Consider tossing in some sliced jalapeños or a dash of hot sauce for those who love heat.
Chef’s Notes
Over the years, this recipe has evolved in my kitchen. What started as a simple “dump and go” meal has become my trusty weeknight staple. I remember one time I attempted to add mushrooms, and let me tell you, they soaked up all the chicken flavor! A happy accident. Also, don’t be surprised if you find yourself making this more than once a week—everyone will be asking for seconds!
FAQs and Troubleshooting
1. Can I use frozen chicken?
Absolutely! If using frozen chicken, the cooking time will need to be extended, especially on the low setting. Ensure it’s cooked to an internal temperature of 165°F.
2. My chicken is dry! What happened?
If your chicken ended up dry, it might have cooked for too long. Always check on it a little sooner if you know your crockpot runs hot.
3. Can I add more vegetables?
You can totally add veggies! Just remember to include ones that cook well in a crockpot, like carrots or bell peppers, and toss them in at the same time as the potatoes.
4. Can I double this recipe?
Yes! Just ensure your crockpot is large enough to handle it, and keep an eye on the cooking time—larger quantities might take a little longer.
Nutritional Info
While the nutritional values can vary based on specific ingredients, a serving of this delightful Garlic Parmesan Crockpot Chicken and Potatoes generally contains around 450 calories, with adequate protein from the chicken and healthy carbs from the potatoes.
So, there you have it—my recipe for Garlic Parmesan Crockpot Chicken and Potatoes! It’s not only simple but also an incredible dish that brings everyone around the table with joy and satisfaction. I hope you enjoy making and sharing this meal just as much as I do. Happy cooking!
PrintGarlic Parmesan Crockpot Chicken and Potatoes
A cozy slow-cooked dish featuring tender chicken and flavorful baby potatoes, perfect for busy days.
- Prep Time: 15 minutes
- Cook Time: 360 minutes
- Total Time: 375 minutes
- Yield: 4 servings 1x
- Category: Main Course
- Method: Slow Cooking
- Cuisine: American
- Diet: Gluten-Free
Ingredients
- 4 boneless, skinless chicken breasts
- 1.5 pounds baby potatoes, halved
- 1 cup chicken broth
- 1/2 cup grated parmesan cheese
- 4 cloves garlic, minced
- 1 tablespoon Italian seasoning
- 1 teaspoon salt
- 1/2 teaspoon black pepper
- 1/2 teaspoon red pepper flakes (optional)
- 2 tablespoons olive oil
- Fresh parsley for garnish (optional)
Instructions
- Prepare your ingredients by rinsing the baby potatoes and halving them; mince the garlic.
- Sear the chicken (optional) in olive oil over medium-high heat for 2-3 minutes on each side until golden.
- Add the halved baby potatoes to the bottom of your crockpot.
- Mix together chicken broth, garlic, Italian seasoning, salt, pepper, and red pepper flakes in a bowl, then pour over chicken and potatoes.
- Cook on low for 6-7 hours or high for 3-4 hours.
- Final touch: Sprinkle grated parmesan cheese over everything 15 minutes before serving.
Notes
For a twist, consider adding fresh herbs, broccoli, lemon zest, or a splash of cream. Adjust cooking time if using frozen chicken.
Nutrition
- Serving Size: 1 serving
- Calories: 450
- Sugar: 2g
- Sodium: 800mg
- Fat: 18g
- Saturated Fat: 6g
- Unsaturated Fat: 10g
- Trans Fat: 0g
- Carbohydrates: 40g
- Fiber: 5g
- Protein: 35g
- Cholesterol: 75mg
Keywords: crockpot chicken, garlic chicken, parmesan chicken, slow cooker recipes, cozy meals
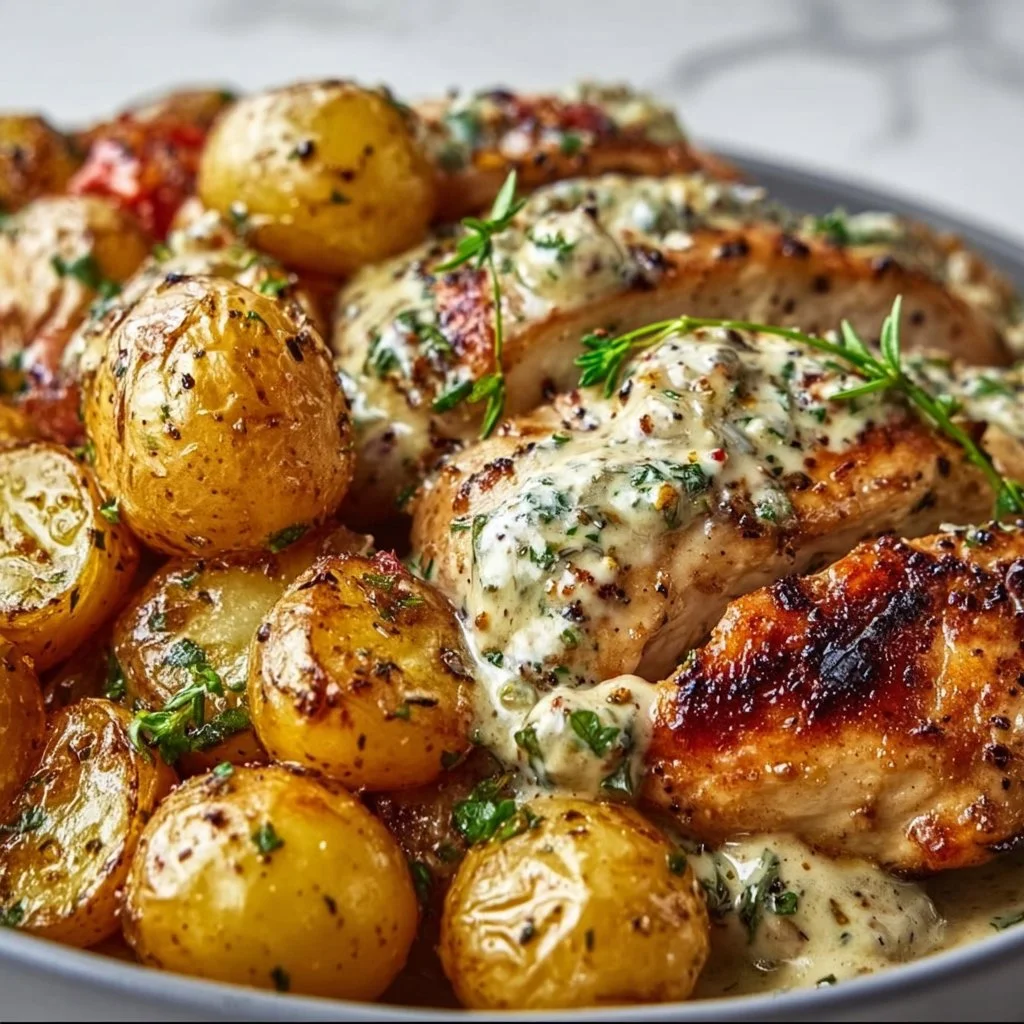
Creamy Garlic Chicken with Roasted Baby Potatoes
Creamy Garlic Chicken with Roasted Baby Potatoes: A Delicious Dream Come True
Hey there, fellow food lovers! Welcome back to Clean Plate Cravings! Today, I’m super excited to share one of my all-time favorite recipes: Creamy Garlic Chicken with Roasted Baby Potatoes. This dish has a way of wrapping you in a comforting embrace, bringing the richness of flavor while keeping things light and wholesome (you won’t be feeling too heavy afterward!).
Imagine coming home after a long day, the aroma of garlic wafting through the air, and knowing that a delectable meal awaits you. Sounds amazing, right? Well, this dish is just that! With tender chicken breasts drenched in a creamy, garlicky sauce and served alongside perfectly roasted baby potatoes, it’s a joyful experience for your taste buds that’s as easy to prepare as it is enjoyable to eat. Let’s dive into the magic of this recipe!
A Timeless Kitchen Memory
Growing up, Sundays were sacred in our household. My family had a tradition where we’d gather around the dinner table for a home-cooked meal. One of the stars of those meals was my mom’s creamy garlic chicken. It had this magical way of making the entire house smell heavenly. I would sit at the table, waiting impatiently, desperately hoping she’d make enough so we could have leftovers!
One particular Sunday, I remember sneaking into the kitchen, trying to watch her work her magic. I was fascinated by how simple ingredients transformed into such a luscious dish. The way she effortlessly minced garlic and blended cream with fragrant seasonings was pure artistry to me. Those moments inspired my love for cooking and these family recipes, and that feeling of togetherness is something I aim to recreate with every meal I share today.
Now, as an adult, I’ve put my own spin on that classic dish, marrying it with delicious roasted baby potatoes that are almost irresistible on their own. Are you ready to recreate this cozy meal with me? Let’s get started!
Ingredients
Here’s what you’ll need to whip up your very own Creamy Garlic Chicken with Roasted Baby Potatoes:
-
4 boneless, skinless chicken breasts
- Tender and quick-cooking, chicken breasts are the perfect canvas for our creamy sauce. If you’re looking for a lighter protein, feel free to swap for turkey cutlets or even tofu for a vegetarian version.
-
Salt, to taste
- A crucial ingredient that enhances all other flavors. For a fragrant twist, try using sea salt or Himalayan salt.
-
Black pepper, to taste
- Adds a touch of heat and depth. If you’re feeling adventurous, fresh cracked peppercorns will elevate the meal even more!
-
2 teaspoons garlic powder, divided
- Adds a lovely background flavor. If you have fresh garlic instead, use 6-8 cloves for that bold, fresh taste.
-
4 cloves garlic, minced
- Fresh garlic is where the real flavor party happens! Always mince it just before cooking to maximize its aromatic effects.
-
3 tablespoons olive oil, divided
- A heart-healthy choice for cooking and drizzling, olive oil lends a nice richness. You can also substitute avocado or coconut oil.
-
1 cup chicken broth
- Provides a deep, savory base for your sauce. Homemade is great, but go for low-sodium store-bought for convenience.
-
1 cup heavy cream
- This is the star player that makes the sauce so luscious! If you want a lighter option, you can use half-and-half or a plant-based cream.
-
1/2 cup grated Parmesan cheese
- Adds a rich umami flavor that marries beautifully with the garlic. Pecorino Romano works just as well if you’re after a sharper taste.
-
1 tablespoon Dijon mustard
- This adds a subtle tang that cuts through the creaminess. For a milder option, you can use yellow mustard.
-
1 teaspoon Italian seasoning
- A blend of herbs that brings a taste of the Mediterranean to the dish. Feel free to adjust the blend with your favorites, like basil or oregano.
-
2 cups baby potatoes, halved
- These little gems are perfect for roasting and absorbing flavors. If you can’t find baby potatoes, try using Yukon Gold or fingerlings cut into smaller pieces.
Step-by-Step Instructions
-
Preheat Your Oven:
First things first, preheat your oven to 400°F (200°C). This will make sure it’s nice and hot to get those baby potatoes perfectly roasted. -
Prep the Baby Potatoes:
Start by placing the halved baby potatoes in a large mixing bowl. Drizzle with 2 tablespoons of olive oil, and sprinkle with salt, black pepper, and a teaspoon of garlic powder. Toss everything together until the potatoes are evenly coated. This little step gets them seasoned and ready for roasting! -
Roast Them Up:
Spread the potatoes out on a baking sheet (line it with parchment for easy cleanup!). Make sure they’re in a single layer to ensure even roasting; no one likes mushy potatoes! Pop them in the oven and roast for about 25-30 minutes or until they’re golden and crispy. Flip them halfway through for that perfect roast! -
Cook the Chicken:
While those delicious potatoes are roasting, let’s move on to the chicken. Heat the remaining tablespoon of olive oil in a large skillet over medium heat. Season both sides of the chicken breasts with salt, black pepper, and the remaining teaspoon of garlic powder. -
Sear the Chicken:
Once your skillet is hot, add the chicken breasts. Sear them for about 5-7 minutes on each side, or until they’re beautifully browned and cooked through. They’ll develop a lovely crust, keeping all those juices locked in. Remove them from the skillet and set them aside on a plate for now. -
Make the Creamy Sauce:
Lower the heat to medium-low. In the same skillet, add the minced garlic. Sauté it for about 30 seconds until it becomes fragrant (but make sure not to burn it!). Add the chicken broth and scrape the bottom of the pan to get all those tasty bits mixed in. -
Add Cream and Cheese:
Stir in the heavy cream, Dijon mustard, Italian seasoning, and grated Parmesan cheese. Keep stirring until it’s nice and bubbly. Let it simmer for about 3-5 minutes until it thickens slightly. -
Return Chicken to Pan:
Add the chicken back into the skillet, making sure it’s coated in that creamy goodness. Let it cook for another 5 minutes, allowing all those flavors to combine.
Serving Suggestions
To plate this dish, serve the creamy garlic chicken on a generous bed of the roasted baby potatoes. I love garnishing with a sprinkle of fresh herbs—like parsley or basil—on top for a pop of color and freshness. You can never go wrong with a side of steamed veggies for a vibrant meal!
Recipe Variations
-
Herb-Infused: Add fresh thyme or rosemary to the creamy sauce for an aromatic twist.
-
Zesty Lemon: For a bright flavor, squeeze some fresh lemon juice into the sauce and add lemon zest before serving.
-
Mushroom Medley: Sauté some sliced mushrooms along with the garlic for a hearty, earthy flavor.
-
Spicy Kick: Add a pinch of red pepper flakes or a splash of hot sauce for some heat!
-
Dairy-Free: Substitute the heavy cream with coconut cream and the cheese with nutritional yeast for a creamy, dairy-free alternative.
Chef’s Notes
Oh boy, this recipe has gone through quite the evolution in my kitchen! The first time I made it, I went a little overboard with the garlic (impressive, but not exactly palatable!). Now, years later, I’ve perfected the balance between creamy and garlicky goodness, and it’s a staple at my gatherings. I love adding little personal touches here and there—like playing around with different herbs or finding new sides that pair well. It’s incredible how a simple dish can tell a story and evolve over time, just like our appreciation for food!
FAQs and Troubleshooting
Q1: What if my sauce is too thick?
A1: No worries! Simply add a splash more chicken broth or cream until you reach your desired consistency.
Q2: How can I ensure my chicken doesn’t dry out?
A2: Don’t overcook the chicken! Use a meat thermometer to check for doneness; it should read 165°F internally. Also, let your chicken rest for a few minutes after cooking to retain its juices.
Q3: Can I make this recipe ahead of time?
A3: Absolutely! You can prepare the sauce and chicken in advance and store them separately in the fridge. Just reheat the chicken and sauce on the stove before serving.
Q4: What’s a good substitute for baby potatoes?
A4: You can use regular-sized potatoes cut into smaller pieces, or even sweet potatoes if you want a healthier twist. Just adjust the cooking time accordingly!
Nutritional Info (if applicable)
This Creamy Garlic Chicken with Roasted Baby Potatoes is packed with protein, flavorful fats, and healthy carbs, making it a balanced dish for any meal. Plus, it’s filled with vitamins from the herbs and garlic, bringing health benefits along with its irresistible taste!
And there you have it—my take on Creamy Garlic Chicken with Roasted Baby Potatoes! I hope this dish warms your kitchen and heart, just like it has mine. Enjoy the process, explore your own creative twists, and remember: cooking is always about bringing joy—not just to your plate, but to everyone you love. Happy cooking, and cheers to flavorful adventures ahead!
PrintCreamy Garlic Chicken with Roasted Baby Potatoes

Tender chicken breasts in a creamy garlic sauce served with perfectly roasted baby potatoes.
- Prep Time: 15 minutes
- Cook Time: 30 minutes
- Total Time: 45 minutes
- Yield: 4 servings 1x
- Category: Main Course
- Method: Baking
- Cuisine: Italian
- Diet: Gluten-Free
Ingredients
- 4 boneless, skinless chicken breasts
- Salt, to taste
- Black pepper, to taste
- 2 teaspoons garlic powder, divided
- 4 cloves garlic, minced
- 3 tablespoons olive oil, divided
- 1 cup chicken broth
- 1 cup heavy cream
- 1/2 cup grated Parmesan cheese
- 1 tablespoon Dijon mustard
- 1 teaspoon Italian seasoning
- 2 cups baby potatoes, halved
Instructions
- Preheat your oven to 400°F (200°C).
- Place the halved baby potatoes in a bowl, drizzle with 2 tablespoons of olive oil, and sprinkle with salt, black pepper, and 1 teaspoon of garlic powder. Toss to coat.
- Spread the potatoes out on a baking sheet and roast for about 25-30 minutes, flipping halfway through.
- Heat the remaining tablespoon of olive oil in a skillet over medium heat. Season the chicken breasts with salt, black pepper, and the remaining garlic powder.
- Sear the chicken in the skillet for 5-7 minutes on each side until browned and cooked through. Remove from the skillet.
- Sauté the minced garlic in the same skillet for 30 seconds, then add chicken broth.
- Stir in heavy cream, Dijon mustard, Italian seasoning, and Parmesan cheese. Simmer for 3-5 minutes until thickened.
- Add the chicken back to the skillet, ensuring it’s coated in the sauce, and cook for another 5 minutes.
Notes
Garnish with fresh herbs for added flavor and color. Best served with steamed vegetables for a complete meal.
Nutrition
- Serving Size: 1 serving
- Calories: 450
- Sugar: 5g
- Sodium: 600mg
- Fat: 20g
- Saturated Fat: 10g
- Unsaturated Fat: 8g
- Trans Fat: 0g
- Carbohydrates: 36g
- Fiber: 4g
- Protein: 30g
- Cholesterol: 90mg
Keywords: Creamy Garlic Chicken, Roasted Baby Potatoes, Comfort Food, Easy Dinner, Family Recipe
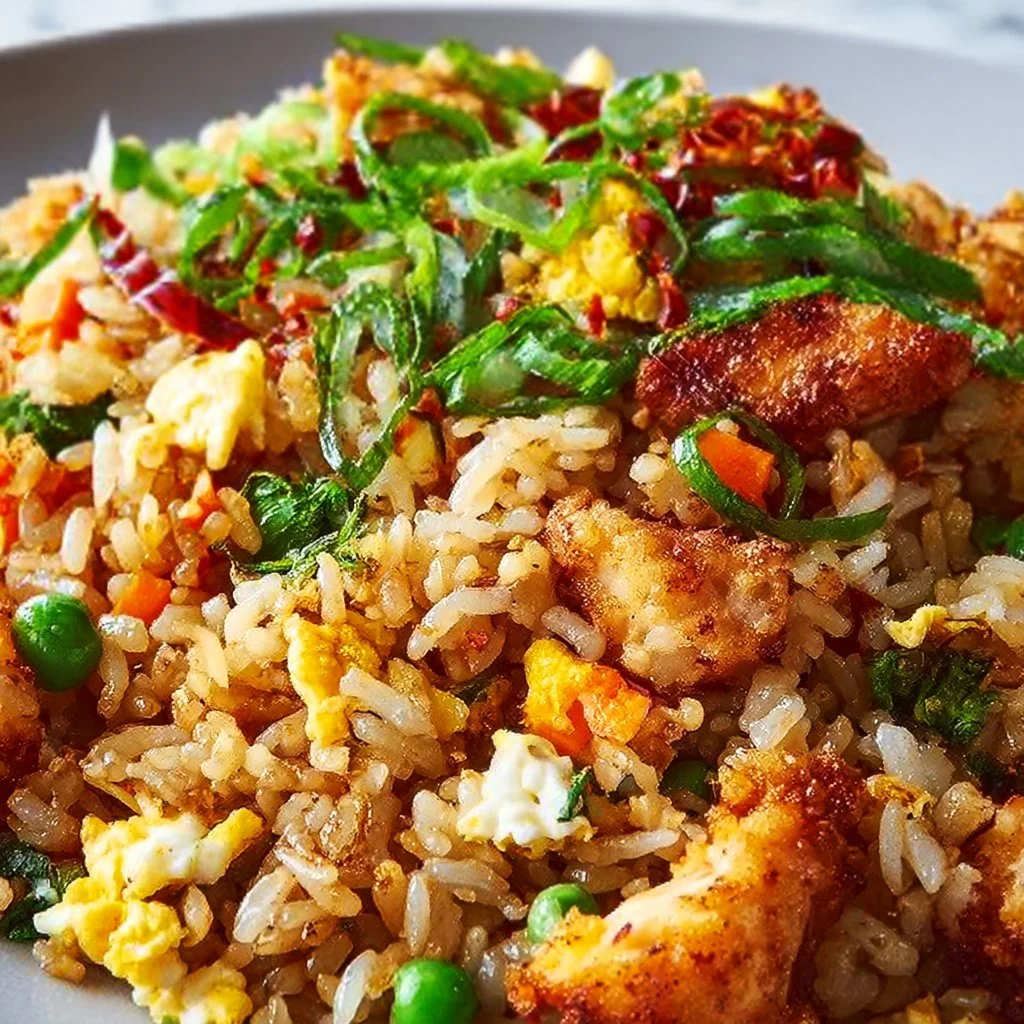
High Protein Crispy Garlic Chicken Fried Rice
High Protein Crispy Garlic Chicken Fried Rice
Welcome to another culinary adventure with me, Ava Carter! Today, I’m thrilled to share a fabulous recipe for High Protein Crispy Garlic Chicken Fried Rice that is not only hearty but also packed with flavor. Think of this dish as your go-to comfort food with a nutrient boost—perfect for those days when you need a little excitement in your meal plan. This stir-fry classic combines the crispy goodness of fried rice with tender chicken, all brought together by the irresistible aroma of garlic.
Whether you’re meal prepping for the week, cooking for family, or just looking for a tasty dinner option, this dish delivers on all fronts. The textures and flavors will make each bite a delightful experience! Plus, it’s a quick and easy meal that can easily fit into a busy weekday schedule. So grab your apron, and let’s get frying!
A Taste of Nostalgia
Growing up, fried rice was one of those magical dishes in my household that brought everyone together. My mom would whip up a big batch, using whatever leftover ingredients she could find in the fridge. I remember sneaking spoonfuls as it crisped up in the pan, the heavenly scent of garlic and soy sauce filling the air.
One particular summer, I spent afternoons in the kitchen with her, learning the art of stir-frying. She always said, “Cooking is like dancing, Ava! You need the right rhythm, a little heat, and ingredients that play well together.” This high protein crispy garlic chicken fried rice is a culmination of those lessons and memories. It reminds me that cooking is a delightful way to express creativity and bond with loved ones. Plus, it’s a fantastic excuse to indulge in a bowl of deliciousness!
Ingredients
-
1 cup of jasmine rice
Jasmine rice is fragrant and cooks up fluffy and tender. If you don’t have jasmine on hand, feel free to substitute with basmati or short-grain rice. -
2 tablespoons of vegetable oil, divided
This oil is perfect for frying because it has a high smoke point. You can substitute with canola or grapeseed oil if you prefer. -
3 large eggs, beaten
Eggs add protein and richness to the dish. If you’re vegan, try using a flaxseed meal mixture, or silken tofu scrambles as a substitute. -
1 pound of boneless, skinless chicken breast, diced
Chicken breast is lean and loaded with protein. For a different protein source, shrimp or tofu can work brilliantly too! -
Salt and black pepper to taste
Always season to your liking! A splash of soy sauce can also enhance flavor without needing to add extra salt. -
1 tablespoon of soy sauce
This is your flavor booster! For a gluten-free option, use tamari. -
1 tablespoon of oyster sauce
It adds a rich, savory depth to the dish. If you’re vegan, look for vegetarian oyster sauce or soy sauce mixed with a splash of hoisin. -
1 tablespoon of fish sauce
Fish sauce gives this dish a unique umami kick. If you prefer vegetarian options, consider using mushroom sauce. -
4 cloves of garlic, minced
Fresh garlic brings an incredible aroma and flavor. You can use garlic powder in a pinch, but fresh is always better! -
1 cup of mixed vegetables (such as peas, carrots, and corn)
Convenient and colorful, mixed veggies provide fiber and vitamins. Feel free to use whatever frozen or fresh veg you love. -
2 green onions, chopped
These add a fresh crunch and kick. Chives can be a great substitute if you don’t have green onions! -
1 tablespoon of sesame oil
This oil adds a wonderful nutty flavor. Keep in mind that a little goes a long way! -
1 tablespoon of chopped fresh cilantro, for garnish
Fresh cilantro enhances the dish’s presentation and taste. You can replace it with parsley or omit it if you’re not a fan.
Step-by-Step Instructions
-
Cook the Rice: Start by cooking 1 cup of jasmine rice according to the package instructions. Once cooked, spread it out on a baking sheet to cool. This helps prevent it from becoming mushy when you fry it later!
-
Prep Your Ingredients: While the rice cools, gather and dice your chicken. Prepare your vegetables, chop the green onions, and mince the garlic. Having everything ready to go makes the cooking process so much smoother!
-
Heat Up Your Pan: In a large skillet or wok, heat 1 tablespoon of vegetable oil over medium-high heat. A hot pan is key for that crispy texture!
-
Scramble the Eggs: Pour the beaten eggs into the pan. Cook until just set, stirring gently. Remove them from the pan and set aside. This way, they’ll stay fluffy and separate.
-
Cook the Chicken: Add the remaining tablespoon of oil to the pan, then toss in the diced chicken. Season with a sprinkling of salt and pepper. Cook for about 5-7 minutes, or until the chicken is browned and cooked through. Make sure to break up any chunks!
-
Join the Flavors: Add the minced garlic and mixed vegetables to the pan. Sauté everything together until the vegetables are tender, about 3-4 minutes. Your kitchen should be smelling heavenly by this point!
-
Add the Rice: Gently fold in the cooled rice, ensuring it mixes well with the chicken and veggies. Pour in the soy sauce, oyster sauce, fish sauce, and sesame oil. Keep stirring it up for about 5 minutes or until everything is heated through and the rice gets a little crispy.
-
Mix the Eggs Back In: Return the scrambled eggs to the pan, and toss everything together. Add in the chopped green onions and give it a final mix. Taste for seasoning—feel free to adjust if necessary.
-
Serve It Up: You’re ready to dig in! Plate your crispy garlic chicken fried rice and sprinkle cilantro on top.
Serving Suggestions
To serve this dish, you can present it in a large bowl for a family-style meal or plate it individually for a more elegant touch. Add some lime wedges on the side for a refreshing zing! You can also pair it with a simple cucumber salad or a light miso soup for a complete feast.
Recipe Variations
- Spicy Kick: Add a dash of sriracha or chili flakes while stir-frying for heat.
- Extra Veggies: Incorporate bell peppers or broccoli for added color and nutrition.
- Swap Proteins: Use shrimp, tofu, or even cooked turkey if you want to change it up!
- Herb Infusion: Try adding basil or mint towards the end for a fragrant twist.
- Quinoa Option: For a twist on the rice, use cooked quinoa for added protein!
Chef’s Notes
This high protein fried rice recipe has become one of my favorites because it’s so adaptable. I often find myself looking at what I have left in the fridge—this dish never fails to rescue those ingredients waiting to be used! One memorable mishap was when I accidentally added too much fish sauce and quickly balanced it out with a dash of honey. The contrast turned out fantastic—so feel free to experiment and make it your own!
FAQs and Troubleshooting
1. Why is my fried rice mushy?
Make sure to use day-old rice or let freshly cooked rice cool completely before frying.
2. Can I make this dish vegetarian?
Absolutely! Just swap out the chicken for extra vegetables, tofu, or tempeh, and use vegetarian-friendly sauces.
3. How can I add more flavor?
Don’t hold back on the garlic, sauces, or even add a splash of lime juice at the end for some brightness!
4. What’s the best way to store leftovers?
Refrigerate in an airtight container for up to three days. You can reheat it in the microwave or on a skillet to regain that crispness!
Nutritional Info
This recipe serves about 4 people, and each serving boasts around:
- Calories: 400
- Protein: 30g
- Carbohydrates: 45g
- Fats: 12g
Enjoy cooking this High Protein Crispy Garlic Chicken Fried Rice recipe! It’s a delicious way to fuel your body and delight your taste buds while reminiscing about those meaningful kitchen moments. Happy cooking, foodie friends!
PrintHigh Protein Crispy Garlic Chicken Fried Rice

A hearty and flavor-packed high protein fried rice recipe, perfect for meal prepping or a tasty dinner.
- Prep Time: 15 minutes
- Cook Time: 20 minutes
- Total Time: 35 minutes
- Yield: 4 servings 1x
- Category: Main Course
- Method: Stir-frying
- Cuisine: Asian
- Diet: High Protein
Ingredients
- 1 cup of jasmine rice
- 2 tablespoons of vegetable oil, divided
- 3 large eggs, beaten
- 1 pound of boneless, skinless chicken breast, diced
- Salt and black pepper to taste
- 1 tablespoon of soy sauce
- 1 tablespoon of oyster sauce
- 1 tablespoon of fish sauce
- 4 cloves of garlic, minced
- 1 cup of mixed vegetables (such as peas, carrots, and corn)
- 2 green onions, chopped
- 1 tablespoon of sesame oil
- 1 tablespoon of chopped fresh cilantro, for garnish
Instructions
- Cook the rice: Start by cooking 1 cup of jasmine rice according to the package instructions. Once cooked, spread it out on a baking sheet to cool.
- Prep your ingredients: While the rice cools, gather and dice your chicken, prepare your vegetables, chop the green onions, and mince the garlic.
- Heat up your pan: In a large skillet or wok, heat 1 tablespoon of vegetable oil over medium-high heat.
- Scramble the eggs: Pour the beaten eggs into the pan. Cook until just set, stirring gently. Remove them from the pan and set aside.
- Cook the chicken: Add the remaining tablespoon of oil to the pan, then toss in the diced chicken. Season with salt and pepper. Cook for about 5-7 minutes, or until browned.
- Join the flavors: Add the minced garlic and mixed vegetables to the pan. Sauté until the vegetables are tender, about 3-4 minutes.
- Add the rice: Gently fold in the cooled rice, soy sauce, oyster sauce, fish sauce, and sesame oil. Stir for about 5 minutes or until heated through and crispy.
- Mix the eggs back in: Return the scrambled eggs to the pan and toss everything together. Add the chopped green onions and adjust seasoning if necessary.
- Serve it up: Plate your crispy garlic chicken fried rice and sprinkle with cilantro.
Notes
Feel free to experiment with different proteins or add extra veggies for a nutritious twist.
Nutrition
- Serving Size: 1 serving
- Calories: 400
- Sugar: 4g
- Sodium: 800mg
- Fat: 12g
- Saturated Fat: 2g
- Unsaturated Fat: 8g
- Trans Fat: 0g
- Carbohydrates: 45g
- Fiber: 3g
- Protein: 30g
- Cholesterol: 200mg
Keywords: fried rice, chicken fried rice, high protein recipe, easy dinner, comfort food
Sweet & Savory Asian Mango Glazed Chicken Twists
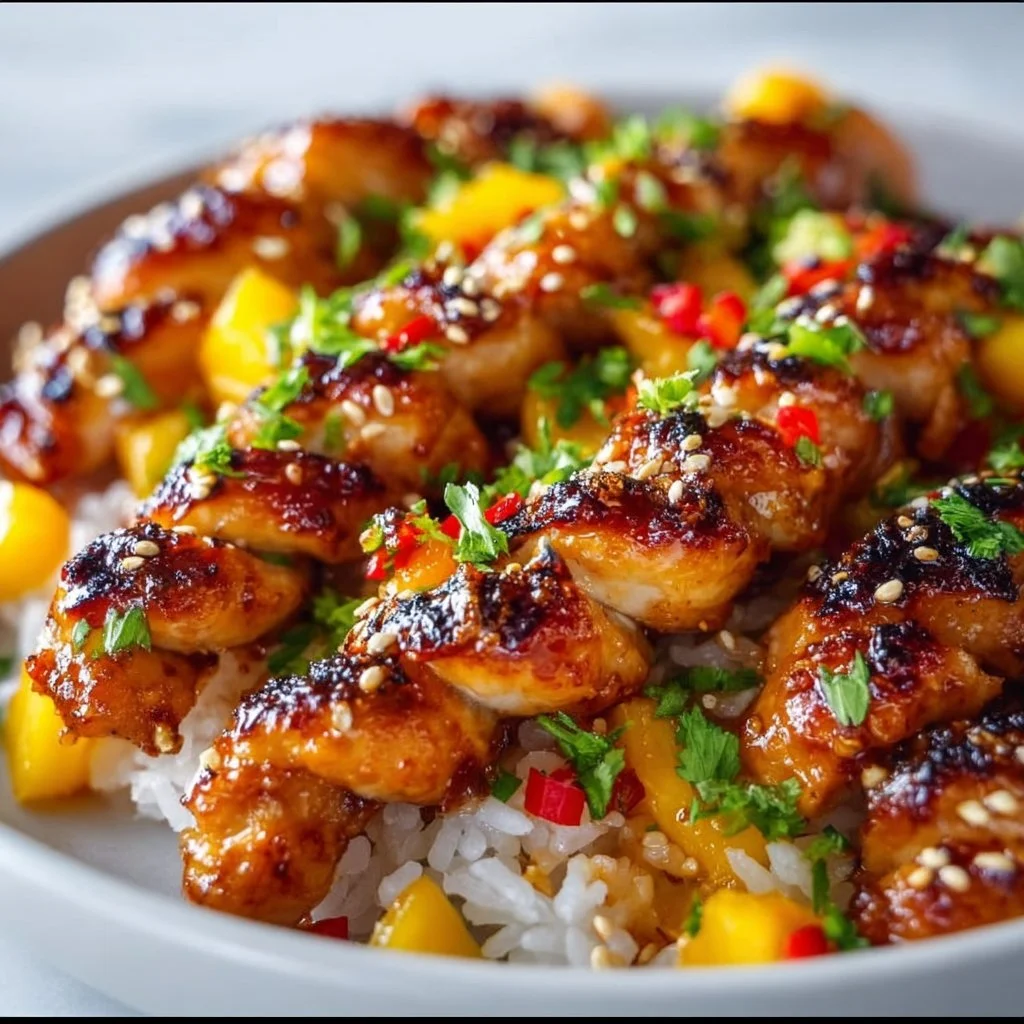
Sweet & Savory Asian Mango Glazed Chicken Twists: A Flavorful Journey
Hey there, foodies! Welcome back to Clean Plate Cravings, where we dive into the vibrant world of flavors and wholesome ingredients. Today, I’m excited to share a recipe that’s not just delicious but also brings a splash of sunshine into your kitchen — Sweet & Savory Asian Mango Glazed Chicken Twists!
Imagine tender chicken breasts drenched in a luscious mango glaze, sweet yet tangy, with a hint of savory goodness from soy sauce and garlic. Sound tempting? It absolutely is! But before we jump into the juicy details, let me take you on a little trip down memory lane.
A Taste of Nostalgia: The Mango Magic
Growing up, I spent countless summers at my grandmother’s house, where the air was always filled with the intoxicating scent of tropical fruits. The highlight of those long, lazy afternoons was when Grandma would whip up her famous mango chicken. It was a dish that seemed to dance off the plate, a harmonious blend of sweet and savory that mirrored the bright flavors of our summer days. The mangoes were always fresh, bursting with sweetness, and we would often pick them right off the tree in her backyard.
Every bite of that tender chicken took me back to the laughter shared on her porch, the sunshine streaming in, and the warmth of family. Inspired by those cherished moments, I decided to create a version of that delightful dish, infusing it with my own twists and touches. This Sweet & Savory Asian Mango Glazed Chicken is my tribute to those carefree summertime days—with the added flair of a contemporary kitchen twist. So, let’s roll up our sleeves and get cooking!
Ingredients: The Building Blocks of Flavor
Before you start cooking, let’s make sure you have everything you need. Here’s our ingredient list, complete with insights for each one:
-
4 chicken breasts: Boneless and skinless breasts are perfect for this dish, ensuring tenderness. You could substitute with thighs for a richer flavor or even tofu if you’re vegetarian!
-
1 cup mango juice: Freshly squeezed is best, but store-bought works too. Don’t have mango juice? Pineapple or orange juice can add a fruity twist!
-
1/4 cup soy sauce: This salty, umami-rich staple gives depth. If you’re gluten-free, feel free to use tamari or coconut aminos.
-
2 tablespoons honey: Adds a lovely sweetness. Agave nectar or maple syrup are great substitutes if you’re looking for a vegan option.
-
2 tablespoons olive oil: This oil enhances flavor and aids in cooking. Avocado oil or sesame oil can bring an extra layer of richness.
-
2 cloves garlic, minced: Fresh garlic packs a punch! If you’re in a pinch, garlic powder works, but fresh is always better.
-
1 teaspoon ginger, grated: Fresh ginger gives that zesty kick. If you don’t have any, try a sprinkle of ground ginger, though fresh is preferable.
-
Salt and pepper to taste: Simple seasonings that contrast beautifully with the glaze.
-
Sesame seeds for garnish: These add a delightful crunch and nutty flavor.
-
Green onions for garnish: Add these just before serving for freshness!
Step-by-Step Instructions: Let’s Get Cooking!
Now that we’ve gathered our ingredients, it’s time to transform them into something extraordinary! Follow these steps for Sweet & Savory Asian Mango Glazed Chicken Twists:
-
Prep Your Ingredients: Start by mincing the garlic and grating the ginger. This small step elevates the dish by getting those flavors out early! While you’re at it, grab a large bowl and combine the mango juice, soy sauce, honey, minced garlic, and grated ginger. This beautiful blend is our marinade and glaze.
-
Marinate the Chicken: Place your chicken breasts in the bowl with the marinade. I recommend letting it marinate for at least 30 minutes, but if you can plan ahead, letting it sit for a few hours or even overnight will create a deeper flavor. Turn the chicken occasionally to ensure even coating!
-
Preheat Your Oven: As the chicken marinates, preheat your oven to 400°F (200°C). A hot oven helps to caramelize the glaze, creating that irresistible shiny coating.
-
Sear the Chicken: In a large skillet, heat the olive oil over medium-high heat. Remove the chicken from the marinade (don’t toss that marinade away, we’ll use it!) and sear each breast for about 3-4 minutes per side, until golden brown. This step locks in the juices and adds texture — it’s all about that magic Maillard reaction!
-
Bake to Perfection: Transfer the seared chicken to a baking dish. Drizzle the leftover marinade over the chicken, making sure each piece is generously coated. Pop it in the oven and bake for 20-25 minutes or until the chicken is cooked through (internal temperature of 165°F or 75°C). I love to spoon some glaze on the chicken halfway through cooking for that extra flavor burst!
-
Garnish and Serve: Once the chicken is cooked, remove it from the oven and let it rest for a few minutes. This resting period gives the juices time to redistribute, ensuring a juicy bite. Before serving, sprinkle sesame seeds and sliced green onions on top for that fresh pop of color and flavor.
Serving Suggestions: Plate It Up!
When it comes to presentation, a little effort goes a long way! I like to slice the glazed chicken into elegant pieces and fan them out on a platter. Drizzle any remaining glaze from the baking dish over the top to really enhance the aesthetic. Serve this delightful dish alongside Jasmine rice or steamed greens for a wholesome meal that looks as good as it tastes!
Recipe Variations: Mix It Up!
One of the best things about this recipe? It’s super versatile! Here are a few fun variations to consider:
- Spicy Mango Glaze: Add chili paste or fresh diced chilies to the marinade for a kick of heat.
- Herb Infusion: Toss in some chopped cilantro or basil for a fresh, aromatic twist.
- Coconut Cream: Replace half of the honey with coconut cream for a richer, tropical flavor.
- Slow Cooker Version: Combine all the ingredients in a slow cooker for an easy, set-it-and-forget-it dish!
- Mango Salsa: Top with a fresh mango salsa made from diced mango, red onion, cilantro, and lime – a bright, refreshing addition!
Chef’s Notes: My Culinary Journey
Cooking is always an adventure, and this recipe is one I’ve perfected over time. I recall initially struggling with the right balance of sweetness and savories, often overdoing the honey or soy sauce. But each trial brought me closer to the final result. A funny kitchen story? The first time I made this dish, I accidentally used pineapple juice instead of mango juice! While it wasn’t what I had planned, it turned out deliciously tropical and bright — a happy accident I now recreate intentionally!
FAQs and Troubleshooting: Cooking Questions Answered
-
What can I use if I don’t have mango juice?
If mangos aren’t available, alternatives like pineapple, orange, or even apple juice can provide a nice sweetness with a different fruity twist! -
How do I know when the chicken is done?
The best way to check is by using a meat thermometer—chicken should reach an internal temperature of 165°F (75°C). If you don’t have one, cut into the thickest part, and ensure the juices run clear. -
Can I make this dish ahead of time?
Yes! You can marinate the chicken the night before, and cook it the following day. Leftovers can be stored in the fridge for up to three days, and you can reheat them in the oven for the best texture! -
What side dishes pair well with this chicken?
I recommend white rice, quinoa, or a refreshing cucumber salad. Steamed or stir-fried veggies would add color and nutrition, balancing the meal beautifully.
Nutritional Information (per serving)
While I encourage enjoying food freely, it’s always helpful to have an idea of nutrition. Here’s a quick glance:
- Calories: Approximately 350
- Protein: 35g
- Carbohydrates: 25g
- Fat: 10g
- Fiber: 1g
Now you’re ready to dig into this vibrant Sweet & Savory Asian Mango Glazed Chicken! On your next cooking adventure, bring back a piece of summer nostalgia. I’d love to hear your kitchen stories or any twists you add to this recipe. Let’s keep the conversation going, and happy cooking!
PrintSweet & Savory Asian Mango Glazed Chicken Twists

A vibrant dish combining tender chicken breasts with a luscious sweet and tangy mango glaze, inspired by nostalgic family summers.
- Prep Time: 15 minutes
- Cook Time: 30 minutes
- Total Time: 45 minutes
- Yield: 4 servings 1x
- Category: Main Course
- Method: Baking and Searing
- Cuisine: Asian
- Diet: Paleo
Ingredients
- 4 boneless, skinless chicken breasts
- 1 cup mango juice
- 1/4 cup soy sauce
- 2 tablespoons honey
- 2 tablespoons olive oil
- 2 cloves garlic, minced
- 1 teaspoon ginger, grated
- Salt and pepper to taste
- Sesame seeds for garnish
- Green onions for garnish
Instructions
- Prep your ingredients by mincing the garlic and grating the ginger. Combine the mango juice, soy sauce, honey, minced garlic, and grated ginger in a large bowl.
- Marinate the chicken by placing the breasts in the bowl with the marinade for at least 30 minutes.
- Preheat your oven to 400°F (200°C).
- Sear the chicken in a large skillet with olive oil for about 3-4 minutes per side until golden brown.
- Transfer the seared chicken to a baking dish, drizzle with the remaining marinade, and bake for 20-25 minutes until cooked through.
- Garnish and serve, adding sesame seeds and sliced green onions on top before enjoying!
Notes
For different flavors, consider adding chili paste for heat or using a slow cooker for convenience.
Nutrition
- Serving Size: 1 serving
- Calories: 350
- Sugar: 10g
- Sodium: 450mg
- Fat: 12g
- Saturated Fat: 2g
- Unsaturated Fat: 8g
- Trans Fat: 0g
- Carbohydrates: 25g
- Fiber: 1g
- Protein: 35g
- Cholesterol: 75mg
Keywords: mango chicken, Asian glaze, savory chicken recipe

Chicken Kofta with Creamy Garlic Yogurt Sauce
Chicken Kofta with Creamy Garlic Yogurt Sauce
Welcome to the world of flavor and nourishment, where we’re diving into the delightful realm of Chicken Kofta with Creamy Garlic Yogurt Sauce! If you’ve never tried kofta, get ready—a culinary journey awaits you that’s bursting with taste and a whole lot of love. Cooking, to me, is much more than just a task; it’s a magical experience that ties us to memories, cultures, and, most importantly, to each other.
A Culinary Journey
Picture this: it’s a sun-drenched afternoon, the aroma of spices wafting through the air, and laughter echoing in the background. That’s the scene I often remember when I think of kofta—a dish that transcends borders and brings people together over hearty meals. My love for Middle Eastern cuisine began during my college years in a bustling food market where I first encountered these fragrant, juicy meatballs. There was a little stall run by an elderly gentleman who made the most incredible kofta. His secret? A pinch of nostalgia and a whole lot of soul.
I remember standing there, mesmerized by how he molded ground meat with fresh herbs and spices, chatting with patrons as he cooked. As the meat sizzled on the grill, our eyes widened in hunger. The moment I took my first bite, I was transported to a world where flavors danced in harmony. The crispy exterior juxtaposed with the juicy interior was a revelation! I knew then that this was something I wanted to replicate in my own kitchen—not just to recreate that moment, but to bring that joy to others, too.
And, dear friend, that’s what I’m here to do with you today! Let’s whip up these delicious Chicken Kofta with creamy garlic yogurt sauce together. Trust me; your taste buds will be forever grateful!
Ingredients
To create the magic of Chicken Kofta, you’ll need:
-
1 lb ground chicken: Tender and healthy, chicken serves as a great base for kofta. If you want an alternative, turkey or lean beef works beautifully as well.
-
1 small onion, finely chopped: The aromatic companion that adds sweetness and depth. You can swap it for shallots if you prefer a milder taste.
-
2 cloves garlic, minced: Because everything is better with garlic! Fresh garlic works its charm here, but jarred minced garlic can save time in a pinch.
-
1/4 cup fresh parsley, chopped: This bright herb lifts the dish with freshness. If parsley isn’t your favorite, consider using cilantro or even mint for a different flavor profile.
-
1 tsp ground cumin: This spice delivers a warm, earthy essence. For a twist, try smoked paprika for a smokier flavor.
-
1 tsp ground coriander: Offers a citrusy note that complements the chicken beautifully. If you don’t have it on hand, feel free to skip it or use a dash of lemon pepper.
-
1/2 tsp paprika: Adds a hint of color and warmth. Use smoked paprika for a deeper flavor or sweet paprika for a milder touch.
-
Salt and pepper to taste: Essential for amplifying the flavors. Don’t shy away from seasoning; it’s what makes every bite delightful!
-
3/4 cup Greek yogurt: The base for our creamy sauce, Greek yogurt adds tanginess. If you’re dairy-free, try using coconut yogurt.
-
1 clove garlic, minced (for yogurt sauce): Another level of garlicky goodness! Adjust according to your love for garlic.
-
1 tbsp lemon juice: Brightness in a bottle! It cuts through the creaminess while enhancing flavors.
-
1 tbsp olive oil: Adds richness and helps with cooking moisture. Feel free to substitute with avocado oil or melted coconut oil.
-
Fresh herbs for garnish (optional): A sprinkle of herbs like dill, mint, or more parsley adds a lovely touch to your final dish.
Step-by-Step Instructions
Let’s cook these koftas like pros! Ready? Let’s get that apron on and start cooking:
-
Prep Your Ingredients: Gather all your ingredients and start with the cutting board. Finely chop the onion and garlic and set them aside. It’s crucial to have everything prepped to make the process smooth. Plus, you’ll feel like a kitchen ninja!
-
Mix the Mixture: In a large bowl, combine the ground chicken, chopped onion, minced garlic, parsley, cumin, coriander, paprika, salt, and pepper. The key here is to mix without overworking the meat; just knead gently until everything is incorporated. I often think of it like a recipe for success; we want unity without overload!
-
Shape the Koftas: With moistened hands (trust me, it helps), grab a handful of the mixture and form to your desired shape! You can go traditional with oval shapes or roll them into little meatballs. Aim for about 1.5 inches in size to ensure even cooking.
-
Heat Up the Cooking Surface: In a non-stick skillet or grill pan, heat a tablespoon of olive oil over medium heat. The oil should shimmer, signaling it’s time for the kofta to meet the pan! It’s like a warm hug waiting for those delicious meatballs.
-
Cook: Carefully place the shaped koftas in the skillet, ensuring they’re not overcrowded. Cook for about 4-5 minutes on each side until golden brown and cooked through. You might need to do this in batches if your skillet isn’t massive. The sizzle will be music to your ears!
-
Prepare the Yogurt Sauce: While the koftas grill, let’s whip up the sauce! In a small bowl, combine Greek yogurt, the minced garlic, lemon juice, and a pinch of salt and pepper. Mix it until creamy and luscious. This sauce is so versatile; you’ll want to drizzle it over everything!
-
Garnish and Serve: Once the koftas are cooked, garnish them with fresh herbs of your choice. Place them on a beautiful platter or individual plates, and don’t forget that creamy garlic yogurt sauce—drizzle or dollop generously on top!
Serving Suggestions
These Chicken Kofta are delightful alongside fluffy couscous or warm pita bread. Pair them with a fresh salad of cucumbers, tomatoes, and a sprinkle of feta for a delightful crunch. If you’re feeling adventurous, serve them with grilled vegetables for that lovely char flavor. And don’t forget a deliciously refreshing drink—a cool mint lemonade pairs perfectly with these savory delights!
Recipe Variations
Feeling creative? Here are a few fun twists to customize your kofta experience:
-
Spicy Twist: Add a kick by incorporating chopped fresh jalapeños or red pepper flakes into your mixture for a zesty touch.
-
Mediterranean Style: Add crumbled feta cheese and sun-dried tomatoes to the chicken mixture—yum!
-
Herb-Infused: Experiment with changing herbs; try basil or dill for a fresh and unique flavor profile.
-
Paleo-Friendly: Serve the kofta on a bed of cauliflower rice instead of grain for a low-carb option.
Chef’s Notes
Over the years, this recipe has evolved in my kitchen. I started with traditional beef kofta, but once I ventured into using the leaner ground chicken, I never looked back! I love how chicken absorbs the flavors of spices so well and remains juicy. A funny memory? I once tried to impress friends by making kofta, but I was so distracted by the conversation that I accidentally added double the garlic! Surprisingly, everyone loved it—maybe it turned into a new recipe all its own!
FAQs and Troubleshooting
1. Can I make kofta in advance?
Absolutely! You can shape the kofta and refrigerate them in advance. They’ll hold up well for up to a day; just cook them right before serving for the best results.
2. Can I freeze these?
Yes! Cooked kofta can be frozen for up to 3 months. Just allow them to cool, wrap them tightly, and pop them in the freezer. Thaw and reheat them gently in a skillet.
3. Why did my kofta fall apart?
Make sure to gently mix the ingredients and avoid overworking the meat. Additionally, adding a little breadcrumb or egg might help bind them if you’re using leaner meat.
4. How do I know when they are cooked through?
Use a meat thermometer for accurate results! Chicken should reach an internal temperature of 165°F (75°C) for safety.
Nutritional Info
Though not mandatory, here’s a minimal breakdown to keep you informed:
- Calories: Approximately 200 per serving (depends on the size of your kofta)
- Protein: 23g
- Fat: 9g
- Carbohydrates: 4g
- Fiber: 0g
So there you have it—Chicken Kofta with Creamy Garlic Yogurt Sauce. This recipe captures my love for cooking and sharing delicious meals. I hope it inspires you to hit the kitchen with a dash of joy and a sprinkle of adventure. Let’s keep it fresh, simple, and seriously delicious! Enjoy every bite, and don’t forget to share the love!
PrintChicken Kofta with Creamy Garlic Yogurt Sauce

Delicious and flavorful Chicken Kofta served with a creamy garlic yogurt sauce, perfect for your next meal.
- Prep Time: 15 minutes
- Cook Time: 20 minutes
- Total Time: 35 minutes
- Yield: 4 servings 1x
- Category: Main Course
- Method: Grilling
- Cuisine: Middle Eastern
- Diet: Paleo-friendly option available
Ingredients
- 1 lb ground chicken
- 1 small onion, finely chopped
- 2 cloves garlic, minced
- 1/4 cup fresh parsley, chopped
- 1 tsp ground cumin
- 1 tsp ground coriander
- 1/2 tsp paprika
- Salt and pepper to taste
- 3/4 cup Greek yogurt
- 1 clove garlic, minced (for yogurt sauce)
- 1 tbsp lemon juice
- 1 tbsp olive oil
- Fresh herbs for garnish (optional)
Instructions
- Prep your ingredients: Gather all your ingredients and finely chop the onion and garlic, then set them aside.
- Mix the mixture: In a large bowl, combine ground chicken, chopped onion, minced garlic, parsley, cumin, coriander, paprika, salt, and pepper.
- Shape the koftas: With moistened hands, grab a handful of the mixture and form to your desired shape, about 1.5 inches in size.
- Heat up the cooking surface: In a skillet, heat a tablespoon of olive oil over medium heat.
- Cook: Carefully place the shaped koftas in the skillet, cooking for about 4-5 minutes on each side until golden brown.
- Prepare the yogurt sauce: In a small bowl, combine Greek yogurt, minced garlic, lemon juice, and a pinch of salt and pepper.
- Garnish and serve: Once the koftas are cooked, garnish with fresh herbs and serve with the yogurt sauce.
Notes
You can make the koftas in advance and refrigerate for up to a day. Cook just before serving for the best results.
Nutrition
- Serving Size: 1 serving
- Calories: 250
- Sugar: 5g
- Sodium: 500mg
- Fat: 10g
- Saturated Fat: 2g
- Unsaturated Fat: 7g
- Trans Fat: 0g
- Carbohydrates: 6g
- Fiber: 1g
- Protein: 23g
- Cholesterol: 80mg
Keywords: Chicken Kofta, Middle Eastern, Yogurt Sauce

Chicken Enchilada Crock Pot Meal Recipe for Easy Dinners
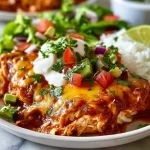
Chicken Enchilada Crock Pot Meal Recipe for Easy Dinners
Welcome to Clean Plate Cravings! If you’re like me, you probably have those busy days when cooking feels like a Herculean task. Between juggling work, family, and a social life, who has time to slave away in the kitchen? That’s precisely why I’m all about easy, wholesome meals that require minimal prep but deliver maximum flavor. Today, we’re diving into a dish that embodies just that: the Chicken Enchilada Crock Pot Meal.
Picture this: tender chicken smothered in spicy enchilada sauce with beans, corn, and those vibrant Mexican spices. A warm, comforting meal that practically cooks itself! The best part? You can make it ahead of time and let the crock pot do all the hard work. Trust me, by the end of the day, you’ll be greeted by the mouthwatering aroma of a dish that tastes like it took all day to prepare. Let’s get cooking, shall we?
Personal Story
Back in college, I discovered my love for Mexican food during late-night study sessions and spontaneous taco nights with friends. One of my fondest memories is cooking with my roommate, who had a family enchilada recipe that we would twist and turn every week. We’d throw everything together last minute because, let’s be honest, who has time to cook from scratch when you’re cramming for finals?
One night, we decided to try crafting a chicken enchilada dish in my trusty crock pot after an exhausting day filled with classes and cafeteria food. As we dumped in the chicken, beans, veggies, and spices, the stress of the day melted away. Hours later, the kitchen filled with a heavenly aroma, and we gathered around a bowl of what could only be described as happiness in a tortilla. These are the kind of meals that build connections and warm the soul. Now, I carry that nostalgia with me every time I whip up this Chicken Enchilada Crock Pot Meal, sharing the love with friends and family alike.
Ingredients
Here’s what you’ll need to create this flavorful masterpiece:
-
2 pounds boneless, skinless chicken breasts or thighs
Juicy and tender, chicken thighs will add more flavor, while breasts are leaner and great for a lighter option. If you’re short on time, rotisserie chicken works wonders too! -
1 can (15 oz) black beans, drained and rinsed (or pinto beans)
Beans are a fantastic source of protein and fiber, which will keep you feeling full. Feel free to swap with kidney beans or even lentils for a twist! -
1 can (15 oz) corn kernels, drained
Sweet corn adds a pop of texture and flavor. You can use frozen corn if that’s what you have on hand. -
1 can (10 oz) enchilada sauce (red or green)
The heart of the dish! Red enchilada sauce tends to be more traditional, while green offers a delightful twist. If you’re feeling adventurous, make your homemade sauce! -
1 can (10 oz) diced tomatoes with green chiles
This adds a zesty flavor kick. Don’t have any? Fresh tomatoes with a touch of chili powder work just as well. -
1 medium onion, diced
Onions build the base flavor and sweetness. Sautéing them beforehand can enhance their taste even more! -
1 tablespoon chili powder
Essential for spice and warmth. Adjust this based on your heat preference! -
2 teaspoons ground cumin
Cumin brings that classic Mexican flavor—essential for any good Mexican dish. -
1 teaspoon garlic powder
Because garlic makes everything better! You can use fresh minced garlic for a stronger punch. -
½ teaspoon smoked paprika
This adds a lovely smokiness to the dish. If you don’t have smoked paprika, regular paprika will work in a pinch. -
Salt and pepper to taste
Always taste as you go! -
2 cups shredded Mexican cheese blend
Cheese is the crown jewel of this dish—melted and gooey over everything equals happiness! -
6-8 small corn or flour tortillas (optional)
Choose whichever you love! Corn tortillas tend to be more authentic, while flour tortillas offer a softer texture. -
Fresh cilantro, chopped
Adds a burst of freshness! If you’re not a fan, you can omit it or use green onions. -
Sour cream or Greek yogurt for topping
A cool, creamy finish to balance the spices—use yogurt for a lower-fat option! -
Diced avocado
Trust me; avocado makes everything better! -
Lime wedges
A squeeze of lime ties all the flavors together. -
Sliced jalapeños
For those who crave an extra kick!
Step-by-Step Instructions
Let’s get to the good stuff! Here’s how to make your Chicken Enchilada Crock Pot Meal in a few simple steps:
Step 1: Prep the Ingredients
First, let’s wash and chop: dice up that onion (don’t worry, I won’t judge if you use pre-chopped), and rinse the black beans. If you’re using fresh tomatoes, chop those up too! This is where the fun begins—lay all your ingredients out like you’re in a cooking show.
Step 2: Season Your Chicken
In a bowl, sprinkle the chili powder, cumin, garlic powder, smoked paprika, salt, and pepper over the chicken. Give it a good rub–this helps to infuse the flavors right into the meat. If you’re feeling particularly adventurous, toss in a dash of cayenne for extra heat!
Step 3: Layer in the Crock Pot
Put your seasoned chicken at the bottom of the crock pot. This helps it to cook perfectly and absorb those fantastic flavors. Next, layer your beans, corn, diced tomatoes, and onion on top. Pour the enchilada sauce over everything—don’t forget every last drop!
Step 4: Stir It Up
Using a wooden spoon, gently mix everything in the crock pot until well combined. It should look like a glorious mountain of color! Cover it and set your crock pot for about 6-8 hours on low, or 3-4 hours on high. Pro tip: while it cooks, resist the urge to lift the lid. The steam is your best friend here!
Step 5: Check for Doneness
When the timer goes off, or the aroma is simply irresistible, take a peek! The chicken should shred easily with a fork. If you’re feeling inspired, shred it in the pot for that rustic, homey vibe, but if you want a more even texture, transfer it to a bowl to shred first.
Step 6: Add the Cheese
Once you’ve shredded the chicken, sprinkle that glorious cheese right on top. Give it a few minutes with the lid on so the cheese melts beautifully into the mix.
Step 7: Serve!
Grab your tortillas and spoon the delicious mixture onto each tortilla. You can eat it like a burrito, or if you enjoy a more rustic feel, serve it on a plate! Top each wrap or plate with fresh cilantro, diced avocado, a dollop of sour cream and a squeeze of lime.
Serving Suggestions
To plate your Chicken Enchilada Crock Pot Meal, lay out individual tortillas and fill them generously with the chicken mixture. You can do a beautiful presentation by stacking them or rolling them up burrito-style. Top each portion with fresh cilantro, diced avocado, and a sprinkle of lime juice for that fresh zing. Don’t forget to serve with tortilla chips on the side for that satisfying crunch!
Recipe Variations
Feeling creative? Here are a few fun twists on this recipe:
-
Vegetarian Version: Substitute chicken with jackfruit or a mixture of lentils and mushrooms for a hearty vegetarian option.
-
Spicy Kick: Add in some chopped chipotle peppers in adobo sauce for a smoky, spicy flavor.
-
Creamy Enchiladas: Mix in some cream cheese or Greek yogurt before serving for a creamy version.
-
Southwestern Quinoa: Swap the tortillas for cooked quinoa for a gluten-free bowl-style meal.
-
Slow-Cooker Tacos: Serve the filling in taco shells for a fun party twist!
Chef’s Notes
This Chicken Enchilada Crock Pot Meal is huge in my culinary arsenal! Over time, I’ve played around with flavors, adding everything from black olives to jalapeños, but the beauty lies in its simplicity. Each time I make it, I’m reminded of cozy college nights filled with laughter and great food—those are the moments I cherish most! I’d love to hear how your version turns out!
FAQs and Troubleshooting
Q: Can I use frozen chicken?
Absolutely! Just remember that if you use frozen chicken, it will take longer to cook, so ensure you check for doneness around the 6-8 hour mark or longer.
Q: How do I know if the chicken is done?
The chicken should shred easily with a fork. If it feels tough, give it more time in the slow cooker.
Q: What if my enchiladas turn out too dry?
This can happen if the chicken is overcooked or not enough sauce. Be sure to check on it periodically and add a little more enchilada sauce if needed.
Q: Can I double this recipe?
Of course! Just make sure your crock pot can accommodate the larger volume, and enjoy the leftovers!
Nutritional Info (optional)
Per serving (based on a 6-serving recipe):
- Calories: 350
- Protein: 27g
- Carbohydrates: 40g
- Fat: 12g
- Fiber: 10g
This Chicken Enchilada Crock Pot Meal is not just a time-saver; it’s an experience, a reminder of the joys of home cooking. So the next time you’re in a pinch for dinner, let this recipe transport you back to those bustling nights of camaraderie and laughter. Happy cooking, friends!
PrintChicken Enchilada Crock Pot Meal
A flavorful Chicken Enchilada meal made easy in a crock pot, perfect for busy days.
- Prep Time: 15 minutes
- Cook Time: 360 minutes
- Total Time: 375 minutes
- Yield: 6 servings 1x
- Category: Main Course
- Method: Slow Cooking
- Cuisine: Mexican
- Diet: Gluten Free
Ingredients
- 2 pounds boneless, skinless chicken breasts or thighs
- 1 can (15 oz) black beans, drained and rinsed
- 1 can (15 oz) corn kernels, drained
- 1 can (10 oz) enchilada sauce (red or green)
- 1 can (10 oz) diced tomatoes with green chiles
- 1 medium onion, diced
- 1 tablespoon chili powder
- 2 teaspoons ground cumin
- 1 teaspoon garlic powder
- ½ teaspoon smoked paprika
- Salt and pepper to taste
- 2 cups shredded Mexican cheese blend
- 6–8 small corn or flour tortillas (optional)
- Fresh cilantro, chopped
- Sour cream or Greek yogurt for topping
- Diced avocado
- Lime wedges
- Sliced jalapeños
Instructions
- Prep the Ingredients: Wash and chop the onion, rinse the black beans, and prepare any other fresh ingredients.
- Season Your Chicken: Mix chili powder, cumin, garlic powder, smoked paprika, salt, and pepper, then rub onto the chicken.
- Layer in the Crock Pot: Place chicken at the bottom, then layer beans, corn, diced tomatoes, and onion. Pour enchilada sauce on top.
- Stir It Up: Mix everything gently in the crock pot and cover it.
- Check for Doneness: After 6-8 hours on low or 3-4 hours on high, ensure the chicken shreds easily.
- Add the Cheese: Sprinkle cheese on top and let it melt.
- Serve: Spoon the mixture onto tortillas and top with cilantro, avocado, sour cream, and lime juice.
Notes
Use rotisserie chicken for a quicker option. You can customize the recipe by adding ingredients like black olives or jalapeños.
Nutrition
- Serving Size: 1 serving
- Calories: 350
- Sugar: 3g
- Sodium: 800mg
- Fat: 12g
- Saturated Fat: 6g
- Unsaturated Fat: 4g
- Trans Fat: 0g
- Carbohydrates: 40g
- Fiber: 10g
- Protein: 27g
- Cholesterol: 75mg
Keywords: crock pot, chicken enchiladas, easy dinner, Mexican recipes, slow cooker