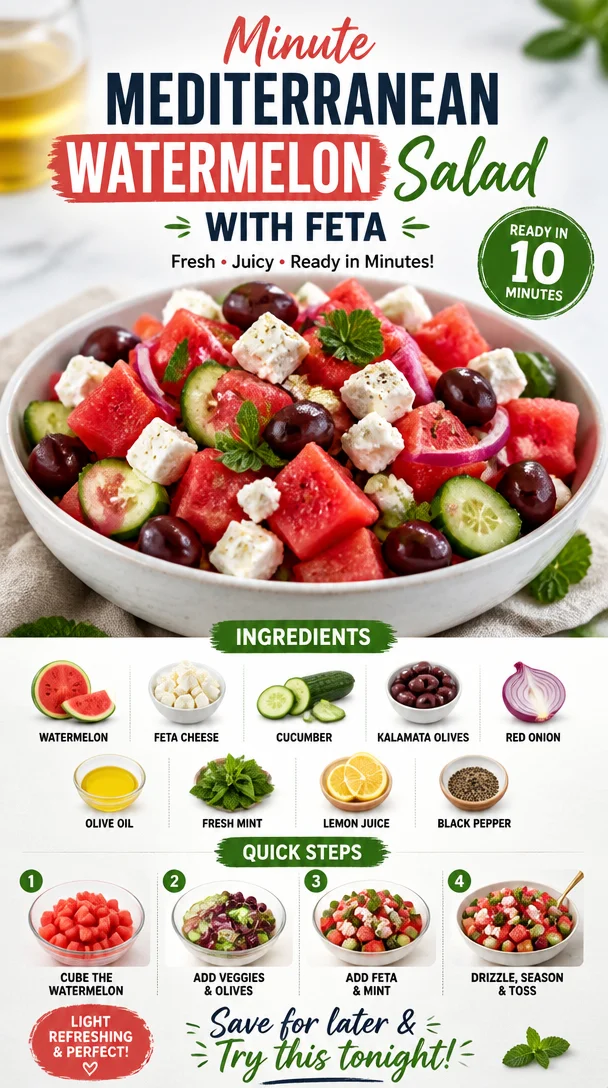
Minute Mediterranean Watermelon Salad with Feta
Mediterranean Watermelon Salad with Feta: A Fresh Take on Summer
Welcome, fellow food lovers! Today, I’m excited to share a delightful recipe that beautifully marries refreshing watermelon with the rich, savory notes of feta cheese. The Mediterranean Watermelon Salad is not just a dish; it’s about celebrating the vibrant flavors of summer and embracing a wholesome lifestyle.
Picture this: It’s a balmy afternoon, the sun is shining, and the sound of laughter fills the air as friends gather on a back porch. Suddenly, you unveil this stunning salad, and everyone’s eyes light up. The juicy pink watermelon is perfectly contrasted by the crumbly white feta and the vibrant green mint. The first bite? Pure bliss! Not only is this dish bright and beautiful, but it’s also incredibly easy to whip up. Let’s dive deep into this recipe, and I’ll guarantee that you’ll find yourself making it time and again.
Personal Story
When I think of summer, I can’t help but remember the countless BBQs and picnics my family hosted in our backyard. My grandmother, who was a fabulous cook, would always whip up a massive bowl of her watermelon salad. It wasn’t exactly the same as this Mediterranean version, but oh, was it delicious! Her secret ingredient was a splash of balsamic vinegar, which somehow made the sweetness of the watermelon dance.
Fast forward to today, as I continue to develop my culinary creativity, I couldn’t help but borrow that nostalgia and give it a Mediterranean twist. Just like Grandma, I wanted to capture the spirit of summer gatherings while adding a little zest of my own. Thus, the Mediterranean Watermelon Salad was born! Each bite takes me back to those sunny days filled with laughter, love, and lots of delicious food. And now, I’m excited for you to create your own memories with this sensational salad!
Ingredients
Here’s what you’ll need for this luscious Mediterranean Watermelon Salad:
-
Seedless Watermelon (4 cups, cubed): The star ingredient! Watermelon is hydrating and high in vitamins A and C, making it perfect for summer. If you can’t find seedless, just choose a sweet variety and make sure to remove the seeds.
-
Feta Cheese (1 cup, crumbled): This tangy cheese adds a creamy texture that perfectly complements the watermelon’s sweetness. If you’re looking for a non-dairy option, try crumbled tofu with a touch of lemon juice for that tangy flavor!
-
Fresh Mint (1/2 cup, chopped): Mint brightens the salad and brings a refreshing note. If you’re not a mint fan, basil or parsley work well, too!
-
Cucumber (1 medium, diced): This adds crunch and a refreshing bite. For a twist, you could use a different variety of cucumber, like Persian or English, which are sweeter and less bitter.
-
Red Onion (1/4 small, diced): A little raw onion brings depth and a bit of zing. If raw onion isn’t your favorite, try soaking it in cold water for 10 minutes to mellow the flavor, or substitute with chives.
-
Extra-Virgin Olive Oil (2 tablespoons): A drizzle of good-quality olive oil makes everything taste fancy! For extra flavor, infuse it with herbs or garlic.
-
Balsamic Vinegar (1 tablespoon): The sweetness of balsamic elevates the flavor profile of this salad. If you prefer, a citrus vinaigrette or a splash of fresh lime juice can also work.
-
Salt and Pepper (to taste): These simple seasonings help enhance and balance flavors. Always taste as you go!
Step-by-Step Instructions
Let’s roll up those sleeves and get cooking! Here’s how to create your refreshing Mediterranean Watermelon Salad step by step:
-
Prepare the Ingredients: Begin by gathering all your ingredients. A well-organized kitchen makes the cooking process smoother and more enjoyable. Trust me; I always feel like a culinary rockstar when the mise en place is complete!
-
Cube the Watermelon: Using a sharp knife, carefully cut the watermelon into manageable chunks. Aim for roughly 1-inch cubes—this will help with even distribution when you combine the salad. If juice collects on your cutting board, save it! That lovely liquid is flavor gold.
-
Dice the Cucumber: Next, dice your cucumber into small pieces. You want it to be similar in size to the watermelon cubes for uniformity. As a tip, consider using a melon baller for a playful texture, or spiralize the cucumber for a fun twist!
-
Chop the Mint: Take your fresh mint and give it a rough chop. Remember, the leaves can bruise easily, so use a gentle hand! One of my favorite hacks is to roll the leaves up tightly before slicing (that’s called chiffonade—fancy, huh?).
-
Prepare the Onion: If you’re using red onion, finely dice it and, if desired, soak it in a bowl of cold water for about 10 minutes. This helps reduce the sharpness! For a sweeter option, you can use green onions instead.
-
Combine Ingredients in a Bowl: In a large mixing bowl, combine the watermelon, cucumber, mint, red onion, and feta cheese. This is where the magic begins! Take a moment to appreciate the colors; it’s a feast for the eyes!
-
Dress the Salad: Drizzle the olive oil and balsamic vinegar over the salad. Season with salt and pepper to taste. Use a gentle hand here as feta can crumble easily—fold the ingredients together rather than stirring vigorously.
-
Give It a Taste: This is the best part! Taste your salad and adjust the seasonings as necessary. Maybe it needs a little more mint or a dash more balsamic? Don’t be shy—this salad is all about your personal touch.
-
Chill (Optional): For maximum flavor, let the salad chill in the fridge for about 30 minutes before serving. This allows all those bright flavors to meld beautifully.
Serving Suggestions
Present your Mediterranean Watermelon Salad in a large, shallow bowl to showcase all those vibrant colors! A sprinkle of extra feta and some mint leaves on top creates a stunning finish. Serve it as a refreshing appetizer at your next gathering or pair it with grilled chicken or fish for a complete meal. It’s light yet fulfilling!
Recipe Variations
Want to get creative with this salad? Here are some fun twists to try out:
-
Add Protein: Toss in some grilled shrimp or chickpeas for a heartier option.
-
Spice it Up: Drizzle a hint of sriracha or add jalapeño slices for that extra kick.
-
Fruit Fusion: Swap out some watermelon for other fruits like strawberries or pomegranate seeds. The flavor will surprise you!
-
Nutty Crunch: For added texture, throw in toasted pine nuts or pistachios. They’ll add a delightful crunch!
Chef’s Notes
Let me share a quick kitchen story: I once attempted to impress a special someone with this salad at a summer gathering. However, in my excitement to create, I accidentally grabbed the chili powder instead of the cumin I had intended to use for another dish. Let’s just say the salad became a bit more of a ‘fiery watermelon concoction’ than anticipated! But you know what? We ended up laughing about it, and it sparked a conversation that lasted all evening. Kitchen mishaps are part of the process, and every meal brings its own story. This salad has evolved over time, and while I occasionally venture into spice territory, I always return to this classic Mediterranean version.
FAQs and Troubleshooting
1. My watermelon is too sweet! What can I do?
If your watermelon is overly sweet, balance it with a tad more feta or introduce a splash of fresh lime juice to cut through the sweetness.
2. Can I make this salad ahead of time?
Absolutely! However, I recommend adding the feta and mint just before serving to keep the flavors fresh. You can prep the watermelon and cucumber ahead of time.
3. What if I can’t find feta?
You can easily substitute with goat cheese or even a light ricotta for a different flavor profile. If you’re dairy-free, crumbled tofu or nutritional yeast can provide a nice alternative.
4. How do I store leftovers?
Keep any leftovers in an airtight container in the fridge for up to 2 days. Note that the watermelon may release some moisture, but it will still taste delish!
Nutritional Info
(Optional)
- Calories: Approximately 150 per serving
- Protein: 5g
- Carbohydrates: 15g
- Fat: 10g
- Fiber: 1g
There you have it—a Mediterranean Watermelon Salad that is a celebration of summer flavors! Enjoy your culinary journey, and remember, each salad you create has the potential to spark laughter, joy, and delicious memories. Bon appétit!
PrintMediterranean Watermelon Salad with Feta
A refreshing salad combining juicy watermelon, creamy feta, and vibrant mint, perfect for summer gatherings.
- Prep Time: 15 minutes
- Cook Time: 0 minutes
- Total Time: 15 minutes
- Yield: 4 servings 1x
- Category: Salad
- Method: No-Cook
- Cuisine: Mediterranean
- Diet: Vegetarian
Ingredients
- 4 cups Seedless Watermelon, cubed
- 1 cup Feta Cheese, crumbled
- 1/2 cup Fresh Mint, chopped
- 1 medium Cucumber, diced
- 1/4 small Red Onion, diced
- 2 tablespoons Extra-Virgin Olive Oil
- 1 tablespoon Balsamic Vinegar
- Salt and Pepper to taste
Instructions
- Prepare the Ingredients: Begin by gathering all your ingredients.
- Cube the Watermelon: Cut the watermelon into manageable chunks.
- Dice the Cucumber: Cut your cucumber into small pieces.
- Chop the Mint: Gently chop your fresh mint.
- Prepare the Onion: Finely dice the onion or soak it to mellow the flavor.
- Combine Ingredients in a Bowl: Mix the watermelon, cucumber, mint, red onion, and feta in a bowl.
- Dress the Salad: Drizzle olive oil and balsamic vinegar, then season with salt and pepper.
- Give It a Taste: Adjust seasonings as necessary.
- Chill (Optional): Let the salad chill in the fridge for 30 minutes.
Notes
Serve chilled for maximum flavor. Great as a side or light meal.
Nutrition
- Serving Size: 1 serving
- Calories: 150
- Sugar: 8g
- Sodium: 400mg
- Fat: 10g
- Saturated Fat: 4g
- Unsaturated Fat: 6g
- Trans Fat: 0g
- Carbohydrates: 15g
- Fiber: 1g
- Protein: 5g
- Cholesterol: 30mg
Keywords: watermelon salad, feta salad, summer salad, Mediterranean recipes
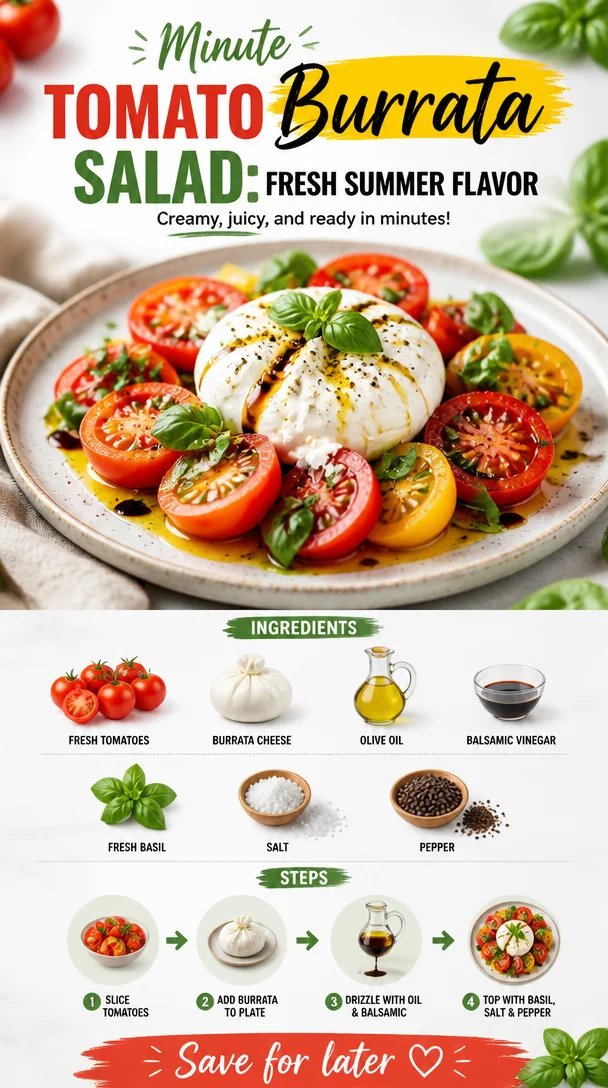
Minute Tomato Burrata Salad: Fresh Summer Flavor
Tomato and Burrata Salad: A Love Letter to Simplicity and Flavor
Welcome, food lovers! Today, we’re diving into one of my all-time favorite dishes: Tomato and Burrata Salad. I can tell you with absolute certainty that this dish is a shining star in the realm of fresh, vibrant eating. With summer’s bounty bursting forth, who wouldn’t want to highlight those juicy tomatoes paired with creamy burrata? It’s a delightful combination that screams sunshine and satisfaction.
Now, let’s be real: we all lead hectic lives. The last thing we want to do when we come home is stress over what to whip up for dinner, right? That’s why I am all about cravings that don’t overwhelm you with complicated steps or lengthy lists of ingredients. Tomato and Burrata Salad is simplicity at its finest—an impressive dish that you can whip up in just about 15 minutes. Yes, you heard that right! Perfect for those busy weeknights or lazy weekends when you want to indulge without breaking a sweat.
This salad is not just a feast for the taste buds; it’s also a visual delight. The vibrant hues of ripe tomatoes, luscious white burrata, and green basil are a pleasure to behold. Drizzled with good quality olive oil and a splash of balsamic vinegar, it not only tastes amazing but also gives you that feel-good factor as you nourish your body with fresh ingredients.
So grab your apron, and let’s get cooking! But first, let me share a little story that will set the mood for this delicious journey.
A Personal Story: The Summer I Discovered Burrata
I still remember the first time I tasted burrata like it was yesterday. It was a lovely summer afternoon at an open-air farmer’s market, the kind that bursts with life, colors, and laughter. My friends and I were wandering from stall to stall, sampling everything from artisanal cheeses to homemade bread.
As we approached a cheese vendor, a creamy white globe caught my eye. Curious, I couldn’t resist asking for a sample. When I took that first bite, my life changed forever! The outer shell was delicate, and when I broke it apart, the creamy center oozed out like a luscious, cheesy river. Pairing it with the perfectly ripe heirloom tomatoes at the market was a no-brainer.
After that day, I became obsessed with recreating that magical salad at home. I could never quite get the burrata quite as magical as that first bite, but I came pretty close! Each summer since, I’ve made it a tradition to treat myself to some fresh burrata and tomatoes, celebrating the season’s offerings while reminiscing about that magical market day.
Now, let’s get into the nitty-gritty of making this fantastic Tomato and Burrata Salad that draws inspiration from that unforgettable experience!
Ingredients
Here’s what you’ll need to create this mouthwatering salad. Each ingredient brings a unique quality to the dish, making it truly special.
-
Fresh Tomatoes: The star of the show! Use ripe, juicy tomatoes like heirlooms, cherry, or vine-ripened for the best flavor. Pro tip: If tomatoes aren’t in season, feel free to use good quality canned tomatoes in a pinch!
-
Burrata Cheese: This creamy cheese takes the dish to another level. If you can’t find burrata, fresh mozzarella is a great substitute, but do yourself a favor and try to find burrata if you can!
-
Olive Oil: A high-quality extra virgin olive oil will elevate your salad. A drizzle of this liquid gold ties all the flavors together. If you want a twist, flavored olive oils like basil or lemon can add an extra pop.
-
Balsamic Vinegar: A drizzle of balsamic adds acidity and sweetness. Opt for a good quality aged balsamic for depth. If you want to mix it up, try balsamic glaze for a thicker consistency.
-
Fresh Basil: Nothing beats the aroma and flavor of fresh herbs. Basil complements the tomatoes and burrata beautifully. If basil isn’t your style, you can use arugula or mint for a different flavor profile.
-
Salt: A sprinkle of flaky sea salt enhances the flavors of the tomatoes and cheese. Don’t skip this step—it makes all the difference.
-
Pepper: Freshly cracked black pepper adds that necessary kick. For a twist, try using a mix of colored peppercorns for a more visual appeal.
Ready to assemble these goodies? Let’s jump into the cooking action!
Step-by-Step Instructions
Here’s how you can put this fresh and fabulous dish together:
-
Prep Your Tomatoes
Start by washing your tomatoes under cool running water. If you’re using larger heirlooms, slice them into thick wedges. Cherry tomatoes can be halved. Aim for a variety of shapes and sizes to make the dish visually appealing. Remember, the more color, the better! -
Slice the Burrata
Be gentle! Burrata is delicate, so use a sharp knife to slice the burrata open, letting that creamy center spill out. It’s like a cheesy surprise waiting to be enjoyed. Be ready to indulge! -
Arrange on a Plate
Grab a large plate or a shallow bowl. Start by arranging your tomatoes however your heart desires. It could be a pretty circular pattern, a casual toss of colors, or any way that speaks to you. The beauty of this dish is in its simplicity—there’s no wrong way to do it! -
Add the Burrata
Nestle the burrata pieces among the tomatoes. Make sure to drape the creamy insides in such a way that everyone will be able to scoop a little when serving. -
Drizzle Some Olive Oil
Generously drizzle your extra virgin olive oil all over the salad. It not only adds incredible flavor but also acts as a beautiful sheen that makes everything look enticing. Don’t be shy; it brings everything together! -
Sprinkle with Balsamic Vinegar
Now, for the balsamic! A light drizzle will do the trick, but feel free to adjust according to your taste. Remember, a little goes a long way, so start small and add more if desired. -
Season with Salt and Pepper
Finish with a sprinkle of flaky sea salt and a generous crack of freshly ground black pepper. This simple seasoning elevates the dish and enhances all the amazing flavors. -
Top with Fresh Basil
Lastly, tear some fresh basil leaves over the top. They can be as small or as large as you like—just make sure to include enough to enjoy that fresh basil flavor with each bite.
And there you have it! Simple, beautiful, and oh-so-delicious Tomato and Burrata Salad ready to be devoured.
Serving Suggestions
When it’s time to serve your Tomato and Burrata Salad, consider presenting it on a wooden platter for a rustic feel or a white plate to really make those colors pop! Pair it with some crusty bread for mopping up any leftover olive oil and gooey burrata. A chilled glass of rosé or a light white wine complements this dish perfectly. Enjoy this salad as a refreshing starter, a side dish alongside grilled meats, or even as a satisfying light lunch on its own!
Recipe Variations
Feeling adventurous? Here are a few fun variations you can explore:
-
Mediterranean Style: Add black olives and capers for a briny punch that complements the sweetness of the tomatoes.
-
Grilled Option: Toss your tomatoes on the grill for a slight char! The smokiness will add an exciting depth of flavor.
-
Pesto Twist: Replace the basil with a drizzle of homemade or store-bought pesto for an herbaceous kick.
-
Fruit Fusion: Add slices of ripe peaches or nectarines for a fruity twist that pairs well with the cheese!
-
Nuts Galore: Toss in some toasted pine nuts or chopped walnuts for added crunch and a nutty flavor.
Explore these variations to suit your taste and make this dish your own!
Chef’s Notes
One of the beautiful things about this Tomato and Burrata Salad is how easy it is to adapt. Over the years, I’ve played around with different cheeses and even roasted my tomatoes to intensify their flavor. Each version has its merits! I often find myself standing over the sink, tearing off pieces of burrata and nibbling while prepping—it’s hard not to!
I love to think of this salad as a blank canvas; you can let your creativity shine. Whether I’m enjoying it on a sunny afternoon, hosting friends, or simply needing a happy food moment, this salad never fails to deliver.
FAQs and Troubleshooting
Q: My burrata is too runny. What did I do wrong?
A: Burrata can be tricky! Make sure to drain it well if it’s packed in liquid. If you bite into it and it’s too runny, just enjoy it as is—runny burrata is still delicious!
Q: Can I make this salad ahead of time?
A: This salad is best enjoyed fresh. However, you can prep the ingredients in advance but avoid adding the burrata and drizzles of oil and balsamic until just before serving.
Q: What should I do if my tomatoes aren’t flavorful?
A: Choose the ripest tomatoes you can find! If they lack flavor, add a pinch of sugar to enhance their sweetness or drizzle a touch more balsamic vinegar for added depth.
Q: Can I use dried herbs instead of fresh basil?
A: While fresh herbs are best for this recipe, if you must use dried herbs, remember that dried herbs are more potent, so use them sparingly. Add them in with the oil and vinegar to help rehydrate them.
Nutritional Info
While I usually focus on the joy of cooking rather than calorie counting, a serving of Tomato and Burrata Salad is generally low in calories but high in healthy fats, vitamins, and antioxidants. Each serving can provide a great source of lycopene from the tomatoes, healthy fats from the olive oil and burrata, and fresh flavors from the herbs.
Well, there you have it—an inviting journey through the wonderful world of Tomato and Burrata Salad! I hope this recipe inspires you to bring a little sunshine to your table. Remember, the kitchen is a place of joy, experimentation, and love. So roll up those sleeves and let’s enjoy the beauty of fresh, feel-good food together! Happy cooking!
PrintTomato and Burrata Salad

A vibrant and fresh Tomato and Burrata Salad highlighting juicy tomatoes paired with creamy burrata, drizzled with olive oil and balsamic vinegar.
- Prep Time: 15 minutes
- Cook Time: 0 minutes
- Total Time: 15 minutes
- Yield: 4 servings
- Category: Salad
- Method: No Cooking
- Cuisine: Italian
- Diet: Vegetarian
Ingredients
- Fresh Tomatoes (heirloom, cherry, or vine-ripened)
- Burrata Cheese
- Olive Oil (extra virgin)
- Balsamic Vinegar
- Fresh Basil
- Salt
- Pepper
Instructions
- Prep your tomatoes by washing them and slicing them into wedges or halves.
- Slice the burrata gently to reveal its creamy center.
- Arrange tomatoes on a large plate or shallow bowl creatively.
- Add the burrata pieces among the tomatoes.
- Drizzle olive oil generously over the salad.
- Sprinkle balsamic vinegar lightly according to taste.
- Season with flaky sea salt and freshly cracked black pepper.
- Top with torn fresh basil leaves before serving.
Notes
Experiment with different variations like adding olives, grilling the tomatoes, or using pesto instead of basil.
Nutrition
- Serving Size: 1 serving
- Calories: 250
- Sugar: 6g
- Sodium: 300mg
- Fat: 20g
- Saturated Fat: 10g
- Unsaturated Fat: 9g
- Trans Fat: 0g
- Carbohydrates: 14g
- Fiber: 2g
- Protein: 8g
- Cholesterol: 30mg
Keywords: salad, tomatoes, burrata, vegetarian, fresh, summer
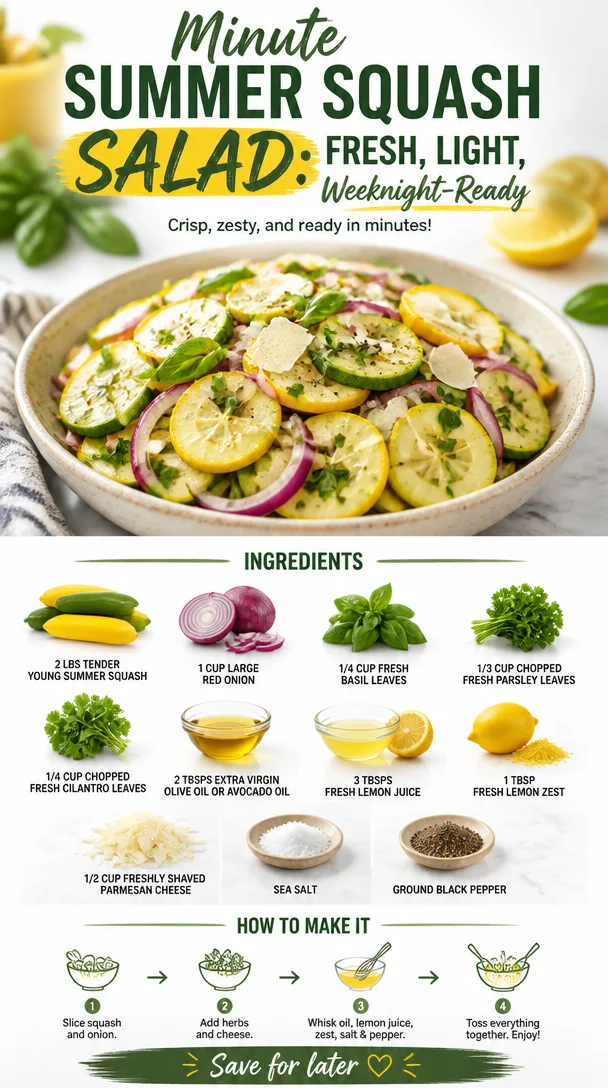
Minute Summer Squash Salad: Fresh, Light, Weeknight-Ready
Welcome to the Summer Squash Salad: A Quick and Fresh Delight!
Summer is a magical season, full of vibrant colors, sun-kissed days, and, of course, an abundance of fresh produce. There’s something about this time of year that puts a little skip in your step and a whole lot of flavor on your plate! Today, I’m excited to share with you a dish that perfectly embodies all the joys of summer: my Quick and Fresh Summer Squash Salad. This salad is not just a side; it’s a celebration of summer’s bounty in every bite!
Imagine biting into tender young squash, mingled with the crispness of red onion and the aromatic freshness of herbs. The vibrant colors and the fragrant scents will transport you to a sunny farmers market, even if you’re just at home! This salad is perfect for those backyard BBQs, picnics in the park, or simply as a light meal to enjoy on a warm summer evening.
But here’s the kicker: this salad is incredibly easy to whip up. In under 30 minutes, you’ll have a radiant dish that is healthy, satisfying, and oh-so-delicious. It’s all about keeping it fresh, simple, and fun! So, roll up your sleeves, grab your favorite cutting board, and let’s dive into this heavenly summer creation.
A Slice of Nostalgia
Growing up, summer meant spending lazy days at my grandma’s house, where the garden was bursting with life. Her prized possession? An incredible array of summer squash. I can still picture those golden zucchinis and vibrant yellow squash stacked in the kitchen, ready to be transformed into something amazing. One warm afternoon, I remember her teaching me how to make a simple salad that showcased all that garden goodness. It was the first time I realized how a few fresh ingredients could sing on your taste buds! We tossed the squash with herbs she’d just picked, drizzled in the best olive oil, and topped it with a generous helping of Parmesan cheese.
We hardly needed anything else—just that fresh salad, a few slices of crusty bread, and laughter as we recounted stories from her youth. I knew then that summer squash wasn’t just a vegetable; it was a bridge to memories, flavors, and happiness. That spirit is what I aim to capture in this recipe, and I can’t wait for you to create your own beautiful memories around the table with this salad!
Ingredients
Let’s gather our stars—the ingredients that make this salad shine:
-
2 lbs tender young summer squash
Perfectly fresh squash should be tender and lightly firm. Look for ones that are shiny and vibrant in color. You can use zucchini or yellow squash (or a mix of both!) for an eye-catching and delightful salad. -
1 cup large red onion
Red onion adds a sweet crunch to the salad. If you’re sensitive to the sharpness of raw onions, soak the slices in cold water for a bit, then drain to mellow their flavor. -
1/4 cup fresh basil leaves
Basil offers a fragrant aromatic note. If you don’t have basil, fresh mint or parsley can also lend a delightful freshness. -
1/3 cup chopped fresh parsley leaves
Parsley is like nature’s seasoning. Trust me, it adds zest! You can substitute it with arugula or even some microgreens for a peppery kick. -
1/4 cup chopped fresh cilantro leaves
A burst of cilantro really brightens this dish. If cilantro isn’t your thing, try swapping it out with dill for another herbal dimension. -
2 Tbsps extra virgin olive oil or avocado oil
I love the smooth richness of good olive oil. Alternatively, avocado oil has a neutral flavor while still delivering healthy fats. -
3 Tbsps fresh lemon juice
This acidity balances the richness of the squash. Fresh is a must! If you’re out of lemons, a splash of white wine vinegar can also do the trick. -
1 Tbsps fresh lemon zest
Zest adds that punch of citrus flavor perfectly! Don’t skip it; it’s where the real flavor lies. -
1/2 cup freshly shaved parmesan cheese
Adding a hit of umami, fresh Parm enhances the flavor of the salad. You can replace it with nutritional yeast for a vegan option or Pecorino for a different cheese angle! -
Sea salt and ground black pepper
Essential for seasoning! Be generous but taste as you go. Adding a pinch can elevate the flavors beautifully.
Step-by-Step Instructions
Are you ready to dive into the joyous task of creating this salad? Let’s break it down step by step!
-
Prep Your Squash
Start by washing your summer squash under cool running water. Pat them dry and slice them into thin rounds—about 1/4 inch thick. This allows for even cooking and a delightful crunch. If you want a twist, try spiralizing the squash to create “noodles.” It adds a fun texture! -
Slice The Onions
Grab your red onion and slice it into thin crescents. Aim for uniform pieces; this way, they mix evenly throughout the salad. If you prefer a milder flavor, I suggest soaking them in cold water while you prepare the other ingredients. -
Chop The Herbs
Now, onto the herbs! Stack a few basil leaves, parsley, and cilantro atop each other, roll them tightly, and slice them into ribbons (this technique is called chiffonade). It creates a beautiful presentation! -
Whisk Your Dressing
In a small bowl, combine the olive oil, fresh lemon juice, lemon zest, sea salt, and black pepper. Whisk them together until well blended. This dressing will add brightness and flavor, bringing the salad’s ingredients to life! -
Combine Everything
In a large mixing bowl, add your sliced squash, red onion, chopped herbs, and the dressing. Toss everything gently but thoroughly; you want every piece of squash to be coated with that delicious dressing—so no one is left out! -
Plate & Finishing Touches
Now comes the fun part! Transfer the salad to a beautiful serving platter or large bowls. Finally, sprinkle the shaved parmesan on top. Alternatively, you can mix it in before plating if you prefer a more thorough distribution.
And voilà! Your summer squash salad is ready to be savored!
Serving Suggestions
When serving this refreshing salad, consider pairing it with grilled chicken or fish for a wholesome meal. It’s also fantastic alongside crusty artisan bread for soaking up that delectable dressing! For an extra touch, garnish with a few extra herb leaves or a sprinkle of additional Parmesan on top right before serving. This will make it pop visually, turning it into a feast for the eyes as well as the palate.
Recipe Variations
Feeling adventurous? Here are a few fun and creative twists you can try:
- Add Color: Include diced cherry tomatoes or bell peppers for extra color and sweetness.
- Whole Grains: Toss in cooked quinoa or farro for a heartier salad that packs a nutritional punch.
- Spicy Kick: Add a sprinkle of red pepper flakes or diced jalapeños for those who enjoy a little heat!
- Nuts & Seeds: For added texture, throw in some toasted sunflower seeds or slivered almonds.
- Creamy Version: Mix in a dollop of Greek yogurt or a vegan option for a creamy, tangy twist.
Chef’s Notes
This summer squash salad is one of those recipes that’s evolved with me over the years. What started as a simple mix with grandma in her kitchen has transformed into something I create for friends, family, and everyone who shares a meal with me. I love how versatile this salad is; every summer, I find new ways to make it my own, adjusting it based on what’s fresh and seasonal.
And let’s be honest—there’s something satisfying about throwing together whatever vegetables are lingering in the fridge to create a stunning dish. I want you to feel that same joy in your kitchen, knowing there are no rigid rules here—only delicious flavors waiting to be explored!
FAQs and Troubleshooting
-
Can I make this salad ahead of time?
Absolutely! The salad holds up well in the refrigerator. However, I’d recommend adding the cheese just before serving to keep it from getting soggy. -
What if I can’t find fresh herbs?
While fresh herbs are best, you can use dried versions. Just remember that dried herbs are more concentrated, so reduce the quantity to about one-third of what the recipe calls for. -
How do I choose the best summer squash?
Look for squash that is firm to the touch and free of blemishes or soft spots. Smaller squash often have better flavor and texture! -
Can I use cooked squash?
For this recipe, fresh squash is best to retain its crunch, but if you prefer cooked squash, consider briefly sautéing it for a warm salad experience!
Nutritional Info
This vibrant salad packs a nutritional punch, filled with vitamins and minerals from fresh veggies and herbs. It is low in calories and high in fiber, making it a fantastic option for those looking to incorporate more wholesome ingredients into their diets.
I hope you’re as excited to make this Quick and Fresh Summer Squash Salad as I am to share it with you! Remember, cooking should be enjoyable and rewarding, so have fun with it and make it your own. Here’s to delicious, fresh meals that bring us together and create lasting memories—cheers!
PrintQuick and Fresh Summer Squash Salad

A vibrant summer salad featuring tender young squash, fresh herbs, and a zesty dressing, perfect for warm weather meals.
- Prep Time: 15 minutes
- Cook Time: 0 minutes
- Total Time: 15 minutes
- Yield: 4 servings 1x
- Category: Salad
- Method: Mixing
- Cuisine: American
- Diet: Vegetarian
Ingredients
- 2 lbs tender young summer squash
- 1 cup large red onion
- 1/4 cup fresh basil leaves
- 1/3 cup chopped fresh parsley leaves
- 1/4 cup chopped fresh cilantro leaves
- 2 Tbsps extra virgin olive oil or avocado oil
- 3 Tbsps fresh lemon juice
- 1 Tbsps fresh lemon zest
- 1/2 cup freshly shaved parmesan cheese
- Sea salt and ground black pepper
Instructions
- Prep your squash: Wash and slice the summer squash into thin rounds.
- Slice the onions: Cut the red onion into thin crescents.
- Chop the herbs: Stack the basil, parsley, and cilantro, roll, and slice into ribbons.
- Whisk your dressing: Combine olive oil, lemon juice, lemon zest, salt, and pepper in a small bowl.
- Combine everything: In a large mixing bowl, add squash, onion, herbs, and dressing; toss to coat.
- Plate & finishing touches: Transfer to a serving platter and sprinkle with parmesan.
Notes
Add cherry tomatoes or cooked quinoa for variations. Can be made ahead; add cheese just before serving.
Nutrition
- Serving Size: 1 serving
- Calories: 250
- Sugar: 4g
- Sodium: 200mg
- Fat: 15g
- Saturated Fat: 3g
- Unsaturated Fat: 7g
- Trans Fat: 0g
- Carbohydrates: 20g
- Fiber: 4g
- Protein: 6g
- Cholesterol: 10mg
Keywords: summer salad, fresh salad, quick salad, vegetarian salad, healthy salad
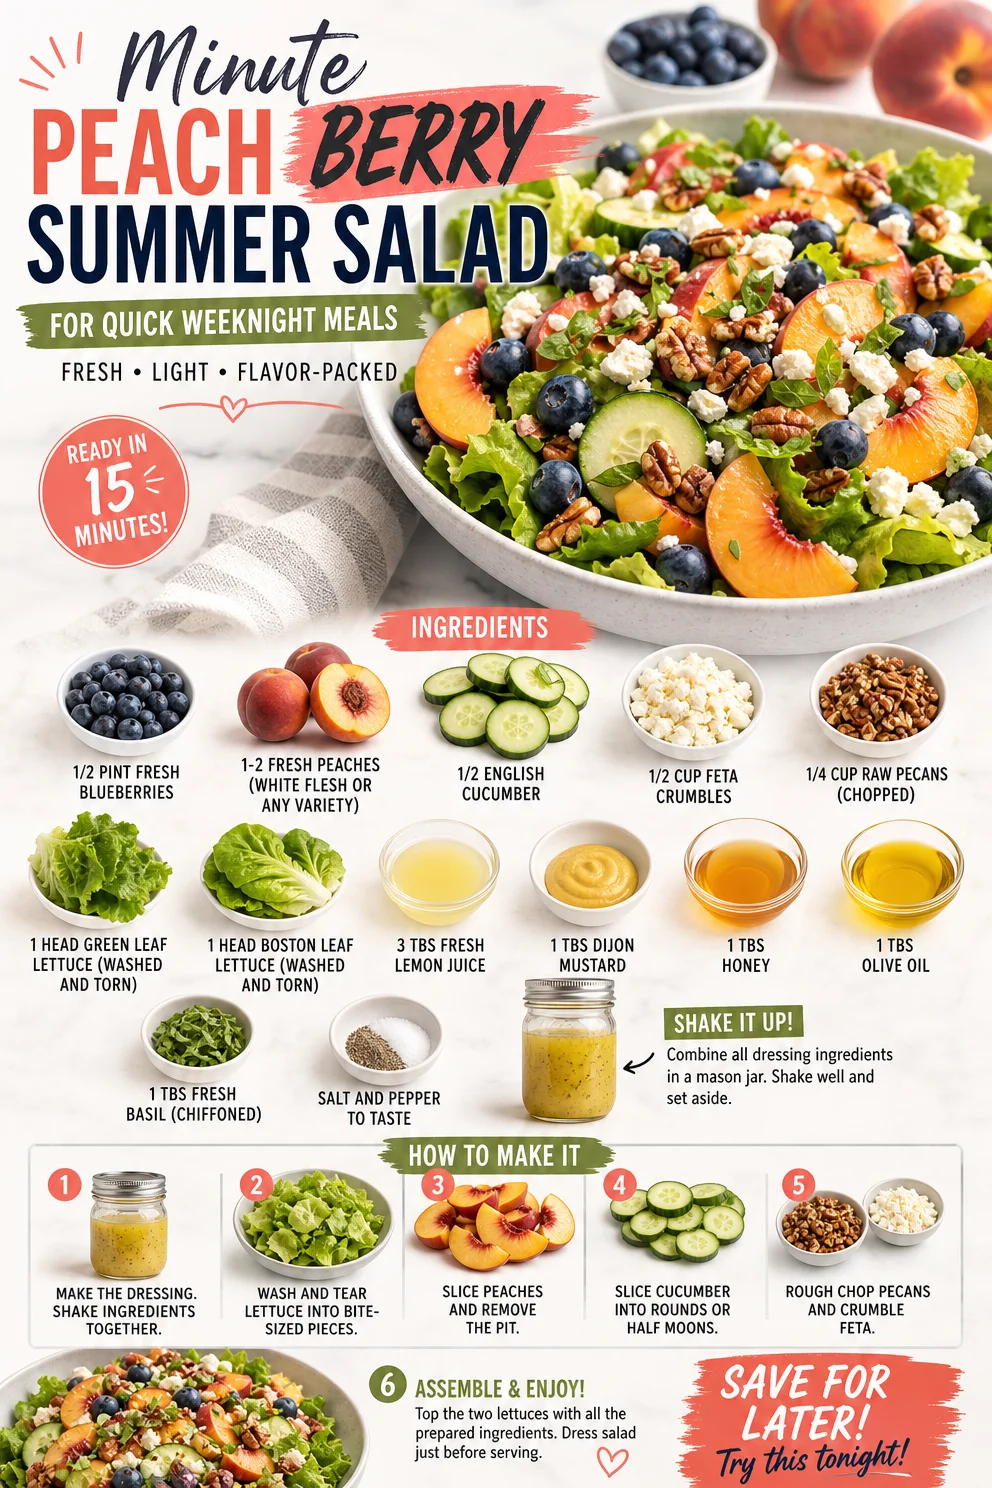
Minute Peach Berry Summer Salad for Quick Weeknight Meals
Peach Berry Summer Salad: A Fresh Take on Seasonal Flavors
Ah, summer—a time for sunshine, warmth, and, of course, the juiciest fruits of the season! Nothing quite compares to biting into a perfectly ripe peach or plucking sweet blueberries fresh from the vine. At Clean Plate Cravings, we’re all about celebrating these delightful ingredients in a way that’s both delicious and nutritious. Today, we’re whipping up a vibrant Peach Berry Summer Salad that’s not only a feast for the senses but also a meal that’s uncomplicated and bursting with flavor.
Imagine bringing together the juicy sweetness of sun-kissed peaches with the tartness of blueberries, all complemented by crunchy cucumbers, creamy feta, and toasted pecans. I mean, talk about summer on a plate! This salad is perfect for those casual backyard barbecues, a light lunch, or a fresh side dish at your next gathering. Let’s dive into this recipe and transform your kitchen into a summer oasis where every bite is a celebration!
A Taste of Nostalgia: My Peachy Summer Memories
When I think of peaches, I’m immediately transported to my childhood summers spent at my grandmother’s house. She had the most magical garden you could imagine, bursting with color and life. The peach tree stood like the monarch of her backyard, heavy with fruit that begged to be picked. Every July, my siblings and I would race each other to see who could reach the juiciest peach first. We’d devour them right there, juice dribbling down our chins, leaving us giggling and sticky.
It was in her kitchen that I first learned the value of fresh ingredients. Grandma would toss together vibrant salads using whatever she had on hand, often inspired by her garden’s bounty. That spirit of joy and simplicity has stuck with me through the years and inspired this Peach Berry Summer Salad. It’s all about using the freshest flavors to create something that tastes like sunshine—and, trust me, you’ll want to share it with everyone, just like I did back then!
Ingredients
Let’s gather the vibrant, fresh ingredients for our salad! Here’s what you’ll need:
-
1/2 pint fresh blueberries
These little gems are not just delicious; they’re packed with antioxidants. If you can’t find blueberries, feel free to substitute with raspberries or sliced strawberries for that sweet-tart flavor. -
1-2 fresh peaches (white flesh or any variety)
I love white peaches for their sweetness, but any ripe peach will do. Look for peaches that are slightly soft to the touch; that’s a sign they’re perfect for eating! -
1/2 cucumber (English cucumber preferred)
A crunchy cucumber adds a refreshing crispness to the salad. If you only have regular cucumbers, just peel the skin to avoid bitterness. -
1/2 cup feta crumbles
Soft, creamy feta is a match made in heaven with sweet fruit. If you’re not a fan of feta, goat cheese works wonderfully too. -
1/4 cup raw pecans (chopped)
The toasty crunch of pecans brings a lovely texture. If you’re nut-free, sunflower seeds are a fantastic alternative. -
1 head green leaf lettuce (washed and torn)
This lettuce adds a tender base for our salad. You could also use arugula for a peppery spin! -
1 head Boston leaf lettuce (washed and torn)
Boston lettuce is mild and buttery, but any leafy green will work. Think spinach or mixed greens if that’s what you have on hand. -
3 Tbs fresh lemon juice
Bright and zesty, lemon juice elevates all the flavors. Lime juice can be a fantastic substitution if you’re looking for a twist! -
1 Tbs Dijon mustard
This provides a creamy, tangy backdrop that binds the salad together. If you don’t have Dijon, yellow mustard will do in a pinch. -
1 Tbs honey
Adding just a touch of sweetness, honey balances the tang of the mustard. Maple syrup is a great vegan alternative. -
1 Tbs olive oil
A drizzle of good-quality olive oil brings everything together beautifully. Feel free to swap this out for avocado oil if you enjoy its mild flavor. -
1 Tbs fresh basil (chiffonade)
Fresh basil adds an aromatic note. Don’t have any? Mint or cilantro can add an intriguing twist. -
Salt and pepper to taste
Essential for bringing all the flavors to life. Always taste as you go!
Step-by-Step Instructions
Ready to create this stunning salad? Follow these simple steps to master the Peach Berry Summer Salad:
-
Prep Your Produce
Begin by washing all your fresh veggies and fruits thoroughly. I like to soak my berries in a bowl of water with a splash of vinegar for a few minutes to make sure they’re super clean. This little hack ensures that any pesky pesticides or residues are washed away! -
Slice Those Peaches
Whether you’re using one or two, slice your peaches into wedges or cubes—whichever you prefer! Don’t you love the way fresh peaches smell? It’s a reminder that summertime is truly the best time for fresh fruit. -
Chop the Cucumber
Slice your English cucumber in half lengthwise and then cut it into thin crescent shapes. The cucumber adds such a satisfying crunch. You can peel it if you’d like, but I usually leave the skin on for that bright color and nutrients! -
Mix the Greens
In a large salad bowl, toss together your washed and torn green leaf and Boston lettuce. This leafy foundation is where all the magic happens! -
Add the Berries and Peaches
Gently fold the sliced peaches and fresh blueberries into the greens. Look at those colors; it’s like a celebration right in your bowl! -
Sprinkle on the Feta and Pecans
Add your feta crumbles and chopped pecans, distributing them evenly over the salad. I love to toast my pecans in a dry skillet for a few minutes to enhance their natural flavors. Just be sure to keep a close eye on them—burnt nuts are a kitchen tragedy! -
Create the Dressing
In a small bowl, whisk together the fresh lemon juice, Dijon mustard, honey, and olive oil until combined. This simple dressing ties all the ingredients together beautifully. Taste it—it should be bright, tangy, and just a little sweet. Adjust with extra honey or lemon juice as desired! -
Dress the Salad
Drizzle your dressing generously over the salad, and season with salt and pepper to taste. Toss gently to combine, ensuring that every ingredient is coated in that yummy dressing. Remember, gentle is key; we want to preserve the integrity of those beautiful berries and peaches! -
Give it a Moment
Allow the salad to rest for a few minutes to let the flavors meld. This step is especially important if you’ve added salt, as it helps draw out some of the juices from the veggies and fruits for extra flavor! -
Serve and Enjoy!
Serve this gorgeous salad immediately for the freshest experience, or refrigerate it for up to an hour if you’re planning to serve it at a gathering. But honestly, I find it’s best enjoyed right after you make it!
Serving Suggestions
To plate the Peach Berry Summer Salad, use a large, shallow bowl to showcase the colorful layers. You can even arrange the salad in a winding design for a more artistic touch. A slice of crusty bread or grilled chicken on the side fully rounds off the experience! For an extra indulgent moment, consider drizzling a little extra honey or a sprinkle of fresh herbs on top just before serving.
Recipe Variations
Feeling adventurous? Here are a few variations to keep things fresh and exciting:
-
Grilled Peach Twist: Get that smoky flavor by grilling the peach slices for a few minutes. This adds a lovely char and enhances sweetness.
-
Dairy-Free Delight: Swap feta for a scoop of creamy avocado for that buttery texture without the dairy!
-
Add Ins: Toss in some grilled chicken or shrimp for a protein-packed twist that makes this salad a complete meal.
-
Dress it Up: Enhance the dressing with a splash of balsamic vinegar for a richer flavor profile.
-
Tropical Flair: Trade peaches for mango or add some sliced strawberries for a fun, tropical vibe!
Chef’s Notes
This salad has evolved throughout the years in my kitchen and has become a staple in my summer repertoire—perfect for potlucks and family gatherings. I can’t count the number of compliments I’ve received, often accompanied by requests for the recipe! Sometimes, I even challenge myself to change it up and incorporate whatever is fresh at the farmers’ market. It’s always a delight to see how versatile a simple salad can be.
Remember, cooking is all about experimentation and joy. So, feel free to switch in your favorite fruits or nuts, and don’t hesitate to make this salad your own!
FAQs and Troubleshooting
1. Can I make this salad ahead of time?
While I recommend serving it fresh, you can prepare all the ingredients and store them separately in the fridge for a day. Just mix them together before serving, and drizzle the dressing at the last minute to prevent sogginess!
2. What can I use instead of honey?
You can substitute honey with agave syrup, maple syrup, or a few drops of stevia for a sugar-free option.
3. Why is my feta crumbly?
If your feta is too crumbly, it may be an indication that it’s been over-processed or too old. Opt for a fresher block of feta and crumble it yourself for a creamier texture.
4. How can I keep the salad fresh longer?
If preparing in advance, keep the dressing in a separate container until you’re ready to serve. This way, the salad remains crisp and vibrant!
Nutritional Info
While I didn’t provide exact nutritional stats for this salad, it’s a wholesome dish packed with vitamins and minerals. Each serving is loaded with antioxidants from the berries, healthy fats from the pecans, and a delicious source of protein from the feta cheese.
There you have it! A vibrant and luscious Peach Berry Summer Salad that embodies everything we love about summer. What are you waiting for? Let’s get chopping and enjoy the season’s best produce together! Happy cooking, friends!

Keto Chocolate Avocado-Chia Pudding: 5-Min No-Bake Recipe
Keto Chocolate Chia Avocado Pudding: A Guilt-Free Indulgence
Welcome, fellow foodies! Today, I’m thrilled to share a scrumptious and indulgent dessert that doesn’t compromise on flavor or nutritional value—Keto Chocolate Chia Avocado Pudding! This dessert is not only delicious, but it’s also packed with healthy fats, fiber, and antioxidants. Plus, it’s super easy to whip up, making it the perfect treat for busy days when you want something sweet without the carbs. Trust me; you’re going to love this!
As someone who believes that eating well should never feel like a chore or restriction, I love to create desserts that fit seamlessly into a healthier lifestyle while still being incredibly tasty. Every spoonful of this rich, creamy pudding will make you feel like you’re indulging in something naughty, when in fact, it’s the complete opposite! Plus, it’s keto-friendly, so if you’re on that low-carb journey or simply looking for a deliciously different dessert, keep reading!
A Sweet Memory
I remember the first time I tried avocado in a dessert. I was attending a friend’s dinner party, and there it was: an elegant chocolate mousse made with ripe avocados. At first, I was skeptical. How could something so creamy and delicious be good for me? But when my friend pressed a spoonful into my hand, I couldn’t resist. One bite, and I was captivated! The rich chocolate flavor paired with the creamy texture of avocado had me hooked.
From that moment on, I started experimenting in my own kitchen, and that’s how this Keto Chocolate Chia Avocado Pudding was born! It’s become a staple in my dessert repertoire, and every time I make it, I think back to that night and the joy of discovering that healthy desserts can actually taste amazing. Whether you’re serving it to guests or just treating yourself after a long day, this pudding is bound to impress.
Ingredients
Here’s what you’ll need for this delicious pudding:
-
1 ripe avocado: The star of the show! Ripe avocados provide the creamy base for our pudding, full of healthy fats and nutrients. If you’re out of avocados, you can substitute with silken tofu for a similar texture but with a different flavor profile.
-
1/4 cup unsweetened cocoa powder: This gives our pudding that rich chocolate flavor. Make sure you use unsweetened to keep it keto-friendly. If you prefer a sweeter taste, you can choose a high-quality dark cocoa powder.
-
1/4 cup chia seeds: These little gems are a fantastic source of fiber and help thicken the pudding. If you don’t have chia seeds on hand, ground flaxseed can be a good substitute, though it might alter the texture a bit.
-
1/4 cup almond milk (or coconut milk): This adds creaminess and helps blend everything smoothly. If you’re nut-free, opt for oat milk or another dairy-free milk of your choice.
-
2 tablespoons sweetener (like erythritol or stevia, to taste): Sweeten to your liking! If you’re not concerned about Keto or low-sugar, you could use honey or maple syrup, but keep in mind this will change the carb content.
-
1 teaspoon vanilla extract: A touch of vanilla elevates the flavors and adds a lovely aroma. If you like a hint of spice, consider adding a sprinkle of cinnamon or even a drop of peppermint extract for a refreshing twist.
-
Pinch of salt: Balancing sweet and savory is key! A little pinch enhances all the flavors without making it taste salty.
Step-by-Step Instructions
-
Prepare Your Avocado: Start by slicing your ripe avocado in half. Gently remove the pit and scoop the creamy flesh into a food processor or a mixing bowl. Make sure to choose a perfectly ripe avocado; it should be slightly soft to the touch but not overly mushy.
Chef’s Tip: To tell if an avocado is ripe, gently press on the skin. If it yields slightly, you’re good to go!
-
Blend Ingredients: Add the unsweetened cocoa powder, chia seeds, almond milk, sweetener, vanilla extract, and a pinch of salt to the avocado. If you’re using a food processor, secure the lid and blend until smooth and creamy. If you’re using a bowl, grab a whisk or hand mixer to blend it to perfection.
Chef’s Hack: Scrape down the sides of your bowl or processor to ensure all ingredients are combined evenly. You want a silky, velvety texture!
-
Taste and Adjust: Once blended, take a quick taste to see if it needs more sweetness or vanilla. Feel free to adjust the flavors as per your preference—this is your pudding after all!
-
Chill & Set: Transfer the pudding into individual serving bowls or one large dish. Cover with plastic wrap (press the wrap directly onto the surface to prevent a skin from forming). Pop it into the fridge for at least 30 minutes to allow the chia seeds to absorb the liquids and thicken the pudding.
-
Serve: After it’s chilled, give it a quick stir. If you’d like a thinner consistency, you can blend in a splash more of your almond or coconut milk.
Chef’s Note: For the ultimate chocolate experience, sprinkle additional cocoa powder on top before serving!
Serving Suggestions
When it comes to serving, the presentation can elevate this simple pudding into something extraordinary! Consider adding a dollop of whipped coconut cream or a few fresh berries on top. You could also garnish it with chocolate shavings or a sprinkle of crushed nuts for a nice crunch. The contrast of the creamy pudding with some textural elements really gives this dessert a wow factor.
Recipe Variations
Here are a few fun variations to take your Keto Chocolate Chia Avocado Pudding to the next level:
-
Peanut Butter Swirl: Add a tablespoon of natural peanut butter or almond butter into the mix before blending to create a deliciously nutty flavor.
-
Mint Chocolate: Add a few drops of peppermint extract for a refreshing twist, making it reminiscent of a thin mint cookie.
-
Caffeinated Kick: Mix in a teaspoon of instant espresso or coffee powder for a mocha delight!
-
Berry Bliss: Top with fresh raspberries or strawberries to give a fruity touch that pairs beautifully with chocolate.
Chef’s Notes
This recipe has evolved over the years as I’ve experimented with ingredients and flavors. Occasionally, I like to throw in a handful of spinach for a nutritional boost—even though you can’t taste it, you’re getting all those extra vitamins! Just keep in mind that the color will change to a light green, but it still looks and tastes amazing.
Sometimes, I’ve even swapped out the chia seeds for rolled oats for a different texture! Each time I make it, I’m reminded of that dinner party where my love for avocado desserts began—a perfect full-circle moment!
FAQs and Troubleshooting
1. What if my pudding isn’t thick enough?
If your pudding didn’t thicken up, it might need more time in the fridge. Let it chill for an additional 15-30 minutes, and the chia seeds will help thicken it up. Also, make sure you used enough chia seeds during the initial prep.
2. Can I make it ahead of time?
Absolutely! This pudding is perfect for meal prep. You can store it in the fridge for up to three days, so feel free to double the recipe for quick, healthy desserts throughout the week.
3. Can I use dairy milk instead of almond or coconut milk?
Yes, if you’re not dairy-free, whole milk or heavy cream can substitute for almond milk. Just keep in mind that this will change the nutritional content.
4. How do I store leftovers?
Keep any leftover pudding in an airtight container in the fridge for up to three days. You may notice the chia seeds may swell slightly, but it’ll still taste divine!
Nutritional Info
This Keto Chocolate Chia Avocado Pudding is rich in healthy fats, fiber, and low in carbs, making it an ideal dessert choice for any health-conscious foodie.
- Calories: Approximately 200 per serving
- Fat: 15g
- Carbohydrates: 10g (Net Carbs: 5g)
- Protein: 3g
- Fiber: 7g
With all that said, I hope you give this delicious Keto Chocolate Chia Avocado Pudding a try! It’s a fun, guilt-free indulgence that will satisfy your chocolate cravings without any of the guilt. Remember, great food doesn’t just nourish our bodies; it also brings joy to our lives. Enjoy this delightful treat and happy cooking!
PrintKeto Chocolate Chia Avocado Pudding

A scrumptious and indulgent keto-friendly dessert that combines avocado, chocolate, and chia seeds for a creamy pudding that’s low in carbs and packed with healthy fats.
- Prep Time: 10 minutes
- Cook Time: 0 minutes
- Total Time: 40 minutes
- Yield: 4 servings 1x
- Category: Dessert
- Method: Blending
- Cuisine: Keto
- Diet: Keto
Ingredients
- 1 ripe avocado
- 1/4 cup unsweetened cocoa powder
- 1/4 cup chia seeds
- 1/4 cup almond milk (or coconut milk)
- 2 tablespoons sweetener (like erythritol or stevia, to taste)
- 1 teaspoon vanilla extract
- Pinch of salt
Instructions
- Prepare your avocado: Start by slicing your ripe avocado in half and removing the pit. Scoop the flesh into a food processor or mixing bowl.
- Blend ingredients: Add cocoa powder, chia seeds, almond milk, sweetener, vanilla extract, and salt to the avocado. Blend until smooth.
- Taste and adjust: Check if it needs more sweetness or vanilla, and adjust to your liking.
- Chill & set: Transfer pudding into serving bowls, cover, and refrigerate for at least 30 minutes.
- Serve: After chilling, stir and adjust consistency with more liquid if desired.
Notes
For extra flavor, consider adding toppings like whipped coconut cream or fresh berries. You can also mix in peanut butter, mint extract, or coffee powder for variations.
Nutrition
- Serving Size: 1 serving
- Calories: 200
- Sugar: 1g
- Sodium: 5mg
- Fat: 15g
- Saturated Fat: 2g
- Unsaturated Fat: 10g
- Trans Fat: 0g
- Carbohydrates: 10g
- Fiber: 7g
- Protein: 3g
- Cholesterol: 0mg
Keywords: keto dessert, chocolate pudding, avocado pudding, low carb dessert, healthy dessert