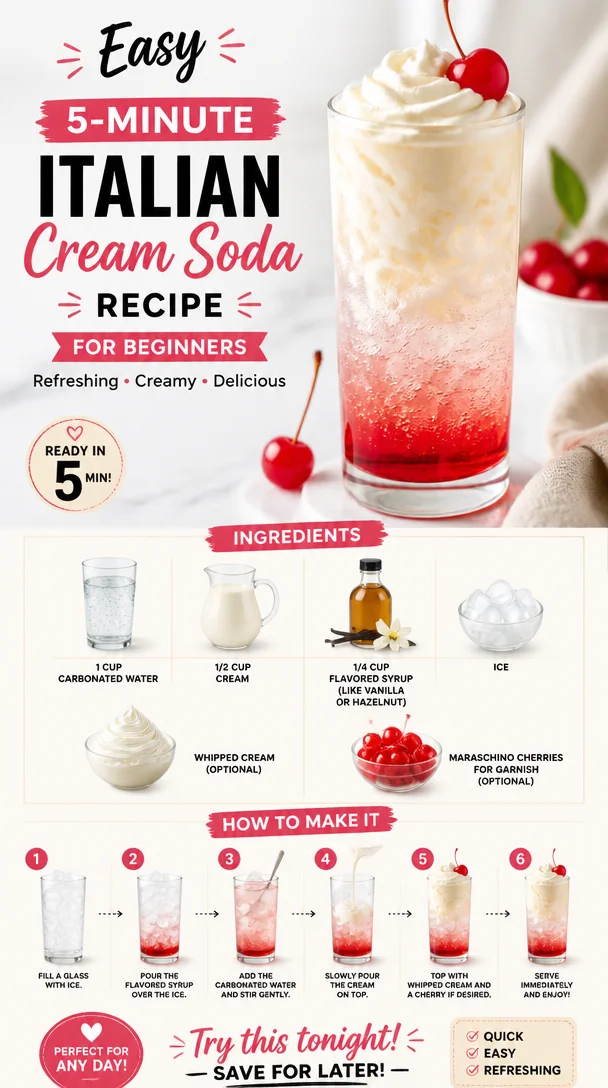
Easy 5-Minute Italian Cream Soda Recipe for Beginners
The Magic of Italian Cream Soda: A Sweet Sip of Nostalgia
Welcome to the delightful world of Italian Cream Soda, where bubbles dance and flavors mingle in the most refreshing way! If you’re like me, you probably have a fondness for those effervescent drinks that combine a creamy richness with a sweet syrupy charm. There’s something utterly delightful about sipping a fizzy treat like this, especially on a warm sunny day or during a cozy movie night.
Allow me to take you on a journey through the process of making this deliciously indulgent drink. It’s simple, yet invigorating and versatile enough to be a favorite among both children and adults alike! So get comfy, because we’re going to stir up some delightful memories and flavors together.
A Sweet Memory from My Childhood
I still remember the first time I had Italian Cream Soda. It was during my childhood at a small Italian café tucked away in a quaint corner of my hometown. The atmosphere inside was warm and inviting, filled with the aroma of fresh pastries and coffee. The moment the waitress set that beautiful glass before me, I was captivated. The layer of creamy foam glistened, and the deep, rich color of the syrup peeked through the fizzy bubbles.
As I took my first sip, the cool sweetness danced on my tongue, instantly transporting me to a sunny afternoon in Italy. That drink was not just a beverage; it was a doorway to memories of laughter, warmth, and the simple pleasures of life. I remember my parents letting me enjoy my own little glass while they savored their coffee — it felt like a rite of passage of sorts.
Now, making Italian Cream Soda at home carries that nostalgia, enabling me to recreate those joyful moments any time I want. Plus, it’s a fantastic way to share that happiness with friends and family. Let’s dive into creating our own delicious version of this delightful drink, shall we?
Ingredients
Here’s what you’ll need to whip up your very own Italian Cream Soda:
-
1 cup carbonated water
The star of the show! It adds a refreshing fizz and lightness to the drink. You can use flavored sparkling water for an extra kick or even a tonic water for a different twist. -
1/2 cup cream
This gives the cream soda its dreamy, velvety texture. You can substitute with half-and-half for a lighter option, or use coconut cream for a dairy-free alternative. -
1/4 cup flavored syrup (like vanilla or hazelnut)
Flavored syrups are what make this drink pop! You can go classic with vanilla, try hazelnut for a nutty depth, or experiment with raspberry or peach for something fruity. A homemade syrup is easy to whip up, too! -
Ice
Essential for keeping your drink nice and chilled. Use regular ice cubes or crushed ice for a more festive look. -
Whipped cream (optional)
For that extra touch of indulgence! Dollop some whipped cream on top, and feel free to use store-bought or make your own. -
Maraschino cherries (optional, for garnish)
Who can resist a cherry on top? It adds a lovely pop of color and sweetness to your drink.
Step-by-Step Instructions
Now that we’ve gathered our ingredients, let’s get to the fun part—making our Italian Cream Soda. Here’s how to do it step-by-step:
-
Fill a Glass with Ice
Start by filling a tall glass with ice cubes. About halfway full should do the trick! This ensures your drink stays cold and refreshing. The sound of ice clinking is already setting a cheerful mood! -
Pour in the Flavored Syrup
Add 1/4 cup of your chosen flavored syrup over the ice. This is where the magic begins! As you pour, watch the vibrant colors swirl together, creating a beautiful layer beneath the ice. Feel free to adjust the syrup amount according to your taste—more for a sweeter soda! -
Add the Carbonated Water
Slowly pour in 1 cup of carbonated water. Here’s a little chef hack: for the fizziest result, pour it gently down the side of the glass to keep that bubbly charm intact! You’ll see that delightful fizzing action as the syrup and soda mingle. -
Stir It Up
Take a spoon and give your drink a gentle stir to combine the syrup and bubbly water. You want to ensure every sip packs that flavored punch! -
Add the Cream
Next, drizzle in 1/2 cup of cream. You can pour this slowly on top, or mix it in—the choice is yours! I love seeing the cream create a beautiful marbled effect before it melds into the fizzy concoction. -
Finish with Whipped Cream and a Cherry
If you’re feeling extra fancy (and who wouldn’t?), top your drink with a generous dollop of whipped cream and a maraschino cherry on top. This last touch turns your Italian Cream Soda into a stunning drink that looks as good as it tastes! -
Serve and Enjoy!
Serve your delightful drink with a straw or spoon, and get ready to savor each fizzy sip! Take a moment to appreciate your creation before diving in — it’s a feast for both the eyes and taste buds.
Serving Suggestions
To make your Italian Cream Soda even more special, consider serving it alongside a light summer dessert like fruit tarts or fresh sorbet. You could also throw a DIY soda bar at your next gathering, allowing guests to customize their drinks with different flavored syrups and toppings. Adding some colorful straws or garnishes like mint leaves can elevate the presentation even further.
Recipe Variations
- Fruit-Infused Cream Soda: Replace the flavored syrup with a homemade fruit syrup using berries or citrus for a fresh twist.
- Iced Coffee Cream Soda: For coffee lovers, mix in a shot of your favorite espresso. The combination of coffee and cream is simply divine!
- Herbic Twist: Add some fresh basil or mint to your preparation for an aromatic burst that complements the sweet creaminess perfectly.
- Dairy-Free Delight: Swap out the cream for coconut milk or almond milk for a lighter, dairy-free version. Use plant-based whipped topping for a finished look.
- Chocolate Lover’s Soda: Use chocolate syrup instead of flavored syrup for a decadent treat that satisfies your sweet tooth.
Chef’s Notes
This recipe holds a special place in my heart, as it fuels the cozy nostalgia of family bonding and summertime fun. Over time, I’ve experimented with different syrups and flavors to keep things interesting. My kids love peach and raspberry variants, and I must admit, those fruity tweaks might now rival the classic vanilla.
Also, I once spilled a whole batch of syrup on my countertop while trying to pour it into a bottle—what a sticky situation that was! But it led to a sweet “kitchen dance party” with my kiddos to clean up the mess and enjoy our creation. Life in the kitchen is always an adventure, isn’t it?
FAQs and Troubleshooting
Q: Can I make this drink ahead of time?
A: I recommend making this drink fresh for the best fizz and creaminess. However, you can prep the syrup and have everything ready to mix!
Q: What is the best syrup to use?
A: It truly depends on your taste! Vanilla is classic, but hazelnut and fruity syrups like raspberry or peach can really elevate the drink.
Q: My cream soda tastes too sweet; what can I do?
A: If your drink is overly sweet, try adding a splash more carbonated water or a dash of lemon juice to balance the sweetness.
Q: Can I use non-carbonated water instead?
A: You can, but it won’t have the same refreshing effect! The fizz is essential to an authentic Italian Cream Soda experience.
Nutritional Info (Optional)
While I won’t dive deep into nutritional specifics, here’s a helpful overview: a standard Italian Cream Soda can range from about 200 to 300 calories depending on the syrup and cream used. It’s a delightful treat meant to be enjoyed, so don’t fret too much over the numbers. Play around with low-calorie syrups or lighter creams if you’re looking to cut back!
There you have it, my friend! Your very own Italian Cream Soda, worthy of all the sunshine-filled days and cozy gatherings ahead. Remember, every sip tells a story, so enjoy the process and share the joy of this bubbly delight with those you cherish! Cheers to delicious memories made in the kitchen!
PrintItalian Cream Soda

A delightful, fizzy drink combining cream and flavored syrup, perfect for warm days or cozy nights.
- Prep Time: 5 minutes
- Cook Time: 0 minutes
- Total Time: 5 minutes
- Yield: 1 serving 1x
- Category: Beverage
- Method: Mixing
- Cuisine: Italian
- Diet: Vegetarian
Ingredients
- 1 cup carbonated water
- 1/2 cup cream
- 1/4 cup flavored syrup (like vanilla or hazelnut)
- Ice
- Whipped cream (optional)
- Maraschino cherries (optional, for garnish)
Instructions
- Fill a tall glass with ice cubes.
- Pour in 1/4 cup of your chosen flavored syrup over the ice.
- Add 1 cup of carbonated water slowly.
- Stir gently to combine the syrup and bubbly water.
- Add 1/2 cup of cream.
- Finish with whipped cream and a maraschino cherry on top.
- Serve with a straw or spoon and enjoy!
Notes
For variations, try using homemade fruit syrups or adding coffee for a unique twist. Enjoy fresh for the best fizz.
Nutrition
- Serving Size: 1 serving
- Calories: 250
- Sugar: 30g
- Sodium: 10mg
- Fat: 12g
- Saturated Fat: 7g
- Unsaturated Fat: 5g
- Trans Fat: 0g
- Carbohydrates: 32g
- Fiber: 0g
- Protein: 2g
- Cholesterol: 40mg
Keywords: Italian Cream Soda, soda, refreshing drink, summer beverage
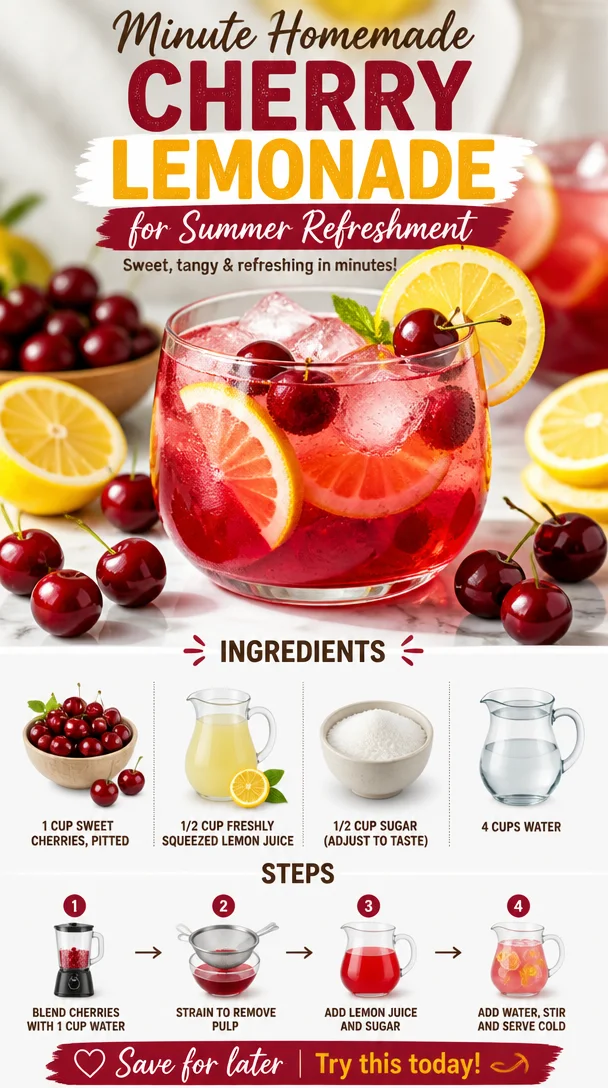
Minute Homemade Cherry Lemonade for Summer Refreshment
Homemade Cherry Lemonade: A Refreshing Twist on a Classic
Summer is here, and with it comes sunshine, picnics, and all the delicious flavors of the season! One sip of homemade cherry lemonade and you’ll be transported to sun-soaked afternoons spent lounging on a porch, surrounded by good friends and laughter. This delightful drink brings together the sweetness of fresh cherries and the tangy zing of lemons, creating a blissful harmony that’s hard to resist. Not only is this cherry lemonade bursting with flavor, but it’s also incredibly easy to make. So, grab your favorite pitcher and let’s dive into the refreshing world of cherry lemonade!
A Bit of Nostalgia
Growing up, summer meant lazy days filled with adventures in the backyard. I fondly remember one particular summer when I was around eight years old. My family had just planted a cherry tree in our backyard, and after months of tender care, it finally bore fruit. One afternoon, my little sister and I decided it was time to harvest the cherries. We excitedly picked bright, juicy cherries and ended up with a whole basketful!
My mom, ever the resourceful chef, decided that it was the perfect opportunity to whip up a batch of cherry lemonade. We crowded around her in the kitchen, our tiny hands helping out as much as possible. The moment she brought that vibrant pitcher to the table was magical—the colors, the aroma, and, of course, the taste. It instantly became a cherished family tradition, one that I look forward to every summer. So, let’s create those sweet memories together with this easy homemade cherry lemonade recipe!
Ingredients
To make this delicious homemade cherry lemonade, you’ll need just a few simple ingredients:
-
1 cup sweet cherries, pitted
These plump, juicy gems are the star of the show! Fresh sweet cherries provide that natural sweetness, but if you’re in a pinch, frozen cherries will work too. Just remember to let them thaw before blending! -
1/2 cup freshly squeezed lemon juice
Freshly squeezed lemons give this drink its zesty kick. Bottled lemon juice can be used in a hurry, but nothing beats the freshness of squeezing it yourself! You can also mix in some lime juice for a fun twist! -
1/2 cup sugar (adjust to taste)
This is where you can personalize the sweetness! Start with half a cup, then adjust based on your personal preference. If you’re looking for a healthier option, you can use honey, agave, or a sugar substitute like stevia. -
4 cups water
The base of your lemonade! You can use plain water, sparkling water for some fizz, or even herbal tea for extra flavor. Herbal teas like hibiscus or peppermint can create unique variations!
Step-by-Step Instructions
Now, let’s get to the fun part—making your cherry lemonade!
-
Prepare the Cherries
Start by washing your cherries thoroughly under cool running water. If you’re using fresh cherries, pit them with a cherry pitter (this gadget is a game-changer!) or carefully with a knife. It can be quite a fun activity! Toss the pitted cherries into your blender. -
Blend the Cherries
Add 1 cup of water to the blender with the pitted cherries. Blend until smooth. You want to create a lovely cherry puree that captures all those amazing flavors. If some cherry pieces remain, that’s totally fine! Strain the mixture through a fine-mesh sieve into a bowl, pressing the pulp to extract as much juice as possible. -
Juice the Lemons
Now it’s time to squeeze the lemons! Cut your lemons in half and use a citrus juicer to extract the juice into a measuring cup. Make sure to remove any seeds that may have fallen in. -
Mix It All Together
In a large pitcher, combine the cherry puree, freshly squeezed lemon juice, and the remaining 3 cups of water. Stir well to combine. Don’t forget to taste at this point! If you want it sweeter, gradually stir in your sugar until you reach your ideal sweetness. -
Chill Before Serving
Once everything is mixed, refrigerate your cherry lemonade for at least 30 minutes. This allows the flavors to meld beautifully and gives you that refreshing chill you crave on a hot day. -
Serve Over Ice
To serve, fill glasses with ice and pour in the cherry lemonade. For an added touch, garnish with fresh lemon slices and a sprig of mint for a lovely presentation!
Serving Suggestions
Homemade cherry lemonade is delightful on its own, but there are some fun ways to elevate your serving game! Consider using fancy glasses or even mason jars for a rustic vibe. You can also create a visually stunning drink by layering your lemonade with fizzy water or a splash of club soda for a sparkling effect. Add a few fresh cherries and lemon slices to each glass to make it pop!
Recipe Variations
Looking to switch things up? Here are a few creative twists for your cherry lemonade:
-
Berry Blend: Add in some strawberries or raspberries for a mixed-berry flavor. Simply blend them with the cherries for a fruity fusion.
-
Herbal Touch: Infuse your lemonade with fresh herbs like basil or mint. Just muddle them in the bottom of the pitcher before adding the liquids for a fresh herbal note.
-
Spiced Lemonade: For a warming twist, add a pinch of cinnamon or ginger. This will take your lemonade to a whole new level of flavor!
-
Cherry Lemonade Spritz: Make it bubbly by mixing in sparkling water or lemon-lime soda right before serving. The extra fizz makes it even more refreshing!
Chef’s Notes
As I’ve played around with this cherry lemonade recipe over the years, it has seen its fair share of transformations—from a simple, classic drink to a vibrant, fruity celebration. I remember one summer party when a friend of mine accidentally added jalapeño slices to the mix. The result? A spicy cherry lemonade that was surprisingly delightful! It turned into a hit at the barbecue. So don’t be afraid to experiment with flavors!
FAQs and Troubleshooting
-
Can I use other fruits instead of cherries?
Absolutely! You can replace cherries with any berry like strawberries, blueberries, or even peaches. Just adjust the sugar level based on the fruit’s sweetness. -
What if my lemonade is too sweet?
If your lemonade turns out too sweet, add a bit more lemon juice or water. Tasting throughout the process is key to achieving your desired balance. -
Can I make this ahead of time?
Yes, this cherry lemonade can be made a day in advance. Just keep it sealed in the refrigerator. However, it’s best served within 1-2 days for optimal freshness. -
How do I store leftover lemonade?
Store any leftover cherry lemonade in an airtight container in the fridge for up to three days. You may want to stir it again before serving, as some separation may occur.
Nutritional Info
While I like to keep things healthy, each serving of this homemade cherry lemonade is approximately:
- Calories: 120
- Sugar: Varies based on sweetener used
- Vitamin C: Rich due to the lemons
So there you have it—a delightful homemade cherry lemonade that’s perfect for summer days, family gatherings, or just a refreshing treat. Let the freshness of cherries and lemons brighten your day. Now, gather your friends, prepare this delicious drink, and make some wonderful memories together! Cheers!
PrintHomemade Cherry Lemonade

A refreshing twist on classic lemonade combining sweet cherries and tangy lemons.
- Prep Time: 15 minutes
- Cook Time: 0 minutes
- Total Time: 45 minutes
- Yield: 4 servings 1x
- Category: Beverage
- Method: Blending
- Cuisine: American
- Diet: Vegan
Ingredients
- 1 cup sweet cherries, pitted
- 1/2 cup freshly squeezed lemon juice
- 1/2 cup sugar (adjust to taste)
- 4 cups water
Instructions
- Prepare the cherries by washing them and pitting them.
- Blend the cherries with 1 cup of water until smooth.
- Strain the mixture through a fine-mesh sieve into a bowl.
- Juice the lemons using a citrus juicer and collect the juice.
- Mix the cherry puree, lemon juice, and remaining 3 cups of water in a large pitcher.
- Chill the mixture in the refrigerator for at least 30 minutes.
- Serve over ice and garnish with lemon slices and mint.
Notes
This lemonade can be customized with other fruits or herbs for a unique flavor twist.
Nutrition
- Serving Size: 1 serving
- Calories: 120
- Sugar: 25g
- Sodium: 5mg
- Fat: 0g
- Saturated Fat: 0g
- Unsaturated Fat: 0g
- Trans Fat: 0g
- Carbohydrates: 30g
- Fiber: 1g
- Protein: 1g
- Cholesterol: 0mg
Keywords: cherry lemonade, summer drink, refreshing beverage, homemade lemonade
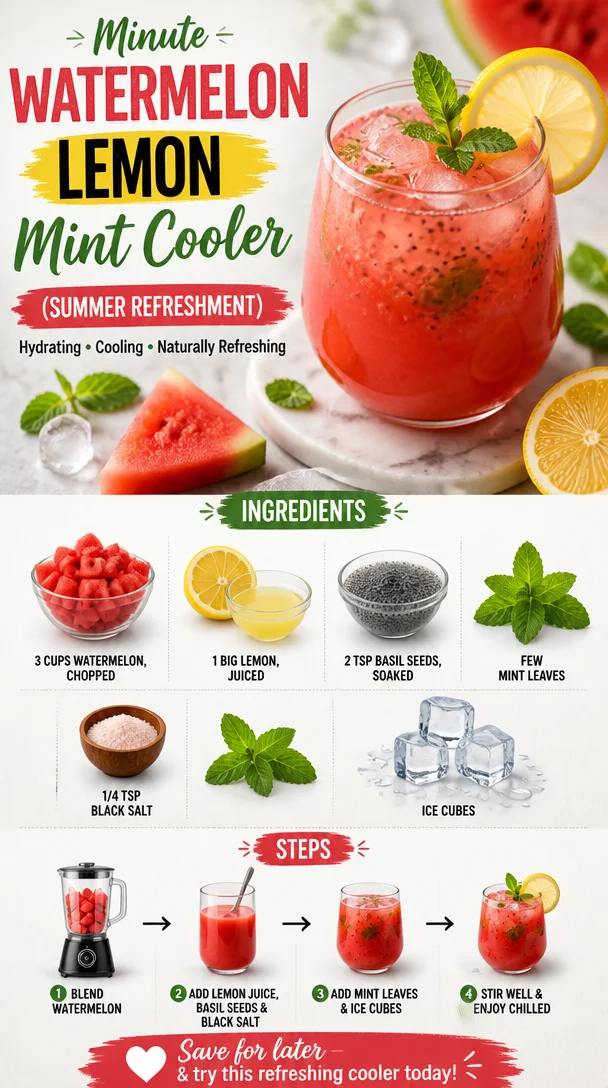
Minute Watermelon Lemon Mint Cooler (Summer Refreshment)
Refreshing Watermelon Lemon Mint Cooler: A Taste of Summer Bliss
Welcome to another sunny kitchen adventure with me, Ava Carter! Today, I’m excited to share one of my absolute favorite summer drinks: the Watermelon Lemon Mint Cooler. It’s refreshing, hydrating, and the perfect way to quench your thirst on a hot day. This delightful cooler is packed with juicy watermelon, zesty lemon, and aromatic mint, making it the ultimate treat that takes just minutes to whip up. Plus, it’s naturally vibrant and oh-so-refreshing!
Growing up, summers were all about family, barbecues, and laughter echoing through our backyard. One of my fondest memories is sitting with my cousins on the porch, sipping on cooler drinks while the world slowed down around us. My grandma often prepared a watermelon drink, and we’d watch in awe as she blended up fresh slices, layering flavors that made our taste buds dance. The sweetness, the tang, the freshness—it all combined into one magical sip.
Now, every time I take a sip of this Watermelon Lemon Mint Cooler, I’m transported back to those carefree summer days. It’s the essence of summer caught in a glass, and I can’t wait for you to join me in creating this nostalgic, refreshing drink that’s bound to become a staple for your warm-weather gatherings. So, let’s dive in and get our cooler on!
Ingredients
To make this delicious Watermelon Lemon Mint Cooler, you will need the following ingredients:
-
3 cups watermelon, chopped
Juicy watermelon is the star of this drink! It’s naturally sweet, hydrating, and packed with vitamins. Choose a ripe watermelon for the best flavor, and feel free to substitute with cantaloupe if watermelon isn’t available. -
1 big lemon, juiced
A burst of fresh lemon juice adds the perfect tang to balance the sweetness of the watermelon. You can also use lime for a different twist, or try adding a splash of orange juice for a citrus medley. -
2 tsp basil seeds, soaked
These tiny seeds are like a nutritional powerhouse! Soaking them gives them a gel-like texture, making your drink more interesting. If you can’t find basil seeds, chia seeds work equally well as a substitute. -
Few mint leaves
Fresh mint leaves lend a cooling effect and a vibrant flavor to the drink. If you’re not a fan of mint, try swapping it out for fresh basil for a unique botanical twist. -
1/4 tsp black salt
Black salt enhances the flavors beautifully, giving the drink a subtle, savory note. If you don’t have black salt, regular sea salt can work in a pinch. -
Ice cubes
To keep your drink chilled and refreshing, don’t forget the ice! You can use regular ice cubes, or freeze some extra watermelon juice into ice cubes for a fruity touch.
Step-by-Step Instructions
Now that we’ve gathered everything we need, it’s time to whip up this delightfully refreshing Watermelon Lemon Mint Cooler. Follow these simple steps and let the good vibes roll!
-
Prep Your Watermelon
Start by cutting your watermelon into small chunks. Look for a ripe watermelon with a bright green appearance and a uniform shape. Be sure to remove the seeds if you prefer a smoother drink!Chef Tip: To make this preparation easier, chill your watermelon in the fridge beforehand. This way, your cooler will be even fresher!
-
Juice the Lemon
Roll the lemon on the countertop for a few seconds—this helps release the juices! Cut it in half and squeeze the juice into a measuring cup. Remove any seeds you find, so they don’t end up in your drink.Fun Fact: If you find it challenging to juice the lemon, you can use a handheld juicer or even a fork to help extract every delicious drop.
-
Blend the Watermelon
In a blender, add the chopped watermelon and the freshly squeezed lemon juice. Blend on high until the mixture is smooth and velvety. You’re looking for that gorgeous, bright pink color!Chef Hack: If you prefer a thicker drink, blend in a few mint leaves right now for that extra burst of flavor.
-
Soak the Basil Seeds
If you haven’t soaked the basil seeds yet, now’s the time! Combine the seeds with about 1/4 cup of water in a small bowl and let them sit for 10-15 minutes until they expand and become gelatinous.Note: If you’re using chia seeds, the process is similar—just make sure they soak long enough to achieve that wonderful texture.
-
Combine Everything
In a pitcher, mix together the blended watermelon-lemon mixture and the soaked basil seeds. Add a pinch of black salt to enhance the flavor and stir well. You’ll love the visual appeal of those basil seeds floating in the mix!Tip: For an extra splash of color, reserve a few watermelon chunks to blend and add them to the drink!
-
Serve Over Ice
Fill glasses with ice cubes (or your frozen watermelon juice cubes) and pour the cooler over the top. Garnish each glass with a sprig of mint for that Insta-worthy touch!Presentation Tip: For a beautiful finish, rim the glasses with some lemon juice and dip them in salt or colored sugar before filling them with the cooler!
Serving Suggestions
To serve your Watermelon Lemon Mint Cooler, present it in tall glasses filled with ice. A sprig of fresh mint on top not only gives a beautiful green pop but also enhances that cooling aroma. You can also accompany it with refreshing snacks like cucumber slices, watermelon cubes, or even some light summer pastries. If you’re hosting, a cute straw or a fancy glass can elevate the whole experience!
Recipe Variations
Looking to shake things up a bit? Here are a few creative twists and variations you can try with your Watermelon Lemon Mint Cooler:
- Berry Burst: Add a cup of fresh berries (like strawberries or blueberries) while blending for a colorful, fruity twist.
- Coconut Splash: Replace half of the water with coconut water for a tropical vibe.
- Spicy Kick: Add a tiny pinch of cayenne pepper or some sliced jalapeño to the blender for an exciting kick!
- Lavender Infusion: Incorporate a few drops of culinary lavender oil or steep lavender buds in your water for a fragrant twist.
- Alcoholic Delight: Turn this cooler into a fun cocktail by adding a splash of vodka or gin for those summer evenings with friends!
Chef’s Notes
This Watermelon Lemon Mint Cooler has evolved over the years in my own kitchen. While my grandma’s recipe was lovely, I love experimenting with textures and flavors, which is how I discovered the joy of adding basil seeds! They not only add a fun texture but also contribute to the drink’s overall nutritional profile. Plus, I can’t help but chuckle every time I see the confused faces of friends who are trying the basil seeds for the first time—what a conversation starter!
FAQs and Troubleshooting
1. My cooler tastes too sweet; how can I fix that?
If you find the drink too sweet, simply add more lemon juice to balance it out. A splash of sparkling water can also cut down the sweetness while adding a refreshing fizz!
2. Can I make this drink ahead of time?
Absolutely! You can blend the watermelon juice and soak the basil seeds in advance, but keep the ingredients separate until serving to ensure everything stays fresh. Add ice right before pouring.
3. How long can I store leftovers?
If you have any leftovers (which is rare!), store the cooler in the fridge for up to 24 hours. It’s best served fresh, so I recommend drinking it right away for the most vibrant flavors.
4. What if I can’t find fresh mint?
If fresh mint isn’t available, you can use dried mint leaves or mint extract. Just remember that extracts are concentrated, so use them sparingly. Generally, about 1/4 teaspoon should suffice!
Nutritional Info
While I don’t focus on strict nutritional labels, here’s a rough breakdown per serving of this refreshing cooler:
- Calories: 80
- Carbohydrates: 20g
- Sugar: 17g
- Fiber: 1g
- Vitamin C: ~25% of your daily value
And there you have it, my friends! Your Watermelon Lemon Mint Cooler is ready to delight your taste buds and quench your thirst! I hope you enjoy this recipe, whether it’s a quiet afternoon at home or a fun gathering with friends. Cheers to summer, fresh flavors, and feeling fabulous! 🍉🥤🌿
PrintRefreshing Watermelon Lemon Mint Cooler
A refreshing summer drink made with juicy watermelon, zesty lemon, and aromatic mint, perfect for quenching your thirst on hot days.
- Prep Time: 10 minutes
- Cook Time: 0 minutes
- Total Time: 10 minutes
- Yield: 4 servings 1x
- Category: Beverage
- Method: Blending
- Cuisine: American
- Diet: Vegan
Ingredients
- 3 cups watermelon, chopped
- 1 big lemon, juiced
- 2 tsp basil seeds, soaked
- Few mint leaves
- 1/4 tsp black salt
- Ice cubes
Instructions
- Prep your watermelon by cutting it into small chunks.
- Juice the lemon and remove any seeds.
- Blend the chopped watermelon and lemon juice until smooth.
- Soak the basil seeds in water for 10-15 minutes until gelatinous.
- Combine the watermelon-lemon mixture with the soaked basil seeds and black salt.
- Serve over ice and garnish with mint leaves.
Notes
For an extra splash of color, reserve a few watermelon chunks to blend and add them to the drink.
Nutrition
- Serving Size: 1 serving
- Calories: 80
- Sugar: 17g
- Sodium: 120mg
- Fat: 0g
- Saturated Fat: 0g
- Unsaturated Fat: 0g
- Trans Fat: 0g
- Carbohydrates: 20g
- Fiber: 1g
- Protein: 1g
- Cholesterol: 0mg
Keywords: watermelon, summer drink, refreshing beverage
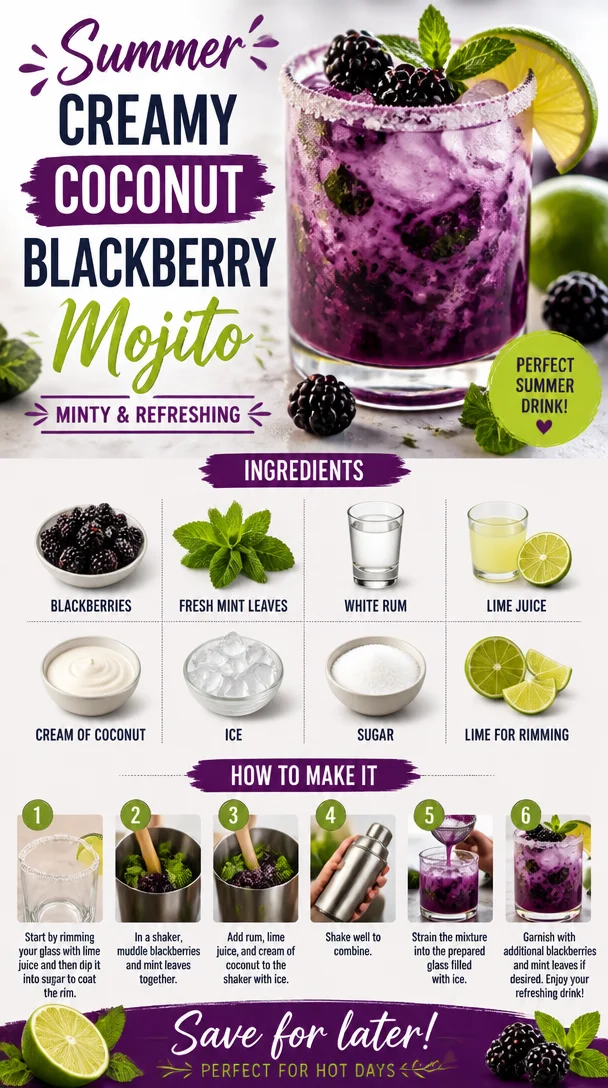
Summer Creamy Coconut Blackberry Mojito: Minty & Refreshing
The Creamy Coconut Blackberry Mojito: A Tropical Twist on a Classic!
Hey there, fellow food lovers! Welcome back to Clean Plate Cravings, where we craft delectable dishes that leave us feeling energized and excited about food. Today, I have a delightful treat for you that’s perfect for relaxing weekends or sunny days—it’s my Creamy Coconut Blackberry Mojito!
Imagine sipping a refreshing drink, where the subtle sweetness of coconut mingles with the tart zing of blackberries and the aromatic freshness of mint. Ahhh, can you feel the tropical vibes already? This drink is not just about taste; it’s an experience that brings back memories of soft ocean breezes and lively beach parties. Plus, who doesn’t love a mojito, am I right?
A Sip Down Memory Lane
Before we dive into the recipe, let me share a little story that warms my heart every time I make this creamy coconut blackberry mojito. One summer, I found myself in a stunning beachside cottage with some of my closest friends. It was a spontaneous getaway, and the long days were filled with laughter, games, and of course, lots of good food and drinks!
One evening, we decided to experiment with cocktails and create a new twist on the classic mojito. Armed with fresh blackberries picked from a nearby bush and a can of creamy coconut, we mixed it all together, and boy, did we strike gold! Each sip was like a taste of paradise. The blackberries added a pop of color and flavor to the traditional mojito, and the coconut cream made it irresistibly lush. It’s a memory that still makes me smile today!
Ingredients
Now, let’s gather the ingredients. This is where the fun begins!
-
Blackberries: These juicy gems are not only delicious but also packed with antioxidants. If you can’t find fresh blackberries, frozen ones work just as well! They may be slightly mushy, but their taste stays intact.
-
Fresh mint leaves: Essential for that characteristic mojito freshness! You can substitute with mint extract in a pinch, but fresh mint really elevates the drink.
-
White rum: The spirit that brings the party! Feel free to swap it out for coconut rum for an extra tropical kick.
-
Lime juice: Freshly squeezed is always best, but bottled lime juice works in a hurry. Just watch for added sugars if you’re keeping it clean!
-
Cream of coconut: This is the star of our show! It adds creaminess and sweetness. If you’re looking for a lighter option, you can use coconut milk, but it won’t be quite as rich.
-
Ice: Because we need it chilled and refreshing!
-
Sugar: Just a touch to balance the tartness of the blackberries and lime. If you’re watching your sugar intake, try agave syrup or even stevia as alternatives.
-
Lime for rimming: This little detail brings extra flavor to every sip. You can also use coarse salt or sugar for a fun twist!
Step-by-Step Instructions
Ready to shake things up in the kitchen? Here’s how to craft your creamy coconut blackberry mojito step-by-step!
-
Prepare Your Glasses: Start by rimming your glass with lime juice, then dip it in granulated sugar (or salt, if you prefer). This extra step jazzes up your drink and adds a delightful sweetness to every sip!
-
Muddle the Blackberries and Mint: In a sturdy glass, toss in a handful of fresh blackberries and a few mint leaves. Using a muddler (or the bottom of a wooden spoon if you don’t have one), gently mash them together. You want to release the blackberry juices and mint oils, but be careful not to shred the mint leaves too much—they can turn bitter if over-muddled.
-
Add the Sweetness: Now, sprinkle in about a tablespoon of sugar. Muddle it again to help dissolve the sugar into the blackberry-mint mixture. If your blackberries are sweet enough, feel free to skip this step or adjust it to your taste.
-
Mix in the Rum and Lime Juice: Pour in 2 ounces of white rum and the juice of half a lime (around 1 ounce). Give it a good stir to combine all those beautiful flavors together. The rum should absorb the fruity and minty goodness wonderfully.
-
Blend in the Cream of Coconut: Now, for the moment of creaminess! Add about 2 ounces of cream of coconut. This transforms your mojito from just refreshing to something truly indulgent. Use a spoon to mix everything together, carefully incorporating the creamy element.
-
Add Ice: Time to chill it! Fill the glass with ice—don’t be shy, pack it in there! The ice will help to meld all the flavors while keeping your drink cold and refreshing.
-
Final Touches: Top off your cocktail with club soda for that zesty fizz. Feel free to adjust the amount based on your personal preference for fizz! Stir gently to combine.
-
Garnish: For the finishing touch, garnish with extra blackberries or a sprig of fresh mint. Not only does it look beautiful, but it also adds a fragrant aroma that’ll entice your senses before your first sip.
Serving Suggestions
Once you’ve completed your creamy coconut blackberry mojito, it’s time to serve it up! I love serving mine in a tall, chilled glass with a fun straw and the beautiful garnish peeking out. You can even pair it with an equally fresh appetizer, like a watermelon salad or shrimp skewers, to complement those tropical flavors!
Recipe Variations
Feeling adventurous? Here are a few creative twists on this classic:
-
Berry Blast: Mix in other berries like strawberries or raspberries for a berry explosion of flavor!
-
Coconut Limeade: Replace blackberries with lime juice for a lighter, more citrusy coconut limeade.
-
Spicy Spin: Add a touch of jalapeño for a spicy kick! Just use a small slice muddled in with the mint.
-
Non-Alcoholic Version: Swap out the rum for coconut water and add a splash of soda water for a refreshing mocktail.
-
Frozen Mojito: Blend all the ingredients with ice for a slushy version that’s perfect for summer parties.
Chef’s Notes
As I share this recipe, I can’t help but smile remembering that spontaneous beachside cocktail experiment. Over time, I’ve refined the balances in this recipe, finding the perfect blend of flavors. If you find yourself wanting to go lighter, just know that each swap you make can lead to delightful new variations. Don’t hesitate to customize the sweetness or creaminess to your liking!
FAQs and Troubleshooting
1. Can I make this mojito ahead of time?
Absolutely! You can prepare the muddled blackberry and mint mixture and store it in the fridge for a few hours before serving. Just add the ice and soda just before serving to keep it fresh.
2. My mojito turned out too sweet. What can I do?
If your drink ends up too sweet, add a splash more lime juice or soda to balance it out. The acidity will cut through the sweetness, giving it that refreshing bite.
3. What if I don’t like blackberries?
No problem! Use your favorite fruits. Watermelon, peaches, or pomegranate would be delicious, just be mindful of adjusting sugar levels based on the fruit’s sweetness.
4. How can I make this a sugar-free drink?
You can use a sugar substitute like stevia or monk fruit sweetener to keep the flavor without the calories. Make sure to adjust according to your taste.
Nutritional Info
While the specific nutritional information will vary based on the specific ingredients used, here’s a rough estimate per serving:
- Calories: 220
- Total Fat: 5g
- Saturated Fat: 4g
- Carbohydrates: 30g
- Fiber: 2g
- Sugars: 24g
- Protein: 1g
And that’s a wrap, friends! Your creamy coconut blackberry mojito is ready to delight your taste buds and make you feel like you’re lounging on a sun-soaked beach. I can already see you enjoying this drink, maybe with a colorful sunset in the background and good company by your side. Cheers to vibrant flavors, good times, and the joy of clean plate cravings! Enjoy! ☀️🍹
PrintCreamy Coconut Blackberry Mojito
A refreshing drink with the subtle sweetness of coconut mingling with tart blackberries and aromatic mint.
- Prep Time: 10 minutes
- Cook Time: 0 minutes
- Total Time: 10 minutes
- Yield: 1 serving 1x
- Category: Beverage
- Method: Mixing
- Cuisine: Tropical
- Diet: Vegetarian
Ingredients
- 1 cup Blackberries
- 10 Fresh mint leaves
- 2 ounces White rum
- 1 ounce Lime juice
- 2 ounces Cream of coconut
- Ice
- 1 tablespoon Sugar
- Lime for rimming
Instructions
- Prepare Your Glasses: Rims with lime juice and dip in granulated sugar.
- Muddle the Blackberries and Mint: Mash the blackberries and mint leaves in a glass.
- Add the Sweetness: Sprinkle in sugar and muddle again.
- Mix in the Rum and Lime Juice: Pour in white rum and lime juice, stir to combine.
- Blend in the Cream of Coconut: Add cream of coconut and mix well.
- Add Ice: Fill the glass with ice.
- Final Touches: Top with club soda and stir gently.
- Garnish: Add extra blackberries or mint leaves.
Notes
Feel free to customize sweetness and creaminess to your liking. Experiment with different fruits or make it non-alcoholic by swapping rum for coconut water.
Nutrition
- Serving Size: 1 serving
- Calories: 220
- Sugar: 24g
- Sodium: 0mg
- Fat: 5g
- Saturated Fat: 4g
- Unsaturated Fat: 1g
- Trans Fat: 0g
- Carbohydrates: 30g
- Fiber: 2g
- Protein: 1g
- Cholesterol: 0mg
Keywords: mojito, cocktail, coconut, blackberry, refreshing drink

Minute Nectarine Lemonade: Bright Summer Refresher
Refreshing Nectarine Lemonade: A Taste of Summer Bliss
When life hands you lemons, make lemonade! But let’s take that classic refreshment up a notch. With sun-kissed nectarines and zesty lemons, this Nectarine Lemonade isn’t just any thirst-quencher; it’s a celebration in a glass. Picture yourself lounging on a warm summer afternoon, a gentle breeze in the air, and a glass of this vibrant drink in hand—you’ve got a moment worth savoring!
Nectarines not only bring a delightful sweetness to your lemonade but also a beautiful, inviting color that makes every sip feel like a special occasion. Whether you’re hosting a backyard barbecue, enjoying a picnic in the park, or just needing a refreshing treat after a long day, this recipe will take you back to sunny days and joyful memories.
Before we dive into the recipe, let’s take a little journey back in time.
Personal Story
I still remember those golden summer days when my grandmother would whip up her famous lemonade. But it wasn’t just any lemonade—it was made with fresh, juicy peaches from her garden. The sweet scent would fill the air as she blended the fruit and mixed it with bright lemon juice. Those hot afternoons were spent on the porch, sipping her drinks and sharing stories about family adventures.
Years later, I thought about how I could incorporate that cherished memory into my own cooking style. Enter nectarines! They became my fruity companion, adding sweetness and flavor that reminds me of my grandmother’s loving touch. Each time I prepare this refreshing nectar flavored lemonade, I’m transported back to those sunny days, surrounded by family and laughter. This recipe is a little slice of nostalgia that I can’t wait to share with you!
Ingredients
Let’s get down to the nitty-gritty—the ingredients that will make this Nectarine Lemonade shine!
-
4 ripe nectarines, pitted and diced
Sweet, juicy nectarines are the star of this drink! They add natural sweetness and a touch of tartness. If you can’t find nectarines, feel free to substitute with peaches, plums, or even mangoes for a different fruity twist. -
1 cup fresh lemon juice
Freshly squeezed lemon juice brings that zesty brightness we all love. Instead of bottled lemon juice, go for the fresh stuff—it really elevates the flavor! If you want a less tart drink, you can adjust this to your taste. -
1 cup sugar (or to taste)
The sugar balances the tartness of the lemons and nectarines. You can use granulated sugar, honey, or agave syrup for a more natural sweetener. Start with ¾ cup and add more if you prefer it sweeter. -
4 cups water
This is the backbone of your lemonade. Use cold water to help chill the drink quickly. You can also experiment with sparkling water for a fizzy twist! -
Ice cubes
Perfect for keeping your lemonade icy cold! You can make ice cubes with lemonade itself for an extra flavor boost. -
Lemon slices and mint leaves for garnish
These are your finishing touches! Lemon slices add visual appeal, while fresh mint leaves provide a pop of color and a refreshing aroma.
Step-by-Step Instructions
Now, let’s make that Nectarine Lemonade!
Step 1: Prepare the Nectarines
Start by pitting and dicing your nectarines. You want them ripe and sweet, so there’s no need to rush through this step. Slice them into quarters, remove the pit, and then chop them into smaller pieces. If you’re feeling adventurous, you can even save a few slices for garnish!
Chef’s Tip: Make sure your nectarines are ripe! This will ensure maximum sweetness and flavor in your lemonade.
Step 2: Blend It Up!
Throw the diced nectarines into a blender and add 1 cup of fresh lemon juice. Blend them until they form a smooth puree. If you like a chunkier texture, blend just until combined.
Tip: If you’ve got a high-powered blender, this step can be done in no time!
Step 3: Combine and Sweeten
In a large pitcher, pour the blended nectarines and lemon juice mixture. Add 4 cups of water and stir well. This is the time to taste your lemonade mixture. If it’s too tart, add sugar a little at a time until it reaches your desired sweetness. Remember, flavors can mellow once it’s chilled.
Chef Hack: If you find it too sweet for your taste, add a splash more lemon juice to balance it out!
Step 4: Chill Out
Let your mixture chill in the refrigerator for at least an hour. This will allow all the flavors to meld beautifully. Plus, nothing beats a cold drink on a hot day!
Tip: If you’re short on time, you can serve it immediately over ice, but chilling definitely improves the flavor.
Step 5: Serve It Gorgeous
Once chilled, grab your favorite glasses and fill them with ice cubes. Pour your vibrant Nectarine Lemonade over the ice, filling the glasses about three-quarters full.
Serving Suggestion: Garnish each glass with a lemon slice on the rim and a sprig of fresh mint for that extra flair!
Recipe Variations
Want to shake things up a bit? Here are some fun variations you can try:
-
Herbal Infusion: Add a few sprigs of fresh basil or rosemary while blending the nectarines for an aromatic touch.
-
Citrus Medley: Mix in other citrus juices like lime or orange for a zesty twist.
-
Spiced Nectarine Lemonade: A pinch of ground ginger or a dash of cinnamon stirred into the mixture adds a warm, spicy depth to the flavor.
-
Boozy Option: For adult get-togethers, mix in a splash of vodka or gin for a refreshing cocktail twist.
-
Berry Blast: Throw in a handful of blended strawberries or raspberries along with the nectarines for a fruity explosion of flavors!
Chef’s Notes
This Nectarine Lemonade recipe has evolved over time, just like my cooking style. Initially, I tried adding a bit of lavender syrup for a floral note, which was delightful but didn’t quite hit the spot for a refreshing lemonade. Sometimes simplicity is best! Now, this recipe is my go-to for gatherings, and everyone loves it!
One of my favorite kitchen memories is when I made this lemonade for a picnic. I packed it up in a mason jar, and it became the highlight of our day out. Just goes to show, a good drink can elevate any occasion!
FAQs and Troubleshooting
Q1: Can I use frozen nectarines for this recipe?
Absolutely! Just thaw the nectarines and blend them as you would with fresh ones. You might need to adjust the water content to reach your desired consistency.
Q2: The lemonade is too sweet/tart! What can I do?
If it’s too sweet, simply add a splash more lemon juice. If it’s too tart, stir in some extra sugar or a little honey until balanced.
Q3: How long will this lemonade last in the fridge?
Fresh Nectarine Lemonade is best enjoyed within 24-48 hours. After that, the flavors may begin to degrade and the fruit may change texture.
Q4: Can I make this a day ahead of time?
Yes! This lemonade can be made a day in advance and stored in the refrigerator. This allows the flavors to meld together nicely!
Nutritional Info
While I focus primarily on flavor and enjoyment, it’s also worth noting that nectarines are a great source of vitamins A and C, as well as fiber. Depending on how much sugar you add, your drink can range from a delightful treat to a more wholesome refreshment.
There you have it! The perfect combination of sweet nectarines and zesty lemons to brighten your day. Whether you’re sipping it solo or sharing with friends, this Nectarine Lemonade is sure to bring smiles all around. So, roll up your sleeves, gather those ingredients, and let’s get to blending! Happy sipping!
PrintRefreshing Nectarine Lemonade

This vibrant Nectarine Lemonade combines sweet nectarines and zesty lemons for a refreshing summer drink that’s perfect for any occasion.
- Prep Time: 15 minutes
- Cook Time: 0 minutes
- Total Time: 60 minutes
- Yield: 4 servings 1x
- Category: Beverage
- Method: Blending
- Cuisine: American
- Diet: Vegetarian
Ingredients
- 4 ripe nectarines, pitted and diced
- 1 cup fresh lemon juice
- 1 cup sugar (or to taste)
- 4 cups water
- Ice cubes
- Lemon slices and mint leaves for garnish
Instructions
- Prepare the nectarines by pitting and dicing them.
- Blend the diced nectarines and fresh lemon juice until smooth.
- Combine the blended mixture with water in a large pitcher and adjust sweetness with sugar.
- Chill the mixture in the refrigerator for at least an hour.
- Serve over ice, garnished with lemon slices and fresh mint.
Notes
This lemonade can be made a day ahead for the best flavor. Adjust sweetness to your liking, and feel free to experiment with other fruit additions.
Nutrition
- Serving Size: 1 serving
- Calories: 200
- Sugar: 35g
- Sodium: 5mg
- Fat: 0g
- Saturated Fat: 0g
- Unsaturated Fat: 0g
- Trans Fat: 0g
- Carbohydrates: 50g
- Fiber: 2g
- Protein: 1g
- Cholesterol: 0mg
Keywords: nectarine lemonade, summer drink, refreshing beverage, lemonade recipe, fruity drinks
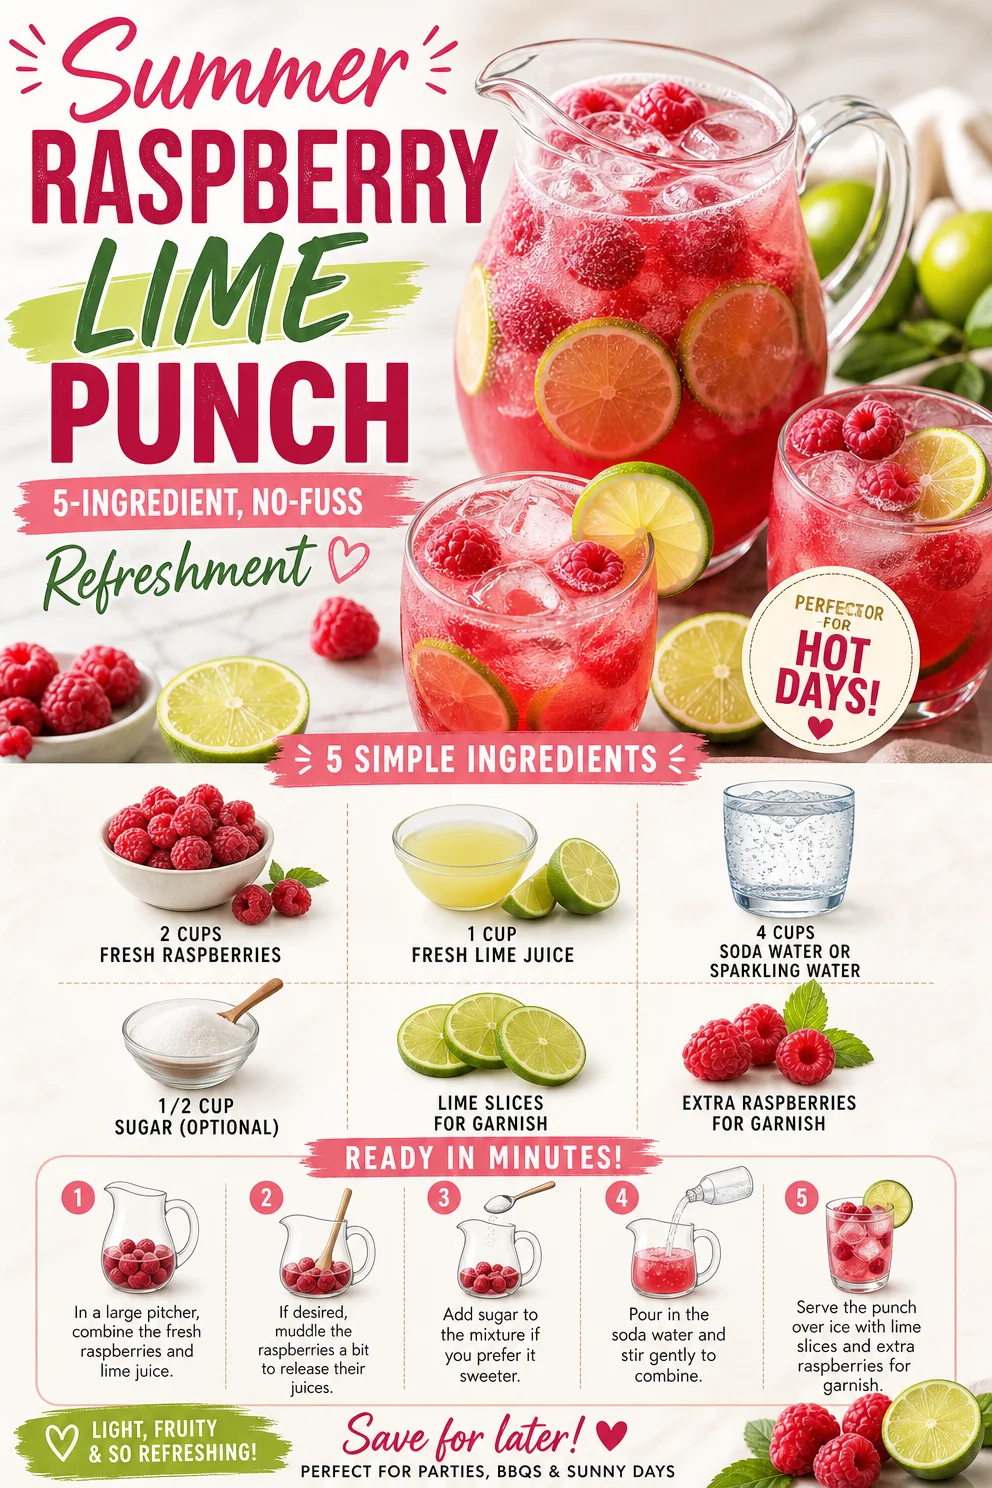
Summer Raspberry Lime Punch: 5-Ingredient, No-Fuss Refreshment
Refreshing Raspberry Lime Punch: A Sparkling Delight for Every Occasion
Hey there, fellow food lovers! If you’re anything like me, you know that sometimes all it takes is a refreshing drink to elevate your mood and bring a little sparkle to your day. Today, I’m excited to share a recipe that’s not only delicious but also bursting with vibrant flavors: Raspberry Lime Punch. This delightful beverage is perfect for BBQs, brunches, pool parties, or just lounging on the porch with a good book. So grab your apron and let’s get started on this fun and easy recipe that will have your taste buds dancing!
A Sip of Nostalgia
Let me take you back to a summer day in my childhood. I was at my grandmother’s house, where she had this incredible garden filled with fresh herbs, tangy limes, and a patch of plump, juicy raspberries. Each summer, we’d spend our afternoons in the garden, picking berries and squeezing limes, giggling as the sunlight danced through the leaves. My grandmother would whip up her famous raspberry limeade, a refreshing drink that kept us cool in the sweltering heat. With every sip, I was reminded of the sweet and tart balance, the fizz of the soda, and the love she infused into every glass.
Now, as an adult, I find joy in recreating those moments in my own kitchen, infusing them with a modern twist. The Raspberry Lime Punch I’m about to share with you is a celebration of those cherished memories—a drink that embodies the essence of summer, friendship, and the vibrant flavors we all crave.
Ingredients
Before we jump into the recipe, let’s gather our ingredients. Here’s what you’ll need to create this fizzy delight:
-
2 cups fresh raspberries
- These little gems are packed with antioxidants and provide a sweet-tart flavor that’s simply irresistible. Fresh is best, but if you can only find frozen, just thaw them and use!
-
1 cup fresh lime juice
- Freshly squeezed juice makes a world of difference! The vibrant acidity balances the sweetness of the raspberries. If you’re in a pinch, you can use bottled lime juice, but fresh is always preferable.
-
4 cups soda water or sparkling water
- This is where the magic happens! The bubbles bring everything to life. You can also use tonic water for a slightly different, more bitter taste, or even flavored sparkling waters for a unique twist.
-
1/2 cup sugar (optional)
- Adjust the sweetness to your liking. If you prefer a healthier alternative, consider using honey, agave syrup, or even a low-calorie sweetener. You can also skip the sweetener altogether if you’re a fan of tangy drinks!
-
Lime slices for garnish
- Not only do they look fabulous, but they also provide a fresh aroma as you sip your punch!
-
Extra raspberries for garnish
- Who doesn’t love a pop of color? They’ll make your drink look as delightful as it tastes.
Step-by-Step Instructions
Now that we have our ingredients prepped, let’s dive into the making of this incredible Raspberry Lime Punch. Follow these steps, and trust me—your taste buds will thank you!
-
Prep the Raspberries:
Start by rinsing those fresh raspberries thoroughly in cold water. Place them in a bowl and set aside a few for garnishing later. With the remaining berries, use a fork or muddler to gently mash them. This will release their beautiful juice and help infuse that raspberry flavor into your punch. Don’t overdo it—just enough to burst them open!Chef’s Note: You can also blend the raspberries if you prefer a smoother drink. Just strain the mixture through a fine mesh sieve later to remove the seeds!
-
Juicing the Limes:
Next, you’ll need to squeeze the limes to extract that glorious juice. Roll each lime on the countertop for a few seconds to maximize the juice yield, then cut them in half and squeeze into a measuring cup, removing any seeds along the way.Tip: For an extra zesty flavor, consider grating a little lime zest before juicing. It adds a fragrant twist!
-
Mixing the Ingredients:
In a large pitcher, combine the mashed raspberries and freshly squeezed lime juice. Stir these two together gently, letting the flavors meld. If you’ve opted to sweeten your punch, now’s the time to add your sugar (or sweetener of choice). Stir until it dissolves completely. -
Adding the Fizz:
Slowly pour in the soda water or sparkling water to avoid excessive fizzing and spillage. Gently stir the mixture to combine, making sure not to lose all those lovely bubbles.Chef’s Tip: To keep your punch fizzy, add the soda water just seconds before serving!
-
Garnishing Your Punch:
Prepare your glasses by adding a few ice cubes, then pour the punch over them. Garnish with fresh lime slices and those reserved raspberries—you want to make it as visually appealing as it is delicious!
Serving Suggestions
When it comes to serving this Raspberry Lime Punch, presentation is key! Pour the vibrant drink into clear glasses to showcase the beautiful raspberry color, and don’t forget to garnish with lime slices and berries for that extra touch. To elevate the experience, try serving it with fun straws or even in a large punch bowl for gatherings. A sprig of mint on top adds a nice aromatic element, too!
Recipe Variations
Want to switch things up a bit? Here are some fun variations for your Raspberry Lime Punch:
-
Berry Medley: Mix in other berries like blueberries, strawberries, or blackberries for a mixed berry punch that’s bursting with flavor.
-
Herbal Twist: Add a handful of fresh mint or basil to the mix for an herbal twist. Muddle them with the raspberries for maximum flavor.
-
Citrus Burst: Incorporate other citrus juices like orange or grapefruit for a zesty twist that’s bright and invigorating.
-
Spicy Kick: For those who love a little heat, add a slice of jalapeño to the mix, or even top with a splash of ginger beer for a spicy, refreshing combo.
-
Alcoholic Version: If you’d like to make a cocktail, consider adding vodka or rum for a boozy punch that’s perfect for summer parties!
Chef’s Notes
This Raspberry Lime Punch has been a staple in my home for years. It’s evolved over time, with me experimenting with different sweeteners and garnishes, as well as switching it up depending on the seasons. I love that it’s a versatile drink—perfect for kids and adults alike. The memories of making it with my grandmother always bring a smile to my face. Each summer, I find myself reminiscing while creating new memories with friends and family, sipping on this vibrant drink while basking in the sun.
FAQs and Troubleshooting
1. Can I make this punch ahead of time?
Absolutely! You can prepare the raspberry-lime mixture a few hours in advance, but for the best fizziness, add the soda water just before serving.
2. My punch is too sweet/tart; what can I do?
Don’t worry! If it’s too sweet, add a bit more lime juice to balance it out. If it’s too tart, a little more sweetener should do the trick.
3. Can I use frozen raspberries?
Yes, frozen raspberries work beautifully! Just make sure to thaw them before mashing. They might make your punch a little less vibrant in color, but they’re still packed with flavor.
4. How do I store any leftovers?
If you happen to have leftovers, store the punch in the refrigerator for up to 24 hours. However, keep in mind that the fizz might diminish over time.
Nutritional Info
While I don’t have a detailed nutritional breakdown for this drink, I can tell you it’s a light and refreshing option! With fresh fruit and minimal added sugar, it’s a much healthier alternative to sugary sodas and many commercial beverages. Feel free to adjust the sugar content based on your dietary preferences.
So there you have it! A fun, vibrant Raspberry Lime Punch that not only quenches your thirst but also brings back sweet memories of the sun-drenched days of summer. Whether you’re sipping solo or sharing with friends, I hope this recipe fills your space with laughter, joy, and fruity goodness. Cheers to fresh and delicious drinks! 🍹
PrintRefreshing Raspberry Lime Punch

A light and refreshing drink bursting with vibrant raspberry and lime flavors, perfect for any occasion.
- Prep Time: 15 minutes
- Cook Time: 0 minutes
- Total Time: 15 minutes
- Yield: 4 servings 1x
- Category: Beverage
- Method: Mixing
- Cuisine: American
- Diet: Vegan
Ingredients
- 2 cups fresh raspberries
- 1 cup fresh lime juice
- 4 cups soda water or sparkling water
- 1/2 cup sugar (optional)
- Lime slices for garnish
- Extra raspberries for garnish
Instructions
- Prep the raspberries: Rinse raspberries, set aside some for garnish, and gently mash the rest.
- Juicing the limes: Squeeze limes for juice, removing seeds.
- Mixing the ingredients: Combine mashed raspberries and lime juice in a pitcher, add sugar if desired, and stir.
- Adding the fizz: Slowly pour in soda water, gently stir to combine.
- Garnishing your punch: Pour the punch over ice and garnish with lime slices and raspberries.
Notes
For a fizzy drink, add soda water just before serving. You can also experiment with various berries or add herbs for different flavors.
Nutrition
- Serving Size: 1 serving
- Calories: 150
- Sugar: 25g
- Sodium: 5mg
- Fat: 0g
- Saturated Fat: 0g
- Unsaturated Fat: 0g
- Trans Fat: 0g
- Carbohydrates: 38g
- Fiber: 2g
- Protein: 1g
- Cholesterol: 0mg
Keywords: raspberry lime punch, refreshing drink, summer beverage, easy recipe, party drink
Ingredient Pineapple Coconut Mockarita: Easy Summer Sipper
Pineapple Coconut Mockarita: A Tropical Twist on Mocktails
Welcome to Clean Plate Cravings! If you’re like me and have a penchant for refreshing beverages that brighten your day, then you’re going to love this Pineapple Coconut Mockarita recipe. I’m convinced that nothing says summer like a vibrant, fruity drink in hand, whether you’re lounging by the pool or enjoying a sunny picnic in the park. The best part? This is a mocktail, meaning it’s alcohol-free, so everyone can enjoy it!
A Toast to Tropical Memories
Let me take you back to my childhood for a moment. My family had this lovely tradition of running to the beach each summer, where the scent of salty air mixed with the sweet fragrance of tropical fruits. I remember weaving through the vibrant stalls at the local markets, where juicy pineapples and creamy coconuts were piled high. It was here that I discovered the joy of drinking fresh coconut water straight from the fruit and indulging in pineapple treats that made my taste buds dance.
One summer, my cousin and I decided to blend these tropical delights into something special, so we concocted a drink using whatever we could get our hands on—a rind of pineapple, a can of coconut milk, and a whole lot of imagination. Although it was a wild mix, the taste was refreshing and made us giggle uncontrollably. It wasn’t perfected, but it sparked my love for combining flavors! Fast forward to today, and I’ve elevated that childhood experiment into a sophisticated yet simple mocktail: the Pineapple Coconut Mockarita. It’s a drink that’s sure to bring a party to your taste buds!
Ingredients
-
Fresh Pineapple Juice: The star of the show! Freshly squeezed pineapple juice ensures that your mockarita is sweet, tangy, and vibrant. If you can’t find fresh pineapples, bottled juice works, but opt for 100% juice with no added sugar.
-
Coconut Milk: This thick, creamy goodness adds a silky texture and a rich coconut flavor. If you prefer a lighter option, you can substitute it with low-fat coconut milk or even almond milk for a different twist.
-
Coconut Water: It’s hydrating and refreshing, bringing a subtle sweetness to balance out the tang of the pineapple. Feel free to replace it with plain water or sparkling water for bubbles!
-
Fresh Lime Juice: A splash of lime juice adds an irresistible zing and brightens the whole drink. When fresh limes are out of season, bottled lime juice is fine in a pinch (but fresh is always best!).
-
Sea Salt: A sprinkle of sea salt on the rim not only elevates flavors but enhances the sweetness of the fruits. If you’re watching sodium, feel free to omit it or use a salt substitute.
-
Toasted Coconut: Used for garnishing the rim of the glass, it adds texture and crunch. You can skip the toasting for a softer texture or even use graham cracker crumbs for a unique touch.
Step-by-Step Instructions
-
Prepare the Glass Rim: Begin by toasting your coconut. Spread shredded coconut on a baking sheet and toast it in a preheated oven at 350°F for about 5-7 minutes, stirring occasionally until golden brown. Meanwhile, prepare your glasses by running a lime wedge around the rim, then dipping it into a plate with sea salt and the toasted coconut. This adds flair and flavor!
-
Juicing the Pineapple: If you’re using fresh pineapple, cut it into chunks. Blend the pineapple pieces in a blender until it’s pureed. Strain it through a fine-mesh sieve to extract about 1 cup of fresh pineapple juice. If you use pre-packaged juice, skip this step to save time.
-
Mixing Your Mockarita: In a cocktail shaker, combine the fresh pineapple juice, 1/2 cup of coconut milk, 1/4 cup coconut water, and a generous squeeze of fresh lime juice. Fill the shaker with ice, and shake well—channel your inner bartender! This step not only cools the mixture down but also aerates it for a delightful texture.
-
Taste Test: Before serving, give your mockarita a taste. If you want it sweeter, consider adding a drizzle of honey or agave syrup. If it’s too sweet, another squeeze of lime can balance it out beautifully.
-
Pour and Serve: Strain the mixture into your prepared glasses filled with ice, and don’t skimp on the pouring—let that tropical goodness flow!
Serving Suggestions
To serve your Pineapple Coconut Mockarita, place a small slice of fresh pineapple or a lime wheel on the rim of the glass for an added tropical vibe. You can also garnish with a sprig of mint for a pop of color and freshness. This drink pairs wonderfully with light appetizers such as guacamole, shrimp cocktails, or even just a bowl of fresh-cut fruit.
Recipe Variations
-
Mango Coconut Mockarita: Swap out the pineapple juice for fresh mango juice for a sweeter, subtler flavor.
-
Berry Blast: Mix in some muddled strawberries or raspberries to add a tart contrast to the sweetness of the coconut and pineapple.
-
Spicy Kick: Add a pinch of cayenne pepper or a slice of jalapeño in the shaker for those who enjoy a bit of spice.
-
Non-Dairy Option: For a completely dairy-free option, use almond or oat milk in place of coconut milk.
-
Mocktail Slush: Blend all ingredients with ice for a refreshing slushie version that’s perfect for hot days!
Chef’s Notes
This recipe has become a refreshing staple in my summer repertoire, and I love experimenting with ingredients based on what’s in season. I once added a splash of passion fruit, and it took my mockarita to a whole new level! It’s funny how a simple twist can bring back memories from my childhood—those sunny days by the beach, drink in hand, laughter all around.
While I love a good, well-crafted cocktail, I cherish the art of crafting mocktails that everyone can indulge in. It’s not just about the flavors; it’s about creating moments that can be shared with friends and family!
FAQs and Troubleshooting
1. Can I prepare this mocktail in advance?
Yes, you can prepare the juice mixture ahead of time and store it in the fridge. However, wait to add ice until you’re ready to serve to maintain the vibrant flavor and freshness.
2. What can I do if my drink is too sweet?
If your mockarita turns out too sweet, add a splash more lime juice or even a little soda water to balance it out.
3. How can I make it fizzy?
To add some sparkle, incorporate club soda or sparkling water right before serving! This adds a lovely effervescence.
4. How do I store leftovers?
Store any leftover mockarita mix in an airtight container in the fridge for up to two days. Just shake it again before serving!
Nutritional Info
While I don’t typically dwell too much on numbers, it’s nice to know that a serving of this Pineapple Coconut Mockarita can offer a healthy dose of vitamin C and hydration. This is a delicious way to treat yourself while keeping things light and refreshing!
Cheers to fresh flavors and joyful gatherings! I hope you enjoy making this Pineapple Coconut Mockarita as much as I loved sharing it with you. Let’s keep it fresh, simple, and seriously delicious! 🥂🍹
PrintPineapple Coconut Mockarita
A refreshing, tropical mocktail featuring a delightful blend of fresh pineapple juice, coconut milk, and lime juice. Perfect for summer gatherings!
- Prep Time: 10 minutes
- Cook Time: 5 minutes
- Total Time: 15 minutes
- Yield: 2 servings 1x
- Category: Beverage
- Method: Mixing
- Cuisine: Tropical
- Diet: Non-Alcoholic
Ingredients
- 1 cup Fresh pineapple juice
- 1/2 cup Coconut milk
- 1/4 cup Coconut water
- 1/4 cup Fresh lime juice
- Sea salt for rimming glasses
- Toasted coconut for garnishing
Instructions
- Prepare the glass rim by toasting shredded coconut and rimming the glasses with lime and sea salt.
- Juicing the pineapple: Blend and strain fresh pineapple for juice.
- Mixing your mockarita: Combine pineapple juice, coconut milk, coconut water, and lime juice in a shaker.
- Taste the mixture and adjust sweetness with honey or lime.
- Pour the mixture into prepared glasses filled with ice.
Notes
Add a slice of fresh pineapple or lime wheel for garnish. Pairs well with light appetizers.
Nutrition
- Serving Size: 1 serving
- Calories: 150
- Sugar: 20g
- Sodium: 200mg
- Fat: 8g
- Saturated Fat: 7g
- Unsaturated Fat: 1g
- Trans Fat: 0g
- Carbohydrates: 20g
- Fiber: 2g
- Protein: 2g
- Cholesterol: 0mg
Keywords: mocktail, pineapple, coconut, refreshing drinks, summer beverage
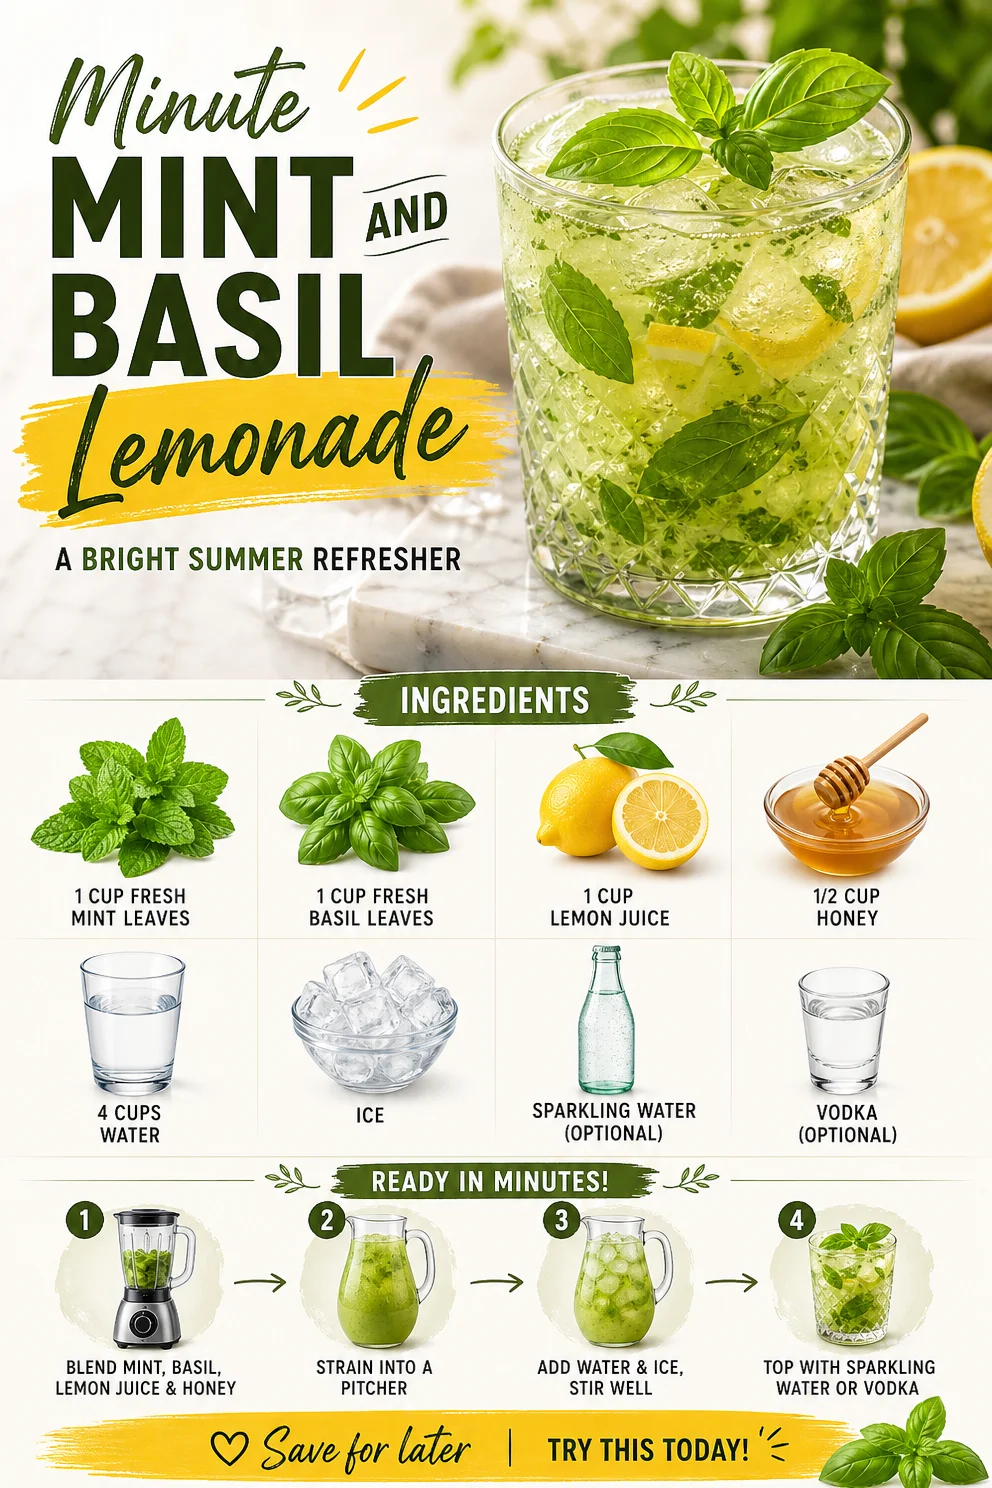
Minute Mint and Basil Lemonade: A Bright Summer Refresher
Refreshing Mint and Basil Lemonade: Your New Favorite Summer Sip!
Welcome back to Clean Plate Cravings, my delightful kitchen filled with fresh flavors, friendly vibes, and all-around good feelings! Today, I’m super excited to share a recipe that perfectly captures the essence of summer—our Mint and Basil Lemonade. This is not your average lemonade; oh no! We’re taking this classic drink up a notch with the vibrant aromatic notes of mint and basil. It’ll make your taste buds dance and your senses sing!
Picture this: a sunny afternoon, maybe you’re lounging by the pool or having a cozy picnic in the park. Maybe the kids are splashing around, or maybe you’re just sitting back, savoring every moment of sunshine. You want something refreshing, revitalizing, and oh-so-delicious to sip on. That, my friends, is where this Mint and Basil Lemonade comes in.
This recipe is packed with freshness and feels like summer in a glass. It’s not just about quenching your thirst; it’s about experiencing a burst of flavor that takes you back to carefree days. Plus, I’ve made it super easy for you—so it’s approachable enough for your busy life. Trust me, once you try this concoction, it will be your go-to drink for backyard barbecues, summer parties or just a chill evening on your patio.
Are you ready to adorn your glass with vibrant hues and delightful aromas? Let’s dive right into this recipe and create a drink that will impress your friends and family alike!
A Refreshing Memory
Growing up, my family would often host summer get-togethers. I can still picture the vibrant green of the backyard grass under the sun, the sounds of laughter, and the camera flashing as we took silly pictures. My aunt, a culinary queen in her own right, was the star of the show with her bomb lemonade. The lovely tanginess of lemons combined with fresh herbs, especially mint, would beckon everyone to gather around the drink station.
One June afternoon, I decided to take it upon myself to impress the family with my own refreshing twist. Armed with my aunt’s “secret recipe” (which I soon found out included a lot of love, not just a list of ingredients), fresh mint, and a touch of basil from the garden, I blended together the summer flavors with all my little foodie heart. The cheers of approval and the smiles on everyone’s faces after the first sip ignited my passion for experimenting in the kitchen.
From that day on, my love for crafting fresh, delicious drinks only deepened, and this Mint and Basil Lemonade has become a staple in my summer repertoire. I’m thrilled now to share this little piece of nostalgia with you so you can bring that same joy to your table!
Ingredients
Here’s what you’ll need to whip up this delightful beverage:
-
1 cup fresh mint leaves
Mint adds a refreshing flavor that feels like a breeze on a hot summer day. If you can’t find mint, feel free to swap it with spearmint or even lemon balm for a different herby twist! -
1 cup fresh basil leaves
The unique flavor of basil complements the tartness of the lemons beautifully. If basil isn’t your jam, try using fresh rosemary or even a hint of cilantro for an adventurous spin. -
1 cup lemon juice
Freshly squeezed lemon juice is a must! Bottled lemon juice lacks the bright flavors we want. If life gives you lemons, make this scrumptious lemonade!! -
1/2 cup honey
Honey adds a touch of natural sweetness. You can replace it with agave nectar or maple syrup for a vegan-friendly option. Don’t want it too sweet? Adjust to taste! -
4 cups water
Water is the base of our lemonade, bringing everything together. You can also use sparkling water for a bubbly twist or coconut water for a tropical vibe. -
Ice
You’ll definitely want some ice to keep your drink icy cold. -
Sparkling water (optional)
For a fizzy finish, feel free to top off your lemonade with some sparkling water. It adds a refreshing zest that’s irresistible! -
Vodka (optional)
If you want to turn this drink into a party potion, add a splash of vodka! Mixology at its finest, my friends!
Step-by-Step Instructions
Here’s how to make your very own Mint and Basil Lemonade:
-
Prep your herbs
Rinse your fresh mint and basil leaves under cool water to remove any dirt. Pat them dry gently with a clean kitchen towel. Tip: Don’t crush them just yet! We want to preserve all that fresh flavor. -
Make the herb infusion
In a small saucepan, combine 1 cup of water and the honey. Heat over medium until the honey has dissolved completely. Remove from heat and add in the mint and basil leaves. Allow them to steep for about 20-30 minutes as they release all that aromatic goodness. Chef Hack: You can use this infusion to sweeten other drinks or desserts too! -
Get zesty with the lemons
While the herbs are steeping, juice your lemons. Pro Tip: Roll the lemons on the countertop with the palm of your hand before cutting them; it’ll help release more juice! -
Combine it all
In a pitcher, strain the herb infusion through a fine-mesh sieve to remove the leaves. Add in your freshly squeezed lemon juice and the remaining 3 cups of water. Stir well to combine the flavors and dilute the tartness. Taste it here and adjust the sweetness if you like! -
Let it chill
Refrigerate this luscious mixture for at least an hour. It needs some time to let the flavors meld together blissfully. But if you’re in a rush, go ahead and serve over ice! -
Serve it up!
When you’re ready to serve, fill glasses with ice and pour the lemonade over. For an extra touch, add a splash of sparkling water if you like things fizzy. For those feeling a little adventurous, now’s the time to add a shot of vodka for a party kick!
Serving Suggestions
When it comes to presenting your Mint and Basil Lemonade, make it special! Fill a beautiful pitcher with your drink and serve it in mason jars or colorful glasses. Add a sprig of fresh mint or a basil leaf to each glass for that gourmet touch. For a simple garnish, consider adding a lemon wheel on the rim. It looks absolutely gorgeous and instantly makes your drink feel like a treat.
Recipe Variations
Looking to mix things up? Check out these quick twists:
- Berry Splash: Add some muddled strawberries, raspberries, or blueberries for a fruity addition.
- Citrus Zest: Include lime or orange juice to give your lemonade a zesty punch.
- Ginger Kick: Grate some fresh ginger into the mixture for a spicy kick!
- Herb Garden: Experiment with other herbs, like thyme or dill, for a unique flavor twist.
- Frozen Delight: Freeze herb-infused lemonade into popsicles for a refreshing summer treat!
Chef’s Notes
Over the years, this recipe has evolved from simple homemade lemonade at family gatherings to a refined drink that has graced cocktail parties and backyard barbecues. I love to play around with different herbs, and one of my recent favorites was using lemongrass instead of mint! It’s funny how something as simple as lemonade can bring everyone together, creating memories that last a lifetime.
Every summer, as the temperature rises, I bring out my herb garden to infuse new flavors into my drinks. Just last week, I tried rosemary in the mix—it’s now a contender against the basil! The things we learn in the kitchen are precious and the joy of creating something vibrant and refreshing is unmatched.
FAQs and Troubleshooting
1. What if I don’t have fresh herbs?
Using dried herbs is not recommended, as they won’t provide the same vibrant flavor. If fresh isn’t available, just stick to the classic lemonade!
2. How can I make this lemonade sweeter or less sweet?
If you like it sweeter, add more honey or a splash of simple syrup. For less sweetness, increase the water ratio or add additional lemon juice.
3. Can I make this ahead of time?
Absolutely! This lemonade can be made a day in advance. Just keep it stored in the fridge, and give it a good stir before serving.
4. Can I use artificial sweeteners?
You can! Just be sure to check the conversion ratio because they often have different sweetness levels compared to honey.
Now that you’re equipped and ready to create this fabulously refreshing Mint and Basil Lemonade, I can’t wait for you to share your adventures in the kitchen! This drink is perfect for keeping you cool and beautifully hydrated this summer. So let’s get mixing, and remember — whatever you do in the kitchen, keep it fresh, simple, and seriously delicious! Cheers!
PrintMint and Basil Lemonade

A refreshing twist on classic lemonade with vibrant mint and basil for the ultimate summer sip.
- Prep Time: 15 minutes
- Cook Time: 30 minutes
- Total Time: 45 minutes
- Yield: 4 servings 1x
- Category: Beverage
- Method: Mixing
- Cuisine: American
- Diet: Vegan
Ingredients
- 1 cup fresh mint leaves
- 1 cup fresh basil leaves
- 1 cup freshly squeezed lemon juice
- 1/2 cup honey
- 4 cups water
- Ice
- Sparkling water (optional)
- Vodka (optional)
Instructions
- Prep your herbs by rinsing and drying mint and basil leaves.
- Make the herb infusion by heating water and honey; steep the herbs for 20-30 minutes.
- Get zesty with the lemons and juice them.
- Combine the herb infusion with lemon juice and remaining water in a pitcher.
- Let it chill in the refrigerator for at least an hour.
- Serve over ice, adding sparkling water or vodka if desired.
Notes
This lemonade can be made a day in advance. Garnish with fresh herbs or lemon wheels for presentation.
Nutrition
- Serving Size: 1 serving
- Calories: 120
- Sugar: 25g
- Sodium: 5mg
- Fat: 0g
- Saturated Fat: 0g
- Unsaturated Fat: 0g
- Trans Fat: 0g
- Carbohydrates: 31g
- Fiber: 0g
- Protein: 0g
- Cholesterol: 0mg
Keywords: lemonade, summer drink, mint, basil, refreshing beverage, herb-infused drink
Ingredient Limonana Mint Lemonade (Lebanese Mint)
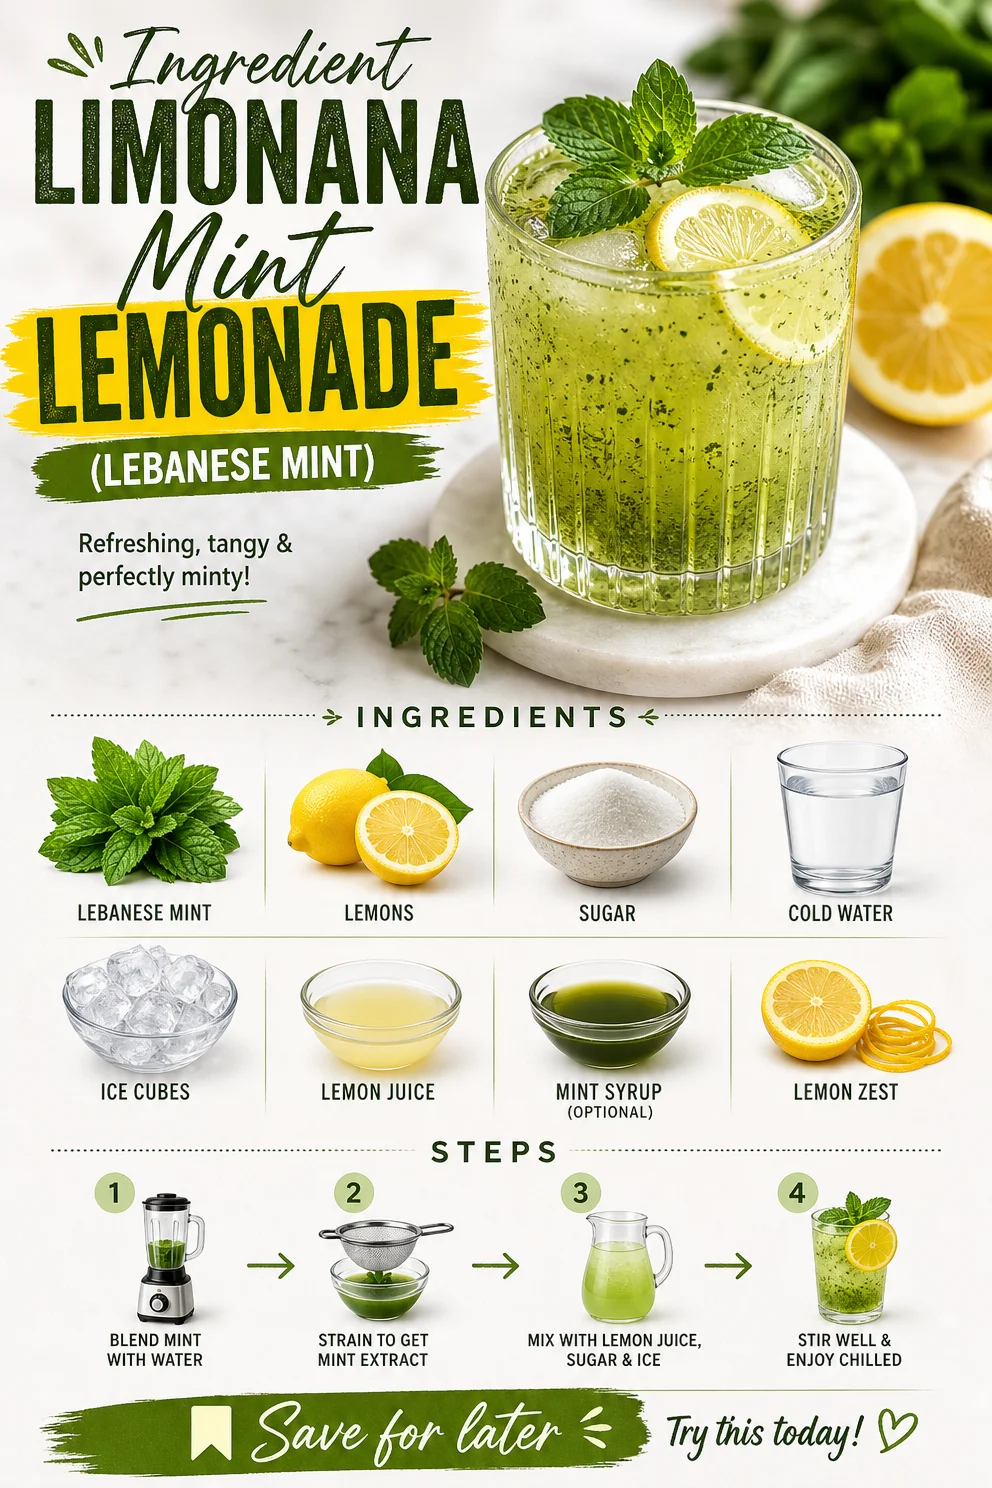
Refreshing Lebanese Mint Lemonade (Limonana Mint): A Delightful Summer Beverage
As the days grow longer and the sun blazes overhead, nothing feels quite as refreshing as a chilled glass of lemonade. But hold on—this isn’t just any lemonade. We’re diving into the vibrant, fragrant world of Lebanese Mint Lemonade, lovingly known as Limonana. This drink captures the essence of summer with its zesty lemons and fresh mint, dancing together in perfect harmony. Sip on a glass, and you’ll feel the heat of the day melt away, replaced by a cool breeze and a burst of flavor.
What makes this beverage even more special is its connection to memories, family gatherings, and those lazy summer afternoons where time stands still. I remember visiting my dear friend Noura’s home in Beirut, where we’d spend the afternoons under the shade of her family’s orange tree, chatting and laughing while her mother prepared the most delicious Limonana. The sweet scent of mint floated through the air, beckoning us like an enticing siren song. As soon as that first sip touched my lips, it transported me to sun-soaked summers filled with warmth and joy. That’s what I hope to share with you today—an experience that evokes not just the taste but the essence of summer itself.
Ingredients
Let’s gather our ingredients for this delightful drink! You’ll need:
-
Fresh Lemons: The star of the show! Choose juicy, vibrant lemons for that perfect tang. For substitutions, limes can work in a pinch, but the flavor profile will change a bit, leaning more toward a tart kick.
-
Fresh Mint Leaves: Mint adds a refreshing quality that elevates this drink. Look for vibrant green leaves; if you can’t find fresh mint, dried mint will give you a different flavor (though it’s less vibrant), or consider using basil for an intriguing twist!
-
Sugar or Honey: This sweetener balances the tartness of lemons. Adjust to taste! For a healthier option, agave syrup or stevia can work nicely. If you’re watching your sugar intake, consider experimenting with erythritol or monk fruit sweetener.
-
Water (still or sparkling): Depending on your preference, both work wonders. If you want something bubbly and festive, sparkling water adds a lovely touch, while still water gives a more traditional feel.
-
Ice: Essential for that refreshing chill! I love using crushed ice for a slushy texture, but you can also use regular ice cubes.
-
Optional Garnish: Lemon slices and mint sprigs make for a beautiful presentation. Don’t overlook the visuals; a well-presented drink is almost as good as one that tastes delicious!
Step-by-Step Instructions
Alright, let’s get to the fun part—making this refreshing Lebanese Mint Lemonade! Follow these steps and embrace your inner chef:
-
Juicing the Lemons: Begin by rolling the lemons on your countertop for a few seconds. This helps release more juice. Cut them in half and juice them into a measuring cup, removing seeds as you go. Chef Hack: If you want an easier juicing experience, microwave the lemon halves for about 10-15 seconds before juicing. The heat helps to soften the lemon, making it easier to extract every drop of juice!
-
Preparing the Mint: While you’re juicing, rinse your mint leaves and pat them dry. Remove the leaves from the stems. Using the back of a wooden spoon or your fingers, gently bruise the leaves to release their aromatic oils. This step is crucial for giving your Limonana that explosive mint flavor. Tip: If you love an extra minty taste, you can save a few leaves for garnish later.
-
Mixing the Ingredients: In a large pitcher, combine your freshly squeezed lemon juice, the bruised mint leaves, and sugar (or sweetener of choice). Pour in about 4 cups of water. Stir until the sugar is fully dissolved. Taste your Limonana; it should be a perfect balance of tart and sweet! If it’s too tart, add more sugar; if it’s too sweet, a splash of lemon juice will do the trick.
-
Chill: Let your pitcher sit in the fridge for at least 30 minutes. This allows the flavors to meld and intensify. Pro Tip: If you prefer it ice-cold immediately, you can pour the mixture into glasses over ice, but chilling it beforehand will give a more enriched flavor.
-
Serve and Enjoy: When you’re ready to serve, fill glasses with either crushed ice or ice cubes and pour Limonana over the top. Garnish with lemon slices and a sprig of mint for that Instagrammable touch! Give it a little stir before serving to redisperse the mint.
Serving Suggestions
Limonana is perfect for any summer gathering—serve it in clear glasses to show off its beautiful color. Pair it with Middle Eastern appetizers like hummus, falafel, or stuffed grape leaves for a refreshing complement to savory dishes. For a fun twist, serve it at your next BBQ alongside grilled dishes for a burst of flavor that tantalizes the taste buds.
Recipe Variations
Here are a few creative twists and variations you can try with your Limonana:
-
Berry Mint Lemonade: Blend in some fresh berries—such as raspberries or strawberries—for a fruity version. Simply muddle the berries with the mint before adding the lemon juice and sugar.
-
Cucumber Mint Lemonade: Add thin slices of cucumber for a cooling effect. It adds a subtle flavor that pairs beautifully with mint and lemon.
-
Spicy Lemonade: For the adventurous palate, add a jalapeño slice (without seeds) while you’re mixing the lemonade. Remove it before serving for a kick that balances the sweetness!
-
Herbal Infusion: Use other fresh herbs like basil or rosemary to change the flavor profile. Each herb brings a unique twist that’ll surprise your guests!
-
Sparkling Mint Lemonade: Replace still water with sparkling water for a fizzy refreshment. It takes the drink to the next level of delight!
Chef’s Notes
Speaking of variations, this recipe has evolved in my kitchen over the years as I’ve experimented with different herbs, spices, and fruits. There was this one summer, during a visit to a local farmer’s market, when I came across some beautifully ripe strawberries that inspired that berry variation mentioned earlier. The combination of fresh mint and bright strawberries created such a refreshing drink that it became a summer staple! Also, don’t be surprised if family and friends start requesting this drink for every gathering. It’s a crowd-pleaser!
FAQs and Troubleshooting
-
What do I do if my Limonana is too tart?
- If your Limonana turns out too tangy, simply add a bit more sugar or sweetener to balance it out. You can also dilute it with extra water.
-
Can I make this recipe ahead of time?
- Absolutely! You can prepare Limonana a day in advance. Just keep it covered in the fridge. Fresh mint leaves may start to wilt, so consider adding them just before serving.
-
How long does Limonana last in the fridge?
- Limonana is best enjoyed fresh, but it can last in the fridge for about 2-3 days. Just give it a good stir before serving!
-
Can I use bottled lemon juice instead of fresh?
- For the best flavor, fresh lemon juice is highly recommended, but if you’re in a pinch, bottled lemon juice can work. Just be mindful that it may taste less vibrant.
Nutritional Info (if applicable)
This refreshing beverage is low in calories and can easily be adapted to suit your dietary preferences. For reference, one serving of Limonana contains approximately:
- Calories: 50-60 (depending on sweetness adjustment)
- Fat: 0g
- Carbs: 15g
- Protein: 0g
So, there you have it! Whether you’re looking to beat the heat, host a party, or simply treat yourself, this Lebanese Mint Lemonade recipe (Limonana) is a sip of summer that you just can’t resist. Get your ingredients, roll up your sleeves, and let’s make some refreshing memories together. Cheers to good food, great company, and the beauty of summer! 🍋🌿
PrintRefreshing Lebanese Mint Lemonade (Limonana)

A refreshing blend of zesty lemons and aromatic mint, this Lebanese Mint Lemonade (Limonana) is the perfect summer beverage to keep you cool.
- Prep Time: 10 minutes
- Cook Time: 0 minutes
- Total Time: 30 minutes
- Yield: 4 servings
- Category: Beverage
- Method: No Cook
- Cuisine: Lebanese
- Diet: Vegan
Ingredients
- Fresh Lemons
- Fresh Mint Leaves
- Sugar or Honey
- Water (still or sparkling)
- Ice
- Optional Garnish: Lemon slices and mint sprigs
Instructions
- Juicing the lemons: Roll the lemons on your countertop, cut in half, and juice into a measuring cup. Remove seeds.
- Preparing the mint: Rinse and pat dry, remove leaves from stems, and bruise leaves to release oils.
- Mixing the ingredients: In a large pitcher, combine lemon juice, bruised mint leaves, and sweetener. Add about 4 cups of water and stir until dissolved.
- Chill: Let sit in the fridge for at least 30 minutes or serve immediately over ice.
- Serve and enjoy: Fill glasses with ice and pour Limonana over. Garnish with lemon slices and mint sprigs.
Notes
The recipe can be adapted with various fruits or herbs for different flavor profiles.
Nutrition
- Serving Size: 1 serving
- Calories: 55
- Sugar: 12g
- Sodium: 5mg
- Fat: 0g
- Saturated Fat: 0g
- Unsaturated Fat: 0g
- Trans Fat: 0g
- Carbohydrates: 15g
- Fiber: 0g
- Protein: 0g
- Cholesterol: 0mg
Keywords: lemonade, mint, refreshing drink, summer beverage, Lebanese recipe