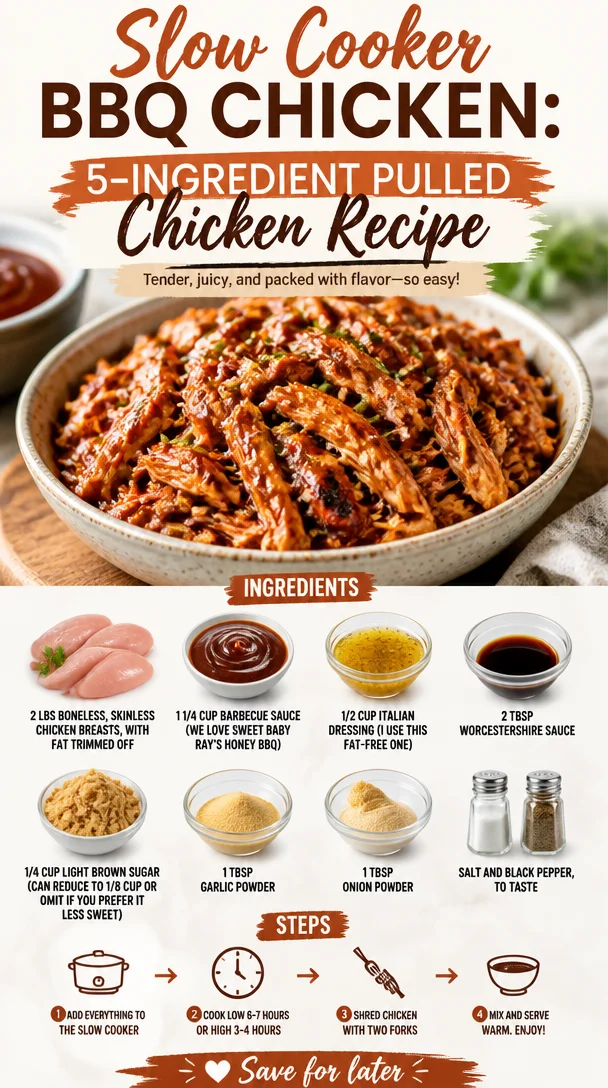
Slow Cooker BBQ Chicken: 5-Ingredient Pulled Chicken Recipe
The Best Crockpot BBQ Chicken: Easy Pulled Chicken Recipe
Welcome back to Clean Plate Cravings, food lovers! Today, we’re diving into a recipe that’s bound to make your taste buds sing: Crockpot BBQ Chicken. There’s something truly magical about the aroma of chicken cooking slowly in a delicious sauce, and the best part? It’s so easy you’ll wonder why you didn’t try it earlier. Grab your favorite brew, get cozy, and let’s get cooking!
Introduction
Picture this: It’s a busy weekday, and you’ve got a million things on your plate. The last thing you want to be doing is stressing over dinner. Enter the Crockpot BBQ Chicken! Not only does it make your life easier, but it also showers you with flavors that’ll have your family gathering around the table without the hard work.
With just a handful of ingredients and a trusty crockpot, you can create a mouth-watering dish that’s perfect for sandwiches, salads, or even tacos. I mean, who doesn’t love a good BBQ flavor, right? This recipe is perfect for anyone looking to whip up a meal without sacrificing time or taste and is an absolute hit at any gathering or family dinner!
The beauty of this dish is its versatility; you can customize it, serve it in many ways, and most importantly, it’s simply delicious. We’re talking tender, juicy pulled chicken that’s slathered in sweet, sticky barbecue sauce. Are you drooling yet? Trust me; this is a recipe you’ll want to bookmark!
So, turn on that slow cooker and let’s embark on this culinary adventure together!
Personal Story
When I think back to my childhood, I have fond memories of summer barbecues in my grandmother’s backyard. Her laughter would mix with the sound of sizzling chicken on the grill, the smell of smoky goodness enveloping the air. Those moments of gathering around the table, sharing stories, and indulging in her homemade BBQ chicken are etched in my heart.
As I grew older and started my culinary journey, I realized that not everyone has the time—or the equipment—to grill outdoors. That’s when I decided to recreate those nostalgic flavors using a slow cooker. Let me tell you, the first time I opened that lid to reveal the tender, delicious pulled chicken, I was transported straight back to my grandma’s backyard. This was my way of keeping her spirit alive in my kitchen, and now it’s your turn to create those cherished memories with your loved ones.
Ingredients
Before we roll up our sleeves and dive into cooking, here’s what you’ll need for this fantastic dish:
-
2 lbs boneless, skinless chicken breasts
These are the star of the show! Use chicken breasts as they stay juicy and shred beautifully. You can substitute with thighs if you want a richer flavor. -
1 1/4 cup barbecue sauce
I’ve got to shout out my favorite: Sweet Baby Ray’s Honey BBQ. It’s sweet, tangy, and seriously delicious. Don’t have any? You can whip up your own or try a homemade version using tomato sauce, vinegar, and spices. -
1/2 cup Italian dressing
This adds a lovely zesty flavor to the chicken. If you’re watching calories, a fat-free dressing works perfectly. No Italian dressing on-hand? Ranch or a honey mustard vinaigrette can also add a different but delightful twist. -
2 tbsp Worcestershire sauce
This sauce provides a savory depth to the BBQ chicken. If you’re vegan, look for a vegan Worcestershire sauce or simply omit it. -
1/4 cup light brown sugar
This balances out the flavors and adds sweetness to your sauce. Prefer your BBQ less sweet? You can cut this down to 1/8 cup or leave it out entirely. -
1 tbsp garlic powder
Adds that wonderful aromatic flavor we all love. Fresh garlic can be used instead; just mince 2-3 cloves. -
1 tbsp onion powder
An effortless way to add sweetness and depth. If you’re feeling ambitious, throw in some freshly chopped onion when cooking. -
Salt and black pepper, to taste
Essential for bringing all the flavors together! Season to your liking.
Step-by-Step Instructions
Now that we have our ingredients lined up, let’s get to the fun part—the cooking! Here’s how to prepare your Crockpot BBQ Chicken step by step.
-
Prepare Your Chicken
Start by trimming any excess fat from your chicken breasts. This step is key to keeping your dish light and flavorful. Once trimmed, place them at the bottom of your crockpot. -
Mix the Sauces
In a mixing bowl, combine the 1 1/4 cup of barbecue sauce, 1/2 cup of Italian dressing, 2 tbsp of Worcestershire sauce, and 1/4 cup of light brown sugar. Stir until well blended; you’ll notice how wonderful the aroma is already! -
Season Your Chicken
Sprinkle the garlic powder, onion powder, salt, and pepper over the chicken—don’t be shy! This step ensures each bite is bursting with flavor. -
Pour the Sauce Over the Chicken
This is where the magic happens! Pour the combined sauce mix evenly over the chicken breasts. Use a spatula to ensure they are well coated. -
Set Your Crockpot
Cover your crockpot and set it on low for 6-8 hours or high for 3-4 hours. The low and slow cook method is fantastic for letting those flavors meld together, so if you can, opt for low. -
Check for Doneness
About 30 minutes before serving, check your chicken. It should shred easily with a fork. If not, give it a little more time. Seriously, the aroma will have you eagerly waiting! -
Shred the Chicken
Once the chicken is cooked through, take two forks and shred the chicken right in the crockpot. Mix it in with the sauce to evenly distribute the flavors. -
Taste and Adjust
Before serving, taste the mixture. If you feel it needs more sweetness or salt, now’s the time to adjust! -
Serve and Enjoy
Your kitchen should smell heavenly right about now. Serve the pulled chicken on a fresh bun, over a salad, or in tacos. You can’t go wrong!
Serving Suggestions
You’ve worked hard for this delicious creation, and now comes the fun part: plating! I love serving this pulled chicken on toasted hamburger buns with a sprinkle of coleslaw for crunch. You can also scoop some onto a plate and pair it with roasted vegetables or a light salad. A drizzle of extra BBQ sauce on top adds a lovely finishing touch.
Recipe Variations
- Spicy BBQ Chicken: Add a teaspoon of cayenne pepper or your favorite hot sauce to the sauce blend for a kick of heat.
- Mexican Twist: Mix in some taco seasoning instead of the garlic and onion powder, and serve in tortillas with avocado.
- Honey Mustard BBQ: Swap the BBQ sauce for a honey mustard dressing for a tangy-sweet flavor.
- Sweet and Sour BBQ: Add pineapple chunks during the last hour of cooking for a sweet and tangy flavor combo.
Chef’s Notes
You know, this recipe has evolved over the years. Initially, I used whatever BBQ sauce I had on hand from the grocery store, but as I got more into cooking, I began experimenting with homemade sauces for that extra zing. Now, every time I whip up a batch, I get a little nostalgic about those barbecues with my grandma. Each bite reminds me of those golden sunny days and the love that went into every dish. Cooking is not just about the food; it’s about sharing moments that stay with you forever.
FAQs and Troubleshooting
-
Can I use frozen chicken?
Yes! You can throw frozen chicken into the crockpot directly. Just be sure to increase the cooking time by about an hour, checking that it’s cooked through before shredding. -
What if my chicken isn’t shredding well?
No worries! Simply give it a little more time in the crockpot. Sometimes, thicker breasts can take longer to cook through. -
How can I make it healthier?
Opt for skinless, boneless chicken thighs instead of breasts. You can also reduce the amount of brown sugar or use a sugar substitute. -
Can I make this in advance?
Absolutely! You can cook it a day ahead and store it in the fridge. Reheat in the microwave or stovetop before serving.
Nutritional Info
- Calories: Approximately 200 per serving
- Protein: 28g
- Fat: 4g
- Carbohydrates: 18g
There you have it! A delicious and easy recipe that not only fills your belly but also warms your heart. That’s the beauty of cooking: it connects us to our past and to each other. So gather your loved ones, serve up some of this delightful Crockpot BBQ Chicken, and let the good times roll! Happy cooking, friends!
PrintCrockpot BBQ Chicken

This Crockpot BBQ Chicken recipe provides tender pulled chicken slathered in a sweet and sticky barbecue sauce, perfect for sandwiches, salads, or tacos.
- Prep Time: 15 minutes
- Cook Time: 360 minutes
- Total Time: 375 minutes
- Yield: 4 servings 1x
- Category: Main Course
- Method: Baking
- Cuisine: American
- Diet: Gluten-Free
Ingredients
- 2 lbs boneless, skinless chicken breasts
- 1 1/4 cup barbecue sauce
- 1/2 cup Italian dressing
- 2 tbsp Worcestershire sauce
- 1/4 cup light brown sugar
- 1 tbsp garlic powder
- 1 tbsp onion powder
- Salt and black pepper, to taste
Instructions
- Prepare your chicken by trimming any excess fat and placing it in the bottom of your crockpot.
- Mix the barbecue sauce, Italian dressing, Worcestershire sauce, and light brown sugar in a bowl until well blended.
- Season the chicken with garlic powder, onion powder, salt, and pepper.
- Pour the sauce over the chicken, ensuring it’s well coated.
- Set your crockpot on low for 6-8 hours or high for 3-4 hours.
- Check for doneness about 30 minutes before serving.
- Shred the chicken in the crockpot using two forks and mix it with the sauce.
- Taste the mixture and adjust seasoning if needed.
- Serve the pulled chicken on buns, over salads, or in tacos.
Notes
Serve with coleslaw, roasted vegetables, or a drizzle of extra BBQ sauce.
Nutrition
- Serving Size: 1 serving
- Calories: 350
- Sugar: 16g
- Sodium: 700mg
- Fat: 10g
- Saturated Fat: 2g
- Unsaturated Fat: 6g
- Trans Fat: 0g
- Carbohydrates: 35g
- Fiber: 1g
- Protein: 28g
- Cholesterol: 75mg
Keywords: Crockpot, BBQ Chicken, Pulled Chicken, Easy Recipe, Slow Cooker
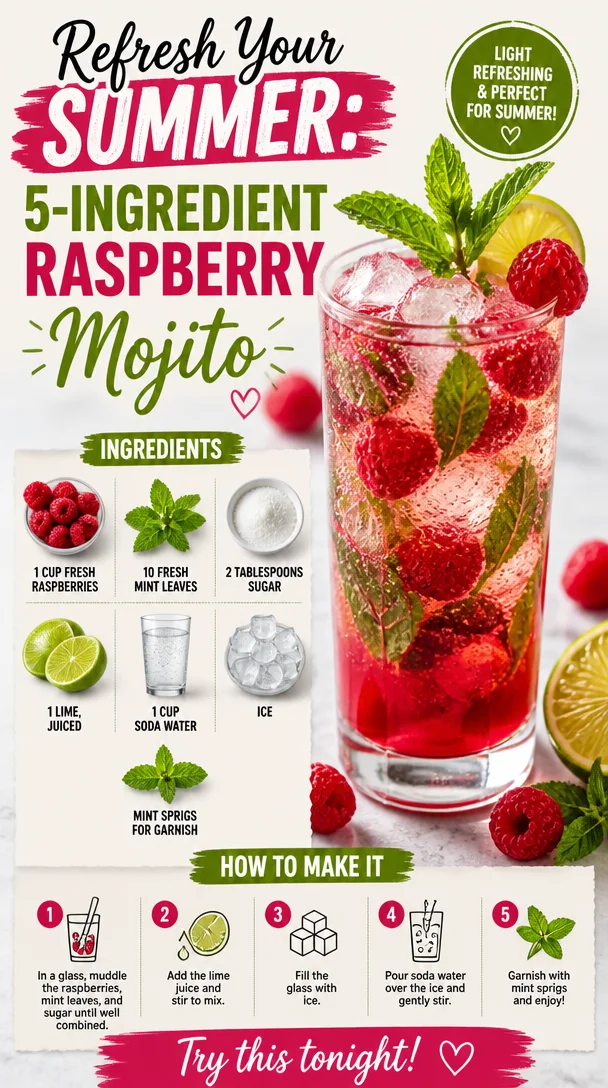
Refresh Your Summer: 5-Ingredient Raspberry Mojito
Refreshing Raspberry Mojito: A Splash of Summer in Every Sip
Welcome back, food lovers! Today, we’re diving into a crowd-pleaser that’s perfect for those sunny afternoons when you want something deliciously refreshing: the Raspberry Mojito. Whether you’re lounging by the pool, hosting a garden party, or simply unwinding after a long day, this drink is your go-to for both hydration and a hint of indulgence. Plus, it’s super easy to whip up, making it a perfect addition to your collection of must-have summer sips.
Now, when I think of mojitos, I can’t help but reminisce about the summer gatherings at my Grandma Lily’s house, where the garden was bursting with color, and laughter was the soundtrack of our afternoons. I remember her mixing up the drinks, with fresh mint sprigs straight from her garden, and the kitchen filled with that irresistible minty aroma. As she muddled the ingredients together, I couldn’t help but feel an air of excitement. Little did I know back then that I’d be crafting my own variations of those delightful summer drinks one day!
So, let’s channel that summer vibe and get started on this Raspberry Mojito! This recipe is not only vibrant and tasty, but it’s also a delightful way to showcase the beauty of fresh ingredients. Trust me; your friends and family will be impressed. Are you ready? Let’s mix it up!
Personal Story
Ah, the Raspberry Mojito. It brings back such cherished memories of summer days spent with my friends at the local park, blankets sprawled out on the grass, laughing and sharing stories over homemade snacks. One particularly unforgettable summer afternoon, my friend Mia showed up with a pitcher of her raspberry mojitos, a recipe she had just perfected. Those drinks were the perfect blend of sweetness and zesty lime, with the fresh mint creating an explosion of flavor. The vibrant color of the raspberries danced in the sunlight, and each sip was more refreshing than the last.
That day marked the beginning of my love affair with mojitos, and it wasn’t long before I found myself experimenting with flavors and ingredients, putting my own twist on this classic beverage. The Raspberry Mojito, however, always holds a special place in my heart and recipe book. It’s more than just a drink; it’s a delicious homage to the joyful times spent with people I love, surrounded by the beauty of nature and good company.
Ingredients
Here’s what you’ll need to create the perfect Raspberry Mojito:
-
1 cup fresh raspberries
These juicy gems not only bring a beautiful color to your drink but also offer a nice tangy sweetness. If you can’t find fresh raspberries, feel free to substitute them with frozen ones—just allow them to thaw before use. -
10 fresh mint leaves
Mint is the star of the show in a mojito! For maximum flavor, use fresh mint. If you’re in a pinch, spearmint or peppermint can be used as alternatives, but always go for the freshest option you can find. -
2 tablespoons sugar
This adds a touch of sweetness to balance the tartness of the raspberries and the brightness of the lime. You can substitute regular granulated sugar with coconut sugar or a sugar alternative like stevia or agave syrup if you prefer a healthier option. -
1 lime, juiced
Fresh lime juice is a must for that zesty kick! If you don’t have lime on hand, lemon juice works as a substitute but will impart a different flavor profile. -
1 cup soda water
This adds fizz and helps balance the sweetness of the sugar and raspberries. Don’t have soda water? You can use tonic water or a lemon-lime soda for a sweeter twist. -
Ice
Essential for keeping your drink chilled and refreshing on those hot summer days! -
Mint sprigs for garnish
A touch of mint on top not only looks beautiful but also enhances the fantastic mint aroma as you sip your drink.
Step-by-Step Instructions
-
Muddle the Raspberries and Mint
In a sturdy glass or cocktail shaker, add the fresh raspberries and mint leaves. Using a muddler or the back of a spoon, gently press down to release the juices from the raspberries and the essential oils from the mint. Be careful not to over-muddle; you want to avoid tearing the mint leaves too much, as this can lead to a bitter taste. Just enough pressure to infuse those delightful flavors will do! -
Add the Sugar and Lime Juice
Now it’s time to sprinkle in the sugar and squeeze your lime juice into the glass. Stir everything together gently until the sugar begins to dissolve. The acidity of the lime will help dissolve the sugar, creating a flavorful base for your mojito. If you’re using an alternative sweetener, add it at this point! -
Mix in Soda Water
Pour in your soda water gradually, allowing the fizzy bubbles to combine with the muddled raspberry and mint mixture. Give it a gentle stir to mix everything together without losing too much carbonation. This is where the magic happens! The lightness of the soda water enhances the fresh flavors and keeps your drink refreshing. -
Add Ice and Serve
Fill your glass with ice! I love using crushed ice for mojitos because it looks beautiful and keeps your drink icy cold. Pour the remaining mojito mixture over the ice. If you find your glass isn’t full enough, don’t hesitate to top it off with a splash more soda water. -
Garnish and Enjoy!
Finally, finish your Raspberry Mojito with a couple of mint sprigs on top. You can also add a raspberry or two for an extra pop of color! Serve it with a fun straw or cocktail umbrella to really bring out those summer vibes. Now sit back, take a sip, and enjoy that refreshing burst of flavor!
Serving Suggestions
When it comes to serving your Raspberry Mojito, presentation is key! Pour the vibrant drink into a tall glass, and don’t be shy with the ice. If you’re feeling fancy, you can even rim the glass with sugar for a sweet touch. Pair it with some crunchy, salty snacks like tortilla chips and fresh guacamole, or serve it alongside a light summer salad for a delightful afternoon feast. This drink is perfect for both casual get-togethers and chic gatherings alike.
Recipe Variations
Feeling adventurous? Here are a few creative twists to elevate your Raspberry Mojito experience:
- Berry Blast: Substitute some of the raspberries with muddled strawberries or blueberries for a mixed berry mojito.
- Coconut Twist: Add a splash of coconut water for a tropical vibe.
- Spicy Kick: Throw in a few slices of jalapeño while muddling to add a hint of spice to your drink.
- Herbal Boost: Experiment with other herbs like basil or even rosemary in place of mint for a unique flavor profile.
- Sparkling Lavender: Infuse your soda water with a touch of lavender syrup for a floral twist!
Chef’s Notes
Over the years, this Raspberry Mojito recipe has seen its fair share of experimentation in my kitchen! I’ve tried various fruits, sweetness levels, and even different types of mint. I have found that while the classic combo is unbeatable, there’s always room for creativity. Just the other day, I made a blueberry-lime mojito that was simply heavenly! Everyone has their own personal preferences, and that’s the beauty of cooking and mixing drinks. The best part? No matter how you customize it, you’re still left with that same refreshing experience.
FAQs and Troubleshooting
-
What if I don’t have fresh raspberries?
If fresh raspberries are out of season or unavailable, frozen raspberries work perfectly fine—just remember to thaw them before muddling. -
How do I make my drink less sweet?
If you’re looking to cut down on the sweetness, reduce the amount of sugar or opt for a natural sweetener that’s less sweet than sugar, like stevia. -
Can I make this a non-alcoholic version?
Absolutely! Simply follow the same recipe but omit any alcohol, and enjoy it as a refreshing mocktail. -
My mint leaves turned brown in the muddling process. What happened?
Over-muddling can bruise mint leaves and make them bitter. Use a gentle touch and apply just enough pressure to release the flavors without breaking them down too much.
Nutritional Info
While I typically focus more on the flavor rather than the numbers, a standard Raspberry Mojito contains roughly:
- Calories: 120-150 per serving (depending on sugar used)
- Sugar: 20-25 grams
- Carbohydrates: 27 grams
- Fat: 0 grams
- Protein: 0 grams
These numbers can vary with alternative sweeteners and portion sizes, so keep that in mind as you make adjustments!
Now that you have all the tools and techniques for crafting a delightful Raspberry Mojito, I can’t wait for you to try it out! Remember, healthy and delicious doesn’t have to be complicated. With fresh ingredients and a bit of love, you can create something that not only tastes incredible but also brings joy to your daily life. Cheers to refreshing summer sips and joyful moments! Enjoy!
PrintRefreshing Raspberry Mojito
A vibrant and refreshing Raspberry Mojito, perfect for summer gatherings and relaxation.
- Prep Time: 10 minutes
- Cook Time: 0 minutes
- Total Time: 10 minutes
- Yield: 2 servings 1x
- Category: Beverage
- Method: Mixing
- Cuisine: Cocktail
- Diet: Vegan
Ingredients
- 1 cup fresh raspberries
- 10 fresh mint leaves
- 2 tablespoons sugar
- 1 lime, juiced
- 1 cup soda water
- Ice
- Mint sprigs for garnish
Instructions
- Muddle the raspberries and mint in a sturdy glass or cocktail shaker.
- Add the sugar and lime juice, stirring gently until the sugar dissolves.
- Mix in soda water gradually, stirring gently.
- Add ice to the glass.
- Pour the mojito mixture over the ice and top with more soda water if desired.
- Garnish with mint sprigs and serve!
Notes
Use fresh mint for the best flavor. Can substitute with frozen raspberries if fresh are unavailable.
Nutrition
- Serving Size: 1 serving
- Calories: 150
- Sugar: 25g
- Sodium: 0mg
- Fat: 0g
- Saturated Fat: 0g
- Unsaturated Fat: 0g
- Trans Fat: 0g
- Carbohydrates: 27g
- Fiber: 2g
- Protein: 1g
- Cholesterol: 0mg
Keywords: Raspberry Mojito, Summer Drinks, Refreshing Cocktail, Non-Alcoholic Drink
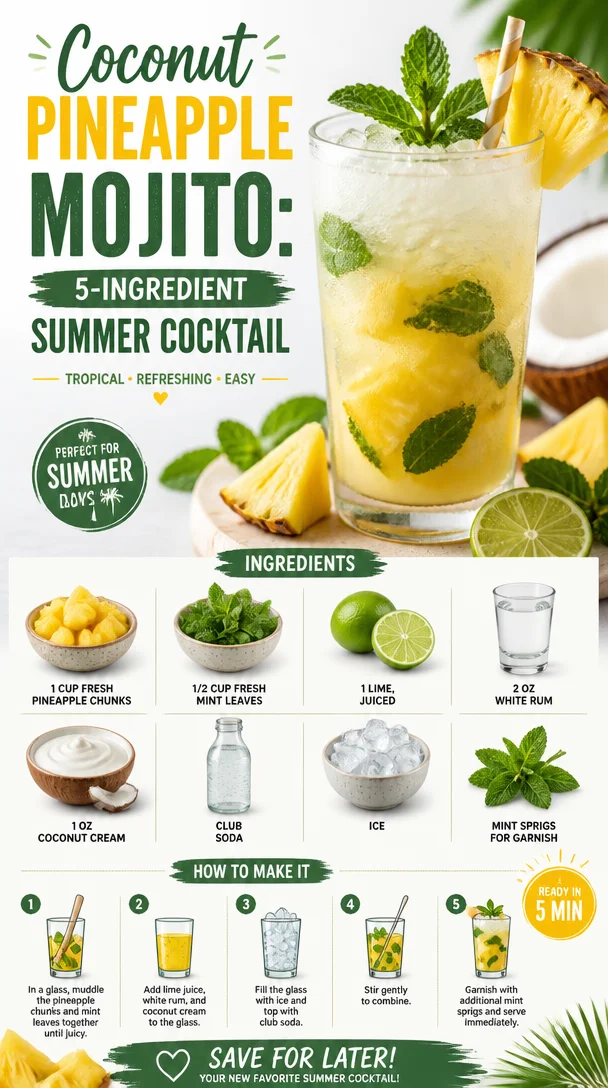
Coconut Pineapple Mojito: 5-Ingredient Summer Cocktail
Refreshing Coconut Mojito with Pineapple: A Taste of Paradise
Ah, the coconut mojito with pineapple—this tropical delight is the perfect way to elevate any gathering, or simply treat yourself after a long day. Picture this: you’re lounging in a hammock, the sun is setting, and a gentle breeze cradles you in bliss. While you might not always find yourself in a tropical paradise, you can definitely bring the essence of one to your kitchen with this easy, refreshing cocktail.
Let’s be honest, the traditional mojito is a classic, but what happens when you infuse it with creamy coconut and sweet pineapple? Pure magic! Kind of like a vacation in a glass. This cocktail is bursting with flavor, combining the tangy brightness of lime with the sweetness of fresh pineapple and a cool minty finish.
And here’s the best part—it’s super easy to make! Whether you’re hosting a summer BBQ, celebrating a birthday, or just unwinding at the end of a busy week, this coconut mojito brings all the feels with none of the fuss. So grab your blender, a few fresh ingredients, and let’s create something that’ll have your taste buds dancing!
A Slice of Nostalgia
I can still remember the first time I enjoyed a mojito on a sun-soaked beach in Costa Rica. The salty breeze contrasted perfectly with the sweetness of the drink, making every sip feel like pure bliss. I was there with friends, lounging under swaying palm trees, laughing and sharing stories as the sun dipped below the horizon.
Not long after returning, I found myself in a cozy kitchen experimenting with cocktails, a newfound tradition of mine, trying to replicate that beachside moment. With my love for coconut and pineapple, I decided to create a fruity twist on the classic mojito. The first time I introduced my Coconut Mojito with Pineapple to friends, their eyes lit up with delight, just like mine did on that beach. And honestly? Every sip takes me back to that unforgettable moment. That’s the magic of food, isn’t it? It transports you back to cherished memories while creating new ones.
Ingredients
Let’s gather our ingredients! This recipe is simple, fresh, and made with ingredients you can easily find. Here’s what you’ll need:
-
1 cup fresh pineapple chunks
- Sweet and juicy, fresh pineapple brings the tropical vibe. If fresh isn’t available, you can substitute with unsweetened canned pineapple chunks, but fresh is always better!
-
1/2 cup fresh mint leaves
- Cool and refreshing, mint is essential for that classic mojito flair. If you’re out of fresh mint, feel free to use a mint simple syrup as an alternative, though the fresh leaves are a must for that vibrant fragrance.
-
1 lime, juiced
- Limes add a zesty kick. If you’re in a pinch, lemon juice will work, but limes offer the unbeatable freshness that makes mojitos sing.
-
2 oz white rum
- This is where the party begins! Using white rum keeps the flavor light. If you prefer a non-alcoholic version, you can replace this with extra club soda for a mocktail version.
-
1 oz coconut cream
- Rich and creamy, coconut cream adds a dreamy depth. If you’re looking for a lower-calorie option, try coconut milk or a light coconut cream alternative.
-
Club soda
- Sparkling and bubbly, club soda gives the drink its refreshing effervescence. You can use flavored sparkling water if you want to mix it up!
-
Ice
- Essential for keeping your drink chilled and refreshing. To cut down on dilution, consider using large ice cubes.
-
Mint sprigs for garnish
- Not just for looks, these sprigs add an extra burst of aroma to every sip.
Step-by-Step Instructions
Alright, let’s make this Coconut Mojito with Pineapple! Follow these steps, and you’ll have a fabulous drink ready in no time.
-
Prepare Your Ingredients:
- Start by gathering all your ingredients and tools. You’ll need a blender, a muddler or wooden spoon, and a glass or cocktail shaker.
-
Blend the Pineapple and Mint:
- Toss the pineapple chunks and mint leaves into the blender. Pulse until you have a beautifully smooth mixture. This is where the party starts! If you’re craving more minty goodness, feel free to add a few more leaves.
-
Add Lime Juice and Rum:
- Pour in the fresh lime juice and white rum into the blender. Blend again until mixed well. Just a quick blend here—no need to overdo it!
-
Strain the Mixture (Optional):
- If you prefer a smoother mojito, strain the mixture into a large glass using a fine mesh strainer or cheesecloth. This will remove any bits of mint leaves or pulp, giving you a clean drink.
-
Mix with Coconut Cream:
- In a separate glass, combine the strained mixture with coconut cream. This is where the magic happens! Stir with a spoon until thoroughly mixed. If you’re feeling adventurous, you can use a cocktail shaker to give it a good shake.
-
Add Club Soda:
- Top off your glass with club soda to your liking. Stir gently to combine and keep that effervescence! This step is crucial for that refreshing fizz that we all love.
-
Prepare Your Glass:
- Fill a serving glass or mason jar with ice. Pour the mixture over the ice, allowing it to cascade through the ice cubes.
-
Garnish:
- Finish your drink with fresh mint sprigs for garnish and perhaps a slice of lime or pineapple on the rim. This boosts the presentation and makes your cocktail all the more inviting.
-
Serve:
- Serve immediately and enjoy your delicious Coconut Mojito with Pineapple! Sipping this cocktail is sure to transport you to a beach paradise, no packing required.
Serving Suggestions
To elevate your serving game, try using a fun glass like a mason jar or a classic highball glass. Consider pairing your coconut mojito with tropical appetizers like shrimp tacos, fish ceviche, or even a fresh summer salad. You could also set up a DIY cocktail bar, letting friends mix their own mojitos with different fruits and flavors! The more, the merrier.
Recipe Variations
Here are a few fun twists you can try to keep your coconut mojito exciting:
-
Berry Bliss: Add a handful of muddled strawberries or blueberries to bring in some fruity sweetness.
-
Ginger Zing: Incorporate fresh ginger for an added kick. It complements coconut beautifully!
-
Coconut Lime: Use coconut-flavored rum for an extra coconut punch, substituted for regular white rum.
-
Crystal Clear: For a lighter version, swap coconut cream for coconut water—and you’ve got yourself a revitalizing tropical refresher!
-
Minty Green: Feel free to mix in other herbs like basil or lemon verbena for a unique twist.
Chef’s Notes
As a chef, I love exploring flavors and textures in the kitchen, and this coconut mojito has evolved to become one of my staple cocktails. I often find myself swapping in various fruits depending on the season. I’ll never forget the time I made a watermelon mojito variant using the same technique, and it was an instant hit at a summer grill party.
One of my funniest kitchen moments is when I attempted to make a giant batch of these mojitos for a gathering. In my haste, I accidentally added salt instead of sugar! The reactions were priceless—but oh, what a lesson learned! Always taste as you go.
FAQs and Troubleshooting
Q: Can I make this mojito a day in advance?
A: While it’s recommended to serve this drink fresh, you can prepare the pineapple and mint mixture ahead of time, store it in the refrigerator, and mix in the coconut cream and soda right before serving.
Q: What should I do if it’s too sweet?
A: If your mojito turns out a bit sweeter than you like, add a splash of lime juice to balance it out. You can also increase the club soda to dilute it.
Q: Can I use dried mint instead of fresh?
A: Fresh mint is definitely preferable, but in a pinch, you can use dried mint. Just keep in mind that it may not deliver the same bold flavor—opt for about one-third of the amount of dried mint.
Q: How can I make this a non-alcoholic drink?
A: Simply replace the rum with more club soda or some coconut water for a refreshing mocktail. You won’t miss the alcohol with all the fresh flavors!
Nutritional Info
This Coconut Mojito with Pineapple is not only a treat for your taste buds but can also be enjoyed as a moderate indulgence. While the exact nutritional info can vary depending on your ingredient proportions, here’s a rough estimate per serving:
- Calories: ~220
- Fat: 5g (from coconut cream)
- Carbohydrates: 28g
- Sugar: 19g
- Fiber: 1g
- Protein: 0g
Drink responsibly, and enjoy the refreshing essence of the tropics in every sip!
So there you have it! My ultimate Coconut Mojito with Pineapple recipe, filled with flavor, nostalgia, and a dash of fun. Now, who’s ready to whip some up? Let’s toast to good times and even better memories! Cheers!
PrintCoconut Mojito with Pineapple

A refreshing tropical cocktail that combines the sweetness of pineapple with creamy coconut and the classic minty flavor of mojitos.
- Prep Time: 10 minutes
- Cook Time: 0 minutes
- Total Time: 10 minutes
- Yield: 2 servings 1x
- Category: Cocktail
- Method: Blending
- Cuisine: Tropical
- Diet: Vegetarian
Ingredients
- 1 cup fresh pineapple chunks
- 1/2 cup fresh mint leaves
- 1 lime, juiced
- 2 oz white rum
- 1 oz coconut cream
- Club soda
- Ice
- Mint sprigs for garnish
Instructions
- Prepare your ingredients: Gather all your ingredients and tools such as a blender, a muddler, and a glass.
- Blend the pineapple and mint: Toss the pineapple chunks and mint leaves into the blender and pulse until smooth.
- Add lime juice and rum: Pour the lime juice and white rum into the blender and mix well.
- Strain the mixture (optional): Use a fine mesh strainer to remove bits of mint leaves or pulp.
- Mix with coconut cream: Combine the strained mixture with coconut cream in a separate glass and stir until mixed.
- Add club soda: Top off with club soda and stir gently to combine.
- Prepare your glass: Fill a glass with ice and pour the mixture over the ice.
- Garnish: Decorate with fresh mint sprigs and enjoy your drink!
Notes
For a non-alcoholic version, substitute white rum with extra club soda.
Nutrition
- Serving Size: 1 serving
- Calories: 220
- Sugar: 19g
- Sodium: 10mg
- Fat: 5g
- Saturated Fat: 4g
- Unsaturated Fat: 1g
- Trans Fat: 0g
- Carbohydrates: 28g
- Fiber: 1g
- Protein: 0g
- Cholesterol: 0mg
Keywords: cocktail, coconut mojito, pineapple drink, refreshing drink, tropical cocktail
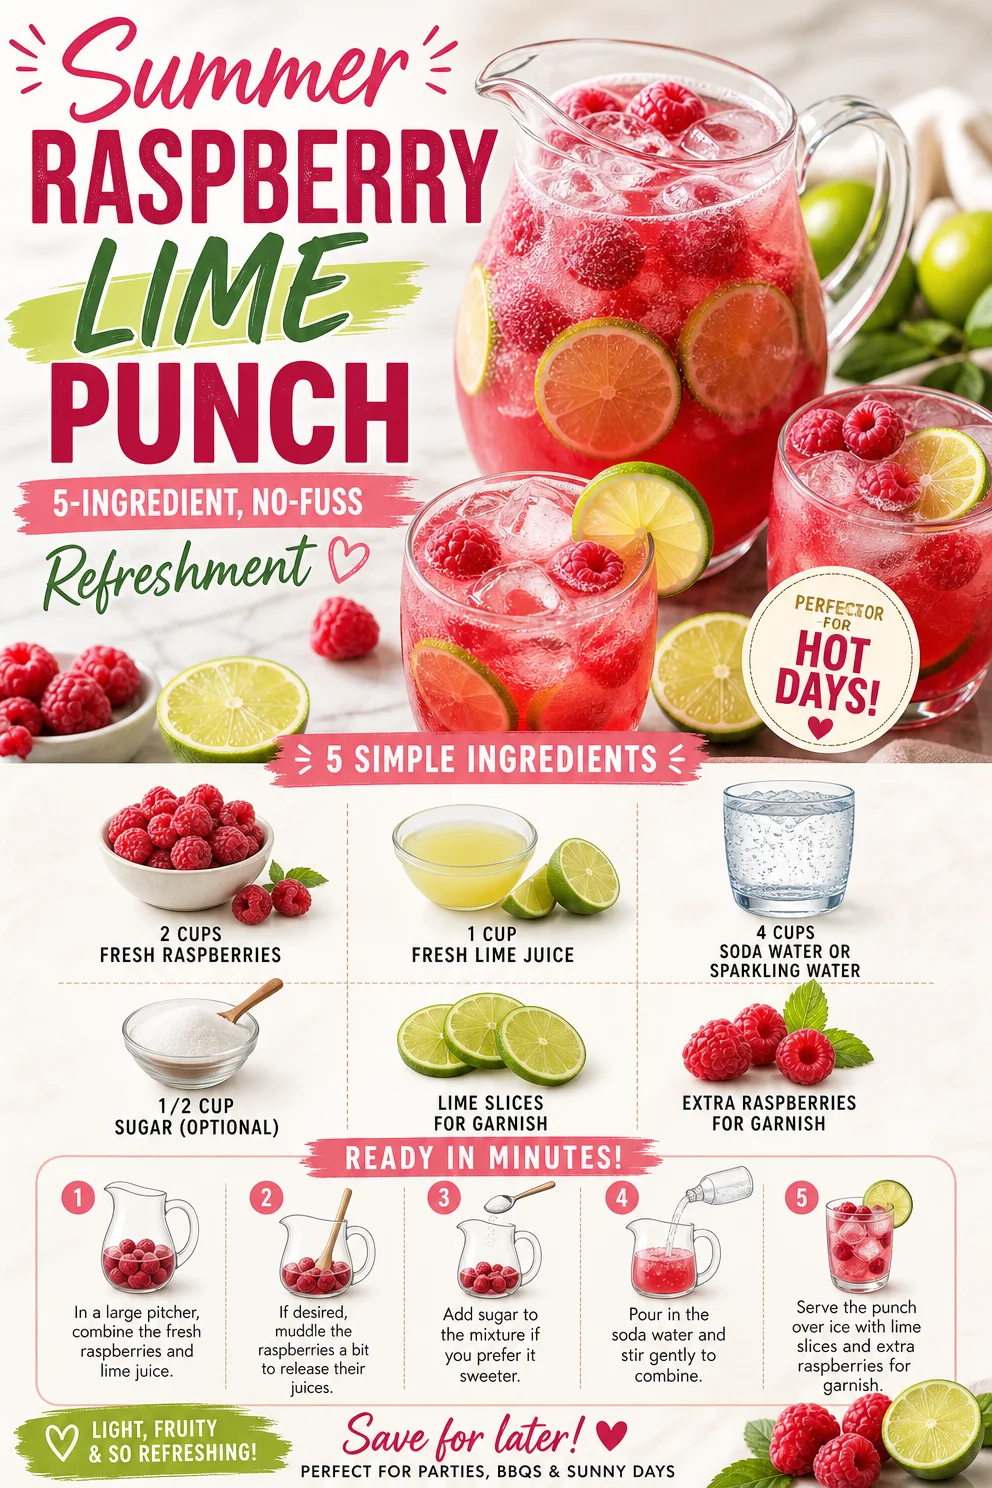
Summer Raspberry Lime Punch: 5-Ingredient, No-Fuss Refreshment
Refreshing Raspberry Lime Punch: A Sparkling Delight for Every Occasion
Hey there, fellow food lovers! If you’re anything like me, you know that sometimes all it takes is a refreshing drink to elevate your mood and bring a little sparkle to your day. Today, I’m excited to share a recipe that’s not only delicious but also bursting with vibrant flavors: Raspberry Lime Punch. This delightful beverage is perfect for BBQs, brunches, pool parties, or just lounging on the porch with a good book. So grab your apron and let’s get started on this fun and easy recipe that will have your taste buds dancing!
A Sip of Nostalgia
Let me take you back to a summer day in my childhood. I was at my grandmother’s house, where she had this incredible garden filled with fresh herbs, tangy limes, and a patch of plump, juicy raspberries. Each summer, we’d spend our afternoons in the garden, picking berries and squeezing limes, giggling as the sunlight danced through the leaves. My grandmother would whip up her famous raspberry limeade, a refreshing drink that kept us cool in the sweltering heat. With every sip, I was reminded of the sweet and tart balance, the fizz of the soda, and the love she infused into every glass.
Now, as an adult, I find joy in recreating those moments in my own kitchen, infusing them with a modern twist. The Raspberry Lime Punch I’m about to share with you is a celebration of those cherished memories—a drink that embodies the essence of summer, friendship, and the vibrant flavors we all crave.
Ingredients
Before we jump into the recipe, let’s gather our ingredients. Here’s what you’ll need to create this fizzy delight:
-
2 cups fresh raspberries
- These little gems are packed with antioxidants and provide a sweet-tart flavor that’s simply irresistible. Fresh is best, but if you can only find frozen, just thaw them and use!
-
1 cup fresh lime juice
- Freshly squeezed juice makes a world of difference! The vibrant acidity balances the sweetness of the raspberries. If you’re in a pinch, you can use bottled lime juice, but fresh is always preferable.
-
4 cups soda water or sparkling water
- This is where the magic happens! The bubbles bring everything to life. You can also use tonic water for a slightly different, more bitter taste, or even flavored sparkling waters for a unique twist.
-
1/2 cup sugar (optional)
- Adjust the sweetness to your liking. If you prefer a healthier alternative, consider using honey, agave syrup, or even a low-calorie sweetener. You can also skip the sweetener altogether if you’re a fan of tangy drinks!
-
Lime slices for garnish
- Not only do they look fabulous, but they also provide a fresh aroma as you sip your punch!
-
Extra raspberries for garnish
- Who doesn’t love a pop of color? They’ll make your drink look as delightful as it tastes.
Step-by-Step Instructions
Now that we have our ingredients prepped, let’s dive into the making of this incredible Raspberry Lime Punch. Follow these steps, and trust me—your taste buds will thank you!
-
Prep the Raspberries:
Start by rinsing those fresh raspberries thoroughly in cold water. Place them in a bowl and set aside a few for garnishing later. With the remaining berries, use a fork or muddler to gently mash them. This will release their beautiful juice and help infuse that raspberry flavor into your punch. Don’t overdo it—just enough to burst them open!Chef’s Note: You can also blend the raspberries if you prefer a smoother drink. Just strain the mixture through a fine mesh sieve later to remove the seeds!
-
Juicing the Limes:
Next, you’ll need to squeeze the limes to extract that glorious juice. Roll each lime on the countertop for a few seconds to maximize the juice yield, then cut them in half and squeeze into a measuring cup, removing any seeds along the way.Tip: For an extra zesty flavor, consider grating a little lime zest before juicing. It adds a fragrant twist!
-
Mixing the Ingredients:
In a large pitcher, combine the mashed raspberries and freshly squeezed lime juice. Stir these two together gently, letting the flavors meld. If you’ve opted to sweeten your punch, now’s the time to add your sugar (or sweetener of choice). Stir until it dissolves completely. -
Adding the Fizz:
Slowly pour in the soda water or sparkling water to avoid excessive fizzing and spillage. Gently stir the mixture to combine, making sure not to lose all those lovely bubbles.Chef’s Tip: To keep your punch fizzy, add the soda water just seconds before serving!
-
Garnishing Your Punch:
Prepare your glasses by adding a few ice cubes, then pour the punch over them. Garnish with fresh lime slices and those reserved raspberries—you want to make it as visually appealing as it is delicious!
Serving Suggestions
When it comes to serving this Raspberry Lime Punch, presentation is key! Pour the vibrant drink into clear glasses to showcase the beautiful raspberry color, and don’t forget to garnish with lime slices and berries for that extra touch. To elevate the experience, try serving it with fun straws or even in a large punch bowl for gatherings. A sprig of mint on top adds a nice aromatic element, too!
Recipe Variations
Want to switch things up a bit? Here are some fun variations for your Raspberry Lime Punch:
-
Berry Medley: Mix in other berries like blueberries, strawberries, or blackberries for a mixed berry punch that’s bursting with flavor.
-
Herbal Twist: Add a handful of fresh mint or basil to the mix for an herbal twist. Muddle them with the raspberries for maximum flavor.
-
Citrus Burst: Incorporate other citrus juices like orange or grapefruit for a zesty twist that’s bright and invigorating.
-
Spicy Kick: For those who love a little heat, add a slice of jalapeño to the mix, or even top with a splash of ginger beer for a spicy, refreshing combo.
-
Alcoholic Version: If you’d like to make a cocktail, consider adding vodka or rum for a boozy punch that’s perfect for summer parties!
Chef’s Notes
This Raspberry Lime Punch has been a staple in my home for years. It’s evolved over time, with me experimenting with different sweeteners and garnishes, as well as switching it up depending on the seasons. I love that it’s a versatile drink—perfect for kids and adults alike. The memories of making it with my grandmother always bring a smile to my face. Each summer, I find myself reminiscing while creating new memories with friends and family, sipping on this vibrant drink while basking in the sun.
FAQs and Troubleshooting
1. Can I make this punch ahead of time?
Absolutely! You can prepare the raspberry-lime mixture a few hours in advance, but for the best fizziness, add the soda water just before serving.
2. My punch is too sweet/tart; what can I do?
Don’t worry! If it’s too sweet, add a bit more lime juice to balance it out. If it’s too tart, a little more sweetener should do the trick.
3. Can I use frozen raspberries?
Yes, frozen raspberries work beautifully! Just make sure to thaw them before mashing. They might make your punch a little less vibrant in color, but they’re still packed with flavor.
4. How do I store any leftovers?
If you happen to have leftovers, store the punch in the refrigerator for up to 24 hours. However, keep in mind that the fizz might diminish over time.
Nutritional Info
While I don’t have a detailed nutritional breakdown for this drink, I can tell you it’s a light and refreshing option! With fresh fruit and minimal added sugar, it’s a much healthier alternative to sugary sodas and many commercial beverages. Feel free to adjust the sugar content based on your dietary preferences.
So there you have it! A fun, vibrant Raspberry Lime Punch that not only quenches your thirst but also brings back sweet memories of the sun-drenched days of summer. Whether you’re sipping solo or sharing with friends, I hope this recipe fills your space with laughter, joy, and fruity goodness. Cheers to fresh and delicious drinks! 🍹
PrintRefreshing Raspberry Lime Punch

A light and refreshing drink bursting with vibrant raspberry and lime flavors, perfect for any occasion.
- Prep Time: 15 minutes
- Cook Time: 0 minutes
- Total Time: 15 minutes
- Yield: 4 servings 1x
- Category: Beverage
- Method: Mixing
- Cuisine: American
- Diet: Vegan
Ingredients
- 2 cups fresh raspberries
- 1 cup fresh lime juice
- 4 cups soda water or sparkling water
- 1/2 cup sugar (optional)
- Lime slices for garnish
- Extra raspberries for garnish
Instructions
- Prep the raspberries: Rinse raspberries, set aside some for garnish, and gently mash the rest.
- Juicing the limes: Squeeze limes for juice, removing seeds.
- Mixing the ingredients: Combine mashed raspberries and lime juice in a pitcher, add sugar if desired, and stir.
- Adding the fizz: Slowly pour in soda water, gently stir to combine.
- Garnishing your punch: Pour the punch over ice and garnish with lime slices and raspberries.
Notes
For a fizzy drink, add soda water just before serving. You can also experiment with various berries or add herbs for different flavors.
Nutrition
- Serving Size: 1 serving
- Calories: 150
- Sugar: 25g
- Sodium: 5mg
- Fat: 0g
- Saturated Fat: 0g
- Unsaturated Fat: 0g
- Trans Fat: 0g
- Carbohydrates: 38g
- Fiber: 2g
- Protein: 1g
- Cholesterol: 0mg
Keywords: raspberry lime punch, refreshing drink, summer beverage, easy recipe, party drink
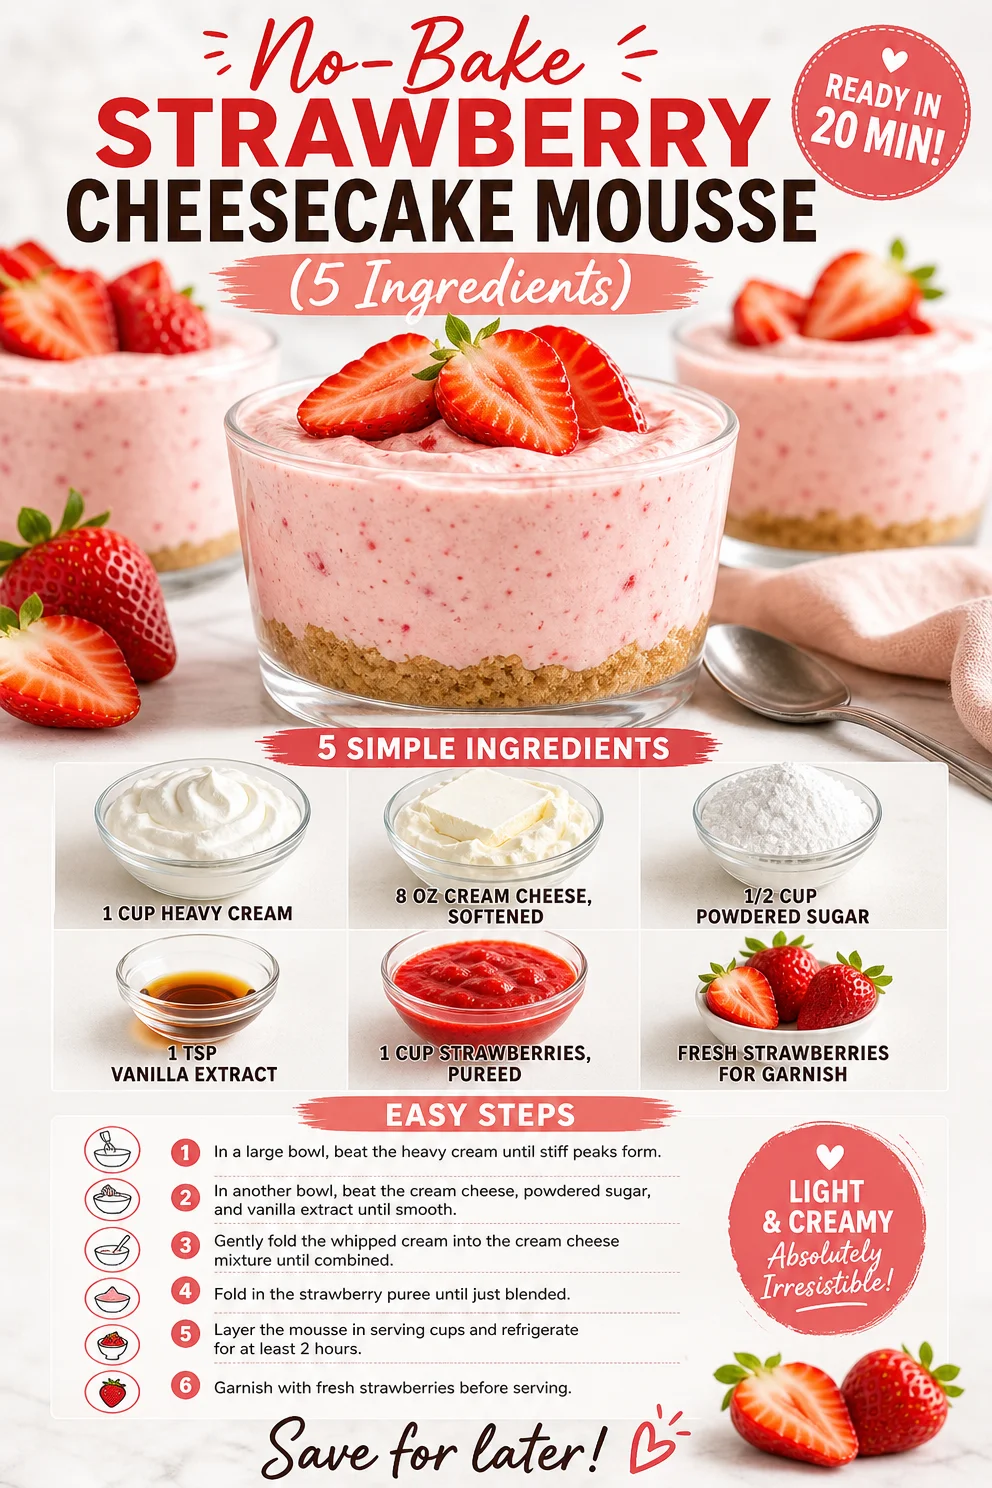
No-Bake Strawberry Cheesecake Mousse (5 Ingredients)
Indulge in Strawberry Cheesecake Mousse: A Sweet Symphony of Flavor and Nostalgia
Welcome back to Clean Plate Cravings, food lovers! Today, we’re diving headfirst into a delightful treat that dances around your taste buds like a summer breeze—Strawberry Cheesecake Mousse. Yes, you read that right! This dessert is a luscious combination of creamy cheesecake and fresh strawberries, whipped up into an airy mousse that’s as satisfying to make as it is to devour.
Imagine sinking into a fluffy cloud of this sweet, fruity mousse after a long day. It’s light yet indulgent, satisfying your sweet tooth without weighing you down. Plus, it’s incredibly simple to whip up, making it a perfect choice for both casual dinners and fancy gatherings. The best part? You don’t even need to be a professional chef to impress your family and friends with this delectable treat!
The flavor profile is a marriage of sweet and creamy, punctuated with the tartness of fresh strawberries that makes it the perfect showstopper for any occasion. I’ll guide you through every step, sharing tips and tricks along the way, so you will feel like an absolute rock star in the kitchen. So grab your mixing bowl and spatula, and let’s make some magic happen!
A Sweet Memory to Share
Before we dive into the recipe, I want to take you back to a cherished memory of mine. Growing up, my family had a sweet tradition of having dessert every Sunday evening. My grandma would whip up a variety of fabulous treats, but the showstopper was always her famous strawberry cheesecake. It was a no-bake delight, rich and creamy, just like me!
I remember the smell of fresh strawberries filling the kitchen as we mashed them down to a pulpy bliss, mixing them with cream cheese and sugar while waiting for the mouse to firm up. Sundays became a celebration—not just of dessert, but of family and laughter. My cousins and I would sit eagerly at the table, with our forks poised, as grandma presented her masterpiece.
This Strawberry Cheesecake Mousse is inspired by that beloved tradition, making it a fitting tribute to those warm, nostalgic Sundays filled with family bonding and deliciousness. I hope this dessert brings you similar joy, creating sweet memories with your loved ones.
Ingredients
Here’s what you’ll need to craft this delicious Strawberry Cheesecake Mousse:
-
1 cup heavy cream: The star ingredient for that rich and fluffy mousse texture. You can substitute it with full-fat coconut milk for a dairy-free option, but it might alter the flavor a bit.
-
8 oz cream cheese, softened: This brings the classic cheesecake flavor. For a lighter option, you can use Neufchatel cheese, which has less fat but retains the creamy consistency.
-
1/2 cup powdered sugar: Sweetens the deal! You can use granulated sugar if you prefer; just be sure to whip it longer to dissolve the sugar completely.
-
1 tsp vanilla extract: Adds a warm, vanilla flavor that complements the strawberries beautifully. Feel free to use almond extract for a different taste twist!
-
1 cup strawberries, pureed: Fresh strawberries are best, but you can also use frozen berries; just make sure to thaw and drain them well before pureeing to remove excess moisture.
-
Fresh strawberries for garnish: Because what’s a dessert without a little bling on top?
Step-by-Step Instructions
Alright, let’s get down to the nitty-gritty of creating this heavenly mousse! Follow these steps, and you’ll have a spectacular dessert ready to impress.
-
Prep your ingredients: Gather all your ingredients, ensuring the cream cheese is at room temperature (this makes it easier to blend). A quick tip: you can soften cream cheese in the microwave for about 15-20 seconds—just be careful not to melt it!
-
Whip the cream: In a mixing bowl, pour in the heavy cream. Using an electric mixer (or a whisk if you’re up for a workout!), whip the cream until stiff peaks form. This step usually takes about 3-5 minutes. The texture should be airy and hold its shape well. Tip: Start on low speed to avoid splattering cream everywhere!
-
Mix the cream cheese: In another large bowl, combine the softened cream cheese and powdered sugar. Use the electric mixer to blend until smooth and creamy, about 2-3 minutes. This is where the magic happens, transforming your ingredients into a dreamy, cheesecake-like base.
-
Add vanilla and strawberries: Now it’s time to add the vanilla extract and the pureed strawberries to the cream cheese mixture. Stir gently until all ingredients are well incorporated. This is your opportunity to taste and adjust sweetness if needed!
-
Fold in the whipped cream: This is a crucial step to ensure your mousse stays light and fluffy. Gently fold the whipped cream into the strawberry mixture using a spatula. You want to retain the airiness, so fold gently without over-mixing.
-
Chill your mousse: Once everything is combined, divide the lovely mousse into serving dishes or glasses. Cover them with plastic wrap and refrigerate for at least an hour, allowing the flavors to meld together and the mousse to firm up. This is a great time to relax and wipe down your kitchen—because we all love a clean workspace!
-
Garnish and serve: Once chilled, it’s time to serve! Top each mousse with a fresh strawberry for that pop of color and vibrant flavor. Get ready to dig in!
Serving Suggestions
To elevate the presentation and make it even more appealing, consider serving the mousse in clear glasses to showcase those beautiful layers. Swirl in some pureed strawberries or drizzle with a bit of chocolate sauce for an elegant touch. You could also pair this mousse with a shortbread cookie or some crushed graham crackers for an added crunch.
This dessert is perfect for dinner parties, special gatherings, or simply to indulge yourself after a long day!
Recipe Variations
Feeling adventurous? Here are some fun twists you can try:
-
Berry Medley Mousse: Substitute the strawberries with a mix of raspberries, blueberries, and blackberries for a vibrant berry medley.
-
Chocolate Strawberry Cheesecake Mousse: Melt some dark chocolate and swirl it into the cream cheese mixture for an enticing chocolatey hit.
-
Minty Fresh Mousse: Toss in some fresh mint leaves into the puree for a refreshing flavor that pairs beautifully with strawberries.
-
Lemon Zest Twist: Add a teaspoon of lemon zest which complements the strawberries and cheesecake flavors beautifully.
Chef’s Notes
This recipe holds a special place in my heart because it’s one of those simple indulgences that never fails to make an appearance during family gatherings. Over the years, I’ve played around with the base—a dash of lemon juice here or some chocolate there. One time, I even threw in some crushed pretzels for a salty crunch, and it was a hit!
I cherish the lightness of this dessert. It’s satisfying without the heaviness of a traditional cheesecake, making it perfect year-round. Plus, it can easily be made ahead of time, freeing up your day for more fun activities or simply lounging in your favorite chair!
FAQs and Troubleshooting
1. My mousse turned out runny! What happened?
This usually happens if the heavy cream wasn’t whipped enough or if it was folded too vigorously with the cream cheese mixture. Make sure to whip it until stiff peaks form and gently fold to retain the airiness.
2. Can I use low-fat cream cheese?
You can! Just remember that the texture and flavor may be slightly different, but it’ll still be delicious.
3. How long can I store leftovers?
You can keep the mousse covered in the fridge for up to 2-3 days. Just give it a quick stir before serving again.
4. Can I freeze this mousse?
While it’s best served fresh, you can freeze the mousse. Just make sure to store it in an airtight container. When ready to enjoy, let it thaw overnight in the fridge for the best texture.
Nutritional Info
Each serving (based on 4 servings) contains approximately:
- Calories: 275
- Protein: 5g
- Carbohydrates: 23g
- Fat: 20g
- Sugars: 14g
(Note: Nutritional values may vary based on portions, brands, and specific ingredient types used.)
With all these delightful insights, tips, and a dash of nostalgia, your journey into the land of Strawberry Cheesecake Mousse should be a breeze. I can’t wait for you to try this recipe! Not only will it add a touch of sweetness to your life, but it will also create lasting memories filled with laughter and deliciousness. Happy cooking!
PrintStrawberry Cheesecake Mousse
A delightful, airy dessert combining creamy cheesecake and fresh strawberries, perfect for any occasion.
- Prep Time: 15 minutes
- Cook Time: 0 minutes
- Total Time: 60 minutes
- Yield: 4 servings 1x
- Category: Dessert
- Method: No-Bake
- Cuisine: American
- Diet: Vegetarian
Ingredients
- 1 cup heavy cream
- 8 oz cream cheese, softened
- 1/2 cup powdered sugar
- 1 tsp vanilla extract
- 1 cup strawberries, pureed
- Fresh strawberries for garnish
Instructions
- Prep your ingredients: Gather all your ingredients, ensuring the cream cheese is at room temperature.
- Whip the cream: In a mixing bowl, pour in the heavy cream and whip until stiff peaks form, about 3-5 minutes.
- Mix the cream cheese: In another large bowl, combine the softened cream cheese and powdered sugar, blending until smooth, about 2-3 minutes.
- Add vanilla and strawberries: Incorporate the vanilla extract and pureed strawberries into the cream cheese mixture, stirring gently.
- Fold in the whipped cream: Gently fold the whipped cream into the strawberry mixture using a spatula.
- Chill your mousse: Divide the mousse into serving dishes and refrigerate for at least 1 hour.
- Garnish and serve: Top each mousse with a fresh strawberry before serving.
Notes
Consider serving in clear glasses to showcase layers. Pair with shortbread cookies or graham crackers for added crunch.
Nutrition
- Serving Size: 1 serving
- Calories: 275
- Sugar: 14g
- Sodium: 200mg
- Fat: 20g
- Saturated Fat: 12g
- Unsaturated Fat: 8g
- Trans Fat: 0g
- Carbohydrates: 23g
- Fiber: 1g
- Protein: 5g
- Cholesterol: 40mg
Keywords: strawberry, cheesecake, mousse, dessert, no-bake
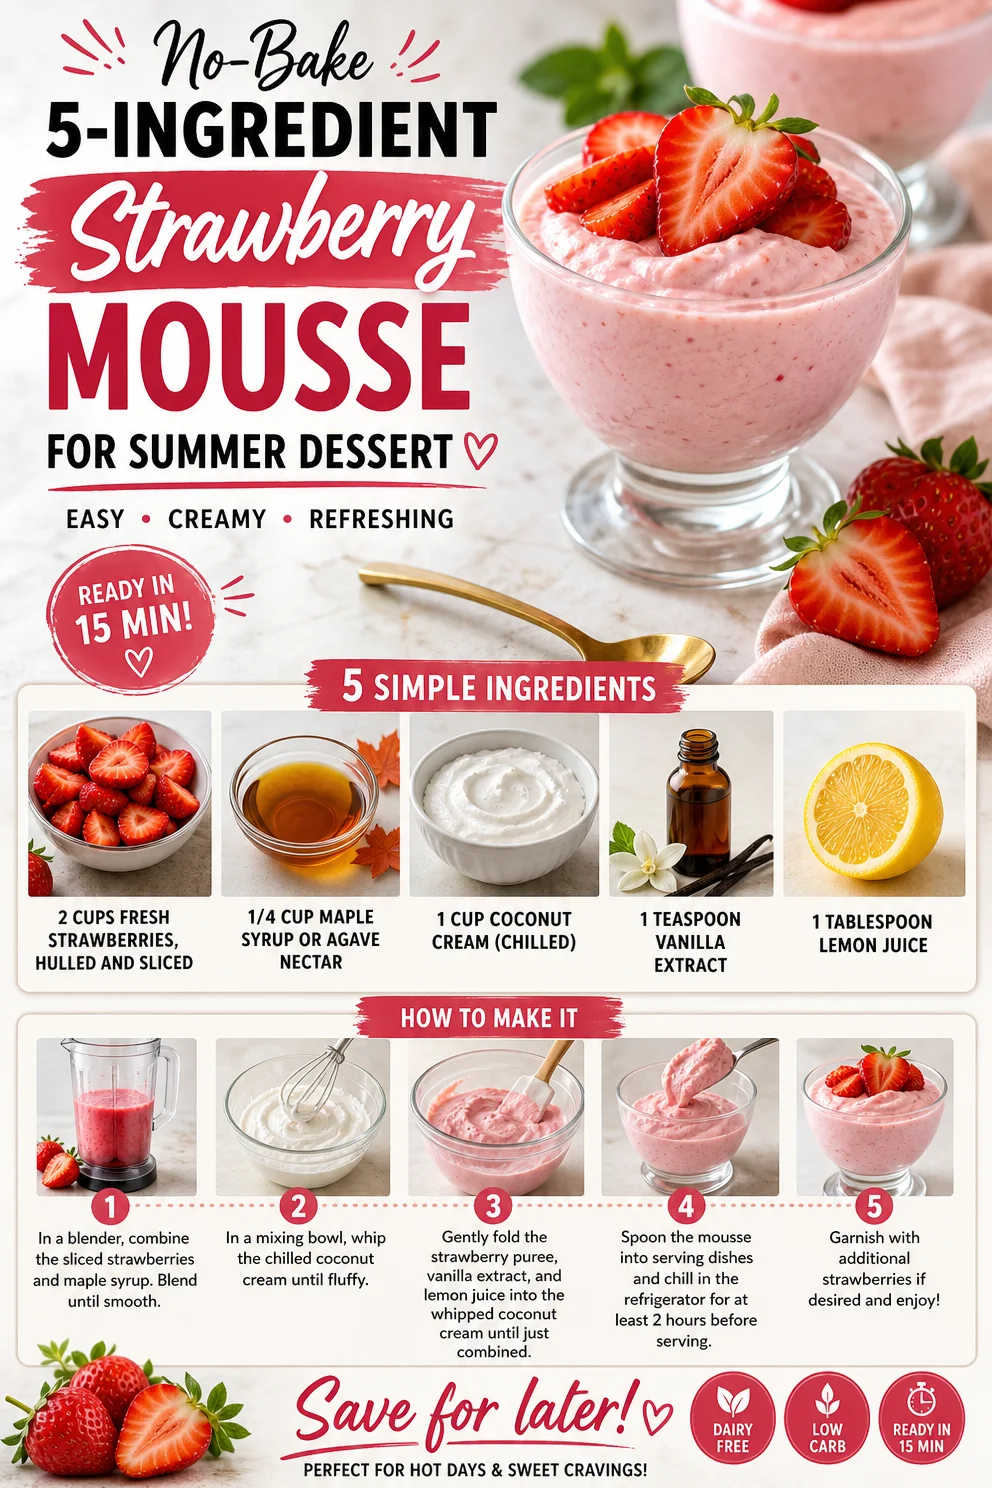
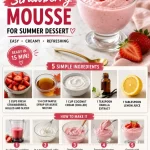
No-Bake 5-Ingredient Strawberry Mousse for Summer Dessert
Indulge in Freshness: A Delightful Strawberry Mousse
Welcome, fellow food lovers! Today, I’m shimmying into your kitchen to share one of my all-time favorite recipes—Strawberry Mousse. This light and fluffy dessert is as vibrant as a summer day and will have your taste buds dancing with delight. I mean, who doesn’t love the combination of creamy, dreamy textures mingling with the sweet-tartness of fresh strawberries? Trust me; this is a dessert that will make you feel like a culinary rockstar, even if you’re just starting out in the kitchen.
The beauty of Strawberry Mousse lies in its simplicity. With just a few wholesome ingredients, we can create a dish that feels indulgent yet remains guilt-free. Plus, it’s versatile enough to suit any occasion—from casual family dinners to fancy gatherings. It’s time to roll up those sleeves, grab your favorite apron, and let’s create a dessert that will be the star of the show.
A Sweet Childhood Memory
Before we dive into the how-to, let me whisk you away to my childhood for a moment. I grew up in a household that absolutely celebrated food. Some of my fondest memories revolve around summer afternoons spent in my grandmother’s sun-kissed garden, where strawberries grew in abundance. We’d pluck those ruby-red jewels right off the vine, their sweetness bursting in our mouths.
One day, my grandmother introduced me to her secret recipe for Strawberry Mousse. As we whipped the creamy mixture together, she shared stories from her childhood, her laughter mixing with the sounds of the mixer whirring. We indulged in cherry-red bowls of mousse on the porch, while the sun set behind us, painting the sky with hues of orange and pink.
Those moments instilled in me a love for cooking and sharing food. This Strawberry Mousse is my way of honoring those sun-drenched days filled with sweetness, laughter, and love. So, grab your strawberries, and let’s whip up some delicious memories of our own!
Ingredients
Here’s what you’ll need to create this delightful Strawberry Mousse:
-
2 cups fresh strawberries, hulled and sliced
The star ingredient! Choose ripe strawberries for the best flavor. If strawberries aren’t in season, feel free to substitute with frozen berries—just ensure they’re thawed and well-drained. -
1/4 cup maple syrup or agave nectar
A natural sweetener that adds richness! If you want to cut down on sweetness, feel free to adjust the amount. Honey can be used here too, just remember that it may change the flavor slightly. -
1 cup coconut cream (chilled)
This gives our mousse its luxurious, creamy texture. Chill your coconut cream overnight for the best results. Want a nut-free option? Try Greek yogurt instead. -
1 teaspoon vanilla extract
A splash of vanilla adds depth! Go for pure vanilla extract if you can; it makes all the difference in flavor. -
1 tablespoon lemon juice
Lemon juice brightens the flavors and balances the sweetness. If you don’t have fresh lemons, bottled lemon juice can work in a pinch.
Step-by-Step Instructions
Now that our ingredients are ready, let’s get into the nitty-gritty of creating this mousse! Follow these steps to ensure success:
-
Prepare Your Strawberries
Start by hulling and slicing your strawberries. A quick tip: use the tip of a paring knife to remove the green tops efficiently. Set aside a few lovely slices for garnishing later! -
Blend the Strawberries
Toss your sliced strawberries into a blender or food processor. Blend until smooth. You want it velvety! If you prefer textured mousse, pulse a few times to leave some tiny chunks. -
Sweeten It Up
Add the maple syrup (or your chosen sweetener) to the strawberry puree. Blend again until combined. Taste at this stage; adjust sweetness as needed! You can even add a tiny pinch of salt to enhance those sweet notes. -
Whip the Coconut Cream
In a separate bowl, beat your chilled coconut cream. Use an electric mixer on medium speed; you want it fluffy and light. It should take about 3-4 minutes. If it’s too stiff, you can add a splash of non-dairy milk to help it along. -
Combine the Mixtures
Gently fold the strawberry puree into the whipped coconut cream until well combined. Be careful not to deflate the cream too much; we want that airy texture to remain! This is where the magic happens. -
Add Vanilla and Lemon Juice
Now, add your teaspoon of vanilla extract and tablespoon of lemon juice. Fold it gently until everything is mixed in. The mousse should look pretty and light, with a beautiful pink color. -
Chill to Perfection
Spoon the mousse into your favorite serving dishes or glasses. Cover them with plastic wrap or a lid and chill in the fridge for at least an hour. This step is crucial to help the flavors meld and ensure it’s cool when served.
Serving Suggestions
Once your mousse has chilled, it’s time to serve! You can ladle it into elegant glasses for a fancy dinner party or into simple bowls for a cozy night-in. Garnish with those reserved strawberry slices, a dollop of coconut cream, or even a sprig of fresh mint for an extra pop of freshness. If you’re feeling adventurous, drizzle a little chocolate sauce over the top—this mousse is all about creative expression, after all!
Recipe Variations
Now, let’s jazz up this recipe with some fun twists, shall we? Here are a few ideas to keep things exciting:
-
Berry Medley Mousse: Blend in a mix of berries—think blueberries, raspberries, or blackberries. The colors and flavors will make your mousse appealing and delicious!
-
Chocolate-Covered Strawberry Mousse: Add 2 tablespoons of cocoa powder to the strawberry mixture for a decadent chocolate flavor that pairs beautifully with strawberries.
-
Citrus Burst: Replace lemon juice with lime or orange juice for a zesty twist on this classic dessert.
-
Herb-Infused: Add fresh mint or basil to the blender with the strawberries for a refreshing herbal note.
-
Nutty Mousse: Incorporate a tablespoon of almond extract along with the vanilla for a subtle nuttiness that complements the strawberries.
Chef’s Notes
This Strawberry Mousse is a canvas for creativity! I often swap ingredients based on what’s in my fridge or pantry—there’s no right or wrong way here. And if you happen to over-whip your coconut cream (guilty!), fear not! Simply add a tad more coconut cream to soften it back up.
I also learned in my kitchen adventures that a bit of patience goes a long way. Letting the mousse chill for a bit helps solidify the lovely fluffy texture. Plus, it allows the flavors to sing in harmony. So don’t rush it; good things take time—especially sweet, creamy things!
FAQs and Troubleshooting
-
Why is my mousse not thickening?
If your mousse isn’t thickening, ensure that your coconut cream is chilled properly before whipping. If you used regular cream, it may require more whipping. -
Can I make this ahead of time?
Absolutely! Strawberry Mousse can be made a day ahead, just keep it stored in the refrigerator. It’s a great make-ahead dessert. -
How long will the mousse last?
Stored in an airtight container in the refrigerator, this mousse will stay fresh for about 2-3 days. -
What if I want to make this recipe vegan?
The recipe is already vegan-friendly, thanks to the coconut cream and maple syrup. Just double-check that all your ingredients align with vegan diets.
Nutritional Info
Each serving of Strawberry Mousse contains approximately:
- Calories: 180
- Fat: 11g
- Carbohydrates: 20g
- Protein: 2g
- Fiber: 2g
And there you have it! A delightful Strawberry Mousse that’s fresh, delicious, and sure to impress. This dessert not only brings back beautiful memories but also creates new ones with every spoonful! Remember, the kitchen is your playground; experiment, enjoy, and most importantly, savor every bite. Happy cooking!
PrintStrawberry Mousse
A light and fluffy strawberry mousse that combines creamy textures with the sweet-tartness of fresh strawberries.
- Prep Time: 15 minutes
- Cook Time: 0 minutes
- Total Time: 60 minutes
- Yield: 4 servings 1x
- Category: Dessert
- Method: No-Cook
- Cuisine: International
- Diet: Vegan
Ingredients
- 2 cups fresh strawberries, hulled and sliced
- 1/4 cup maple syrup or agave nectar
- 1 cup coconut cream (chilled)
- 1 teaspoon vanilla extract
- 1 tablespoon lemon juice
Instructions
- Prepare your strawberries by hulling and slicing them. Set aside a few slices for garnishing later.
- Blend the sliced strawberries in a blender until smooth.
- Sweeten the strawberry puree by adding maple syrup and blending again. Adjust sweetness as needed.
- Whip the chilled coconut cream in a separate bowl until fluffy, about 3-4 minutes.
- Combine the strawberry puree with the whipped coconut cream, folding gently.
- Add the vanilla extract and lemon juice, folding until well mixed.
- Chill the mousse in serving dishes for at least an hour before serving.
Notes
You can garnish with additional strawberry slices or a dollop of coconut cream. This mousse can be made ahead of time and stored in the fridge for 2-3 days.
Nutrition
- Serving Size: 1 serving
- Calories: 180
- Sugar: 14g
- Sodium: 5mg
- Fat: 11g
- Saturated Fat: 10g
- Unsaturated Fat: 1g
- Trans Fat: 0g
- Carbohydrates: 20g
- Fiber: 2g
- Protein: 2g
- Cholesterol: 0mg
Keywords: strawberry mousse, dessert, vegan dessert, easy dessert, summer recipes