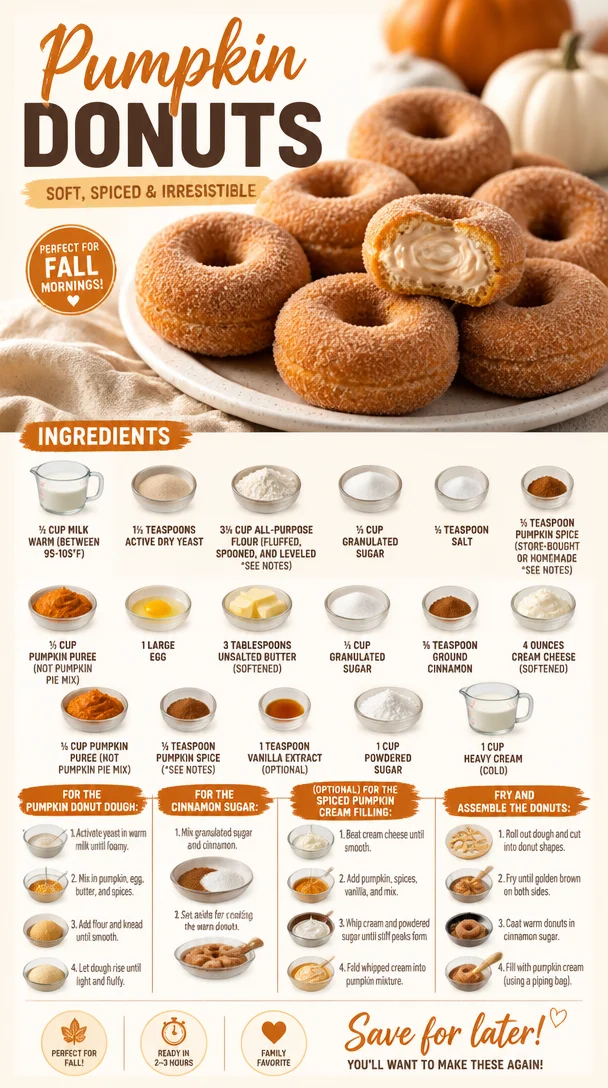
Pumpkin Donuts
Whipped Pumpkin Bliss: Your New Favorite Pumpkin Donuts Recipe
As the leaves begin to fall and the air grows crisp, we all know what that means: it’s pumpkin season! A time when everything from our lattes to our baking transforms with the rich, warm flavors of harvest. But let’s be honest—who can resist the soft, fluffy goodness of a freshly baked donut? Today, I’m excited to share my delightful pumpkin donut recipe that’s perfect for cozy mornings or delightful afternoon snacks. Trust me; your taste buds will be singing!
These pumpkin donuts are not just any ordinary treat; they are light, airy, and infused with the essence of autumn. The secret? A blend of warm spices and the natural sweetness of pumpkin puree. Not to mention, they’re super easy to whip up, making them a great project for a chilly weekend in the kitchen. With each bite, you can almost hear the crunching leaves beneath your feet! So grab your apron, and let’s get those ovens warm—we’re about to create some magic!
A Touch of Nostalgia: My First Pumpkin Donut Adventure
I remember the very first time I decided to make pumpkin donuts. It was one of those overcast October afternoons when the rain tapped softly against the window. I was home from college for the weekend, and my mom had a stash of pumpkin puree left over from her annual baking spree. I can still picture us together in the kitchen, flour flying every which way. We had a blast mixing the ingredients and giggling as we tasted the batter (I couldn’t help but sneak a few spoonfuls!).
Once we pulled those golden, warm donuts from the oven, the heavenly smell filled our home and wrapped around us like a cozy blanket. As we dipped them into cinnamon sugar, our hearts and stomachs were filled with love and joy. That day sparked my passion for kitchen experimenting, and now I can’t wait for you to experience the same delight! So grab that pumpkin puree, and let’s create some sweet memories together.
Ingredients
Here’s what you’ll need to make these delightful pumpkin donuts:
-
½ cup warm milk (between 95-105°F): This helps activate the yeast to make your donuts fluffy. If you don’t have milk, almond or oat milk works too!
-
1½ teaspoons active dry yeast: This little magic worker gives your donuts that perfect rise. If you’re using instant yeast, you can skip the activation step!
-
3¼ cups all-purpose flour (fluffed, spooned, and leveled): Measuring is crucial for successful baking! Fluffing your flour aerates it, giving you a lighter donut.
-
⅓ cup granulated sugar: This adds sweetness! Brown sugar can be swapped for a deeper flavor if you like.
-
½ teaspoon salt: A pinch of salt enhances all the flavors, so don’t skip it!
-
½ teaspoon pumpkin spice (store-bought or homemade): This aromatic mixture brings the warm, cozy flavors of fall into your donuts. Feel free to make your own using cinnamon, ginger, nutmeg, and cloves!
-
⅔ cup pumpkin puree (NOT pumpkin pie mix): Pure pumpkin gives the donuts moisture and flavor without extra sugars. Canned is fine but be sure to check it’s the pure stuff!
-
1 large egg: Binds the ingredients together and adds richness (vegan substitution is coming up!).
-
3 tablespoons unsalted butter (softened): Adds a lovely richness. You can substitute with coconut oil for a dairy-free option.
-
½ cup granulated sugar: For the cinnamon-sugar coating, because who doesn’t love that?
-
¾ teaspoon ground cinnamon: Essential for that warm, spicy goodness!
-
4 ounces cream cheese (softened): This will be part of the creamy glaze. It makes it luscious!
-
¼ cup pumpkin puree (NOT pumpkin pie mix): Additional pumpkin in the glaze? Yes, please!
-
½ teaspoon pumpkin spice: A sprinkle again for extra flavor in that glaze.
-
1 teaspoon vanilla extract (optional): Optional but highly recommended for an extra layer of depth.
-
1 cup powdered sugar: For that sweet, satisfying glaze.
-
1 cup heavy cream (cold): Makes the glaze a dreamy consistency. You could substitute with a non-dairy cream or coconut cream if you’d like!
With all these ingredients in hand, you’re on the way to creating the most delightful pumpkin donuts!
Step-by-Step Instructions
-
Activate the yeast: In a small bowl, combine the warm milk and active dry yeast. Let it sit for about 5-10 minutes until it becomes foamy. This tells you the yeast is alive and ready to do its job—don’t skip this step! If you don’t see foam, start over with new yeast.
-
Make the dough: In a large bowl, mix the flour, sugar, salt, and pumpkin spice. Whisk it well to combine. Then, create a well in the center and add the yeast mixture, pumpkin puree, egg, and softened butter.
-
Knead the dough: Mix until a shaggy dough forms. Lightly flour your counter and knead the dough for about 5-7 minutes, or until it becomes smooth and elastic. If it’s too sticky, sprinkle a bit more flour, but be careful not to overdo it! We want that fluffy texture.
-
Let it rise: Place the dough in a greased bowl, cover it with a kitchen towel, and let it rise in a warm spot for about 1-2 hours or until doubled in size. This is the perfect time to clean up your kitchen a bit or enjoy a cozy cup of tea!
-
Shape the donuts: Once your dough has risen, punch it down gently to release the air. Transfer it to a floured surface and roll it out to about ½-inch thick. Use a donut cutter or two round cookie cutters (one large and one small) to cut out your donuts.
-
Heat the oil: In a deep saucepan, heat oil to about 375°F. You can use a thermometer to ensure it’s at the right temperature. If you don’t have a thermometer, drop a small piece of dough in; if it sizzles and rises, you’re good to go!
-
Fry the donuts: Carefully place the donuts in the hot oil, a few at a time, and fry them for about 1-2 minutes on each side until golden brown. Remember, don’t overcrowd the pan!
-
Drain and coat: Use a slotted spoon to transfer the donuts to a paper towel-lined plate to drain excess oil. After a minute, while they’re still warm, toss them in the cinnamon-sugar mixture until well coated.
-
Prepare the glaze: In a medium bowl, beat the softened cream cheese until smooth. Add the additional pumpkin puree, pumpkin spice, vanilla extract, and powdered sugar. Mix until creamy and smooth. Slowly whisk in the cold heavy cream for a velvety glaze.
-
Glaze the donuts: Once the donuts have cooled slightly, dip each one into the pumpkin glaze, letting the excess drip off. Set them on a wire rack to allow the glaze to set.
And there you have it—beautiful pumpkin donuts that will fill your kitchen with the aroma of autumn!
Serving Suggestions
These pumpkin donuts are best served warm! Arrange them on a beautiful platter, and feel free to sprinkle a dash of cinnamon on top for that extra cozy vibe. Drizzle with any leftover glaze or serve with a side of creamy coffee or chai for a delightful pairing.
Recipe Variations
Want to switch things up? Here are a few fun ideas to make your pumpkin donuts uniquely yours:
-
Spicy Pumpkin Chocolate Chip: Fold in ½ cup of chocolate chips into your batter for a chocolatey twist!
-
Maple Glazed: Swap the cream cheese glaze for a maple glaze by mixing powdered sugar with maple syrup and a bit of milk.
-
Vegan Donuts: Use flaxseed eggs (1 tablespoon flaxseed meal + 2.5 tablespoons water = 1 egg), almond milk instead of cow’s milk, and coconut oil instead of butter.
-
Nutty Crunch: Top your donuts with chopped pecans or walnuts for a bit of crunchy texture!
-
Cream-filled Delight: Instead of dipping in glaze, you can fill these donuts with your favorite flavored filling—a delicious surprise inside!
Chef’s Notes
Over the years, this pumpkin donuts recipe has morphed and changed, filled with stories of impromptu kitchen parties and cozy family gatherings. I fondly remember the time I hosted a fall-themed brunch and made these donuts for friends, proving to them that homemade isn’t just better, but irresistibly delicious.
Baking is about experimenting and having fun—with a sprinkle of laughter and a dash of joy. I encourage you to put your personality into this recipe and make it your own. Embrace the seasonal ingredients, and allow yourself to enjoy the journey in the kitchen.
FAQs and Troubleshooting
1. What if my donuts turned out too dense?
If your donuts are dense, it could be because your yeast didn’t activate correctly or the flour was packed too tightly. Always fluff and spoon your flour before measuring.
2. Can I make the dough ahead of time?
Absolutely! You can make the dough, let it rise, punch it down, and refrigerate it overnight. The next day, just let it come to room temperature before rolling out and frying.
3. What can I do if I don’t have a donut cutter?
No worries! Use two round cookie cutters, or even the top of a glass for the outer circle and the cap from a bottle for the inner circle.
4. My glaze is too runny. What do I do?
If your glaze is too runny, gradually add more powdered sugar until you reach your desired consistency. The creaminess of the cream cheese should give it a nice thickness.
Nutritional Info
While I don’t usually dive deep into nutrition stats here, I believe in balance. These pumpkin donuts are a treat meant to be enjoyed as part of your beautiful life—don’t forget to savor each bite!
In conclusion, these pumpkin donuts aren’t just a delightful treat; they bring people together and celebrate the simple joys of life. I can’t wait for you to try them and share your kitchen adventures! Remember, cooking is about creativity and love, so sprinkle a little bit of both in everything you make. Happy baking!
PrintWhipped Pumpkin Bliss: Your New Favorite Pumpkin Donuts
Delight in the flavors of autumn with these light and airy pumpkin donuts, perfect for cozy mornings or delightful afternoon snacks.
- Prep Time: 30 minutes
- Cook Time: 30 minutes
- Total Time: 60 minutes
- Yield: 12 donuts 1x
- Category: Dessert
- Method: Frying
- Cuisine: American
- Diet: Vegetarian
Ingredients
- ½ cup warm milk (between 95-105°F)
- 1½ teaspoons active dry yeast
- 3¼ cups all-purpose flour (fluffed, spooned, and leveled)
- ⅓ cup granulated sugar
- ½ teaspoon salt
- ½ teaspoon pumpkin spice
- ⅔ cup pumpkin puree (NOT pumpkin pie mix)
- 1 large egg
- 3 tablespoons unsalted butter (softened)
- ½ cup granulated sugar (for coating)
- ¾ teaspoon ground cinnamon
- 4 ounces cream cheese (softened)
- ¼ cup pumpkin puree (for glaze)
- ½ teaspoon pumpkin spice (for glaze)
- 1 teaspoon vanilla extract (optional)
- 1 cup powdered sugar
- 1 cup heavy cream (cold)
Instructions
- Activate the yeast: In a small bowl, combine the warm milk and active dry yeast. Let it sit for about 5-10 minutes until it becomes foamy.
- Make the dough: In a large bowl, mix the flour, sugar, salt, and pumpkin spice. Create a well in the center and add the yeast mixture, pumpkin puree, egg, and softened butter.
- Knead the dough: Mix until a shaggy dough forms. Knead for about 5-7 minutes until smooth and elastic.
- Let it rise: Place the dough in a greased bowl, cover it, and let it rise in a warm spot for about 1-2 hours until doubled in size.
- Shape the donuts: Punch down the dough gently. Roll it out to about ½-inch thick and cut out your donuts.
- Heat the oil: Heat oil to about 375°F in a deep saucepan.
- Fry the donuts: Carefully fry the donuts for about 1-2 minutes on each side until golden brown.
- Drain and coat: Transfer to a paper towel-lined plate. Coat in cinnamon-sugar mixture while warm.
- Prepare the glaze: Beat the cream cheese until smooth, and mix in additional pumpkin puree, pumpkin spice, vanilla extract, and powdered sugar. Whisk in cold heavy cream.
- Glaze the donuts: Dip each donut into the pumpkin glaze and set on a wire rack to allow the glaze to set.
Notes
These donuts are best served warm. Pair with coffee or chai for a delightful experience.
Nutrition
- Serving Size: 1 donut
- Calories: 250
- Sugar: 15g
- Sodium: 200mg
- Fat: 10g
- Saturated Fat: 5g
- Unsaturated Fat: 4g
- Trans Fat: 0g
- Carbohydrates: 35g
- Fiber: 1g
- Protein: 3g
- Cholesterol: 30mg
Keywords: pumpkin donuts, fall recipes, baking, autumn desserts
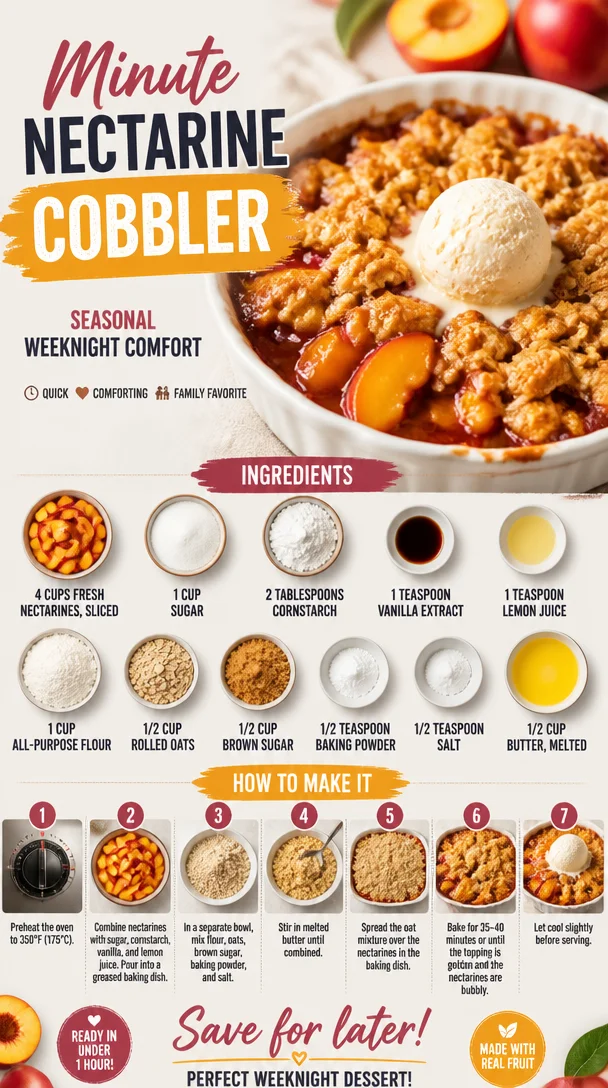
Minute Nectarine Cobbler: Seasonal Weeknight Comfort
A Fresh Take on Nectarine Cobbler: The Sweet Slice of Summer
Hey there, fellow food lovers! Today, we’re diving into a fruit-laden delight that captures the essence of sunny days and lazy afternoons—Fresh Nectarine Cobbler. This dish embodies everything we adore about summer: juicy nectarines that burst with flavor, a crumbly topping that whispers comfort, and an aroma that dances through the kitchen inviting you to indulge.
Introduction
Imagine it’s a warm Saturday afternoon. The sky is blue, the sun is shining, and you’re lounging on the porch, savoring the sweet fragrance of summer. You take a quick trip to the farmer’s market and come back with a basket brimming with perfectly ripe nectarines. The moment you sink your teeth into one, juice dribbling down your chin, you realize you can’t let these beauties sit idly on the kitchen counter. What’s the best way to celebrate them? Nectarine cobbler, of course!
This cobbler is not just any dessert—it’s the sweet embrace of nostalgia, warm and welcoming, just like grandma used to make. There’s something magical about that first spoonful, the way the sweet nectarines mingle with the buttery crumble on top. Each bite tells a story, bringing back memories of family gatherings and backyard BBQs, where laughter echoed around the table as we savored every last crumb.
And while you might think cobbler sounds complicated, I’m here to tell you it’s as easy as pie—or, dare I say, even easier! With simple ingredients you likely have on hand and a few straightforward steps, you can whip up a delightful dessert that will impress your family and friends. So, roll up your sleeves, and let’s make some magic happen in the kitchen!
Personal Story
I first fell in love with the idea of cobblers during a summer spent at my grandparents’ home in the countryside. Each week, we’d visit the local orchard, where my grandmother would let me pick the ripest fruit, often resulting in a few strays ending up in my mouth before making it home! One day, we came back with an enormous basket overflowing with nectarines.
That evening, the kitchen filled with laughter and the clinking of spoons against bowls as we mixed ingredients and created our masterpiece. My grandmother’s enthusiasm was infectious; she showed me how to slice the fruit just right and how a pinch of salt could enhance the sweetness of the nectarines. I never knew baking could be so much fun! When the cobbler finally emerged from the oven, golden brown and bubbling, I’ll never forget the look on her face as she handed me a warm bowl, ice cream melting perfectly on top. It was pure bliss.
Now, whenever I make nectarines cobbler, I can’t help but recall those joyful summer days, and I can’t wait to create new memories with all of you and this delightful recipe!
Ingredients
Here’s what you’ll need to whip up this Fresh Nectarine Cobbler, along with some handy tips:
-
4 cups fresh nectarines, sliced: Pick ripe, juicy ones for the best flavor! If nectarines aren’t available, feel free to substitute peaches or even plums—just adjust the sugar based on the fruit’s sweetness.
-
1 cup sugar: This is essential for balancing the tartness of the nectarines. You can substitute with coconut sugar or any granulated sugar of your choice for a different flavor.
-
2 tablespoons cornstarch: This helps thicken the fruit’s juices as it bakes. If you don’t have cornstarch on hand, arrowroot powder or all-purpose flour can work in a pinch.
-
1 teaspoon vanilla extract: Adds a lovely depth of flavor. If you’re feeling adventurous, try almond extract for a nutty twist!
-
1 teaspoon lemon juice: Brightens up the filling and complements the sweetness of the nectarines. Lime juice can work too, providing another layer of zest.
-
1 cup all-purpose flour: This creates the base for the topping. Gluten-free flour blends are a perfect alternative if you’re avoiding gluten.
-
½ cup rolled oats: These add a delightful texture. For a nutty crunch, consider using crushed nuts instead!
-
½ cup brown sugar: The molasses in the brown sugar enhances the caramelization when baked. Light brown sugar works just as well, though dark brown will intensify the flavor.
-
½ teaspoon baking powder: Key for that enticing rise in the topping! Be sure it’s fresh for optimal results.
-
½ teaspoon salt: Just a pinch brings out the natural flavors in your dish. Sea salt or kosher salt works wonderfully.
-
½ cup butter, melted: This is what makes the topping deliciously rich. If you’re looking for a dairy-free alternative, melted coconut oil or vegan butter can do the trick.
Step-by-Step Instructions
-
Preheat that Oven: Kick things off by preheating your oven to 350°F (175°C). This ensures your cobbler has a warm, inviting home to rise in.
-
Prepare Your Nectarines: Slice the nectarines into thin wedges—about ¼ inch thick. Toss them in a large bowl with sugar, cornstarch, vanilla extract, and lemon juice. Let them sit for about 10 minutes to allow the sugars to draw out their juices—trust me, this is where the magic begins!
-
Make the Topping: In a separate bowl, whisk together the flour, rolled oats, brown sugar, baking powder, and salt. Then, drizzle in the melted butter. Use a fork or your fingers to combine until the mixture resembles coarse crumbs. It should be a little messy—embrace it!
-
Combine Fruit and Topping: Pour the nectarine mixture into a greased baking dish (about 8×8 inches works perfectly). Evenly distribute the crumble topping over the nectarines, making sure to cover as much of the fruit as possible. This helps to create that gorgeous, golden crust we all crave.
-
Bake It Up: Slide the dish into your preheated oven. Let it bake for about 30-35 minutes, or until the topping is golden brown and the nectarines are bubbly. Keep an eye on it—the aroma will have everyone flocking to the kitchen!
-
Cool and Serve: Once baked, remove the cobbler from the oven and allow it to cool for 10-15 minutes. This lets the juices thicken up a bit more and makes it easier to serve.
Serving Suggestions
For plating, scoop generous portions of the cobbler into bowls (the deeper the better!). Top with a scoop of vanilla ice cream or a dollop of freshly whipped cream for that classic touch. Drizzle a touch of caramel sauce for an extra touch of indulgence, and garnish with a sprig of fresh mint if you’re feeling fancy!
Recipe Variations
-
Berry & Nectarine Mash-Up: Mix in some fresh berries like blueberries or raspberries for a colorful twist and added antioxidants!
-
Nutty Topping: Add chopped nuts (think almonds or pecans) to the topping mixture for a delightful crunch.
-
Spiced Cobbler: Kick it up a notch by adding a teaspoon of cinnamon or nutmeg to the nectarines for a warm, cozy flavor that’s perfect for fall.
-
Coconut Delight: Swap regular oats for unsweetened shredded coconut for a tropical vibe.
-
Vegan Twist: Replace the butter with coconut oil and use a flax egg instead of regular egg (1 tablespoon ground flaxseed + 3 tablespoons water for every egg).
Chef’s Notes
Every time I make this cobbler, I’m reminded of the joy that comes from simple ingredients coming together to create something spectacular. What’s funny is how I initially struggled with the topping—trying to get it just right! I once forgot to add sugar to the topping, and while it was still good, it just didn’t have the “wow” factor. Now I ensure every component sings together in harmony. Over the years, I’ve played with flavors, and each version has its own special place in my heart.
FAQs and Troubleshooting
1. Can I use frozen nectarines?
Yes, you certainly can! Just make sure to thaw and drain them first to prevent excess moisture in the cobbler.
2. Why is my cobbler soggy?
If your cobbler turns out soggy, it’s usually due to overripe fruit or not allowing it enough time to cool. Ensure to let it rest before serving for best texture.
3. Can I make it ahead of time?
Absolutely! You can prep the fruit filling and topping separately and store them in the fridge overnight. Just assemble and bake when you’re ready.
4. How do I store leftovers?
Store leftover cobbler in an airtight container in the fridge for up to 3 days—though it rarely lasts that long in my house!
Nutritional Info
While I won’t bore you with numbers, I’ll say this: nectarines are a great source of vitamins A and C, while the oats provide fiber that keeps you feeling satisfied. If you indulge in a scoop of ice cream on top, it transforms this dessert into a total treat—just don’t forget to savor every bite!
So there you have it—a Fresh Nectarine Cobbler recipe that’s easy enough for every home cook to master. I can’t wait for you to give it a try and share it with loved ones. Remember, the best dishes are made with love and a pinch of nostalgia. Happy baking!
PrintFresh Nectarine Cobbler
A delightful summer dessert featuring juicy nectarines topped with a crumbly mixture, perfect for warm days and family gatherings.
- Prep Time: 15 minutes
- Cook Time: 35 minutes
- Total Time: 50 minutes
- Yield: 8 servings 1x
- Category: Dessert
- Method: Baking
- Cuisine: American
- Diet: Vegetarian
Ingredients
- 4 cups fresh nectarines, sliced
- 1 cup sugar
- 2 tablespoons cornstarch
- 1 teaspoon vanilla extract
- 1 teaspoon lemon juice
- 1 cup all-purpose flour
- ½ cup rolled oats
- ½ cup brown sugar
- ½ teaspoon baking powder
- ½ teaspoon salt
- ½ cup butter, melted
Instructions
- Preheat the oven to 350°F (175°C).
- Slice the nectarines into thin wedges and mix with sugar, cornstarch, vanilla extract, and lemon juice. Allow to sit for 10 minutes.
- In a bowl, whisk together flour, rolled oats, brown sugar, baking powder, and salt. Drizzle in melted butter and mix until coarse crumbs form.
- Pour the nectarine mixture into a greased baking dish. Evenly distribute the crumble topping over the nectarines.
- Bake for 30-35 minutes or until the topping is golden brown and the nectarines are bubbly.
- Cool for 10-15 minutes before serving.
Notes
Serve with a scoop of vanilla ice cream or whipped cream. You can customize with nuts or spices for a unique touch.
Nutrition
- Serving Size: 1 serving
- Calories: 270
- Sugar: 22g
- Sodium: 180mg
- Fat: 10g
- Saturated Fat: 6g
- Unsaturated Fat: 4g
- Trans Fat: 0g
- Carbohydrates: 40g
- Fiber: 3g
- Protein: 3g
- Cholesterol: 30mg
Keywords: nectarine cobbler, summer dessert, fruit dessert, easy recipe, baking
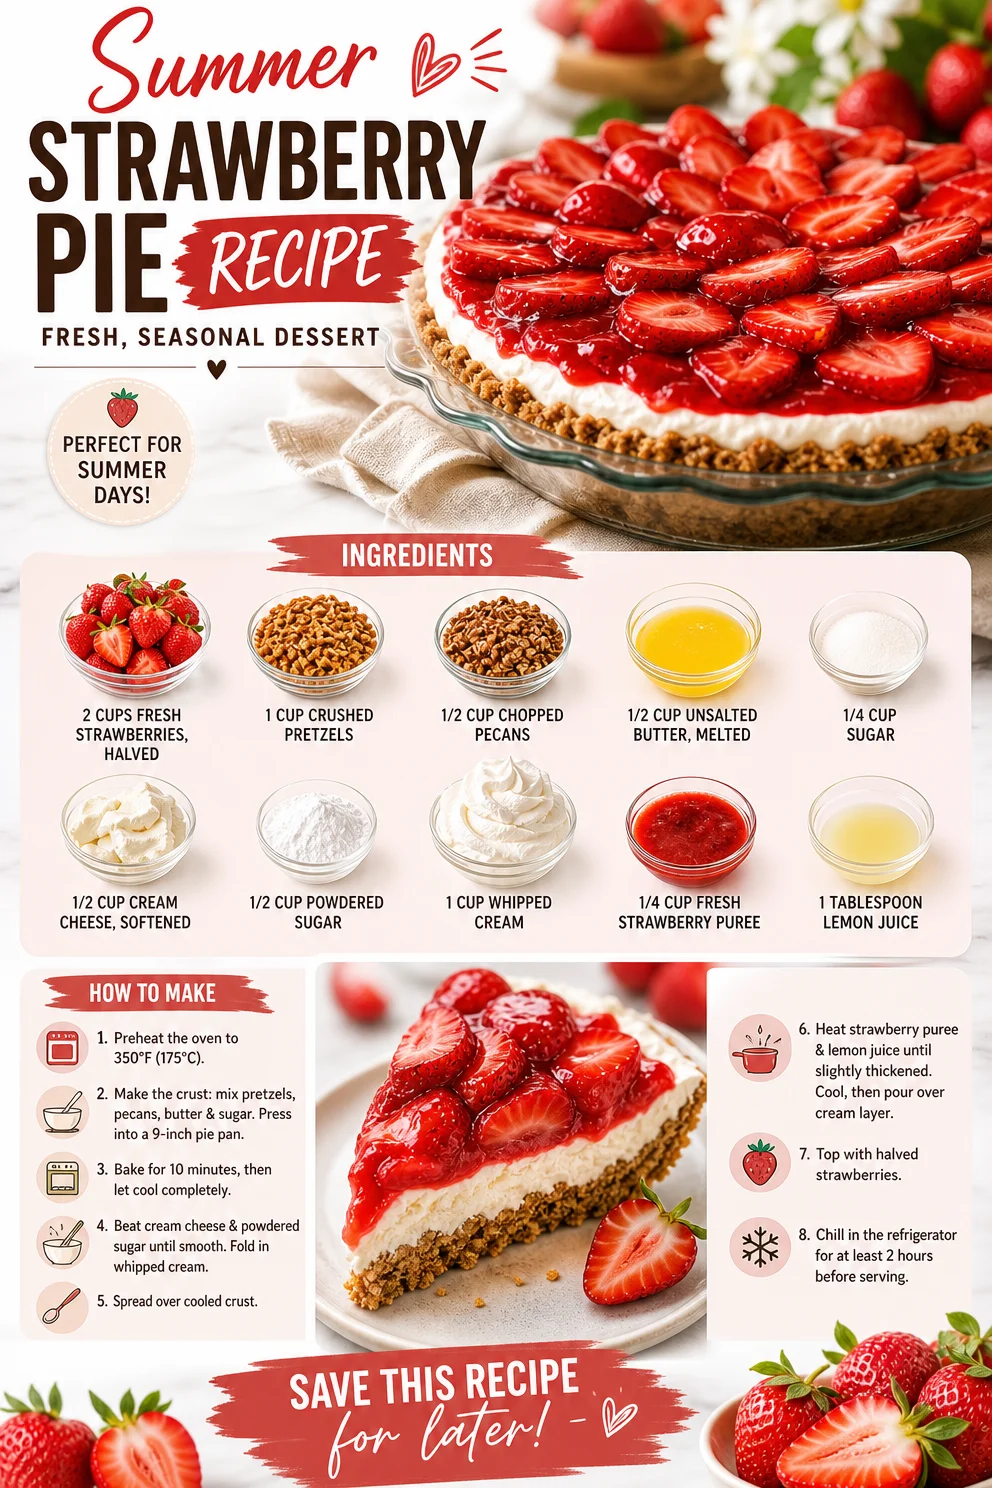
Summer Strawberry Pie Recipe: Fresh, Seasonal Dessert
Fresh Strawberry Pie: A Slice of Summer
Hello, food lovers! Welcome back to Clean Plate Cravings, where we create scrumptious, colorful meals that make you feel as good as they taste. Today, I have a delightful treat that will whisk you straight to summer—the Fresh Strawberry Pie! This pie is a fusion of captivating flavors and textures, with the freshness of strawberries and the crunch of a buttery pretzel crust that will make your taste buds sing. Let’s dive right in!
A Sweet Childhood Memory
Growing up, summer was all about adventures outdoors and enjoying the bountiful harvest from the local farms. I can vividly remember one sunny afternoon spent at my Grandma’s house. She had a small garden where strawberries thrived under the warm sun. I can still hear her laughter as she handed me a bowl and sent me out to pick the ripest strawberries. The thrill of finding those bright red gems and the satisfaction of feasting on them just moments after plucking them is a memory I cherish.
That day, Grandma decided to whip up a fresh strawberry pie. The kitchen filled with the sweet, fruity aroma as she gently sliced the strawberries and prepared the crust. I was her eager little helper, blown away by how straightforward yet magical the process was. Watching her transform those simple ingredients into something so delicious sparked my love for cooking and baking. And that, my friends, is how this Fresh Strawberry Pie became a staple in my kitchen. Now, I’m excited to share it with you—get ready for a burst of summer on your plate!
Ingredients
For this Fresh Strawberry Pie, you’ll need the following ingredients:
-
2 cups fresh strawberries, halved – Look for strawberries that are bright red and plump. If fresh strawberries aren’t available, try frozen, thawing them beforehand for a juicy pie.
-
1 cup crushed pretzels – This will create a salty, crunchy crust! If you don’t have pretzels, graham crackers or even crushed nuts can work in a pinch.
-
1/2 cup chopped pecans – Pecans add a lovely nuttiness. Feel free to substitute with walnuts or almonds if preferred.
-
1/2 cup unsalted butter, melted – This will help bind the crust ingredients together. If you’re looking for a dairy-free option, coconut oil can be a great substitute.
-
1/4 cup sugar – This is for sweetening the crust. If you’re watching sugar intake, try using a sugar substitute like stevia.
-
1/2 cup cream cheese, softened – Cream cheese adds creaminess to the filling. For a lighter alternative, use Greek yogurt or cottage cheese!
-
1/2 cup powdered sugar – This sweetens the cream cheese. If you want a healthier option, make your own powdered sugar with a blender and a sugar substitute.
-
1 cup whipped cream – Freshly whipped cream is a must for that light, airy feel! You can use store-bought, but homemade tastes best.
-
1/4 cup fresh strawberry puree – This adds a beautiful color and enhances the strawberry flavor. You can puree extra strawberries if needed.
-
1 tablespoon lemon juice – A touch of lemon juice balances the sweetness wonderfully! You could also use lime juice for a zesty twist.
Step-by-Step Instructions
Now, let’s get to the fun part—making the pie! Follow these steps to create your masterpiece.
Step 1: Preheat Your Oven
Preheat your oven to 350°F (175°C). This ensures your crust gets that perfect golden brown finish.
Step 2: Prepare the Crust
In a medium bowl, combine the crushed pretzels, chopped pecans, melted butter, and sugar. Mix until everything is well coated; the mixture should stick together when pressed. Chef Tip: Use a fork to really break down any large bits of pretzel for a smoother crust!
Step 3: Form the Crust
Press the pretzel mixture into the bottom and up the sides of a 9-inch pie pan. Make sure it’s evenly distributed! Bake for 10-12 minutes until the crust is lightly golden. This step adds that lovely crunch you won’t be able to resist!
Step 4: Cool the Crust
Let the crust cool completely before adding the filling. Patience is key here! While it cools, you can whip up the creamy filling.
Step 5: Make the Filling
In a large mixing bowl, combine softened cream cheese and powdered sugar until smooth and creamy. Gradually fold in the whipped cream and fresh strawberry puree. The mixture should be light and fluffy—oh, that gorgeous color!
Step 6: Assemble the Pie
Once the crust has cooled, spread the cream cheese filling evenly over the crust. Little Chef Hack: Use an offset spatula for a smooth finish!
Step 7: Top with Strawberries
Arrange the halved strawberries on top of the filling, cut side up, for a stunning presentation. Drizzle with lemon juice for added freshness.
Step 8: Chill
Cover the pie and refrigerate for at least 2 hours, or until set. This step lets the flavors meld together beautifully. Also makes it a wonderful make-ahead dessert!
Serving Suggestions
When you’re ready to serve, slice the pie into wedges and plate it up. For a touch of elegance, add a dollop of whipped cream on each slice and a few sprigs of fresh mint for color. If you’re feeling festive, sprinkle a little extra strawberry puree on the plates for that added wow factor!
Recipe Variations
If you love getting creative in the kitchen, here are some fun twists on this Fresh Strawberry Pie:
-
Balsamic Glaze Drizzle: Add a drizzle of balsamic reduction over the strawberries for a sweet-and-savory contrast.
-
Minty Freshness: Toss some chopped fresh mint into the filling for a refreshing twist.
-
Nut-Free Version: Swap the pecans for more pretzels if you want to keep it nut-free and crunchy.
-
Chocolate Drizzle: Melt some dark chocolate and drizzle it over the finished pie for a decadent touch.
-
Vegan Option: Use vegan cream cheese and coconut whipped cream to make this pie entirely plant-based.
Chef’s Notes
This Fresh Strawberry Pie is not just a recipe; it’s a canvas for creativity and a family tradition rolled into one! Over the years, I’ve tinkered with it, mixing in different fruits and flavors. Once, I added a layer of raspberry puree beneath the strawberry topping—it was a game changer! I love hearing how others put their spin on it too; it’s all about making food that reflects your kitchen and your palate.
FAQs and Troubleshooting
1. My crust crumbled when I tried to slice it. What happened?
Make sure to mix the crust ingredients thoroughly, and press it firmly into the pie pan. A little chill time helps it hold together, too!
2. Can I make this pie in advance?
Absolutely! It keeps beautifully in the fridge for a few days. Just wait to add any toppings until you’re ready to serve for a vibrant finish.
3. What if I can’t find fresh strawberries?
You can use frozen strawberries, but make sure to thaw and drain them well before using, as they can release water.
4. Can I use a store-bought crust?
Of course! A store-bought crust can save time; just skip the baking step and move on to the filling!
Nutritional Info (optional)
While the exact nutrition information may vary based on specific ingredients, a typical slice of this Fresh Strawberry Pie is a refreshing, lighter dessert that pairs well with any meal. Enjoy guilt-free indulgence!
There you have it! A delightful journey through memories, mouthwatering flavors, and a recipe that’s sure to win hearts and taste buds alike. I hope you give this Fresh Strawberry Pie a try, share it with loved ones, and create your own special memories in the kitchen. Happy baking! 🍓
PrintFresh Strawberry Pie
Delightful Fresh Strawberry Pie with a buttery pretzel crust, promising a burst of summer flavors.
- Prep Time: 20 minutes
- Cook Time: 15 minutes
- Total Time: 135 minutes
- Yield: 8 servings 1x
- Category: Dessert
- Method: Chilling, Baking
- Cuisine: American
- Diet: Vegetarian
Ingredients
- 2 cups fresh strawberries, halved
- 1 cup crushed pretzels
- 1/2 cup chopped pecans
- 1/2 cup unsalted butter, melted
- 1/4 cup sugar
- 1/2 cup cream cheese, softened
- 1/2 cup powdered sugar
- 1 cup whipped cream
- 1/4 cup fresh strawberry puree
- 1 tablespoon lemon juice
Instructions
- Preheat the oven to 350°F (175°C).
- Combine the crushed pretzels, chopped pecans, melted butter, and sugar in a medium bowl.
- Press the pretzel mixture into the bottom and up the sides of a 9-inch pie pan.
- Bake for 10-12 minutes until the crust is lightly golden.
- Let the crust cool completely.
- Mix the softened cream cheese and powdered sugar until smooth, then fold in whipped cream and fresh strawberry puree.
- Spread the cream cheese filling evenly over the crust.
- Arrange the halved strawberries on top of the filling and drizzle with lemon juice.
- Cover the pie and refrigerate for at least 2 hours until set.
Notes
This pie is a canvas for creativity! Try adding a layer of raspberry puree or a drizzle of balsamic reduction on top.
Nutrition
- Serving Size: 1 slice
- Calories: 200
- Sugar: 10g
- Sodium: 150mg
- Fat: 10g
- Saturated Fat: 5g
- Unsaturated Fat: 4g
- Trans Fat: 0g
- Carbohydrates: 25g
- Fiber: 1g
- Protein: 3g
- Cholesterol: 15mg
Keywords: strawberry pie, summer dessert, easy pie recipe