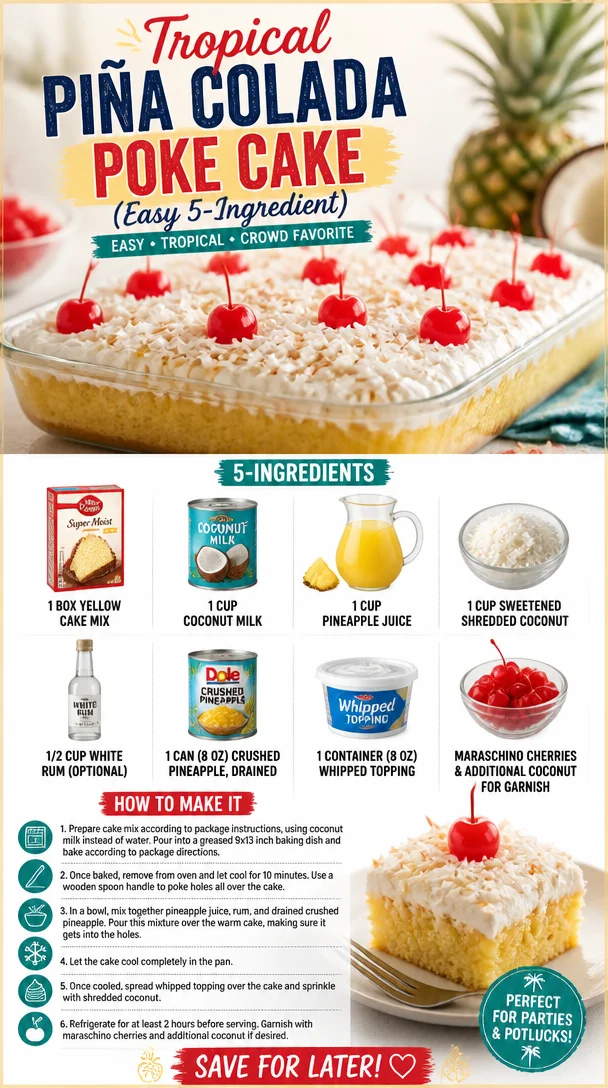
Tropical Piña Colada Poke Cake (Easy 5-Ingredient)
Dive Into Summer with Piña Colada Poke Cake
Welcome to sunshine-filled days and sweet indulgences! If you’re looking for a dessert that captures the essence of summer in every bite, you’ve arrived at the right place. Today, we’re whipping up something that’s as fun to make as it is to eat: a Piña Colada Poke Cake! This delightful dessert marries the tropical flavors of coconut and pineapple, giving you a taste of paradise right at home.
There’s a certain magic that happens when I think about the word “poke cake.” It conjures up images of sunny barbecues, joyful gatherings with friends, and long, lazy afternoons. Picture this: you’ve just wrapped up a day of fun in the sun, and there’s a cooling breeze in the air. The moment you cut into that sumptuous cake, the delightful aroma of coconut and pineapple wafts through the air, lifting everyone’s spirits. Yep, that’s the kind of dessert we’re talking about!
But let’s dive a little deeper into my relationship with poke cakes. I remember the very first time I made one. It was for a backyard BBQ during a family reunion. My Aunt Marge, the queen of all desserts, brought out her legendary chocolate poke cake, and everyone went wild for it. Inspired, I decided to take a risk and try my hand at creating a tropical version. With a few trials and errors, my Piña Colada Poke Cake was born! The sheer joy on my family’s faces as they devoured the cake sparked something amazing in me.
Since then, I’ve perfected this recipe, and each time I bake it, I’m taken back to those sun-kissed days filled with laughter and love. It’s truly a celebration of life and flavors, and I can’t wait to share this journey with you. Let’s get started!
Ingredients
Let’s gather our ingredients! Here’s what you’ll need:
-
1 box yellow cake mix: The foundation of our poke cake. You can use any brand—it’s all about convenience! Substitute with a homemade cake if you’re feeling adventurous.
-
1 cup coconut milk: This creamy ingredient adds a luscious texture and tropical flavor. If you’re looking for a lighter option, almond milk could work, though it’ll change the flavor profile a bit.
-
1 cup pineapple juice: Pure pineapple juice brings a burst of freshness. If you prefer a less sugary version, opt for unsweetened juice or even fresh pineapple puree!
-
1 cup sweetened shredded coconut: This is where the magic happens! The sweet coconut texture adds depth. If you’re aiming for a less sweet outcome, you could use unsweetened coconut instead.
-
1/2 cup white rum (optional): For that true piña colada experience! If you prefer to skip the spirits, simply substitute with an extra 1/2 cup of pineapple juice or coconut milk.
-
1 can (8 oz) crushed pineapple, drained: This adds moisture and tropical flavor. Fresh crushed pineapple could be used, just ensure it’s drained well.
-
1 container (8 oz) whipped topping: This fluffy goodness makes for a light, creamy layer on top. For a dairy-free alternative, coconut whipped cream is divine!
-
Maraschino cherries and additional coconut for garnish: The finishing touch! These vibrant cherries take the cake to the next level; they scream “tropical celebration!”
Step-by-Step Instructions
Ready to bake? Let’s get this show on the road! Here’s a step-by-step guide on how to create your Piña Colada Poke Cake.
-
Preheat Your Oven: Set your oven to 350°F (175°C). Preheating ensures an even bake, giving you that light and fluffy cake you crave.
-
Prepare the Cake Mix: In a large mixing bowl, combine the yellow cake mix, coconut milk, and pineapple juice. Mix according to the instructions on the box. Some people like to use a hand mixer for a fluffier texture, but whisking by hand works just fine too!
-
Bake the Cake: Pour the batter into a greased 9×13-inch baking dish. Bake it in your preheated oven for about 30-35 minutes, or until a toothpick inserted in the center comes out clean. My little tip here? Keep an eye on it! Every oven is a bit different.
-
Let it Cool: Once it’s done, pull the cake out and let it cool in the pan for about 10-15 minutes. This cooling period allows the cake to settle, making it easier for the next step.
-
Poke It Up!: Grab a wooden skewer or the handle of a wooden spoon and poke holes throughout the cake, about an inch apart. This is where all that delicious liquid flavor will seep in!
-
Prepare the Soak: In a medium bowl, mix the drained crushed pineapple with the coconut milk and white rum (if using). Pour this mix evenly over the poked cake, allowing it to soak in every flavorful drop. Just imagine the dreamy taste at this stage!
-
Chill: Cover the cake with plastic wrap and refrigerate for at least 2 hours (or overnight if you can wait!). This allows all those flavors to meld beautifully together.
-
Top It Off: Once chilled, spread the whipped topping over the cake for a luscious finish. Then, get creative! Sprinkle the sweetened shredded coconut on top, and add Maraschino cherries for a pop of color.
-
Serve and Enjoy: Slice up your creation, serve it on a nice plate, and enjoy the compliments that come pouring in. Don’t forget to snap a pic for social media before it disappears!
Serving Suggestions
When it’s time to serve, a few simple presentation tips can elevate this dish! Place a generous slice of your Piña Colada Poke Cake on a plate and sprinkle with extra coconut for that visual appeal. Add a Maraschino cherry on top for a classic touch. You can even throw in a few pineapple wedges on the side, or serve it with a scoop of coconut ice cream for a delightful twist. Happy serving!
Recipe Variations
Feeling adventurous? Here are some fun variations to keep your dessert game strong:
-
Mango Madness: Substitute crushed pineapple with crushed mango for a different tropical twist.
-
Berry Bonanza: Add a layer of fresh berries on top—the tartness complements the sweet coconut beautifully.
-
Chocolate Lovers: Drizzle melted dark chocolate over the whipped topping for a decadent finish.
-
Coconut-Free: Substitute all coconut ingredients with almond or oat versions for a nutty flavor.
-
Extra Boozy: Swap the rum with your favorite liqueur like Malibu for an even more tropical vibe!
Chef’s Notes
I can’t stress enough how much joy this recipe brings to my kitchen. It’s not just about the flavors but the moments it creates. Each time I pull this cake from the fridge, I remember that sunny BBQ with family and friends. It’s interesting how recipes evolve too! From my initial attempt to its current state, I love that it’s adaptable for your taste and dietary needs. Plus, it’s a recipe that gets people excited—it’s hard to resist that tropical allure!
FAQs and Troubleshooting
What if my cake falls apart when I poke it?
No worries! If your cake seems crumbly, it might be slightly overbaked. Just take it easy with the poking—you’ll still get all those luscious flavors into every bite.
Can I make this cake gluten-free?
Absolutely! Just swap the yellow cake mix with a gluten-free blend. There are plenty of great options out there now that work just as well!
How long will leftovers last?
Assuming there are leftovers (which is often not the case), you can store your poked cake in the refrigerator for up to 3-4 days, covered with plastic wrap.
Can I freeze this cake?
Yes! You can freeze the cake either whole or in individual slices. Just wrap it well in plastic wrap and foil to prevent freezer burn. It’s great for those unexpected dessert cravings!
Nutritional Info
While it’s definitely a special treat, knowing the nutrition can help you enjoy it fully. This Piña Colada Poke Cake serves approximately 12 slices, and each slice contains about:
- Calories: 350
- Total Fat: 15g
- Saturated Fat: 9g
- Cholesterol: 30mg
- Sodium: 200mg
- Total Carbohydrates: 49g
- Dietary Fiber: 1g
- Sugars: 30g
- Protein: 4g
Remember, balance is key when it comes to indulgence!
And there you have it—a delightful journey into making a Piña Colada Poke Cake. I hope you enjoy every moment in the kitchen and every bite of your creation. It’s time to share the love of food and all its joyous flavors! Happy baking, my foodie friends! 🍍🌴
PrintPiña Colada Poke Cake

A delightful dessert that combines the tropical flavors of coconut and pineapple in a moist poke cake, perfect for summer gatherings.
- Prep Time: 15 minutes
- Cook Time: 35 minutes
- Total Time: 50 minutes
- Yield: 12 servings 1x
- Category: Dessert
- Method: Baking
- Cuisine: Tropical
- Diet: Vegetarian
Ingredients
- 1 box yellow cake mix
- 1 cup coconut milk
- 1 cup pineapple juice
- 1 cup sweetened shredded coconut
- 1/2 cup white rum (optional)
- 1 can (8 oz) crushed pineapple, drained
- 1 container (8 oz) whipped topping
- Maraschino cherries and additional coconut for garnish
Instructions
- Preheat your oven to 350°F (175°C).
- Prepare the cake mix by combining the yellow cake mix, coconut milk, and pineapple juice in a large bowl.
- Bake the batter in a greased 9×13-inch baking dish for about 30-35 minutes.
- Let it cool in the pan for 10-15 minutes.
- Poke holes in the baked cake, about an inch apart.
- Prepare the soak by mixing drained crushed pineapple with coconut milk and white rum, then pour over the poked cake.
- Chill the cake in the refrigerator for at least 2 hours.
- Top with whipped topping, shredded coconut, and Maraschino cherries.
- Serve and enjoy your tropical treat!
Notes
This recipe can be varied by substituting crushed pineapple with mango or adding berries on top.
Nutrition
- Serving Size: 1 slice
- Calories: 350
- Sugar: 30g
- Sodium: 200mg
- Fat: 15g
- Saturated Fat: 9g
- Unsaturated Fat: 3g
- Trans Fat: 0g
- Carbohydrates: 49g
- Fiber: 1g
- Protein: 4g
- Cholesterol: 30mg
Keywords: cake, dessert, summer, tropical, poke cake, piña colada
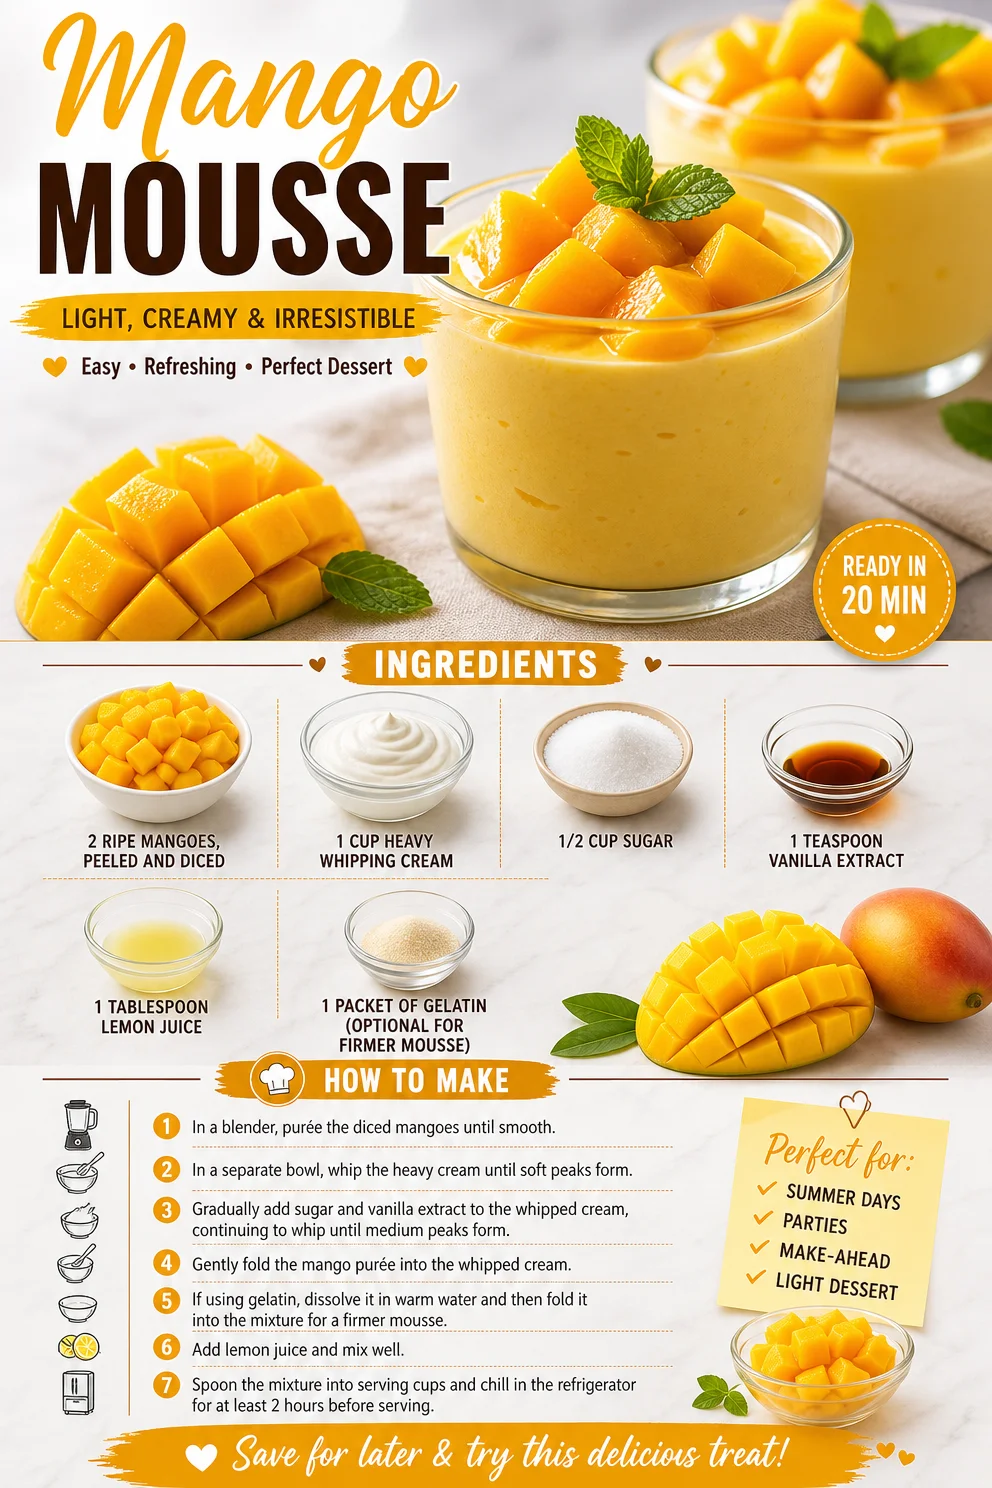
Mango Mousse
Whip Up Some Sunshine: The Magic of Mango Mousse
Ah, mango mousse—the dessert that whispers sweet nothings to your taste buds while wrapping you in a warm, tropical embrace. If you’ve ever dove into that first spoonful, experiencing the creamy yet fruity delight dancing on your palate, you’ll know exactly what I mean. It’s like summer vacation captured in a bite!
Today, I want to share a family-favorite recipe for mango mousse that not only brings the flavors of tropical goodness to your kitchen but also carries with it a cherished memory I hold dear. You see, cooking isn’t just about the ingredients or the fancy techniques; it’s about connection, creativity, and sharing love through food—something I’m excited to explore with you.
So, pull up a chair, grab your cooking utensils, and let’s dive into the world of mango mousse. It captures the essence of summer days spent with friends and family, where laughter mingles with the sweet aroma of mango and a hint of cream. Trust me; you’ll want to make this a regular in your dessert rotation!
A Bite of Nostalgia
Let me take you back to the sun-soaked afternoons of my childhood when my grandmother would whip up her famous mango mousse. Each summer, my cousins and I would gather at her house, our faces covered in sticky popsicle remnants from the fruit stands nearby. The air would be filled with the scents of ripe fruits, and laughter would echo in the kitchen as Grandma played the role of the mad scientist in her culinary lab.
The best part? We were her sous chefs! I can still picture it—mangoes piled high, a shiny silver bowl filled with whipped cream, and Grandma’s warm smile lighting up the room. She would tell us stories about her favorite mangoes as she diced them with the precision of a seasoned chef, and we’d eagerly await our turn to whip the cream. The anticipation grew as we churned our ingredients, knowing dessert was just a few whisking moments away.
When that fluffy, golden mousse hit the table, we were all in bliss. It felt like indulging in summer itself, vibrant and light. This recipe is my homage to those joyful summer days, bringing a touch of nostalgia and a whole lot of flavor to your kitchen.
Ingredients
To create this delightful mango mousse, you’ll need the following:
-
2 ripe mangoes, peeled and diced
Look for mangoes that yield slightly when pressed; that means they’re ready for the sweet dive into dessert! If mangos aren’t in season, you can substitute with frozen mango, just be sure to thaw and drain excess moisture. -
1 cup heavy whipping cream
This is the secret to a rich, velvety mousse. For a lighter version, you can swap in coconut cream or a plant-based alternative, though the texture will be slightly different. -
1/2 cup sugar
Adjust the sweetness to your taste! If you prefer a healthier option, you can use agave syrup or honey; keep in mind that liquid sweeteners may alter the mousse’s consistency slightly. -
1 teaspoon vanilla extract
Always opt for pure vanilla extract over imitation for an authentic flavor boost. The depth of the vanilla harmonizes beautifully with mango. -
1 tablespoon lemon juice
This not only enhances the mango flavor but also helps to keep the mousse from browning. Fresh lemon will give you the brightest taste, but bottled lemon juice works in a pinch. -
1 packet of gelatin (optional for firmer mousse)
If you want a more stable mousse perfect for beautiful plating, use this. For a plant-based option, try agar-agar but remember to adjust the cooking time according to the package instructions.
Step-by-Step Instructions
Now, let’s get our hands a little sticky and create that luscious mango mousse:
-
Prep the Mangoes
Start by peeling and dicing your fresh mangoes, which is arguably the most vital step! The riper, the better! Cut around the pit and chop the sweet flesh into cubes. If you’ve chosen frozen mango, just make sure it’s thoroughly thawed before proceeding. Place these glorious chunks into a blender. -
Blend Until Smooth
Blend the diced mangoes until the texture is silky—no lumps allowed! This should take about 30 seconds. If you’re feeling adventurous, toss in a sprinkle of cinnamon for an extra layer of flavor! -
Whip the Cream
In a separate bowl, use an electric mixer to whip the heavy cream until it forms soft peaks. Trust me, there’s something joyfully therapeutic about watching that cream transform before your eyes. Whip until it’s light and fluffy—don’t overdo it, or you’ll end up with buttery clumps. -
Combine with Sugar and Vanilla
Gradually add in the sugar and vanilla extract as you continue to whip the cream. The sweetness should complement the mango without overpowering it; it’s a delicate dance of flavors! -
Add the Lemon Juice
Once your cream is nice and whipped, add the lemon juice and proceed to gently fold in the mango puree. This step is key—use a spatula and fold the mixture rather than stirring. We want to keep that light, airy texture! -
Incorporate Gelatin (if using)
If you’re opting for that extra firmness with gelatin, dissolve a packet in a small amount of warm water according to the package instructions. Allow it to cool slightly before gently folding it into your mousse mixture. -
Chill the Mousse
Spoon your delightful mixture into serving glasses or a large bowl and let it chill in the refrigerator for at least 2–3 hours—this allows the flavors to meld beautifully while setting the texture. I find that the longer it chills, the better it gets! -
Serve and Enjoy
Once it’s set and chilled, take a moment to admire your masterpiece before serving. A little mango wedge or a sprig of mint on top gives it that chef-level finish!
Serving Suggestions
When it comes to plating, keep it simple and elegant. Present the mango mousse in clear glasses or bowls to showcase its beautiful, vibrant color. You can garnish with additional diced mango, a drizzle of honey, or even some crushed pistachios for that delicious crunch. If you’re feeling extra festive, a dollop of whipped cream on top with a sprinkle of lime zest can elevate your presentation and flavor profile even further.
Recipe Variations
Now let’s get a little creative! Here are a few fun twists to try with your mango mousse:
-
Coconut Mango Mousse: Swap half of the heavy cream with coconut cream for a tropical coconut flavor that pairs beautifully with mango.
-
Spicy Mango Mousse: Add a touch of cayenne pepper or finely chopped jalapeños for a sweet and spicy kick that tantalizes the senses.
-
Berry Fusion: Incorporate other fruits such as chopped strawberries or blueberries into the mousse for a mixed-berry delight that bursts in flavor.
-
Chocolate Drizzle: Top the mousse with melted dark chocolate for an indulgent dessert experience! It adds a rich contrast to the fruity flavors.
-
Tropical Twist: Mix in a bit of pineapple or passion fruit puree for an even fruitier flair that keeps the tropical vibes going strong!
Chef’s Notes
This mango mousse has been a staple on my dessert table for years, evolving as I explored different flavor profiles and techniques. I remember a time I accidentally whipped the cream too much, and instead of throwing it away, I folded some of it back into the mango puree, and voila! It was a happier accident that made me appreciate the beauty in imperfection in the kitchen.
Mangoes are versatile delights! I try to use the freshest ones at their peak ripeness, but even a can of good-quality mango puree can save the day now and then. Cooking is a journey of flavors, and I invite you to take the reins and make this mango mousse your own.
FAQs and Troubleshooting
1. My mousse didn’t set. What happened?
No worries! The most common culprits are under-whipping the cream or not letting the mousse chill long enough. If you used gelatin, ensure it was properly dissolved and incorporated.
2. Can I make this ahead of time?
Absolutely! This dessert is perfect for prepping a day in advance. Just cover it well and keep it in the fridge until you’re ready to serve.
3. How can I make this dairy-free?
Great question! You can swap the heavy cream for coconut cream or a dairy-free whipping cream. Just make sure the texture and flavor balance works for you.
4. What should I do if it’s too sweet?
If you find the mousse overly sweet, add a little more lemon juice to balance the sweetness. A touch of sea salt can also help bring all the flavors together!
Nutritional Info
(Optional based on preference and can be modified depending on specific nutritional needs.)
- Serving Size: 1 portion
- Calories: Approximately 150
- Fat: 10g
- Carbohydrates: 15g
- Protein: 2g
So there you have it, friends! A sunny, cheerful mango mousse recipe that brings back the essence of summer right into your home. I hope you feel inspired to whip this up for your next gathering or simply treat yourself to a taste of sunshine. Happy cooking!
PrintMango Mousse
A delightful mango mousse that captures the essence of summer with its creamy, tropical flavor.
- Prep Time: 15 minutes
- Cook Time: 0 minutes
- Total Time: 180 minutes
- Yield: 4 servings 1x
- Category: Dessert
- Method: No-Cook
- Cuisine: Tropical
- Diet: Vegetarian
Ingredients
- 2 ripe mangoes, peeled and diced
- 1 cup heavy whipping cream
- 1/2 cup sugar
- 1 teaspoon vanilla extract
- 1 tablespoon lemon juice
- 1 packet of gelatin (optional for firmer mousse)
Instructions
- Prep the mangoes by peeling and dicing them, then place them in a blender.
- Blend until smooth—about 30 seconds.
- Whip the cream in a separate bowl until soft peaks form.
- Combine the sugar and vanilla into the whipped cream.
- Add the lemon juice and gently fold in the mango puree.
- Incorporate gelatin if you’re using it, following package instructions.
- Chill the mousse in the refrigerator for at least 2–3 hours.
- Serve and enjoy with garnishes like mango wedges or mint.
Notes
Feel free to customize your mousse with toppings or mix-ins like coconut, berries, or chocolate.
Nutrition
- Serving Size: 1 serving
- Calories: 150
- Sugar: 15g
- Sodium: 30mg
- Fat: 10g
- Saturated Fat: 6g
- Unsaturated Fat: 4g
- Trans Fat: 0g
- Carbohydrates: 15g
- Fiber: 1g
- Protein: 2g
- Cholesterol: 30mg
Keywords: mango mousse, dessert, tropical dessert, summer recipe, easy dessert