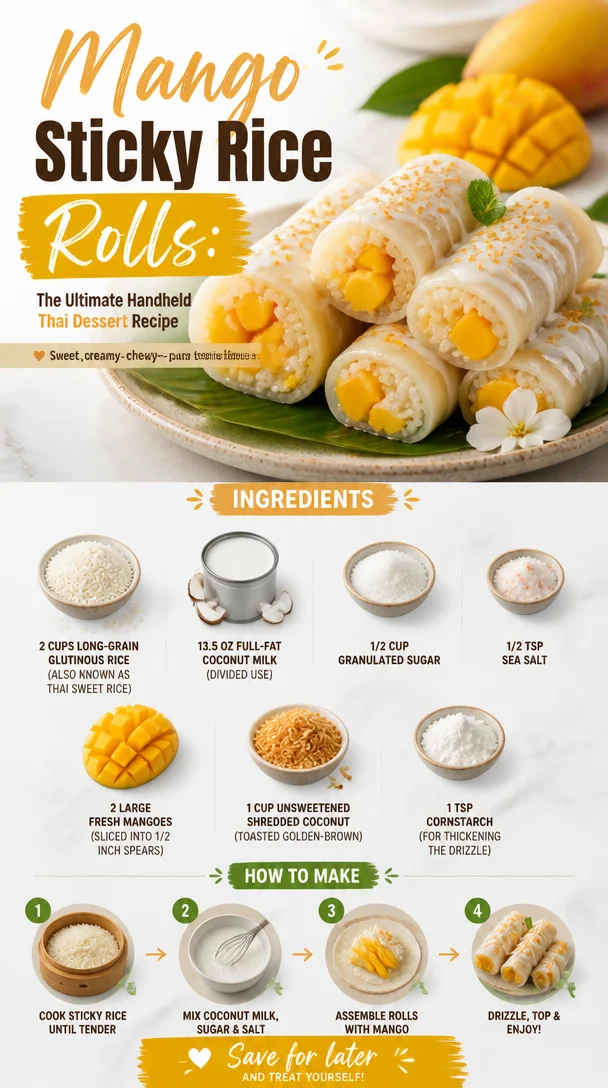
Mango Sticky Rice Rolls: The Ultimate Handheld Thai Dessert Recipe
Mango Sticky Rice Rolls: The Ultimate Handheld Thai Dessert Recipe
Introduction
Welcome, fellow food lovers! Today, we’re diving into a delightful corner of Thai cuisine with a twist: Mango Sticky Rice Rolls. If you’re anything like me, the combination of sweet mango and creamy coconut rice has you dreaming of tropical beaches and sun-soaked afternoons. These rolls are not just a dessert; they’re a celebration of flavor, texture, and the joy that comes from sharing delicious food with those you love.
I remember the first time I tasted mango sticky rice in a cozy street market in Bangkok. The vendor, with a smile as warm as the sun, handed me a beautiful plate of glistening sticky rice topped with ripe, juicy mango. As I took my first bite, a symphony of flavors burst in my mouth—the creamy coconut milk mingling perfectly with the sweetness of the mango. It was an unforgettable experience, and one that inspired me to recreate it in new, fun ways right in my kitchen.
Today, we’re transforming that classic dessert into adorable handheld rolls that are perfect for sharing (or keep them all to yourself—I won’t judge!). With just a few simple ingredients and easy steps, you’ll have a delicious treat that’s sure to impress anyone lucky enough to try them. Grab your apron, and let’s get rolling!
Personal Story
Growing up in a family that adored food, my parents often cooked recipes inspired by their travels. One summer, they decided to take us on a culinary journey through Asia, which included a stop in Thailand. I’ll never forget the night we stumbled upon a bustling night market. Our senses were overwhelmed by the vibrant colors and intoxicating aromas of the various stalls. My mom, ever the adventurous eater, insisted we try everything!
When we reached the dessert stand, I was a little hesitant—it was new, unfamiliar, and I was a picky eater at the time. But my mom nudged me to try the mango sticky rice, and oh boy, was I glad she did! The moment that silky rice, sweet mango, and creamy sauce touched my lips, I was transported. It was pure magic! Now, I find joy in recreating that memory and sharing it with others by turning this traditional dish into an exciting snack.
Ingredients
Before we dig into crafting these delightful Mango Sticky Rice Rolls, let’s take a look at what you’ll need:
-
2 cups Long-grain glutinous rice
Also known as Thai sweet rice, this key ingredient has a unique ability to turn creamy and sticky when cooked. If you can’t find it, you can substitute with short-grain rice, but the texture won’t be as authentic! -
13.5 oz Full-fat coconut milk (Divided use)
This luscious milk adds creaminess and a beautiful coconut flavor. If you prefer a lighter option, you can use light coconut milk, but the texture and richness will differ. -
1/2 cup Granulated sugar
Sweetness is essential here. You can use coconut sugar for a more natural flavor, or even agave syrup if you’re looking to keep it refined sugar-free. -
1/2 tsp Sea salt
Just a dash to balance out the sweetness and enhance all those beautiful flavors. -
2 large Fresh mangoes (Sliced into 1/2 inch spears)
Sweet, ripe mangoes are the star of this dish! Choose mangoes that are soft to the touch but not overly mushy. If mango isn’t in season, you can substitute with ripe peaches or even berries. -
1 cup Unsweetened shredded coconut (Toasted golden-brown)
Toasting the coconut adds a lovely crunch and nutty flavor. If you’re short on time, you can skip the toasting, but trust me, this extra step is worth it! -
1 tsp Cornstarch (For thickening the drizzle)
This helps to create a luscious sauce for drizzling over your rolls. If you’re looking for a gluten-free option, arrowroot powder is a fantastic substitute.
Step-by-Step Instructions
Let’s get down to the fun part! Here’s how we’ll create your mango sticky rice rolls:
-
Cook the Glutinous Rice
Begin by rinsing the sticky rice under cold water until the water runs clear. This removes excess starch, ensuring a perfect texture after cooking. Soak the rice in water for about 4-6 hours, or overnight if possible. This step is crucial for achieving that deliciously sticky consistency! -
Steam the Rice
After soaking, drain and transfer the rice into a steamer lined with cheesecloth. Steam the rice on medium heat for 30-40 minutes until the grains are tender. If you don’t have a steamer, a bamboo steamer or a heat-proof plate set over a pot of boiling water will do the trick. -
Prepare the Coconut Milk Mix
While the rice is steaming, in a small saucepan, combine 1 cup of coconut milk, sugar, and sea salt. Over medium heat, whisk until the sugar dissolves but avoid bringing it to a boil. This mix is pure magic—it’s the creamy drizzle that will bring your rolls to the next level! -
Combine Rice and Coconut Milk
Once the rice is cooked, transfer it to a large bowl and pour the coconut milk mixture over the rice. Mix it well, ensuring each grain is coated and letting it sit for about 30 minutes. This step helps the rice absorb all that coconut goodness! -
Assemble the Rolls
Grab a large, flat plate and place a small amount of rice in your palm; gently shape it to a rectangle before laying a mango spear in the center. Roll it up like a burrito, enclosing the mango in the sticky rice. Repeat until all rolls are made—this part is fun, so channel your inner sushi chef! -
Prepare the Coconut Drizzle
In a small saucepan, combine the remaining coconut milk and cornstarch. Whisk over low heat until it thickens into a drizzleable consistency. This will give your rolls that extra layer of creamy coconut flavor! -
Toast the Coconut
While the drizzle is thickening, toast the shredded coconut in a dry skillet over medium heat until golden brown. Stir frequently to avoid burning it; this will only take a few minutes! -
Serve
Place your mango sticky rice rolls on a serving platter. Drizzle your coconut sauce over the top and finish with a sprinkle of toasted coconut for a beautiful presentation!
Serving Suggestions
To serve your Mango Sticky Rice Rolls, plate them up neatly, drizzling a generous amount of the creamy coconut sauce on top. For an extra touch of elegance, you can also garnish with a few mint leaves for a pop of color! These rolls are perfect for parties, a fun dessert for family dinners, or a sweet snack whenever you crave a taste of Thailand.
Recipe Variations
Feeling adventurous? Here are a few creative twists and dietary swaps to consider:
- Tropical Fusion: Add a sprinkle of chopped pineapple or kiwi for an exciting fruit contrast.
- Nutty Crunch: Mix in some crushed peanuts for an extra layer of flavor and texture.
- Chocolate Lovers: Drizzle with a chocolate sauce instead of coconut for a decadent treat!
- Vegan Version: All ingredients are naturally vegan, but make sure to use plant-based sugar, as some sugar is processed with bone char.
- Flavor Infusion: Add a couple of drops of vanilla or almond extract to your coconut milk for a unique flavor profile.
Chef’s Notes
This recipe has been a favorite of mine for years! I remember a time I tried to make it for my friends during a casual dinner party. Let’s just say that my first attempt didn’t go as smoothly as planned—my rice was a little too firm, and the rolls looked more like very cute, but very sad blobs. Luckily, my friends were gracious and found a way to enjoy them anyway! Through trial and error (and many batches), I perfected this recipe, and now it’s a guaranteed crowd-pleaser every time!
FAQs and Troubleshooting
1. Why didn’t my sticky rice become sticky?
It’s essential to soak the glutinous rice before cooking! This allows it to fully absorb water, creating that perfect sticky texture after steaming. If you forget to soak it, you can still use the same rice; just increase the steaming time a bit.
2. Can I use a different type of rice?
While it’s best to stick to glutinous rice for authenticity, you can try short-grain rice in a pinch. Just know that the texture will be different—less sticky and more firm.
3. How long do these rolls last?
These rolls are best consumed fresh but can be stored in the fridge for up to 2 days in an airtight container. Just be aware that they may lose some of their original texture.
4. Can I make these ahead of time?
Absolutely! Prepare the rice and mango ahead, assemble just before serving, and drizzle with coconut sauce. This way, the freshness remains intact!
Nutritional Info
While I recommend enjoying these Mango Sticky Rice Rolls in moderation due to their sweetness, they are a delightful source of carbohydrates from the rice and healthy fats from the coconut. A serving (2 rolls) comes in at roughly:
- Calories: 250
- Protein: 3g
- Fat: 12g
- Carbohydrates: 35g
- Fiber: 2g
Conclusion
And there you have it! A delightful recipe that marries the sweetness of mango with the creamy texture of coconut sticky rice, all wrapped in a fun roll format. Perfect for parties, dessert gatherings, or simply treating yourself on a cozy afternoon. Remember, cooking should be a celebration, full of joy and creativity. I can’t wait to hear your story as you try out Mango Sticky Rice Rolls—so grab your ingredients, roll them up, and let your taste buds take a trip to Thailand! Enjoy, fellow foodies!
PrintMango Sticky Rice Rolls

Delightful handheld rolls combining sweet mango with creamy coconut sticky rice, perfect for parties or a tropical treat.
- Prep Time: 15 minutes
- Cook Time: 40 minutes
- Total Time: 55 minutes
- Yield: 4 servings 1x
- Category: Dessert
- Method: Steaming
- Cuisine: Thai
- Diet: Vegetarian
Ingredients
- 2 cups Long-grain glutinous rice
- 13.5 oz Full-fat coconut milk (Divided use)
- 1/2 cup Granulated sugar
- 1/2 tsp Sea salt
- 2 large Fresh mangoes (Sliced into 1/2 inch spears)
- 1 cup Unsweetened shredded coconut (Toasted golden-brown)
- 1 tsp Cornstarch (For thickening the drizzle)
Instructions
- Begin by rinsing the sticky rice under cold water until the water runs clear.
- Soak the rice in water for about 4-6 hours, or overnight if possible.
- After soaking, drain and transfer the rice into a steamer lined with cheesecloth.
- Steam the rice on medium heat for 30-40 minutes until the grains are tender.
- While the rice is steaming, in a small saucepan, combine 1 cup of coconut milk, sugar, and sea salt.
- Whisk until the sugar dissolves but avoid bringing it to a boil.
- Once the rice is cooked, transfer it to a large bowl and pour the coconut milk mixture over the rice.
- Mix it well, ensuring each grain is coated and letting it sit for about 30 minutes.
- Grab a large, flat plate and place a small amount of rice in your palm; gently shape it to a rectangle.
- Lay a mango spear in the center and roll it up like a burrito.
- In a small saucepan, combine the remaining coconut milk and cornstarch.
- Whisk over low heat until it thickens into a drizzleable consistency.
- Toast the shredded coconut in a dry skillet over medium heat until golden brown.
- Serve your mango sticky rice rolls on a platter, drizzled with sauce and topped with toasted coconut.
Notes
For an extra touch of elegance, garnish with mint leaves.
Nutrition
- Serving Size: 2 rolls
- Calories: 250
- Sugar: 15g
- Sodium: 120mg
- Fat: 12g
- Saturated Fat: 10g
- Unsaturated Fat: 2g
- Trans Fat: 0g
- Carbohydrates: 35g
- Fiber: 2g
- Protein: 3g
- Cholesterol: 0mg
Keywords: Mango, Sticky Rice, Thai Dessert, Vegetarian, Coconut, Rolls, Summer Treat
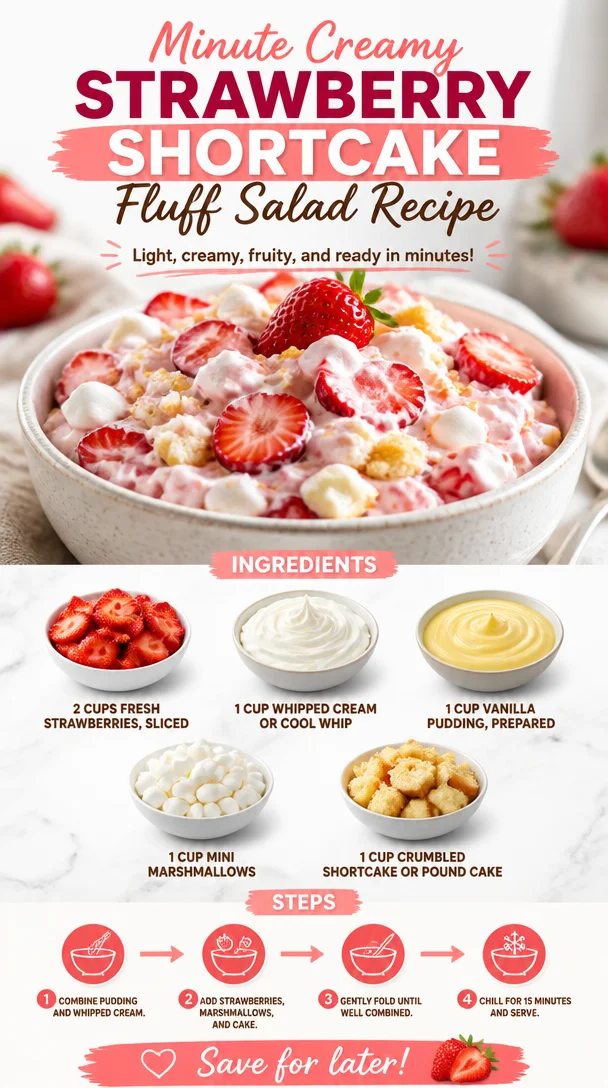
Minute Creamy Strawberry Shortcake Fluff Salad Recipe
Strawberry Shortcake Fluff Salad: A Sweet Symphony of Flavor
Welcome, friends, to a delightful culinary journey where fun flavors and wholesome ingredients come together in perfect harmony! Today, I’m excited to share a recipe that embodies everything I believe about cooking and eating—it’s simple, absolutely delicious, and brings a smile to your face. Say hello to my Strawberry Shortcake Fluff Salad! Perfect for summer gatherings, cozy family dinners, or even a treat for yourself, this dish is all about celebrating fresh, feel-good food.
Picture this: it’s a sun-kissed afternoon, and the tantalizing smell of strawberries wafts through the air. Family and friends are gathered, laughter lingers, and the table is bursting with colors and joyful energy. That’s the essence of summer, isn’t it? When I think back to my childhood summers, one of my fondest memories is the big family picnics in my grandparents’ backyard. My grandmother, a culinary wizard in her own right, would whip up this fluffy, sweet Strawberry Shortcake Fluff Salad that had us all clamoring for seconds. It was a refreshing treat on hot days—a glorious blend of flavors that paired beautifully with sunshine and smiles.
You’ll find this dish captures that nostalgia while adding a modern twist. The sweetness of ripe strawberries, combined with fluffy whipped cream, luscious vanilla pudding, soft mini marshmallows, and buttery shortcake crumbles, creates a delightful dessert that’s not just a feast for the palate but also a visual delight. Trust me, this Strawberry Shortcake Fluff Salad will become a staple in your home, bringing joy and vibrant flavors to your table. Let’s dive into the kitchen and create this masterpiece!
A Sweet Memory to Savor
As I reminisce about those cherished summer picnics, I can almost hear the laughter and see the smiles of my loved ones as they dug into my grandma’s creation. It wasn’t just food; it was a moment—a celebration of unity, love, and summer. She always had a knack for making the simplest ingredients shine. I still remember her saying, “A good dish is all about love and good quality ingredients.” This philosophy inspired me to keep my recipes approachable but flavorful.
One summer, I decided to help her in the kitchen while she prepared the salad. I was responsible for slicing strawberries and sneaking a few into my mouth when I thought she wasn’t looking! The vibrant red of the berries, the fluffy clouds of cream, and the golden shortcake crumbles stuck with me. Every spoonful was a harmony of textures, flavors, and memories, and we both knew that sharing food makes every experience richer and more meaningful. Today, I cherish those moments and hope to pass on that joy and love through my cooking.
Let’s bring a bit of that nostalgia into your home with my rendition of this delightful Strawberry Shortcake Fluff Salad!
Ingredients
Before we roll up our sleeves and get cooking, let’s gather our ingredients. This recipe is as simple as it is delicious. Here’s what you’ll need:
-
2 cups fresh strawberries, sliced
- Fresh strawberries are the star of this dish! When choosing berries, look for vibrant, plump ones without any bruises. If you can’t find fresh strawberries, feel free to use frozen strawberries. Just thaw them first and drain excess moisture to avoid a soggy fluff.
-
1 cup whipped cream or Cool Whip
- Whipped cream adds a light and airy texture. You can use store-bought Cool Whip for convenience, or make your own by whipping heavy cream until it forms soft peaks. The home-made version will taste fresher!
-
1 cup vanilla pudding, prepared
- This ingredient brings creaminess and sweetness. You can use instant pudding, but for a richer flavor, consider preparing it from scratch with milk, sugar, and vanilla.
-
1 cup mini marshmallows
- Mini marshmallows add a fun, chewy texture to the fluff salad. If you’re feeling adventurous, swap these out for flavored marshmallows, like strawberry or coconut, for a unique twist.
-
1 cup crumbled shortcake or pound cake
- Shortcake or pound cake provides a comforting, buttery base. If you’re looking for a gluten-free version, there are plenty of gluten-free cakes available that will work beautifully!
These ingredients come together to create a dish that not only tastes incredible but also brings back joyful memories of family gatherings and sunny days.
Step-by-Step Instructions
Now that we have our lovely ingredients lined up, let’s get into the fun part—creating our Strawberry Shortcake Fluff Salad! Here’s a step-by-step guide:
-
Prep the Strawberries:
- Take your fresh strawberries, remove the green tops, and slice them into thin pieces. Don’t be shy about tasting a few as you go—quality control is a must! Set them aside in a bowl.
- Tip: For added flavor, sprinkle the sliced strawberries with a little sugar and let them sit for about 15 minutes. This will create a syrupy sweetness that enhances the overall flavor!
-
Whip the Cream:
- If you’re making your own whipped cream, use a mixing bowl and an electric mixer to whip the heavy cream until it forms soft peaks. Add a tablespoon of powdered sugar for sweetness and a splash of vanilla extract for flavor.
- Chef Hack: Make sure your mixing bowl and beaters are cold to ensure the cream whips up perfectly!
-
Prepare the Pudding:
- If using instant pudding, follow the package instructions by mixing it with milk. If you’re making your own, combine milk, sugar, and a touch of vanilla in a saucepan, heat until warm, then stir in your cornstarch until thickened.
- Let the pudding cool slightly before folding it into the whipped cream.
-
Combine Whipped Cream and Pudding:
- In a large mixing bowl, gently fold the prepared whipped cream into the vanilla pudding using a spatula. Be gentle; we want to keep that lovely light texture!
- Pro Tip: Folding involves gently mixing without deflating the whipped cream, rotating the bowl while you scrape along the sides and bottom with the spatula.
-
Mix in the Marshmallows:
- Add the mini marshmallows to the cream and pudding mixture, incorporating them subtly. These will be little delightful bites in your salad!
-
Assemble the Fluff Salad:
- In a large serving bowl, layer the prepared strawberry slices, followed by a generous layer of the whipped cream and pudding mixture. Then add a layer of crumbled shortcake or pound cake. Repeat until you’ve used all ingredients, finishing with a layer of the whipped cream mixture on top.
- Presentation Tip: You can also serve this is individual cups for a beautiful display—perfect for parties!
-
Chill and Serve:
- Cover the bowl with plastic wrap and let it chill in the refrigerator for at least 1 hour. This step is crucial! Chilling allows the flavors to meld and gives the marshmallows time to soften for that perfect fluffiness.
- When you’re ready to serve, give it a gentle stir, and enjoy the beautiful blend of flavors and textures!
Serving Suggestions
When it comes to serving Strawberry Shortcake Fluff Salad, the sky’s the limit! The vibrant colors make for a stunning presentation. You can serve it right from the bowl or in individual dessert cups layered elegantly—what a treat!
Consider garnishing each serving with additional sliced strawberries or a sprinkle of crushed shortcake crumbs on top for that extra touch. If you’re feeling a bit indulgent, a drizzle of chocolate or caramel sauce wouldn’t hurt either!
Recipe Variations
Now, if you’re feeling adventurous and want to tweak this recipe, I’ve got some fun suggestions for you:
-
Berry Medley: Swap out the strawberries for a mix of your favorite berries—blueberries, raspberries, or blackberries can add an exciting twist to the flavor profile.
-
Chocolate Lovers: Add some mini chocolate chips or a drizzle of chocolate syrup when layering for a rich chocolate-strawberry flavor explosion!
-
Nutty Delight: Sprinkle a handful of chopped nuts (like pecans or almonds) between the layers for added crunch and flavor.
-
Cream Cheese Variation: For a richer texture, consider folding in a bit of softened cream cheese into the whipped cream and pudding mixture. It adds a delicious creaminess to the fluff!
-
Dairy-Free Version: Use coconut cream in place of whipped cream, cashew milk pudding, and gluten-free cake to convert this into a delightful dairy-free treat!
Chef’s Notes
As I reflect on this recipe, I can’t help but think about how it has evolved over time. My grandmother had a knack for making seasonal fruits shine in her desserts, and she effortlessly balanced richness with lightness. I’ve kept her spirit alive by ensuring my recipe is just as simple, yet bursting with flavor.
Funny story: One year, I decided to throw a summer BBQ and whipped this salad up as an impromptu dessert, only to find out that I was also serving it as an appetizer while everyone mingled! Who could resist such a delicious, fluffy treat right from the start?
I love seeing how different families interpret this recipe—each version reflecting personal tastes and memories. It’s what makes cooking so special.
FAQs and Troubleshooting
1. Can I make this salad ahead of time?
Absolutely! This salad actually tastes better after sitting in the fridge for a few hours as the flavors meld. Just be sure to cover it well to keep it fresh.
2. How do I prevent the strawberries from getting mushy?
As mentioned earlier, tossing the sliced strawberries with a little sugar helps them maintain their structure before adding them to the fluff. Also, avoid mixing them in too early.
3. Can I use a different type of cake?
Definitely! Any soft cake will work. Angel food cake is an excellent alternative if you want something lighter, or even a sponge cake!
4. The marshmallows are sticking together; what can I do?
If the mini marshmallows tend to clump up, toss them lightly in a bit of cornstarch before adding them to the mix. This will help keep them fluffy!
Nutritional Info
While this dish falls squarely in the dessert category, it brings with it a medley of fresh fruit. Generally, a serving can provide:
- Calories: Approximately 250
- Protein: 2g
- Fat: 10g
- Carbohydrates: 36g
- Dietary Fiber: 1g
Of course, nutritional values will vary based on ingredients and portions, but who’s counting when you’re having this much fun?
And there you have it! The Strawberry Shortcake Fluff Salad, a beautiful dish that brings joy, laughter, and a bit of nostalgia to your table. Whether you serve it at a celebration, family picnic, or simply enjoy it at home, it’s a dessert that’s sure to please everyone. Remember, food is about creating memories—so gather your loved ones and let the magic happen! Enjoy, friends!
PrintStrawberry Shortcake Fluff Salad
A delightful and fluffy dessert that brings together fresh strawberries, whipped cream, vanilla pudding, mini marshmallows, and shortcake crumbles for a refreshing treat perfect for summer.
- Prep Time: 15 minutes
- Cook Time: 0 minutes
- Total Time: 75 minutes
- Yield: 4 servings 1x
- Category: Dessert
- Method: No Cooking
- Cuisine: American
- Diet: Vegetarian
Ingredients
- 2 cups fresh strawberries, sliced
- 1 cup whipped cream or Cool Whip
- 1 cup vanilla pudding, prepared
- 1 cup mini marshmallows
- 1 cup crumbled shortcake or pound cake
Instructions
- Prep the strawberries: Remove the green tops and slice them thinly. Set aside.
- Whip the cream: Whip the heavy cream until soft peaks form, adding powdered sugar and vanilla to taste.
- Prepare the pudding: Mix instant pudding with milk or prepare it from scratch and let it cool.
- Combine the whipped cream and pudding gently to maintain the texture.
- Mix in the mini marshmallows to the cream mixture.
- Assemble the salad by layering strawberries, whipped cream mixture, and shortcake in a serving bowl.
- Chill in the refrigerator for at least 1 hour before serving.
Notes
Can be made ahead of time and tastes better after chilling. Serve in bowls or individual cups for a beautiful presentation.
Nutrition
- Serving Size: 1 serving
- Calories: 250
- Sugar: 20g
- Sodium: 200mg
- Fat: 10g
- Saturated Fat: 6g
- Unsaturated Fat: 4g
- Trans Fat: 0g
- Carbohydrates: 36g
- Fiber: 1g
- Protein: 2g
- Cholesterol: 30mg
Keywords: dessert, strawberry salad, fluff salad, summer dessert
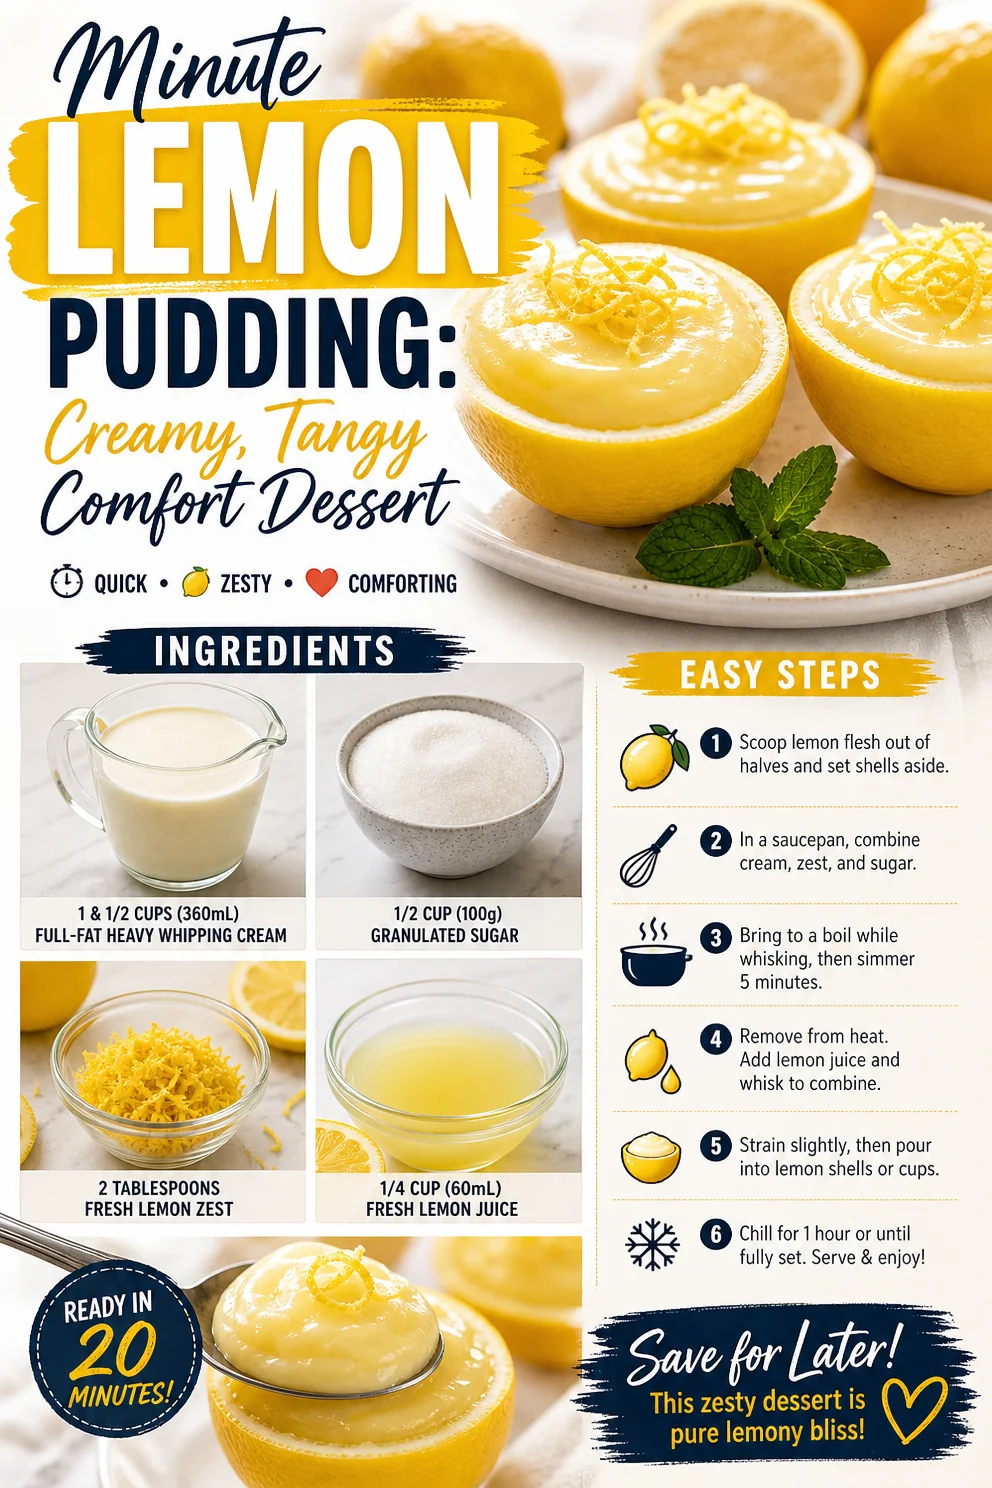
Minute Lemon Pudding: Creamy, Tangy Comfort Dessert
Easy Lemon Pudding: A Bright Delight for Every Occasion
Welcome to the sweet side of clean eating! Today, we’re diving into a dish that perfectly balances simplicity with flavor—Easy Lemon Pudding. This delightful dessert is not only a treat for your taste buds but also a comforting reminder of sunny days and special moments. So, let’s make a fresh batch that will brighten up any gathering or simply elevate your weeknight dinner!
When it comes to desserts, I’ve always been a fan of those that feel indulgent but can also fit into a more wholesome lifestyle. I remember the first time I tasted homemade lemon pudding; it was at my grandmother’s summer barbecue, where laughter filled the air and the sun kissed our cheeks. There was something magical about that cool, creamy pudding topped with a dusting of fresh zest that danced on the palate. It was one of those dishes that seemed to embody joy and warmth, and I’ve carried that memory with me ever since.
This recipe is my take on that nostalgic treat, infused with all the bright flavors of fresh lemons. I promise you that each spoonful will not only transport you back to carefree summer days but also leave you feeling satisfied, not deprived. Now, let’s get cooking!
Personal Story
Lemon pudding takes me back to my childhood—specifically, to afternoons spent in my grandmother’s sunlit kitchen. She was a master of simple yet delightful desserts, and lemon pudding was one of her best creations. I still remember clutching the edges of the wooden table, waiting for that first taste as she poured the silky mixture into bowls. The tangy brightness was like sunshine in my mouth, making every scoop feel like a treat. My grandma always said that food is best when shared, and this lemon pudding became a family favorite, often requested for gatherings and celebrations. Now, I love recreating that joy in my kitchen, passing down the tradition of sharing love through food. Every time I whip up this pudding, I channel those fond memories of my grandma, and I hope you get a bit of that warmth in your own kitchen too!
Ingredients
Here’s what you’ll need to whip up your very own Easy Lemon Pudding. Think of each ingredient as a building block of flavor.
-
1 & 1/2 cups (360mL) full-fat heavy whipping cream: This gives the pudding its rich, creamy texture. You can substitute it with coconut cream for a dairy-free version, or use half and half for a lighter option.
-
1/2 cup (100g) granulated sugar: The sweetness balances the tartness of lemon. If you prefer a healthier choice, you can replace it with honey or maple syrup, but adjust to taste as they can vary in sweetness.
-
2 tablespoons fresh lemon zest: Freshly grated zest adds a fragrant citrus note that elevates the pudding. If you’re in a pinch, you can use bottled lemon zest but fresh is always better for flavor.
-
1/4 cup (60mL) fresh lemon juice: Lemon juice provides the zing and acidity that makes this pudding bright. Bottled lemon juice works in a hurry, but squeezing fresh lemons gives you way more flavor!
Step-by-Step Instructions
Alright, let’s bring this delicious pudding to life! Follow along with these simple steps:
-
Prep Your Ingredients: Before we start cooking, gather all your ingredients and have them at your fingertips. It makes the process smoother and more enjoyable—plus, it keeps you from scrambling around looking for the sugar mid-recipe!
-
Whip the Cream: In a medium mixing bowl, pour in that luscious heavy cream. Using a hand mixer or a whisk, whip the cream until soft peaks form. You want it to be thick yet still smooth—be careful not to over-whip or you’ll end up with butter! (Trust me, I’ve made that mistake before!)
-
Mix the Sugar and Lemon: In another mixing bowl, combine the granulated sugar, lemon zest, and fresh lemon juice. Stir them together until the sugar begins to dissolve. This step is crucial because it allows those zesty flavors to bloom.
-
Combine Everything: Gently fold the whipped cream into the lemon mixture. Use a spatula to lift and fold rather than stir too vigorously. This keeps the cream airy and light, giving your pudding that delightful texture.
-
Chill: Once everything is well combined, transfer the pudding into your serving dishes (think cute ramekins or small glasses for a more refined presentation). Cover with plastic wrap and pop them in the fridge for at least 2 hours—or overnight for the best flavor infusion!
-
Serve and Enjoy: When you’re ready to serve your lemon pudding, remove it from the fridge and remove the wrap. For an extra touch, you can top it with additional lemon zest or a dollop of whipped cream.
Serving Suggestions
Presentation can elevate any dish, and your Easy Lemon Pudding is no exception! Serve it in individual ramekins, topped with fresh berries or a sprinkle of mint for a pop of color. You could also drizzle a little honey over the top for added sweetness and visual flair. If you’re feeling stylish, use glass cups to showcase the beautiful layers, making it even more tempting for everyone at the table.
Recipe Variations
Want to switch things up a bit? Here are some fun variations to consider:
-
Berry Bliss: Fold in some pureed strawberries or blueberries into the pudding for a fruity twist.
-
Coconut Cream Dream: Replace the heavy cream with coconut cream for a tropical version.
-
Spiced Surprise: Add a pinch of ground ginger or cinnamon to the lemon mixture for a subtle kick.
-
Lemon-Lavender: Incorporate a teaspoon of culinary lavender for a floral hint.
-
Vegan Option: Substitute the cream with coconut whipped cream and replace sugar with agave syrup for a plant-based treat.
Chef’s Notes
You know, this lemon pudding recipe has evolved quite a bit since I first started making it! I initially followed a rather complicated recipe with cornstarch and eggs, but I learned to simplify it over the years. The magic of this version is how easy and quick it is to prepare—it’s almost foolproof! Plus, I can now whip up a batch much faster; the hardest part is waiting for it to chill before indulging! Remember, the cleaner your ingredients, the better the flavors will shine through, so always use fresh lemons if you can. Enjoy each moment spent in the kitchen, and don’t forget to share your creations with loved ones—they’ll appreciate the effort and love that went into it!
FAQs and Troubleshooting
-
Q: Can I use bottled lemon juice instead of fresh?
A: While bottled lemon juice works in a pinch, fresh lemon juice gives you a much brighter and more vibrant flavor. If you get the chance, opt for fresh lemons! -
Q: What if my pudding is too runny?
A: If your pudding doesn’t set properly, it might be due to insufficient chilling time, or the cream wasn’t whipped enough. Make sure to whip until soft peaks form and give the pudding enough time in the fridge. -
Q: How can I make this recipe keto-friendly?
A: Simply substitute the granulated sugar with a keto-friendly sweetener like erythritol or monk fruit. The result will still be delicious and guilt-free! -
Q: Can I make this pudding ahead of time?
A: Absolutely! In fact, it’s best when made a day in advance. Just store it in the fridge until you’re ready to serve. It’ll be a refreshing treat that you can enjoy at any time!
Nutritional Info
(Optional, but here’s a sample layout if you want it included.)
- Calories: Approximately 250 per serving
- Fat: 22g
- Carbohydrates: 16g
- Protein: 2g
- Sugar: 10g (if using granulated sugar)
Now that you have all the tools and stories to create this joyful Easy Lemon Pudding, it’s your turn to bring a bit of sunshine into your kitchen! Dive in, enjoy the process, and share the love with those you care about. Happy cooking!
PrintEasy Lemon Pudding
A delightful and creamy lemon pudding that captures the essence of sunshine in every spoonful.
- Prep Time: 15 minutes
- Cook Time: 0 minutes
- Total Time: 120 minutes
- Yield: 4 servings 1x
- Category: Dessert
- Method: Chilling
- Cuisine: American
- Diet: Vegetarian
Ingredients
- 1 & 1/2 cups (360mL) full-fat heavy whipping cream
- 1/2 cup (100g) granulated sugar
- 2 tablespoons fresh lemon zest
- 1/4 cup (60mL) fresh lemon juice
Instructions
- Prep your ingredients: Gather all your ingredients for a smoother cooking process.
- Whip the cream: Pour the heavy cream into a mixing bowl and whip until soft peaks form.
- Mix the sugar and lemon: In another bowl, combine sugar, lemon zest, and lemon juice until the sugar begins to dissolve.
- Combine everything: Gently fold the whipped cream into the lemon mixture until well incorporated.
- Chill: Transfer the pudding into serving dishes, cover, and chill in the fridge for at least 2 hours.
- Serve and enjoy: Remove from the fridge and top with extra lemon zest or whipped cream if desired.
Notes
For variations, consider folding in pureed berries, using coconut cream, or adding spices such as ginger or cinnamon.
Nutrition
- Serving Size: 1 serving
- Calories: 250
- Sugar: 10g
- Sodium: 50mg
- Fat: 22g
- Saturated Fat: 14g
- Unsaturated Fat: 6g
- Trans Fat: 0g
- Carbohydrates: 16g
- Fiber: 0g
- Protein: 2g
- Cholesterol: 70mg
Keywords: lemon pudding, dessert, easy recipe, summer dessert, creamy pudding
Mango Mousse
Whip Up Some Sunshine: The Magic of Mango Mousse
Ah, mango mousse—the dessert that whispers sweet nothings to your taste buds while wrapping you in a warm, tropical embrace. If you’ve ever dove into that first spoonful, experiencing the creamy yet fruity delight dancing on your palate, you’ll know exactly what I mean. It’s like summer vacation captured in a bite!
Today, I want to share a family-favorite recipe for mango mousse that not only brings the flavors of tropical goodness to your kitchen but also carries with it a cherished memory I hold dear. You see, cooking isn’t just about the ingredients or the fancy techniques; it’s about connection, creativity, and sharing love through food—something I’m excited to explore with you.
So, pull up a chair, grab your cooking utensils, and let’s dive into the world of mango mousse. It captures the essence of summer days spent with friends and family, where laughter mingles with the sweet aroma of mango and a hint of cream. Trust me; you’ll want to make this a regular in your dessert rotation!
A Bite of Nostalgia
Let me take you back to the sun-soaked afternoons of my childhood when my grandmother would whip up her famous mango mousse. Each summer, my cousins and I would gather at her house, our faces covered in sticky popsicle remnants from the fruit stands nearby. The air would be filled with the scents of ripe fruits, and laughter would echo in the kitchen as Grandma played the role of the mad scientist in her culinary lab.
The best part? We were her sous chefs! I can still picture it—mangoes piled high, a shiny silver bowl filled with whipped cream, and Grandma’s warm smile lighting up the room. She would tell us stories about her favorite mangoes as she diced them with the precision of a seasoned chef, and we’d eagerly await our turn to whip the cream. The anticipation grew as we churned our ingredients, knowing dessert was just a few whisking moments away.
When that fluffy, golden mousse hit the table, we were all in bliss. It felt like indulging in summer itself, vibrant and light. This recipe is my homage to those joyful summer days, bringing a touch of nostalgia and a whole lot of flavor to your kitchen.
Ingredients
To create this delightful mango mousse, you’ll need the following:
-
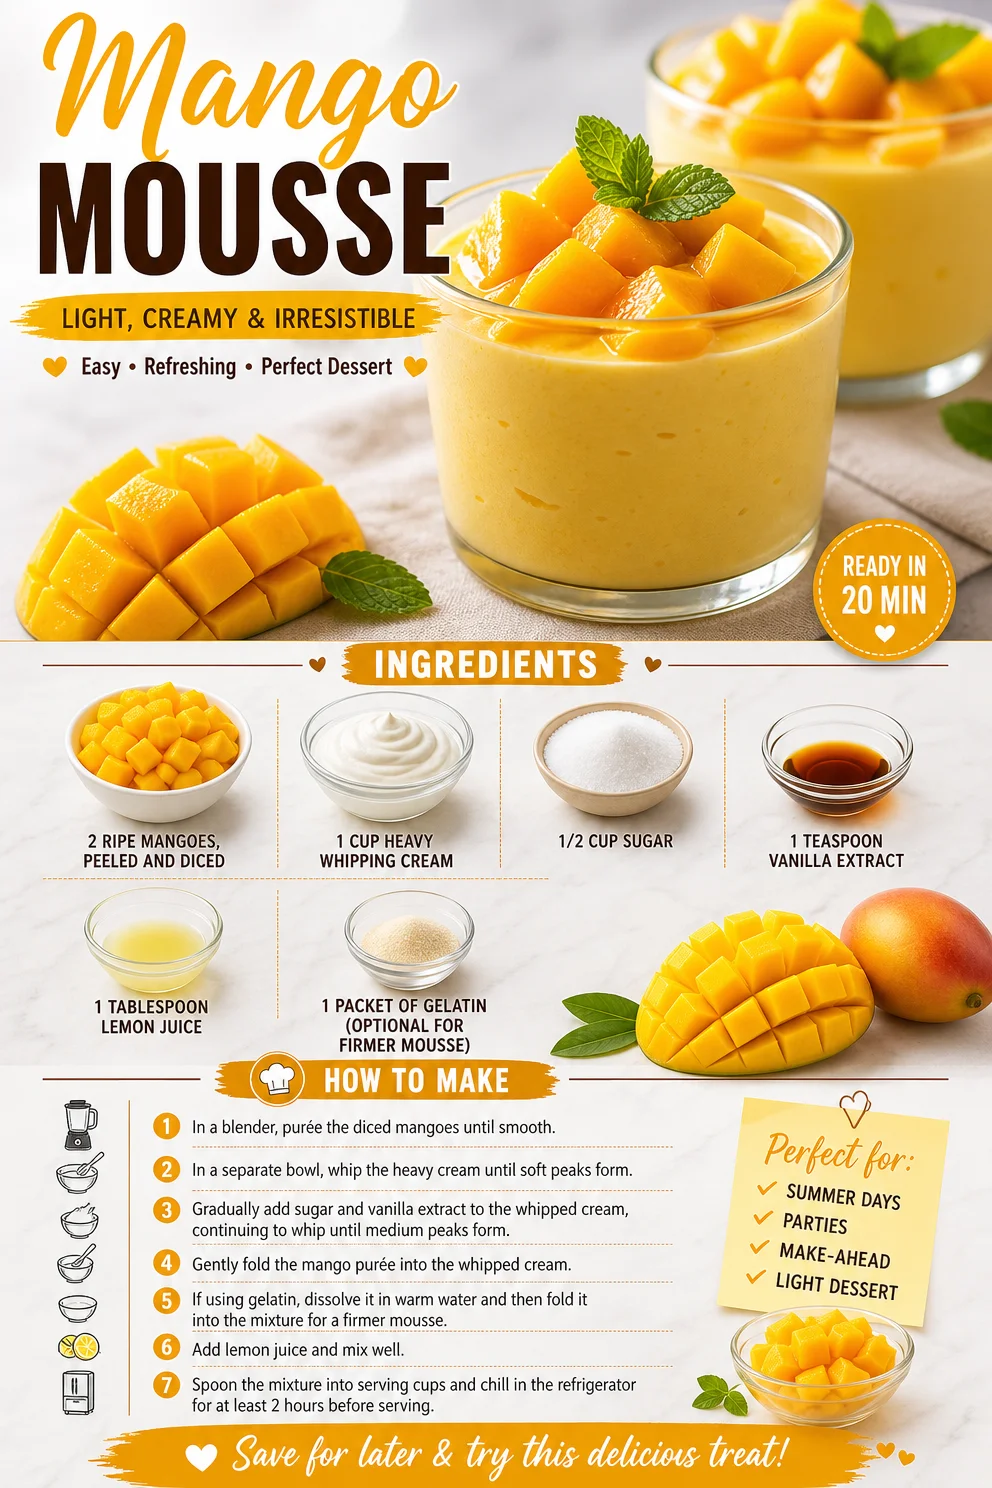
2 ripe mangoes, peeled and diced
Look for mangoes that yield slightly when pressed; that means they’re ready for the sweet dive into dessert! If mangos aren’t in season, you can substitute with frozen mango, just be sure to thaw and drain excess moisture. -
1 cup heavy whipping cream
This is the secret to a rich, velvety mousse. For a lighter version, you can swap in coconut cream or a plant-based alternative, though the texture will be slightly different. -
1/2 cup sugar
Adjust the sweetness to your taste! If you prefer a healthier option, you can use agave syrup or honey; keep in mind that liquid sweeteners may alter the mousse’s consistency slightly. -
1 teaspoon vanilla extract
Always opt for pure vanilla extract over imitation for an authentic flavor boost. The depth of the vanilla harmonizes beautifully with mango. -
1 tablespoon lemon juice
This not only enhances the mango flavor but also helps to keep the mousse from browning. Fresh lemon will give you the brightest taste, but bottled lemon juice works in a pinch. -
1 packet of gelatin (optional for firmer mousse)
If you want a more stable mousse perfect for beautiful plating, use this. For a plant-based option, try agar-agar but remember to adjust the cooking time according to the package instructions.
Step-by-Step Instructions
Now, let’s get our hands a little sticky and create that luscious mango mousse:
-
Prep the Mangoes
Start by peeling and dicing your fresh mangoes, which is arguably the most vital step! The riper, the better! Cut around the pit and chop the sweet flesh into cubes. If you’ve chosen frozen mango, just make sure it’s thoroughly thawed before proceeding. Place these glorious chunks into a blender. -
Blend Until Smooth
Blend the diced mangoes until the texture is silky—no lumps allowed! This should take about 30 seconds. If you’re feeling adventurous, toss in a sprinkle of cinnamon for an extra layer of flavor! -
Whip the Cream
In a separate bowl, use an electric mixer to whip the heavy cream until it forms soft peaks. Trust me, there’s something joyfully therapeutic about watching that cream transform before your eyes. Whip until it’s light and fluffy—don’t overdo it, or you’ll end up with buttery clumps. -
Combine with Sugar and Vanilla
Gradually add in the sugar and vanilla extract as you continue to whip the cream. The sweetness should complement the mango without overpowering it; it’s a delicate dance of flavors! -
Add the Lemon Juice
Once your cream is nice and whipped, add the lemon juice and proceed to gently fold in the mango puree. This step is key—use a spatula and fold the mixture rather than stirring. We want to keep that light, airy texture! -
Incorporate Gelatin (if using)
If you’re opting for that extra firmness with gelatin, dissolve a packet in a small amount of warm water according to the package instructions. Allow it to cool slightly before gently folding it into your mousse mixture. -
Chill the Mousse
Spoon your delightful mixture into serving glasses or a large bowl and let it chill in the refrigerator for at least 2–3 hours—this allows the flavors to meld beautifully while setting the texture. I find that the longer it chills, the better it gets! -
Serve and Enjoy
Once it’s set and chilled, take a moment to admire your masterpiece before serving. A little mango wedge or a sprig of mint on top gives it that chef-level finish!
Serving Suggestions
When it comes to plating, keep it simple and elegant. Present the mango mousse in clear glasses or bowls to showcase its beautiful, vibrant color. You can garnish with additional diced mango, a drizzle of honey, or even some crushed pistachios for that delicious crunch. If you’re feeling extra festive, a dollop of whipped cream on top with a sprinkle of lime zest can elevate your presentation and flavor profile even further.
Recipe Variations
Now let’s get a little creative! Here are a few fun twists to try with your mango mousse:
-
Coconut Mango Mousse: Swap half of the heavy cream with coconut cream for a tropical coconut flavor that pairs beautifully with mango.
-
Spicy Mango Mousse: Add a touch of cayenne pepper or finely chopped jalapeños for a sweet and spicy kick that tantalizes the senses.
-
Berry Fusion: Incorporate other fruits such as chopped strawberries or blueberries into the mousse for a mixed-berry delight that bursts in flavor.
-
Chocolate Drizzle: Top the mousse with melted dark chocolate for an indulgent dessert experience! It adds a rich contrast to the fruity flavors.
-
Tropical Twist: Mix in a bit of pineapple or passion fruit puree for an even fruitier flair that keeps the tropical vibes going strong!
Chef’s Notes
This mango mousse has been a staple on my dessert table for years, evolving as I explored different flavor profiles and techniques. I remember a time I accidentally whipped the cream too much, and instead of throwing it away, I folded some of it back into the mango puree, and voila! It was a happier accident that made me appreciate the beauty in imperfection in the kitchen.
Mangoes are versatile delights! I try to use the freshest ones at their peak ripeness, but even a can of good-quality mango puree can save the day now and then. Cooking is a journey of flavors, and I invite you to take the reins and make this mango mousse your own.
FAQs and Troubleshooting
1. My mousse didn’t set. What happened?
No worries! The most common culprits are under-whipping the cream or not letting the mousse chill long enough. If you used gelatin, ensure it was properly dissolved and incorporated.
2. Can I make this ahead of time?
Absolutely! This dessert is perfect for prepping a day in advance. Just cover it well and keep it in the fridge until you’re ready to serve.
3. How can I make this dairy-free?
Great question! You can swap the heavy cream for coconut cream or a dairy-free whipping cream. Just make sure the texture and flavor balance works for you.
4. What should I do if it’s too sweet?
If you find the mousse overly sweet, add a little more lemon juice to balance the sweetness. A touch of sea salt can also help bring all the flavors together!
Nutritional Info
(Optional based on preference and can be modified depending on specific nutritional needs.)
- Serving Size: 1 portion
- Calories: Approximately 150
- Fat: 10g
- Carbohydrates: 15g
- Protein: 2g
So there you have it, friends! A sunny, cheerful mango mousse recipe that brings back the essence of summer right into your home. I hope you feel inspired to whip this up for your next gathering or simply treat yourself to a taste of sunshine. Happy cooking!
PrintMango Mousse
A delightful mango mousse that captures the essence of summer with its creamy, tropical flavor.
- Prep Time: 15 minutes
- Cook Time: 0 minutes
- Total Time: 180 minutes
- Yield: 4 servings 1x
- Category: Dessert
- Method: No-Cook
- Cuisine: Tropical
- Diet: Vegetarian
Ingredients
- 2 ripe mangoes, peeled and diced
- 1 cup heavy whipping cream
- 1/2 cup sugar
- 1 teaspoon vanilla extract
- 1 tablespoon lemon juice
- 1 packet of gelatin (optional for firmer mousse)
Instructions
- Prep the mangoes by peeling and dicing them, then place them in a blender.
- Blend until smooth—about 30 seconds.
- Whip the cream in a separate bowl until soft peaks form.
- Combine the sugar and vanilla into the whipped cream.
- Add the lemon juice and gently fold in the mango puree.
- Incorporate gelatin if you’re using it, following package instructions.
- Chill the mousse in the refrigerator for at least 2–3 hours.
- Serve and enjoy with garnishes like mango wedges or mint.
Notes
Feel free to customize your mousse with toppings or mix-ins like coconut, berries, or chocolate.
Nutrition
- Serving Size: 1 serving
- Calories: 150
- Sugar: 15g
- Sodium: 30mg
- Fat: 10g
- Saturated Fat: 6g
- Unsaturated Fat: 4g
- Trans Fat: 0g
- Carbohydrates: 15g
- Fiber: 1g
- Protein: 2g
- Cholesterol: 30mg
Keywords: mango mousse, dessert, tropical dessert, summer recipe, easy dessert
Mango Mousse
Indulge in Lightness: The Delightful Mango Mousse Recipe
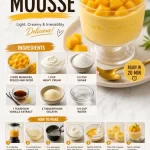
Welcome back to Clean Plate Cravings! You know, there are few things in life that evoke pure happiness quite like a delicious dessert, particularly when that dessert has the refreshing flavor of mango. Today, I’m thrilled to share with you my Oh-So-Luscious Mango Mousse recipe! Trust me, this light, creamy treat is as vibrant as it is delicious. Each dollop is like a little kiss from the tropics, and it’s perfect for any occasion—or just because you deserve it!
Why Mango Mousse?
Mango mousse dances at the intersection of decadence and simplicity. It’s a fabulous dessert that’s airy, subtly sweet, and bursting with the juicy flavor of ripe mangoes. The best part? You won’t find a single ounce of heaviness here. This dessert relies on the magic of fresh ingredients and a technique that allows the natural sweetness of mango to shine through. So grab a spoon, and let’s dive into a delightful creation you’ll be proud to whip up for family and friends!
A Personal Touch: The Joy of Mangoes
Let me take you back to a sunny summer day a few years ago. I was visiting my grandmother’s house when I first discovered my love for mangoes. It was the peak of the season, and those golden fruits were literally falling off the trees in her backyard. She would often slice one open, hand me half, and insist I enjoy it right there, standing in the sun. The sweet juice would dribble down my arms—what a glorious sticky mess!
Fast forward to today, and that love for mangoes has blossomed into numerous recipes, but this mango mousse is particularly special to me. It reminds me of those carefree days, flavored with nostalgia and sunny smiles. It’s not just a recipe; it’s a tribute to cherished memories and the beauty of simple things. So, let’s create our own sweet moments in the kitchen!
Ingredients That Shine
Here’s what you’ll need to make this luscious mango mousse:
-
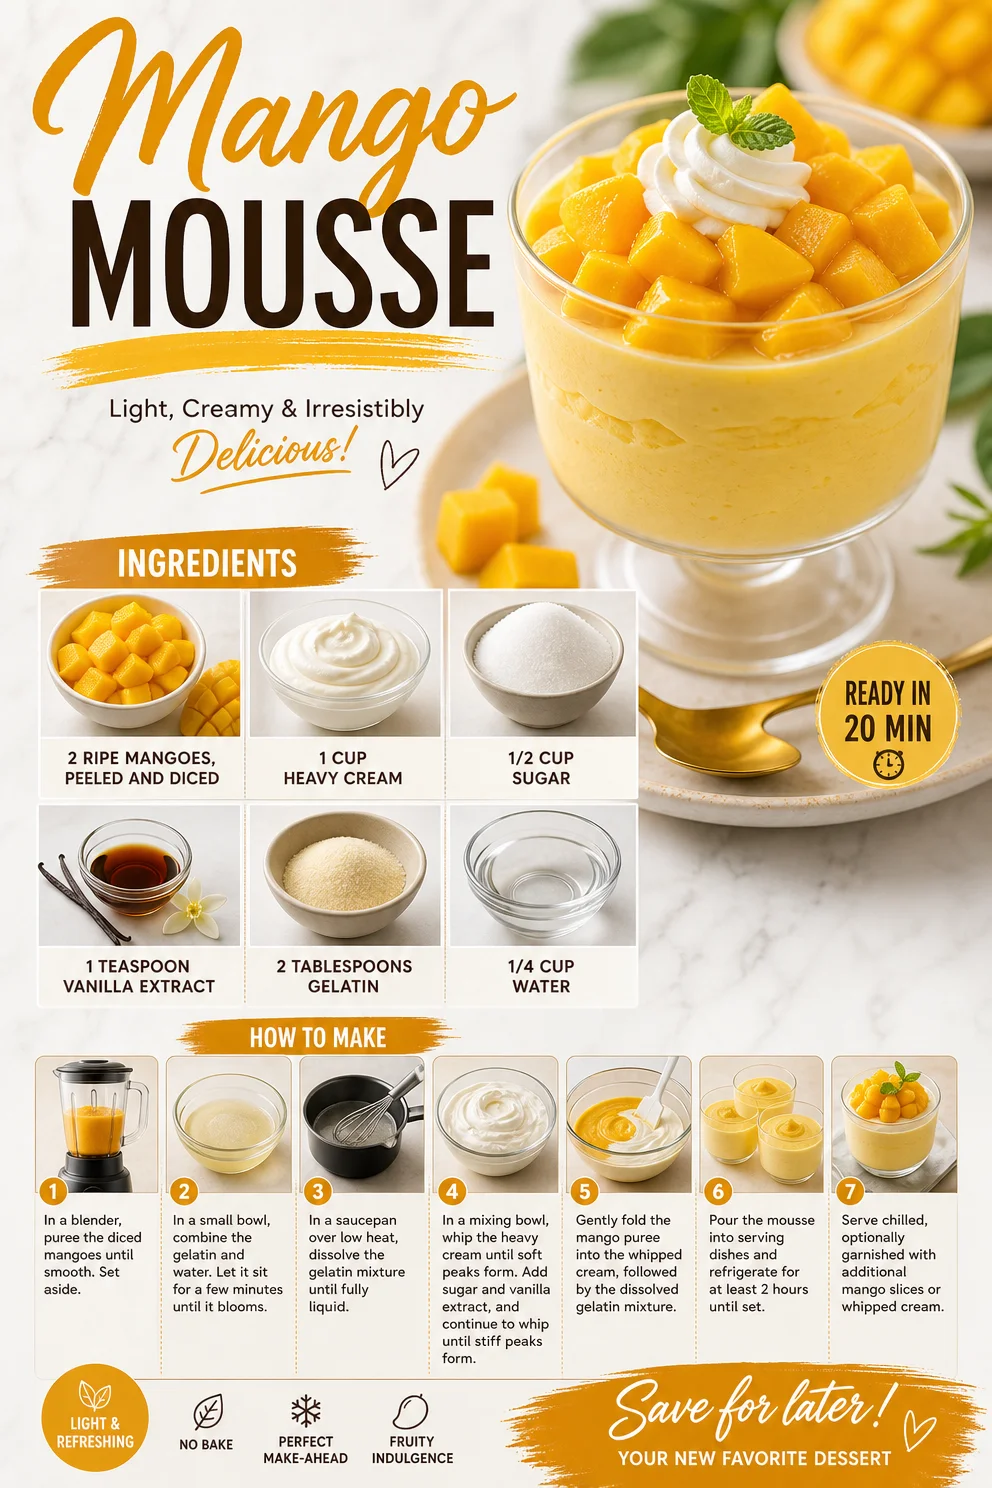
2 ripe mangoes, peeled and diced
Mangoes are the star of this dish, providing natural sweetness and a vibrant color. Look for mangoes that yield slightly to pressure for the best flavor. -
1 cup heavy cream
To achieve that airy mousse texture, heavy cream is your go-to. If you prefer a lighter version, you can substitute it with coconut cream for a tropical twist! -
1/2 cup sugar
Sugar is essential for balancing the natural acidity of the mangoes. For a healthier option, you can use honey or maple syrup to sweeten this treat. -
1 teaspoon vanilla extract
Vanilla adds warmth and depth to the flavors. Always opt for pure vanilla extract instead of synthetic vanilla for the best results. -
2 tablespoons gelatin
Gelatin helps stabilize the mousse, giving it that perfect, creamy consistency. If you’re looking for a vegetarian alternative, agar-agar works just as well. -
1/4 cup water
This combines with the gelatin to bloom it for that soft, mousse-like texture.
Step-by-Step Instructions
-
Prepare the Gelatin
First things first! In a small bowl, mix the 2 tablespoons of gelatin with 1/4 cup of water. Let it sit for about 5-10 minutes until it swells. This process is called blooming, and it’s crucial for achieving the perfect texture in your mousse. -
Blend the Mangoes
While the gelatin is blooming, grab your diced mangoes and toss them into a blender. Blend until smooth and creamy. You can taste it! If you feel it needs a touch more sweetness, now’s the time to add a bit of sugar. Just remember, this dessert should taste like sunshine! -
Prepare Whipped Cream
In a mixing bowl, whip the heavy cream with an electric mixer until soft peaks form—think lightly whipped cream clouds! You want it airy, but not too stiff. If you’re using coconut cream, refrigerate it before whipping to make it light and fluffy. -
Dissolve the Gelatin
Now that your gelatin has bloomed, it’s time to melt it. Place it in a microwave for about 15 seconds or on low heat on the stove until it’s fully dissolved. Be careful not to overheat! It should be liquid but not hot. -
Combine Everything
In a large bowl, combine the mango puree, dissolved gelatin, sugar, and vanilla extract. Mix thoroughly to ensure the sweet and fruity flavors meld together beautifully. -
Fold in the Whipped Cream
Finally, fold in the whipped cream gently into the mango mixture. This is where the mousse gets its light and airy texture—go easy here to avoid deflating the cream! Use a spatula, and make sweeping motions from the bottom of the bowl to the top. -
Chill
Pour the mousse into serving dishes or a large bowl and chill for at least 2 hours. This allows it to set beautifully, creating that luscious texture that’s oh-so satisfying! -
Serve and Enjoy
When ready to serve, you can top your mango mousse with a sprinkle of fresh mango chunks, whipped cream, or even mint leaves for added color and flavor.
Serving Suggestions
Plating your Mango Mousse can be as fun as making it! For a classy touch, serve it in elegant glass cups to showcase that beautiful color. Spoon a dollop of whipped cream on top and garnish it with a slice of fresh mango or a mint leaf. If you’re feeling adventurous, you can even pour a little passion fruit puree on top for a tropical vibe. Your guests will be wowed by both the presentation and the taste!
Recipe Variations
Feeling creative? Here are some easy variations to give your mango mousse a fun twist:
-
Coconut Mango Mousse: Substituting half of the heavy cream with coconut cream gives it a creamy tropical flair.
-
Spicy Ginger Kick: Add a teaspoon of grated fresh ginger to the cream mixture for a zingy update!
-
Berry Swirl: Fold in some raspberry or blueberry puree right before serving for a gorgeous contrast and added tartness.
-
Dairy-Free Delight: Use almond milk or cashew cream in place of heavy cream for a lighter, dairy-free option.
Chef’s Notes
I remember the first time I made this mango mousse for my family—everyone devoured it in seconds! It’s one of those recipes that evolves as we try new things. I’ve added so many twists over the years, like incorporating fresh lime zest or swapping mango for other fruits like passionfruit and peach. Each time, I learn something new about flavor combinations and textures. It’s a testament to the beauty of keeping cooking fun and adventurous!
FAQs and Troubleshooting
1. My mousse didn’t set properly; what went wrong?
This can happen if the gelatin isn’t fully dissolved or if it wasn’t allowed to cool properly before combining with other ingredients. Make sure the mixture cools slightly before folding in the whipped cream!
2. Can I use frozen mangoes?
Absolutely! Just be sure to thaw them completely and drain any excess liquid before blending!
3. Is the mousse safe for kids or pregnant women?
If using gelatin, ensure it’s dissolved properly. For pregnant women, consulting with a healthcare provider about consuming gelatin is always a good idea.
4. How long can I store the mousse?
You can store it in the fridge for up to three days, though the texture is best within the first 1-2 days!
Nutritional Info
While I typically focus on the joy of eating rather than strict nutritional guidelines, here’s a simple overview per serving (based on 4 servings):
- Calories: 250
- Protein: 2g
- Carbohydrates: 30g
- Fat: 15g
- Sugar: 20g
Now that you’re armed with this incredible Mango Mousse recipe, it’s time to make some sweet memories and share that goodness with your loved ones! Savor every bite, and let the tropical flavors work their magic. I can’t wait to hear how yours turns out! Happy cooking, foodies!
PrintLuscious Mango Mousse
A light and creamy mango mousse that is perfect for any occasion, bursting with the refreshing flavor of ripe mangoes.
- Prep Time: 15 minutes
- Cook Time: 0 minutes
- Total Time: 135 minutes
- Yield: 4 servings 1x
- Category: Dessert
- Method: Chilling
- Cuisine: Tropical
- Diet: Vegetarian
Ingredients
- 2 ripe mangoes, peeled and diced
- 1 cup heavy cream
- 1/2 cup sugar
- 1 teaspoon vanilla extract
- 2 tablespoons gelatin
- 1/4 cup water
Instructions
- Prepare the gelatin: In a small bowl, mix the 2 tablespoons of gelatin with 1/4 cup of water. Let it sit for about 5-10 minutes until it swells.
- Blend the mangoes: Toss the diced mangoes into a blender and blend until smooth and creamy. Adjust sweetness with sugar if desired.
- Prepare whipped cream: Whip the heavy cream with an electric mixer until soft peaks form.
- Dissolve the gelatin: Melt the bloomed gelatin in the microwave for about 15 seconds or on low heat until fully dissolved.
- Combine everything: In a large bowl, combine mango puree, dissolved gelatin, sugar, and vanilla extract. Mix thoroughly.
- Fold in the whipped cream gently into the mango mixture to maintain the airy texture.
- Chill: Pour the mousse into serving dishes and chill for at least 2 hours to set.
- Serve and enjoy: Top with fresh mango chunks, whipped cream, or mint leaves before serving.
Notes
For a tropical twist, substitute half of the heavy cream with coconut cream. You can also add a teaspoon of grated fresh ginger for a spicy kick.
Nutrition
- Serving Size: 1 serving
- Calories: 250
- Sugar: 20g
- Sodium: 50mg
- Fat: 15g
- Saturated Fat: 10g
- Unsaturated Fat: 4g
- Trans Fat: 0g
- Carbohydrates: 30g
- Fiber: 2g
- Protein: 2g
- Cholesterol: 30mg
Keywords: mango mousse, tropical dessert, light dessert, easy recipes, summer recipes
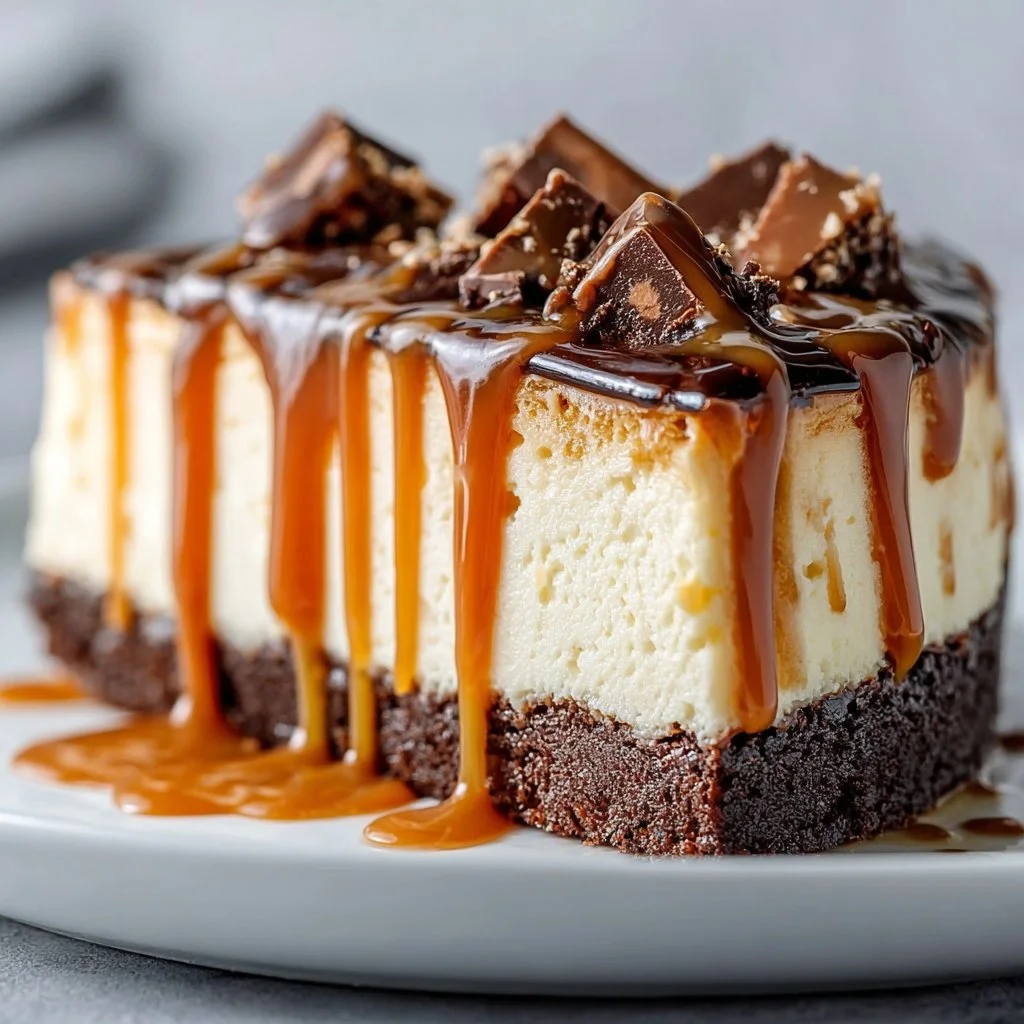
Caramel Brownie Cheesecake: A Dreamy Dessert for Every Occasion
Caramel Brownie Cheesecake: A Dreamy Dessert for Every Occasion
Hey there, fellow food lovers! If you love indulging in desserts that balance decadence with a hint of nostalgia, you’ve landed in the right place! Today, we’re diving into a spectacular recipe that combines the best of two worlds: your beloved brownies and creamy cheesecake! It’s a Caramel Brownie Cheesecake, and let me tell you, it’s a dreamy dessert that will have your taste buds dancing with joy.
I still remember the first time I tried a dessert creation that mixed brownies and cheesecake. It was at a friend’s birthday party, and as soon as I had my first bite, I knew I found my dessert soulmate. The rich and fudgy brownie meets the luscious tang of the cream cheese, all beautifully swirled together and topped with caramel—what’s not to love?
In this chilled wonder, we’ll master a classic that is perfect for every occasion—birthdays, holidays, or even just a Tuesday when you deserve a treat (and let’s be honest, don’t we all?). Plus, it’s surprisingly simple to make; you’ll impress your friends and family without spending all day in the kitchen. So let’s roll up our sleeves and create some magic together!
My Sweet Memory
Ah, before we get our hands dirty, let me share a little memory that makes this dessert even more special. I was a teenager, still learning my way around the kitchen, but always eager to help out during family gatherings. One year, my aunt decided to throw a potluck dinner, and she asked if I’d like to help her whip up something sweet. That was my golden opportunity!
We teamed up to create a variety of treats, but the highlight was her caramel cheesecake, which instantly became a family favorite. As we crafted the layers, I vividly remember creating perfect swirls of caramel and chocolate, getting a bit too excited and sneaking bites in between layers. It was a kitchen adventure filled with laughter and an explosion of flavor in every bite.
Now, every time I make this Caramel Brownie Cheesecake, I’m transported back to that day. The blend of excitement and love in the kitchen reminds me that food is more than just sustenance; it’s about creating memories with the ones we cherish. So, whether you’re creating this dessert for yourself or for someone you love, let’s dive in and sprinkle a little magic together!
Ingredients
Here’s what you’ll need to create this beautiful Caramel Brownie Cheesecake:
-
1 package of brownie mix: Choose your favorite brand! Most mixes require eggs, oil, and water. I usually go for a fudgy brownie mix for that deep, rich texture. If you have a homemade recipe you love, feel free to substitute it.
-
24 ounces (three 8-ounce packages) cream cheese, softened: You want your cream cheese to be soft and at room temperature for a smooth cheesecake batter. If you need a lower-fat option, you can use Neufchâtel cheese, which works well too!
-
1 cup granulated sugar: Sugar will sweeten the cheesecake perfectly and balance out the richness. If you’re looking for a healthier option, you can use coconut sugar as a substitute for a different flavor profile.
-
1 teaspoon vanilla extract: Pure vanilla extract gives your cheesecake a lovely flavor that elevates everything. If you want to experiment, try using almond extract for a nutty twist!
-
3 large eggs: Eggs are crucial for binding everything together and giving your cheesecake the right texture. If you’re in a pinch, you can use flax eggs (1 tablespoon of ground flaxseed mixed with 3 tablespoons of water per egg) as a substitute.
-
1/4 cup sour cream: This ingredient adds creaminess and a slight tang to the cheesecake. You can replace it with Greek yogurt when you need a healthier option.
-
1/4 cup heavy cream: The heavy cream enhances the overall creaminess. If you need a dairy-free option, coconut cream works wonders.
-
1/2 cup caramel sauce (plus extra for drizzling on top): You can make your own caramel or store-bought works just as well! Just be sure it’s thick and rich for that perfect drizzle.
-
Whipped cream: Homemade or store-bought; it’s the finishing touch that elevates this dessert!
-
Chocolate shavings: For garnish, you can use dark chocolate, white chocolate, or caramelized chocolate for an extra layer of richness.
Step-by-Step Instructions
Now, it’s time to bring this beauty to life! Follow these detailed steps and watch as your kitchen transforms into a delicious wonderland!
-
Preheat the Oven: Start by preheating your oven to 350°F (175°C). This step is crucial because you want all the parts of your cheesecake to cook evenly.
-
Prepare the Brownie Base: Prepare your brownie mix as directed on the package. Pour the batter into a greased springform pan, smoothing it out evenly. The brownie layer should be about an inch thick. Bake for about 25–30 minutes until a toothpick comes out with minimal crumbs. Remove from the oven and let it cool completely—it should be fudgy and delightful!
-
Make the Cheesecake Filling: In a large mixing bowl, combine the softened cream cheese and granulated sugar. Use a hand mixer or a stand mixer to beat until it’s smooth and creamy, about 2-3 minutes. Don’t skip this step; a properly beaten mixture ensures your cheesecake will be super smooth!
-
Add Eggs One at a Time: Add in the eggs, one at a time, mixing on low speed after each addition. This method combines them without overmixing and keeps your cheesecake from cracking in the oven—we’re aiming for a velvety texture!
-
Incorporate the Other Ingredients: Add the vanilla extract, sour cream, and heavy cream. Beat until just combined. Stir in the caramel sauce by hand, creating a lovely marbling effect. A little extra caramel never hurts! If you like things extra sweet, feel free to add more!
-
Fill the Springform: Pour the cheesecake mixture over the cooled brownie base, spreading it evenly. Make sure all that chocolatey goodness is well covered!
-
Bake the Cheesecake: Place the springform pan in the preheated oven. Bake for 55-60 minutes or until the edges appear set, but the center still has a slight jiggle. Trust me; that jiggle means it will be creamy as it cools.
-
Cool Down: After baking, turn off the oven and crack the door open, letting the cheesecake cool in the oven for about an hour. This prevents cracking by allowing it to cool gradually.
-
Chill: Once it’s at room temperature, cover it with plastic wrap and refrigerate it for at least 4 hours or, even better, overnight. The flavors will deepen, and the cheesecake will set beautifully.
-
Serve with Style: When ready to serve, remove the sides of the springform pan. Drizzle additional caramel sauce on top and garnish with whipped cream and chocolate shavings. How gorgeous!
Serving Suggestions
When serving your Caramel Brownie Cheesecake, presentation is key! Here are some fun ways to plate it up:
-
For a sophisticated twist, use a cake stand and plate the cheesecake cleanly with a slice already out. Decorate individual slices with extra caramel drizzle and a dollop of whipped cream on the side.
-
If you’re feeling festive, garnish with fresh berries around the base—strawberries or raspberries pop against the caramel and chocolate beautifully!
-
Add a mini sprinkle of sea salt on top—it pairs delightfully with the chocolate and caramel. It’s a game-changer!
Recipe Variations
You’re in for a treat! Here are a few creative ways to switch things up with your Caramel Brownie Cheesecake:
-
Nutty Delight: Swirl in chopped pecans or walnuts into the cheesecake batter before baking for a delightful crunch.
-
Different Flavors: Experiment with different flavored extracts! Try orange or coffee to enhance the flavors of your base.
-
Swirled Chocolate: Incorporate some melted dark chocolate into the cheesecake mixture for an additional layer of chocolate goodness.
-
Minty Fresh: Add a few drops of peppermint extract for a festive twist during the holidays!
-
Dairy-Free Version: Substitute all dairy-based ingredients with dairy-free alternatives (like nut cream cheese, coconut whipped cream, and soy milk), and you’ll have a delicious treat for everyone.
Chef’s Notes
As a chef, I love sharing tips and tales from the kitchen. This recipe has come a long way! The original idea sparked when a friend of mine invited me over just to taste her brownie cheesecake concoction, and I couldn’t help but tweak it over the years. My encounters in the kitchen often lead to joyful accidents—like adding a bit too much caramel and accidentally creating the richest dessert to ever exist! Just remember: cooking is all about having fun and leaning into your creativity.
Don’t be afraid to experiment—if something doesn’t turn out as expected, laugh it off and try again! Some of my best kitchen stories come from attempts that didn’t quite nail it but turned into something extraordinary.
FAQs and Troubleshooting
1. Why did my cheesecake crack?
Cheesecakes can crack for various reasons, often related to temperature. Ensure you cool it down gradually, as mentioned above, and avoid overmixing after adding the eggs.
2. Can I make this dessert ahead of time?
Absolutely! This cheesecake tastes even better a day or two after making it, giving the flavors more time to meld together. Just keep it stored in the fridge tightly covered.
3. How do I know when my cheesecake is done?
The edges should be set while the center remains slightly jiggly. It will continue to firm as it cools, leading to that creamy texture we’re all dreaming of!
4. Can I freeze the cheesecake?
Yes, this cheesecake can be frozen! Just wrap it tightly in plastic wrap and then foil to avoid freezer burn. When ready to enjoy, thaw it in the refrigerator overnight.
Nutritional Info
Please note: Nutritional information can vary based on specific products and brands used. Based on the ingredients above, a single slice (assuming 12 slices) averages around:
- Calories: 350
- Protein: 6g
- Carbohydrates: 40g
- Fat: 20g
- Sugar: 25g
And there you have it—your mouthwatering Caramel Brownie Cheesecake! I’m so excited for you to get into your kitchen and create something delicious. So grab your apron, turn on some tunes, and let’s make some unforgettable food memories together! Happy baking!
PrintCaramel Brownie Cheesecake

A decadent Caramel Brownie Cheesecake that beautifully combines rich brownies and creamy cheesecake with a drizzle of caramel.
- Prep Time: 30 minutes
- Cook Time: 60 minutes
- Total Time: 90 minutes (plus chilling time)
- Yield: 12 servings 1x
- Category: Dessert
- Method: Baking
- Cuisine: American
- Diet: Vegetarian
Ingredients
- 1 package brownie mix
- 24 ounces cream cheese, softened
- 1 cup granulated sugar
- 1 teaspoon vanilla extract
- 3 large eggs
- 1/4 cup sour cream
- 1/4 cup heavy cream
- 1/2 cup caramel sauce (plus extra for drizzling)
- Whipped cream for topping
- Chocolate shavings for garnish
Instructions
- Preheat the oven to 350°F (175°C).
- Prepare your brownie mix as directed and pour into a greased springform pan, smoothing it out evenly.
- Bake for about 25–30 minutes until a toothpick comes out with minimal crumbs. Let it cool completely.
- In a large mixing bowl, combine the softened cream cheese and granulated sugar, beating until smooth, about 2-3 minutes.
- Add the eggs one at a time, mixing on low speed after each addition.
- Incorporate the vanilla extract, sour cream, and heavy cream, beating until just combined.
- Stir in the caramel sauce by hand to create a marbling effect.
- Pour the cheesecake mixture over the cooled brownie base and spread it evenly.
- Bake for 55-60 minutes, or until the edges appear set but the center has a slight jiggle.
- Cool in the oven with the door cracked for about 1 hour, then refrigerate for at least 4 hours or overnight.
- Serve with additional caramel drizzle and garnish with whipped cream and chocolate shavings.
Notes
Try serving with fresh berries or a sprinkle of sea salt for added flavor.
Nutrition
- Serving Size: 1 slice
- Calories: 350
- Sugar: 25g
- Sodium: 300mg
- Fat: 20g
- Saturated Fat: 10g
- Unsaturated Fat: 8g
- Trans Fat: 0g
- Carbohydrates: 40g
- Fiber: 2g
- Protein: 6g
- Cholesterol: 70mg
Keywords: cheesecake, brownie, caramel, dessert, baking