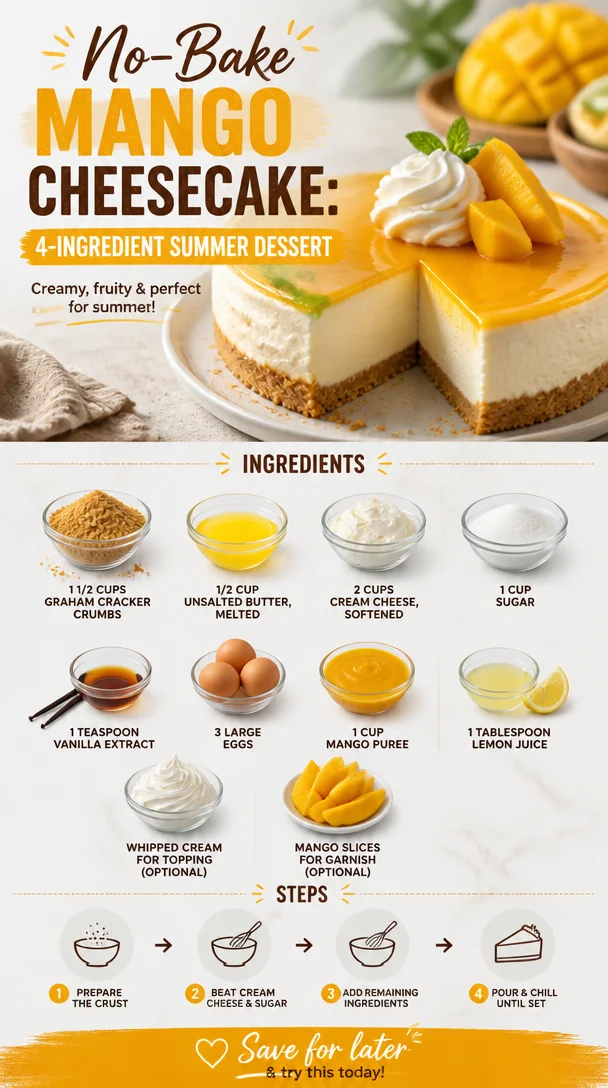
No-Bake Mango Cheesecake: 4-Ingredient Summer Dessert
Indulge in Paradise: Your Ultimate Mango Cheesecake Recipe
Welcome to the tropical oasis of flavor that is Mango Cheesecake! With its creamy texture, vibrant mango flavor, and a buttery graham cracker crust, this dessert takes you straight to a sun-kissed beach with every delightful bite. I’m Ava Carter, your kitchen companion on this delicious journey, and I’m excited to share my recipe that celebrates the incredible taste of mango while keeping things light and refreshing.
If you’re like me, you believe that dessert can be satisfying and still feel great—especially when it features fresh, juicy mangoes. Whether it’s a sunny afternoon or a cozy evening with friends, this Mango Cheesecake will fit right in, offering a sweet, tangy escape anyone can enjoy.
Now, let’s dive into this unforgettable recipe—trust me, your taste buds are in for a treat!
A Sweet Slice of Nostalgia
Every bite of this Mango Cheesecake takes me back to my childhood days spent in my grandmother’s kitchen. She was the queen of desserts, and her love for fresh fruits was infectious. One summer, while visiting her in a small coastal town, we discovered a local mango festival. It was magic—mango ice creams, smoothies, salsas, and yes, the most divine mango cheesecake I had ever tasted.
That dessert was rich yet light, with a perfect blend of sweet and tart, just like a summer day. Inspired by this memory, I decided to create my own version that retains that same spirit but with a lighter twist. So let’s roll up our sleeves and get ready to whip up a Mango Cheesecake that carries the joy of those sunny afternoons right into your home!
Ingredients
Here’s what you’ll need for this tropical delight:
-
1 1/2 cups graham cracker crumbs
The base of our cheesecake, providing a sweet crunch. If you’re gluten-free, consider using gluten-free graham crackers or even crushed almonds! -
1/2 cup unsalted butter, melted
This binds the crumbs together and adds richness. You can substitute coconut oil for a tropical twist! -
2 cups cream cheese, softened
The star of the cheesecake! Ensure it’s at room temperature for smooth mixing. For a lighter option, try using Greek yogurt. -
1 cup sugar
Adds sweetness; you can swap this for coconut sugar or a sugar substitute if you’re looking to cut down on sweetness. -
1 teaspoon vanilla extract
Enhances the flavor profile; consider using pure vanilla for the best results. -
3 large eggs
These will provide stability and richness to the cheesecake. For a vegan version, use flax eggs or aquafaba. -
1 cup mango puree
The hero ingredient; fresh or canned works well! If using canned, opt for those without added sugar. -
1 tablespoon lemon juice
Brightens up the flavors—don’t skip it! If you have limes, they can work just as well. -
Whipped cream for topping (optional)
A fluffy addition; try flavored whipped cream for extra pizzazz! -
Mango slices for garnish (optional)
These add a beautiful finish and a burst of freshness.
Step-by-Step Instructions
Ready to get started? Let’s turn that vibrant vision into a reality!
-
Preheat the Oven: Begin by preheating your oven to 325°F (163°C). This ensures that your cheesecake bakes evenly, resulting in a silky texture.
-
Prepare the Crust: In a medium bowl, combine the graham cracker crumbs and melted butter. Mix until fully coated. This mixture should resemble wet sand. Press it firmly into the bottom of a 9-inch springform pan. A flat-bottomed glass or measuring cup can help you achieve a nice, even layer. Bake for 10 minutes and then let it cool, allowing the crust to firm up.
-
Make the Cheesecake Filling: In a large mixing bowl, blend the cream cheese and sugar using an electric mixer. Start on low speed to avoid splattering (trust me on this one!). Gradually increase to medium speed until it’s smooth and creamy, around 2 minutes.
-
Add Vanilla and Eggs: Mix in the vanilla extract. Then, one at a time, add the eggs, blending well after each addition. Make sure to scrape down the sides of the bowl to ensure everything is well combined.
-
Incorporate Mango and Lemon Juice: Add the mango puree and lemon juice to the bowl. Blend until your mixture is smooth and vibrant (the color is pure sunshine!). Give it a taste; if you need a little more sweetness, feel free to sprinkle in some extra sugar.
-
Pour and Bake: Pour the cheesecake mixture over the cooled crust, smoothing the top with a spatula. Bake in the preheated oven for 55-60 minutes. The edges should be set, but the center might still be a little wobbly—it will firm up as it cools!
-
Cool Down: Once baked, turn off the oven and crack the door open slightly. Let the cheesecake cool in the oven for an hour. This helps prevent cracks. Afterward, refrigerate for at least four hours—overnight is best for the flavors to develop.
-
Serve It Up: Before serving, top with whipped cream and decorate with fresh mango slices. Slice with a hot, wet knife to get clean edges.
Serving Suggestions
When it’s time to serve, cut the Mango Cheesecake into generous slices and place them on colorful dessert plates. A dollop of whipped cream on top adds a playful touch, and the bright mango slices provide that final pop of color. Pair it with a refreshing glass of iced tea or a fruity cocktail for a delightful dessert experience!
Recipe Variations
Feeling like mixing things up? Here are a few fun twists you can explore:
- Coconut Mango Cheesecake: Add shredded coconut into the crust for an added tropical crunch. You can even replace some cream cheese with coconut cream.
- Chocolate Rock: Drizzle melted dark chocolate on top of your mango cheesecake for a rich contrast.
- Spicy Kick: Incorporate a pinch of cayenne or chili powder into the crust for a surprising heat that enhances the mango flavor.
- Berry Fusion: Layer some mixed berries on the cheesecake before serving for a colorful and tangy contrast.
- Savory Twist: Try adding a touch of fresh basil or mint into the mango puree for a unique herbal edge.
Chef’s Notes
I have to admit, this Mango Cheesecake recipe has evolved over the years. I initially struggled to achieve that creamy texture without it feeling too heavy. I experimented with various creams and fruits, and each trial made me fall in love with mango even more. A good friend of mine, who is a tropical fruit enthusiast, once challenged me to make a cheesecake without feeling guilty about indulging. That sparked my journey to create this delightfully satisfying dessert. Every time I make it, I feel a rush of gratitude for the fresh ingredients and the memories they evoke.
FAQs and Troubleshooting
-
Why did my cheesecake crack?
Cracking can happen if the filling is overbeaten, or if it cools down too quickly. Be gentle when mixing, and ensure to cool it gradually in the oven. -
Can I use frozen mango?
Absolutely! Just thaw and drain excess moisture before pureeing. Fresh mango will give you the best flavor, but frozen works in a pinch. -
How do I prevent the crust from getting soggy?
Bake the crust for 10 minutes before adding the filling. Also, be sure not to oversaturate it with the filling. -
How should I store leftovers?
Keep this cheesecake covered and refrigerated; it should stay fresh for 5-7 days. You can also freeze it for longer storage—just wrap it tightly!
Nutritional Info
While I believe in enjoying desserts without stressing too much about calories, it’s always good to have an idea of what you’re indulging in. Each slice of this Mango Cheesecake is approximately 300 calories. But remember, it’s packed with goodness courtesy of those bright, fresh mangoes!
So there you have it—a dessert that’s not just a treat, but also a heartwarming experience. I hope you find joy in making this Mango Cheesecake as much as I do. Sharing it with friends or family brings back the essence of those summer days, and trust me, your loved ones will adore it. Happy baking!
PrintMango Cheesecake
A creamy and vibrant Mango Cheesecake with a buttery graham cracker crust, transporting you to a tropical paradise with every bite.
- Prep Time: 20 minutes
- Cook Time: 60 minutes
- Total Time: 80 minutes
- Yield: 8 servings 1x
- Category: Dessert
- Method: Baking
- Cuisine: Fusion
- Diet: Vegetarian
Ingredients
- 1 1/2 cups graham cracker crumbs
- 1/2 cup unsalted butter, melted
- 2 cups cream cheese, softened
- 1 cup sugar
- 1 teaspoon vanilla extract
- 3 large eggs
- 1 cup mango puree
- 1 tablespoon lemon juice
- Whipped cream for topping (optional)
- Mango slices for garnish (optional)
Instructions
- Preheat the oven to 325°F (163°C).
- Prepare the crust by combining the graham cracker crumbs and melted butter, then press into a 9-inch springform pan. Bake for 10 minutes and let cool.
- Make the cheesecake filling by blending cream cheese and sugar until smooth, about 2 minutes.
- Add vanilla extract and eggs one at a time, blending well after each addition.
- Incorporate mango puree and lemon juice until the mixture is smooth.
- Pour the cheesecake mixture over the cooled crust and bake for 55-60 minutes.
- Cool the cheesecake in the oven for an hour, then refrigerate for at least four hours.
- Serve topped with whipped cream and fresh mango slices.
Notes
For a lighter option, consider using Greek yogurt instead of cream cheese. You can also replace sugar with coconut sugar or a substitute if desired.
Nutrition
- Serving Size: 1 slice
- Calories: 300
- Sugar: 20g
- Sodium: 250mg
- Fat: 18g
- Saturated Fat: 10g
- Unsaturated Fat: 7g
- Trans Fat: 0g
- Carbohydrates: 34g
- Fiber: 1g
- Protein: 4g
- Cholesterol: 90mg
Keywords: mango cheesecake, dessert, tropical dessert, creamy cheesecake, summer dessert
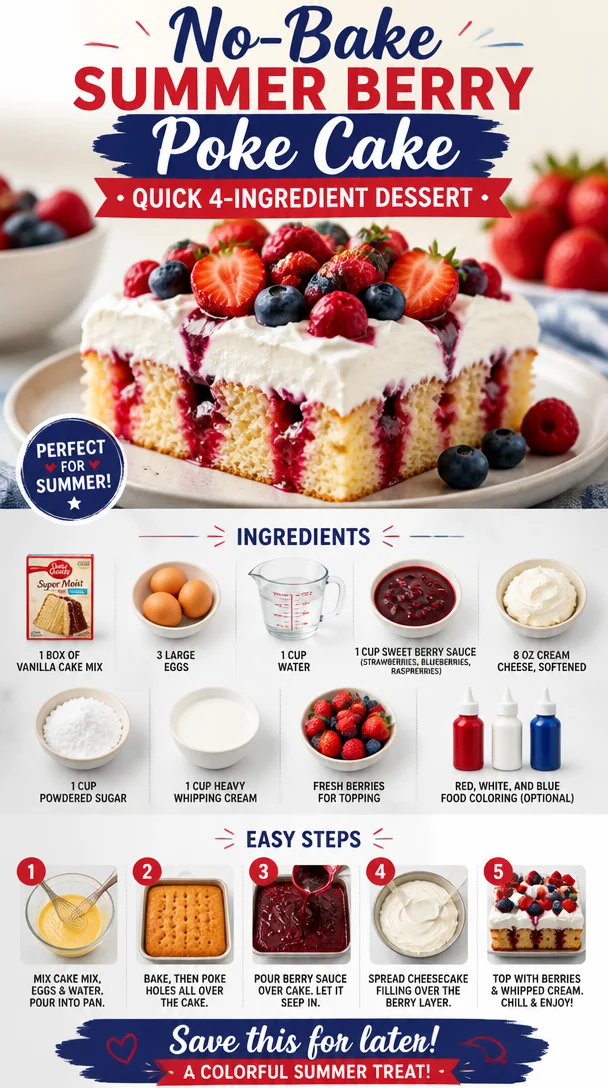
No-Bake Summer Berry Poke Cake: Quick 4-Ingredient Dessert
Get Ready to Dive into Summer with This Scrumptious Summer Berry Poke Cake!
Hey there, fellow foodies! It’s Ava Carter here, your go-to chef for all things delicious and nutritious. Today, I’m super excited to share a recipe that’s not only easy to whip up but also perfect for beating the summer heat—my delightful Summer Berry Poke Cake! This cake is a burst of flavor that screams sunshine and joy, making it an absolute hit for those warm weather gatherings, picnics, or even just a cozy day at home.
Imagine this: a soft, moist vanilla cake soaked in a luscious berry sauce, topped with a heavenly cream cheese frosting and crowned with fresh berries. Sounds dreamy, right? And let me tell you, the best part about this cake is that it’s not just about taste; it’s about creating memories too. So, grab your apron, and let’s get baking!
A Slice of Nostalgia: The Story Behind My Summer Berry Poke Cake
Every time I make this Summer Berry Poke Cake, I’m transported back to my childhood summers spent in Grandma’s kitchen. Oh, the memories! Grandma would whip this cake up on warm afternoons when my cousins and I would come running in from the backyard, our faces flushed from play and our tummies rumbling. The air would be filled with the sweet aroma of fluffy cake and berries, enticing us into the kitchen like moths to a flame.
We’d watch in awe as she poked tiny holes into the freshly baked cake, pouring that vibrant berry sauce all over. I remember the giggles as we fought over who got to add the freshest strawberries and blueberries on top. That special family tradition became a summer staple, a delicious reminder that food is more than just sustenance—it’s a way to connect, celebrate, and create joy. Today, I’m sharing that same joy with you, hoping you’ll create your own cherished moments with this ever-delicious berry beauty!
Ingredients You’ll Need
-
1 box of vanilla cake mix
A classic base for our cake, rich and fluffy! If you’re feeling adventurous, you could substitute with a lemon cake mix for a zesty twist. -
3 large eggs
Adding richness and acting as a binder, the eggs will help your cake rise beautifully. For an egg-free alternative, try flax eggs (1 tablespoon ground flaxseed mixed with 2.5 tablespoons water per egg). -
1 cup water
This keeps the cake moist. You can swap plain water for milk if you want a little extra richness in the flavor. -
1 cup sweet berry sauce
A blend of strawberries, blueberries, and raspberries creates that signature summer flavor. You can make your own sauce or pick up a store-bought version. -
8 oz cream cheese, softened
Essential for our frosting, adding creamy texture and tanginess. If you need a dairy-free option, use vegan cream cheese. -
1 cup powdered sugar
Sweetening things up! Sifting it can help achieve that perfect smooth frosting texture. -
1 cup heavy whipping cream
For fluffy frosting that holds its shape. If you’re low on cream, you can mix in some Greek yogurt for a lighter option. -
Fresh berries for topping
Think of it as nature’s confetti! Any combination of strawberries, blueberries, and raspberries works. -
Red, white, and blue food coloring (optional)
Perfect for a festive touch, especially around the Fourth of July! A few drops can make your cake even more visually stunning.
Step-by-Step Instructions
1. Preheat Your Oven:
Start by preheating your oven to 350°F (175°C). This ensures that your cake gets that perfect rise as soon as it hits the heat. A well-prepped oven is key to a fluffy, perfect cake!
2. Prepare the Cake Mix:
In a large mixing bowl, combine the box of vanilla cake mix, 3 large eggs, and 1 cup of water. Use an electric mixer on medium speed for about 2 minutes until the batter is smooth and blended. Tip: Don’t overmix! This can lead to a dense cake. Your batter should be light and airy.
3. Bake the Cake:
Pour the batter into a greased 9×13-inch baking pan. Bake in the preheated oven for 25-30 minutes or until a toothpick inserted in the center comes out clean. Chef’s hack: Set a timer for 25 minutes; check for doneness, and be careful not to open the oven door too soon!
4. Poke the Cake:
Once baked, allow the cake to cool in the pan for about 10 minutes. Then, take a fork or the handle of a wooden spoon and poke holes all over the top of the cake. This is where the magic happens! The holes will allow the berry sauce to seep in, making the cake super moist and flavorful.
5. Pour on the Berry Sauce:
In a separate bowl, mix your sweet berry sauce until it’s well combined. Pour this luscious sauce all over the entire poke cake, making sure to cover it evenly. Let it soak in as it cools completely—this is the star moment of your cake!
6. Make the Frosting:
In a clean mixing bowl, beat the softened cream cheese with an electric mixer until smooth and creamy. Gradually add powdered sugar, then mix in the heavy whipping cream until you achieve that luxurious frosting consistency. Little tip: Start slow to avoid a powdered sugar cloud!
7. Frost the Cake:
Once the cake is completely cooled, spread the cream cheese frosting evenly across the top. Use a spatula for a smooth finish, or get creative with a swirl pattern!
8. Add Fresh Berries:
Now comes the fun part! Top your frosted cake with fresh berries of your choice. Arrange them in a colorful pattern! Don’t skimp on the berries—this is a berry poke cake, after all!
Serving Suggestions
Slice up your Summer Berry Poke Cake and serve it chilled, perhaps with a dollop of whipped cream on the side. It’s perfect for afternoon gatherings or as a light dessert after a summer barbecue. For an extra touch, consider dusting with powdered sugar before serving—who doesn’t love that elegant finish?
Recipe Variations
-
Berry Swirl Cake: Instead of a plain berry sauce, swirl it right into the cake batter before baking for a delightful marbled effect.
-
Coconut Cream Frosting: Mix in some coconut cream with your frosting for a tropical twist.
-
Lemon Zest Add-In: Add zest from one lemon to your cake batter for a refreshing zing!
-
Gluten-Free Option: Use a gluten-free vanilla cake mix for a lovely gluten-free alternative that everyone can enjoy.
-
Sugar Alternatives: If you’re watching sugar intake, replace powdered sugar with a sugar-free version.
Chef’s Notes
This Summer Berry Poke Cake has truly evolved over the years. I remember the first time I attempted to create it—I accidentally forgot to add the eggs! The cake turned out dense and flat, but I added double the frosting and fresh berries, and guess what? Everyone loved it! That mistake taught me that a little creativity in the kitchen goes a long way. It’s all about having fun, experimenting, and not taking things too seriously.
FAQs and Troubleshooting
1. My cake didn’t rise. What went wrong?
Ensure that your baking powder and other ingredients are fresh and still active! Also, check that you mixed it just enough—over-mixing can lead to a dense texture.
2. How can I get a smooth frosting?
Make sure your cream cheese is at room temperature, and sift your powdered sugar to avoid lumps—this gives you that beautifully smooth texture.
3. Can I make this cake a day ahead?
Absolutely! Just keep it covered in the fridge. The flavors often blend overnight, making it even more delicious!
4. What if my berry sauce is too runny?
Try thickening it with a bit of cornstarch mixed with water, simmered on low heat until it reaches your desired consistency.
Nutritional Info
Per serving, roughly: 300 calories, 15g fat, 40g carbohydrates, 3g protein. (Nutritional values can vary based on specific brands and measurements.)
So there you have it, my dear food lovers! Dive into the season with this fabulous Summer Berry Poke Cake, and let it bring a little sunshine to your kitchen. Embrace the flavors, share the joy, and remember—food is all about love, laughter, and those cozy moments spent with family and friends. Happy baking! 🌟
PrintSummer Berry Poke Cake
A delightful and moist vanilla cake soaked in berry sauce, topped with cream cheese frosting and fresh berries, perfect for summer gatherings.
- Prep Time: 15 minutes
- Cook Time: 30 minutes
- Total Time: 45 minutes
- Yield: 12 servings 1x
- Category: Dessert
- Method: Baking
- Cuisine: American
- Diet: Vegetarian
Ingredients
- 1 box of vanilla cake mix
- 3 large eggs
- 1 cup water
- 1 cup sweet berry sauce
- 8 oz cream cheese, softened
- 1 cup powdered sugar
- 1 cup heavy whipping cream
- Fresh berries for topping
- Red, white, and blue food coloring (optional)
Instructions
- Preheat your oven to 350°F (175°C).
- Combine the vanilla cake mix, eggs, and water in a large mixing bowl and mix for about 2 minutes until smooth.
- Pour the batter into a greased 9×13-inch baking pan and bake for 25-30 minutes.
- Cool the cake in the pan for 10 minutes, then poke holes all over the top.
- Mix your sweet berry sauce until well combined and pour it over the cake.
- Beat the softened cream cheese until smooth, gradually add powdered sugar, then mix in heavy whipping cream until you achieve a luxurious frosting.
- Spread the cream cheese frosting evenly across the top of the cooled cake.
- Top the cake with fresh berries in a colorful pattern.
Notes
Serve chilled with a dollop of whipped cream on the side. For added elegance, dust with powdered sugar before serving.
Nutrition
- Serving Size: 1 slice
- Calories: 300
- Sugar: 20g
- Sodium: 350mg
- Fat: 15g
- Saturated Fat: 8g
- Unsaturated Fat: 5g
- Trans Fat: 0g
- Carbohydrates: 40g
- Fiber: 2g
- Protein: 3g
- Cholesterol: 90mg
Keywords: berry poke cake, summer dessert, vanilla cake, berry sauce, cream cheese frosting