Ingredient No-Bake Summer Berry Lasagna (Weeknight-Ready)
No-Bake Summer Berry Lasagna: A Delightful Twist on a Classic
When the summer sun is shining, there’s nothing quite like the fresh taste of berries to brighten your day. And what better way to celebrate the season than with a dessert that’s not only simple to whip up but also a showstopper at any summer gathering? Welcome to the world of No-Bake Summer Berry Lasagna!
Picture this: layer upon layer of creamy goodness, tart fresh berries, and sweet, crunchy graham crackers weaving together to create a dessert that feels indulgently rich while being refreshingly light. This is the kind of dish that will have your friends oohing and aahing, wondering how you pulled it off without turning on the oven.
What I love about this recipe, aside from its incredible taste, is the way it brings people together. No-Bake Summer Berry Lasagna evokes memories of summer barbecues, potlucks, and family gatherings. You know those warm evenings where laughter fills the air and everyone is sharing stories over delicious food? That’s what this dessert is all about.
So, let’s dive into how you can create your very own No-Bake Summer Berry Lasagna. Trust me, once you make it, you’ll never look at a traditional lasagna the same way again.
A Slice of Nostalgia
Growing up, my family would gather every summer for what we called "Berry Days." My mom, armed with fresh berries from our garden, would invite neighbors over for a day of berry picking, baking, and laughter. We would rush inside, red-stained fingers from too many sweet-tart treats, and transform those freshly picked berries into all sorts of delicious concoctions.
Among all those cherished recipes, my favorite was this No-Bake Summer Berry Lasagna. I remember the first time I helped make it; the messy combinations of cream cheese and whipped cream, the sweet scent of berries wafting through the kitchen, and the fun of layering it all up like a sweet puzzle! It was an event, a celebration of summer, and an excuse to eat dessert first.
Every bite evokes those nostalgic summer afternoons filled with chatter, laughter, and a whole lot of love. And now, it’s your turn to create those same memories.
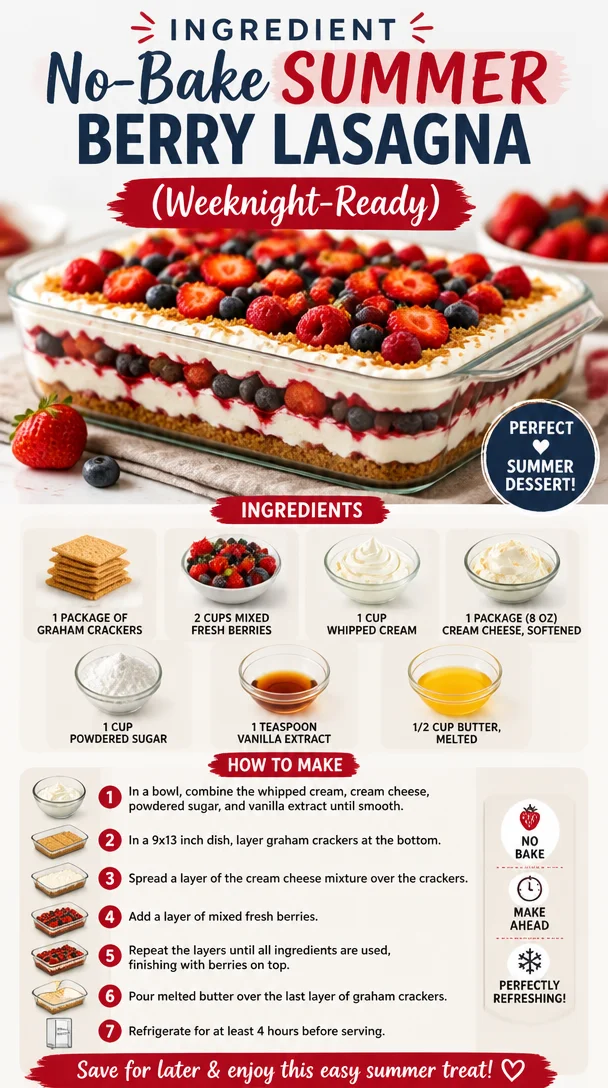
Ingredients
Here’s what you’ll need to make this scrumptious No-Bake Summer Berry Lasagna:
-
1 package of graham crackers
The base of your lasagna. These create that perfect crispy layer! Use cinnamon or honey variety for a twist. -
2 cups mixed fresh berries
A delightful combination of strawberries, blueberries, and raspberries for freshness. You can substitute with any berries you love! -
1 cup whipped cream
Adds a light and fluffy texture. If you’re short on time, store-bought whipped cream works; just make sure it’s light and airy! -
1 package (8 oz) cream cheese, softened
This creamy base is the heart of the lasagna. Make sure it’s soft for an easy mix. You can swap with a vegan cream cheese for a dairy-free option! -
1 cup powdered sugar
Sweetens up the cream cheese mixture. For a healthier alternative, you can use coconut sugar, which will add a hint of caramel flavor. -
1 teaspoon vanilla extract
Adds a lovely depth of flavor. Always use pure vanilla extract for the best taste! -
1/2 cup butter, melted
Helps hold the graham cracker crust together. If you’re looking for a lighter option, melted coconut oil works well here too!
Step-by-Step Instructions
-
Prepare the Cream Cheese Mixture:
In a large mixing bowl, beat the softened cream cheese until smooth. Add in the powdered sugar and vanilla extract, and continue mixing until it’s completely blended. You want a creamy, luscious texture, so don’t rush this step! Pro tip: Use an electric mixer to get that light airiness. -
Whip the Cream:
In a separate bowl, whip the cream until soft peaks form. You want it fluffy but still spreadable. For a hint of sweetness, consider adding a tablespoon of powdered sugar to the cream while whipping. -
Combine Cream Mixtures:
Gently fold the whipped cream into the cream cheese mixture. Here’s where the magic happens! Mix until just combined—no need to overdo it. You want to keep that puffiness from the cream. -
Prepare the Dish:
Grab a 9×13-inch glass dish (or whatever you have on hand). Start by laying down a single layer of graham crackers at the bottom. Break them if necessary to fit! -
Add the Cream Layer:
Spread about half of the cream cheese mixture evenly over the graham crackers. This is your first layer of creamy goodness. -
Berry Time:
Scatter one cup of your mixed berries over the cream cheese layer. Feel free to mix and match! Hint: crushing some of the berries slightly under your fingers releases even more flavor. -
Repeat Layers:
Repeat the process! Another layer of graham crackers, followed by the rest of the cream cheese mixture, and another cup of berries. You’re building a delicious masterpiece here! -
Top It Off:
Finish with a final layer of graham crackers and a sprinkle of fresh berries on top for a stunning presentation. -
Chill:
Cover the dish with plastic wrap and let it chill in the refrigerator for at least four hours, or overnight if you can wait! This allows all those flavors to meld beautifully. -
Serve and Enjoy:
When you’re ready to serve, slice into squares and watch as everyone digs into this delightful summer treat!
Serving Suggestions
To serve, I like to plate individual squares on a cute dessert plate. A sprinkle of mint on top provides a lovely color contrast and a fresh pop of flavor. You can also drizzle some berry sauce or a sprinkle of crushed graham crackers for added texture. Don’t forget a scoop of vanilla ice cream on the side for a truly decadent experience!
Recipe Variations
Feeling adventurous? Here are some creative twists to try with your No-Bake Summer Berry Lasagna:
- Citrus Burst: Add a bit of lemon or orange zest to the cream cheese mixture for a zesty kick.
- Chocolate Lovers: Sprinkle mini chocolate chips between layers or add cocoa powder to the whipped cream for a chocolatey twist.
- Nutty Crunch: Layer in chopped nuts like almonds or walnuts for a delightful crunch.
- Peachy Keen: Replace some of the berries with fresh peach slices for a juicy summer variation!
- Gluten-Free: Swap graham crackers with gluten-free cookies or your favorite gluten-free cracker for a suitable alternative.
Chef’s Notes
I’ve made this No-Bake Summer Berry Lasagna countless times, and it’s always a crowd-pleaser! One year, I decided to be adventurous and dyed the cream cheese mixture with a hint of pink food coloring for extra fun—it looked fabulous, though my kids still debate whether they liked it better in its natural state!
Cooking is about experimentation and finding what works for you. I encourage you to make this dessert your own; each variation has its own charm.
FAQs and Troubleshooting
1. Why did my cream cheese mixture turn out lumpy?
Make sure your cream cheese is truly softened. If it’s still cold from the fridge, it won’t mix well. Try placing it in the microwave for a few seconds or leaving it out for a bit longer.
2. Can I make this dessert ahead of time?
Absolutely! In fact, it’s best when made a day ahead. Just store it tightly wrapped in the fridge, and it will taste delicious after the flavors meld.
3. What if I don’t have fresh berries?
You can absolutely use frozen berries, but make sure to thaw and drain them first to avoid excess moisture. Canned berries work in a pinch too!
4. How should I store leftovers?
Keep any leftovers in an airtight container in the fridge. It will last for 2-3 days, though I doubt there will be much left with how good it is!
Nutritional Info
(Optional):
Per serving (based on 12 servings): Approximately 220 calories, 9g fat, 32g carbohydrates, 2g protein.
Whether you’re reminiscing about summer gatherings or getting together with friends for a fun evening, this No-Bake Summer Berry Lasagna is a vibrant, flavorful dessert that’s sure to bring joy to your table. So gather up those fresh berries, roll up your sleeves, and let’s get cooking! Here’s to delicious memories and flavor-filled adventures! 🍓💖
PrintNo-Bake Summer Berry Lasagna
A delightful twist on a classic dessert featuring layers of creamy goodness, fresh berries, and crunchy graham crackers, perfect for summer gatherings.
- Prep Time: 20 minutes
- Cook Time: 0 minutes
- Total Time: 240 minutes
- Yield: 12 servings 1x
- Category: Dessert
- Method: No-Bake
- Cuisine: American
- Diet: Vegetarian
Ingredients
- 1 package of graham crackers
- 2 cups mixed fresh berries (strawberries, blueberries, raspberries)
- 1 cup whipped cream
- 1 package (8 oz) cream cheese, softened
- 1 cup powdered sugar
- 1 teaspoon vanilla extract
- 1/2 cup butter, melted
Instructions
- Prepare the Cream Cheese Mixture: In a large mixing bowl, beat the softened cream cheese until smooth. Add in the powdered sugar and vanilla extract, and continue mixing until completely blended.
- Whip the Cream: In a separate bowl, whip the cream until soft peaks form.
- Combine Cream Mixtures: Gently fold the whipped cream into the cream cheese mixture until just combined.
- Prepare the Dish: Grab a 9×13-inch glass dish and lay down a single layer of graham crackers at the bottom.
- Add the Cream Layer: Spread half of the cream cheese mixture evenly over the graham crackers.
- Berry Time: Scatter one cup of mixed berries over the cream cheese layer.
- Repeat Layers: Add another layer of graham crackers followed by the rest of the cream cheese mixture and another cup of berries.
- Top It Off: Finish with a final layer of graham crackers and a sprinkle of fresh berries on top.
- Chill: Cover the dish with plastic wrap and let it chill in the refrigerator for at least 240 minutes (4 hours) or overnight.
- Serve and Enjoy: Slice into squares and serve.
Notes
For extra flavor, consider adding citrus zest or chocolate chips. This dessert can be made a day ahead for the best taste.
Nutrition
- Serving Size: 1 serving
- Calories: 220
- Sugar: 12g
- Sodium: 200mg
- Fat: 9g
- Saturated Fat: 5g
- Unsaturated Fat: 3g
- Trans Fat: 0g
- Carbohydrates: 32g
- Fiber: 2g
- Protein: 2g
- Cholesterol: 30mg
Keywords: no-bake dessert, summer dessert, berry lasagna, refreshing dessert, easy dessert
Minute Summer Mango Salsa: Quick Weeknight Favorite
Summer Mango Salsa: Fresh, Vibrant, and Oh-So-Delicious!
Welcome to another exciting culinary adventure here at Clean Plate Cravings! Today, we’re diving into the world of summer flavors with a dish that’s bound to make your taste buds dance with joy—Summer Mango Salsa! This vibrant, colorful salsa is perfect for those sunny days when you want to feel refreshed and energized. Whether you’re hosting a backyard barbecue, just chilling on the patio, or prepping a week’s worth of clean meals, this salsa is a versatile powerhouse that adds a pop of flavor to just about anything.
Picture this: The sun is shining, the birds are chirping, and you’re surrounded by friends, laughter, and the delicious aroma of grilled goodness wafting through the air. That’s what summer is all about, right? And what better way to complement a summer feast than with a fresh, zesty mango salsa that elevates everything from grilled chicken to fish tacos? Plus, it’s super easy to make, packed with nutrients, and utterly satisfying. Who wouldn’t want a bowl of this brilliant dish at their table?
As I embarked on my cooking journey, salsa was one of those magical creations that stole my heart. Growing up, my family had a tradition of making salsa together during summer gatherings. We would sit around the kitchen counter, chopping and mixing, as laughter and stories were shared. It was more than just a recipe; it was a bonding experience. Each ingredient contributed not just to the flavor but also to the love and joy that enveloped those summer afternoons. So, whether you’re reliving fond memories or creating new ones, this Summer Mango Salsa will become a staple in your kitchen!
Now let’s roll up those sleeves and get to the fun part! Here’s everything you need to whip up this gorgeous salsa.
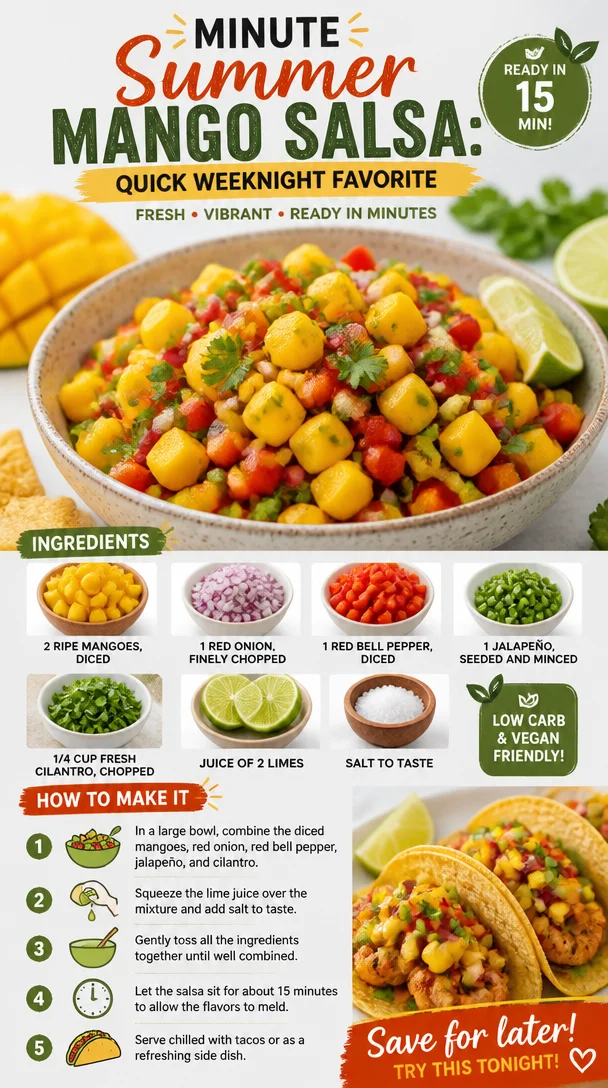
Ingredients
-
2 ripe mangoes, diced
- The star of the show! Look for mangoes that yield slightly to pressure—this means they’re ripe and ready to be enjoyed. Not enough mangoes? Try substituting with peaches or nectarines for a similar sweetness!
-
1 red onion, finely chopped
- This brings a touch of sharpness that pairs beautifully with the sweetness of the mangoes. If red onion isn’t your thing, you could swap it out with green onions or shallots for a milder flavor.
-
1 red bell pepper, diced
- Adds crunch and a hint of sweetness. Feel free to swap it with yellow or orange bell peppers for a slightly different taste while keeping that vibrant color!
-
1 jalapeño, seeded and minced
- Here’s where you get to play with spice! Don’t be shy, but remove the seeds if you want to dial down the heat. If you prefer, you can use a different pepper like a serrano for a bolder kick, or skip it altogether for a milder salsa.
-
1/4 cup fresh cilantro, chopped
- This herb is essential for that fresh, bright flavor! If you’re not a fan of cilantro (I know, it’s a controversial herb!), feel free to substitute with fresh parsley or basil for a unique twist.
-
Juice of 2 limes
- The acidity brings everything together! The lime juice cuts through the sweetness and adds that zing we all crave. In a pinch, lemon juice can work too.
-
Salt to taste
- A little salt enhances all those beautiful flavors. Don’t skip it! If you’re watching your sodium intake, consider using a pinch of Himalayan pink salt for added mineral content.
Step-by-Step Instructions
-
Prepare your ingredients: Begin by gathering all your ingredients on the countertop. This is the best way to streamline your process and make sure you have everything you need. Organize your cutting board, and don’t forget to put on your favorite tunes to create an uplifting kitchen atmosphere!
-
Dice the mangoes: Grab those ripe mangoes and slice them down the sides of the pit. Extract the flesh and make some crisscross cuts with your knife before scooping it out with a spoon. The result? Perfectly diced mango pieces that are bursting with flavor!
-
Chop the onion and bell pepper: Next, finely chop the red onion and dice the red bell pepper. These colors alone will brighten up any kitchen! When chopping onions, I recommend using a sharp knife to avoid tearing up, but if you do find yourself sniffling, a quick rinse with cold water can help.
-
Mince the jalapeño: Take your jalapeño and carefully slice it open. Use a spoon to scrape out the seeds (unless you like it spicy—then leave some in!). Finely mince the jalapeño to distribute just the right amount of heat throughout your salsa.
-
Chop the cilantro: Give your fresh cilantro a rough chop to release those delightful oils. If you’re using parsley or basil instead, go ahead and do the same. Herb freshness is key!
-
Mix it all together: In a large mixing bowl, combine your diced mangoes, chopped red onion, bell pepper, jalapeño, and cilantro. Now, here’s your chef hack: use a gentle folding motion to combine the ingredients, preserving their texture and avoiding mushiness.
-
Add lime juice and salt: Squeeze the juice of the two limes directly into the bowl, making sure to catch any seeds (those slippery little critters!). Then, sprinkle salt to taste. Give everything a good stir and taste as you go. Adjust the lime and salt until it’s just how you like it.
-
Chill and serve: Allow the mango salsa to chill in the refrigerator for at least 30 minutes to let those flavors meld together. Trust me; it’s worth the wait. Serve it chilled or at room temperature with your favorite chips or as a topping for your grilled recipes!
Serving Suggestions
Ready to impress your guests? Here’s how to serve your delicious Summer Mango Salsa: scoop it into a bright, beautiful serving bowl and unleash its colorful charms. Garnish with a sprig of cilantro on top for that professional touch. Pair it with crispy tortilla chips or spoon it generously over grilled fish, chicken, tacos, or even salads for a refreshing upgrade. The possibilities are truly endless, and the smiles will be contagious!
Recipe Variations
-
Add Avocado: Dice up some ripe avocado to add creaminess—this will make your salsa richer and texturally diverse. Plus, who can resist avocado?
-
Pineapple Twist: Swap out some of the mango for fresh pineapple! This will add a tangy sweetness that pairs perfectly with the savory elements in your meal.
-
Black Beans for Protein: Want to make this salsa a full meal? Toss in some drained canned black beans. This will boost the fiber and protein content, making it even more satisfying.
-
Coconut Flakes: For a fun tropical twist, mix in some unsweetened coconut flakes. This will give that exotic flair and an interesting texture.
-
Spicy Garlic Kick: Add minced garlic for an extra layer of flavor, or toss in some chopped fresh ginger for an unexpected zing!
Chef’s Notes
This Summer Mango Salsa recipe has beautifully evolved over the years as I played with different ingredients based on what was available or in season. I fondly remember making it in my tiny apartment kitchen, with all sorts of concoctions that would sometimes go hilariously wrong (mesquite mango salsa, anyone?). But each error taught me something new, and now I’m thrilled to share this tried-and-true version with you! Salsas can be so personal, really reflective of each person’s palate. It’s an exciting journey where we can all celebrate our unique flavor preferences.
FAQs and Troubleshooting
1. What if my mangoes are too firm?
- If your mangoes aren’t quite ripe, let them sit at room temperature for a few days until they yield slightly to pressure. You can also speed up the ripening process by placing them in a paper bag with an apple or banana!
2. Can I make this salsa ahead of time?
- Absolutely! Just keep in mind that the longer it sits, the softer the ingredients will become. It’s best if consumed within 2-3 days. Just give it a good stir before serving.
3. How can I adjust the spiciness?
- You can control the heat by adjusting the amount of jalapeño based on your taste preference. You can also add a pinch of cayenne pepper for a unique kick if you want more spice without more bulk.
4. Can I freeze the salsa?
- While it’s not recommended to freeze the salsa due to the fresh ingredients losing their texture, you can freeze the mangoes separately and make a fresh batch later!
Nutritional Info
While I won’t overload you with numbers, rest assured this Summer Mango Salsa is packed with vitamins, potassium, and antioxidants—making it a healthy choice for snacking or a side dish. Pair it with whole-grain chips or on top of a bed of leafy greens for a nutritious boost!
So, what do you think? Are you ready to dive into this delightful Summer Mango Salsa recipe? Gather your ingredients, don your apron, and let’s make those summer days even sweeter! Happy cooking, my fellow foodies! 🌟
PrintSummer Mango Salsa

A vibrant and refreshing salsa made with fresh mangoes and colorful veggies, perfect for summer gatherings.
- Prep Time: 15 minutes
- Cook Time: 0 minutes
- Total Time: 15 minutes
- Yield: 4 servings 1x
- Category: Appetizer
- Method: Mixing
- Cuisine: Mexican
- Diet: Vegan
Ingredients
- 2 ripe mangoes, diced
- 1 red onion, finely chopped
- 1 red bell pepper, diced
- 1 jalapeño, seeded and minced
- 1/4 cup fresh cilantro, chopped
- Juice of 2 limes
- Salt to taste
Instructions
- Prepare your ingredients: Begin by gathering all your ingredients on the countertop.
- Dice the mangoes: Grab those ripe mangoes and slice them down the sides of the pit.
- Chop the onion and bell pepper: Next, finely chop the red onion and dice the red bell pepper.
- Mince the jalapeño: Take your jalapeño and carefully slice it open.
- Chop the cilantro: Give your fresh cilantro a rough chop to release those delightful oils.
- Mix it all together: In a large mixing bowl, combine your diced mangoes, chopped red onion, bell pepper, jalapeño, and cilantro.
- Add lime juice and salt: Squeeze the juice of the two limes directly into the bowl.
- Chill and serve: Allow the mango salsa to chill in the refrigerator for at least 30 minutes.
Notes
This salsa can be made ahead of time but is best enjoyed within 2-3 days for optimal freshness.
Nutrition
- Serving Size: 1/4 cup
- Calories: 150
- Sugar: 18g
- Sodium: 50mg
- Fat: 1g
- Saturated Fat: 0g
- Unsaturated Fat: 1g
- Trans Fat: 0g
- Carbohydrates: 37g
- Fiber: 3g
- Protein: 2g
- Cholesterol: 0mg
Keywords: salsa, mango, summer recipes, healthy snacks, fresh salsa
Minute Tangy Marinated Cucumber Salad (Summer Side)
Refreshing Marinated Cucumber Salad: A Crisp and Zesty Delight
Welcome back, food lovers! Today, we’re diving into a dish that will bring a burst of freshness to your table: Marinated Cucumber Salad. If there was ever a dish that embodies the essence of summer, this is it! Crisp, cooling, and oh-so-delicious, this salad is perfect for warm days, barbecues, or even as a refreshing side to your weeknight dinners.
Oh, and did I mention it’s super simple? You can whip it up in a flash, and it’s packed with vibrant flavors that will make you feel like a kitchen rock star. As we embark on this culinary adventure, let’s celebrate the humble cucumber—this miraculous veggie that just might be the MVP of summer salads.
A Slice of Nostalgia
Growing up, summer meant countless days spent in my grandmother’s garden, playing hide and seek among the rows of vegetables while she tended to her precious plants. Cucumbers were always among her favorites; I can still see her harvesting them, their cool skin glistening with morning dew. Often, she would call me into the kitchen where the air was filled with tangy notes of vinegar and the sweetness of sugar, blended beautifully with the crunch of freshly sliced cucumbers.
We would diligently prepare her famous marinated cucumber salad together, our laughter mingling with the sound of the chopping board. Her recipe was simple yet packed with flavor, a testament to her belief that fresh ingredients were all you needed. Making this salad became our summer tradition, a ritual that drew us closer and filled our bellies with light, wholesome food. I can still hear her voice guiding me through the steps, and today, I can’t wait to share her legacy with you!
Ingredients
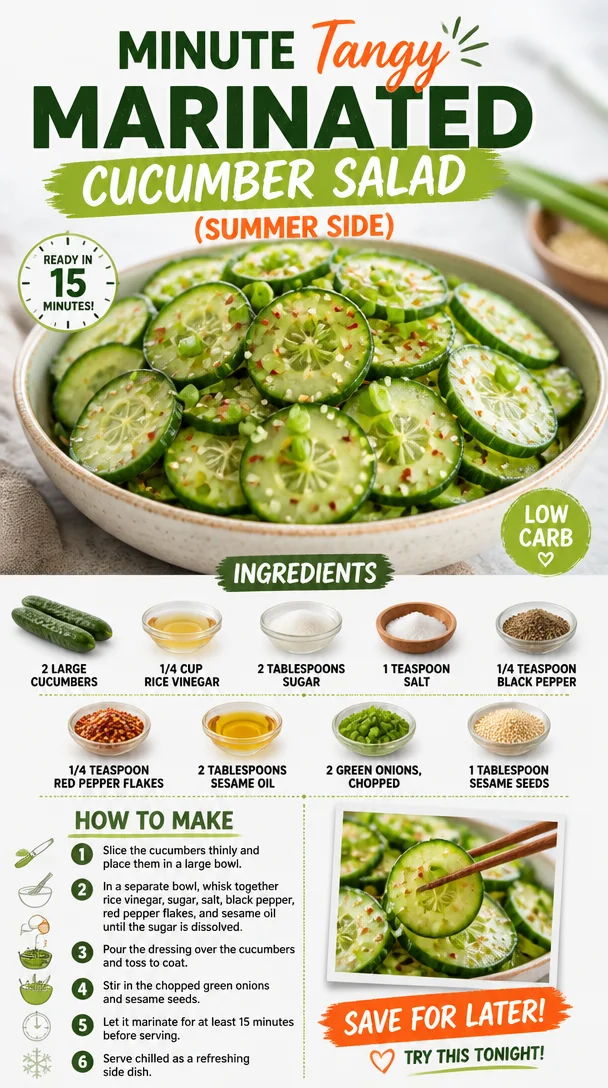
Now, let’s gather our ingredients! Here’s what you’ll need for this vibrant and zesty Marinated Cucumber Salad:
-
2 large cucumbers: The star of the show! Choose firm cucumbers for the best crunch. For a twist, try Persian cucumbers, which are smaller and sweeter, or even pickling cucumbers if you want an extra crunch.
-
1/4 cup rice vinegar: This vinegar adds a mild, tangy flavor. If you don’t have rice vinegar, you can substitute it with apple cider vinegar or white wine vinegar for a slightly different taste.
-
2 tablespoons sugar: This balances the tang from the vinegar. For a healthier option, you can swap it with honey or agave syrup.
-
1 teaspoon salt: Essential for seasoning. Sea salt or kosher salt works perfectly, but you can use table salt in a pinch.
-
1/4 teaspoon black pepper: Adds just the right amount of kick. If you like it spicy, feel free to amp it up!
-
1/4 teaspoon red pepper flakes: For those who enjoy a bit of heat. Adjust the quantity based on your spice tolerance, or omit if you’d prefer a milder flavor.
-
2 tablespoons sesame oil: This adds a lovely nuttiness and richness. If you need a substitute, you can use olive oil, but it will change the flavor profile a bit.
-
2 green onions, chopped: Fresh and vibrant, they add a burst of flavor. If you don’t have green onions, finely chopped red onion works well too.
-
1 tablespoon sesame seeds: These add a delightful crunch and nutty essence. You can toast them lightly for deeper flavor or use sunflower seeds as a nut-free alternative.
Step-by-Step Instructions
Ready to create your masterpiece? Let’s get cooking!
-
Prep the Cucumbers: Start by washing your cucumbers under cool water to remove any dirt or residue. Trim both ends and then slice them thinly—about 1/4 inch thick works perfectly. If you prefer a fancier presentation, try cutting them into half-moons or even dicing them!
-
Make The Dressing: In a medium-sized bowl, whisk together the rice vinegar, sugar, salt, black pepper, red pepper flakes, and sesame oil. This dressing should be a delightful balance of sweet, tangy, and a hint of spice, so feel free to taste and adjust according to your preferences. A little extra sugar or vinegar can go a long way!
-
Combine: Now, it’s time to bring it all together! Place the sliced cucumbers into a large mixing bowl and pour the dressing over them. Gently toss everything together until the cucumbers are well-coated. Ah, that fresh aroma!
-
Add Green Onions & Sesame Seeds: Toss in the chopped green onions and sesame seeds, mixing them gently. This is where the salad truly transforms into a flavor explosion!
-
Marinate: For the best results, let your salad sit for at least 30 minutes in the refrigerator. This allows the cucumbers to absorb all that delicious dressing and become even more flavorful. If you’re in a hurry, you can serve it right away, but the marination makes a world of difference.
-
Serve It Up: Just before serving, give the salad another quick toss to redistribute the dressing. You’ll want to make sure each slice of cucumber is glistening and flavorful!
Serving Suggestions
Serving your Marinated Cucumber Salad is as easy as pie. Use a large, vibrant bowl to showcase all those beautiful green hues. You can also individualize the portions by plating them in small bowls or on crisp romaine leaves for a fantastic presentation. Drizzle a little extra sesame oil or a sprinkle of sesame seeds on top for that perfect finishing touch!
Recipe Variations
Now that you’ve mastered the classic version, let’s have some fun with variations! Here are a few creative twists to try with your Marinated Cucumber Salad:
-
Asian-Inspired Twist: Add julienned carrots and sliced radishes for a colorful crunch. Toss in some fresh cilantro for an extra layer of flavor.
-
Mediterranean Vibe: Swap the sesame oil for olive oil and sprinkle in some chopped Kalamata olives and crumbled feta cheese.
-
Tropical Kick: Add diced mango or pineapple for a sweet and tangy tropical flair. Lime juice can replace rice vinegar for an authentic taste.
-
Herbed Delight: Incorporate fresh herbs like dill or mint for a refreshing twist. These herbs will add a whole new depth of flavor.
-
Spicy Option: For those who love heat, incorporate sliced jalapeños or a dash of sriracha into the dressing for a fiery kick.
Chef’s Notes
Ah, the joys of cooking—it’s all about experimenting and evolving! When I first made this salad, I simply followed my grandmother’s recipe to the letter. But as I dabbled in flavors, I discovered exciting new twists that kept it fresh, just like those summer afternoons in her garden.
Like any beloved family recipe, there’s always room for creativity. I once made this delicious using pickled ginger tossed into the mix after a particularly inspiring sushi night! Just goes to show, don’t be afraid to try new things.
FAQs and Troubleshooting
1. My cucumbers are too watery—what did I do wrong?
Cucumbers naturally contain a lot of water, especially when they’re fresh. If they’re too watery, you can lightly salt and let them sit for 10-15 minutes before proceeding. Drain any excess liquid, then add them to the dressing.
2. How long can I store leftovers?
This salad is best enjoyed fresh, but you can store leftovers in an airtight container in the fridge for up to 2 days. Note that the cucumbers may become softer over time, but the flavors will still be delicious!
3. Can I make this salad ahead of time?
Absolutely! This salad is a great make-ahead dish. Just prepare it up to 24 hours in advance for the best flavor as it melds together. However, I recommend adding the sesame seeds and green onions just before serving to ensure they stay crispy.
4. What if I don’t like sesame?
No worries! While sesame oil adds depth of flavor, you can easily substitute it with olive oil or a mild vegetable oil.
Nutritional Info
While specifics may vary based on proportions and ingredient brands, here’s a basic rundown per serving:
- Calories: Approximately 80
- Fat: 5g
- Carbohydrates: 10g
- Fiber: 1g
- Sugar: 3g
- Protein: 1g
And there you have it—a refreshing, vibrant Marinated Cucumber Salad that is bound to become a favorite at your table! As you take the first bite, let the memories of summer, laughter, and family fill your heart. Whether you’re hosting a barbecue or enjoying a quiet dinner, this salad is a reminder that simple ingredients can create something truly magical. Enjoy the crunch, savor the flavors, and happy cooking!
PrintRefreshing Marinated Cucumber Salad

A crisp and zesty cucumber salad, perfect for warm days and barbecues.
- Prep Time: 15 minutes
- Cook Time: 0 minutes
- Total Time: 45 minutes
- Yield: 4 servings 1x
- Category: Salad
- Method: No cooking required
- Cuisine: Asian
- Diet: Vegan
Ingredients
- 2 large cucumbers, thinly sliced
- 1/4 cup rice vinegar
- 2 tablespoons sugar
- 1 teaspoon salt
- 1/4 teaspoon black pepper
- 1/4 teaspoon red pepper flakes
- 2 tablespoons sesame oil
- 2 green onions, chopped
- 1 tablespoon sesame seeds
Instructions
- Wash the cucumbers under cool water and slice them thinly.
- Whisk together the rice vinegar, sugar, salt, black pepper, red pepper flakes, and sesame oil in a bowl.
- Combine the sliced cucumbers with the dressing in a large mixing bowl.
- Toss in the green onions and sesame seeds.
- Marinate in the refrigerator for at least 30 minutes.
- Serve and enjoy!
Notes
This salad is great served fresh, but can be made a day in advance. Add sesame seeds and green onions right before serving.
Nutrition
- Serving Size: 1 serving
- Calories: 80
- Sugar: 3g
- Sodium: 600mg
- Fat: 5g
- Saturated Fat: 0.5g
- Unsaturated Fat: 4g
- Trans Fat: 0g
- Carbohydrates: 10g
- Fiber: 1g
- Protein: 1g
- Cholesterol: 0mg
Keywords: cucumber salad, refreshing salad, summer salad, vegan salad, quick salad
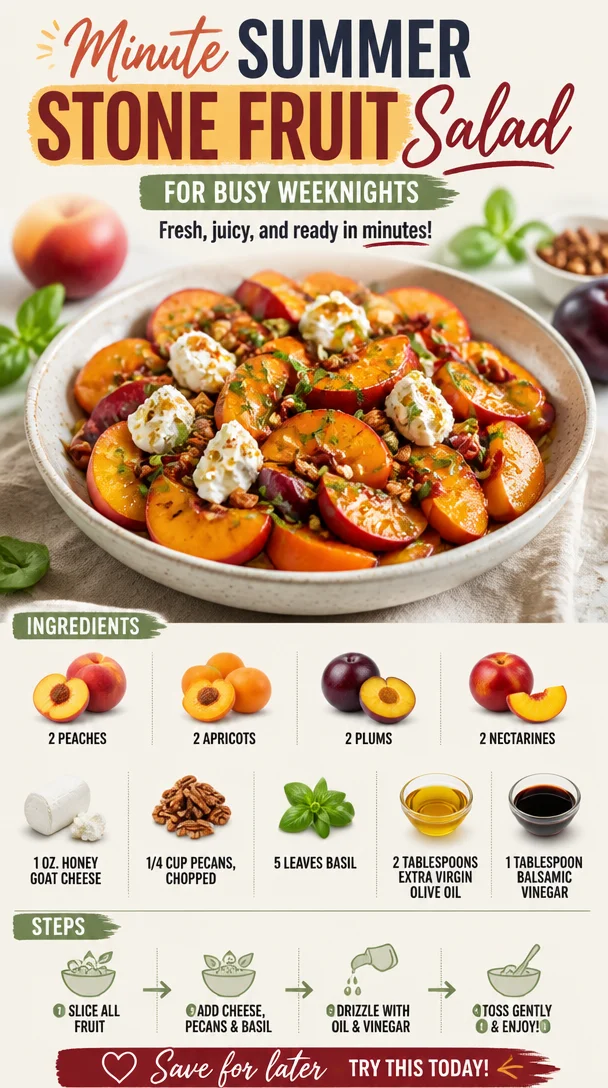
Minute Summer Stone Fruit Salad for Busy Weeknights
Summer Stone Fruit Salad: A Celebration of Flavor and Freshness
Welcome, fellow food lovers! Today, I’m thrilled to share one of my all-time favorite summer recipes—Summer Stone Fruit Salad. As the sun shines brightly and the days stretch longer, there’s nothing quite like gathering fresh, ripe stone fruits and putting together a dish that not only looks stunning but also bursts with flavor and joy.
Stone fruits—peaches, plums, apricots, and nectarines—are synonymous with summer indulgence. They remind me of warm afternoons spent lounging in my grandparents’ backyard, where the air was sweet with the scent of blossoms and the promise of juicy treats. It was during one of those idyllic days that I first discovered the magic of combining these fruits, and let me tell you, it was a game-changer!
This Summer Stone Fruit Salad isn’t just a dish; it’s a vibrant homage to lazy summer days, picnics in the park, and the art of uncomplicated, delicious cooking. Picture yourself on a sunny patio, a gentle breeze blowing, and a refreshing bowl of this colorful salad in front of you. It’s the kind of dish that draws everyone in—it’s fresh, energizing, and oh-so-satisfying.
Let’s dive deeper into what makes this salad a must-try recipe, as we blend textures, flavors, and aromas in a way that celebrates the bounty of summer. Ready to get cookin’? Let’s go!
A Nostalgic Kitchen Memory
One of my fondest culinary memories revolves around those lazy summer afternoons at my grandparents’ house. Each year, right in the middle of summer, my grandma would gather all of us in the kitchen, enlisting my help to create what she called her "Fruit Fiesta."
The kitchen would be alive with laughter, chatter, and the delightful scents of fresh fruits. As she sliced up peaches, plums, and nectarines, I would eagerly pluck a piece of fruit here and there, their sweet juice running down my chin. Grandma would always tell stories about why she loved stone fruits so much. They reminded her of her childhood summers—playing outside until dusk, with not a worry in the world.
Sometimes she’d whip up a simple fruit salad drizzled with honey and olive oil, tossing in whatever she could find ripe on the counter. It taught me that cooking need not be complicated; it’s all about using what you have and letting those flavors shine. This summer stone fruit salad I’m sharing with you today is my homage to those moments—simple, delicious, and filled with all the joy of summer.
Ingredients
Here’s what you’ll need to whip up this fabulous Summer Stone Fruit Salad:
-
2 peaches: Sweet and juicy, they add a delightful burst of flavor. Look for slightly fuzzy skin and a fragrant aroma. If peaches aren’t in season, feel free to use nectarines—they’re just as delicious!
-
2 apricots: These little gems bring a beautiful tangy sweetness that balances the salad perfectly. If they aren’t available, you can substitute with more plums or even some mango for a tropical twist.
-
2 plums: Plums introduce a lovely tartness that contrasts perfectly with the sweetness of the peaches and apricots. If plums are out of season, cherries make an excellent substitute!
-
2 nectarines: Nectarines are fabulous subs for peaches if you prefer a smooth skin. They bring a slightly firmer texture, which adds variety to the salad.
-
1 oz. honey goat cheese: This creamy cheese elevates the salad with its unique flavor profile—sweet and tangy all at once! Can’t find honey goat cheese? Regular goat cheese with a drizzle of honey works wonders too!
-
1/4 cup pecans, chopped: These add a satisfying crunch and earthy flavor. If nuts aren’t your thing, toasted sunflower seeds or pumpkin seeds are excellent gluten-free alternatives.
-
5 leaves basil: Fresh basil brightens the dish with herbal notes. If you’re feeling adventurous, try mint or cilantro for a different twist!
-
2 tablespoons extra virgin olive oil: A drizzle of good olive oil enhances the fruit’s natural sweetness and adds richness. Opt for a fruity version to complement the salad’s flavors.
-
1 tablespoon balsamic vinegar: This adds depth and a little acidity to balance out the sweetness. A splash of lemon juice or apple cider vinegar can be used in a pinch!
Step-by-Step Instructions
Now that we have all our ingredients ready, it’s time to bring our Summer Stone Fruit Salad to life! Grab your favorite cutting board and let’s get chopping!
-
Prep your stone fruits: Begin by washing all your stone fruits under cool running water to remove any dirt or pesticides. Once they’re clean, slice the peaches, apricots, plums, and nectarines into bite-sized pieces. I love leaving the skin on for added texture and nutrients, plus the colors are just gorgeous. Pro tip: Use a serrated knife for juicy fruits—it minimizes squishing!
-
Assemble the base: In a large mixing bowl, gently toss together the sliced fruits. Let them mingle and appreciate each other’s company—this salad is all about the vibrant flavors coming together!
-
Make the dressing: In a small bowl, whisk together the extra virgin olive oil and balsamic vinegar. You want a well-emulsified mixture that will coat all the fruits beautifully. If you’re feeling fancy, add a pinch of salt and a sprinkle of freshly cracked black pepper to the dressing for added depth.
-
Combine the salad: Drizzle your dressing over the fruit mixture and gently fold everything together. You want to ensure each piece is evenly coated without breaking the delicate fruits.
-
Add the cheese and pecans: Crumble the honey goat cheese over the top and sprinkle with chopped pecans. It’s amazing how the creaminess of the cheese complements the fruity goodness. For a bit of added flair, toss in some torn basil leaves at this stage too!
-
Taste and adjust: Give your salad a taste! This is the moment to check if it needs a little extra honey if you prefer it sweeter, or perhaps a splash more vinegar if you like a bit more tang. Trust your palate; it knows best!
-
Chill (optional): If you have time, let the salad sit in the fridge for about 30 minutes. This allows the flavors to meld beautifully and creates a refreshing dish that’s a joy to eat cold.
Serving Suggestions
When it comes to serving this delightful Summer Stone Fruit Salad, keep it simple! Use a large, shallow bowl to beautifully showcase those vibrant colors. For a more formal occasion, consider plating individual portions in small bowls or mason jars, layering the fruits with the cheese and nuts for a charming presentation. Drizzle a bit of extra dressing on top for visual appeal, and garnish with whole basil leaves for that fresh touch.
It’s equally tasty as a main dish, a side salad, or even a light dessert—versatility at its finest!
Recipe Variations
Get creative with your Summer Stone Fruit Salad! Here are some fun variations to keep things interesting:
-
Grilled Stone Fruits: Try grilling your stone fruits for a smoky twist. The caramelized edges add an entirely new flavor profile!
-
Berry Boost: Add a handful of fresh berries like strawberries, blueberries, or raspberries for a burst of color and flavor.
-
Citrus Infusion: Toss in some orange or grapefruit segments to give the salad a refreshing zing.
-
Sweet & Spicy: Add a sprinkle of chili powder or cayenne pepper to the dressing for a hint of heat that beautifully contrasts with the fruits’ sweetness.
-
Vegan Version: Substitute the honey goat cheese with a vegan cream cheese or avocado for a luscious creaminess without dairy.
Chef’s Notes
This Summer Stone Fruit Salad has evolved over the years—initially, it would include whatever stone fruits were available at the market or our local farmer’s stand. Sometimes, I’d swap in different nuts or add in a splash of flavored vinaigrette to change it up. The beauty of this recipe is in its flexibility—it allows you the freedom to experiment based on seasonal availability and your taste preferences.
And speaking of flexibility, I once had a friend who decided to throw in some hot sauce for fun while we were enjoying a BBQ together—it was a wild card, but to our surprise, it added an exciting twist! We ended up laughing and munching on our little flavor experiment that day. Cooking is all about joy and exploration—don’t be afraid to live a little!
FAQs and Troubleshooting
Q: Can I make this salad in advance?
A: Absolutely! Just keep in mind that some fruits can brown if they sit too long. If you’re preparing it in advance, consider adding the cheese and nuts just before serving for the best texture.
Q: What if I can’t find honey goat cheese?
A: No worries! Regular goat cheese with a drizzle of honey is a fantastic alternative. You can also use feta cheese if you prefer something tangier.
Q: Can I make this salad without nuts?
A: Certainly! Feel free to omit the nuts entirely for a nut-free version, or substitute with seeds or crispy chickpeas for that crunch.
Q: What’s the best way to store leftovers?
A: If you have any leftovers, store them in an airtight container in the fridge for up to 2 days. Just be aware that the fruits may release some juices over time.
Nutritional Info
While the exact nutritional information may vary based on specific ingredients used, here’s an approximate breakdown (per serving, serves 2):
- Calories: 250
- Protein: 7g
- Carbohydrates: 30g
- Dietary Fiber: 4g
- Sugars: 18g
- Fat: 13g
- Saturated Fat: 3g
So there you have it, dear friends! A delightful, vibrant Summer Stone Fruit Salad that’s not only delicious but also brings back wonderful memories of sun-soaked summer days. Let’s lift our forks and celebrate the season with a bowlful of freshness, flavor, and fun!
Bon appétit, and happy cooking! 🍑🌞
PrintSummer Stone Fruit Salad

A vibrant and refreshing salad featuring fresh stone fruits like peaches, plums, apricots, and nectarines, drizzled with olive oil and balsamic vinegar.
- Prep Time: 15 minutes
- Cook Time: 0 minutes
- Total Time: 15 minutes
- Yield: 4 servings 1x
- Category: Salad
- Method: No-Cook
- Cuisine: American
- Diet: Vegetarian
Ingredients
- 2 peaches, sliced
- 2 apricots, sliced
- 2 plums, sliced
- 2 nectarines, sliced
- 1 oz. honey goat cheese, crumbled
- 1/4 cup pecans, chopped
- 5 leaves basil, torn
- 2 tablespoons extra virgin olive oil
- 1 tablespoon balsamic vinegar
Instructions
- Wash all stone fruits under cool running water.
- Slice the peaches, apricots, plums, and nectarines into bite-sized pieces.
- Toss together the sliced fruits in a large mixing bowl.
- Whisk together the olive oil and balsamic vinegar in a small bowl.
- Drizzle the dressing over the fruit mixture and fold gently.
- Crumble honey goat cheese over the salad and sprinkle with chopped pecans.
- Taste and adjust seasoning with honey or vinegar if necessary.
- Chill in the fridge for about 30 minutes before serving.
Notes
Let the salad sit in the fridge to meld flavors. Best enjoyed fresh.
Nutrition
- Serving Size: 1 serving
- Calories: 250
- Sugar: 18g
- Sodium: 100mg
- Fat: 13g
- Saturated Fat: 3g
- Unsaturated Fat: 8g
- Trans Fat: 0g
- Carbohydrates: 30g
- Fiber: 4g
- Protein: 7g
- Cholesterol: 10mg
Keywords: summer salad, stone fruit, fresh fruit salad, healthy salad
Minute Stone Fruit Salad for Fresh Summer Flavor
Elegant Stone Fruit Salad: A Burst of Summer on Your Plate
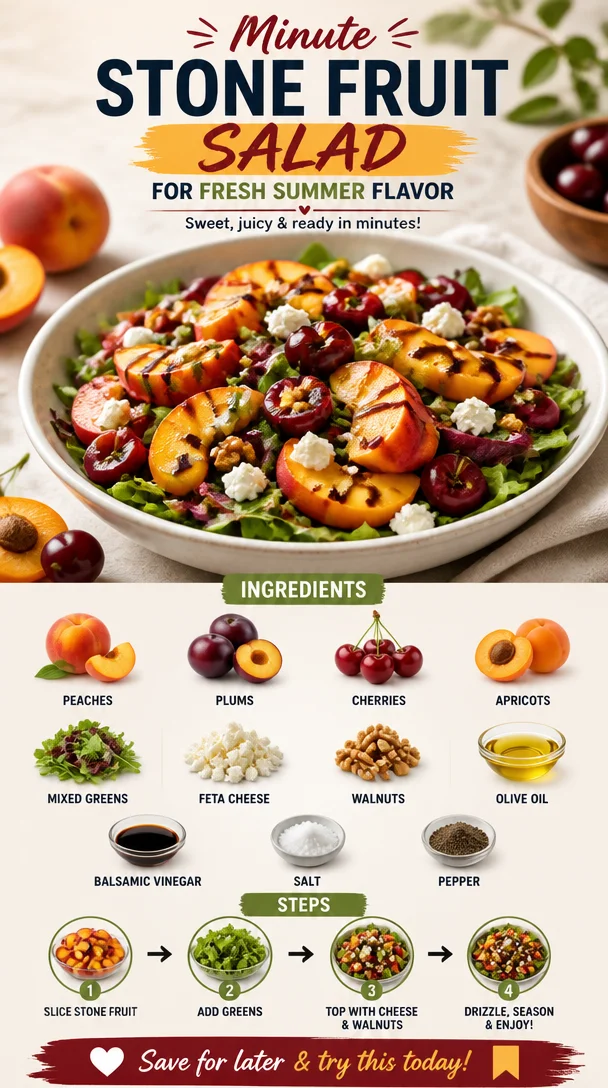
Welcome, fellow food lovers! Today, I’m excited to share with you a vibrant and refreshing dish that captures the essence of summer—an Elegant Stone Fruit Salad. Perfect for picnics, barbecues, or even a quiet dinner at home, this salad celebrates the bold, juicy flavors of seasonal stone fruits. Think peaches, plums, cherries, and apricots artfully tossed together with mixed greens, crumbled feta, and toasted walnuts—all brought together with a drizzle of olive oil and balsamic vinegar. Let’s get this delicious journey started!
Imagine walking through a sunlit orchard, warm breezes rustling the leaves overhead, and the sweet scent of ripe stone fruits filling the air. That’s exactly how I feel every time I make this salad. It brings back memories of long summer afternoons spent at my grandparents’ farmhouse, where we would pluck sun-warmed fruit straight from the tree and enjoy it at the picnic table under a sprawling oak. Each bite of this salad evokes that nostalgic bliss, making me feel a bit like a kid again.
Stone fruits, like peaches and plums, are not only delightful to eat but also full of nutrients. Each season, I can’t resist the vibrant colors and shapes they bring to my plate. This salad is a celebration—of flavor, of memories, and of fresh, wholesome food that doesn’t take itself too seriously. Because life is too short for boring meals, right? Let’s dive into this delightful dish and see how it all comes together!
Personal Story
Ah, stone fruits! The very name conjures up memories of sweet summer days. I remember visiting my grandparents during the harvest season, when the air was thick with sunshine and the promise of juicy bites. I’d trudge out to the orchard, eager to fill my basket with the best peaches and plums my small hands could grab. My grandfather would teach me the art of picking—how to choose the ripest ones without damaging the rest. After our harvest, we’d gather to prepare a feast that always included a stone fruit salad. It was a time for laughter, storytelling, and tons of taste-testing.
To this day, I carry those traditions into my kitchen. This Elegant Stone Fruit Salad is more than just a dish—it’s a way to connect with the past and celebrate the present. Every time I make it, I can hear my grandfather’s voice offering cooking tips, and that brings a big smile to my face. So, let’s honor those memories and make something that will create new ones, shall we?
Ingredients
Here’s what you’ll need to whip up this gorgeous salad:
- Peaches: Sweet and juicy, peaches are the stars of this salad. Choose firm but ripe to give your salad the right texture.
- Plums: A delightful complement to peaches, they add tartness and brilliant color. Any variety will work, so feel free to experiment!
- Cherries: Fresh, juicy cherries with a pop of sweetness! Look for bright red, plump ones—these will take your salad to the next level.
- Apricots: These little gems bring a unique sweetness and a lovely orange hue to the mix—plus, they’re rich in vitamins A and C.
- Mixed Greens: Any combination of greens works here—arugula, spinach, or even baby kale. The greens provide a refreshing base and balance out the sweetness of the fruits.
- Feta Cheese: Creamy, tangy, and briny, feta adds an incredible depth of flavor that brightens up the salad.
- Walnuts: Crunchy, toasty walnuts bring texture and healthy fats. You can roast them lightly for added flavor.
- Olive Oil: A good quality extra virgin olive oil will elevate your dish, adding richness without overwhelming the fresh flavors.
- Balsamic Vinegar: This adds a sweet-tart kick. Look for a high-quality balsamic for the best flavor.
- Salt & Pepper: Simple seasoning helps bring out the natural sweetness of the fruits.
Chef Insight
Keep in mind that fresh ingredients are key to making this salad pop! Always choose ripe, in-season fruits for the best flavor. If a certain stone fruit isn’t available, don’t hesitate to swap it out for whatever juicy fruits you can find.
Step-by-Step Instructions
Let’s bring this beautiful salad to life together! Here’s how to do it:
-
Gather Your Ingredients: First things first, make sure you have everything ready. This is important, especially with a salad, where you want to maintain the freshness of each component.
-
Prep the Fruits: Start by washing all your fruits under cool water. Pat them dry before slicing. Next, slice the peaches, plums, and apricots into thin wedges—about 1/4-inch thick—so they can mingle nicely with your greens. Prune cherries can be halved or left whole depending on your preference.
-
Chop the Greens: Toss the mixed greens into a large salad bowl. Feel free to tear them by hand; it makes for a lovely, rustic look.
-
Add the Fruits: Gently add the sliced fruits to the bowl. Aim for a visually pleasing arrangement! The more colorful the salad, the more inviting it will be.
-
Feta & Walnuts Time: Crumble the feta cheese over the top, creating little pockets of creamy goodness. Then, sprinkle in the walnuts for that crispy crunch.
-
Whisk the Dressing: In a small bowl, whisk together your olive oil and balsamic vinegar. Aim for a ratio of about 3 parts oil to 1 part vinegar, but feel free to adjust based on your taste. Whisk until well combined. Season with salt and pepper to taste.
-
Dress the Salad: Pour the dressing over the salad, but don’t drown it! You can always add more later, so toss gently to coat everything without bruising the greens or the fruits.
-
Taste and Adjust: This is where the magic happens! Taste your salad and see if it needs a little more salt, a drizzle of honey, or extra balsamic. Trust your taste buds!
-
Serve: Once everything is nicely mixed, it’s time to plate. Transfer your Elegant Stone Fruit Salad to a clean serving dish, allowing all the vibrant colors to shine.
Chef Tips
- Use a variety of stone fruits to provide a range of textures and flavors. Mix in anything else you love—like nectarines or colored cherries.
- Feel free to add some herbs like mint or basil for an extra flavor kick!
- Make it ahead of time for meal prep by storing the dressing separately to keep your greens fresh.
Serving Suggestions
How you present this salad can elevate the entire dining experience! I love serving it on a large, beautiful platter; scattering the fruits and greens so that every guest can see each vibrant component. Garnishing with extra feta and walnuts right before serving makes it look like a work of art. You could also serve it alongside grilled chicken or fish for a delightful complete meal.
Recipe Variations
Here are a few fun twists to mix things up:
-
Herbed Variation: Add fresh herbs like basil or mint for a refreshing twist on your salad.
-
Grilled Fruits: Fire up the grill! Grilling the fruits intensifies their sweetness and adds a smoky flavor, which is absolutely divine.
-
Nutty Swap: Switch walnuts for pecans or almonds to discover new textures and flavors.
-
Vegan Option: Leave the feta cheese out or use a vegan feta substitute to tailor this salad for strict plant-based diets.
-
Spicy Touch: Add a sprinkle of chili flakes or a drizzle of spicy honey for a sweet and heat combo that’ll awaken your palate!
Chef’s Notes
As I’ve gathered secrets and tips along my cooking journey, this salad has evolved a lot! Originally, I played with boring iceberg lettuce as the base. But along the way, I discovered mixed greens and just how versatile stone fruits can be. Honestly, every season brings in something new—swapping out fruits or adding components based on what’s fresh has made this dish close to my heart. The best part? It’s a recipe that begs for creativity, and that’s what cooking is all about!
FAQs and Troubleshooting
1. Can I make this salad ahead of time?
Absolutely! To keep the greens fresh, prepare the fruits and dressing ahead but wait to combine everything until right before serving. Just store everything separately in the fridge.
2. What if some of the fruits are overripe?
Use slightly softer stone fruits for a sauce or puree instead of raw. They can taste divine in a smoothie or as a topping for yogurt!
3. How do I adjust for a larger crowd?
Scaling this salad up is easy! Just increase the quantities while maintaining the same ratios. A little more fruit, greens, and nuts will go a long way!
4. What if I don’t have balsamic vinegar?
Not a problem! Substitute with apple cider vinegar or a splash of lemon juice mixed with honey for a lovely tangy dressing!
Nutritional Info
While the precise nutrition will vary based on your specific ingredients and portions, this salad is generally low in calories and high in vitamins, antioxidants, and healthy fats, making it a nourishing choice.
With the season’s best fruits at your fingertips, this Elegant Stone Fruit Salad is your ticket to vibrant meals that everyone will love. I invite you to dive into the joy of cooking and create beautiful memories with every delicious bite. Happy cooking, friends!
PrintElegant Stone Fruit Salad
A vibrant and refreshing stone fruit salad that captures the essence of summer with peaches, plums, cherries, and apricots, tossed with mixed greens, feta, and walnuts.
- Prep Time: 15 minutes
- Cook Time: 0 minutes
- Total Time: 15 minutes
- Yield: 4 servings 1x
- Category: Salad
- Method: No-Cook
- Cuisine: American
- Diet: Vegetarian
Ingredients
- 2 ripe peaches, sliced
- 2 plums, sliced
- 1 cup cherries, halved
- 4 apricots, sliced
- 4 cups mixed greens (arugula, spinach, or baby kale)
- 1/2 cup feta cheese, crumbled
- 1/4 cup walnuts, toasted
- 3 tbsp olive oil
- 1 tbsp balsamic vinegar
- Salt and pepper to taste
Instructions
- Gather your ingredients.
- Prep the fruits by washing them and slicing peaches, plums, and apricots into wedges.
- Chop the mixed greens into a large salad bowl.
- Add the sliced fruits to the bowl, arrange them attractively.
- Crumble the feta cheese over the top, then sprinkle in the walnuts.
- Whisk the olive oil and balsamic vinegar together in a small bowl.
- Dress the salad gently with the dressing, then adjust the seasoning.
- Serve the salad on a beautiful platter and enjoy!
Notes
Use ripe, in-season fruits for the best flavor. Feel free to experiment with different stone fruits or add fresh herbs.
Nutrition
- Serving Size: 1 serving
- Calories: 250
- Sugar: 15g
- Sodium: 250mg
- Fat: 18g
- Saturated Fat: 4g
- Unsaturated Fat: 12g
- Trans Fat: 0g
- Carbohydrates: 20g
- Fiber: 3g
- Protein: 5g
- Cholesterol: 10mg
Keywords: salad, stone fruits, summer salad, healthy recipe, picnic recipe
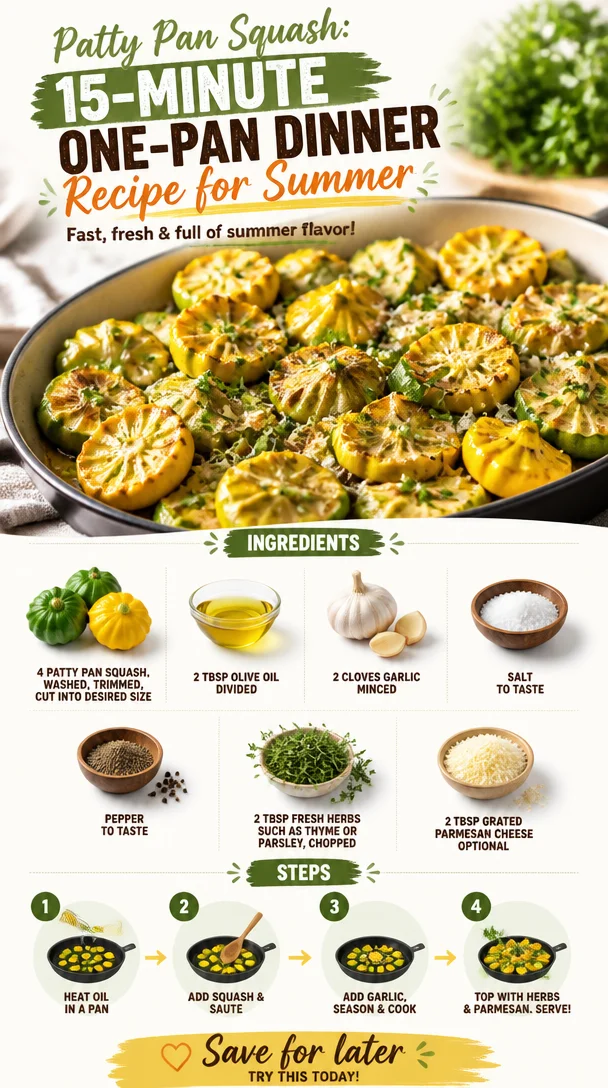
Patty Pan Squash: 15-Minute One-Pan Dinner Recipe for Summer
The Sprightly Squash: A Celebration of Patty Pan Delights
Welcome, fellow food aficionados! Today, we’re diving into the wonderfully whimsical world of patty pan squash. If you’re new to this delightful little veggie, you’re in for a treat. These cheerful, scalloped squashes are not only a feast for the eyes but also a canvas for delicious flavors. Let’s discover together how easy—and fun—it is to whip up a meal that will have you dazzling your dinner guests (or treating yourself!).
A Personal Journey with Patty Pan Squash
My love affair with patty pan squash goes way back to summer afternoons in my grandmother’s garden. Her garden was like a treasure trove of fresh produce, and I can still remember the delight on her face as she picked those quirky, sun-kissed squashes. She would hand me a freshly picked patty pan squash, all gleaming and green, and invite me into the kitchen to transform it into something spectacular.
One of my favorite memories is when we turned them into a vibrant roasted dish that filled the house with an irresistible aroma. The way the squash caramelized in the oven was pure magic! Watching her artfully chop fresh herbs and sprinkle them over the shimmering patty pans was both a lesson in cooking and a cherished bonding experience. Those afternoons shaped my journey as a chef and instilled in me the belief that cooking is about joy, sharing, and celebration.
So, gear up as we recreate these beautiful memories and enjoy patty pan squash in the most flavorful way possible!
Ingredients
Here’s what you’ll need for this vibrant dish:
- 4 patty pan squash: These unique, scalloped squash can vary in color from yellow to green. They have a mild taste that can take on various flavors wonderfully. If unavailable, zucchini can be a good substitute, though the shape won’t be the same.
- 2 tbsp olive oil, divided: A staple in many kitchens, olive oil not only enhances flavor but also helps achieve that lovely roasted finish. Feel free to swap it out for avocado oil if you prefer something with a higher smoke point.
- 2 cloves garlic, minced: Fresh garlic is a game changer! It adds depth and flavor to your dish. If you’re in a pinch, garlic powder can serve as a substitute, but nothing beats freshly minced garlic for that aromatic punch.
- Salt and Pepper to taste: These basics are vital in elevating the overall flavor of your dish. Use sea salt for a pop of flavor, and don’t be shy with the pepper!
- 2 tbsp fresh herbs: I love using thyme or parsley for brightness. You can also mix it up with basil for a sweeter note or oregano for a more earthy flavor.
- 2 tbsp grated Parmesan cheese (optional): This optional ingredient adds a nutty, salty touch that can really elevate your dish. For a dairy-free alternative, nutritional yeast works beautifully here.
Step-by-Step Instructions
Now that we’ve gathered our ingredients, let’s jump into making our delicious roasted patty pan squash!
-
Preheat Your Oven: Set your oven to 400°F (200°C). This heat will help the squash roast perfectly, developing that lovely caramelized exterior while staying tender inside.
-
Prep the Squash: Start by washing your patty pan squash under cool water to remove any dirt. Trim the tops and bottoms, then cut them into bite-sized pieces. The whimsical shape of these squashes makes for a beautiful presentation, so don’t stress too much about uniformity—let their natural shapes shine.
-
Toss with Olive Oil and Garlic: In a large bowl, combine the cut squash with 1 tablespoon of olive oil and the minced garlic. Now, here’s a chef hack: Instead of just adding the garlic raw, you can sauté it for a minute in the olive oil before tossing it with the squash. This step brings out that sweet, rich garlic flavor!
-
Season Generously: Sprinkle in salt and pepper to taste, and mix well. This is your moment to infuse flavor into the squash, so don’t be shy! Remember, salt helps draw out moisture and flavors, while pepper adds the perfect zing.
-
Add Fresh Herbs: Fold in the fresh herbs, ensuring every piece of squash gets a touch of that herby goodness. The aroma alone will make you feel like you’re walking through a sunlit herb garden.
-
Roast to Perfection: Spread the squash mixture evenly on a baking sheet lined with parchment paper. This ensures easy cleanup and avoids any sticking. Roast in the preheated oven for about 20-25 minutes. You’ll know they are ready when they’re tender and golden brown, stirring halfway through to ensure even cooking.
-
Finish with Parmesan: Once they’re beautifully roasted, take them out of the oven and sprinkle with Parmesan cheese, if using. Pop them back in for an additional 2-3 minutes until the cheese is melted and bubbly.
-
Serve and Enjoy: Once you pull that tray out of the oven, watch out! You’ll instantly be drawn in by the melty cheese and fragrant herbs. Taste a piece, and you might just be transported to those summer afternoons in the garden!
Serving Suggestions
These roasted patty pan squash are best served warm. I love plating them alongside a light salad or some grilled chicken for a complete meal. You can garnish with a few extra fresh herbs for a pop of color and freshness. For a lovely presentation, consider stacking them on a vibrant plate or serving them in a rustic bowl, drizzled with a touch of balsamic reduction. Enjoy every colorful bite!
Recipe Variations
- Spicy Kick: Add a pinch of red pepper flakes along with your other seasonings for a touch of heat!
- Mediterranean Vibes: Toss in some chopped olives and sun-dried tomatoes before roasting for a burst of Mediterranean flavor.
- Sweet Glaze: Drizzle with honey or maple syrup in the last few minutes of roasting for a delightful sweet contrast.
- Vegan Version: Skip the cheese or substitute with a nut-based cheese for a deliciously creamy result without dairy.
- Stuffed Patty Pan: For a more filling option, you can scoop out the squash and fill them with quinoa and veggies before roasting!
Chef’s Notes
Oh, the stories I have about patty pan squash! Once during a cook-out, I mischievously offered a friend some “exotic” vegetable that they had never tried before. Little did they know it was just good ol’ patty pan squash! Their surprised expression when they found out made my day! These quirky squashes are often overlooked, but they deserve the spotlight—embrace their unique shapes and flavors, and let your creativity flow in the kitchen.
Over the years, my recipe has evolved as I’ve experimented with different herbs and spices. Don’t be afraid to make it your own—add that touch of “you” into every dish!
FAQs and Troubleshooting
-
Why are my squash mushy?
- If your squash turned out mushy, it may have been overcooked. Each oven is different, so keep an eye on them, especially in the last few minutes of roasting!
-
Can I prep these squash in advance?
- Absolutely! You can chop and season the squash a few hours ahead of time and store it in the refrigerator until you’re ready to roast them.
-
What can I serve with patty pan squash?
- These roasted delights pair beautifully with grilled fish, steak, or a simple green salad. They can also be served as a vibrant side dish to any meal.
-
How do I store leftover patty pan squash?
- Store unused roasted squash in an airtight container in the fridge for up to 3 days. Reheat gently in the oven or microwave!
Nutritional Info
While specific nutritional data varies based on portion sizes, patty pan squash is low in calories, making it a fantastic option for those looking for lighter meal options. It’s high in vitamins A and C and rich in antioxidant properties, which are great for your skin and immune health!
So there you have it! A fun, flavorful journey into the delightful world of patty pan squash, complete with nostalgia and culinary creativity. I hope this recipe inspires you to bring these charming veggies into your kitchen and creates new food memories of your own! Let’s keep it fresh, simple, and delicious! Happy cooking, food friends!
PrintRoasted Patty Pan Squash

A vibrant and flavorful dish featuring roasted patty pan squash, enhanced with garlic and fresh herbs.
- Prep Time: 15 minutes
- Cook Time: 25 minutes
- Total Time: 40 minutes
- Yield: 4 servings 1x
- Category: Side Dish
- Method: Roasting
- Cuisine: Vegetarian
- Diet: Vegetarian
Ingredients
- 4 patty pan squash, cut into bite-sized pieces
- 2 tbsp olive oil, divided
- 2 cloves garlic, minced
- Salt and Pepper to taste
- 2 tbsp fresh herbs (thyme, parsley, or basil)
- 2 tbsp grated Parmesan cheese (optional)
Instructions
- Preheat your oven to 400°F (200°C).
- Wash the patty pan squash under cool water, trim the tops and bottoms, and cut into bite-sized pieces.
- Toss the cut squash with 1 tablespoon of olive oil and minced garlic.
- Season with salt and pepper to taste.
- Fold in the fresh herbs.
- Spread the mixture evenly on a baking sheet lined with parchment paper and roast for about 20-25 minutes, stirring halfway through.
- Sprinkle with Parmesan, if using, and return to the oven for an additional 2-3 minutes.
- Serve warm and enjoy!
Notes
For a vegan version, skip the cheese or substitute with a nut-based cheese.
Nutrition
- Serving Size: 1 serving
- Calories: 150
- Sugar: 2g
- Sodium: 300mg
- Fat: 10g
- Saturated Fat: 2g
- Unsaturated Fat: 8g
- Trans Fat: 0g
- Carbohydrates: 12g
- Fiber: 3g
- Protein: 3g
- Cholesterol: 5mg
Keywords: patty pan squash, roasted vegetables, vegetarian recipes
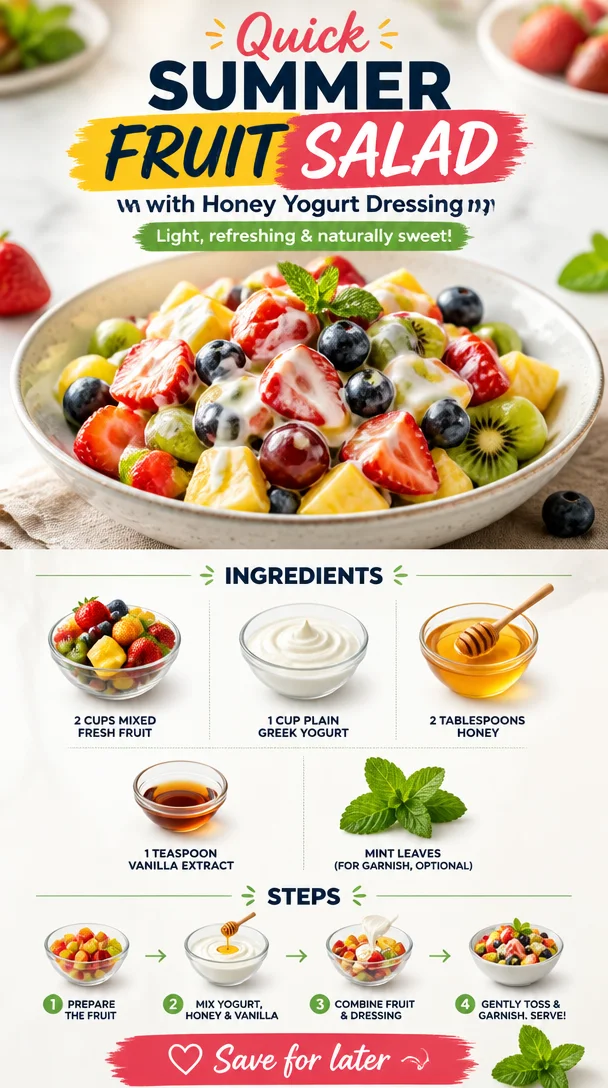
Quick Summer Fruit Salad with Honey Yogurt Dressing
A Refreshing Treat: Fruit Salad with Honey Yogurt Dressing
Welcome, food lovers! Today, we’re diving into the world of fresh, vibrant flavors with a deliciously simple recipe: Fruit Salad with Honey Yogurt Dressing. On a sunny afternoon or as a snack during a busy day, this dish is a perfect way to brighten your mood and nourish your body. Nothing beats the refreshing burst of fresh fruit combined with a creamy, slightly sweet yogurt dressing. Whether you’re treating yourself or impressing your friends, this fruit salad is a delightful option that keeps things light and lively.
A Walk Down Memory Lane: The Magic of Fruit Salad
Let me take you back to my childhood. I remember those summer days spent at my grandmother’s house, where the sunlight poured through the kitchen windows, casting a warm glow on everything it touched. Grandma had this magical way of transforming simple ingredients into moments that truly mattered. Every time we visited, her famous fruit salad was front and center on the dining table—a colorful masterpiece that beckoned for attention! She would gather whatever fruits were in season, often including strawberries, blueberries, or whatever was fresh from her backyard garden.
As a child, I didn’t fully appreciate the complexities of flavor combinations, but the explosion of sweetness when biting into a juicy strawberry or the subtle creaminess of yogurt that accompanied it was pure bliss. Grandma would whip up her special honey yogurt dressing, telling us how it made everything better—she was right! We would gather around the table, share stories, and savor those bright, exuberant flavors together. It was more than just a dish; it was a celebration of family, laughter, and love.
Now, decades later, I still find joy in creating fruit salad. It’s a dish that’s evolved with me, adopting new ingredients and combinations, but the essence remains the same—a burst of flavors and a tool for sharing joy. So, let’s round up some fresh ingredients and make some delicious memories together!
Ingredients
Here’s what you’ll need for your vibrant Fruit Salad with Honey Yogurt Dressing:
-
2 cups mixed fresh fruit:
- Options: strawberries, blueberries, kiwi, pineapple, and grapes are all fantastic picks. Feel free to swap in any seasonal fruit you love! If you’re feeling adventurous, add some citrus for a zesty twist or consider swap-outs like mango or raspberries.
-
1 cup plain Greek yogurt:
- Tip: Greek yogurt is creamier than regular yogurt and packs a protein punch, making it a satisfying base for our dressing. If you want a lighter version, you can use low-fat or non-fat yogurt. For a dairy-free option, coconut yogurt will add a delightful tropical flavor!
-
2 tablespoons honey:
- Why: Honey adds natural sweetness and works beautifully with the yogurt, creating a perfectly balanced dressing. If you’re looking for a vegan option, maple syrup is an excellent substitute—just use it in the same amount.
-
1 teaspoon vanilla extract:
- Chef Insight: A touch of vanilla enhances the overall flavor of the dressing and pairs perfectly with the fruit. If you want to get fancy, consider adding a pinch of cinnamon or even a splash of almond extract for a unique twist.
-
Mint leaves (for garnish, optional):
- Touch of freshness: Mint leaves not only add a pop of beautiful green, but they also elevate your dish with a refreshing aroma. If mint isn’t available, basil or even edible flowers can make a stunning garnish!
Step-by-Step Instructions
Now that we’ve gathered our ingredients, let’s jump into the kitchen and whip up this delightful fruit salad together!
-
Wash your fruits:
- Start by thoroughly washing all your fresh fruits under cool running water. For berries, a gentle touch is best to avoid bruising. If you’re using tougher fruits like apples or pears, no need to worry about their durability! Just make sure to check for any hidden dirt or residue.
-
Prep the fruit:
- Slice the strawberries into bite-sized pieces, halve the grapes, and chop the kiwi and pineapple into manageable chunks. You want all pieces to be similar in size so everyone can enjoy a balanced bite in each serving. While prepping, remember to let your creativity shine—mix and match fruits as you go!
-
Mix the yogurt dressing:
- In a mixing bowl, combine the Greek yogurt, honey, and vanilla extract. Whisk until your mixture is smooth and creamy. Try not to over-whisk it, as you want it to maintain that lovely, velvety texture! Taste it—if you want it a tad sweeter, feel free to add a touch more honey.
-
Combine the fruits:
- In a large serving bowl, gently toss all your prepared fruits together. This is where you can admire the rainbow of colors! Make sure to be gentle—no one likes squished fruit.
-
Drizzle with dressing:
- Once your fruit is beautifully mixed, pour the yogurt dressing over the fruit. Use a soft spatula to gently combine everything, ensuring each piece of fruit is well-coated in that luscious dressing.
-
Garnish and serve:
- Finally, sprinkle your fresh mint leaves on top for a beautiful presentation and fresh aroma. You can serve it right away, or if you want the flavors to meld a little longer, cover it and pop it in the fridge for about 30 minutes.
Serving Suggestions
When it comes to plating your fruit salad, you can keep it casual or make it a bit more elegant! Serve it in glass bowls or jars to highlight the beautiful colors of the fruits. For a kid-friendly option, scoop some fruit salad into fun, colorful cups. If you’re entertaining, consider arranging the fruit salad on a large platter, maybe even drizzling some extra honey on top for an artful touch. Either way, however you serve it, you’re sure to impress!
Recipe Variations
Want to switch things up? Here are a few fun variations to keep your fruit salad fresh and exciting:
-
Tropical Twist: Use tropical fruits like mango, papaya, and shredded coconut for a vacation vibe. Drizzle with lime juice instead of honey for a zesty kick.
-
Berry Blast: Combine various berries—blackberries, raspberries, and strawberries—and add a sprinkle of chia seeds for added nutrition.
-
Spiced Delight: For a warm flavor profile, mix in a pinch of cinnamon into your yogurt sauce, and consider adding roasted nuts for a delightful crunch.
-
Creamy Nutty Addition: Fold in a tablespoon of almond or peanut butter into the yogurt dressing for an extra layer of creaminess and protein.
-
Citrus Burst: Incorporate citrus fruits like oranges and grapefruits along with a splash of orange juice in the dressing for an uplifting, tangy version.
Chef’s Notes
This fruit salad has become a staple in my kitchen over the years. What I love most about it is its adaptability—no two salads are ever the same! Some days I crave tropical fruits, while other days, I find myself reaching for juicy berries. Not only is it a great way to use up leftover fruit before it spoils, but it’s also an amazing canvas for creativity. Plus, I love that I can make it ahead of time as part of my meal prep for the week! And don’t even get me started on how many compliments I’ve received during potluck parties—bring this to one, and you’ll be a rock star!
FAQs and Troubleshooting
Q: Can I use frozen fruit?
A: While fresh fruit is best for texture, you can use frozen fruit in a pinch! Just be sure to let it thaw and drain the excess liquid to keep your salad from getting soggy.
Q: How can I store leftover fruit salad?
A: Keep any leftover fruit salad in an airtight container in the fridge. It’ll stay fresh for about 1-2 days. However, note that the fruit may become a bit mushy over time, so enjoy it as soon as you can!
Q: Is there a way to make this a more substantial meal?
A: Absolutely! You can easily add a handful of granola or nuts for extra crunch and nourishment, making it a filling breakfast or snack option.
Q: What if I don’t have Greek yogurt?
A: No problem! You can use regular yogurt or any other plant-based alternative. Just remember that the flavor and creaminess might vary slightly.
Nutritional Info
This section is optional; if you’d like, let’s talk about the health benefits of our fruit salad! It’s low in calories, rich in vitamins, and ideal for hydration, thanks to the variety of fruit. Plus, pairing fruits with yogurt adds protein and probiotics, making it a balanced option for any time of day.
So there you have it, my friends! A simple yet delightful recipe for a vibrant Fruit Salad with Honey Yogurt Dressing that’s sure to become a favorite in your kitchen. Enjoy every bite, reminisce about the beautiful moments food brings into our lives, and remember to share the joy with those you love! Happy cooking!
PrintFruit Salad with Honey Yogurt Dressing

A refreshing fruit salad with a creamy honey yogurt dressing, perfect for warm days and gatherings.
- Prep Time: 15 minutes
- Cook Time: 0 minutes
- Total Time: 15 minutes
- Yield: 4 servings 1x
- Category: Salad
- Method: N/A
- Cuisine: American
- Diet: Vegetarian
Ingredients
- 2 cups mixed fresh fruit (strawberries, blueberries, kiwi, pineapple, grapes)
- 1 cup plain Greek yogurt
- 2 tablespoons honey
- 1 teaspoon vanilla extract
- Mint leaves (for garnish, optional)
Instructions
- Wash your fruits under cool running water.
- Prep the fruit by slicing strawberries, halving grapes, and chopping kiwi and pineapple.
- Mix the yogurt, honey, and vanilla extract in a bowl until smooth.
- Combine the fruits in a large serving bowl and gently toss.
- Drizzle the yogurt dressing over the mixed fruit.
- Garnish with fresh mint leaves and serve.
Notes
You can prepare this ahead of time, and adjust the sweetness by adding more honey if desired.
Nutrition
- Serving Size: 1 serving
- Calories: 180
- Sugar: 20g
- Sodium: 50mg
- Fat: 2g
- Saturated Fat: 0g
- Unsaturated Fat: 2g
- Trans Fat: 0g
- Carbohydrates: 37g
- Fiber: 3g
- Protein: 6g
- Cholesterol: 6mg
Keywords: fruit salad, healthy snack, summer recipes, yogurt dressing, easy dessert
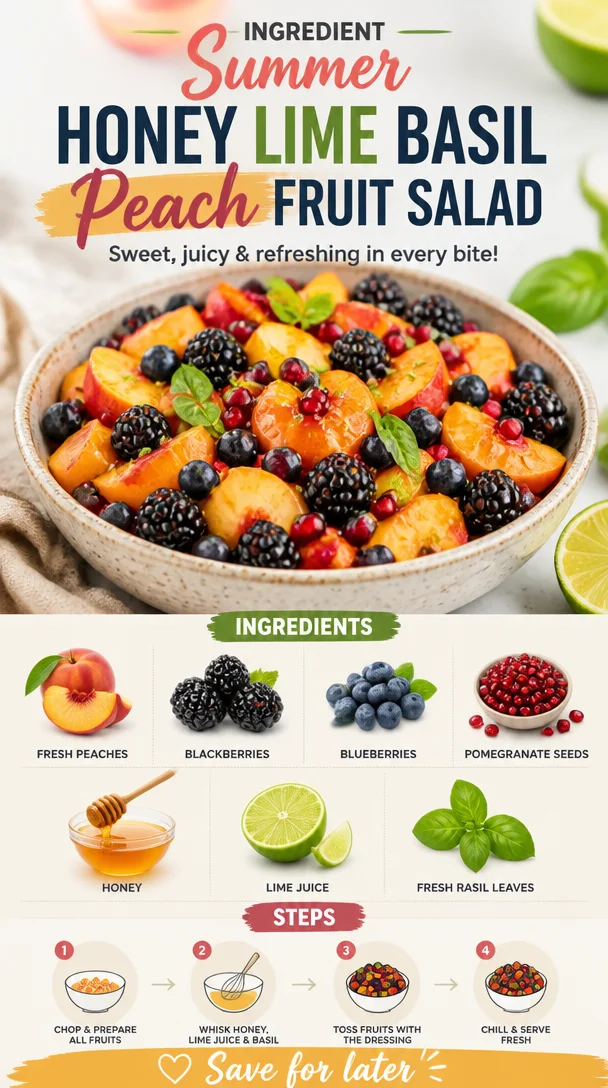
Ingredient Summer Honey Lime Basil Peach Fruit Salad
Honey Lime Basil Peach Fruit Salad: A Fresh Twist on Summer Classics
Welcome back, my foodie friends! Today, I’m excited to share one of my absolute favorite summer delights: Honey Lime Basil Peach Fruit Salad. This vibrant salad bursts with flavor and color and brings together the sweetness of ripe peaches, the tartness of berries, and a hint of aromatic basil. Honestly, what could be better on a hot summer day?
Picture this: the summer sun is shining, the warm breeze is blowing, and you’re sitting outside with a bowl of this refreshing fruit salad. Every bite is a celebration of summer’s bounty. This dish is not just a side; it’s a delightful centerpiece for any backyard barbecue or picnic, and let me assure you, it’s as easy to make as it is delicious!
One of the best things about this salad is how simple it is. No elaborate cooking techniques are required—just a bit of chopping and tossing. And the flavors? Oh boy, they sing! The sweet honey and zesty lime juice elevate the fruits to a whole new level, while the fresh basil adds an unexpected twist that takes this salad from ordinary to extraordinary. Trust me, you’ll be going back for seconds (or thirds!).
So grab your apron, channel your inner chef, and let’s dive into this delightful dish. Not only will it leave you feeling refreshed and satisfied, but it’s also a fantastic way to showcase those juicy summer peaches and berries while bringing a whimsical touch to your table.
A Sweet Summer Memory
Before we dive into the recipe, I want to take you back to a sunny afternoon from a few years ago. It was the tail end of summer, and I was visiting my grandmother out in the countryside. She always had a knack for turning the simplest ingredients into magical creations. One afternoon, she brought a basket of sun-ripened peaches and berries fresh from her garden to the kitchen.
We spent the day chatting and laughing as we sliced the peaches and tossed in the berries. She drizzled honey and squeezed some lime juice over the mix, and just like that, we had a fruit salad that was bursting with flavor. It quickly became a tradition—each summer, we would make our fruit salad, and I would always be the one to add a few sprigs of basil from her herb garden. Those moments spent with her, full of love and laughter, made this dish special, and it’s a cherished memory I hold dear.
Now, let’s recreate that radiant moment with this Honey Lime Basil Peach Fruit Salad!
Ingredients
Here’s what you’ll need to whip up this refreshing salad:
-
Fresh Peaches: Ripe, juicy peaches are the star of this salad. Choose peaches that are slightly soft to the touch for maximum sweetness. If you can’t find fresh peaches, feel free to use nectarines as a substitute!
-
Blackberries: These little gems add a delicious tartness. If they’re out of season, you can use raspberries or even sliced strawberries for a similar vibe.
-
Blueberries: Sweet and pop-in-your-mouth blueberries are an essential here! If you’re feeling adventurous, try swapping them for cherries or any sweet berry you love.
-
Pomegranate Seeds: For a burst of crunch and tangy flavor, the pomegranate seeds are a game-changer. If you can’t find fresh pomegranate, you can use a sprinkle of dried cranberries or leave them out entirely.
-
Honey: This natural sweetener enhances the flavors beautifully. For a vegan version, maple syrup works just as well.
-
Lime Juice: The acidity of the lime juice cuts through the sweetness and balances the dish perfectly. Freshly squeezed is best, but bottled lime juice can suffice in a pinch.
-
Fresh Basil Leaves: Ah, the unexpected ingredient! Chopped fresh basil offers a lovely aromatic twist. If you’re not a fan, mint could offer a refreshing alternative.
Step-by-Step Instructions
Alright, my culinary companions, let’s get this salad whipped up! You won’t believe how quickly it comes together.
-
Gather Your Ingredients: Make sure you have all the ingredients ready. It’s always good to have a clean kitchen counter—trust me; it makes the process more enjoyable!
-
Prep the Peaches: Start by washing the peaches thoroughly. You can either slice them into wedges or chop them into bite-sized pieces—whatever catches your fancy! Just remove the pit. Pro tip: If you want to peel them, blanch them in boiling water for 30 seconds to loosen the skin first.
-
Toss in the Berries: In a large mixing bowl, combine the sliced peaches with blackberries and blueberries. Gently fold them together—be careful not to squish the delicate berries; they have a mind of their own!
-
Add the Pomegranate Seeds: If you’re using fresh pomegranate, cut one in half and gently tap the back with a wooden spoon to release the seeds. Toss those beautiful red jewels into the mix. They not only add flavor but also make the salad visually stunning!
-
Prepare the Dressing: In a small bowl, whisk together the honey and lime juice until smooth. If you prefer a thinner dressing, you can add a teaspoon of water to help it glide over the fruits more easily.
-
Drizzle and Toss: Pour the honey-lime mixture over your fruit medley and give everything a gentle toss to ensure the dressing coats every piece. This is where the magic happens!
-
Chop the Basil: Finally, chop the fresh basil leaves and sprinkle them over the top of your salad. Give it one last gentle toss to incorporate that aromatic goodness.
-
Taste Test: This is the most important step—taste your salad! Adjust the honey or lime juice according to your preference. This salad should be perfectly balanced between sweet and tangy.
-
Refrigerate: Allow the salad to chill in the refrigerator for about 15-30 minutes. This allows the flavors to meld even more beautifully.
Serving Suggestions
Now it’s time to plate up this beautiful creation! Serve the Honey Lime Basil Peach Fruit Salad in a large, colorful bowl for a buffet-style vibe, or drizzle it into individual serving bowls to showcase the vibrant colors. Garnish with a sprig of basil on top, and consider adding a scoop of creamy yogurt or a dollop of whipped coconut cream for an extra indulgent touch. Whether you’re serving it as a dessert, a side dish, or a light lunch, it’s sure to impress!
Recipe Variations
Feeling adventurous? Here are a few creative twists to customize your fruit salad:
-
Tropical Twist: Swap peaches for diced mango or pineapple for a refreshing tropical flair. Add shredded coconut for an even more beachy vibe!
-
Nutty Crunch: Sprinkle some toasted almonds or walnuts on top for a satisfying crunch. It adds texture and healthy fats too!
-
Citrus Burst: Add segments of orange or grapefruit to brighten up the salad and introduce another layer of acidity.
-
Spicy Kick: For a kick of heat, sprinkle in a pinch of red pepper flakes or chopped jalapeños. It sounds wild, but you’ll be surprised at how good spicy and sweet can be together!
-
Berry Party: Use any combination of berries you desire! Swap blackberries for raspberries or strawberries to create your perfect blend.
Chef’s Notes
Let me tell you, this recipe has a special place in my heart. Over the years, I’ve played around with seasonal fruits to keep things fresh and exciting. I once made it with summer melon and added a splash of orange juice instead of lime—it was a massive hit at a family gathering!
Every time I make this salad, I think of that joyful sunny afternoon with my grandmother, and it reminds me of how food can create memories that last a lifetime. Enjoy every bite, and remember that food should always be enjoyed, never rushed!
FAQs and Troubleshooting
-
Can I make this salad in advance?
- Absolutely! However, I recommend assembling everything except the dressing a few hours ahead. When you’re ready to enjoy it, drizzle the dressing and toss! It keeps the fruit fresh and prevents them from getting soggy.
-
What if I have leftover salad?
- This salad is best enjoyed fresh, but if you have leftovers, store them in an airtight container in the refrigerator. Just know the berries may lose some of their texture. Give it a little stir before serving!
-
Can I use frozen fruit?
- While fresh fruit yields the best texture and flavor, you can use thawed frozen fruit in a pinch. However, try to avoid mushy, overripe varieties.
-
How can I adjust the sweetness?
- If you like it sweeter, definitely add more honey. For a lower-sugar version, consider using a sugar substitute or even omitting the honey altogether, as the fruit is naturally sweet.
Nutritional Info
This light and refreshing fruit salad packs a nutritional punch! It’s high in vitamins C and A, fiber, and antioxidants. Each serving is around 120 calories, depending on the portion size, and it’s low in fat—making it a guilt-free treat!
So, there you have it! Your perfect recipe for a Honey Lime Basil Peach Fruit Salad. Whether you’re enjoying it at a barbecue, a picnic, or simply as a light dessert at home, I hope it brings as much joy to your kitchen as it has to mine. Happy cooking, and remember: keep it fresh, simple, and delicious!
PrintHoney Lime Basil Peach Fruit Salad
A vibrant and refreshing fruit salad combining ripe peaches, berries, and aromatic basil with a honey-lime dressing.
- Prep Time: 10 minutes
- Cook Time: 0 minutes
- Total Time: 30 minutes
- Yield: 4 servings 1x
- Category: Salad
- Method: No Cooking
- Cuisine: American
- Diet: Vegetarian
Ingredients
- 4 Fresh Peaches, chopped
- 1 cup Blackberries
- 1 cup Blueberries
- 1/2 cup Pomegranate Seeds
- 2 tablespoons Honey
- 2 tablespoons Lime Juice
- 1/4 cup Fresh Basil Leaves, chopped
Instructions
- Gather your ingredients.
- Prep the peaches by washing them thoroughly and chopping them into bite-sized pieces.
- Toss in the blackberries and blueberries in a large mixing bowl.
- Add the pomegranate seeds to the fruit mix.
- Prepare the dressing by whisking together honey and lime juice until smooth.
- Drizzle the honey-lime mixture over the fruit and toss gently.
- Chop the basil leaves and sprinkle over the salad.
- Taste the salad and adjust the flavors as needed.
- Refrigerate for 15-30 minutes before serving.
Notes
Serve with a scoop of creamy yogurt or whipped coconut cream for extra indulgence. Great for barbecues or picnics.
Nutrition
- Serving Size: 1 serving
- Calories: 120
- Sugar: 14g
- Sodium: 5mg
- Fat: 0g
- Saturated Fat: 0g
- Unsaturated Fat: 0g
- Trans Fat: 0g
- Carbohydrates: 30g
- Fiber: 4g
- Protein: 1g
- Cholesterol: 0mg
Keywords: fruit salad, summer salad, peach salad, refreshing salad, healthy dessert
Minute Tomato Burrata Salad: Fresh Summer Flavor
Tomato and Burrata Salad: A Love Letter to Simplicity and Flavor
Welcome, food lovers! Today, we’re diving into one of my all-time favorite dishes: Tomato and Burrata Salad. I can tell you with absolute certainty that this dish is a shining star in the realm of fresh, vibrant eating. With summer’s bounty bursting forth, who wouldn’t want to highlight those juicy tomatoes paired with creamy burrata? It’s a delightful combination that screams sunshine and satisfaction.
Now, let’s be real: we all lead hectic lives. The last thing we want to do when we come home is stress over what to whip up for dinner, right? That’s why I am all about cravings that don’t overwhelm you with complicated steps or lengthy lists of ingredients. Tomato and Burrata Salad is simplicity at its finest—an impressive dish that you can whip up in just about 15 minutes. Yes, you heard that right! Perfect for those busy weeknights or lazy weekends when you want to indulge without breaking a sweat.
This salad is not just a feast for the taste buds; it’s also a visual delight. The vibrant hues of ripe tomatoes, luscious white burrata, and green basil are a pleasure to behold. Drizzled with good quality olive oil and a splash of balsamic vinegar, it not only tastes amazing but also gives you that feel-good factor as you nourish your body with fresh ingredients.
So grab your apron, and let’s get cooking! But first, let me share a little story that will set the mood for this delicious journey.
A Personal Story: The Summer I Discovered Burrata
I still remember the first time I tasted burrata like it was yesterday. It was a lovely summer afternoon at an open-air farmer’s market, the kind that bursts with life, colors, and laughter. My friends and I were wandering from stall to stall, sampling everything from artisanal cheeses to homemade bread.
As we approached a cheese vendor, a creamy white globe caught my eye. Curious, I couldn’t resist asking for a sample. When I took that first bite, my life changed forever! The outer shell was delicate, and when I broke it apart, the creamy center oozed out like a luscious, cheesy river. Pairing it with the perfectly ripe heirloom tomatoes at the market was a no-brainer.
After that day, I became obsessed with recreating that magical salad at home. I could never quite get the burrata quite as magical as that first bite, but I came pretty close! Each summer since, I’ve made it a tradition to treat myself to some fresh burrata and tomatoes, celebrating the season’s offerings while reminiscing about that magical market day.
Now, let’s get into the nitty-gritty of making this fantastic Tomato and Burrata Salad that draws inspiration from that unforgettable experience!
Ingredients
Here’s what you’ll need to create this mouthwatering salad. Each ingredient brings a unique quality to the dish, making it truly special.
-
Fresh Tomatoes: The star of the show! Use ripe, juicy tomatoes like heirlooms, cherry, or vine-ripened for the best flavor. Pro tip: If tomatoes aren’t in season, feel free to use good quality canned tomatoes in a pinch!
-
Burrata Cheese: This creamy cheese takes the dish to another level. If you can’t find burrata, fresh mozzarella is a great substitute, but do yourself a favor and try to find burrata if you can!
-
Olive Oil: A high-quality extra virgin olive oil will elevate your salad. A drizzle of this liquid gold ties all the flavors together. If you want a twist, flavored olive oils like basil or lemon can add an extra pop.
-
Balsamic Vinegar: A drizzle of balsamic adds acidity and sweetness. Opt for a good quality aged balsamic for depth. If you want to mix it up, try balsamic glaze for a thicker consistency.
-
Fresh Basil: Nothing beats the aroma and flavor of fresh herbs. Basil complements the tomatoes and burrata beautifully. If basil isn’t your style, you can use arugula or mint for a different flavor profile.
-
Salt: A sprinkle of flaky sea salt enhances the flavors of the tomatoes and cheese. Don’t skip this step—it makes all the difference.
-
Pepper: Freshly cracked black pepper adds that necessary kick. For a twist, try using a mix of colored peppercorns for a more visual appeal.
Ready to assemble these goodies? Let’s jump into the cooking action!
Step-by-Step Instructions
Here’s how you can put this fresh and fabulous dish together:
-
Prep Your Tomatoes
Start by washing your tomatoes under cool running water. If you’re using larger heirlooms, slice them into thick wedges. Cherry tomatoes can be halved. Aim for a variety of shapes and sizes to make the dish visually appealing. Remember, the more color, the better! -
Slice the Burrata
Be gentle! Burrata is delicate, so use a sharp knife to slice the burrata open, letting that creamy center spill out. It’s like a cheesy surprise waiting to be enjoyed. Be ready to indulge! -
Arrange on a Plate
Grab a large plate or a shallow bowl. Start by arranging your tomatoes however your heart desires. It could be a pretty circular pattern, a casual toss of colors, or any way that speaks to you. The beauty of this dish is in its simplicity—there’s no wrong way to do it! -
Add the Burrata
Nestle the burrata pieces among the tomatoes. Make sure to drape the creamy insides in such a way that everyone will be able to scoop a little when serving. -
Drizzle Some Olive Oil
Generously drizzle your extra virgin olive oil all over the salad. It not only adds incredible flavor but also acts as a beautiful sheen that makes everything look enticing. Don’t be shy; it brings everything together! -
Sprinkle with Balsamic Vinegar
Now, for the balsamic! A light drizzle will do the trick, but feel free to adjust according to your taste. Remember, a little goes a long way, so start small and add more if desired. -
Season with Salt and Pepper
Finish with a sprinkle of flaky sea salt and a generous crack of freshly ground black pepper. This simple seasoning elevates the dish and enhances all the amazing flavors. -
Top with Fresh Basil
Lastly, tear some fresh basil leaves over the top. They can be as small or as large as you like—just make sure to include enough to enjoy that fresh basil flavor with each bite.
And there you have it! Simple, beautiful, and oh-so-delicious Tomato and Burrata Salad ready to be devoured.
Serving Suggestions
When it’s time to serve your Tomato and Burrata Salad, consider presenting it on a wooden platter for a rustic feel or a white plate to really make those colors pop! Pair it with some crusty bread for mopping up any leftover olive oil and gooey burrata. A chilled glass of rosé or a light white wine complements this dish perfectly. Enjoy this salad as a refreshing starter, a side dish alongside grilled meats, or even as a satisfying light lunch on its own!
Recipe Variations
Feeling adventurous? Here are a few fun variations you can explore:
-
Mediterranean Style: Add black olives and capers for a briny punch that complements the sweetness of the tomatoes.
-
Grilled Option: Toss your tomatoes on the grill for a slight char! The smokiness will add an exciting depth of flavor.
-
Pesto Twist: Replace the basil with a drizzle of homemade or store-bought pesto for an herbaceous kick.
-
Fruit Fusion: Add slices of ripe peaches or nectarines for a fruity twist that pairs well with the cheese!
-
Nuts Galore: Toss in some toasted pine nuts or chopped walnuts for added crunch and a nutty flavor.
Explore these variations to suit your taste and make this dish your own!
Chef’s Notes
One of the beautiful things about this Tomato and Burrata Salad is how easy it is to adapt. Over the years, I’ve played around with different cheeses and even roasted my tomatoes to intensify their flavor. Each version has its merits! I often find myself standing over the sink, tearing off pieces of burrata and nibbling while prepping—it’s hard not to!
I love to think of this salad as a blank canvas; you can let your creativity shine. Whether I’m enjoying it on a sunny afternoon, hosting friends, or simply needing a happy food moment, this salad never fails to deliver.
FAQs and Troubleshooting
Q: My burrata is too runny. What did I do wrong?
A: Burrata can be tricky! Make sure to drain it well if it’s packed in liquid. If you bite into it and it’s too runny, just enjoy it as is—runny burrata is still delicious!
Q: Can I make this salad ahead of time?
A: This salad is best enjoyed fresh. However, you can prep the ingredients in advance but avoid adding the burrata and drizzles of oil and balsamic until just before serving.
Q: What should I do if my tomatoes aren’t flavorful?
A: Choose the ripest tomatoes you can find! If they lack flavor, add a pinch of sugar to enhance their sweetness or drizzle a touch more balsamic vinegar for added depth.
Q: Can I use dried herbs instead of fresh basil?
A: While fresh herbs are best for this recipe, if you must use dried herbs, remember that dried herbs are more potent, so use them sparingly. Add them in with the oil and vinegar to help rehydrate them.
Nutritional Info
While I usually focus on the joy of cooking rather than calorie counting, a serving of Tomato and Burrata Salad is generally low in calories but high in healthy fats, vitamins, and antioxidants. Each serving can provide a great source of lycopene from the tomatoes, healthy fats from the olive oil and burrata, and fresh flavors from the herbs.
Well, there you have it—an inviting journey through the wonderful world of Tomato and Burrata Salad! I hope this recipe inspires you to bring a little sunshine to your table. Remember, the kitchen is a place of joy, experimentation, and love. So roll up those sleeves and let’s enjoy the beauty of fresh, feel-good food together! Happy cooking!
PrintTomato and Burrata Salad

A vibrant and fresh Tomato and Burrata Salad highlighting juicy tomatoes paired with creamy burrata, drizzled with olive oil and balsamic vinegar.
- Prep Time: 15 minutes
- Cook Time: 0 minutes
- Total Time: 15 minutes
- Yield: 4 servings
- Category: Salad
- Method: No Cooking
- Cuisine: Italian
- Diet: Vegetarian
Ingredients
- Fresh Tomatoes (heirloom, cherry, or vine-ripened)
- Burrata Cheese
- Olive Oil (extra virgin)
- Balsamic Vinegar
- Fresh Basil
- Salt
- Pepper
Instructions
- Prep your tomatoes by washing them and slicing them into wedges or halves.
- Slice the burrata gently to reveal its creamy center.
- Arrange tomatoes on a large plate or shallow bowl creatively.
- Add the burrata pieces among the tomatoes.
- Drizzle olive oil generously over the salad.
- Sprinkle balsamic vinegar lightly according to taste.
- Season with flaky sea salt and freshly cracked black pepper.
- Top with torn fresh basil leaves before serving.
Notes
Experiment with different variations like adding olives, grilling the tomatoes, or using pesto instead of basil.
Nutrition
- Serving Size: 1 serving
- Calories: 250
- Sugar: 6g
- Sodium: 300mg
- Fat: 20g
- Saturated Fat: 10g
- Unsaturated Fat: 9g
- Trans Fat: 0g
- Carbohydrates: 14g
- Fiber: 2g
- Protein: 8g
- Cholesterol: 30mg
Keywords: salad, tomatoes, burrata, vegetarian, fresh, summer
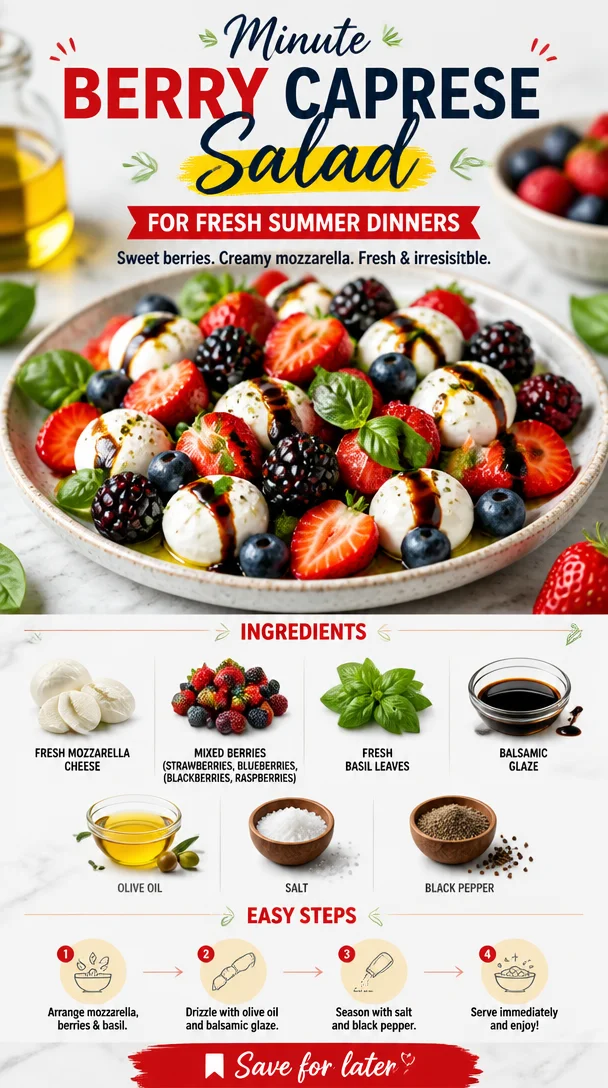
Minute Berry Caprese Salad for Fresh Summer Dinners
Berry Caprese Salad: A Fresh Take on a Classic
Welcome to another delicious day in my kitchen! Today, we’re whipping up a dish that will bring a smile to your face and a burst of flavor to your palate: Berry Caprese Salad. If you’re a fan of vibrant, playful salads that don’t just look good but taste incredible, then you’ve stumbled upon something special. Picture this: luscious, creamy mozzarella hugging juicy mixed berries, all wrapped up in the aromatic embrace of fresh basil. You’d be right to think that this sounds like a heavenly match, and trust me, it is!
What I love about this salad is that it perfectly straddles the line between indulgent and healthy. Each ingredient shines, and when they come together, it’s magic in a bowl. There’s something about the sweet-tart explosion from the berries paired with the smooth, mild mozzarella that creates a symphony of flavors. Whether you’re planning a fancy picnic, a backyard BBQ, or just looking for a quick and nutritious lunch, Berry Caprese Salad is here to elevate your meal.
Now, before we dive into the details, let me reminisce a bit and share how this delightful dish became a staple in my cuisine.
A Nostalgic Memory: The First Time I Made a Berry Caprese Salad
It was several summers ago when I first encountered the charm of a Berry Caprese Salad. I was hosting a backyard gathering, excited to impress my friends with my culinary creations. The idea of a traditional Caprese Salad was dancing around in my head, but I wanted to kick it up a notch, something fun and unexpected. As I strolled through the local farmer’s market, the ripe strawberries and vibrant blueberries called out to me. It struck me like a bolt of lightning! Why not combine the fresh berries with the classic Caprese elements?
So, with a basket of colorful produce, I headed home, eager to experiment. My friends were skeptical as I set the table—after all, the classic tomato and mozzarella duo is hard to beat! But as soon as I took that first bite of our innovative creation, laughter erupted around the table. It was a hit! The sweet berries playfully danced with the creamy mozzarella, and everyone was hooked. From that moment on, Berry Caprese Salad became my summer showstopper—a dish that ushered in laughter, friendships, and the joy of shared meals. And now, I’m thrilled to share that joy with you!
Ingredients: Fresh, Colorful, and Simple
Here’s what you’ll need to create this delightful dish, along with some little chef insights to help you shine in your kitchen:
-
Fresh Mozzarella Cheese: Creamy and mild, fresh mozzarella is a must for that authentic Caprese experience. If you can’t find it, burrata works beautifully too. It adds an extra creaminess that’s simply divine!
-
Mixed Berries (strawberries, blueberries, blackberries, raspberries): The star of the show! Feel free to mix and match based on what you love or what’s in season. You could even try blackcurrants or cherries for a twist!
-
Fresh Basil Leaves: Aromatic and bright, basil adds a fantastic herbal note. Look for vibrant green leaves, and don’t be shy! The more, the merrier. If you’re feeling adventurous, mint could be a refreshing substitute!
-
Balsamic Glaze: This adds that sweet-and-sour punch that ties everything together. If you don’t have balsamic glaze on hand, a drizzle of balsamic vinegar works too—just ensure to use a high-quality one for maximum flavor.
-
Olive Oil: A good drizzle of extra virgin olive oil enhances the richness of the mozzarella and balances the sweetness of the fruit. You can substitute with avocado oil for a different flavor profile.
-
Salt: Just a pinch, please! Salt brings out the flavors of the ingredients and helps them shine. Try flaky sea salt for a gourmet touch.
-
Black Pepper: Freshly cracked black pepper adds a bit of zesty warmth to the salad. For a spicy kick, you can use a bit of crushed red pepper instead.
Step-by-Step Instructions: Let’s Get Cooking!
Alright, my foodie friends, it’s time to roll up your sleeves and jump into the fun of assembling this gorgeous salad. Follow these steps, and you’ll have a masterpiece in no time:
-
Prepare the Ingredients: Start by gathering all your ingredients. Rinse the berries gently under cool water; be careful not to squish them! Pat them dry with a paper towel.
-
Slice the Mozzarella: Carefully slice your fresh mozzarella into bite-sized pieces. Aim for roughly half-inch thick slices—big enough to enjoy but small enough to fit comfortably on your fork. If you’re using burrata, simply break it apart with your fingers; that creamy goodness should be easily accessible!
-
Tear the Basil: Take a handful of fresh basil leaves and tear them into smaller pieces. This helps release their aromatic oils, which enhances the overall flavor of the dish.
-
Assemble the Salad: On a serving platter or in a large bowl, start layering your salad. Begin with a base of sliced mozzarella, then alternate with mixed berries and torn basil leaves. Don’t worry about perfection; this dish is all about showing off cozy, rustic beauty. The colors should shine!
-
Drizzle with Balsamic Glaze and Olive Oil: Now comes the magic touch. Drizzle balsamic glaze over the salad, allowing it to cascade down the mozzarella and berries. Next, add a gentle drizzle of olive oil for that rich mouthfeel. It’s like giving your salad a fashionable coat to wear!
-
Season It Right: Sprinkle a pinch of salt and a few cracks of fresh black pepper over the top. Just enough to elevate those flavors without overpowering the delightful balance.
-
Taste and Adjust: Before serving, give it a little taste test. Adjust seasoning if needed, and maybe add more balsamic or olive oil if you’re feeling fancy. Each bite should excite your taste buds!
-
Serve Immediately: This salad is best enjoyed fresh, so try to serve it right away. If you must make it ahead, keep the dressed salad in the fridge and assemble it just before serving.
As you prepare your Berry Caprese Salad, don’t hesitate to enjoy the process! Chat with someone nearby, sip a tasty drink, and relish the fresh aromas wafting through your kitchen.
Serving Suggestions: Make It a Masterpiece
When it comes to serving this dish, presentation matters just as much as taste! If you’ve assembled it on a platter, simply bring it to the table for a stunning centerpiece. For individual servings, layer each component into clear glasses for a charming effect where guests can see the beautiful colors. This elevates your salad to a culinary art piece!
This salad pairs wonderfully with grilled meats, crusty bread, or can be served as a refreshing side dish at a summer BBQ. Don’t forget about wine! A chilled rosé or Sauvignon Blanc adds to the experience—trust me on this one.
Recipe Variations: Get Creative
This Berry Caprese Salad is a great canvas for your culinary creativity. Here are a few tasty variations to consider:
-
Tropical Twist: Substitute strawberries and blueberries for pineapple and mango for a tropical vibe. The sweetness of the fruit will pair beautifully with the mozzarella.
-
Nuts for Crunch: Toss in some toasted pine nuts or walnuts for an added crunch. They provide a lovely texture while enhancing the flavors.
-
Balsamic Berry Vinaigrette: Whisk together balsamic vinegar, Dijon mustard, and honey for a unique dressing instead of glaze. This lightens up the dish while adding more zing.
-
Spicy Kick: Add thin slices of jalapeño or drizzle some spicy chili oil for those who like it hot! This unexpected twist will surprise and delight your guests.
-
Vegan Delight: Swap out the mozzarella for vegan cheese or marinated tofu. The flavors from the berries and basil will make it a hit for everyone!
Chef’s Notes: A Personal Touch
Every recipe tells a story, and this one is no different! Over the years, I have enjoyed experimenting with flavors and ingredients. One fun memory that stands out was during a cooking class I held in my home. I asked my students to brainstorm exotic berries to include, and we ended up trying out some astonishing combinations like goji berries and raspberries. The twist made it an unforgettable event filled with laughter and new friendships.
It’s important to remember that cooking is a form of self-expression. Each time you make this salad, let your creativity shine! Have fun with it, and never hesitate to try something new.
FAQs and Troubleshooting: Your Burning Questions Answered
-
Can I make this salad ahead of time?
Absolutely! However, I recommend keeping the berries and mozzarella separate from the dressing until you’re ready to serve. If you mix it all, the salad can become soggy, and that’s not what we want! -
What if I can’t find fresh mozzarella?
No worries at all! Feel free to substitute with regular mozzarella cheese or even feta if you’re looking for something a bit tangier. Reminder: the flavor profile will change slightly, but it will still be delicious! -
Is it possible to make this dish low-sugar?
Yes! Simply reduce or eliminate the balsamic glaze in favor of plain balsamic vinegar or a drizzle of olive oil. Focus on letting the natural sweetness of the berries stand out. -
How do I prevent the salad from getting soggy in the fridge?
Store the berries and mozzarella in separate containers from the dressing. When you’re ready to enjoy, toss it together for the freshest taste.
Nutritional Info
While I encourage you to savor each bite without stress, here’s a rough estimate of what you’re indulging in:
- Calories: 230 per serving (This can vary based on quantity and specific ingredients)
- Protein: 10g
- Carbohydrates: 15g
- Fat: 15g
Conclusion
And there you have it! A vibrant, Berry Caprese Salad that not only looks stunning on the plate but also tantalizes your taste buds. I hope you enjoy making it as much as I do! Remember, cooking is all about balance, so feel free to swap and experiment while keeping the essence of this delightful dish alive. Let food be delightful fuel for your life, and share it generously with those you love. Happy cooking!
PrintBerry Caprese Salad

A vibrant and playful salad that combines creamy mozzarella with juicy mixed berries and fresh basil, drizzled with balsamic glaze.
- Prep Time: 15 minutes
- Cook Time: 0 minutes
- Total Time: 15 minutes
- Yield: 4 servings
- Category: Salad
- Method: Assembling
- Cuisine: Italian
- Diet: Vegetarian
Ingredients
- Fresh Mozzarella Cheese
- Mixed Berries (strawberries, blueberries, blackberries, raspberries)
- Fresh Basil Leaves
- Balsamic Glaze
- Olive Oil
- Salt
- Black Pepper
Instructions
- Prepare the Ingredients: Gather all ingredients and rinse berries gently under cool water; pat dry.
- Slice the Mozzarella: Cut fresh mozzarella into bite-sized slices.
- Tear the Basil: Tear basil leaves into smaller pieces to release oils.
- Assemble the Salad: Layer salad starting with mozzarella, followed by mixed berries and basil.
- Drizzle with Balsamic Glaze and Olive Oil: Let glaze cascade over the salad.
- Season It Right: Sprinkle salt and black pepper over the top.
- Taste and Adjust: Adjust seasoning as needed.
- Serve Immediately: Best enjoyed fresh.
Notes
This salad pairs well with grilled meats or crusty bread. For serving, layer ingredients in clear glasses for a charming effect.
Nutrition
- Serving Size: 1 serving
- Calories: 230
- Sugar: 10g
- Sodium: 200mg
- Fat: 15g
- Saturated Fat: 5g
- Unsaturated Fat: 8g
- Trans Fat: 0g
- Carbohydrates: 15g
- Fiber: 3g
- Protein: 10g
- Cholesterol: 30mg
Keywords: salad, berry salad, caprese, fresh ingredients, summer recipe