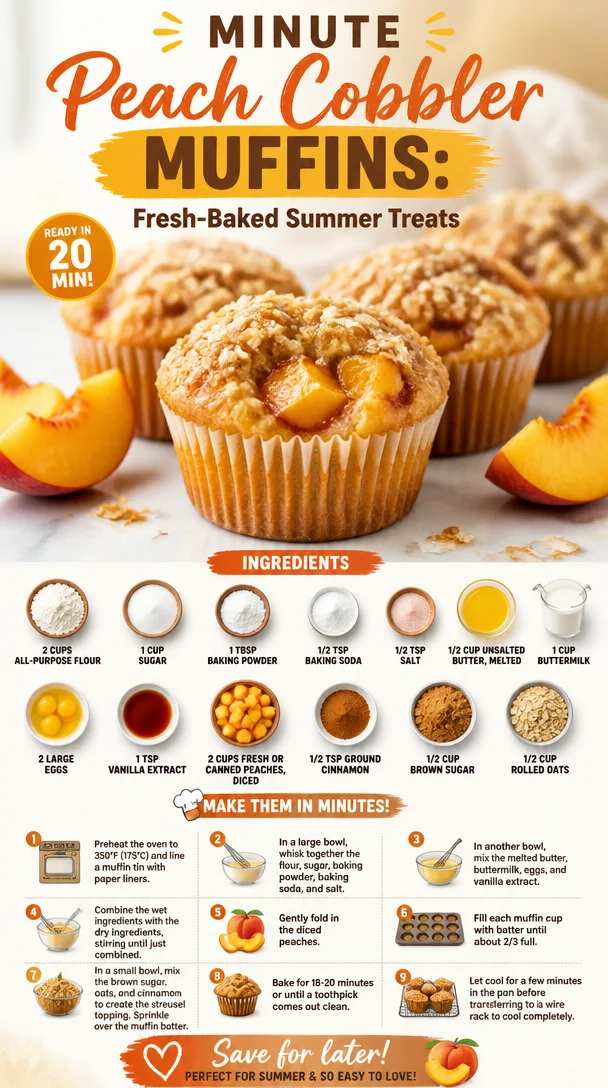
Minute Peach Cobbler Muffins: Fresh-Baked Summer Treats
Homemade Peach Cobbler Muffins: A Sweet Slice of Joy
Hey there, fellow food enthusiasts! Welcome back to Clean Plate Cravings, where each recipe is crafted to bring a bit of sunshine to your plate. Today, we’re diving into a delightful treat that perfectly encapsulates the essence of summer sweetness: Homemade Peach Cobbler Muffins! These muffins blend the comforting flavors of a warm peach cobbler with the easy, delicious nature of a muffin, making them the perfect addition to breakfast or a sweet afternoon snack.
Imagine biting into a warm muffin fresh from the oven, the juicy peaches bursting with flavor and a hint of cinnamon dancing on your taste buds. Seriously, what’s not to love? They are tender, moist, and just sweet enough to make you smile, but they won’t leave you feeling heavy. Plus, they’re quick to whip up, making them an easy go-to for busy mornings or unexpected guests. So grab your apron, and let’s get started!
A Little Slice of Nostalgia
Growing up, my grandmother was the queen of muffins. Whenever I’d visit her house, the aroma of fresh-baked goods would greet me at the door, wrapping me in a warm embrace. One of the highlights of those visits was her famous peach cobbler — the kind that could make your knees weak! She’d often make a hybrid version by baking her cobbler in muffin tins, and I fondly remember hopping onto the counter, my little hands covered in flour, as she taught me all her secret tricks.
Sometimes, we’d even mix in some fresh peaches that we’d picked ourselves at a local orchard. The joy of biting into that first muffin—warm, fluffy, and bursting with luscious peach goodness—was pure bliss. This recipe is my homage to those nostalgic days and the love that went into each delicious bite. Trust me, once you try these muffins, you’ll be transported back to summers spent in a cozy kitchen, laughter, and sweet smiles all around.
Ingredients You’ll Need
To whip up these scrumptious Peach Cobbler Muffins, here’s your shopping list:
-
2 cups all-purpose flour: This will be the base of our muffins. You can substitute with whole wheat flour for a heartier texture, but make sure to adjust the liquid ingredients slightly.
-
1 cup sugar: Sweetness is key! For a healthier alternative, feel free to use coconut sugar or a sugar substitute like stevia—just follow the package equivalents.
-
1 tablespoon baking powder: This leavening agent gets those muffins rising to the occasion!
-
1/2 teaspoon baking soda: A little extra lift!
-
1/2 teaspoon salt: Always a must to enhance the flavors and balance sweetness.
-
1/2 cup unsalted butter, melted: Richness in every bite! You can use coconut oil or vegetable oil if you prefer a dairy-free option.
-
1 cup buttermilk: Adds moisture and a slight tang. If you don’t have buttermilk, mix a cup of milk with a tablespoon of vinegar and let it sit for five minutes.
-
2 large eggs: Helps bind everything together. For a vegan option, you can use flaxseed meal mixed with water.
-
1 teaspoon vanilla extract: Because everything is better with vanilla!
-
2 cups fresh or canned peaches, diced: The star of the show! If using canned peaches, be sure to drain them well.
-
1/2 teaspoon ground cinnamon: For that cozy, warm flavor that pairs beautifully with peaches.
-
1/2 cup brown sugar: A little more depth of flavor. Feel free to go all brown sugar for a richer taste!
-
1/2 cup rolled oats: Adds a wonderful texture and a little heartiness to the muffins.
Step-by-Step Instructions
-
Preheat your oven: Start by preheating your oven to 375°F (190°C). While you’re at it, line a muffin tin with paper liners or lightly grease it with cooking spray for easy removal.
-
Mix the dry ingredients: In a large bowl, whisk together the all-purpose flour, sugar, baking powder, baking soda, salt, and cinnamon. This ensures that the leavening agents are evenly distributed, which is crucial for fluffy muffins.
Chef Tip: Sifting your flour before measuring can help remove any lumps, making for a more tender muffin!
-
Prepare the wet ingredients: In another bowl, combine the melted butter, buttermilk, eggs, and vanilla extract. Whisk until well blended. You want these ingredients to be combined but not over-mixed. It’s all about keeping it light and airy!
-
Combine wet and dry: Pour the wet ingredients into the dry ingredients. Gently mix with a spatula or wooden spoon until just combined. Don’t fret if there are a few lumps; that’s perfectly fine! Overmixing can lead to tough muffins, and nobody wants that.
-
Fold in the peaches: Gently fold in the diced peaches. You want them evenly distributed throughout without smashing them into oblivion. The goal is to have juicy flavor pockets in every bite!
-
Fill the muffin cups: Divide the batter evenly among the muffin tins. Aim to fill each cup about 3/4 full for that perfect bakery-style rise.
Little Chef Hack: If you have a cookie scoop, use it! It makes filling the tins so much easier and mess-free.
-
Add the toppings: In a small bowl, combine the rolled oats and brown sugar for a crunchy topping. Sprinkle a generous amount over each muffin before popping them in the oven.
-
Baking time: Bake in your preheated oven for about 20-25 minutes, or until a toothpick inserted in the center comes out clean. Your kitchen is about to smell heavenly!
Pro Tip: If the tops are browning too quickly, cover them loosely with foil halfway through baking.
-
Cool it down: Once baked, remove the muffins from the oven and allow them to cool in the pan for about 5 minutes before transferring them to a wire rack to cool completely.
Serving Suggestions
These peach cobbler muffins are delightful on their own, but why not elevate the experience? Serve them warm with a pat of butter or drizzle a little honey on top for extra sweetness. Pair them with your favorite coffee or tea, and you’ve got a cozy little afternoon treat! They also make a wonderful breakfast paired with Greek yogurt and fresh fruit.
Recipe Variations
Feeling a little adventurous? Here are a few creative twists you can try out:
-
Berry Fusion: Substitute half the peaches with blueberries or raspberries for a mixed fruit muffin!
-
Spiced Up: Add a dash of nutmeg or allspice along with the cinnamon for a warm, spiced flavor.
-
Nutty Addition: Toss in some chopped pecans or walnuts for a delightful crunch.
-
Coconut Delight: Add some shredded coconut to the batter for a tropical twist.
-
Gluten-Free Goodness: Substitute the all-purpose flour with a 1:1 gluten-free flour blend.
Chef’s Notes
As I experimented with these muffins, I found myself making little tweaks here and there — like the addition of oats and brown sugar for crunch! It’s so satisfying to watch them rise in the oven and smell that peachy goodness wafting through the house. Over the years, I’ve simplified the recipe to make it more approachable, and I think you’ll find it’s just the right balance of easy and rewarding!
And here’s a funny story: the first time I made these muffins for my friends, I accidentally swapped the salt and sugar! Let’s just say it resulted in some very confused expressions. Now, I double-check my measurements—every. Single. Time!
FAQs and Troubleshooting
Q: Can I use frozen peaches instead of fresh?
Absolutely! Just thaw them, pat them dry, and then chop. They’ll add wonderful flavor!
Q: My muffins turned out too dense. What happened?
This can happen if the flour is over-mixed or if there’s too much flour in the batter. Make sure to scoop and level your flour rather than packing it into the measuring cup.
Q: How do I store these muffins?
Store them in an airtight container at room temperature for up to 3 days. For longer storage, you can freeze them for up to 3 months!
Q: Can I make these as mini muffins?
You bet! Just reduce the baking time to around 12-15 minutes, keeping an eye on them to avoid over-baking.
Nutritional Info (if applicable)
While I believe in enjoying treats like these muffins in moderation, if you’re curious about the nutritional content, a muffin typically contains approximately 200 calories, 8 grams of fat, and 3 grams of protein, depending on the specific ingredients used. The health benefits of peaches and oats add extra fiber and vitamins, making them a smart choice for a snack!
So there you have it! Homemade Peach Cobbler Muffins that are sure to delight your taste buds and warm your soul. I hope you enjoy making and sharing these as much as I do. Happy baking, my friends!
PrintHomemade Peach Cobbler Muffins

Delightful muffins blending the comforting flavors of peach cobbler with the convenience of a muffin, perfect for breakfast or a sweet snack.
- Prep Time: 15 minutes
- Cook Time: 25 minutes
- Total Time: 40 minutes
- Yield: 12 servings 1x
- Category: Snack
- Method: Baking
- Cuisine: American
- Diet: Vegetarian
Ingredients
- 2 cups all-purpose flour
- 1 cup sugar
- 1 tablespoon baking powder
- 1/2 teaspoon baking soda
- 1/2 teaspoon salt
- 1/2 cup unsalted butter, melted
- 1 cup buttermilk
- 2 large eggs
- 1 teaspoon vanilla extract
- 2 cups fresh or canned peaches, diced
- 1/2 teaspoon ground cinnamon
- 1/2 cup brown sugar
- 1/2 cup rolled oats
Instructions
- Preheat your oven to 375°F (190°C) and prepare a muffin tin.
- Mix the dry ingredients in a large bowl: flour, sugar, baking powder, baking soda, salt, and cinnamon.
- Prepare the wet ingredients in another bowl: combine melted butter, buttermilk, eggs, and vanilla extract.
- Combine the wet ingredients with the dry until just mixed.
- Fold in the diced peaches gently.
- Fill the muffin cups about 3/4 full with the batter.
- Add a mixture of rolled oats and brown sugar on top of each muffin.
- Bake for 20-25 minutes, or until a toothpick comes out clean.
- Cool in the pan for 5 minutes, then transfer to a wire rack.
Notes
Serve warm with butter or honey for an extra treat. Can also be paired with coffee or yogurt.
Nutrition
- Serving Size: 1 muffin
- Calories: 200
- Sugar: 10g
- Sodium: 180mg
- Fat: 8g
- Saturated Fat: 5g
- Unsaturated Fat: 3g
- Trans Fat: 0g
- Carbohydrates: 30g
- Fiber: 2g
- Protein: 3g
- Cholesterol: 30mg
Keywords: peach, muffins, dessert, baking, summer recipes
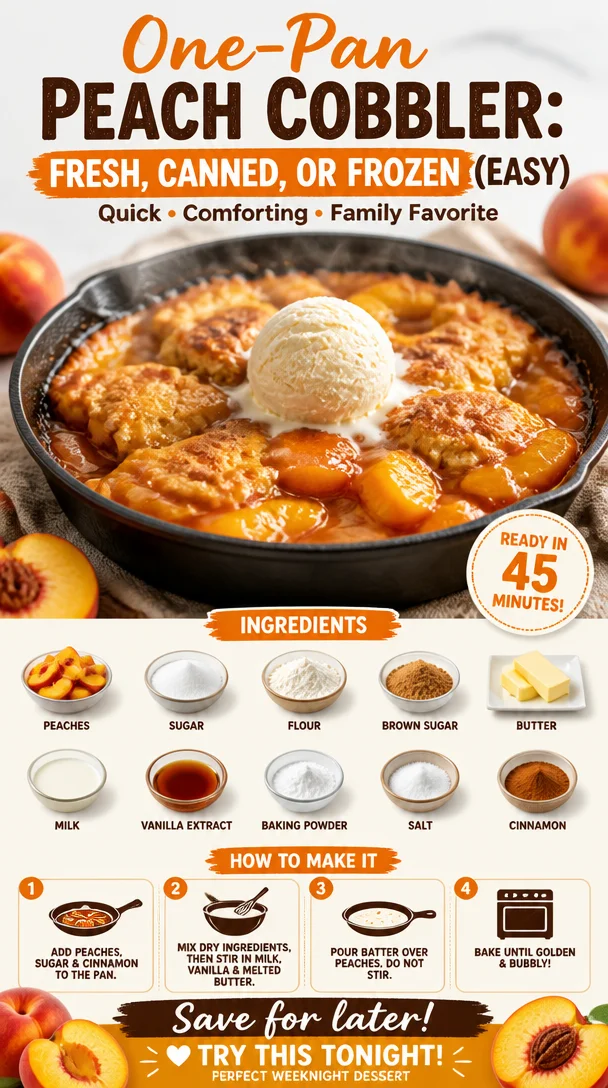
One-Pan Peach Cobbler: Fresh, Canned, or Frozen (Easy)
The Ultimate Homemade Peach Cobbler Recipe: A Sweet Slice of Nostalgia
Ah, peach cobbler. The very mention of it can transport you back to those sunny afternoons of your childhood, where the air was thick with laughter, sweet summer breezes, and the tantalizing aroma of baked peaches wafting through the kitchen. If your mouth is already watering, you’re in good company! Whether you’re using fresh, canned, or frozen peaches, this homemade peach cobbler recipe is a delightful way to embrace that nostalgia while creating a dish that will have everyone swooning.
Now, I can’t emphasize enough how this recipe is not just about throwing some peaches in a dish and slapping a crust on top. Oh no, my friends, this is about crafting a love letter to summer. My journey with peach cobbler started in my grandmother’s kitchen, where she would pull out her old, worn cookbook and remind me that the secret to a perfect cobbler is all about balance—sweetness, warmth, and that irresistible flaky crust that crumbles just right.
Some of my fondest memories are tied to helping her prepare this dish, learning the art of patience as we let those peaches marinate with a sprinkle of sugar, and watching them transform into a bubbling, golden masterpiece in the oven. So, while you’re mixing, baking, and savoring, know that you’re not just whipping up dessert; you’re creating memories, just like I did with my beloved grandma.
And here’s the best part: You can enjoy this peach cobbler no matter the season! Using fresh peaches in summer or those frozen gems straight out of your freezer makes it a year-round staple. Ready to dig into this deliciousness? Let me share the simple steps you need to create your own peach cobbler masterpiece!
Ingredients
-
Peaches (fresh, canned, or frozen): Use about 4 cups for this recipe. Fresh peaches are amazing in summer, but if you have canned or frozen on hand, they work just as well. If using frozen, let them thaw but don’t drain the juices—who doesn’t love a little extra peachy goodness?
-
Granulated sugar: About ¾ cup for sweetening the peaches and enhancing their natural flavors. You can adjust this based on the sweetness of your peaches or swap for coconut sugar for a healthier twist.
-
All-purpose flour: You’ll need 1 cup for the cobbler topping. Gluten-free flour blends can substitute here. Just be sure to check that they have xanthan gum for proper binding!
-
Baking powder: 2 teaspoons is what we’ll need to give our crust a nice rise. Make sure it’s fresh for the best results!
-
Salt: A pinch (about ¼ teaspoon) will enhance the flavors in both the peaches and the topping. It’s magic, I tell you!
-
Milk: ½ cup of milk (dairy or plant-based) will bring everything together in our cobbler batter. Almond or oat milk works beautifully if you’re dairy-free.
-
Butter: ½ cup (1 stick), melted. Butter makes everything better! If you prefer oil, coconut oil is a great alternative, just be sure it’s melted too.
-
Vanilla extract: 1 teaspoon adds that extra layer of flavor. Feel free to get creative with other extracts like almond or even a hint of cinnamon.
Step-by-Step Instructions
-
Preheat your oven: Start by preheating your oven to 375°F (190°C). This allows the peach cobbler to bake evenly and ensures you get that golden-brown crust.
-
Prepare the peaches: In a mixing bowl, toss your prepared peaches with ½ cup of sugar. If you’re using fresh peaches, peel, slice, and dice them. For frozen peaches, just let them thaw until they can be cut into manageable slices. Let this mixture sit while the sugar works its magic to draw out the juices—about 15 minutes is perfect.
-
Make the batter: In another bowl, whisk together the flour, remaining sugar, baking powder, and salt. This dry mix is the base of your topping. Then, gradually whisk in the milk and melted butter (and vanilla extract if you’re using it) until everything is smooth and combined. Don’t overmix; it’s okay if there are a few lumps!
-
Combine fruit and batter: Pour the peach mixture into a greased baking dish (about 9×13 inches works great) and then gently spoon your batter over the top. You want those bubbling juices to peek through the batter without completely mixing.
-
Bake it up: Slide your cobbler into the oven, and bake for about 30-40 minutes, or until the topping is golden brown and a toothpick inserted comes out clean. Keep an eye on it—if the edges start to darken too quickly, you can tent it with foil.
-
Cool and serve: Once it’s out of the oven, let it cool for about 15 minutes before serving. This helps the juices set a bit, but let’s be real—it’s hard to resist digging in right away!
Serving Suggestions
Serve this peach cobbler warm with a generous scoop of vanilla ice cream or a dollop of whipped cream for the ultimate indulgence. If you’re feeling fancy, sprinkle some toasted almonds or pecans on top for a lovely crunch. It’s also delightful with a drizzle of caramel sauce or a sprinkle of cinnamon for extra warmth!
Recipe Variations
-
Berry Peach Cobbler: Mix in some fresh or frozen blueberries or raspberries for a delightful burst of flavor.
-
Spicy Peach Cobbler: Add a teaspoon of cinnamon and a pinch of nutmeg to the peach mixture for a seasonal twist that warms up those cozy evenings.
-
Coconut Peach Cobbler: Substitute half the milk for coconut milk, and sprinkle shredded coconut on top for a tropical vibe.
-
Oat Topping: Swap half of the flour for rolled oats to create a chewy, hearty topping that adds texture and nutrition.
Chef’s Notes
This peach cobbler recipe has seen its fair share of evolution in my kitchen over the years. What started as a classic dish has transformed into a vehicle for creativity. I can’t tell you how many times I’ve mixed fruits or added unexpected spices just to see what would happen! Some experiments turned into instant favorites.
My funniest kitchen story with peach cobbler involves using lavender instead of vanilla once—I thought I was being inventive but ended up with a very floral dessert! It was a polite "no, thank you" from my friends that day. Now I stick with beloved flavors but still keep that spirit of experimentation alive.
FAQs and Troubleshooting
1. My cobbler topping is too dense. What went wrong?
- This could be due to overmixing the batter. Aim for a lumpy but uniform batter—mix just until you combine. Too much mixing can lead to gluten development, making your topping dense.
2. How do I know when it’s done?
- The cobbler is finished when the top is golden brown, and the juices are bubbling around the edges. A toothpick inserted into the center of the topping should come out clean or with a few moist crumbs (not wet batter).
3. Can I make this ahead?
- Yes! You can prepare it a few hours in advance and keep it covered in the fridge before baking. Just add about 5-10 minutes to the baking time if baking straight from the fridge.
4. What if I don’t have any peaches?
- No problem! You can substitute with almost any fruit you like, such as apples, cherries, or even mixed frozen berries. Just adjust the sugar according to the sweetness of the fruit.
Nutritional Info
While peach cobbler is definitely a treat, it can be made a bit healthier without losing any of its deliciousness! Each serving (assuming 9 servings from the above recipe) contains approximately:
- Calories: 250
- Protein: 3g
- Carbohydrates: 38g
- Fat: 10g
- Fiber: 2g
And there you have it—a sweet slice of nostalgia that’s easy to recreate no matter the time of year. So gather up those peaches, call your friends and family, and make some memories with this fabulous peach cobbler! Happy cooking! 🍑✨
PrintUltimate Homemade Peach Cobbler
A delightful and nostalgic peach cobbler recipe, perfect for any season using fresh, canned, or frozen peaches.
- Prep Time: 15 minutes
- Cook Time: 40 minutes
- Total Time: 55 minutes
- Yield: 9 servings 1x
- Category: Dessert
- Method: Baking
- Cuisine: American
- Diet: Vegetarian
Ingredients
- 4 cups peaches (fresh, canned, or frozen)
- ¾ cup granulated sugar
- 1 cup all-purpose flour
- 2 teaspoons baking powder
- ¼ teaspoon salt
- ½ cup milk (dairy or plant-based)
- ½ cup butter, melted
- 1 teaspoon vanilla extract
Instructions
- Preheat your oven to 375°F (190°C).
- Prepare the peaches by tossing them with ½ cup of sugar in a mixing bowl.
- Make the batter by whisking together flour, remaining sugar, baking powder, and salt, then gradually whisk in milk and melted butter.
- Combine the peach mixture with the batter by pouring the peaches into a greased baking dish and spooning the batter over the top.
- Bake for about 30-40 minutes or until the topping is golden brown.
- Cool for about 15 minutes before serving.
Notes
Serve warm with vanilla ice cream or whipped cream for the ultimate treat. Feel free to mix in other fruits or spices for variations.
Nutrition
- Serving Size: 1 serving
- Calories: 250
- Sugar: 10g
- Sodium: 150mg
- Fat: 10g
- Saturated Fat: 6g
- Unsaturated Fat: 3g
- Trans Fat: 0g
- Carbohydrates: 38g
- Fiber: 2g
- Protein: 3g
- Cholesterol: 30mg
Keywords: peach cobbler, dessert, summer recipe, baked dessert, nostalgic dessert
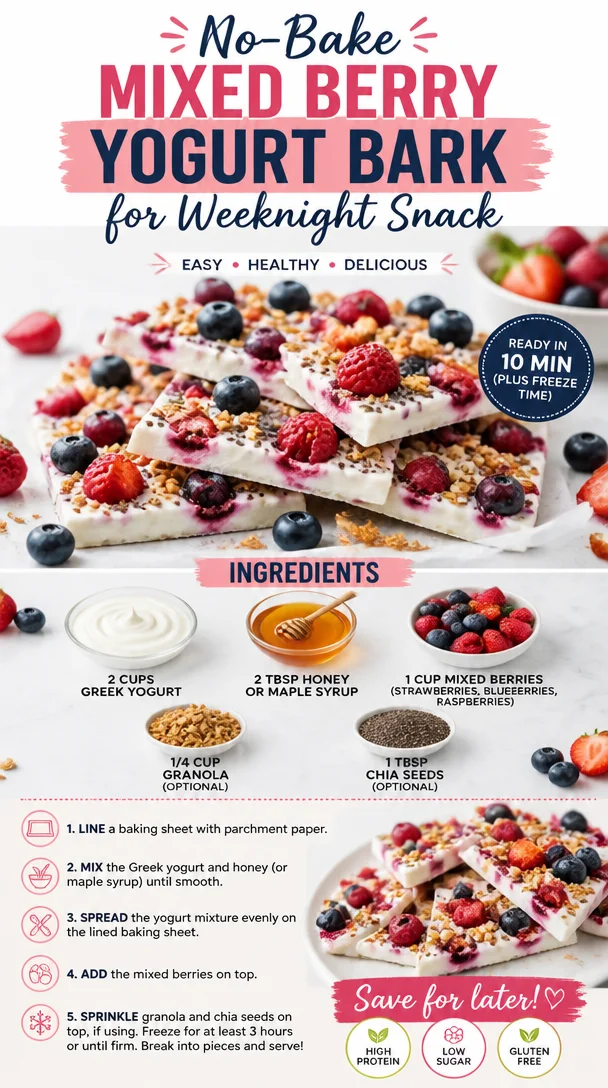
No-Bake Mixed Berry Yogurt Bark for Weeknight Snack
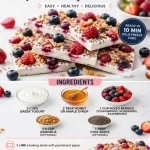
Mixed Berry Yogurt Bark: A Sweet Treat for the Soul
Hey there, fellow food enthusiasts! If there’s one thing I’ve learned in my culinary journey, it’s that some of the simplest recipes bring the most joy. Today, we’re diving into a vibrant and refreshing treat that’s perfect for any time of day: Mixed Berry Yogurt Bark. This recipe is not just about satisfying your sweet tooth; it’s also about nourishing your body and spirit.
Now, whether you’re a busy mom looking for a quick snack for the kiddos, a college student needing a brain boost during finals, or someone who simply adores the fresh taste of summer berries, this yogurt bark is here to save the day! It’s creamy, fruity, a little crunchy—and oh-so-Instagrammable.
A Nostalgic Kitchen Memory
Every time I whip up this Mixed Berry Yogurt Bark, I’m reminded of sunny afternoons in my grandma’s kitchen. On those lazy summer days, we would set out blankets in the backyard, spread them with delicious snacks, and enjoy the fresh fruits of the season. I remember helping her make desserts, blending flavors and colors in a way that made the food irresistible.
One summer, we concocted a berry parfait layered with yogurt and topped with crunchy nuts. The flavors burst in my mouth, igniting a childhood joy that never fades. It was during those joyful moments that I learned that good cooking is rooted in love and simplicity. This yogurt bark captures that same spirit: easy to make, delightful to eat, and best of all, it invites you to experiment and make it your own.
So grab your apron and let’s get started on this delicious journey!
Ingredients
Here’s what you’ll need to create this berry-licious yogurt bark:
-
2 cups Greek yogurt
Greek yogurt is rich, creamy, and packed with protein, making it a great base for our bark. For a lighter option, you can substitute with regular yogurt or even coconut yogurt for a dairy-free version. -
2 tablespoons honey or maple syrup
This natural sweetener will add just the right amount of sweetness without overpowering the fresh flavors of the berries. You can easily swap this for agave nectar or date syrup if you prefer a different flavor profile. -
1 cup mixed berries (strawberries, blueberries, raspberries)
Fresh or frozen, these tiny gems are bursting with antioxidants and vitamins. If you’re out of fresh berries, feel free to use dried fruit—just keep in mind that it will create a different texture. -
1/4 cup granola (optional)
For a delightful crunch, sprinkle in some granola! You can use your favorite variety, whether it’s nutty, fruity, or even a chocolate granola for a sweet twist. -
1 tablespoon chia seeds (optional)
These little seeds are powerhouses of nutrients and will help to thicken the yogurt, adding an extra health boost. If chia isn’t your thing, flax seeds or even crushed nuts are wonderful substitutes!
Step-by-Step Instructions
Ready to make your own Mixed Berry Yogurt Bark? Let’s dive into the steps!
-
Prepare Your Baking Sheet
Start by lining a baking sheet with parchment paper. This will help the yogurt bark come off easily once it’s frozen, and it also prevents sticking. Plus, using parchment paper makes cleanup a breeze! -
Mix the Yogurt and Sweetener
In a mixing bowl, combine 2 cups of Greek yogurt with 2 tablespoons of honey (or maple syrup). Whisk it together until it’s smooth and creamy. Pro tip: If you’re looking for a little zing, try adding a splash of vanilla extract or a sprinkle of cinnamon—it elevates the flavor beautifully! -
Spread It Out
Spoon the yogurt mixture onto the prepared baking sheet. Using a spatula, gently spread it out into an even layer about half an inch thick. Don’t stress over perfection—this bark is all about a homemade touch! -
Add the Berries
Next, scatter your cup of mixed berries across the yogurt layer. Feel free to get creative—mix the colors and sizes for a stunning visual appeal. Press them down lightly to ensure they stick when frozen. -
Sprinkle on the Crunch
If you’ve chosen to use granola, now’s the time to sprinkle it over the top along with the chia seeds. It’ll add that delightful crunch we all love. Just be sure not to overcrowd; less is often more! -
Freeze
Carefully place the baking sheet in your freezer and let it freeze for at least 3–4 hours, or until the yogurt is completely firm. This is the perfect time to whip up a quick salad or admire your handiwork! -
Break It Up
Once frozen, take the baking sheet out and let it sit at room temperature for a few minutes to soften slightly. This makes it easier to break into pieces. Use a sharp knife to cut, or just use your hands to break it into fun, rustic shapes!
Serving Suggestions
This Mixed Berry Yogurt Bark is best enjoyed straight out of the freezer! Feel free to plate it up for a charming snack or even serve it as a dessert. If you want to take things up a notch, drizzle a little extra honey or chocolate sauce over the top for an indulgent finish. You can also garnish with fresh mint leaves for that pop of color and freshness.
Recipe Variations
Want to experiment? Here are some exciting ideas to customize your yogurt bark:
-
Tropical Twist: Swap out the mixed berries for tropical fruits like mango, pineapple, and kiwi. Add a splash of coconut milk for a tropical flavor.
-
Nutty Delight: Mix in crushed nuts—like almonds or walnuts—into the yogurt before spreading it on the baking sheet for a nutty flavor explosion.
-
Chocolate Lovers: Drizzle melted dark chocolate over the yogurt before freezing for a deliciously decadent treat.
-
Seasonal Flavors: Try using seasonal fruits; peaches in summer or cranberries in the fall will provide a new gorgeous color and a hint of flavor adjustment.
-
Plant-Based Option: Make this recipe vegan by opting for plant-based yogurt and maple syrup as your sweetener, ensuring everyone can enjoy this treat!
Chef’s Notes
Creating this yogurt bark has been a delightful journey in my kitchen. I love how it has become a staple snack in my household, whether it’s a quick breakfast for me on busy mornings or a delightful treat for friends who stop by. Over the years, I’ve played around with different flavor combos and toppings, discovering that the sky’s the limit with this recipe! My kids especially love it because we can all collaborate on selecting our favorite toppings—it’s a fun family activity, and it’s an easy way to involve them in the kitchen.
FAQs and Troubleshooting
-
What if I can’t find Greek yogurt?
No problem! You can easily substitute regular yogurt, but the texture may be a bit thinner. If you like it firmer, you can strain it through a cheesecloth to get that thicker consistency. -
Can I use frozen berries?
Absolutely! Frozen berries can be used. Just keep in mind they may release extra moisture. If so, you might want to blot them dry before using to prevent the bark from becoming too watery. -
How should I store leftovers?
Store any leftovers in an airtight container in the freezer for up to two weeks. They can get a bit icy, so you might let them sit out for a couple of minutes before enjoying them again. -
My yogurt bark turned out too soft. What happened?
If your yogurt bark doesn’t freeze well, it might be due to extra moisture or not freezing long enough. Make sure to spread it evenly and allow sufficient freezing time.
Nutritional Info
While this recipe is flexible, here’s a rough estimate per serving (based on one piece out of eight):
- Calories: 150
- Protein: 5g
- Carbohydrates: 20g
- Sugars: 7g
- Fat: 6g
Conclusion
And there you have it—your very own Mixed Berry Yogurt Bark! This refreshing treat is not only a feast for the eyes but also a delight for the taste buds. It’s versatile, satisfying, and a fantastic option for a snack or dessert. So the next time you’re in the kitchen, remember this recipe, and let those fresh flavors inspire you. Happy cooking and enjoy every single bite!
PrintMixed Berry Yogurt Bark
A vibrant and refreshing yogurt bark filled with mixed berries for a healthy and delightful treat.
- Prep Time: 15 minutes
- Cook Time: 240 minutes
- Total Time: 255 minutes
- Yield: 8 servings 1x
- Category: Snack
- Method: Freezing
- Cuisine: American
- Diet: Vegetarian
Ingredients
- 2 cups Greek yogurt
- 2 tablespoons honey or maple syrup
- 1 cup mixed berries (strawberries, blueberries, raspberries)
- 1/4 cup granola (optional)
- 1 tablespoon chia seeds (optional)
Instructions
- Prepare your baking sheet by lining it with parchment paper.
- Mix the Greek yogurt and honey (or maple syrup) in a mixing bowl until smooth.
- Spread the yogurt mixture onto the prepared baking sheet into an even layer.
- Add the mixed berries across the yogurt layer, pressing them down lightly.
- Sprinkle granola and chia seeds on top if using.
- Freeze for at least 180-240 minutes, or until firm.
- Break into pieces once frozen and enjoy!
Notes
This yogurt bark is best enjoyed straight out of the freezer and can be customized with various fruits and toppings.
Nutrition
- Serving Size: 1 piece
- Calories: 150
- Sugar: 7g
- Sodium: 50mg
- Fat: 6g
- Saturated Fat: 3g
- Unsaturated Fat: 2g
- Trans Fat: 0g
- Carbohydrates: 20g
- Fiber: 2g
- Protein: 5g
- Cholesterol: 15mg
Keywords: yogurt bark, healthy snack, mixed berries, easy dessert, frozen treat
Easy Banana Magic Cake
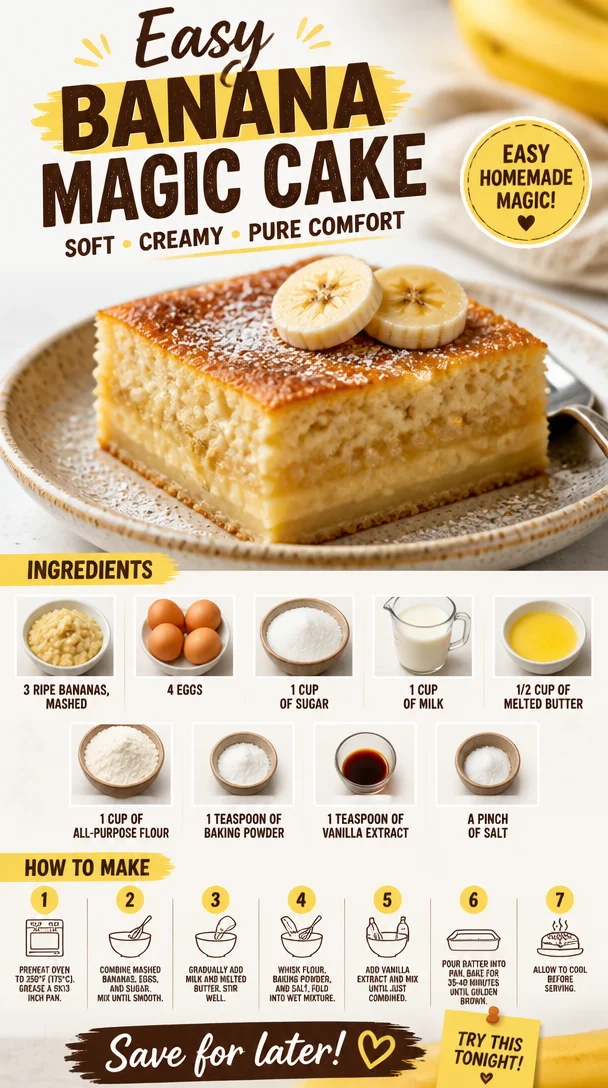
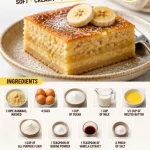
Easy Banana Magic Cake
Welcome back, food lovers! Today, I’ve got a special treat that’s bound to awaken your inner bakery wizard: the Easy Banana Magic Cake! If you’ve ever had one of those days when you’re craving something sweet but don’t want to spend hours in the kitchen, this cake is for you. It’s super simple, ridiculously delicious, and—best of all—it requires ingredients you probably already have at home. So, roll up your sleeves, put on that apron, and let’s dive into this banana-infused goodness together!
Introduction
Have you ever had one of those days where everything seems to call for a dose of comfort? You know the kind—where the sun may be shining, but you’re craving something warm and sweet that wraps you in cozy nostalgia? For me, that’s where this Easy Banana Magic Cake comes into play!
Imagine a cake that’s just the right amount of fluffy, with light layers that melt in your mouth. The moment you’re graced with the aroma wafting through your kitchen, you’ll feel the stresses of the day melt away. There’s just something magical about bananas, isn’t there? Growing up, my mother would always make banana bread with the overripe bananas that no one wanted to eat. But I wanted to take that beloved family recipe and transform it into something just as comforting but with a fun twist!
This cake isn’t just another banana treat; it’s a delightful contrast of creamy and light, creating the perfect balance of sweetness. The best part? You can whip it up in no time! Whether you’re serving it for brunch, dessert, or just for yourself with a cup of coffee, this cake is sure to be a hit for anyone who takes a bite. So let’s sprinkle a bit of magic into our kitchens and create a sweet masterpiece today!
Personal Story
Growing up, my family had a knack for good food and even better stories. There was this one summer afternoon when my cousin and I decided to have a banana cake baking competition. I vividly remember racing against the clock, trying to mash bananas with the fervor of a professional chef while she was nonchalantly tossing hers into the bowl. The house was filled with laughter, flour explosions, and a bit of friendly rivalry.
We ended up creating banana cakes that were so different but equally delicious. I remember the taste of my creation; it was soft, airy, and enough to make anyone smile! That day was more than just about baking; it was about shared memories, laughter, and the joy of creating something with love. That spirit, that warmth—that’s what I strive to capture in every recipe I share. Fast forward to today, and I find myself recreating that deliciousness with this Easy Banana Magic Cake.
Ingredients
Let’s break down the key players in this delightful cake, shall we? Here’s what you’ll need:
-
3 Ripe Bananas: Mashed to create a luscious base. The riper the bananas, the sweeter and more flavorful your cake will be. If you’re in a pinch, you can substitute them with unsweetened applesauce (about 1 cup) for a different flavor!
-
4 Eggs: These are essential for binding the ingredients and adding richness. If you’re looking for a vegan swap, 1/4 cup of unsweetened flaxseed meal mixed with 3/4 cup of water works like a charm!
-
1 Cup of Sugar: This sweetness helps achieve a delectable caramelization while baking. If you’re looking for a healthier alternative, coconut sugar or honey can be used, but keep in mind that quantity adjustments might be necessary.
-
1 Cup of Milk: This adds moisture to the cake. If you’re dairy-free, almond milk or oat milk will work beautifully!
-
1/2 Cup of Melted Butter: For that rich, buttery flavor. If you need to make it dairy-free, coconut oil or vegan butter is a fantastic substitute.
-
1 Cup of All-Purpose Flour: This provides structure. Whole wheat flour can give it a lovely nuttiness, though it may alter the texture slightly.
-
1 Teaspoon of Baking Powder: Our loyal leavening agent! If you’re out, you can use 1/3 teaspoon of baking soda combined with 2/3 teaspoon of cream of tartar.
-
1 Teaspoon of Vanilla Extract: This brings out the flavors and adds an aromatic touch. If you’re feeling adventurous, almond extract can provide a lovely twist!
-
A Pinch of Salt: Just enough to balance the sweetness and amplify all those delicious flavors.
Step-by-Step Instructions
Now that we’ve gathered all our ingredients, let’s dive into the cooking magic!
-
Preheat Your Oven: First things first, preheat your oven to 350°F (175°C). This is key as it ensures an even bake.
-
Prepare Your Baking Pan: Grease a 9×13-inch baking dish with a bit of butter or oil—nothing fancy, just enough to prevent sticking. You can also line it with parchment paper for an easy release!
-
Mash the Bananas: In a large mixing bowl, mash those ripe bananas until they’re smooth and creamy. Leave some small chunks if you like a bit of texture, but the smoother, the better if you want that melt-in-your-mouth vibe.
-
Whisk the Eggs: In a separate bowl, crack in the eggs and whisk until they’re light and frothy. This incorporates air, which helps with the fluffiness of your cake.
-
Combine Sugar and Wet Ingredients: Add the sugar, milk, melted butter, and vanilla to the eggs, whisking until everything is combined. The mixture should be smooth and slightly thick.
-
Mix Wet and Dry Together: Gradually add in the mashed bananas. Now, sprinkle the flour, baking powder, and salt over the wet mixture. Fold everything together with a spatula until just combined. Be careful not to overmix—it’s okay if there are a few lumps!
-
Pour it Into the Baking Dish: Gently pour the batter into your prepared baking dish. Give it a little jiggle to level it out!
-
Bake to Perfection: Pop it in the oven and let it bake for about 30-40 minutes. Your kitchen will start to smell heavenly! Keep an eye on it after around 30 minutes; it’s done when a toothpick inserted in the center comes out clean.
-
Cool and Serve: Once baked, allow the cake to cool in the pan for about 10 minutes before transferring it to a wire rack to cool completely. Trust me, the wait is worth it!
Serving Suggestions
When it comes to serving this Easy Banana Magic Cake, the choices are limitless! You can simply slice it up and serve it as is, or sprinkle some powdered sugar on top for an elegant touch. For an extra indulgence, pair it with a dollop of whipped cream or a scoop of vanilla ice cream on the side. Drizzle some caramel sauce over it, and you’ll have dessert perfection right there!
Recipe Variations
Now, let’s chat about how you can get creative with this recipe:
-
Nutty Banana Magic Cake: Add 1 cup of chopped walnuts or pecans into the batter for a delightful crunch!
-
Choco-Banana Delight: Toss in a cup of chocolate chips for a decadent twist that will make your heart skip a beat.
-
Coconut Banana Magic Cake: Add 1/2 cup of shredded coconut for a tropical flair that brings a whole new level of yum!
-
Spicy Banana Magic Cake: Want to give it a kick? A teaspoon of cinnamon or a dash of nutmeg will warm things up beautifully.
-
Gluten-Free Option: Substitute the all-purpose flour with a gluten-free flour blend! Just make sure it includes xanthan gum for the right texture.
Chef’s Notes
Making this Easy Banana Magic Cake has become a cherished tradition in my home. I love experimenting with different variations each time! You can truly be as creative as you want—whether you want to keep it classic or go wild with flavor combos. One time I made it with peanut butter swirl, which was an absolute game-changer! Just swirl some peanut butter into the batter before baking for a rich, nutty flavor.
Oh, and I can’t forget the times when I’ve used it as a base for birthday cakes—just layer it with frosting, and voilà! You’ve got yourself a showstopper.
FAQs and Troubleshooting
-
What should I do if my cake is too dense?
- A dense cake often means it was overmixed or overbaked. Be sure to mix until just combined and check the cake for doneness early!
-
Can I use frozen bananas?
- Absolutely! Just make sure to thaw them completely and drain any excess water before mashing. Frozen bananas are often more flavorful!
-
What can I do with leftovers?
- Store it in an airtight container at room temperature for up to 3 days or refrigerate it for a week. It also freezes beautifully—just wrap it tightly!
-
What can I do if I don’t have baking powder?
- You can make a DIY replacement using 1/4 teaspoon of baking soda mixed with 1/2 teaspoon of vinegar or lemon juice as a leavening agent.
Nutritional Info (Optional)
While I don’t usually focus on numbers, it’s always nice to know! Each serving of this Easy Banana Magic Cake has approximately:
- Calories: 210
- Carbohydrates: 30g
- Fat: 8g
- Protein: 3g
- Sugar: 12g
Remember, it’s all about balance! This cake is a treat, so savor every bite!
And there you have it, my fellow foodies! Your kitchen adventure awaits with this Easy Banana Magic Cake. I can’t wait for you to take your first bite and share it with loved ones. Remember, food brings us together—let’s make it magical! Happy baking!
PrintEasy Banana Magic Cake
A fluffy and delightful banana-infused cake that’s easy to make and perfect for any occasion.
- Prep Time: 15 minutes
- Cook Time: 30 minutes
- Total Time: 45 minutes
- Yield: 8 servings 1x
- Category: Dessert
- Method: Baking
- Cuisine: American
- Diet: Vegetarian
Ingredients
- 3 Ripe Bananas, mashed
- 4 Eggs
- 1 Cup of Sugar
- 1 Cup of Milk
- 1/2 Cup of Melted Butter
- 1 Cup of All-Purpose Flour
- 1 Teaspoon of Baking Powder
- 1 Teaspoon of Vanilla Extract
- A Pinch of Salt
Instructions
- Preheat your oven to 350°F (175°C).
- Prepare a 9×13-inch baking dish with grease or parchment paper.
- Mash the ripe bananas in a large mixing bowl.
- Whisk the eggs in a separate bowl until light and frothy.
- Combine sugar, milk, melted butter, and vanilla with the eggs, whisking until smooth.
- Mix in the mashed bananas, then fold in the flour, baking powder, and salt until just combined.
- Pour the batter into the prepared baking dish.
- Bake for 30-40 minutes until a toothpick comes out clean.
- Cool in the pan for 10 minutes before transferring to a wire rack.
Notes
For variations, consider adding nuts, chocolate chips, or a swirl of peanut butter for extra flavor.
Nutrition
- Serving Size: 1 serving
- Calories: 210
- Sugar: 12g
- Sodium: 150mg
- Fat: 8g
- Saturated Fat: 4g
- Unsaturated Fat: 4g
- Trans Fat: 0g
- Carbohydrates: 30g
- Fiber: 1g
- Protein: 3g
- Cholesterol: 70mg
Keywords: banana cake, easy dessert, baking, comfort food
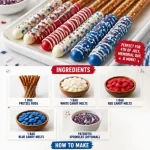
Patriotic Pretzel Rods
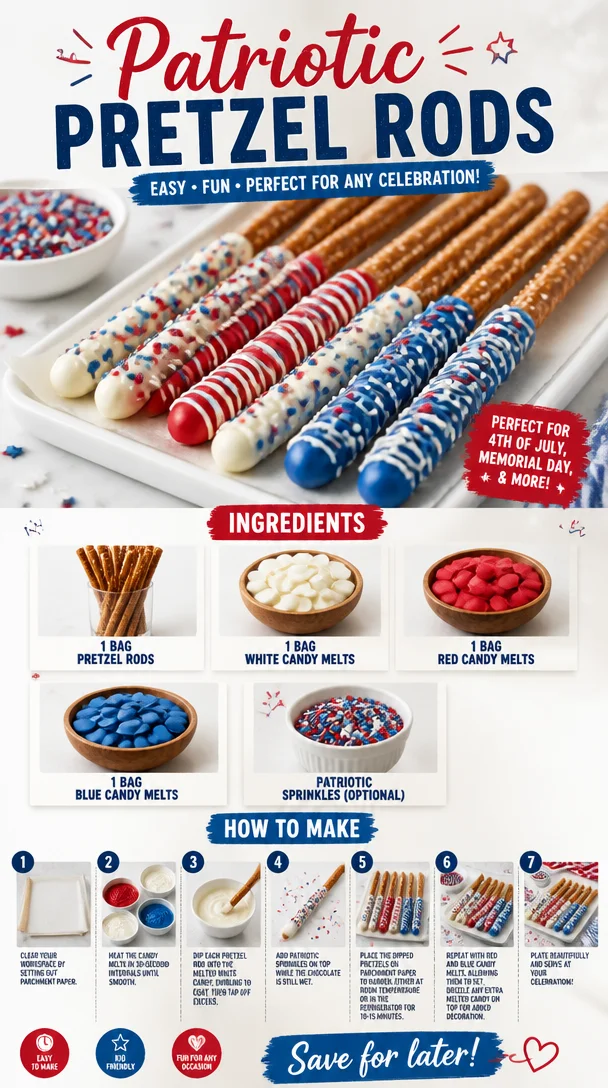
Patriotic Pretzel Rods: A Perfect Treat for Any Celebration!
Welcome, foodies! Today, we’re diving into a fun and festive treat that’s not only tasty but also incredibly easy to whip up. If you’re looking to add a splash of color and crunch to your next gathering, look no further than these delightful Patriotic Pretzel Rods! Whether it’s the Fourth of July, Memorial Day, or any day you want to feel that star-spangled spirit, these treats are sure to impress.
So, what makes these pretzel rods so special? First off, let’s talk about texture. You’ve got the satisfying crunch of the pretzel paired with the smooth, creamy coating of candy melts. And then there’s the color! Striking red, white, and blue hues make these treats a visual feast—perfect for snapping a quick photo before they disappear! They’re easy to make, easy to customize, and even the kiddos can join in on the fun.
But wait—let’s not get ahead of ourselves! Before we jump into the kitchen to start dipping and decorating, let me share a little story about how these delightful snacks came to be one of my go-to treats for any Americana-themed celebration.
A Sweet Memory with Patriotic Vibes
I’ll never forget the first time I made these Patriotic Pretzel Rods. It was a warm summer evening, and my family was gearing up for our annual Fourth of July barbecue. My mom was busy grilling and my dad was flipping burgers while I rummaged through our pantry. I wanted to bring something fun to the table, something that would jazz up the dessert spread. That’s when I spotted a bag of pretzel rods peeking out from behind a box of old recipes.
With a flash of inspiration and a little bit of nostalgia, I pulled out the candy melts I had left over from a birthday party last year and decided to play around. I melted the white candy melts first, dipping the pretzel rods in smoothly and letting them cool before using red and blue candy melts to create fun designs. Then came the sprinkles—a must for that adorable festive flair!
As I presented my creation to my family, I felt a wave of excitement as we all gathered around the dessert table. Those crunchy, colorful rods quickly became a hit! Everyone loved the combination of sweet and salty, and the laughter and smiles that filled the air made it a memory I cherish to this day. And ever since then, these Patriotic Pretzel Rods have become a staple at all our summer get-togethers.
Now, it’s your turn to create that same joy! Let’s get our hands a little messy and dive into making these adorable snacks. Ready? Let’s go!
Ingredients
For this delicious and colorful treat, you’ll need just a handful of ingredients. Here’s what you’ll need:
-
1 bag pretzel rods
- These are the star of our show! Their long, crunchy shape makes them perfect for dipping and decorating. If you can’t find pretzel rods, you can use pretzel twists for a fun twist on this recipe.
-
1 bag white candy melts
- These creamy morsels serve as the base for our colorful designs. White chocolate will work in a pinch if you don’t have candy melts. Just be careful not to overheat it when melting!
-
1 bag red candy melts
- Because what’s a celebration without a little red? These sweet candies will give your pretzel rods that festive flair! You can substitute with red icing if you’re in a hurry.
-
1 bag blue candy melts
- The other half of our patriotic color trio! Again, white or dark chocolate tinted with food coloring can be a fun alternative if candy melts are hard to find.
-
Patriotic sprinkles (optional)
- These are the cherry on top—or should I say the sprinkle on the side? They add that extra pop of color and fun! Feel free to use any sprinkles you have on hand; you’re the artist here!
Step-by-Step Instructions
Alright, it’s time to work some kitchen magic! Follow these steps, and you’ll have beautiful Patriotic Pretzel Rods ready in no time.
-
Prep Your Workspace:
- Before you start dipping, I recommend laying out some parchment paper on your kitchen counter or a baking sheet. This will help the chocolate set up nicely without sticking. Get a small bowl of warm, soapy water to wash your utensils and a clean towel nearby—let’s keep things tidy!
-
Melt the Candy Melts:
- Divide your candy melts into microwavable bowls (one for each color). Heat them according to the package instructions—typically 30 seconds at a time, stirring in between until smooth. If you find your candy melts too thick, add a teaspoon of vegetable oil to thin them out. Trust me—this little hack makes all the difference!
-
Dip the Pretzel Rods:
- Take a pretzel rod and dip it into your melted white candy melts, swirling gently to fully coat the lower two-thirds. Let any excess dribble off. Trust your instincts here; you want enough coverage but don’t worry about making it perfect!
-
Let It Set:
- Place the dipped rod on your parchment paper and repeat the process for as many pretzel rods as you like. Once you’ve got a good number ready, let them cool for about 10-15 minutes, or until they’re fully set.
-
Get Colorful:
- Now for the fun part! Melt your red and blue candy melts the same way, then take your cooled white-dipped pretzel rods and dip them halfway into the red and blue melts to create a striped effect. Alternatively, you can drizzle the colored melts on top for a more artistic flair.
-
Add the Sprinkles:
- While the colored candy melts are still wet, generously sprinkle your patriotic sprinkles over the tops. This is where you can really let your creativity shine—mix and match!
-
Let Them Cool (Again!):
- Once all your pretzel rods are decorated, let them cool completely until the candy is hardened. This will only take about 20 minutes if you’re patient!
And there you have it—your completed Patriotic Pretzel Rods! The colors, the textures, the flavors…it’s a treat that’s impossible to resist!
Serving Suggestions
When it comes to serving your Patriotic Pretzel Rods, it’s all about presentation! Arrange them upright in a mason jar, or lay them side by side on a decorative platter. You can even tie a little ribbon around the jar for an extra festive touch. Grab your favorite napkins and watch as your friends and family dive right in!
Recipe Variations
Feel free to get creative with this recipe! Here are a few delightful variations to try:
- Chocolate Drizzle: Instead of using colored candy melts alone, drizzle some dark or milk chocolate over your dipped pretzel rods for an added layer of flavor.
- Nutty Inspiration: Before the candy coating sets, sprinkle chopped nuts, like almonds or peanuts, for a delightful crunch.
- Seasonal Sprinkles: Change up the sprinkles by using seasonal colors—think orange and black for Halloween or green and red for Christmas!
- Spicy Twist: Add a pinch of cayenne or chili powder to your melted white chocolate for a sweet and spicy combo—perfect for those who lean toward unique flavors.
Chef’s Notes
I’ve made these Patriotic Pretzel Rods for countless occasions, and every time they’re gobbled up in no time! One funny incident I remember was when I tried adding edible glitter to the mix and got carried away—let’s just say my kitchen was sparkling for days, but the pretzels turned into glitter bombs! Lesson learned: moderation is key. Over the years, I’ve cherished the evolution of this recipe, from my first attempts with only white chocolate to now creating vibrant hues that reflect the spirit of the occasions we celebrate. The best part? Each batch is made with love, which is the secret ingredient I always say!
FAQs and Troubleshooting
-
Why did my candy melts seize up?
- A common cooking hiccup! Candy melts can seize if they come into contact with water, so make sure your bowls and utensils are completely dry. If your melts get too thick, adding a little vegetable oil can smooth things out.
-
How do I store leftover pretzel rods?
- Store your pretzel rods in an airtight container at room temperature. They’ll stay fresh for about a week, though I’ll be surprised if they last that long!
-
Can I use chocolate instead of candy melts?
- Absolutely! Just be cautious while melting real chocolate to avoid burning it. Use a double boiler or microwave at lower power intervals.
-
The candy coating isn’t sticking well. What did I do wrong?
- This might happen if the pretzels aren’t fully cooled or if they were dipped in the melts when they were too hot. Allow them to cool completely before dipping, and make sure your melts aren’t too thick.
Nutritional Info
While these treats are meant for fun, it’s always good to be mindful of portion sizes! Each pretzel rod, once coated and topped, contains roughly 100 calories (depending on how much candy you use for the coating), along with carbohydrates and sugars. Enjoy in moderation and make them a special treat for your celebrations!
So there you have it, friends—your complete guide to making delicious, colorful, and fun Patriotic Pretzel Rods! I hope you feel inspired to get creative in your kitchen and whip up a batch for your next celebration. Remember, it’s all about joy and connection, and what better way to celebrate than with these delightful treats? Happy cooking!
PrintPatriotic Pretzel Rods
These delightful Patriotic Pretzel Rods are a fun and colorful treat perfect for any celebration, combining the satisfying crunch of pretzels with a creamy candy melt coating.
- Prep Time: 15 minutes
- Cook Time: 30 minutes
- Total Time: 45 minutes
- Yield: 12 pretzel rods 1x
- Category: Dessert
- Method: Dipping
- Cuisine: American
- Diet: Vegetarian
Ingredients
- 1 bag pretzel rods
- 1 bag white candy melts
- 1 bag red candy melts
- 1 bag blue candy melts
- Patriotic sprinkles (optional)
Instructions
- Prep your workspace: Lay out parchment paper and have a bowl of warm, soapy water ready.
- Melt the candy melts: Divide candy melts into bowls and heat according to package instructions.
- Dip the pretzel rods: Dip each rod in white candy melts, covering the lower two-thirds.
- Let it set: Place dipped rods on parchment paper and let cool for about 10-15 minutes.
- Get colorful: Dip the white-dipped rods into red and blue melts to create stripes, or drizzle the melts on top.
- Add the sprinkles: While melts are wet, sprinkle on your patriotic sprinkles.
- Let them cool completely for about 20 minutes until hardened.
Notes
Store leftover pretzel rods in an airtight container at room temperature for about a week. Try adding nuts or chocolate drizzle for variation.
Nutrition
- Serving Size: 1 pretzel rod
- Calories: 100
- Sugar: 10g
- Sodium: 200mg
- Fat: 5g
- Saturated Fat: 3g
- Unsaturated Fat: 2g
- Trans Fat: 0g
- Carbohydrates: 15g
- Fiber: 0g
- Protein: 1g
- Cholesterol: 0mg
Keywords: Patriotic, Pretzel Rods, Celebration, Dessert, Easy Recipe
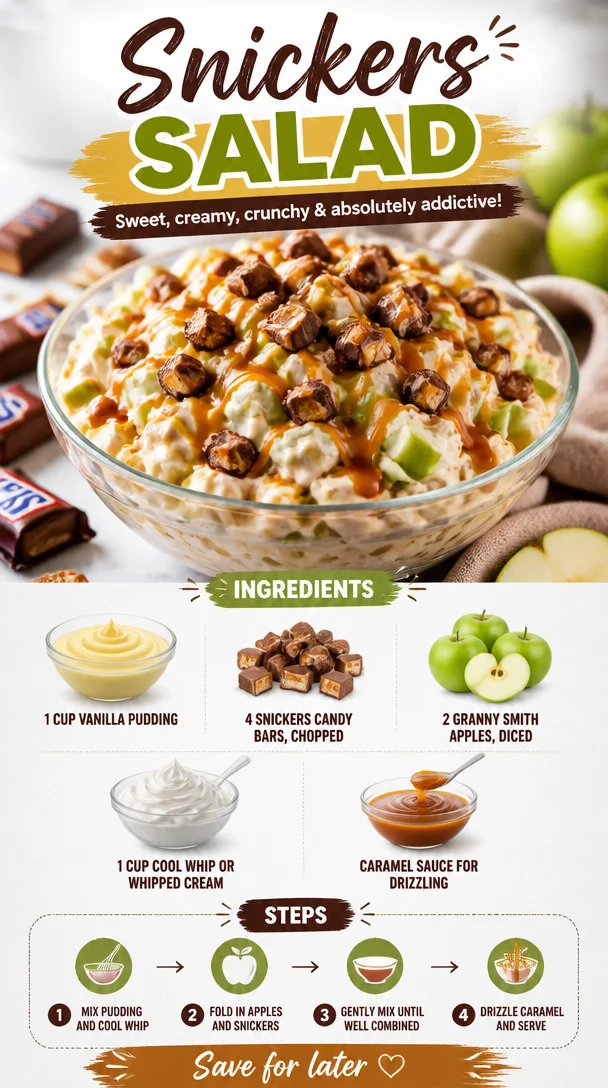
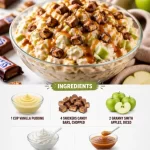
Snickers Salad
Snickers Salad: A Sweet, Crunchy Treat You’ll Love!
Are you ready to take your taste buds on a delightful adventure? Welcome to the world of Snickers Salad—a scrumptiously sweet dish that will have everyone asking for seconds! When I first stumbled upon this recipe as a kid during a family gathering, I thought it was too good to be true. This isn’t your ordinary salad; it’s sweet, crunchy, and absurdly easy to make. I remember watching my aunt whip this up, tossing Snickers, apples, and whipped cream together like it was the most natural thing in the world. I mean, who wouldn’t want a salad where candy is a star player?
You might be wondering—salad? Candy? Apples? This delightful concoction is often served as a dessert, and it’s incredibly versatile, making it perfect for every occasion. Whether you’re potlucking, celebrating a birthday, or just treating yourself on a Wednesday, Snickers Salad fits the bill. It’s like a scoop of happiness in a bowl, combining creamy textures with a crunch from the apples and a delightful surprise from the chocolatey Snickers bars.
What I love most about this Snickers Salad is how approachable it is. You don’t have to be a master chef to impress your friends with this recipe—trust me! The combination of flavors, simplicity of preparation, and nostalgia wrapped up in one dish make it a crowd-pleaser every time. Plus, it’s a great way to sneak in some fruit into your dessert (let’s pretend those apples are the healthy part, shall we?). So grab your apron (or your favorite comfy shirt) and let’s jump into making this sensational dish together!
A Sweet Memory with Snickers Salad
Before we dive into the recipe, I want to share a sweet memory about my first encounter with Snickers Salad. It was a summer barbecue hosted by my parents in our backyard. The sun was shining, burgers were sizzling, and the tantalizing aroma of grilled veggies wafted through the air. My cousins were running around with the energy only kids could muster, while the adults were busy discussing—the weather? I don’t know!
And then, my aunt Michelle arrived with a giant bowl of Snickers Salad. She had this beaming smile on her face, and I could tell she knew she was about to steal the show. As soon as she set it down on the table, it was like a magnet for everyone. I remember peeking into the bowl and thinking, “Is that…Snickers? In a salad?” The mix of crunchy apples, velvety pudding, and sweet caramel sauce created a beautiful clash of flavors I had never experienced.
After that day, Snickers Salad became a staple at our family get-togethers. Every time I take a bite of that creamy, sweet goodness, I’m transported back to those sunny afternoons, surrounded by laughter and love. It’s amazing how food can connect us to memories, isn’t it? Now, let’s create our own memories and dive into making this fantastic dish.
Ingredients
Here’s everything you’ll need to whip up your own delicious Snickers Salad:
-
1 cup vanilla pudding
This is the creamy base of your salad. The vanilla flavor complements the chocolate in the Snickers beautifully. If you want a lighter option, you can use vanilla Greek yogurt instead! -
4 Snickers candy bars, chopped
The hero of the dish! Feel free to get creative with other chocolate bars like Milky Ways or Twix if you’re feeling adventurous, but trust me, the classic Snickers here is hard to beat. -
2 Granny Smith apples, diced
The tartness of these apples balances the rich sweetness of the Snickers. If you’re looking for a sweeter alternative, Fuji or Honeycrisp apples work perfectly. -
1 cup Cool Whip or whipped cream
The light and fluffy texture of whipped cream is what brings everything together, giving it that dreamy effect. For a lower-calorie option, you could use whipped coconut cream. -
Caramel sauce for drizzling
Because let’s be honest, everything is better with caramel. You can buy this pre-made or, if you’re up for it, make your own! A sprinkle of sea salt over the warm caramel takes it to another level.
Step-by-Step Instructions
Ready to bring your Snickers Salad to life? Here we go—follow these simple steps for a fantastic treat:
-
Prepare the Pudding
In a mixing bowl, prepare the vanilla pudding as per the package instructions. If you’re using instant pudding, mix it with milk until it thickens, usually about 2 minutes of whisking. Looking to save time? You can make this ahead of time—just cover it and refrigerate until you’re ready to mix everything together. -
Chop the Snickers
Take your Snickers bars and chop them into bite-sized pieces. It’s best if you chill the bars in the freezer for a bit—they’re much easier to chop when cold! The extra crunch when biting into them is absolute heaven. -
Dice the Apples
Wash and dice the Granny Smith apples. You’re aiming for around half-inch pieces. No need to be too particular; a rustic look adds charm! If you want to keep them from browning, toss them in a tiny bit of lemon juice—it doesn’t alter the flavor, just keeps them looking fresh. -
Combine Ingredients
In a large mixing bowl, combine the prepared pudding, chopped Snickers, and diced apples. Gently fold everything together until the apples and Snickers are evenly coated with the pudding. Get in there with your spatula; it’s okay to be a little rough—just be gentle with those apples! -
Add the Whipped Cream
Now it’s time to fold in the Cool Whip or whipped cream. This step adds a lovely lightness to the salad. Keep it gentle! You want to combine everything without losing that airiness. -
Chill Time
Once all the ingredients are mixed together, cover the bowl with plastic wrap and let it chill in the refrigerator for at least 30 minutes. This allows the flavors to meld together perfectly. Trust me; it’s worth the wait! -
Drizzle and Serve
When you’re ready to serve, spoon the salad into bowls, and drizzle with caramel sauce. If you’re feeling extra fancy, you can even sprinkle some crushed peanuts on top for an added crunch. Voilà! A masterpiece made with love and the perfect balance of flavors.
Serving Suggestions
Serve your Snickers Salad in individual bowls or in a large glass dish for that retro dessert vibe! Garnish with extra chopped Snickers and a light drizzle of caramel sauce on top. A sprinkle of crushed nuts can add an appetizing crunch and elegant touch. Voila! You’ve got yourself a presentation that not only tastes amazing but looks fantastic, too!
Recipe Variations
Why not get a little creative and switch things up? Here are some variations you can try:
-
Nutty Addition: Add in some chopped walnuts or pecans for a nutty crunch that complements the sweetness beautifully.
-
Chocolate Lovers Delight: Mix in mini chocolate chips along with the Snickers for an extra chocolaty treat!
-
Healthier Option: Replace the Snickers with dark chocolate-covered almonds for a healthier twist, while still delivering that chocolatey satisfaction.
-
Fruity Fusion: Trade in some of the apples for diced bananas or pears—both are fabulous and will add a yummier sweetness!
-
Dairy-Free Version: Swap out the Cool Whip for coconut whipped cream and use almond milk for the pudding. Delicious and dairy-free!
Chef’s Notes
I still remember the first time I made this for my friends. I was nervous they’d think it was weird—an unconventional salad, right? But to my surprise, they devoured it like it was the best thing ever. We all laughed as we tried to determine if we were having dessert or snack time! This recipe has stuck with me over the years, reminding me that food is all about joy and connection. Plus, my friends now expect it at every get-together, so it’s become a beloved tradition!
FAQs and Troubleshooting
Q: Can I make this ahead of time?
Absolutely! You can prepare it a day in advance. Just splash some lemon juice on the apples before mixing them in to keep them fresh.
Q: What if I can’t find Snickers?
No problem! Swap them for any chocolate candy bars you love—Milky Way, Twix, or even Reese’s peanut butter cups. Get creative!
Q: My pudding isn’t thickening; what did I do wrong?
Sometimes, it’s all about the milk. Make sure to use cold milk as indicated. If it continues to stay runny, check the expiration date—old pudding mix can be temperamental.
Q: Can I make this vegan?
Great question! You can use plant-based pudding, coconut cream, and dairy-free chocolate bars to create a delicious vegan version that everyone can enjoy!
Nutritional Info (Optional)
- Serving Size: 1 cup
- Calories: 350
- Total Fat: 18g
- Saturated Fat: 8g
- Carbohydrates: 42g
- Sugars: 27g
- Protein: 3g
Snickers Salad is a fabulous mix of flavors that is sure to ignite joy in your kitchen—and in your tummy. So, whether you’re whipping it up for a special occasion or cozying up on the couch to indulge, remember to savor not just the taste, but the memories it brings along. Happy cooking, friends!
PrintSnickers Salad
A scrumptiously sweet dish combining Snickers, apples, and whipped cream for a delightful dessert experience.
- Prep Time: 15 minutes
- Cook Time: 0 minutes
- Total Time: 45 minutes
- Yield: 4 servings 1x
- Category: Dessert
- Method: No-Cook
- Cuisine: American
- Diet: Vegetarian
Ingredients
- 1 cup vanilla pudding
- 4 Snickers candy bars, chopped
- 2 Granny Smith apples, diced
- 1 cup Cool Whip or whipped cream
- Caramel sauce for drizzling
Instructions
- Prepare the pudding by mixing it with milk as per package instructions, then refrigerate.
- Chop the Snickers bars into bite-sized pieces.
- Dice the Granny Smith apples into half-inch pieces.
- Combine the prepared pudding, chopped Snickers, and diced apples in a large mixing bowl.
- Add the Cool Whip or whipped cream and gently fold to combine.
- Chill the salad in the refrigerator for at least 30 minutes.
- Drizzle with caramel sauce before serving.
Notes
You can prepare this a day in advance by keeping the apples coated in lemon juice to prevent browning.
Nutrition
- Serving Size: 1 cup
- Calories: 350
- Sugar: 27g
- Sodium: 100mg
- Fat: 18g
- Saturated Fat: 8g
- Unsaturated Fat: 8g
- Trans Fat: 0g
- Carbohydrates: 42g
- Fiber: 1g
- Protein: 3g
- Cholesterol: 0mg
Keywords: Snickers Salad, dessert, easy salad, sweet treat
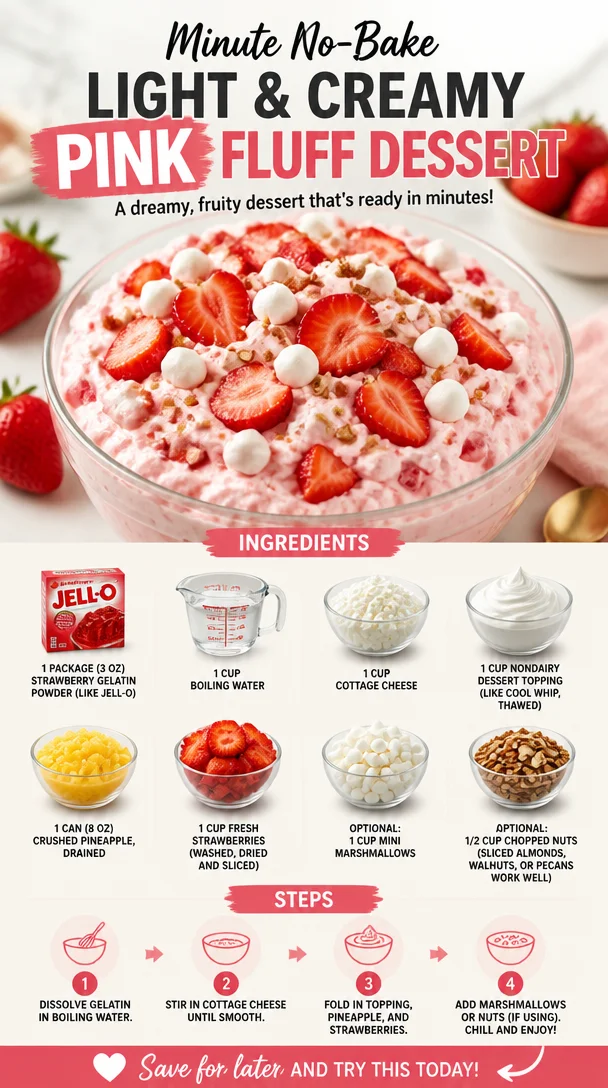
Minute No-Bake Light and Creamy Pink Fluff Dessert
Light and Creamy Pink Fluff Recipe: A Nostalgic Delight
Introduction
Hey there, fellow food enthusiasts! Welcome back to Clean Plate Cravings, where we’re diving headfirst into the delightfully whimsical world of desserts with my favorite Light and Creamy Pink Fluff recipe. This dish always takes me back to my childhood, where every gathering, picnic, and BBQ felt more vibrant and festive with this sweet, fluffy delight gracing the table. As summer approaches, this retro dish makes a perfect statement—a dessert that feels light, refreshing, and oh-so-delicious!
If you’ve never tried Pink Fluff, let me paint you a picture. Imagine fluffy clouds of sweetness, bursts of juicy strawberries, and a creamy texture that dances on your taste buds. This is not just a dish; it’s a memory-maker! Whether you serve it as a side at a potluck or as a light dessert, it radiates happiness. Plus, it’s simple to throw together, making it a fantastic choice for busy weekdays or relaxed weekends.
What I love most about Pink Fluff is how versatile it is. You can whip it up in less than 30 minutes, and it requires no advanced culinary skills—perfect for chefs of all levels! Plus, its vibrant pink hue adds a splash of color to any table setting, giving your meal an extra festive touch.
Ready to create some delicious nostalgia? Grab your mixing bowls and let’s dive into this recipe, sharing kitchen stories and tips along the way. You’ll be sharing your own memories of this delightful dish in no time!
Personal Story
I can clearly recall the first time I experienced Pink Fluff—it was at my Aunt Millie’s annual summer barbecue. The scent of grilled burgers and fresh corn filled the air as family and friends gathered in the backyard, laughter echoing against the sun-soaked sky. And there it was—a large, fluffy bowl shimmering like a pink cloud amidst the spread of savory dishes.
As a kid, it felt like a treasure waitin’ to be uncovered. Once Aunt Millie called everyone to dig in, my cousins and I dove into it, loving how the tiny marshmallows popped in our mouths while the pineapple added a slight tang. Each bite seemed to burst with sweetness and summer vibes, making it an instant favorite.
Years later, I found myself flipping through my grandma’s recipe book, discovering that Aunt Millie had passed down her Pink Fluff recipe. A wave of nostalgia washed over me as I got ready to recreate this family classic. Now, each time I make it, it’s a wonderful reminder of those carefree days spent laughing with family, while also setting the stage for new memories to be made. Let’s create this delicious dish together!
Ingredients
-
1 package (3 oz) strawberry gelatin powder (like Jell-O): The star of the show! This powder gives Pink Fluff its vibrant color and sweet flavor. If you’re in the mood for something different, feel free to experiment with other fruity flavors like raspberry or peach!
-
1 cup boiling water: Used to dissolve the gelatin powder. You can boil water in a kettle or on the stovetop—just ensure it’s good and hot to make the gelatin dissolve perfectly!
-
1 cup cottage cheese: This adds a lovely creaminess and protein boost to the dish. If you’re looking for a less tangy option, you could swap it for Greek yogurt or even a vegan cream cheese.
-
1 cup nondairy dessert topping (like Cool Whip, thawed): This gives our Pink Fluff a fluffy texture. No dairy? No worries! There are great coconut or almond whipped toppings available that work just as well.
-
1 can (8 oz) crushed pineapple, drained: The pineapple lends a fantastic tropical twist and juicy texture. If fresh pineapple is in season, go ahead and use that instead for an even fresher taste!
-
1 cup fresh strawberries (washed, dried, and sliced): Strawberries are a must for their sweetness and flavor. You could also use blueberries, raspberries, or even a mix of berries if you’re feeling adventurous!
-
Optional: 1 cup mini marshmallows or 1/2 cup chopped nuts (like sliced almonds, walnuts, or pecans): These are great for added texture and sweetness—mini marshmallows are perfect for that nostalgic touch. If you prefer a nuttier version, the chopped nuts add a delightful crunch.
Step-by-Step Instructions
-
Prepare the Gelatin: In a mixing bowl, combine the strawberry gelatin powder with the boiling water. Give it a good stir until it’s fully dissolved—about 2 minutes. Make sure there are no clumps! This is the foundation of our Pink Fluff.
-
Chill the Mixture: Once the gelatin is dissolved, let it cool down for about 10-15 minutes. This helps to thicken it up a bit before we add the creamy components. It’s like letting a movie build up anticipation before the big reveal!
-
Mix in the Cottage Cheese: Once the gelatin has cooled, fold in the cottage cheese gently. Don’t whisk it aggressively, as you want to maintain a fluffy texture. This is where the creaminess starts to shine through, making it both luscious and comforting!
-
Add the Whipped Topping: Now, fold in the thawed nondairy dessert topping. This step will lighten up the mixture and bind everything in fluffy harmony. Take your time here to ensure it’s well incorporated, giving the final dish a light fluffiness.
-
Incorporate the Pineapple and Strawberries: Drain any excess juice from the crushed pineapple before folding it into the mixture along with the fresh strawberries. The fruity freshness brings a delightful counterbalance to the sweetness. Mmm, just picture that color popping!
-
Optionally Add Marshmallows and Nuts: If you’re using marshmallows or nuts, this is the time to gently fold them in. The marshmallows provide a nostalgic feel, while nuts add crunch—choose whichever vibe you’re feeling that day.
-
Set it in the Fridge: Pour the mixture into a serving bowl or individual cups, and cover with plastic wrap. Pop it in the refrigerator for at least 2 hours, or until it’s set. Try to resist the urge to sneak a taste—you want the full experience!
-
Serve and Enjoy: Once it’s set, scoop it into bowls or serve it directly from the dish. Top with extra fresh strawberries if you like, and get ready to bask in the smiles this dessert will bring.
Serving Suggestions
To serve your Light and Creamy Pink Fluff, you can scoop it into individual dessert cups for a fun presentation at a gathering or serve it from a large bowl for a more laid-back vibe. A sprig of mint makes a beautiful garnish, and don’t hesitate to sprinkle a few extra mini marshmallows on top for that whimsical touch. Trust me, this dish is as much about the presentation as it is about the flavor!
Recipe Variations
-
Berry Blast: Swap out the strawberries for mixed berries like blueberries, raspberries, and blackberries. This gives a lovely color contrast and a burst of flavors!
-
Tropical Twist: Replace the strawberries with diced mango and add shredded coconut for a tropical vibe. You could even use coconut-flavored whipped topping!
-
Nutty Delight: Add a cup of chopped nuts like pecans or walnuts, which adds a nice crunch and flavor depth. Just make sure to keep an eye on those allergies!
-
Vegan Version: Use vegan whipped topping and a dairy-free cottage cheese alternative (tofu works well) to make this dish entirely plant-based without sacrificing taste.
Chef’s Notes
As I think back on my culinary journey, it’s incredible to see how classic recipes like Pink Fluff can withstand the test of time! My version has slightly evolved over the years—sometimes I switch up the gelatin flavors or add different fruits based on the season. I even had a phase where I experimented with adding a splash of lime juice for a zesty twist!
The memories that accompany this dessert never fade, and it’s a joy to share this recipe with you so you can create your own memories. After all, sweet dishes like this carry laughter, love, and warmth that fuels our lives. So whether it’s a family barbecue, a cozy night in, or something special for a friend, Pink Fluff always has a place in my heart and kitchen.
FAQs and Troubleshooting
1. Can I make Pink Fluff ahead of time?
Absolutely! Pink Fluff is great when made a day in advance. Just make sure to store it in an airtight container in the fridge to keep it fresh.
2. What if my gelatin won’t dissolve?
Make sure the water is at a rolling boil before adding it to the gelatin. If clumps persist, you may need to stir it longer or reheat it slightly.
3. My Pink Fluff seems too runny—what went wrong?
If you’re facing a runny consistency, it may be that the gelatin didn’t fully set or that it was too warm when combined with the toppings. Ensure the gelatin is completely cooled and has been in the fridge for long enough to solidify.
4. How can I store leftovers?
To store any leftovers, simply cover the bowl tightly with plastic wrap or transfer it to an airtight container. It generally lasts up to three to four days in the refrigerator.
Nutritional Info
While specific values can vary based on ingredient brands and measurements, a typical serving of this Pink Fluff (about 1/2 cup) contains roughly:
- Calories: 90
- Protein: 2g
- Fat: 3g
- Carbohydrates: 15g
- Fiber: 1g
Enjoy finding your own culinary happy place with this delightful Light and Creamy Pink Fluff recipe! Whether it evokes nostalgia or inspires new memories, it’s sure to be a hit in your kitchen. Happy cooking, friends!
PrintLight and Creamy Pink Fluff

A nostalgic dessert featuring fluffy clouds of sweetness, juicy strawberries, and a creamy texture.
- Prep Time: 15 minutes
- Cook Time: 0 minutes
- Total Time: 135 minutes
- Yield: 8 servings 1x
- Category: Dessert
- Method: No Cook
- Cuisine: American
- Diet: Vegetarian
Ingredients
- 1 package (3 oz) strawberry gelatin powder
- 1 cup boiling water
- 1 cup cottage cheese
- 1 cup nondairy dessert topping (like Cool Whip, thawed)
- 1 can (8 oz) crushed pineapple, drained
- 1 cup fresh strawberries, sliced
- Optional: 1 cup mini marshmallows or 1/2 cup chopped nuts
Instructions
- Prepare the Gelatin: In a mixing bowl, combine the strawberry gelatin powder with the boiling water. Stir until fully dissolved, about 2 minutes.
- Chill the Mixture: Let it cool down for about 10-15 minutes.
- Mix in the Cottage Cheese: Fold in the cottage cheese gently to maintain a fluffy texture.
- Add the Whipped Topping: Fold in the thawed nondairy dessert topping until well incorporated.
- Incorporate the Pineapple and Strawberries: Fold in the drained crushed pineapple and fresh strawberries.
- Optionally Add Marshmallows and Nuts: Fold in mini marshmallows or nuts if using.
- Set it in the Fridge: Pour the mixture into a serving bowl, cover, and refrigerate for at least 2 hours.
- Serve and Enjoy: Serve in bowls and enjoy the smiles!
Notes
For a fun presentation, scoop into individual dessert cups, and garnish with mint or extra marshmallows.
Nutrition
- Serving Size: 1/2 cup
- Calories: 90
- Sugar: 10g
- Sodium: 120mg
- Fat: 3g
- Saturated Fat: 1g
- Unsaturated Fat: 2g
- Trans Fat: 0g
- Carbohydrates: 15g
- Fiber: 1g
- Protein: 2g
- Cholesterol: 5mg
Keywords: pink fluff, dessert, summer recipe, nostalgia, easy dessert
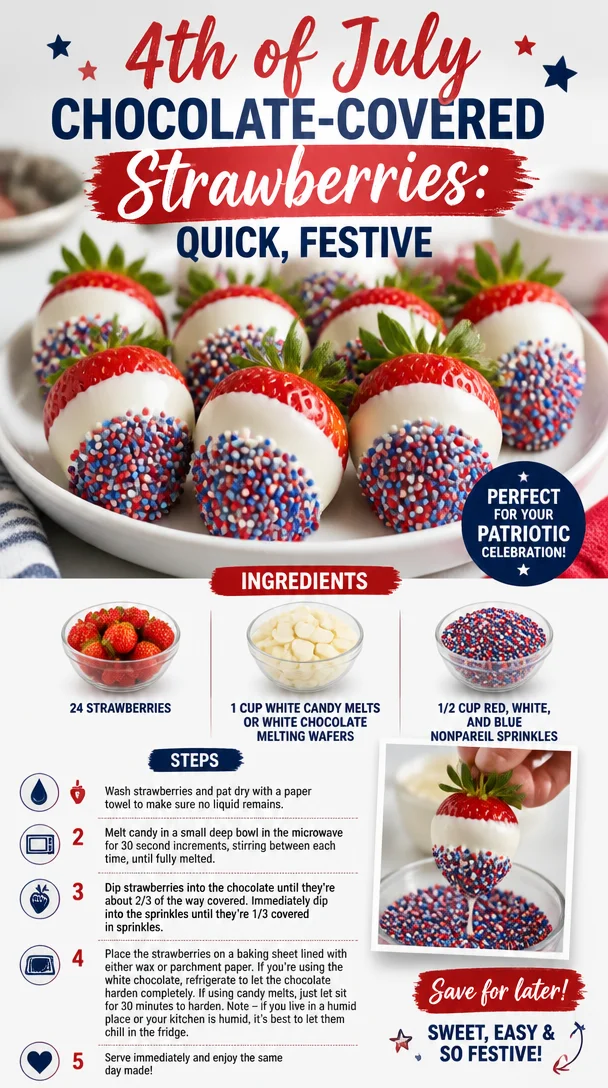
4th of July Chocolate-Covered Strawberries: Quick, Festive
Celebrate Independence Day with Festive Chocolate Covered Strawberries
Fourth of July celebrations are all about bringing people together, and what better way to do that than with a sweet treat that embodies the essence of summer, fun, and patriotism? Today, I’m excited to share my recipe for vibrant Chocolate Covered Strawberries adorned with red, white, and blue sprinkles, perfect for your holiday festivities. These delightful desserts are not only visually stunning but also incredibly easy to make, ensuring you can spend more time celebrating with friends and family, and less time stressing in the kitchen.
Picture this: It’s a warm July afternoon, and the smell of barbecue wafts through the air while kids are giggling in the backyard. You’ve got the grill going and the patriotic decor in full swing, but you know that dessert is where the magic happens. That’s where these chocolate strawberries come in! They’re not just a treat but a memory-maker.
A Sweet Memory from My Kitchen
I’ll never forget my very first Fourth of July celebration where I took my first step into the world of chocolate-covered delights. I was in my grandma’s kitchen, the sun streaming through the windows, and the scent of fresh strawberries mingling with melted chocolate filled the air. She handed me a bowl of melted chocolate, and my eyes lit up—the idea of dipping strawberries felt like magic!
As we dipped those luscious fruits, we laughed and shared stories of family traditions, tales of fireworks, and summer fun. That day, I learned how simple ingredients can be transformed into something extraordinary just with a little love and creativity. So fast forward to today, and I’m here to reignite that nostalgic joy in my own kitchen and yours with a fun twist on those classic chocolate-covered goodies—perfectly themed for Independence Day!
Ingredients
Here’s what you’ll need to create these festive strawberries:
-
24 Strawberries
These juicy gems are the star of the show. Look for bright, ripe ones with their green tops still attached. If strawberries aren’t in season, try replacing them with blueberries for a tangy taste or even bananas cut into stars for a fun shape! -
1 Cup White Candy Melts or White Chocolate Melting Wafers
This is your canvas! White candy melts are ideal because they melt smoothly and set nicely. If you prefer chocolate, semi-sweet chocolate chips work too; just remember to add a touch of coconut oil to help them set! -
1/2 Cup Red, White, and Blue Nonpareil Sprinkles
These little guys are what make your strawberries pop! If you can’t find patriotic sprinkles, you can mix regular sprinkles with some edible glitter for an extra sparkle or use a combination of crushed nuts for a different crunch.
Step-by-Step Instructions
Let’s get to this deliciousness! Follow these steps, and before you know it, you’ll have a platter of patriotic chocolate-covered strawberries ready to impress.
-
Prep Your Strawberries
Rinse the strawberries under cold water and gently pat them dry with a paper towel. It’s essential to make sure they’re completely dry because any moisture can cause the chocolate to seize up. -
Melt the Chocolate
In a microwave-safe bowl, combine the white candy melts. Heat them in 30-second intervals, stirring in between until melted and smooth. Chef Tip: To avoid burning, ensure you heat the chocolate gradually. -
Dip the Strawberries
Hold a strawberry by the green stem and dip it into the melted chocolate, swirling it slightly to coat. Lift it out and let the excess chocolate drip back into the bowl. Quick Hack: If you’re feeling adventurous, you can create a marbled effect by swirling in some melted dark chocolate with the white. -
Add Sprinkles
Immediately after dipping, sprinkle your festive nonpareils over the chocolate-coated strawberries while the chocolate is still wet. This step is vital, as the chocolate hardens quickly. Tip: Tilt the strawberry slightly to get a nice even coverage on one side if you want a half-dipped effect. -
Let Them Set
Place the dipped strawberries on a parchment-lined baking sheet. This helps prevent them from sticking. If you’re in a hurry, pop the tray into the refrigerator for about 15-20 minutes until the chocolate is fully set. -
Serve and Enjoy!
Once the chocolate is firm, they’re ready to be served! Arrange your strawberries on a festive platter for that extra ‘wow’ factor.
Serving Suggestions
To really capture that holiday spirit, arrange your strawberries in a circular pattern to resemble a patriotic flag or create a colorful centerpiece. You can even add small little flags in each strawberry or around the platter for a cute touch. These little pops of delight will brighten up any picnic table or dessert bar!
Recipe Variations
Want to get a bit creative? Here are a few variations to make the recipe your own:
-
Chocolate Drizzle
After the white chocolate sets, drizzle some dark or milk chocolate on top for a beautiful contrast. -
Different Sprinkle Themes
Change up the celebration theme by using different colored sprinkles for birthdays, anniversaries, or any festive occasion! -
Stuffed Strawberries
For a fun twist, hollow out the strawberries and fill them with whipped cream or flavored cream cheese before dipping them. -
Flavored Chocolate
Infuse your melting chocolate with flavors like vanilla extract, peppermint, or even some espresso powder for an extra kick. -
Fruit Arrangements
Swap some strawberries for raspberries or blueberries for a berry medley that still keeps that festive spirit alive.
Chef’s Notes
Over the years, my chocolate-covered strawberries have taken on a life of their own! They started as a simple treat but have evolved into a fun project I often do with friends and family. There’s just something magical about the process—seeing everyone’s unique designs brings a smile. Plus, every time I think back to that cheerful day in my grandma’s kitchen, I can’t help but love how truly special these treats are, not only for taste but for the memories they create.
FAQs and Troubleshooting
Here are some common questions you might have while making these delightful strawberries:
-
Why did my chocolate seize?
Chocolate seizes when it comes into contact with moisture. Always ensure your strawberries are dry before dipping, and melt your chocolate gently! -
How can I store them?
Store your chocolate-covered strawberries in the refrigerator in an airtight container for up to two days. Keep them away from moisture! -
Can I use regular chocolate instead of candy melts?
Absolutely! Just use a bit of coconut oil to help the chocolate remain smooth and shiny. -
What if my chocolate isn’t melting smoothly?
This could be due to overheating. Make sure you’re melting your chocolate in short bursts and stirring thoroughly to even out the temperature.
Nutritional Info
While I believe in enjoying treats without restriction, you may be curious about the nutritional profile. Here’s a rough estimate for each strawberry with a white chocolate coating:
- Calories: ~50 calories
- Fat: 2.5g
- Carbohydrates: 8g
- Protein: 0.5g
Feel free to adjust the toppings to make them even more your style!
And there you have it—your very own Fourth of July Chocolate Covered Strawberries! Ready to make a memorable impact on your celebrations while delighting your taste buds. Let them be a reminder of the joy food can bring, creating gatherings filled with laughter and love. Enjoy every bite and don’t forget to make those sweet memories along the way! Happy Fourth! 🎆🍓
PrintFestive Chocolate Covered Strawberries
Celebrate Independence Day with vibrant Chocolate Covered Strawberries adorned with red, white, and blue sprinkles, perfect for your holiday festivities.
- Prep Time: 10 minutes
- Cook Time: 5 minutes
- Total Time: 15 minutes
- Yield: 12 servings 1x
- Category: Dessert
- Method: Dipping
- Cuisine: American
- Diet: Vegetarian
Ingredients
- 24 Strawberries
- 1 Cup White Candy Melts or White Chocolate Melting Wafers
- 1/2 Cup Red, White, and Blue Nonpareil Sprinkles
Instructions
- Rinse the strawberries under cold water and gently pat them dry with a paper towel.
- Combine the white candy melts in a microwave-safe bowl. Heat in 30-second intervals, stirring until melted and smooth.
- Hold a strawberry by the green stem and dip it into the melted chocolate, swirling to coat.
- Immediately sprinkle your festive nonpareils over the chocolate-coated strawberries.
- Place the dipped strawberries on a parchment-lined baking sheet.
- Pop the tray into the refrigerator for 15-20 minutes until the chocolate is fully set.
- Arrange the strawberries on a festive platter and enjoy!
Notes
Store chocolate-covered strawberries in the refrigerator in an airtight container for up to two days.
Nutrition
- Serving Size: 1 strawberry
- Calories: 50
- Sugar: 4g
- Sodium: 10mg
- Fat: 2.5g
- Saturated Fat: 1.5g
- Unsaturated Fat: 1g
- Trans Fat: 0g
- Carbohydrates: 8g
- Fiber: 0g
- Protein: 0.5g
- Cholesterol: 0mg
Keywords: chocolate covered strawberries, Fourth of July, summer dessert, patriotic treats, easy dessert
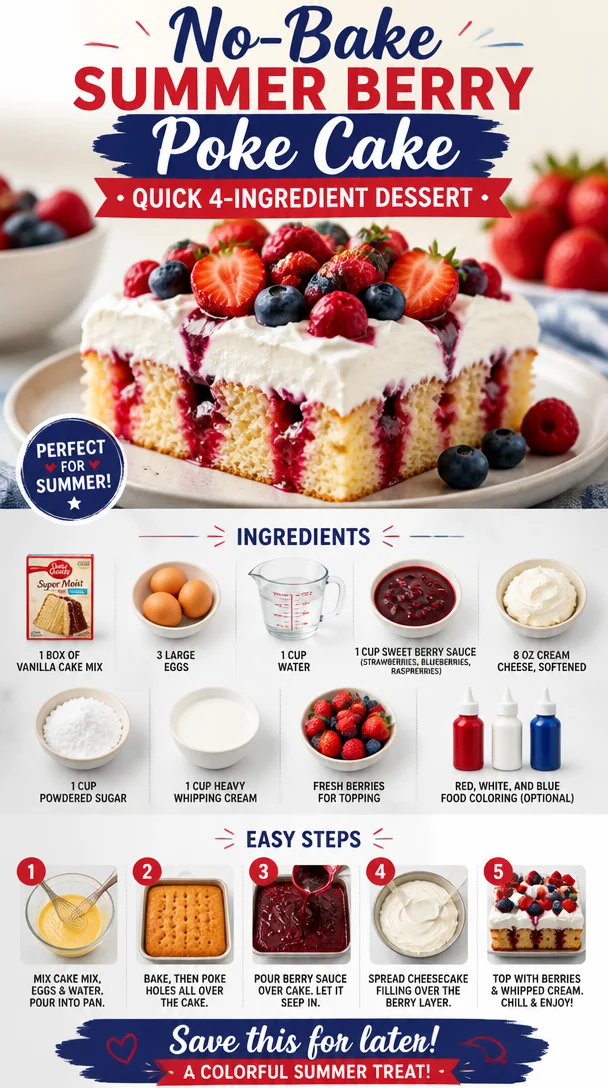
No-Bake Summer Berry Poke Cake: Quick 4-Ingredient Dessert
Get Ready to Dive into Summer with This Scrumptious Summer Berry Poke Cake!
Hey there, fellow foodies! It’s Ava Carter here, your go-to chef for all things delicious and nutritious. Today, I’m super excited to share a recipe that’s not only easy to whip up but also perfect for beating the summer heat—my delightful Summer Berry Poke Cake! This cake is a burst of flavor that screams sunshine and joy, making it an absolute hit for those warm weather gatherings, picnics, or even just a cozy day at home.
Imagine this: a soft, moist vanilla cake soaked in a luscious berry sauce, topped with a heavenly cream cheese frosting and crowned with fresh berries. Sounds dreamy, right? And let me tell you, the best part about this cake is that it’s not just about taste; it’s about creating memories too. So, grab your apron, and let’s get baking!
A Slice of Nostalgia: The Story Behind My Summer Berry Poke Cake
Every time I make this Summer Berry Poke Cake, I’m transported back to my childhood summers spent in Grandma’s kitchen. Oh, the memories! Grandma would whip this cake up on warm afternoons when my cousins and I would come running in from the backyard, our faces flushed from play and our tummies rumbling. The air would be filled with the sweet aroma of fluffy cake and berries, enticing us into the kitchen like moths to a flame.
We’d watch in awe as she poked tiny holes into the freshly baked cake, pouring that vibrant berry sauce all over. I remember the giggles as we fought over who got to add the freshest strawberries and blueberries on top. That special family tradition became a summer staple, a delicious reminder that food is more than just sustenance—it’s a way to connect, celebrate, and create joy. Today, I’m sharing that same joy with you, hoping you’ll create your own cherished moments with this ever-delicious berry beauty!
Ingredients You’ll Need
-
1 box of vanilla cake mix
A classic base for our cake, rich and fluffy! If you’re feeling adventurous, you could substitute with a lemon cake mix for a zesty twist. -
3 large eggs
Adding richness and acting as a binder, the eggs will help your cake rise beautifully. For an egg-free alternative, try flax eggs (1 tablespoon ground flaxseed mixed with 2.5 tablespoons water per egg). -
1 cup water
This keeps the cake moist. You can swap plain water for milk if you want a little extra richness in the flavor. -
1 cup sweet berry sauce
A blend of strawberries, blueberries, and raspberries creates that signature summer flavor. You can make your own sauce or pick up a store-bought version. -
8 oz cream cheese, softened
Essential for our frosting, adding creamy texture and tanginess. If you need a dairy-free option, use vegan cream cheese. -
1 cup powdered sugar
Sweetening things up! Sifting it can help achieve that perfect smooth frosting texture. -
1 cup heavy whipping cream
For fluffy frosting that holds its shape. If you’re low on cream, you can mix in some Greek yogurt for a lighter option. -
Fresh berries for topping
Think of it as nature’s confetti! Any combination of strawberries, blueberries, and raspberries works. -
Red, white, and blue food coloring (optional)
Perfect for a festive touch, especially around the Fourth of July! A few drops can make your cake even more visually stunning.
Step-by-Step Instructions
1. Preheat Your Oven:
Start by preheating your oven to 350°F (175°C). This ensures that your cake gets that perfect rise as soon as it hits the heat. A well-prepped oven is key to a fluffy, perfect cake!
2. Prepare the Cake Mix:
In a large mixing bowl, combine the box of vanilla cake mix, 3 large eggs, and 1 cup of water. Use an electric mixer on medium speed for about 2 minutes until the batter is smooth and blended. Tip: Don’t overmix! This can lead to a dense cake. Your batter should be light and airy.
3. Bake the Cake:
Pour the batter into a greased 9×13-inch baking pan. Bake in the preheated oven for 25-30 minutes or until a toothpick inserted in the center comes out clean. Chef’s hack: Set a timer for 25 minutes; check for doneness, and be careful not to open the oven door too soon!
4. Poke the Cake:
Once baked, allow the cake to cool in the pan for about 10 minutes. Then, take a fork or the handle of a wooden spoon and poke holes all over the top of the cake. This is where the magic happens! The holes will allow the berry sauce to seep in, making the cake super moist and flavorful.
5. Pour on the Berry Sauce:
In a separate bowl, mix your sweet berry sauce until it’s well combined. Pour this luscious sauce all over the entire poke cake, making sure to cover it evenly. Let it soak in as it cools completely—this is the star moment of your cake!
6. Make the Frosting:
In a clean mixing bowl, beat the softened cream cheese with an electric mixer until smooth and creamy. Gradually add powdered sugar, then mix in the heavy whipping cream until you achieve that luxurious frosting consistency. Little tip: Start slow to avoid a powdered sugar cloud!
7. Frost the Cake:
Once the cake is completely cooled, spread the cream cheese frosting evenly across the top. Use a spatula for a smooth finish, or get creative with a swirl pattern!
8. Add Fresh Berries:
Now comes the fun part! Top your frosted cake with fresh berries of your choice. Arrange them in a colorful pattern! Don’t skimp on the berries—this is a berry poke cake, after all!
Serving Suggestions
Slice up your Summer Berry Poke Cake and serve it chilled, perhaps with a dollop of whipped cream on the side. It’s perfect for afternoon gatherings or as a light dessert after a summer barbecue. For an extra touch, consider dusting with powdered sugar before serving—who doesn’t love that elegant finish?
Recipe Variations
-
Berry Swirl Cake: Instead of a plain berry sauce, swirl it right into the cake batter before baking for a delightful marbled effect.
-
Coconut Cream Frosting: Mix in some coconut cream with your frosting for a tropical twist.
-
Lemon Zest Add-In: Add zest from one lemon to your cake batter for a refreshing zing!
-
Gluten-Free Option: Use a gluten-free vanilla cake mix for a lovely gluten-free alternative that everyone can enjoy.
-
Sugar Alternatives: If you’re watching sugar intake, replace powdered sugar with a sugar-free version.
Chef’s Notes
This Summer Berry Poke Cake has truly evolved over the years. I remember the first time I attempted to create it—I accidentally forgot to add the eggs! The cake turned out dense and flat, but I added double the frosting and fresh berries, and guess what? Everyone loved it! That mistake taught me that a little creativity in the kitchen goes a long way. It’s all about having fun, experimenting, and not taking things too seriously.
FAQs and Troubleshooting
1. My cake didn’t rise. What went wrong?
Ensure that your baking powder and other ingredients are fresh and still active! Also, check that you mixed it just enough—over-mixing can lead to a dense texture.
2. How can I get a smooth frosting?
Make sure your cream cheese is at room temperature, and sift your powdered sugar to avoid lumps—this gives you that beautifully smooth texture.
3. Can I make this cake a day ahead?
Absolutely! Just keep it covered in the fridge. The flavors often blend overnight, making it even more delicious!
4. What if my berry sauce is too runny?
Try thickening it with a bit of cornstarch mixed with water, simmered on low heat until it reaches your desired consistency.
Nutritional Info
Per serving, roughly: 300 calories, 15g fat, 40g carbohydrates, 3g protein. (Nutritional values can vary based on specific brands and measurements.)
So there you have it, my dear food lovers! Dive into the season with this fabulous Summer Berry Poke Cake, and let it bring a little sunshine to your kitchen. Embrace the flavors, share the joy, and remember—food is all about love, laughter, and those cozy moments spent with family and friends. Happy baking! 🌟
PrintSummer Berry Poke Cake
A delightful and moist vanilla cake soaked in berry sauce, topped with cream cheese frosting and fresh berries, perfect for summer gatherings.
- Prep Time: 15 minutes
- Cook Time: 30 minutes
- Total Time: 45 minutes
- Yield: 12 servings 1x
- Category: Dessert
- Method: Baking
- Cuisine: American
- Diet: Vegetarian
Ingredients
- 1 box of vanilla cake mix
- 3 large eggs
- 1 cup water
- 1 cup sweet berry sauce
- 8 oz cream cheese, softened
- 1 cup powdered sugar
- 1 cup heavy whipping cream
- Fresh berries for topping
- Red, white, and blue food coloring (optional)
Instructions
- Preheat your oven to 350°F (175°C).
- Combine the vanilla cake mix, eggs, and water in a large mixing bowl and mix for about 2 minutes until smooth.
- Pour the batter into a greased 9×13-inch baking pan and bake for 25-30 minutes.
- Cool the cake in the pan for 10 minutes, then poke holes all over the top.
- Mix your sweet berry sauce until well combined and pour it over the cake.
- Beat the softened cream cheese until smooth, gradually add powdered sugar, then mix in heavy whipping cream until you achieve a luxurious frosting.
- Spread the cream cheese frosting evenly across the top of the cooled cake.
- Top the cake with fresh berries in a colorful pattern.
Notes
Serve chilled with a dollop of whipped cream on the side. For added elegance, dust with powdered sugar before serving.
Nutrition
- Serving Size: 1 slice
- Calories: 300
- Sugar: 20g
- Sodium: 350mg
- Fat: 15g
- Saturated Fat: 8g
- Unsaturated Fat: 5g
- Trans Fat: 0g
- Carbohydrates: 40g
- Fiber: 2g
- Protein: 3g
- Cholesterol: 90mg
Keywords: berry poke cake, summer dessert, vanilla cake, berry sauce, cream cheese frosting
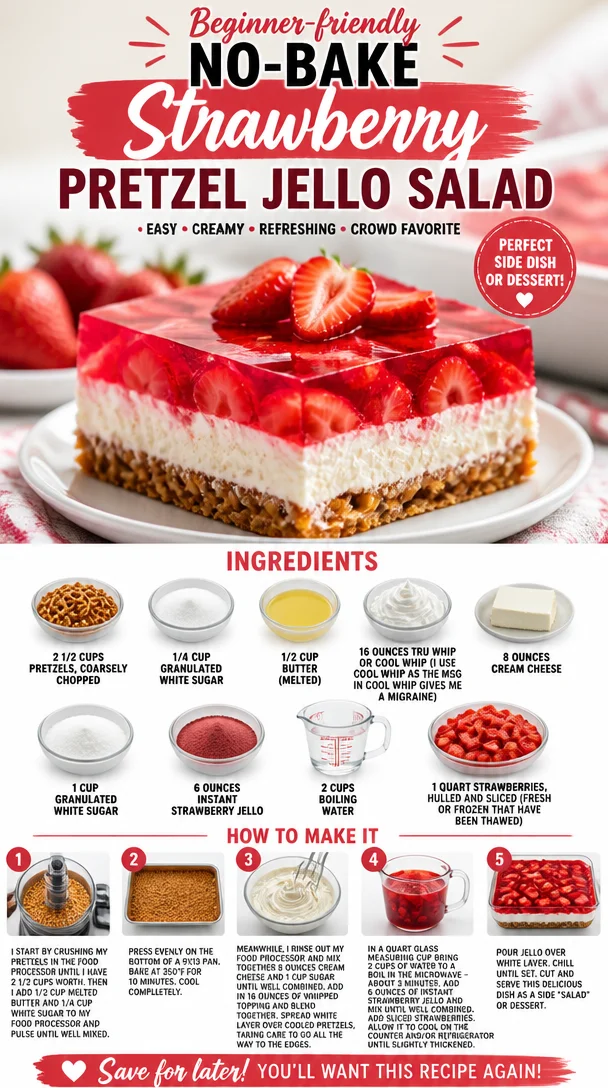
Beginner-friendly No-Bake Strawberry Pretzel Jello Salad
The Best Strawberry Pretzel Jello Salad Recipe
Welcome back, food lovers! Today, I’m diving into a delightful throwback that combines nostalgia with an undeniable pop of flavor: the Famous Strawberry Pretzel Jello Salad. You might be wondering, “What’s so special about jello salad?” Well, let me tell you; this dish is not just a side but a vibrant star that can brighten any gathering. It’s that sweet-and-salty, crunchy-and-smooth creation that dances on your taste buds like it’s at a summer picnic under the sun.
This recipe is a chat with good times, gatherings, and laughter. Picture this: a warm sunny day spent with family at our annual summer BBQ. My Aunt May would arrive, her kitchen always cluttered with a cornucopia of salads and sides, but the clear favorite was her strawberry jello salad—an eye-catching centerpiece adorned with bright pink strawberries, surrounded by a glistening layer of vivid gelatin, all resting on a buttery pretzel crust.
I remember my cousins and I couldn’t wait to dive into it; the crunch of those pretzels contrasted perfectly with the creamy layer and the stellar fruit. There was something magical about how Aunt May brought flavors together, proudly declaring, “Everyone needs a little sweetness in life!” It was never just a salad; it was a delectable memory in the making, a dish overflowing with love and laughter. Today, we’re recreating that magic with my version of Aunt May’s classic recipe, and trust me, you’ll want to make this one more than once!
Ingredients
Let’s roll into the pantry and gather our supplies! Here’s what you’ll need for the best Strawberry Pretzel Jello Salad:
-
2 1/2 cups pretzels, coarsely chopped
These salty, crunchy delights form the perfect base for our salad, giving that fantastic contrast to the sweet layers. If you can’t access pretzel sticks or bites, you can use crushed crackers as a substitute; they’ll provide a different texture but still work beautifully! -
1/4 cup granulated white sugar
This sugar adds just the right amount of sweetness to our pretzel crust, helping to mellow the saltiness of the pretzels. Need a substitute? Brown sugar or even coconut sugar could do the trick if you want a different depth of flavor. -
1/2 cup butter (melted)
Butter brings richness to the pretzel crust. If you prefer a plant-based option, use coconut oil or a dairy-free alternative! -
16 ounces tru whip or Cool Whip
I use Cool Whip because, let’s be honest, it’s nostalgic and creamy! For a fluffier dish, feel free to use homemade whipped cream if you have the extra time. Just remember to fold it in gently! -
8 ounces cream cheese
The backbone of our creamy layer, cream cheese brings that beloved richness. If you want a lighter version, you can swap half of it with Greek yogurt. -
1 cup granulated white sugar
This sugary goodness makes the creamy layer so sweet and delightful. If you’re cutting back on sugar, you can use a sugar substitute like erythritol or agave syrup. -
6 ounces instant strawberry jello
This is where the magic happens! The jello gives a burst of strawberry flavor and that gorgeous pink hue. If you want to shake things up, you can substitute with raspberry or peach jello for a unique spin! -
2 cups boiling water
This helps dissolve the jello mix and gives it the perfect texture to set. No substitutes needed here—just boil away! -
1 quart strawberries, hulled and sliced (fresh or frozen that have been thawed)
Fresh strawberries bring brightness, but frozen ones work too if you thaw them first. They add that lovely fruity freshness! Alternatively, mix in some blueberries or crushed pineapple for even more fruity flair.
Step-by-Step Instructions
Ready to get creative? Let’s turn those ingredients into a star-studded dish that’ll leave everyone craving more!
-
Preheat your oven to 350°F (175°C)
Preheating your oven is key to getting that lovely crust. You’ll want it hot and ready to go by the time our crust is mixed! -
Make the Pretzel Crust
In a large mixing bowl, combine the coarsely chopped pretzels, 1/4 cup of granulated sugar, and melted butter.
Chef Tip: Use your hands to really mix those ingredients together! You want to ensure every pretzel is coated with buttery goodness. -
Press into a Baking Dish
Lightly coat a 9×13 inch baking dish with non-stick spray or butter for easy removal. Then, pour your pretzel mixture into the dish and press it firmly into an even layer.
Hack: Use a flat-bottomed measuring cup to press it down evenly! This helps prevent crusty edges from burning in the process. -
Bake the Crust
Place the dish in the preheated oven and bake for about 10 minutes, until the crust is golden and fragrant. Remove it and let it cool completely.
Chef Insight: This step is super important because it solidifies that lovely salty crunch we want to complement the creamy layers! -
Prepare the Cream Cheese Layer
In a medium bowl, beat the cream cheese until smooth and creamy—this should take about 2 minutes. Add in 1 cup of granulated sugar and the Cool Whip and mix until it’s all well incorporated and fluffy.
Pro Tip: If your cream cheese is too cold, it might clump. Let it sit at room temperature for about 30 minutes before mixing! -
Spread the Cream Cheese Mixture
Once your pretzel crust has cooled, evenly spread the cream cheese mixture over it. Use a spatula to smooth it out nicely.
Chef Hack: Make sure to leave a border of pretzel crust around the edges so the jello can set properly! -
Prepare the Jello
In a mixing bowl, dissolve your 6 ounces of strawberry jello in 2 cups of boiling water. Stir until fully mixed and let it cool slightly for about 10 minutes.
Tip: You don’t want it too hot when layering, or it might melt the cream cheese layer! -
Add the Strawberries
Stir your hulled and sliced strawberries into the cooled jello mixture. Pour this on top of the cream cheese layer, spreading it gently with a spatula.
Chef Insight: Pushing the strawberries into the jello will help create beautiful layers and keep them suspended! -
Chill Until Set
Cover the dish with plastic wrap and refrigerate for at least 4 hours or overnight if you can resist! It needs to set properly to be the star of the show.
Tip: The longer you let it chill, the better the flavors meld together! -
Serve & Enjoy
When you’re ready to serve, cut into squares and watch everyone dive in! You can add a dollop of extra whipped cream on top for a little flair!
Chef Note: This dish is even better the next day as the flavors have a chance to deepen!
Serving Suggestions
Serve your Strawberry Pretzel Jello Salad in vibrant, colorful bowls or plate it in a fancy dish for a touch of elegance. You can sprinkle a few extra sliced strawberries on top or even a couple of mint leaves for that fresh pop. Trust me, your guests will be asking for the recipe!
Recipe Variations
Feeling adventurous? Here are a few fun variations to mix things up:
-
Fruit Medley: Incorporate a mix of berries like raspberries and blueberries for a burst of color. Blend them into the jello for a spectrum of fruity flavors!
-
Nutty Crunch: Add chopped pecans or walnuts to the pretzel crust for extra crunch and a nutty taste—so good!
-
Creamy Layer Twist: Swap out half the cream cheese for vanilla yogurt—it’s a lighter option that still tastes incredible!
-
Savory Sweet: Drizzle a little honey or maple syrup into the cream cheese mixture for an unexpected twist of flavor.
-
Layered Delight: Elevate your salad by layering both strawberry and pineapple jello with a cream cheese layer in between for a double delight!
Chef’s Notes
Over the years, this recipe has seen its fair share of love and twists! From family gatherings to potlucks, it never fails to bring smiles. I remember one summer family reunion, the kids were supposed to keep their paws off it until dinner, but distractions and giggles led to half the salad disappearing before the meal. Oh, those mischievous little hands! Now, I always make two batches—one for the main event and the other for late-night snacking. It’s a must-have for any festive occasion, and I love how it evolves with every generation!
FAQs and Troubleshooting
Q1: Why did my jello salad separate when I served it?
A: Separation often happens if the jello was too hot when poured over the layers. Make sure to let it cool before adding it to the cream cheese layer.
Q2: Can I make this ahead of time?
A: Absolutely! In fact, it gets better with time. Just ensure you cover it tightly in the fridge to maintain freshness.
Q3: What if I don’t have instant jello?
A: If you only have regular gelatin, you can create a similar flavor by combining fruit and sugar, but be mindful of the setting process. Instant jello makes it super easy!
Q4: My cream cheese mixture is clumpy—what can I do?
A: Ensure your cream cheese is at room temperature before mixing! If it’s already mixed and clumpy, try blending it again with a splash of milk to smooth it out.
Nutritional Info
(Optional—Insert here if applicable based on preferred nutrition standards.)
And there you have it! This Strawberry Pretzel Jello Salad is not just a recipe; it’s a festivity of flavors, textures, and memories that will keep calling you back into the kitchen. Enjoy making it and, even more, enjoy sharing it with your loved ones! Let’s keep it fresh, simple, and delicious. Happy cooking!
PrintThe Best Strawberry Pretzel Jello Salad
A delightful and nostalgic Strawberry Pretzel Jello Salad that combines sweet, salty, crunchy, and creamy layers for a perfect summer dish.
- Prep Time: 15 minutes
- Cook Time: 10 minutes
- Total Time: 240 minutes
- Yield: 12 servings 1x
- Category: Dessert
- Method: Baking
- Cuisine: American
- Diet: Vegetarian
Ingredients
- 2 1/2 cups pretzels, coarsely chopped
- 1/4 cup granulated white sugar
- 1/2 cup butter, melted
- 16 ounces Cool Whip
- 8 ounces cream cheese
- 1 cup granulated white sugar
- 6 ounces instant strawberry jello
- 2 cups boiling water
- 1 quart strawberries, hulled and sliced
Instructions
- Preheat your oven to 350°F (175°C).
- Combine pretzels, 1/4 cup sugar, and melted butter in a large mixing bowl.
- Press mixture into a lightly greased 9×13 inch baking dish.
- Bake for about 10 minutes until golden and fragrant, then let cool.
- Beat cream cheese until smooth; add sugar and Cool Whip, mixing until fluffy.
- Spread cream cheese mixture over cooled pretzel crust.
- Dissolve strawberry jello in boiling water, let cool slightly.
- Stir in hulled strawberries and pour over cream cheese layer.
- Cover with plastic wrap and refrigerate for at least 4 hours.
- Serve cut into squares, optionally topping with whipped cream.
Notes
This dish is even better the next day as the flavors meld together.
Nutrition
- Serving Size: 1 serving
- Calories: 250
- Sugar: 28g
- Sodium: 350mg
- Fat: 10g
- Saturated Fat: 6g
- Unsaturated Fat: 4g
- Trans Fat: 0g
- Carbohydrates: 34g
- Fiber: 1g
- Protein: 3g
- Cholesterol: 30mg
Keywords: strawberry, jello salad, dessert, summer dessert, nostalgic recipes