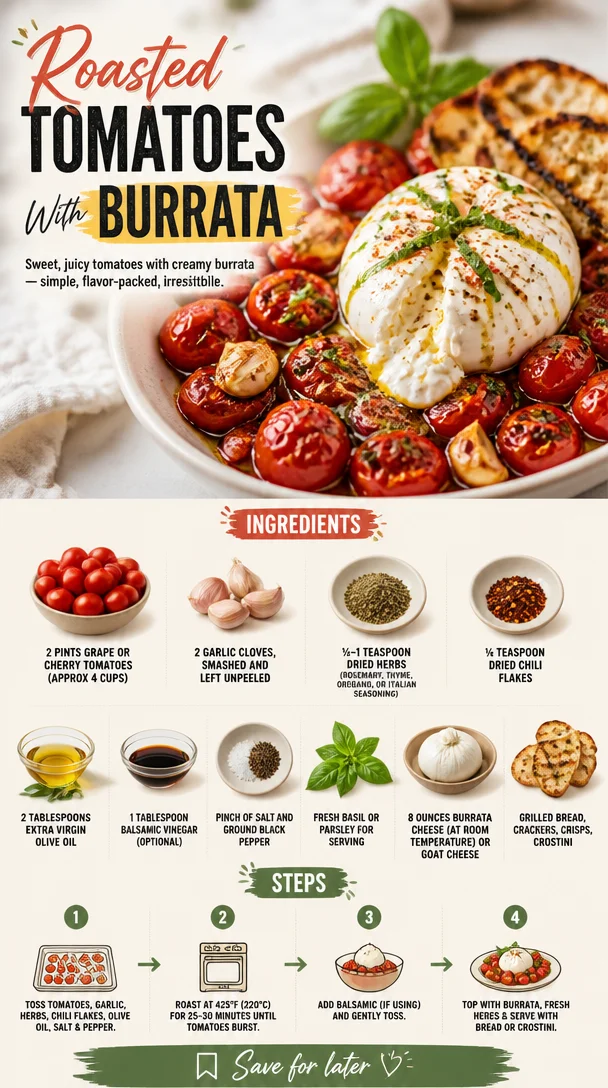
Roasted Tomatoes With Burrata
Roasted Tomatoes with Burrata: A Burst of Flavor
Welcome, fellow food lovers! Today, I’m excited to share a delightful dish that sings with seasonal flavors and makes any meal feel like a special occasion: Roasted Tomatoes with Burrata. This vibrant dish is not only visually stunning but also incredibly simple to whip up, making it perfect for those busy weeknights or casual weekend gatherings. So grab your apron, and let’s dive into the world of juicy tomatoes, creamy burrata, and aromatic herbs!
A Flavorful Journey: Personal Story
As I look back on my culinary journey, one memory that always brings a smile to my face is that summer evening at my grandma’s house. The sun was setting, casting a golden glow over her small garden where she grew the juiciest tomatoes you could ever imagine. We’d pick them together, laughing and chatting, and then head inside to make her famous roasted tomato dish.
I can still hear her voice, so enthusiastic, as she explained how roasting tomatoes brought out their natural sweetness and flavor. She would pair them with all sorts of delicious cheese, but burrata was her favorite choice! We’d enjoy them fresh with crunchy bread, straight from the oven. This dish is more than just a recipe for me; it’s a representation of love, laughter, and the joy of making food with family. Whenever I roast tomatoes, I feel that same warmth and happiness spill back into my kitchen, and I can’t wait for you to experience it too!
Ingredients
Here’s what you’ll need to create this delightful dish:
-
2 pints grape or cherry tomatoes (approx 4 cups)
These bite-sized beauties are sweet and juicy. Look for vibrant, plump ones for the best flavor! If you can’t find grape or cherry, any ripe medium-sized tomatoes will do in a pinch. -
2 garlic cloves, smashed and left unpeeled
Garlic adds a lovely depth of flavor. Leaving the skin on while roasting mellows its intensity. Feel free to swap with shallots for a sweeter taste. -
½-1 teaspoon dried herbs (rosemary, thyme, oregano, or Italian seasoning)
Herbs bring character! Choose your favorite or a mix. If you’re feeling adventurous, fresh herbs can add even more brightness. -
¼ teaspoon dried chili flakes
Just a pinch will do, but feel free to adjust based on your heat preference! Substitute with black pepper for a milder kick. -
2 tablespoons extra virgin olive oil
Quality olive oil enhances the dish immensely. Opt for cold-pressed varieties for more flavor, or use avocado oil for a different taste. -
1 tablespoon balsamic vinegar (optional)
Adds a lovely tang! If you’re looking for sweetness, try a drizzle of honey instead. -
Pinch of salt and ground black pepper
Essential for balancing flavors; don’t skip these! -
Fresh basil or parsley for serving
Adding freshness right before serving elevates the flavors. Use your favorite soft herb here! -
8 ounces burrata cheese (at room temperature) or goat cheese
Burrata provides a creamy, luxurious touch; goat cheese is a great tangy alternative! -
Grilled bread, crackers, crisps, or crostini
This is what you’ll use for scooping up all the deliciousness. Make sure it’s crispy enough to handle those juicy tomatoes!
Step-by-Step Instructions
Alright! Let’s get cooking! Follow these steps for perfectly roasted tomatoes with creamy burrata.
-
Preheat your oven to 400°F (200°C).
This is crucial! The right temperature will caramelize the sugars in those tomatoes, creating a flavor explosion. -
Prep your baking dish.
Take a large baking dish and line it with parchment paper for easy cleanup (and trust me, your future self will thank you!). -
Toss the tomatoes and garlic together.
In a large bowl, combine the grape or cherry tomatoes and garlic cloves. Drizzle with olive oil, and sprinkle in your herbs, chili flakes, salt, and pepper. Toss everything together until the tomatoes are well-coated. Chef’s Hack: Use your hands here; it’s messy but way more fun! -
Spread them out on the baking dish.
Pour the tomato mixture onto your prepared baking dish, ensuring they’re in a single layer for even roasting. We want all those tomatoes to get direct access to the heat! -
Roast those little gems!
Pop your baking dish in the oven and roast for about 25–30 minutes, or until the tomatoes are blistered and beginning to burst. Tip: Give the dish a gentle shake halfway through roasting to help everything cook evenly. -
Add balsamic vinegar (if using).
In the last 5 minutes of roasting, drizzle your balsamic vinegar over the tomatoes for an extra layer of flavor. This sweetness pairs beautifully with the savory notes! -
Plate it up!
Once roasted, remove the dish from the oven and let it cool slightly. Nestle the burrata in the center of the tomatoes and drizzle with a touch of olive oil. Finish with a sprinkle of fresh herbs for color. -
Serve it warm!
This dish is best enjoyed fresh from the oven. Serve it with your favorite crispy bread, allowing everyone to enjoy the creamy burrata and burst of flavors in every bite.
Serving Suggestions
Serve your roasted tomatoes with burrata warm, in the middle of a beautiful table spread. Arrange slices of grilled bread or crostini next to the dish, allowing everyone to dig in! You can also accompany this dish with a fresh green salad drizzled with lemon vinaigrette for a complete meal. The colorful contrast of the roasted tomatoes and creamy cheese paired with vibrant greens just makes for an irresistible presentation!
Recipe Variations
-
Herb-Infused Burrata: Marinate your burrata in olive oil with fresh herbs like basil and parsley before serving for extra flavor!
-
Spicy Kick: Mix in some chopped fresh chili or a dash of sriracha before roasting for a fiery version.
-
Mediterranean Flair: Add olives or artichokes to the mix to give your dish an exciting Mediterranean twist.
-
Cheesy Overload: Swap out burrata for a mixture of feta and ricotta to create a different creamy texture!
-
Vegan Delight: Use tofu feta or cashew cheese in place of burrata, and make it plant-based!
Chef’s Notes
It’s funny how a simple dish can evoke such fond memories. I’ve made this roasted tomatoes with burrata for everything from casual hangouts to festive gatherings, and the response is always the same: pure delight! Over the years, I’ve evolved this recipe, opting for whatever fresh herbs I can find or experimenting with different cheeses based on the season. This dish is a true reflection of kitchen creativity—feel free to mix and match ingredients to your heart’s content!
FAQs and Troubleshooting
1. What if my tomatoes are not sweet enough?
If your tomatoes lack sweetness, a sprinkle of sugar before roasting can help enhance their natural sugars.
2. Can I prepare the tomatoes ahead of time?
Certainly! You can roast the tomatoes earlier in the day and simply reheat before serving. Just be mindful that the cheese will need to be added fresh!
3. Why did my burrata melt instead of stay creamy?
This can happen if the burrata is too warm before serving. Make sure it’s at room temperature and not directly exposed to the oven’s heat!
4. Can I use different types of tomatoes?
Absolutely! Use whatever is fresh and looks good—heirloom tomatoes, even larger beefsteak varieties, are also delicious. Just adjust your roasting time accordingly.
Nutritional Info
While precise nutritional information can vary, this dish is a delightful source of vitamins A and C, fiber, and good fats, thanks to the olive oil and cheese. Pairing it with whole-grain bread can further enhance the nutrient profile!
So, there you have it! Your new favorite dish that combines nostalgia, flavor, and simplicity—Roasted Tomatoes with Burrata. I hope this recipe brings as much joy to your kitchen as it does to mine. Happy cooking, and let’s keep it fresh, simple, and oh-so-delicious!
PrintRoasted Tomatoes with Burrata
A vibrant dish featuring sweet roasted tomatoes and creamy burrata, perfect for any meal.
- Prep Time: 10 minutes
- Cook Time: 30 minutes
- Total Time: 40 minutes
- Yield: 4 servings 1x
- Category: Appetizer
- Method: Roasting
- Cuisine: Italian
- Diet: Vegetarian
Ingredients
- 2 pints grape or cherry tomatoes (approx 4 cups)
- 2 garlic cloves, smashed and left unpeeled
- ½–1 teaspoon dried herbs (rosemary, thyme, oregano, or Italian seasoning)
- ¼ teaspoon dried chili flakes
- 2 tablespoons extra virgin olive oil
- 1 tablespoon balsamic vinegar (optional)
- Pinch of salt and ground black pepper
- Fresh basil or parsley for serving
- 8 ounces burrata cheese (at room temperature) or goat cheese
- Grilled bread, crackers, crisps, or crostini
Instructions
- Preheat your oven to 400°F (200°C).
- Prep your baking dish by lining it with parchment paper.
- Toss the tomatoes and garlic together in a large bowl with olive oil, herbs, chili flakes, salt, and pepper.
- Spread them out on the prepared baking dish in a single layer.
- Roast for about 25–30 minutes, or until the tomatoes are blistered and bursting.
- Add balsamic vinegar in the last 5 minutes of roasting, if using.
- Plate it up by nesting burrata in the center and drizzling with olive oil.
- Serve it warm with crispy bread for scooping.
Notes
Feel free to mix and match herbs or cheeses based on your preference! The dish can be prepared in advance and reheated, but add cheese fresh for best results.
Nutrition
- Serving Size: 1 serving
- Calories: 320
- Sugar: 6g
- Sodium: 350mg
- Fat: 18g
- Saturated Fat: 10g
- Unsaturated Fat: 8g
- Trans Fat: 0g
- Carbohydrates: 30g
- Fiber: 3g
- Protein: 12g
- Cholesterol: 30mg
Keywords: roasted tomatoes, burrata, Italian appetizer, easy recipe, vegetarian dish
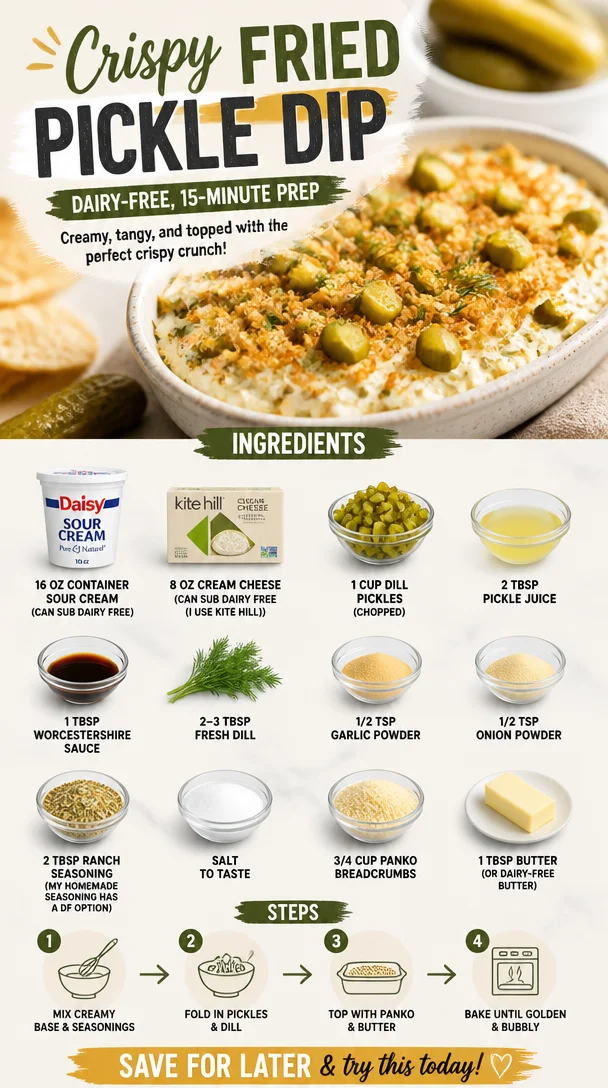
Crispy Fried Pickle Dip (Dairy-Free, 15-Minute Prep)
The Ultimate Easy Fried Pickle Dip: A Dairy-Free Delight
Hey there, food lovers! Welcome back to Clean Plate Cravings! Today, we’re diving right into one of my favorite crowd-pleasers that’s perfect for game days, movie nights, or simply when you’re craving something tasty to snack on. Yep, you guessed it – it’s Easy Fried Pickle Dip! This dip is rich, creamy, and bursting with flavor, and the best part? I’ll show you how to whip it up with a dairy-free option, so everyone can join in on the fun!
I remember the first time I stumbled upon a fried pickle dip at a local pub. It was a warm summer evening, and I was hanging out with friends, just enjoying the vibes. We ordered a few appetizers to share, and when that golden, crispy pickle dip came out, my world changed! The crunchy bits on top, alongside that fabulous tangy pickle flavor, created a taste explosion that I just couldn’t resist. I knew I had to recreate it at home! After a few trial and errors in my kitchen, I can confidently say this recipe captures all that nostalgia without the fuss. So, let’s jump straight into it!
Personal Story
Growing up, my family had this tradition of gathering for Sunday dinners. Each week, we would choose a theme, and one time it was all about “dips.” We lined the table with various spreads, each one more delicious than the last. There were guacamoles, hummuses, and legends of a spinach artichoke dip that always disappeared by the time desserts came out. Somewhere in that mix, my aunt introduced us to her take on fried pickles, and we couldn’t get enough!
Fast forward a few years, and the moment I discovered fried pickle dip was like a nostalgic memory come back to life. It reminded me of family gatherings, laughter, and good food. I decided to take my aunt’s love for fried pickles and morph it into a creamy, dreamy dip—making it perfect for a casual get-together or even a cozy night in. I couldn’t wait to share this dish with you all, so let’s get cooking!
Ingredients
Let’s gather our ingredients! Here’s what you’ll need:
-
16 oz container sour cream (dairy-free option available)
- Chef Insight: Sour cream gives that creamy texture and tang. If you go dairy-free, try out cashew-based options or coconut cream for a dreamy substitute!
-
8 oz cream cheese (can substitute with dairy-free cream cheese like Kite Hill)
- Substitution Tip: The cream cheese adds richness; ensure it’s softened so you can blend it seamlessly into the dip.
-
1 cup dill pickles (chopped)
- Fun Fact: The heart of this recipe! Use good-quality dill pickles for that signature tang. You can also try bread and butter pickles if you prefer a sweet twist.
-
2 tbsp pickle juice
- Chef Insight: This brings the briny flavor into the dip! Don’t be shy; it adds that zesty kick we love.
-
1 tbsp Worcestershire sauce (make sure it’s vegan if you’re dairy-free)
- Note: This adds depth and umami to the flavor; read labels to ensure it aligns with your dietary needs.
-
2-3 tbsp fresh dill
- Substitution Tip: Fresh dill brightens everything up! If you only have dried, 1 tablespoon will do, but fresh is always best!
-
1/2 tsp garlic powder
- Chef Insight: Adds lovely flavor without the hassle of chopping fresh garlic.
-
1/2 tsp onion powder
- Substitution Tip: Like garlic powder, this is a powerhouse and creates a wonderful backdrop for the pickle flavor.
-
2 tbsp ranch seasoning (I have a homemade version with a dairy-free option!)
- Fun Fact: This is where the magic happens! Store-bought ranch may work, but homemade gives you control over the ingredients.
-
Salt to taste
- Note: Always taste your mixture! Pickles can be salty, so adjust as necessary.
-
3/4 cup Panko breadcrumbs
- Substitution Tip: For a gluten-free option, swap these out for gluten-free breadcrumbs or crushed nuts.
-
1 tbsp butter (or dairy-free butter)
- Chef Insight: Using butter gives the Panko a beautiful golden crunch! Leave it out if you’re cooking without oil or fat.
Step-by-Step Instructions
Alright, let’s get our hands dirty—this dip is super simple to make! Follow along closely:
-
Prep Your Ingredients: Start by gathering and measuring out all your ingredients. This makes the cooking process smoother. While some people love winging it, trust me, a little prep goes a long way!
-
Combine the Cream Base: In a large mixing bowl, add your softened cream cheese and sour cream. Blend them together using a spatula or hand mixer until they’re well combined. You want this to be super creamy and smooth.
-
Add the Good Stuff: Now, slowly fold in the chopped dill pickles, pickle juice, Worcestershire sauce, fresh dill, garlic powder, onion powder, and ranch seasoning. Mix well until everything is incorporated. You should see bites of pickle peeking through that gorgeous, creamy base!
-
Taste and Adjust: Here’s the fun part—taste your dip! This is your chance to adjust anything to your liking. Need more pickle juice? Want it a bit zestier? Go ahead and make it your own!
-
Prepare for Baking: Transfer the dip mixture into a baking dish (an 8×8 inch dish is perfect). Even out the top with a spatula.
-
Panko Topping Time: In a small bowl, melt your butter, then mix in the Panko breadcrumbs until they’re nicely coated. Spread this crunchy mixture evenly over the dip.
-
Bake to Perfection: Preheat your oven to 350°F (175°C) and pop the dip in for 20-25 minutes, or until the top is golden and bubbly. Your kitchen will smell heavenly, and the anticipation will build!
-
Chill for a Moment: Once it’s out of the oven (and cooled slightly), dive in with some chips, veggies, or even crackers. But beware, it can be hard to wait!
Serving Suggestions
When it comes to serving this Easy Fried Pickle Dip, you have endless options. Serve it warm right out of the oven for that gooey, melty goodness! Pair it with crispy potato chips or veggie sticks like carrots and celery for that crunchy contrast. A platter filled with colorful snacks will make your dip stand out even more. Just don’t forget to have extra pickle slices on the side for those who can’t get enough!
Recipe Variations
Want to switch it up? Here are a few creative twists you can make to keep things fresh:
-
Spicy Kick: Add a sprinkle of cayenne pepper or some chopped jalapeños for a fiery twist.
-
Cheesy Delight: Mix in some dairy-free cheese shreds for an even creamier dip.
-
Herbal Adventure: Swap out dill for fresh chives or parsley for a different flavor profile.
-
Bacon Lover’s Dip: Crumple some crispy turkey bacon or coconut bacon on top before baking for a smoky crunch.
-
Tex-Mex Style: Incorporate a handful of chopped sundried tomatoes or black olives for a Mediterranean flair.
Chef’s Notes
Cooking is always evolving, just like this recipe! The first iteration I made was too heavy on the cream cheese, which overshadowed the pickles. After a couple of tweaks (and some snack breaks!), I found the perfect balance of creaminess and tang. I even introduced a dairy-free version for my friends with dietary restrictions, making it versatile for gatherings. And let me tell you—this dip never lasts long!
FAQs and Troubleshooting
1. My dip isn’t creamy enough; what do I do?
If your dip turns out too thick, mix in a bit more pickle juice or a splash of non-dairy milk to loosen it up and make it silky.
2. Can I make this dip ahead of time?
Absolutely! You can prepare the dip and even sprinkle on the breadcrumbs a day in advance. Just cover and refrigerate until you’re ready to bake.
3. My Panko got soggy, what happened?
If your dip is too watery, the Panko can absorb it and lose that crunch. Make sure to drain excess pickle juice before adding it into your dip.
4. What can I use instead of Panko?
Try using crushed crackers or nuts for a tasty topping! Just remember that the texture will be different.
Nutritional Info
While I don’t always include nutritional info, it’s worth noting that this Easy Fried Pickle Dip is a creamy indulgence and best enjoyed in moderation. With the ability to make it dairy-free, it caters to various dietary preferences, making it a versatile addition to your snacking game!
I hope you feel inspired to bring this Easy Fried Pickle Dip into your kitchen! It’s a recipe that comes with memories, laughs, and, of course, scrumptious bites. Let’s keep the flavor alive! Happy dipping, my friends!
PrintThe Ultimate Easy Fried Pickle Dip: A Dairy-Free Delight
A rich and creamy dip bursting with flavor, and a dairy-free option for everyone to enjoy. Perfect for game days and cozy nights.
- Prep Time: 15 minutes
- Cook Time: 25 minutes
- Total Time: 40 minutes
- Yield: 8 servings 1x
- Category: Appetizer
- Method: Baking
- Cuisine: American
- Diet: Dairy-Free, Vegetarian
Ingredients
- 16 oz container sour cream (dairy-free option available)
- 8 oz cream cheese (can substitute with dairy-free cream cheese)
- 1 cup dill pickles (chopped)
- 2 tbsp pickle juice
- 1 tbsp Worcestershire sauce (vegan if dairy-free)
- 2–3 tbsp fresh dill
- 1/2 tsp garlic powder
- 1/2 tsp onion powder
- 2 tbsp ranch seasoning (dairy-free option available)
- Salt to taste
- 3/4 cup Panko breadcrumbs
- 1 tbsp butter (or dairy-free butter)
Instructions
- Prep your ingredients: Start by gathering and measuring out all your ingredients for a smoother cooking process.
- Combine the cream base: In a large mixing bowl, add soft cream cheese and sour cream. Blend until creamy and smooth.
- Add the good stuff: Fold in chopped dill pickles, pickle juice, Worcestershire sauce, fresh dill, garlic powder, onion powder, and ranch seasoning.
- Taste and adjust: Sample your dip and adjust seasoning as needed.
- Prepare for baking: Transfer the dip mixture into an 8×8 inch baking dish and even out the top with a spatula.
- Panko topping time: Melt butter and mix with Panko breadcrumbs. Spread over the dip.
- Bake to perfection: Preheat oven to 350°F (175°C) and bake for 20-25 minutes until golden and bubbly.
- Chill for a moment: Let cool slightly before serving with chips, veggies, or crackers.
Notes
You can prepare the dip ahead of time and refrigerate until you’re ready to bake. Adjust ingredients to personal taste.
Nutrition
- Serving Size: 1 serving
- Calories: 320
- Sugar: 3g
- Sodium: 450mg
- Fat: 18g
- Saturated Fat: 6g
- Unsaturated Fat: 10g
- Trans Fat: 0g
- Carbohydrates: 30g
- Fiber: 1g
- Protein: 5g
- Cholesterol: 24mg
Keywords: fried pickle dip, dairy-free dip, appetizer recipes, party food, game day snacks
Caprese Dip
A Taste of Summer: Caprese Dip to Savor
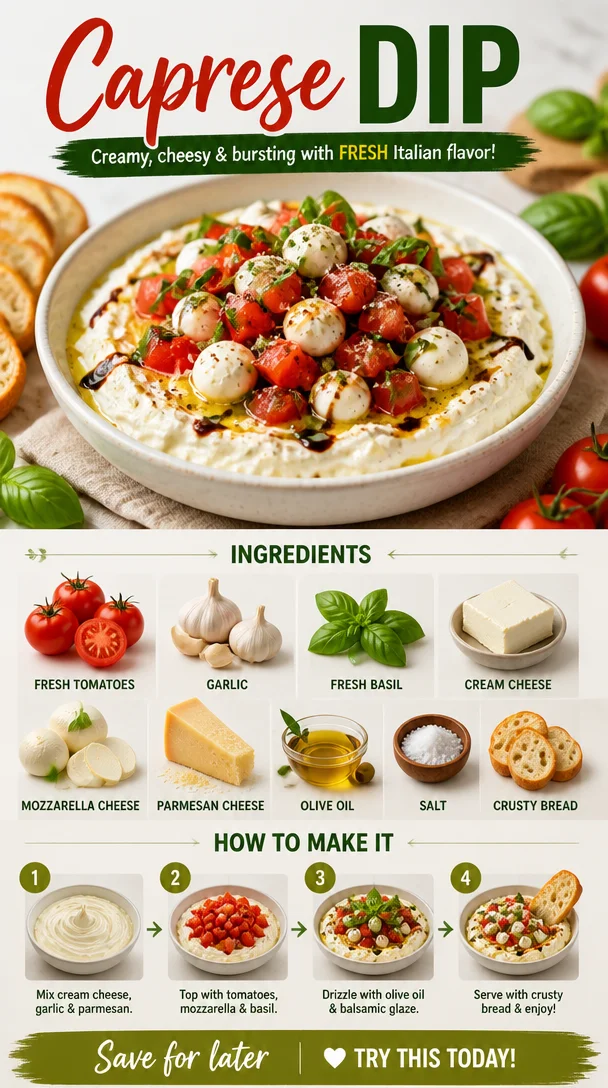
Hello there, fellow food lovers! Today, I’m thrilled to share one of my go-to recipes that screams summer but is delightful on any occasion: Caprese Dip! This vibrant, creamy, and oh-so-delicious dip combines the classic flavors of a Caprese salad and brings it right to your snack table. It’s perfect for parties, casual get-togethers, or even a cozy night in with friends—because who doesn’t love some good foot-stomping, finger-licking goodness?
Let’s chat for a moment about the fresh ingredients that come together to create this dip. Imagine plump, ripe tomatoes bursting with flavor, aromatic garlic dancing around in the mix, and the sweet, herbal notes of fresh basil wafting through the air. And don’t even get me started on the creamy goodness of cream cheese combined with gooey mozzarella and salty Parmesan—pure bliss!
Back in the day, during those endless summer afternoons at my grandparents’ house, my family would gather around a big platter of fresh Caprese salad, with all the colors of summer exploding on the table. It was a simple dish but packed with memories, laughter, and a hint of competition to see who could snag the last piece of mozzarella. This dip is my homage to those sunny days, a way to bring that nostalgia and love into a comforting, shareable form.
Now, let’s jump into how to whip up this fabulous Caprese Dip that your taste buds (and your friends) will thank you for!
Ingredients
Gather these fresh goodies to create your Caprese Dip masterpiece:
-
Fresh Tomatoes: The star of the show! I recommend using heirloom or vine-ripened tomatoes for their intense flavor. If you’re in a pinch, feel free to substitute with cherry tomatoes or even sun-dried tomatoes for a different flavor profile.
-
Garlic: A couple of cloves will do the trick, bringing a lovely depth of flavor. If you’re not a fan of raw garlic, try roasting it first for a sweeter, milder taste.
-
Fresh Basil: Nothing beats the fragrant aroma of fresh basil! If you can’t find any, dried basil can be used in a pinch, but fresh is always best for that vibrant punch.
-
Cream Cheese: This adds a luscious creaminess to the dip. Low-fat cream cheese can be a lighter alternative, but you can also swap it for Greek yogurt for a tangy twist!
-
Mozzarella Cheese: Go for the fresh mozzarella balls (bocconcini) for the best texture and flavor, but shredded mozzarella works if that’s all you have on hand.
-
Parmesan Cheese: Grated Parmesan gives that savory kick! For a vegan option, try nutritional yeast for a cheesy flavor without the dairy.
-
Olive Oil: A drizzle of high-quality extra virgin olive oil will elevate your dip’s flavors. You can swap this out with avocado oil for a buttery taste.
-
Salt: Just a pinch to enhance all the flavors. Always taste and adjust; everyone has different salt preferences!
-
Crusty Bread: To serve, you’ll need something to scoop up this deliciousness. A fresh baguette, ciabatta, or even pita chips will work beautifully.
Step-by-Step Instructions
-
Prep the Ingredients:
- Start by dicing your tomatoes. Aim for bite-sized pieces since this dip will be an easy grab-and-dip situation. Don’t forget to remove any excess seeds to prevent it from getting watery. A chef hack? Gently squeeze the tomatoes to release some juice before chopping.
- Mince the garlic finely; this will infuse every bite with flavor. Don’t be shy; garlic lovers rejoice!
-
Mix the Creamy Base:
- In a large mixing bowl, beat the cream cheese until it’s smooth. You can use a hand mixer, or just your trusty spatula—whatever floats your boat! If your cream cheese is still cold, it might take a moment to soften up, so patience is key!
- Add in the minced garlic and finely chopped fresh basil. Mix well, letting those flavors meld—it’s a fragrant delight!
-
Incorporate the Cheeses:
- Fold in the mozzarella and Parmesan cheese gently so you don’t break apart the mozzarella balls. Imagine you’re cradling a small, lovely baby; we want the cheese chunks intact for those gooey bites!
-
Combine with Tomatoes:
- Now, gently fold in the diced tomatoes and a pinch of salt. This is where color and flavor collide! The vivid reds and greens will make your heart sing.
-
Final Touches:
- Drizzle in a generous swirl of olive oil and give it one last mix. Taste it—does it need a bit more salt? Maybe another drizzle of olive oil? Adjust as needed to suit your taste.
-
Serve It Up:
- Transfer the Caprese Dip to a rustic serving bowl. Optional step: Garnish with a few basil leaves and an extra drizzle of olive oil on top to make it Instagram-ready.
Serving Suggestions
This dip is best enjoyed fresh, served alongside warm, crusty bread or crispy pita chips. Arrange your serving platter beautifully, with toast slices around the dip, maybe even a few fresh basil leaves for that extra touch. It’s all about presentation, so get creative! Win the hearts of your guests with an attractive spread that invites everyone to dig in.
Recipe Variations
-
Pesto Caprese Dip: Mix in a few tablespoons of pesto when combining with the cheeses for a herby twist that’ll make it pop.
-
Spicy Caprese Dip: Add a dash of red pepper flakes or some finely chopped jalapeños for a kick.
-
Veggie-packed Dip: Fold in finely diced bell peppers or roasted red peppers for extra flavor and a dosage of color.
-
Olive Tapenade Addition: Try mixing in a bit of olive tapenade for a briny depth that complements the fresh flavors.
Chef’s Notes
I first experimented with this dip one lazy Friday evening, yearning for something fresh but cozy. It began as a little creativity while clearing out my fridge. The fact that it magically transforms simple ingredients into a crowd-pleaser is beyond me, but that’s how cooking goes sometimes, isn’t it?
Over the years, I’ve had friends tell me they’ve made this for their summer barbecues and even holiday parties—successes that have put a smile on my face. It evolves with the seasons, much like my cooking journey—from trying new ingredients to adapting for dietary needs. I love that cooking can be fluid and adaptable; it’s part of the fun!
FAQs and Troubleshooting
1. My dip turned out too watery. What happened?
This often happens if the tomatoes are too juicy! Be sure to remove excess seeds before chopping, or you can strain the chopped tomatoes if needed.
2. Can I use dried basil instead of fresh?
While I always recommend fresh for best flavor, you can substitute dried basil in a pinch! Just use about a third of the amount—dried herbs are more concentrated.
3. My cream cheese isn’t blending smoothly. What can I do?
If your cream cheese is too cold, try microwaving it for just about 10-15 seconds or let it sit out at room temperature for about 30 minutes before mixing to make it easier to blend.
4. How can I store leftovers?
If you have any dip left (which is rare), store it in an airtight container in the fridge. It should last for 3–5 days. Just give it a good stir before serving again!
Nutritional Info
Though I’ll always advocate for enjoying food without fear, here’s a little peek at the nutritional value: approximately 150 calories per serving (about 2 tablespoons), with a healthy dose of protein and wonderful flavor without any guilt!
So, there you have it! Dive into your very own Caprese Dip, and recreate those sunny days filled with flavor and laughter. Whether you’re sharing it with friends or keeping it all to yourself (no judgment here!), I hope this vibrant dip brings a bit of joy to your table. Happy cooking, my friends! 🍅🍃🥖
PrintCaprese Dip
A vibrant and creamy dip that combines classic Caprese salad flavors, perfect for summer gatherings or cozy nights in.
- Prep Time: 15 minutes
- Cook Time: 0 minutes
- Total Time: 15 minutes
- Yield: 8 servings 1x
- Category: Appetizer
- Method: No Cooking
- Cuisine: Italian
- Diet: Vegetarian
Ingredients
- 4 Fresh Heirloom Tomatoes, diced
- 2 cloves Garlic, minced
- 1/4 cup Fresh Basil, chopped
- 8 oz Cream Cheese, softened
- 1 cup Fresh Mozzarella balls (bocconcini)
- 1/2 cup Grated Parmesan cheese
- 2 tbsp Olive Oil
- Salt, to taste
- Crusty Bread, for serving
Instructions
- Prep the Ingredients: Dice the tomatoes into bite-sized pieces, remove excess seeds, and mince the garlic finely.
- Mix the Creamy Base: Beat the cream cheese until smooth, then mix in minced garlic and chopped basil.
- Incorporate the Cheeses: Gently fold in mozzarella and Parmesan cheese to maintain the mozzarella’s shape.
- Combine with Tomatoes: Fold in the diced tomatoes and a pinch of salt.
- Final Touches: Drizzle olive oil and adjust seasoning as needed.
- Serve It Up: Transfer to a rustic serving bowl and garnish with basil and olive oil.
Notes
Best served fresh with warm crusty bread or crispy pita chips. Can be customized with pesto, spicy peppers, or vegetables.
Nutrition
- Serving Size: 2 tablespoons
- Calories: 150
- Sugar: 3g
- Sodium: 300mg
- Fat: 10g
- Saturated Fat: 5g
- Unsaturated Fat: 3g
- Trans Fat: 0g
- Carbohydrates: 5g
- Fiber: 1g
- Protein: 4g
- Cholesterol: 25mg
Keywords: Caprese Dip, Summer Dip, Appetizer, Italian Recipes, Creamy Dip
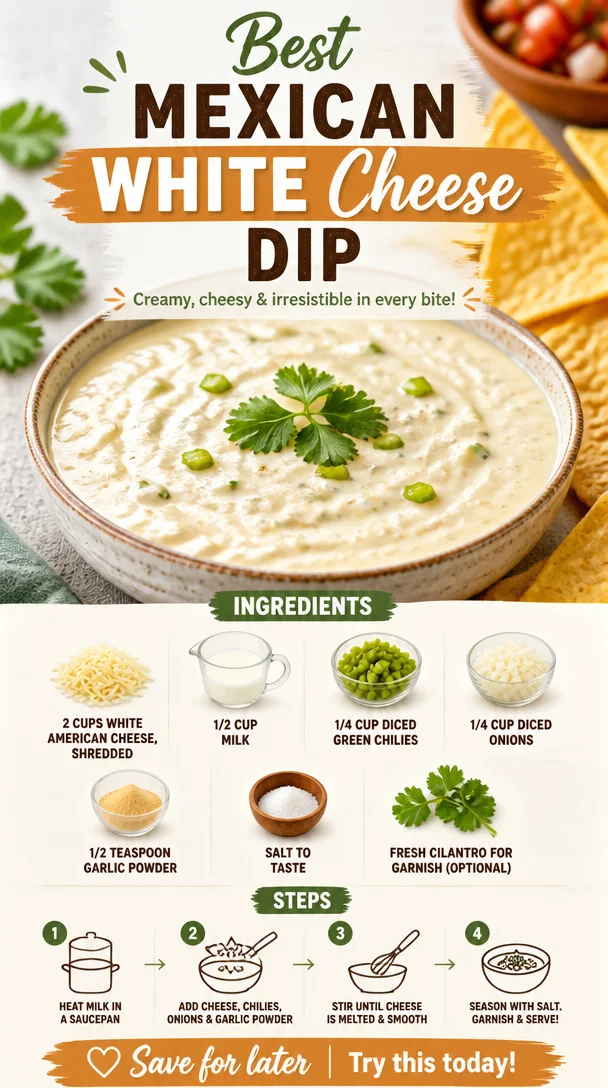
Best Mexican White Cheese Dip
Best Mexican White Cheese Dip: A Flavorful Journey
Welcome to Clean Plate Cravings, friends! Today, we’re diving into a beloved classic that is sure to make your taste buds dance. I can already hear the crunch of tortilla chips and the zing of flavor as we prepare to make the best Mexican white cheese dip. This cheesy delight is not just a party favorite; it’s a comfort food that brings people together, whether you’re throwing a festive gathering or just indulging in a cozy night on the couch.
Now, let’s talk about the magic that happens when smooth, velvety cheese meets zesty ingredients. Trust me, this dip is a crowd-pleaser! There’s something about that warm, gooey texture and rich flavor that makes every bite feel like a warm hug. The best part is that it’s incredibly simple to make—perfect for busy weeknights when you just want something delicious without all the fuss.
A Whirlwind Through Flavorful Memories
Flashback to my childhood summers spent in my abuela’s kitchen. The tantalizing aroma of spice and cheese wafted through the air, mingling perfectly with laughter and chatter. Every family gathering centered around delicious food, and no occasion was too small for her famous white cheese dip. It wasn’t just about the dip; it was the experience of gathering around the table, dipping crunchy tortilla chips in a pot of cheesy goodness, and sharing stories with family and friends.
Each bite transported me back to those sun-soaked afternoons—friends and family, a backyard full of sunshine, and of course, that unforgettable white cheese dip. Now, I’ll share that joy with you through this recipe, so you can create those same wonderful moments. Whether you’re hosting a taco night, watching the big game, or just needing a cozy treat, this dip fits right in!
Ingredients
Here’s what you’ll need to create this heavenly white cheese dip, plus some tips to enhance your experience:
-
2 cups white American cheese, shredded
The star of the show! Its creamy texture melts beautifully and creates that desired dip consistency. If you can’t find white American, you can use Monterey Jack or a blend of both for a slightly different flavor. -
1/2 cup milk
This helps to provide the right creaminess. Use whole milk for a richer dip, or substitute with almond milk or oat milk for a lighter option. -
1/4 cup diced green chilies
These little gems bring a lively flavor and a touch of heat. If you prefer a milder taste, opt for canned diced green chilies such as mild or substitute with sweet bell peppers. -
1/4 cup diced onions
For added depth of flavor! You can use white or yellow onions, or even sauté some scallions for a fresher taste. -
1/2 teaspoon garlic powder
Just a pinch as we want it to enhance, not overpower. Feel free to switch to fresh minced garlic for a more intense flavor. -
Salt to taste
Always adjust to your personal preference, but remember, the cheese already has some saltiness! -
Fresh cilantro for garnish (optional)
A sprinkle brings freshness and a pop of color. If cilantro isn’t your thing, chopped green onions work well too.
Step-by-Step Instructions
Ready to set your cheese dip into motion? Let’s get cooking!
-
Prepare Your Ingredients
Start by gathering all your ingredients. Shred the cheese ahead of time for a smoother melt. Having everything ready will make the cooking process seamless! -
Heat Up the Pot
In a medium saucepan, pour in your milk and set it on low to medium heat. Gently heating the milk helps it blend seamlessly with the cheese. -
Add the Cheese
Gradually add in the shredded white American cheese while stirring continuously. I love to use a wooden spoon for this—it feels more rustic and somehow enhances the experience! -
Incorporate the Diced Veggies
Once the cheese starts to melt (and the smell wafts through the kitchen—heaven!), fold in the diced green chilies and onions. Keep stirring, so everything warms evenly. This is also where you want to sprinkle in that garlic powder. -
Season and Stir
Taste your mixture and add salt as needed. Remember, every cheese has a different salt content, so adjust accordingly. Continue stirring until it’s completely smooth and melted. If it feels too thick, splash in a bit more milk until it reaches your desired dip consistency. -
Garnish and Serve
Remove the saucepan from the heat. This is where you can be creative—sprinkle fresh cilantro on top for a pop of color and flavor.
Serving Suggestions
Now that your dip is ready, it’s time to serve! Pour the cheesy goodness into a charming bowl, and place it in the center of your dining table with a generous pile of crunchy tortilla chips around it. You can also serve it with fresh veggie sticks for a lighter alternative. Perfect for sharing… or for indulging solo—no judgment here!
Recipe Variations
Get ready to take this dip to new heights with these fun variations:
- Spicy Twist: Add a dash of cayenne pepper or diced jalapeños to really kick things up a notch.
- Meaty Addition: Crumble in some cooked chorizo or ground beef for a heartier version.
- Veggie Delight: Mix in some sautéed bell peppers and corn for extra flavor and texture.
- Herbed Up: Stir in some fresh herbs like basil or oregano for a unique twist.
- Smoky Flavor: Use smoked gouda cheese in place of white American for a deliciously smoky version.
Chef’s Notes
This recipe has been a beloved staple in my kitchen for years, and believe me; I’ve had my fair share of experimental dips. I remember once adding too much garlic, thinking I could intensify the flavor. Let’s just say, it was a lesson learned—sometimes, less is more! Over time, I refined this recipe, incorporating traditional elements while making it approachable.
If you have kids in the kitchen, this is a fantastic recipe to have them help with. Let them sprinkle cheese or choose the garnishes—anything to get them excited about cooking!
FAQs and Troubleshooting
1. My dip turned out too thick—what should I do?
No worries! Gradually add more milk until you reach the desired consistency while stirring continuously.
2. Why is my cheese dip gritty?
This can happen if the cheese is overheated or if it’s not good quality. Ensure you’re melting at low heat, and consider investing in a higher-quality cheese for better results.
3. Can I make this dip in advance?
Yes! Prepare the dip and store it in an airtight container in the fridge for up to three days. When you’re ready to serve, gently reheat it on low heat, adding a splash of milk as needed.
4. What can I use instead of cheese?
For a dairy-free option, try a cashew cheese sauce or a plant-based cheese alternative. Just consider that the flavor and consistency may differ.
Nutritional Info (optional)
While I don’t often dive deep into nutritional information, this dip provides a blend of protein and calcium thanks to the cheese. Just remember to enjoy it in moderation, especially if you’re pairing it with that big bowl of tortilla chips!
In conclusion, this Mexican white cheese dip is more than just a recipe; it’s a celebration of flavor and memories. I hope you bring this joy into your kitchen and make it your own. Get ready to dip, share, and savor every mouthful! Happy cooking!
PrintBest Mexican White Cheese Dip

A creamy and flavorful Mexican cheese dip that brings people together, perfect for parties or cozy nights. Enjoy this beloved comfort food with tortilla chips!
- Prep Time: 10 minutes
- Cook Time: 15 minutes
- Total Time: 25 minutes
- Yield: 4 servings 1x
- Category: Appetizer
- Method: Cooking
- Cuisine: Mexican
- Diet: Vegetarian
Ingredients
- 2 cups white American cheese, shredded
- 1/2 cup milk
- 1/4 cup diced green chilies
- 1/4 cup diced onions
- 1/2 teaspoon garlic powder
- Salt to taste
- Fresh cilantro for garnish (optional)
Instructions
- Prepare your ingredients by gathering everything and shredding the cheese.
- Heat up a medium saucepan over low to medium heat and pour in the milk.
- Add the shredded cheese gradually while stirring continuously.
- Incorporate the diced green chilies and onions once the cheese starts to melt, and then sprinkle in the garlic powder.
- Season the mixture with salt to taste and stir until smooth, adding more milk if needed.
- Garnish with cilantro before serving.
Notes
For added spice, mix in cayenne pepper or jalapeños. This dip can be made in advance and reheated for convenience.
Nutrition
- Serving Size: 1 serving
- Calories: 350
- Sugar: 2g
- Sodium: 800mg
- Fat: 24g
- Saturated Fat: 14g
- Unsaturated Fat: 8g
- Trans Fat: 0g
- Carbohydrates: 6g
- Fiber: 1g
- Protein: 15g
- Cholesterol: 60mg
Keywords: cheese dip, Mexican dip, appetizer, comfort food, party food