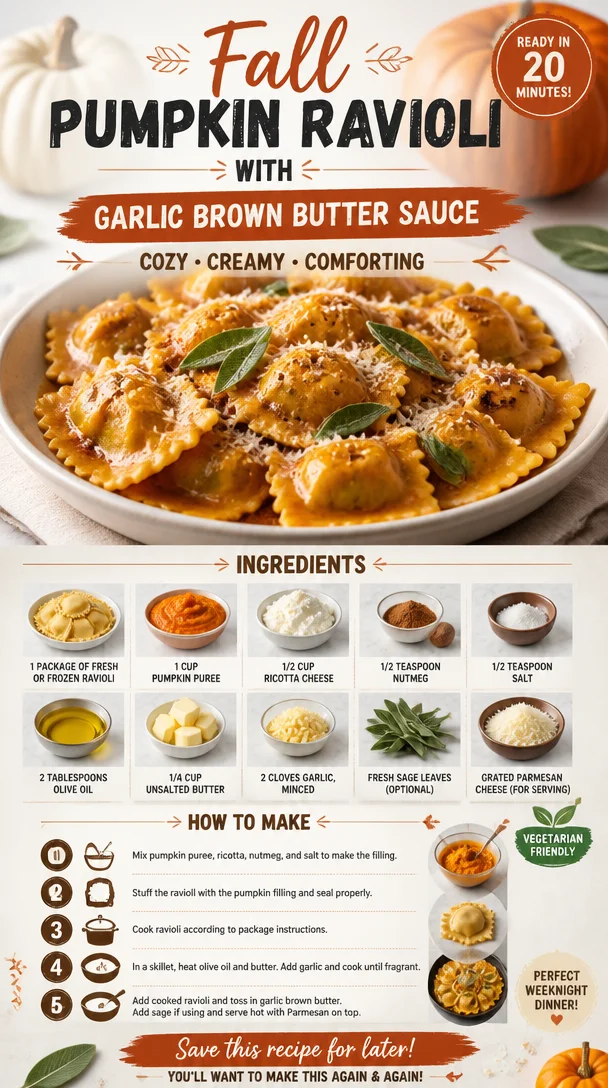
Fall Pumpkin Ravioli with Garlic Brown Butter Sauce
Homemade Pumpkin Ravioli with Garlic Brown Butter
Welcome, fellow food lovers! Today I’m here to share a recipe that perfectly captures the essence of fall—Homemade Pumpkin Ravioli with Garlic Brown Butter. If you’re anything like me, there’s something magical about the aroma of pumpkin wafting through your kitchen, especially as the leaves turn golden, and everything feels cozy.
This dish beautifully balances that rich pumpkin flavor with a nutty garlic brown butter sauce that’ll have you doing a happy dance in your kitchen. Homemade ravioli might sound intimidating, but trust me, once you see how easy and fun it can be, you’ll want to make it again and again. So, roll up those sleeves, and let’s dive in!
A Journey to the Heart of Pumpkin Ravioli
This dish holds a special place in my heart. Let me take you back to a sunny October afternoon several years ago when I decided to host my very first fall dinner party. I wanted to impress my friends with something unique, and after flipping through an old family recipe book, I stumbled upon a simple yet elegant pumpkin ravioli recipe.
With my hands dusted in flour and a sprinkling of fall ambiance all around, I felt a connection to my roots and cooking traditions. As my friends arrived, the excitement in the air was palpable. We laughed, shared stories, and enjoyed our homemade ravioli tossed in a garlic brown butter sauce. The warmth and laughter flowed freely, marking that evening as one of my most cherished memories in the kitchen.
Ingredients
Let’s make magic happen! Here’s what you’ll need for your pumpkin ravioli:
-
1 package of fresh or frozen ravioli: While you can absolutely use store-bought ravioli to save time, opt for fresh ones if you can. They’ll really elevate the dish!
-
1 cup pumpkin puree: This is the star of the show! You can use canned pumpkin puree or make your own by roasting and pureeing fresh pumpkins. If you want to switch things up, try using sweet potato puree for a different flavor profile.
-
1/2 cup ricotta cheese: Adds creaminess and richness to the filling. If you’re looking for a lighter option, cottage cheese can be a nice substitute.
-
1/2 teaspoon nutmeg: Essential for that warm, cozy flavor that’s synonymous with fall. You can swap this for freshly grated nutmeg, which has a more robust aroma.
-
1/2 teaspoon salt: Balances the flavors and helps enhance the sweetness of the pumpkin. Feel free to adjust this based on your taste.
-
2 tablespoons olive oil: Used to sauté the garlic and gives a healthy dose of flavor. Avocado oil works well too!
-
1/4 cup unsalted butter: For that luscious brown butter sauce. If you want to keep it dairy-free, go for coconut oil or a vegan butter substitute.
-
2 cloves garlic, minced: Adds depth and richness to the sauce. If you’re a garlic lover, feel free to add more!
-
Fresh sage leaves (optional): Lightly frying sage leaves in the brown butter brings a delightful flavor. If you’re not a fan of sage, try using thyme or parsley.
-
Grated Parmesan cheese (for serving): A beautiful finishing touch! Nutritional yeast is a great plant-based alternative if you want a dairy-free option.
Step-by-Step Instructions
Sit back, relax, and let’s get cooking! Here’s how to make your pumpkin ravioli from scratch.
-
Prepare the Filling: In a mixing bowl, combine the pumpkin puree, ricotta cheese, nutmeg, and salt. Mix until smooth and creamy. That’s it for the filling! It’s delightful on its own, too. Consider tasting a little for seasoning—after all, a great chef always samples!
-
Roll out the Ravioli Dough: If you’re making homemade pasta (which I highly recommend), roll out your dough to a thin sheet using a pasta machine or a rolling pin. Dusting with flour helps prevent sticking and makes things so much easier.
-
Form the Ravioli: Use a round cookie cutter or a glass to cut out circles from the pasta sheet. Place a small spoonful of your pumpkin filling in the center of each circle. Don’t overfill; about a teaspoon should do!
-
Seal the Ravioli: Wet the edges of the pasta circles with a little water, and fold them over to create a half-moon shape. Press the edges tightly to seal, and if you want a decorative touch, seal the edges with a fork.
-
Cook the Ravioli: Bring a large pot of salted water to a gentle boil. Carefully drop the ravioli in and cook for about 3-4 minutes, until they float to the surface. Fresh ravioli usually cooks faster, so keep an eye on them!
-
Make the Garlic Brown Butter Sauce: While the ravioli cook, heat the olive oil and butter in a saucepan over medium heat. Add the minced garlic and cook for 1-2 minutes until fragrant. Be careful not to let it burn, as burnt garlic is never fun!
-
Brown the Butter: Allow the butter to melt and bubble, and watch it turn golden brown. You want those nutty aromas! Once it reaches that rich color, add in some fresh sage leaves if using. Stir for an additional minute.
-
Combine: Once the ravioli are cooked, use a slotted spoon to transfer them to the pan with the brown butter sauce. Toss gently to coat without breaking the ravioli.
-
Plate It Up: Serve your gorgeous pumpkin ravioli in shallow bowls. Drizzle the garlic brown butter sauce over the top and finish with a generous sprinkle of grated Parmesan cheese.
Serving Suggestions
To make your dinner extra special, consider serving the pumpkin ravioli with a simple arugula salad dressed with lemon vinaigrette. The peppery greens contrast beautifully with the creamy ravioli and adds a refreshing crunch. Pair it with a light Pinot Grigio or an herbal tea to round out the experience!
Recipe Variations
Feel free to get creative! Here are a few fun twists to consider:
- Spicy Pumpkin Ravioli: Add a pinch of cayenne pepper or chili flakes to your filling for a bit of heat.
- Nutty Sage Variations: Toast some walnuts or pine nuts and sprinkle them over the ravioli for added crunch and flavor.
- Creamy Alfredo Twist: Swap the garlic brown butter for a light Alfredo sauce for an indulgent variation.
- Vegetarian Option: Replace the ricotta cheese with a vegan alternative or a blend of sautéed mushrooms for a hearty, earthy flavor.
Chef’s Notes
I love how this recipe has evolved over the years! Initially, I was quite nervous about making pasta from scratch. But after several attempts (and a couple of mishaps), I finally nailed it! There’s something so rewarding about creating a dish that’s not only comforting but also brimming with nostalgia. It reminds me of family gatherings during the holidays, sharing food and love around the table. Cooking should always feel approachable; it’s about experimenting, learning, and having fun!
FAQs and Troubleshooting
-
What can I do if my ravioli keep breaking?
- If the pasta dough is too dry, it can crack easily. Make sure to knead it well and keep it covered with a cloth to prevent drying out. If it’s too wet, sprinkle a bit of flour while rolling.
-
How can I store leftover ravioli?
- Allow cooked ravioli to cool and store them in an airtight container in the fridge for up to 3 days. You can also freeze uncooked ravioli in a single layer on a cookie sheet, then transfer to a freezer bag.
-
Is it possible to make this recipe gluten-free?
- Absolutely! Substitute regular pasta sheets for gluten-free options available at most grocery stores. It might take a bit of trial and error, but it can be done.
-
Can I prepare the filling ahead of time?
- Yes, feel free to prepare the filling a day in advance. Just store it in the fridge in an airtight container.
Nutritional Info
While I focus on flavor first and foremost, here’s a little breakdown for those interested. Each serving of pumpkin ravioli with garlic brown butter contains approximately:
- Calories: 350
- Protein: 15g
- Carbohydrates: 40g
- Fat: 15g
- Fiber: 4g
Remember, these are rough estimates and can vary based on specific ingredients used.
There you have it—a delightful, homemade pumpkin ravioli that is not only delicious but also holds the power to create memories that last a lifetime. So grab your apron, call up some friends, and share this fantastic dish! Happy cooking, and enjoy the cozy flavors of fall!
PrintHomemade Pumpkin Ravioli with Garlic Brown Butter
A delightful fall recipe featuring homemade pumpkin ravioli tossed in a nutty garlic brown butter sauce.
- Prep Time: 30 minutes
- Cook Time: 10 minutes
- Total Time: 40 minutes
- Yield: 4 servings 1x
- Category: Main Course
- Method: Baking
- Cuisine: Italian
- Diet: Vegetarian
Ingredients
- 1 package of fresh or frozen ravioli
- 1 cup pumpkin puree
- 1/2 cup ricotta cheese
- 1/2 teaspoon nutmeg
- 1/2 teaspoon salt
- 2 tablespoons olive oil
- 1/4 cup unsalted butter
- 2 cloves garlic, minced
- Fresh sage leaves (optional)
- Grated Parmesan cheese (for serving)
Instructions
- Prepare the filling: In a mixing bowl, combine the pumpkin puree, ricotta cheese, nutmeg, and salt. Mix until smooth and creamy.
- Roll out the ravioli dough: Roll out your dough to a thin sheet using a pasta machine or a rolling pin, dusting with flour.
- Form the ravioli: Use a round cookie cutter to cut out circles, placing a small spoonful of filling in the center of each.
- Seal the ravioli: Wet the edges with water, fold them over, and press tightly to seal.
- Cook the ravioli: Bring a pot of salted water to a gentle boil and cook the ravioli for about 3-4 minutes until they float.
- Make the garlic brown butter sauce: Heat olive oil and butter in a saucepan over medium heat, adding minced garlic.
- Brown the butter: Allow the butter to melt, bubble, and turn golden brown, adding sage leaves if using.
- Combine: Use a slotted spoon to transfer the cooked ravioli to the pan with the brown butter sauce and toss gently.
- Plate it up: Serve in shallow bowls, drizzled with the garlic brown butter and topped with grated Parmesan cheese.
Notes
Serve with a simple arugula salad dressed with lemon vinaigrette for a refreshing crunch.
Nutrition
- Serving Size: 1 serving
- Calories: 350
- Sugar: 5g
- Sodium: 400mg
- Fat: 15g
- Saturated Fat: 4g
- Unsaturated Fat: 6g
- Trans Fat: 0g
- Carbohydrates: 40g
- Fiber: 4g
- Protein: 15g
- Cholesterol: 30mg
Keywords: pumpkin, ravioli, fall recipes, garlic butter, homemade pasta
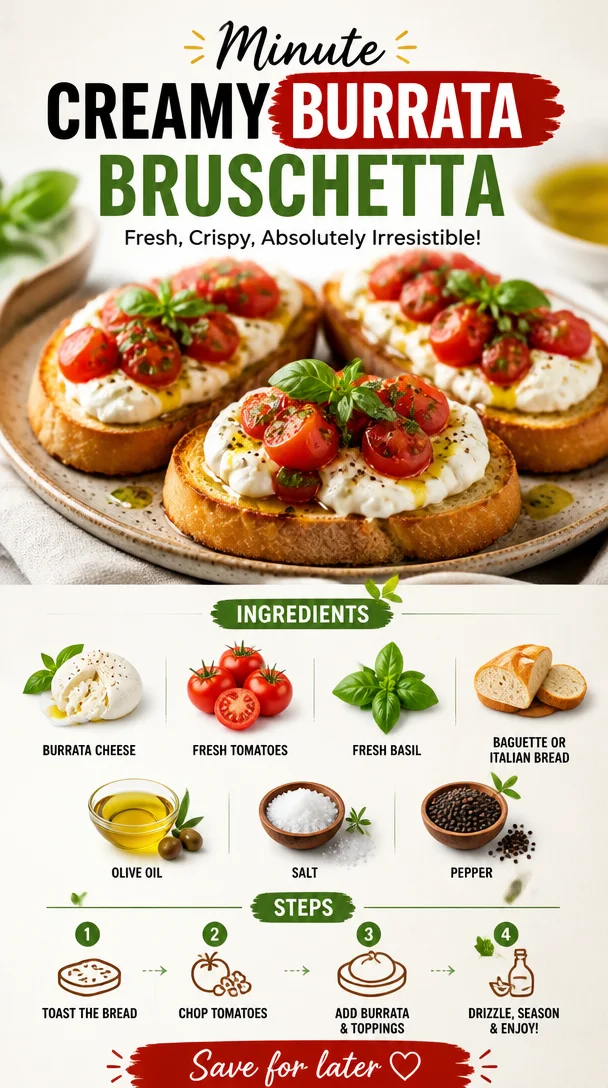
Minute Creamy Burrata Bruschetta: Fresh, Crispy Appetizer
Burrata Bruschetta: A Fresh and Flavorful Delight
Welcome, fellow foodies! Today, we’re diving into a dish that has it all—flavor, freshness, and a healthy dose of nostalgia! Say hello to Burrata Bruschetta, a heartwarming dish that brings together creamy burrata cheese, juicy tomatoes, fragrant basil, and toasted bread into a heavenly bite that’s sure to impress anyone at your table.
I’ll never forget the first time I made this dish for my friends. It was a sunny summer afternoon, and we gathered around my little kitchen, excited to enjoy good food and great company. I had just discovered burrata cheese, and the thought of showcasing its creamy goodness made my heart race! As I set out to assemble my bruschetta, I couldn’t help but reminisce about my Italian grandmother’s kitchen, where the aromas of ripe tomatoes and fresh herbs would mingle in the air. Cooking was always a family affair for us, with laughter echoing off the walls and everyone pitching in.
Now, I’m thrilled to share this delightful recipe that easily transports you to those sun-kissed summer days, no matter where you are. Whether you’re hosting a gathering, enjoying a cozy dinner, or just indulging in a quiet evening on your own, this Burrata Bruschetta is a wonderful way to elevate your meal and celebrate fresh, nourishing ingredients. So, let’s roll up our sleeves and start cooking something fabulous!
A Personal Story: Reliving the Magic
The first time I tasted burrata was at a charming little bistro in Florence. I was on a culinary adventure, soaking up the rich flavors of Italian cuisine. My friends and I ordered an array of tapas-style dishes, but nothing prepared us for the arrival of the burrata. Its round, delicate exterior housed a luxurious creamy center that simply melted in my mouth. I distinctly remember the mix of excitement and curiosity as I spread it on crispy bread and topped it off with the ripest tomatoes and fragrant basil. That day was a revelation for me, as I learned that food isn’t just about sustenance; it’s about creating moments that linger in your memory.
When I returned home, brimming with inspiration, I decided to recreate that magic in my own kitchen. After some trial and error, I landed on a recipe that embodies that warm, sunny day in Florence, infused with my personal touch. Now I want to share this delightful dish so that you can also experience a little bit of that Italian charm, right in your kitchen.
Ingredients
Here’s what you’ll need for a delicious Burrata Bruschetta:
-
Burrata Cheese: The star of the show! This creamy, luscious cheese is a combination of mozzarella and cream, bringing richness to each bite. If you can’t find burrata, a fresh mozzarella will work in a pinch, but it won’t have the same creamy texture.
-
Fresh Tomatoes: Opt for the ripest, juiciest tomatoes you can find! Heirloom tomatoes are a fantastic choice for their vibrant flavor. If it’s off-season, cherry or grape tomatoes can be a great alternative.
-
Fresh Basil: The aromatic touch that brightens the dish! Fresh basil leaves add a refreshing note. If you’re out of basil, try fresh arugula, cilantro, or even mint for a unique twist.
-
Baguette or Italian Bread: A crisp, hearty base for our toppings! A nice crusty baguette holds up beautifully under the weight of the toppings. If gluten is a concern, you can use gluten-free bread or even slices of zucchini that have been grilled.
-
Olive Oil: A high-quality extra virgin olive oil elevates the flavors of this dish. If you’re in the mood for something different, consider infused oils like garlic or chili oil for an extra kick.
-
Salt & Pepper: Simple seasonings that should never be overlooked! A sprinkle of flaky sea salt can make the flavors pop. Feel free to experiment with flavored salts or fresh cracked pepper for added complexity.
Step-by-Step Instructions
Ready to get cooking? Let’s make that Burrata Bruschetta shine!
-
Prep the Ingredients: Start by washing your tomatoes and basil. If you’re using heirlooms or larger tomatoes, dice them into small chunks—think bite-sized pieces. If you opted for cherry tomatoes, halving them works perfectly. Stack the basil leaves, roll, and slice them thinly to create a beautiful chiffonade.
-
Make the Tomato Mixture: In a bowl, combine the diced tomatoes, a drizzle of olive oil, salt, and pepper. Give it a gentle toss and let it sit for about 15-20 minutes. This allows the flavors to mingle and the juices to start flowing, which is crucial for that delicious summery flavor.
-
Toast the Bread: While your tomatoes are getting cozy, it’s time to toast the bread. Preheat your oven to 400°F (200°C). Optionally, you can brush the sliced baguette with olive oil for extra flavor. Place the slices on a baking sheet and toast them for about 5-7 minutes until they are golden brown and crispy. Keep an eye on them so they don’t burn. If you want a smoky flavor, consider grilling the bread instead!
-
Assemble the Bruschetta: Now, the moment we’ve all been waiting for! Take those crispy, golden slices of bread and add generous dollops of the tomato mixture on each piece. Next, gently pull apart the burrata, revealing its creamy insides, and place a portion on top of the tomatoes. Don’t be shy—go for that lavish presentation!
-
Garnish & Serve: Finish it off with a sprinkle of fresh basil and a light drizzle of olive oil. If you’re feeling fancy, a pinch of balsamic glaze can add a beautiful touch. Serve your Burrata Bruschetta on a wooden board for a rustic vibe or arrange it on a lovely platter. Dig in immediately while the bread is still warm and the burrata is at its creaminess!
Serving Suggestions
For a magnificent presentation, consider serving your Burrata Bruschetta on a large wooden board with fresh arugula sprinkled around, colorful cherry tomatoes, and perhaps even a bowl of extra burrata for sharing! Pair it with a chilled glass of white wine or sparkling water infused with lemon slices for a truly refreshing meal.
Recipe Variations
While this classic Burrata Bruschetta is a showstopper on its own, here are some fun variations to take your dish to the next level:
-
Roasted Garlic: Add a layer of roasted garlic on the bread before the tomato mixture for a rich, savory experience.
-
Fruit Twist: Swap out the tomatoes for peaches or strawberries in the summer for a sweet touch. Drizzle with a balsamic reduction for extra oomph.
-
Pesto Swirl: Add a dollop of basil pesto along with the tomatoes for an extra herby kick.
-
Spicy Kick: Incorporate finely diced jalapeños or red pepper flakes into the tomato mixture to enhance that flavor profile.
-
Mediterranean Vibe: Toss in some olives and serve the burrata atop a bed of cooked quinoa or farro for a delightful grain bowl twist.
Chef’s Notes
I can’t help but smile every time I make this dish! Over the years, this recipe has evolved, and what began as a simple snack turned into a beloved centerpiece at dinner gatherings. I’ve tried countless variations, and each time, I find something new that excites my palate. Whether it’s experimenting with different cheeses or adding unexpected toppings, the creativity behind burrata never ceases to amaze me. Embrace this recipe as your own canvas, and feel free to add your personality to it!
FAQs and Troubleshooting
Q: What’s the best way to store leftovers?
A: Although I doubt there will be many leftovers, store any uneaten bruschetta components separately. The bread will lose its crispiness if it’s stored with the toppings. Keep the tomatoes and burrata in airtight containers, and assemble fresh when ready to enjoy.
Q: Can I prepare this dish ahead of time?
A: To ensure maximum freshness, prep the tomatoes ahead but avoid assembling until you’re ready to serve. The toasted bread can be made in advance, just store it in a cool, dry place.
Q: My burrata didn’t have that creamy center—what went wrong?
A: Burrata should be soft and creamy, if it’s too firm, it may not have been fresh. Always check the expiration date and seek good quality cheeses from specialty stores.
Q: Can I use dried basil instead of fresh?
A: While dried basil has its place in cooking, nothing beats the vibrant flavor of fresh basil in this dish. If you must use dried, only dial it down to a pinch, as it’s more concentrated.
Nutritional Info (Optional)
Estimated per serving (for 2 Bruschetta):
- Calories: 250
- Protein: 10g
- Carbohydrates: 30g
- Fats: 12g
Indulge while enjoying the freshness of this Burrata Bruschetta that delights not just the taste buds but also the soul. This classic dish is all about balance and simplicity, and I hope you love making it as much as I do! Happy cooking!
PrintBurrata Bruschetta

A fresh and flavorful dish combining creamy burrata cheese, juicy tomatoes, fragrant basil, and toasted bread.
- Prep Time: 15 minutes
- Cook Time: 10 minutes
- Total Time: 25 minutes
- Yield: 4 servings
- Category: Appetizer
- Method: Toasting
- Cuisine: Italian
- Diet: Vegetarian
Ingredients
- Burrata Cheese
- Fresh Tomatoes
- Fresh Basil
- Baguette or Italian Bread
- Olive Oil
- Salt
- Pepper
Instructions
- Prep the ingredients by washing the tomatoes and basil. Dice the tomatoes into bite-sized pieces and chiffonade the basil.
- Make the tomato mixture by combining the diced tomatoes, olive oil, salt, and pepper. Let it sit for 15-20 minutes.
- Toast the bread in an oven preheated to 400°F (200°C) for 5-7 minutes until golden brown.
- Assemble the bruschetta by placing the tomato mixture on the toasted bread and topping it with burrata.
- Garnish with fresh basil and a drizzle of olive oil before serving.
Notes
For a unique twist, consider adding roasted garlic, swapping tomatoes for fruits, or incorporating pesto.
Nutrition
- Serving Size: 2 pieces
- Calories: 250
- Sugar: 4g
- Sodium: 200mg
- Fat: 12g
- Saturated Fat: 4g
- Unsaturated Fat: 6g
- Trans Fat: 0g
- Carbohydrates: 30g
- Fiber: 2g
- Protein: 10g
- Cholesterol: 30mg
Keywords: burrata, bruschetta, appetizer, Italian, vegetarian
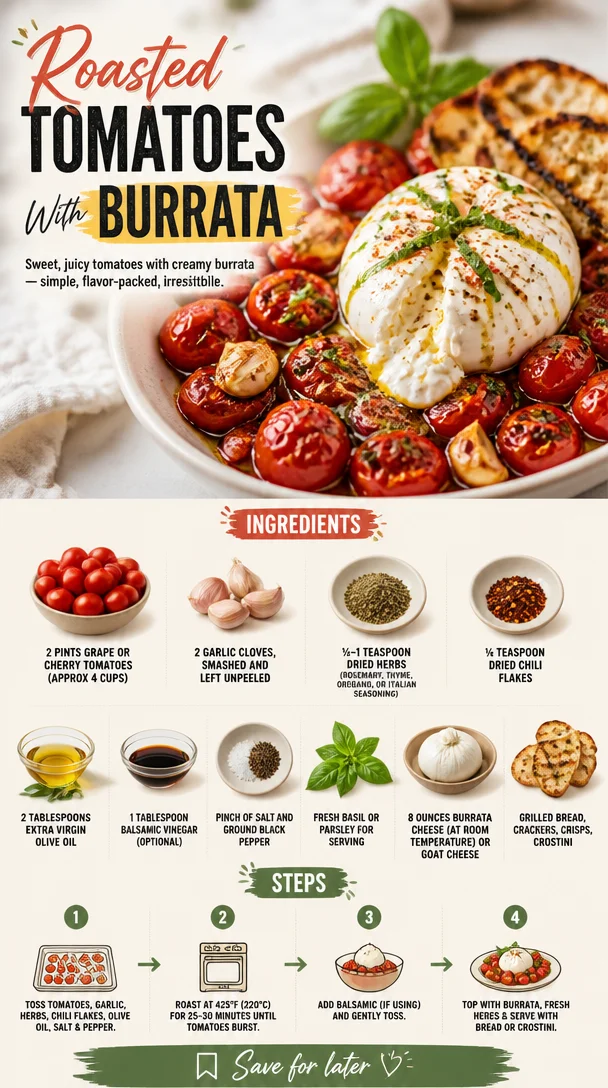
Roasted Tomatoes With Burrata
Roasted Tomatoes with Burrata: A Burst of Flavor
Welcome, fellow food lovers! Today, I’m excited to share a delightful dish that sings with seasonal flavors and makes any meal feel like a special occasion: Roasted Tomatoes with Burrata. This vibrant dish is not only visually stunning but also incredibly simple to whip up, making it perfect for those busy weeknights or casual weekend gatherings. So grab your apron, and let’s dive into the world of juicy tomatoes, creamy burrata, and aromatic herbs!
A Flavorful Journey: Personal Story
As I look back on my culinary journey, one memory that always brings a smile to my face is that summer evening at my grandma’s house. The sun was setting, casting a golden glow over her small garden where she grew the juiciest tomatoes you could ever imagine. We’d pick them together, laughing and chatting, and then head inside to make her famous roasted tomato dish.
I can still hear her voice, so enthusiastic, as she explained how roasting tomatoes brought out their natural sweetness and flavor. She would pair them with all sorts of delicious cheese, but burrata was her favorite choice! We’d enjoy them fresh with crunchy bread, straight from the oven. This dish is more than just a recipe for me; it’s a representation of love, laughter, and the joy of making food with family. Whenever I roast tomatoes, I feel that same warmth and happiness spill back into my kitchen, and I can’t wait for you to experience it too!
Ingredients
Here’s what you’ll need to create this delightful dish:
-
2 pints grape or cherry tomatoes (approx 4 cups)
These bite-sized beauties are sweet and juicy. Look for vibrant, plump ones for the best flavor! If you can’t find grape or cherry, any ripe medium-sized tomatoes will do in a pinch. -
2 garlic cloves, smashed and left unpeeled
Garlic adds a lovely depth of flavor. Leaving the skin on while roasting mellows its intensity. Feel free to swap with shallots for a sweeter taste. -
½-1 teaspoon dried herbs (rosemary, thyme, oregano, or Italian seasoning)
Herbs bring character! Choose your favorite or a mix. If you’re feeling adventurous, fresh herbs can add even more brightness. -
¼ teaspoon dried chili flakes
Just a pinch will do, but feel free to adjust based on your heat preference! Substitute with black pepper for a milder kick. -
2 tablespoons extra virgin olive oil
Quality olive oil enhances the dish immensely. Opt for cold-pressed varieties for more flavor, or use avocado oil for a different taste. -
1 tablespoon balsamic vinegar (optional)
Adds a lovely tang! If you’re looking for sweetness, try a drizzle of honey instead. -
Pinch of salt and ground black pepper
Essential for balancing flavors; don’t skip these! -
Fresh basil or parsley for serving
Adding freshness right before serving elevates the flavors. Use your favorite soft herb here! -
8 ounces burrata cheese (at room temperature) or goat cheese
Burrata provides a creamy, luxurious touch; goat cheese is a great tangy alternative! -
Grilled bread, crackers, crisps, or crostini
This is what you’ll use for scooping up all the deliciousness. Make sure it’s crispy enough to handle those juicy tomatoes!
Step-by-Step Instructions
Alright! Let’s get cooking! Follow these steps for perfectly roasted tomatoes with creamy burrata.
-
Preheat your oven to 400°F (200°C).
This is crucial! The right temperature will caramelize the sugars in those tomatoes, creating a flavor explosion. -
Prep your baking dish.
Take a large baking dish and line it with parchment paper for easy cleanup (and trust me, your future self will thank you!). -
Toss the tomatoes and garlic together.
In a large bowl, combine the grape or cherry tomatoes and garlic cloves. Drizzle with olive oil, and sprinkle in your herbs, chili flakes, salt, and pepper. Toss everything together until the tomatoes are well-coated. Chef’s Hack: Use your hands here; it’s messy but way more fun! -
Spread them out on the baking dish.
Pour the tomato mixture onto your prepared baking dish, ensuring they’re in a single layer for even roasting. We want all those tomatoes to get direct access to the heat! -
Roast those little gems!
Pop your baking dish in the oven and roast for about 25–30 minutes, or until the tomatoes are blistered and beginning to burst. Tip: Give the dish a gentle shake halfway through roasting to help everything cook evenly. -
Add balsamic vinegar (if using).
In the last 5 minutes of roasting, drizzle your balsamic vinegar over the tomatoes for an extra layer of flavor. This sweetness pairs beautifully with the savory notes! -
Plate it up!
Once roasted, remove the dish from the oven and let it cool slightly. Nestle the burrata in the center of the tomatoes and drizzle with a touch of olive oil. Finish with a sprinkle of fresh herbs for color. -
Serve it warm!
This dish is best enjoyed fresh from the oven. Serve it with your favorite crispy bread, allowing everyone to enjoy the creamy burrata and burst of flavors in every bite.
Serving Suggestions
Serve your roasted tomatoes with burrata warm, in the middle of a beautiful table spread. Arrange slices of grilled bread or crostini next to the dish, allowing everyone to dig in! You can also accompany this dish with a fresh green salad drizzled with lemon vinaigrette for a complete meal. The colorful contrast of the roasted tomatoes and creamy cheese paired with vibrant greens just makes for an irresistible presentation!
Recipe Variations
-
Herb-Infused Burrata: Marinate your burrata in olive oil with fresh herbs like basil and parsley before serving for extra flavor!
-
Spicy Kick: Mix in some chopped fresh chili or a dash of sriracha before roasting for a fiery version.
-
Mediterranean Flair: Add olives or artichokes to the mix to give your dish an exciting Mediterranean twist.
-
Cheesy Overload: Swap out burrata for a mixture of feta and ricotta to create a different creamy texture!
-
Vegan Delight: Use tofu feta or cashew cheese in place of burrata, and make it plant-based!
Chef’s Notes
It’s funny how a simple dish can evoke such fond memories. I’ve made this roasted tomatoes with burrata for everything from casual hangouts to festive gatherings, and the response is always the same: pure delight! Over the years, I’ve evolved this recipe, opting for whatever fresh herbs I can find or experimenting with different cheeses based on the season. This dish is a true reflection of kitchen creativity—feel free to mix and match ingredients to your heart’s content!
FAQs and Troubleshooting
1. What if my tomatoes are not sweet enough?
If your tomatoes lack sweetness, a sprinkle of sugar before roasting can help enhance their natural sugars.
2. Can I prepare the tomatoes ahead of time?
Certainly! You can roast the tomatoes earlier in the day and simply reheat before serving. Just be mindful that the cheese will need to be added fresh!
3. Why did my burrata melt instead of stay creamy?
This can happen if the burrata is too warm before serving. Make sure it’s at room temperature and not directly exposed to the oven’s heat!
4. Can I use different types of tomatoes?
Absolutely! Use whatever is fresh and looks good—heirloom tomatoes, even larger beefsteak varieties, are also delicious. Just adjust your roasting time accordingly.
Nutritional Info
While precise nutritional information can vary, this dish is a delightful source of vitamins A and C, fiber, and good fats, thanks to the olive oil and cheese. Pairing it with whole-grain bread can further enhance the nutrient profile!
So, there you have it! Your new favorite dish that combines nostalgia, flavor, and simplicity—Roasted Tomatoes with Burrata. I hope this recipe brings as much joy to your kitchen as it does to mine. Happy cooking, and let’s keep it fresh, simple, and oh-so-delicious!
PrintRoasted Tomatoes with Burrata
A vibrant dish featuring sweet roasted tomatoes and creamy burrata, perfect for any meal.
- Prep Time: 10 minutes
- Cook Time: 30 minutes
- Total Time: 40 minutes
- Yield: 4 servings 1x
- Category: Appetizer
- Method: Roasting
- Cuisine: Italian
- Diet: Vegetarian
Ingredients
- 2 pints grape or cherry tomatoes (approx 4 cups)
- 2 garlic cloves, smashed and left unpeeled
- ½–1 teaspoon dried herbs (rosemary, thyme, oregano, or Italian seasoning)
- ¼ teaspoon dried chili flakes
- 2 tablespoons extra virgin olive oil
- 1 tablespoon balsamic vinegar (optional)
- Pinch of salt and ground black pepper
- Fresh basil or parsley for serving
- 8 ounces burrata cheese (at room temperature) or goat cheese
- Grilled bread, crackers, crisps, or crostini
Instructions
- Preheat your oven to 400°F (200°C).
- Prep your baking dish by lining it with parchment paper.
- Toss the tomatoes and garlic together in a large bowl with olive oil, herbs, chili flakes, salt, and pepper.
- Spread them out on the prepared baking dish in a single layer.
- Roast for about 25–30 minutes, or until the tomatoes are blistered and bursting.
- Add balsamic vinegar in the last 5 minutes of roasting, if using.
- Plate it up by nesting burrata in the center and drizzling with olive oil.
- Serve it warm with crispy bread for scooping.
Notes
Feel free to mix and match herbs or cheeses based on your preference! The dish can be prepared in advance and reheated, but add cheese fresh for best results.
Nutrition
- Serving Size: 1 serving
- Calories: 320
- Sugar: 6g
- Sodium: 350mg
- Fat: 18g
- Saturated Fat: 10g
- Unsaturated Fat: 8g
- Trans Fat: 0g
- Carbohydrates: 30g
- Fiber: 3g
- Protein: 12g
- Cholesterol: 30mg
Keywords: roasted tomatoes, burrata, Italian appetizer, easy recipe, vegetarian dish
Air Fryer Pesto Stuffed Burrata
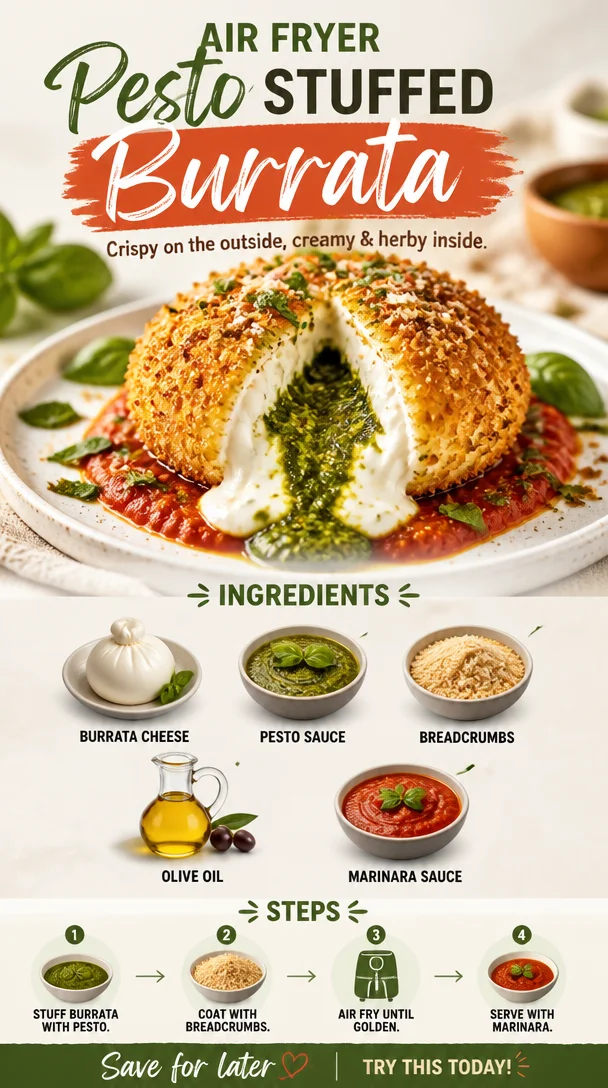
Air Fryer Pesto Stuffed Burrata: Elevating Your Cheese Game
Welcome to the delicious world of gourmet comfort food! Today, I’m thrilled to share a delightful dish that combines rich, creamy burrata cheese with the vibrant flavors of pesto, all cooked to perfection in your air fryer. Yes, you heard that right! We’re taking a classic culinary favorite and giving it a modern twist that you won’t want to miss. This Air Fryer Pesto Stuffed Burrata recipe is not just about cheese; it’s about creating an experience that’s bursting with flavor and joy.
Imagine this: a gooey, silky interior spilling out as you slice into your burrata, mingling with the herby, nutty essence of pesto. The crispy breadcrumbs add the perfect texture to contrast the creaminess of the cheese. Trust me, it’s a game-changer!
The Birth of an Idea
Every recipe has a story, and this one is close to my heart. A few summers ago, I found myself in a small Italian village, far away from the hustle and bustle of everyday life. It was the kind of place where time seemed to stand still, and the local trattorias had been family-run for generations. One evening, I stumbled upon a rustic, little restaurant serving fresh burrata with a drizzle of homemade pesto. The taste was nothing short of life-changing.
As I savored every bite, I couldn’t help but imagine how I could elevate this dish. Fast forward to today, and I’ve created this air fryer version! It’s quick, it’s easy, and it brings that same tantalizing flavor back home. This dish embodies the joy of transforming simple kitchen staples into something extraordinary. Plus, the air fryer makes it all healthier while adding that satisfying crunch with less oil.
Ingredients
Here’s what you will need to make your very own Air Fryer Pesto Stuffed Burrata:
-
Burrata Cheese
A fresh Italian cheese, burrata is known for its delicate outer shell containing creamy, luscious curds. If you can’t find burrata, fresh mozzarella can work as a substitute, but the creaminess won’t be quite the same. -
Pesto Sauce
This vibrant green sauce is made from basil, garlic, olive oil, pine nuts, and Parmesan cheese. For a quick fix, store-bought pesto works too! If you want to go nut-free, try using sunflower seeds instead of pine nuts in your homemade version. -
Breadcrumbs
They’re necessary for achieving a crunchy topping. You can use plain, panko, or seasoned breadcrumbs depending on your preference. If gluten is an issue, gluten-free breadcrumbs are available and work just as well. -
Olive Oil
A drizzle of good-quality extra virgin olive oil elevates the flavors. You can also experiment with flavored oils for added depth. -
Marinara Sauce
This classic tomato sauce is perfect for dipping or drizzling. You can make it from scratch or grab a jar from the store. If you’re feeling adventurous, a roasted red pepper sauce adds a unique twist!
Step-by-Step Instructions
Let’s get a little hands-on and bring this dish to life!
-
Prep the Burrata
Start by carefully slicing into the burrata. You want to create a pocket without cutting all the way through. If your burrata is packed in water, make sure to drain it well to prevent a soggy dish. -
Fill with Pesto
Using a spoon, carefully stuff the pocket you created with pesto. Don’t be shy—this is where the flavor comes from! Feel free to add more than you think; the creaminess of the burrata will balance out the intense flavors. -
Coat with Breadcrumbs
In a bowl, combine your breadcrumbs with a drizzle of olive oil. This will make them crispy when air-fried. Roll the stuffed burrata gently in the breadcrumb mixture, ensuring it’s evenly coated. This step is crucial for that satisfying crunch. -
Preheat Your Air Fryer
Preheat your air fryer to 350°F (175°C). Preheating helps achieve that golden crispiness you’re after. While it warms up, it’s a great time to prepare your marinara sauce—if you’re making it from scratch, now would be the moment! -
Air Fry
Place your breaded burrata in the air fryer basket, making sure not to overcrowd. Air fry for about 6-8 minutes, or until the breadcrumbs are golden brown and crisp. Keep an eye on them since air fryer models can vary in cooking time. -
Serve with Marinara
Once the burrata is cooked to perfection, carefully remove it from the air fryer. Let it cool for a minute, then place it on a serving plate with marinara sauce on the side. You can drizzle a bit more pesto on top for flair!
Serving Suggestions
For a stunning presentation, consider placing the stuffed burrata atop a bed of lightly dressed arugula or spinach, adding a sprinkle of cherry tomatoes for color. Pair it with crusty bread for the perfect vessel to scoop up all that lusciousness. A glass of chilled white wine or sparkling water will complete your dining experience beautifully!
Recipe Variations
-
Add Some Heat
Spice things up by adding crushed red pepper flakes to your pesto for a kick. -
Herb Infusion
Blend in different herbs to your pesto, like cilantro or parsley, for a unique flavor twist. -
Cheesy Bliss
Try adding a layer of shredded mozzarella inside the burrata pocket for an extra cheesy experience. -
Veggie Medley
Sauté some spinach or sun-dried tomatoes and mix them into your pesto for a veggie punch. -
Make it Sweet
For a dessert twist, swap out the marinara for a drizzle of balsamic reduction and add fresh figs or strawberries next to your burrata.
Chef’s Notes
You know, as I’ve adapted this recipe through the years, it has become an absolute favorite among my friends! The beauty of the air fryer is that it means you can indulge with less guilt, and it cooks everything so evenly. I remember the first time I made this dish for guests; I was a bundle of nerves. But when they took that first bite and their eyes lit up, I knew I had created something special. Food truly brings people together—and that’s a big part of what keeps me in the kitchen.
FAQs and Troubleshooting
1. My burrata is too watery; what do I do?
Make sure to drain the burrata thoroughly after unpacking it. You want it as dry as possible for that crunchy coating.
2. What if my breadcrumbs aren’t crispy?
If they’re soggy, ensure they’re well-coated with oil before air frying and try increasing the temperature slightly or cooking for a few more minutes.
3. Can I make this ahead of time?
Yes, you can prep your stuffed burrata ahead of time and chill it in the refrigerator. When you’re ready to serve, just pop it in the air fryer. Just know that the breadcrumbs may lose some crispiness if prepped too far in advance.
4. I don’t have an air fryer; can I bake these?
Absolutely! Preheat your oven to 375°F (190°C) and bake them on a lined baking sheet for about 12-15 minutes, or until golden brown.
Nutritional Info
While I won’t get overly technical with numbers, this dish offers a balanced blend of healthy fats, proteins, and flavors without excessive calories. Naturally creamy burrata and herby pesto with some crunch – what’s not to love? Plus, the olive oil adds heart-healthy monounsaturated fats, making this dish as nourishing as it is delicious.
Now that you have the recipe, go gather your ingredients and share a flavorful moment with loved ones—or just indulge by yourself! This Air Fryer Pesto Stuffed Burrata is sure to become a go-to dish in your repertoire. Happy cooking, fellow foodies!
PrintAir Fryer Pesto Stuffed Burrata

A delightful dish that combines rich, creamy burrata cheese with vibrant pesto flavors, all cooked to perfection in an air fryer.
- Prep Time: 15 minutes
- Cook Time: 8 minutes
- Total Time: 23 minutes
- Yield: 2 servings
- Category: Appetizer
- Method: Air Frying
- Cuisine: Italian
- Diet: Vegetarian
Ingredients
- Burrata Cheese
- Pesto Sauce
- Breadcrumbs
- Olive Oil
- Marinara Sauce
Instructions
- Prep the burrata by carefully slicing into it to create a pocket.
- Fill the pocket with pesto using a spoon.
- Coat the stuffed burrata in a mixture of breadcrumbs and olive oil.
- Preheat your air fryer to 350°F (175°C).
- Air fry the breaded burrata for 6-8 minutes until golden brown.
- Serve with marinara sauce on the side, and drizzle more pesto on top.
Notes
For presentation, place the burrata atop a bed of arugula or spinach and add cherry tomatoes for color.
Nutrition
- Serving Size: 1 serving
- Calories: 350
- Sugar: 6g
- Sodium: 420mg
- Fat: 25g
- Saturated Fat: 6g
- Unsaturated Fat: 13g
- Trans Fat: 0g
- Carbohydrates: 22g
- Fiber: 1g
- Protein: 14g
- Cholesterol: 50mg
Keywords: burrata, pesto, air fryer, vegetarian appetizer, Italian cheese
Baked Burrata
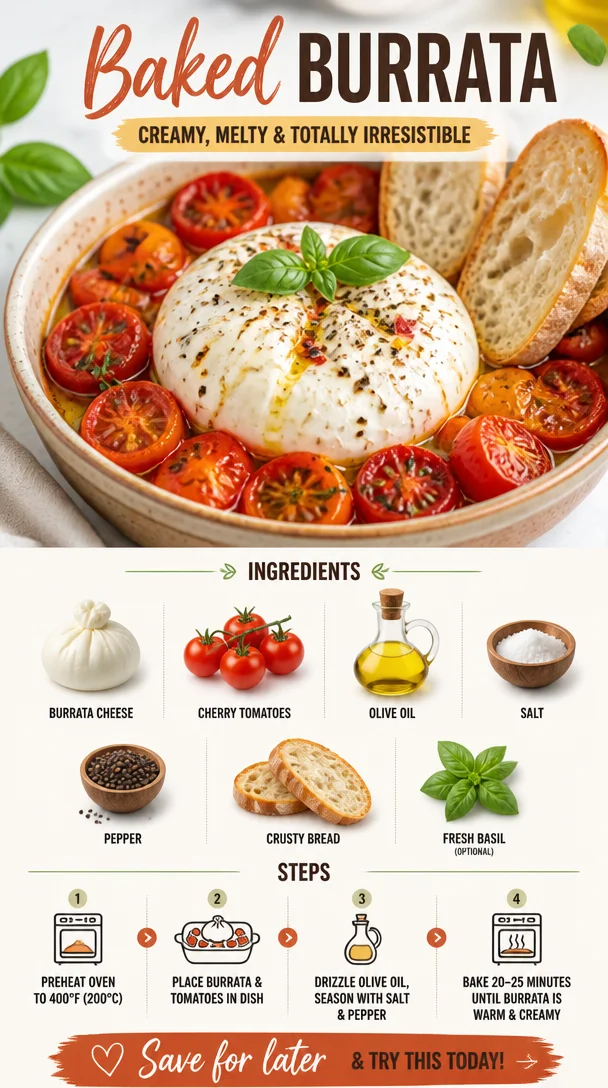
The Magic of Baked Burrata: A Delightful Culinary Journey
Welcome to my cozy corner of the kitchen, where we’re about to embark on a delicious adventure with a dish that sings comfort and flavor: Baked Burrata! If you’ve ever wanted to elevate your cheese game and impress your friends, then you’re in for a treat. This delightful dish is not just a meal; it’s an experience—a testament to the joy of simple ingredients coming together to create something breathtakingly delicious.
Picture this: a creamy ball of burrata cheese perfectly nestled among roasted cherry tomatoes, drizzled with a hint of olive oil, and finished with a sprinkle of salt and pepper. It’s a symphony of flavors, served warm and oozy—perfect for sharing or indulging all by your lonesome when the craving strikes. And trust me, once you try Baked Burrata, you’ll wonder how you ever lived without it!
One of the things I love most about Baked Burrata is how it resonates with real life. A dish this comforting and satisfying works beautifully for date nights, lazy Sundays, or even last-minute gatherings with friends. The ingredients are simple, but when combined, they create something extraordinary that can transform any occasion into a feast.
Our journey into the world of Baked Burrata is more than just cooking; it’s about celebrating the moments that happen around the table—the laughter, the connection, and the love that fills the air. So, grab your apron, preheat that oven, and let’s dive into the wonderful world of Baked Burrata!
A Fond Memory: The Burrata Moment
I remember the first time I tasted burrata. It was at a quaint little Italian café tucked away in the heart of the city. The owner, a warm and spirited chef with a twinkle in his eye, proudly presented us with a dish of freshly baked burrata, surrounded by bright cherry tomatoes that looked like jewels against white porcelain. That first gooey bite was nothing short of a revelation. The creaminess of the burrata mingling with the sweetness of the tomatoes was a love story I never wanted to end.
Fast forward a few years, and I’ve taken that memory and transformed it into a dish I can whip up whenever the mood strikes. The simplicity of baking burrata at home means I can enjoy my favorite café experience on a casual Wednesday or serve it at the next gathering with friends. It’s a nostalgic taste of Italy that I can now share with all of you!
Ingredients: What You Need
Here’s what you’ll need to bring this delightful dish to life:
-
Burrata Cheese: The star of the show! Burrata is a creamy Italian cheese that’s an ode to indulgence. If you can’t find burrata, fresh mozzarella, while not quite the same, provides a similar texture.
-
Cherry Tomatoes: These tiny flavor bombs burst with sweetness as they roast. If you’re feeling adventurous, you can swap them out for sun-dried tomatoes for a different flavor profile.
-
Olive Oil: A drizzle of good olive oil adds richness and depth. If you’re low on olive oil, any light oil like avocado or grapeseed can work.
-
Salt: Brings all the flavors together—use sea salt or kosher salt for texture, or go for flavorful finishing salts like flaky Maldon for a gourmet touch.
-
Pepper: A little bit of freshly cracked black pepper adds a lovely bite. You can substitute with red pepper flakes for a spicy kick!
-
Crusty Bread: Perfect for dipping into that luscious burrata! If you’re gluten-free, consider serving it with veggie sticks or gluten-free crackers.
-
Fresh Basil (Optional): Adds a fresh burst of flavor and a beautiful pop of color! If you can’t find fresh basil, a sprinkle of dried herbs like oregano can suffice.
Step-by-Step Instructions: Let’s Get Cooking!
Now that we have our ingredients ready, let’s dive into the cooking process. Trust me, it’s easier than you think!
-
Preheat Your Oven: Start by preheating your oven to 400°F (200°C). The goal is to create a warm environment for our burrata to melt into cheesy bliss!
-
Arrange the Tomatoes: Grab a baking dish and throw in your cherry tomatoes. They can be halved for quicker cooking, but I love throwing them in whole for that extra burst of juiciness. Drizzle them generously with olive oil, and sprinkle with salt and pepper to taste. Give them a gentle toss to ensure every tomato is coated in that luscious oil.
-
Make a Space for the Burrata: Create a little nest among the tomatoes for the burrata to rest comfortably. This allows it to absorb some of that tomato goodness as it bakes. Place the burrata directly in the center of your beautiful tomato bed.
-
Drizzle More Olive Oil: Don’t be shy—drizzle a little more olive oil over the burrata. This step is purely for indulgence! It enhances the flavor and helps achieve that beautiful golden-brown crust.
-
Bake It Up: Pop the baking dish into your preheated oven for about 15 minutes. You’ll know it’s done when the burrata is warm and slightly oozy and the tomatoes start to blister and burst. Your kitchen will smell incredible, by the way.
-
Garnish and Serve: Once it’s out of the oven, let it rest for a minute (if you can resist!). Finish it off with a sprinkle of fresh basil. This step is totally optional but does add that lovely, aromatic touch. Now get your crusty bread ready for dipping!
-
Dig In: Serve this beauty straight out of the oven—there’s something magical about that warm, gooey burrata just waiting to be scooped up with your bread. Don’t forget to drizzle any leftover tomato juice over the top. It’s pure heaven!
Serving Suggestions: An Elegant Plating
When it comes to serving Baked Burrata, keep it simple and delicious. Use a beautiful wooden board or a rustic platter for presentation. Place the baking dish in the center, and surround it with toasted slices of crusty bread for scooping. You might even throw in a small bowl of balsamic reduction or a sprinkle of pine nuts for an extra touch. Drizzle with a bit more olive oil and fresh basil for that final pop of color—your guests will be in awe!
Recipe Variations: Get Creative
Baked Burrata is as versatile as it is delicious! Here are a few creative twists to try:
-
Pesto Infusion: Add a spoonful of basil pesto to the tomatoes before baking for an extra layer of flavor.
-
Spicy Kick: Toss in some red pepper flakes with the tomatoes for a delightful heat that pairs well with the creamy cheese.
-
Roasted Garlic: Include a few cloves of whole, unpeeled garlic with the tomatoes for a sweet and mellow roasted garlic flavor.
-
Mediterranean Twist: Mix in some olives and artichokes for a Mediterranean flair that adds even more depth to the dish.
-
Herb-Infused: Experiment with fresh herbs like thyme or rosemary for a unique twist on flavor.
Chef’s Notes: Lessons from the Kitchen
Baked Burrata has become a staple in my kitchen, and I’ve learned a few things along the way. Once, I tried to bake it with flavored oils, and the result was a bit too overwhelming. Now, I stick to good-quality olive oil to let the burrata shine on its own. Also, don’t let leftover tomatoes go to waste—mix them into a salad or pasta dish the next day for a refreshing lunch!
Cooking can be an adventure, and every little mishap in the kitchen is a chance to learn something new. Whether it’s forgetting to preheat the oven or realizing you’re out of olive oil (oops!), those moments often lead to surprisingly delicious outcomes.
FAQs and Troubleshooting: Your Questions Answered
-
Can I use regular mozzarella instead of burrata?
Yes! While burrata has a creamier texture, fresh mozzarella will still deliver a satisfying result. Just make sure to use a good quality one. -
What should I do if my tomatoes aren’t bursting?
If your tomatoes aren’t bursting, try roasting them a little longer. They need that heat to release their natural juices, but keep an eye on the burrata to prevent overcooking. -
How do I store leftovers?
If there’s any left (which is rare!), store it in an airtight container in the fridge. Reheat gently in the oven or microwave—just be careful not to dry out the burrata! -
What can I serve with baked burrata?
It pairs beautifully with a light salad, savory roasted vegetables, or even as a stunning appetizer before pasta dishes!
Nutritional Info
While every dish can vary based on specific ingredients and portions, here’s a rough idea per serving of Baked Burrata:
- Calories: Approximately 300-400 (including bread)
- Carbohydrates: 20-30g (depending on bread choice)
- Protein: 15-20g
- Fats: 25-30g
Note that the nutritional information will change based on substitutions and portions used, but remember, enjoyment and balance in what you eat are what truly matters!
And there you have it! Baked Burrata is more than just a dish; it’s a celebration of flavor, nostalgia, and, best of all, the art of uncomplicated cooking. I hope you relish making this delightful recipe and create your own kitchen memories along the way. Happy cooking, my fellow foodies!
PrintBaked Burrata
A comforting and indulgent baked burrata cheese dish served with roasted cherry tomatoes and crusty bread, perfect for sharing or solo feasting.
- Prep Time: 10 minutes
- Cook Time: 15 minutes
- Total Time: 25 minutes
- Yield: 4 servings
- Category: Appetizer
- Method: Baking
- Cuisine: Italian
- Diet: Vegetarian
Ingredients
- Burrata Cheese
- Cherry Tomatoes
- Olive Oil
- Salt
- Pepper
- Crusty Bread
- Fresh Basil (Optional)
Instructions
- Preheat your oven to 400°F (200°C).
- Arrange the cherry tomatoes in a baking dish, drizzle with olive oil, and sprinkle with salt and pepper.
- Create a space among the tomatoes for the burrata to rest.
- Drizzle more olive oil over the burrata for added flavor.
- Bake for about 15 minutes until the burrata is warm and oozy, and the tomatoes start to blister.
- Garnish with fresh basil if desired, then serve with crusty bread for dipping.
- Dig in and enjoy the warm, gooey burrata with the roasted tomatoes.
Notes
Feel free to experiment with different add-ins like pesto, red pepper flakes, or garlic for additional flavor.
Nutrition
- Serving Size: 1 serving
- Calories: 350
- Sugar: 5g
- Sodium: 400mg
- Fat: 30g
- Saturated Fat: 10g
- Unsaturated Fat: 15g
- Trans Fat: 0g
- Carbohydrates: 22g
- Fiber: 3g
- Protein: 20g
- Cholesterol: 30mg
Keywords: baked burrata, burrata recipe, Italian cheese, comfort food, easy appetizer
Caprese Dip
A Taste of Summer: Caprese Dip to Savor
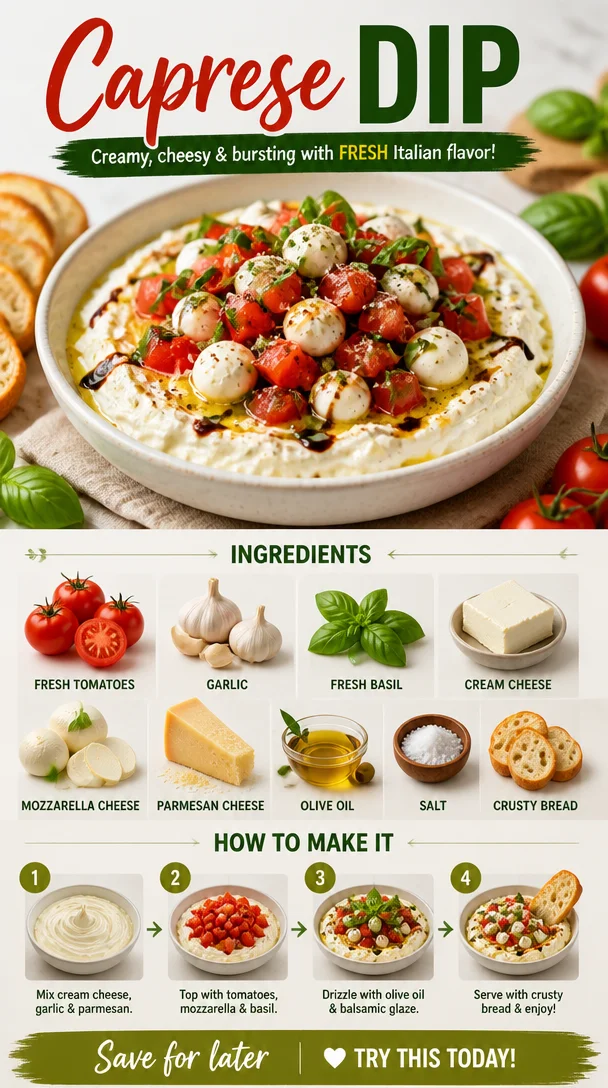
Hello there, fellow food lovers! Today, I’m thrilled to share one of my go-to recipes that screams summer but is delightful on any occasion: Caprese Dip! This vibrant, creamy, and oh-so-delicious dip combines the classic flavors of a Caprese salad and brings it right to your snack table. It’s perfect for parties, casual get-togethers, or even a cozy night in with friends—because who doesn’t love some good foot-stomping, finger-licking goodness?
Let’s chat for a moment about the fresh ingredients that come together to create this dip. Imagine plump, ripe tomatoes bursting with flavor, aromatic garlic dancing around in the mix, and the sweet, herbal notes of fresh basil wafting through the air. And don’t even get me started on the creamy goodness of cream cheese combined with gooey mozzarella and salty Parmesan—pure bliss!
Back in the day, during those endless summer afternoons at my grandparents’ house, my family would gather around a big platter of fresh Caprese salad, with all the colors of summer exploding on the table. It was a simple dish but packed with memories, laughter, and a hint of competition to see who could snag the last piece of mozzarella. This dip is my homage to those sunny days, a way to bring that nostalgia and love into a comforting, shareable form.
Now, let’s jump into how to whip up this fabulous Caprese Dip that your taste buds (and your friends) will thank you for!
Ingredients
Gather these fresh goodies to create your Caprese Dip masterpiece:
-
Fresh Tomatoes: The star of the show! I recommend using heirloom or vine-ripened tomatoes for their intense flavor. If you’re in a pinch, feel free to substitute with cherry tomatoes or even sun-dried tomatoes for a different flavor profile.
-
Garlic: A couple of cloves will do the trick, bringing a lovely depth of flavor. If you’re not a fan of raw garlic, try roasting it first for a sweeter, milder taste.
-
Fresh Basil: Nothing beats the fragrant aroma of fresh basil! If you can’t find any, dried basil can be used in a pinch, but fresh is always best for that vibrant punch.
-
Cream Cheese: This adds a luscious creaminess to the dip. Low-fat cream cheese can be a lighter alternative, but you can also swap it for Greek yogurt for a tangy twist!
-
Mozzarella Cheese: Go for the fresh mozzarella balls (bocconcini) for the best texture and flavor, but shredded mozzarella works if that’s all you have on hand.
-
Parmesan Cheese: Grated Parmesan gives that savory kick! For a vegan option, try nutritional yeast for a cheesy flavor without the dairy.
-
Olive Oil: A drizzle of high-quality extra virgin olive oil will elevate your dip’s flavors. You can swap this out with avocado oil for a buttery taste.
-
Salt: Just a pinch to enhance all the flavors. Always taste and adjust; everyone has different salt preferences!
-
Crusty Bread: To serve, you’ll need something to scoop up this deliciousness. A fresh baguette, ciabatta, or even pita chips will work beautifully.
Step-by-Step Instructions
-
Prep the Ingredients:
- Start by dicing your tomatoes. Aim for bite-sized pieces since this dip will be an easy grab-and-dip situation. Don’t forget to remove any excess seeds to prevent it from getting watery. A chef hack? Gently squeeze the tomatoes to release some juice before chopping.
- Mince the garlic finely; this will infuse every bite with flavor. Don’t be shy; garlic lovers rejoice!
-
Mix the Creamy Base:
- In a large mixing bowl, beat the cream cheese until it’s smooth. You can use a hand mixer, or just your trusty spatula—whatever floats your boat! If your cream cheese is still cold, it might take a moment to soften up, so patience is key!
- Add in the minced garlic and finely chopped fresh basil. Mix well, letting those flavors meld—it’s a fragrant delight!
-
Incorporate the Cheeses:
- Fold in the mozzarella and Parmesan cheese gently so you don’t break apart the mozzarella balls. Imagine you’re cradling a small, lovely baby; we want the cheese chunks intact for those gooey bites!
-
Combine with Tomatoes:
- Now, gently fold in the diced tomatoes and a pinch of salt. This is where color and flavor collide! The vivid reds and greens will make your heart sing.
-
Final Touches:
- Drizzle in a generous swirl of olive oil and give it one last mix. Taste it—does it need a bit more salt? Maybe another drizzle of olive oil? Adjust as needed to suit your taste.
-
Serve It Up:
- Transfer the Caprese Dip to a rustic serving bowl. Optional step: Garnish with a few basil leaves and an extra drizzle of olive oil on top to make it Instagram-ready.
Serving Suggestions
This dip is best enjoyed fresh, served alongside warm, crusty bread or crispy pita chips. Arrange your serving platter beautifully, with toast slices around the dip, maybe even a few fresh basil leaves for that extra touch. It’s all about presentation, so get creative! Win the hearts of your guests with an attractive spread that invites everyone to dig in.
Recipe Variations
-
Pesto Caprese Dip: Mix in a few tablespoons of pesto when combining with the cheeses for a herby twist that’ll make it pop.
-
Spicy Caprese Dip: Add a dash of red pepper flakes or some finely chopped jalapeños for a kick.
-
Veggie-packed Dip: Fold in finely diced bell peppers or roasted red peppers for extra flavor and a dosage of color.
-
Olive Tapenade Addition: Try mixing in a bit of olive tapenade for a briny depth that complements the fresh flavors.
Chef’s Notes
I first experimented with this dip one lazy Friday evening, yearning for something fresh but cozy. It began as a little creativity while clearing out my fridge. The fact that it magically transforms simple ingredients into a crowd-pleaser is beyond me, but that’s how cooking goes sometimes, isn’t it?
Over the years, I’ve had friends tell me they’ve made this for their summer barbecues and even holiday parties—successes that have put a smile on my face. It evolves with the seasons, much like my cooking journey—from trying new ingredients to adapting for dietary needs. I love that cooking can be fluid and adaptable; it’s part of the fun!
FAQs and Troubleshooting
1. My dip turned out too watery. What happened?
This often happens if the tomatoes are too juicy! Be sure to remove excess seeds before chopping, or you can strain the chopped tomatoes if needed.
2. Can I use dried basil instead of fresh?
While I always recommend fresh for best flavor, you can substitute dried basil in a pinch! Just use about a third of the amount—dried herbs are more concentrated.
3. My cream cheese isn’t blending smoothly. What can I do?
If your cream cheese is too cold, try microwaving it for just about 10-15 seconds or let it sit out at room temperature for about 30 minutes before mixing to make it easier to blend.
4. How can I store leftovers?
If you have any dip left (which is rare), store it in an airtight container in the fridge. It should last for 3–5 days. Just give it a good stir before serving again!
Nutritional Info
Though I’ll always advocate for enjoying food without fear, here’s a little peek at the nutritional value: approximately 150 calories per serving (about 2 tablespoons), with a healthy dose of protein and wonderful flavor without any guilt!
So, there you have it! Dive into your very own Caprese Dip, and recreate those sunny days filled with flavor and laughter. Whether you’re sharing it with friends or keeping it all to yourself (no judgment here!), I hope this vibrant dip brings a bit of joy to your table. Happy cooking, my friends! 🍅🍃🥖
PrintCaprese Dip
A vibrant and creamy dip that combines classic Caprese salad flavors, perfect for summer gatherings or cozy nights in.
- Prep Time: 15 minutes
- Cook Time: 0 minutes
- Total Time: 15 minutes
- Yield: 8 servings 1x
- Category: Appetizer
- Method: No Cooking
- Cuisine: Italian
- Diet: Vegetarian
Ingredients
- 4 Fresh Heirloom Tomatoes, diced
- 2 cloves Garlic, minced
- 1/4 cup Fresh Basil, chopped
- 8 oz Cream Cheese, softened
- 1 cup Fresh Mozzarella balls (bocconcini)
- 1/2 cup Grated Parmesan cheese
- 2 tbsp Olive Oil
- Salt, to taste
- Crusty Bread, for serving
Instructions
- Prep the Ingredients: Dice the tomatoes into bite-sized pieces, remove excess seeds, and mince the garlic finely.
- Mix the Creamy Base: Beat the cream cheese until smooth, then mix in minced garlic and chopped basil.
- Incorporate the Cheeses: Gently fold in mozzarella and Parmesan cheese to maintain the mozzarella’s shape.
- Combine with Tomatoes: Fold in the diced tomatoes and a pinch of salt.
- Final Touches: Drizzle olive oil and adjust seasoning as needed.
- Serve It Up: Transfer to a rustic serving bowl and garnish with basil and olive oil.
Notes
Best served fresh with warm crusty bread or crispy pita chips. Can be customized with pesto, spicy peppers, or vegetables.
Nutrition
- Serving Size: 2 tablespoons
- Calories: 150
- Sugar: 3g
- Sodium: 300mg
- Fat: 10g
- Saturated Fat: 5g
- Unsaturated Fat: 3g
- Trans Fat: 0g
- Carbohydrates: 5g
- Fiber: 1g
- Protein: 4g
- Cholesterol: 25mg
Keywords: Caprese Dip, Summer Dip, Appetizer, Italian Recipes, Creamy Dip
Minute One-Pan Smoky Garlic Butter Chicken Pasta
Sticky Smoky Garlic Butter Chicken Pasta: A Flavor Explosion for Your Dinner Table
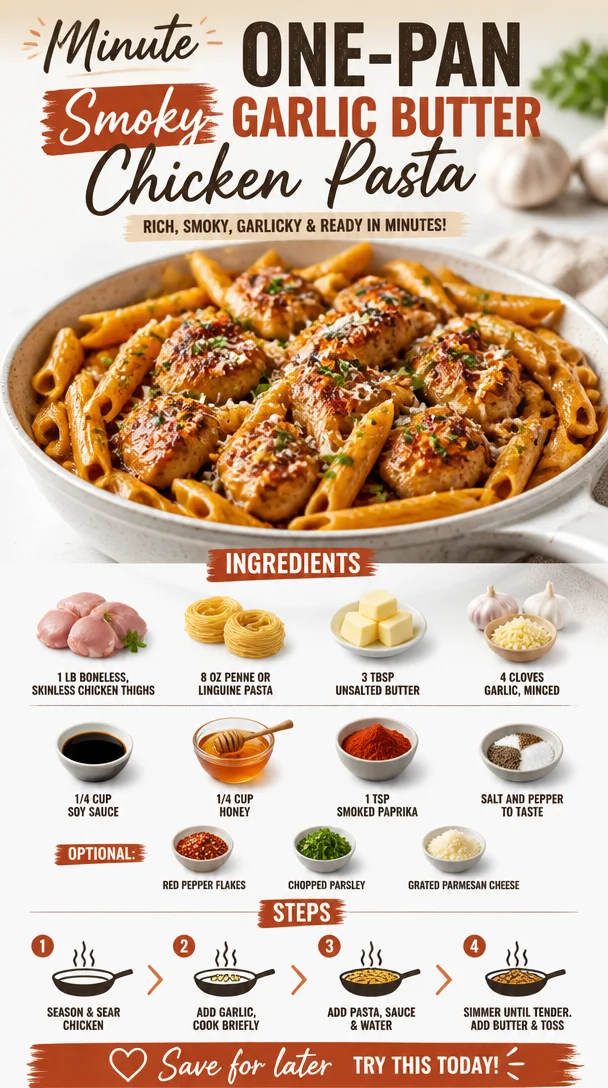
Hey food lovers! Welcome to another delicious adventure in the kitchen with me, Ava Carter. Today, I’m absolutely thrilled to share a recipe that not only satisfies those midweek cravings, but also brings a burst of flavor that can transform your dinner into a culinary delight. Say hello to Sticky Smoky Garlic Butter Chicken Pasta!
Imagine golden-brown chicken thighs coated in a rich, sticky garlic buttery sauce that’s so good, you’ll want to lick the plate clean. And let’s not forget the pasta, soaking up all those smokey, garlicky flavors—the perfect vehicle to carry this indulgent goodness straight to your taste buds. If you’re ready to elevate your weeknight dinners and impress your family or guests, then grab your apron and let’s dive in!
Personal Story: A Flavorful Memory
Let me take you back to one of my fondest childhood memories. It was a crisp autumn evening, and my family was gathered in the kitchen, the aroma of garlic and butter wafting through the air. My mom—a powerhouse in the kitchen—was teaching me how to make a simple pasta dish. I vividly recall her laughter, the clinking of pots and pans, and the anticipation of that first bite.
She always said that cooking is an act of love, and I couldn’t agree more. As we stirred the sauce together, she shared stories of her own childhood, showing me how food can transport us to cherished moments. Fast forward years later, I’ve taken that simple dish and given it a sticky, smoky spin, creating this memorable Sticky Smoky Garlic Butter Chicken Pasta recipe. Just like my mom, I want to fill your kitchen with love, laughter, and mouthwatering flavors!
Ingredients
Let’s talk about what you’ll need for this showstopper dish. Here’s a handy checklist:
-
1 lb boneless, skinless chicken thighs: These are juicy and flavorful, perfect for absorbing the sticky sauce. If you’re a fan of leaner cuts, you can substitute with chicken breast, but tender thighs truly shine here.
-
8 oz penne or linguine pasta: Both options work beautifully. Penne holds onto the sauce better with its tubular shape, while linguine adds a delicate touch. Feel free to choose your favorite!
-
3 tbsp unsalted butter: This is what gives our dish that luscious, buttery richness. If you’re wanting a dairy-free option, coconut oil works well too.
-
4 cloves garlic, minced: Garlic is the MVP in this dish, bringing aroma and flavor. Freshly minced garlic is best, though garlic powder in a pinch will do.
-
1/4 cup soy sauce: This brings umami and depth to our sauce. If you need a gluten-free option, use tamari instead.
-
1/4 cup honey: It adds sweetness and balances the saltiness of the soy sauce. Maple syrup or agave can stand in if you prefer a vegan option.
-
1 tsp smoked paprika: It adds a subtle smokiness that really elevates the dish. If you don’t have it, regular paprika will work, although it won’t have that smoky kick.
-
Salt and pepper to taste: Essential for rounding out all the flavors. Always taste as you go!
-
Optional:
- Red pepper flakes: For a spicy kick.
- Chopped parsley: For a fresh touch and color.
- Grated Parmesan cheese: Because who doesn’t love a sprinkle of cheesy goodness?
Step-by-Step Instructions
Okay, are you ready to create some kitchen magic? Let’s get cooking!
-
Cook the Pasta:
In a large pot of boiling salted water, cook your pasta according to package instructions until al dente. Make sure to add salt—this is your chance to flavor the pasta itself! Remember, it’ll keep cooking a bit after you drain it. Once ready, reserve about 1/2 cup of pasta water, then drain and set aside. Little chef tip: toss it with a bit of olive oil to prevent sticking! -
Sear the Chicken:
In a large skillet over medium-high heat, melt 1 tablespoon of the butter. Season the chicken thighs with salt and pepper. Once the butter is sizzling, lay the chicken in the pan and sear until golden brown and cooked through, about 6-7 minutes per side depending on thickness. Here’s a pro chef hack: don’t crowd the pan; work in batches if necessary to get that beautiful sear! -
Create the Sauce:
Once the chicken is done, remove it from the skillet and let it rest for a few minutes. In the same skillet, melt the remaining butter. Add the minced garlic and sauté for about a minute, just until it’s fragrant (but not burned!). Then, pour in the soy sauce and honey, stirring until they blend together. -
Add the Smoky Flavor:
Sprinkle in the smoked paprika and stir. You’ll see the sauce begin to thicken slightly. Lower the heat to medium and return the chicken thighs to the skillet. Let them swim in that glorious sauce for 3-4 minutes, turning them to coat nicely. -
Combine with Pasta:
Now for the exciting part! Toss the cooked pasta into the skillet with the chicken and sauce. Gently mix everything together until the pasta is thoroughly coated. If the sauce seems too thick, add a little reserved pasta water until you reach your desired consistency. Keep tasting and adjusting the seasoning to your liking! -
Serve and Enjoy:
Once everything is well mixed, remove from heat. For the grand presentation, serve it hot right from the skillet or portion it onto individual plates. Top with red pepper flakes (if you like it spicy), a sprinkle of chopped parsley, and freshly grated Parmesan cheese. Each bite is sure to be sticky, smoky, and absolutely scrumptious.
Serving Suggestions
For a beautiful presentation, serve the pasta in wide, shallow bowls for a casual feel, or on a large platter for family-style dining. You can also complement your meal with a fresh green salad or some roasted veggies on the side to balance the richness of the dish. Grab a glass of chilled white wine, and you’ve got yourself a perfect dinner date at home!
Recipe Variations
Feeling adventurous? Here are a few ideas to put a fun twist on this recipe:
-
Vegetarian Delight: Swap the chicken for sautéed mushrooms or chickpeas for a hearty plant-based option.
-
Add More Veggies: Toss in some spinach, cherry tomatoes, or bell peppers for added nutrition and flavor.
-
Different Flavors: Replace soy sauce with teriyaki sauce for a sweeter version, or use a spicy stir-fry sauce for an Asian flair.
-
Nutty Addition: Toss in some toasted sesame seeds before serving for a crunchy surprise.
Chef’s Notes
This recipe has become a family favorite for a reason! I love how simple ingredients can come together to create such a bold, mouthwatering dish. Over the years, I’ve tweaked the recipe here and there—adding more garlic on some days and experimenting with different pasta shapes. But one thing remains constant: the joy it brings to the table. Every time I cook my Sticky Smoky Garlic Butter Chicken Pasta, it reminds me of those cozy family meals from my childhood, and I hope it does the same for you.
FAQs and Troubleshooting
1. Can I use chicken breast instead of thighs?
Absolutely! Chicken breast is a leaner option, but it may dry out if overcooked. Just keep a close eye on it and check for that juicy tenderness.
2. My sauce turned out too salty. What can I do?
If your sauce is too salty, you can balance it out with a pinch of sugar or honey. Another option is to add more pasta or even a splash of cream to tone it down.
3. Can I make this dish in advance?
Yes! You can cook the chicken and sauce ahead of time and just reheat when you’re ready to serve. Just be sure to cook the pasta fresh to avoid it getting mushy.
4. What can I substitute for honey?
If you’re looking for a vegan alternative, agave nectar or maple syrup works wonderfully. If you prefer, you can even try brown sugar for a deeper flavor!
Nutritional Info
While I always suggest enjoying your meals in moderation, here’s a quick nutritional breakdown:
- Calories: Approximately 450-500 per serving (depending on portion size and additional toppings)
- Protein: 30-35g (primarily from chicken)
- Carbohydrates: 50-60g (thanks to the pasta)
- Fats: 20-25g (mainly from butter)
So, there you have it—my Sticky Smoky Garlic Butter Chicken Pasta, a dish that not only delivers on flavor but also evokes sweet memories and warms your heart. I hope you give this recipe a try and create your own kitchen stories! Let me know how it goes, and as always, keep it fresh, simple, and seriously delicious! Happy cooking!
PrintSticky Smoky Garlic Butter Chicken Pasta
A flavor-packed dish featuring tender chicken thighs coated in a rich garlic butter sauce, served with pasta that absorbs all the smokey goodness.
- Prep Time: 15 minutes
- Cook Time: 30 minutes
- Total Time: 45 minutes
- Yield: 4 servings 1x
- Category: Main Course
- Method: Searing
- Cuisine: Italian
- Diet: Non-Vegetarian
Ingredients
- 1 lb boneless, skinless chicken thighs
- 8 oz penne or linguine pasta
- 3 tbsp unsalted butter
- 4 cloves garlic, minced
- 1/4 cup soy sauce
- 1/4 cup honey
- 1 tsp smoked paprika
- Salt and pepper to taste
- Red pepper flakes (optional)
- Chopped parsley (optional)
- Grated Parmesan cheese (optional)
Instructions
- Cook the Pasta: In a large pot of boiling salted water, cook your pasta according to package instructions until al dente. Reserve about 1/2 cup of pasta water, then drain and set aside.
- Sear the Chicken: In a large skillet over medium-high heat, melt 1 tablespoon of the butter. Season the chicken thighs with salt and pepper. Lay the chicken in the pan and sear until golden brown, about 6-7 minutes per side.
- Create the Sauce: Remove the chicken and let it rest. In the same skillet, melt the remaining butter. Add the minced garlic and sauté for about a minute. Pour in the soy sauce and honey, stirring until blended.
- Add the Smoky Flavor: Sprinkle in the smoked paprika and stir. Return the chicken thighs to the skillet and let them coat in the sauce for 3-4 minutes.
- Combine with Pasta: Toss the cooked pasta into the skillet with the chicken and sauce. Mix until the pasta is coated, adding reserved pasta water if needed for consistency.
- Serve and Enjoy: Plate the pasta hot, topped with red pepper flakes, parsley, and Parmesan cheese if desired.
Notes
Feel free to customize with veggies or different sauces to suit your taste preferences!
Nutrition
- Serving Size: 1 serving
- Calories: 475
- Sugar: 15g
- Sodium: 700mg
- Fat: 22g
- Saturated Fat: 10g
- Unsaturated Fat: 8g
- Trans Fat: 0g
- Carbohydrates: 50g
- Fiber: 3g
- Protein: 32g
- Cholesterol: 80mg
Keywords: chicken pasta, garlic butter, smoky flavor, comfort food

Cottage Cheese Chicken Parmesan Bowl
Cottage Cheese Chicken Parmesan Bowl: A Twist on a Classic Favorite
Welcome to the wonderful world of clean and delicious eating! Today, I’m thrilled to share with you one of my all-time favorite dishes that marries comfort food with wholesome goodness: the Cottage Cheese Chicken Parmesan Bowl. This dish takes everything you love about traditional chicken parmesan and gives it a fresh, protein-packed twist with cottage cheese. Trust me, once you try this recipe, you’ll wonder why you hadn’t thought of it sooner!
In my kitchen, food is all about adventure and creativity—nothing gets left behind! When I think of chicken parmesan, my mind is flooded with memories of my mom in the kitchen, her hands expertly breading chicken cutlets while the aroma of marinara sauce danced in the air. It was a meal that brought the family together, a Sunday staple that filled our hearts as much as our bellies. As I grew older and started exploring different flavors and ingredients, I learned to lighten up classics without losing any of that deliciousness. Adding cottage cheese not only enhances the dish’s creaminess but also packs in extra protein, making this bowl satisfying and nutritious.
So, grab your apron, and let’s dive into making this Cottage Cheese Chicken Parmesan Bowl that’s perfect for a cozy weeknight dinner or impressing guests.
My Favorite Memory
One of my most cherished food memories revolves around those weekends filled with laughter, chatter, and, of course, sumptuous meals. There was this one particular Sunday when I was around eight years old. My mom decided we’d have a family cooking day. We donned our aprons; I truly believed I looked like a chef at that point! As we moved through the kitchen, I remember helping her whip up that savory chicken parmesan we all loved.
I was tasked with tossing the breadcrumbs with seasonings, and every sprinkle felt like magic! As we layered marinara and cheese on the crispy chicken, I could hardly contain my excitement. The golden, bubbling cheese was something I looked forward to all week. Fast forward a couple of decades, I wanted to create a version that would bring all that nostalgia back—without feeling guilty about what I was eating. Hence, the Cottage Cheese Chicken Parmesan Bowl was born, capturing both that love for comfort food and a brighter take on healthiness.
Ingredients
Here’s what you’ll need to whip up your very own Cottage Cheese Chicken Parmesan Bowl:
-
Chicken Breasts (2)
- Chef Insight: Chicken breasts are a lean protein source, but feel free to use thighs if you prefer more flavor.
-
Salt and Pepper
- A classic seasoning combo! Adjust according to your taste.
-
Italian Breadcrumbs (1 cup)
- For that perfect crispiness! Whole wheat breadcrumbs are a great healthier alternative.
-
Egg (1)
- This acts as a binder for our breadcrumbs. You can use a flaxseed egg as a vegan swap!
-
Marinara Sauce (1 cup)
- Store-bought saves time, but homemade is always a winner!
-
Cottage Cheese (1 cup)
- Creamy and rich in protein. You can blend it for a smoother texture if desired.
-
Mozzarella Cheese (1 cup, shredded)
- The gooey melted layer that brings the bowl together. Low-fat options work too!
-
Fresh Basil (for garnish)
- Adds a pop of freshness. Dried basil can work in a pinch.
-
Olive Oil (1 tablespoon)
- For drizzling, adds a nice depth of flavor.
Step-by-Step Instructions
Let’s turn that shopping list into a delicious reality! Follow these steps for a mouthwatering Cottage Cheese Chicken Parmesan Bowl:
-
Preheat Your Oven to 375°F (190°C): This high temperature not only helps the chicken cook quickly but also gives it that lovely golden color.
-
Prepare the Chicken: Start by trimming any excess fat from your chicken breasts. Season them generously with salt and pepper on both sides. This simple step enhances the inherent flavor of the chicken.
-
Set Up Your Breading Station: In one bowl, beat the egg. In another bowl, spread out the Italian breadcrumbs. This will ensure an even coating, making your chicken extra crispy.
-
Bread the Chicken: Dip each chicken breast into the egg, allowing excess to drip off, then coat thoroughly with breadcrumbs. Press the breadcrumbs onto the chicken to adhere well. It’s all about that texture!
-
Sear the Chicken (Optional, but Recommended): In a large oven-proof skillet, heat olive oil over medium heat. Once hot, add the breaded chicken and sear for about 3-4 minutes on each side until golden brown. This step adds a nice crunch and depth of flavor, but if you’re short on time, you can skip it and bake directly.
-
Layer It Up: Remove the skillet from heat (if searing). Ladle half of the marinara sauce over each chicken breast, ensuring every inch is covered.
-
Cottage Cheese Bliss: Spoon the cottage cheese over the marinara layer, creating a creamy bed for the cheese that follows.
-
Cheesy Topping: Sprinkle the shredded mozzarella evenly over the cottage cheese layer, then top it off with a drizzle of the remaining marinara sauce.
-
Bake: Transfer the skillet to the preheated oven and bake for about 25-30 minutes or until the chicken is cooked through and the cheese is bubbly and golden.
-
Garnish and Serve: Once done, pull the skillet from the oven and let it rest for a few minutes. Sprinkle with fresh basil before serving. This final touch not only adds stunning color but a lovely aromatic flavor!
Serving Suggestions
When ready to serve, scoop out a generous portion of your Cottage Cheese Chicken Parmesan Bowl onto a plate or into a shallow bowl. Serve it alongside a simple green salad or over a bed of zoodles (zucchini noodles) for a refreshing twist. Trust me, a drizzle of balsamic glaze wouldn’t hurt either!
Recipe Variations
-
Vegetarian Version: Swap out the chicken for eggplant or portobello mushrooms for a delightful meat-free meal.
-
Spicy Kick: Add red pepper flakes to the marinara or breadcrumbs for a spicy twist.
-
Mediterranean Flair: Swap marinara for a roasted red pepper sauce and mix feta with the cottage cheese for a fun remix.
-
Low-Carb Delight: Serve over cauliflower rice instead of traditional pasta for a lower-carb option.
-
Cheesy Variety: Feel free to mix in other cheeses, like provolone or Parmesan, to elevate the cheesiness!
Chef’s Notes
Every time I make this dish, I can’t help but smile, thinking of those incredible family Sundays. It’s funny how one recipe can carry so many memories and evolve with our tastes, too! Initially, I only used mozzarella, but incorporating cottage cheese was a game changer. It’s a great way to add creaminess without the guilt, and the extra protein keeps me going!
FAQs and Troubleshooting
1. Can I use frozen chicken?
Yes, but make sure to thaw it completely before cooking for even results.
2. What if I burn the breadcrumbs?
No worries! If you notice them getting too dark during cooking, cover the dish with foil for the remainder of the baking time.
3. How can I make this dish ahead of time?
Feel free to assemble everything up to the baking point, cover and refrigerate overnight. Just pop it in the oven when you’re ready.
4. Can I use a different type of cheese?
Absolutely! Get creative—using a four-cheese blend or pepper jack can give it extra flair!
Nutritional Info
This Cottage Cheese Chicken Parmesan Bowl is not only delectable but also packed with nutrients. It is high in protein thanks to the chicken and cottage cheese while being lower in fat compared to traditional recipes. Each serving contains approximately:
- Calories: 450
- Protein: 45g
- Carbohydrates: 25g
- Fat: 15g
And there you have it! A vibrant, satisfying, and nutritious Cottage Cheese Chicken Parmesan Bowl that not only tastes amazing but also brings a piece of nostalgia into your kitchen. Here’s to fresh, flavorful meals that fuel your life. Happy cooking!
PrintCottage Cheese Chicken Parmesan Bowl

A healthy twist on traditional chicken parmesan, incorporating creamy cottage cheese for added protein and richness.
- Prep Time: 15 minutes
- Cook Time: 30 minutes
- Total Time: 45 minutes
- Yield: 4 servings 1x
- Category: Main Course
- Method: Baking
- Cuisine: Italian
- Diet: Protein-rich
Ingredients
- 2 Chicken Breasts
- Salt and Pepper to taste
- 1 cup Italian Breadcrumbs
- 1 Egg
- 1 cup Marinara Sauce
- 1 cup Cottage Cheese
- 1 cup Mozzarella Cheese, shredded
- Fresh Basil for garnish
- 1 tablespoon Olive Oil
Instructions
- Preheat your oven to 375°F (190°C).
- Prepare the chicken by trimming excess fat and seasoning with salt and pepper.
- Set up a breading station with beaten egg and breadcrumbs in separate bowls.
- Bread the chicken by dipping it in egg and coating thoroughly with breadcrumbs.
- Sear the chicken in olive oil for 3-4 minutes on each side (optional).
- Layer half of the marinara sauce over each chicken breast.
- Spoon cottage cheese over the marinara layer.
- Sprinkle shredded mozzarella over the cottage cheese, drizzle remaining marinara sauce.
- Bake for 25-30 minutes until chicken is cooked and cheese is golden.
- Garnish with fresh basil before serving.
Notes
Serve with a green salad or over zoodles. A drizzle of balsamic glaze adds a nice touch.
Nutrition
- Serving Size: 1 serving
- Calories: 450
- Sugar: 6g
- Sodium: 600mg
- Fat: 15g
- Saturated Fat: 6g
- Unsaturated Fat: 8g
- Trans Fat: 0g
- Carbohydrates: 25g
- Fiber: 2g
- Protein: 45g
- Cholesterol: 60mg
Keywords: chicken parmesan, cottage cheese, healthy dinner, Italian comfort food, protein-rich meal