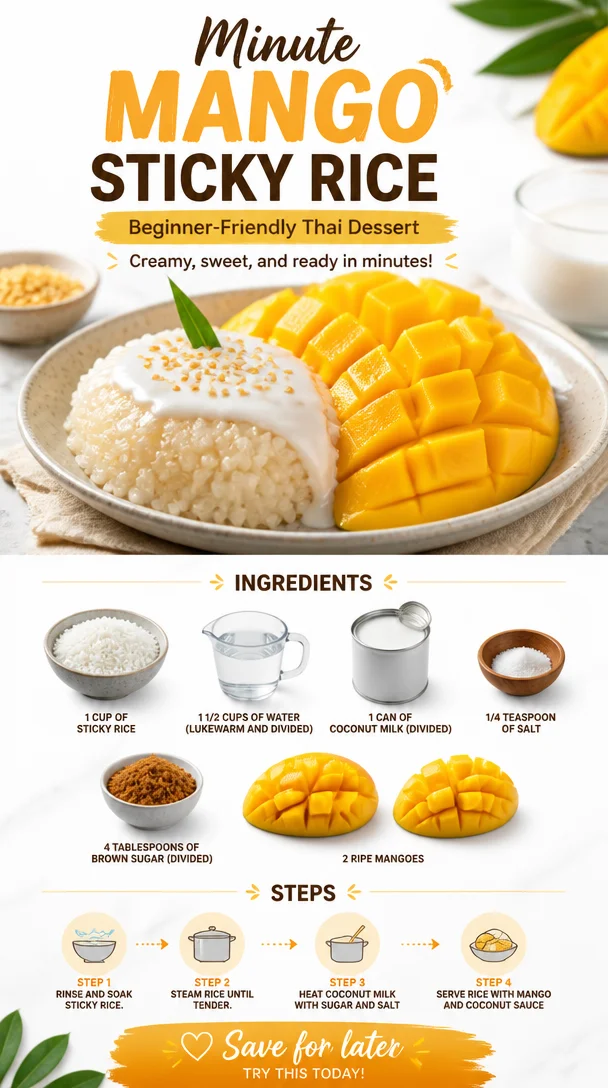
Minute Mango Sticky Rice: Beginner-Friendly Thai Dessert
Easy Yet Delicious Mango Sticky Rice
Welcome to another mouthwatering adventure in the kitchen! If you’re anything like me, you’re always on the lookout for recipes that are both easy to prepare and irresistibly delicious. Today, I’m thrilled to share a dish that’s a personal favorite—Mango Sticky Rice. This Thai dessert captures the essence of sweet, creamy coconut milk and perfectly ripe mangoes, all nestled atop a bed of tender sticky rice. It’s a simple yet glamorous treat that feels like sunshine in a bowl!
Now, I get it. Sometimes, dessert can seem a bit daunting, especially if you haven’t ventured into the world of sticky rice before. But trust me, the combination of flavors in this dish will have you swooning, and the best part? It’s so simple that you’ll wonder why you haven’t made it sooner! Plus, the vibrant colors and mouthwatering aroma will make your kitchen feel like a tropical island retreat. Ready to dive in? Let’s go!
A Sweet Memory to Inspire Us
Some of my fondest memories are linked to food, and Mango Sticky Rice is no exception. I remember the first time I tasted it during a family vacation in Thailand. We were exploring the bustling streets of Chiang Mai, soaking in the vibrant sights and sounds. After a long day of sightseeing, we stumbled upon a little street vendor selling Mango Sticky Rice. The vendor cheerfully served it in a banana leaf, and as I took my first bite, I was blown away by the explosion of flavors.
The sticky rice was perfectly chewy, the coconut milk rich and creamy, and the mangoes were so sweet and juicy. It was like a gift from the culinary gods! My family and I couldn’t help but devour every last bite, giggling about how we could eat this sweet treat every day of the week. That experience ignited my passion for exploring diverse cuisines and sharing those flavors with others. So here we are, working our magic in the kitchen together, where I hope to bring a little slice of that experience to your home!
Ingredients
To whip up this delightful dish, gather the following ingredients:
-
1 cup of sticky rice
Sticky rice (also known as glutinous rice) is key for achieving that chewy texture. You can find it in most Asian grocery stores. If you’re in a pinch, you can use short-grain rice, but the texture won’t be quite the same. -
1 1/2 cups of lukewarm water (divided)
The water is essential for soaking the rice and cooking it. The trick? Make sure your water isn’t too hot; lukewarm is ideal for better absorption! -
1 can of coconut milk (divided)
This will give the dish its rich, creamy flavor. You can opt for light coconut milk for a lower-fat version, though it may be slightly less luscious. -
1/4 teaspoon of salt
Just a pinch! Salt helps to enhance the sweetness of the coconut milk and balances the flavors in the dish. -
4 tablespoons of brown sugar (divided)
Brown sugar adds a lovely caramel note to the dish. If you’re aiming for a lighter option, you can substitute with honey or maple syrup. -
2 ripe mangoes
Look for mangoes that yield slightly to pressure for perfect sweetness. If mangoes are out of season, you could use sliced bananas for a twist, though they won’t replicate the original flavor.
Step-by-Step Instructions
-
Soak the Sticky Rice
Start by rinsing the sticky rice under cold water until the water runs clear. This removes excess starch and helps achieve that wonderful chewy texture. Next, place the rice in a bowl, cover it with lukewarm water, and let it soak for at least 4 hours or overnight if you have the time. Trust me, this soak makes all the difference! -
Prepare the Coconut Mixture
In a small saucepan, combine half of the coconut milk, 2 tablespoons of brown sugar, and salt. Heat over medium-low heat, stirring until the sugar dissolves. Be careful not to let it boil; just warm it enough until everything’s mixed together beautifully. -
Steam the Rice
Drain the soaked rice and place it in a steamer basket lined with cheesecloth (or a clean kitchen towel). You can also use a bamboo steamer for an authentic touch. Steam the rice over boiling water for about 25-30 minutes until tender and sticky. Give it a gentle stir halfway through to ensure even cooking. The aroma will be heavenly! -
Combine It All
Once the rice is done, transfer it to a large bowl or a plate and gradually stir in the warm coconut mixture. Mix until the rice absorbs the coconut goodness. Let it sit for about 15 minutes, allowing the flavors to meld together. -
Slice the Mangoes
While the rice is resting, peel and slice the ripe mangoes into thin strips. Aim for finesse here—beautiful presentation goes a long way in impressing friends and family! -
Serve it Up
To serve, place a generous scoop of the sticky rice on a plate or in a bowl, drizzle with the remaining coconut milk, and artfully arrange the mango slices on the side. There you have it—a masterpiece!
Serving Suggestions
For an eye-catching presentation, serve your Mango Sticky Rice in individual bowls topped with a lovely drizzle of coconut milk. Garnish with sesame seeds, a sprinkle of toasted coconut flakes, or fresh mint leaves for that extra touch of elegance. Pair this dessert with a slightly salty snack, like crispy fried spring rolls, creating a delightful contrast that will wow your guests!
Recipe Variations
- Coconut Pandan Version: Add a few drops of pandan extract to the coconut milk mixture for a fragrant twist!
- Tropical Bliss: Include sliced strawberries or cubes of pineapple for a fruity explosion!
- Vegan Delight: Swap brown sugar for coconut sugar to keep it 100% plant-based.
- Nutty Crunch: Add crushed peanuts or cashews on top for a delightful crunch.
Chef’s Notes
Mango Sticky Rice has been a staple in my dessert menu for as long as I can remember, but I’ve played around with it over the years. My sister once tried adding a bit of lime zest, and let me tell you, it was an unexpected hit! Sometimes, I also like to prep a batch on lazy Sunday afternoons, letting the aroma transport me back to those sun-kissed days in Thailand. Cooking is all about evolution, experimentation, and turning simple ingredients into beautiful memories!
FAQs and Troubleshooting
1. My rice didn’t turn out sticky. What happened?
If your rice isn’t sticky enough, it may be due to not soaking it long enough. Make sure to soak for at least 4 hours, preferably overnight, for the best results.
2. Can I use regular rice instead?
While you can use regular rice, the texture won’t quite match the chewiness of sticky rice. If you want an even closer result, try using short-grain rice instead.
3. How do I store leftovers?
Store any leftovers in an airtight container in the fridge for up to 2 days. The rice may harden, but you can warm it in the microwave with a splash of coconut milk to bring it back to life.
4. What’s the secret to perfect mangoes?
The key is to pick mangoes that are slightly soft yet firm to the touch. If mangoes aren’t in season, consider using a different fruit like bananas or even peaches!
Nutritional Info
While I don’t provide specific nutritional info for every recipe, enjoy knowing that this Mango Sticky Rice is packed with wholesome ingredients! The coconut milk offers healthy fats, while mangoes are rich in vitamins and minerals—definitely a treat you can feel good about!
So there you have it—Easy Yet Delicious Mango Sticky Rice that’s bound to impress! Whether you’re treating yourself, hosting a gathering, or simply looking to indulge in some tropical flavors, this dish ticks all the boxes. Happy cooking, and remember: keep it fresh, simple, and oh-so-delicious!
PrintEasy Yet Delicious Mango Sticky Rice
A delightful Thai dessert featuring sticky rice topped with sweet, ripe mangoes and creamy coconut milk.
- Prep Time: 15 minutes
- Cook Time: 30 minutes
- Total Time: 45 minutes
- Yield: 4 servings 1x
- Category: Dessert
- Method: Steaming
- Cuisine: Thai
- Diet: Vegetarian
Ingredients
- 1 cup of sticky rice
- 1 1/2 cups of lukewarm water (divided)
- 1 can of coconut milk (divided)
- 1/4 teaspoon of salt
- 4 tablespoons of brown sugar (divided)
- 2 ripe mangoes
Instructions
- Soak the sticky rice under cold water until the water runs clear, then soak in lukewarm water for at least 4 hours or overnight.
- Prepare the coconut mixture by combining half of the coconut milk, 2 tablespoons of brown sugar, and salt in a saucepan and warming it.
- Steam the soaked rice for 25-30 minutes until tender and sticky.
- Combine the warm coconut mixture with the steamed rice, stirring until absorbed and letting it sit for 15 minutes.
- Slice the mangoes into thin strips.
- Serve the sticky rice with a drizzle of coconut milk and arranged mango slices.
Notes
For added flavor, consider variations like coconut pandan or adding nuts on top. Serve with crispy snacks for a delightful contrast.
Nutrition
- Serving Size: 1 serving
- Calories: 350
- Sugar: 18g
- Sodium: 200mg
- Fat: 15g
- Saturated Fat: 13g
- Unsaturated Fat: 2g
- Trans Fat: 0g
- Carbohydrates: 50g
- Fiber: 2g
- Protein: 4g
- Cholesterol: 0mg
Keywords: Mango Sticky Rice, Thai Dessert, Easy Dessert, Coconut Milk, Mango Recipes
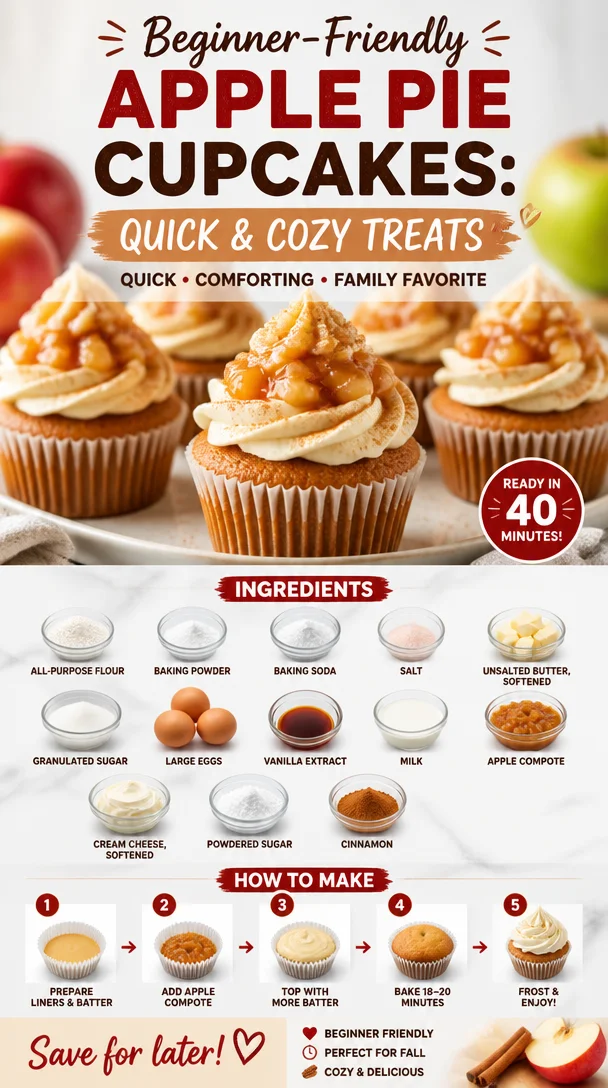
Beginner-Friendly Apple Pie Cupcakes: Quick & Cozy Treats
Apple Pie Cupcakes: A Sweet Twist on a Classic Favorite
Welcome, fellow food lovers! Today, we’re diving into a recipe that’s as heartwarming as it is delicious: Apple Pie Cupcakes. Yes, you heard that right—tiny, moist, and absolutely scrumptious cupcakes that pack all the flavors of a classic apple pie into one delightful bite. If you’re craving that sweet, cinnamon-spiced goodness but want a modern twist, you’re in for a treat.
Growing up, apple pie was the ultimate comfort food in my household. Every fall, my mom would roll up her sleeves and bake the most mouthwatering apple pie, filling our kitchen with that irresistible aroma of baked apples and cinnamon. It was a ritual—family gathered around the kitchen table, laughter echoing, and the anticipation of that warm pie cooling on the counter. The first slice was always the best, warm and gooey, topped with a scoop of vanilla ice cream (I still dream about that combo!).
But here’s the thing—sometimes, I find myself wanting the flavor without the fuss. That’s where these Apple Pie Cupcakes come in. They’re perfect for any occasion, whether you’re hosting a cozy gathering or just treating yourself to a little slice of nostalgia. The best part? They’re super easy to whip up and feature fresh apple compote, which keeps them moist and flavorful! Ready to bake some joy into your kitchen? Let’s go!
Ingredients
Here’s what you’ll need to create these delightful Apple Pie Cupcakes:
-
1 1/2 cups all-purpose flour
This is your base! If you need a gluten-free version, substitute it with a 1:1 gluten-free baking flour blend. -
1 tsp baking powder
Helps the cupcakes rise and become light and fluffy. Be sure to use fresh baking powder for the best results! -
1/2 tsp baking soda
This adds to the leavening as well, ensuring a perfect bake. Like baking powder, freshness is key. -
1/4 tsp salt
Salt enhances all the flavors. Don’t skip it! -
1/2 cup unsalted butter, softened
Adds rich flavor and moisture. If it’s cold, you can quickly soften it by cutting it into small pieces and letting it sit for about 15 minutes. -
1 cup granulated sugar
Sweetens the deal! Feel free to experiment with coconut sugar for a caramel flavor twist. -
2 large eggs
Bind everything together while adding moisture and richness. -
1 tsp vanilla extract
A classic flavor booster! Homemade vanilla extract is even better if you have it. -
1/2 cup milk
Milk keeps the cupcakes tender. You can substitute with almond milk or oat milk for a dairy-free option. -
1 cup apple compote
This is where the magic happens! You can either buy it or make your own by cooking down apples with a little sugar and cinnamon until soft. -
8 oz cream cheese, softened
For a luscious frosting that complements the cupcakes perfectly. -
1/2 cup powdered sugar
Sweetens the frosting without making it grainy. -
1 tsp cinnamon
Brings that classic apple pie flavor to life!
Step-by-Step Instructions
Now, let’s dive into the baking process. It’s easier than you might think!
-
Preheat the Oven
Preheat your oven to 350°F (175°C). It’s essential to have your oven ready to go, so your cupcakes rise beautifully. -
Prepare the Cupcake Liners
Line a cupcake pan with liners. Choose festive designs or colors that match the mood of your gathering! -
Mix Dry Ingredients
In a mixing bowl, whisk together the all-purpose flour, baking powder, baking soda, salt, and cinnamon. This step ensures everything is evenly distributed. -
Cream the Butter and Sugar
In a separate bowl, cream together the softened butter and granulated sugar until it’s light and fluffy. This will take about 3-4 minutes. You want to incorporate air for fluffiness. -
Add Eggs and Flavoring
Beat in the eggs, one at a time, and then mix in the vanilla extract. Scrape down the sides of the bowl for a perfectly mixed batter. -
Combine Wet and Dry Ingredients
Alternate adding the flour mixture and milk to the butter mixture, starting and ending with the flour. This will prevent overmixing the batter, keeping it tender. -
Stir in the Apple Compote
Fold in the apple compote gently with a spatula. You want big chunks of apple to remain for a delightful texture. -
Fill the Cupcake Liners
Scoop the batter into your prepared cupcake liners, filling them about two-thirds full. This will allow them to rise without spilling over. -
Bake
Bake in the preheated oven for about 18-20 minutes or until a toothpick inserted into the center comes out clean. The smell while they bake will draw everyone into the kitchen! -
Cool Down
Let the cupcakes cool in the pan for 5 minutes before transferring them to a wire rack to cool completely. Patience is key if you want to frost them perfectly! -
Prepare the Frosting
In a mixing bowl, beat the softened cream cheese until smooth, then gradually add the powdered sugar. You can mix in a pinch of cinnamon for an extra flavor boost. -
Frost the Cupcakes
Once the cupcakes are completely cooled, pipe or spread the cream cheese frosting on top. Feel free to get creative with your frosting technique!
Serving Suggestions
To serve these Apple Pie Cupcakes, arrange them on a beautiful platter. Consider adding a sprinkle of cinnamon on top of the frosting or a drizzle of caramel sauce for an irresistible finishing touch. They’re perfect for afternoon tea, birthday parties, or just as a delightful treat to brighten your day!
Recipe Variations
-
Caramel Apple Twist: Add chopped caramel candies to the cupcake batter for a gooey surprise!
-
Nutty Addition: Toss in a half cup of finely chopped walnuts or pecans for a delightful crunch.
-
Spiced Frosting: Mix in a dash of nutmeg along with the cinnamon for a more complex flavor profile.
-
Dairy-Free Delight: Use coconut cream in place of cream cheese for a lighter, dairy-free frosting.
-
Mini Cupcakes: Make mini versions of these cupcakes for bite-sized happiness!
Chef’s Notes
The inspiration for these Apple Pie Cupcakes came from a desire to make my mom’s traditional apple pie more accessible. Over the years, I’ve played around with the ingredients, and this recipe is a culmination of all those experiments. I remember the first time I tried to make frosting—let’s just say it almost turned into a butter soup (not one of my finer moments!). Now, I’ve got it down to a creamy perfection that makes these cupcakes sing!
FAQs and Troubleshooting
-
What can I do if my cupcakes are dry?
If your cupcakes turn out dry, it might be due to overbaking. Always check for doneness a few minutes early. You can also brush a little simple syrup on top while they’re still warm for added moisture. -
Can I make the batter ahead of time?
While it’s best to bake the batter right after mixing, you can refrigerate it for a few hours if needed. Just give it a good stir before baking. -
Why are my cupcakes sinking?
This can happen if there’s too much batter in each liner, or if the leavening agents (baking powder and baking soda) are outdated. Stick to the recommended fill level and use fresh ingredients! -
Can I freeze these cupcakes?
Absolutely! Freeze the unfrosted cupcakes in an airtight container for up to 3 months. Just let them thaw completely before frosting.
Nutritional Info
(Optional: For the sake of reference, here’s a rough breakdown per cupcake without frosting):
- Calories: 200
- Protein: 2g
- Carbs: 30g
- Fat: 9g
- Fiber: 1g
There you have it, folks! A delightful blend of nostalgia and modern twist, perfect for sharing or enjoying all to yourself. I hope you savor every bite of these Apple Pie Cupcakes as much as I do. Happy baking!
PrintApple Pie Cupcakes

Delicious cupcakes that capture the flavors of a classic apple pie in a modern twist.
- Prep Time: 15 minutes
- Cook Time: 20 minutes
- Total Time: 35 minutes
- Yield: 12 servings 1x
- Category: Dessert
- Method: Baking
- Cuisine: American
- Diet: Vegetarian
Ingredients
- 1 1/2 cups all-purpose flour
- 1 tsp baking powder
- 1/2 tsp baking soda
- 1/4 tsp salt
- 1/2 cup unsalted butter, softened
- 1 cup granulated sugar
- 2 large eggs
- 1 tsp vanilla extract
- 1/2 cup milk
- 1 cup apple compote
- 8 oz cream cheese, softened
- 1/2 cup powdered sugar
- 1 tsp cinnamon
Instructions
- Preheat the oven to 350°F (175°C).
- Line a cupcake pan with liners.
- Mix together the all-purpose flour, baking powder, baking soda, salt, and cinnamon in a bowl.
- Cream the butter and granulated sugar until light and fluffy.
- Add the eggs one at a time, followed by the vanilla extract.
- Combine the flour mixture with the milk, alternating between them.
- Stir in the apple compote until combined.
- Scoop the batter into the cupcake liners, filling them about two-thirds full.
- Bake for 18-20 minutes or until a toothpick comes out clean.
- Cool in the pan for 5 minutes, then transfer to a wire rack to cool completely.
- Beat the cream cheese until smooth, then add the powdered sugar and mix well.
- Frost the cooled cupcakes with the cream cheese frosting.
Notes
For added flavor, consider a sprinkle of cinnamon on top of the frosting or a drizzle of caramel sauce.
Nutrition
- Serving Size: 1 cupcake
- Calories: 200
- Sugar: 15g
- Sodium: 150mg
- Fat: 9g
- Saturated Fat: 5g
- Unsaturated Fat: 3g
- Trans Fat: 0g
- Carbohydrates: 30g
- Fiber: 1g
- Protein: 2g
- Cholesterol: 30mg
Keywords: apple pie, cupcakes, dessert, baking, fall flavors