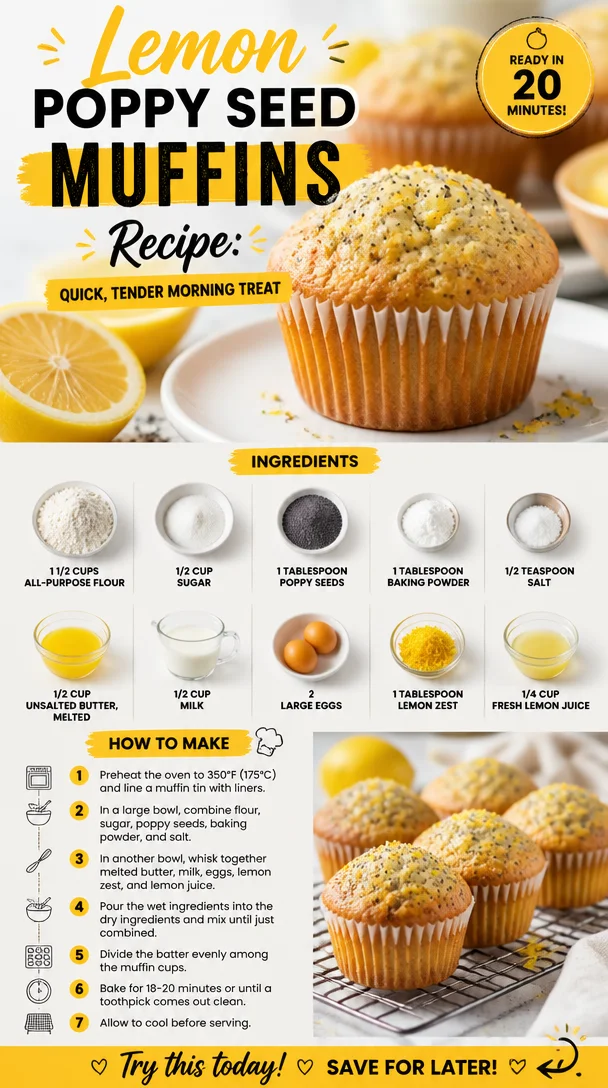
Lemon Poppy Seed Muffins Recipe: Quick, Tender Morning Treat
Lemon Poppy Seed Muffins: A Zesty Twist on a Classic Treat
Welcome, fellow food lovers! Today, we are diving into the delightful world of Lemon Poppy Seed Muffins. These little wonders are not just any ordinary muffins; they are fluffy, zesty, and bursting with a light, refreshing flavor that can whisk you away to a sunny afternoon. Each bite is a symphony of sweetness, nuttiness, and a tangy citrus kick that makes your taste buds dance. Whether you’re enjoying them with a cup of coffee for breakfast or as a snack in the afternoon, these muffins are sure to put a smile on your face.
I like to think of muffins as little packages of happiness. They’re versatile enough for any time of day and are easy to whip up on a whim. Plus, who doesn’t love that warm, home-baked aroma that fills the kitchen? It’s like a hug from the oven! And let’s be honest; there’s something utterly satisfying about transforming simple ingredients into a delightful treat.
My journey with lemon poppy seed muffins dates back to childhood. I remember sunny weekends spent with my grandmother, who had a special knack for baking. With her apron tied tightly around her waist, she would have me help her zest lemons and measure out the poppy seeds. It was during those moments that I learned the magic of cooking with love. Every muffin she made was a testament to her warm spirit and culinary skills. Even now, when I whip up these muffins, the tang of lemon and the crunch of poppy seeds take me back to those cherished days spent in her cozy kitchen. It’s amazing how food can connect us to memories, isn’t it?
Ingredients
Here’s what you’ll need to create these lemony delights:
-
1 1/2 cups all-purpose flour
This is your base. If you’re looking for a healthier option, try using whole wheat flour or almond flour for a nutty flavor. -
1/2 cup sugar
The sugar adds sweetness and helps the muffins rise. You can substitute coconut sugar or stevia for a healthier alternative, but keep in mind that it may alter the texture slightly. -
1 tablespoon poppy seeds
These little seeds bring a nutty crunch and a dash of visual appeal. If you can’t find them, chia seeds make for a lovely substitute, albeit with a different flavor profile. -
1 tablespoon baking powder
This is your leavening agent that helps the muffins rise beautifully. Make sure it’s fresh; old baking powder may lead to flat muffins. -
1/2 teaspoon salt
A pinch of salt enhances all the flavors. Sea salt or kosher salt works well too! -
1/2 cup unsalted butter, melted
Butter adds richness and moisture; you can swap it out for coconut oil or a plant-based butter if you’re aiming for a vegan version. -
1/2 cup milk
Dairy milk adds moisture; almond or oat milk are excellent alternatives for dairy-free muffins. -
2 large eggs
Eggs are essential for binding. If you need an egg substitute, 1/4 cup of applesauce or 1/4 cup of yogurt can work wonders. -
1 tablespoon lemon zest
This is where the magic happens! Freshly zested lemons will give your muffins that bright, zesty flavor. Avoid the zest from older lemons, as they lack vibrancy. -
1/4 cup fresh lemon juice
Fresh is key! Bottled lemon juice just doesn’t cut it when it comes to flavor – trust me!
Step-by-Step Instructions
Now, let’s get baking! Follow these steps closely for lemon poppy seed muffin perfection.
Step 1: Preheat the Oven
Start by preheating your oven to 350°F (175°C). This is an important step that ensures your muffins bake evenly.
Step 2: Prepare Your Muffin Tin
While the oven heats up, line a 12-cup muffin tin with paper liners or give it a good spray with non-stick cooking spray. If you’re a fan of paper-less baking, consider greasing the tin with a little butter, so they pop right out.
Step 3: Combine Dry Ingredients
In a large mixing bowl, whisk together the flour, sugar, baking powder, poppy seeds, and salt. This ensures that your dry ingredients are evenly distributed, which is key for consistent flavor in each muffin!
Step 4: Mix Wet Ingredients
In another bowl, combine the melted butter, milk, eggs, lemon zest, and lemon juice. Whisk them until they are well combined. Here’s a little tip: gently warm the milk before mixing to help create an even fluffier muffin.
Step 5: Combine the Mixtures
Pour the wet ingredients into the dry ingredients and stir until just combined. Be careful not to overmix; it’s okay if there are a few lumps—they’ll bake out! Overmixing can lead to dense muffins, and nobody wants a brick.
Step 6: Fill the Muffin Cups
Using a large spoon or an ice cream scoop, fill each muffin cup about 3/4 full. This gives them room to rise while keeping them perfectly muffin-shaped.
Step 7: Bake to Perfection
Pop the muffin tin into the preheated oven and bake for about 18-20 minutes, or until the tops are lightly golden and a toothpick inserted into the center comes out clean. Keep an eye on them as oven temperatures can vary!
Step 8: Cool and Enjoy
Once baked, let the muffins cool in the tin for about 5 minutes before transferring them to a wire rack to cool completely. This step is crucial for preventing sogginess!
Serving Suggestions
These lemon poppy seed muffins are best enjoyed warm. Serve them with a pat of butter or a drizzle of honey on top for an extra touch of sweetness. You can also pair them with a delightful cup of tea or coffee for the perfect afternoon pick-me-up. If you’re feeling a bit fancy, sprinkle some powdered sugar on top for a gorgeous finish!
Recipe Variations
Get ready to get creative! Here are a few fun ways to put your spin on these muffins:
-
Lemon Blueberry Muffins: Add 1 cup of fresh or frozen blueberries for a fruity twist.
-
Chia Seed Muffins: Replace poppy seeds with chia seeds for added health benefits and a slightly different texture.
-
Lemon Almond Muffins: Substitute half the flour with almond flour for a nutty flavor profile, and sprinkle slivered almonds on top before baking.
-
Coconut Lemon Muffins: Add shredded coconut into the batter for a tropical touch.
-
Glazed Lemon Poppy Seed Muffins: Drizzle a simple lemon glaze made from powdered sugar and lemon juice over the cooled muffins for extra zing.
Chef’s Notes
I have to say, these lemon poppy seed muffins have been a staple in my kitchen for years. They’ve evolved over time; each batch is a little different based on what I have on hand or what I feel like that day. Sometimes, I’ll throw some fresh herbs like rosemary into the mix for a unique flavor twist. It’s all about having fun and making the recipe your own!
I remember one time I was hosting a brunch and completely forgot the muffins in the oven. The kitchen filled with an, let’s say, robust aroma! Thankfully, with a little bit of creativity (and some powdered sugar), I managed to turn those burnt muffins into a “charred citrus concept” dessert. Sometimes, kitchen mishaps can lead to the best stories!
FAQs and Troubleshooting
Q: My muffins turned out dry. What did I do wrong?
A: This usually happens if the flour was over-measured or if they were overbaked. Be sure to fluff your flour and spoon it into your measuring cup rather than scooping directly to avoid packing it down. Always check for doneness a few minutes early!
Q: Can I make these ahead of time?
A: Absolutely! These muffins store well in an airtight container for up to three days. You can also freeze them for longer storage. Just let them cool completely, then wrap them tightly in plastic wrap and place them in a freezer bag.
Q: How can I make these muffins vegan?
A: You can easily make these vegan by substituting the eggs with 1/4 cup applesauce or your favorite egg replacer, using plant-based butter, and opting for non-dairy milk.
Q: My muffins didn’t rise very much. What went wrong?
A: There are a couple of culprits here! Make sure your baking powder is fresh, and double-check that you’re using the correct measurements. Also, don’t skip preheating your oven; putting the batter in a cold oven can significantly impact rising.
Nutritional Info (Optional)
- Serving Size: 1 muffin
- Calories: 180
- Protein: 3g
- Fat: 8g
- Total Carbohydrates: 25g
- Fiber: 1g
- Sugars: 8g
And there you have it! Your very own batch of scrumptious Lemon Poppy Seed Muffins, ready to share (or not!) with friends and family. I hope this recipe sparks joy and nostalgia in your kitchen, just like it has in mine. Happy baking, and until next time – keep it fresh, simple, and delicious!
PrintLemon Poppy Seed Muffins

Fluffy, zesty muffins bursting with refreshing lemon flavor and a delightful crunch from poppy seeds.
- Prep Time: 15 minutes
- Cook Time: 20 minutes
- Total Time: 35 minutes
- Yield: 12 muffins 1x
- Category: Breakfast
- Method: Baking
- Cuisine: American
- Diet: Vegetarian
Ingredients
- 1 1/2 cups all-purpose flour
- 1/2 cup sugar
- 1 tablespoon poppy seeds
- 1 tablespoon baking powder
- 1/2 teaspoon salt
- 1/2 cup unsalted butter, melted
- 1/2 cup milk
- 2 large eggs
- 1 tablespoon lemon zest
- 1/4 cup fresh lemon juice
Instructions
- Preheat the oven to 350°F (175°C).
- Prepare your muffin tin by lining it with paper liners or spraying with non-stick spray.
- Combine the flour, sugar, baking powder, poppy seeds, and salt in a large mixing bowl.
- Mix the melted butter, milk, eggs, lemon zest, and lemon juice in another bowl until well combined.
- Pour the wet ingredients into the dry ingredients and stir until just combined.
- Fill each muffin cup about 3/4 full with the batter.
- Bake for 18-20 minutes or until golden brown and a toothpick comes out clean.
- Cool in the tin for 5 minutes before transferring to a wire rack to cool completely.
Notes
These muffins are best enjoyed warm, optionally served with butter or honey. They can also be frozen for longer storage.
Nutrition
- Serving Size: 1 muffin
- Calories: 180
- Sugar: 8g
- Sodium: 200mg
- Fat: 8g
- Saturated Fat: 5g
- Unsaturated Fat: 3g
- Trans Fat: 0g
- Carbohydrates: 25g
- Fiber: 1g
- Protein: 3g
- Cholesterol: 50mg
Keywords: muffins, lemon poppy seed, baking, breakfast, snacks

Lemon Streusel Muffins: 30-Minute Recipe for Busy Mornings
Lemon Streusel Muffins: A Bright Bite of Sunshine
Welcome back, fellow food lovers! Today, we’re diving into a delightful treat that’s sure to brighten your morning and put a smile on your face—Lemon Streusel Muffins! Imagine waking up to the aroma of fresh-baked muffins filled with zesty lemon goodness, perfectly topped with a sweet, crumbly streusel. Sounds tempting, right?
These muffins aren’t just a feast for the senses; they’re also incredibly easy to whip up, making them a perfect choice for busy weekdays or leisurely brunches. So grab your apron, and let’s get ready to create some muffin magic!
Personal Story: A Zesty Childhood Memory
Growing up, my kitchen was always filled with the comforting sounds of my mom baking. Each weekend, her special treat was a batch of muffins, and as I’m sure you can guess, lemon muffins were in heavy rotation. I remember the first time I helped—my little hands covered in flour while I grated lemons for zest and watched my mom effortlessly concoct her magical streusel topping.
One particularly sunny Saturday, she decided to let me take the lead in muffin-making. I was so excited; the smell of lemons filled the air, and I could hardly wait for them to come out of the oven. As we pulled them out, molten streusel bubbling away, I took a big whiff and knew I was going to cherish that day forever.
Fast forward to today, and I still find myself coming back to this recipe. Every time I smell that zesty citrus aroma wafting through my kitchen, I’m transported back to those joyful mornings with my mom, flour-covered but filled with love. Now it’s my turn to share that joy with you!
Ingredients
Let’s gather our ingredients and make magic happen! Here’s what you’ll need for these scrumptious Lemon Streusel Muffins:
-
1 1/2 cups all-purpose flour
This is the base of your muffins, giving them structure. For a gluten-free option, try using gluten-free all-purpose flour! -
1/2 cup sugar
This will sweeten your muffins! If you’re looking for a less refined option, coconut sugar or honey can also do the trick—just adjust the liquid content accordingly. -
2 tsp baking powder
The magic ingredient that makes your muffins rise! Ensure it’s fresh for the best results—check the expiration date! -
1/2 tsp salt
Salt enhances the flavors, balancing the sweetness. Don’t skip it—it’s like the secret superhero of baking! -
1/2 cup milk
Milk adds moisture. If you’re dairy-free, almond milk or oat milk work beautifully as substitutes. -
1/3 cup vegetable oil
This keeps the muffins moist and tender. For a healthier twist, you can use applesauce—just know it may change the texture slightly. -
1 large egg
Eggs bind everything together. If you’re going vegan, a flaxseed meal or chia seed substitute can work wonders! -
1 tsp vanilla extract
Vanilla adds a lovely depth of flavor. Homemade vanilla extract is a great way to up your baking game! -
Zest of 1 lemon
Zest brings an intense lemon flavor; just the yellow part for a bright kick! If you only have bottled lemon zest, that’ll work in a pinch but may not be as vibrant. -
1/4 cup fresh lemon juice
This is where the real lemon magic happens! Use freshly squeezed lemon juice for the best flavor. -
1/2 cup streusel topping (made with flour, sugar, butter)
This simple topping is a game-changer! You can make it from scratch or buy a ready-made version for a quick fix.
Step-by-Step Instructions
Now that we’ve gathered our ingredients, let’s get baking! This process is not only straightforward but also incredibly rewarding. Here’s how to create these lemony delights:
-
Preheat Your Oven:
Preheat your oven to 375°F (190°C). This is the perfect temperature to get your muffins to rise beautifully and develop a lovely golden crust. -
Prepare Your Muffin Pan:
Grab a standard 12-cup muffin pan and either grease it lightly or line it with muffin liners. Lining is my preferred method because it makes cleanup a breeze and adds a pop of color! -
Mix Dry Ingredients:
In a medium bowl, whisk together the flour, sugar, baking powder, and salt. This ensures even distribution of the baking powder, preventing any floury clumps in your muffins.Chef Hack: If you’re feeling fancy, sift the dry ingredients before mixing; it’ll make your muffins extra fluffy!
-
Combine Wet Ingredients:
In a large bowl, whisk together the milk, vegetable oil, egg, vanilla extract, lemon zest, and lemon juice. This wonderful mixture will add moisture and that zesty flavor that makes these muffins sing! -
Combine Wet and Dry Mixtures:
Gradually fold the dry ingredients into the wet ingredients using a spatula or wooden spoon. Be careful not to overmix—lumps are okay! Overmixing can lead to tough muffins, and nobody wants that! -
Fill Muffin Cups:
Spoon the batter into the prepared muffin pan, filling each cup about 2/3 full. This will give them room to rise without overflowing.Chef Tip: Use an ice cream scoop for perfect muffin portions and less mess!
-
Prepare the Streusel Topping:
In a small bowl, mix together your streusel topping ingredients (flour, sugar, and butter) using a fork until crumbly. The texture should resemble small peas. Sprinkle this heavenly mixture over the muffin batter in your pan. -
Bake Time:
Pop the muffin pan into the preheated oven and bake for about 18-20 minutes or until a toothpick inserted in the center comes out clean or with just a few crumbs.Pro Tip: Rotate your muffin pan halfway through baking for even browning!
-
Cool & Enjoy:
Once baked, let the muffins cool in the pan for about 10 minutes, then transfer them to a wire rack to cool completely. The aroma is going to be hard to resist!
Serving Suggestions
These Lemon Streusel Muffins are perfect served warm, perhaps with a pat of butter or a drizzle of honey. They also pair beautifully with a cup of tea or coffee. For an extra touch, sprinkle a bit of powdered sugar on top for a lovely presentation. You can even add a side of fresh berries for a pop of color and flavor!
Recipe Variations
Want to switch things up? Here are a few fun variations to consider:
- Blueberry Lemon Muffins: Add a cup of fresh or frozen blueberries for a delightful fruity twist!
- Glazed Lemon Muffins: After baking, drizzle with a simple glaze made from powdered sugar and lemon juice.
- Lemon Poppy Seed Muffins: Add 1-2 tablespoons of poppy seeds to the batter for added texture and flavor.
- Coconut Lemon Muffins: Mix in some shredded coconut for a tropical flair!
- Lemon Chia Muffins: Swap the egg for a chia seed "egg" (1 tablespoon chia seeds mixed with 2.5 tablespoons water) for a vegan option.
Chef’s Notes
This recipe is one of those beautifully adaptable creations that has seen some love over the years. I started with my mom’s base recipe but have added and changed things to suit my evolving taste. I’ve tried incorporating Greek yogurt for extra moisture, play with different sweeteners, and even made a mini muffin version for those times when I want just a little taste.
Every time I make these muffins, I can’t help but reminisce about those childhood kitchen adventures. It reminds me that cooking and baking should always be filled with joy, creativity, and sometimes just a little chaos!
FAQs and Troubleshooting
Q: Why did my muffins come out dense?
A: This could be due to overmixing or using too much flour. Measure flour by gently spooning it into a measuring cup, then leveling off.
Q: Can I freeze these muffins?
A: Absolutely! Cool completely, then place them in an airtight container or a freezer bag. They’ll last up to three months. Thaw them at room temperature or pop them in the microwave for a quick heat-up.
Q: How do I know when my muffins are done?
A: The toothpick test is your best friend! If it comes out clean or with a few crumbs, you’re golden. Overbaking can result in dry muffins, so keep a close eye on them.
Q: How can I make these muffins gluten-free?
A: Use a gluten-free all-purpose flour blend, and ensure your baking powder is gluten-free as some brands may contain gluten as an anti-caking agent.
Nutritional Info (Optional)
While I won’t get into the nitty-gritty here, remember that these muffins are a wonderful balance of flavor and nourishment, especially with the bright notes coming from those fresh, zesty lemons! They’re perfect for enjoying in moderation as part of a balanced diet.
So there you have it! A recipe that’s not just delicious but also packed with memories and possibilities. I can’t wait for you to try these Lemon Streusel Muffins and make some joyful kitchen memories of your own! Happy baking, friends!
PrintLemon Streusel Muffins

Bright and zesty Lemon Streusel Muffins topped with a sweet crumbly streusel, perfect for any morning.
- Prep Time: 10 minutes
- Cook Time: 20 minutes
- Total Time: 30 minutes
- Yield: 12 servings 1x
- Category: Breakfast
- Method: Baking
- Cuisine: American
- Diet: Vegetarian
Ingredients
- 1 1/2 cups all-purpose flour
- 1/2 cup sugar
- 2 tsp baking powder
- 1/2 tsp salt
- 1/2 cup milk
- 1/3 cup vegetable oil
- 1 large egg
- 1 tsp vanilla extract
- Zest of 1 lemon
- 1/4 cup fresh lemon juice
- 1/2 cup streusel topping (made with flour, sugar, butter)
Instructions
- Preheat your oven to 375°F (190°C).
- Prepare a standard 12-cup muffin pan by greasing it or lining it with muffin liners.
- Mix together the flour, sugar, baking powder, and salt in a medium bowl.
- Combine the milk, vegetable oil, egg, vanilla extract, lemon zest, and lemon juice in a large bowl.
- Fold the dry ingredients into the wet ingredients being careful not to overmix.
- Fill the muffin cups about 2/3 full with batter.
- Prepare the streusel topping by mixing flour, sugar, and butter until crumbly, then sprinkle over the batter.
- Bake for 18-20 minutes or until a toothpick comes out clean.
- Cool in the pan for 10 minutes before transferring to a wire rack.
Notes
These muffins can be served warm with butter or honey, and you can also freeze them for later enjoyment.
Nutrition
- Serving Size: 1 muffin
- Calories: 260
- Sugar: 12g
- Sodium: 200mg
- Fat: 10g
- Saturated Fat: 1g
- Unsaturated Fat: 7g
- Trans Fat: 0g
- Carbohydrates: 36g
- Fiber: 1g
- Protein: 3g
- Cholesterol: 25mg
Keywords: lemon muffins, breakfast, pastries, baking, muffins, easy recipes
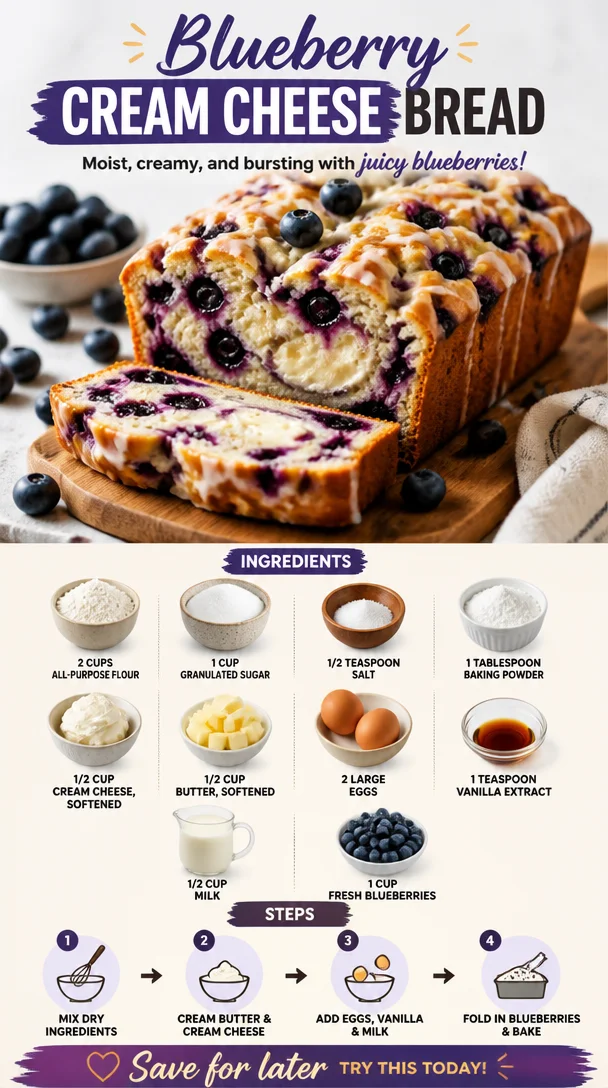
Blueberry Cream Cheese Bread
Blueberry Cream Cheese Bread: A Slice of Heaven
Welcome back to Clean Plate Cravings, friends! Today, I’m excited to share with you a recipe that’s as delightful as a lazy Sunday morning and as comforting as a warm hug from grandma: Blueberry Cream Cheese Bread. This recipe is not just any ordinary bread; it’s a luscious treat that’s bursting with juicy blueberries and creamy goodness that you just won’t be able to resist.
When I first encountered blueberry bread, I was at a quaint little café nestled on the edge of town, where the scent of freshly baked goods danced around me and drew me in like a moth to a flame. There was something about the contrast between the sweet, slightly tangy blueberries and the rich cream cheese that intrigued me. I took a bite, and let me tell you, it was an explosion of flavor that made my taste buds do the happy dance!
Blueberry Cream Cheese Bread is the perfect fusion of wholesome ingredients and indulgent flavors. Whether you enjoy it for breakfast with a hot cup of coffee, as an afternoon snack with tea, or simply as a sweet treat any time of day, this bread stands out in all the right ways. And the best part? It’s so easy to whip up that you may just find yourself making it every week!
Are you ready to dive in? Let’s bake something fun together!
A Slice of Nostalgia
Before we get into the nitty-gritty of the recipe, let me take you back down memory lane. Growing up, Saturdays were sacred in my household. My mom had this delightful ritual of baking while the rest of us would still be nestled under our warm blankets. The sweet and comforting aroma of baked goods would waft through the air, drawing us into the kitchen for what felt like magic in the making.
One particular morning, my mom decided to try her hand at blueberry cream cheese bread. I remember the excitement as the bright blue gems popped against the creamy batter, and my brothers and I were on “blueberry watch,” ensuring every single berry made it into the bowl. As the bread baked, we could hardly contain our anticipation; the delightful smell was too much to bear!
When the timer finally rang, we couldn’t wait to dig into the warm, golden loaf. Each slice was thick and luscious, with that gorgeous cream cheese blended throughout, and the tart blueberries balanced out the sweetness perfectly. We spread butter on top—because why not? It was pure bliss. From that day onward, blueberry cream cheese bread became a staple in our home, one I still cherish deeply.
Ingredients You’ll Need
Let’s gather everything you need to whip up this delicious Blueberry Cream Cheese Bread. Here’s what we’re working with:
-
2 cups all-purpose flour
A classic choice for baking, all-purpose flour gives the bread its structure. For a healthier twist, try using whole wheat flour—just be sure to adjust the liquid slightly as it can absorb more. -
1 cup granulated sugar
This sugar adds sweetness but can also be swapped for coconut sugar for a more caramel undertone, or you might use a sugar substitute if you’re aiming for lower calories. -
1/2 teaspoon salt
A pinch of salt enhances all flavors, balancing out the sweetness of the blueberries and sugar. -
1 tablespoon baking powder
The star here, baking powder ensures our bread rises to fluffy perfection. If you’re out, you can substitute with 1/2 teaspoon of baking soda combined with 1 teaspoon of lemon juice. -
1/2 cup cream cheese, softened
This ingredient brings a creamy tang to the bread. If you’re looking for a dairy-free option, you could try vegan cream cheese. -
1/2 cup butter, softened
A must for flavor and moisture! If you prefer, melted coconut oil or applesauce can work—a fun way to change the taste! -
2 large eggs
The binding agents here provide structure and moisture. For a vegan alternative, consider using flax eggs (1 tablespoon flaxseed meal with 3 tablespoons water for each egg). -
1 teaspoon vanilla extract
Always use pure vanilla for the best flavor; it’s a game changer! In a pinch, you can use almond extract for a different twist. -
1/2 cup milk
The milk adds moistness; non-dairy milk (like almond or oat) are fantastic swaps if you’re avoiding dairy. -
1 cup fresh blueberries
The star of the show! Fresh blueberries bring sweetness and a burst of flavor. If out of season, feel free to use frozen ones; just don’t thaw them beforehand to keep your batter from getting too colorful.
Step-by-Step Instructions
Now, let’s get down to the fun part—actually making this delicious bread! Follow these step-by-step instructions for a baking experience filled with love and flavor:
-
Preheat Your Oven:
Preheat your oven to 350°F (175°C). This initial step is crucial because a properly heated oven leads to perfect baking. Meanwhile, prepare your loaf pan by greasing it well or lining it with parchment paper. -
Mix Dry Ingredients:
In a large mixing bowl, whisk together the all-purpose flour, baking powder, and salt. Make sure they’re well combined—this ensures even baking. Pro-tip: sift the flour for a lighter texture if you want to be super fancy! -
Cream the Butter and Sugar:
In another bowl, combine the softened butter and granulated sugar. Using a hand mixer or a stand mixer, beat them together until the mixture is light and fluffy (about 2-3 minutes). This process incorporates air and makes for a soft bread. -
Add the Cream Cheese:
Next, add the softened cream cheese to the sugar mixture and blend until smooth. Don’t skip this step—cream cheese is what makes this bread decadent! -
Incorporate Eggs and Vanilla:
Crack in those eggs one at a time, mixing well after each addition. Pour in the vanilla extract and mix until everything is combined. This batter should be creamy and luscious! -
Add Dry Ingredients & Milk:
Gradually add the dry ingredients to the creamy mixture, alternating with the milk. Start and end with the flour mixture to keep the batter fluffy. Mix until just combined; be careful not to over-mix! -
Gently Fold in Blueberries:
Using a spatula, gently fold in the fresh blueberries. You want to distribute them evenly without crushing them. Remember, we want those vibrant blue bursts throughout! -
Transfer to Loaf Pan:
Pour the batter into your prepared loaf pan and smooth the top with the spatula. Give it a gentle shake to settle it in. -
Bake:
Bake in the preheated oven for 50-60 minutes or until a toothpick inserted in the center comes out clean. Your kitchen will smell simply amazing during this time. Keep an eye on it; ovens can vary! -
Cool and Enjoy!
Once baked, let it sit in the pan for about 10 minutes before transferring it to a wire rack to cool completely. Slicing it while warm is tempting, but allowing it to cool makes for cleaner slices and better flavor development.
Serving Suggestions
Slice your Blueberry Cream Cheese Bread and serve it warm or at room temperature. It’s incredible on its own, but feel free to dress it up! A light dusting of powdered sugar or a smear of butter adds a touch of luxury. Pair it with a hot cup of coffee or a refreshing herbal tea for a delightful breakfast or snack that you’re going to crave again and again!
Recipe Variations
Here are a few fun twists on the classic Blueberry Cream Cheese Bread that I think you’ll love:
-
Lemon Blueberry Bread: Add the zest of one lemon to the batter for a bright, fresh flavor that complements the blueberries beautifully!
-
Nutty Banana Bread: Incorporate 1 ripe mashed banana into the batter for added moisture and natural sweetness, along with some chopped walnuts for crunch.
-
Spiced Bread: Add 1 teaspoon of cinnamon or nutmeg, or even a pinch of cardamom for a warm, spiced note that makes every bite feel like a cozy hug.
-
Coconut Cream Cheese Bread: Substitute shredded coconut in the batter and on top before baking for wonderful texture and flavor.
Chef’s Notes
I can’t tell you how many times I’ve experimented with this recipe! Each batch brings its own surprises, from slightly overbaked corners to those glorious moments when every slice is perfect. It’s all about experimentation and finding what you love best. One time, I forgot to add the eggs and ended up with a dense, pudding-like treat that’s now my secret guilty pleasure! It was so different but still pined for, and it led to a new family recipe that we now call “Blueberry Pudding Bread”! Remember, kitchen “mistakes” are sometimes the best ways to create something exciting.
FAQs and Troubleshooting
Q1: My bread didn’t rise! What happened?
Answer: This could be due to expired baking powder. Always check the freshness of your leavening agents before baking. A good tip is to add a little vinegar to it; if it bubbles, it’s still good!
Q2: Why is my bread too dense?
Answer: Overmixing your batter can lead to dense bread. Ensure you’re mixing just until combined, and that your ingredients are at room temperature for the best results.
Q3: Can I freeze this bread?
Answer: Absolutely! Once fully cooled, wrap it tightly in plastic wrap and then in foil, or store it in a freezer-safe bag. It should keep well for up to 3 months. Just defrost overnight in the fridge before enjoying!
Q4: Can I use frozen blueberries?
Answer: Yes! Just remember not to thaw them beforehand; adding them frozen will help prevent them from bleeding into the batter and turning it blue.
Nutritional Info
For those curious about the health aspects, here’s a rough estimation per slice (based on a standard loaf cut into 12 slices):
- Calories: 190
- Protein: 3g
- Fat: 8g
- Carbohydrates: 28g
- Fiber: 1g
- Sugar: 9g
Of course, these numbers can vary based on your ingredient choices, but it gives you a general idea of what you’re working with!
Thank you for joining me on this blueberry-filled adventure! I hope you give this Blueberry Cream Cheese Bread a try and experience the nostalgia and deliciousness I hold dear to my heart. Share your creations, stories, and any variations you come up with—let’s keep this vibrant community growing. Until next time, happy baking! 🍞💙
PrintBlueberry Cream Cheese Bread

A delightful bread bursting with juicy blueberries and creamy goodness, perfect for breakfast or as a sweet treat.
- Prep Time: 15 minutes
- Cook Time: 60 minutes
- Total Time: 75 minutes
- Yield: 12 slices 1x
- Category: Bread
- Method: Baking
- Cuisine: American
- Diet: Vegetarian
Ingredients
- 2 cups all-purpose flour
- 1 cup granulated sugar
- 1/2 teaspoon salt
- 1 tablespoon baking powder
- 1/2 cup cream cheese, softened
- 1/2 cup butter, softened
- 2 large eggs
- 1 teaspoon vanilla extract
- 1/2 cup milk
- 1 cup fresh blueberries
Instructions
- Preheat your oven to 350°F (175°C) and prepare your loaf pan.
- Mix the all-purpose flour, baking powder, and salt in a large mixing bowl.
- Cream the softened butter and granulated sugar until light and fluffy.
- Add the softened cream cheese to the sugar mixture and blend until smooth.
- Incorporate the eggs one at a time, mixing well after each addition, and then add the vanilla extract.
- Add the dry ingredients gradually to the creamy mixture, alternating with the milk.
- Gently fold in the fresh blueberries.
- Transfer the batter to your prepared loaf pan and smooth the top.
- Bake for 50-60 minutes or until a toothpick inserted in the center comes out clean.
- Cool the bread in the pan for about 10 minutes, then transfer to a wire rack to cool completely.
Notes
Try variations like adding lemon zest or nuts for a twist on the classic recipe.
Nutrition
- Serving Size: 1 slice
- Calories: 190
- Sugar: 9g
- Sodium: 200mg
- Fat: 8g
- Saturated Fat: 5g
- Unsaturated Fat: 2g
- Trans Fat: 0g
- Carbohydrates: 28g
- Fiber: 1g
- Protein: 3g
- Cholesterol: 35mg
Keywords: blueberry bread, cream cheese bread, breakfast recipe