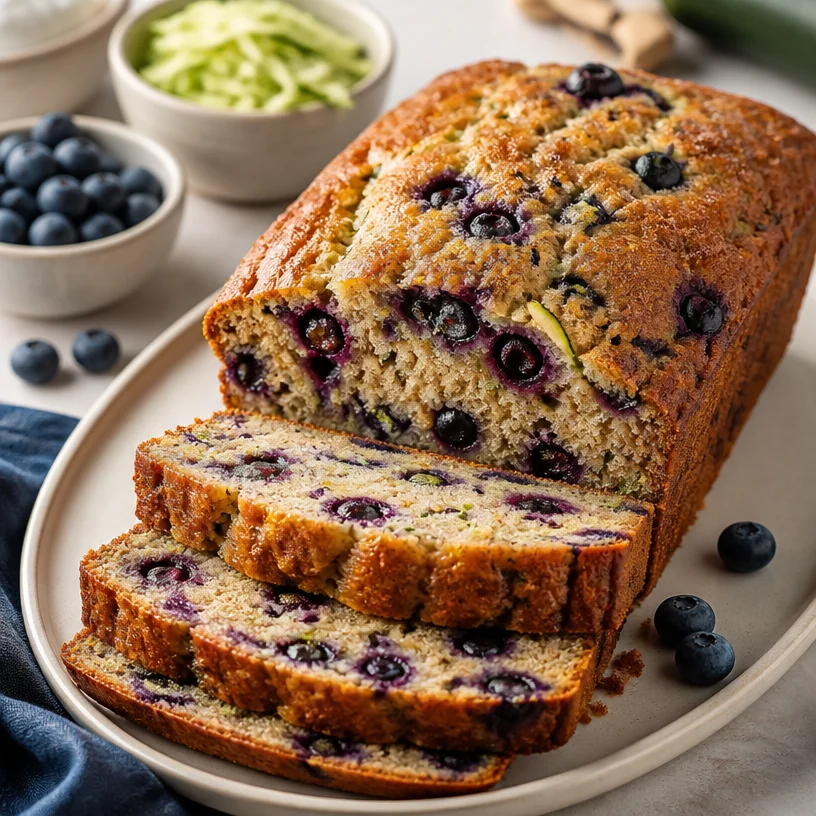
Blueberry Zucchini Bread
Blueberry Zucchini Bread: A Deliciously Moist Treat
Welcome, my fellow food lovers! Today, we’re diving into a recipe that perfectly combines the sweetness of ripe blueberries with the subtle earthiness of zucchini. Yes, we’re talking about Blueberry Zucchini Bread—a delightful and moist loaf that makes the perfect snack, breakfast, or even dessert. This vibrant bread is not just a treat for the taste buds but also a wonderful way to sneak in some veggies. So, grab your mixing bowls, and let’s get baking!
A Trip Down Memory Lane
Growing up, my grandmother always had a garden that she was incredibly proud of. Among her prized vegetables were mountains of zucchinis that seemed to multiply overnight! I remember summers spent at her house, where I’d help her pick zucchinis larger than my arm. Rather than let any of that bounty go to waste, she would whip up a myriad of delicious treats, but there was always one that stood out: her famous zucchini bread.
With its golden crust and subtle sweetness, it was the ultimate comfort food! One sunny afternoon, we decided to mix things up by adding blueberries—a random idea that turned into a family favorite. I can still picture the joy on my grandmother’s face as we pulled that loaf from the oven, its aroma wafting through the kitchen. The recipe not only became a staple in our home but also sparked my love for baking. Now, every time I make Blueberry Zucchini Bread, I can’t help but feel a connection to my grandmother, her garden, and those lazy summer days filled with laughter and good food.
Ingredients You’ll Need
Here’s the fabulous lineup for this Blueberry Zucchini Bread:
-
1 cup grated zucchini: This adds moisture and a subtle flavor. Look for a medium zucchini for the perfect balance. No zucchini? Try substituting with grated carrot for a sweet twist!
-
1 cup blueberries (fresh or frozen): These juicy little gems are packed with antioxidants and lend a burst of sweetness! If you don’t have blueberries, feel free to swap in raspberries or chopped strawberries for a different flavor profile.
-
1/2 cup vegetable oil: This keeps the bread moist and tender. Canola oil or melted coconut oil work well too!
-
1/2 cup granulated sugar: Sweet but not too overpowering. You can reduce this by 1/4 cup if you prefer a less sweet loaf.
-
1/2 cup brown sugar: This adds a rich, caramel-like flavor to the bread. Light brown sugar is your best bet; dark brown sugar adds even more depth if you’re feeling adventurous.
-
2 large eggs: These bind everything together and help the bread rise. If you’re vegan or egg-free, try using flax eggs (1 tablespoon ground flaxseed mixed with 3 tablespoons water per egg).
-
1 teaspoon vanilla extract: For that warm, comforting flavor—don’t skip this one! If you want a twist, consider using almond extract for a different layer.
-
1 1/2 cups all-purpose flour: This is the base of the bread. You can also use whole wheat flour or gluten-free flour as a swap!
-
1 teaspoon baking powder: This helps the bread rise beautifully. Make sure it’s not expired for optimal fluffiness!
-
1/2 teaspoon baking soda: Working in tandem with baking powder, it gives the loaf a lovely lift.
-
1/2 teaspoon salt: A small amount to balance the sweetness.
-
1 teaspoon ground cinnamon: This adds warmth and depth. Feel free to experiment with nutmeg or cardamom if you’re feeling spicy!
Step-by-Step Instructions
1. Preheat the Oven
Preheat your oven to 350°F (175°C). This ensures that the bread begins baking instantly, helping it to rise perfectly!
2. Prepare the Baking Dish
Grease a 9×5 loaf pan with cooking spray or line it with parchment paper. This will prevent our delicious creation from sticking. Ah, the beauty of a clean release!
3. Grate the Zucchini
Using a box grater or a food processor, grate your zucchini. Once you have a cup, place it in a clean kitchen towel and wring out as much moisture as possible. This step is important! Too much moisture can lead to a soggy loaf.
4. Mix Wet Ingredients
In a large mixing bowl, combine the grated zucchini, granulated sugar, brown sugar, vegetable oil, and eggs. Whisk until the mixture is smooth and well blended. Don’t you just love how the sugars and oil come together in a beautiful, sugary embrace?
5. Add Vanilla
Stir in the vanilla extract. This fragrant addition will have your kitchen smelling heavenly! Remember to taste it if you want to reassure yourself that the sweet aroma is indeed delightful.
6. Combine Dry Ingredients
In a separate bowl, whisk together the all-purpose flour, baking powder, baking soda, salt, and ground cinnamon until they are well combined. This helps ensure even distribution of the leavening agents so you won’t have any surprises!
7. Combine Wet and Dry Mixtures
Gradually add your dry ingredient mixture into the wet ingredients, folding gently with a spatula. Overmixing can lead to dense bread—nobody wants that! Just combine until you still see a few streaks of flour.
8. Fold in Blueberries
Gently fold in the blueberries. If you’re using frozen blueberries, do not thaw them first, or the batter will turn a mysterious shade of blue!
9. Pour into the Pan
Transfer your lovely batter into the prepared loaf pan. Use the spatula to smooth the top; a nice, level surface will bake evenly and look gorgeous.
10. Bake
Place the loaf pan in the preheated oven and bake for about 55-60 minutes. You’ll know it’s done when a toothpick inserted in the center comes out clean, with just a few moist crumbs sticking to it.
11. Cool
Let it cool in the pan for about 10 minutes, then carefully transfer it to a wire rack to cool completely. Don’t rush this—trust me, the cooling stage is essential to ensure the correct texture!
Serving Suggestions
This Blueberry Zucchini Bread is best served slightly warm or at room temperature. Slice it up and enjoy it plain, or smear a bit of butter or cream cheese on top for that little extra indulgence. Pair it with a cup of coffee or tea for a marvelous afternoon treat, or enjoy it as a sweet and healthy breakfast option!
Recipe Variations
-
Nutty Addition: Toss in 1/2 cup of chopped walnuts or pecans for a delightful crunch.
-
Spice it Up: Add a pinch of nutmeg or a teaspoon of ginger for a warm twist.
-
Citrusy Zing: Add the zest of one lemon or orange to brighten the flavors.
-
Chocolatey Delight: Fold in 1/2 cup of chocolate chips for a sweet surprise!
-
Gluten-Free Version: Replace the all-purpose flour with a gluten-free flour blend to keep it celiac-friendly.
Chef’s Notes
I can honestly say that this Blueberry Zucchini Bread has evolved over the years. The original recipe was a simple zucchini bread that my grandmother made. But as I grew and started experimenting in the kitchen, I realized that blueberries made everything better! This recipe becomes a fun reminder that baking is about exploring flavors and creating memories. Plus, it’s a great way to use up those extra zucchinis that you might have lying around.
FAQs and Troubleshooting
Q: Why did my bread come out too dense?
A: This is often due to overmixing. Once you add the dry ingredients to the wet, mix just until incorporated. A few flour streaks are okay!
Q: What do I do if the top of my bread is browning too quickly?
A: If you notice that the top is browning too much while baking, cover it loosely with aluminum foil for the last 10 minutes of baking.
Q: Can I store this bread?
A: Absolutely! You can store it at room temperature in an airtight container for up to 3 days. For longer storage, freeze individual slices wrapped in plastic wrap or foil for up to 3 months.
Q: How do I know when it’s fully baked?
A: Besides the toothpick test, you should also look for a golden-brown crust and a springy top. If you gently press the top and it springs back, it’s done!
Nutritional Information
- Serving Size: 1 slice
- Calories: ~200
- Protein: 3g
- Fat: 8g
- Carbohydrates: 30g
- Fiber: 2g
- Sugars: 10g
And there you have it, my friends—Blueberry Zucchini Bread, infused with love, warmth, and a splash of nostalgia. I hope this recipe finds its way into your kitchen and adds a touch of cheer to your day. Happy baking!
PrintBlueberry Zucchini Bread
A deliciously moist loaf that combines the sweetness of blueberries with the earthiness of zucchini.
- Prep Time: 15 minutes
- Cook Time: 60 minutes
- Total Time: 75 minutes
- Yield: 8 servings 1x
- Category: Dessert
- Method: Baking
- Cuisine: American
- Diet: Vegetarian
Ingredients
- 1 cup grated zucchini
- 1 cup blueberries (fresh or frozen)
- 1/2 cup vegetable oil
- 1/2 cup granulated sugar
- 1/2 cup brown sugar
- 2 large eggs
- 1 teaspoon vanilla extract
- 1 1/2 cups all-purpose flour
- 1 teaspoon baking powder
- 1/2 teaspoon baking soda
- 1/2 teaspoon salt
- 1 teaspoon ground cinnamon
Instructions
- Preheat the oven to 350°F (175°C).
- Grease a 9×5 loaf pan with cooking spray or line it with parchment paper.
- Grate the zucchini and wring out moisture using a towel.
- Combine the zucchini, granulated sugar, brown sugar, vegetable oil, and eggs in a bowl and whisk until smooth.
- Add the vanilla extract.
- Whisk the flour, baking powder, baking soda, salt, and cinnamon together in a separate bowl.
- Fold the dry ingredients gently into the wet mixture.
- Fold in the blueberries.
- Pour the batter into the prepared loaf pan.
- Bake for 55-60 minutes, until a toothpick comes out clean.
- Cool in the pan for 10 minutes, then transfer to a wire rack.
Notes
Best served slightly warm or at room temperature. Can be enjoyed plain or with butter or cream cheese.
Nutrition
- Serving Size: 1 slice
- Calories: 200
- Sugar: 10g
- Sodium: 300mg
- Fat: 8g
- Saturated Fat: 1g
- Unsaturated Fat: 7g
- Trans Fat: 0g
- Carbohydrates: 30g
- Fiber: 2g
- Protein: 3g
- Cholesterol: 40mg
Keywords: blueberry, zucchini bread, quick bread, moist bread, healthy dessert
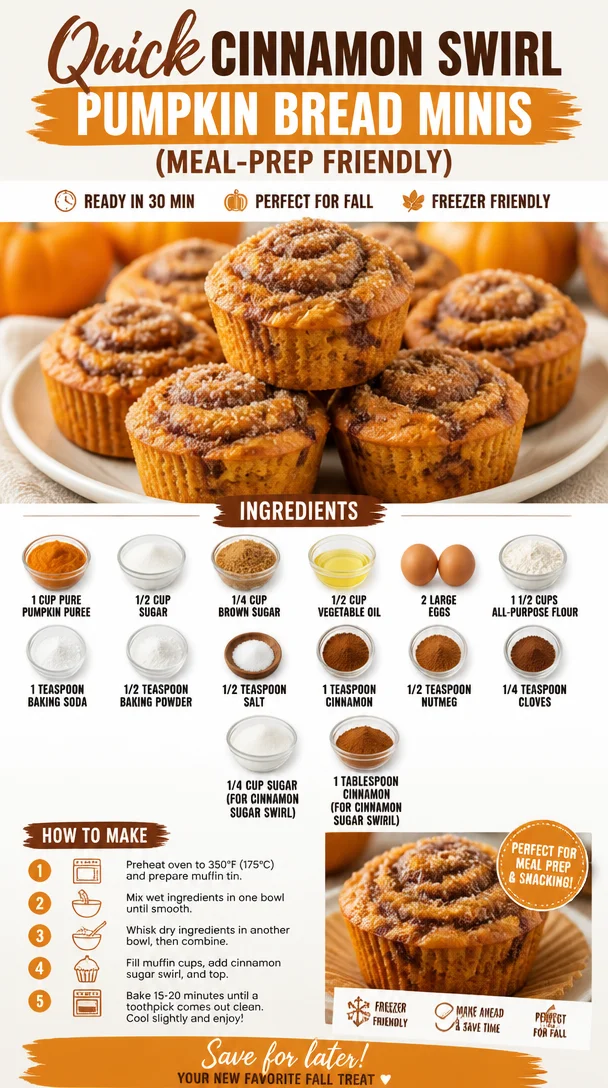
Quick Cinnamon Swirl Pumpkin Bread Minis (Meal-Prep Friendly)
The Sweet Whiff of Fall: Cinnamon Swirl Pumpkin Bread Minis
Ah, fall! The season of cozy sweaters, crunchy leaves, and, best of all, the scent of pumpkin spice wafting through the air. As temperatures drop and days grow crisp, nothing captures the essence of this beautiful season quite like a fragrant loaf of pumpkin bread. But what if I told you there was a way to elevate that classic recipe into delightful little masterpieces perfect for sharing? Enter my Cinnamon Swirl Pumpkin Bread Minis! These adorable bite-sized treats are not only easy to make but also an absolute delight to both the eyes and the taste buds.
Growing up, the kitchen was often filled with the warm and spicy aroma of homemade baked goods. My family had a tradition of gathering in the kitchen every Sunday afternoon, where we’d whip up our favorite recipes while sharing stories, laughter, and occasionally a little flour fight or two. The highlight of those days was always when my grandmother would bring out her famous pumpkin bread. She had this magical ability to make simple ingredients transform into something utterly delicious. While anyone could bake a loaf, her secret was the cinnamon swirl that added a layer of warmth and sweetness. It was love at first bite! Today, I’ve taken that warm, nostalgic feeling and put my own spin on it, creating these adorable mini loaves that pack a comforting punch of flavor in every bite.
Are you ready to create your very own batch of these irresistible Cinnamon Swirl Pumpkin Bread Minis? Grab an apron, turn up the music, and let’s bake some magic!
Ingredients
To bring these delicious little mini loaves to life, you’ll need the following ingredients:
-
1 cup pure pumpkin puree
This key ingredient gives the bread its moist and dreamy texture. You can also use homemade pumpkin puree if you’re feeling adventurous! Canned is perfectly fine, but look for brands that don’t add extra sugar or preservatives for the best flavor. -
1/2 cup sugar
This granulated sugar sweetens the batter beautifully. If you’d like a less sugary loaf, feel free to reduce this amount slightly. -
1/4 cup brown sugar
Brown sugar adds depth and a slight toffee flavor while helping maintain moisture in the bread. If you don’t have brown sugar on hand, you can substitute it with an equal amount of white sugar mixed with a teaspoon of molasses. -
1/2 cup vegetable oil
Oil keeps the bread tender and moist. You can also use melted coconut oil for a hint of tropical flavor or apple sauce for a healthier approach. -
2 large eggs
Eggs bind everything together and provide structure. For a vegan option, try using flax eggs (1 tablespoon of ground flaxseed mixed with 2.5 tablespoons of water per egg, let it sit for a few minutes until it gels). -
1 1/2 cups all-purpose flour
This forms the base of your bread. You could substitute half for whole wheat flour to add extra fiber and flavor. -
1 teaspoon baking soda
Essential for leavening! It helps your bread rise beautifully. -
1/2 teaspoon baking powder
A little extra lift never hurt! You can skip this if you want to keep your ingredients minimal. -
1/2 teaspoon salt
Salt enhances the sweetness and balances flavors, so don’t skip it! -
1 teaspoon cinnamon
The star spice of this recipe, adding warmth and a comforting aroma. -
1/2 teaspoon nutmeg
This nutty flavor complements the cinnamon perfectly. If you don’t have nutmeg, you can add an additional 1/2 teaspoon of cinnamon for a similar warmth. -
1/4 teaspoon cloves
A pinch of cloves contributes a robust, aromatic punch to the mix. You can skip it if you’re not a fan. -
1/4 cup sugar (for cinnamon sugar swirl)
This added sugar is the secret for our delightful swirl in the mini loaves! -
1 tablespoon cinnamon (for cinnamon sugar swirl)
Sprinkle this cinnamon goodness into the sugar, and you’ve got a heavenly mix perfect for swirling into the batter.
Step-by-Step Instructions
Now that you have all your ingredients, let’s get baking! Follow these steps closely to ensure your mini masterpieces turn out perfectly every time.
-
Preheat your oven: Begin by preheating your oven to 350°F (175°C). This is a crucial first step, as it allows your bread to bake evenly. You can also prepare your mini loaf pans by greasing them or lining them with parchment paper.
-
Mix the wet ingredients: In a large mixing bowl, combine the pumpkin puree, vegetable oil, granulated sugar, brown sugar, and eggs. Use a whisk to blend everything together until smooth and uniform. You want to make sure the sugars dissolve completely. A quick tip: try to use room temperature eggs for best results!
-
Combine the dry ingredients: In another bowl, whisk together the all-purpose flour, baking soda, baking powder, salt, cinnamon, nutmeg, and cloves. Mixing the dry ingredients separately prevents clumps and ensures even distribution throughout the batter.
-
Combine wet and dry mixtures: Gradually add the dry ingredients to the wet mixture, using a spatula or wooden spoon to fold them together. Be careful not to overmix—just mix until you see no more flour streaks. Overmixing can lead to tough bread, and we want it soft and tender.
-
Prepare the cinnamon sugar swirl: In a small bowl, combine the 1/4 cup sugar and 1 tablespoon cinnamon. This will be your lovely swirl mix. The sugar will caramelize slightly during baking, creating a sweet surprise when you cut into the mini loaves.
-
Fill the mini loaf pans: Pour a generous amount of the batter into each mini loaf pan, filling them about halfway. Then, sprinkle a layer of the cinnamon sugar mixture on top of each filled pan. Next, gently add more batter over the sugar sprinkle until they are about 2/3 full.
-
Swirl it around: Using a toothpick or the end of a knife, swirl the batter and cinnamon sugar together to create a beautiful marbled effect. You can make a couple of swirls, but don’t overdo it; we want to see those pretty layers!
-
Bake them up: Place the mini loaf pans in the preheated oven and bake for approximately 25-30 minutes, or until a toothpick inserted in the center comes out clean. Keep an eye on them, as ovens vary. No one likes burnt edges!
-
Cool down: Once done, remove the pans from the oven and let them cool in the pan for about 10 minutes. Then, carefully transfer the loaves to a wire rack to cool completely. The smell in your kitchen will have everyone flocking to see what you’ve made!
-
Slice and serve: Once cool, slice the mini loaves, add a pat of butter (optional but oh-so-delicious), and watch how smiles spread across the faces of those who indulge!
Serving Suggestions
These Cinnamon Swirl Pumpkin Bread Minis are already a feast for the eyes, but here are a few serving ideas to make them even more delightful:
- With Coffee or Tea: Serve warm alongside a steaming cup of coffee or your favorite herbal tea for the ultimate cozy experience.
- Top with Cream Cheese Frosting: For a little indulgence, whip up a simple cream cheese frosting and spread a thin layer on top. The tanginess contrasts beautifully with the sweetness of the bread!
- Garnish with Nuts: Sprinkle some chopped walnuts or pecans on top for added crunch and richness.
Recipe Variations
Want to mix things up a bit? Here are some fun variations you might consider trying:
-
Chocolate Chip Surprise: Add a handful of chocolate chips to the batter for deeper flavor and sweetness.
-
Nutty Banana: Replace half of the pumpkin puree with mashed ripe banana for an extra fruity twist and moisture.
-
Gluten-Free Delight: Substitute regular flour with gluten-free all-purpose flour for a gluten-free version that everyone can enjoy.
-
Maple Glaze: Drizzle some maple syrup over the cooled bread for a seasonal sweetness that complements the pumpkin spice flavors perfectly.
-
Dried Fruit Addition: Toss in some chopped dried cranberries or raisins to the batter for a little chewiness and surprise.
Chef’s Notes
This recipe is very near and dear to my heart. What started as a simple adaptation of my grandmother’s pumpkin bread turned into a cherished tradition of baking with friends on chilly autumn days. Over the years, I’ve added my flair to the recipe—experimenting with spices, oils, and various add-ins. I’ve learned that cooking is all about making it your own and embracing the creative process. Plus, there’s nothing like enjoying a warm slice of pumpkin bread while reminiscing about those happy kitchen memories!
FAQs and Troubleshooting
-
Why is my pumpkin bread too dense?
A dense loaf can result from overmixing the batter or not using enough leavening agents. Ensure you’re gentle when combining the wet and dry ingredients, and don’t forget those baking soda and powder! -
Can I use pumpkin pie filling instead of pure pumpkin puree?
While you can use pumpkin pie filling, it often contains sugar and spices that will alter the flavor of your bread, so you might want to adjust your sugar and spice measurements accordingly. -
How do I store leftovers?
Keep your mini loaves in an airtight container at room temperature for up to 3 days. For longer storage, they freeze beautifully! Just wrap them tightly in plastic wrap and place them in a freezer bag. Thaw at room temperature when ready to enjoy. -
My bread sunk in the middle—what went wrong?
This can happen if the oven temperature is too low, or if you opened the oven door too often during baking. Try keeping the oven door closed and make sure your oven is fully preheated before baking.
Nutritional Info
While I don’t want to dwell too much on specific numbers when we’re about the joy of cooking and eating, here’s a quick estimate for one mini loaf (based on standard ingredients):
- Calories: Approximately 180 kcal
- Total Fat: 7g
- Saturated Fat: 1g
- Carbohydrates: 26g
- Fiber: 1g
- Protein: 3g
Calories may vary depending on ingredient substitutions and exact serving size, so always best to adjust according to your needs!
There you have it—the ultimate guide to creating delicious Cinnamon Swirl Pumpkin Bread Minis! I hope these recipes and tips inspire you to fill your kitchen with joy this fall. Let’s keep the oven warm, the aromas sweet, and the laughter ringing! Happy baking, my fellow foodies! 🍂🥧
PrintCinnamon Swirl Pumpkin Bread Minis
Delightful mini loaves of pumpkin bread with a swirl of cinnamon sugar, perfect for sharing this fall.
- Prep Time: 15 minutes
- Cook Time: 30 minutes
- Total Time: 45 minutes
- Yield: 12 mini loaves 1x
- Category: Dessert
- Method: Baking
- Cuisine: American
- Diet: Vegetarian
Ingredients
- 1 cup pure pumpkin puree
- 1/2 cup sugar
- 1/4 cup brown sugar
- 1/2 cup vegetable oil
- 2 large eggs
- 1 1/2 cups all-purpose flour
- 1 teaspoon baking soda
- 1/2 teaspoon baking powder
- 1/2 teaspoon salt
- 1 teaspoon cinnamon
- 1/2 teaspoon nutmeg
- 1/4 teaspoon cloves
- 1/4 cup sugar (for cinnamon sugar swirl)
- 1 tablespoon cinnamon (for cinnamon sugar swirl)
Instructions
- Preheat your oven to 350°F (175°C).
- Mix the pumpkin puree, vegetable oil, granulated sugar, brown sugar, and eggs in a bowl until smooth.
- Combine the all-purpose flour, baking soda, baking powder, salt, cinnamon, nutmeg, and cloves in another bowl.
- Add the dry ingredients to the wet mixture and gently fold together.
- Prepare the cinnamon sugar swirl by mixing the 1/4 cup sugar and 1 tablespoon cinnamon in a small bowl.
- Fill mini loaf pans halfway with batter, sprinkle with the cinnamon sugar, then add more batter until 2/3 full.
- Swirl the batter and cinnamon sugar together using a toothpick.
- Bake for approximately 25-30 minutes, or until a toothpick comes out clean.
- Cool in the pan for 10 minutes, then transfer to a wire rack to cool completely.
- Slice and serve as desired.
Notes
These mini loaves are perfect for sharing and can be served warm with butter, alongside coffee, or with cream cheese frosting.
Nutrition
- Serving Size: 1 mini loaf
- Calories: 180
- Sugar: 12g
- Sodium: 200mg
- Fat: 7g
- Saturated Fat: 1g
- Unsaturated Fat: 4g
- Trans Fat: 0g
- Carbohydrates: 26g
- Fiber: 1g
- Protein: 3g
- Cholesterol: 30mg
Keywords: pumpkin bread, fall recipes, dessert, baking, cinnamon
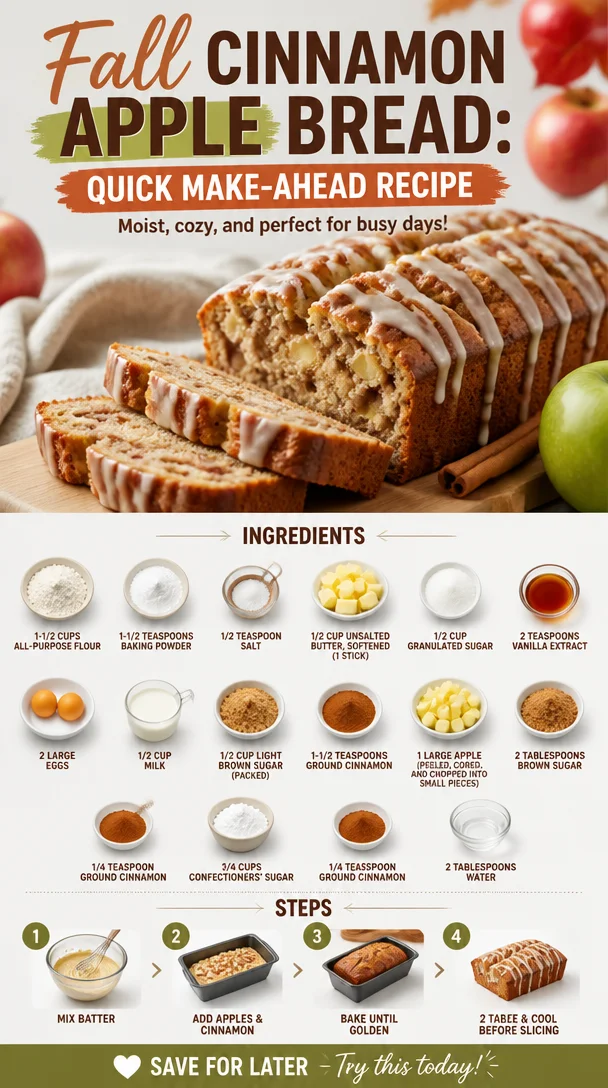
Fall Cinnamon Apple Bread: Quick Make-Ahead Recipe
Warm and Cozy Cinnamon Apple Bread: A Slice of Nostalgia
Welcome back to Clean Plate Cravings! Today, we’re diving into a recipe that wraps you in a warm, sugary hug and fills your home with irresistible aromas—the heartwarming Cinnamon Apple Bread. Whether you’re hosting a cozy breakfast with friends, packing a sweet treat for someone special, or simply indulging in a slice during quiet moments with a cup of tea, this bread feels like a hug from grandma.
But really, what’s better than the wonderful smell of cinnamon wafting through your kitchen? I remember the first time I baked apple bread. I was just a kid, standing on a stool beside my mom in our tiny kitchen. We had just picked fresh apples from a local orchard, and as we chopped them up, my excitement grew, knowing a delicious treat was on the horizon. My mom had a knack for turning everyday ingredients into something extra magical, and this cinnamon apple bread was one of her go-to recipes.
As we mixed the batter and sprinkled in the cinnamon—oh, that heavenly smell!—I realized that something special was happening. This wasn’t just a recipe; it was a special moment shared between us. This bread became our family’s comfort food, perfect for cozying up with a hot cup of cocoa on chilly evenings or gifting to neighbors during the holidays. It was a delicious blend of sweet and spice with a moist, tender crumb that had us all coming back for seconds.
Now, I’m excited to share my own version of this cherished recipe with you! With its balance of flavors and simple ingredients, you too can create a memorable experience with every slice. Let’s jump into the delectable world of Cinnamon Apple Bread!
Ingredients
Here’s what you’ll need to whip up this delightful cinnamon apple bread:
-
1-1/2 cups all-purpose flour
The base of your bread! If you’re looking for a gluten-free version, substitute with gluten-free all-purpose flour. Just make sure it includes xanthan gum for proper texture! -
1-1/2 teaspoons baking powder
This is your leavening agent, helping the bread rise. Be sure it’s fresh; expired baking powder can lead to dense bread. -
1/2 teaspoon salt
A pinch of salt enhances all those lovely flavors. Don’t overlook it! -
1/2 cup unsalted butter, softened (1 stick)
Brings richness and flavor to your bread. If dairy is a concern, coconut oil works as a great substitute! -
1/2 cup granulated sugar
Sweetness factor! You can also use coconut sugar for a lower glycemic index. -
2 teaspoons vanilla extract
Adds a lovely warmth. Use pure vanilla extract for a deeper flavor-profile, though imitation works too in a pinch! -
2 large eggs
These bind everything together and add moisture. For a vegan option, substitute with flax eggs (1 tablespoon of ground flaxseed mixed with 2.5 tablespoons of water per egg). -
1/2 cup milk
Dairy or plant-based milk works! Almond milk, oat milk, or even coconut milk can be excellent choices. -
1/2 cup light brown sugar (packed)
This brings a subtle caramel flavor to the bread. If you run out, you can use dark brown sugar instead—it’ll just give more depth. -
1-1/2 teaspoons ground cinnamon
The flavor star of this recipe! For a twist, consider using fresh ground cinnamon or even a dash of nutmeg or cardamom for added spice. -
1 large apple (peeled, cored, and chopped into small pieces)
The fresh fruit keeps your bread moist and adds a lovely tartness. Granny Smith or Honeycrisp apples work wonderfully here! -
2 tablespoons brown sugar
Great for sprinkling on top for a crunchy finish! -
1/4 teaspoon ground cinnamon
Used here for the topping—because you can never have too much cinnamon! -
3/4 cups confectioners’ sugar
This is for an optional glaze to make your bread extra special. -
1/4 teaspoon ground cinnamon
A final touch for the glaze! -
2 tablespoons water
To achieve the perfect glaze consistency.
Step-by-Step Instructions
Let’s make this cinnamon apple bread shine! Here’s how we do it—step by step:
-
Preheat the oven: Start by preheating your oven to 350°F (175°C). This is crucial for ensuring your bread bakes evenly. While it heats up, you can prepare your loaf pan.
-
Grease your loaf pan: Grab a 9×5-inch loaf pan and grease it with a little butter or line it with parchment paper. This will make it super easy to get your bread out after baking.
-
Mix the dry ingredients: In a medium bowl, whisk together the flour, baking powder, cinnamon, and salt. This is a cool chef hack! Whisking these dry ingredients helps to evenly distribute the leavening agents and ensures there are no flour lumps later.
-
Cream the butter and sugar: In a large bowl, using a hand mixer or a stand mixer, cream the softened butter and granulated sugar together until it’s light and fluffy—about 3 minutes. It’s important to really aerate the mixture here; that’s where the magic happens!
-
Add eggs and vanilla: Add in the eggs one by one, mixing well after each addition. Then, stir in the vanilla extract. This step adds moisture and flavor to your batter.
-
Incorporate the milk: Gradually mix in the milk until it’s well combined. Here’s a little tip: If your batter seems too thick, a splash more milk can help!
-
Combine wet and dry: Gradually add your dry ingredient mixture to the wet ingredients. Fold gently with a spatula until just combined. Avoid overmixing—this helps your bread stay light and fluffy!
-
Add the apples: Gently stir in your chopped apples. This is the fun part! Those little apple bits will caramelize beautifully in the oven, offering pockets of warm, juicy goodness.
-
Pour into the pan: Transfer your batter to the greased loaf pan, smoothing the top down with your spatula.
-
Prepare the topping: In a small bowl, mix together the brown sugar and cinnamon. Sprinkle this mixture evenly over the top of your batter. This little topping gives your bread a crunchy, sweet crust!
-
Bake: Pop your loaf in the preheated oven and bake for 50-60 minutes, or until a toothpick comes out clean from the center. The aroma that fills your kitchen will have you salivating!
-
Cool and glaze: Once it’s baked, let it cool in the pan for about 10 minutes before transferring it to a wire rack. If you’re feeling adventurous, make a quick glaze by whisking together the confectioners’ sugar, cinnamon, and water until smooth. Drizzle it over the cooled bread!
Serving Suggestions
Slice your cinnamon apple bread while it’s still warm for that fresh-out-of-the-oven experience! Serve it on a rustic wooden board with a side of creamy butter or spreadable cream cheese. Cuddle up on the sofa with a generous slice and your favorite hot drink—the perfect pairing for a relaxing afternoon!
Recipe Variations
Here are some fun twists on this classic recipe to keep things exciting:
- Nutty Additions: Fold in 1/2 cup of chopped walnuts or pecans into the batter for a crunchy element.
- Dried Fruits: Add 1/4 cup of raisins or cranberries for a delightful surprise textural contrast.
- Spiced Up: Want more warmth? Toss in a pinch of nutmeg or ginger along with the cinnamon.
- Maple Glaze: Swap the water in the glaze for pure maple syrup for a richer sweetness.
- Mini Loaves: Bake in mini loaf pans for adorable gifts or portion control!
Chef’s Notes
This cinnamon apple bread is a well-loved family recipe that I’ve cherished and adapted over the years. I remember one holiday baking marathon when my family decided to make it with a twist—adding cranberries for a festive flair! It turned out to be a huge hit!
Now, I often use this recipe as a base for other fruity breads too: swap apples for mashed bananas for a banana bread version or try zucchini for a savory twist.
Remember, baking should be fun and adaptable! Don’t stress too much about measurements—cooking is all about flavors and the love you put into it!
FAQs and Troubleshooting
1. My bread is too dense. What did I do wrong?
Overmixing can lead to a denser bread. Mix just until combined. Also, ensure your baking powder is fresh!
2. Can I use frozen apples?
Absolutely! Just make sure to thaw and drain them well to avoid extra moisture. Fresh apples are best, but frozen works in a pinch.
3. How should I store the bread?
Store it in an airtight container at room temperature for up to 3 days. For longer freshness, wrap it tightly and freeze. It tastes great even after thawing!
4. What’s the best way to serve leftovers?
Slicing it and toasting the leftover bread gives it a lovely crispy texture and warms up that cinnamon goodness!
This delightful Cinnamon Apple Bread is more than just a recipe; it’s an opportunity to create fond memories while enjoying scrumptious, homemade goodness. So gather your ingredients, roll up your sleeves, and let’s make some kitchen magic together. Enjoy every bite!
PrintWarm and Cozy Cinnamon Apple Bread
A heartwarming recipe for Cinnamon Apple Bread that fills your home with the irresistible aroma of cinnamon and fresh apples.
- Prep Time: 15 minutes
- Cook Time: 60 minutes
- Total Time: 75 minutes
- Yield: 10 servings 1x
- Category: Dessert
- Method: Baking
- Cuisine: American
- Diet: Vegetarian
Ingredients
- 1–1/2 cups all-purpose flour
- 1–1/2 teaspoons baking powder
- 1/2 teaspoon salt
- 1/2 cup unsalted butter, softened
- 1/2 cup granulated sugar
- 2 teaspoons vanilla extract
- 2 large eggs
- 1/2 cup milk
- 1/2 cup light brown sugar, packed
- 1–1/2 teaspoons ground cinnamon
- 1 large apple, peeled, cored, and chopped
- 2 tablespoons brown sugar
- 1/4 teaspoon ground cinnamon
- 3/4 cups confectioners’ sugar
- 1/4 teaspoon ground cinnamon
- 2 tablespoons water
Instructions
- Preheat the oven: Start by preheating your oven to 350°F (175°C).
- Grease your loaf pan: Use a 9×5-inch loaf pan and grease with butter or line with parchment paper.
- Mix the dry ingredients: In a medium bowl, whisk together flour, baking powder, cinnamon, and salt.
- Cream the butter and sugar: In a large bowl, cream the softened butter and granulated sugar together until light and fluffy, about 3 minutes.
- Add eggs and vanilla: Mix in the eggs one by one, then stir in the vanilla extract.
- Incorporate the milk: Gradually mix in the milk until well combined.
- Combine wet and dry: Gradually add the dry ingredient mixture to the wet ingredients and fold gently until just combined.
- Add the apples: Gently stir in the chopped apples.
- Pour into the pan: Transfer the batter to the greased loaf pan and smooth the top.
- Prepare the topping: Mix the brown sugar and cinnamon, then sprinkle over the top of the batter.
- Bake: Bake for 50-60 minutes, or until a toothpick comes out clean from the center.
- Cool and glaze: Let it cool in the pan for about 10 minutes before transferring to a wire rack.
- Make a glaze (optional): Whisk together confectioners’ sugar, cinnamon, and water until smooth, then drizzle over the cooled bread.
Notes
This bread is perfect for cozying up with a hot drink or gifting during the holidays. Enhance it with nuts or dried fruits for added texture.
Nutrition
- Serving Size: 1 slice
- Calories: 310
- Sugar: 25g
- Sodium: 250mg
- Fat: 12g
- Saturated Fat: 7g
- Unsaturated Fat: 5g
- Trans Fat: 0g
- Carbohydrates: 44g
- Fiber: 1g
- Protein: 4g
- Cholesterol: 50mg
Keywords: cinnamon apple bread, dessert, baking, comfort food, easy recipe
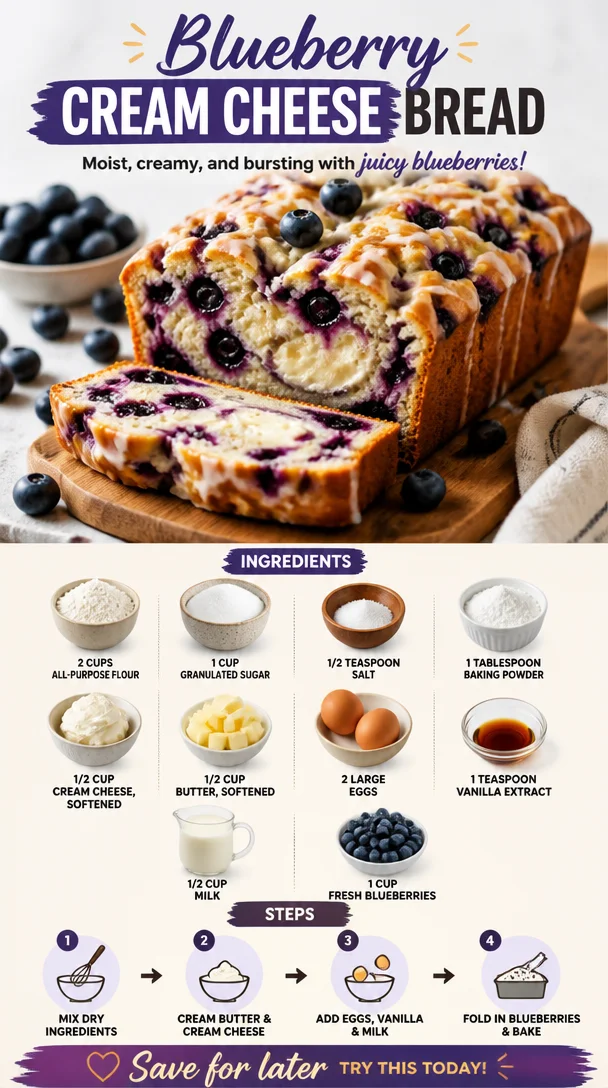
Blueberry Cream Cheese Bread
Blueberry Cream Cheese Bread: A Slice of Heaven
Welcome back to Clean Plate Cravings, friends! Today, I’m excited to share with you a recipe that’s as delightful as a lazy Sunday morning and as comforting as a warm hug from grandma: Blueberry Cream Cheese Bread. This recipe is not just any ordinary bread; it’s a luscious treat that’s bursting with juicy blueberries and creamy goodness that you just won’t be able to resist.
When I first encountered blueberry bread, I was at a quaint little café nestled on the edge of town, where the scent of freshly baked goods danced around me and drew me in like a moth to a flame. There was something about the contrast between the sweet, slightly tangy blueberries and the rich cream cheese that intrigued me. I took a bite, and let me tell you, it was an explosion of flavor that made my taste buds do the happy dance!
Blueberry Cream Cheese Bread is the perfect fusion of wholesome ingredients and indulgent flavors. Whether you enjoy it for breakfast with a hot cup of coffee, as an afternoon snack with tea, or simply as a sweet treat any time of day, this bread stands out in all the right ways. And the best part? It’s so easy to whip up that you may just find yourself making it every week!
Are you ready to dive in? Let’s bake something fun together!
A Slice of Nostalgia
Before we get into the nitty-gritty of the recipe, let me take you back down memory lane. Growing up, Saturdays were sacred in my household. My mom had this delightful ritual of baking while the rest of us would still be nestled under our warm blankets. The sweet and comforting aroma of baked goods would waft through the air, drawing us into the kitchen for what felt like magic in the making.
One particular morning, my mom decided to try her hand at blueberry cream cheese bread. I remember the excitement as the bright blue gems popped against the creamy batter, and my brothers and I were on “blueberry watch,” ensuring every single berry made it into the bowl. As the bread baked, we could hardly contain our anticipation; the delightful smell was too much to bear!
When the timer finally rang, we couldn’t wait to dig into the warm, golden loaf. Each slice was thick and luscious, with that gorgeous cream cheese blended throughout, and the tart blueberries balanced out the sweetness perfectly. We spread butter on top—because why not? It was pure bliss. From that day onward, blueberry cream cheese bread became a staple in our home, one I still cherish deeply.
Ingredients You’ll Need
Let’s gather everything you need to whip up this delicious Blueberry Cream Cheese Bread. Here’s what we’re working with:
-
2 cups all-purpose flour
A classic choice for baking, all-purpose flour gives the bread its structure. For a healthier twist, try using whole wheat flour—just be sure to adjust the liquid slightly as it can absorb more. -
1 cup granulated sugar
This sugar adds sweetness but can also be swapped for coconut sugar for a more caramel undertone, or you might use a sugar substitute if you’re aiming for lower calories. -
1/2 teaspoon salt
A pinch of salt enhances all flavors, balancing out the sweetness of the blueberries and sugar. -
1 tablespoon baking powder
The star here, baking powder ensures our bread rises to fluffy perfection. If you’re out, you can substitute with 1/2 teaspoon of baking soda combined with 1 teaspoon of lemon juice. -
1/2 cup cream cheese, softened
This ingredient brings a creamy tang to the bread. If you’re looking for a dairy-free option, you could try vegan cream cheese. -
1/2 cup butter, softened
A must for flavor and moisture! If you prefer, melted coconut oil or applesauce can work—a fun way to change the taste! -
2 large eggs
The binding agents here provide structure and moisture. For a vegan alternative, consider using flax eggs (1 tablespoon flaxseed meal with 3 tablespoons water for each egg). -
1 teaspoon vanilla extract
Always use pure vanilla for the best flavor; it’s a game changer! In a pinch, you can use almond extract for a different twist. -
1/2 cup milk
The milk adds moistness; non-dairy milk (like almond or oat) are fantastic swaps if you’re avoiding dairy. -
1 cup fresh blueberries
The star of the show! Fresh blueberries bring sweetness and a burst of flavor. If out of season, feel free to use frozen ones; just don’t thaw them beforehand to keep your batter from getting too colorful.
Step-by-Step Instructions
Now, let’s get down to the fun part—actually making this delicious bread! Follow these step-by-step instructions for a baking experience filled with love and flavor:
-
Preheat Your Oven:
Preheat your oven to 350°F (175°C). This initial step is crucial because a properly heated oven leads to perfect baking. Meanwhile, prepare your loaf pan by greasing it well or lining it with parchment paper. -
Mix Dry Ingredients:
In a large mixing bowl, whisk together the all-purpose flour, baking powder, and salt. Make sure they’re well combined—this ensures even baking. Pro-tip: sift the flour for a lighter texture if you want to be super fancy! -
Cream the Butter and Sugar:
In another bowl, combine the softened butter and granulated sugar. Using a hand mixer or a stand mixer, beat them together until the mixture is light and fluffy (about 2-3 minutes). This process incorporates air and makes for a soft bread. -
Add the Cream Cheese:
Next, add the softened cream cheese to the sugar mixture and blend until smooth. Don’t skip this step—cream cheese is what makes this bread decadent! -
Incorporate Eggs and Vanilla:
Crack in those eggs one at a time, mixing well after each addition. Pour in the vanilla extract and mix until everything is combined. This batter should be creamy and luscious! -
Add Dry Ingredients & Milk:
Gradually add the dry ingredients to the creamy mixture, alternating with the milk. Start and end with the flour mixture to keep the batter fluffy. Mix until just combined; be careful not to over-mix! -
Gently Fold in Blueberries:
Using a spatula, gently fold in the fresh blueberries. You want to distribute them evenly without crushing them. Remember, we want those vibrant blue bursts throughout! -
Transfer to Loaf Pan:
Pour the batter into your prepared loaf pan and smooth the top with the spatula. Give it a gentle shake to settle it in. -
Bake:
Bake in the preheated oven for 50-60 minutes or until a toothpick inserted in the center comes out clean. Your kitchen will smell simply amazing during this time. Keep an eye on it; ovens can vary! -
Cool and Enjoy!
Once baked, let it sit in the pan for about 10 minutes before transferring it to a wire rack to cool completely. Slicing it while warm is tempting, but allowing it to cool makes for cleaner slices and better flavor development.
Serving Suggestions
Slice your Blueberry Cream Cheese Bread and serve it warm or at room temperature. It’s incredible on its own, but feel free to dress it up! A light dusting of powdered sugar or a smear of butter adds a touch of luxury. Pair it with a hot cup of coffee or a refreshing herbal tea for a delightful breakfast or snack that you’re going to crave again and again!
Recipe Variations
Here are a few fun twists on the classic Blueberry Cream Cheese Bread that I think you’ll love:
-
Lemon Blueberry Bread: Add the zest of one lemon to the batter for a bright, fresh flavor that complements the blueberries beautifully!
-
Nutty Banana Bread: Incorporate 1 ripe mashed banana into the batter for added moisture and natural sweetness, along with some chopped walnuts for crunch.
-
Spiced Bread: Add 1 teaspoon of cinnamon or nutmeg, or even a pinch of cardamom for a warm, spiced note that makes every bite feel like a cozy hug.
-
Coconut Cream Cheese Bread: Substitute shredded coconut in the batter and on top before baking for wonderful texture and flavor.
Chef’s Notes
I can’t tell you how many times I’ve experimented with this recipe! Each batch brings its own surprises, from slightly overbaked corners to those glorious moments when every slice is perfect. It’s all about experimentation and finding what you love best. One time, I forgot to add the eggs and ended up with a dense, pudding-like treat that’s now my secret guilty pleasure! It was so different but still pined for, and it led to a new family recipe that we now call “Blueberry Pudding Bread”! Remember, kitchen “mistakes” are sometimes the best ways to create something exciting.
FAQs and Troubleshooting
Q1: My bread didn’t rise! What happened?
Answer: This could be due to expired baking powder. Always check the freshness of your leavening agents before baking. A good tip is to add a little vinegar to it; if it bubbles, it’s still good!
Q2: Why is my bread too dense?
Answer: Overmixing your batter can lead to dense bread. Ensure you’re mixing just until combined, and that your ingredients are at room temperature for the best results.
Q3: Can I freeze this bread?
Answer: Absolutely! Once fully cooled, wrap it tightly in plastic wrap and then in foil, or store it in a freezer-safe bag. It should keep well for up to 3 months. Just defrost overnight in the fridge before enjoying!
Q4: Can I use frozen blueberries?
Answer: Yes! Just remember not to thaw them beforehand; adding them frozen will help prevent them from bleeding into the batter and turning it blue.
Nutritional Info
For those curious about the health aspects, here’s a rough estimation per slice (based on a standard loaf cut into 12 slices):
- Calories: 190
- Protein: 3g
- Fat: 8g
- Carbohydrates: 28g
- Fiber: 1g
- Sugar: 9g
Of course, these numbers can vary based on your ingredient choices, but it gives you a general idea of what you’re working with!
Thank you for joining me on this blueberry-filled adventure! I hope you give this Blueberry Cream Cheese Bread a try and experience the nostalgia and deliciousness I hold dear to my heart. Share your creations, stories, and any variations you come up with—let’s keep this vibrant community growing. Until next time, happy baking! 🍞💙
PrintBlueberry Cream Cheese Bread
A delightful bread bursting with juicy blueberries and creamy goodness, perfect for breakfast or as a sweet treat.
- Prep Time: 15 minutes
- Cook Time: 60 minutes
- Total Time: 75 minutes
- Yield: 12 slices 1x
- Category: Bread
- Method: Baking
- Cuisine: American
- Diet: Vegetarian
Ingredients
- 2 cups all-purpose flour
- 1 cup granulated sugar
- 1/2 teaspoon salt
- 1 tablespoon baking powder
- 1/2 cup cream cheese, softened
- 1/2 cup butter, softened
- 2 large eggs
- 1 teaspoon vanilla extract
- 1/2 cup milk
- 1 cup fresh blueberries
Instructions
- Preheat your oven to 350°F (175°C) and prepare your loaf pan.
- Mix the all-purpose flour, baking powder, and salt in a large mixing bowl.
- Cream the softened butter and granulated sugar until light and fluffy.
- Add the softened cream cheese to the sugar mixture and blend until smooth.
- Incorporate the eggs one at a time, mixing well after each addition, and then add the vanilla extract.
- Add the dry ingredients gradually to the creamy mixture, alternating with the milk.
- Gently fold in the fresh blueberries.
- Transfer the batter to your prepared loaf pan and smooth the top.
- Bake for 50-60 minutes or until a toothpick inserted in the center comes out clean.
- Cool the bread in the pan for about 10 minutes, then transfer to a wire rack to cool completely.
Notes
Try variations like adding lemon zest or nuts for a twist on the classic recipe.
Nutrition
- Serving Size: 1 slice
- Calories: 190
- Sugar: 9g
- Sodium: 200mg
- Fat: 8g
- Saturated Fat: 5g
- Unsaturated Fat: 2g
- Trans Fat: 0g
- Carbohydrates: 28g
- Fiber: 1g
- Protein: 3g
- Cholesterol: 35mg
Keywords: blueberry bread, cream cheese bread, breakfast recipe