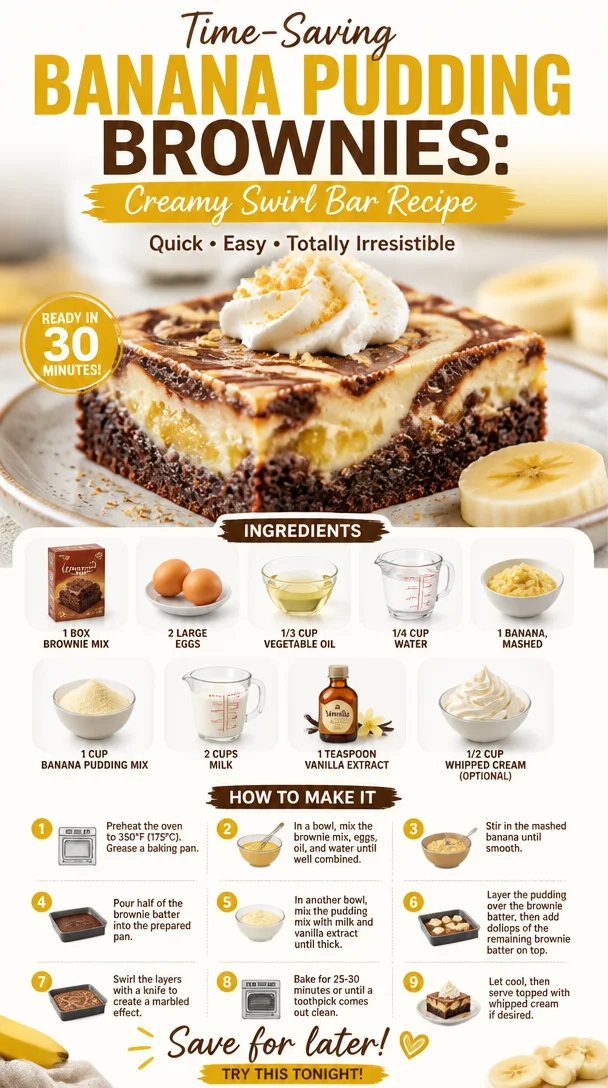
Time-Saving Banana Pudding Brownies: Creamy Swirl Bar Recipe
The Sweetest Mashup: Banana Pudding Brownies
Hey there, fellow food lovers! If you’re anything like me, dessert is where your heart truly lies, and it’s time to take it to a whole new level. Today, I’m thrilled to introduce you to a wonderful creation: Banana Pudding Brownies. Picture this: the rich, chocolaty goodness of brownies meets the creamy, nostalgic flavors of banana pudding—sounds divine, right? This recipe is not just a treat for the taste buds but also a beautiful ode to the delightful memories of my childhood, where dessert was always a centerpiece.
As we dive into this recipe, I want you to feel the excitement I feel when I pull these brownies out of the oven. They’re chewy, fudgy, and oh-so-delectable. Trust me, once you take your first bite, you’ll be transported back to those carefree days of summer picnics and family get-togethers, sharing laughter and treats under the sun. So, roll up your sleeves, grab your mixing bowl, and let’s create some magic in the kitchen!
A Nostalgic Twist
Let me take you back to my childhood for a moment. I was nine years old, sitting on my grandmother’s back porch with my cousins. It was a hot summer day, and the aroma of baked goods wafted through the air. My grandma was known for her legendary banana pudding, a recipe that had been passed down through generations. I remember her carefully layering the vanilla wafers, rich pudding, and slices of ripe bananas in a big glass bowl. We’d all sit around the table, forks in hand, eagerly waiting for dessert time, our excitement bubbling over just like the pudding!
This memory is what inspired me to merge two of my favorite desserts: brownies and banana pudding. The result? A dreamy treat that combines the best of both worlds. It’s the kind of dessert that brings back warm memories and creates new ones with every bite! Now, let’s get to the fun part—making these scrumptious Banana Pudding Brownies!
Ingredients
Here’s what you’ll need to whip up these delightful brownies. I’ve included some chef insights and substitution tips where relevant:
- 1 box brownie mix: This is the foundation of our dessert. Choose your favorite brand, and you can also opt for a gluten-free version if you need to.
- 2 large eggs: These act as a binder to hold everything together. If you’re vegan, you can substitute with unsweetened applesauce or a flax egg (1 tablespoon of ground flaxseed mixed with 2.5 tablespoons of water).
- 1/3 cup vegetable oil: Vegetable oil keeps the brownies moist and gives them a lovely texture. You can swap it out for melted coconut oil or unsweetened applesauce for a lighter version.
- 1/4 cup water: This adds to the moisture in the brownies. You can use any liquid, like milk or even a nut milk for added flavor.
- 1 banana, mashed: The star of our show! Bananas not only add flavor but also sweetness. Make sure your banana is ripe for maximum flavor. You can substitute applesauce for a different twist.
- 1 cup banana pudding mix: This is where the magic happens! It gives the brownies that nostalgic banana flavor and a creamy texture. Use instant pudding mix for best results.
- 2 cups milk: This is added to the pudding mix. If you prefer a dairy-free version, almond milk or coconut milk works beautifully.
- 1 teaspoon vanilla extract: Vanilla enhances the flavors, and you won’t want to skip this step! Feel free to use vanilla bean paste for a more intense flavor.
- 1/2 cup whipped cream (optional): While optional, a dollop of whipped cream on top can elevate your dessert to the next level. For a non-dairy option, consider coconut whipped cream!
Step-by-Step Instructions
Now that we’ve gathered our ingredients, it’s time to roll up our sleeves and get cooking! Follow these simple steps to make your Banana Pudding Brownies:
-
Preheat Your Oven: Start by preheating your oven to 350°F (175°C). This step is crucial to achieve that perfect brownie texture. While it’s heating up, you can prepare your baking dish!
-
Prepare Your Baking Dish: Grease a 9×13-inch baking dish lightly with cooking spray or line it with parchment paper for easy removal. I love using parchment paper because it makes cleanup a breeze!
-
Mix the Brownie Batter: In a large mixing bowl, combine the brownie mix, eggs, vegetable oil, water, and the mashed banana. Use a whisk or an electric mixer to ensure everything is well blended. This step is your opportunity for a bit of fun—don’t be afraid to get your hands in there if you want! The more you mix, the more rustic and fudgy your brownies will be.
-
Pour into the Baking Dish: Once your brownie batter is smooth and combined, pour it into your prepared baking dish. Use a spatula to spread it evenly so that every bite is decadent!
-
Bake the Brownie Base: Place the dish in the oven and bake for about 20-25 minutes. Keep an eye on them—every oven is different! You’ll want them to be set but still slightly gooey in the middle. A toothpick inserted into the center should come out with a few moist crumbs but not wet batter.
-
Prepare the Pudding Layer: While the brownies are baking, whip up that banana pudding. In a separate bowl, mix the banana pudding mix with the milk and vanilla extract according to the package instructions. This should take just a few minutes; whisk until it’s smooth and creamy.
-
Layer the Pudding: Once the brownies are out of the oven and have cooled slightly, it’s time to add the pudding layer. Pour the pudding over the warm brownies, spreading it evenly. The heat from the brownies will keep everything cozy and meld those flavors together beautifully.
-
Chill the Brownies: Cover your dish with plastic wrap or foil and let it chill in the refrigerator for at least 2 hours. This is when the magic happens! The pudding will set, making it easier to cut and serve later.
-
Add the Whipped Cream: If you’re feeling fancy, top with whipped cream before serving. You can add as much or as little as you like—because who doesn’t love whipped cream?
-
Slice and Serve: Now for the best part! Slice your brownies into squares and serve them chilled. You can garnish with additional banana slices or crumbled vanilla wafers for that banana pudding vibes.
Serving Suggestions
These Banana Pudding Brownies are best served chilled, making them the perfect make-ahead dessert for gatherings or potlucks. As you plate them, consider using a colorful dessert plate to contrast against the rich brownie and creamy pudding layers. Add a dollop of whipped cream on top, a few banana slices, and maybe even a sprinkle of crushed Nilla wafers for a delightful presentation. Your friends and family will be so impressed!
Recipe Variations
In the spirit of creativity, here are some fun twists you can try with this recipe:
- Peanut Butter Swirl: Add dollops of creamy peanut butter to the brownie batter before baking for a deliciously nutty flavor.
- Chocolate Chip Delight: Fold in a cup of chocolate chips into the brownie mixture for bonus chocolate goodness.
- Caramel Drizzle: Once you serve the brownies, drizzle them with caramel sauce for that extra decadence.
- Nutty Banana: Stir in some chopped walnuts or pecans into the brownie batter for added crunch.
- Choco-Banana Frosting: Top with a chocolate ganache frosting instead of whipped cream for a rich twist.
Chef’s Notes
As a chef who loves to experiment, this recipe has seen its fair share of adaptations over the years. I remember the first time I attempted to make it vegan—I was worried about losing that luscious texture, but the banana worked wonders! I’ve also enjoyed making mini versions in muffin tins for bite-sized delights. One funny story involves my dog sneaking a lick off the counter right before I was ready to chill them—let’s just say, it made for some laughter and a quick cleanup session!
FAQs and Troubleshooting
1. Can I use homemade brownie mix instead of a box mix?
Absolutely! If you prefer to whip up a homemade brownie recipe, feel free to use your favorite brownie ingredients. Just be cautious of the ratios, as box mixes can often vary in the amount of ingredients needed.
2. Why did my brownies turn out dry?
If your brownies feel dry, it could be that they were baked for too long. Ovens can vary, so I recommend checking on them a minute or two before the minimum baking time. Remember, a little gooeyness in the center is desirable!
3. Can I freeze these brownies?
You sure can! They freeze beautifully—just wrap them tightly in plastic wrap and then in foil before storing in the freezer. Thaw in the refrigerator before serving.
4. How do I make sure the pudding layer isn’t too runny?
Stir the pudding mix and milk diligently, ensuring it’s whisked well and allowed to chill enough in the fridge to set. Instant pudding is your best bet for the perfect consistency!
Nutritional Info
While I believe in indulging occasionally, it’s nice to be mindful about what our treats contain too. Here’s a rough estimate for one brownie with pudding topping:
- Calories: ~250
- Fat: 10g
- Carbohydrates: 38g
- Fiber: 1g
- Protein: 2g
Enjoy these Banana Pudding Brownies, channeling all the warmth of childhood memories into a delightful dessert that’s easy to make and impossible to resist. Now, go ahead and dig in—your taste buds are in for a treat! Happy baking! 🍌🍫
PrintBanana Pudding Brownies
A delightful fusion of rich brownies and creamy banana pudding that evokes warm childhood memories.
- Prep Time: 15 minutes
- Cook Time: 25 minutes
- Total Time: 150 minutes
- Yield: 12 servings 1x
- Category: Dessert
- Method: Baking
- Cuisine: American
- Diet: Vegetarian
Ingredients
- 1 box brownie mix
- 2 large eggs
- 1/3 cup vegetable oil
- 1/4 cup water
- 1 banana, mashed
- 1 cup banana pudding mix
- 2 cups milk
- 1 teaspoon vanilla extract
- 1/2 cup whipped cream (optional)
Instructions
- Preheat your oven to 350°F (175°C).
- Prepare a 9×13-inch baking dish by greasing it or lining it with parchment paper.
- Mix the brownie batter in a large bowl with the brownie mix, eggs, vegetable oil, water, and mashed banana.
- Pour the brownie batter into the prepared baking dish and spread it evenly.
- Bake for 20-25 minutes until set but slightly gooey in the center.
- Prepare the pudding layer by mixing the banana pudding mix with the milk and vanilla extract until smooth.
- Layer the pudding over the warm brownies once they are out of the oven.
- Chill in the refrigerator for at least 2 hours before serving.
- Add whipped cream on top if desired, then slice and serve chilled.
Notes
This dessert is best served chilled and can be garnished with banana slices or crumbled vanilla wafers.
Nutrition
- Serving Size: 1 brownie
- Calories: 250
- Sugar: 12g
- Sodium: 150mg
- Fat: 10g
- Saturated Fat: 2g
- Unsaturated Fat: 8g
- Trans Fat: 0g
- Carbohydrates: 38g
- Fiber: 1g
- Protein: 2g
- Cholesterol: 30mg
Keywords: banana pudding brownies, dessert recipe, nostalgic dessert
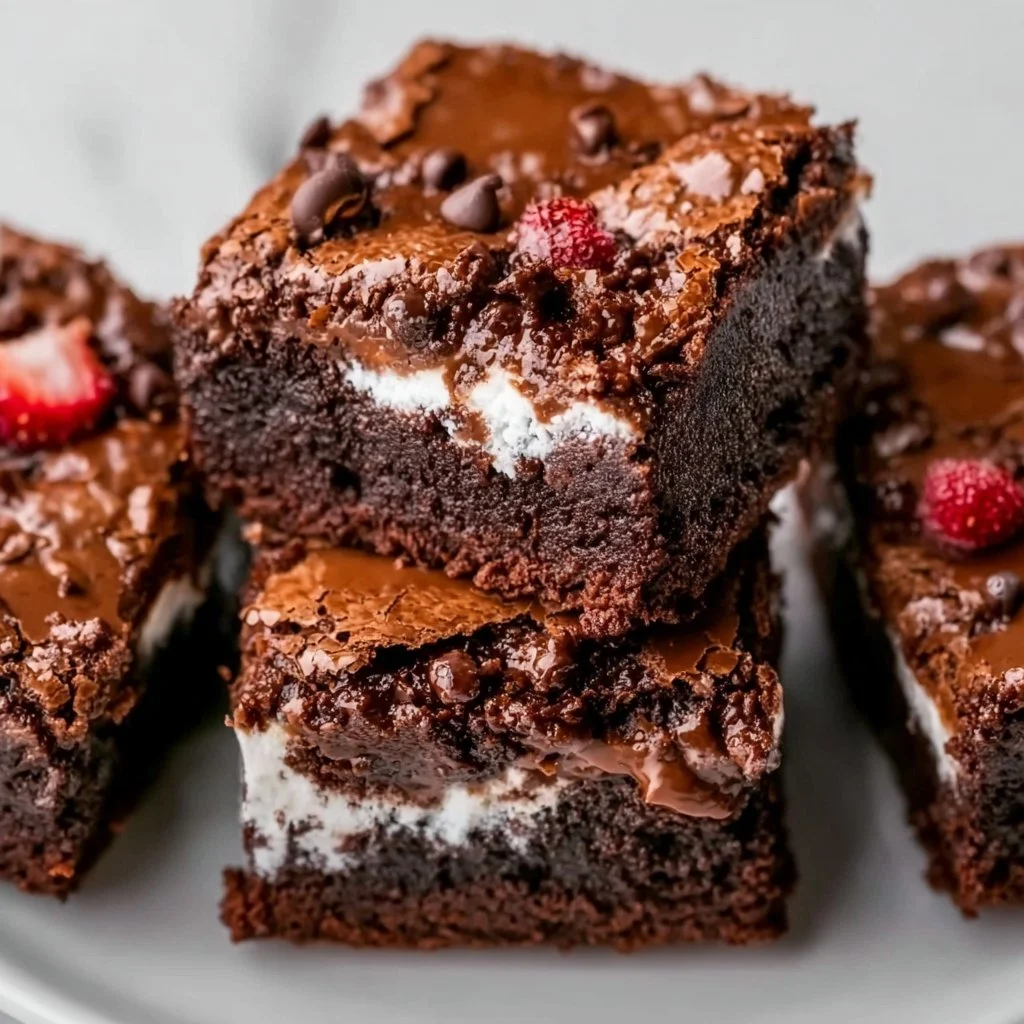
Zero Sugar Brownies with Greek Yogurt
Indulge Guilt-Free: Zero Sugar Brownies with Greek Yogurt
Welcome to Clean Plate Cravings! Today, we’re diving into the world of guilt-free indulgence with a delightful recipe that’ll leave your taste buds dancing and your body feeling great. What could be better than brownies that are rich, fudgy, and—wait for it—completely free of added sugar? Yes, you heard that right! These Zero Sugar Brownies with Greek Yogurt are a game-changer.
As much as we love a good dessert, the post-sweet treat slump can sometimes feel unbearable, and that just won’t do! Imagine enjoying a delicious brownie without the nagging guilt or the energy crash after. By swapping traditional ingredients for healthier alternatives, we’re creating a treat that you can truly savor. I’m here to tell you that these brownies do not compromise on flavor or texture. So grab your apron, and let’s get baking!
A Sweet Memory
It was a Sunday afternoon, and I was rummaging through my childhood memories in the kitchen of my parents’ home. I stumbled upon a tattered old recipe book filled with handwritten notes and little smudges—possibly remnants of past baking adventures. My mom had been whipping up her signature brownies for as long as I could remember, and the aroma of chocolate wafting from the oven was something I cherished in those innocent days. That rich cocoa smell would float up the stairs and lead me straight to the kitchen, a siren call that was impossible to resist.
As I flipped through the pages, I realized how sentimental food can be. The act of baking those brownies was more than just mixing ingredients; it was bonding time, sharing laughter, and creating memories with loved ones. Inspired by that nostalgia, I set out on a mission to create a version of those classic brownies—only this time, they’d be healthier. Enter my Zero Sugar Brownies, a heartfelt tribute with a twist that brings the essence of my childhood into today’s kitchen!
Ingredients
Before we dive into the magic of baking, let’s gather our ingredients. Each one is carefully chosen to ensure you get a delicious brownie without the added sugar!
-
1 cup Greek yogurt: This creamy ingredient adds moisture and a protein kick to our brownies. Greek yogurt is a great substitute for oil or butter in baking. You can also use dairy-free yogurt if you prefer.
-
1/2 cup unsweetened cocoa powder: The rich base for our brownies, providing all that deep chocolate flavor without any added sugars. Be sure to look for high-quality cocoa for the best taste!
-
1/2 cup almond flour or oat flour: These flours keep our brownies moist and give them a lovely texture. Almond flour is lower in carbs and packed with healthy fats, while oat flour adds a heartier touch. Use whichever suits your dietary needs!
-
1/2 cup sugar substitute (like erythritol or stevia): A key ingredient that allows us to enjoy sweetness without the added sugar. Erythritol offers a similar texture to sugar, while stevia is much sweeter so you might need less. Always check the conversion guidelines!
-
1/4 cup unsweetened applesauce: Adds natural sweetness and moisture, plus a bit of fiber. Feel free to substitute it with mashed banana if you’re a fan of that flavor!
-
1 teaspoon vanilla extract: A must for any baking recipe, vanilla enhances all the flavors in our brownies. You can also use almond extract for a unique twist.
-
1/2 teaspoon baking powder: Helps our brownies rise just enough to keep them from being too dense.
-
1/4 teaspoon salt: Just a pinch to elevate all the sweet flavors; salt balances the sweetness beautifully!
Step-by-Step Instructions
Now that we’ve got everything prepped, let’s get baking! Here’s how to whip up these delicious brownies in no time:
-
Preheat Your Oven: Preheat your oven to 350°F (175°C). While the oven warms up, it’s the perfect time to gather your equipment: a mixing bowl, spatula, measuring cups, and a 9×9 baking pan. Don’t forget to grease the pan or line it with parchment paper for easy removal! Trust me; you don’t want to risk losing any of that gooey goodness.
-
Mix the Wet Ingredients: In a medium mixing bowl, combine the Greek yogurt, unsweetened applesauce, and vanilla extract. Whisk them together until smooth. Here’s a pro tip: Using room temperature yogurt will help you achieve a smoother mixture and integrate better!
-
Sift the Dry Ingredients: In another bowl, combine the almond or oat flour, cocoa powder, baking powder, sugar substitute, and salt. Sifting them together not only breaks up any lumps but also creates a lighter brownie!
-
Combine Wet and Dry: Gradually add the dry mixture into the wet mixture, stirring gently with a spatula. It’s important not to overmix. If you’re feeling fancy, fold in some chocolate chips or nuts for extra texture and flavor!
-
Pour the Batter: Transfer the brownie batter into your prepared baking pan, smoothing it out evenly with the spatula. It’s okay if the batter is thick; that’s what makes them fudgy!
-
Bake to Perfection: Pop the pan into your preheated oven and bake for 20-25 minutes. Keep an eye on them; you want the edges to be firm and the center to be slightly underbaked for that gooey texture. Insert a toothpick—if it comes out with a few moist crumbs, they’re ready!
-
Cool and Slice: Once baked, remove the brownies from the oven and let them cool in the pan for about 10-15 minutes before transferring them to a wire rack. Allow them to cool completely before slicing. Yes, the waiting is tough, but just imagine to get to enjoy that fudgy goodness!
Serving Suggestions
When it comes to serving these brownies, the sky’s the limit! You can simply cut them into squares and serve them warm alongside a dollop of Greek yogurt or a scoop of your favorite sugar-free ice cream. Want to dress it up a bit? Drizzle a homemade chocolate sauce or a sprinkle of fresh berries for an elegant touch. Trust me, your guests (or family) will be looking for seconds!
Recipe Variations
Feeling adventurous? Here are some fun twists to customize your brownies:
-
Nutty Brownies: Fold in some chopped walnuts or pecans for that extra crunch and a boost of healthy fats.
-
Mint Chocolate Delights: Add some mint extract to the batter for a refreshing mint brownie experience.
-
Coconut Bliss: Toss in shredded unsweetened coconut for a tropical flair.
-
Peanut Butter Swirl: Drop spoonfuls of natural peanut butter into the batter and swirl it around for rich, creamy bites.
-
Fruity Fudge: Stir in a handful of fresh or frozen berries for a fruity twist on the classic brownie.
Chef’s Notes
These brownies have come a long way since that Sunday afternoon memory. Every time I make them, I think about how they transformed from my mom’s decadent, sugar-laden version into a treat I can feel good about eating (and sharing!). When testing recipes, I’ve learned that simple swaps can make a big difference, and healthy eating doesn’t have to mean sacrificing joy in the kitchen.
Oh, and I’ve had my fair share of “kitchen adventures” (read: mishaps) along the way. From flour explosions to chocolate-covered countertops, let’s just say that the journey to create these brownies was as much fun as the finished product. So don’t be afraid to experiment and make your own memories along the way!
FAQs and Troubleshooting
-
Why are my brownies too gooey?
Make sure to bake them long enough. If they’re undercooked, they’ll remain gooey. Always do the toothpick test to check for doneness—they should come out with moist crumbs, not wet batter. -
Can I use another sweetener?
Absolutely! Just keep in mind that different sweeteners have varying degrees of sweetness. If you’re using a liquid sweetener, adjust the other wet ingredients accordingly. -
What if I don’t have Greek yogurt?
No problem! You can substitute it with unsweetened regular yogurt, or even a nut-based yogurt if you’re looking for a dairy-free option. -
How do I store the brownies?
These brownies can be stored in an airtight container in the fridge for up to a week (if they last that long!). They also freeze well, making it easy to meal prep for your future sweet cravings!
Nutritional Info (if applicable)
These brownies are packed with protein from the Greek yogurt, healthy fats from almond flour, and are low in sugar, making them a nutritious yet decadent treat. Depending on your choice of sugar substitute and additional mix-ins, the calorie count can vary, but you’re looking at roughly 100-120 calories per brownie!
So there you have it, friends! Your guide to making scrumptious, guilt-free Zero Sugar Brownies with Greek Yogurt. I can’t wait for you to try this recipe and fall in love—with desserts like this, healthy eating becomes a delicious journey rather than a chore. Happy baking!
PrintZero Sugar Brownies with Greek Yogurt
Indulge guilt-free with these rich and fudgy brownies that are completely free of added sugar, featuring Greek yogurt for added moisture and protein.
- Prep Time: 10 minutes
- Cook Time: 25 minutes
- Total Time: 35 minutes
- Yield: 12 servings 1x
- Category: Dessert
- Method: Baking
- Cuisine: American
- Diet: Vegetarian
Ingredients
- 1 cup Greek yogurt
- 1/2 cup unsweetened cocoa powder
- 1/2 cup almond flour or oat flour
- 1/2 cup sugar substitute (like erythritol or stevia)
- 1/4 cup unsweetened applesauce
- 1 teaspoon vanilla extract
- 1/2 teaspoon baking powder
- 1/4 teaspoon salt
Instructions
- Preheat your oven to 350°F (175°C) and prepare your baking pan.
- Mix the Greek yogurt, applesauce, and vanilla extract until smooth.
- Sift the almond or oat flour, cocoa powder, baking powder, sugar substitute, and salt together.
- Combine the wet and dry mixtures, stirring gently.
- Pour the batter into the prepared baking pan.
- Bake for 20-25 minutes or until the edges are firm and the center is slightly underbaked.
- Cool in the pan, then transfer to a wire rack to cool completely before slicing.
Notes
Optional: Fold in chocolate chips or nuts for added texture. Serve warm with Greek yogurt or sugar-free ice cream.
Nutrition
- Serving Size: 1 brownie
- Calories: 120
- Sugar: 1g
- Sodium: 130mg
- Fat: 6g
- Saturated Fat: 1g
- Unsaturated Fat: 5g
- Trans Fat: 0g
- Carbohydrates: 16g
- Fiber: 2g
- Protein: 5g
- Cholesterol: 5mg
Keywords: zero sugar brownies, healthy dessert, Greek yogurt brownies, guilt-free baking