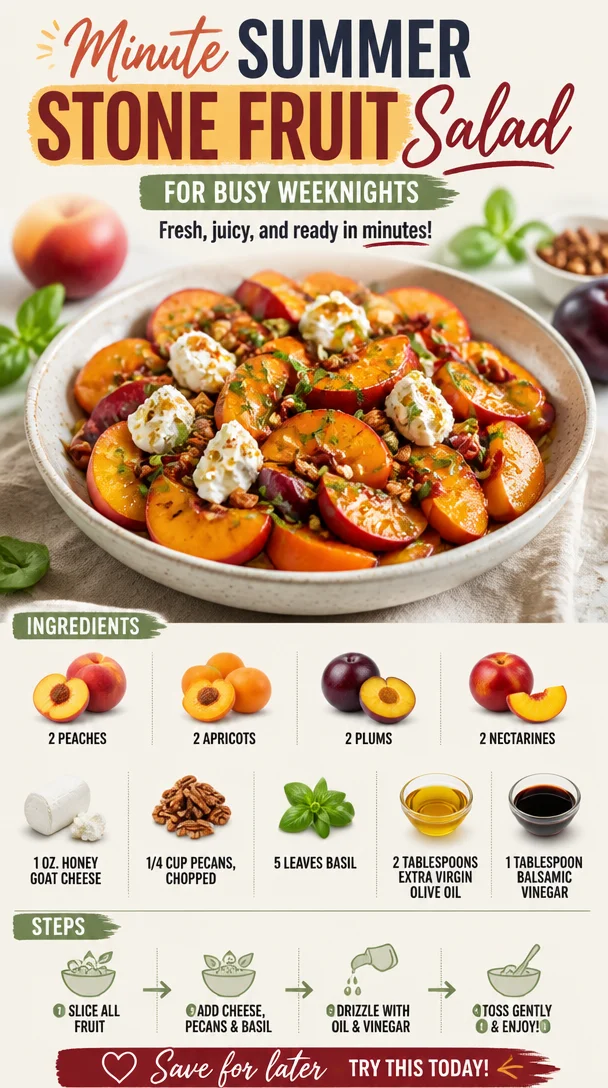
Minute Summer Stone Fruit Salad for Busy Weeknights
Summer Stone Fruit Salad: A Celebration of Flavor and Freshness
Welcome, fellow food lovers! Today, I’m thrilled to share one of my all-time favorite summer recipes—Summer Stone Fruit Salad. As the sun shines brightly and the days stretch longer, there’s nothing quite like gathering fresh, ripe stone fruits and putting together a dish that not only looks stunning but also bursts with flavor and joy.
Stone fruits—peaches, plums, apricots, and nectarines—are synonymous with summer indulgence. They remind me of warm afternoons spent lounging in my grandparents’ backyard, where the air was sweet with the scent of blossoms and the promise of juicy treats. It was during one of those idyllic days that I first discovered the magic of combining these fruits, and let me tell you, it was a game-changer!
This Summer Stone Fruit Salad isn’t just a dish; it’s a vibrant homage to lazy summer days, picnics in the park, and the art of uncomplicated, delicious cooking. Picture yourself on a sunny patio, a gentle breeze blowing, and a refreshing bowl of this colorful salad in front of you. It’s the kind of dish that draws everyone in—it’s fresh, energizing, and oh-so-satisfying.
Let’s dive deeper into what makes this salad a must-try recipe, as we blend textures, flavors, and aromas in a way that celebrates the bounty of summer. Ready to get cookin’? Let’s go!
A Nostalgic Kitchen Memory
One of my fondest culinary memories revolves around those lazy summer afternoons at my grandparents’ house. Each year, right in the middle of summer, my grandma would gather all of us in the kitchen, enlisting my help to create what she called her "Fruit Fiesta."
The kitchen would be alive with laughter, chatter, and the delightful scents of fresh fruits. As she sliced up peaches, plums, and nectarines, I would eagerly pluck a piece of fruit here and there, their sweet juice running down my chin. Grandma would always tell stories about why she loved stone fruits so much. They reminded her of her childhood summers—playing outside until dusk, with not a worry in the world.
Sometimes she’d whip up a simple fruit salad drizzled with honey and olive oil, tossing in whatever she could find ripe on the counter. It taught me that cooking need not be complicated; it’s all about using what you have and letting those flavors shine. This summer stone fruit salad I’m sharing with you today is my homage to those moments—simple, delicious, and filled with all the joy of summer.
Ingredients
Here’s what you’ll need to whip up this fabulous Summer Stone Fruit Salad:
-
2 peaches: Sweet and juicy, they add a delightful burst of flavor. Look for slightly fuzzy skin and a fragrant aroma. If peaches aren’t in season, feel free to use nectarines—they’re just as delicious!
-
2 apricots: These little gems bring a beautiful tangy sweetness that balances the salad perfectly. If they aren’t available, you can substitute with more plums or even some mango for a tropical twist.
-
2 plums: Plums introduce a lovely tartness that contrasts perfectly with the sweetness of the peaches and apricots. If plums are out of season, cherries make an excellent substitute!
-
2 nectarines: Nectarines are fabulous subs for peaches if you prefer a smooth skin. They bring a slightly firmer texture, which adds variety to the salad.
-
1 oz. honey goat cheese: This creamy cheese elevates the salad with its unique flavor profile—sweet and tangy all at once! Can’t find honey goat cheese? Regular goat cheese with a drizzle of honey works wonders too!
-
1/4 cup pecans, chopped: These add a satisfying crunch and earthy flavor. If nuts aren’t your thing, toasted sunflower seeds or pumpkin seeds are excellent gluten-free alternatives.
-
5 leaves basil: Fresh basil brightens the dish with herbal notes. If you’re feeling adventurous, try mint or cilantro for a different twist!
-
2 tablespoons extra virgin olive oil: A drizzle of good olive oil enhances the fruit’s natural sweetness and adds richness. Opt for a fruity version to complement the salad’s flavors.
-
1 tablespoon balsamic vinegar: This adds depth and a little acidity to balance out the sweetness. A splash of lemon juice or apple cider vinegar can be used in a pinch!
Step-by-Step Instructions
Now that we have all our ingredients ready, it’s time to bring our Summer Stone Fruit Salad to life! Grab your favorite cutting board and let’s get chopping!
-
Prep your stone fruits: Begin by washing all your stone fruits under cool running water to remove any dirt or pesticides. Once they’re clean, slice the peaches, apricots, plums, and nectarines into bite-sized pieces. I love leaving the skin on for added texture and nutrients, plus the colors are just gorgeous. Pro tip: Use a serrated knife for juicy fruits—it minimizes squishing!
-
Assemble the base: In a large mixing bowl, gently toss together the sliced fruits. Let them mingle and appreciate each other’s company—this salad is all about the vibrant flavors coming together!
-
Make the dressing: In a small bowl, whisk together the extra virgin olive oil and balsamic vinegar. You want a well-emulsified mixture that will coat all the fruits beautifully. If you’re feeling fancy, add a pinch of salt and a sprinkle of freshly cracked black pepper to the dressing for added depth.
-
Combine the salad: Drizzle your dressing over the fruit mixture and gently fold everything together. You want to ensure each piece is evenly coated without breaking the delicate fruits.
-
Add the cheese and pecans: Crumble the honey goat cheese over the top and sprinkle with chopped pecans. It’s amazing how the creaminess of the cheese complements the fruity goodness. For a bit of added flair, toss in some torn basil leaves at this stage too!
-
Taste and adjust: Give your salad a taste! This is the moment to check if it needs a little extra honey if you prefer it sweeter, or perhaps a splash more vinegar if you like a bit more tang. Trust your palate; it knows best!
-
Chill (optional): If you have time, let the salad sit in the fridge for about 30 minutes. This allows the flavors to meld beautifully and creates a refreshing dish that’s a joy to eat cold.
Serving Suggestions
When it comes to serving this delightful Summer Stone Fruit Salad, keep it simple! Use a large, shallow bowl to beautifully showcase those vibrant colors. For a more formal occasion, consider plating individual portions in small bowls or mason jars, layering the fruits with the cheese and nuts for a charming presentation. Drizzle a bit of extra dressing on top for visual appeal, and garnish with whole basil leaves for that fresh touch.
It’s equally tasty as a main dish, a side salad, or even a light dessert—versatility at its finest!
Recipe Variations
Get creative with your Summer Stone Fruit Salad! Here are some fun variations to keep things interesting:
-
Grilled Stone Fruits: Try grilling your stone fruits for a smoky twist. The caramelized edges add an entirely new flavor profile!
-
Berry Boost: Add a handful of fresh berries like strawberries, blueberries, or raspberries for a burst of color and flavor.
-
Citrus Infusion: Toss in some orange or grapefruit segments to give the salad a refreshing zing.
-
Sweet & Spicy: Add a sprinkle of chili powder or cayenne pepper to the dressing for a hint of heat that beautifully contrasts with the fruits’ sweetness.
-
Vegan Version: Substitute the honey goat cheese with a vegan cream cheese or avocado for a luscious creaminess without dairy.
Chef’s Notes
This Summer Stone Fruit Salad has evolved over the years—initially, it would include whatever stone fruits were available at the market or our local farmer’s stand. Sometimes, I’d swap in different nuts or add in a splash of flavored vinaigrette to change it up. The beauty of this recipe is in its flexibility—it allows you the freedom to experiment based on seasonal availability and your taste preferences.
And speaking of flexibility, I once had a friend who decided to throw in some hot sauce for fun while we were enjoying a BBQ together—it was a wild card, but to our surprise, it added an exciting twist! We ended up laughing and munching on our little flavor experiment that day. Cooking is all about joy and exploration—don’t be afraid to live a little!
FAQs and Troubleshooting
Q: Can I make this salad in advance?
A: Absolutely! Just keep in mind that some fruits can brown if they sit too long. If you’re preparing it in advance, consider adding the cheese and nuts just before serving for the best texture.
Q: What if I can’t find honey goat cheese?
A: No worries! Regular goat cheese with a drizzle of honey is a fantastic alternative. You can also use feta cheese if you prefer something tangier.
Q: Can I make this salad without nuts?
A: Certainly! Feel free to omit the nuts entirely for a nut-free version, or substitute with seeds or crispy chickpeas for that crunch.
Q: What’s the best way to store leftovers?
A: If you have any leftovers, store them in an airtight container in the fridge for up to 2 days. Just be aware that the fruits may release some juices over time.
Nutritional Info
While the exact nutritional information may vary based on specific ingredients used, here’s an approximate breakdown (per serving, serves 2):
- Calories: 250
- Protein: 7g
- Carbohydrates: 30g
- Dietary Fiber: 4g
- Sugars: 18g
- Fat: 13g
- Saturated Fat: 3g
So there you have it, dear friends! A delightful, vibrant Summer Stone Fruit Salad that’s not only delicious but also brings back wonderful memories of sun-soaked summer days. Let’s lift our forks and celebrate the season with a bowlful of freshness, flavor, and fun!
Bon appétit, and happy cooking! 🍑🌞
PrintSummer Stone Fruit Salad
A vibrant and refreshing salad featuring fresh stone fruits like peaches, plums, apricots, and nectarines, drizzled with olive oil and balsamic vinegar.
- Prep Time: 15 minutes
- Cook Time: 0 minutes
- Total Time: 15 minutes
- Yield: 4 servings 1x
- Category: Salad
- Method: No-Cook
- Cuisine: American
- Diet: Vegetarian
Ingredients
- 2 peaches, sliced
- 2 apricots, sliced
- 2 plums, sliced
- 2 nectarines, sliced
- 1 oz. honey goat cheese, crumbled
- 1/4 cup pecans, chopped
- 5 leaves basil, torn
- 2 tablespoons extra virgin olive oil
- 1 tablespoon balsamic vinegar
Instructions
- Wash all stone fruits under cool running water.
- Slice the peaches, apricots, plums, and nectarines into bite-sized pieces.
- Toss together the sliced fruits in a large mixing bowl.
- Whisk together the olive oil and balsamic vinegar in a small bowl.
- Drizzle the dressing over the fruit mixture and fold gently.
- Crumble honey goat cheese over the salad and sprinkle with chopped pecans.
- Taste and adjust seasoning with honey or vinegar if necessary.
- Chill in the fridge for about 30 minutes before serving.
Notes
Let the salad sit in the fridge to meld flavors. Best enjoyed fresh.
Nutrition
- Serving Size: 1 serving
- Calories: 250
- Sugar: 18g
- Sodium: 100mg
- Fat: 13g
- Saturated Fat: 3g
- Unsaturated Fat: 8g
- Trans Fat: 0g
- Carbohydrates: 30g
- Fiber: 4g
- Protein: 7g
- Cholesterol: 10mg
Keywords: summer salad, stone fruit, fresh fruit salad, healthy salad
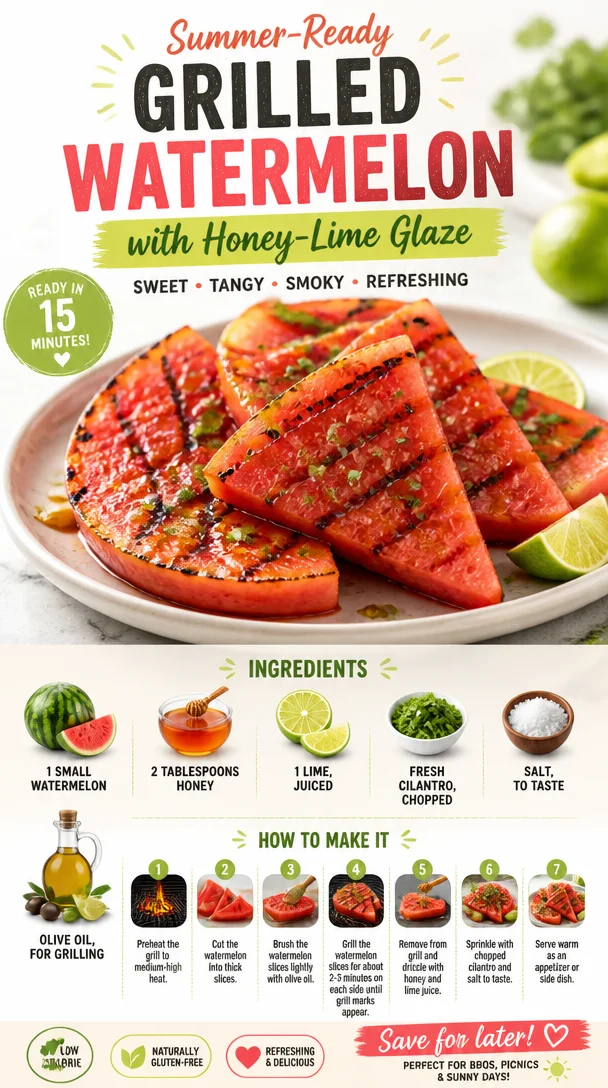
Summer-Ready Grilled Watermelon with Honey-Lime Glaze
Grilled Watermelon with Honey and Lime: A Summer Delight
Welcome to Clean Plate Cravings! If you’re here, you’re likely on a journey for fresh, vibrant, and feel-good meals. Today, I’m thrilled to share a recipe that’s not just easy to make—it’s utterly delightful: Grilled Watermelon with Honey and Lime. Trust me, once you sink your teeth into this sweet, smoky treat, you’ll want to keep it in your summer rotation all season long!
A Taste of Nostalgia
Let’s take a walk down memory lane, shall we? I’ll never forget the summer family barbecues at my grandparents’ house. My grandma, with her sunhat perched jauntily atop her head, would be in charge of the grill, flipping burgers, but what really stole the show was her grilled watermelon. As the sweet scent of caramelizing fruit filled the air, we kids would hover around the grill, waiting impatiently for that first slice. Fast forward to today, and I’ve taken grandma’s incredible idea and given it a little fresh twist. With a drizzle of honey and a zing of lime, it’s modernized but still pays homage to those sunny days spent with family.
Ingredients
Let’s talk ingredients! Here’s what you’ll need to whip up this refreshing grilled treat:
-
1 small watermelon: Look for one that’s firm, seedless, and has a symmetrical shape. These will yield the best grilling results. If watermelon isn’t your vibe, try swapping in cantaloupe for a twist!
-
2 tablespoons honey: This adds a touch of sweetness and helps create that gorgeous caramelized effect on the grill. Feel free to substitute with maple syrup or agave nectar for a vegan option.
-
1 lime, juiced: The bright acidity cuts through the sweetness, balancing the dish perfectly. If you don’t have lime, lemon can work in a pinch—just remember, it packs a different punch!
-
Fresh cilantro, chopped: This herb adds a fresh layer to the dish, making it vibrant. If cilantro isn’t your thing, fresh mint or basil can provide a lovely alternative, too!
-
Salt, to taste: Just a pinch of salt enhances all the flavors and balances the sweetness. It’s the secret ingredient that can bring everything together, so don’t skip it!
-
Olive oil, for grilling: A light brush of olive oil prevents sticking and adds a hint of richness. You can use avocado oil if you’re looking for a higher smoke point.
Step-by-Step Instructions
Ready to bring this dish to life? Let’s dive into the cooking process.
-
Prep the Watermelon: Start by cutting the watermelon into thick slices, about 1-inch each. Keep the rind on—this helps the slices hold their shape when grilling. Think of them as little juicy boats waiting to be flavored!
-
Make the Honey-Lime Drizzle: In a small bowl, mix together the honey and lime juice until well combined. This drizzle is the magic sauce that will elevate our grilled watermelon, so give it a little taste—sweet, tart, and refreshing all at once.
-
Heat the Grill: Preheat your grill to medium-high. You want it hot enough to get those lovely grill marks but not so hot that it scorches the watermelon. If you’re using a stovetop grill pan, preheat it similarly.
-
Oil the Grill: Brush your grill grates lightly with olive oil—this helps prevent sticking and creates those beautiful sear marks. You can use a paper towel dipped in oil held with tongs for this job.
-
Grill the Watermelon: Place the watermelon slices directly onto the grill. Let them grill for about 3-4 minutes on each side. You’re looking for those beautiful char marks and slightly softened flesh. You might hear some sizzle—this means you’re doing it right! Take this time to enjoy the smell; your kitchen (or backyard) should be filled with summer goodness.
-
Drizzle and Serve: Once those slices are perfectly grilled, remove them from the grill and drizzle your honey-lime mixture generously over each slice. Then sprinkle with a pinch of salt and finish with a sprinkle of freshly chopped cilantro. Voilà, your masterpiece is ready!
Serving Suggestions
Grilled watermelon is not only a dish but an experience! Serve it warm as an appetizer or side dish alongside your favorite grilled meats or even atop a bed of greens for a refreshing salad. You can also dress it up for dessert by pairing it with a scoop of vanilla ice cream for an extra indulgent treat!
Recipe Variations
Want to get adventurous? Here are a few ideas to switch things up:
-
Spicy Twist: Add a pinch of chili powder or cayenne pepper to your honey-lime drizzle for a spicy kick!
-
Feta Crumble: Crumble some feta cheese on top before serving for a savory-sweet contrast.
-
Balsamic Drizzle: Instead of honey, try adding a balsamic reduction for a tangy flavor.
-
Herbed Variation: Swap cilantro for fresh mint or basil to change up the herb profile entirely.
-
Grill Them All: You could also grill peaches, pineapple, or even zucchini alongside your watermelon for a colorful platter.
Chef’s Notes
I’ll admit—this recipe has come a long way since those childhood barbecues. The first time I tried grilling watermelon, I wasn’t sure what to expect. It didn’t take long to realize how deliciously unexpected the flavors were! Over the years, I’ve played with it and now love adding herbs and different drizzles. It’s one of those versatile dishes that tells a story of summer both in flavor and memory.
FAQs and Troubleshooting
Q: Can I make this dish ahead of time?
A: Grilled watermelon is best enjoyed fresh off the grill. If you need to prep in advance, store the grilled slices in the fridge for a couple of hours—just be sure to reheat them gently on the grill or in a pan to regain that lovely texture.
Q: What if my watermelon is too watery?
A: Smaller, seedless watermelons tend to be less watery and sweeter. If you find your watermelon is too juicy, you can grill it longer to help caramelize the sugars while reducing moisture.
Q: How do I know when the watermelon is done?
A: You want soft grill marks but firm mango-flavored flesh. If it’s too mushy, it may have been on the grill too long. Keep an eye on it as it grills!
Q: Can this recipe be adapted for a camping trip?
A: Absolutely! Just slice your watermelon ahead of time, pack your olive oil and drizzle ingredients, then grill it up over an open flame or portable grill. It’s a showstopper around the campfire!
Nutritional Info
While we won’t dive too deep into the numbers (because let’s face it—food is about joy, not just calories), grilled watermelon is low in calories, packed with hydration, and filled with vitamins A and C, making it a nutritious choice for those sunny days.
So there you have it, my dear foodies! Grilled Watermelon with Honey and Lime is your new summer staple that’s all about fresh flavors and feel-good vibes. I hope you enjoy preparing this dish as much as I enjoyed sharing it with you! Now, grab that watermelon, fire up the grill, and let’s create some delicious moments together!
PrintGrilled Watermelon with Honey and Lime
A refreshing summer dish featuring grilled watermelon drizzled with honey and lime.
- Prep Time: 10 minutes
- Cook Time: 10 minutes
- Total Time: 20 minutes
- Yield: 4 servings 1x
- Category: Dessert
- Method: Grilling
- Cuisine: American
- Diet: Vegetarian
Ingredients
- 1 small watermelon, firm and seedless
- 2 tablespoons honey (or maple syrup for a vegan option)
- 1 lime, juiced
- Fresh cilantro, chopped
- Salt, to taste
- Olive oil, for grilling
Instructions
- Prep the watermelon: Cut into 1-inch thick slices, keeping the rind on.
- Make the honey-lime drizzle by mixing honey and lime juice.
- Heat the grill to medium-high temperature.
- Oil the grill grates lightly with olive oil.
- Grill the watermelon slices for 3-4 minutes on each side, looking for char marks.
- Drizzle the honey-lime mixture over the grilled slices and sprinkle with salt and chopped cilantro.
Notes
Serve warm as an appetizer or side dish, or dress it up with ice cream for dessert!
Nutrition
- Serving Size: 1 serving
- Calories: 80
- Sugar: 14g
- Sodium: 20mg
- Fat: 0g
- Saturated Fat: 0g
- Unsaturated Fat: 0g
- Trans Fat: 0g
- Carbohydrates: 20g
- Fiber: 1g
- Protein: 1g
- Cholesterol: 0mg
Keywords: grilled watermelon, summer recipe, healthy dessert, fruity dessert, easy recipes

Minute Coconut Chia Pudding Recipe (Raffaello Flavor)
The Ultimate Easy Coconut Chia Pudding Recipe (Coconut Raffaello)
Welcome back, food lovers! Today, I’m thrilled to share one of my absolute favorite recipes—a creamy, dreamy Coconut Chia Pudding that’s inspired by the delightful flavors of Raffaello coconut candies. This dessert not only delights your taste buds but is also packed with nourishing ingredients that will leave you feeling energized and satisfied. Let’s dig in!
Introduction
Now, who doesn’t love a simple, satisfying dessert that tastes like a tropical vacation? There’s something about the sweet, nutty flavor of coconut combined with the simplistic charm of chia pudding that strikes a nostalgic chord for many of us.
Growing up, I remember my family indulging in coconut treats during the summer, each bite reminiscent of sunny beach days and carefree laughter. Coconut Chia Pudding brings me back to those moments, with the added bonus of being a healthy alternative to traditional desserts. It’s made with real, wholesome ingredients that are easy to find and even easier to prepare.
I know many of you are navigating a busy life and might feel challenged when it comes to preparing healthier meals. That’s where this recipe comes in! This Coconut Raffaello Chia Pudding is not only a guilt-free treat but also an incredibly adaptable one. Whether you prefer it for breakfast, as a snack, or even a dessert, you’ll find that it fits perfectly in your day-to-day routine.
With just a handful of ingredients and minimal prep time, this recipe is designed to reduce your stress in the kitchen while delivering maximum flavor. Are you ready to impress your friends and family with this delightful dish that’s sure to bring smiles and satisfaction all around? Let’s get cooking!
Personal Story
Let me share a little background story that embodies my love for coconut desserts. A few summers ago, I packed my bags for a tropical getaway with friends. One afternoon, we found ourselves in a charming little café on the beach, where I first tasted a homemade coconut dessert that would make me swoon. Picture this: a bowl of creamy coconut pudding topped with fresh mango slices and a sprinkle of toasted coconut!
I was instantly hooked. It was light, refreshing, and perfectly sweet—the ideal treat after a day soaking up the sun. As I savored each bite, I knew I had to recreate this experience in my own kitchen. Thus began my journey to perfect homemade coconut desserts.
Fast forward to today, and here we are with this Coconut Chia Pudding recipe. It’s quick and easy to make, allowing you to recreate that beachy bliss any time you please!
Ingredients
Let’s break down the ingredients needed for this delightful Coconut Chia Pudding:
-
3 tbsp oats
Oats add heartiness and fiber to your pudding. If you need a gluten-free option, replace them with gluten-free oats or skip them entirely for a smoother texture! -
4 tbsp shredded coconut
Choose unsweetened shredded coconut for a more authentic taste. Feel free to toast it lightly in a pan for added flavor! -
1 tbsp chia seeds
Chia seeds are little powerhouses of nutrition, packed with omega-3 fatty acids. If you’re not a fan, try flaxseeds as a substitute! -
2 tbsp honey
Honey adds a touch of natural sweetness. If you prefer, agave syrup or maple syrup work wonderfully too! -
2 tbsp Greek yogurt
Greek yogurt brings a creamy texture and a protein boost. You can replace it with a non-dairy yogurt if you’re going plant-based. -
1 tsp vanilla extract
Vanilla extract enhances the overall flavor of the pudding. For a little twist, try almond extract or coconut extract instead! -
1 cup milk
Use any milk of your choice—almond, coconut, or dairy! The milk offers a creamy base for the pudding; opt for full-fat for extra richness or a lower-fat version if you’d like.
Step-by-Step Instructions
Alright, let’s get our cook on! Here’s how to whip up this Coconut Chia Pudding in no time:
-
Gather Your Ingredients: Make sure you’ve got everything out and ready. This will make the process much smoother.
-
Mix the Dry Ingredients: In a medium-sized bowl, combine the oats, shredded coconut, and chia seeds. Give them a good stir to mix everything together. This is where the magic begins!
-
Create the Wet Mixture: In a separate bowl, whisk together the honey, Greek yogurt, vanilla extract, and milk until smooth. Watch as the creamy yogurt blends harmoniously with the milk, creating a dreamy base.
-
Combine: Pour the wet mixture into the dry ingredients. Stir well until everything is well combined. The chia seeds will start to absorb liquid, thickening the mixture as you let it sit.
-
Chill Time: Transfer your mixture to a jar or individual serving cups, cover, and refrigerate for at least two hours or overnight if you can wait! This is when the chia seeds do their magic and turn your mixture into a luscious pudding.
-
Enjoy the Transformation: Once it’s set, give it a good stir, and you’ll see it gains a delightful pudding-like consistency. Dive in with a spoon, and you’re all set!
Serving Suggestions
To serve this delightful Coconut Chia Pudding, you can layer it in cute glasses for an elegant touch. Top with additional shredded coconut, a sprinkle of cocoa nibs, or fresh fruit like berries or mango slices for a gorgeous finish. It’s not just about taste but also presentation—because we eat with our eyes first!
Recipe Variations
Here are a few fun ways to switch it up and keep things exciting:
-
Chocolate Coconut Chia Pudding: Add a tablespoon of cocoa powder to the wet mixture for a chocolate twist. You can even add a few chocolate chips on top!
-
Tropical Fruit Medley: Layer with chopped tropical fruits like pineapple, papaya, or kiwi for that ultimate beach vibe.
-
Nutty Delight: Stir in a tablespoon of almond or peanut butter before letting the pudding set for a nutty flavor.
-
Spiced Option: Add a pinch of cinnamon or nutmeg to the mixture for a warm, cozy feel.
-
Alternative Sweeteners: Try using date syrup or stevia for sweetness if you’re on a low-sugar kick.
Chef’s Notes
I’ve come a long way in my culinary journey, and this Coconut Chia Pudding is a testament to my philosophy of simplicity and flavor. One funny story I have relates to my earlier attempts at making chia pudding. I eagerly made a large batch, thinking a day of soaking would do the trick. But I got busy and ended up leaving it for two days. Let me tell you, the consistency was nothing short of a science experiment! I couldn’t have imagined that the little seeds would absorb so much liquid!
But with each experiment, I learned: patience is key, and perfection comes with practice. Now, I have my foolproof method that never fails. And honestly, it still astonishes me how something so simple can be so delicious!
FAQs and Troubleshooting
1. My chia pudding isn’t thickening as expected! What went wrong?
Chia seeds need enough liquid and time to fully absorb it. Make sure you’re using a good ratio of chia seeds to liquid and refrigerate long enough. If it’s taking too long, try adding a bit more chia seeds and let it sit longer.
2. Can I make this vegan?
Absolutely! Simply swap Greek yogurt with a plant-based yogurt, and use maple syrup or agave as your sweetener. Use almond milk or coconut milk for a truly decadent vegan treat.
3. How long can I store leftovers?
Your Coconut Chia Pudding will last up to 5 days in the fridge, making it a perfect meal prep option for busy weekdays!
4. Can I eat chia pudding daily? Is it healthy?
Yes! Chia seeds are packed with fiber, omega-3s, and antioxidants. Just be mindful of the added sweeteners and toppings to keep it balanced.
Nutritional Info
For those curious about the nutritional aspect, each serving of this delightful Coconut Chia Pudding gives you a hearty dose of fiber, healthy fats, and protein. Perfect for keeping you fueled throughout the day!
There you have it! An easy, delicious Coconut Chia Pudding that’s not just a treat but a celebration of simple ingredients and joyful cooking. So, gather your ingredients, make a batch, and enjoy that flavorful tropical bliss right at home. Happy cooking, my friends!
PrintUltimate Easy Coconut Chia Pudding

A creamy, dreamy Coconut Chia Pudding inspired by Raffaello coconut candies, perfect for any time of the day.
- Prep Time: 10 minutes
- Cook Time: 0 minutes
- Total Time: 120 minutes
- Yield: 2 servings 1x
- Category: Dessert
- Method: Chilling
- Cuisine: Tropical
- Diet: Vegan
Ingredients
- 3 tbsp oats
- 4 tbsp shredded coconut
- 1 tbsp chia seeds
- 2 tbsp honey
- 2 tbsp Greek yogurt
- 1 tsp vanilla extract
- 1 cup milk
Instructions
- Gather your ingredients: Make sure you’ve got everything out and ready.
- Mix the dry ingredients: In a medium-sized bowl, combine the oats, shredded coconut, and chia seeds.
- Create the wet mixture: In a separate bowl, whisk together the honey, Greek yogurt, vanilla extract, and milk until smooth.
- Combine: Pour the wet mixture into the dry ingredients and stir well.
- Chill Time: Transfer your mixture to a jar, cover, and refrigerate for at least two hours or overnight.
- Enjoy the transformation: Once set, give it a good stir, and dive in with a spoon!
Notes
Serve layered in glasses with additional toppings like fruit or cocoa nibs for added elegance.
Nutrition
- Serving Size: 1 serving
- Calories: 250
- Sugar: 10g
- Sodium: 50mg
- Fat: 10g
- Saturated Fat: 5g
- Unsaturated Fat: 4g
- Trans Fat: 0g
- Carbohydrates: 30g
- Fiber: 8g
- Protein: 6g
- Cholesterol: 5mg
Keywords: coconut, chia pudding, healthy dessert, tropical treat, vegan dessert
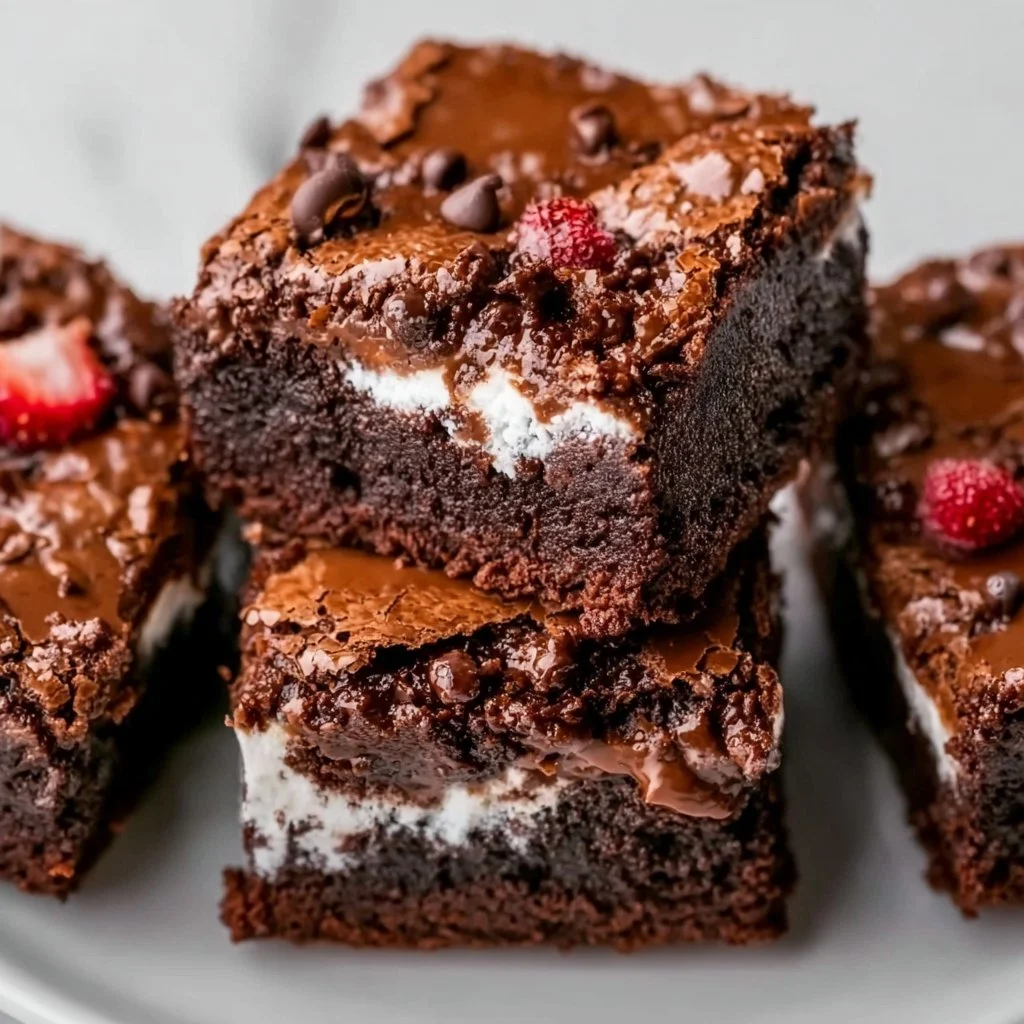
Zero Sugar Brownies with Greek Yogurt
Indulge Guilt-Free: Zero Sugar Brownies with Greek Yogurt
Welcome to Clean Plate Cravings! Today, we’re diving into the world of guilt-free indulgence with a delightful recipe that’ll leave your taste buds dancing and your body feeling great. What could be better than brownies that are rich, fudgy, and—wait for it—completely free of added sugar? Yes, you heard that right! These Zero Sugar Brownies with Greek Yogurt are a game-changer.
As much as we love a good dessert, the post-sweet treat slump can sometimes feel unbearable, and that just won’t do! Imagine enjoying a delicious brownie without the nagging guilt or the energy crash after. By swapping traditional ingredients for healthier alternatives, we’re creating a treat that you can truly savor. I’m here to tell you that these brownies do not compromise on flavor or texture. So grab your apron, and let’s get baking!
A Sweet Memory
It was a Sunday afternoon, and I was rummaging through my childhood memories in the kitchen of my parents’ home. I stumbled upon a tattered old recipe book filled with handwritten notes and little smudges—possibly remnants of past baking adventures. My mom had been whipping up her signature brownies for as long as I could remember, and the aroma of chocolate wafting from the oven was something I cherished in those innocent days. That rich cocoa smell would float up the stairs and lead me straight to the kitchen, a siren call that was impossible to resist.
As I flipped through the pages, I realized how sentimental food can be. The act of baking those brownies was more than just mixing ingredients; it was bonding time, sharing laughter, and creating memories with loved ones. Inspired by that nostalgia, I set out on a mission to create a version of those classic brownies—only this time, they’d be healthier. Enter my Zero Sugar Brownies, a heartfelt tribute with a twist that brings the essence of my childhood into today’s kitchen!
Ingredients
Before we dive into the magic of baking, let’s gather our ingredients. Each one is carefully chosen to ensure you get a delicious brownie without the added sugar!
-
1 cup Greek yogurt: This creamy ingredient adds moisture and a protein kick to our brownies. Greek yogurt is a great substitute for oil or butter in baking. You can also use dairy-free yogurt if you prefer.
-
1/2 cup unsweetened cocoa powder: The rich base for our brownies, providing all that deep chocolate flavor without any added sugars. Be sure to look for high-quality cocoa for the best taste!
-
1/2 cup almond flour or oat flour: These flours keep our brownies moist and give them a lovely texture. Almond flour is lower in carbs and packed with healthy fats, while oat flour adds a heartier touch. Use whichever suits your dietary needs!
-
1/2 cup sugar substitute (like erythritol or stevia): A key ingredient that allows us to enjoy sweetness without the added sugar. Erythritol offers a similar texture to sugar, while stevia is much sweeter so you might need less. Always check the conversion guidelines!
-
1/4 cup unsweetened applesauce: Adds natural sweetness and moisture, plus a bit of fiber. Feel free to substitute it with mashed banana if you’re a fan of that flavor!
-
1 teaspoon vanilla extract: A must for any baking recipe, vanilla enhances all the flavors in our brownies. You can also use almond extract for a unique twist.
-
1/2 teaspoon baking powder: Helps our brownies rise just enough to keep them from being too dense.
-
1/4 teaspoon salt: Just a pinch to elevate all the sweet flavors; salt balances the sweetness beautifully!
Step-by-Step Instructions
Now that we’ve got everything prepped, let’s get baking! Here’s how to whip up these delicious brownies in no time:
-
Preheat Your Oven: Preheat your oven to 350°F (175°C). While the oven warms up, it’s the perfect time to gather your equipment: a mixing bowl, spatula, measuring cups, and a 9×9 baking pan. Don’t forget to grease the pan or line it with parchment paper for easy removal! Trust me; you don’t want to risk losing any of that gooey goodness.
-
Mix the Wet Ingredients: In a medium mixing bowl, combine the Greek yogurt, unsweetened applesauce, and vanilla extract. Whisk them together until smooth. Here’s a pro tip: Using room temperature yogurt will help you achieve a smoother mixture and integrate better!
-
Sift the Dry Ingredients: In another bowl, combine the almond or oat flour, cocoa powder, baking powder, sugar substitute, and salt. Sifting them together not only breaks up any lumps but also creates a lighter brownie!
-
Combine Wet and Dry: Gradually add the dry mixture into the wet mixture, stirring gently with a spatula. It’s important not to overmix. If you’re feeling fancy, fold in some chocolate chips or nuts for extra texture and flavor!
-
Pour the Batter: Transfer the brownie batter into your prepared baking pan, smoothing it out evenly with the spatula. It’s okay if the batter is thick; that’s what makes them fudgy!
-
Bake to Perfection: Pop the pan into your preheated oven and bake for 20-25 minutes. Keep an eye on them; you want the edges to be firm and the center to be slightly underbaked for that gooey texture. Insert a toothpick—if it comes out with a few moist crumbs, they’re ready!
-
Cool and Slice: Once baked, remove the brownies from the oven and let them cool in the pan for about 10-15 minutes before transferring them to a wire rack. Allow them to cool completely before slicing. Yes, the waiting is tough, but just imagine to get to enjoy that fudgy goodness!
Serving Suggestions
When it comes to serving these brownies, the sky’s the limit! You can simply cut them into squares and serve them warm alongside a dollop of Greek yogurt or a scoop of your favorite sugar-free ice cream. Want to dress it up a bit? Drizzle a homemade chocolate sauce or a sprinkle of fresh berries for an elegant touch. Trust me, your guests (or family) will be looking for seconds!
Recipe Variations
Feeling adventurous? Here are some fun twists to customize your brownies:
-
Nutty Brownies: Fold in some chopped walnuts or pecans for that extra crunch and a boost of healthy fats.
-
Mint Chocolate Delights: Add some mint extract to the batter for a refreshing mint brownie experience.
-
Coconut Bliss: Toss in shredded unsweetened coconut for a tropical flair.
-
Peanut Butter Swirl: Drop spoonfuls of natural peanut butter into the batter and swirl it around for rich, creamy bites.
-
Fruity Fudge: Stir in a handful of fresh or frozen berries for a fruity twist on the classic brownie.
Chef’s Notes
These brownies have come a long way since that Sunday afternoon memory. Every time I make them, I think about how they transformed from my mom’s decadent, sugar-laden version into a treat I can feel good about eating (and sharing!). When testing recipes, I’ve learned that simple swaps can make a big difference, and healthy eating doesn’t have to mean sacrificing joy in the kitchen.
Oh, and I’ve had my fair share of “kitchen adventures” (read: mishaps) along the way. From flour explosions to chocolate-covered countertops, let’s just say that the journey to create these brownies was as much fun as the finished product. So don’t be afraid to experiment and make your own memories along the way!
FAQs and Troubleshooting
-
Why are my brownies too gooey?
Make sure to bake them long enough. If they’re undercooked, they’ll remain gooey. Always do the toothpick test to check for doneness—they should come out with moist crumbs, not wet batter. -
Can I use another sweetener?
Absolutely! Just keep in mind that different sweeteners have varying degrees of sweetness. If you’re using a liquid sweetener, adjust the other wet ingredients accordingly. -
What if I don’t have Greek yogurt?
No problem! You can substitute it with unsweetened regular yogurt, or even a nut-based yogurt if you’re looking for a dairy-free option. -
How do I store the brownies?
These brownies can be stored in an airtight container in the fridge for up to a week (if they last that long!). They also freeze well, making it easy to meal prep for your future sweet cravings!
Nutritional Info (if applicable)
These brownies are packed with protein from the Greek yogurt, healthy fats from almond flour, and are low in sugar, making them a nutritious yet decadent treat. Depending on your choice of sugar substitute and additional mix-ins, the calorie count can vary, but you’re looking at roughly 100-120 calories per brownie!
So there you have it, friends! Your guide to making scrumptious, guilt-free Zero Sugar Brownies with Greek Yogurt. I can’t wait for you to try this recipe and fall in love—with desserts like this, healthy eating becomes a delicious journey rather than a chore. Happy baking!
PrintZero Sugar Brownies with Greek Yogurt

Indulge guilt-free with these rich and fudgy brownies that are completely free of added sugar, featuring Greek yogurt for added moisture and protein.
- Prep Time: 10 minutes
- Cook Time: 25 minutes
- Total Time: 35 minutes
- Yield: 12 servings 1x
- Category: Dessert
- Method: Baking
- Cuisine: American
- Diet: Vegetarian
Ingredients
- 1 cup Greek yogurt
- 1/2 cup unsweetened cocoa powder
- 1/2 cup almond flour or oat flour
- 1/2 cup sugar substitute (like erythritol or stevia)
- 1/4 cup unsweetened applesauce
- 1 teaspoon vanilla extract
- 1/2 teaspoon baking powder
- 1/4 teaspoon salt
Instructions
- Preheat your oven to 350°F (175°C) and prepare your baking pan.
- Mix the Greek yogurt, applesauce, and vanilla extract until smooth.
- Sift the almond or oat flour, cocoa powder, baking powder, sugar substitute, and salt together.
- Combine the wet and dry mixtures, stirring gently.
- Pour the batter into the prepared baking pan.
- Bake for 20-25 minutes or until the edges are firm and the center is slightly underbaked.
- Cool in the pan, then transfer to a wire rack to cool completely before slicing.
Notes
Optional: Fold in chocolate chips or nuts for added texture. Serve warm with Greek yogurt or sugar-free ice cream.
Nutrition
- Serving Size: 1 brownie
- Calories: 120
- Sugar: 1g
- Sodium: 130mg
- Fat: 6g
- Saturated Fat: 1g
- Unsaturated Fat: 5g
- Trans Fat: 0g
- Carbohydrates: 16g
- Fiber: 2g
- Protein: 5g
- Cholesterol: 5mg
Keywords: zero sugar brownies, healthy dessert, Greek yogurt brownies, guilt-free baking