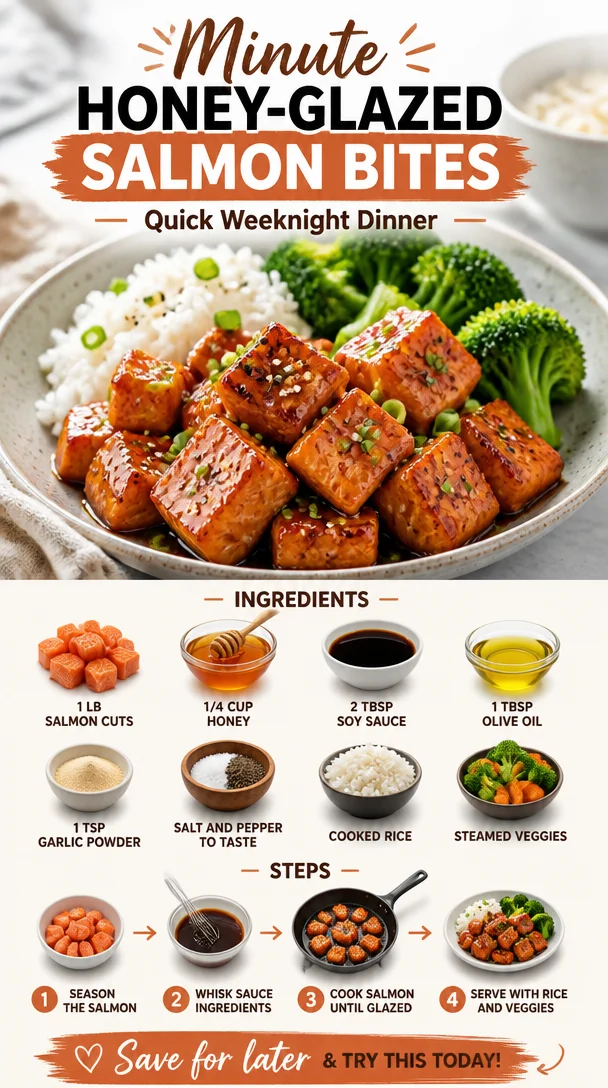
Minute Honey-Glazed Salmon Bites: Quick Weeknight Dinner
Honey Glazed Salmon Bites: Your New Favorite Quick Meal
Welcome to another delicious adventure in the world of Clean Plate Cravings! Today, I’m thrilled to share something that’s not just a meal; it’s a burst of flavor and goodness that feels like a warm hug. If you’re looking for a dish that’s simple yet impressive, look no further than my Honey Glazed Salmon Bites. These flavorful morsels pack the perfect sweet-and-savory punch, transforming any meal into something special without requiring hours in the kitchen.
Picture this: it’s a busy weeknight, the clock is ticking, and you’re staring into the fridge wishing for an easy dinner that doesn’t compromise taste or nutrition. That’s where these honey-glazed delights come in! Not only do they come together in a snap, but they’ll also have your family and friends raving about how fantastic you are in the kitchen (even if you’re secretly following along with my recipe!).
I remember the first time I whipped up something similar. It was during a lazy Sunday afternoon at my childhood home. My mom had invited a few friends over, and I wanted to impress everyone with my budding culinary skills. Armed with only a few staple ingredients and an unstoppable enthusiasm, I tossed together a sweet glaze that perfectly complemented tender chunks of salmon. That day was a culinary epiphany for me, and it ignited my passion for creating dishes that bring people together around the table. And now? I want to share that excitement with you!
Let’s dive into this delectable Honey Glazed Salmon Bites recipe that’ll elevate your dinner game and leave you feeling energized and satisfied!
Ingredients
Here’s what you’ll need to make these mouthwatering Honey Glazed Salmon Bites:
-
1 lb salmon cuts
Fresh salmon offers a buttery texture and rich flavor. If you’re looking for a more budget-friendly option, feel free to substitute with trout or tilapia. -
1/4 cup honey
The star of the show! Honey brings that irresistible sweetness. If you’re vegan or trying to reduce sugar, agave syrup or maple syrup work beautifully as substitutes. -
2 tbsp soy sauce
The umami factor! This ingredient balances the sweetness of the honey. If you need a gluten-free option, try tamari or coconut aminos. -
1 tbsp olive oil
A splash of healthy fat to keep everything moist and add flavor. You can swap it with avocado oil if you prefer a higher smoke point for searing. -
1 tsp garlic powder
This gives an aromatic kick to the dish. Fresh minced garlic can be used instead if you’re feeling extra zesty. -
Salt and pepper to taste
Essential seasonings that elevate the overall flavor. Don’t hesitate to play around with herbs like dill or cilantro for an added flourish! -
Cooked rice
A perfect base! You can use brown rice, white rice, quinoa, or even a cauliflower rice for a low-carb option. -
Steamed veggies
Whatever veggies you love or have on hand! Broccoli, carrots, or snap peas add both color and nutrition.
Step-by-Step Instructions
Let’s get cooking! Follow these steps for a delightful Honey Glazed Salmon Bites experience:
-
Prep the Salmon
Start by cutting the salmon into bite-sized pieces, about 1 inch each. This helps them cook evenly and makes them easy to eat. Chef’s Tip: Pat them dry with a paper towel to ensure a nice sear and browning. -
Make the Marinade
In a bowl, whisk together honey, soy sauce, olive oil, garlic powder, salt, and pepper until well combined. This marinade is where the magic happens! Chef’s Insight: If you have time, let the salmon sit in this marinade for 15-30 minutes. This allows those flavors to really sink in. -
Heat the Pan
Heat a non-stick skillet over medium-high heat. Make sure it’s hot before adding the salmon—that way, you’ll get that beautiful caramelization. Quick Hack: Add a drop of water to the pan; if it sizzles, you’re ready! -
Cook the Salmon Bites
Carefully lay the salmon pieces in the hot skillet. Let them sear for about 3-4 minutes on one side until golden brown. Don’t overcrowd the pan; cook in batches if necessary. Chef’s Tip: Turn them only once to get that crispy texture! -
Glaze it Up
Once the salmon bites are beautifully seared, pour the remaining marinade over them. Cook for another 2-3 minutes, allowing the glaze to caramelize. Pro Tip: Baste the salmon with the glaze while cooking for an extra layer of flavor. -
Serve it Right
When the salmon bites are cooked through and flaky, remove them from the heat. Serve them over a bed of cooked rice, then add a generous helping of steamed veggies on the side.
Serving Suggestions
To present your Honey Glazed Salmon Bites beautifully, scoop a serving of rice onto a plate, create a small nest for the salmon, then pile on those vibrant veggies. You could also sprinkle a few sesame seeds on top for an elegant touch or fresh herbs for a pop of color. Serve it warm, and get ready for the compliments to roll in!
Recipe Variations
Feel like getting adventurous? Here are a few creative twists to jazz up your Honey Glazed Salmon Bites:
- Citrus Twist: Add a splash of orange or lemon juice to the marinade for a zesty kick.
- Spicy Honey: Mix in some chili flakes or sriracha to the glaze for those who love a bit of heat!
- Teriyaki Twist: Swap the honey for teriyaki sauce for an Asian-inspired version.
- Herbed Infusion: Mix fresh herbs like basilik or cilantro into the marinade for an aromatic boost.
- Nutty Crunch: Sprinkle crushed nuts like almonds or cashews on top before serving for added texture!
Chef’s Notes
I absolutely adore this recipe not just because it’s quick, but because it’s so versatile. I’ve made it countless times, often adjusting the marinade based on what I have in the fridge. One time, I tossed in some sesame oil instead of olive oil, and it added a delightful nuttiness that I still crave. Cooking should be fun and adaptable; if you find yourself missing an ingredient, don’t sweat it! Get creative!
FAQs and Troubleshooting
Here are some common questions and potential hiccups you might find while whipping up those Honey Glazed Salmon Bites:
-
What if my salmon is overcooked?
Overcooking can happen easily with salmon. Aim for an internal temperature of 145°F for perfectly flaky fish. If you overdo it, try serving it with a homemade sauce or salsa to add moisture. -
Can I use frozen salmon?
Absolutely! Just make sure to thaw it properly before cooking. Frozen salmon can release more water during cooking, so it’s essential to pat it dry before marinating. -
How do I know when the salmon is done?
Salmon is done when it turns opaque and flakes easily. A good rule of thumb is about 4-6 minutes per half-inch thickness at medium heat. -
What’s the best way to reheat leftovers?
To keep the salmon from drying out, gently reheat it in a pan on low heat, covering it with a lid to retain moisture. Alternatively, you can microwave in short bursts (10-20 seconds) until warm.
Nutritional Info
(Optional but helpful)
For those of you watching your macros and nutritional intake, here’s a rough breakdown per serving (based on the recipe serving 4):
- Calories: 300
- Protein: 25g
- Carbohydrates: 40g (mostly from rice and veggies)
- Fats: 10g (primarily from olive oil and salmon)
So there you have it—my Honey Glazed Salmon Bites recipe that brings joy, flavor, and a hint of nostalgia straight to your kitchen! I hope this dish lights up your dining table just as it did for me. Remember, cooking is all about love, enjoyment, and sharing good food with great people. So, toss on your apron, crank up the music, and let’s get cooking! Happy feasting!
PrintHoney Glazed Salmon Bites
Quick and delicious honey glazed salmon bites that provide a sweet-and-savory flavor profile, perfect for a busy weeknight meal.
- Prep Time: 10 minutes
- Cook Time: 15 minutes
- Total Time: 25 minutes
- Yield: 4 servings 1x
- Category: Main Course
- Method: Searing
- Cuisine: Asian
- Diet: Pescatarian
Ingredients
- 1 lb salmon cuts
- 1/4 cup honey
- 2 tbsp soy sauce
- 1 tbsp olive oil
- 1 tsp garlic powder
- Salt and pepper to taste
- Cooked rice
- Steamed veggies
Instructions
- Prep the salmon by cutting it into bite-sized pieces, about 1 inch each.
- Make the marinade by whisking together honey, soy sauce, olive oil, garlic powder, salt, and pepper in a bowl.
- Heat a non-stick skillet over medium-high heat until hot.
- Cook the salmon bites for about 3-4 minutes on one side until golden brown.
- Glaze the salmon bites by pouring the remaining marinade over them and cooking for another 2-3 minutes.
- Serve the salmon bites over cooked rice with a side of steamed veggies.
Notes
You can substitute salmon with trout or tilapia. For vegan options, use agave syrup or maple syrup in the marinade.
Nutrition
- Serving Size: 1 serving
- Calories: 300
- Sugar: 20g
- Sodium: 800mg
- Fat: 10g
- Saturated Fat: 1.5g
- Unsaturated Fat: 8.5g
- Trans Fat: 0g
- Carbohydrates: 40g
- Fiber: 3g
- Protein: 25g
- Cholesterol: 60mg
Keywords: salmon, honey glaze, quick meal, healthy dinner, seafood recipe
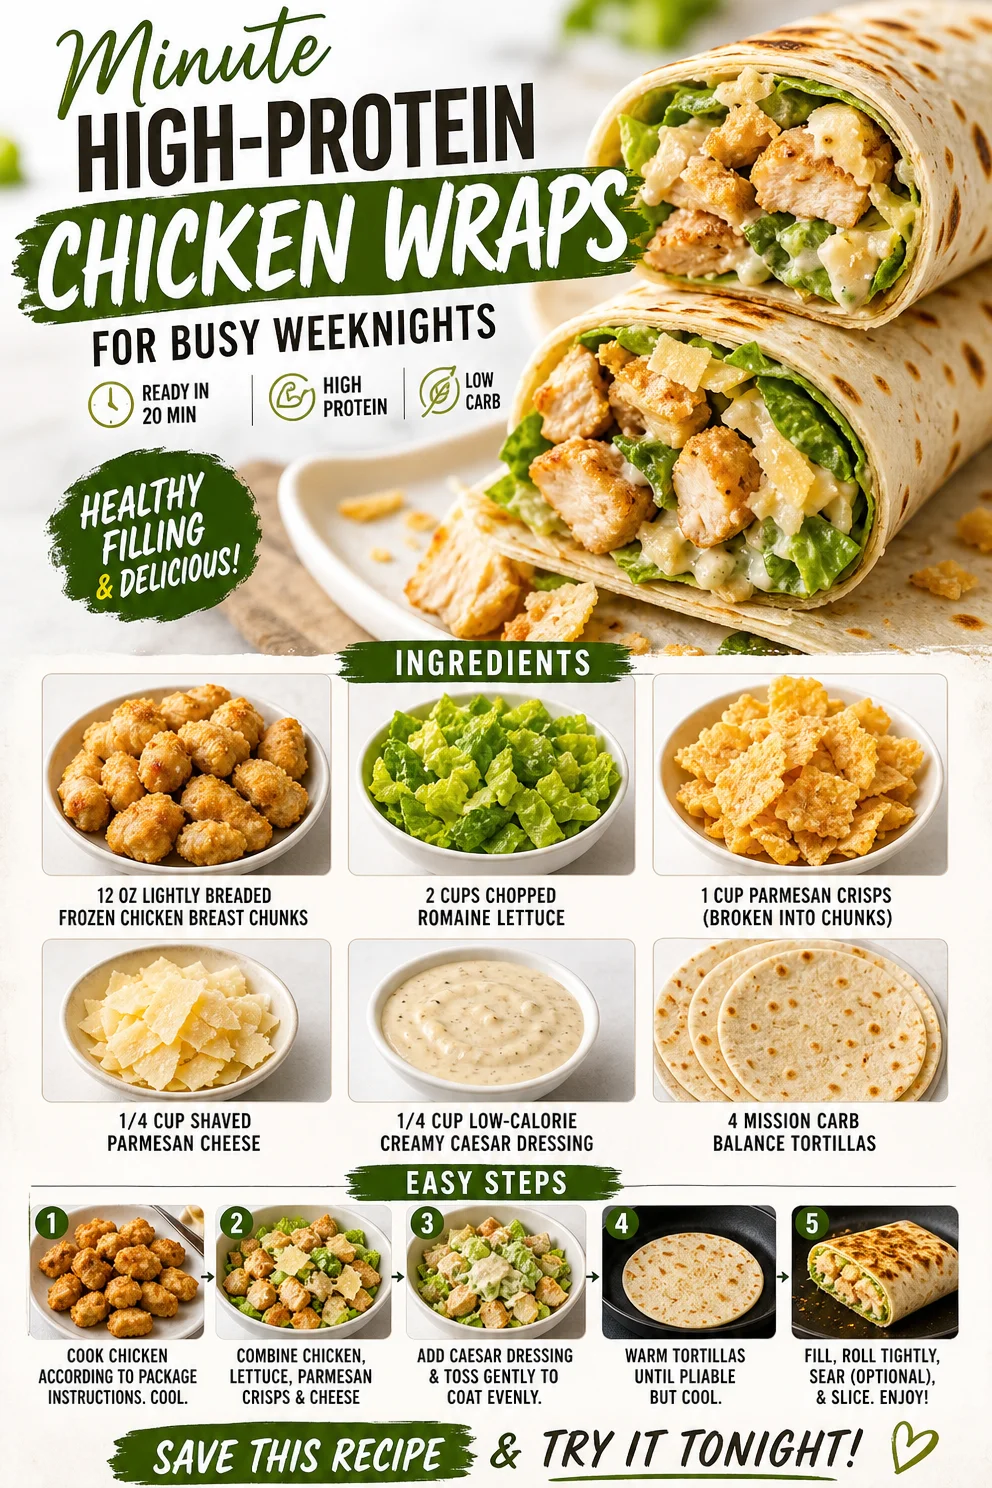
Minute High-Protein Chicken Wraps for Busy Weeknights
High Protein Chicken Wraps: Your Go-To for Flavorful Fuel
Hey there, food lovers! Welcome back to Clean Plate Cravings, where we embrace vibrant, delicious meals that keep our energy levels high without driving us to the brink of madness in the kitchen. Today, I’m thrilled to share a recipe for high protein chicken wraps that are not just delightful to the taste buds but also super simple to whip up, making them perfect for busy days and hungry bellies.
Imagine biting into a wrap filled with crispy chicken, crunchy romaine, savory Parmesan, and a creamy Caesar dressing that dances across your palate. Sounds divine, right? Well, that’s exactly what we’re creating today. Whether you’re meal prepping for the week, looking for a quick lunch, or just want to impress a friend with your culinary skills (we won’t tell anyone how easy this is!), these wraps have got your back!
Let’s get into why high protein chicken wraps should be your new favorite go-to meal. First of all, they’re a fantastic way to pack in nutrients—specifically, protein! Chicken is not only filling but also supports muscle health and keeps you feeling satisfied for longer. Plus, these wraps are loaded with fresh veggies and a punch of flavor that will make you want to rave about them to all your friends.
So, roll up those sleeves, grab your apron, and let’s create some magic in the kitchen!
A Bite of Nostalgia
Growing up, I have vivid memories of Sundays spent gathering around the kitchen table with my family. While my mom busied herself with her famous lemon rosemary chicken, my dad would be wrapping up leftovers for lunch the next day. It was a delightful chaos of flavors, laughter, and the comforting aroma of homemade meals wafting through our home.
One day, in the rush of Sunday dinner, I decided to take matters into my own hands. I found some leftover chicken breast from the night before (one of my mom’s ingenious tricks to save time) and, inspired by my parents, I decided to make my own wraps. Using whatever I could find in the fridge—romaine, some cheese, and that glorious Caesar dressing—we had an impromptu high-protein meal that we all enjoyed. It was quick, delicious, and the perfect way to use up leftovers! Fast forward to today, and I still channel that inspiration for my chicken wraps. They’re now a staple in my meal plan, reminding me of those beautiful family moments while also fueling the busy lifestyle I lead as a food enthusiast.
Ingredients
To create these amazing high protein chicken wraps, you’ll need the following ingredients:
-
12 oz lite breaded frozen chicken breast chunks
A convenient option that you can toss in the oven or air fryer. If you’re looking for a healthier version, opt for grilled chicken breast cut into chunks as a great substitute. -
2 cups chopped romaine lettuce
Fresh and crunchy, romaine adds a refreshing element to each bite. If you want to switch it up, try spinach or kale for an extra nutrient boost! -
1 cup parmesan crisps (broken into chunks)
These savory bites are the perfect crunch! For a low-carb option, you could substitute with crushed nuts or seeds. -
1/4 cup shaved Parmesan cheese
A little more cheesy goodness never hurt anyone! If you’re dairy-free, nutritional yeast can offer a cheesy flavor without the milk. -
1/4 cup low-calorie creamy Caesar dressing
This dressing ties all the flavors together. For a homemade touch, try a yogurt-based dressing or a drizzle of olive oil and lemon juice for a lighter option. -
4 Mission Carb Balance tortillas
These low-carb tortillas are flexible and delicious. Feel free to use whole-grain wraps or even lettuce leaves for a lighter, grain-free option.
Step-by-Step Instructions
Let’s dive into the how-to! Get ready to turn your kitchen into a flavor factory with these delightful chicken wraps.
Step 1: Preheat and Prepare
Start by preheating your oven according to the package instructions for the frozen chicken breast chunks. Typically, this will be around 400°F (200°C) and takes about 20-25 minutes to ensure they’re perfectly crispy.
Chef’s Tip: While that’s heating up, you can multitask—set the table or chop your romaine!
Step 2: Bake Those Chicken Chunks
Once your oven is hot and ready to go, spread your frozen chicken chunks evenly on a baking sheet. Pop them in the oven and let them bake until golden brown and crispy. Remember, you want them to have that delightful crunch!
Chef’s Insight: If you have an air fryer, feel free to use that for an even quicker prep time and an ultra-crispy finish!
Step 3: Chop the Romaine
While the chicken is baking, grab your chopping board and toss the romaine lettuce into a large bowl. Make sure to chop to your desired size—some like it big and crunchy while others prefer smaller bites.
Fun Fact: Did you know that romaine is packed with vitamins A and K? It not only adds crunch but also a nutritional punch!
Step 4: Prepare the Extras
While your chicken cooks and your romaine is cut, break up the parmesan crisps into chunks. Add those to your bowl along with the shaved Parmesan cheese for some gourmet flair.
Little Chef Hack: If you’re a cheese lover (who isn’t?), go ahead and add a sprinkle of your favorite cheese for an added creaminess!
Step 5: Combine Ingredients
Once your chicken is done and has had a minute to cool (you don’t want any major heat accidents!), toss those crispy chunks into the bowl with the romaine and cheeses. Pour in the Caesar dressing and mix it all up until everything is coated and happy!
Quick Tip: Don’t overmix! Just enough to coat evenly is perfect.
Step 6: Wrap It Up
Now for the fun part! Grab one of your tortillas and lay it flat. Spoon a generous amount of your chicken and salad mixture into the center of the wrap, leaving enough space to fold over the edges and roll it up neatly.
Chef’s Note: If you want the wrap to hold better, heat the tortillas for about 10 seconds in the microwave. This will soften them up!
Step 7: Serve and Enjoy
After you’ve successfully rolled your wraps, slice them in half if you’d like. Arrange them on a plate, and voilà, you have a beautiful meal that’s as eye-catching as it is tasty!
Serving Suggestions
For a fun and inviting presentation, serve your chicken wraps on a colorful platter with a small bowl of extra Caesar dressing for dipping. You can add a side of veggie sticks or baked sweet potato fries for a complete meal that’s nothing short of amazing!
Recipe Variations
Feeling inspired? Here are a few ways to jazz up your chicken wraps:
- Buffalo Chicken Twist: Add some buffalo sauce to the chicken before combining it with the other ingredients for a spicy kick.
- Mediterranean Style: Swap the dressing for tzatziki, add diced cucumbers, and feta cheese for a Mediterranean feast.
- Vegan Delight: Replace the chicken with chickpeas or marinated tofu and use a vegan dressing.
- Southwest Flair: Toss in black beans and corn, and switch the cheese for pepper jack for some heat.
- Breakfast Wrap: Enjoy this recipe as a breakfast option by including scrambled eggs and avocado for a protein-packed start to your day.
Chef’s Notes
This recipe has evolved over the years—from a simple family dinner to a versatile staple in my kitchen. I love how it encourages creativity! Last week, I found myself combining leftover veggies and chicken, and that’s when it hit me: these wraps are perfect for cleaning out the fridge! Additionally, they make for great meals on the go, whether that be a road trip or a busy workday.
And honestly, every time I take a bite, I’m transported back to those Sunday dinners with my family. It warms my heart knowing that those memories continue to inspire my love for cooking!
FAQs and Troubleshooting
-
What if my chicken isn’t crispy?
- If your chicken chunks aren’t crispy, try increasing the oven temperature slightly and give them a few more minutes. An air fryer also works wonders for achieving the perfect crunch!
-
What’s the best way to store leftovers?
- Store your wraps in an airtight container in the fridge for up to two days. I recommend keeping the dressing separate until you’re ready to enjoy!
-
Can I use different sauces?
- Absolutely! Any dressing you love will work. A ranch or a creamy garlic sauce could add a delightful touch as well.
-
What can I substitute for the tortillas?
- Try lettuce leaves or collard greens for a low-carb option, or use whole grain tortillas for more fiber.
Nutritional Info (Optional)
If you’re tracking your macros, one wrap (including the chicken, dressing, and toppings) typically contains around 450 calories, with approximately 30 grams of protein, making it a filling meal option!
So there you have it, foodies! High protein chicken wraps that are as flavorful as they are filling, perfect for any day of the week. Get creative, have fun, and remember, the kitchen is your playground! Happy cooking!
PrintHigh Protein Chicken Wraps
Delicious and easy high protein chicken wraps made with crispy chicken, fresh romaine, cheeses, and creamy Caesar dressing, perfect for busy days.
- Prep Time: 15 minutes
- Cook Time: 25 minutes
- Total Time: 40 minutes
- Yield: 4 servings 1x
- Category: Main Course
- Method: Baking
- Cuisine: American
- Diet: High Protein
Ingredients
- 12 oz lite breaded frozen chicken breast chunks
- 2 cups chopped romaine lettuce
- 1 cup parmesan crisps (broken into chunks)
- 1/4 cup shaved Parmesan cheese
- 1/4 cup low-calorie creamy Caesar dressing
- 4 Mission Carb Balance tortillas
Instructions
- Preheat your oven according to the package instructions for the frozen chicken breast chunks.
- Bake the chicken chunks on a baking sheet until golden brown and crispy.
- Chop the romaine lettuce into a large bowl.
- Prepare the parmesan crisps and shaved Parmesan cheese, adding them to the bowl.
- Combine the baked chicken, romaine, and cheeses with the Caesar dressing.
- Wrap a generous amount of the mixture in a tortilla.
- Serve and enjoy your delicious wraps!
Notes
Store leftovers in an airtight container in the fridge for up to two days. Keep the dressing separate until ready to eat.
Nutrition
- Serving Size: 1 wrap
- Calories: 450
- Sugar: 3g
- Sodium: 600mg
- Fat: 20g
- Saturated Fat: 6g
- Unsaturated Fat: 10g
- Trans Fat: 0g
- Carbohydrates: 35g
- Fiber: 5g
- Protein: 30g
- Cholesterol: 60mg
Keywords: chicken wraps, high protein, lunch, easy recipes, meal prep