
Minute Creamy Spinach Orzo: Quick Weeknight Dinner
Creamy Spinach Orzo: A Soul-Warming Delight
Welcome, fellow foodies! Today, I’m thrilled to share with you a dish that’s as comforting as a warm hug on a chilly day: creamy spinach orzo. This dish is not just about the ingredients—it’s packed with love, nostalgia, and the kind of flavors that’ll turn any meal into a cozy gathering. So grab your apron, and let’s dive right into the delicious world of creamy spinach orzo!
A Taste of Nostalgia
Cooking has always been more than just a way to fill our bellies; it’s a way to create memories. I remember the first time I prepared a dish similar to this creamy spinach orzo in my tiny college kitchen. With my friends gathered around, we were experimenting with whatever we could find in our pantry. We stumbled upon some leftover orzo and a bag of fresh spinach, and the magic began.
As we diced garlic and tossed in cream, laughter filled the air. There was something ridiculously satisfying about turning a handful of ingredients into a dish that not only nourished us but brought us closer together. It was a surefire hit—everyone went back for seconds, and that’s when I knew I had discovered something special.
Years later, I’ve refined the recipe, but the essence remains: comfort, warmth, and a touch of creativity in your own kitchen. Let’s recreate that magic today!
Ingredients
Here’s what you’ll need to make your very own creamy spinach orzo:
-
1 cup orzo pasta
Orzo is a delightful rice-shaped pasta that cooks quickly and absorbs flavors beautifully. If you’re out of orzo, you can substitute with any small pasta like ditalini or even quinoa for a gluten-free option. -
2 cups fresh spinach
Spinach is packed with nutrients and adds a wonderful earthiness to the dish. Feel free to swap it out for kale or Swiss chard if you’re in the mood for something different. -
1 cup heavy cream
This is where the creaminess comes from! If you’re looking for a lighter version, you can use half-and-half or even coconut milk for a dairy-free alternative. -
1 cup shredded cheese (e.g., mozzarella or parmesan)
Cheese is the magic ingredient that brings everything together. Mozzarella gives it a mild, creamy flavor, while parmesan adds a nutty richness. A good vegan cheese can also work if you’re avoiding dairy. -
2 tablespoons olive oil
A splash of olive oil not only adds flavor but helps in sautéing our garlic to perfection. For a twist, try using garlic-infused olive oil! -
2 cloves garlic, minced
The aroma of garlic sizzling in olive oil is simply irresistible! Don’t skimp here—garlic brings all the flavors to life. If you’re in a pinch, garlic powder will do, but fresh is always best. -
Salt and pepper to taste
Simple seasonings that elevate the dish and allow the other flavors to shine. Always taste as you go to find your perfect balance!
Now that we’ve gathered our ingredients, let’s get cooking!
Step-by-Step Instructions
-
Cook the Orzo
Start by boiling a pot of salted water over high heat. Once it’s bubbling, add your orzo and cook until al dente, about 8–10 minutes. Stir occasionally to prevent sticking. Chef’s tip: save a cup of the pasta cooking water before draining! It’s liquid gold for adjusting the creaminess later. -
Sauté the Garlic
In a large skillet, heat the olive oil over medium heat. Once it’s shimmering, toss in the minced garlic. Sauté for about 1-2 minutes until fragrant. Be careful not to burn it—garlic can turn bitter if overcooked! Pro tip: if you’re using minced garlic from a jar, remember that it’s often more potent than fresh garlic, so adjust accordingly. -
Add the Spinach
Toss in your fresh spinach and sauté until wilted, around 3–4 minutes. If the skillet looks a little dry, a splash of your reserved pasta water will help. A touch of moisture will also help the spinach further break down and incorporate flavor. -
Introduce the Cream
Pour in the heavy cream and stir gently. Allow it to come to a gentle simmer. The beautifully rich sauce will start to thicken; this is when the magic happens! Keep an eye on it, stirring often so it doesn’t scorch. -
Stir in the Cheese
Gradually add in your shredded cheese, stirring continuously until it melts and combines thoroughly with the creamy sauce. This is where we build flavor! If the sauce looks too thick, just add a little of that reserved pasta water until it reaches your desired consistency. -
Mix in the Orzo
Now, add the drained orzo into the skillet. Toss everything together until the pasta is evenly coated in the creamy sauce. At this stage, taste it! This is your chance to sprinkle in salt and pepper as needed until it’s just right. -
Serve!
Once everything is beautifully combined and heated through, remove it from the stovetop. You can serve it immediately, garnished with extra cheese or even a sprinkle of fresh herbs for that beautiful touch. What could be simpler?
Serving Suggestions
For that extra flair, consider serving your creamy spinach orzo in individual bowls. Top with a sprinkle of freshly grated parmesan cheese and a drizzle of olive oil for that added gourmet touch. Pair it with a side salad dressed in a lemon vinaigrette, or serve it alongside grilled chicken or shrimp for a heartier meal. The beauty of this dish is it can complement a variety of main courses!
Recipe Variations
Feeling a little adventurous? Here are some fun variations you can try to put your own spin on creamy spinach orzo:
-
Sun-Dried Tomato Spinach Orzo: Add chopped sun-dried tomatoes for a burst of flavor.
-
Lemon Zest and Herb Infusion: Incorporate fresh lemon zest and chopped herbs like basil or parsley for a fresh, bright twist.
-
Mushroom Lover’s Delight: Add sautéed mushrooms to the mix for an earthy, earthy addition.
-
Protein Power: Toss in some cooked chicken, grilled shrimp, or cannellini beans to boost the protein content and make it a complete meal.
-
Spicy Kick: Add a pinch of red pepper flakes to the garlic step for a delightful heat!
Chef’s Notes
As I reflect on this creamy spinach orzo, I can’t help but smile at the simplicity and versatility of it all. The recipe has come a long way since those chaotic college days, but the heart remains the same: making feeding yourself—and those you love—an enjoyable experience. Over the years, I’ve played with ingredients, discovered new combinations driving my creativity in the kitchen, and each experience gets me excited to share with all of you!
One of the most rewarding parts of cooking is knowing that each time you make a dish, you have the power to tweak and adjust it to fit your taste. So, don’t be shy—make this creamy spinach orzo your own!
FAQs and Troubleshooting
Q: My orzo is sticky—what did I do wrong?
A: Sticky orzo usually means it was overcooked or lacked enough water during cooking. Make sure to stir occasionally while boiling, and watch the timer!
Q: Can I make this dish in advance?
A: Yes! You can prepare this in advance and store it in the refrigerator. Just be sure to store it in an airtight container. Reheat it in a skillet on medium-low heat, adding a bit of cream or pasta water to loosen it up.
Q: How can I make this dish dairy-free?
A: Swap the heavy cream with a plant-based cream and use a vegan cheese alternative. Almond milk or coconut cream can work for the cream.
Q: How do I prevent the spinach from turning too mushy?
A: Add spinach at the end of the cooking process—just sauté it until wilted. Overcooking makes it lose its vibrant color and nutritional goodness.
Nutritional Info
Now, you may wonder about the nutritional goodness found in this creamy dish. Here’s a general idea (per serving, based on 4 servings):
- Calories: 450
- Protein: 12g
- Carbohydrates: 45g
- Fat: 25g
- Fiber: 2g
Keep in mind, these values will vary depending on your specific ingredients and any variations you decide to incorporate!
So there you have it—a beautifully creamy, flavor-packed orzo dish, steeped in memories and flexibility. Let it become a staple in your kitchen, reminding you that every meal is an opportunity to create, share, and enjoy life’s simple pleasures. Happy cooking!
PrintCreamy Spinach Orzo
A comforting creamy spinach orzo dish that brings warmth and nostalgia, perfect for cozy gatherings.
- Prep Time: 10 minutes
- Cook Time: 20 minutes
- Total Time: 30 minutes
- Yield: 4 servings 1x
- Category: Main Course
- Method: Stovetop
- Cuisine: Italian
- Diet: Vegetarian
Ingredients
- 1 cup orzo pasta
- 2 cups fresh spinach
- 1 cup heavy cream
- 1 cup shredded cheese (e.g., mozzarella or parmesan)
- 2 tablespoons olive oil
- 2 cloves garlic, minced
- Salt and pepper to taste
Instructions
- Cook the orzo by boiling a pot of salted water over high heat. Add orzo and cook until al dente, about 8–10 minutes. Save a cup of the cooking water before draining.
- Sauté the garlic in a large skillet with olive oil over medium heat for about 1-2 minutes until fragrant, being careful not to burn it.
- Add the spinach and sauté until wilted, around 3–4 minutes, adding a splash of reserved pasta water if needed.
- Introduce the heavy cream and bring to a gentle simmer, stirring often.
- Stir in the shredded cheese until melted and combined with the sauce. Add reserved pasta water if the sauce is too thick.
- Mix in the drained orzo, tossing until evenly coated, then season with salt and pepper to taste.
- Serve! Garnish with extra cheese or fresh herbs, if desired.
Notes
Consider serving in individual bowls with a sprinkle of parmesan and a drizzle of olive oil. Pairs well with side salads or grilled proteins.
Nutrition
- Serving Size: 1 serving
- Calories: 450
- Sugar: 3g
- Sodium: 500mg
- Fat: 25g
- Saturated Fat: 15g
- Unsaturated Fat: 8g
- Trans Fat: 0g
- Carbohydrates: 45g
- Fiber: 2g
- Protein: 12g
- Cholesterol: 70mg
Keywords: creamy orzo, spinach, comfort food, vegetarian pasta dish, easy recipes
Pistachio White Pizza: 15-Minute Weeknight Skillet
A Slice of Happiness: Pistachio White Pizza Recipe
Ah, pizza—the universal comfort food that brings people together, conjures smiles, and satisfies cravings like no other. But let’s take a little detour today, shall we? Instead of the classic tomato sauce and mozzarella, I’m diving into the vibrant world of a Pistachio White Pizza! This delightful creation will have your taste buds dancing and your heart singing. Think creamy burrata, crunchy pistachios, and a zesty arugula salad on top. It’s a beautiful balance of flavors and textures that will elevate your pizza game to gourmet levels, all while feeling light and fresh.
Picture this: It’s a sunny Saturday afternoon, the aroma of freshly baked dough wafts through your home, and friends gather around the kitchen island, laughter filling the air. That’s the kind of vibe this recipe embodies—simple, delicious, and fun! Whether you’re hosting friends, indulging in a cozy night in, or simply wanting to treat yourself to something special, this Pistachio White Pizza promises to bring joy to your table.
Forget about the ordinary—let’s dive into creating this pizza masterpiece that not only looks stunning but tastes even better. Trust me; it’s about to become your new favorite!
A Nostalgic Kitchen Memory
I remember the first time I encountered the idea of a white pizza. I was visiting a quaint little pizzeria that had a rustic, warm atmosphere. The moment I walked in, the smell of fresh dough and bubbling cheese wrapped around me like a comforting blanket. I spotted a special on the menu called "Pistachio White Pizza," and I was immediately intrigued.
It arrived at the table, a work of art: a golden crust topped abundantly with melted burrata, speckled with vibrant green pistachios, and garnished with an explosion of peppery arugula. One bite, and I was hooked! The creaminess of the cheese combined with the unexpected crunch of pistachios gave each mouthful an entirely new dimension. The freshness of arugula was the perfect zesty compliment.
That day, I left the pizzeria feeling inspired, realizing that pizza doesn’t have to be boring or predictable. It can be a canvas for creativity, much like a painter expresses themselves on their palette. Since then, I’ve made it a tradition to reinvigorate classic dishes with fresh and unexpected ingredients. And that’s exactly what I’m encouraging you to do too. So grab your apron, and let’s whip up this fantastic Pistachio White Pizza together!
Ingredients
Before we get our hands doughy, let’s gather all the goodies we’ll need for this masterpiece.
-
Pizza Dough
- A fresh, homemade dough is always the best, but store-bought works wonders too! Look for high-quality options that are par-baked or even raw.
-
Burrata Cheese
- Creamy, rich, and decadently satisfying, burrata elevates any dish. If burrata isn’t in your fridge, fresh mozzarella is a great substitute—just make sure to drain it well!
-
Red Onions (thinly sliced)
- These add a lovely sweetness and crunch. If you prefer a milder flavor, soak them in cold water for 10 minutes before using.
-
Arugula
- This peppery green is a must-have for freshness and color. If you’re not a fan, baby spinach or mixed greens can also work nicely.
-
Chopped Pistachios
- Crunchy and slightly sweet, they give our pizza an unexpected twist. No pistachios? Feel free to swap in walnuts or pine nuts for a similar texture.
-
Olive Oil
- A drizzle of good quality olive oil brings all the flavors together beautifully. You can also try using flavored oil, like garlic or chili-infused.
-
Salt & Pepper
- Essential for seasoning! Always season where needed to highlight the dish’s natural flavors.
Each of these ingredients plays a pivotal role in crafting a pizza that is not only visually stunning but also bursts with flavor. Feel free to personalize them! Remember, cooking is all about experimenting and making it your own.
Step-by-Step Instructions
Let’s get into the nitty-gritty of making our Pistachio White Pizza. Here’s how to whip up magic in your kitchen:
-
Preheat Your Oven
- First things first! Set your oven to the highest temperature, usually around 475°F (245°C). This high heat will help us achieve that crispy crust we crave.
-
Prepare the Dough
- If you’re using store-bought dough, follow the package instructions for resting it. If making your own, roll it out on a floured surface to your desired thickness—thin for a crispy base, or thicker for a chewier bite. Transfer the rolled out dough to a baking sheet or pizza stone, and I like to sprinkle a little cornmeal on the bottom—it helps prevent sticking and adds texture!
-
Stretch It Out
- Using your fingers, gently stretch the dough from the center outward. Don’t worry if it doesn’t look perfect—rustic is beautiful! Remember, it’s all about the love you put into your cooking.
-
Add the Cheese
- Tear the burrata into chunks and distribute it evenly over the dough. If you’re using fresh mozzarella, tear it into smaller pieces and scatter it around. The cheese will melt beautifully, creating ooey-gooey goodness.
-
Season It
- Sprinkle a pinch of salt and pepper over the cheese. This step is crucial—seasoning allows each flavor to shine and brings everything to life.
-
Slice the Onions
- In a small bowl, toss those thinly sliced red onions in a splash of olive oil and a pinch of salt. This will soften their bite and sweeten the flavor. Scatter the onions over the cheese.
-
Bake to Perfection
- Slide your masterpiece into the preheated oven. Bake for about 10-12 minutes, or until the crust is golden brown and the cheese is bubbly and slightly blistered. If you have access to a pizza stone, use it for an extra crispy crust!
-
Top with Pistachios and Arugula
- Once out of the oven, immediately sprinkle chopped pistachios over the hot pizza. Then, add a handful of fresh arugula on top—this adds a fantastic peppery crunch and a beautiful pop of green.
-
Finish with Olive Oil
- Drizzle a touch of good quality olive oil over the top to enhance the flavors and add a glossy finish.
-
Slice and Serve
- Allow it to cool for a few minutes—if you can wait that long! Then, slice into wedges and enjoy every bite!
Feel free to invite family or friends to help you with this part. Cooking is always more fun when shared with loved ones!
Serving Suggestions
Once your Pistachio White Pizza is ready, plate it up with care. You can serve it straight on a wooden pizza board for that rustic feel or on a vibrant platter. Pair it with a zesty salad dressed in lemon vinaigrette, and perhaps a crisp white wine or sparkling water to keep the meal refreshing.
For a finishing touch, consider a sprinkle of extra pistachios or a few flakes of sea salt right before serving to catch the eye and excite the palate.
Recipe Variations
Now that you have the basics down, let’s get creative! Here are a few variations to explore:
-
Herbed Variations: Add fresh herbs like basil or thyme for a fragrant twist. You can toss them with the arugula or sprinkle them on top after baking.
-
Add Some Heat: If you love a kick, consider topping the pizza with red pepper flakes or even drizzle some spicy olive oil over it before serving.
-
Mushroom Magic: Sauté some mixed mushrooms with garlic and toss them on top before baking for an earthy flavor that complements the cheese beautifully.
-
Sweet Touch: Drizzle a little honey or fig jam over the top once it comes out of the oven for a sweet-savory experience.
-
Dairy-Free Option: For a dairy-free version, try using cashew cheese or a vegan ricotta. The flavors will still shine!
The possibilities are endless, and that’s what makes cooking so exciting!
Chef’s Notes
This Pistachio White Pizza is very much a love letter to simplicity and flavor. I’ve played around with it over the years—experimenting with different toppings, ensuring the right balance between creamy and crunchy. One of my first favorites was adding honey, which just elevated the flavors to a whole new level!
I also love to share this recipe with friends who are intimidated by making pizza at home. It’s always a hit and proves that you can create restaurant-quality dishes right in your kitchen without fussing over complicated techniques.
Every time I make it, it brings back that first memory of biting into that divine pizza at the pizzeria. And you know what? It always manages to create new memories around the table.
FAQs and Troubleshooting
1. Why is my crust soggy?
- If your pizza crust is soggy, ensure your oven is preheated correctly and that you’ve baked it long enough. Also, consider pre-baking your dough for a few minutes before adding toppings!
2. Can I make this pizza gluten-free?
- Absolutely! Use a gluten-free pizza dough, and you’ll be enjoying a scrumptious pizza without the gluten.
3. Can I prepare this ahead of time?
- You can prep the dough and toppings ahead of time! Just store the raw pizza in the fridge, and pull it out when you’re ready to bake.
4. What’s the best way to store leftovers?
- Place any leftover pizza in an airtight container in the refrigerator. You can reheat it in the oven or stovetop for the best taste, avoiding the microwave if possible, as it can make the crust chewy.
Nutritional Info
While I always recommend enjoying pizza as an indulgence, it’s also great to know what you’re feeding your body. This Pistachio White Pizza is rich in protein from the burrata, healthy fats from the pistachios, and fiber from the arugula.
Don’t hesitate to adapt the recipe to suit your nutritional needs, and remember that balance is key!
And there you have it! A delightful Pizza Pistachio White that brings joy and flavor with every slice. Whether you’re sharing it with friends or enjoying it solo, it’s a dish made with love and creativity. So roll up your sleeves and let the magic happen in your kitchen! Happy cooking, fellow foodies! 🍕✨
PrintPistachio White Pizza
A delightful Pistachio White Pizza topped with creamy burrata, crunchy pistachios, and zesty arugula for a fresh and gourmet twist on traditional pizza.
- Prep Time: 15 minutes
- Cook Time: 12 minutes
- Total Time: 27 minutes
- Yield: 4 servings
- Category: Main Course
- Method: Baking
- Cuisine: Italian
- Diet: Vegetarian
Ingredients
- Pizza Dough
- Burrata Cheese
- Red Onions (thinly sliced)
- Arugula
- Chopped Pistachios
- Olive Oil
- Salt & Pepper
Instructions
- Preheat your oven to the highest temperature, around 475°F (245°C).
- Prepare the dough by following the package instructions or rolling out homemade dough on a floured surface.
- Stretch the dough gently from the center outward.
- Add torn burrata pieces evenly over the dough.
- Season with a pinch of salt and pepper.
- Slice red onions and toss them in olive oil and salt.
- Bake for 10-12 minutes until the crust is golden and cheese is bubbly.
- Top with chopped pistachios and fresh arugula.
- Finish with a drizzle of olive oil.
- Slice and serve warm.
Notes
Feel free to personalize the ingredients to your liking. Consider adding fresh herbs, spices, or alternative toppings for variety.
Nutrition
- Serving Size: 1 slice
- Calories: 350
- Sugar: 3g
- Sodium: 400mg
- Fat: 18g
- Saturated Fat: 6g
- Unsaturated Fat: 10g
- Trans Fat: 0g
- Carbohydrates: 40g
- Fiber: 2g
- Protein: 12g
- Cholesterol: 25mg
Keywords: pizza, white pizza, pistachio, gourmet pizza, vegetarian pizza
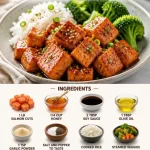
Minute Honey-Glazed Salmon Bites: Quick Weeknight Dinner
Honey Glazed Salmon Bites: Your New Favorite Quick Meal
Welcome to another delicious adventure in the world of Clean Plate Cravings! Today, I’m thrilled to share something that’s not just a meal; it’s a burst of flavor and goodness that feels like a warm hug. If you’re looking for a dish that’s simple yet impressive, look no further than my Honey Glazed Salmon Bites. These flavorful morsels pack the perfect sweet-and-savory punch, transforming any meal into something special without requiring hours in the kitchen.
Picture this: it’s a busy weeknight, the clock is ticking, and you’re staring into the fridge wishing for an easy dinner that doesn’t compromise taste or nutrition. That’s where these honey-glazed delights come in! Not only do they come together in a snap, but they’ll also have your family and friends raving about how fantastic you are in the kitchen (even if you’re secretly following along with my recipe!).
I remember the first time I whipped up something similar. It was during a lazy Sunday afternoon at my childhood home. My mom had invited a few friends over, and I wanted to impress everyone with my budding culinary skills. Armed with only a few staple ingredients and an unstoppable enthusiasm, I tossed together a sweet glaze that perfectly complemented tender chunks of salmon. That day was a culinary epiphany for me, and it ignited my passion for creating dishes that bring people together around the table. And now? I want to share that excitement with you!
Let’s dive into this delectable Honey Glazed Salmon Bites recipe that’ll elevate your dinner game and leave you feeling energized and satisfied!
Ingredients
Here’s what you’ll need to make these mouthwatering Honey Glazed Salmon Bites:
-
1 lb salmon cuts
Fresh salmon offers a buttery texture and rich flavor. If you’re looking for a more budget-friendly option, feel free to substitute with trout or tilapia. -
1/4 cup honey
The star of the show! Honey brings that irresistible sweetness. If you’re vegan or trying to reduce sugar, agave syrup or maple syrup work beautifully as substitutes. -
2 tbsp soy sauce
The umami factor! This ingredient balances the sweetness of the honey. If you need a gluten-free option, try tamari or coconut aminos. -
1 tbsp olive oil
A splash of healthy fat to keep everything moist and add flavor. You can swap it with avocado oil if you prefer a higher smoke point for searing. -
1 tsp garlic powder
This gives an aromatic kick to the dish. Fresh minced garlic can be used instead if you’re feeling extra zesty. -
Salt and pepper to taste
Essential seasonings that elevate the overall flavor. Don’t hesitate to play around with herbs like dill or cilantro for an added flourish! -
Cooked rice
A perfect base! You can use brown rice, white rice, quinoa, or even a cauliflower rice for a low-carb option. -
Steamed veggies
Whatever veggies you love or have on hand! Broccoli, carrots, or snap peas add both color and nutrition.
Step-by-Step Instructions
Let’s get cooking! Follow these steps for a delightful Honey Glazed Salmon Bites experience:
-
Prep the Salmon
Start by cutting the salmon into bite-sized pieces, about 1 inch each. This helps them cook evenly and makes them easy to eat. Chef’s Tip: Pat them dry with a paper towel to ensure a nice sear and browning. -
Make the Marinade
In a bowl, whisk together honey, soy sauce, olive oil, garlic powder, salt, and pepper until well combined. This marinade is where the magic happens! Chef’s Insight: If you have time, let the salmon sit in this marinade for 15-30 minutes. This allows those flavors to really sink in. -
Heat the Pan
Heat a non-stick skillet over medium-high heat. Make sure it’s hot before adding the salmon—that way, you’ll get that beautiful caramelization. Quick Hack: Add a drop of water to the pan; if it sizzles, you’re ready! -
Cook the Salmon Bites
Carefully lay the salmon pieces in the hot skillet. Let them sear for about 3-4 minutes on one side until golden brown. Don’t overcrowd the pan; cook in batches if necessary. Chef’s Tip: Turn them only once to get that crispy texture! -
Glaze it Up
Once the salmon bites are beautifully seared, pour the remaining marinade over them. Cook for another 2-3 minutes, allowing the glaze to caramelize. Pro Tip: Baste the salmon with the glaze while cooking for an extra layer of flavor. -
Serve it Right
When the salmon bites are cooked through and flaky, remove them from the heat. Serve them over a bed of cooked rice, then add a generous helping of steamed veggies on the side.
Serving Suggestions
To present your Honey Glazed Salmon Bites beautifully, scoop a serving of rice onto a plate, create a small nest for the salmon, then pile on those vibrant veggies. You could also sprinkle a few sesame seeds on top for an elegant touch or fresh herbs for a pop of color. Serve it warm, and get ready for the compliments to roll in!
Recipe Variations
Feel like getting adventurous? Here are a few creative twists to jazz up your Honey Glazed Salmon Bites:
- Citrus Twist: Add a splash of orange or lemon juice to the marinade for a zesty kick.
- Spicy Honey: Mix in some chili flakes or sriracha to the glaze for those who love a bit of heat!
- Teriyaki Twist: Swap the honey for teriyaki sauce for an Asian-inspired version.
- Herbed Infusion: Mix fresh herbs like basilik or cilantro into the marinade for an aromatic boost.
- Nutty Crunch: Sprinkle crushed nuts like almonds or cashews on top before serving for added texture!
Chef’s Notes
I absolutely adore this recipe not just because it’s quick, but because it’s so versatile. I’ve made it countless times, often adjusting the marinade based on what I have in the fridge. One time, I tossed in some sesame oil instead of olive oil, and it added a delightful nuttiness that I still crave. Cooking should be fun and adaptable; if you find yourself missing an ingredient, don’t sweat it! Get creative!
FAQs and Troubleshooting
Here are some common questions and potential hiccups you might find while whipping up those Honey Glazed Salmon Bites:
-
What if my salmon is overcooked?
Overcooking can happen easily with salmon. Aim for an internal temperature of 145°F for perfectly flaky fish. If you overdo it, try serving it with a homemade sauce or salsa to add moisture. -
Can I use frozen salmon?
Absolutely! Just make sure to thaw it properly before cooking. Frozen salmon can release more water during cooking, so it’s essential to pat it dry before marinating. -
How do I know when the salmon is done?
Salmon is done when it turns opaque and flakes easily. A good rule of thumb is about 4-6 minutes per half-inch thickness at medium heat. -
What’s the best way to reheat leftovers?
To keep the salmon from drying out, gently reheat it in a pan on low heat, covering it with a lid to retain moisture. Alternatively, you can microwave in short bursts (10-20 seconds) until warm.
Nutritional Info
(Optional but helpful)
For those of you watching your macros and nutritional intake, here’s a rough breakdown per serving (based on the recipe serving 4):
- Calories: 300
- Protein: 25g
- Carbohydrates: 40g (mostly from rice and veggies)
- Fats: 10g (primarily from olive oil and salmon)
So there you have it—my Honey Glazed Salmon Bites recipe that brings joy, flavor, and a hint of nostalgia straight to your kitchen! I hope this dish lights up your dining table just as it did for me. Remember, cooking is all about love, enjoyment, and sharing good food with great people. So, toss on your apron, crank up the music, and let’s get cooking! Happy feasting!
PrintHoney Glazed Salmon Bites
Quick and delicious honey glazed salmon bites that provide a sweet-and-savory flavor profile, perfect for a busy weeknight meal.
- Prep Time: 10 minutes
- Cook Time: 15 minutes
- Total Time: 25 minutes
- Yield: 4 servings 1x
- Category: Main Course
- Method: Searing
- Cuisine: Asian
- Diet: Pescatarian
Ingredients
- 1 lb salmon cuts
- 1/4 cup honey
- 2 tbsp soy sauce
- 1 tbsp olive oil
- 1 tsp garlic powder
- Salt and pepper to taste
- Cooked rice
- Steamed veggies
Instructions
- Prep the salmon by cutting it into bite-sized pieces, about 1 inch each.
- Make the marinade by whisking together honey, soy sauce, olive oil, garlic powder, salt, and pepper in a bowl.
- Heat a non-stick skillet over medium-high heat until hot.
- Cook the salmon bites for about 3-4 minutes on one side until golden brown.
- Glaze the salmon bites by pouring the remaining marinade over them and cooking for another 2-3 minutes.
- Serve the salmon bites over cooked rice with a side of steamed veggies.
Notes
You can substitute salmon with trout or tilapia. For vegan options, use agave syrup or maple syrup in the marinade.
Nutrition
- Serving Size: 1 serving
- Calories: 300
- Sugar: 20g
- Sodium: 800mg
- Fat: 10g
- Saturated Fat: 1.5g
- Unsaturated Fat: 8.5g
- Trans Fat: 0g
- Carbohydrates: 40g
- Fiber: 3g
- Protein: 25g
- Cholesterol: 60mg
Keywords: salmon, honey glaze, quick meal, healthy dinner, seafood recipe
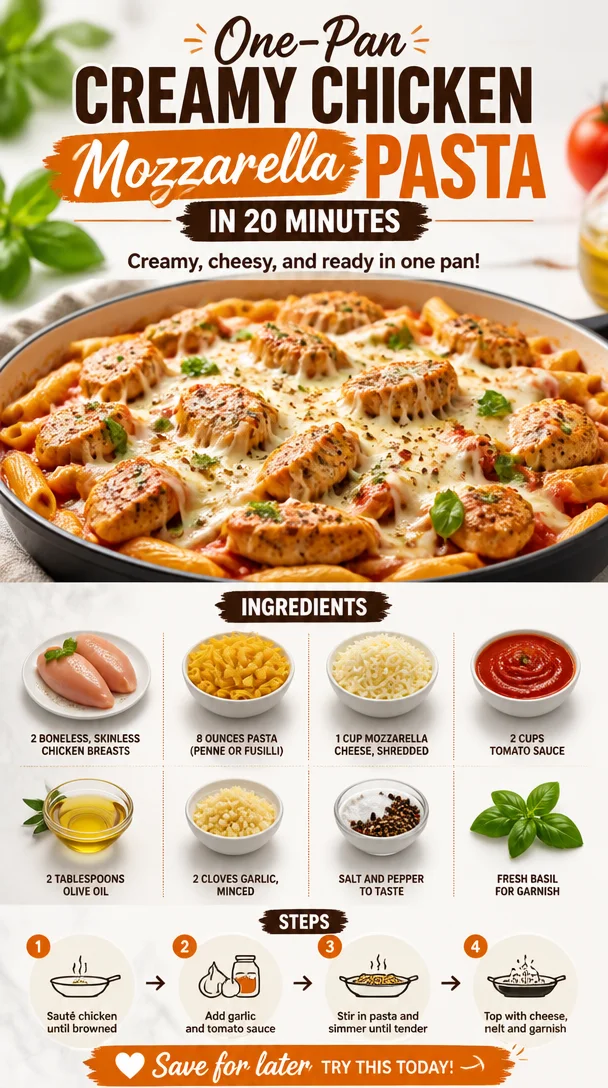
One-Pan Creamy Chicken Mozzarella Pasta in 20 Minutes
Chicken Mozzarella Pasta: A Wholesome Delight
Welcome back, food lovers! If you’re anything like me, you’re always on the lookout for that perfect balance of comfort and nutrition in your meals. Today, I’m excited to bring you a fantastic recipe: Chicken Mozzarella Pasta. This dish is not only packed with flavor but also super easy to whip up, making it perfect for busy weeknights or a cozy weekend dinner. Let’s explore this delicious fusion that tantalizes your taste buds while nourishing your body!
Introduction
Picture this: It’s a chilly evening after a long day. You step into your kitchen, the sunset casting a warm glow across the countertop, and you’re ready to create something magnificent. What better way to beat the evening chill than with a hearty bowl of Chicken Mozzarella Pasta? It brings together juicy chicken breasts, gooey mozzarella, and a flavorful tomato sauce that simply screams comfort!
The beauty of this dish is how it manages to be both satisfying and wholesome. You can savor each bite knowing it’s made from fresh ingredients without any of the fuss that sometimes comes with cooking. Plus, you can whip it up in about 30 minutes—can you imagine? No more trading off flavor for efficiency!
Whether you’re cooking for yourself, your family, or that special someone, Chicken Mozzarella Pasta is sure to impress. And the best part? Everyone can pitch in! Get the kiddos to help with stirring or setting the table, making it a fun family affair. Trust me, cooking should be a joyful experience—and this recipe embodies just that.
So, shall we? Grab your apron, and let’s dive into this culinary adventure together!
Personal Story
Ah, the memories that food can summon! This Chicken Mozzarella Pasta recipe takes me back to my college days, where budgeting and quick meals reigned supreme. I lived in a tiny apartment with friends, and the kitchen was often the heart of our little home. One Friday night, we decided to host a “pasta night” to celebrate another week of classes survived.
With limited time and ingredients, we had to get creative. We scavenged the fridge and came across chicken, some half-used tomato sauce, and a block of mozzarella cheese. It was a match made in culinary heaven! We tossed everything together, and with laughter echoing off the walls, we created an unforgettable dinner that bonded us even closer.
To this day, that culinary adventure remains a cherished memory. It’s incredible how food not only nourishes the body but nourishes relationships too. So, every time I whip up this dish, I’m transported back to that cozy apartment filled with laughter and love.
Ingredients
Let’s take a look at what you’ll need for this delectable Chicken Mozzarella Pasta. Each ingredient plays an essential role in bringing this dish to life, and I’ve added some quick chef insights to help you along the way!
-
2 boneless, skinless chicken breasts: The star of our dish! Try to buy organic or free-range chicken for better flavor and nutrition. If you’re short on time, you can use rotisserie chicken or even grilled chicken from the deli.
-
8 ounces pasta (penne or fusilli work well): Both shapes hold the sauce beautifully. Feel free to experiment with whole grain or gluten-free pasta for a healthier twist!
-
1 cup mozzarella cheese, shredded: The gooey goodness that takes this dish over the top! If you’re watching your dairy intake, cashew cheese works surprisingly well here.
-
2 cups tomato sauce: A simple marinara or a homemade version can elevate the flavor. If you prefer a spicier kick, opt for Arrabbiata sauce!
-
2 tablespoons olive oil: A heart-healthy fat that’s perfect for sautéing. You can substitute it with avocado oil or even butter for a richer flavor.
-
2 cloves garlic, minced: Aromatic and mouthwatering. You can use garlic powder in a pinch, but fresh is always better!
-
Salt and pepper to taste: Essential for bringing out all the flavors. Don’t be shy—season generously but taste as you go!
-
Fresh basil for garnish: A pop of color and fresh flavor that makes all the difference. Dried basil can be used in a pinch, but fresh basil is superior.
Step-by-Step Instructions
Ready to get cooking? Let’s dive into each step! Follow along, and don’t hesitate to add your own personal flair to this recipe!
-
Cook the Pasta: Start by boiling a large pot of salted water. Once it reaches a rolling boil, add your pasta of choice. Cook according to the package instructions until al dente (usually 8-10 minutes). Remember to reserve about half a cup of pasta water before draining; this starchy liquid will help your sauce cling beautifully to the pasta!
-
Sauté the Chicken: While the pasta cooks, heat the olive oil in a large skillet over medium-high heat. Season your chicken breasts with salt and pepper on both sides. Add them to the hot skillet and let them cook for 6-7 minutes on each side until golden brown and cooked through. Use a meat thermometer to ensure they reach an internal temperature of 165°F (75°C). Pro tip: let the chicken rest for a few minutes before slicing—this keeps it juicy!
-
Add Garlic: Once the chicken is done, remove it from the skillet and let it rest on a cutting board. In the same skillet (let’s use those tasty bits left behind!) add the minced garlic and sauté for about 30 seconds, or just until fragrant. Be careful not to burn it—garlic can go from aromatic to acrid in a flash!
-
Incorporate the Tomato Sauce: Pour in your tomato sauce and stir it into the garlic, letting it simmer for about 5 minutes. If the sauce seems too thick, add a splash of the reserved pasta water to create your desired consistency. This is the moment to taste and adjust your seasoning; perhaps a pinch more salt or some crushed red pepper flakes for a kick!
-
Combine Chicken and Pasta: Slice the rested chicken into bite-sized pieces and add it back into the skillet along with your drained pasta. Toss everything together, ensuring the pasta is well-coated with the sauce. If needed, add more pasta water to achieve an extra creamy texture.
-
Add Cheese and Heat Through: Finally, sprinkle the shredded mozzarella over the chicken and pasta mix. Let it sit for a couple of minutes off the heat, allowing the cheese to melt beautifully. Stir until the cheese is well incorporated and everything is warmed through.
-
Serve It Up: Dish the Chicken Mozzarella Pasta into your favorite bowls and garnish with fresh basil leaves. Not only does it look fabulous, but the aroma will have everyone gathering around the table before you know it!
Serving Suggestions
To plate this delightful dish, grab a shallow bowl and serve a generous helping of Chicken Mozzarella Pasta. Garnish with fresh basil, a drizzle of olive oil, and a sprinkle of grated Parmesan cheese if you’re feeling fancy. Pair it with a simple green salad or some garlic bread for a complete meal that will have your guests (or family) raving.
Recipe Variations
Now, let’s shake things up a bit! Here are some creative twists, flavor options, and dietary swaps to keep your Chicken Mozzarella Pasta exciting:
-
Veggie Boost: Toss in spinach, zucchini, or bell peppers for an extra serving of veggies. Sauté them with the garlic to enhance their flavor!
-
Pesto Upgrade: Swap out the tomato sauce for your favorite pesto for a rich, herbaceous flavor that’s simply divine.
-
Spicy Kick: Add diced jalapeños or a splash of Sriracha to your sauce for some heat.
-
Gluten-Free: Use gluten-free pasta and check your tomato sauce for any sneaky gluten ingredients!
-
Low-Carb Option: Substitute pasta with spiralized zucchini or spaghetti squash for a lightened-up dish.
Chef’s Notes
This Chicken Mozzarella Pasta recipe has evolved over the years in my kitchen. I used to toss everything together without much thought, but I’ve learned that taking the time to sauté the garlic enhances that aromatic flavor so much! Also, the love I felt cooking for my friends back in college instilled in me the belief that food is about connection—and that’s something I cherish every time I cook.
And if you ever find yourself with leftover Chicken Mozzarella Pasta (which is rare, but it happens!), don’t fret! This dish reheats beautifully—just add a splash of olive oil or a few tablespoons of broth when reheating to ensure it stays moist.
FAQs and Troubleshooting
Here are a few common questions you might have while making your Chicken Mozzarella Pasta:
-
What if my pasta is overcooked?
Don’t worry too much! If you accidentally overcook your pasta, add it to the sauce immediately after draining. The sauce can help mask some of that mushy texture, but be sure to keep an eye on cooking times! -
Can I use frozen chicken?
Yes! However, I recommend first thawing it in the fridge overnight for even cooking. If you’re in a rush, the microwave can be a lifesaver—just be sure to cook it fully before slicing. -
My sauce is too watery—what do I do?
If you find your sauce is too runny, let it simmer uncovered for a few extra minutes. This will allow some of the liquid to evaporate, thickening it up beautifully. -
Can I make this dish ahead of time?
Absolutely! You can prepare the pasta and the sauce separately and then combine them just before serving. Just remember to store leftovers in airtight containers for up to three days in the fridge.
Nutritional Info
This Chicken Mozzarella Pasta is not just delicious; it’s also packed with nutrition! Here’s a rough estimate of the nutritional information per serving (based on a total of four servings):
- Calories: 550
- Protein: 32g
- Carbohydrates: 60g
- Total Fat: 18g
- Saturated Fat: 7g
- Fiber: 3g
- Sugar: 4g
This is a great balance of protein and carbs, which makes it a wonderful meal to fuel your evening!
There you have it—a delightful journey through the creation of Chicken Mozzarella Pasta! Whether you choose to follow the recipe to a tee or put your own twist on it, I hope you find joy and satisfaction in every bite. Happy cooking! Remember, the kitchen is your playground, so let your creativity flow and enjoy every moment of it!
PrintChicken Mozzarella Pasta

A quick and wholesome dish combining juicy chicken, gooey mozzarella, and a flavorful tomato sauce, perfect for busy weeknights or cozy dinners.
- Prep Time: 10 minutes
- Cook Time: 30 minutes
- Total Time: 40 minutes
- Yield: 4 servings 1x
- Category: Main Course
- Method: Sautéing
- Cuisine: Italian
- Diet: Paleo
Ingredients
- 2 boneless, skinless chicken breasts
- 8 ounces pasta (penne or fusilli)
- 1 cup mozzarella cheese, shredded
- 2 cups tomato sauce
- 2 tablespoons olive oil
- 2 cloves garlic, minced
- Salt and pepper to taste
- Fresh basil for garnish
Instructions
- Cook the Pasta: Start by boiling a large pot of salted water. Once boiling, add pasta and cook according to package instructions until al dente (8-10 minutes). Reserve half a cup of pasta water before draining.
- Sauté the Chicken: Heat olive oil in a large skillet over medium-high heat. Season chicken with salt and pepper, then cook for 6-7 minutes on each side until golden brown. Let rest for a few minutes before slicing.
- Add Garlic: In the same skillet, add minced garlic and sauté for about 30 seconds until fragrant.
- Incorporate the Tomato Sauce: Pour in the tomato sauce, stir, and let simmer for about 5 minutes. Adjust seasoning as necessary with salt or red pepper flakes.
- Combine Chicken and Pasta: Slice chicken into bite-sized pieces and add back to the skillet with the drained pasta. Toss everything to combine.
- Add Cheese and Heat Through: Sprinkle shredded mozzarella over the mixture, let sit for a couple of minutes off the heat to melt, then stir to combine.
- Serve It Up: Dish into bowls and garnish with fresh basil.
Notes
Consider adding vegetables like spinach or zucchini for extra nutrition. This dish can be made ahead and reheats well.
Nutrition
- Serving Size: 1 serving
- Calories: 550
- Sugar: 4g
- Sodium: 500mg
- Fat: 18g
- Saturated Fat: 7g
- Unsaturated Fat: 9g
- Trans Fat: 0g
- Carbohydrates: 60g
- Fiber: 3g
- Protein: 32g
- Cholesterol: 75mg
Keywords: chicken pasta, mozzarella pasta, quick dinner, weeknight meal, comfort food
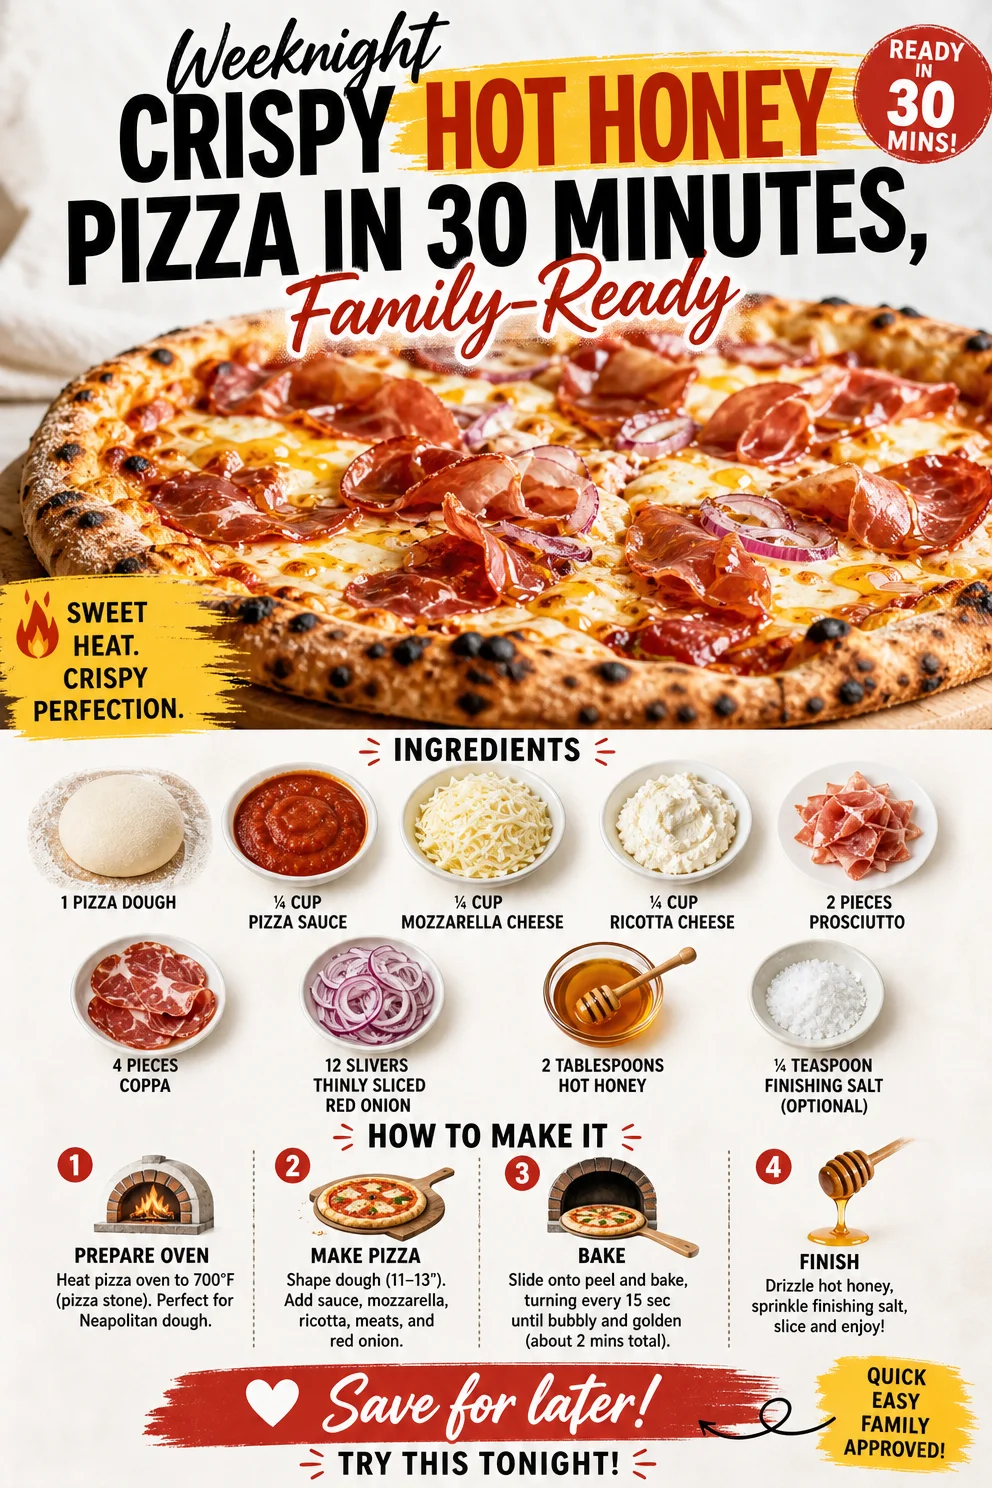
Weeknight Crispy Hot Honey Pizza in 30 Minutes, Family-Ready
Hot Honey Pizza: A Slice of Flavorful Paradise
Hey there, fellow food lovers! If you’ve landed here, you’re probably on the lookout for a pizza that doesn’t just satisfy your cravings but also jazzes up your taste buds. Well, get ready, because today we’re about to whip up a spectacular Hot Honey Pizza that’s as fun to make as it is to eat!
There’s something magical about pizza, isn’t there? It’s like the universal language of comfort food. From casual Friday nights to celebratory gatherings, pizza brings people together—and when you add the breathtaking heat of hot honey, oh boy, you’ve got an irresistible masterpiece on your hands!
Imagine this: a hot, crispy crust bubbling with gooey mozzarella and creamy ricotta, layered with savory prosciutto and coppa, and garnished with sweet yet spicy drizzles of hot honey that tingle your senses. Sounds divine, right? And let me tell you about the first time I made it—because every great recipe comes with its own story.
A Slice of Nostalgia
Flashback to a sunny summer afternoon a few years ago. I was at a cozy little Italian restaurant, celebrating a friend’s birthday. It was one of those places that felt like home—dim lights, mellow music, and the enchanting aroma of freshly baked pizza wafting through the air. That’s when I first encountered hot honey on pizza. I was skeptical at first. Hot honey? On pizza? But bravely, I took my first bite.
The moment that sweet heat hit my taste buds, I knew I had stumbled upon something extraordinary. The contrast between the gooey cheese and the warm, spicy drizzle was unlike anything else. My friends and I couldn’t stop talking about it; we even ordered a second pizza just to experience that magic again! It inspired me to recreate this beauty at home, and that’s how my beloved Hot Honey Pizza was born, full of flavors and memories. Now I’m excited to share it with you!
Ingredients
To craft this delightfully spicy, cheesy wonder, you’ll need the following ingredients:
- 1 Pizza Dough: You can use store-bought or make your own. If you go store-bought, opt for fresh dough from the bakery section for the best flavor and texture.
- ¼ Cup Pizza Sauce: A simple tomato sauce works wonders. Check the label for low sugar content. You can also blend canned tomatoes with garlic and herbs for a homemade touch!
- ¼ Cup Mozzarella Cheese: The classic gooey cheese! If you’re feeling adventurous, try buffalo mozzarella or even vegan cheese alternatives.
- ¼ Cup Ricotta Cheese: Creamy and luscious, ricotta cheese adds a layer of richness. If you’re dairy-free, swap it with cashew cheese or another nut-based option.
- 2 Pieces Prosciutto, Shredded: This adds a lovely saltiness. If you prefer a vegetarian option, use marinated artichokes or olives instead.
- 4 Pieces Coppa: A delightful cured meat; consider swapping with salami or pepperoni based on your preference.
- 12 Slivers Thinly Sliced Red Onion: For a bit of crunch and zing! If red onions are too sharp for your liking, try caramelizing them first for a sweeter flavor.
- 2 Tablespoons Hot Honey: A sweet, spicy drizzle that takes everything up a notch! If you’re feeling adventurous, try infusing plain honey with chili flakes or sriracha.
- ¼ Teaspoon Finishing Salt (Optional): A sprinkle of flaky sea salt right before serving enhances flavors beautifully.
Step-by-Step Instructions
Now that we’ve got our ingredients lined up, let’s dive into making this homemade Hot Honey Pizza! Trust me; you’ll want to grab a slice as soon as it’s out of the oven.
1. Preheat Your Oven
Preheat your oven to the hottest setting, typically around 475°F (245°C) or higher if your oven allows. This step is crucial for that perfect crispy crust! If you’re using a pizza stone, pop it in the oven to heat up as well.
2. Roll Out the Dough
On a floured surface, take your pizza dough and roll it out into your desired shape—round, square, or rustic! Just be sure to make it about ¼ inch thick for that nice texture. If it’s too sticky, lightly flour your rolling pin. Chef’s Tip: If your dough keeps bouncing back, let it rest for a few minutes to relax the gluten.
3. Spread the Sauce
Once rolled out, carefully transfer the dough to a pizza peel or a baking sheet lined with parchment paper. Spread ¼ cup of pizza sauce evenly over the crust, leaving a little room at the edges for that golden crust. Bonus Tip: Add a sprinkle of dried oregano or basil for extra flavor!
4. Load Up on Cheese
Now, sprinkle ¼ cup of mozzarella evenly over the pizza. Then dollop ¼ cup of ricotta in strategic spots; it’ll melt beautifully in the oven! Note: For an added fun moment, you can use your fingers to fashion little ricotta ‘clouds’ on top!
5. Add the Meats and Onions
Next, layer on 2 pieces of shredded prosciutto and 4 pieces of coppa. Make sure to distribute them evenly; every bite should have that delicious meaty flavor. Top it off with those lovely 12 slivers of red onion for that crispy crunch! Chef Note: The onions will caramelize slightly in the oven, adding sweetness.
6. Bake It Up
Slide the pizza into your hot oven (on the pizza stone if you have one). Bake for about 12–15 minutes or until the crust is golden brown and the cheese is melted and bubbly. Check on it around the 10-minute mark to avoid overbaking!
7. Drizzle with Hot Honey
Once the pizza is out of the oven, let it cool for a minute. Then, drizzle 2 tablespoons of hot honey over the top. If you really love spice, don’t hold back! Chef’s Tip: A honey drizzle adds an irresistible sweetness that contrasts beautifully with the saltiness of the meats!
8. Finish with Finishing Salt
For a little flair, sprinkle ¼ teaspoon of finishing salt over the top if desired. This will just enhance all those lovely flavors and bring everything together!
Serving Suggestions
Slice your Hot Honey Pizza into wedges and transfer them to a large platter or individual plates. Serve it alongside a simple arugula salad with lemon vinaigrette for a refreshing contrast. Guests will love the unexpected warmth and crunch of the pizza paired with the zesty salad! 🍕✨
Recipe Variations
Feeling adventurous? Here are some creative twists to this Hot Honey Pizza:
- Veggie Lover’s Delight: Add bell peppers, mushrooms, and spinach for a delicious veggie version.
- Pineapple Passion: Toss on some pineapple chunks for a sweet and savory Hawaiian twist!
- BBQ Chicken: Swap out the meats for shredded BBQ chicken and drizzle with extra hot honey.
- Spicy Veggie: Add jalapeños or banana peppers for a deeper kick of heat!
- Mediterranean Flair: Use feta cheese, kalamata olives, and roasted red peppers for an exotic Mediterranean pizza.
Chef’s Notes
This Hot Honey Pizza has truly become a staple in my kitchen. Over the years, I’ve experimented with different cheeses and toppings, and I have to say, each version has its own unique charm! I still remember the first time I made this for my family; their reactions were priceless! It’s a recipe that brings everyone together, laughing and sharing stories around the table—just the way food should be.
FAQs and Troubleshooting
Q: My pizza dough keeps sticking. What can I do?
Sometimes dough can be sticky. Be sure to flour your surface generously, and if it’s too much trouble, let it rest for a bit.
Q: How can I tell when the pizza is done?
The cheese should be melted and bubbly, and the crust should be golden brown. A simple lift with a spatula will show you a nice golden bottom!
Q: Can I make the dough ahead of time?
Absolutely! You can make it a day in advance and keep it covered in the fridge. Just bring it to room temperature before rolling out.
Q: What if I don’t have hot honey?
No biggie! You can easily infuse regular honey with chili flakes or hot sauce to achieve that sweet and spicy goodness.
And there you have it—your roadmap to creating a Hot Honey Pizza that will make your taste buds dance! So grab your apron and get ready to create a masterpiece in your kitchen. Remember, food is meant to be enjoyed, so make it fun, share it with loved ones, and savor every single bite! Happy cooking, my foodie friends! 🌶️🍯🍕
PrintHot Honey Pizza

A deliciously spicy and cheesy pizza topped with prosciutto, coppa, and a sweet hot honey drizzle.
- Prep Time: 15 minutes
- Cook Time: 15 minutes
- Total Time: 30 minutes
- Yield: 4 servings 1x
- Category: Main Course
- Method: Baking
- Cuisine: Italian
- Diet: None
Ingredients
- 1 Pizza Dough
- ¼ Cup Pizza Sauce
- ¼ Cup Mozzarella Cheese
- ¼ Cup Ricotta Cheese
- 2 Pieces Prosciutto, Shredded
- 4 Pieces Coppa
- 12 Slivers Thinly Sliced Red Onion
- 2 Tablespoons Hot Honey
- ¼ Teaspoon Finishing Salt (Optional)
Instructions
- Preheat your oven to the hottest setting, typically around 475°F (245°C).
- Roll out the dough on a floured surface to about ¼ inch thickness.
- Spread ¼ cup of pizza sauce evenly over the crust.
- Load up with ¼ cup of mozzarella and dollop on ¼ cup of ricotta.
- Add 2 pieces of shredded prosciutto and 4 pieces of coppa, then top with 12 slivers of red onion.
- Bake for 12–15 minutes or until the crust is golden brown.
- Drizzle 2 tablespoons of hot honey over the top after baking.
- Finish with optional finishing salt if desired.
Notes
For a vegetarian option, substitute meats with marinated artichokes or olives. Experiment with different cheeses and toppings for variations.
Nutrition
- Serving Size: 1 slice
- Calories: 350
- Sugar: 8g
- Sodium: 600mg
- Fat: 15g
- Saturated Fat: 6g
- Unsaturated Fat: 7g
- Trans Fat: 0g
- Carbohydrates: 40g
- Fiber: 2g
- Protein: 14g
- Cholesterol: 35mg
Keywords: Hot Honey Pizza, Spicy Pizza, Italian Recipe, Comfort Food, Easy Pizza Recipe
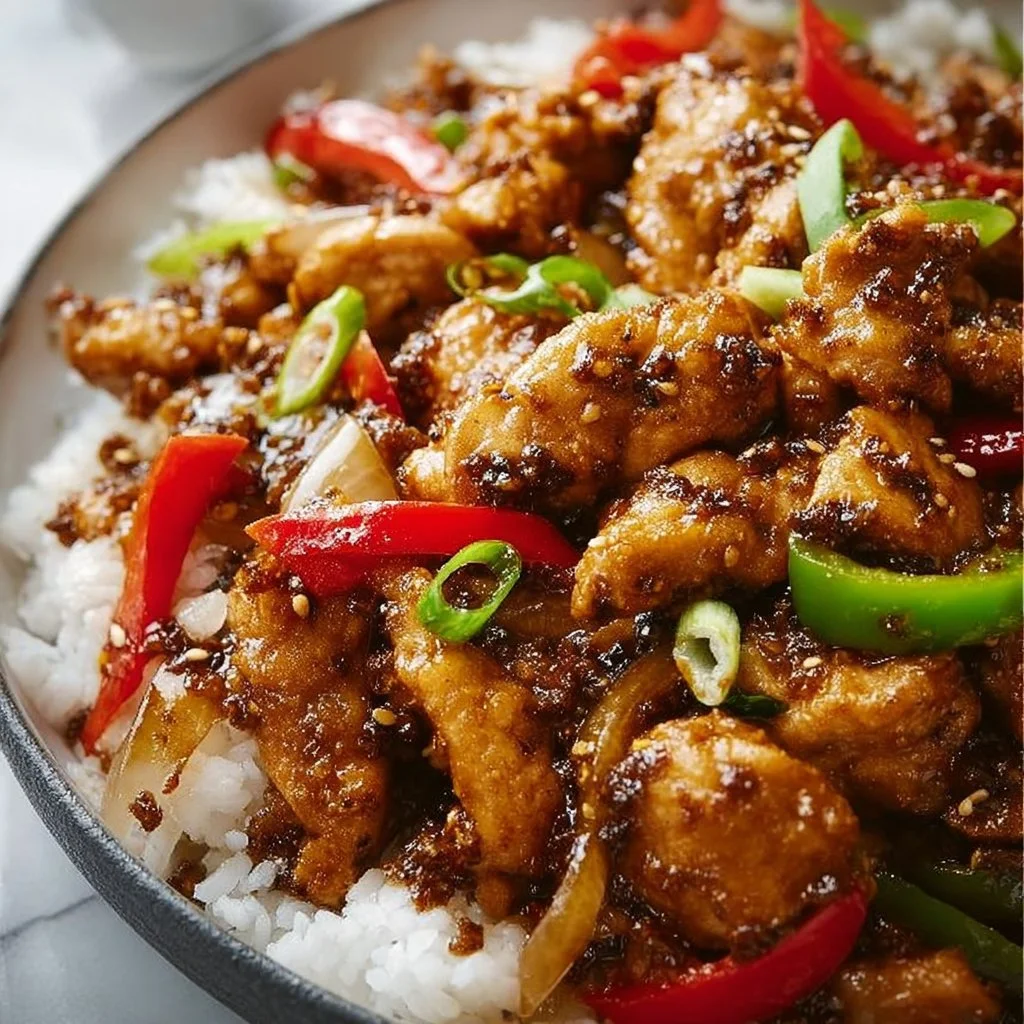
Minute Black Pepper Chicken Skillet for Weeknights
Black Pepper Chicken: A Wholesome Delight You’ll Keep Coming Back To
Hey there, food-loving friends! If there’s one dish that can transform a simple weeknight dinner into something special, it’s Black Pepper Chicken. It’s a dish that strikes the perfect balance between vibrant flavors and wholesome ingredients. With a crisp golden exterior, juicy chicken, and a fragrant black pepper kick, every bite feels like a cozy hug from the kitchen. So, grab your apron and let’s dive into this delicious culinary adventure!
A Taste of Nostalgia
When I think of Black Pepper Chicken, I’m instantly transported back to my childhood kitchen, where the aroma of spices danced in the air. My dad used to whip up a version of this dish every time we had family over for dinner. I can still see the sheer joy on everyone’s faces as they gathered around our old oak dining table, each plate piled high with his spicy chicken.
He always had this way of making everything feel like a celebration—the sizzle of the chicken in the pan, the laughter echoing through the room, and the clinking of glasses filled with refreshing lemonade. There was this delightful camaraderie that came alive in those moments, as we all dug into delicious food, swapping stories and laughter. Black Pepper Chicken became a staple for us, and it was so much more than just a meal; it was a symbol of love, family, and connection.
As I honed my cooking skills over the years, I embraced my dad’s love for this dish and set out to create a lighter, healthier version without sacrificing that classic punch of flavor. Now, I invite you to share some of that joy at your own table. Let’s make some Black Pepper Chicken that’ll have your loved ones gathering close and savoring every bite!
Ingredients
Here’s what you’ll need to make this bold flavor-packed dish:
-
Chicken Breasts:
- The star of the show! Opt for boneless, skinless chicken breasts. They’re lean and easy to work with. If you’re looking for a substitution, feel free to use thighs for a richer flavor, or even tofu for a plant-based option.
-
Black Pepper:
- This is where the magic happens! Freshly cracked black pepper brings the spice, unlike pre-ground. If you’re sensitive to heat, you can reduce the amount or use white pepper for a milder flavor.
-
Soy Sauce:
- Soy sauce adds depth and umami. Low-sodium soy sauce is a great substitute if you want to keep the sodium in check. For a gluten-free version, use tamari or coconut aminos.
-
Garlic:
- Fresh garlic provides aromatic notes that complement the chicken beautifully. If you’re in a pinch, garlic powder can work, but fresh is always best!
-
Ginger:
- Minced fresh ginger adds a touch of warmth. If you can’t find fresh ginger, a little ground ginger can do the trick—remember, it’s more concentrated!
-
Bell Peppers:
- Use a mix of colors (red, yellow, green) for visual appeal and sweetness. You can swap them out for broccoli or snap peas if you prefer.
-
Onion:
- Sweet onion or shallots work well to provide a gentle sweetness. Red or green onions make for a lovely flavor twist!
-
Cornstarch:
- A little cornstarch helps achieve that glossy, saucy texture. You can substitute it with arrowroot powder if you need a paleo-friendly option.
-
Oil:
- A high smoke point oil like vegetable or canola oil is best for frying. If you want to keep it wholesome, opt for avocado oil or a splash of sesame oil for added flavor.
Step-by-Step Instructions
Let’s get cooking! Follow these steps for a simple yet delightful Black Pepper Chicken:
-
Prep Your Ingredients:
Start by gathering everything. Chop your bell peppers and onion into bite-sized pieces, mince the garlic and ginger, and slice the chicken into thin strips. A sharp knife and cutting board will make this a breeze! -
Marinate the Chicken:
In a mixing bowl, toss the chicken strips with soy sauce, minced garlic, ginger, and a generous amount of black pepper. Let it marinate for at least 15-20 minutes. This is where the magic happens—the more time the chicken has to soak up those flavors, the better! -
Dust with Cornstarch:
After marinating, sprinkle a thin layer of cornstarch over the chicken. This coats the chicken and gives it that crispy texture when cooking. Use your hands to evenly coat each piece, shaking off any excess. -
Heat the Pan:
In a large skillet or wok, heat your oil over medium-high heat. Give it a moment to come to temperature—you’ll know it’s ready when the oil shimmers and dances in the pan. -
Cook the Chicken:
Carefully add the chicken strips in a single layer, being careful not to overcrowd the pan. Let them cook undisturbed for about 3-4 minutes until they get a beautiful golden brown crust. Flip them to the other side and let them cook for another 2-3 minutes until they’re cooked through. A little chef hack: make sure the chicken doesn’t touch each other too much when cooking so they get that nice sear! -
Toss in the Veggies:
Once the chicken is cooked, remove it from the pan and set it aside. Add a splash more of oil if needed, and toss in the chopped onion and bell peppers. Sauté for 2-3 minutes until the veggies are tender-crisp and vibrant in color. The smell will be divine! -
Combine Everything:
Return the cooked chicken to the pan, toss everything to combine, and stir-fry for another minute. Take a moment to taste and adjust the seasoning with more soy sauce or black pepper if you wish. -
Serve and Enjoy:
Plate your Black Pepper Chicken over a bed of steamed rice or quinoa. Drizzle the savory sauce from the pan over the top and garnish with sesame seeds or sliced green onions for a finished touch.
Serving Suggestions
To serve this dish beautifully, consider plating it in a large shallow bowl with the chicken and veggies artfully arranged atop a bed of fluffy rice. Sprinkle some sesame seeds for a touch of elegance. If you’re feeling extra fancy, pair it with a side of steamed broccoli or a bright cucumber salad to balance those robust flavors.
Recipe Variations
Feeling adventurous? Here are some creative twists to elevate your Black Pepper Chicken:
- Spicy Black Pepper Chicken: Add a sprinkle of crushed red pepper flakes to the marinade for an extra kick!
- Honey Ginger Glaze: Drizzle with honey or maple syrup in the last minute of cooking for a sweet and savory combo.
- Add Pineapple: Toss in some diced pineapple for a delightful sweet contrast to the peppery chicken.
- Vegetable-Heavy: Load it up with even more veggies like snap peas, carrots, or zucchini for a colorful and nutritious twist.
- Mediterranean Flair: Swap soy sauce for lemon juice and add olives and artichokes for a Mediterranean-inspired dish.
Chef’s Notes
This recipe has evolved quite a bit over time! I initially started with a more traditional take, but I realized that my love for freshness and health needed to shine through. I experimented with different marinades, added more veggies, and now it’s a dish I can make any day of the week without guilt. If you find yourself adapting it over time, I’d love to hear about your variations!
The best advice I can share when making this dish is to have fun with it! Don’t stress over the details; cooking is about enjoying the process and the flavors. Whether you’re making it for yourself or hosting friends, it’s sure to bring everyone to the table with a smile.
FAQs and Troubleshooting
1. Why is my chicken rubbery?
If your chicken ends up rubbery, it could be overcooked. Chicken breasts can dry out quickly, so ensure you’re cooking them just until they’re no longer pink inside. Invest in a meat thermometer if you can—we’re aiming for 165°F (75°C) for perfectly cooked chicken!
2. Can I use chicken thighs instead of breasts?
Absolutely! Chicken thighs are more forgiving and tend to stay juicier. They will also add a nice richness to your dish.
3. How can I make this dish gluten-free?
Simply substitute soy sauce with tamari or coconut aminos, and always check that your cornstarch is certified gluten-free. You can enjoy this dish without the gluten!
4. What can I serve with Black Pepper Chicken?
This dish is wonderful served over rice, quinoa, or even noodles. If you’re going lighter, a refreshing salad or steamed veggies on the side complement the meal beautifully.
Nutritional Info
This recipe, as prepared, provides a balanced meal full of protein, fiber, and essential vitamins from the veggies. For a rough estimate:
- Calories: ~350 per serving
- Protein: 30g
- Carbohydrates: 30g
- Fat: 14g
Now, fellow foodies, it’s your turn! Dive into this recipe, relish the process, and share the joy at your table. Black Pepper Chicken isn’t just about the food; it’s about creating connections and savoring every moment—a true Clean Plate Cravings experience! Happy cooking!
PrintBlack Pepper Chicken

A bold flavor-packed dish featuring juicy chicken breasts, aromatic spices, and vibrant vegetables.
- Prep Time: 20 minutes
- Cook Time: 15 minutes
- Total Time: 35 minutes
- Yield: 4 servings 1x
- Category: Main Course
- Method: Stir-frying
- Cuisine: Asian
- Diet: Gluten-Free
Ingredients
- 1 lb boneless, skinless chicken breasts
- 1 tbsp freshly cracked black pepper
- 1/4 cup soy sauce
- 3 cloves garlic, minced
- 1 tbsp fresh ginger, minced
- 1 cup bell peppers, chopped
- 1 medium onion, chopped
- 2 tbsp cornstarch
- 2 tbsp vegetable oil
Instructions
- Prep your ingredients: Chop bell peppers and onion, mince garlic and ginger, slice chicken into thin strips.
- Marinate the chicken: Toss chicken strips with soy sauce, garlic, ginger, and black pepper. Marinate for 15-20 minutes.
- Dust with cornstarch: Coat chicken with cornstarch, shaking off excess.
- Heat the pan: Warm oil in a skillet over medium-high heat.
- Cook the chicken: Add chicken strips in a single layer, cook until golden brown, about 3-4 minutes per side.
- Toss in the veggies: Remove chicken, sauté onion and bell peppers for 2-3 minutes.
- Combine everything: Return chicken, mix well, taste, and adjust seasoning.
- Serve and enjoy: Plate over rice or quinoa, garnishing as desired.
Notes
Feel free to experiment with different vegetables or add crushed red pepper for a spicier kick.
Nutrition
- Serving Size: 1 serving
- Calories: 350
- Sugar: 5g
- Sodium: 800mg
- Fat: 14g
- Saturated Fat: 2g
- Unsaturated Fat: 10g
- Trans Fat: 0g
- Carbohydrates: 30g
- Fiber: 3g
- Protein: 30g
- Cholesterol: 85mg
Keywords: Black Pepper Chicken, Asian Cooking, Quick Dinner, Family Recipe, Weeknight Meals