Minute High-Protein Chicken Wraps for Busy Weeknights
High Protein Chicken Wraps: Your Go-To for Flavorful Fuel
Hey there, food lovers! Welcome back to Clean Plate Cravings, where we embrace vibrant, delicious meals that keep our energy levels high without driving us to the brink of madness in the kitchen. Today, I’m thrilled to share a recipe for high protein chicken wraps that are not just delightful to the taste buds but also super simple to whip up, making them perfect for busy days and hungry bellies.
Imagine biting into a wrap filled with crispy chicken, crunchy romaine, savory Parmesan, and a creamy Caesar dressing that dances across your palate. Sounds divine, right? Well, that’s exactly what we’re creating today. Whether you’re meal prepping for the week, looking for a quick lunch, or just want to impress a friend with your culinary skills (we won’t tell anyone how easy this is!), these wraps have got your back!
Let’s get into why high protein chicken wraps should be your new favorite go-to meal. First of all, they’re a fantastic way to pack in nutrients—specifically, protein! Chicken is not only filling but also supports muscle health and keeps you feeling satisfied for longer. Plus, these wraps are loaded with fresh veggies and a punch of flavor that will make you want to rave about them to all your friends.
So, roll up those sleeves, grab your apron, and let’s create some magic in the kitchen!
A Bite of Nostalgia
Growing up, I have vivid memories of Sundays spent gathering around the kitchen table with my family. While my mom busied herself with her famous lemon rosemary chicken, my dad would be wrapping up leftovers for lunch the next day. It was a delightful chaos of flavors, laughter, and the comforting aroma of homemade meals wafting through our home.
One day, in the rush of Sunday dinner, I decided to take matters into my own hands. I found some leftover chicken breast from the night before (one of my mom’s ingenious tricks to save time) and, inspired by my parents, I decided to make my own wraps. Using whatever I could find in the fridge—romaine, some cheese, and that glorious Caesar dressing—we had an impromptu high-protein meal that we all enjoyed. It was quick, delicious, and the perfect way to use up leftovers! Fast forward to today, and I still channel that inspiration for my chicken wraps. They’re now a staple in my meal plan, reminding me of those beautiful family moments while also fueling the busy lifestyle I lead as a food enthusiast.
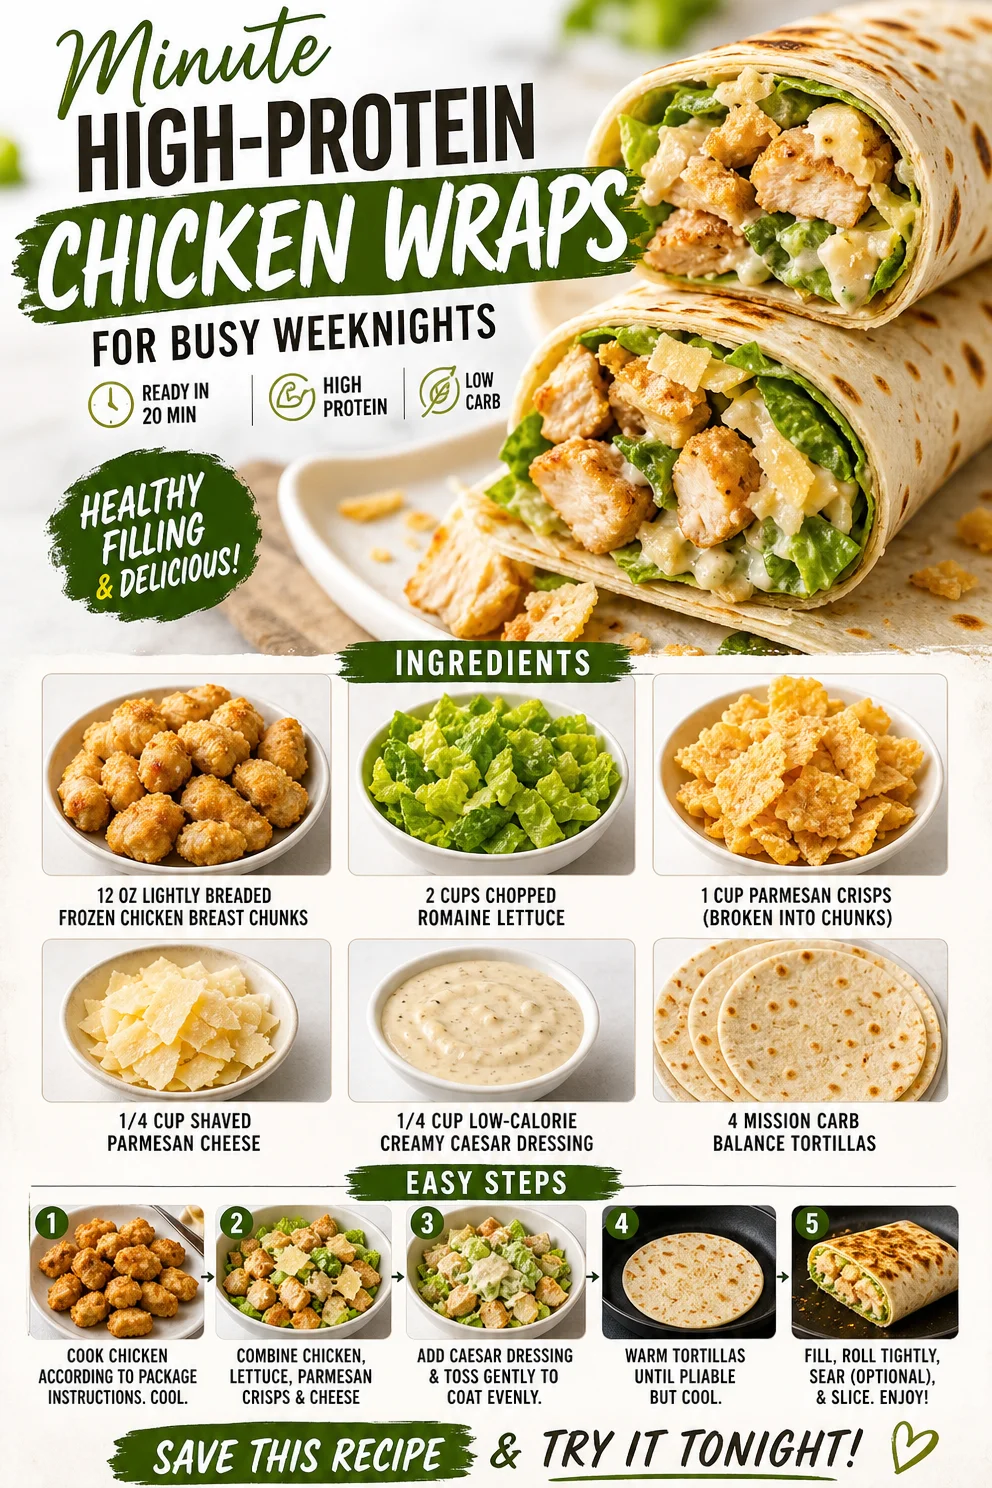
Ingredients
To create these amazing high protein chicken wraps, you’ll need the following ingredients:
-
12 oz lite breaded frozen chicken breast chunks
A convenient option that you can toss in the oven or air fryer. If you’re looking for a healthier version, opt for grilled chicken breast cut into chunks as a great substitute. -
2 cups chopped romaine lettuce
Fresh and crunchy, romaine adds a refreshing element to each bite. If you want to switch it up, try spinach or kale for an extra nutrient boost! -
1 cup parmesan crisps (broken into chunks)
These savory bites are the perfect crunch! For a low-carb option, you could substitute with crushed nuts or seeds. -
1/4 cup shaved Parmesan cheese
A little more cheesy goodness never hurt anyone! If you’re dairy-free, nutritional yeast can offer a cheesy flavor without the milk. -
1/4 cup low-calorie creamy Caesar dressing
This dressing ties all the flavors together. For a homemade touch, try a yogurt-based dressing or a drizzle of olive oil and lemon juice for a lighter option. -
4 Mission Carb Balance tortillas
These low-carb tortillas are flexible and delicious. Feel free to use whole-grain wraps or even lettuce leaves for a lighter, grain-free option.
Step-by-Step Instructions
Let’s dive into the how-to! Get ready to turn your kitchen into a flavor factory with these delightful chicken wraps.
Step 1: Preheat and Prepare
Start by preheating your oven according to the package instructions for the frozen chicken breast chunks. Typically, this will be around 400°F (200°C) and takes about 20-25 minutes to ensure they’re perfectly crispy.
Chef’s Tip: While that’s heating up, you can multitask—set the table or chop your romaine!
Step 2: Bake Those Chicken Chunks
Once your oven is hot and ready to go, spread your frozen chicken chunks evenly on a baking sheet. Pop them in the oven and let them bake until golden brown and crispy. Remember, you want them to have that delightful crunch!
Chef’s Insight: If you have an air fryer, feel free to use that for an even quicker prep time and an ultra-crispy finish!
Step 3: Chop the Romaine
While the chicken is baking, grab your chopping board and toss the romaine lettuce into a large bowl. Make sure to chop to your desired size—some like it big and crunchy while others prefer smaller bites.
Fun Fact: Did you know that romaine is packed with vitamins A and K? It not only adds crunch but also a nutritional punch!
Step 4: Prepare the Extras
While your chicken cooks and your romaine is cut, break up the parmesan crisps into chunks. Add those to your bowl along with the shaved Parmesan cheese for some gourmet flair.
Little Chef Hack: If you’re a cheese lover (who isn’t?), go ahead and add a sprinkle of your favorite cheese for an added creaminess!
Step 5: Combine Ingredients
Once your chicken is done and has had a minute to cool (you don’t want any major heat accidents!), toss those crispy chunks into the bowl with the romaine and cheeses. Pour in the Caesar dressing and mix it all up until everything is coated and happy!
Quick Tip: Don’t overmix! Just enough to coat evenly is perfect.
Step 6: Wrap It Up
Now for the fun part! Grab one of your tortillas and lay it flat. Spoon a generous amount of your chicken and salad mixture into the center of the wrap, leaving enough space to fold over the edges and roll it up neatly.
Chef’s Note: If you want the wrap to hold better, heat the tortillas for about 10 seconds in the microwave. This will soften them up!
Step 7: Serve and Enjoy
After you’ve successfully rolled your wraps, slice them in half if you’d like. Arrange them on a plate, and voilà, you have a beautiful meal that’s as eye-catching as it is tasty!
Serving Suggestions
For a fun and inviting presentation, serve your chicken wraps on a colorful platter with a small bowl of extra Caesar dressing for dipping. You can add a side of veggie sticks or baked sweet potato fries for a complete meal that’s nothing short of amazing!
Recipe Variations
Feeling inspired? Here are a few ways to jazz up your chicken wraps:
- Buffalo Chicken Twist: Add some buffalo sauce to the chicken before combining it with the other ingredients for a spicy kick.
- Mediterranean Style: Swap the dressing for tzatziki, add diced cucumbers, and feta cheese for a Mediterranean feast.
- Vegan Delight: Replace the chicken with chickpeas or marinated tofu and use a vegan dressing.
- Southwest Flair: Toss in black beans and corn, and switch the cheese for pepper jack for some heat.
- Breakfast Wrap: Enjoy this recipe as a breakfast option by including scrambled eggs and avocado for a protein-packed start to your day.
Chef’s Notes
This recipe has evolved over the years—from a simple family dinner to a versatile staple in my kitchen. I love how it encourages creativity! Last week, I found myself combining leftover veggies and chicken, and that’s when it hit me: these wraps are perfect for cleaning out the fridge! Additionally, they make for great meals on the go, whether that be a road trip or a busy workday.
And honestly, every time I take a bite, I’m transported back to those Sunday dinners with my family. It warms my heart knowing that those memories continue to inspire my love for cooking!
FAQs and Troubleshooting
-
What if my chicken isn’t crispy?
- If your chicken chunks aren’t crispy, try increasing the oven temperature slightly and give them a few more minutes. An air fryer also works wonders for achieving the perfect crunch!
-
What’s the best way to store leftovers?
- Store your wraps in an airtight container in the fridge for up to two days. I recommend keeping the dressing separate until you’re ready to enjoy!
-
Can I use different sauces?
- Absolutely! Any dressing you love will work. A ranch or a creamy garlic sauce could add a delightful touch as well.
-
What can I substitute for the tortillas?
- Try lettuce leaves or collard greens for a low-carb option, or use whole grain tortillas for more fiber.
Nutritional Info (Optional)
If you’re tracking your macros, one wrap (including the chicken, dressing, and toppings) typically contains around 450 calories, with approximately 30 grams of protein, making it a filling meal option!
So there you have it, foodies! High protein chicken wraps that are as flavorful as they are filling, perfect for any day of the week. Get creative, have fun, and remember, the kitchen is your playground! Happy cooking!
PrintHigh Protein Chicken Wraps
Delicious and easy high protein chicken wraps made with crispy chicken, fresh romaine, cheeses, and creamy Caesar dressing, perfect for busy days.
- Prep Time: 15 minutes
- Cook Time: 25 minutes
- Total Time: 40 minutes
- Yield: 4 servings 1x
- Category: Main Course
- Method: Baking
- Cuisine: American
- Diet: High Protein
Ingredients
- 12 oz lite breaded frozen chicken breast chunks
- 2 cups chopped romaine lettuce
- 1 cup parmesan crisps (broken into chunks)
- 1/4 cup shaved Parmesan cheese
- 1/4 cup low-calorie creamy Caesar dressing
- 4 Mission Carb Balance tortillas
Instructions
- Preheat your oven according to the package instructions for the frozen chicken breast chunks.
- Bake the chicken chunks on a baking sheet until golden brown and crispy.
- Chop the romaine lettuce into a large bowl.
- Prepare the parmesan crisps and shaved Parmesan cheese, adding them to the bowl.
- Combine the baked chicken, romaine, and cheeses with the Caesar dressing.
- Wrap a generous amount of the mixture in a tortilla.
- Serve and enjoy your delicious wraps!
Notes
Store leftovers in an airtight container in the fridge for up to two days. Keep the dressing separate until ready to eat.
Nutrition
- Serving Size: 1 wrap
- Calories: 450
- Sugar: 3g
- Sodium: 600mg
- Fat: 20g
- Saturated Fat: 6g
- Unsaturated Fat: 10g
- Trans Fat: 0g
- Carbohydrates: 35g
- Fiber: 5g
- Protein: 30g
- Cholesterol: 60mg
Keywords: chicken wraps, high protein, lunch, easy recipes, meal prep

Minute High-Protein Chicken Wraps for Busy Weeknights
High Protein Chicken Wraps: A Delicious Twist on Healthy Eating
Welcome to another tasty adventure in the kitchen at Clean Plate Cravings! Today, we’re whipping up something that’s not just easy to make, but also packed with protein and flavor—High Protein Chicken Wraps! These wraps are the perfect meal for anyone looking to enjoy a fulfilling, healthful dish without sacrificing taste. They’re great for lunch, dinner, or even a snack, and you’ll love how simple it is to bring them to life with just a few ingredients.
Now, let’s take a moment to break down why these wraps are a game changer. First off, they’re quick to assemble, which is perfect for those of us who lead busy lives (let’s be honest, we’re all there sometimes!). With lightly breaded frozen chicken breast chunks as the star of the show, these wraps pack a protein punch that’ll keep you feeling satisfied for hours. Plus, let’s not forget the fresh and crunchy romaine lettuce, savory Parmesan crisps, and the creamy, dreamy Caesar dressing that ties it all together.
As a chef, I believe that food is not just about nourishment; it’s about joy, creativity, and connecting with the people you love. The vibrant flavors in these wraps make them perfect for any gathering—whether you’re meal prepping for the week or hosting friends for a cozy night in. So roll up your sleeves, grab your favorite cutting board, and let’s dive into this delicious recipe!
A Journey Down Memory Lane
Let me take you back to a summer afternoon when I was a teenager, back when my love affair with food blossomed. My best friend, Lily, and I decided to have a “wrap-off” after seeing a food truck festival in town. We invited a group of friends, each tasked with creating the best wrap using whatever ingredients we could find in our kitchens.
Lily brought an assortment of ingredients she had from baking experiments gone wild, while I opted for a simple approach with grilled chicken, fresh veggies, and a tangy sauce. As we all gathered around the table, taste-testing one another’s creations and laughing until our bellies hurt, I realized then how powerful food could be—not just as a source of nourishment but as a catalyst for connection.
Years later, I’m still drawn to wraps, and now I’ve elevated them into these High Protein Chicken Wraps, perfect for any occasion. They bring me back to that vibrant summer day, and I hope they can do the same for you!
Ingredients
Here’s what you’ll need for these yummy High Protein Chicken Wraps:
-
12 oz lightly breaded frozen chicken breast chunks
- Chef Insight: These provide a convenient and crunchy protein base. You can swap them for grilled chicken strips or even some spicy fried tofu if you’re looking for plant-based protein!
-
2 cups chopped romaine lettuce
- Substitution Tip: Any leafy green works here! Spinach or kale will add a bit of a different flavor profile and can sneak in more nutrients.
-
1 cup Parmesan crisps (broken into chunks)
- Substitution Tip: If you’re looking for extra crunch, feel free to swap in other crispy elements like crushed tortilla chips or baked pita chips.
-
1/4 cup shaved Parmesan cheese
- Chef Insight: This adds a creamy, cheesy depth. Nutritional yeast can be a great vegan substitute if you’re looking to cut out dairy.
-
1/4 cup low-calorie creamy Caesar dressing
- Tip: Experiment with different dressings like ranch or a balsamic vinaigrette if you’re feeling adventurous.
-
4 Mission Carb Balance tortillas
- Substitution Tip: Try gluten-free wraps or lettuce leaves for a low-carb alternative.
Step-by-Step Instructions
Let’s get cooking! These wraps can come together in under 30 minutes if you have your ingredients prepped. Here’s how to make these delicious wraps:
-
Cook the Chicken
- Start by preheating your oven according to the instructions on the frozen chicken packaging. Spread the chicken chunks out on a baking sheet in an even layer. Bake until they are golden and crispy, usually around 15 minutes.
- Chef’s Tip: To ensure the crispiest results, flip the chicken halfway through cooking. The last 5 minutes can also be a great time to set your oven to broil to get that extra crunch!
-
Prep the Veggies
- While your chicken is baking, go ahead and chop those romaine lettuce leaves. The crunch from the lettuce is what brings life to the wraps, so don’t skimp on this step!
- Pro Tip: You can also toss the chopped lettuce with a splash of lemon juice or a dash of salt to enhance its flavor while you wait!
-
Assemble the Wraps
- Once the chicken is crispy and your lettuce is prepped, it’s time to build your masterpiece. Lay out a tortilla on a clean, flat surface.
- Begin layering by placing handfuls of chopped romaine, followed by the chicken chunks.
- Add the Parmesan crisps and sprinkle on the shaved Parmesan cheese. Drizzle with the creamy Caesar dressing to your liking.
- Chef Hack: If you want to avoid messy wraps, don’t overstuff them! About a cup of chicken and greens is usually a good starting point.
-
Wrap It Up!
- Fold in the sides of the tortilla and then roll it up tightly from the bottom to the top. Voila! You’ve created a wrap that’s ready to go.
- Pro Tip: If wrapping is tricky, you can also cut the tortilla’s edges to create a better folding experience.
-
Slice and Serve
- For a nice presentation, slice your wrap in half diagonally and lay it on a plate with the cut side facing upwards, showing off all those glorious layers.
- Serving Suggestion: Serve with some extra dressing for dipping and a few extra Parmesan crisps on the side for crunch!
Recipe Variations
Feeling adventurous? Here are some fun twists you can try with this recipe:
-
Buffalo Chicken Wrap: Swap the Caesar dressing for buffalo sauce and add some crumbled blue cheese to give it a spicy kick.
-
Mediterranean Twist: Use feta cheese instead of Parmesan, add diced cucumbers, cherry tomatoes, and a drizzle of tzatziki for a refreshing touch.
-
Southwest Style: Incorporate corn, black beans, avocado, and some sprinkle of taco seasoning for a fiesta in every bite.
-
Vegan Option: Replace chicken with crispy chickpeas and use a vegan Caesar or tahini dressing for a plant-based delight!
-
Breakfast Wrap: Use scrambled eggs instead of chicken, add diced tomatoes, spinach, and a sprinkle of cheese for a hearty morning meal.
Chef’s Notes
This recipe has a special place in my heart, and it’s seen some evolution over the years. Initially, I made it with whatever leftovers I and my family had in the fridge, but I’ve tailored it to keep the flavors balanced and satisfying. Experimenting with different dressings and textures over time has taught me a few things about wraps—each fold holds a story, and every bite is a chance for creativity!
I also remember the disastrous time I tried to showcase my “chef-ness” by making a wrap for a picnic only to realize I’d forgotten to put any dressing on it! Cue dry chicken and sad lettuce. Now, I always ensure to add that creamy touch; it truly makes a huge difference!
FAQs and Troubleshooting
-
Q: Can I make these wraps ahead of time?
- A: Absolutely! Just keep the wraps tightly wrapped in foil or plastic wrap in the fridge for up to 2 days. They may lose some crispiness, but they’ll still be tasty!
-
Q: What can I do if my chicken is undercooked?
- A: Make sure to cook the chicken according to package directions. If it’s undercooked, pop it back into the oven until it’s heated all the way through—better safe than sorry!
-
Q: How can I prevent my wraps from getting soggy?
- A: To avoid soggy wraps, make sure to keep the dressing on the side until you’re ready to eat. You can also use thicker spreads or hummus as a base to prevent moisture.
-
Q: Can I freeze the wraps?
- A: Yes! Wrap them tightly in foil or plastic before freezing. Just remember to let them thaw in the fridge overnight before enjoying them.
Nutritional Info (Optional)
While nutritional content will vary based on specific ingredient brands used, here’s a rough estimate per wrap:
- Calories: 350
- Protein: 30g
- Carbohydrates: 30g
- Fat: 15g
Enjoy the process, and remember to keep it fresh, healthy, and full of flavor. Happy cooking, friends!
PrintHigh Protein Chicken Wraps
A delicious and healthy chicken wrap packed with protein, fresh veggies, and creamy Caesar dressing.
- Prep Time: 15 minutes
- Cook Time: 15 minutes
- Total Time: 30 minutes
- Yield: 4 servings 1x
- Category: Main Course
- Method: Baking
- Cuisine: American
- Diet: High Protein
Ingredients
- 12 oz lightly breaded frozen chicken breast chunks
- 2 cups chopped romaine lettuce
- 1 cup Parmesan crisps (broken into chunks)
- 1/4 cup shaved Parmesan cheese
- 1/4 cup low-calorie creamy Caesar dressing
- 4 Mission Carb Balance tortillas
Instructions
- Preheat your oven according to the instructions on the frozen chicken packaging. Spread the chicken chunks out on a baking sheet in an even layer. Bake until they are golden and crispy, usually around 15 minutes.
- Chop the romaine lettuce leaves while the chicken is baking.
- Layer a tortilla on a clean, flat surface. Place chopped romaine, chicken chunks, Parmesan crisps, and shaved Parmesan cheese. Drizzle with Caesar dressing.
- Fold in the sides of the tortilla and roll it up tightly from the bottom to the top.
- Slice the wrap in half diagonally and serve with extra dressing for dipping.
Notes
Wraps can be made ahead of time; keep them tightly wrapped in the fridge for up to 2 days. To avoid sogginess, keep dressing on the side until ready to eat.
Nutrition
- Serving Size: 1 wrap
- Calories: 350
- Sugar: 3g
- Sodium: 700mg
- Fat: 15g
- Saturated Fat: 5g
- Unsaturated Fat: 8g
- Trans Fat: 0g
- Carbohydrates: 30g
- Fiber: 4g
- Protein: 30g
- Cholesterol: 40mg
Keywords: chicken wraps, high protein, healthy recipe, quick meal, easy dinner
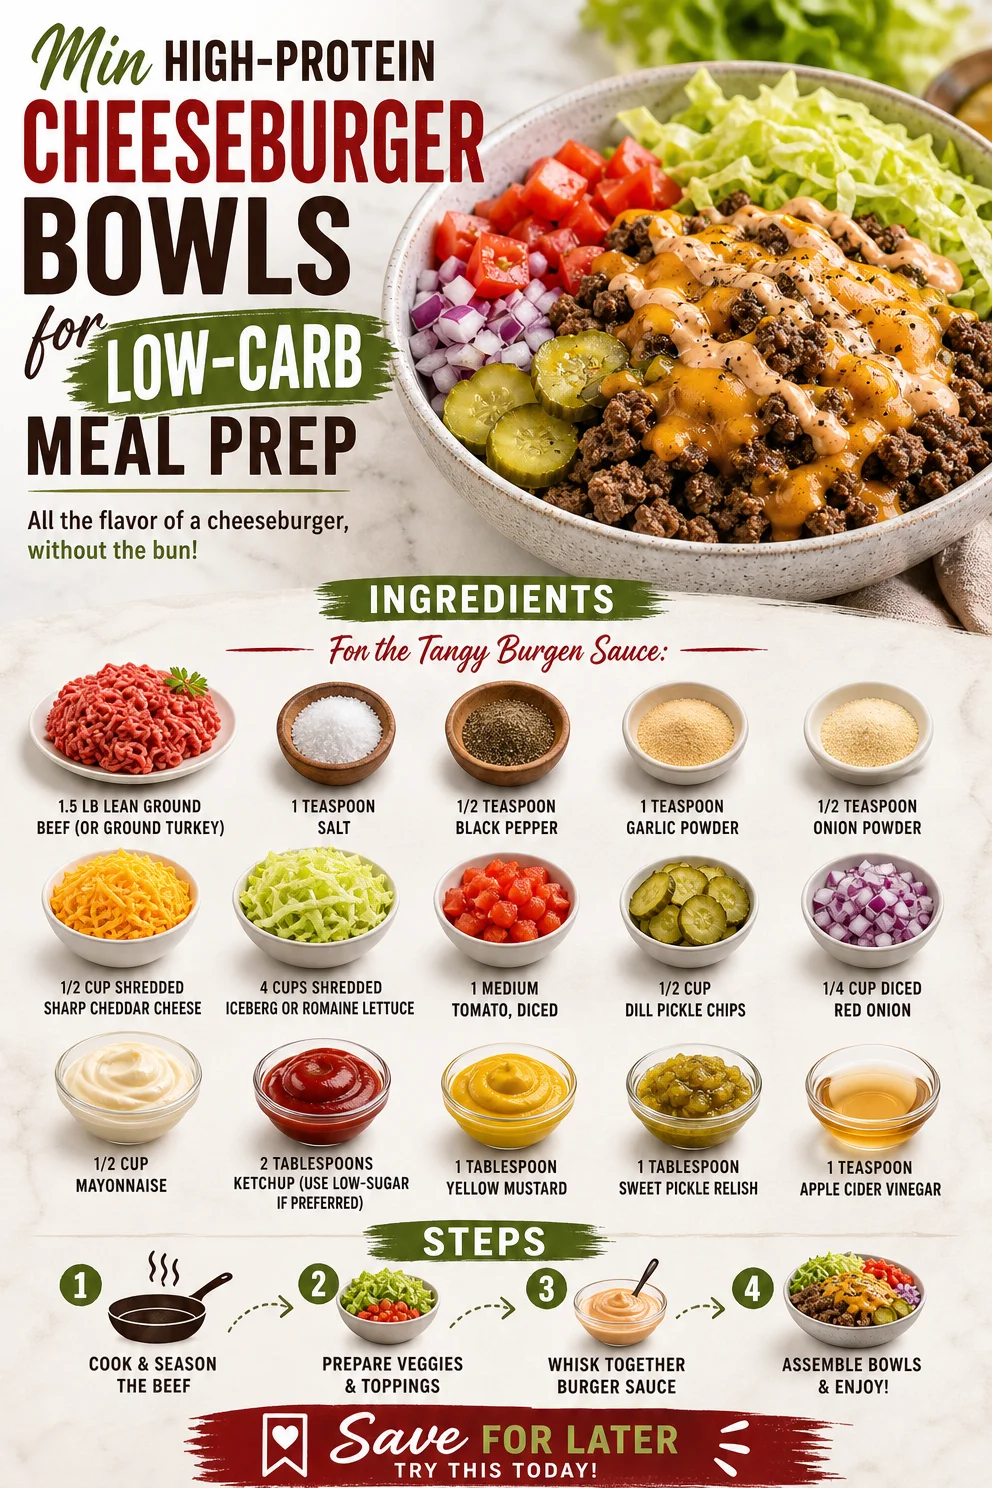
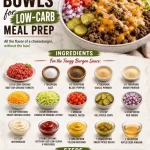
Min High-Protein Cheeseburger Bowls for Low-Carb Meal Prep
High-Protein Cheeseburger Bowls: Easy Low-Carb Meal Prep
Welcome to another delicious adventure here at Clean Plate Cravings! Today, we’re diving into the world of comfort food with a healthful twist – High-Protein Cheeseburger Bowls. This recipe is all about enjoying the classic flavors of a cheeseburger while keeping it low-carb and nutritious. Picture this: a vibrant bowl brimming with lean protein, crisp veggies, and draped in a tangy sauce that’ll make your taste buds dance. Whether you’re meal prepping for the week or whipping up a quick dinner, these cheeseburger bowls are going to become a staple in your kitchen.
Now, before we jump into the cooking, let me share a little story that captures my passion for this dish.
Personal Story
Ah, cheeseburgers! They hold a special place in my heart (and stomach). I remember my dad firing up the grill on Saturday afternoons while the tantalizing aroma of sizzling beef wafted through our backyard. We’d gather around, laughter echoing, while dad flipped patties to perfection. He had this secret blend of seasonings that made every bite nothing short of magical. Each burger was a masterpiece topped with melty cheese and all the fixings.
As I grew older, I realized my love for burgers wasn’t just about the taste; it was about those shared moments, the joy of good food bringing people together. Fast forward to today, I’ve concocted a healthier twist on that family favorite. These High-Protein Cheeseburger Bowls capture the essence of those delightful afternoons, minus the heavy carbs. So grab your apron, and let’s recreate this nostalgic dish together!
Ingredients
For the Bowls:
-
1.5 lb lean ground beef (or ground turkey)
This is the star of your bowl! Lean meat helps keep the protein high and the fat lower. If you’re looking for an even leaner option, ground turkey is a fantastic substitute. You can also use plant-based ground meat for a vegetarian version. -
1 teaspoon salt
Essential for enhancing the flavors of your meat. Feel free to tweak the amount based on your taste preference, or try a seasoned salt for an extra kick! -
1/2 teaspoon black pepper
A key seasoning that brings depth to the meat. You can use white pepper for a milder flavor, or add red pepper flakes if you like a little heat. -
1 teaspoon garlic powder
Adds a warm, aromatic flavor. You can substitute with fresh minced garlic if you prefer a bolder garlic hit—just adjust the quantity since fresh garlic is more potent. -
1/2 teaspoon onion powder
This enhances the savory flavor profile. Fresh onions can be used here too; just sauté them with the meat until they soften for a sweeter, richer taste. -
1/2 cup shredded sharp cheddar cheese
Because what’s a cheeseburger without cheese? Opt for a low-fat version if you want to cut down on calories, or experiment with other types like pepper jack for a spicy twist. -
4 cups shredded iceberg or romaine lettuce
The perfect crunchy base for your bowl! If you’re feeling adventurous, swap it for spinach or kale for added nutrients. -
1 medium tomato, diced
Fresh tomatoes add a juicy burst. Cherry tomatoes work well too; just halve them for a sweet pop of flavor. -
1/2 cup dill pickle chips
These provide a zesty crunch that really elevates the dish. If you prefer a bit of sweetness, you can use bread-and-butter pickles instead. -
1/4 cup diced red onion
A little kick of sharpness. You can use green onions for a milder taste or leave them out entirely if you’re not a fan.
For the Tangy Burger Sauce:
-
1/2 cup mayonnaise
A creamy base for our sauce. Try using Greek yogurt for a lighter version rich in protein. -
2 tablespoons ketchup
Adds a hint of sweetness. Choose low-sugar ketchup if you’re watching your sugar intake. -
1 tablespoon yellow mustard
Brings tang and depth to the sauce. You can swap for Dijon for a more sophisticated flavor. -
1 tablespoon sweet pickle relish
This is what adds that classic burger flavor. If you want to skip it, a teaspoon of honey can add a sweet touch instead. -
1 teaspoon apple cider vinegar
For a touch of acidity that balances the flavors. If you don’t have it on hand, white vinegar can work, but adjust to taste as it’s a bit sharper.
Step-by-Step Instructions
Step 1: Cook the Meat
Start by heating a large skillet over medium heat. Add your lean ground beef (or turkey) to the pan. Season it with salt, black pepper, garlic powder, and onion powder. Use a spatula to break the meat into crumbles as it cooks. You’re looking for a nice brown color, which typically takes about 8-10 minutes. Stir occasionally to prevent sticking. This step is crucial; browning the meat adds amazing flavor!
Step 2: Prepare the Sauce
While the meat is cooking, let’s whip up our tangy burger sauce. In a medium bowl, combine the mayonnaise, ketchup, mustard, sweet pickle relish, and apple cider vinegar. Stir well until everything is smooth and combined. Give it a taste—feel free to adjust ingredients based on your preferences. You might like it a little sweeter or tangier!
Step 3: Assemble the Bowls
Once the meat is fully cooked, it’s assembly time! Start with a generous handful of shredded lettuce at the bottom of each bowl. This is your base, and it’s going to add crunch and freshness. Top the lettuce with a scoop of the seasoned meat, then sprinkle the shredded cheddar cheese over the hot beef. The cheese will melt slightly, creating that delicious cheeseburger effect.
Step 4: Add Fresh Toppings
Next, it’s time for the fun part—adding your toppings! Dice the tomato and scatter it over the bowl along with the dill pickle chips and diced red onion. Each bite will be a delightful mix of flavors and textures.
Step 5: Drizzle with Sauce
Finally, drizzle the tangy burger sauce generously over the top. You can also serve some on the side for dipping, which is always a hit!
Step 6: Dig In!
There you have it—your High-Protein Cheeseburger Bowls are ready to be enjoyed! Serve them warm, and don’t forget to take the first bite to savor the symphony of flavors. You’ll be transported straight back to those backyard barbecues with every mouthful!
Serving Suggestions
These cheeseburger bowls are versatile! For a colorful presentation, you can serve them in vibrant bowls or even on a bed of seasoned quinoa for added nutrition and texture. For guests, consider adding some crusty bread or whole-grain buns on the side for the ultimate burger experience.
Recipe Variations
- BBQ Cheeseburger Bowls: Add barbecue sauce to the beef while it cooks for a smoky twist!
- Southwest Style: Mix in black beans and corn, and add avocado slices for a Tex-Mex flair.
- Mediterranean Variation: Swap the cheddar for feta and add olives and cucumber—yum!
- Vegan Option: Use a plant-based ground meat substitute and cashew mayo for the sauce.
- Spicy Kick: Toss in jalapeños or chili powder for an extra kick of heat.
Chef’s Notes
Creating these cheeseburger bowls has been a labor of love for me. Initially, I started with a traditional burger recipe, but as I embraced healthier eating habits, I knew I had to find a way to keep the comfort without the carbs. Over time, I discovered that by using fresh ingredients and crafting a flavorful sauce, I could satisfy that cheeseburger craving without the guilt! Plus, these bowls make for quick meal prep—an added win in my busy kitchen life.
FAQs and Troubleshooting
1. Can I make this ahead of time?
Absolutely! These bowls are perfect for meal prep. Just store everything separately in airtight containers and assemble when you’re ready to eat. The toppings keep well for a few days, and the flavors meld beautifully.
2. What if I don’t have all the spices?
Don’t worry! You can always customize the spices based on what you have on hand. Italian seasoning or a dash of paprika can also work wonders.
3. How can I make it spicy?
Want to add some heat? Incorporate diced jalapeños into the bowls or mix spicy mustard into your sauce. You could also blend in some Sriracha!
4. My ground meat is dry—what did I do wrong?
Overcooking can dry out meat, especially lean varieties! Make sure to cook it just until it’s no longer pink. If it happens, try mixing in a bit of your tangy sauce to bring some moisture back.
Nutritional Info
(Approximate per serving – based on 4 servings with ground beef, excluding optional toppings)
- Calories: 400
- Protein: 35g
- Carbohydrates: 8g (Net carbs: 5g)
- Fat: 25g
So there you have it—High-Protein Cheeseburger Bowls! With every flavorful bite, you’ll not only be nourishing your body but also reminiscing about those cherished grilled moments. Happy cooking, my food-loving friends!
PrintHigh-Protein Cheeseburger Bowls
Enjoy the classic flavors of a cheeseburger while keeping it low-carb and nutritious with these High-Protein Cheeseburger Bowls.
- Prep Time: 15 minutes
- Cook Time: 10 minutes
- Total Time: 25 minutes
- Yield: 4 servings 1x
- Category: Main Course
- Method: Cooking
- Cuisine: American
- Diet: Low Carb
Ingredients
- 1.5 lb lean ground beef (or ground turkey)
- 1 teaspoon salt
- 1/2 teaspoon black pepper
- 1 teaspoon garlic powder
- 1/2 teaspoon onion powder
- 1/2 cup shredded sharp cheddar cheese
- 4 cups shredded iceberg or romaine lettuce
- 1 medium tomato, diced
- 1/2 cup dill pickle chips
- 1/4 cup diced red onion
- 1/2 cup mayonnaise
- 2 tablespoons ketchup
- 1 tablespoon yellow mustard
- 1 tablespoon sweet pickle relish
- 1 teaspoon apple cider vinegar
Instructions
- Cook the meat: Heat a large skillet over medium heat. Add your lean ground beef (or turkey) to the pan. Season it with salt, black pepper, garlic powder, and onion powder. Cook until browned, about 8-10 minutes.
- Prepare the sauce: In a medium bowl, combine the mayonnaise, ketchup, mustard, sweet pickle relish, and apple cider vinegar. Stir well until smooth and combined.
- Assemble the bowls: Start with a handful of shredded lettuce at the bottom of each bowl. Top with a scoop of the seasoned meat, then sprinkle the shredded cheddar cheese over the hot beef.
- Add fresh toppings: Dice the tomato and scatter it over the bowl along with the dill pickle chips and diced red onion.
- Drizzle with sauce: Generously drizzle the tangy burger sauce over the top.
- Dig in and enjoy: Serve warm and savor the delicious flavors!
Notes
These bowls are perfect for meal prep. Store ingredients separately and assemble when ready to eat.
Nutrition
- Serving Size: 1 serving
- Calories: 400
- Sugar: 4g
- Sodium: 700mg
- Fat: 25g
- Saturated Fat: 9g
- Unsaturated Fat: 9g
- Trans Fat: 0g
- Carbohydrates: 8g
- Fiber: 3g
- Protein: 35g
- Cholesterol: 90mg
Keywords: cheeseburger bowls, low-carb, meal prep, high-protein
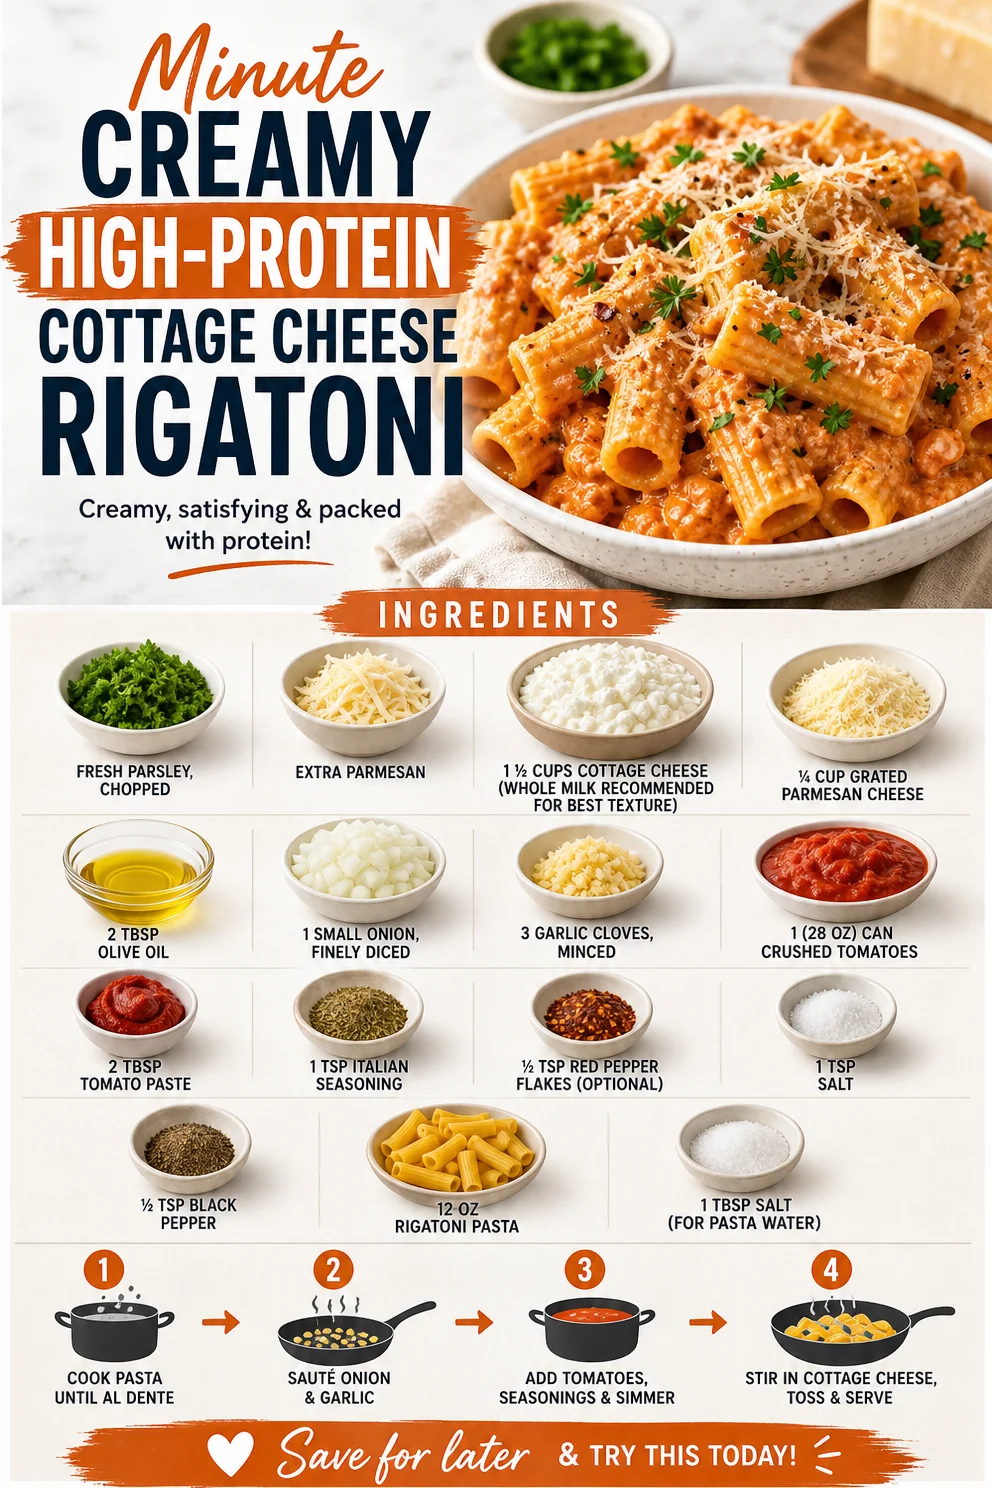
Minute Creamy High-Protein Cottage Cheese Rigatoni
Creamy Cottage Cheese Rigatoni: A High-Protein Delight for Foodies
Hello, my foodie friends! Welcome back to Clean Plate Cravings, where we believe that every meal can be a vibrant celebration of flavor—even when we’re aiming for healthy eating! Today, I’m thrilled to share one of my latest obsessions: Creamy Cottage Cheese Rigatoni. If you’re looking for a high-protein pasta dish that’s rich, satisfying, and packed with flavor, you’ve landed in the right place!
This recipe is the epitome of comfort food, but with a twist. Imagine creamy pasta that’s not only delicious but also nutritious—sounds dreamy, doesn’t it? You’ll be amazed at how simple it is to whip up a dish that feels indulgent yet wholesome. With the perfect balance of savory tomatoes, aromatic garlic, and that luscious cottage cheese, this rigatoni dish is about to become your new weeknight favorite.
A Taste of Nostalgia: The Cottage Cheese Connection
Let me take you back to my childhood kitchen where cottage cheese was a staple of many meals. My mom used to layer it into her lasagna for that extra creaminess and protein boost. I’ll never forget the times spent bustling around the kitchen, the smell of simmering tomatoes wafting through the air, and the laughter that echoed as we enjoyed dinner together.
One day, while wandering through the grocery store, I spotted a bright, colorful block of fresh parsley. It all came rushing back to me—the aroma of the herb mingling with the rich flavors of tomato sauce. That day, I decided to get creative and recreate my mom’s classic recipe with a modern twist. I replaced the ricotta with cottage cheese and added rigatoni for a delightful twist! The result? A pasta dish that not only brings back cherished memories but also serves up goodness on a plate.
Now, let’s dive into making this dish and capture that same warmth of my childhood.
Ingredients You’ll Need
Here’s what you’ll need for this creamy creation:
- Fresh parsley, chopped: A fragrant herb that adds bright color and freshness to the dish. Feel free to substitute with basil or oregano if you prefer.
- Extra Parmesan: Because who doesn’t love more cheese? This is your finishing touch to intensify flavors. Grated Pecorino Romano can be a great substitute.
- 1 ½ cups cottage cheese (whole milk recommended for best texture): The star of the show! Whole milk cottage cheese gives a creamy texture, but low-fat varieties work as well if you’re watching calories.
- ¼ cup grated Parmesan cheese: Adds depth to our sauce. You can use a vegan alternative if you’re going dairy-free.
- 2 tbsp olive oil: For sautéing! Feel free to replace it with avocado oil for a milder flavor.
- 1 small onion, finely diced: Sautéing onion brings out its natural sweetness. Shallots can be a great alternative if you want a milder taste.
- 3 garlic cloves, minced: Garlic makes everything better! If you’re a garlic lover, don’t shy away from adding an extra clove!
- 1 (28 oz) can crushed tomatoes: This forms the base of our sauce. You can substitute with diced tomatoes if you prefer a chunkier sauce.
- 2 tbsp tomato paste: Concentrated tomato goodness to boost flavor. If you’re out, a handful of fresh tomatoes blended works too.
- 1 tsp Italian seasoning: A blend of dried herbs that’s a pantry staple! Don’t have it? Try a mix of dried basil, oregano, and thyme.
- ½ tsp red pepper flakes (optional): For a little kick! Adjust to your preference based on your spice tolerance.
- 1 tsp salt: Enhances flavors. Adjust based on dietary needs.
- ½ tsp black pepper: A cornerstone of seasoning! Freshly ground always packs more flavor.
- 12 oz rigatoni pasta: The perfect vessel for sauce! If you’re gluten-free, you can use chickpea or lentil pasta.
- 1 tbsp salt (for pasta water): Salting the water ensures your pasta is properly seasoned. Don’t skip it!
Step-by-Step Instructions
Are you ready to get cooking? Let’s bring together all these beautiful ingredients and create a dish that will have people begging for seconds!
-
Cook the pasta:
Start by bringing a large pot of salted water to a boil. Remember—this is your chance to add flavor to the pasta itself! Add 12 oz of rigatoni and cook until al dente according to package instructions. Mix it up a bit with a spoon during cooking. Trust me, that extra love keeps everything from sticking together! -
Sauté the aromatics:
While your pasta cooks, heat 2 tablespoons of olive oil in a large skillet over medium heat. Toss in the finely diced onion and sauté until it’s softened and translucent, about 4-5 minutes. As the onion cooks, let its fragrance fill the kitchen and set the mood for deliciousness. Then, add your minced garlic and red pepper flakes. Sauté for an additional minute until the garlic is fragrant but not browned—nobody likes burnt garlic! -
Create the sauce:
Pour in the 28 oz can of crushed tomatoes and mix in the 2 tablespoons of tomato paste along with the Italian seasoning, salt, and black pepper. Allow this mixture to simmer for about 10-15 minutes, stirring occasionally. This is where the magic happens! You’ll notice the sauce thickening and deepening in flavor. Feel free to taste and adjust the seasonings as needed; it’s all about your personal preference! -
Bring in the cottage cheese:
Once your sauce has simmered to perfection, reduce the heat to low and stir in the 1 ½ cups of cottage cheese. Mix it well to create that creamy texture we’re after. Don’t forget to add the ¼ cup of grated Parmesan cheese into the mix! It’s what makes the sauce sing harmony with the rigatoni. Note: There’s something so therapeutic about this step; don’t rush it! -
Combine pasta and sauce:
Drain your rigatoni, reserving a little pasta water (about ½ cup) if it looks too thick. Combine the pasta directly into the skillet with the sauce and toss to coat evenly. If it looks a bit dry, drizzle in some of that reserved pasta water to create a silkier texture. Your home is about to smell like a little Italian bistro! -
Finish and garnish:
Once everything is well incorporated, serve it hot! Plate your creamy cottage cheese rigatoni and sprinkle with fresh chopped parsley and extra Parmesan. Not only does this add a vibrant touch, but it also elevates the flavors beautifully.
Serving Suggestions
To serve, grab a large pasta bowl and heap spoonfuls of that luscious rigatoni in the center. Sprinkle a little extra fresh parsley and some crushed red pepper flakes for those who enjoy a bit of heat. Serve it family-style or plate individual servings, and don’t forget a side of crusty bread to mop up any remaining sauce—it’s an absolute must!
Recipe Variations
Here are a few creative twists to make this dish your own:
- Vegetable Boost: Add sautéed spinach, zucchini, or mushrooms into the sauce for added nutrients and flavor.
- Protein-packed: Stir in cooked ground turkey or chicken for an added protein boost. For a plant-based option, add chickpeas or lentils.
- Flavorful Swaps: Experiment with different types of cheese—ricotta, mascarpone, or even goat cheese can create a beautiful taste profile.
- Tailored Spice Levels: If you like more kick, consider adding more red pepper flakes, or why not try a splash of hot sauce right before you serve?
- Dairy-Free Delight: Use a plant-based alternative for cottage cheese and a vegan Parmesan to create a totally dairy-free version of this dish.
Chef’s Notes
I love that this recipe honors the beauty of comfort food while packing a nutritious punch. The creamy cottage cheese gives me those nostalgic vibes while allowing me to enjoy a lighter meal that keeps me satisfied. Over the years, I’ve played with different herbs and spices in this recipe, but I always come back to my initial inspiration—simple, honest ingredients that truly shine.
Oh, and don’t get me started on the dishes this recipe can conjure up! One evening, a friend dropped by unexpectedly, and I whipped this up in no time. The surprise win? My friend was a die-hard pasta snob! They swooned over the creaminess and couldn’t believe how healthy it was. There’s something special about sharing a meal that makes everyone feel at home—what you serve truly matters.
FAQs and Troubleshooting
Here are some common questions and tips that might help you out:
-
Can I use a different kind of pasta?
Absolutely! While rigatoni is fantastic for holding onto that creamy sauce, you can use any pasta you adore, like penne, farfalle, or even gluten-free options! -
What if the sauce is too thick?
No worries! Just add a splash of pasta water to loosen things up. You can always adjust the creaminess to your liking. -
Can I meal prep this dish?
Yes, indeed! This rigatoni holds up well in the fridge for about 3 days. Just reheat gently, and if it’s a bit dry, add a splash of water or stock while heating to bring back the creamy goodness. -
Is this recipe easily doubled?
You bet! Just remember to adjust the cooking time for the pasta and ensure your skillet is big enough to hold all that deliciousness!
Nutritional Info (Optional)
While I know many of you have varying dietary preferences, here’s a rough estimate for one serving (including rigatoni and sauce):
- Calories: 450
- Protein: 25g
- Fat: 15g
- Carbohydrates: 55g
- Fiber: 4g
(Note: Nutritional values may vary based on specific ingredients used or portion sizes.)
And there you have it, my friends—Creamy Cottage Cheese Rigatoni that will make your taste buds dance! I hope you love making this dish as much as I do. Remember, cooking should be fun, and every bite can be an adventure waiting to happen. Let’s keep it fresh, simple, and seriously delicious! Happy cooking!
PrintCreamy Cottage Cheese Rigatoni
A high-protein pasta dish that combines creamy cottage cheese with savory tomatoes and aromatic garlic for a delightful twist on comfort food.
- Prep Time: 15 minutes
- Cook Time: 30 minutes
- Total Time: 45 minutes
- Yield: 4 servings 1x
- Category: Main Course
- Method: Baking
- Cuisine: Italian
- Diet: Vegetarian
Ingredients
- 12 oz rigatoni pasta
- 1 ½ cups cottage cheese (whole milk recommended)
- ¼ cup grated Parmesan cheese
- 2 tbsp olive oil
- 1 small onion, finely diced
- 3 garlic cloves, minced
- 1 (28 oz) can crushed tomatoes
- 2 tbsp tomato paste
- 1 tsp Italian seasoning
- ½ tsp red pepper flakes (optional)
- 1 tsp salt
- ½ tsp black pepper
- 1 tbsp salt (for pasta water)
- Fresh parsley, chopped (for garnish)
- Extra Parmesan (for garnish)
Instructions
- Cook the pasta: Bring a large pot of salted water to a boil. Add rigatoni and cook until al dente according to package instructions.
- Sauté the aromatics: Heat olive oil in a large skillet over medium heat. Add diced onion and sauté until softened. Add minced garlic and red pepper flakes; sauté for an additional minute.
- Create the sauce: Pour in crushed tomatoes and mix in tomato paste, Italian seasoning, salt, and black pepper. Simmer for about 10-15 minutes.
- Bring in the cottage cheese: Reduce heat and stir in cottage cheese and grated Parmesan. Mix well to create a creamy texture.
- Combine pasta and sauce: Drain rigatoni, reserving some pasta water. Combine pasta with the sauce and toss to coat evenly.
- Finish and garnish: Serve hot and sprinkle with chopped parsley and extra Parmesan.
Notes
This dish can be easily customized with added vegetables or proteins. Perfect for meal prep!
Nutrition
- Serving Size: 1 serving
- Calories: 450
- Sugar: 8g
- Sodium: 800mg
- Fat: 15g
- Saturated Fat: 5g
- Unsaturated Fat: 8g
- Trans Fat: 0g
- Carbohydrates: 55g
- Fiber: 4g
- Protein: 25g
- Cholesterol: 40mg
Keywords: rigatoni, cottage cheese, high protein, quick dinner, comfort food

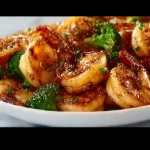
Minute High-Protein Honey Garlic Shrimp for Meal Prep
High-Protein Honey Garlic Shrimp: A Delicious Adventure
Introduction
Hello, fellow food lovers! Buckle up your aprons because today we’re embarking on a culinary journey that’s about to transform your weeknight dinners—High-Protein Honey Garlic Shrimp! This dish is not just tantalizingly tasty; it’s also packed with protein, making it a guilt-free pleasure you’ll want to savor again and again.
Imagine a busy weekday evening. You’ve shuffled through the chaos of meetings, errands, and the inevitable “What’s for dinner?” disaster. You walk into your kitchen, and the thought of whipping up something delicious feels miles away. But wait! With just a handful of ingredients, you can bring the vibrant flavors of a great seafood restaurant right to your table.
This dish features juicy shrimp coated in a sweet and savory honey garlic sauce that’s simply irresistible! Not only is it quick to prepare—taking about 20-30 minutes—but it’s also extraordinarily versatile, allowing you to serve it with rice, quinoa, or fresh vegetables. Plus, it’s wonderful on its own or dressed up with your favorite sides.
And let’s not forget about the nutritional side of things! Shrimp is an excellent source of protein and packed with vitamins and minerals, making this dish not only scrumptious but also wholesome. Join me as we dive headfirst into this adventure in flavor!
Personal Story
Growing up in my family, seafood wasn’t just food; it was a celebration. I fondly remember the evenings spent by the ocean, the salty breeze wrapping around us as my parents cooked up shrimp on the grill while sharing stories and laughter. One evening, my dad decided to try his hand at making garlic shrimp with a touch of honey sauce—an experiment that turned into a family favorite.
We all waited eagerly as the sweet aroma drifted from the kitchen to the dining table—a combination of smoky garlic and a hint of sweetness dancing through the air. As the first bite melted in my mouth, I realized he’d created magic! That simple dish, full of flavor and nostalgia, became a staple in our household.
Fast forward to today, and I can’t tell you how happy it makes me to recreate that same happiness in my own kitchen, pasta parties instead replaced with meal prepping shrimp for the week ahead. Trust me, once you try this High-Protein Honey Garlic Shrimp, you’ll have your own memories to cherish for years to come!
Ingredients
To make this delectable dish, gather the following ingredients:
-
1 pound shrimp, peeled and deveined
Fresh shrimp provides the best flavor and texture. If you can’t find fresh, frozen shrimp works too! Just ensure to thaw it thoroughly before cooking. -
1/4 cup honey
Honey adds a lovely sweetness to balance the garlic. Adjust the quantity if you prefer a sweeter or less sweet flavor! -
3 cloves garlic, minced
Garlic is essential for that delightful aromatic quality. Feel free to use garlic powder in a pinch—just aim for about 1 teaspoon. -
2 tablespoons soy sauce
This adds the umami kick! You can swap in low-sodium soy sauce for a lighter option, or use tamari for a gluten-free alternative. -
1 tablespoon olive oil
Olive oil adds healthy fats and helps prevent shrimp from sticking to the pan. If you’re looking for a flavor twist, try sesame oil for an extra punch! -
Salt and pepper to taste
Seasoning is vital! Remember, you can always add more, but you can’t take it out once it’s in. -
Cooked rice or vegetables for serving
Serve this dish over your choice of rice, quinoa, or steamed veggies. It’s super versatile—play around to find your favorite combination!
Step-by-Step Instructions
Step 1: Preparing the Shrimp
Start by ensuring your shrimp is thawed, cleaned, and patted dry. The drier they are, the better they’ll sear. There’s nothing worse than steaming when you want a lovely golden crust! Chef tip: If your shrimp come with tails, consider leaving them on for presentation—makes it feel a bit fancier!
Step 2: Mixing the Sauce
In a small bowl, whisk together the honey, minced garlic, and soy sauce. This sauce is where the magic happens! Pro tip: If you like a bit of kick, add a pinch of red pepper flakes to the mix for a sweet and spicy finish.
Step 3: Heating the Pan
In a large skillet, heat the olive oil over medium-high heat. You want the oil hot but not smoking; too much heat can burn the garlic and give it a bitter flavor. Keep an eye on it! If your pan starts to smoke, turn it down a notch.
Step 4: Cooking the Shrimp
Add the shrimp to the skillet in a single layer. Let them cook for about 2-3 minutes without stirring to achieve that golden sear. You’ll know they’re ready to flip when they turn pink around the edges. Chef secret: Don’t overcrowd the pan! If you’re making a double batch, do it in two rounds.
Step 5: Adding the Sauce
Once the shrimp are beautifully seared, pour the honey garlic sauce over and toss to coat. Cook for another 1-2 minutes until the shrimp are fully cooked and the sauce has thickened slightly. Tip: The shrimp will continue cooking from residual heat, so take them off the stove as soon as they’re opaque.
Step 6: Seasoning
Taste your shrimp and season with salt and pepper if needed. You may not even need it with the soy sauce already in there! A little spritz of lemon juice at the end can elevate the flavors to another level—try it out!
Serving Suggestions
To serve, pile a generous portion of cooked rice or your favorite veggies on a plate and gently lay the honey garlic shrimp on top. Drizzle any extra sauce over the shrimp and garnish with sesame seeds or finely chopped green onions for a little extra flair! This presentation not only packs a flavor punch but also makes for an eye-catching meal!
Recipe Variations
-
Spicy Honey Garlic Shrimp: Add a splash of sriracha or a diced fresh chili to the sauce for an exciting kick!
-
Citrusy Twist: Squeeze some fresh lime juice into the sauce for a refreshing zing that compliments the sweetness of the honey.
-
Zucchini Noodles Option: Serve the honey garlic shrimp over spiralized zucchini noodles for a low-carb alternative!
-
Herb Infusion: Mix in some fresh basil or cilantro when serving to elevate the dish with vibrant herb flavors.
-
Sweet and Savory: Toss in some pineapple chunks when cooking the shrimp for a tropical, sweet addition!
Chef’s Notes
This High-Protein Honey Garlic Shrimp recipe has evolved over the years. Initially, I used to cook my shrimp in plain olive oil, but after my dad introduced me to the beauty of sauce-making, I couldn’t resist adding flavor layers. The sweetness of honey and the pungent garlic opened a whole new world of possibilities!
And let me tell you, there have been funny moments, too! One time, during a dinner party, I accidentally spilled half a bottle of honey into the pan, thinking I was using a different recipe! It turned into a sticky disaster but somehow turned out to be the favorite dish of the night—so, I guess accidents in the kitchen can be a blessing, right?
FAQs and Troubleshooting
1. How do I know when the shrimp are cooked?
Look for shrimp that have turned pink and opaque all the way through. They should curl up into a "C" shape. If they curl into an "O," they may be overcooked.
2. Can I use frozen shrimp?
Absolutely! Just make sure to thaw them completely and pat them dry before cooking. This ensures they sear nicely.
3. What sides pair well with honey garlic shrimp?
This dish is super versatile! Try it over fluffy rice, sautéed greens, or even a fresh salad for a balanced meal.
4. Why is my sauce too runny?
If your sauce isn’t thickening, try increasing the heat slightly and cooking for a bit longer. Alternatively, you can add a cornstarch-water slurry (1 tsp cornstarch mixed with 1 tsp water) to thicken it up quickly.
Nutritional Info (Optional)
While I haven’t included the specifics in our conversation, you can roughly estimate this serving to contain about 200 calories, with 22 grams of protein, 8 grams of carbs, and minimal fats if you stick to olive oil.
So there you have it—your go-to High-Protein Honey Garlic Shrimp recipe! Don’t forget to share your culinary experiences with me, and let’s keep the delicious vibes flowing. Happy cooking!
PrintHigh-Protein Honey Garlic Shrimp
A quick and delicious high-protein meal featuring shrimp coated in a sweet and savory honey garlic sauce.
- Prep Time: 10 minutes
- Cook Time: 10 minutes
- Total Time: 20 minutes
- Yield: 4 servings 1x
- Category: Main Course
- Method: Sautéing
- Cuisine: Seafood
- Diet: Gluten-Free
Ingredients
- 1 pound shrimp, peeled and deveined
- 1/4 cup honey
- 3 cloves garlic, minced
- 2 tablespoons soy sauce
- 1 tablespoon olive oil
- Salt and pepper to taste
- Cooked rice or vegetables for serving
Instructions
- Start by ensuring your shrimp is thawed, cleaned, and patted dry.
- In a small bowl, whisk together the honey, minced garlic, and soy sauce.
- In a large skillet, heat the olive oil over medium-high heat.
- Add the shrimp to the skillet in a single layer; let them cook for about 2-3 minutes without stirring.
- Once the shrimp are beautifully seared, pour the honey garlic sauce over and toss to coat.
- Taste your shrimp and season with salt and pepper if needed.
Notes
For an exciting kick, consider adding sriracha or diced chili to the sauce. A squeeze of fresh lemon juice at the end can elevate the flavors.
Nutrition
- Serving Size: 1 serving
- Calories: 200
- Sugar: 21g
- Sodium: 400mg
- Fat: 7g
- Saturated Fat: 1g
- Unsaturated Fat: 5g
- Trans Fat: 0g
- Carbohydrates: 9g
- Fiber: 0g
- Protein: 22g
- Cholesterol: 200mg
Keywords: shrimp, honey garlic, seafood, quick dinner, high-protein