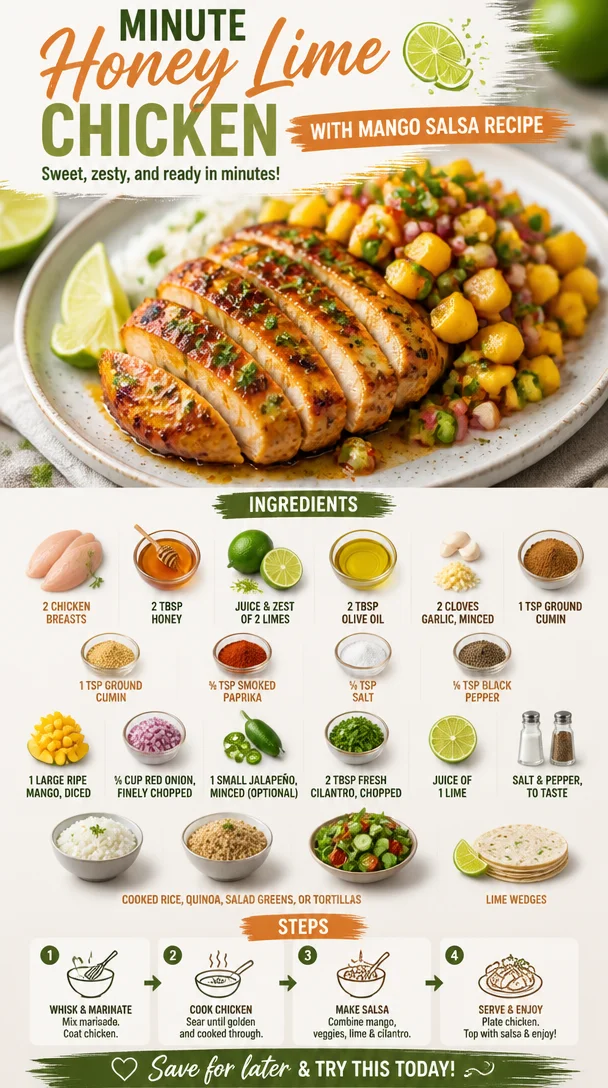
Minute Honey Lime Chicken with Mango Salsa Recipe
Honey Lime Chicken with Mango Salsa: A Flavorful Escape to the Tropics
Welcome back, my foodie friends! Today, we’re diving into the vibrant and tangy world of Honey Lime Chicken with a refreshing Mango Salsa. Imagine the sun shining, the sound of waves crashing in the distance, and the sweet scent of tropical fruits woven together with the savory notes of perfectly grilled chicken. Whether you’re cooking for family, friends, or just treating yourself to a scrumptious meal, this dish is bound to be a hit.
Eating is not just about fueling our bodies—it’s also about creating memories, sharing experiences, and enjoying the moment. In this post, we’ll guide you through a journey of flavors, nostalgia, and a few chef secrets that will make you feel like a kitchen rockstar. So grab your apron, and let’s get cooking!
A Memory to Savor
Growing up, summer evenings meant gathering around the grill with family and friends. My parents would fire up the barbecue, and the aroma of marinated meats would fill the air. One dish that stood out was a simple honey lime chicken, marinated to perfection and served with a side of vibrant salsa. I remember sneaking bites of juicy mango while my mom prepared the salsa, giggling as my little brother tried to steal the last piece of grilled chicken from my plate.
It was more than just a meal; it was about laughter, warmth, and connection. As each bite filled my senses with flavor, I realized that food has a beautiful way of bringing people together. This Honey Lime Chicken with Mango Salsa echoes those cherished moments, inviting you to create your own delicious memories around the dinner table.
Ingredients
Here’s what you’ll need to create this culinary masterpiece:
-
2 large boneless, skinless chicken breasts (or 4 small): Choose free-range or organic chicken for the best flavor. If you’re vegan, try using tofu or portobello mushrooms as a hearty substitute.
-
2 tablespoons honey: This natural sweetener adds a wonderful caramelization when grilled. You can swap it for agave syrup if you’re looking for a vegan alternative.
-
Juice and zest of 2 limes: A must for that zesty punch! Zest adds vibrant flavor—don’t skip it!
-
2 tablespoons olive oil: This healthy fat helps with cooking and enhances overall flavor. If you’re sensitive to olive oil, feel free to use avocado oil instead.
-
2 cloves garlic, minced: Fresh garlic brings a touch of warmth to the dish. If you’re in a pinch, garlic powder works too. Use ½ teaspoon instead.
-
1 teaspoon ground cumin: Adds a lovely earthy flavor. For a different twist, try smoked cumin to enhance the smokiness.
-
½ teaspoon smoked paprika: This ingredient gives the chicken a subtle smokey flavor along with its beautiful color.
-
½ teaspoon salt: It elevates all the flavors but adjust according to personal preference.
-
¼ teaspoon black pepper: Freshly ground adds better flavor. It can be omitted for a milder taste.
-
1 large ripe mango, diced: This fruit offers a sweet, juicy counterpoint to the savory chicken. Substitute with pineapple for a different tropical flair.
-
¼ cup red onion, finely chopped: Adds a nice crunch and tang. If you prefer a milder taste, soak the onion in cold water for about 10 minutes before using.
-
1 small jalapeño, seeded and minced (optional for heat): Add just a little spice if you’re a heat lover! Skip it entirely if you prefer a milder salsa.
-
2 tablespoons fresh cilantro, chopped: For a refreshing touch. If cilantro isn’t your thing, try fresh parsley or mint.
-
Juice of 1 lime: Enhances flavor in the salsa—always fresh for the best result.
-
Salt and pepper, to taste: Don’t forget to adjust these for the final season.
-
Cooked rice, quinoa, salad greens, or tortillas: These serve as great accompaniments for serving.
-
Lime wedges: Perfect for a zesty squeeze right before enjoying!
Step-by-Step Instructions
-
Marinate the Chicken: In a mixing bowl, combine the honey, lime juice, lime zest, olive oil, minced garlic, cumin, smoked paprika, salt, and black pepper. Whisk until smooth. Add the chicken and make sure it’s well-coated in the marinade. Cover and let it marinate for at least 30 minutes (or up to 4 hours!) in the refrigerator. Chef Hack: The longer you marinate, the more flavor your chicken will have, but if you’re short on time, even 30 minutes will make a difference!
-
Prepare the Salsa: While the chicken marinates, let’s whip up that vibrant mango salsa! In a separate bowl, mix the diced mango, red onion, minced jalapeño (if using), chopped cilantro, lime juice, salt, and pepper. Gently fold to combine—be careful not to mash the mango! Tip: Letting the salsa sit for about 10-15 minutes allows the flavors to meld beautifully—don’t rush this step!
-
Preheat the Grill: Get your grill or grill pan ready by preheating it to medium-high heat. Lightly grease the grill grates to prevent the chicken from sticking.
-
Cook the Chicken: Remove the chicken from the marinade, letting the excess drip off. Place the chicken on the grill and cook for about 5-7 minutes on each side, or until the internal temperature reaches 165°F and the juices run clear. Fun Tip: Don’t flip the chicken too early! Give it some time to get those beautiful grill marks!
-
Rest the Chicken: Once cooked, transfer the chicken to a cutting board and let it rest for about 5 minutes before slicing. This resting period keeps the juices sealed inside, ensuring tender, juicy meat!
-
Plate the Dish: Slice the chicken against the grain into strips. Presentation matter—and who doesn’t love a beautifully plated dish?
Serving Suggestions
For the perfect meal, create a bed of fluffy rice, quinoa, or fresh salad greens. Lay the sliced Honey Lime Chicken on top and generously spoon some mango salsa over it. Garnish with lime wedges for that extra zesty finish! This dish pairs beautifully with some grilled veggies or warm tortillas on the side.
Recipe Variations
-
Tropical Twist: Swap the mango for diced pineapple or papaya for a new tropical flavor.
-
Spicy Sour: Add a bit of diced red chili for an extra kick in the salsa.
-
Vegan Delight: Substitute chicken with marinated tofu or chickpeas for a delightful plant-based version.
-
Herbaceous Infusion: Swap cilantro for fresh basil or mint in the salsa for a twist on freshness!
-
Citrus Burst: Mix other citrus juices like orange or grapefruit into the marinade for a unique flavor profile.
Chef’s Notes
I’ve experimented with this recipe for years, tweaking the ingredients and cooking techniques along the way. One time, I used too much cumin, and while my family was understanding, they joked that it tasted more like spice than food! Since then, I’ve learned that balance is key. Remember, cooking is a bit like life—you’ll have your ups and downs, but those little lessons make the journey worthwhile.
I love how this dish embodies the lively, sunny days of summer and brings a taste of the tropics right to your kitchen.
FAQs and Troubleshooting
What can I pair with this chicken?
You can pair it with rice, quinoa, greens, or even tortilla wraps for a fun twist.
My chicken is too dry. What went wrong?
Overcooking can lead to dry chicken. Make sure you keep an eye on it, and always let it rest before slicing!
Can I make the mango salsa ahead of time?
Absolutely! The salsa tastes even better 24 hours after making it—just give it a good stir before serving.
What if I don’t have a grill?
You can easily bake the chicken in the oven at 400°F for about 20-25 minutes or until cooked through. A skillet on the stove works just as well, giving you those lovely sear marks!
Nutritional Info
While this recipe is packed with flavor, it’s equally good for you! Each serving of Honey Lime Chicken with Mango Salsa contains roughly:
- Calories: 350
- Protein: 30g
- Carbohydrates: 25g
- Fats: 15g
This equates to a satisfying meal that won’t weigh you down!
Now that you’ve got the scoop on Honey Lime Chicken with Mango Salsa, why not plan a tropical dinner adventure? Whether it’s a casual weeknight meal or a fun gathering with friends, this dish is sure to impress. Remember, cooking is an art. Let your taste buds lead the way, and don’t be afraid to make it your own. Happy cooking, and may your kitchen be filled with laughter and flavor!
PrintHoney Lime Chicken with Mango Salsa
A vibrant and tangy chicken dish marinated in honey and lime, paired with a refreshing mango salsa.
- Prep Time: 30 minutes
- Cook Time: 15 minutes
- Total Time: 45 minutes
- Yield: 4 servings 1x
- Category: Main Course
- Method: Grilling
- Cuisine: Tropical
- Diet: Gluten Free, Dairy Free
Ingredients
- 2 large boneless, skinless chicken breasts
- 2 tablespoons honey
- Juice and zest of 2 limes
- 2 tablespoons olive oil
- 2 cloves garlic, minced
- 1 teaspoon ground cumin
- ½ teaspoon smoked paprika
- ½ teaspoon salt
- ¼ teaspoon black pepper
- 1 large ripe mango, diced
- ¼ cup red onion, finely chopped
- 1 small jalapeño, seeded and minced (optional)
- 2 tablespoons fresh cilantro, chopped
- Juice of 1 lime
- Salt and pepper, to taste
- Cooked rice, quinoa, salad greens, or tortillas (for serving)
- Lime wedges (for garnish)
Instructions
- Marinate the chicken: In a mixing bowl, combine the honey, lime juice, lime zest, olive oil, minced garlic, cumin, smoked paprika, salt, and black pepper. Whisk until smooth. Add the chicken and make sure it’s well-coated in the marinade. Cover and let it marinate for at least 30 minutes (or up to 4 hours!) in the refrigerator.
- Prepare the salsa: In a separate bowl, mix the diced mango, red onion, minced jalapeño (if using), chopped cilantro, lime juice, salt, and pepper. Gently fold to combine.
- Preheat the grill: Preheat your grill or grill pan to medium-high heat. Lightly grease the grill grates.
- Cook the chicken: Remove the chicken from the marinade and place it on the grill. Cook for about 5-7 minutes on each side or until the internal temperature reaches 165°F.
- Rest the chicken: Transfer the chicken to a cutting board and let it rest for about 5 minutes before slicing.
- Plate the dish: Slice the chicken against the grain into strips and serve with the mango salsa and garnished with lime wedges.
Notes
For a vegan option, substitute chicken with tofu or portobello mushrooms.
Nutrition
- Serving Size: 1 serving
- Calories: 350
- Sugar: 15g
- Sodium: 400mg
- Fat: 12g
- Saturated Fat: 2g
- Unsaturated Fat: 9g
- Trans Fat: 0g
- Carbohydrates: 25g
- Fiber: 3g
- Protein: 30g
- Cholesterol: 70mg
Keywords: chicken, mango salsa, grilled chicken, tropical recipes, summer recipes
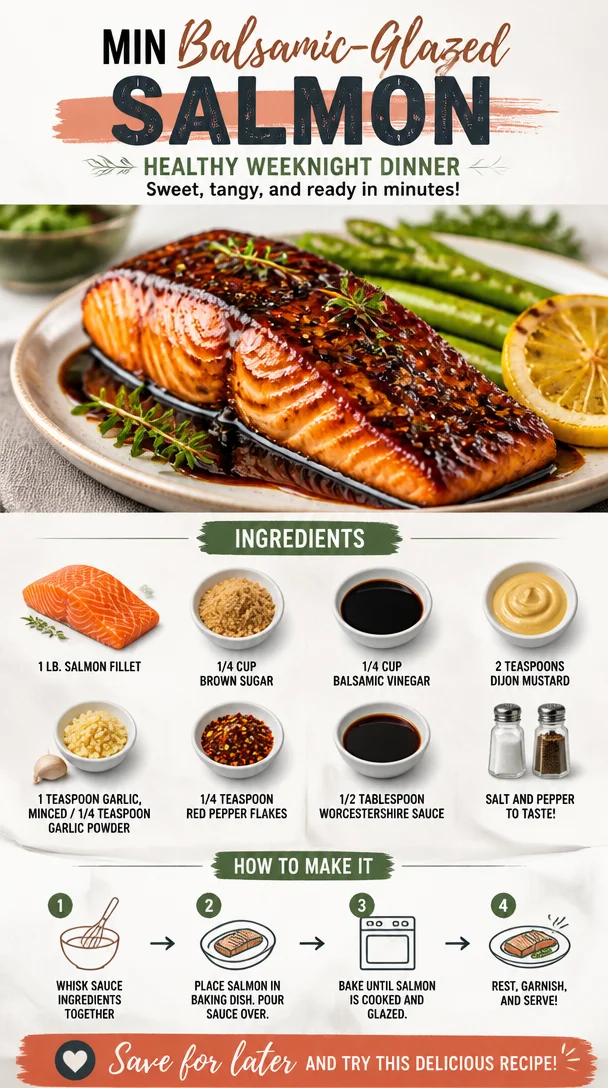
Min Balsamic-Glazed Salmon: Healthy Weeknight Dinner
Taste the Magic: Balsamic Glazed Salmon
Welcome, food lovers! Today, we’re diving into a dish that’s not just a meal; it’s an experience—Balsamic Glazed Salmon. From bustling weeknight dinners to fancy date nights, this dish has the power to elevate any occasion while still feeling effortlessly approachable. What’s the secret ingredient, you ask? It’s all in that luscious balsamic glaze that wraps around the salmon, creating a beautiful balance of sweet, tangy, and umami flavors.
I’ve always believed that cooking should be a celebration, not a chore. So, let me take you on a flavorful journey where fresh ingredients shine, and amazing aromas fill your kitchen. Grab your apron, and let’s get cooking!
A Sweet Memory with Salmon
Growing up, family dinners were always something special in my household. My mom had a few go-to dishes, but her salmon creations were legendary. One of my fondest memories was preparing dinner with her on a rainy Saturday afternoon. We laughed, played music, and just marveled at how a simple piece of fish could transform into something spectacular. The dish that became our favorite was a glazed salmon, which she tweaked based on what we had in the pantry, always involving balsamic vinegar and a hint of sweetness.
Years later, my own rendition of Balsamic Glazed Salmon still carries all those warm memories. It reminds me of how food can connect us to our past, evoke feelings of love, and create new traditions. So, I’m excited to share this recipe with you—it’s a dish that’s not only delicious but holds a piece of my heart.
Ingredients You’ll Need
Here’s what you’ll need to whip up this delightful Balsamic Glazed Salmon:
- 1 lb. salmon fillet: Fresh is best! You can substitute with trout if you desire a different flavor.
- 1/4 cup brown sugar: This brings the sweetness to our glaze. Feel free to swap with honey or maple syrup for a different twist!
- 1/4 cup balsamic vinegar: A quality balsamic vinegar can elevate this dish. Try white balsamic for a lighter note.
- 2 teaspoons Dijon mustard: Adds a lovely tang. Don’t have any? Yellow mustard will work in a pinch, though the flavor will differ slightly.
- 1 teaspoon garlic, minced: Fresh garlic makes a huge difference. If you’re short on fresh, garlic powder can do the trick—just use about 1/4 teaspoon.
- 1/4 teaspoon garlic powder: This enhances the garlic flavor without being overwhelming.
- 1/4 teaspoon red pepper flakes: For a little kick! Modify based on your spice tolerance.
- 1/2 tablespoon Worcestershire sauce: Adds depth; you can leave it out if you want a gluten-free version.
- Salt and pepper to taste: Essential for seasoning and balance.
These ingredients may seem simple but trust me, together, they create a symphony of flavors that will dance on your palate!
Cooking Steps to Glaze Your Way to Glory
Alright, let’s get this culinary party started! Follow these steps for your Balsamic Glazed Salmon:
-
Preheat Your Oven: Start by preheating your oven to 400°F (200°C). This ensures your salmon cooks evenly and gets that lovely crispy texture we all crave.
-
Make the Glaze: In a small saucepan over low heat, combine the brown sugar, balsamic vinegar, Dijon mustard, minced garlic, garlic powder, red pepper flakes, and Worcestershire sauce. Stir it all together and let it simmer gently for about 5–7 minutes until the mixture slightly thickens. This is your magic potion that will turn the salmon into something extraordinary. Keep an eye on it, and don’t let it boil away—nobody wants burnt sugar!
-
Prepare the Salmon: While the glaze is simmering, rinse your salmon fillet under cold water, pat it dry with paper towels, and then season generously with salt and freshly cracked pepper on both sides. The seasoning is key to bringing out the natural flavors of the fish.
-
Bake the Salmon: Line a baking dish with parchment paper (easy cleanup!) and place the salmon skin-side down in the center. Brush half of the balsamic glaze over the salmon, making sure it’s well coated. This glaze will caramelize beautifully as it bakes!
-
Time to Bake: Place the baking dish in your preheated oven and bake for about 12–15 minutes, depending on the thickness of your salmon fillet. The salmon should be cooked through but remain moist and flaky. If you have a food thermometer, aim for an internal temperature of 145°F (63°C).
-
Glaze It Again: Once the salmon is done, remove it from the oven and give it one last brush with the remaining glaze—this will make the surface glossy and incredibly appetizing! Let it rest for a couple of minutes; this step allows the juices to redistribute.
-
Serve and Enjoy: Slice your perfectly cooked salmon into portions and get ready for compliments. It pairs wonderfully with a side of steamed vegetables or a light salad.
Plating Perfection
When it comes to serving your Balsamic Glazed Salmon, presentation is everything! Place your salmon on a fresh bed of arugula or quinoa for a pop of color and flavor. Drizzle a little more of that irresistible glaze over the top, and finish it off with a sprinkle of fresh herbs like parsley or chives for a vibrant touch. If you’re feeling fancy, add some lemon wedges on the side for an extra zing!
Upscale Your Recipe
Here are a few different twists to consider when making your Balsamic Glazed Salmon:
- Lemon Zest: Add some fresh lemon zest to the glaze for a refreshing citrus hit!
- Herb Infusion: Mix in fresh chopped herbs like thyme or rosemary for an aromatic twist.
- Citrus Variation: Use orange juice instead of balsamic vinegar for a sweeter, fruitier glaze.
- Miso Magic: Add a tablespoon of miso paste to the glaze to give it an umami flair.
- Spice It Up: Incorporate different spices like cumin or smoked paprika for a totally different flavor profile.
Chef’s Notes
As I reflect on my culinary journey, I can’t help but chuckle at the countless experiments that have taken place in my kitchen. There was that one time I accidentally used apple cider vinegar instead of balsamic in the glaze—let’s just say it taught me the importance of reading labels! Through those little mishaps, I discovered that cooking is about exploration and having fun, not just perfection.
Over the years, this Balsamic Glazed Salmon recipe has evolved into a beloved staple in our house. It’s become a go-to dish for gatherings, family dinners, and even the occasional ‘I just want something delicious’ moment. Each time I make it, I’m reminded of those rainy Saturdays in my childhood kitchen, and I hope to create similar memories for you.
FAQs and Troubleshooting
Q1: My salmon turned out dry. What went wrong?
A: Overcooking is often the culprit. Keep an eye on the time and use a thermometer to check for that sweet spot at 145°F (63°C).
Q2: Can I make the glaze ahead of time?
A: Absolutely! You can make the glaze in advance and store it in the fridge for up to a week. Just reheat it gently before using.
Q3: What’s the best type of salmon to use?
A: Wild-caught salmon is fantastic for flavor and sustainability. However, farmed salmon works well too—just ensure it’s fresh!
Q4: How do I know when the salmon is perfectly cooked?
A: The salmon should be opaque and flake easily with a fork. If it still looks translucent in the middle, give it a few extra minutes in the oven.
Nutritional Info
While I believe in enjoying food without the stress of counting calories, I know that many of you like to keep an eye on the nutritional value. Here’s a rough estimate per serving of Balsamic Glazed Salmon:
- Calories: ~300
- Protein: ~30g
- Fat: ~15g
- Carbohydrates: ~18g
- Fiber: ~0g
These numbers can vary based on the exact ingredients and serving sizes, but you’re definitely fueling your body with this tasty dish!
There you have it! A delicious, approachable, and vibrant Balsamic Glazed Salmon recipe that’s perfect for any occasion. I hope you enjoy every bite as much as I do, and remember—cooking is all about joy, creativity, and sharing good food with those you love. Happy cooking!
PrintBalsamic Glazed Salmon
A delicious Balsamic Glazed Salmon recipe that elevates any occasion with a sweet and tangy glaze.
- Prep Time: 10 minutes
- Cook Time: 15 minutes
- Total Time: 25 minutes
- Yield: 4 servings 1x
- Category: Main Course
- Method: Baking
- Cuisine: American
- Diet: Pescatarian
Ingredients
- 1 lb. salmon fillet
- 1/4 cup brown sugar
- 1/4 cup balsamic vinegar
- 2 teaspoons Dijon mustard
- 1 teaspoon garlic, minced
- 1/4 teaspoon garlic powder
- 1/4 teaspoon red pepper flakes
- 1/2 tablespoon Worcestershire sauce
- Salt and pepper to taste
Instructions
- Preheat your oven to 400°F (200°C).
- Make the glaze by combining brown sugar, balsamic vinegar, Dijon mustard, minced garlic, garlic powder, red pepper flakes, and Worcestershire sauce in a saucepan over low heat, stirring, and simmering for 5–7 minutes.
- Prepare the salmon by rinsing it under cold water, patting it dry, and seasoning with salt and pepper.
- Bake the salmon in a lined baking dish, brushing half of the glaze over it, and bake for 12–15 minutes.
- Glaze again with the remaining sauce after baking.
- Serve the salmon on a bed of arugula or quinoa, drizzled with extra glaze and garnished with herbs.
Notes
For variations, consider adding lemon zest, fresh herbs, or using different types of vinegar.
Nutrition
- Serving Size: 1 serving
- Calories: 300
- Sugar: 20g
- Sodium: 600mg
- Fat: 15g
- Saturated Fat: 3g
- Unsaturated Fat: 10g
- Trans Fat: 0g
- Carbohydrates: 18g
- Fiber: 0g
- Protein: 30g
- Cholesterol: 60mg
Keywords: salmon recipe, balsamic glaze, seafood, easy dinner, healthy meal
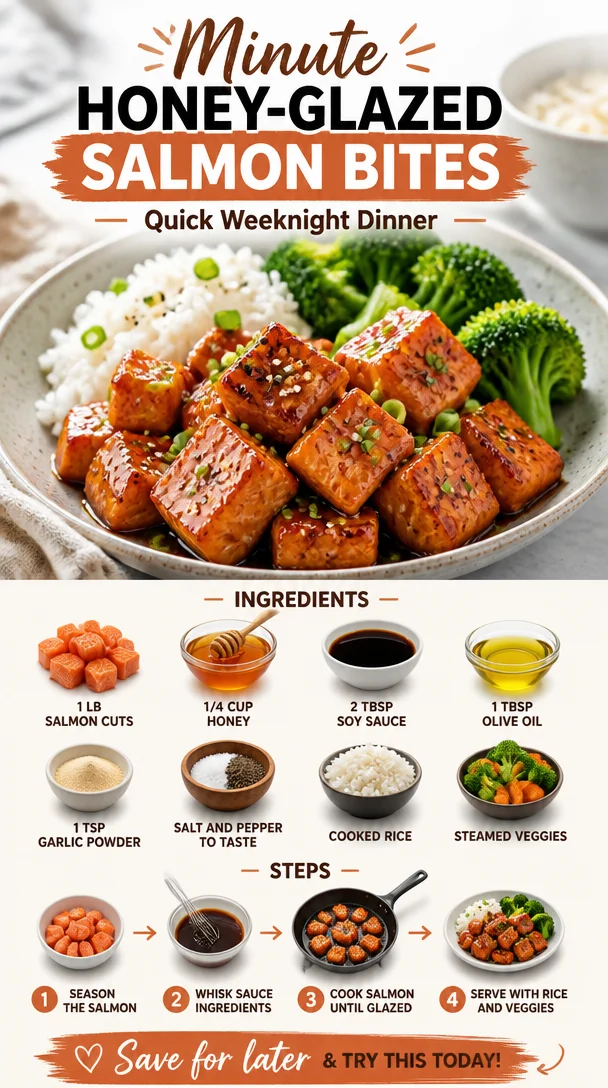
Minute Honey-Glazed Salmon Bites: Quick Weeknight Dinner
Honey Glazed Salmon Bites: Your New Favorite Quick Meal
Welcome to another delicious adventure in the world of Clean Plate Cravings! Today, I’m thrilled to share something that’s not just a meal; it’s a burst of flavor and goodness that feels like a warm hug. If you’re looking for a dish that’s simple yet impressive, look no further than my Honey Glazed Salmon Bites. These flavorful morsels pack the perfect sweet-and-savory punch, transforming any meal into something special without requiring hours in the kitchen.
Picture this: it’s a busy weeknight, the clock is ticking, and you’re staring into the fridge wishing for an easy dinner that doesn’t compromise taste or nutrition. That’s where these honey-glazed delights come in! Not only do they come together in a snap, but they’ll also have your family and friends raving about how fantastic you are in the kitchen (even if you’re secretly following along with my recipe!).
I remember the first time I whipped up something similar. It was during a lazy Sunday afternoon at my childhood home. My mom had invited a few friends over, and I wanted to impress everyone with my budding culinary skills. Armed with only a few staple ingredients and an unstoppable enthusiasm, I tossed together a sweet glaze that perfectly complemented tender chunks of salmon. That day was a culinary epiphany for me, and it ignited my passion for creating dishes that bring people together around the table. And now? I want to share that excitement with you!
Let’s dive into this delectable Honey Glazed Salmon Bites recipe that’ll elevate your dinner game and leave you feeling energized and satisfied!
Ingredients
Here’s what you’ll need to make these mouthwatering Honey Glazed Salmon Bites:
-
1 lb salmon cuts
Fresh salmon offers a buttery texture and rich flavor. If you’re looking for a more budget-friendly option, feel free to substitute with trout or tilapia. -
1/4 cup honey
The star of the show! Honey brings that irresistible sweetness. If you’re vegan or trying to reduce sugar, agave syrup or maple syrup work beautifully as substitutes. -
2 tbsp soy sauce
The umami factor! This ingredient balances the sweetness of the honey. If you need a gluten-free option, try tamari or coconut aminos. -
1 tbsp olive oil
A splash of healthy fat to keep everything moist and add flavor. You can swap it with avocado oil if you prefer a higher smoke point for searing. -
1 tsp garlic powder
This gives an aromatic kick to the dish. Fresh minced garlic can be used instead if you’re feeling extra zesty. -
Salt and pepper to taste
Essential seasonings that elevate the overall flavor. Don’t hesitate to play around with herbs like dill or cilantro for an added flourish! -
Cooked rice
A perfect base! You can use brown rice, white rice, quinoa, or even a cauliflower rice for a low-carb option. -
Steamed veggies
Whatever veggies you love or have on hand! Broccoli, carrots, or snap peas add both color and nutrition.
Step-by-Step Instructions
Let’s get cooking! Follow these steps for a delightful Honey Glazed Salmon Bites experience:
-
Prep the Salmon
Start by cutting the salmon into bite-sized pieces, about 1 inch each. This helps them cook evenly and makes them easy to eat. Chef’s Tip: Pat them dry with a paper towel to ensure a nice sear and browning. -
Make the Marinade
In a bowl, whisk together honey, soy sauce, olive oil, garlic powder, salt, and pepper until well combined. This marinade is where the magic happens! Chef’s Insight: If you have time, let the salmon sit in this marinade for 15-30 minutes. This allows those flavors to really sink in. -
Heat the Pan
Heat a non-stick skillet over medium-high heat. Make sure it’s hot before adding the salmon—that way, you’ll get that beautiful caramelization. Quick Hack: Add a drop of water to the pan; if it sizzles, you’re ready! -
Cook the Salmon Bites
Carefully lay the salmon pieces in the hot skillet. Let them sear for about 3-4 minutes on one side until golden brown. Don’t overcrowd the pan; cook in batches if necessary. Chef’s Tip: Turn them only once to get that crispy texture! -
Glaze it Up
Once the salmon bites are beautifully seared, pour the remaining marinade over them. Cook for another 2-3 minutes, allowing the glaze to caramelize. Pro Tip: Baste the salmon with the glaze while cooking for an extra layer of flavor. -
Serve it Right
When the salmon bites are cooked through and flaky, remove them from the heat. Serve them over a bed of cooked rice, then add a generous helping of steamed veggies on the side.
Serving Suggestions
To present your Honey Glazed Salmon Bites beautifully, scoop a serving of rice onto a plate, create a small nest for the salmon, then pile on those vibrant veggies. You could also sprinkle a few sesame seeds on top for an elegant touch or fresh herbs for a pop of color. Serve it warm, and get ready for the compliments to roll in!
Recipe Variations
Feel like getting adventurous? Here are a few creative twists to jazz up your Honey Glazed Salmon Bites:
- Citrus Twist: Add a splash of orange or lemon juice to the marinade for a zesty kick.
- Spicy Honey: Mix in some chili flakes or sriracha to the glaze for those who love a bit of heat!
- Teriyaki Twist: Swap the honey for teriyaki sauce for an Asian-inspired version.
- Herbed Infusion: Mix fresh herbs like basilik or cilantro into the marinade for an aromatic boost.
- Nutty Crunch: Sprinkle crushed nuts like almonds or cashews on top before serving for added texture!
Chef’s Notes
I absolutely adore this recipe not just because it’s quick, but because it’s so versatile. I’ve made it countless times, often adjusting the marinade based on what I have in the fridge. One time, I tossed in some sesame oil instead of olive oil, and it added a delightful nuttiness that I still crave. Cooking should be fun and adaptable; if you find yourself missing an ingredient, don’t sweat it! Get creative!
FAQs and Troubleshooting
Here are some common questions and potential hiccups you might find while whipping up those Honey Glazed Salmon Bites:
-
What if my salmon is overcooked?
Overcooking can happen easily with salmon. Aim for an internal temperature of 145°F for perfectly flaky fish. If you overdo it, try serving it with a homemade sauce or salsa to add moisture. -
Can I use frozen salmon?
Absolutely! Just make sure to thaw it properly before cooking. Frozen salmon can release more water during cooking, so it’s essential to pat it dry before marinating. -
How do I know when the salmon is done?
Salmon is done when it turns opaque and flakes easily. A good rule of thumb is about 4-6 minutes per half-inch thickness at medium heat. -
What’s the best way to reheat leftovers?
To keep the salmon from drying out, gently reheat it in a pan on low heat, covering it with a lid to retain moisture. Alternatively, you can microwave in short bursts (10-20 seconds) until warm.
Nutritional Info
(Optional but helpful)
For those of you watching your macros and nutritional intake, here’s a rough breakdown per serving (based on the recipe serving 4):
- Calories: 300
- Protein: 25g
- Carbohydrates: 40g (mostly from rice and veggies)
- Fats: 10g (primarily from olive oil and salmon)
So there you have it—my Honey Glazed Salmon Bites recipe that brings joy, flavor, and a hint of nostalgia straight to your kitchen! I hope this dish lights up your dining table just as it did for me. Remember, cooking is all about love, enjoyment, and sharing good food with great people. So, toss on your apron, crank up the music, and let’s get cooking! Happy feasting!
PrintHoney Glazed Salmon Bites
Quick and delicious honey glazed salmon bites that provide a sweet-and-savory flavor profile, perfect for a busy weeknight meal.
- Prep Time: 10 minutes
- Cook Time: 15 minutes
- Total Time: 25 minutes
- Yield: 4 servings 1x
- Category: Main Course
- Method: Searing
- Cuisine: Asian
- Diet: Pescatarian
Ingredients
- 1 lb salmon cuts
- 1/4 cup honey
- 2 tbsp soy sauce
- 1 tbsp olive oil
- 1 tsp garlic powder
- Salt and pepper to taste
- Cooked rice
- Steamed veggies
Instructions
- Prep the salmon by cutting it into bite-sized pieces, about 1 inch each.
- Make the marinade by whisking together honey, soy sauce, olive oil, garlic powder, salt, and pepper in a bowl.
- Heat a non-stick skillet over medium-high heat until hot.
- Cook the salmon bites for about 3-4 minutes on one side until golden brown.
- Glaze the salmon bites by pouring the remaining marinade over them and cooking for another 2-3 minutes.
- Serve the salmon bites over cooked rice with a side of steamed veggies.
Notes
You can substitute salmon with trout or tilapia. For vegan options, use agave syrup or maple syrup in the marinade.
Nutrition
- Serving Size: 1 serving
- Calories: 300
- Sugar: 20g
- Sodium: 800mg
- Fat: 10g
- Saturated Fat: 1.5g
- Unsaturated Fat: 8.5g
- Trans Fat: 0g
- Carbohydrates: 40g
- Fiber: 3g
- Protein: 25g
- Cholesterol: 60mg
Keywords: salmon, honey glaze, quick meal, healthy dinner, seafood recipe

Chicken Zucchini Stir Fry
Delightful Chicken Zucchini Stir Fry: A Colorful and Flavorful Meal
Welcome to Clean Plate Cravings, my kitchen haven where delicious meets nutritious! Today, I’m thrilled to share a vibrant Chicken Zucchini Stir Fry that’s not only packed with flavors but also represents everything I believe about enjoying food. Eating well shouldn’t feel like a chore; it should be a joyful experience where colors, tastes, and even the smell of cooking coax you into a happy dance in the kitchen!
Imagine the sizzle of chicken, the crunch of the bell pepper, and the fresh aroma of garlic filling your home. This stir fry is made with simple, fresh ingredients that are likely hanging out in your fridge right now. It’s the kind of recipe that fits perfectly into a busy weeknight cooking schedule or an everyday meal prepped on a Sunday, ready to be enjoyed all week long.
Stir fry dishes are one of my favorite ways to whip up quick, delicious meals. With minimal cooking time, you can whip together something that not only tastes good but also fuels your body with nutrients. This Chicken Zucchini Stir Fry is certainly one of those dishes that delivers on taste while keeping it light and healthy. So, let’s dive deep into this recipe and stir up some magic together!
A Bite of Nostalgia: Mom’s Kitchen Wisdom
This dish brings back sweet memories from my childhood when my mom would whip up her famous stir fry for dinner. As a busy working mom, she had her ways of making the kitchen her own little sanctuary, producing meals that not only tasted great but were also wholesome. I remember sitting at the kitchen counter, watching her slice vibrant veggies. Every slice was precise and purposeful, and she always emphasized using what’s fresh and in season.
I’d help her wash the vegetables while she’d hum along to our favorite tunes playing in the background. Those moments taught me the importance of bringing joy into cooking and reminded me that food can forge connections, comfort, and perhaps even a little nostalgia. That’s why this Chicken Zucchini Stir Fry is special to me—it embodies what I learned from her: keep it simple, vibrant, and full of love.
Ingredients
Before we jump into the kitchen, let’s gather our ingredients. Here’s what you’ll need to create this colorful stir fry:
-
2 boneless, skinless chicken breasts
Tender chicken is the base of this dish. You can swap it for turkey breast if you prefer. For a plant-based option, try using tofu or tempeh! -
2 medium zucchinis, sliced
Zucchini adds a lovely crunch and absorbs all the flavors beautifully. If zucchini isn’t available, yellow squash works just as well. -
1 bell pepper, sliced
Use any color you have on hand—red, yellow, or green—each brings its own sweetness. If you’re looking for a spicy twist, try a jalapeño instead! -
1 onion, sliced
Onions enhance the overall flavor. I love using red onions, but yellow or sweet onions can be fantastic substitutes too. -
2 cloves garlic, minced
Garlic is the secret flavor booster in this dish! If you love garlic, feel free to add more. If you’re short on fresh, garlic powder can be used, too—just keep it light. -
2 tablespoons soy sauce
This brings the salty umami flavor that stir fry is known for. If you want a gluten-free option, use tamari or coconut aminos instead. -
1 tablespoon olive oil
Olive oil is perfect for cooking due to its light flavor and health benefits. Feel free to use avocado oil or sesame oil for an Asian flair. -
Salt and pepper to taste
Always be generous with seasoning! What matters is it’s to your preference.
Step-by-Step Instructions
Now that we have everything ready, it’s time to cook! Cooking is all about enjoying the process, so grab your favorite playlist, and let’s get started.
-
Prepare Your Ingredients
Start by slicing your chicken, zucchini, bell pepper, and onion into bite-sized pieces. Keep everything uniform so it cooks evenly. Pro-tip: use a sharp knife for quicker and easier cutting. If you struggle with knifework, check out some online tutorials for handy tips! -
Sauté the Chicken
Heat the olive oil in a large skillet or wok over medium-high heat. Once it’s shimmering, add in the chicken pieces. Season with salt and pepper. Sauté the chicken for about 5-7 minutes until it’s fully cooked and golden brown. Make sure not to crowd the pan—this allows for a nice sear. Here’s a hack: if you use a wooden spoon to flip the chicken, you’ll get an even cook on all sides. -
Add the Aromatics
Toss in the minced garlic and sliced onions into the pan. The fragrance will hit you like a wave of comfort! Stir-fry this mix for about 1-2 minutes until fragrant and the onions become translucent. Keep it moving so the garlic doesn’t burn—charred garlic can turn bitter. -
In with the Veggies
Next, add the sliced zucchini and bell pepper to the pan. Stir well and cook for another 3-5 minutes, allowing the vegetables to soften while still being crisp. Remember, we want crunch in our stir fry! If your veggies start wilting too fast, turn down the heat slightly to avoid overcooking. -
Season It Up
Finally, pour in the soy sauce. It’ll add depth and richness! Stir everything together and allow it to cook for another minute to let the flavors meld. If you like a bit of zing, try adding a dash of chili paste or sesame oil at this stage. -
Taste Test and Adjust
Before serving, taste your dish and adjust the seasoning as needed—you might find it needs a little more salt or soy sauce. Cooking is about personal preference, so don’t hesitate to make it yours. -
Serve and Savor
Once everything is cooked, remove it from heat and let it rest for a couple of minutes. This gives the flavors a moment to settle before serving.
Serving Suggestions
Serving this Chicken Zucchini Stir Fry is all about presentation and satisfaction. I love serving it over a fluffy bed of jasmine rice or whole grain quinoa for a wholesome touch. You can also enjoy it wrapped in lettuce leaves for a fresh, low-carb option. Drizzle a little extra soy sauce or a sprinkle of sesame seeds for a finishing touch.
Recipe Variations
Let’s get creative with some variations to keep this dish exciting:
- Spicy Kick: Add sliced red chili peppers or a sprinkle of chili flakes for a bit of heat!
- Coconut Delight: Stir in a splash of coconut milk for a creamy twist.
- Herb Weave: Finish with a handful of fresh basil or cilantro for a zesty lift.
- Noodle Swap: Swap out the chicken for shrimp and toss in some rice noodles for an easy Asian-inspired meal.
- Veggie Load: Add in additional veggies like broccoli, snap peas, or carrots based on what you have.
Chef’s Notes
This Chicken Zucchini Stir Fry is a staple in my kitchen for good reason! The recipe has evolved since those childhood memories; now I play with various ingredients to keep things fresh and in line with the season. I often encourage people to explore their pantry and fridge and let those ingredients dictate the meal. This stir fry has seen everything from leftover veggies to different protein sources, emphasizing its versatility.
And let me tell you a little secret: there’s no wrong way to stir fry. One time, I accidentally spilled in some red wine while cooking, and instead of being upset, I embraced it! That was one of the most delicious flukes I’ve ever created in my kitchen.
FAQs and Troubleshooting
Here are some common questions and potential hiccups you might run into:
-
Why is my stir fry watery?
Make sure you’re cooking on high heat, which helps to evaporate excess moisture. If it’s still watery, you might have added too much sauce—consider using less next time or increasing your cooking time to reduce it. -
Can I make this ahead of time?
Absolutely! This stir fry stores well in an airtight container in the fridge for up to 3 days. Just reheat it in a skillet or microwave when you’re ready to enjoy it again. -
What if my veggies overcook?
If this happens, next time try adding the firmer veggies, like carrots and onion, first, and add the softer ones, like zucchini and peppers, later in the cooking process. -
Can I freeze this dish?
Yes, but I recommend freezing just the chicken and veggies before cooking, as stir-fried vegetables don’t retain their texture well after freezing and reheating.
Nutritional Info
- Calories: 350 per serving (approx.)
- Protein: 30g
- Carbohydrates: 15g
- Fats: 15g
- Fiber: 2g
(Note: Nutritional values can vary based on exact ingredients and portion sizes.)
Thanks for tuning in! I hope this Chicken Zucchini Stir Fry brings warmth to your kitchen and joy to your table. Don’t forget to embrace your creativity and bake with love. Happy cooking, foodies!
PrintChicken Zucchini Stir Fry

A vibrant Chicken Zucchini Stir Fry that’s packed with flavors and perfect for a quick weeknight meal.
- Prep Time: 15 minutes
- Cook Time: 15 minutes
- Total Time: 30 minutes
- Yield: 4 servings 1x
- Category: Main Course
- Method: Stir Fry
- Cuisine: Asian
- Diet: Gluten-Free
Ingredients
- 2 boneless, skinless chicken breasts
- 2 medium zucchinis, sliced
- 1 bell pepper, sliced
- 1 onion, sliced
- 2 cloves garlic, minced
- 2 tablespoons soy sauce
- 1 tablespoon olive oil
- Salt and pepper to taste
Instructions
- Prepare your ingredients by slicing your chicken, zucchini, bell pepper, and onion into bite-sized pieces.
- Sauté the chicken in a large skillet over medium-high heat with olive oil, seasoning with salt and pepper, for 5-7 minutes.
- Add minced garlic and sliced onions, stir-frying for 1-2 minutes until fragrant.
- In with the sliced zucchini and bell pepper, cooking for an additional 3-5 minutes.
- Season it up by pouring in the soy sauce and letting it cook for another minute.
- Taste test and adjust the seasoning before serving.
- Serve the stir fry over jasmine rice or quinoa, and enjoy!
Notes
This stir fry can be customized with different vegetables or proteins like tofu, shrimp, or even a splash of coconut milk for creaminess.
Nutrition
- Serving Size: 1 serving
- Calories: 350
- Sugar: 5g
- Sodium: 700mg
- Fat: 15g
- Saturated Fat: 2g
- Unsaturated Fat: 10g
- Trans Fat: 0g
- Carbohydrates: 15g
- Fiber: 2g
- Protein: 30g
- Cholesterol: 70mg
Keywords: chicken, zucchini, stir fry, quick meal, healthy cooking

Minute Grilled Zucchini & Chickpea Wraps (Weeknight)
Grilled Zucchini and Chickpea Wraps: A Fresh Take on Flavor
Welcome back, food lovers! Today, we’re diving into a dish that embodies everything I stand for at Clean Plate Cravings: fresh, vibrant flavors that are easy to whip up! We’re making Grilled Zucchini and Chickpea Wraps—a fantastic option for a healthy lunch or a light dinner. These wraps are loaded with wholesome ingredients and are completely customizable to suit your tastes. Ready your grilling tools and let’s create some culinary magic together!
A Personal Favorite: The Zucchini Chronicles
Before we dive into the recipe, let me share a fun little story. Growing up, summer was magical for many reasons, but one of the highlights was visiting my grandmother’s garden. She had a green thumb that could cultivate anything—from tomatoes to zucchinis, those long, crispy vegetables always found their way into our meals. I vividly remember the excitement of picking fresh zucchinis with her, each one a token of summer’s bounty.
We’d often grill them right away, tossing them on the BBQ while they sizzled and charred to perfection, filling the air with their smoky aroma. Not only did we savor the flavors, but we also bonded over our love for food and cooking. Goodness, the memories of her secret seasoning mixes and her laughter still bring a smile to my face!
Inspired by those fond cooking experiences, I created this Grilled Zucchini and Chickpea Wrap recipe. It’s a nod to those summer days and the joy of eating fresh, light meals.
Ingredients That Shine
Let’s gather our ingredients! Here’s what you’ll need for your wraps:
-
4 large tortillas or flatbreads
These serve as the base. I love whole wheat or spinach-flavored options for added nutrition. Gluten-free? No problem! There are plenty of delicious gluten-free wraps available. -
1 medium zucchini, sliced lengthwise
Fresh zucchini brings a subtle sweetness and a lovely texture. You can swap it for eggplant or yellow squash depending on your mood. -
1 cup cooked chickpeas, rinsed and drained
Protein-packed and hearty! Canned beans make this dish quick and easy, but you can also use cooked lentils for a twist. -
100 g feta cheese, crumbled
This is the perfect creamy, tangy addition. Feel free to replace it with goat cheese or omit it for a dairy-free version. -
1 tablespoon olive oil
A drizzle enhances the grilling process and locks in flavors. Avocado oil is a great alternative if you prefer. -
Salt and black pepper to taste
These simple seasoning essentials elevate your dish. Experiment! Try smoked salt or add a pinch of chili powder for a kick. -
½ cup plain yogurt (Greek preferred)
Creamy, refreshing, and a great pairing for chips! You could also use a plant-based yogurt if you’re going dairy-free. -
1 tablespoon fresh herbs (parsley, mint, or dill), chopped finely
Fresh herbs boost flavor and freshness. You can mix and match as desired—basil and cilantro work beautifully as well! -
1 teaspoon lemon juice
A splash of lemon juice adds brightness and balances the flavors. Lime juice can step in if you’re feeling zesty!
Step-by-Step Instructions: Let’s Get Cooking!
Are you ready to grill? Let’s get our hands dirty (in a good way!) and follow these steps:
-
Prep Your Grill or Pan
Start by preheating your grill or stovetop grill pan. You want it hot for those signature grill marks! If grilling outside, aim for medium heat; if on the stovetop, turn it to medium-high. -
Slice the Zucchini and Season
While the grill is heating up, slice your zucchini lengthwise into about ¼-inch thick strips. Drizzle olive oil over them and season with salt and black pepper. Be liberal—this is where flavor starts! -
Grill the Zucchini
Place each slice on the grill and cook for about 2-3 minutes on each side, until you see beautiful grill marks and the zucchini is tender. Note: Patience is key. Resist the urge to flip too soon to avoid sticking! -
Prepare the Chickpeas
In a bowl, combine your rinsed chickpeas with a sprinkle of salt, pepper, and a touch of olive oil. Give them a gentle toss. This adds flavor and keeps them cohesive. -
Warm Your Tortillas or Flatbreads
After your zucchini is done, it’s time to warm the tortillas! Place them on the grill for about a minute on each side or pop them in the microwave wrapped in a damp paper towel for 30 seconds. This makes them pliable and perfect for wrapping! -
Build Your Wrap
Now, it’s assembly time! Lay your warm tortilla on a plate, spread a generous dollop of yogurt, and layer with grilled zucchini, chickpeas, and crumbled feta. Don’t skimp on the ingredients—it’s a wrap, not a minimalist art project! -
Add Fresh Herbs and Lemon Juice
Sprinkle chopped herbs on top and finish with a squeeze of fresh lemon juice. It’s like adding the final brushstroke to a masterpiece! -
Wrap and Serve
Fold in the sides of the tortilla, then roll it up tightly from the bottom. Give it a gentle press to hold everything together. Place it seam-side down on the plate.
Serving Suggestions: Make It Pop!
For an impressive presentation, slice your wraps in half diagonally and show off those vibrant layers! Arrange them on a colorful platter alongside extra yogurt for dipping. You can also toss a light salad of mixed greens, cherry tomatoes, and cucumber on the side for a refreshing crunch. Add a sprinkle of herbs on top, and voilà, you’re all set!
Recipe Variations: Get Creative!
The beauty of these wraps lies in their versatility! Here are a few ways to tweak this recipe and keep things exciting:
-
Add Roasted Vegetables: Try incorporating bell peppers, mushrooms, or even grilled corn for extra texture and flavor!
-
Swap the Greens: Instead of yogurt, spread a layer of hummus or baba ganoush for a different taste profile.
-
Make It Spicy: Add a scattering of sliced jalapeños or drizzle your favorite hot sauce for a fiery kick!
-
Use Different Cheeses: Experiment with shredded cheddar or pepper jack for a more robust flavor.
-
Vegan Variation: For a plant-based twist, skip the feta altogether and replace yogurt with almond or cashew cream.
Chef’s Notes: A Journey Through Flavors
As a chef, it’s easy to get attached to recipes, but I’ve learned to embrace evolution in cooking. When I first experimented with these wraps, I distinctly used just zucchini and chickpeas. Over time, I found myself adding new flavors and toppings that reflected my mood and the seasons!
Remember, cooking is about enjoyment and experimenting with what you have on hand. So if you find yourself suddenly inspired by a rogue vegetable in your fridge—go ahead and toss it in!
FAQs and Troubleshooting
1. What if my zucchinis are too soggy?
If your zucchini seems a bit mushy after grilling, try slicing them thinner next time or sprinkling a little salt on the slices beforehand to draw out excess moisture.
2. Can I make these in advance?
Absolutely! You can grill the zucchini and mix the chickpeas ahead of time. Assemble them freshly with the tortillas on the day you plan to serve for optimal flavor and texture.
3. How do I store leftovers?
Leftover wraps can be stored in an airtight container in the fridge for up to 2 days. To reheat, wrap in foil and warm gently in the oven to avoid sogginess.
4. What if I don’t have a grill?
No grill? No problem! A stovetop pan or a broiler works just as well! For the oven, place the zucchini strips on a baking sheet and roast at 400°F until tender.
Nutritional Info
While I’m not a nutritionist, I can tell you that these wraps are brimming with protein, fiber, and healthy fats! Each serving is a delicious way to fuel your body without sacrificing flavor.
Final Word
Creating a delicious dish can be both a rewarding and pleasurable endeavor, especially when you know it’s good for your body! I can’t wait for you to try these Grilled Zucchini and Chickpea Wraps. It’s a dish that truly nails the balance of fresh, fast, and flavor-packed! Happy cooking, friends, and remember—keep it fresh, simple, and seriously delicious!
PrintGrilled Zucchini and Chickpea Wraps
A vibrant dish loaded with fresh flavors, making a healthy lunch or light dinner effortlessly delicious.
- Prep Time: 10 minutes
- Cook Time: 10 minutes
- Total Time: 20 minutes
- Yield: 4 servings 1x
- Category: Main Course
- Method: Grilling
- Cuisine: Mediterranean
- Diet: Vegetarian
Ingredients
- 4 large tortillas or flatbreads
- 1 medium zucchini, sliced lengthwise
- 1 cup cooked chickpeas, rinsed and drained
- 100 g feta cheese, crumbled
- 1 tablespoon olive oil
- Salt and black pepper to taste
- ½ cup plain yogurt (Greek preferred)
- 1 tablespoon fresh herbs (parsley, mint, or dill), chopped finely
- 1 teaspoon lemon juice
Instructions
- Prep your grill or pan by preheating it to medium-high heat.
- Slice the zucchini lengthwise into ¼-inch thick strips, drizzle with olive oil, and season with salt and pepper.
- Grill the zucchini for about 2-3 minutes on each side until tender.
- Prepare the chickpeas by combining them with salt, pepper, and olive oil in a bowl.
- Warm the tortillas on the grill for about a minute on each side or in the microwave for 30 seconds.
- Build your wrap by laying a tortilla on a plate, spreading yogurt, and adding zucchini, chickpeas, and feta.
- Add fresh herbs and a squeeze of lemon juice on top.
- Wrap tightly and serve seam-side down.
Notes
These wraps are highly customizable. Try adding different vegetables, spices, or cheese to suit your taste!
Nutrition
- Serving Size: 1 wrap
- Calories: 350
- Sugar: 5g
- Sodium: 400mg
- Fat: 12g
- Saturated Fat: 4g
- Unsaturated Fat: 6g
- Trans Fat: 0g
- Carbohydrates: 45g
- Fiber: 8g
- Protein: 15g
- Cholesterol: 30mg
Keywords: zucchini wraps, chickpea wraps, healthy lunch, vegetarian recipe, grilling

Greek Chicken Tenders
Greek Chicken Tenders: A Flavorful Journey to the Mediterranean
Welcome to the vibrant world of Clean Plate Cravings, where we dive into the irresistible and exciting realm of healthy, taste-packed meals! Today, we’re whipping up something that’s not just a crowd pleaser but also a dish that’ll make your weeknight dinners feel a bit more special without any fuss. I’m talking about Greek Chicken Tenders, tender, juicy morsels of chicken infused with bright Mediterranean flavors that transport you right to a sun-soaked paradise.
Eating well doesn’t mean sacrificing flavor or fun! In fact, it should enhance our lives and bring joy to our tables. These chicken tenders are perfect for anyone looking to jazz up their mealtime routine with something that’s both clean and utterly delicious. Ready to embark on a culinary adventure? Let’s go!
A Taste of Nostalgia
Growing up, my family often gathered around the table for homemade dinners, where the air was filled with laughter and the aromas of fantastic food. One summer, my parents decided to host what they called "Greek Night." They transformed our backyard into a Mediterranean oasis with fairy lights, colorful table linens, and, most importantly, a spread of scrumptious Greek dishes.
I remember my mom marinating chicken with tons of garlic, lemon, and herbs—her secret ingredients that brought magic to every bite. We grilled that chicken until it was golden brown and charred, served it with tzatziki and fresh pita, and danced the night away under the stars. It was one of those moments that made me realize how food creates lasting memories and connections.
That summer inspired my version of Greek Chicken Tenders, which keeps those beloved flavors alive while simplifying the cooking process. It’s not merely a recipe; it’s a way to evoke joy and warmth at your own dining table!
Ingredients You’ll Need
Here’s what you’ll be gathering for these delicious Greek Chicken Tenders:
-
1 lb chicken tenders: These are the stars of our show. Tender cuts of chicken make for quick cooking and are perfect for making flavorful bites. If chicken tenders aren’t available, you can use chicken breasts, thinly sliced for similar results.
-
2 tablespoons olive oil: A must-have for marinating and cooking. It adds a beautiful richness and depth to the chicken. You can substitute it with avocado oil if you prefer a higher smoke point.
-
1 teaspoon dried oregano: This herb brings that classic Greek flavor. If you don’t have oregano, try using thyme or rosemary for a different twist.
-
1 teaspoon garlic powder: Garlic is essential in Greek cuisine! It adds flavor without the need for fresh garlic. You can substitute with minced fresh garlic, using about two cloves if you want that extra punch.
-
1 teaspoon onion powder: This helps deepen the flavor profile without the texture of onions. If you’d like, you can use finely chopped fresh onions for more texture but note that it might alter the cook time slightly.
-
1 teaspoon salt: Essential for enhancing all the flavors. If you’re watching sodium intake, you can use sea salt or reduce the amount according to your preference.
-
1/2 teaspoon black pepper: Freshly cracked provides a nice kick. If you enjoy a bit more spice, feel free to add cayenne pepper for an additional punch!
-
1 tablespoon lemon juice: Freshly squeezed lemon juice brightens the entire dish. You can use lime juice if that’s what you have handy.
-
1/4 cup plain Greek yogurt (optional for serving): Perfect for a creamy dip! If you’re looking for a lighter option, you can substitute low-fat yogurt or even a dollop of hummus.
-
Lemon wedges (for serving): These are fantastic for squeezing over the tenders right before serving, adding a refreshing zing.
Step-by-Step Instructions
Now that you’ve gathered all your ingredients, let’s bring this dish to life! Follow these simple steps to make your Greek Chicken Tenders:
-
Marinate the Chicken: In a large bowl, mix together the olive oil, dried oregano, garlic powder, onion powder, salt, black pepper, and lemon juice. Add the chicken tenders, making sure they’re well-coated. Let them marinate for at least 30 minutes at room temperature, or longer in the refrigerator for deeper flavor (up to 4 hours is ideal). Chef tip: The longer you let it marinade, the juicier and tastier your chicken will be!
-
Prep Your Cooking Surface: Heat a large skillet or grill pan over medium-high heat. Make sure it’s hot before adding the chicken; this ensures a nice sear. If you’re grilling, preheat your grill to medium-high as well. Little hack: To check if your skillet is hot enough, sprinkle a few drops of water on it. If they sizzle and evaporate, you’re ready!
-
Cook the Chicken: Add the marinated chicken tenders to the hot pan in a single layer. Cook for 4-5 minutes on each side, or until cooked through (internal temperature should reach 165°F). Pro tip: Resist the urge to flip the chicken too soon; let it get a lovely crust for maximum flavor!
-
Rest the Chicken: Once cooked, transfer the tenders to a plate and cover with foil. Let them rest for about 5 minutes. This step is crucial for keeping the chicken moist and tender. Chef insider info: Resting is essential! If you cut into the chicken too soon, all those delicious juices will escape!
-
Serve Up: Plate your chicken tenders, drizzle with leftover marinade if you have any, and serve alongside a bowl of Greek yogurt and lemon wedges. Fun idea: You can also serve these tenders over a bed of greens or alongside a simple Greek salad for a complete meal.
Serving Suggestions
Plating is just as important as cooking! To serve your Greek Chicken Tenders, stack a few tenders on a plate, then add a generous scoop of Greek yogurt on the side—don’t forget those fresh lemon wedges for an extra burst of flavor. To elevate your dish even further, toss a handful of cherry tomatoes and cucumber slices on the plate. Voilà, you’ve got a meal that not only tastes amazing but also looks like a work of art!
Recipe Variations
Want to switch things up? Here are a few fun variations you can try to keep this dish exciting!
-
Mediterranean Spice: Add some smoked paprika or cumin to the marinade for a different flavor profile.
-
Zesty Pesto: Swap out the olive oil for a tablespoon of pesto, mixing in some fresh basil for an herbaceous twist.
-
Greek Chicken Tacos: Serve the chicken tenders in pita or tortillas with tzatziki, chopped peppers, and cucumber for a fun twist on traditional tacos!
-
Baked Option: For an oven-baked version, preheat the oven to 425°F, place the chicken on a lined baking sheet, and bake for 15-20 minutes until cooked through.
-
Vegetarian-Friendly Alternative: Use marinated portobello mushrooms or tofu instead of chicken for a plant-based version!
Chef’s Notes
This recipe holds a special place in my heart, not just for its nostalgic ties but also for how it has evolved over the years. I started with a simple marinade and later added layers of flavor, making it versatile for any occasion. Whenever I make it for friends or family, they can’t help but rave about it! I also love how easy it is to double the batch for meal prep—having these juicy tender pieces ready to go sets you up for success all week long!
FAQs and Troubleshooting
1. My chicken came out dry, what happened?
- This can happen if you overcook the chicken. Always use a meat thermometer to check for doneness. If you cook it until it reaches 165°F and let it rest as instructed, you’ll avoid dryness.
2. Can I use frozen chicken tenders?
- Yes! Just ensure they’re thoroughly thawed before marinating. Frozen chicken should not be cooked in the marinade directly as it can lead to uneven cooking.
3. How do I store leftovers?
- Store any leftovers in an airtight container in the fridge for up to 3-4 days. To reheat, just give them a quick warm-up in a skillet or microwave.
4. Can I freeze these chicken tenders?
- Absolutely! You can freeze the marinated chicken before cooking. Just remember to thaw them in the fridge overnight before cooking them as per the instructions.
Nutritional Info (optional)
As a rough estimate, a serving of Greek Chicken Tenders (based on a standard serving size) contains approximately:
- Calories: 200
- Protein: 26g
- Fat: 9g
- Carbohydrates: 0g
These tenders are packed with protein and provide healthy fats, making them a fantastic choice for a nourishing meal!
Conclusion
And there you have it—the marvelous journey of Greek Chicken Tenders from my kitchen to yours! This simple yet flavorful dish proves that eating well can be easy, enjoyable, and endlessly versatile. I hope you create your own memories with this recipe, just as I did many years ago on that unforgettable Greek Night. Happy cooking, and may every meal be a celebration of flavor and joy!
PrintGreek Chicken Tenders
Tender, juicy chicken tenders marinated in Mediterranean flavors, perfect for a healthy dinner.
- Prep Time: 30 minutes
- Cook Time: 10 minutes
- Total Time: 40 minutes
- Yield: 4 servings 1x
- Category: Main Course
- Method: Grilling
- Cuisine: Mediterranean
- Diet: Paleo
Ingredients
- 1 lb chicken tenders
- 2 tablespoons olive oil
- 1 teaspoon dried oregano
- 1 teaspoon garlic powder
- 1 teaspoon onion powder
- 1 teaspoon salt
- 1/2 teaspoon black pepper
- 1 tablespoon lemon juice
- 1/4 cup plain Greek yogurt (optional for serving)
- Lemon wedges (for serving)
Instructions
- Marinate the Chicken: In a large bowl, mix together the olive oil, dried oregano, garlic powder, onion powder, salt, black pepper, and lemon juice. Add the chicken tenders, making sure they’re well-coated. Let them marinate for at least 30 minutes at room temperature.
- Prep Your Cooking Surface: Heat a large skillet or grill pan over medium-high heat. Make sure it’s hot before adding the chicken.
- Cook the Chicken: Add the marinated chicken tenders to the hot pan in a single layer. Cook for 4-5 minutes on each side, or until cooked through.
- Rest the Chicken: Once cooked, transfer the tenders to a plate and cover with foil. Let them rest for about 5 minutes.
- Serve Up: Plate your chicken tenders, drizzle with leftover marinade if you have any, and serve alongside a bowl of Greek yogurt and lemon wedges.
Notes
For added flavor, serve with a salad or over greens. Feel free to experiment with spices for different variations.
Nutrition
- Serving Size: 1 serving
- Calories: 200
- Sugar: 1g
- Sodium: 600mg
- Fat: 9g
- Saturated Fat: 1g
- Unsaturated Fat: 4g
- Trans Fat: 0g
- Carbohydrates: 0g
- Fiber: 0g
- Protein: 26g
- Cholesterol: 75mg
Keywords: Greek chicken, Mediterranean meal, healthy dinner, chicken tenders
Easy Low-Carb Chicken Spinach Mushroom Bake
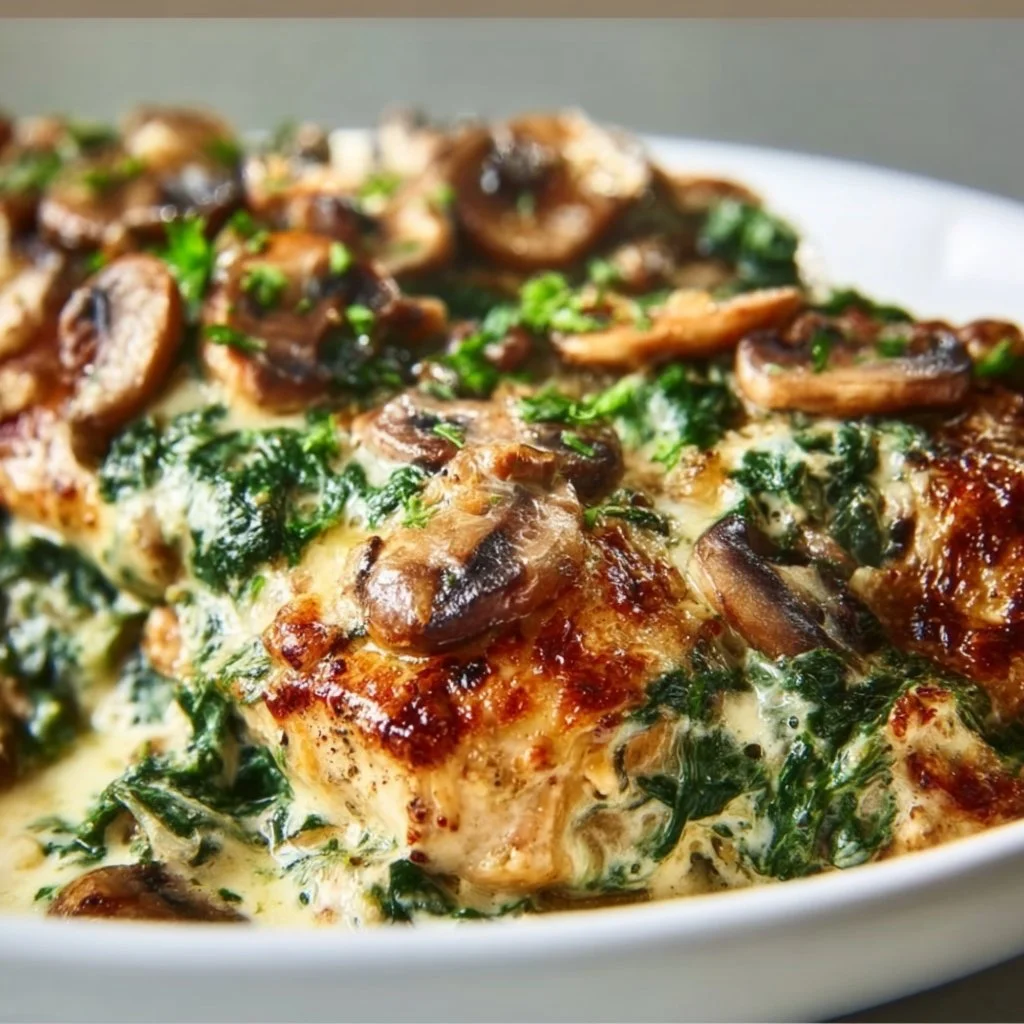
Easy Low-Carb Chicken Spinach Mushroom Bake
Introduction
Hey there, food lovers! Welcome back to my cozy kitchen here at Clean Plate Cravings! Today, I’m excited to share a dish that’s not only bursting with flavor but is also low-carb and a breeze to whip up—my Easy Low-Carb Chicken Spinach Mushroom Bake. This comforting recipe is perfect for a busy weeknight but fancy enough to impress those special guests on the weekends!
Picture this: It’s a chilly evening, and after a long day filled with meetings and errands, you crave something warm and satisfying. But here’s the kicker—you also want to keep it healthy and light. That’s where this one-dish wonder comes into play! With tender shredded chicken, vibrant spinach, earthy mushrooms, and a creamy Parmesan sauce, this bake hits all the right notes without weighing you down.
And let me tell you, this dish comes with a little nostalgia. It reminds me of weekends spent cooking with my grandma in her bustling kitchen, where everything was homemade, and flavors mingled like old friends. She would often throw together a casserole filled with whatever vegetables we had on hand, and we’d savor every last bite. That’s the spirit I channel when I craft recipes today—good food, good vibes, and a lot of love.
So, roll up your sleeves, and let’s dive into this easy low-carb bake that’s sure to become a staple in your kitchen! You’ll find that it’s not only delicious but incredibly versatile, too. Let’s get cooking!
Personal Story
Growing up, my family kitchen was always filled with the aromas of delicious home-cooked meals. My grandma was a master of casseroles. She never shied away from throwing whatever was left in the fridge into a baking dish, and her motto was always, "You won’t know until you try!" One chilly autumn evening, I watched her create a creamy chicken and spinach bake that would later become one of our family favorites.
I still remember how she’d let me stir the pot, teaching me her secrets with the warmest smile. "Always taste as you go, dear," she’d say, her eyes twinkling. That day, our kitchen was alive with laughter and the tantalizing smell of garlic sautéing—an irresistible combination I’ve never forgotten.
This Easy Low-Carb Chicken Spinach Mushroom Bake is inspired by those cherished moments in my Grandma’s kitchen. It captures the essence of comfort food while keeping it light and fresh. It’s a reminder that food is not just nourishment; it’s also connection, warmth, and love shared around the table.
Ingredients
Here’s what you’ll need to create this delightful dish:
-
2 cups cooked chicken, shredded
The star of our show! Feel free to use leftover rotisserie chicken, grilled chicken, or even poach chicken breast specifically for this dish. -
2 cups fresh spinach
Spinach adds a beautiful pop of color and a ton of nutrients. Fresh is best, but you can easily substitute with frozen spinach—just make sure to thaw and squeeze out excess moisture. -
1 cup mushrooms, sliced
I love using cremini or button mushrooms for their rich umami flavor. If you’re feeling adventurous, try shiitake for an earthy twist! -
1 cup heavy cream
This creamy base is what ties everything together. For a lighter option, you can substitute with coconut cream or half-and-half, although the flavor will differ slightly. -
1 cup Parmesan cheese, grated
Parmesan brings a salty, nutty flavor to the dish. If you’re not a fan of Parmesan, any cheese that melts well, like mozzarella or goat cheese, can work in a pinch. -
2 cloves garlic, minced
Garlic is a must for adding depth and aroma. For a milder flavor, try roasted garlic. -
Salt and pepper to taste
Simple seasonings that elevate every dish. Don’t be shy—taste as you season! -
Olive oil for cooking
A splash of olive oil helps sauté the veggies and brings a lovely richness. Avocado oil is a great alternative, with a higher smoke point.
Step-by-Step Instructions
Now that we have our ingredients, let’s get to the fun part—cooking this delightful bake!
-
Preheat Your Oven
Preheat your oven to 375°F (190°C). This step is crucial for achieving that beautifully baked, golden top. -
Sauté the Aromatics
In a large skillet, heat about 2 tablespoons of olive oil over medium heat. Add the minced garlic and sauté until fragrant, about 1 minute. This sizzles up the kitchen and sends greetings to all your taste buds! -
Add the Mushrooms
Toss in your sliced mushrooms and sauté for about 3-4 minutes until they’re tender and have released their moisture. Chef’s Tip: Don’t overcrowd the pan; otherwise, the mushrooms will steam instead of sauté! -
Incorporate the Spinach
Add the fresh spinach to the skillet and cook until wilted, about 2-3 minutes. It feels like magic watching it shrink down! Season with salt and pepper to enhance the flavors. -
Combine the Chicken and Cream
Stir in the shredded chicken and pour in the heavy cream, mixing everything together. Allow it to simmer for another 2-3 minutes until everything is well coated. If you want to add a bit of zest, squeeze a little lemon juice into the mix—trust me, it elevates the flavor! -
Cheesy Goodness
Gradually fold in the Parmesan cheese until melted and creamy. Chef Hack: Save a bit of cheese for topping—this will give you a delicious, crispy layer! -
Transfer to Baking Dish
Pour the mixture into a greased 9×13 inch baking dish, spreading it evenly. Top with the remaining Parmesan cheese for a golden crust. -
Bake
Pop it into your preheated oven and bake for 25-30 minutes or until the top is bubbly and golden brown. The delightful aroma will fill your kitchen, making it hard to resist! -
Cool and Serve
Once ready, let it cool for about 5 minutes to set. Serve warm, and enjoy every bite!
Serving Suggestions
This Chicken Spinach Mushroom Bake is perfect all on its own, but if you’re looking to dress it up a bit for serving, here are a couple of ideas! Plate it in individual baking ramekins for a rustic touch. Add a sprinkle of fresh herbs, like parsley or basil, for that pop of freshness. It pairs beautifully with a simple garden salad dressed in balsamic vinaigrette.
Recipe Variations
Now, let’s get creative! Here are a few fun variations to keep this dish exciting:
-
Spicy Kick: Add a pinch of red pepper flakes to the sautéed mushrooms for a spicy version.
-
Herb Infusion: Experiment with different herbs like thyme or rosemary for a gourmet touch.
-
Cauliflower Upgrade: Add roasted cauliflower florets to the bake for an extra veggie boost and delicious texture.
-
Zucchini Noodles: Swap out half of the chicken for spiraled zucchini for a fun twist on the classic!
-
Dairy-Free Delight: Use coconut cream and nutritional yeast instead of Parmesan for a creamy, dairy-free option.
Chef’s Notes
This recipe has evolved from my grandmother’s original version, which was a bit heavier and less health-conscious. I love how we can take traditional comfort foods and make them into healthier options while preserving those beloved flavors. And honestly, I can’t help but giggle sometimes in the kitchen when I try creative combinations—some of which go wonderfully wrong but lead me to even better discoveries. Kitchen experimentation is truly where the magic happens!
FAQs and Troubleshooting
Q: Can I use leftover shredded chicken?
A: Absolutely! This dish is perfect for using up leftover chicken. Just make sure it’s seasoned to your tasting!
Q: Can I make this dish ahead of time?
A: Yes! You can prepare everything a day in advance and store it in the fridge. Just bake it right before serving.
Q: What if my bake is too dry?
A: If your bake comes out a bit dry, it might be because it was cooked for too long. Try not to overbake it, and if needed, add a splash more cream before baking.
Q: How do I store leftovers?
A: Store it in an airtight container in the fridge for up to 3 days. Reheat gently in the oven or microwave!
Nutritional Info
While I always encourage enjoying food without guilt, here’s a rough estimate of the nutritional info per serving (assuming 6 servings):
- Calories: 380
- Protein: 30g
- Fat: 27g
- Carbohydrates: 6g
- Fiber: 2g
Remember, these values can vary based on ingredient substitutions and portion sizes!
And there you have it—a cozy, easy Low-Carb Chicken Spinach Mushroom Bake that’s filled with flavor, nostalgia, and love. Grab your apron and give this recipe a try—you won’t be disappointed! Happy cooking!
PrintEasy Low-Carb Chicken Spinach Mushroom Bake

A delightful low-carb bake featuring tender shredded chicken, vibrant spinach, earthy mushrooms, and a creamy Parmesan sauce, perfect for busy weeknights or impressing guests.
- Prep Time: 15 minutes
- Cook Time: 30 minutes
- Total Time: 45 minutes
- Yield: 6 servings 1x
- Category: Main Course
- Method: Baking
- Cuisine: American
- Diet: Low-Carb, Gluten-Free
Ingredients
- 2 cups cooked chicken, shredded
- 2 cups fresh spinach
- 1 cup mushrooms, sliced
- 1 cup heavy cream
- 1 cup Parmesan cheese, grated
- 2 cloves garlic, minced
- Salt and pepper to taste
- Olive oil for cooking
Instructions
- Preheat your oven to 375°F (190°C).
- Sauté the minced garlic in olive oil over medium heat until fragrant, about 1 minute.
- Add the sliced mushrooms and sauté for about 3-4 minutes until tender.
- Incorporate the fresh spinach and cook until wilted, about 2-3 minutes; season with salt and pepper.
- Combine the shredded chicken and heavy cream, mixing well.
- Cheesy goodness: fold in the Parmesan cheese until melted and creamy.
- Transfer the mixture to a greased 9×13 inch baking dish, top with remaining Parmesan cheese.
- Bake for 25-30 minutes until bubbly and golden brown.
- Cool for 5 minutes and serve warm.
Notes
This dish is versatile; you can add red pepper flakes for spice or substitute with vegetables like cauliflower or zucchini noodles.
Nutrition
- Serving Size: 1 serving
- Calories: 380
- Sugar: 2g
- Sodium: 600mg
- Fat: 27g
- Saturated Fat: 13g
- Unsaturated Fat: 12g
- Trans Fat: 0g
- Carbohydrates: 6g
- Fiber: 2g
- Protein: 30g
- Cholesterol: 90mg
Keywords: low-carb, chicken, bake, easy recipe, comfort food, healthy