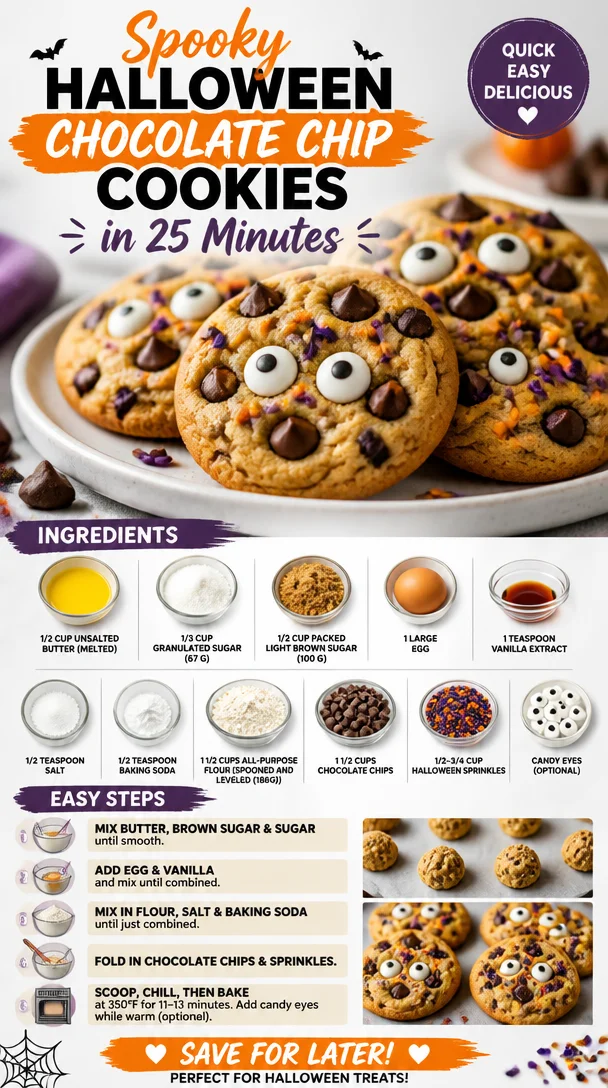
Spooky Halloween Chocolate Chip Cookies in 25 Minutes
Halloween Chocolate Chip Cookies: A Spooktacular Treat!
Hey there, fellow food lovers! As Halloween approaches, it’s time to summon that playful spirit and whip up something wickedly delicious in the kitchen. What could be more fun than baking a batch of Halloween Chocolate Chip Cookies? These cookies are not just any ordinary sweets; they’re bursting with chocolatey goodness, festooned with festive sprinkles, and ready to delight your ghoulish gathering or cozy movie night.
Imagine the sweet, warm aroma wafting through your kitchen as you mix up a simple dough that transforms into little bites of joy. Halloween should be all about having fun and indulging in treats that make your taste buds dance with delight. So, roll up your sleeves, grab your favorite mixing bowl, and let’s get started on this hauntingly good recipe!
A Sweet Memory from My Childhood
One of my fondest childhood memories revolves around Halloween baking nights with my mom. Each year, we’d dive into the kitchen, flour dusting our faces, and mix up our favorite cookie dough. I remember the excitement of breaking out the festive cookie cutters—ghosts, pumpkins, and bats. We’d fill our home with giggles and laughter, and the best part? Sneaking dough when my mom wasn’t looking!
One year, she introduced chocolate chip cookies loaded with Halloween sprinkles, and it was love at first bite! The crunchy outside, gooey chocolate inside, and a pop of color from the sprinkles took our Halloween to the next level! Now, every time I bake these cookies, I’m reminded of those delightful evenings, the warmth of the kitchen, and that unmistakable smell of freshly baked cookies. It fills my heart and makes me so grateful to share this tradition with you all.
Ingredients
Before we jump into the mixing and baking dance, let’s gather our ingredients!
-
1/2 cup unsalted butter (melted): Adds richness and depth. If you don’t have unsalted, you can use salted butter but cut back on the added salt.
-
1/3 cup granulated sugar (67 g): Provides sweetness and helps with a lovely chewy texture. Feel free to swap with coconut sugar for a healthier alternative!
-
1/2 cup packed light brown sugar (100 g): Its molasses content deepens the flavor and keeps cookies soft. Dark brown sugar works too, adding a more robust flavor.
-
1 large egg: Brings everything together and aids in fluffiness. For a vegan option, you can substitute with a flax egg (1 tablespoon flaxseed meal + 2.5 tablespoons of water, let sit for a few minutes).
-
1 teaspoon vanilla extract: A touch adds warmth and enhances all the flavors. Try using almond extract for a twist!
-
1/2 teaspoon salt: To balance sweetness—don’t skip this! If you’re on a low-sodium diet, consider reducing the amount or using a salt substitute.
-
1/2 teaspoon baking soda: This is your leavening agent. Make sure it’s fresh for the best rise! If you only have baking powder, use it at a 1:1 ratio, but note the flavor might be a little different.
-
1 1/2 cups all-purpose flour (spooned and leveled for 186g): The base of our cookies. For a gluten-free option, use a 1:1 gluten-free flour blend.
-
1 1/2 cups chocolate chips: The star of the show! Use semi-sweet, dark, or even white chocolate for a different taste profile.
-
1/2-3/4 cup Halloween sprinkles: Adds a festive touch! Don’t have Halloween sprinkles? Mix regular sprinkles with a bit of orange or black food coloring for custom colors.
-
Candy eyes (optional): For a fun spooky effect! If you can’t find them, white chocolate chips work just as well for that ghostly touch!
Step-by-Step Instructions
Ready to get baking? Let’s dive into the steps of creating these delightful treats!
-
Preheat the Oven: The first step to cookie perfection is preheating your oven to 350°F (175°C). This ensures your cookies bake evenly and get that mouthwatering golden-brown color!
-
Mix the Wet Ingredients: In a large mixing bowl, combine the melted butter, granulated sugar, brown sugar, and vanilla extract. With a whisk or electric mixer, mix until smooth and creamy, about 2 minutes. This step is crucial; it helps dissolve the sugars fully for a silky dough.
-
Add the Egg: Crack in your egg. Mix well until it’s fully incorporated—this should take about 30 seconds. The egg acts as a binder and helps the cookies spread perfectly.
-
Combine the Dry Ingredients: In a separate bowl, whisk together the flour, baking soda, and salt. I recommend this method for better distribution of the baking soda and avoiding clumps.
-
Mix it All Together: Gradually add the dry ingredients to the wet mixture, stirring gently until just combined. Overmixing can lead to tough cookies, so be gentle—think of it as nurturing your dough!
-
Fold in the Chocolate Chips and Sprinkles: Next, fold in the chocolate chips and 1/2 to 3/4 cup of Halloween sprinkles. This is where the magic happens! You’ll see so much color and texture, instantly thrilling for Halloween.
-
Scoop the Dough: Using a cookie scoop or two tablespoons, drop rounded balls of dough onto a lined baking sheet, leaving space for them to spread.
-
Decorate with Extra Sprinkles: If you’re feeling festive (and why wouldn’t you?), sprinkle a few more Halloween sprinkles on top of each dough ball. You could even add candy eyes for a spooky touch!
-
Bake: Place the baking sheet in the preheated oven and bake for 10-12 minutes or until the edges are golden brown and the center looks slightly undercooked. Remember, cookies continue to bake on the baking sheet once removed from the oven.
-
Cool Down: Allow the cookies to cool on the rack for 5 minutes before transferring them to a wire rack to cool completely. This patience is key for mastering that chewy texture!
Serving Suggestions
Now that we’ve baked our delicious Halloween Chocolate Chip Cookies, let’s talk about serving. I like to arrange these cheerful cookies on a spooky-themed platter with some purple and orange napkins, maybe even decorate the edge with candy corn for that extra festive feel. If you’re feeling extra crafty, you can stack them and tie with a pretty ribbon. Serve them warm, accompanied by a glass of milk (or a fun Halloween-inspired beverage) for the ultimate treat experience!
Recipe Variations
Nothing spices up a classic recipe like a twist! Here are a few fun variations to inspire your Halloween cookies:
-
Pumpkin Spice Cookie: Mix in 1/2 teaspoon of pumpkin spice to the dry ingredients for that cozy fall flavor.
-
Nutty Surprise: Fold in chopped nuts like pecans or walnuts for that added crunch!
-
White Chocolate Delight: Swap the semi-sweet chocolate chips for white chocolate chips and add a dash of orange zest for a burst of brightness.
-
Oatmeal Halloween Cookies: Replace 1/2 cup of flour with 1/2 cup of rolled oats for a chewy texture.
-
Limitless Sprinkles: Mix and match your favorite seasonal sprinkles! Think ghosts, witches, and pumpkins—the more, the merrier!
Chef’s Notes
These cookies have evolved over time from a standard gooey chocolate chip to a fun Halloween favorite. I started adding festive sprinkles just to make them look cute, but soon it became a crucial part of the recipe. It’s incredible how just a few vibrant sprinkles can turn a classic into a celebration.
Also, every batch tells its own story—sometimes they’re perfectly puffy; other times, they flatten out a bit more, but they’re always delicious! If you ever face a batch that flattens, it can often be due to butter that’s too warm, so make sure it’s melted but cooled slightly before mixing with sugars.
FAQs and Troubleshooting
-
Why are my cookies flat?
- If your cookies spread too much, it could be that your butter was too warm or you didn’t measure your flour correctly. Use a spoon to lightly portion flour into your measuring cup, then level off—no scooping!
-
Can I freeze these cookies?
- Absolutely! You can freeze the dough before baking. Just scoop the dough and place the balls on a cookie sheet to freeze until firm, then transfer to a freezer bag. Bake directly from the freezer, adding a couple of extra minutes to the baking time.
-
What if I don’t have sprinkles?
- No worries! You could decorate with crushed candy, chocolate drizzles, or even add a dollop of frosting on top after the cookies cool down for a sweet finishing touch.
-
How can I keep cookies soft?
- To keep your cookies soft, store them in an airtight container with a slice of bread! The moisture from the bread keeps the cookies soft and fresh.
Nutritional Info
While I’m all about enjoying treats like these Halloween Chocolate Chip Cookies, it’s good to keep some balance in mind. Each cookie roughly contains approximately 150 calories, 7 grams of fat, 22 grams of carbohydrates, 1 gram of protein, and minimal dietary fiber. Remember that enjoyment is key!
There you have it—a hefty 2000+ word journey into the thrilling world of Halloween Chocolate Chip Cookies! With every bite, you’ll not only taste the joy of chocolate but also the thrill of creating a festive treat that fills your home with magic and delight. So what are you waiting for? Grab those ingredients and let’s bake some spooky deliciousness together! 🍪👻
PrintHalloween Chocolate Chip Cookies

A spooktacular treat for Halloween, these chocolate chip cookies are loaded with sweetness, festive sprinkles, and a deliciously gooey center.
- Prep Time: 15 minutes
- Cook Time: 12 minutes
- Total Time: 27 minutes
- Yield: 12 servings 1x
- Category: Dessert
- Method: Baking
- Cuisine: American
- Diet: Vegetarian
Ingredients
- 1/2 cup unsalted butter (melted)
- 1/3 cup granulated sugar (67 g)
- 1/2 cup packed light brown sugar (100 g)
- 1 large egg
- 1 teaspoon vanilla extract
- 1/2 teaspoon salt
- 1/2 teaspoon baking soda
- 1 1/2 cups all-purpose flour (spooned and leveled for 186g)
- 1 1/2 cups chocolate chips
- 1/2–3/4 cup Halloween sprinkles
- Candy eyes (optional)
Instructions
- Preheat the oven to 350°F (175°C).
- Mix the melted butter, granulated sugar, brown sugar, and vanilla extract until smooth and creamy.
- Add the egg and mix well until fully incorporated.
- Combine the flour, baking soda, and salt in a separate bowl.
- Mix the dry ingredients with the wet mixture until just combined.
- Fold in the chocolate chips and Halloween sprinkles.
- Scoop rounded balls of dough onto a lined baking sheet.
- Decorate with extra sprinkles and optional candy eyes.
- Bake for 10-12 minutes or until golden brown.
- Cool on a wire rack before serving.
Notes
These cookies can be frozen before baking. Store in an airtight container with a slice of bread to keep them soft.
Nutrition
- Serving Size: 1 cookie
- Calories: 150
- Sugar: 10g
- Sodium: 100mg
- Fat: 7g
- Saturated Fat: 4g
- Unsaturated Fat: 3g
- Trans Fat: 0g
- Carbohydrates: 22g
- Fiber: 1g
- Protein: 1g
- Cholesterol: 30mg
Keywords: Halloween, chocolate chip cookies, festive treats, dessert, baking
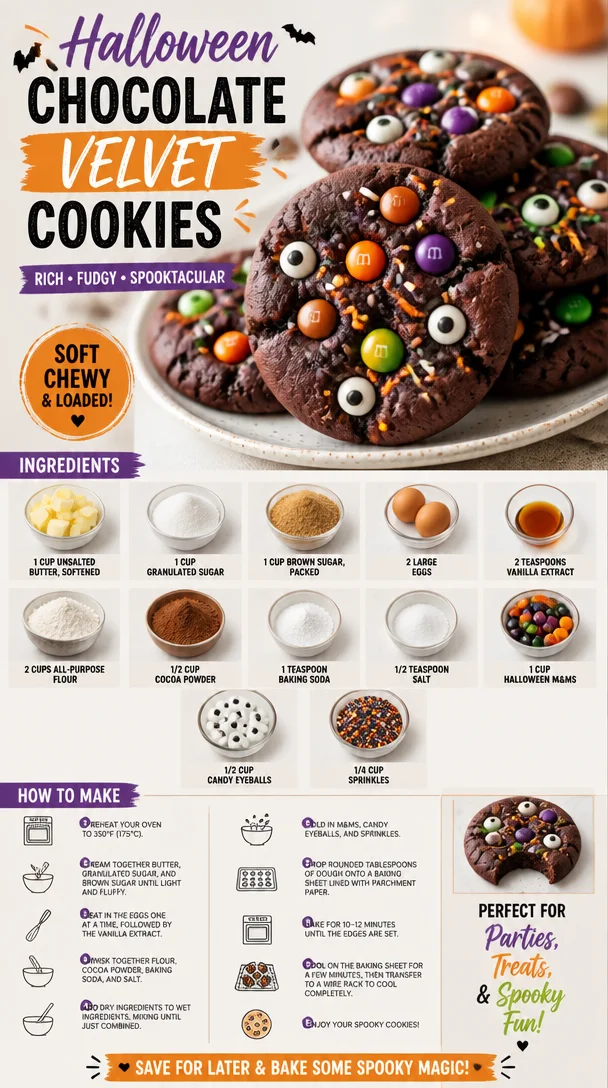
Halloween Chocolate Velvet Cookies
Halloween Chocolate Velvet Cookies: A Spooktacular Treat!
Welcome, my fellow foodies! It’s that time of year again when the leaves turn crisp, and the air is filled with the sweet scent of cocoa and cinnamon. As Halloween creeps around the corner, we’re all looking for ways to celebrate—a perfect time to whip up some delightful Halloween Chocolate Velvet Cookies! Trust me; these treats are not just delicious but also a fun way to get into the spooky spirit. Let’s dive in!
In my kitchen, Halloween isn’t just about costumes and candy; it’s about creating magical memories with food that dances on your taste buds. I remember a time when my best friend and I spent hours concocting Halloween treats, our faces covered in flour and our laughter filling the air. We would layer gooey molten chocolate in between ghost-shaped cookies while adorned with candy eyeballs to give our spooky snacks a little character. Fast forward a few years, and my love for those whimsical creations has only grown!
These Halloween Chocolate Velvet Cookies are a celebration of that spirit. They’re soft, chewy, and packed with rich chocolate flavor, perfect for making with friends or enjoying solo while cozied up on the couch with your favorite fall movie. Oh, and the best part? They’re loaded with colorful M&Ms and sprinkles that add that extra sprinkle of fun!
So grab your apron, and let’s create a batch of these enchanting cookies that will have everyone screaming for more!
Personal Story
I often recall the Halloween nights of my childhood, where our family kitchen transformed into a haunted bakery filled with festive scents. One year, I decided to team up with my little brother, who insisted on dressing as a vampire chef (which was quite the sight!). We spent the evening mixing batter and dodging powdered sugar clouds, all while bantering about the best way to decorate our cookies. It was during these innocent days that I realized a simple batch of cookies could evoke such joy, laughter, and connection.
From that moment on, every Halloween became a cherished tradition, filled with laughter and mouth-watering creations. Those memories kick-started my passion for baking, and now, we’re turning that nostalgia into pure magic with these delightful Halloween Chocolate Velvet Cookies.
Ingredients
Let’s get our spook on! Here’s what you’ll need for these delicious cookies:
-
1 cup unsalted butter, softened: You want your butter to be at room temperature for easy mixing. If you’re out of unsalted butter, salted butter is a suitable substitute—just reduce the salt in the recipe by half!
-
1 cup granulated sugar: This adds sweetness and helps achieve that perfect chewy texture. If you’re looking for a healthier alternative, coconut sugar can work, but it will give you a slightly different flavor.
-
1 cup brown sugar, packed: The moisture and slight caramel flavor from the brown sugar balances the rich cocoa. Feel free to use light brown sugar, but dark brown sugar adds even more depth.
-
2 large eggs: Eggs provide structure and moisture. If you’re vegan, a chia egg (1 tablespoon of chia seeds mixed with 2.5 tablespoons of water) is a great substitute!
-
2 teaspoons vanilla extract: This enhances the cookie’s flavor profile. Use pure vanilla extract for the best results.
-
2 cups all-purpose flour: Essential for structure, but whole wheat flour can also be used for a heartier texture—just consider reducing the amount slightly.
-
1/2 cup cocoa powder: The star ingredient! Use quality unsweetened cocoa for the richest flavor. You might swap this for Dutch-process cocoa for a deeper taste.
-
1 teaspoon baking soda: This is your leavening agent. If you’re out, you can substitute with baking powder using a 1:2 ratio (2 teaspoons of baking powder instead of 1 teaspoon of baking soda).
-
1/2 teaspoon salt: Salt balances sweetness and enhances flavors. If you’re using salted butter, you may want to skip this altogether!
-
1 cup Halloween M&Ms: These add color and fun! If you can’t find Halloween ones, go with regular M&Ms or even chocolate chips.
-
1/2 cup candy eyeballs: These are what make the cookies truly festive! You might use mini marshmallows if you want a softer option, but let’s be real—eyeballs are just way more fun!
-
1/4 cup sprinkles: Adds that extra festive touch to make your cookies pop. You could swap these out with themed sprinkles that match the season.
Step-by-Step Instructions
Let’s get down to the fun part—baking these beauties! Follow my trusty steps for cookie perfection, and don’t forget to channel your inner chef!
-
Preheat Your Oven: Preheat your oven to 350°F (175°C). This ensures that your cookies bake evenly. A tip from the kitchen: Don’t skip this step; a hot oven is crucial for achieving that perfect texture!
-
Mix the Sugars and Butter: In a large mixing bowl, cream together the softened butter, granulated sugar, and brown sugar until light and fluffy—around 3-4 minutes. This step incorporates air into the dough, creating a nice rise in your cookies. Pro tip: Make sure your butter is really soft; if it’s too hard, you won’t get that airy fluffiness.
-
Add the Eggs and Vanilla: Beat in the eggs one at a time, allowing each egg to fully incorporate before adding the next. Stir in the vanilla extract, and let the delicious aroma fill your kitchen. A little tip? Scrape down the sides of the bowl with a spatula; you don’t want any hidden chunks of butter!
-
Combine Dry Ingredients: In another bowl, whisk together the flour, cocoa powder, baking soda, and salt. This ensures that your dry ingredients are evenly distributed. And here’s a chef hack: Use a sifter for the cocoa powder to avoid clumps and achieve a silky-smooth texture!
-
Mix Wet and Dry: Gradually add the dry ingredient mixture to your butter mixture, mixing until just combined. Avoid over-mixing; we want tender cookies, not tough ones! Stop mixing as soon as you see no more flour streaks.
-
Fold in the Fun: Gently fold in the Halloween M&Ms, candy eyeballs, and sprinkles. This is where things get festive! Feel free to save a handful of M&Ms and sprinkles for topping when you place the cookies on the baking sheet.
-
Scoop and Drop: Using a tablespoon or cookie scoop, drop heaping tablespoons of dough onto a lined baking sheet. Leave about 2 inches of space between each ball as they will spread while baking. A fun tip: Use a spatula to shape them slightly for that perfect round look.
-
Bake: Pop them into your preheated oven and bake for 10-12 minutes until the edges are set but the center looks a bit soft. This is key for that chewy texture! Trust me; don’t overbake—your cookies will continue to cook a bit after you take them out.
-
Cool: Let them cool on the baking sheet for about 5 minutes before transferring to a wire rack to cool completely. This allows them to set while still warm so that they stay gooey on the inside.
-
Enjoy!: Once cooled, gather your friends, grab a cup of apple cider or a warm drink, and dig into these delightful Halloween Chocolate Velvet Cookies that everyone will rave about!
Serving Suggestions
To present your Halloween Chocolate Velvet Cookies, simply stack a few on a festive plate or tray, and don’t forget to sprinkle them with extra M&Ms and sprinkles for that spooky vibe! You can even set up a little cookie decorating station for guests to add their special touch—think extra sprinkles, melted chocolate drizzle, or even a dusting of powdered sugar for a ghostly effect!
Recipe Variations
Want to get even more creative? Here are some fun twists on the classic recipe:
-
Nutty Addition: Toss in 1/2 cup of chopped walnuts or pecans for a crunchy contrast to the soft cookie.
-
Mint-Chocolate: Swap out M&Ms for mint chocolate chips for a refreshing twist. Perfect for those who love chocolate mint combos!
-
Spooky Surprise: Add a mini marshmallow in the center of each dough ball before baking for a gooey surprise in every bite.
-
Chili Twist: For the adventurous, mix in a pinch of cayenne pepper or chili powder to the flour for a spicy, sweet kick!
-
Gluten-Free: Substitute the all-purpose flour with a 1:1 gluten-free baking flour to accommodate gluten-free diets. Watch the texture closely; you might need to adjust the baking time slightly!
Chef’s Notes
As with any good recipe, my Halloween Chocolate Velvet Cookies have seen some evolution over the years. Initially, everything I made was gigantic—you could say I went for the "monster cookie" idea, but they weren’t exactly enjoyable to eat in one sitting. With time, I found the joy of the perfect bite-sized cookie, and more importantly, I learned to enjoy sharing that experience with others.
Also, I can’t help but chuckle every time I bake these cookies; my cats always seem to think it’s hunting season when the oven buzzes, darting around my feet, hoping for a taste. Hiding some cookies on the counter always results in a game of fetch (with my cat not cooperating, of course) as they excitedly wait for those treats to cool.
Make these cookies your new Halloween tradition, and you won’t regret it!
FAQs and Troubleshooting
1. My cookies turned out flat. What did I do wrong?
This can happen for a couple of reasons! Make sure your butter wasn’t too melted (softened is key, not runny!). Also, check your baking soda—if it’s expired, it won’t provide the lift you need.
2. How do I store these cookies?
To keep them fresh, store in an airtight container at room temperature for up to a week. If you want them to last longer, freeze them! Just ensure they’re well-wrapped.
3. Can I make the dough ahead of time?
Absolutely! You can roll the dough into balls and freeze them for up to three months. Just bake them directly from the freezer, adding a minute or two to the bake time.
4. Can I skip the candy eyeballs?
Of course! While the eyeballs are super fun, you can either leave them out or replace them with any fun candy of your choice. The cookies will still be delicious!
Nutritional Info
We all know that indulging in a cookie deserves a little reflection on balance! A typical cookie (when made into about 24 cookies) contains approximately:
- Calories: 150
- Fat: 7g
- Carbohydrates: 21g
- Protein: 2g
- Fiber: 1g
Remember, treats are part of life, so enjoy these cookies in good company, guilt-free!
So there you have it, lovely foodies! Get ready to hit the kitchen and create some delightful Halloween Chocolate Velvet Cookies that will fill your home with the best aromas and fun memories. Happy Halloween baking!
PrintHalloween Chocolate Velvet Cookies

Deliciously soft and chewy Halloween Chocolate Velvet Cookies packed with rich chocolate flavor, colorful M&Ms, and fun candy eyeballs.
- Prep Time: 15 minutes
- Cook Time: 12 minutes
- Total Time: 27 minutes
- Yield: 24 servings 1x
- Category: Dessert
- Method: Baking
- Cuisine: American
- Diet: Vegetarian
Ingredients
- 1 cup unsalted butter, softened
- 1 cup granulated sugar
- 1 cup brown sugar, packed
- 2 large eggs
- 2 teaspoons vanilla extract
- 2 cups all-purpose flour
- 1/2 cup cocoa powder
- 1 teaspoon baking soda
- 1/2 teaspoon salt
- 1 cup Halloween M&Ms
- 1/2 cup candy eyeballs
- 1/4 cup sprinkles
Instructions
- Preheat your oven to 350°F (175°C).
- Mix together the softened butter, granulated sugar, and brown sugar until light and fluffy.
- Add the eggs one at a time, then stir in the vanilla extract.
- Combine the flour, cocoa powder, baking soda, and salt in another bowl.
- Mix the dry ingredients into the wet mixture until just combined.
- Fold in the M&Ms, candy eyeballs, and sprinkles gently.
- Scoop heaping tablespoons of dough onto a lined baking sheet.
- Bake for 10-12 minutes until the edges are set.
- Cool on the baking sheet for 5 minutes before transferring to a wire rack.
- Enjoy your festive cookies!
Notes
Store cookies in an airtight container at room temperature for up to a week. Freeze dough for up to three months for future baking.
Nutrition
- Serving Size: 1 cookie
- Calories: 150
- Sugar: 10g
- Sodium: 120mg
- Fat: 7g
- Saturated Fat: 4g
- Unsaturated Fat: 2g
- Trans Fat: 0g
- Carbohydrates: 21g
- Fiber: 1g
- Protein: 2g
- Cholesterol: 30mg
Keywords: Halloween cookies, chocolate cookies, dessert recipes
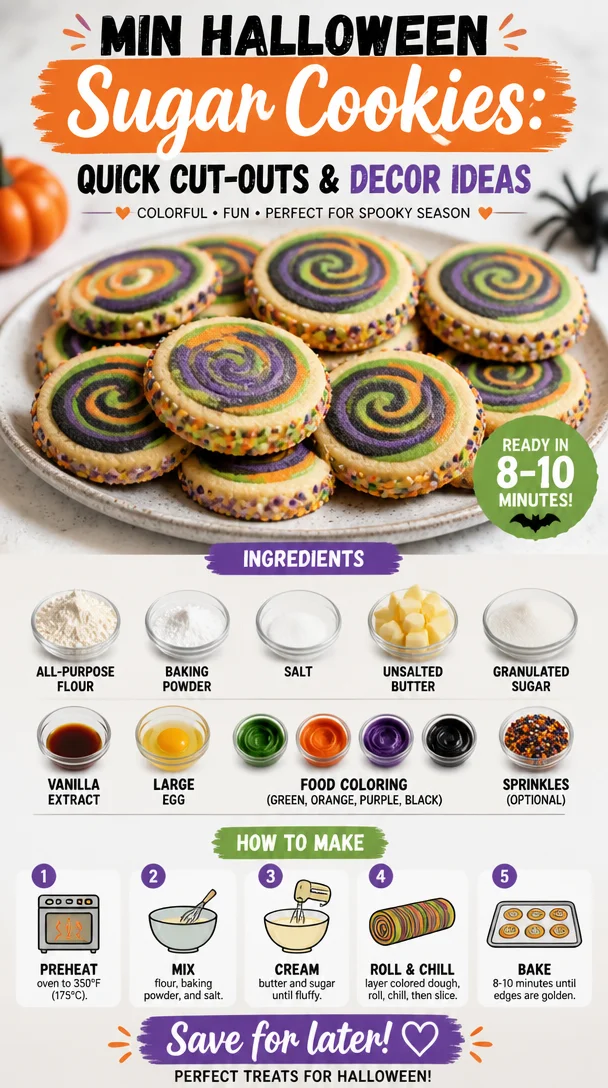
Min Halloween Sugar Cookies: Quick Cut-Outs & Decor Ideas
Easy Halloween Sugar Cookies: A Spook-tacular Treat
Ah, Halloween! The season of all things spooky and sweet, where the air turns crisp, costumes come alive, and, of course, the smell of freshly baked cookies wafts through the house. If there’s one treat that brings back childhood memories of trick-or-treating, it’s those delightful sugar cookies adorned with bright icing and sprinkles. Today, I’m excited to share my go-to recipe for Easy Halloween Sugar Cookies that will undoubtedly become a staple in your holiday festivities.
When I was growing up, my family had a tradition of gathering in the kitchen every Halloween to bake a mountain of sugar cookies. The kitchen would transform into a chaotic little workshop filled with laughter, flour explosions, and festive decorations. I vividly remember my little brother covering himself in flour as he tried to help roll out the dough (spoiler alert: it didn’t end well for him!). But in those moments of joyful creativity, we forged memories that tasted just as sweet as those cookies.
So, if you’re ready to bake a batch or two of sugar cookies that will be perfect for Halloween parties, school events, or just cozy nights at home, grab your apron, and let’s get started!
Ingredients
Here’s what you’ll need to whip up these spook-tacular cookies:
-
2 3/4 cups all-purpose flour: This is your cookie base. It provides the structure necessary to keep your cookies fluffy yet firm. For a gluten-free option, try using a 1:1 gluten-free flour blend.
-
1 teaspoon baking powder: This little booster helps your cookies rise perfectly without becoming cake-like. Make sure it’s fresh for the best results!
-
1/2 teaspoon salt: Salt enhances the sweetness of the cookies and balances the flavors. You can reduce it slightly if you prefer less saltiness.
-
1 cup unsalted butter, softened: Ah, butter! It gives the cookies their rich flavor and tender texture. If you’re sensitive to dairy, consider using a dairy-free butter substitute.
-
1 1/2 cups granulated sugar: Sweetness is key here! If you want to cut down on sugar, you can use a sugar substitute, but keep in mind it may alter the texture.
-
1 teaspoon vanilla extract: Vanilla adds a depth of flavor that makes cookies irresistible. For a twist, you could try almond extract instead for a nutty flavor!
-
1 large egg: Acts as a binding agent to hold everything together. If you’re looking for an egg substitute, a flaxseed egg or unsweetened applesauce can work in a pinch!
-
Food coloring (green, orange, purple, black): Get creative with your Halloween spirit! Gel food coloring gives the best vibrant results.
-
Sprinkles (optional): Who doesn’t love sprinkles? They add a festive touch and a little crunch. Choose your favorite Halloween-themed sprinkles to add a fun pop!
Now that we’ve gathered our cast of ingredients, let’s dive into the steps to create these magical cookies.
Step-by-Step Instructions
-
Preheat Your Oven: First things first, let’s get that oven fired up! Preheat it to 350°F (175°C). You want it nice and hot by the time you get your cookies ready to bake.
-
Mix Dry Ingredients: In a large bowl, whisk together the flour, baking powder, and salt. This helps ensure that your dry ingredients are evenly distributed and prevents any lumps in your dough. Plus, it gives you a chance to show off your whisking skills!
-
Cream the Butter and Sugar: In another bowl, beat the softened unsalted butter and granulated sugar together until the mixture is light and fluffy (about 3-5 minutes). This is where the magic happens! The air you incorporate here will help the cookies rise.
-
Add the Egg and Vanilla: Crack in the egg and pour in the vanilla extract. Beat until they are fully incorporated, creating a creamy mixture that smells heavenly.
-
Combine It All: Gradually add your flour mixture into the butter mixture, mixing until just combined. Don’t overmix! Your dough should come together nicely and not be sticky. If it feels too sticky, you can mix in a bit more flour, a tablespoon at a time.
-
Color the Dough: If you want to create colorful cookies, now’s the time! Divide the dough into separate bowls based on how many colors you plan to use, and then mix in your food coloring until you reach your desired shade. I love the vibrant hues that remind me of Halloween!
-
Chill the Dough: For best results, wrap your colored dough in plastic wrap and chill it in the refrigerator for at least 30 minutes. This helps improve the texture and makes it easier to roll out.
-
Roll Out & Cut: Once chilled, on a lightly floured surface, roll out the dough to about 1/4 inch thick. Use cookie cutters to cut out Halloween shapes like bats, ghosts, and pumpkins. Don’t forget to transfer them to a parchment-lined baking sheet!
-
Bake: Pop your cookie sheets in the preheated oven and bake for 8-10 minutes or until the edges are just slightly golden. Keep an eye on them because they can go from perfect to overbaked pretty quickly.
-
Cool: Remove the cookies from the oven and let them cool on the baking sheet for 5 minutes before transferring them to a wire rack to cool completely. This part can be tough because the smell is intoxicating, but patience is key!
-
Decorate: Once cooled, let your creativity run wild! Use icing, sprinkles, or edible glitter to decorate your cookies. Create spooky faces, vibrant designs, or anything that fits your Halloween theme!
Serving Suggestions
These Halloween Sugar Cookies can be served on a festive platter, or if you’re feeling extra spooky, arrange them in a haunted house shape! For a fun twist, place them in clear treat bags tied with colorful ribbons for party favors. Add your favorite spooky decorations around the platter to set the mood, and watch as everyone gathers around to grab a cookie (or five!).
Recipe Variations
Feeling adventurous? Here are some variations to spice up your cookie experience:
- Chocolate Sugar Cookies: Swap out a cup of flour for 1/2 cup of cocoa powder for a delicious chocolate twist.
- Spiced Sugar Cookies: Add a teaspoon of cinnamon and a pinch of nutmeg for a warm, autumn flavor.
- Lemon Zest Cookies: Stir in some lemon zest to the dough for a zesty surprise in your sweet treats.
- Pumpkin Spice Delight: Incorporate a tablespoon of pumpkin puree and pumpkin spice for an autumn-inspired cookie.
- Gluten-Free Delight: Use a gluten-free flour blend and ensure all other ingredients are gluten-free for a safe option for your friends with gluten intolerance.
Chef’s Notes
Every time I make these cookies, I’m reminded of those joyful kitchen moments with my family. I’ve experimented over the years—adding different flavors and colors, and each batch brings a new memory. One funny incident comes to mind where I accidentally grabbed a bag of salt instead of sugar (yikes!). Let’s just say that batch was not a crowd-pleaser. So, always double-check your ingredients!
This recipe has also evolved; I love trying new designs based on trends or fun shapes I find online. The versatility of sugar cookies means you can adapt them to fit any holiday or event!
FAQs and Troubleshooting
-
Why are my cookies spreading too much?
- Make sure your butter is properly softened (not melted) and that you chilled your dough adequately. If your kitchen is warm, consider chilling your cookies on the baking sheet before baking.
-
Can I freeze these cookies?
- Absolutely! You can freeze the dough before baking. Just wrap it tightly in plastic wrap and store it in an airtight container. When you’re ready to bake, let it thaw overnight in the refrigerator.
-
What if my icing isn’t setting?
- If your icing isn’t setting, it might be too thin. Add a little more powdered sugar to thicken it up. Make sure your cookies are cool before icing; warm cookies can cause icing to run.
-
How do I store these cookies?
- Store baked cookies in an airtight container at room temperature for up to a week. If you’ve decorated them with icing, let the icing set first before stacking them to avoid smudging.
Nutritional Info
While exact nutritional values can vary based on specific brands and ingredients used, here’s a rough estimate per cookie (assuming 24 cookies):
- Calories: 150
- Total Fat: 7g
- Saturated Fat: 4g
- Cholesterol: 20mg
- Sodium: 50mg
- Total Carbohydrates: 20g
- Dietary Fiber: 0g
- Sugars: 8g
- Protein: 2g
Remember, it’s all about balance and enjoying our favorite treats in moderation!
There you have it, friends! These Easy Halloween Sugar Cookies are bound to become a holiday tradition and will have everyone asking for seconds. I can’t wait to see the delightful creations you come up with—happy baking!
PrintEasy Halloween Sugar Cookies
Delicious and fun sugar cookies perfect for Halloween celebrations, decorated with vibrant icing and sprinkles.
- Prep Time: 30 minutes
- Cook Time: 10 minutes
- Total Time: 40 minutes
- Yield: 24 cookies 1x
- Category: Dessert
- Method: Baking
- Cuisine: American
- Diet: Vegetarian
Ingredients
- 2 3/4 cups all-purpose flour
- 1 teaspoon baking powder
- 1/2 teaspoon salt
- 1 cup unsalted butter, softened
- 1 1/2 cups granulated sugar
- 1 teaspoon vanilla extract
- 1 large egg
- Food coloring (green, orange, purple, black)
- Sprinkles (optional)
Instructions
- Preheat your oven to 350°F (175°C).
- Mix dry ingredients: In a large bowl, whisk together the flour, baking powder, and salt.
- Cream the butter and sugar in another bowl until light and fluffy.
- Add the egg and vanilla extract, and beat until incorporated.
- Combine the flour mixture into the butter mixture, mixing until just combined.
- Color the dough by dividing it and mixing in food coloring.
- Chill the dough in the refrigerator for at least 30 minutes.
- Roll out the dough to 1/4 inch thick and cut into Halloween shapes.
- Bake for 8-10 minutes or until edges are slightly golden.
- Cool on a wire rack and decorate with icing and sprinkles.
Notes
For best results, chill your dough adequately. Feel free to experiment with different flavors and decorations.
Nutrition
- Serving Size: 1 cookie
- Calories: 150
- Sugar: 8g
- Sodium: 50mg
- Fat: 7g
- Saturated Fat: 4g
- Unsaturated Fat: 3g
- Trans Fat: 0g
- Carbohydrates: 20g
- Fiber: 0g
- Protein: 2g
- Cholesterol: 20mg
Keywords: Halloween, sugar cookies, dessert, party treats, baking