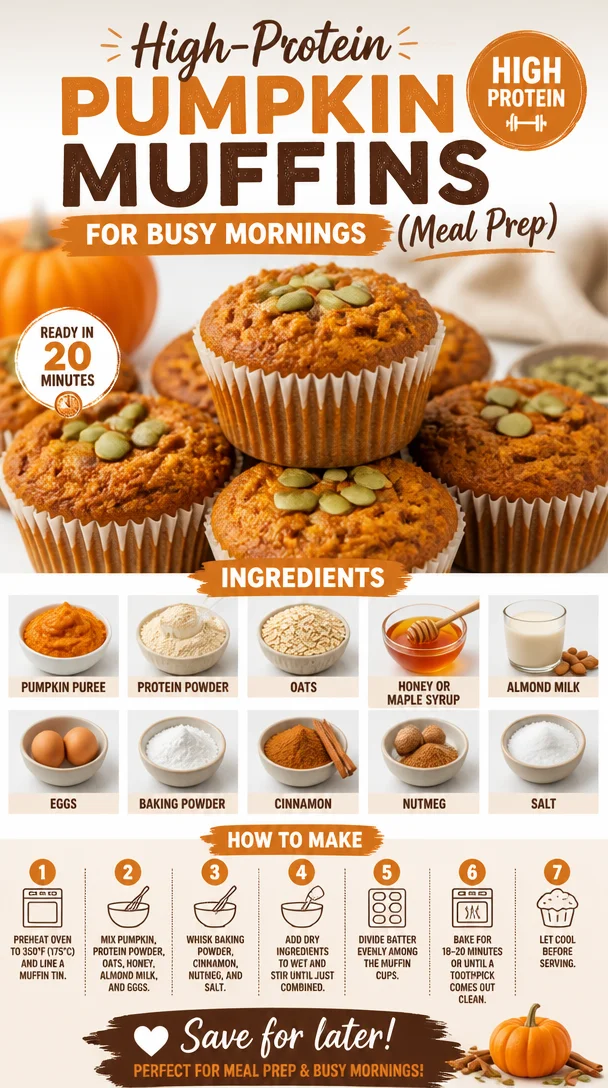
High-Protein Pumpkin Muffins for Busy Mornings (Meal Prep)
Pumpkin Protein Muffins: A Cozy Kitchen Treat
Welcome back to Clean Plate Cravings! Today, I’m thrilled to share a recipe that warms my heart and fills my kitchen with the delightful scent of fall—Pumpkin Protein Muffins. These muffins are not just a delicious treat; they’re a wholesome way to fuel your day, whether you need a quick breakfast on the go or a tasty snack to keep you energized.
Now, let’s be real—pumpkin isn’t just for lattes and pies. It’s a powerhouse of nutrition, packed with fiber, vitamins, and minerals. And when combined with protein powder and oats, these muffins transform into a satisfying bite that keeps you feeling lighter and brighter. Plus, they’re simple enough to whip up, making them the perfect addition to your weekly meal prep!
A Taste of Nostalgia: My Pumpkin Muffin Memories
One of my fondest memories from childhood involves my grandma’s kitchen during the crisp autumn months. The air would be filled with the sweet aroma of spices—cinnamon, nutmeg, and cloves—as she baked her famous pumpkin muffins. I remember standing on a stool, watching her carefully mix the ingredients, and getting excited about the first bite. Her recipe was a bit indulgent, rich with sugar and butter, but oh, was it amazing!
Fast forward to now, and I’ve had my fair share of muffin experiments. I wanted to recreate that nostalgic warmth and aroma, but with a healthier twist. After many trials and a few delightful failures (which we can laugh about now), I finally landed on this version that honors my grandmother’s recipe while keeping it clean and protein-packed. So, grab your apron and let’s bake together!
Ingredients That Shine
Here’s what you’ll need to whip up these scrumptious Pumpkin Protein Muffins:
-
1 cup pumpkin puree
A must for that classic pumpkin flavor! You can use canned pumpkin for convenience or make your own from fresh pumpkin. If you need a swap, try using mashed bananas for a different flavor. -
1/2 cup protein powder
Boosts the protein content and keeps you full longer. I personally love using vanilla whey or plant-based protein. If you don’t have protein powder, you can increase the oats to 1 cup, but the texture may differ. -
1/2 cup oats
Adds texture and heartiness. I recommend rolled or old-fashioned oats. For a gluten-free option, use certified gluten-free oats. -
1/4 cup honey or maple syrup
Natural sweeteners that add moisture and sweetness. Maple syrup gives a lovely flavor twist. If you lean towards lower sugar, feel free to reduce the amount or substitute with stevia or monk fruit. -
1/2 cup almond milk
Lightens the mixture and keeps it moist. You can substitute with any milk you prefer—dairy, oat, or soy will all work well. -
2 eggs
Binds everything together. For a vegan alternative, you can use flax eggs (1 tablespoon of flaxseed meal mixed with 2.5 tablespoons of water equals one egg). -
1 teaspoon baking powder
Provides that delightful rise. If you’re out, baking soda can work with a tiny splash of vinegar. -
1 teaspoon cinnamon
A warm spice that really enhances the pumpkin flavor. Feel free to adjust the amount based on your preference. -
1/2 teaspoon nutmeg
Another classic spice that complements pumpkin perfectly. If you don’t have nutmeg on hand, try a pinch of allspice instead. -
1/4 teaspoon salt
Balances the sweetness and enhances the overall flavor.
Step-by-Step Cooking Instructions
-
Preheat Your Oven:
Preheat your oven to 350°F (175°C) and line a muffin tin with paper liners or lightly grease it. This will ensure our muffins bake evenly and pop out easily. -
Mix Dry Ingredients:
In a large mixing bowl, combine the protein powder, oats, baking powder, cinnamon, nutmeg, and salt. Tip: Whisk them together to have a uniform mixture and avoid clumps. -
Combine Wet Ingredients:
In another bowl, mix the pumpkin puree, honey (or maple syrup), almond milk, and eggs. Chef’s insight: Give this a good whisk to incorporate the eggs fully; you want a smooth, creamy base for your muffins. -
Combine Wet and Dry:
Pour the wet mixture into the dry ingredients and gently fold them together. Be careful not to overmix—just until you see no dry flour! Tip: A rubber spatula works wonders here, ensuring no pockets of flour remain. -
Fill Muffin Tin:
Scoop the batter into the prepared muffin tin, filling each cup about 2/3 full. Hack: Use an ice cream scoop for an even fill, and you’ll impress your friends with the presentation!. -
Bake:
Place the muffin tin in the oven and bake for about 18-20 minutes until the tops are golden and a toothpick inserted into the center comes out clean. -
Cooldown:
Remove from the oven and let them cool for about 5 minutes in the tin before transferring to a wire rack. Trust me, the cooling step is crucial—this is where the texture gets just right!
Serving Suggestions
These muffins are perfect for breakfast, but they shine in so many situations. Serve them warm, slathered with a bit of almond butter for an extra protein punch, or enjoy them alongside a steaming cup of herbal tea. They also make fantastic snacks post-workout or packed in lunchboxes—kids and adults will love them alike!
Recipe Variations
-
Nutty Delight: Add 1/2 cup of chopped walnuts or pecans for a satisfying crunch.
-
Berry Boost: Fold in 1/2 cup of blueberries or cranberries for extra flavor and antioxidants.
-
Chocolate Twist: Add 1/4 cup of dark chocolate chips for a decadent surprise.
-
Spiced Up: Experiment with 1 tablespoon of pumpkin pie spice instead of the individual spices for a bolder flavor.
-
Vegan Version: Replace the eggs with flax eggs and use maple syrup as your sweetener for a vegan-friendly option.
Chef’s Notes
These muffins have come a long way from my grandma’s recipe, but the heart remains the same—bringing people together through delicious, comforting food. I often find myself altering the grain options based on the season; in summer, I toss in fresh blueberries to brighten them up! And let’s not forget the myriad of toppings you can try: honey drizzles, yogurt dollops, or even a sprinkle of granola for added texture.
Baking is a bit like life—sometimes it takes a couple of tries to get things just right. I once forgot to add the eggs and ended up with a dense pumpkin bread rather than muffins—while it wasn’t what I intended, it made for a delightful surprise coffee cake!
FAQs and Troubleshooting
1. My muffins didn’t rise as expected. What happened?
If your muffins are flat, it could be that your baking powder is old. Always check the expiration date and ensure you mix it well with the dry ingredients.
2. Can I store these muffins for later?
Absolutely! Let them cool completely, then store them in an airtight container at room temperature for a few days. They also freeze beautifully for up to three months. Just let them thaw before munching!
3. What if I’m allergic to nuts?
No problem! Just swap almond milk for oat or coconut milk, and skip any nut add-ins.
4. Can I make a bigger batch?
Yes! You can double the recipe and store extras—or share them with friends! Just remember to adjust your bake time slightly if you’re using more than one muffin tin.
Nutritional Info
While I’m all about enjoying delicious food, I know it’s helpful to have a grip on what we’re putting in our bodies. Each muffin (based on 12 muffins per batch) packs in roughly:
- Calories: 150
- Protein: 8g
- Fiber: 3g
- Sugars: 5g
Remember, nutritional values can vary based on ingredient selections and brands.
So there you have it—a heartfelt recipe packed with flavor and nutrition, perfect for any time of the day. As you bake these delightful Pumpkin Protein Muffins, I hope they bring you warmth, nostalgia, and a little happiness, just like they do for me. Happy baking, friend!
PrintPumpkin Protein Muffins
A wholesome take on classic pumpkin muffins, packed with protein and delicious spices to fuel your day.
- Prep Time: 10 minutes
- Cook Time: 20 minutes
- Total Time: 30 minutes
- Yield: 12 servings 1x
- Category: Snack
- Method: Baking
- Cuisine: American
- Diet: Vegetarian
Ingredients
- 1 cup pumpkin puree
- 1/2 cup protein powder
- 1/2 cup oats
- 1/4 cup honey or maple syrup
- 1/2 cup almond milk
- 2 eggs
- 1 teaspoon baking powder
- 1 teaspoon cinnamon
- 1/2 teaspoon nutmeg
- 1/4 teaspoon salt
Instructions
- Preheat your oven to 350°F (175°C) and line a muffin tin with paper liners or lightly grease it.
- Mix dry ingredients: In a large bowl, combine protein powder, oats, baking powder, cinnamon, nutmeg, and salt.
- Combine wet ingredients: In another bowl, mix pumpkin puree, honey (or maple syrup), almond milk, and eggs.
- Combine wet and dry: Pour the wet mixture into the dry ingredients and gently fold them together.
- Fill muffin tin: Scoop the batter into the prepared muffin tin, filling each cup about 2/3 full.
- Bake: Place the muffin tin in the oven and bake for about 18-20 minutes until the tops are golden and a toothpick comes out clean.
- Cooldown: Remove from the oven and let cool for about 5 minutes before transferring to a wire rack.
Notes
These muffins are versatile—feel free to add nuts, berries, or chocolate chips for variations. They also freeze well for up to three months.
Nutrition
- Serving Size: 1 muffin
- Calories: 150
- Sugar: 5g
- Sodium: 130mg
- Fat: 3g
- Saturated Fat: 0.5g
- Unsaturated Fat: 2g
- Trans Fat: 0g
- Carbohydrates: 25g
- Fiber: 3g
- Protein: 8g
- Cholesterol: 40mg
Keywords: pumpkin muffins, protein muffins, healthy snacks, fall baking, quick breakfasts
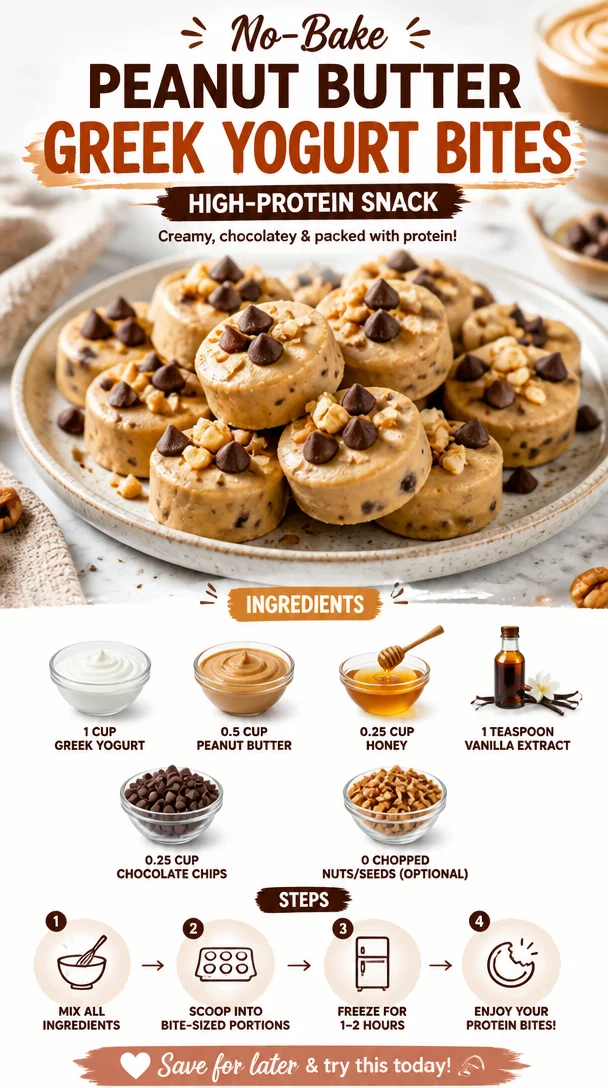
No-Bake Peanut Butter Greek Yogurt Bites: High-Protein Snack
Peanut Butter Greek Yogurt Bites: A Guilt-Free Delight
Hey there, food friends! If you’re anything like me, you know how important it is to have delicious yet guilt-free snacks at your fingertips. Let’s face it, life gets busy, and when those cravings hit, we want something that’s not only satisfying but also makes us feel good about what we’re eating. That’s why I’m so excited to share with you one of my all-time favorite treats: Peanut Butter Greek Yogurt Bites!
These delightful little morsels are a scrumptious combination of creamy Greek yogurt and rich peanut butter, perfect for a quick energy boost or a post-workout pick-me-up. I promise you, they’re easy to make and will quickly become a staple in your snack rotation. So grab your apron, and let’s dive in!
A Personal Taste of Nostalgia
As I reminisce about my childhood, I can’t help but smile when I think of my dad making peanut butter and jelly sandwiches on lazy weekends. That gooey, salty-sweet combination took my taste buds on a nostalgic ride every time I’d take a bite. Fast forward to my adult years, and while those sandwiches still hold a special place in my heart, I’ve had to find healthier alternatives that fit my lifestyle.
During one particularly hot summer, I was searching for something refreshing, satisfying, and healthy. That’s when I stumbled upon the idea of blending Greek yogurt and peanut butter to create a rich, creamy mixture that harkened back to those beloved sandwiches—but in a bite-sized snack form! It was an instant hit, and I’ve been experimenting with variations ever since. Trust me, you’re going to love these bites as much as I do!
Ingredients
Ready to whip up these delicious bites? Here’s what you’ll need:
-
1 cup Greek Yogurt
Greek yogurt is packed with protein and probiotics, making it a fantastic base for our bites. If you’re avoiding dairy, feel free to substitute it with non-dairy yogurt, like almond or coconut yogurt! -
0.5 cup Peanut Butter
The star of the show! Choose a natural peanut butter that’s free of added sugars and oils for the best flavor. Not a peanut fan? Almond or sunflower seed butter works great too—just use similar amounts. -
0.25 cup Honey
This adds just the right amount of sweetness and helps bind the ingredients together. If you prefer a vegan option, swap it out for maple syrup or agave nectar! -
1 teaspoon Vanilla Extract
This is a magical addition that elevates the flavor profile, making the bites irresistible. Opt for pure vanilla extract if you want the absolute best flavor. -
0.25 cup Chocolate Chips
Because let’s be real, chocolate makes everything better! You can use dark, milk, or dairy-free chocolate based on your preference. -
Chopped Nuts or Seeds (optional)
For an added crunch, sprinkle in some chopped pecans, walnuts, or even chia seeds. It adds texture and extra nutrients!
Step-by-Step Instructions
Let’s get cooking! Follow these simple steps to make your Peanut Butter Greek Yogurt Bites:
-
Gather Your Ingredients
Lay out all your ingredients on the counter. This not only makes the process smoother but also helps you double-check that you have everything you need. -
Mix the Base
In a mixing bowl, combine the Greek yogurt and peanut butter. Use a whisk or a spatula to blend until they are smooth and fully incorporated. This is where the magic begins! The creamy peanut butter should meld perfectly into the yogurt. -
Sweeten It Up
Add in the honey (or your chosen sweetener) and vanilla extract. Again, mix well until everything is combined. You want a smooth and creamy consistency, and the sweetness should balance perfectly with the tang of the yogurt. -
Add the Chocolate Chips
Gently fold in the chocolate chips. Make sure to reserve a few to sprinkle on top if you like that aesthetic touch! This is also the perfect moment to add any chopped nuts or seeds if you’re going for that extra crunch. -
Scoop and Shape
Using a cookie scoop or spoon, portion out the mixture onto a parchment-lined baking sheet. I love using a teaspoon for bite-sized goodness, but feel free to make them larger if you’re feeling indulgent! -
Chill Out!
Pop the baking sheet in the freezer for about 30 minutes until the bites are solid. This step is crucial for that perfect bite! -
Store Them Right
Once frozen, you can transfer the bites into an airtight container. They’ll keep well in the freezer for up to three months—if they last that long!
Serving Suggestions
When it comes to serving these delicious bites, the options are limitless! Enjoy them as a quick pick-me-up during the day, post-workout fuel, or as a sweet treat after dinner. You can also garnish your serving plate with some fresh fruit slices and drizzles of chocolate or nut butter for an extra splash of indulgence. Perfectly presentable for yourself or your guests—these bites are sure to impress!
Recipe Variations
Feeling adventurous? Here are some creative ways to mix it up:
-
Berry Blast
Add a tablespoon of chia seeds and mix in some chopped strawberries or blueberries to the base for a fruity kick! -
Mint Chocolate Chip
Add a drop of peppermint extract to the mix and try adding mini chocolate chips. It’s refreshing and perfect for summertime! -
Coconut Craze
Toss in some unsweetened shredded coconut to the mix to give a tropical twist to these bites! -
Spicy Kick
Feeling bold? Mix in a dash of cinnamon or even cayenne for a surprising flavor kick! -
Nut-Free Delight
Swap peanut butter for sunflower seed butter to create nut-free bites that are just as tasty.
Chef’s Notes
I wanted to create these bites to be super flexible, and they have evolved quite a bit! There was a time I added protein powder to amplify the nutritional value (great for those post-workout cravings!). And I absolutely love how you can adjust the sweetness to suit personal tastes. Every time I make them, I find myself excited to see what new twist I can come up with. Plus, they’re always an excellent conversation starter at parties!
Oh, and a little tidbit: the first time I made these, I forgot to add the sweetener! While the bites were definitely good, they were just missing that little sweet spark—and my friends promptly informed me of that!
FAQs and Troubleshooting
Here are some common questions you might have while making these bites:
-
Can I make these without honey?
Absolutely! You can use maple syrup, agave nectar, or even date syrup for sweetness. -
What if I don’t have Greek yogurt?
You can use regular yogurt, but the texture might be a bit runnier. Draining it for a little while can help! -
Are these snack bites too sweet?
You control the sweetness! Feel free to adjust the amount of honey or sweetener according to your taste preferences. -
How do I store these?
There’s nothing easier! Just pop them in an airtight container in the freezer, and they’ll last for up to three months.
Nutritional Info (Optional)
While exact nutritional information can vary, here’s a rough estimate per bite (assuming you yield about 12 bites):
- Calories: 110
- Protein: 4g
- Carbohydrates: 9g
- Fat: 7g
- Sugar: 4g
So there you have it, my friends—Peanut Butter Greek Yogurt Bites are not just a tasty and wholesome snack; they’re adjustable, fun, and super crowd-pleasing! I hope you enjoy making them as much as I do. Let me know how yours turn out, and feel free to share your unique twists! Keep it fresh, simple, and seriously delicious! 🍽️
PrintPeanut Butter Greek Yogurt Bites
A guilt-free snack made with creamy Greek yogurt and rich peanut butter, perfect for a quick energy boost or a post-workout treat.
- Prep Time: 15 minutes
- Cook Time: 30 minutes
- Total Time: 45 minutes
- Yield: 12 bites 1x
- Category: Snack
- Method: Freezing
- Cuisine: American
- Diet: Vegetarian
Ingredients
- 1 cup Greek Yogurt
- 0.5 cup Peanut Butter
- 0.25 cup Honey
- 1 teaspoon Vanilla Extract
- 0.25 cup Chocolate Chips
- Chopped Nuts or Seeds (optional)
Instructions
- Gather your ingredients.
- Mix the Greek yogurt and peanut butter until smooth.
- Sweeten it up by adding honey and vanilla extract, then mix well.
- Add the chocolate chips and optional nuts or seeds.
- Scoop the mixture onto a parchment-lined baking sheet.
- Chill in the freezer for about 30 minutes until solid.
- Store in an airtight container in the freezer for up to three months.
Notes
Feel free to customize with different nut butters, sweeteners, or mix-ins like berries or coconut!
Nutrition
- Serving Size: 1 bite
- Calories: 110
- Sugar: 4g
- Sodium: 50mg
- Fat: 7g
- Saturated Fat: 1g
- Unsaturated Fat: 6g
- Trans Fat: 0g
- Carbohydrates: 9g
- Fiber: 1g
- Protein: 4g
- Cholesterol: 0mg
Keywords: snack, healthy bites, peanut butter, yogurt, guilt-free
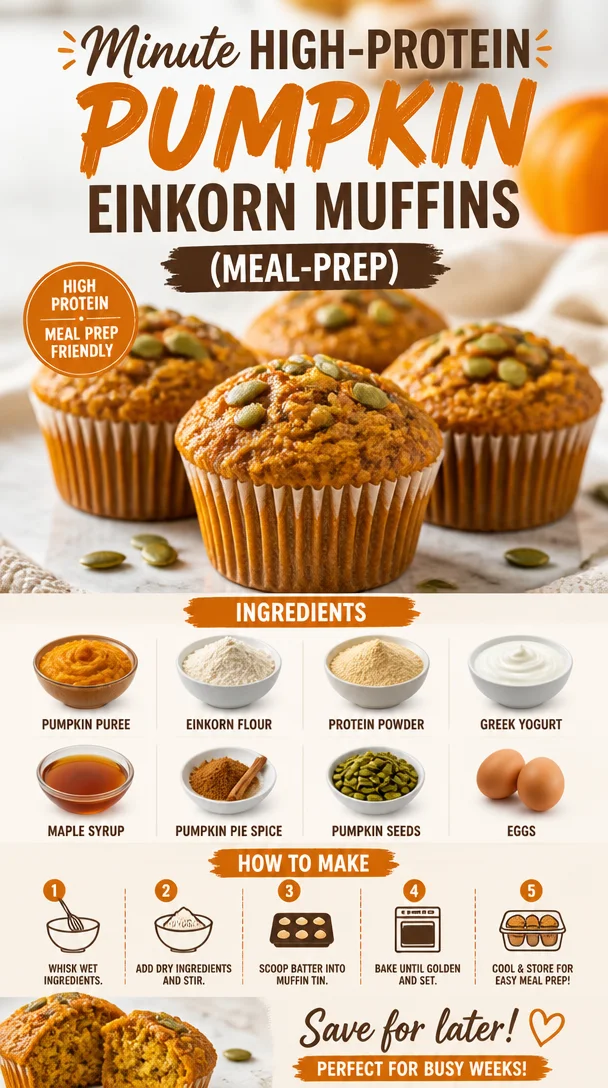
Minute High-Protein Pumpkin Einkorn Muffins (Meal-Prep)
Easy and Healthy Pumpkin Protein Einkorn Muffins: Your New Favorite Recipe
As the leaves begin to change and sweater weather kicks in, there’s something magical about the smell of pumpkin spice wafting through the kitchen. It’s a signal that comfort food season has arrived! Today, I’m excited to share a recipe that’s not only delicious but also packed with nutrition: Easy and Healthy Pumpkin Protein Einkorn Muffins. These muffins are the perfect blend of moistness from pumpkin, a boost of protein, and the nutty goodness of einkorn flour. Plus, they’re so easy to whip up that they might just become your new breakfast or snack obsession.
If you’re like me and love a wholesome treat that doesn’t skimp on flavor, these muffins will quickly find a place in your heart. I’ve made it my mission to create recipes that feel indulgent but are still healthy and satisfying. So, whether you’re looking to fuel your day or simply enjoy a cozy treat, these muffins are an all-star addition to your recipe collection.
Before we dive into the ease of creating these delightful muffins, let’s take a stroll down memory lane. Baking has always been a way of expressing love for me, and there’s one memory that stands out.
Personal Story: A Warm Kitchen Memory
Growing up, my grandmother had this mind-blowing pumpkin muffin recipe that I can still hear her delicate voice reciting with charm. “A pinch of spice, my dear, and a dollop of love are what make these muffins divine!” Every fall, our kitchen would transform into a cozy haven filled with laughter, smells of cinnamon and nutmeg, and those sweet moments where life slowed down just a touch.
I remember sitting on her kitchen counter, swinging my legs and watching her sift through flour and sprinkle the spices, all while telling stories of how she made these muffins for my mom. Those traditions bonded us, the warmth from the oven mingling with the warmth in our hearts. Fast forward to today, and I love reimagining her classic treats into healthier versions. That’s where this pumpkin protein muffin recipe is born—from nostalgia and the desire to create something fun and nourishing for all of us to enjoy.
Ingredients
Here’s what you need to make these fabulous muffins. Don’t worry; it’s a straightforward list, and I’ve got some substitutive hacks up my sleeve!
-
1 cup pumpkin puree
The star of our recipe! Look for canned pumpkin for convenience or roast your own for a fresh flavor punch. Just avoid pumpkin pie filling, which is loaded with sugar. -
1 cup einkorn flour
A fantastic alternative to regular all-purpose flour, einkorn is easier to digest and has a lovely nutty flavor. If you can’t find it, you can substitute with whole wheat flour or spelt flour for a similar experience. -
¼ cup protein powder
This is where the muscles come in! Choose a clean plant-based protein or whey—just ensure it’s unsweetened for better flavor balance. You can also omit this if you’re looking for a lighter version. -
½ cup maple syrup or honey
This natural sweetener adds a beautiful caramel note. Feel free to adjust the sweetness to your liking or use a sugar substitute if you’re cutting back on sugar. -
2 large eggs
Eggs lend structure and moisture. If you’re vegan, try substituting with flax eggs (1 tablespoon of ground flaxseed mixed with 2.5 tablespoons of water per egg) for similar binding and moisture. -
1 teaspoon baking soda
The leavening agent that gives muffins their fluffy rise. Make sure it’s fresh for the best results. -
½ teaspoon sea salt
This will elevate the flavors in your muffins. Don’t skip it! -
1 teaspoon cinnamon
This is where the warmth of fall comes in! Feel free to add nutmeg or ginger for an extra spice kick. -
Optional: dark chocolate chips or nuts
For an added treat! Toss in a handful if you’re in the mood for something a little extra sweet and crunchy.
Step-by-Step Instructions
Let’s get to baking these gorgeous muffins! Follow these steps carefully, and don’t forget to add your personal touch along the way.
-
Preheat your oven to 350°F (175°C) and line a muffin tin with paper liners or grease it lightly with some cooking spray. This is crucial because no one wants to wrestle with muffin debris.
-
Mix the wet ingredients. In a large mixing bowl, combine the pumpkin puree, maple syrup (or honey), and eggs. Whisk them until you have a smooth, creamy mixture. Pro tip: If you mix the wet ingredients vigorously, it adds air, giving the muffins a fluffier texture!
-
Sift together the dry ingredients. In a separate bowl, sift the einkorn flour, protein powder, baking soda, salt, and cinnamon. Sifting helps to break up any lumpy bits and ensures everything is well blended. A happy little tip: You can also whisk this mixture gently with a fork!
-
Combine the mixtures. Gradually add the dry mixture into the wet mixture. Use a spatula to gently fold them together until just combined—overmixing can make your muffins tough. (Trust me, nobody wants dense muffins on their breakfast plate!)
-
Add enhancements. If you’re including chocolate chips or nuts, fold them in now. The more, the merrier! Just be careful not to overdo it; we want balance here.
-
Fill the muffin tin. Divide the batter evenly among the muffin cups, filling each about ¾ full. This allows them to rise beautifully without overflowing, so keep that in mind!
-
Bake! Pop them in the oven for 20-25 minutes. You’ll know they’re done when the tops are golden brown and a toothpick inserted into the center comes out clean. As you wait, enjoy the delightful aroma filling your kitchen!
-
Cool and enjoy. Once baked, let the muffins cool in the tin for about 5 minutes, then transfer them to a wire rack. Try not to devour them immediately—they’re much better when you give them a moment to cool!
Serving Suggestions
These muffins shine best when they’re warm and slightly toasted. Serve them as is, or slather a bit of almond butter on top for an extra protein punch. They also pair beautifully with a steaming cup of chai or coffee for a delightful breakfast treat or afternoon pick-me-up. Trust me, your taste buds will rejoice!
Recipe Variations
Ready to shake things up a bit? Here are a few delicious twists to consider:
- Choco-Pumpkin Delight: Replace some of the protein powder with cocoa powder for a chocolatey spin!
- Nutty Goodness: Mix in chopped walnuts or pecans for that extra crunch.
- Spiced Up: Add a dash of allspice or cardamom to give them warming complexity.
- Cranberry Pumpkin Muffins: Incorporate dried cranberries for a sweet-tart flavor explosion.
- Savory Twist: Swap the spices for a blend of herbs (like rosemary or thyme) for a savory muffin—perfect with cheese.
Chef’s Notes
When I first attempted to recreate my grandmother’s recipes, I faced some moments of kitchen chaos—flour explosions, muffin mix stuck to the whisk, and the lingering question, “Will these even taste as good as hers?” Spoiler alert: practice makes perfect! Over time, I learned that cooking is less about perfection and more about enjoyment. Each time you bake, it’s an opportunity to experiment and create memories.
FAQs and Troubleshooting
-
Why did my muffins come out dense?
This often happens from overmixing the batter. When you combine the wet and dry ingredients, mix just until they’re combined! -
Can I use another type of flour?
Absolutely! You can substitute with whole wheat flour or gluten-free flour blends, though it may affect the texture slightly. Adjustments in liquid may be needed. -
How do I store these muffins?
Keep them in an airtight container on your countertop for up to three days. If you want them to last longer, pop them in the freezer and thaw them as you need! -
Can I double this recipe?
Yes! Just multiply the ingredients by two, and you’ll have muffins to share (or hoard for yourself!).
Nutritional Info
While the exact nutrition will vary depending on your chosen ingredients and amounts, typically, each muffin contains:
- Calories: ~150-200
- Protein: ~5-7g (depending on protein powder)
- Carbohydrates: ~25g
- Fats: ~4g
- Fiber: ~2-3g
Feel free to adjust the quantities based on your dietary needs, and don’t forget to enjoy every bite!
So there you have it! Easy and Healthy Pumpkin Protein Einkorn Muffins, bringing you the warmth of tradition with a modern twist. I hope this recipe fills your home with the comfort of fall and inspires you to bake up a storm! Remember, cooking is all about sharing, so I’d love to hear your stories or variations you create! Happy baking! 🥰🍂
PrintEasy and Healthy Pumpkin Protein Einkorn Muffins
Delicious and nutritious pumpkin muffins made with einkorn flour, protein powder, and sweetened naturally for a wholesome treat.
- Prep Time: 15 minutes
- Cook Time: 25 minutes
- Total Time: 40 minutes
- Yield: 12 muffins 1x
- Category: Breakfast
- Method: Baking
- Cuisine: American
- Diet: Vegetarian
Ingredients
- 1 cup pumpkin puree
- 1 cup einkorn flour
- ¼ cup protein powder
- ½ cup maple syrup or honey
- 2 large eggs
- 1 teaspoon baking soda
- ½ teaspoon sea salt
- 1 teaspoon cinnamon
- Optional: dark chocolate chips or nuts
Instructions
- Preheat your oven to 350°F (175°C) and line a muffin tin with paper liners or grease it lightly.
- Mix the wet ingredients: In a large mixing bowl, combine the pumpkin puree, maple syrup (or honey), and eggs. Whisk until smooth.
- Sift together the dry ingredients: In a separate bowl, sift the einkorn flour, protein powder, baking soda, salt, and cinnamon.
- Combine the mixtures by gradually adding the dry mixture into the wet mixture, folding gently until just combined.
- Add enhancements: If using, fold in chocolate chips or nuts.
- Fill the muffin tin: Divide the batter evenly among the muffin cups, filling each about ¾ full.
- Bake for 20-25 minutes, until the tops are golden brown and a toothpick comes out clean.
- Cool for 5 minutes in the tin, then transfer to a wire rack before serving.
Notes
For a vegan version, substitute eggs with flax eggs. These muffins are best served warm with almond butter.
Nutrition
- Serving Size: 1 muffin
- Calories: 175
- Sugar: 8g
- Sodium: 200mg
- Fat: 5g
- Saturated Fat: 1g
- Unsaturated Fat: 4g
- Trans Fat: 0g
- Carbohydrates: 28g
- Fiber: 3g
- Protein: 6g
- Cholesterol: 50mg
Keywords: pumpkin muffins, healthy muffins, einkorn muffins, protein muffins, fall recipes
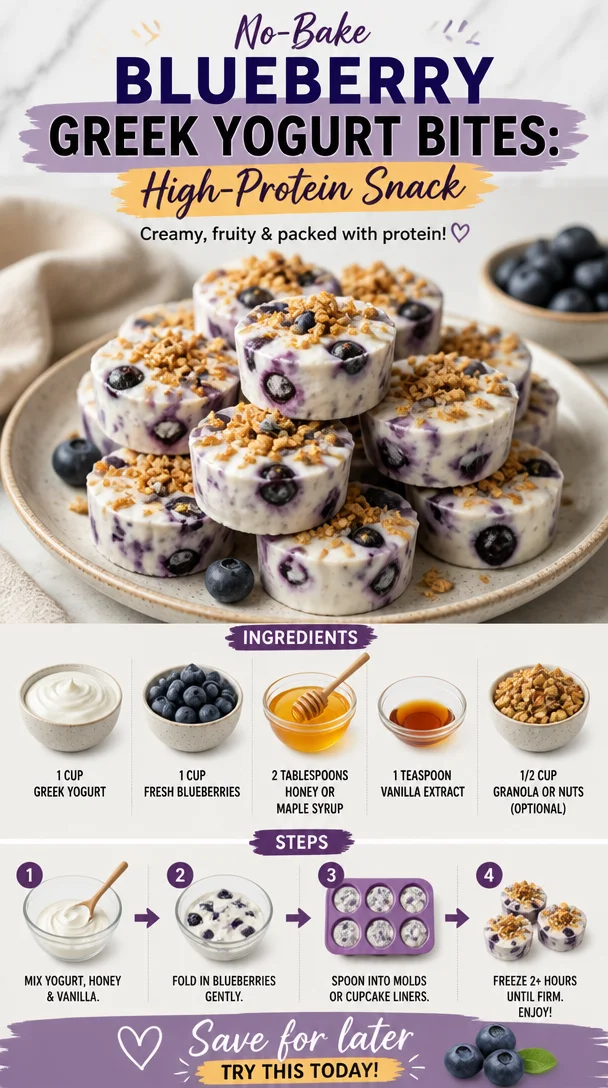
No-Bake Blueberry Greek Yogurt Bites: High-Protein Snack
Refreshingly Delicious Blueberry Greek Yogurt Bites
When it comes to healthy snacking, it’s easy to find yourself reaching for the same old options—maybe a handful of nuts or a sad apple that’s been sitting in the fridge a little too long. Well, my dear foodies, I’m here to change that narrative with a vibrant, tasty, and oh-so-easy recipe that you’ll be craving week after week: Blueberry Greek Yogurt Bites! These delightful little bites are a perfect blend of creamy Greek yogurt, juicy blueberries, and a touch of sweetness, all frozen to create a satisfying and refreshing treat.
As a chef, I see food as a celebration, and snacks like these are the perfect way to bring joy into your everyday routine. Picture this: it’s a sunny afternoon; you’re lounging on your patio or perhaps enjoying a picnic in the park. You unwrap a Blueberry Greek Yogurt Bite, take a bite, and instantly feel a wave of happiness wash over you. Who says healthy eating can’t be fun?
And the best part? These bites are super customizable! Whether you’re looking for a morning pick-me-up, a midday boost, or a healthier dessert option, these creamy, fruity delights will keep you energized without any guilt. Ready to dive in? Let’s roll up our sleeves and make these scrumptious bites together!
My Blueberry Journey: A Sweet Slice of Nostalgia
Growing up, my grandmother had a knack for turning every family gathering into a delicious feast, and one of her specialties was berry picking. Each summer, we’d eagerly await those weekend morning trips to the local farm, armed with buckets and sun hats, ready to hunt for the ripest blueberries. The feeling of plucking those plump blueberries off the bushes, staining our fingers with vibrant blue juice, was magical. We weren’t just picking fruit; we were making memories.
After a fruitful day at the farm, my grandmother would gather us all in the kitchen to whip up her famous blueberry yogurt parfaits. One bite of those creamy layers filled with blueberries and a drizzle of honey takes me straight back to those sun-soaked afternoons. Fast forward to today, and while I may not be berry picking every weekend, I still seek to invite that nostalgia into my cooking. That’s where these Blueberry Greek Yogurt Bites come in—a modern twist that’s just as delightful and packed with love!
Ingredients
Let’s gather our ingredients and get ready to create something fabulous:
-
1 cup Greek yogurt: The star of our dish! Greek yogurt is rich and creamy, packed with protein, and supports gut health. If you want a non-dairy option, go for coconut or almond-based yogurt.
-
1 cup fresh blueberries: Bursting with antioxidants and natural sweetness, blueberries add a delicious-tart flavor. If fresh are out of season, feel free to use frozen blueberries—just thaw and drain any excess water before use.
-
2 tablespoons honey or maple syrup: This adds a touch of sweetness to balance the tanginess of the yogurt. For a raw alternative, agave nectar works wonderfully too!
-
1 teaspoon vanilla extract: A hint of vanilla elevates the flavors and gives our bites that extra oomph. You could also use almond extract for a fun twist!
-
1/2 cup granola or nuts (optional): This is all about texture! Granola brings a delightful crunch, while nuts like chopped almonds or walnuts can add healthy fats. Feel free to skip this if you prefer a smoother bite.
Step-by-Step Instructions
-
Prep Your Ingredients: Gather all your ingredients and ensure your blueberries are clean and dry. This will really make a difference when you pop these bites out of the mold!
-
Mix the Yogurt and Sweetener: In a mixing bowl, combine the Greek yogurt, honey (or maple syrup), and vanilla extract. Use a spatula to mix until smooth and well incorporated. Here’s a chef hack: taste it! Adjust the sweetness to your liking. If you love it sweeter, just add a drizzle more of honey, and mix again.
-
Fold in the Blueberries: Now for the fun part! Gently fold in the fresh blueberries into your yogurt mixture. Be gentle to avoid mashing them up; we want those lovely bursts of flavor in every bite.
-
Pour into Molds: Grab your silicone ice cube trays or muffin tins (lightly greased for easy release). Spoon the yogurt-blueberry mixture into the molds, filling them about 3/4 full. If you’re using granola or nuts, sprinkle some on top for an added crunch.
-
Freeze: Place the molds in the freezer and allow the mixture to freeze for at least 4 hours, or until completely firm.
-
Pop Them Out: Once frozen, remove the molds from the freezer. To release the bites, simply pull gently on the sides of the silicone mold or run warm water over the outside of a metal mold. They should pop right out!
-
Serve & Enjoy: Enjoy immediately, or store the bites in an airtight container in the freezer for those moments when you need a pick-me-up!
Serving Suggestions
These Blueberry Greek Yogurt Bites are best enjoyed fresh from the freezer! Serve them on a colorful platter for a fun snack option at parties or keep them ready in your freezer for a quick grab-and-go breakfast. They also work beautifully alongside a warm slice of whole-grain toast or a smoothie for a balanced breakfast spread.
Recipe Variations
Get creative and shake things up with these fun spins:
-
Berry Blast: Substitute blueberries for your favorite berries—think strawberries, raspberries, or even cherries! Mix and match for a berry medley.
-
Nutty Delight: Add a tablespoon of nut butter (like almond or peanut butter) to your yogurt mixture for a creamy, protein-packed treat.
-
Zesty Citrus: Add the zest of a lemon or orange to the mixture for a zesty pop of flavor that brightens up the bites.
-
Chocolate Swirl: For the chocolate lovers, drizzle some melted dark chocolate over the tops of the bites before freezing, or fold in some mini chocolate chips!
Chef’s Notes
This recipe holds a special place in my heart! I originally concocted it when I was looking for a healthy snack option to keep my energy up during long cooking sessions. As my friends began to taste them, they kept coming back with requests for more! What started as a simple snack evolved into a delicious treat that friends and family adore. Now, it’s one of my go-to recipes for potlucks, and they always vanish before I get the chance to enjoy one myself.
Remember, cooking is all about experimenting. If you have leftover yogurt or fruit, throw it into this mix! It may surprise you how delightful your accidental creations turn out.
FAQs and Troubleshooting
1. Can I use frozen blueberries?
Absolutely! Just thaw them beforehand and drain any excess liquid so they don’t water down your mixture.
2. What if my bites are too hard?
If your bites end up too frozen, you can let them sit at room temperature for a few minutes to soften before enjoying them, or pop them in the microwave for just a few seconds to get the perfect creamy texture.
3. I don’t have silicone molds—what should I do?
No worries! You can use paper muffin cups placed in a regular muffin tin, or even an ice cube tray—just make sure to lightly grease it for the easiest release.
4. How long can I store these bites in the freezer?
These yogurt bites can be stored in an airtight container for up to 3 months. Just make sure to keep them frozen until you’re ready to eat!
Nutritional Info
These Blueberry Greek Yogurt Bites are not only a treat for your taste buds but also a healthy choice. Each bite is packed with protein, antioxidants, healthy fats (if you include nuts), and a touch of natural sweetness—making them the perfect guilt-free snack option.
Now that you’ve got the scoop on these delightful Blueberry Greek Yogurt Bites, it’s time to head into your kitchen and whip up a batch. Trust me, not only will they satisfy your cravings, but they’ll also bring a smile to your face and love to your heart! Happy snacking!
PrintRefreshingly Delicious Blueberry Greek Yogurt Bites
A vibrant, tasty, and healthy snack made with creamy Greek yogurt and juicy blueberries, perfect for a guilt-free treat.
- Prep Time: 15 minutes
- Cook Time: 0 minutes
- Total Time: 255 minutes
- Yield: 12 servings 1x
- Category: Snack
- Method: Freezing
- Cuisine: American
- Diet: Vegetarian
Ingredients
- 1 cup Greek yogurt
- 1 cup fresh blueberries
- 2 tablespoons honey or maple syrup
- 1 teaspoon vanilla extract
- 1/2 cup granola or nuts (optional)
Instructions
- Prep Your Ingredients: Gather all your ingredients and ensure your blueberries are clean and dry.
- Mix the Yogurt and Sweetener: In a mixing bowl, combine the Greek yogurt, honey (or maple syrup), and vanilla extract. Use a spatula to mix until smooth.
- Fold in the Blueberries: Gently fold in the fresh blueberries into your yogurt mixture.
- Pour into Molds: Spoon the yogurt-blueberry mixture into silicone ice cube trays or muffin tins, filling them about 3/4 full.
- Freeze: Place the molds in the freezer and allow to freeze for at least 240 minutes, or until firm.
- Pop Them Out: Remove the molds from the freezer and release the bites by pulling gently on the sides.
- Serve & Enjoy: Enjoy immediately or store in an airtight container in the freezer.
Notes
These bites can be customized with various fruits, nuts, or flavorings. Perfect for grab-and-go snacks!
Nutrition
- Serving Size: 1 bite
- Calories: 50
- Sugar: 6g
- Sodium: 40mg
- Fat: 1g
- Saturated Fat: 0g
- Unsaturated Fat: 1g
- Trans Fat: 0g
- Carbohydrates: 10g
- Fiber: 1g
- Protein: 2g
- Cholesterol: 5mg
Keywords: blueberry, yogurt bites, healthy snacks, frozen treats, easy recipe