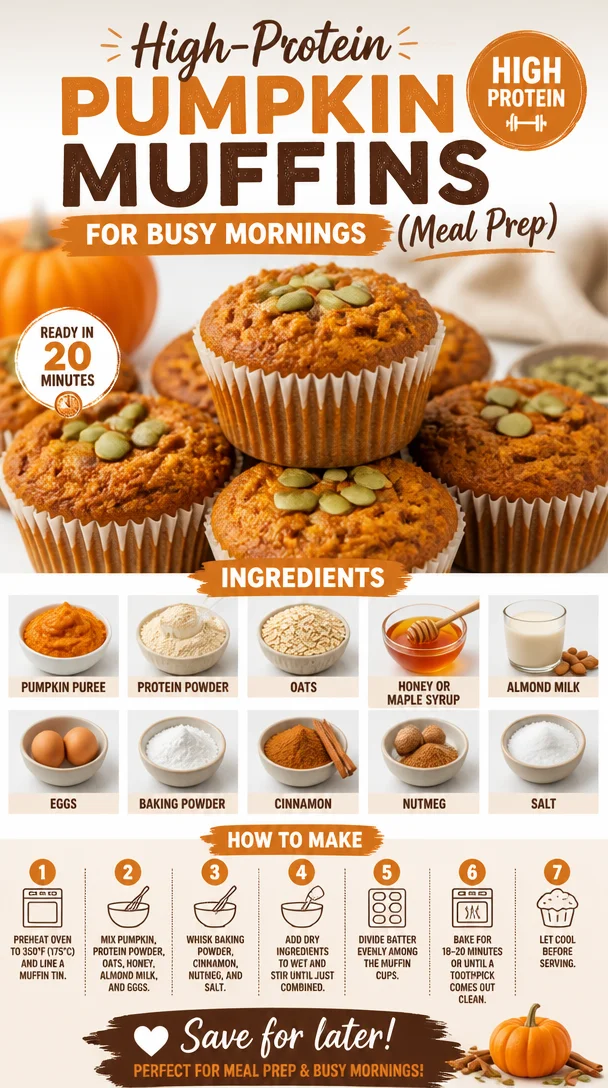
High-Protein Pumpkin Muffins for Busy Mornings (Meal Prep)
Pumpkin Protein Muffins: A Cozy Kitchen Treat
Welcome back to Clean Plate Cravings! Today, I’m thrilled to share a recipe that warms my heart and fills my kitchen with the delightful scent of fall—Pumpkin Protein Muffins. These muffins are not just a delicious treat; they’re a wholesome way to fuel your day, whether you need a quick breakfast on the go or a tasty snack to keep you energized.
Now, let’s be real—pumpkin isn’t just for lattes and pies. It’s a powerhouse of nutrition, packed with fiber, vitamins, and minerals. And when combined with protein powder and oats, these muffins transform into a satisfying bite that keeps you feeling lighter and brighter. Plus, they’re simple enough to whip up, making them the perfect addition to your weekly meal prep!
A Taste of Nostalgia: My Pumpkin Muffin Memories
One of my fondest memories from childhood involves my grandma’s kitchen during the crisp autumn months. The air would be filled with the sweet aroma of spices—cinnamon, nutmeg, and cloves—as she baked her famous pumpkin muffins. I remember standing on a stool, watching her carefully mix the ingredients, and getting excited about the first bite. Her recipe was a bit indulgent, rich with sugar and butter, but oh, was it amazing!
Fast forward to now, and I’ve had my fair share of muffin experiments. I wanted to recreate that nostalgic warmth and aroma, but with a healthier twist. After many trials and a few delightful failures (which we can laugh about now), I finally landed on this version that honors my grandmother’s recipe while keeping it clean and protein-packed. So, grab your apron and let’s bake together!
Ingredients That Shine
Here’s what you’ll need to whip up these scrumptious Pumpkin Protein Muffins:
-
1 cup pumpkin puree
A must for that classic pumpkin flavor! You can use canned pumpkin for convenience or make your own from fresh pumpkin. If you need a swap, try using mashed bananas for a different flavor. -
1/2 cup protein powder
Boosts the protein content and keeps you full longer. I personally love using vanilla whey or plant-based protein. If you don’t have protein powder, you can increase the oats to 1 cup, but the texture may differ. -
1/2 cup oats
Adds texture and heartiness. I recommend rolled or old-fashioned oats. For a gluten-free option, use certified gluten-free oats. -
1/4 cup honey or maple syrup
Natural sweeteners that add moisture and sweetness. Maple syrup gives a lovely flavor twist. If you lean towards lower sugar, feel free to reduce the amount or substitute with stevia or monk fruit. -
1/2 cup almond milk
Lightens the mixture and keeps it moist. You can substitute with any milk you prefer—dairy, oat, or soy will all work well. -
2 eggs
Binds everything together. For a vegan alternative, you can use flax eggs (1 tablespoon of flaxseed meal mixed with 2.5 tablespoons of water equals one egg). -
1 teaspoon baking powder
Provides that delightful rise. If you’re out, baking soda can work with a tiny splash of vinegar. -
1 teaspoon cinnamon
A warm spice that really enhances the pumpkin flavor. Feel free to adjust the amount based on your preference. -
1/2 teaspoon nutmeg
Another classic spice that complements pumpkin perfectly. If you don’t have nutmeg on hand, try a pinch of allspice instead. -
1/4 teaspoon salt
Balances the sweetness and enhances the overall flavor.
Step-by-Step Cooking Instructions
-
Preheat Your Oven:
Preheat your oven to 350°F (175°C) and line a muffin tin with paper liners or lightly grease it. This will ensure our muffins bake evenly and pop out easily. -
Mix Dry Ingredients:
In a large mixing bowl, combine the protein powder, oats, baking powder, cinnamon, nutmeg, and salt. Tip: Whisk them together to have a uniform mixture and avoid clumps. -
Combine Wet Ingredients:
In another bowl, mix the pumpkin puree, honey (or maple syrup), almond milk, and eggs. Chef’s insight: Give this a good whisk to incorporate the eggs fully; you want a smooth, creamy base for your muffins. -
Combine Wet and Dry:
Pour the wet mixture into the dry ingredients and gently fold them together. Be careful not to overmix—just until you see no dry flour! Tip: A rubber spatula works wonders here, ensuring no pockets of flour remain. -
Fill Muffin Tin:
Scoop the batter into the prepared muffin tin, filling each cup about 2/3 full. Hack: Use an ice cream scoop for an even fill, and you’ll impress your friends with the presentation!. -
Bake:
Place the muffin tin in the oven and bake for about 18-20 minutes until the tops are golden and a toothpick inserted into the center comes out clean. -
Cooldown:
Remove from the oven and let them cool for about 5 minutes in the tin before transferring to a wire rack. Trust me, the cooling step is crucial—this is where the texture gets just right!
Serving Suggestions
These muffins are perfect for breakfast, but they shine in so many situations. Serve them warm, slathered with a bit of almond butter for an extra protein punch, or enjoy them alongside a steaming cup of herbal tea. They also make fantastic snacks post-workout or packed in lunchboxes—kids and adults will love them alike!
Recipe Variations
-
Nutty Delight: Add 1/2 cup of chopped walnuts or pecans for a satisfying crunch.
-
Berry Boost: Fold in 1/2 cup of blueberries or cranberries for extra flavor and antioxidants.
-
Chocolate Twist: Add 1/4 cup of dark chocolate chips for a decadent surprise.
-
Spiced Up: Experiment with 1 tablespoon of pumpkin pie spice instead of the individual spices for a bolder flavor.
-
Vegan Version: Replace the eggs with flax eggs and use maple syrup as your sweetener for a vegan-friendly option.
Chef’s Notes
These muffins have come a long way from my grandma’s recipe, but the heart remains the same—bringing people together through delicious, comforting food. I often find myself altering the grain options based on the season; in summer, I toss in fresh blueberries to brighten them up! And let’s not forget the myriad of toppings you can try: honey drizzles, yogurt dollops, or even a sprinkle of granola for added texture.
Baking is a bit like life—sometimes it takes a couple of tries to get things just right. I once forgot to add the eggs and ended up with a dense pumpkin bread rather than muffins—while it wasn’t what I intended, it made for a delightful surprise coffee cake!
FAQs and Troubleshooting
1. My muffins didn’t rise as expected. What happened?
If your muffins are flat, it could be that your baking powder is old. Always check the expiration date and ensure you mix it well with the dry ingredients.
2. Can I store these muffins for later?
Absolutely! Let them cool completely, then store them in an airtight container at room temperature for a few days. They also freeze beautifully for up to three months. Just let them thaw before munching!
3. What if I’m allergic to nuts?
No problem! Just swap almond milk for oat or coconut milk, and skip any nut add-ins.
4. Can I make a bigger batch?
Yes! You can double the recipe and store extras—or share them with friends! Just remember to adjust your bake time slightly if you’re using more than one muffin tin.
Nutritional Info
While I’m all about enjoying delicious food, I know it’s helpful to have a grip on what we’re putting in our bodies. Each muffin (based on 12 muffins per batch) packs in roughly:
- Calories: 150
- Protein: 8g
- Fiber: 3g
- Sugars: 5g
Remember, nutritional values can vary based on ingredient selections and brands.
So there you have it—a heartfelt recipe packed with flavor and nutrition, perfect for any time of the day. As you bake these delightful Pumpkin Protein Muffins, I hope they bring you warmth, nostalgia, and a little happiness, just like they do for me. Happy baking, friend!
PrintPumpkin Protein Muffins

A wholesome take on classic pumpkin muffins, packed with protein and delicious spices to fuel your day.
- Prep Time: 10 minutes
- Cook Time: 20 minutes
- Total Time: 30 minutes
- Yield: 12 servings 1x
- Category: Snack
- Method: Baking
- Cuisine: American
- Diet: Vegetarian
Ingredients
- 1 cup pumpkin puree
- 1/2 cup protein powder
- 1/2 cup oats
- 1/4 cup honey or maple syrup
- 1/2 cup almond milk
- 2 eggs
- 1 teaspoon baking powder
- 1 teaspoon cinnamon
- 1/2 teaspoon nutmeg
- 1/4 teaspoon salt
Instructions
- Preheat your oven to 350°F (175°C) and line a muffin tin with paper liners or lightly grease it.
- Mix dry ingredients: In a large bowl, combine protein powder, oats, baking powder, cinnamon, nutmeg, and salt.
- Combine wet ingredients: In another bowl, mix pumpkin puree, honey (or maple syrup), almond milk, and eggs.
- Combine wet and dry: Pour the wet mixture into the dry ingredients and gently fold them together.
- Fill muffin tin: Scoop the batter into the prepared muffin tin, filling each cup about 2/3 full.
- Bake: Place the muffin tin in the oven and bake for about 18-20 minutes until the tops are golden and a toothpick comes out clean.
- Cooldown: Remove from the oven and let cool for about 5 minutes before transferring to a wire rack.
Notes
These muffins are versatile—feel free to add nuts, berries, or chocolate chips for variations. They also freeze well for up to three months.
Nutrition
- Serving Size: 1 muffin
- Calories: 150
- Sugar: 5g
- Sodium: 130mg
- Fat: 3g
- Saturated Fat: 0.5g
- Unsaturated Fat: 2g
- Trans Fat: 0g
- Carbohydrates: 25g
- Fiber: 3g
- Protein: 8g
- Cholesterol: 40mg
Keywords: pumpkin muffins, protein muffins, healthy snacks, fall baking, quick breakfasts
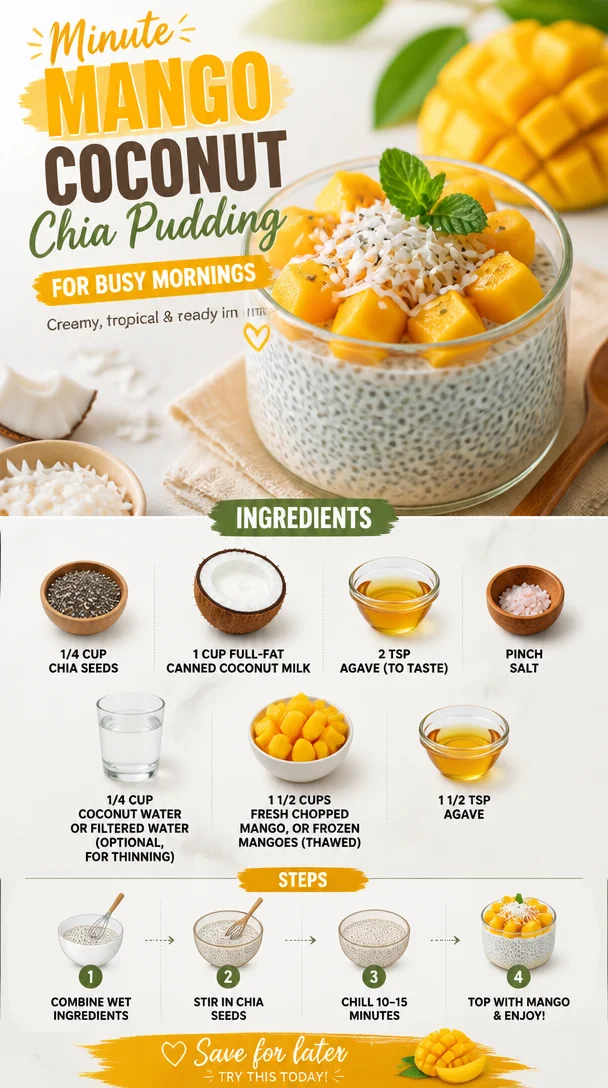
Minute Mango Coconut Chia Pudding for Busy Mornings
Mango Coconut Chia Pudding: Your New Favorite 20-Minute Recipe
Welcome to Clean Plate Cravings! Today, we’re diving into a refreshing treat that’s not only super simple to whip up but also bursting with tropical vibes: Mango Coconut Chia Pudding. If you’re anything like me, you love finding delicious ways to incorporate wholesome ingredients into your daily routine, and this recipe does just that.
Imagine starting your day or finishing up your lunch with a creamy, dreamy bowl of chia pudding that feels downright indulgent yet is packed with nutrients. We all deserve to give ourselves a little something special, and the combination of sweet mango and rich coconut milk in this dish will make you feel like you’re indulging in a mini vacation—without ever leaving your kitchen!
A Delicious Journey Through Flavor
This recipe wasn’t born out of a professional kitchen, but rather from a cherished memory I have of my grandmother, who was always trying out new flavors. She adored experimenting with fruits, and one of her favorites was the mango. I distinctly remember summers spent in her kitchen, the sunlight spilling through the window as we chopped up juicy mangoes and blended them into magical smoothies that danced on our tongues.
One day, she introduced me to chia seeds, little specks of wonder packed with nutrition and a unique gelatinous texture when soaked. I was captivated! We spent the afternoon blending mangoes, measuring chia seeds, and mixing in coconut milk, creating a delicious pudding that felt like a party in a bowl. That day ignited my passion for cooking with vibrant, whole foods—the same passion that fuels Clean Plate Cravings today.
Now, let’s make our own mango coconut chia pudding and create some delicious memories of our own!
Ingredients
-
1/4 cup chia seeds
Chia seeds are tiny powerhouses of nutrition! Packed with fiber, omega-3 fatty acids, and protein, they also form a delightful gel when soaked. If you don’t have chia seeds on hand, you can substitute them with flaxseeds, although the texture will be different. -
1 cup full-fat canned coconut milk
Full-fat coconut milk adds a luscious creaminess and a hint of natural sweetness. It’s perfect for those silky puddings! If you prefer a lighter version, you can use light coconut milk or even almond milk, although keep in mind the flavor will change. -
2 tsp agave (to taste)
Agave provides a mild sweetness with a low glycemic index, making it a great option for those looking to enjoy a sweet treat without the sugar spike. If you want to go completely natural, honey or maple syrup can be great alternatives! -
Pinch of salt
A little pinch of salt enhances all the sweet and creamy flavors, lifting the dish to another level! It’s like a secret ingredient; you won’t taste it, but you’ll notice the difference. -
1/4 cup coconut water or filtered water (optional, for thinning)
If you prefer a thinner consistency, adding coconut water or filtered water is a great choice. Coconut water adds a subtle sweetness, while regular water allows the coconut flavor to shine. -
1 1/2 cups fresh chopped mango
Fresh mango brings juicy sweetness and a beautiful pop of color! Make sure to choose ripe mangoes that give slightly when you press on them. If fresh mango isn’t available, thawed frozen mango works just as well and is often easier to keep on hand. -
1 1/2 tsp agave (for layering and serving)
A little extra agave to drizzle over your mango top will make every bite feel even more special. Feel free to adjust the sweetness based on your preference!
Step-by-Step Instructions
-
Prepare the Chia Mixture
Start by combining the chia seeds, coconut milk, 2 teaspoons of agave, and a pinch of salt in a mixing bowl. Whisk everything together until well combined. You want to ensure that the chia seeds are evenly distributed, and there are no clumps. This initial step is where the magic begins, as the chia seeds will soak up the liquid and create that amazing pudding-like texture. -
Let it Rest
Once your mixture is well whisked, let it rest for about 5-10 minutes. This gives the chia seeds time to hydrate and bloom. You’ll notice that the mixture will start to thicken as the seeds absorb the coconut milk. It’s like watching a little transformation happen right before your eyes. -
Final Whisk
After a few minutes, give the mixture another good whisk. You’ll see that the chia seeds have expanded, and the pudding is already forming. If you find it’s too thick for your liking, you can add the coconut water or filtered water a little at a time until you reach your desired consistency. -
Chill Out
Cover the bowl with plastic wrap or transfer the mixture into jars or cups, and place it in the refrigerator. Let it chill for at least 15-30 minutes. This cooling time helps develop the flavors further and allows the pudding to set completely. -
Mango Magic
While your pudding is chilling, chop up your fresh mango into small cubes. Reserve a few pieces for garnish later, so you can create a beautiful presentation! -
Assemble Your Pudding
After your pudding has chilled and thickened beautifully, it’s time for assembly. Layer the chia pudding with fresh mango chunks in your favorite serving bowl or jar. You can alternate layers of pudding and mango, creating a beautiful pattern that will make your dish not only delicious but also a feast for the eyes. -
Final Touches
Drizzle a bit of agave on top of the assembly for an extra touch of sweetness and visual appeal. And voilà! Your Mango Coconut Chia Pudding is ready to be enjoyed!
Serving Suggestions
Serve your mango coconut chia pudding in beautiful glass jars or bowls to let those vibrant layers shine through. A sprinkle of shredded coconut on top will add an extra layer of texture and visual flair. For an added crunch, consider topping with some granola or nuts before serving. This pudding can be a delightful breakfast, a healthy snack, or even a light dessert!
Recipe Variations
- Tropical Paradise: Add a splash of pineapple juice to the coconut milk mixture for an extra tropical twist. Top with toasted coconut flakes!
- Berry Bliss: Swap out the mango for blueberries or strawberries, or mix in a few berries for a delightful twist.
- Chocolate Lovers: Add a tablespoon of cocoa powder into your chia mixture for a decadent take! Top with banana slices and a sprinkle of cacao nibs.
- Nutty Delight: Stir in a spoonful of almond or peanut butter into the pudding for a creamy, nutty twist.
- Healthy Swaps: If you’re vegan, the agave already works perfectly, but honey can be used if you want to take a non-vegan approach!
Chef’s Notes
This recipe has become a staple in my kitchen over the years. I love how versatile it is! The original idea of mango coconut pudding spun off a basic chia pudding, and I couldn’t resist the temptation of tropical flavors. Every time I serve it, it reminds me of those sun-soaked afternoons spent with my grandmother, creating in the kitchen. I often experiment with different fruits and toppings based on what I have on hand, which makes it such a fun dish to prepare!
FAQs and Troubleshooting
1. Why isn’t my pudding thickening?
If your chia pudding is too runny, it may be due to not allowing enough time for the seeds to soak up the liquid. Ensure you let it rest long enough. Alternatively, adding an extra tablespoon of chia seeds can help thicken it.
2. Can I use other types of milk?
Absolutely! While coconut milk provides a unique flavor and creaminess, almond milk, oat milk, or even soy milk can work well too. Just be mindful that the overall taste and texture might change.
3. Can I prepare this in advance?
Yes! You can prepare the pudding up to 3 days ahead and keep it stored in the fridge. Just make sure to add your fresh fruits right before serving to keep them from getting too mushy.
4. How can I add more flavor?
Feel free to experiment with spices like cinnamon or cardamom when mixing in the chia seeds. Vanilla extract is also a wonderful addition if you want that warm flavor profile!
Nutritional Info (per serving)
- Calories: Approximately 210 calories
- Protein: 4g
- Carbohydrates: 25g
- Dietary Fiber: 10g
- Sugars: 6g
- Fat: 12g
Now that you have the tools and inspiration to whip up this delightful Mango Coconut Chia Pudding, it’s time to recreate those magic moments in your own kitchen. Dive in and enjoy the feeling of nourishing your body with something vibrant and delicious. Here’s to fresh, simple, and seriously delicious meals!
PrintMango Coconut Chia Pudding

A refreshing and nutritious chia pudding combined with sweet mango and rich coconut milk, perfect for breakfast or a light dessert.
- Prep Time: 10 minutes
- Cook Time: 30 minutes
- Total Time: 40 minutes
- Yield: 4 servings 1x
- Category: Dessert
- Method: No-Cook
- Cuisine: American
- Diet: Vegan
Ingredients
- 1/4 cup chia seeds
- 1 cup full-fat canned coconut milk
- 2 tsp agave (to taste)
- Pinch of salt
- 1/4 cup coconut water or filtered water (optional, for thinning)
- 1 1/2 cups fresh chopped mango
- 1 1/2 tsp agave (for layering and serving)
Instructions
- Prepare the chia mixture by combining chia seeds, coconut milk, 2 teaspoons of agave, and a pinch of salt in a mixing bowl.
- Let it rest for about 5-10 minutes to allow the chia seeds to hydrate and thicken.
- Final whisk the mixture to ensure it’s well combined and thickened to your preference.
- Chill the mixture in the refrigerator for at least 15-30 minutes.
- Chop the fresh mango into small cubes while the pudding cools.
- Assemble the pudding with layers of chia pudding and mango in a serving bowl or jar.
- Drizzle agave on top for added sweetness before serving.
Notes
Experiment with different fruits and toppings for variety. This pudding can be prepared up to 3 days in advance; just add fresh fruit before serving.
Nutrition
- Serving Size: 1 serving
- Calories: 210
- Sugar: 6g
- Sodium: 20mg
- Fat: 12g
- Saturated Fat: 10g
- Unsaturated Fat: 2g
- Trans Fat: 0g
- Carbohydrates: 25g
- Fiber: 10g
- Protein: 4g
- Cholesterol: 0mg
Keywords: chia pudding, mango, coconut, vegan dessert, healthy breakfast, tropical recipes
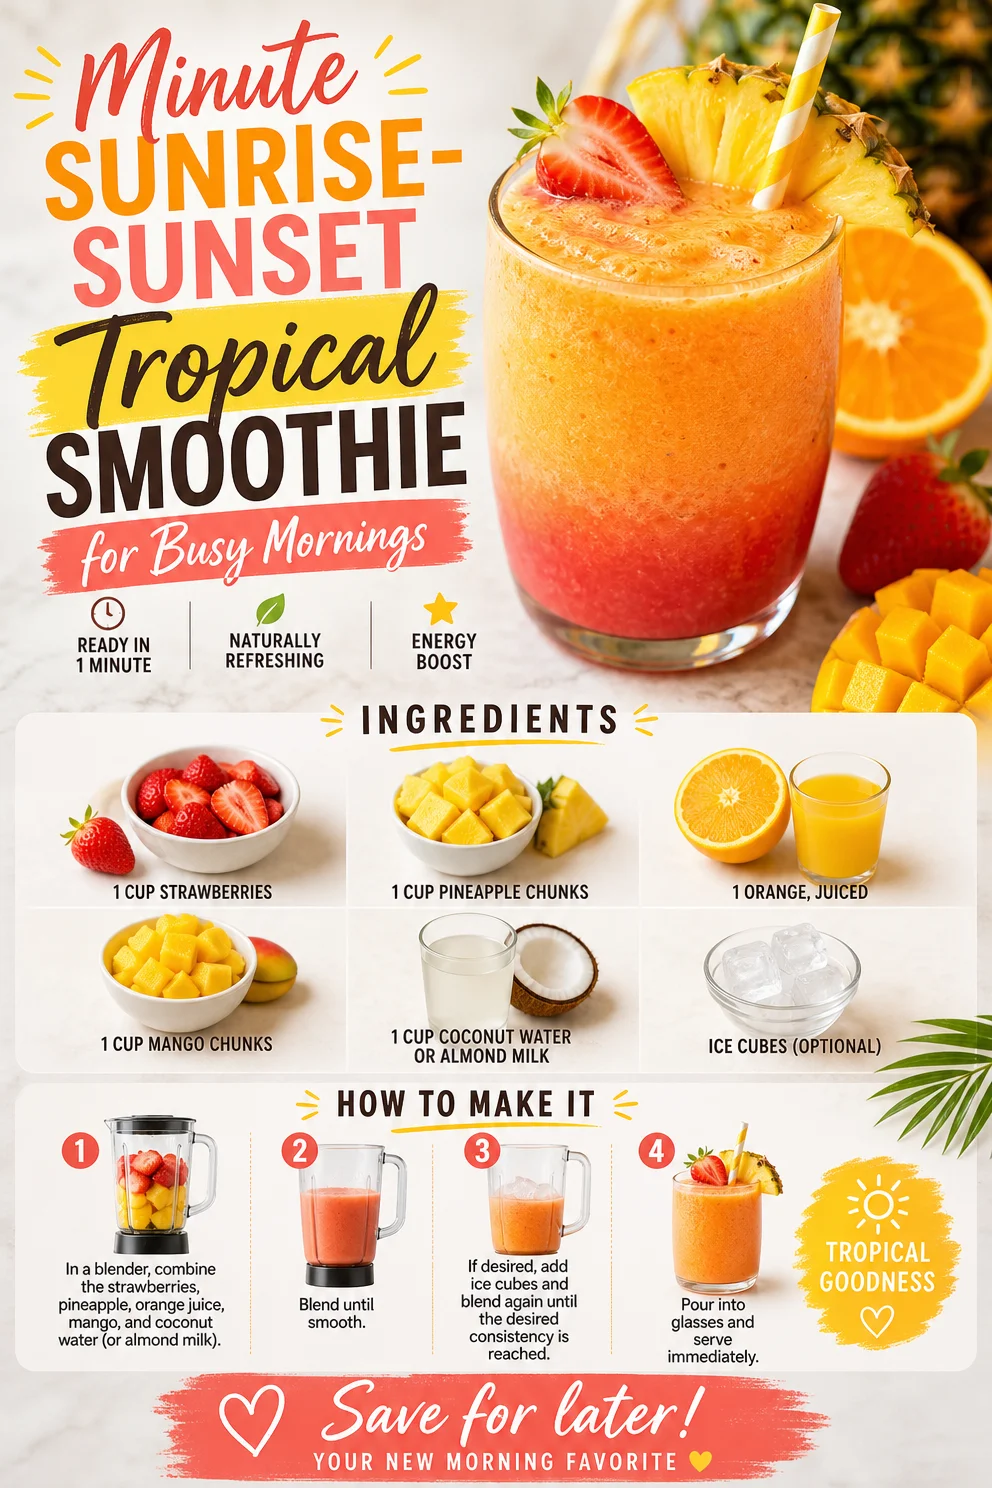
Minute Sunrise-Sunset Tropical Smoothie for Busy Mornings
Sunrise Sunset Tropical Smoothie: Your Perfect Morning Boost
Let’s talk about mornings! You know, that magical time of day when you wake up, and the sun is just beginning to spill golden light across the horizon. There’s something about that morning glow that makes everything feel fresh and full of potential. Whether you’re a busy bee rushing to work or someone who loves to linger over breakfast, there’s one thing we can all agree on: a bright and cheerful morning smoothie can set the tone for a wonderful day ahead. Say hello to the Sunrise Sunset Tropical Smoothie—your new breakfast buddy!
This smoothie is a delightful whirlpool of sweetness and a burst of flavor that’ll transport you straight to a tropical island, no passport required! Packed with vibrant strawberries, luscious pineapple, zesty orange, and creamy mango, it’s like taking a mini-vacation right in your kitchen. Not only is it a feast for your taste buds, but it’s also a nutritional powerhouse, giving you the energy boost you need to tackle whatever lies ahead in your day.
But wait! Let me share a little story that makes this smoothie even more special for me. Picture this: it’s a warm summer morning, and I’m at my favorite beachside café in Bali. The aroma of fresh fruits fills the air, and the gentle sound of waves crashing on the shore sets a soothing backdrop. I remember ordering a tropical smoothie that was so bright and flavorful; it was like a hug in a glass. That experience inspired my version of the Sunrise Sunset Tropical Smoothie, perfect for those moments when you want to capture that vacation vibe at home. Whether you sip it on your porch or prep it for a quick breakfast, this smoothie will bring that same sunny joy to your day.
Ingredients
Here’s what you’ll need to whip up this tropical delight:
-
1 cup strawberries, hulled and sliced
Fresh strawberries are the star of this smoothie. They add a lovely sweetness and vibrant color. If strawberries are out of season, you can swap them for frozen strawberries to keep the texture perfect! -
1 cup pineapple chunks
Pineapple brings a juicy, tropical flavor that brightens every sip. Don’t have fresh pineapple? Canned pineapple works too—just make sure it’s packed in juice or water, not syrup. -
1 orange, juiced
Freshly squeezed orange juice adds a zesty kick and a dose of vitamin C that’ll have you feeling refreshed. If oranges aren’t handy, you can use store-bought orange juice—just go for the no-sugar-added kind! -
1 cup mango chunks
Ah, mango! The creamy superstar of tropical fruits. It elevates your smoothie with its sweetness and velvety texture. Frozen mango is a fantastic substitute and gives the smoothie that refreshing chill! -
1 cup coconut water or almond milk
Coconut water is wonderful for hydration and adds a light tropical flavor. If you prefer almond milk for creaminess, it’s a great alternative. You can also use any plant-based milk you love! -
Ice cubes (optional)
If you want your smoothie to have a frosty texture, add a handful of ice cubes. I personally love it chilled!
Step-By-Step Instructions
Now, let’s get blending! Here’s a simple breakdown of how to make this Sunrise Sunset Tropical Smoothie:
-
Prep Your Ingredients
Start by hulking (removing the green tops) and slicing your strawberries. It’s so satisfying to see fresh fruit ready to go! Make sure you have everything within arm’s reach so you won’t have to pause mid-blend. -
Juice the Orange
Cut the orange in half and juice it right into your blender. If you don’t have a juicer, simply squeeze it with your hands. Just keep an eye out for those pesky seeds—nobody wants a surprise crunch! -
Add the Fruits
Toss in the strawberries, pineapple chunks, and mango. I like to add the soft fruits like mango and strawberries first so that they blend up nicely without clumping together. -
Pour in the Coconut Water or Almond Milk
Now pour in your coconut water or almond milk for that smooth texture. If you’re using ice, you can add that at the same time or delay it until later for a thicker consistency. -
Blend Until Smooth
Put the lid on your blender and blend on high until everything is completely smooth—usually, about 30 seconds to a minute should do the trick. If you notice it’s too thick, add a little more coconut water or almond milk until you reach your desired consistency. -
Taste and Adjust
Give your smoothie a quick taste! If you’d like it sweeter, feel free to add a bit of honey or agave syrup. Or if it needs a bit more zest, a squeeze of lime can brighten it up even more! -
Pour and Enjoy
Pour your vibrant smoothie into a glass or bowl, and take a moment to admire that stunning sunset-like color! Serve it immediately for the best taste and texture.
Serving Suggestions
For an extra flair, garnish your smoothie with a few slices of fresh fruit or a sprinkle of shredded coconut on top. A cute straw doesn’t hurt either! If you’re feeling fancy, you can even top it off with some granola for a bit of crunch. Serve it with your favorite whole-grain toast or a handful of nuts for a well-rounded breakfast.
Recipe Variations
If you’re ready to get creative, here are a few easy twists you can try with this Sunrise Sunset Tropical Smoothie:
-
Tropical Green Boost: Add a handful of spinach or kale for a nutritional punch without sacrificing flavor!
-
Chia Seed Power-Up: Toss in a tablespoon of chia seeds for a boost of omega-3s and added texture.
-
Creamy Avocado Delight: Swap out 1/2 cup of mango for half an avocado. It gives a rich creaminess and sneaks in healthy fats.
-
Berry Medley: Exchange the strawberries and pineapple for a mix of blueberries, raspberries, or blackberries for a delightful twist.
-
Coconut Milk Creaminess: Switch the coconut water for full-fat coconut milk for an indulgent treat that’s really rich and creamy.
Chef’s Notes
Years ago, I first experimented with tropical smoothies while dreaming of sandy beaches and sunshine during a chilly winter day. It’s funny how that one sunny morning inspired such a bright recipe! Over the years, I’ve adapted this particular blend many times, letting seasonal fruits dictate my choices. Sometimes I even sneak in a bit of Greek yogurt for a protein boost. No matter how I change it up, this smoothie never fails to lift my spirits and remind me of warmer days!
FAQs and Troubleshooting
-
Can I make this smoothie ahead of time?
Absolutely! Just blend your smoothie and store it in an airtight container in the fridge. It’s best consumed within 24 hours for optimal freshness. -
Why is my smoothie too thick?
If you find your smoothie is too thick, simply add more coconut water, almond milk, or even a bit of juice until you reach the desired consistency. You can also blend in a few more ice cubes for a lighter texture. -
Can I replace the fruit with frozen versions?
Yes, using frozen fruit is a great way to achieve that frosty texture! It can also help you keep your smoothie colder for longer. -
How can I make it sweeter?
If you prefer a sweeter smoothie, consider adding a bit of honey, agave nectar, or even a few medjool dates. Remember to blend those right in!
Nutritional Info (Optional)
While I won’t dive too deep into numbers, here’s a quick heads-up—this smoothie is loaded with vitamin C, antioxidants, and hydration thanks to the fruits and coconut water. It’s a fantastic option that helps kickstart your metabolism while keeping your energy levels high throughout the day.
So there you have it—a delicious, energizing Sunrise Sunset Tropical Smoothie that’s just waiting to brighten up your mornings. Whatever your day may hold, this little glass of sunshine might be just what you need. Cheers to fresh, feel-good food that empowers you and keeps you craving more! Enjoy your tasty journey in the kitchen! 🌞🍹
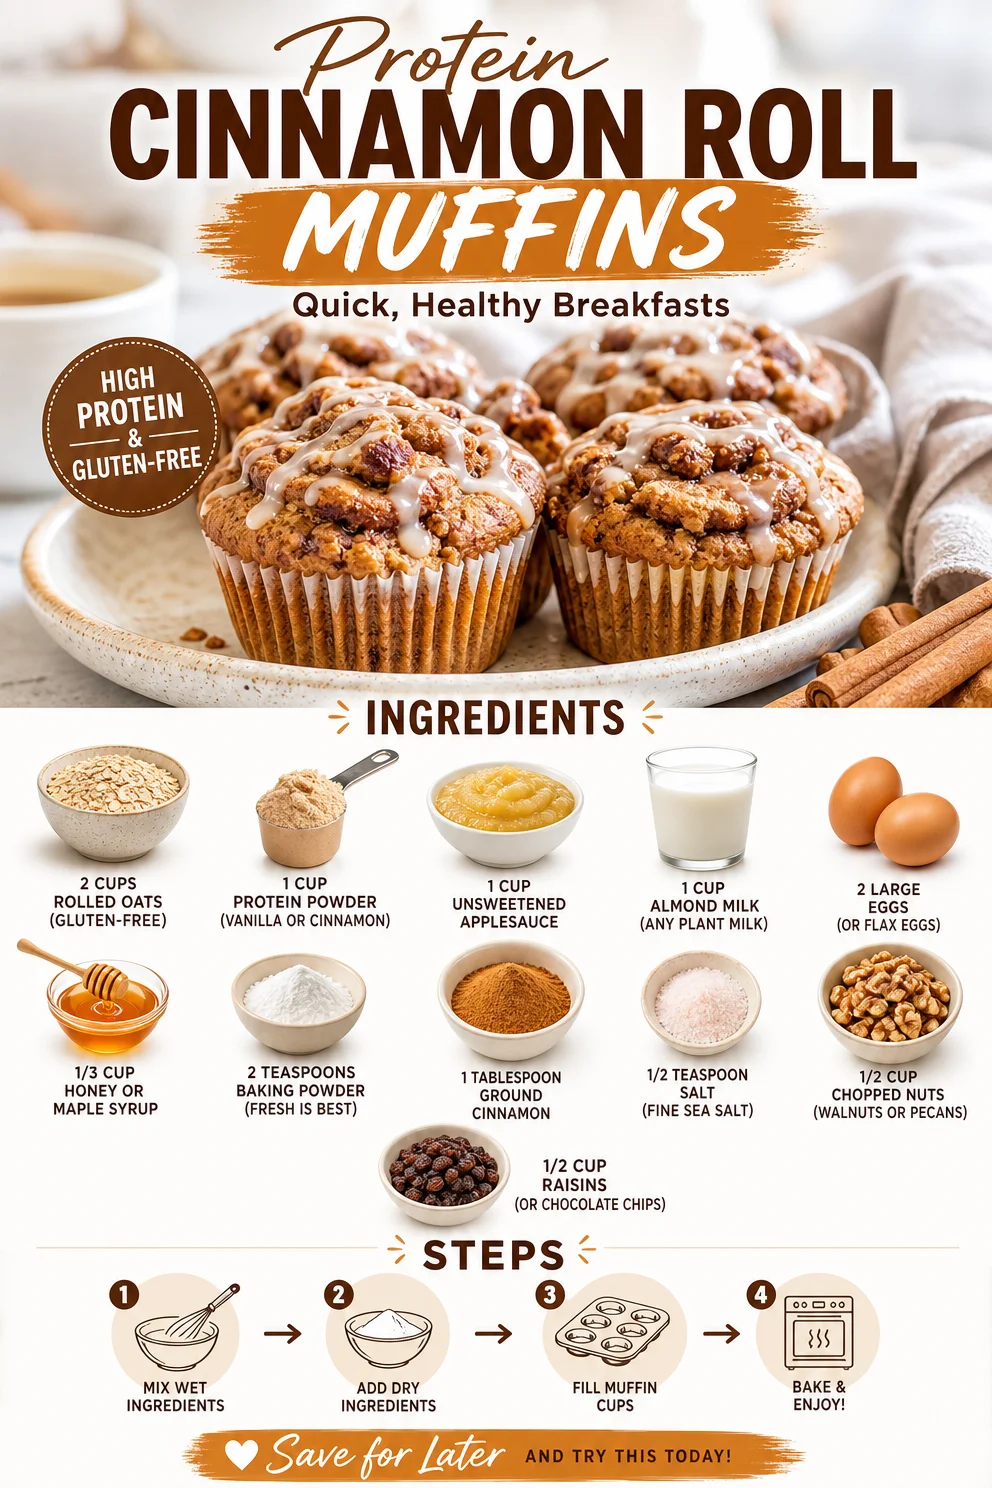
Protein Cinnamon Roll Muffins: Quick, Healthy Breakfasts
Cinnamon Roll Protein Muffins: Your Healthier Breakfast Dream
Welcome to another deliciously healthy adventure with Clean Plate Cravings! Today, we’re whipping up something that combines the comfort of a classic pastry with the power of a nutrient-packed muffin: Cinnamon Roll Protein Muffins. Seriously, they’re a breakfast lover’s dream come true. Imagine soft, moist muffins with that warm, cinnamon swirl just like your favorite cinnamon roll, but without the guilt!
But before we jump into the recipe, let’s chat a little about what makes these muffins so special. I believe that breakfast should be a joyful experience, setting the tone for the rest of your day. You shouldn’t feel like you have to choose between health and flavor—why not have both? These muffins come together quickly, making them perfect for busy mornings when you want something nourishing but satisfying. And trust me, your taste buds will thank you!
Now, let’s get cozy in the kitchen. Grab your mixing bowls and your favorite whisk, and let’s make some magic happen!
A Sweet Memory in Every Bite
Growing up, my weekends were often filled with the sweet aroma of cinnamon wafting through the house. My mom had a special knack for baking, especially when it came to cinnamon rolls. Saturday mornings felt like a feast, with the gooey rolls and a heaping dollop of cream cheese frosting that we would eagerly lick off the spoon. Those mornings were always filled with laughter, family, and a sense of comfort that came from sharing good food.
As I grew older, I realized that not every Saturday needed to be a sugar-laden festival. I wanted to capture that nostalgic flavor in a healthier way. That’s how these Cinnamon Roll Protein Muffins came to be! They bring back all those wonderful childhood memories but are packed with protein and wholesome ingredients. Now, I can enjoy my mornings even more, knowing that I’m fueling my body right.
Ingredients
Here’s what you’ll need to create these yummy muffins:
-
2 cups rolled oats
Rolled oats provide a fabulous base for your muffins, offering fiber and a heartiness that keeps you full. If you’re going gluten-free, just make sure to grab certified gluten-free oats! -
1 cup protein powder
For that extra protein boost! I prefer vanilla or cinnamon-flavored powder to complement the taste of the muffins. You can substitute it with a plant-based protein powder if that’s your jam. -
1 cup unsweetened applesauce
This natural fruit puree replaces oil or butter, keeping the muffins moist while adding some natural sweetness. If you’re not a fan of applesauce, mashed bananas work beautifully too! -
1 cup almond milk
This plant-based milk keeps things light and fluffy. Feel free to use any milk you have on hand; oat, soy, or regular dairy milk all work well. -
2 large eggs
These help bind the ingredients and create a fluffy texture. If you’re looking for an egg-free version, flax eggs are fantastic! Just mix one tablespoon of ground flaxseed with three tablespoons of water and let it sit for a few minutes. -
1/3 cup honey or maple syrup
To sweeten things up! Honey or maple syrup gives these muffins that delightful sweetness with a hint of flavor. Brown sugar is a great alternative too if you prefer. -
2 teaspoons baking powder
Make sure your baking powder is fresh for the best rise! -
1 tablespoon ground cinnamon
The star ingredient! You can add extra for swirls if you like a little more cinnamon magic in every bite. -
1/2 teaspoon salt
A dash of fine sea salt enhances all the lovely flavors going on! -
1/2 cup chopped nuts
Walnuts or pecans add a delightful crunchy texture. You can also skip them if you prefer a nut-free muffin. -
1/2 cup raisins
These add a natural sweetness reminiscent of traditional cinnamon rolls. If you want to kick it up a notch, chocolate chips work just as well for a decadent twist!
Step-by-Step Instructions
Ready to get baking? Here’s how to make these fabulous muffins step by step:
1. Preheat Your Oven
Preheat your oven to 350°F (175°C). This helps to ensure your muffins rise beautifully and bake evenly.
2. Prepare the Muffin Pan
Grease a muffin tin with cooking spray or line with paper liners for easy removal. Your muffins will thank you for it!
3. Mix the Dry Ingredients
In a large mixing bowl, combine the rolled oats, protein powder, baking powder, ground cinnamon, and salt. Whisk it all together until evenly mixed. This step is crucial as it ensures all the dry ingredients are well-distributed.
4. Combine the Wet Ingredients
In another bowl, mix the unsweetened applesauce, almond milk, eggs, and honey (or maple syrup). Whisk until well combined. Fun chef hack: you can use a hand mixer for a fluffier texture but whisking by hand works just fine too!
5. Mix it All Together
Pour the wet ingredients into the dry ingredients. Stir gently until just combined; be careful not to overmix. Your batter should be thick and a little lumpy, which is exactly what we want!
6. Add Nuts and Raisins
Gently fold in the chopped nuts and raisins (or chocolate chips). This is where the magic happens, baby!
7. Swirl the Cinnamon
If you want that classic cinnamon roll swirl, take a small bowl and mix a little extra cinnamon with a teaspoon of honey or maple syrup. Once you pour the batter into the muffin tins, use a toothpick to swirl this mixture into the batter for a beautiful presentation.
8. Fill the Muffin Tins
Scoop your batter into each muffin cup, filling them about 3/4 full. This allows them to rise nicely without overflowing.
9. Bake
Pop your muffin tin into the preheated oven and bake for 18–20 minutes, or until a toothpick inserted into the center comes out clean. The aroma wafting through your kitchen is going to be heavenly, trust me!
10. Cool Down
Once baked, let the muffins cool in the pan for about 5 minutes, then transfer them to a wire rack to cool completely. You can indulge while they’re still warm, but be careful—they’ll be soft and delicate!
Serving Suggestions
These Cinnamon Roll Protein Muffins are perfect as they are, but for a little extra flair, serve them warm with a light drizzle of honey or a smear of almond butter. You could even sprinkle a few chopped nuts or coconut flakes on top for a delightful crunch. Grab your favorite coffee or tea, and you’ve got yourself a fulfilling breakfast or snack!
Recipe Variations
Feeling adventurous? Here are a few fun variations you can try:
-
Stuffed Muffins: Add a dollop of cream cheese or nut butter in the center of each muffin before baking for a surprise filling.
-
Fruity Muffins: Toss in some chopped apples or blueberries for a fruity burst.
-
Chocolate Lover: Swap in chocolate protein powder and add chocolate chips for a richer, dessert-like muffin!
-
Spicy Kick: Add a pinch of nutmeg or allspice for a more complex flavor profile.
-
Vegan Version: Make the muffins plant-based using flax eggs and dairy alternatives as noted in the ingredient list.
Chef’s Notes
Cinnamon Roll Protein Muffins have come a long way since I first started experimenting in my kitchen. It’s amazing how you can take a classic, sugar-loaded treat and transform it into something nutritious yet delicious! I once had a muffin explosion when I forgot the baking powder, and let’s just say the results were… not pretty! So trust me when I say, don’t skip any step—each one is important for flavor and structure.
Also, feel free to adjust the sweetness to your liking! Everyone’s palate is different, and that’s what makes cooking exciting. My goal is for you to feel empowered to make this dish uniquely your own.
FAQs and Troubleshooting
1. Why did my muffins sink in the middle?
This usually happens when you overmix the batter or use stale baking powder. Make sure to mix just until combined and check that your baking powder is fresh.
2. Can I make these muffins ahead of time?
Absolutely! These muffins store well in an airtight container for up to 3 days at room temperature or can be refrigerated for a week. You can also freeze them for up to 3 months; just pop them in the microwave for a quick breakfast!
3. What if I don’t have protein powder?
You can substitute with an additional cup of rolled oats, but the muffins will lose some protein content. Alternatively, you could look for a flour alternative, like whole wheat flour, but it might require adjustments in liquid levels.
4. Can I skip the nuts/r raisins?
Definitely! You can leave them out or replace with other additions that you prefer. Think about seeds or coconut flakes for different textures!
Nutritional Info
While the exact nutritional info can vary based on specific ingredients used, each muffin provides a balance of healthy carbs, proteins, and fats, along with lots of fiber!
And there you have it! Scrumptious, Cinnamon Roll Protein Muffins that not only taste amazing but also nourish your body! So, what are you waiting for? Gather those ingredients, and let’s make this breakfast dream a reality! Happy baking, my fellow foodies!
PrintCinnamon Roll Protein Muffins
A healthier take on classic cinnamon rolls, these protein-packed muffins are soft, moist, and full of that warm cinnamon flavor.
- Prep Time: 10 minutes
- Cook Time: 20 minutes
- Total Time: 30 minutes
- Yield: 12 muffins 1x
- Category: Breakfast
- Method: Baking
- Cuisine: American
- Diet: Vegetarian
Ingredients
- 2 cups rolled oats
- 1 cup protein powder
- 1 cup unsweetened applesauce
- 1 cup almond milk
- 2 large eggs
- 1/3 cup honey or maple syrup
- 2 teaspoons baking powder
- 1 tablespoon ground cinnamon
- 1/2 teaspoon salt
- 1/2 cup chopped nuts
- 1/2 cup raisins
Instructions
- Preheat your oven to 350°F (175°C).
- Prepare a muffin tin by greasing it with cooking spray or lining with paper liners.
- Mix the dry ingredients in a large bowl: rolled oats, protein powder, baking powder, ground cinnamon, and salt.
- Combine the wet ingredients in another bowl: unsweetened applesauce, almond milk, eggs, and honey (or maple syrup).
- Pour the wet mixture into the dry mixture and stir gently until just combined.
- Add the chopped nuts and raisins, folding them in gently.
- Swirl a small bowl of cinnamon with honey or maple syrup into the batter using a toothpick.
- Fill the muffin cups about 3/4 full with the batter.
- Bake for 18–20 minutes, or until a toothpick comes out clean.
- Cool in the pan for 5 minutes, then transfer to a wire rack to cool completely.
Notes
Serve warm with a drizzle of honey or a smear of almond butter for added flavor.
Nutrition
- Serving Size: 1 muffin
- Calories: 180
- Sugar: 8g
- Sodium: 150mg
- Fat: 5g
- Saturated Fat: 0.5g
- Unsaturated Fat: 4g
- Trans Fat: 0g
- Carbohydrates: 26g
- Fiber: 4g
- Protein: 8g
- Cholesterol: 50mg
Keywords: cinnamon roll, protein muffins, healthy breakfast, quick muffins
Minute One-Serving Cottage Cheese Pancake (High-Protein)
Easy Cottage Cheese Pancake for One
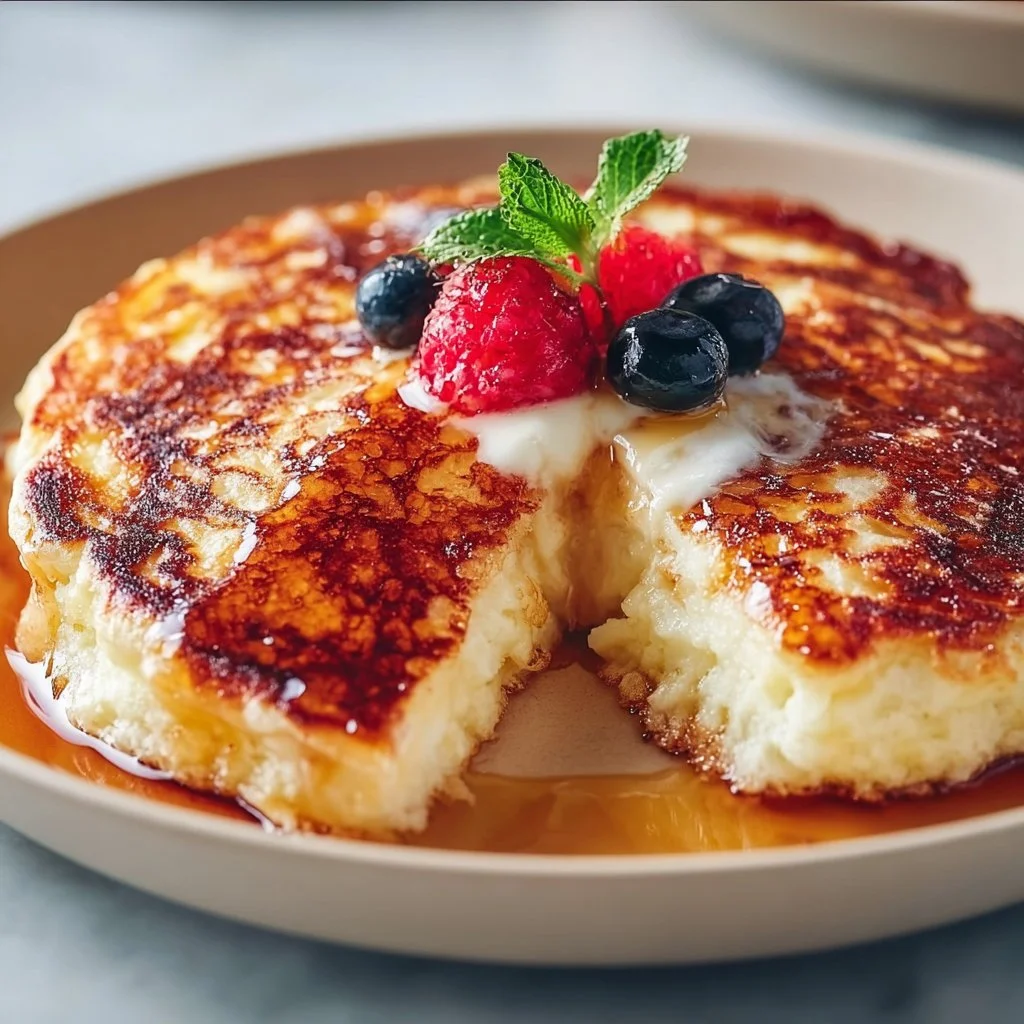
Welcome to Clean Plate Cravings! Today, we’re diving into something so simple yet oh-so-delicious: the Easy Cottage Cheese Pancake for One. If you’re like me and love breakfast that feels more like a hug than a chore, this dish is about to become your go-to. With just a handful of wholesome ingredients, you can whip up a fluffy pancake that’s packed with protein and flavor, satisfying both your morning cravings and your health goals. So, grab your mixing bowl and let’s get cooking!
A Fluffy Memory
I remember the first time I stumbled upon cottage cheese pancakes. I was in college, loaded with textbooks and energy drinks, trying to juggle classes and my part-time job. Cooking was often a hurried affair in my tiny kitchen, with little time for elaborate meals. One morning, rummaging through the fridge, I found a tub of cottage cheese that was about to expire. “Why not?” I thought. I mixed it up with some oats and an egg and threw it onto a hot skillet. The aroma that filled my kitchen was so enticing that I couldn’t help but take a moment to savor it. The first bite was a revelation! Fluffy, satisfying, and utterly delicious, these pancakes quickly became a staple in my breakfast rotation. They were budget-friendly, fueled my busy days, and even made me feel like a chef in my small little space. They’ve been a cherished part of my mornings ever since, and I’m thrilled to share this delight with you!
Ingredients
-
1/2 cup cottage cheese
A creamy base that adds protein and moisture to your pancakes. If you’re not a fan of cottage cheese, Greek yogurt can be a great substitute for a similar texture. -
1/2 cup oats
Rolled oats give these pancakes a hearty bite. For a gluten-free option, use certified gluten-free oats. If you’re looking for something different, you can blend the oats into oat flour for a smoother texture. -
1 egg
The egg binds everything together and adds richness. You can replace it with a flax egg (1 tablespoon ground flaxseed mixed with 2.5 tablespoons of water) for a vegan version. -
1/4 teaspoon baking powder
This little powerhouse helps your pancakes rise, making them light and fluffy. Don’t skip this step—it’s essential for the perfect pancake! -
Salt to taste
A pinch of salt enhances the flavors. Feel free to add a dash of cinnamon if you want to bring a warm spice element to your pancakes. -
Butter or oil for cooking
Whether you choose butter for that rich flavor or a bit of coconut oil for a subtle sweetness, both options work beautifully. Just make sure the skillet is hot enough so they don’t stick!
Step-by-Step Instructions
-
Mix the Batter
In a mixing bowl, combine the cottage cheese, oats, egg, baking powder, and salt. Use a fork to mash the cottage cheese slightly, blending all the ingredients together. You want everything to come together nicely, but it’s okay if the mixture isn’t completely smooth. Chef’s Tip: Don’t overmix; a few lumps are perfectly fine and will add to the texture of your pancake! -
Heat the Skillet
Place a non-stick skillet or frying pan over medium heat and add butter or oil as it heats up. Chef Hack: To test if your skillet is hot enough, sprinkle a few drops of water on the surface. If they sizzle and evaporate immediately, you’re ready to go! -
Cook the Pancake
Pour half of your batter into the skillet, using a spatula to gently spread it into a round shape. Cook for 2-3 minutes until the edges look set and you see bubbles forming on top. Chef Insight: If you find it hard to flip, let it cook a bit longer! Patience is key for the fluffiest pancake. -
Flip and Finish
Carefully flip the pancake using a spatula and cook for another 1-2 minutes on the other side until golden brown. It should feel springy to the touch! Repeat the process with the remaining batter. -
Serve
Once cooked, transfer your pancake(s) onto a plate and stack them high for an impressive presentation. Pro Tip: Top with fresh fruit, maple syrup, or a dollop of yogurt for added deliciousness!
Serving Suggestions
When it comes to serving your Easy Cottage Cheese Pancake, the sky’s the limit! I love topping mine with a mix of fresh blueberries and a drizzle of honey. You could also try a sprinkle of nuts for crunch or a dusting of powdered sugar for a sweet touch. Feel free to get creative—this pancake is a blank canvas waiting for your culinary artistry!
Recipe Variations
- Savory Twist: Add herbs and cheese (like feta or cheddar) to the batter for a savory pancake perfect for brunch.
- Sweet Surprise: Mix in a mashed banana or a splash of vanilla extract for a hint of sweetness.
- Spiced Up: Add a dash of cinnamon or nutmeg to the batter to warm up those flavors.
- Pumpkin Spice: Use canned pumpkin puree in place of some of the cottage cheese for a seasonal touch.
- Chocolate Lovers: Fold in some dark chocolate chips while cooking for a special treat.
Chef’s Notes
These cottage cheese pancakes have been a kitchen staple for years! I can’t even count how many variations I’ve tried—some were epic fails, like the time I accidentally used expired cottage cheese (yikes!). But even those mishaps taught me to embrace the kitchen adventure. What I love most about these pancakes is their versatility; they adapt beautifully to whatever ingredients you have on hand. So don’t hesitate to experiment and make this recipe your own!
FAQs and Troubleshooting
-
Why are my pancakes sticking to the pan?
Make sure your skillet is adequately greased and hot before you pour in the batter. If you’re using a cast-iron skillet, preheat it well and season it properly for the best results. -
My pancakes are too dense. What did I do wrong?
This could be due to overmixing the batter or not enough baking powder. Give it a little stir, ensuring a few lumps remain, and check your baking powder’s freshness! -
Can I make the batter ahead of time?
Yes! You can prep it the night before and store it in the fridge. Just give it a quick stir before cooking to reintegrate everything. -
How can I make these pancakes sweeter?
If you prefer a sweeter pancake, add a tablespoon of honey or maple syrup to the batter, or top with your favorite syrup or sweet spread.
Nutritional Info
This Easy Cottage Cheese Pancake is not only delicious but also packed with nutrients! Depending on specific brands and measurements, one pancake contains approximately:
- Calories: 200
- Protein: 15g
- Carbohydrates: 20g
- Fat: 7g
- Fiber: 3g
Conclusion
There you have it! A delightful, easy recipe for Cottage Cheese Pancakes that’s perfect for a quick breakfast or a leisurely brunch. With every bite, you’ll experience a blend of hearty oats and creamy cottage cheese, making your mornings that much brighter. So why wait? Gather your ingredients and treat yourself to a delicious pancake experience today. Happy cooking, and let’s keep it fresh, simple, and seriously delicious!
PrintEasy Cottage Cheese Pancake for One

A fluffy and protein-packed pancake made with cottage cheese and oats, perfect for a quick breakfast.
- Prep Time: 5 minutes
- Cook Time: 5 minutes
- Total Time: 10 minutes
- Yield: 1 serving 1x
- Category: Breakfast
- Method: Cooking
- Cuisine: American
- Diet: Vegetarian
Ingredients
- 1/2 cup cottage cheese
- 1/2 cup oats
- 1 egg
- 1/4 teaspoon baking powder
- Salt to taste
- Butter or oil for cooking
Instructions
- Mix the Batter: In a mixing bowl, combine the cottage cheese, oats, egg, baking powder, and salt. Use a fork to mash the cottage cheese slightly, blending all the ingredients together.
- Heat the Skillet: Place a non-stick skillet over medium heat and add butter or oil as it heats up.
- Cook the Pancake: Pour half of your batter into the skillet and gently spread it into a round shape. Cook for 2-3 minutes until the edges look set and bubbles form on top.
- Flip and Finish: Carefully flip the pancake and cook for another 1-2 minutes until golden brown. Repeat with the remaining batter.
- Serve: Transfer your pancake(s) onto a plate and stack them high. Top with fresh fruit, syrup, or yogurt.
Notes
Feel free to experiment with different toppings and mix-ins for a personalized pancake experience.
Nutrition
- Serving Size: 1 pancake
- Calories: 200
- Sugar: 3g
- Sodium: 200mg
- Fat: 7g
- Saturated Fat: 2g
- Unsaturated Fat: 5g
- Trans Fat: 0g
- Carbohydrates: 20g
- Fiber: 3g
- Protein: 15g
- Cholesterol: 130mg
Keywords: pancakes, cottage cheese, breakfast, easy recipe, healthy pancakes
Creamy Spinach and Eggs
Creamy Spinach and Eggs: A Breakfast Delight
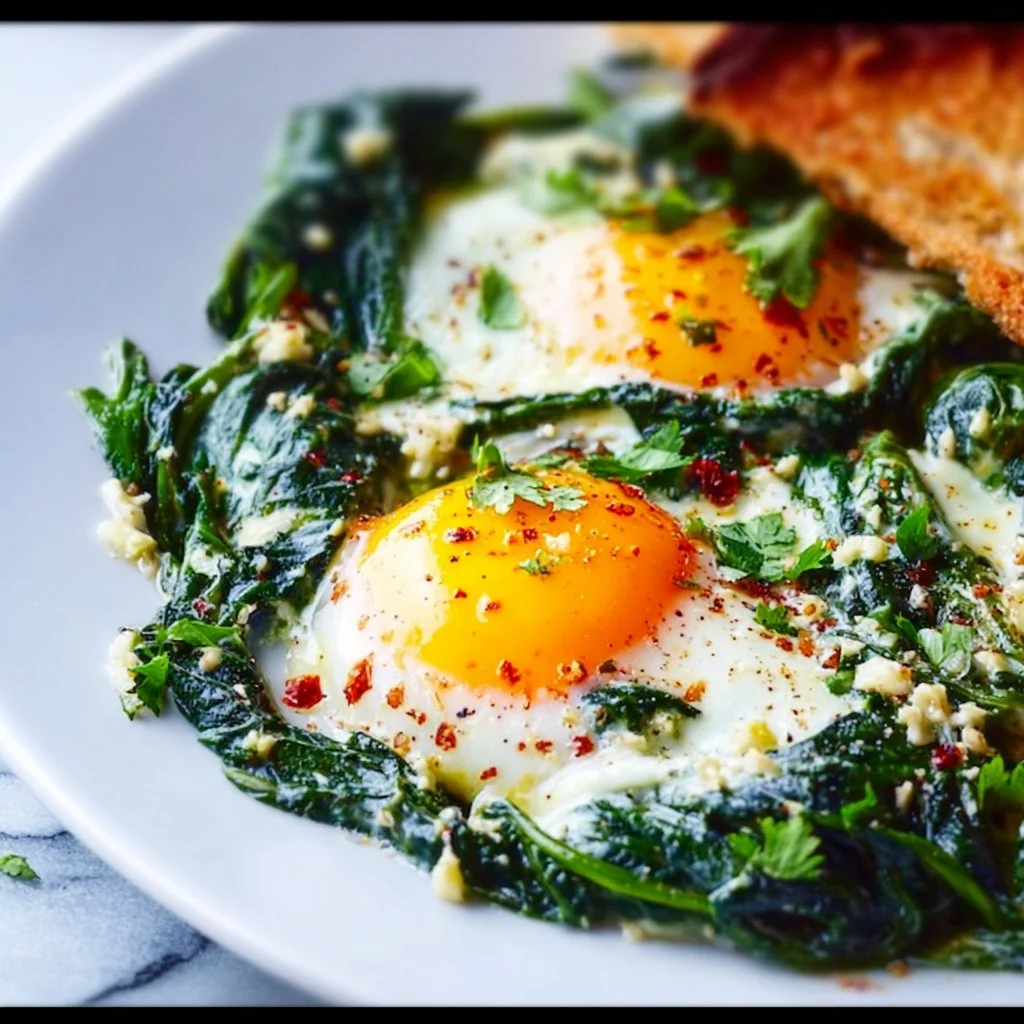
Welcome to another delicious installment here at Clean Plate Cravings! Today, we’re diving into a colorful, nutritious dish that’s perfect for breakfast, brunch, or even a light dinner—Creamy Spinach and Eggs. This dish is not just a treat for your taste buds; it’s a warm embrace for your soul. Imagine starting your day with creamy, luscious eggs nestled in vibrant sautéed spinach, all brought together with a dollop of tangy Greek yogurt. Trust me, this dish will have you singing for joy!
You know, breakfast has always held a special place in my heart. Growing up in a bustling household, mornings were a mix of laughter, the aroma of brewing coffee, and the inevitable clatter of plates and pans. My mom had a knack for transforming simple ingredients into something extraordinary. One dish that sticks out in my memory is her creamy scrambled eggs. She would whip up fluffy eggs with whatever greens we had on hand—spinach, kale, or even a handful of freshly chopped herbs from our garden. It was a simple yet magical way to start the day, filling our bellies and hearts with love.
Fast-forward to today, and I’ve taken a page from her book with my own spin—quite literally! This Creamy Spinach and Eggs recipe is inspired by those cozy mornings filled with family. It’s quick to prepare, loaded with nutrients, and bursting with flavor. Let’s get started on this delightful journey into the kitchen where wholesome ingredients come together in a joyful symphony.
Ingredients
Let’s gather our ingredients, shall we? Here’s what you’ll need to whip up this creamy masterpiece:
-
1 tablespoon extra-virgin olive oil
A healthy fat that not only adds delicious flavor but also helps keep our hearts happy. You can substitute this with avocado oil or coconut oil if you prefer a different flavor profile. -
3-4 green onions (thinly sliced, both white and green parts)
These bring a mild onion flavor that complements the creaminess of the eggs. If you’re out of green onions, feel free to use shallots or chives—they’ll work beautifully! -
5 oz. baby spinach (about 4 cups)
Fresh spinach is the star of this dish! Not only does it provide vibrant color and nutrients, but it also wilts down considerably when cooked. You can swap this with kale or arugula for a twist, but they may require slight adjustments in cooking time. -
½ teaspoon kosher salt (plus more if needed)
Salt brings out the flavors in our dish, so don’t skimp! If you’re watching your sodium intake, opt for low-sodium seasoning or omit extra salt until the end. -
¼ teaspoon black pepper (plus more if needed)
A pinch of this gives a lovely bite to our creamy dish. You can spice it up with a dash of red pepper flakes or smoked paprika if you love a little heat. -
½ cup Greek yogurt (I prefer Fage 5%)
This not only adds creaminess but also a tangy kick that takes the flavors up a notch! If you’re avoiding dairy, consider using a non-dairy yogurt, like coconut or almond yogurt—just taste to ensure it matches your flavor preference. -
4 eggs
Eggs are packed with protein and healthy fats. You can also use egg whites or a plant-based egg substitute if you’re looking to lower the cholesterol or make it vegan. -
Crusty bread (for serving, optional)
Nothing pairs better with creamy eggs than a slice of toasted, crusty bread. Choose whole grain for added fiber, or go gluten-free if you need to!
Step-by-Step Instructions
Now that we have everything prepped and ready, it’s time for the fun part—cooking! Follow my steps below to create your delicious Creamy Spinach and Eggs:
-
Heat the Oil
In a large skillet, heat the tablespoon of extra-virgin olive oil over medium heat. You want it to shimmer, but not smoke. A good chef tip: if you’re unsure whether your oil is hot enough, toss in a tiny piece of onion; if it sizzles, you’re ready to go! -
Sauté the Green Onions
Add the thinly sliced green onions (both the white and green parts) to the skillet. Sauté for about 2-3 minutes until they’re tender and fragrant. This step releases their delicious flavors. If you notice they’re browning too quickly, reduce the heat! -
Add the Spinach
Next, add the baby spinach to the skillet. It may seem like a lot at first, but trust me—it will wilt down significantly. Stir gently for about 2 minutes until the spinach is wilted and vibrant. Remember, you want it to maintain its bright green color. Here’s a little chef hack: if you want to save time, you can use pre-washed and pre-chopped spinach, though fresh is always best! -
Season the Greens
Sprinkle in the kosher salt and black pepper. Stir well to combine and let the mixture cook for another minute. Give it a taste—this is your chance to adjust the seasoning to your liking! -
Incorporate the Greek Yogurt
Reduce the heat to low and stir in the Greek yogurt, mixing everything until it’s well combined. This is where the magic happens—the creamy yogurt turns the whole dish into a luscious delight. If you want it extra creamy, don’t be shy to add a bit more yogurt! -
Cook the Eggs
Crack the eggs directly over the spinach mixture, spacing them evenly apart. Cover the skillet with a lid and let the eggs cook for around 3-5 minutes or until the whites are set but the yolks are still runny. Here’s a little tip: if you prefer your eggs more cooked, just keep them covered a bit longer, but be careful not to overcook! -
Serve It Up
Once the eggs are cooked to your liking, remove the skillet from heat. You can either serve the eggs directly from the skillet or gently slide them onto plates. I like to spoon some of that creamy spinach underneath the eggs for a beautiful presentation.
Serving Suggestions
Serve your Creamy Spinach and Eggs with a side of crusty bread—trust me, you’ll want to mop up every bit of goodness on your plate! For an extra touch, sprinkle some additional black pepper or a few chilies on top to kick things up a notch. Enjoy with a side of fresh fruit or a simple salad for a well-rounded meal!
Recipe Variations
Now, let’s get creative! Here are some fun twists you can try with this recipe:
-
Cheesy Spinach and Eggs
Add shredded cheese (like feta or cheddar) to the creamy mixture for a rich, cheesy flavor that’ll have you dreaming about breakfast all day. -
Mediterranean Flair
Toss in some diced sun-dried tomatoes and black olives for a Mediterranean twist that’s bursting with flavor. -
Herbed Up
Incorporate fresh herbs like dill, parsley, or basil to elevate the dish. Herbs bring freshness that pairs beautifully with the creamy spinach. -
Spicy Kick
Add a dash of sriracha or hot sauce on top before serving for a delightful heat that wakes up your palate. -
Vegan Version
Replace the eggs with scrambled tofu and use a non-dairy yogurt for a completely plant-based version that doesn’t skimp on flavor.
Chef’s Notes
This recipe has a special place in my heart because it reminds me of lazy Sunday mornings spent in my mom’s kitchen. Over the years, I’ve fiddled with the ratios and ingredients to create a dish that fits my personal taste. The combination of creamy yogurt, bright greens, and rich eggs is the perfect morning pick-me-up! And as always, don’t hesitate to get creative—cooking should be a fun adventure, so put your unique spin on it!
FAQs and Troubleshooting
1. My eggs turned out rubbery. What went wrong?
This can happen if the eggs are overcooked or if the heat is too high. For perfect eggs, keep the heat low and remove them from the heat while they’re still slightly runny!
2. Can I make this recipe in advance?
While this dish is best enjoyed fresh, you can prep the spinach and yogurt mixture a day in advance. Simply reheat in a skillet and add fresh eggs when ready to serve.
3. How can I make this dish more filling?
Add some cooked quinoa or roasted sweet potatoes on the side for extra heartiness!
4. What’s a good substitute for Greek yogurt if I don’t have any?
You can use sour cream or a thick plant-based yogurt as an alternative, or simply skip it if preferred!
Nutritional Info
While I typically don’t focus on specific statistics, it’s worth noting this dish is rich in protein and packed with vitamins from the spinach. Plus, it’s low in carbs, if that’s something you’re mindful of in your meals.
There you have it! A warm, nutritious, and absolutely delicious Creamy Spinach and Eggs that’s sure to brighten up your mornings. I hope you enjoyed cooking along with me today—let’s keep these kitchen stories going. Share your creations with me, and let’s inspire each other to make every meal a celebration of vibrant, fresh flavors! Happy cooking!
PrintCreamy Spinach and Eggs

A colorful, nutritious dish perfect for breakfast, brunch, or a light dinner, featuring creamy eggs nestled in sautéed spinach and Greek yogurt.
- Prep Time: 10 minutes
- Cook Time: 15 minutes
- Total Time: 25 minutes
- Yield: 2 servings 1x
- Category: Breakfast
- Method: Sautéing
- Cuisine: American
- Diet: Vegetarian
Ingredients
- 1 tablespoon extra-virgin olive oil
- 3–4 green onions (thinly sliced, both white and green parts)
- 5 oz. baby spinach (about 4 cups)
- ½ teaspoon kosher salt (plus more if needed)
- ¼ teaspoon black pepper (plus more if needed)
- ½ cup Greek yogurt
- 4 eggs
- Crusty bread (for serving, optional)
Instructions
- Heat the oil in a large skillet over medium heat.
- Add the green onions and sauté for about 2-3 minutes.
- Include the baby spinach and stir gently for about 2 minutes until wilted.
- Season the greens with kosher salt and black pepper, mixing well.
- Incorporate the Greek yogurt, stirring until well combined.
- Crack the eggs over the spinach mixture, cover the skillet, and let cook for 3-5 minutes.
- Serve directly from the skillet or slide onto plates, spooning the creamy spinach underneath.
Notes
This dish is versatile—try adding cheese, sun-dried tomatoes, or fresh herbs for variations.
Nutrition
- Serving Size: 1 serving
- Calories: 300
- Sugar: 5g
- Sodium: 350mg
- Fat: 20g
- Saturated Fat: 5g
- Unsaturated Fat: 10g
- Trans Fat: 0g
- Carbohydrates: 15g
- Fiber: 3g
- Protein: 14g
- Cholesterol: 200mg
Keywords: spinach, eggs, breakfast, creamy, healthy, quick recipe