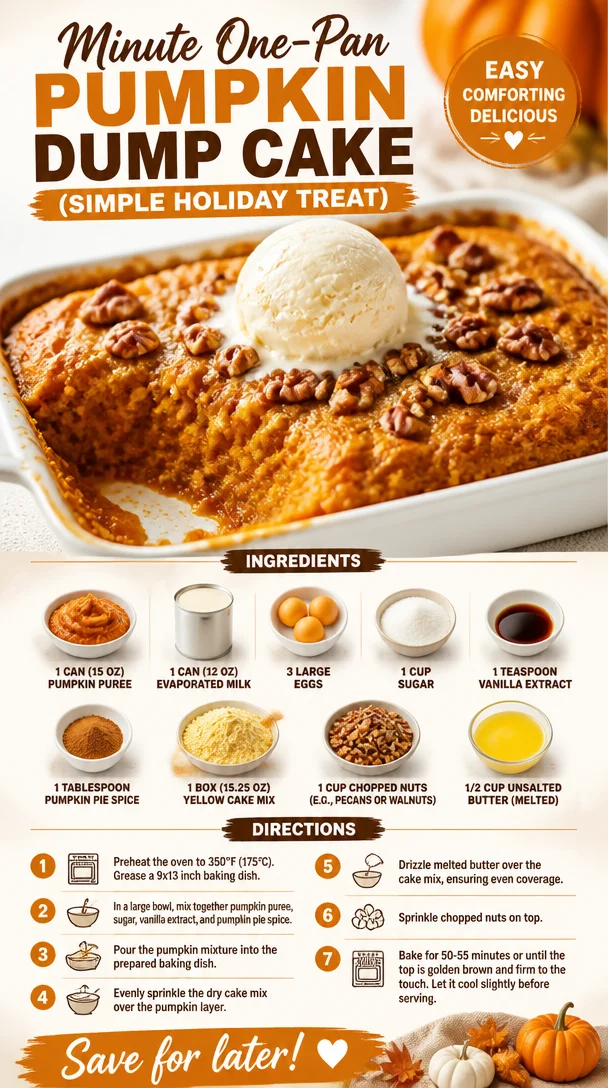
Minute One-Pan Pumpkin Dump Cake (Simple Holiday Treat)
The Joy of Baking: Pumpkin Dump Cake
Welcome to the cozy embrace of autumn, where leaves crunch underfoot, pumpkin spice reigns supreme, and our kitchens emanate warmth and sweetness. Today, I’m excited to share a recipe that’s not only easy to whip up but also a beloved classic that will have your family flocking to the table every time you make it. Enter the glorious Pumpkin Dump Cake, a dessert that captures the very essence of fall with its rich, spiced flavor and delightful texture.
Now, if you are wondering what exactly a "dump cake" is, let me tell you: it’s a glorious baking hack that involves “dumping” your ingredients into a pan without the fuss of layers or the worry of precision. This effortless method means you can spend more time savoring the season and less time sweating in the kitchen.
But pumpkin dump cake isn’t just any dessert; it holds a special place in my heart. As those cool breezes turn our thoughts to holiday gatherings and warm family moments, I can’t help but dive into the fond memories tied to this sweet treat.
A Slice of Nostalgia
I’ll never forget the first time I made pumpkin dump cake; it was a night that felt oddly magical. My best friend Sarah and I, fresh out of college and eager to impress our families, decided to hold a cozy fall dinner before heading off to our respective jobs. Armed with a few trusty recipes, pumpkin dump cake was our secret weapon.
We whipped it up in Sarah’s tiny apartment kitchen, laughter mingling with the scent of cinnamon and nutmeg wafting through the air. As we gently mixed the pumpkin puree with evaporated milk, sugar, and spice, we reminisced about our childhood—Halloween costumes, visits to pumpkin patches, and those endless nights of baking in her mom’s kitchen.
When our families came over, an enchanting aroma guided them straight to our dessert table. With every rich, creamy bite, we heard sighs of happiness and a chorus of “what is this deliciousness?”. They devoured every crumb, and Sarah and I shared knowing smiles. That night, we solidified our bond not just as friends, but as fellow food lovers. It was a slice of nostalgia I’ll carry with me forever, reminding me how food has the power to bring people together.
Ingredients
Let’s gather our ingredients for this delightful creation:
-
1 can (15 oz) pumpkin puree: The star of the show! Rich in flavor and nutrients, pumpkin puree provides that comforting taste we crave in autumn. For a twist, you could use butternut squash puree, which brings a slightly different sweetness.
-
1 can (12 oz) evaporated milk: This creamy ingredient adds richness to the cake. If you’re looking for a lighter option, feel free to swap in coconut milk or any non-dairy alternative.
-
3 large eggs: Eggs bind everything together and add a lovely fluffiness. If you’re doing a vegan version, substitute with flax eggs (1 tablespoon ground flaxseed mixed with 2.5 tablespoons water = 1 egg).
-
1 cup sugar: Sweetness is essential, but if you’re trying to reduce sugar, feel free to use coconut sugar or a sugar substitute that’s suitable for baking.
-
1 teaspoon vanilla extract: A dash of vanilla elevates the flavor. Consider using pure vanilla extract for more depth, or try almond extract for a unique twist!
-
1 tablespoon pumpkin pie spice: This fantastic mix should scream "fall." If you don’t have it on hand, mix your own with cinnamon, nutmeg, ginger, and cloves in equal parts.
-
1 box (15.25 oz) yellow cake mix: The foundation for our dump cake. You can swap this for a gluten-free cake mix or a spice cake mix for an extra flavor kick.
-
1 cup chopped nuts (e.g., pecans or walnuts): These add texture and nuttiness. This is optional; if you are nut-free, feel free to leave them out!
-
1/2 cup unsalted butter (melted): This step is key, as it creates a crispy, golden topping. For a vegan alternative, opt for melted coconut oil or dairy-free butter.
Step-by-Step Instructions
Let’s get down to the fun part! Here’s how to create your pumpkin dump cake:
-
Preheat Your Oven: Preheat your oven to 350°F (175°C). This allows for even baking from the get-go, ensuring your cake is moist and delicious.
-
Prepare the Baking Dish: Grab a 9×13 inch baking dish and lightly grease it with cooking spray or butter. This will make it easy to serve and clean up later.
-
Mix the Pumpkin Filling: In a large mixing bowl, combine the pumpkin puree, evaporated milk, sugar, eggs, vanilla extract, and pumpkin pie spice. Using a whisk, blend everything until smooth and homogenous. You want the mixture to be creamy and lovely.
-
Pour the Mixture: Pour this creamy pumpkin filling into the prepared baking dish and spread it evenly with a spatula.
-
Sprinkle the Cake Mix: Now for the “dump” part! Sprinkle the entire box of yellow cake mix over the pumpkin mixture. Don’t mix it! Just let the powder sit on top; this is what helps create that amazing crumbly topping.
-
Add the Nuts: If you’re using nuts, sprinkle them generously over the top. This adds a wonderful crunch that contrasts beautifully with the creamy pumpkin.
-
Drizzle with Butter: Melt your unsalted butter and drizzle it evenly over the cake mix and nuts. This is what makes it golden and delicious without needing to mix in!
-
Bake: Place the dish in the preheated oven and bake for about 50–60 minutes, or until the top is golden brown and a toothpick inserted comes out clean. The smell will fill your home, and you’ll be counting down the minutes!
-
Cool: Once baked, allow the cake to cool slightly in the dish. This makes it easier to slice and also helps the flavors meld.
Serving Suggestions
Slice into squares and serve warm, perhaps with a dollop of freshly whipped cream or a scoop of vanilla ice cream on top. For a more festive presentation, sprinkle some extra pumpkin spice or crushed nuts on top for that finishing touch. Trust me, your guests will be asking for seconds!
Recipe Variations
Feeling adventurous? Here are some creative twists to make this dish your own:
-
Add Chocolate: Sprinkle in some chocolate chips before baking for a delightful chocolate-pumpkin combo!
-
Coconut Flavor: Mix in shredded coconut for extra texture and a tropical hint.
-
Maple Glaze: Drizzle a warm maple syrup glaze over the top before serving for a rich finish.
-
Fruit Layer: Add a layer of fresh cranberries or sliced apples on top of the pumpkin filling for a pop of tartness.
-
Nut-Free Version: Swap in quick oats on the top layer rather than nuts for a hearty texture.
Chef’s Notes
Every time I bake this pumpkin dump cake, I’m reminded of all the simple joys of cooking—how it invites laughter and memories into the kitchen. Over the years, I’ve played around with flavors, tried various toppings, and even made it vegan on a few occasions. Each version has its own charm, but the classic remains close to my heart.
The best part? With virtually no cleanup, this recipe is ideal for a last-minute gathering or Thanksgiving dinner when time is of the essence!
FAQs and Troubleshooting
1. Why is my pumpkin dump cake too runny?
This might happen if the pumpkin puree is too watery. Always opt for high-quality pumpkin puree and drain any excess liquid if necessary before mixing.
2. Can I make this in advance?
Absolutely! You can prepare it the night before and bake it just before serving. Letting it sit overnight in the fridge allows those lovely flavors to meld together.
3. How do I store leftovers?
Cover the pan tightly with plastic wrap or transfer leftovers to an airtight container. It’ll last in the fridge for up to 5 days—but trust me, it’s unlikely to last that long!
4. Can I freeze the pumpkin dump cake?
Sure! Once cooled, you can freeze it for up to 3 months. Thaw in the refrigerator overnight before serving.
Nutritional Info
(If applicable; adjust based on actual ingredients used.)
Per serving: Approximately 250 calories, 10g fat, 35g carbohydrates, 3g protein. Keep in mind that this can vary based on ingredients and portion size!
So, whether you’re baking for a gathering, a cozy night in, or just because it’s a Tuesday, this pumpkin dump cake is sure to bring joy, comfort, and a heck of a lot of flavor to your table. Enjoy the process, share it with loved ones, and always keep it fresh, simple, and seriously delicious! Happy baking!
PrintPumpkin Dump Cake
An easy and delicious pumpkin dump cake that captures the essence of fall with its rich, spiced flavor and delightful texture.
- Prep Time: 15 minutes
- Cook Time: 60 minutes
- Total Time: 75 minutes
- Yield: 12 servings 1x
- Category: Dessert
- Method: Baking
- Cuisine: American
- Diet: Vegetarian
Ingredients
- 1 can (15 oz) pumpkin puree
- 1 can (12 oz) evaporated milk
- 3 large eggs
- 1 cup sugar
- 1 teaspoon vanilla extract
- 1 tablespoon pumpkin pie spice
- 1 box (15.25 oz) yellow cake mix
- 1 cup chopped nuts (e.g., pecans or walnuts)
- 1/2 cup unsalted butter (melted)
Instructions
- Preheat your oven to 350°F (175°C).
- Prepare a 9×13 inch baking dish by lightly greasing it with cooking spray or butter.
- Mix the pumpkin puree, evaporated milk, sugar, eggs, vanilla extract, and pumpkin pie spice in a large mixing bowl until smooth.
- Pour the pumpkin filling into the prepared baking dish and spread it evenly.
- Sprinkle the yellow cake mix over the pumpkin mixture without mixing.
- Add the chopped nuts on top, if using.
- Drizzle the melted butter evenly over the cake mix and nuts.
- Bake for 50–60 minutes or until golden brown and a toothpick inserted comes out clean.
- Cool slightly in the dish before slicing.
Notes
Serve warm with whipped cream or vanilla ice cream. Can be made in advance and frozen for up to 3 months.
Nutrition
- Serving Size: 1 serving
- Calories: 250
- Sugar: 10g
- Sodium: 300mg
- Fat: 10g
- Saturated Fat: 5g
- Unsaturated Fat: 3g
- Trans Fat: 0g
- Carbohydrates: 35g
- Fiber: 2g
- Protein: 3g
- Cholesterol: 50mg
Keywords: pumpkin cake, fall dessert, easy baking, Thanksgiving dessert, pumpkin recipes
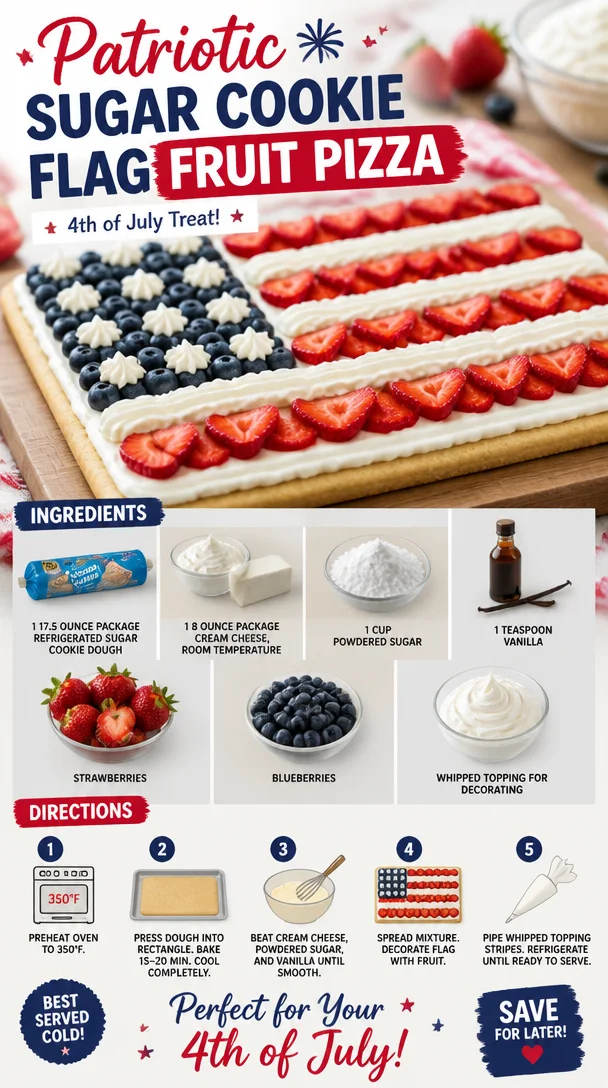
Patriotic Sugar Cookie Flag Fruit Pizza (4th of July Treat)
A Slice of Summer: Sugar Cookie Flag Fruit Pizza
As the sun begins to shine brighter and the days grow longer, we know one thing for sure: it’s time to celebrate! And what better way to celebrate summer gatherings, barbecues, and festive holidays than with a delicious, eye-catching dessert? Enter the Sugar Cookie Flag Fruit Pizza—a delightful twist on traditional fruit pizza that will have everyone raving about your kitchen prowess.
This dessert is not just about taste; it’s a vibrant centerpiece that captures the very essence of summer. It’s wonderfully easy to make, which makes it perfect for novice bakers and seasoned pros alike. Picture a buttery, sweet cookie crust topped with creamy frosting and finished off with a vibrant medley of fresh fruits arranged to create an American flag. The flavor is casual yet festive, and every bite feels like summer on your tongue.
Let’s face it: life can be hectic. But that doesn’t mean we can’t indulge in a delicious, homemade dessert! This recipe keeps things simple with minimal ingredients and maximum flavor. No fuss, no frills—just pure joy. Gather your friends and family around, because once you start making this colorful fruit pizza, you’ll want to whip it up again and again.
A Sweet Memory from My Childhood
Growing up, my summer weekends were filled with laughter, backyard barbecues, and of course, Grandma’s famous desserts. One summer, she decided to mix things up and introduced the family to a vibrant fruit pizza for an Independence Day celebration. I can still picture the stars and stripes of strawberries and blueberries, shining brightly on that creamy white canvas.
Grandma, with her infectious laughter and heartwarming stories, would proudly present her creation on a picnic table draped with a red, white, and blue tablecloth. As we dug in, my cousins and I debated who got to be the “flag builder” this year. Those sweet moments of joy and friendly competition are etched in my memory forever.
Seeing how a simple dish could bring family together made cooking more than just a chore—it became a cherished ritual. Now, as I put my own spin on that delightful recipe, I can’t help but pass along the same joy to you. Grab your favorite people, and let’s dive into this fun, colorful, and simple creation!
Ingredients to Create Kitchen Magic
Let’s break down the ingredients you’ll need for this scrumptious Sugar Cookie Flag Fruit Pizza:
-
1 17.5-ounce package refrigerated sugar cookie dough: This is your base—a soft, buttery cookie that will serve as the perfect canvas. If you’re feeling adventurous, you can make your own sugar cookie dough, but the refrigerated version saves time and keeps things easy!
-
1 8-ounce package cream cheese, room temperature: This will give your pizza a luscious, creamy layer. If you’re looking for a lighter option, feel free to use Neufchâtel cream cheese, which has less fat but still packs a delicious punch!
-
1 cup powdered sugar: This adds sweetness and helps achieve that creamy frosting texture. If you’re avoiding refined sugar, try using a powdered sugar substitute available in most health food stores.
-
1 teaspoon vanilla extract: A dash of vanilla adds a warm, sweet flavor that enhances all the other ingredients! If you’re out of vanilla, almond extract can work as an interesting and slightly nutty substitute.
-
Strawberries: The star of your flag! Fresh strawberries add sweetness, tartness, and a beautiful red hue. If strawberries aren’t in season, raspberries can also add a nice burst.
-
Blueberries: These little gems bring a refreshing note and add to the flag theme beautifully. They’re also super nutritious! If you want to mix things up, try using blackberries for a deeper flavor.
-
Whipped topping: Use this as an optional finishing touch for added lightness and creaminess. You can use homemade whipped cream or store-bought for convenience.
Step-by-Step Instructions: Baking Up a Storm!
Now that we’ve got our ingredients ready, let’s get those creative juices flowing! Follow these simple steps to create a fantastic fruit pizza that will have everyone clamoring for seconds.
-
Preheat your oven: Set your oven to 350°F (175°C). This ensures your sugar cookies bake to golden perfection.
-
Prepare the cookie crust: Open your package of refrigerated sugar cookie dough and slice it into rounds. Place those rounds on a lightly greased baking sheet, spacing them about 2 inches apart. Now, here’s a chef hack: use the bottom of a glass to gently press each round into a larger disk. This way, you’ll create a seamless crust!
-
Bake to golden goodness: Pop the baking sheet into the preheated oven and bake for about 10-12 minutes, or until the edges are lightly golden. Keep an eye on them—no one wants over-baked cookies! They will continue to firm up as they cool.
-
Make the frosting: While the cookies cool, grab a large mixing bowl. Combine your cream cheese, powdered sugar, and vanilla extract. Mix until the mixture is smooth and creamy—this is your luscious frosting! You can do this with an electric mixer, but a whisk works just fine if you’re feeling a bit like a strong chef today.
-
Spread the frosting: Once your cookies have cooled completely, carefully spread a generous layer of that creamy frosting across the cookie crust. You want to cover it fully for a beautiful surface for your toppings.
-
Create your flag: Now comes the fun part! Arrange the blueberries in the top left corner, creating a "star" field. Then, make rows of strawberries to form the stripes of the flag. This is where you can get creative—make each row perfectly straight or allow for some organic flair—it’s all about having fun!
-
Chill and Serve: Pop your beautiful fruit pizza into the fridge for about 30 minutes to allow the frosting to firm up slightly. Once you’re ready to serve, slice it into wedges just like pizza. Trust me, it’s way easier than cutting into squares!
Serving Suggestions: Presentation Matters
When it comes to serving this beauty, presentation is key! Slice the fruit pizza into triangles that resemble pizza slices, and place them on colorful dessert plates. You can even garnish the plate with a couple of extra berries or a sprig of mint for that pop of freshness. For a more festive touch, consider adding some star-shaped sprinkles or edible glitter for a special occasion.
Recipe Variations to Spice Things Up
Feeling a little adventurous with your fruit pizza? Here are a few creative variations to switch things up:
-
Chocolate Drizzle: Melt some dark or white chocolate and swirl it on top of your frosting for a decadent touch.
-
Seasonal Variations: Change the fruits depending on the season! Use peaches, kiwi, or raspberries for a summer vibe, or apples and pears in the fall.
-
Nutty Crunch: Sprinkle some chopped nuts, like pecans or walnuts, over the top for added crunch and flavor.
-
Herbal Infusion: Add a hint of freshness by layering on some finely chopped mint or basil between the fruit for an unexpected twist.
-
Gluten-Free Alternative: Swap the sugar cookie dough for a gluten-free version, and you can easily enjoy this treat while accommodating dietary needs.
Chef’s Notes: A Recipe that Dances Through Time
This recipe is a love letter to the sweetness of summer, but it’s also a reminder of how recipes can evolve over time. From my childhood memories with Grandma to my own family traditions, each version of the fruit pizza reflects the people, flavors, and moments that shape us.
I once tried to make a tropical version with mangoes and coconut cream, and while it never made it to the official recipe, it was a sweet mess that sparked laughter and creativity in the kitchen. Cooking should always be about discovery, so don’t be afraid to put your own spin on it!
FAQs and Troubleshooting
1. Can I make the cookie crust ahead of time?
Absolutely! You can prepare the sugar cookie crust in advance. Just store it in an airtight container for a couple of days, then frost and top it right before serving.
2. How can I prevent my fruit from getting soggy?
To keep things fresh, wait until serving time to slice your fruit and add it to the pizza. You can even toss the fruit in a little lemon juice to prevent browning.
3. My frosting is too runny; what can I do?
If your frosting is too runny, just add a bit more powdered sugar, a tablespoon at a time, until it reaches your desired consistency.
4. What if I don’t like cream cheese?
No problem! You can swap the cream cheese for Greek yogurt or a whipped mascarpone for a different flavor. You’ll still get that creamy base without the tanginess of cream cheese.
Nutritional Info (if applicable)
While indulging in sweet treats is all about balance, it’s worthwhile to know that each slice of this Sugar Cookie Flag Fruit Pizza is packed with vitamins from the fruit, and the recipe can easily be tailored to fit various dietary preferences. Adjust the sugar content and toppings as needed!
So there you have it—a delightful, festive Sugar Cookie Flag Fruit Pizza that is sure to become a summer staple in your kitchen. Embrace the sweetness of life, share this treat with loved ones, and, most importantly, keep those good memories rolling in the kitchen. After all, it’s not just about the food; it’s about the love and stories we create along the way. Let’s keep it fresh, simple, and seriously delicious!
PrintSugar Cookie Flag Fruit Pizza

A vibrant and delicious dessert featuring a buttery sugar cookie crust topped with creamy frosting and fresh fruits arranged to create an American flag.
- Prep Time: 15 minutes
- Cook Time: 12 minutes
- Total Time: 45 minutes
- Yield: 8 servings 1x
- Category: Dessert
- Method: Baking
- Cuisine: American
- Diet: Vegetarian
Ingredients
- 1 17.5-ounce package refrigerated sugar cookie dough
- 1 8-ounce package cream cheese, room temperature
- 1 cup powdered sugar
- 1 teaspoon vanilla extract
- 2 cups fresh strawberries
- 1 cup blueberries
- Whipped topping (optional)
Instructions
- Preheat your oven to 350°F (175°C).
- Prepare the cookie crust by slicing the refrigerated dough into rounds and placing them on a greased baking sheet.
- Bake for about 10-12 minutes, until the edges are lightly golden.
- Make the frosting by mixing cream cheese, powdered sugar, and vanilla until smooth.
- Spread the frosting over the cooled cookie crust.
- Arrange the blueberries in the top left corner to create a star field, and make rows of strawberries for the flag stripes.
- Chill in the fridge for about 30 minutes before slicing and serving.
Notes
For a creative twist, consider adding chocolate drizzle, seasonal fruits, or a sprinkle of nuts on top.
Nutrition
- Serving Size: 1 slice
- Calories: 250
- Sugar: 15g
- Sodium: 200mg
- Fat: 10g
- Saturated Fat: 5g
- Unsaturated Fat: 4g
- Trans Fat: 0g
- Carbohydrates: 35g
- Fiber: 2g
- Protein: 3g
- Cholesterol: 25mg
Keywords: fruit pizza, sugar cookies, summer dessert, festive dessert, patriotic dessert