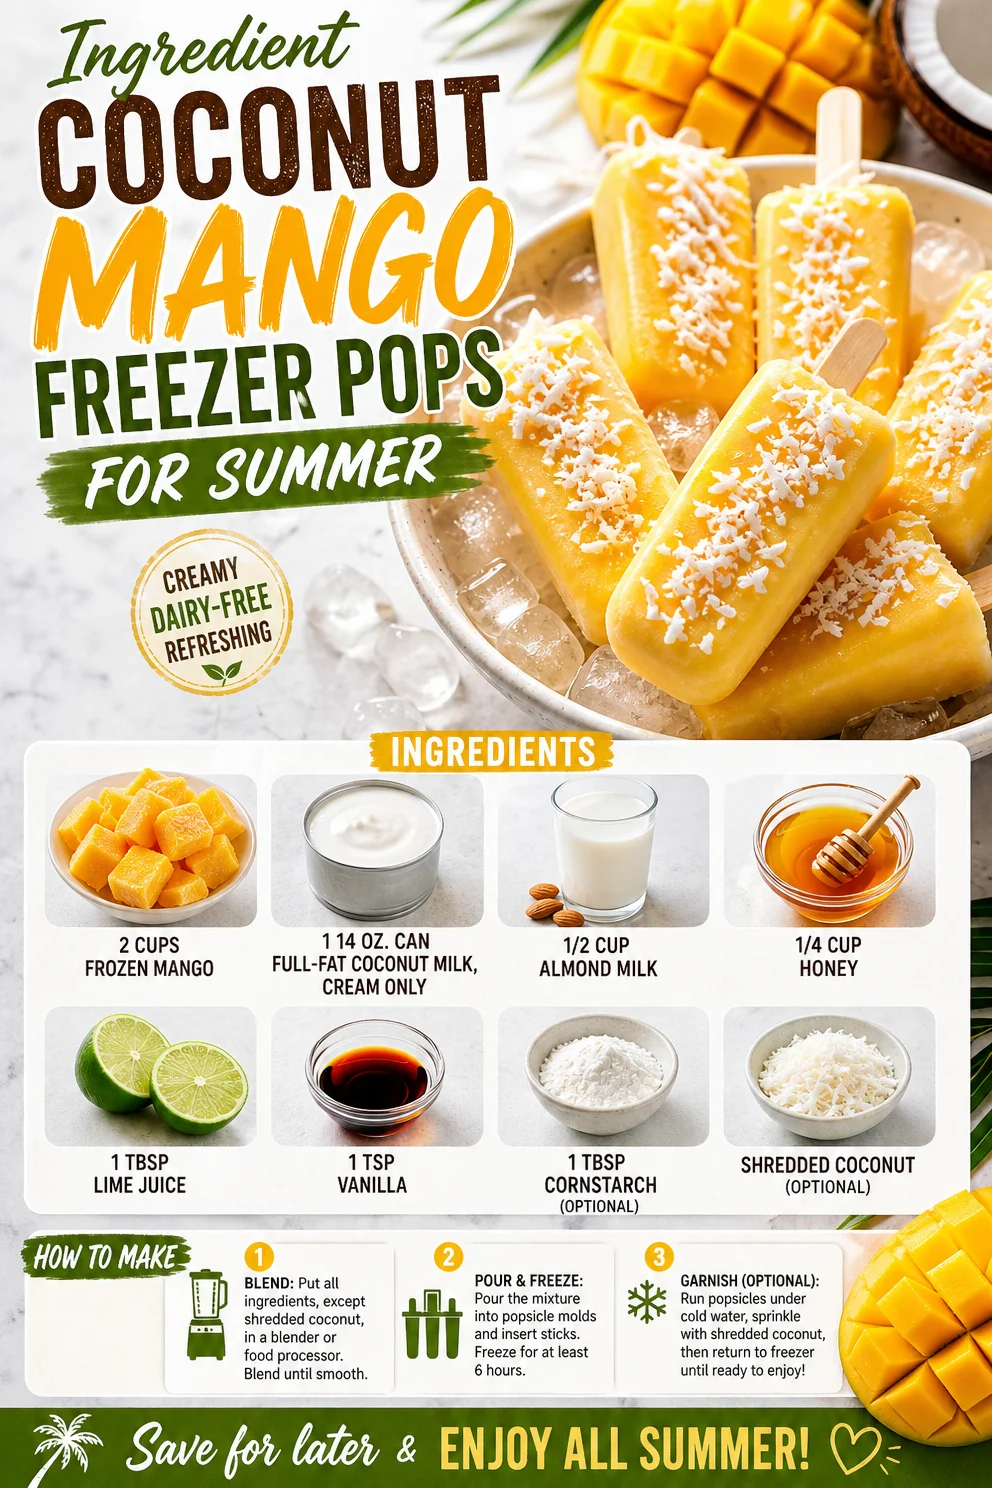
Ingredient Coconut Mango Freezer Pops for Summer
Cool Down with Tropical Bliss: Coconut Mango Popsicles
Welcome to the sweet escape of summer! If you’re anything like me, there’s nothing quite as refreshing as a delicious homemade popsicle on a hot day. As the sun blazes down and the days stretch long, it’s time to embrace the magic of fruity treats that are both satisfying and healthy. Today, I’m excited to share my beloved Coconut Mango Popsicles—a recipe that’s more than just a dessert; it’s a little piece of sunshine!
Picture this: You’re lounging in a hammock, the gentle breeze tousling your hair, and you reach into your cooler to pull out a blissful popsicle. You take your first bite, and suddenly, you’re whisked away to a tropical paradise, the flavors of sweet mango and creamy coconut dancing on your taste buds. Trust me, these popsicles are like a mini-vacation on a stick!
One of the reasons I adore this recipe is its simplicity and vibrant flavor. We’re not talking complicated techniques or obscure ingredients here—just real, wholesome goodness! This is all about enjoying feel-good ingredients that make you smile. Plus, they’re perfect for a family-friendly treat or a healthy snack when those sweet cravings hit.
So, grab your blender, some popsicle molds, and let’s dive into the world of coconut and mango bliss!
A Taste of Home: My Popsicle Memory
Let me take you back to a balmy summer evening from my childhood. I was visiting my grandparents in Florida, where the air was thick with warmth and the laughter of my cousins filled the backyard. Those lazy afternoons were always spent chasing each other around the pool, splashing and squealing like kids do.
My grandma, the magical kitchen sorceress, would come out every once in a while with a tray of colorful popsicles, each bright hue sparking joy more than the last. Every bite was a joyous explosion of fruitiness, but the ones laced with coconut were my absolute favorite. They were like the summer sun made edible.
I came to realize my love for those nostalgic popsicles wasn’t just about the flavors—they were a symbol of summer, of family togetherness, and of all things delightful. Decades later, I can still see my grandma’s smile as we raced for the final popsicle, and I can feel the sunshine on my skin.
Now, every time I whip up these Coconut Mango Popsicles, I picture those carefree summer days and all the love that went into each fruity bite. And best of all, I get to share this wholesome, feel-good treat with you!
Ingredients You’ll Need
Let’s gather our ingredients! Here’s what you’ll need to bring the tropical vibes into your kitchen:
- 2 cups frozen mango: Frozen mango is not only convenient, but it also offers that sweet, tangy flavor year-round. If you can’t find frozen mango, feel free to use fresh mango—just peel, chop, and freeze until firm.
- 1 (14 oz) can full-fat coconut milk, cream only: The creamy richness of this milk will give us that dreamy texture. Always shake the can before opening, and if you prefer a lighter version, try using light coconut milk for fewer calories!
- 1/2 cup almond milk: This helps to balance out the consistency and gives a nutty undertone. Unsweetened almond milk is best, or you can swap it for any nut or dairy milk you prefer.
- 1/4 cup honey: For sweetness! Honey pairs beautifully with mango and coconut. If you want a vegan option, agave syrup or maple syrup works wonderfully as substitutes.
- 1 Tbsp lime juice: A splash of acid enhances the flavors and provides a refreshing zing. You can also use lemon juice if you prefer.
- 1 tsp vanilla: Adds a depth of flavor—I always recommend using pure vanilla extract for the best taste.
- 1 Tbsp cornstarch (optional): If you desire a popsicle that’s extra creamy and less icy, whisk a bit of cornstarch into your mixture (mixed with almond milk) before blending.
- Shredded coconut (optional): For garnishing, this adds a slight crunch and an extra coconut flavor. Go for unsweetened shredded coconut if you’d like it less sugary!
Step-by-Step Instructions
Ready to get your popsicle game on? Let’s blend this tropical delight step-by-step!
-
Prep Your Ingredients: Start by gathering all your ingredients on your kitchen counter. This helps the cooking process flow smoothly (and it keeps your stress levels down!). I like to have everything pre-measured in little bowls, so it’s just a matter of blending, pouring, and freezing.
-
Blend the Base: In a blender, combine the frozen mango, coconut milk (just the creamy part!), almond milk, honey, lime juice, and vanilla extract. If you decided to use cornstarch for that creamy texture, whisk it with the almond milk first before adding it to the blender. Blend on high until everything is smooth and silky—about 30 seconds should do it. If the mixture is too thick, you can add a bit more almond milk, a tablespoon at a time.
-
Taste the Mix: Here’s my favorite step! Give your mixture a taste. This is where you can customize it a bit more—want it sweeter? Add a tad more honey. Looking for more zing? Throw in a bit more lime juice.
-
Pour into Molds: Carefully pour your blended mixture into popsicle molds, filling each mold about 3/4 full to leave room for expansion as they freeze. If you want to add that shredded coconut, sprinkle a layer into each mold before pouring in the mixture. Just a little, so you don’t overwhelm the flavor!
-
Insert Sticks: If your popsicle molds come with sticks, insert them now. If not, don’t worry! Just cover the molds with aluminum foil and poke wooden sticks through the foil in the center of each mold.
-
Freeze: Place your molds in the freezer for at least 4-6 hours, or until completely frozen. If you’re like me and can’t handle the wait, try to resist peeking too often!
-
Unmolding Time: Once frozen, to enjoy, run warm water over the outside of the mold for a few seconds to help loosen the popsicles. Gently pull on the sticks to release them, and voilà! You have a stunning tropical treat ready to be devoured!
Serving Suggestions
Serving these Coconut Mango Popsicles is as easy as 1-2-3! Present them on a colorful platter, perhaps with a few sprigs of fresh mint for a pop of color. You can even drizzle a bit of honey over the top for added sweetness and a touch of elegance. Kids will love these as playful snacks, and so will the adults! Pair them with a fresh fruit salad or a tropical smoothie for a full-on fruity feast.
Recipe Variations
Feeling adventurous? Here are a few fun ways to shake things up:
- Berry Bliss: Add in a cup of frozen strawberries or blueberries for a swirled effect and a lovely color contrast.
- Spicy Twist: Add a pinch of cayenne pepper or some finely chopped jalapeño to the mixture to give your popsicles a fun kick!
- Creamy Delight: Mix in some Greek yogurt before blending for a protein boost and creamier texture.
- Tropical Sensation: Substitute the lime with fresh orange juice and add a few chopped pineapple pieces for a more tropical punch.
- Nutty Fun: Incorporate a tablespoon of almond butter into the mixture for an extra nutty flavor that pairs beautifully with coconut.
Chef’s Notes
Every recipe I create has its own little story, and these popsicles are no exception! I remember whipping these up for my friend’s summer BBQ, and I found myself standing by the freezer, pulling them out with each guest’s arrival. I felt like a mixologist, only instead of cocktails, I was serving sweet, frozen magic! The joy on everyone’s faces was priceless as they devoured them, nostalgic and happy.
Over the years, I’ve adjusted and adapted this recipe based on feedback, but my favorite part is always the first taste. The fresh mango flavor is simply unparalleled. It’s like a crunchy, fruity party in your mouth!
FAQs and Troubleshooting
Q: Why are my popsicles icy instead of creamy?
A: If your popsicles are icy, it’s likely due to not enough fat! Make sure to use full-fat coconut milk, and consider adding a bit of Greek yogurt or using cornstarch to enhance creaminess.
Q: How do I store leftovers?
A: If you have extra popsicles, wrap them in parchment paper and store them in a zip-top bag in the freezer. This prevents freezer burn and keeps them fresh!
Q: Can I use other fruits instead of mango?
A: Absolutely! This recipe is versatile. You can use ripe peaches, pineapple, or even mixed berries—just blend until smooth.
Q: How long do they take to freeze completely?
A: Popsicles typically need at least 4-6 hours to freeze. If you can, leave them overnight to ensure they’re solid!
Nutritional Info
While I encourage enjoying treats in moderation, here’s a quick rundown of what you’ll be sipping on in each popsicle (the values may vary based on ingredient choices):
- Calories: Approximately 120 calories per popsicle
- Fat: 8g (mostly from coconut milk)
- Carbohydrates: 16g
- Sugar: 9g (natural sugars from mango and honey)
- Protein: 1.5g
And there you have it, my friends! Coconut Mango Popsicles are waiting for you to enjoy. This recipe is not just a way to cool down; it’s a way to bring sunny smiles to your kitchen! So, go ahead and join me in this tropical adventure. Happy blending!
PrintCoconut Mango Popsicles

Delicious homemade popsicles made with creamy coconut milk and sweet mango, perfect for cooling down on a hot day.
- Prep Time: 10 minutes
- Cook Time: 0 minutes
- Total Time: 360 minutes
- Yield: 6 servings 1x
- Category: Dessert
- Method: Freezing
- Cuisine: Tropical
- Diet: Vegan
Ingredients
- 2 cups frozen mango
- 1 (14 oz) can full-fat coconut milk, cream only
- 1/2 cup almond milk
- 1/4 cup honey
- 1 Tbsp lime juice
- 1 tsp vanilla
- 1 Tbsp cornstarch (optional)
- Shredded coconut (optional)
Instructions
- Prep Your Ingredients: Gather all your ingredients on your kitchen counter.
- Blend the Base: Combine the frozen mango, coconut milk, almond milk, honey, lime juice, and vanilla extract in a blender. Blend until smooth.
- Taste the Mix: Taste your mixture and adjust sweetness or acidity if desired.
- Pour into Molds: Pour the mixture into popsicle molds, filling them about 3/4 full.
- Insert Sticks: Insert sticks into the molds or cover with foil and poke sticks through the foil.
- Freeze: Freeze for at least 4-6 hours until solid.
- Unmolding Time: Run warm water over the outside of the mold to loosen the popsicles, then gently pull on the sticks.
Notes
Add optional garnishes like shredded coconut for extra flavor and texture.
Nutrition
- Serving Size: 1 popsicle
- Calories: 120
- Sugar: 9g
- Sodium: 5mg
- Fat: 8g
- Saturated Fat: 7g
- Unsaturated Fat: 1g
- Trans Fat: 0g
- Carbohydrates: 16g
- Fiber: 1g
- Protein: 1.5g
- Cholesterol: 0mg
Keywords: popsicles, coconut, mango, summer, dessert
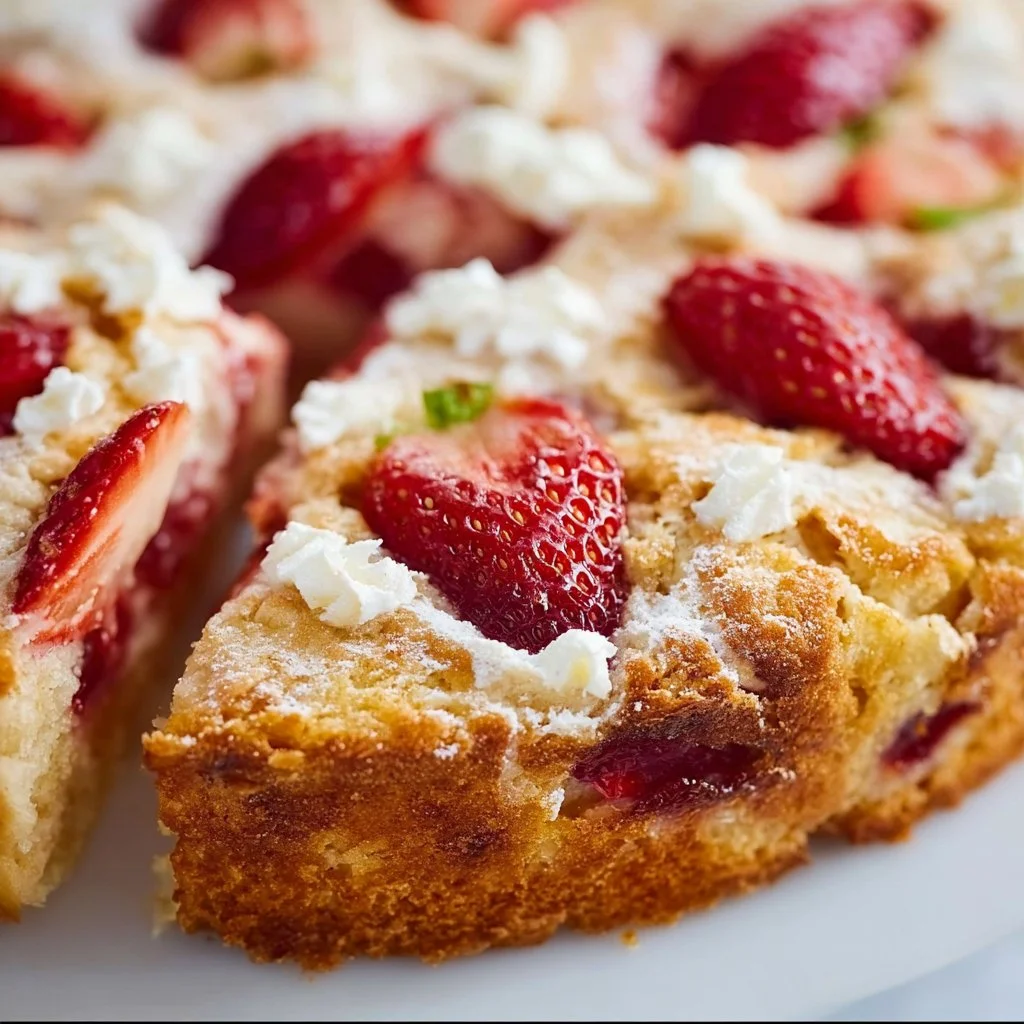
French Strawberry Cake Recipe: Quick, Elegant Summer Treat
The BEST French Strawberry Cake Recipe: A Slice of Nostalgia
Welcome to Clean Plate Cravings! I’m thrilled you’re here because today, I’m sharing a recipe that holds a special place in my heart: the BEST French Strawberry Cake. Imagine a soft, buttery cake, bursting with fresh strawberries and topped with a light, airy frosting that feels like summer on a plate. This recipe isn’t just about making dessert; it’s about the memories of baking with family, the aroma of strawberries filling the kitchen, and the smiles that come with every bite. So, let’s dive in!
When I was a kid, summer meant two things: long days spent outside and my grandmother’s annual strawberry picking trip. Those trips were magical! We would roam the fields, laughter intermingled with the sweet scent of ripe strawberries. Once we got home, my grandmother would whip up her famous strawberry cake, and I would be her little sous-chef, eagerly stirring batter while sprinkling in a little sugar and a lot of love. That cake—the one that could turn any ordinary day into a celebration—sparked my love for cooking and baking. Now, as an adult, I carry those memories with me every time I bake.
This French Strawberry Cake is my take on my grandmother’s classic recipe, modernized and made with a little flair while retaining that nostalgic charm. Trust me; you’ll want to keep this one in your repertoire!
Ingredients
Here’s what you’ll need for this delightful cake. Each ingredient plays a key role, so let’s break it down:
- 1 stick unsalted butter, softened (about 1/2 cup): Butter gives the cake its rich flavor and tender texture. If you need a dairy-free option, you can substitute with a plant-based butter.
- 1 cup granulated sugar: This sweetens the cake and helps create a lovely golden crust. You can use coconut sugar for a less refined option, but it may impart a caramel flavor.
- 2 large eggs: Eggs provide structure and moisture. If you’re vegan, you can substitute with 1/2 a mashed banana or a flaxseed egg (1 tablespoon ground flaxseed mixed with 2.5 tablespoons water, let sit until gel-like).
- 1 1/2 teaspoons vanilla extract: Vanilla brightens up the flavors in the cake. For a twist, use almond extract or a splash of citrus zest.
- 1 1/2 cups all-purpose flour: Essential for that fluffy cake texture. If you need a gluten-free version, swap in a gluten-free all-purpose flour blend.
- 1 1/4 teaspoon baking powder: This leavening agent helps the cake rise. Make sure it’s fresh for the best results!
- 1/4 teaspoon salt: Salt enhances flavors and balances sweetness. Don’t skip it!
- 1/2 cup sour cream: This adds moisture and tang, making the cake super soft. Greek yogurt can be a great substitute for that creamy texture.
- 16 ounces strawberries, sliced (about 2 cups): The star of the show! Fresh strawberries bring natural sweetness and flavor. You can use other berries if strawberries aren’t in season.
- 3 Tablespoons granulated sugar (for strawberries): This macerates the strawberries and brings out their juices, making them deliciously sweet.
- 2 Tablespoons powdered sugar (optional): For dusting on top, giving your cake that beautiful bakery finish.
Step-by-Step Instructions
Now let’s get to the fun part—baking this glorious cake!
- Preheat your oven to 350°F (175°C) and grease a 9-inch round cake pan. Nothing beats the smell of a warm oven, so let’s get that going!
- Cream together the butter and sugar in a large mixing bowl until light and fluffy—this should take about 3-4 minutes. This step is crucial as it helps to incorporate air, which gives your cake that fluffy texture. Don’t rush this step; it’s worth the extra time!
- Add in the eggs one at a time, mixing until fully combined before adding the next. Ensure each egg is fully incorporated, creating a smooth batter. This helps avoid any curdling, giving you a lovely consistent mixture.
- Stir in the vanilla, and then set the bowl aside. The aroma is already divine!
- In another bowl, whisk together the flour, baking powder, and salt. This step is often overlooked but mixing the dry ingredients separately ensures an even distribution of the leavening agent.
- Gradually add the dry ingredients to the butter mixture, alternating with the sour cream. Start and end with the flour mixture (dry-wet-dry). Use a spatula to gently fold it in until just combined. Be careful not to overmix; a few lumps are okay!
- Prepare the strawberries while the batter comes together: toss the sliced strawberries with 3 tablespoons of sugar in a bowl and let them sit for about 10 minutes. This will create a juicy syrup that’s pure magic.
- Gently fold the strawberries into the cake batter, taking care not to break them up too much. This adds a beautiful texture and flavor to every bite!
- Pour the batter into your prepared cake pan and smooth the top. Give it a little tap on the counter to settle it, and pop it in the oven.
- Bake for 30-35 minutes, or until a toothpick inserted in the center comes out clean. Watch your cake closely as oven times can vary. A golden top and a small bounce back should have you reaching for the toothpick!
- Once baked, let the cake cool in the pan for about 10 minutes, then carefully transfer it onto a wire rack to cool completely. I’ll let you in on a little secret: The smell of fresh cake can be hard to resist, so try not to sneak a bite yet!
Serving Suggestions
When it’s time to serve, I love to dust the top with powdered sugar for a pretty finish. Place the cake on a lovely cake stand or a platter and slice it into generous pieces—don’t forget to scoop out some of those delicious strawberries along with each slice! A dollop of whipped cream on the side wouldn’t hurt either.
Recipe Variations
Let’s get creative! Here are a few fun twists to switch things up:
- Berry Medley: Swap out the strawberries for raspberries or blueberries, or mix them for a berry bomb delight!
- Lemon Zest: Add the zest of one lemon to the batter for a fresh citrus flavor that complements the strawberries beautifully.
- Almond Joy: Sprinkle some sliced almonds on top before baking for a crunchy texture and nutty flavor.
- Minty Fresh: A few fresh mint leaves finely chopped into the batter or as a garnish can elevate the flavors to a whole new level.
Chef’s Notes
This recipe has evolved over the years from my early attempts in the kitchen. I remember my first French Strawberry Cake; I was so eager to get it right that I forgot to adjust the oven temperature, and it came out a bit dense. But even that cake was devoured, proving that even mishaps can lead to delicious results!
Going forward, I learned the importance of textures and flavors and how they work together. Today’s version is just the right balance of airy sweetness with a touch of nostalgia.
FAQs and Troubleshooting
- What if my cake sinks in the middle? This sometimes happens due to overmixing or using old leavening agents. Avoid overmixing when combining dry and wet ingredients, and always check the freshness of your baking powder.
- Can I make this cake ahead of time? Absolutely! The cake can be made a day in advance; just keep it covered at room temperature. You can even freeze it if you want to save it for later. Just make sure to wrap it tightly!
- Why are my strawberries not juicy? If your strawberries aren’t as sweet or juicy, it might be a sign that they’re out of season. Always try to use fresh, ripe strawberries for the best flavor.
- Can I use frozen strawberries? Yes, but make sure to thaw and drain them first to avoid extra moisture in your batter. I recommend fresh fruit for the best flavor and texture, though!
Nutritional Info
(For a standard slice assuming 12 slices in total)
- Calories: 250
- Protein: 4g
- Carbohydrates: 36g
- Fat: 10g
- Fiber: 1g
- Sugar: 15g
There you have it—the BEST French Strawberry Cake! The memories of baking this delight, the sweet fragrance filling your home, and sharing it with loved ones will be the icing on the cake. Happy baking, my fellow foodie friends!
PrintThe BEST French Strawberry Cake

A soft, buttery cake bursting with fresh strawberries and topped with a light, airy frosting, perfect for summer celebrations.
- Prep Time: 15 minutes
- Cook Time: 30 minutes
- Total Time: 45 minutes
- Yield: 12 servings 1x
- Category: Dessert
- Method: Baking
- Cuisine: French
- Diet: Vegetarian
Ingredients
- 1 stick unsalted butter, softened (about 1/2 cup)
- 1 cup granulated sugar
- 2 large eggs
- 1 1/2 teaspoons vanilla extract
- 1 1/2 cups all-purpose flour
- 1 1/4 teaspoon baking powder
- 1/4 teaspoon salt
- 1/2 cup sour cream
- 16 ounces strawberries, sliced (about 2 cups)
- 3 tablespoons granulated sugar (for strawberries)
- 2 tablespoons powdered sugar (optional)
Instructions
- Preheat your oven to 350°F (175°C) and grease a 9-inch round cake pan.
- Cream together the butter and sugar in a large mixing bowl until light and fluffy—this should take about 3-4 minutes.
- Add in the eggs one at a time, mixing until fully combined before adding the next.
- Stir in the vanilla, and then set the bowl aside.
- Whisk together the flour, baking powder, and salt in another bowl.
- Gradually add the dry ingredients to the butter mixture, alternating with the sour cream.
- Prepare the strawberries by tossing them with 3 tablespoons of sugar and letting them sit for about 10 minutes.
- Fold the strawberries gently into the cake batter.
- Pour the batter into your prepared cake pan and smooth the top.
- Bake for 30-35 minutes, or until a toothpick inserted in the center comes out clean.
- Let the cake cool in the pan for about 10 minutes before transferring it to a wire rack to cool completely.
Notes
Dust with powdered sugar before serving for a bakery finish. Pair with whipped cream for extra indulgence.
Nutrition
- Serving Size: 1 slice
- Calories: 250
- Sugar: 15g
- Sodium: 200mg
- Fat: 10g
- Saturated Fat: 6g
- Unsaturated Fat: 4g
- Trans Fat: 0g
- Carbohydrates: 36g
- Fiber: 1g
- Protein: 4g
- Cholesterol: 30mg
Keywords: French cake, strawberry dessert, summer cake, nostalgic recipe