Cleanplate Cravings

Cleanplate Cravings

June 25, 2026 |

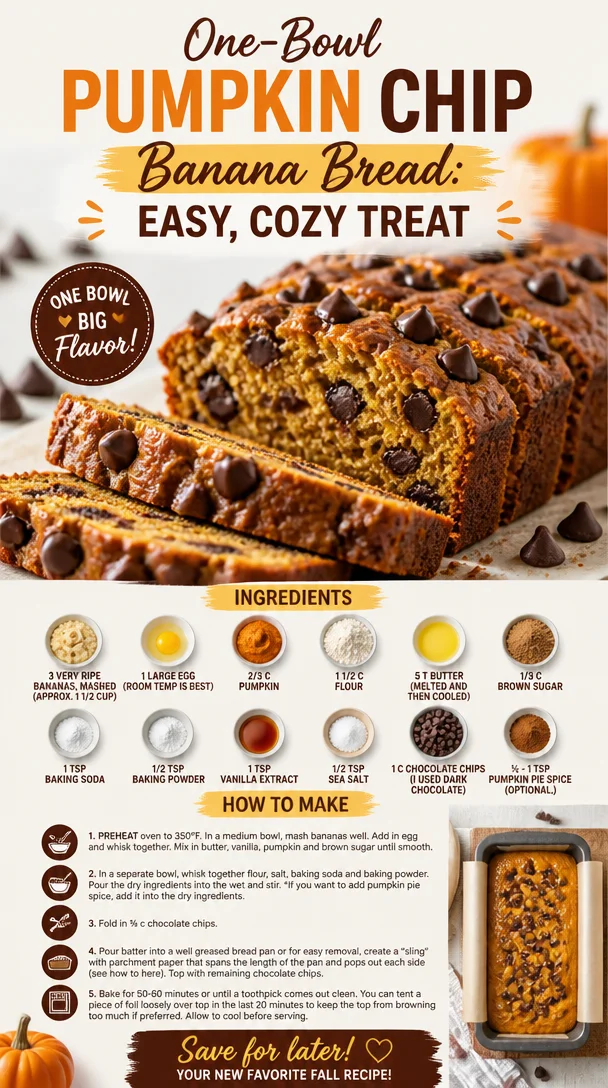
One-Bowl Pumpkin Chip Banana Bread: Easy, Cozy Treat

One-bowl pumpkin banana bread with chocolate chips freshly baked

The Ultimate Pumpkin Chip Banana Bread: A Cozy Delicacy

Ah, the sweet smell of freshly baked banana bread wafting through the kitchen! Nothing warms the heart quite like the aroma of sweet bananas mingling with cozy autumn spices and rich chocolate. Today, I am thrilled to share one of my most beloved recipes—Pumpkin Chip Banana Bread. Picture yourself snuggling up with a warm slice of this delightful bread, coffee in hand, as the crisp autumn leaves fall outside.

When I think about pumpkin chip banana bread, it takes me back to my childhood. Growing up, my family had a tradition of baking together on Sunday afternoons. We would gather in the kitchen, laughter filling the air as we mixed, measured, and created culinary masterpieces. One particular September, my grandma decided it was time to add a seasonal twist to our banana bread, incorporating pumpkin and chocolate chips for a treat that was beyond delicious! That first bite of her warm, soft creation left a lasting impression and soon became a family favorite.

So here we are, blending those sweet memories with simple ingredients to create an incredible treat that’s perfect for any gathering—or just your cozy afternoon snack. Let’s get started!

Ingredients

Here’s what you’ll need to whip up this scrumptious Pumpkin Chip Banana Bread:

  • 3 very ripe bananas, mashed (approx. 1 ½ cup): The riper, the better! Use overripe bananas to add natural sweetness and moisture. If you’re in a pinch, unsweetened applesauce can serve as a replacement—just note it may change the bread’s flavor slightly.

  • 1 large egg (room temp is best): Eggs bind our ingredients together. For a vegan twist, you could try flaxseed meal (1 tablespoon ground flax + 2.5 tablespoons water = 1 egg) or a store-bought egg replacer.

  • 2/3 cup pumpkin puree: Canned pumpkin works wonders here. And if you’re adventurous, use fresh pumpkin for a more authentic taste—just roast and puree it! Make sure not to confuse pumpkin puree with pumpkin pie filling, as the latter contains added spices and sugars.

  • 1 ½ cups all-purpose flour: This recipe is super forgiving! You can swap in whole wheat flour for a nuttier flavor, or even gluten-free flour if you need to—just check the conversion ratios.

  • 5 tablespoons butter (melted and then cooled): Butter brings richness to our loaf. If you prefer dairy-free, coconut oil works like a charm!

  • 1/3 cup brown sugar: This adds a lovely caramelized sweetness. Feel free to use coconut sugar or maple syrup in place of brown sugar for a different nuance.

  • 1 teaspoon baking soda: Our leavening agent that gives the bread a lovely rise!

  • 1/2 teaspoon baking powder: Adds some extra fluffiness—perfect for that tender crumb.

  • 1 teaspoon vanilla extract: A dash of vanilla elevates the flavors beautifully. Don’t skip it!

  • 1/2 teaspoon sea salt: Balances the sweetness. Always use fine sea salt for even distribution; it’s a kitchen must!

  • 1 cup chocolate chips (I used dark chocolate): Because who doesn’t love chocolate? You can use semi-sweet, milk chocolate, or even white chocolate for a fun twist.

  • 1/2-1 teaspoon pumpkin pie spice (optional): This adds warm, cozy flavors reminiscent of fall. If you don’t have it on hand, a combination of cinnamon and nutmeg will work just fine.

Now that we have our ingredients all lined up, let me take you through the fun part—the cooking process!

Step-by-Step Instructions

Step 1: Preheat Your Oven

Preheat your oven to 350°F (175°C). This is crucial! We want your oven nice and toasty for our banana bread to rise perfectly.

Step 2: Prepare Pan

Grab a loaf pan (9×5 inches is perfect), and grease it with butter or line it with parchment paper for easy removal. Nothing’s worse than your gorgeous loaf sticking to the pan!

Step 3: Mash The Bananas

In a large mixing bowl, mash those ripe bananas using a fork or a potato masher until smooth. Leave a few lumps for texture if you like it rustic. This is where the magic starts—smell that banana goodness?

Step 4: Mix The Wet Ingredients

Add the egg, pumpkin puree, lactose-free butter, brown sugar, and vanilla extract to the mashed bananas. Beat until well combined. The mixture should be creamy and inviting. A little secret: at this stage, you can sneak a taste—just a tiny one, promise!

Step 5: Combine Dry Ingredients

In another bowl, whisk together flour, baking soda, baking powder, pumpkin pie spice (if using), and sea salt. This ensures even distribution of those dry ingredients, avoiding any baking surprises.

Step 6: Merge Wet and Dry

Gently fold the dry ingredients into the wet mixture using a spatula or wooden spoon. Mix until just combined—it’s okay to have a few lumps in the batter. Overmixing can lead to dense bread, and we want it fluffy!

Step 7: Chocolate Chips

Now for the fun part: fold in your chocolate chips. Ensure they’re evenly distributed without overmixing. Remember, every bite should be a chocolatey dream!

Step 8: Pour and Bake

Transfer your batter to the prepared loaf pan. Smooth the top with a spatula and pop it in the oven on the middle rack. Bake for 55-65 minutes, or until a toothpick inserted into the center comes out clean or with just a few crumbs.

Step 9: Cool It Down

Once baked, remove your loaf from the oven and let it cool in the pan for about 10 minutes. Then, transfer it to a wire rack to cool completely. This is the hardest part—waiting for that first heavenly slice!

Serving Suggestions

Slice your Pumpkin Chip Banana Bread thick, and serve it warm with a pat of butter or a drizzle of maple syrup for added decadence. For a delightful brunch item, pair it with a side of fruit or a dollop of yogurt. Or, if you’re feeling adventurous, toast slices and top them with cream cheese for a luxurious twist!

Recipe Variations

  1. Nutty Surprise: Add 1/2 cup of chopped walnuts or pecans for an added crunch.

  2. Spiced Up: Blend in some chopped candied ginger or additional spices like nutmeg for a complex flavor profile.

  3. Fruit Fusion: Throw in some dried cranberries or raisins to give it a fruity finish.

  4. Coconut Twist: Replace 1/4 cup of flour with unsweetened shredded coconut for added richness.

  5. Frosted Delight: Once cooled, frost the top with vanilla or cream cheese icing for a sweet treat!

Chef’s Notes

I’ve been making this recipe for years now, and it’s evolved through my personal adventures in the kitchen. Each autumn, I play around with different spices and chocolate varieties, and you know what? Every loaf tells a different story. A family friend once asked me to add a pinch of chili flakes for a surprising kick; I was skeptical, but oh boy, was I amazed at the flavor explosion!

FAQs and Troubleshooting

Q: Why did my pumpkin banana bread sink in the middle?
A: A common culprit is underbaking. Make sure you test it with a toothpick before removing it from the oven. Also, avoid opening the oven door while it’s baking!

Q: Can I freeze this banana bread?
A: Absolutely! Wrap it tightly in plastic wrap then again in foil. It can last up to 3 months in the freezer—perfect for those future cravings.

Q: How do I know when my banana bread is done?
A: Look for a golden top and a toothpick test—insert it in the center, and if it comes out clean or with a few crumbs, you are all set!

Q: What should I do if my bread is too dense?
A: Overmixing the batter can lead to dense bread. Be gentle as you combine your wet and dry ingredients!

Nutritional Info

While every slice of this bread is a delightful indulgence, it has some wholesome elements. Each slice (roughly 1/10 of your loaf) comes in at around 180 calories, with healthy fats, fiber, and potassium from bananas. Adding nuts or using whole grain flour can increase the fiber content!


There you have it! Your journey to creating the perfect Pumpkin Chip Banana Bread is just a few steps away. Whether it’s sharing with loved ones, savoring a slice with coffee, or gifting someone a delicious treat, this recipe is sure to warm hearts and fill bellies. So grab your apron, gather those ingredients, and let’s create some kitchen magic together! Happy baking!

Print

Pumpkin Chip Banana Bread

A delightful blend of ripe bananas, pumpkin, and chocolate chips, baked into a cozy bread, perfect for autumn afternoons.

  • Prep Time: 15 minutes
  • Cook Time: 60 minutes
  • Total Time: 75 minutes
  • Yield: 10 servings 1x
  • Category: Dessert
  • Method: Baking
  • Cuisine: American
  • Diet: Vegetarian

Ingredients

Scale
  • 3 very ripe bananas, mashed (approx. 1 ½ cup)
  • 1 large egg
  • 2/3 cup pumpkin puree
  • 1 ½ cups all-purpose flour
  • 5 tablespoons butter, melted and cooled
  • 1/3 cup brown sugar
  • 1 teaspoon baking soda
  • 1/2 teaspoon baking powder
  • 1 teaspoon vanilla extract
  • 1/2 teaspoon sea salt
  • 1 cup chocolate chips
  • 1/21 teaspoon pumpkin pie spice (optional)

Instructions

  1. Preheat your oven to 350°F (175°C).
  2. Prepare a loaf pan (9×5 inches) by greasing it with butter or lining it with parchment paper.
  3. Mash the ripe bananas in a large mixing bowl until smooth.
  4. Add the egg, pumpkin puree, melted butter, brown sugar, and vanilla extract to the mashed bananas and mix until well combined.
  5. Whisk together the flour, baking soda, baking powder, pumpkin pie spice, and sea salt in another bowl.
  6. Fold the dry ingredients into the wet mixture until just combined.
  7. Gently fold in the chocolate chips.
  8. Transfer the batter to the prepared loaf pan and smooth the top.
  9. Bake for 55-65 minutes, or until a toothpick inserted comes out clean.
  10. Cool the bread in the pan for about 10 minutes, then transfer it to a wire rack to cool completely.

Notes

Serve warm with butter or maple syrup. Can be frozen for up to 3 months.

Nutrition

  • Serving Size: 1 slice
  • Calories: 180
  • Sugar: 10g
  • Sodium: 200mg
  • Fat: 8g
  • Saturated Fat: 4g
  • Unsaturated Fat: 4g
  • Trans Fat: 0g
  • Carbohydrates: 25g
  • Fiber: 2g
  • Protein: 3g
  • Cholesterol: 30mg

Keywords: pumpkin bread, banana bread, autumn baking, dessert, cozy treat

Did you make this recipe?

Share a photo and tag us — we can't wait to see what you've made!

June 25, 2026 |

One-Bowl Baked Pumpkin Donuts: Easy, Fluffy & Quick

Fluffy one-bowl baked pumpkin donuts garnished with spices

Delightfully Easy Baked Pumpkin Donuts: A Fall Favorite

Ah, fall! The season where the air turns crisp, leaves start to dance in shades of amber and gold, and pumpkin spice reigns supreme. If you’re like me, the aroma of freshly baked treats wafting through the kitchen is not just an indulgence; it’s a cherished ritual that brings cozy comfort to our busy lives. Today, I’m excited to share a recipe that will have your taste buds singing with joy—Baked Pumpkin Donuts!

These delightful donuts are not only easy to whip up but also a fun way to embrace the flavors of autumn. Forget about deep frying! I promise you, these baked beauties are moist, flavorful, and somehow manage to be both guilt-free and indulgent all at once. And the best part? They are made with wholesome ingredients that will leave you feeling satisfied without the sugar crash.

Whether you are hosting a brunch, looking for a delicious snack, or just want to treat yourself (because you deserve it!), this recipe is here to guide you toward bakery-style donuts right at home. Grab your apron, roll up your sleeves, and let’s make some magic in the kitchen with these deliciously easy baked pumpkin donuts!

A Slice of Nostalgia

I’ll never forget the first time I experienced the joy of pumpkin donuts. It was a crisp October morning, and my family decided to visit our local pumpkin patch. Between picking the perfect pumpkin and drinking apple cider, I found myself at a little stand that promised freshly made pumpkin donuts. One bite, and I was transported to “comfort food heaven.” The sweetness of the pumpkin, the hint of nutmeg, and the glaze that was almost too delicious to believe—it was pure joy wrapped in a donut!

From that day on, pumpkin donuts became a fall staple in my life. I went home determined to recreate that magical experience, and now, after countless experiments and joyful taste tests, I’ve settled upon a recipe that captures all that nostalgia—minus the frying and the guilt. Let me show you how to bring a piece of that pumpkin patch magic right to your own kitchen!

Ingredients

Here’s what you’ll need to whip up these scrumptious baked pumpkin donuts:

  • 1 cup all-purpose flour

    • The base of our donuts! If you’re looking for a gluten-free option, look for a 1:1 gluten-free flour blend that contains xanthan gum.
  • 1 cup pumpkin puree

    • Use canned for convenience, or roast fresh pumpkins for a richer flavor! Just make sure you use plain pumpkin puree, not pumpkin pie filling, for the best results.
  • ½ cup brown sugar

    • This will give our donuts a subtle depth of flavor. You can substitute with coconut sugar for a healthier alternative, though the flavor will differ slightly.
  • ¼ cup granulated sugar

    • A little extra sweetness never hurt anyone! You can reduce the amount for a less sweet donut if you prefer.
  • 1/4 cup vegetable oil or melted coconut oil

    • This helps keep the donuts moist. Feel free to use applesauce or unsweetened Greek yogurt as a light substitute.
  • 2 large eggs

    • They provide structure too! For an egg-free option, a flaxseed meal ‘egg’ works well—mix 1 tablespoon of flaxseed meal with 2.5 tablespoons of water and let it sit for a few minutes to thicken.
  • 1 tsp vanilla extract

    • This enhances the flavor beautifully. Always good to use pure vanilla extract for the best taste!
  • 1 tsp baking powder

    • This will help our donuts rise and become wonderfully fluffy.
  • 1/2 tsp baking soda

    • Together with the baking powder, this creates the perfect leavening. Do double-check their freshness before use!
  • 1 tsp ground cinnamon

    • The spice of fall! Feel free to use a homemade pumpkin spice blend for an extra warm flavor.
  • 1/2 tsp ground nutmeg

    • Adds a nice complexity; always fresher when you grate it yourself!
  • 1/4 tsp salt

    • It may seem small, but salt enhances all the flavors beautifully!
  • Optional: Glaze or cinnamon sugar for topping

    • Use a simple mixture of powdered sugar and a splash of milk for a quick glaze or toss your baked donuts in a mixture of cinnamon and sugar while they’re still warm for a cozy finish!

Step-by-Step Instructions

Creating your own Baked Pumpkin Donuts is easy and fun! Here’s how to bring it all together:

  1. Preheat Your Oven
    Preheat your oven to 350°F (175°C) and grease a donut pan (or use a silicone pan) to ensure those beauties pop right out later!

  2. Combine Dry Ingredients
    In a medium bowl, whisk together the flour, baking powder, baking soda, cinnamon, nutmeg, and salt. This will help distribute the leavening agents evenly through the batter, ensuring that each donut is perfectly risen.

  3. Mix Wet Ingredients
    In another large bowl, mix the brown sugar, granulated sugar, and oil until well combined, then add the pumpkin puree and mix until smooth. The sugars will help incorporate air into the mixture, so you’re looking for a creamy consistency.

  4. Add Eggs and Vanilla
    Crack in the eggs and pour in the vanilla extract, then whisk everything together until the mixture is wonderfully smooth and fluffy.

  5. Combine Dry and Wet Mixtures
    Gradually add the dry ingredients to the wet mixture. Stir gently until just combined! Overmixing can create donuts that are dense instead of fluffy, so be careful here!

  6. Spoon Batter into the Pan
    Using a piping bag or a zip-top bag with a corner cut off, fill the donut cavities about 2/3 full. This prevents overflow while still allowing enough room for rising.

  7. Bake to Perfection
    Pop your pan in the preheated oven and bake for 10-12 minutes or until a toothpick inserted into the center comes out clean. Keep an eye on them; every oven is a little different!

  8. Cool and Decorate
    Allow the donuts to cool in the pan for about 5 minutes, then transfer them to a wire rack to cool completely. Once cool, you can dip them in a delicious glaze or roll them in cinnamon sugar for that extra touch of magic.

Serving Suggestions

These baked pumpkin donuts are perfect for any occasion! Serve them warm with a piping hot cup of coffee or a spiced chai tea. For a festive brunch, stack them neatly on a cake stand, adding some additional decorative elements like autumn leaves or tiny pumpkins around the base. If you’re feeling fancy, drizzle some caramel sauce on top for an extra hit of sweetness!

Recipe Variations

Looking to switch things up? Here are some creative twists to consider:

  • Chocolate Chip Delight: Toss in some mini chocolate chips for a decadent, chocolaty surprise!
  • Nutty Crunch: Add chopped pecans or walnuts to the batter for a delightful crunch.
  • Glazed Maple Wonder: Swap the sugar glaze for a maple glaze by mixing powdered sugar with maple syrup for a rich flavor.
  • Spiced Apple Twist: Fold in finely chopped apples or apple sauce for a fruity take on the classic pumpkin flavor.

Chef’s Notes

Oh, the memories I have while perfecting this recipe! The kitchen is always a playground for experimentation, and I once accidentally mixed up baking soda and baking powder. Talk about a science experiment gone wrong! A mini explosion of failed donut density motivated me to keep testing until I got it right. Now, friends come knocking at my door the moment the leaves start falling, asking me to whip these up!

Remember, these donuts are more than just food; they are little nuggets of happiness that can brighten anyone’s day. Experiment, have fun, and make it your own!

FAQs and Troubleshooting

Q: Why are my donuts dense?
A: This usually happens from overmixing the batter or not using fresh leavening agents (baking powder and baking soda). Be sure to mix just until combined!

Q: Can I make these ahead of time?
A: Absolutely! You can store baked donuts in an airtight container for about 2-3 days. They also freeze well, so make extra batches to pull out on busy mornings!

Q: What can I do if I don’t have a donut pan?
A: No problem! You can use a muffin tin; just adjust the baking time and keep an eye out for doneness. They’ll be more like muffin tops but still delicious!

Q: How do I store leftover donuts?
A: Place your donuts in an airtight container at room temperature for a few days, or refrigerate for a longer shelf life. They can also be frozen for up to three months; just thaw before enjoying!

Nutritional Info

While I am not a nutritionist, I can tell you that these baked pumpkin donuts are made with wholesome ingredients that provide a satisfying treat without the guilt!

Conclusion

Baked pumpkin donuts are more than just a delicious treat—they are a celebration of flavors, memories, and the beauty of fall. So whether you’re treating yourself on a quiet morning or entertaining friends at brunch, this easy recipe is here to make your kitchen smell like the sweetest autumn dream.

Let’s keep that oven warm and those flavors fresh! Happy baking, my friends!

Print

Delightfully Easy Baked Pumpkin Donuts

These delightful baked pumpkin donuts capture the essence of fall with their moist, flavorful texture and guilt-free indulgence.

  • Prep Time: 15 minutes
  • Cook Time: 12 minutes
  • Total Time: 27 minutes
  • Yield: 12 servings 1x
  • Category: Dessert
  • Method: Baking
  • Cuisine: American
  • Diet: Vegetarian

Ingredients

Scale
  • 1 cup all-purpose flour
  • 1 cup pumpkin puree
  • ½ cup brown sugar
  • ¼ cup granulated sugar
  • ¼ cup vegetable oil or melted coconut oil
  • 2 large eggs
  • 1 tsp vanilla extract
  • 1 tsp baking powder
  • ½ tsp baking soda
  • 1 tsp ground cinnamon
  • ½ tsp ground nutmeg
  • ¼ tsp salt
  • Optional: Glaze or cinnamon sugar for topping

Instructions

  1. Preheat your oven to 350°F (175°C) and grease a donut pan.
  2. Combine dry ingredients in a bowl.
  3. Mix brown sugar, granulated sugar, and oil until well combined, then add pumpkin puree and mix until smooth.
  4. Add eggs and vanilla, whisking until smooth and fluffy.
  5. Combine dry and wet mixtures gently to avoid overmixing.
  6. Spoon batter into the donut pan about 2/3 full.
  7. Bake for 10-12 minutes until a toothpick comes out clean.
  8. Cool for 5 minutes in the pan, then transfer to a wire rack to cool completely.

Notes

Experiment with toppings like a maple glaze or cinnamon sugar for added flavor.

Nutrition

  • Serving Size: 1 donut
  • Calories: 200
  • Sugar: 10g
  • Sodium: 150mg
  • Fat: 8g
  • Saturated Fat: 2g
  • Unsaturated Fat: 6g
  • Trans Fat: 0g
  • Carbohydrates: 29g
  • Fiber: 1g
  • Protein: 2g
  • Cholesterol: 30mg

Keywords: pumpkin donuts, baked donuts, fall recipes

Did you make this recipe?

Share a photo and tag us — we can't wait to see what you've made!

June 25, 2026 |

Beginner-Friendly Apple Cobbler: Easy Homemade Comfort

Delicious homemade apple cobbler baking in a dish

Easy Homemade Apple Cobbler: A Cozy Kitchen Delight

Welcome, fellow food lovers! Today, we’re diving into the scrumptious world of apple cobbler—a delightful dessert that marries the sweetness of baked apples with a warm, buttery topping. If you’re anything like me, the aroma of cinnamon and sugar wafting from the oven brings back cherished memories of kitchen escapades. So grab your apron, let’s roll up our sleeves, and whip up a treat that feels like a hug on a plate!

Personal Story: A Trip Down Memory Lane

Growing up, autumn meant a burst of colorful leaves and, more importantly, endless apple picking adventures with my family. We’d head out to the glistening orchards on crisp Sunday mornings, eagerly selecting bags of the juiciest apples. Those days were magical—filled with laughter, sunshine, and the overwhelming sense of getting lost in nature.

Once we returned home with our load, the kitchen transformed into a buzzing hub of activity. My mom’s famous apple cobbler was on the menu, and I could hardly wait! As we sliced through those shiny apples, my little hands would dabble in flour, sugar, and spice—creating a concoction that was as fun to make as it was to eat. The cobbler emerged from the oven golden-brown, nestled under a sweet, crumbly topping that was just begging for a scoop of vanilla ice cream. That first spoonful of warm, gooey goodness made all the hard work worth it, and the smile on my mom’s face said it all: we had created something truly special together.

Ingredients

Now, let’s gather our ingredients for this mouthwatering homemade apple cobbler. Here’s what you’ll need:

  • 6 cups sliced apples
    Choose firm apples like Granny Smith or Honeycrisp for the best texture and flavor. If you’re feeling adventurous, mix a couple of varieties!

  • 1 cup granulated sugar
    Sweetness is key! You can adjust the amount up or down based on your taste preference (and the tartness of your apples).

  • 1 teaspoon cinnamon
    A warm, cozy spice that pairs perfectly with apples. Don’t shy away—this is what gives the cobbler its signature flavor!

  • 1/4 teaspoon nutmeg
    A pinch of nutmeg elevates the flavor. If you don’t have it on hand, you can omit it or use a bit more cinnamon.

  • 1 tablespoon lemon juice
    This helps to balance the sweetness and enhance the apple flavor. Fresh-squeezed is best, but bottled juice works too.

  • 1 1/2 cups all-purpose flour
    The foundation of our topping! For a gluten-free alternative, use a 1:1 gluten-free flour blend.

  • 1/2 cup buttermilk
    This adds moisture and a lovely tang. If you don’t have buttermilk, mix regular milk with a tablespoon of vinegar and let it sit for five minutes.

  • 1/2 cup unsalted butter, melted
    Adds richness. If you’re watching your fat intake, consider using coconut oil or a mild flavored vegetable oil.

  • 1 cup brown sugar
    For that delightful caramel flavor! Light or dark brown sugar will work, but dark gives a deeper taste.

  • 1/2 teaspoon baking powder
    This helps our topping rise and become fluffy.

  • 1/2 teaspoon baking soda
    Combined with buttermilk, it creates a light and airy texture.

  • 1/4 teaspoon salt
    A small but essential ingredient that complements the sweetness!

Step-by-Step Instructions

Now that we have everything we need, let’s jump into the cooking process. Trust me, this is going to fill your kitchen with the most enchanting aroma!

  1. Preheat Your Oven
    Preheat your oven to 350°F (175°C). Get your kitchen ready for some sizzling magic!

  2. Prepare the Apples
    In a large mixing bowl, toss your sliced apples with the granulated sugar, cinnamon, nutmeg, and lemon juice. Let it sit for about 10-15 minutes. This helps the apples release their juices and become extra flavorful.

    Chef’s tip: If you’re using particularly tart apples, try adding a touch more sugar to balance out the flavors.

  3. Make the Topping
    In another bowl, combine the flour, brown sugar, baking powder, baking soda, and salt. Whisk it together to ensure the baking powder is well-distributed.

    Tip: Sifting the dry ingredients together can help prevent clumps, but it’s not essential if you mix well!

  4. Add the Wet Ingredients
    Pour in the melted butter and buttermilk. Stir gently until just combined; it’s okay if it’s a little lumpy—remember, we want it light and fluffy.

    Quick hack: If you whisk the buttermilk before mixing it in, it helps to prevent lumps in your batter.

  5. Combine
    In a greased baking dish (a 9×13 inch or something similar works great), layer the apple mixture evenly first. Then, dollop spoonfuls of the batter over the apples. Don’t worry about covering every inch—some gaps allow the steam to escape and make the edges crispy.

  6. Bake
    Place the baking dish in your preheated oven and bake for about 40-45 minutes, or until the topping is golden brown and the apples are bubbly.

    Chef tip: If you notice the top browning too quickly, cover it loosely with aluminum foil for the last 10 minutes of baking.

  7. Cool and Serve
    Once baked, let your cobbler cool for about 10-15 minutes. This gives it a chance to set up a little and makes serving easier.

Serving Suggestions

To serve, scoop out a generous portion of apple cobbler into a bowl or on a plate. A dollop of whipped cream or a scoop of vanilla ice cream on top just takes things to the next level! If you’re feeling indulgent, a sprinkle of crushed pecans or walnuts adds a lovely crunch and extra flavor.

Recipe Variations

Let’s get creative! Here are some fun twists you can try with this basic apple cobbler recipe:

  1. Berry Blast: Add a cup of fresh or frozen blueberries or raspberries to the apples for a delightful twist.

  2. Spiced Pear Cobbler: Swap out half the apples for pears to give a unique flavor combination.

  3. Maple Twist: Replace half of the granulated sugar with pure maple syrup for a distinctive, rich taste.

  4. Oat Topping: For a heartier version, stir in half a cup of rolled oats to the topping mixture for added texture.

  5. Nutty Addition: Sprinkle some finely chopped nuts like almonds or pecans into the apple mixture for an extra crunch.

Chef’s Notes

Oh, how this recipe has evolved over the years! What started as my mom’s simple concoction has transformed—I’ve added my personal touch through these variations, ever honing in on the perfect balance of flavors. While we can all appreciate the nostalgia that comes with making a classic recipe, I love how every iteration tells a story of its own!

And let me tell you, I can’t count how many times I’ve had to swap out ingredients last minute. Lurking in the back of the pantry? That half-empty jar of honey? You bet your apple cobbler it can get a little creative sometimes!

FAQs and Troubleshooting

Q: Can I make this cobbler ahead of time?
A: Absolutely! You can prep it the day before and store it in the fridge. Just bake it right before serving. It’ll be just as delicious!

Q: Why is my cobbler gooey in the middle?
A: If it’s too gooey, it might need a little more baking time. Ensure you bake until the topping is golden brown, and the fruit is bubbling.

Q: Can I freeze leftover apple cobbler?
A: Definitely! Allow it to cool completely, then wrap it tightly in aluminum foil or plastic wrap and place it in the freezer. When you’re ready to enjoy it again, thaw and reheat gently in the oven.

Q: What’s the best way to store leftovers?
A: Store the cobbler in an airtight container in the fridge for up to five days. Just reheat in the oven to bring back the melty goodness!

Nutritional Info

If you’re keeping track, a standard serving of apple cobbler has approximately:

  • Calories: 310
  • Total Fat: 15g
  • Carbohydrates: 45g
  • Fiber: 3g
  • Sugar: 25g
  • Protein: 3g

Remember, these values can vary based on your specific ingredients, portions, and any tweaks you might make!

So there you have it! An easy homemade apple cobbler that’s sure to delight your taste buds and warm your heart. I can’t wait for you to try this recipe and create your own delicious memories in the kitchen. Happy baking! 🥧✨

Print

Easy Homemade Apple Cobbler

A delightful dessert that marries sweet baked apples with a warm, buttery topping, perfect for cozy gatherings.

  • Prep Time: 15 minutes
  • Cook Time: 45 minutes
  • Total Time: 60 minutes
  • Yield: 8 servings 1x
  • Category: Dessert
  • Method: Baking
  • Cuisine: American
  • Diet: Vegetarian

Ingredients

Scale
  • 6 cups sliced apples (Granny Smith or Honeycrisp)
  • 1 cup granulated sugar
  • 1 teaspoon cinnamon
  • 1/4 teaspoon nutmeg
  • 1 tablespoon lemon juice
  • 1 1/2 cups all-purpose flour
  • 1/2 cup buttermilk
  • 1/2 cup unsalted butter, melted
  • 1 cup brown sugar
  • 1/2 teaspoon baking powder
  • 1/2 teaspoon baking soda
  • 1/4 teaspoon salt

Instructions

  1. Preheat your oven to 350°F (175°C).
  2. In a large mixing bowl, toss your sliced apples with the granulated sugar, cinnamon, nutmeg, and lemon juice. Let it sit for about 10-15 minutes.
  3. In another bowl, combine the flour, brown sugar, baking powder, baking soda, and salt. Whisk it together.
  4. Pour in the melted butter and buttermilk. Stir gently until just combined.
  5. In a greased baking dish, layer the apple mixture evenly first. Then, dollop spoonfuls of the batter over the apples.
  6. Place the baking dish in your preheated oven and bake for about 40-45 minutes, or until the topping is golden brown and the apples are bubbly.
  7. Once baked, let your cobbler cool for about 10-15 minutes.

Notes

Serve with whipped cream or a scoop of vanilla ice cream for a delightful addition.

Nutrition

  • Serving Size: 1 serving
  • Calories: 310
  • Sugar: 25g
  • Sodium: 200mg
  • Fat: 15g
  • Saturated Fat: 9g
  • Unsaturated Fat: 6g
  • Trans Fat: 0g
  • Carbohydrates: 45g
  • Fiber: 3g
  • Protein: 3g
  • Cholesterol: 30mg

Keywords: apple cobbler, dessert, baking, homemade, fall recipes

Did you make this recipe?

Share a photo and tag us — we can't wait to see what you've made!

June 25, 2026 |

Caramel Apple Cheesecake Bars

Delicious caramel apple cheesecake bars topped with caramel drizzle and apple slices

Caramel Apple Cheesecake Bars: A Slice of Nostalgia and Flavor

Welcome to the cozy corner of my kitchen, where we’re about to whip up something truly delicious: Caramel Apple Cheesecake Bars! Imagine a dessert that combines the creamy richness of cheesecake with the nostalgic flavors of apple pie and the sweet, gooey goodness of caramel. Sounds heavenly, right? Well, trust me when I say these bars are not just delicious—they’re a warm hug for your taste buds!

Every bite of these cheesecake bars brings me back to crisp autumn days spent at the local apple orchard with my family. I can still smell the air thick with fresh apples and cinnamon as we picked out our favorites for pies, sauces, and, of course, a little baking project to do together at home. My mom had this way of making everything feel special, whether it was her obvious love for cooking or the way she turned the ordinary into something magical.

Back then, it was all about the iconic apple pie, but as I grew older—and a bit bolder in the kitchen—I found myself wanting to blend traditions and create something that brought all those flavors together in a new way. Enter these Caramel Apple Cheesecake Bars, a dessert that perfectly encapsulates the essence of autumn but is truly loved year-round. They’re super easy to make and guaranteed to impress!

So grab your apron, and let’s dive into this delightful recipe that’s sure to become a cherished favorite in your home!

A Sweet Memory

I still remember my first time making cheesecake from scratch. It was a rainy Saturday afternoon, and I felt a sense of adventure bubbling inside me. I had a hunch that combining my love for apples with this dreamy cheesecake would yield something incredible. I decided to give it a whirl. With the help of my trusty vintage mixer and a few snack breaks (I mean, who can resist a slice of apple while baking?), I mixed, blended, and baked my way through the recipe.

Once it was ready, I pulled that golden-brown cheesecake out of the oven, drizzled caramel all over it, and let it cool. My family gathered around the dining table, and the moment I served those first slices, everyone’s eyes lit up. It was an instant hit! That day struck a chord within me, igniting a passion for baking that continues to this day. There’s something special about sharing food with loved ones—these Caramel Apple Cheesecake Bars are a throwback to that beautiful memory, and I’m thrilled to share it with you!

Ingredients

Here’s what you’ll need to create these luscious Caramel Apple Cheesecake Bars:

  • 1 1/2 cups graham cracker crumbs: The perfect base for our crust. If you’re in a pinch, you can swap these for digestive biscuits or even gluten-free graham crackers for a gluten-free variation.

  • 1/2 cup unsalted butter, melted: This adds richness and binds the crumbs together. You can substitute coconut oil for a dairy-free option if needed.

  • 1 cup sugar, divided: Half will sweeten the filling and half for the caramel drizzle (more on that later). If you prefer it less sweet, use less or try coconut sugar for a deeper flavor.

  • 2 (8-ounce) packages cream cheese, softened: Cream cheese brings that delightful creaminess. Neufchâtel cheese can work in its place if you’re looking for a lighter option.

  • 2 large eggs: These are crucial for setting the cheesecake. Flax eggs or applesauce can be used as a vegan alternative if you want to avoid eggs.

  • 1 teaspoon vanilla extract: Because every delicious dessert needs this heavenly flavor. Pure vanilla extract is best, but you can use vanilla bean paste in a pinch.

  • 3 cups diced apples (such as Granny Smith): Tart apples add a nice tangy flavor and a lovely texture. Feel free to mix in some sweeter varieties like Gala or Honeycrisp if you like!

  • 1 cup caramel sauce: Ready-made caramel sauce makes it easy to whip this up, but you can also make your own if you’re feeling adventurous!

  • 1 teaspoon cinnamon: This is the spice that amplifies those warm autumn flavors. You can use apple pie spice for a more complex flavor if you have it on hand.

  • 1/4 teaspoon nutmeg: A pinch of nutmeg adds depth. If you’re not a fan, feel free to skip it, or replace it with a hint of allspice for a different floral note.

Let’s gather our ingredients, roll up our sleeves, and get started on these irresistible bars!

Step-by-Step Instructions

Here’s how to create these Caramel Apple Cheesecake Bars step by step—let’s get cooking!

  1. Preheat the Oven: Preheat your oven to 325°F (160°C). This step is essential for ensuring that our cheesecake bakes evenly.

  2. Prepare the Crust: In a mixing bowl, combine the graham cracker crumbs and melted butter. Here’s where the magic begins! Mix until the crumbs resemble wet sand. If it’s too dry, add a bit more melted butter.

  3. Press the Mixture into the Pan: Line a 9×9-inch baking pan with parchment paper for easy removal. Pour the crust mixture into the pan and press it firmly into an even layer using your hands or the bottom of a glass. Make sure it’s packed tightly!

  4. Bake the Crust: Pop it in the oven for about 10 minutes, until it’s golden and fragrant. Keep an eye on it—the aroma will be hard to resist!

  5. Make the Cheesecake Filling: While the crust is cooling, mix softened cream cheese and 1/2 cup of sugar in a clean mixing bowl. Beat until smooth. The trick here is to make sure there are no lumps, so aim for a creamy, luscious texture.

  6. Add Eggs and Vanilla: Crack in the eggs one at a time, mixing thoroughly after each addition. Then add the vanilla extract. This is where the filling starts to get that beautiful richness!

  7. Mix in Diced Apples: Gently fold in the diced apples, cinnamon, and nutmeg. The apples will soften and release juices while baking, making each bite of cheesecake delightfully fruity.

  8. Pour the Filling over the Crust: Carefully pour the apple cheesecake mixture onto the crust, spreading it evenly with a spatula.

  9. Bake the Bars: Bake for about 40-45 minutes or until the center is just set (it might have a slight jiggle). If you see cracks, don’t worry—those will be disguised by our caramel topping!

  10. Cool Down: Remove from the oven and let the bars cool at room temperature for about an hour, then transfer them to the fridge for at least 2 hours. Trust me; they’re worth the wait!

  11. Drizzle with Caramel: Once chilled, it’s time for the star of the show! Drizzle the cooled cheesecake with caramel sauce—generous amounts, of course.

  12. Slice and Serve: Carefully lift the bars out of the pan using the parchment paper edges. Slice into squares, serve, and watch everyone fall in love.

Serving Suggestions

These Caramel Apple Cheesecake Bars are perfect for sharing! Serve them at gatherings, potlucks, or just for a cozy night in. To elevate the serving, garnish with a sprinkle of cinnamon or a dollop of freshly whipped cream. And don’t forget a little extra caramel drizzle on top for that wow factor!

Recipe Variations

Want to switch things up? Here are a few fun variations to try:

  1. Nutty Crunch: Add 1/2 cup of chopped pecans or walnuts to the crust for added crunch and nutty flavor.

  2. S’mores Twist: Replace some of the graham cracker crumbs with mini marshmallows, chocolate chips, and a bit of cocoa powder for a delicious s’mores-inspired treat.

  3. Pumpkin Spice: Substitute some of the apples with pumpkin puree and add a tablespoon of pumpkin spice for a seasonal delight.

  4. Chocolate Drizzle: Feeling extra indulgent? Drizzle melted dark chocolate over the caramel drizzle for a rich flavor combination.

  5. Swap the Apples: Try pears or even berries instead of apples for a delightful twist on flavor!

Chef’s Notes

Making these Caramel Apple Cheesecake Bars brings back so many memories of laughter and family bonding in the kitchen. Each time I make them, I find myself tweaking the recipe just a touch—maybe a different blend of spices or a sprinkle of sea salt on top for an added flavor kick.

There was a time when my friends and I attempted to make these cheesecake bars for the first time at a small get-together. A tiny misunderstanding led to an over-the-top amount of caramel sauce, but instead of worrying, we embraced the gooey goodness! We laughed our way through the chaos, and those bars turned out delicious anyway. That’s what cooking is all about, after all—embracing imperfections and having fun!

FAQs and Troubleshooting

1. Why did my cheesecake crack?
Cracks can happen for a few reasons: overmixing the batter, baking at too high a temperature, or cooling too quickly. If you see cracks, don’t fret! They’ll be covered by caramel, and the flavor remains fantastic.

2. Can I freeze these bars?
Absolutely! You can freeze these bars for up to 3 months. Just make sure to wrap them tightly in plastic wrap and place them in an airtight container. Thaw in the fridge before serving.

3. Can I use other types of apples?
Definitely! Granny Smith apples add tartness, but feel free to mix and match with your favorite varieties. Sweeter apples like Fuji or Honeycrisp will create a different but delightful flavor.

4. How do I tell if my cheesecake is done?
The edges should be set, while the center will still have a slight jiggle. Avoid overbaking as this could lead to a dry texture.

Nutritional Info

While this delightful treat is a bit indulgent, it’s meant for sharing and enjoyment, so enjoy it in moderation! These Caramel Apple Cheesecake Bars are packed with good vibes and nostalgia, making every bite feel worth it.


And there you have it—a delicious journey to make Caramel Apple Cheesecake Bars from scratch, weaving together flavors, memories, and a touch of creativity. Bonus points for sharing them with loved ones—these bars are sure to spread joy! Happy baking!

Print

Caramel Apple Cheesecake Bars

A delightful dessert combining the creamy richness of cheesecake, nostalgic flavors of apple pie, and sweet caramel goodness, perfect for autumn or year-round.

  • Prep Time: 15 minutes
  • Cook Time: 50 minutes
  • Total Time: 65 minutes
  • Yield: 16 servings 1x
  • Category: Dessert
  • Method: Baking
  • Cuisine: American
  • Diet: Vegetarian

Ingredients

Scale
  • 1 1/2 cups graham cracker crumbs
  • 1/2 cup unsalted butter, melted
  • 1 cup sugar, divided
  • 2 (8-ounce) packages cream cheese, softened
  • 2 large eggs
  • 1 teaspoon vanilla extract
  • 3 cups diced apples (such as Granny Smith)
  • 1 cup caramel sauce
  • 1 teaspoon cinnamon
  • 1/4 teaspoon nutmeg

Instructions

  1. Preheat the oven to 325°F (160°C).
  2. Combine graham cracker crumbs and melted butter.
  3. Press the mixture into the bottom of a lined 9×9-inch baking pan.
  4. Bake the crust for about 10 minutes.
  5. Mix cream cheese and 1/2 cup of sugar until smooth.
  6. Add eggs one at a time, mixing thoroughly, then add vanilla extract.
  7. Fold in diced apples, cinnamon, and nutmeg.
  8. Pour the filling over the crust.
  9. Bake for 40-45 minutes until the center is just set.
  10. Cool the bars at room temperature for about an hour, then refrigerate for at least 2 hours.
  11. Drizzle with caramel sauce before serving.
  12. Slice into squares and serve.

Notes

These bars can be enjoyed as is or garnished with whipped cream and extra caramel. For variations, try adding nuts, chocolate, or pumpkin.

Nutrition

  • Serving Size: 1 bar
  • Calories: 320
  • Sugar: 20g
  • Sodium: 250mg
  • Fat: 14g
  • Saturated Fat: 8g
  • Unsaturated Fat: 4g
  • Trans Fat: 0g
  • Carbohydrates: 45g
  • Fiber: 2g
  • Protein: 4g
  • Cholesterol: 60mg

Keywords: cheesecake, caramel, apple, dessert, fall recipes, baking

Did you make this recipe?

Share a photo and tag us — we can't wait to see what you've made!

June 25, 2026 |

Crustless Pumpkin Pie

Slice of crustless pumpkin pie topped with whipped cream

Crustless Pumpkin Pie: A Flavorful & Easy Fall Treat

Ah, fall. The air turns crisp, leaves don brilliant hues, and everywhere you turn, pumpkin spice reigns supreme. But let’s talk about something even better than a pumpkin spice latte—Crustless Pumpkin Pie! If you’re thinking, “Wait, no crust? How will that work?”—trust me, my friend, this pie is like a warm hug during the chilly season. It’s rich, creamy, and boasts all the delightful flavors of traditional pumpkin pie, sans the fuss of making a crust.

Now, I know what you might be imagining—is it really pumpkin pie without that flaky, buttery crust? Absolutely! It’s all the flavor you love with none of the heavy lifting. Imagine the ease of whipping up a delicious dessert that not only tastes divine but also accommodates your friends who might be counting calories or avoiding gluten. Consider this recipe as your secret weapon for holiday gatherings or cozy nights in. Get ready for a slice of pumpkin paradise!

Personal Story

Let me take you back to my grandmother’s kitchen during the autumn months. The scent of cinnamon and nutmeg would dance around the room like the falling leaves outside. Grandma would pull out her vintage mixing bowl and gather her ingredients like it was a ritual—a sprinkle of this, a dash of that—always with a twinkle in her eye.

It was the one time of year when nothing else mattered but that magical pie made from her secret recipe. She never liked fussing with crusts; to her, the filling was the star of the show. I remember one particular Thanksgiving when she decided to try making her crustless pumpkin pie for the first time, and despite my initial skepticism, as soon as I tasted it, I was a believer. The creaminess of the pumpkin mingling with the warm spices? Instant bliss! We devoured it, and it became an instant family favorite, proving that sometimes, simplicity brings the most joy.

Now, every time I whip up this crustless pumpkin pie, I can’t help but smile and think of those warm, cozy memories. This recipe is not just a dish—it’s a celebration of comfort food and nostalgia.

Ingredients

  • 2 cups pumpkin puree
    This is the star of the show! Canned pumpkin puree is convenient and consistent. If you’re feeling adventurous, you can make your own by roasting sugar pumpkins—just scoop out the flesh and blend until smooth!

  • 1 cup evaporated milk
    This ingredient adds creaminess without the heaviness of heavy cream. If you’re dairy-free, try using coconut milk for a tropical twist or almond milk for a lighter version.

  • 3/4 cup sugar
    Regular granulated sugar works perfectly. If you’re looking for a lower-calorie option, you can try using coconut sugar or a sugar substitute like Stevia.

  • 2 large eggs
    Eggs help bind everything together. If you’re looking for an egg-free version, you can use flaxseed meal (1 tablespoon of flaxseed mixed with 2.5 tablespoons of water for each egg) or a commercial egg replacer.

  • 1 teaspoon vanilla extract
    Always opt for pure vanilla extract for the best flavor. If you want a hint of something unique, try almond extract for a delightful twist.

  • 1 teaspoon ground cinnamon
    A must-have spice that brings warmth to the pie. If you’re feeling spicy, mix in some cardamom for an unexpected flavor profile.

  • 1/2 teaspoon ground nutmeg
    Nutmeg adds a nutty, slightly sweet flavor that’s synonymous with pumpkin pie. Freshly grated nutmeg is even more aromatic, so if you have some, go for it!

  • 1/2 teaspoon ground ginger
    Ginger enhances the pie’s overall warmth. For a spicier kick, you can add a touch of fresh grated ginger instead.

  • 1/4 teaspoon salt
    A pinch of salt elevates the sweetness and balances the flavors beautifully.

Step-by-Step Instructions

  1. Preheat Your Oven
    Preheat your oven to 350°F (175°C). This will ensure your pie bakes evenly, giving you that perfect texture.

  2. Prepare the Mixing Bowl
    Grab a large mixing bowl—this is where the magic happens! Combine the pumpkin puree, evaporated milk, and sugar. Mix well until everything is smooth. Using a whisk will help incorporate air, making your pie light and fluffy.

  3. Add the Eggs and Vanilla
    Crack in the eggs one at a time, whisking them in thoroughly after each addition. You want to ensure everything is well combined. Then, drizzle in the vanilla extract—this will enhance the overall flavor profile beautifully!

  4. Incorporate the Spices
    Sprinkle in the ground cinnamon, nutmeg, ginger, and salt. The aroma here is divine! Mix until everything is evenly distributed. You want all those warm spices singing together in harmony!

  5. Grease Your Baking Dish
    Lightly grease a 9-inch pie dish or an equivalent baking dish with cooking spray or butter. This will help the pie slide out easily once it’s baked—nobody likes a stuck pie!

  6. Pour It All In
    Gently pour the pumpkin mixture into the greased pie dish, making sure to spread it evenly. Don’t worry about making it perfect; the magic happens in the oven!

  7. Bake Your Pie
    Pop your pie in the preheated oven and bake for about 60-70 minutes. You’ll know it’s done when the edges are set, and the center has a slight jiggle but isn’t runny.

  8. Cool and Serve
    Once baked, take it out of the oven and let it cool for at least 30 minutes. This cooling time helps it set—plus, you want to avoid burning your tongue, right? Serve it at room temperature or refrigerate it for later; it’s just as delicious chilled!

Serving Suggestions

To serve this delightful crustless pumpkin pie, slice it into wedges and dust a little powdered sugar on top for a fancy finish. For an extra touch of decadence, add a dollop of whipped cream or a scoop of vanilla ice cream on the side. Drizzle a bit of caramel sauce over it, and you have an irresistible treat that everyone will love!

Recipe Variations

  1. Spiced Rum Variation: Add a splash of spiced rum to the mixture for an adult twist.
  2. Chocolate Chip Twist: Fold in some dark chocolate chips to the batter for a sweet surprise.
  3. Nuts & Seeds: Add chopped pecans or walnuts on top before baking for a crunchy contrast.
  4. Maple Sweetened: Substitute the sugar with maple syrup for a richer flavor.
  5. Coconut Crust: Press shredded coconut at the bottom of the dish before pouring in the filling for a unique texture.

Chef’s Notes

Reflecting back on my first attempts at making this pie, I recall a not-so-funny moment when I mistakenly grabbed salt instead of sugar. The taste was… well, let’s say it’s a family joke now! I learned quickly that not all ingredients can afford to be swapped. Over the years, though, I’ve refined this recipe, adapting it based on what I have on hand or the tastes of those around my table. It’s a testament to how adaptable recipes can be, and how each pie can tell a different story.

FAQs and Troubleshooting

Q: My pie is too watery. What went wrong?
A: This can happen if the pumpkin puree you used was too watery. Always check the label to ensure you’re using 100% pumpkin.

Q: Can I make this pie ahead of time?
A: Absolutely! This pie holds up wonderfully in the fridge for up to a week. Just cover it tightly with plastic wrap or foil.

Q: Why did my pie not set?
A: If it’s not set in the center after baking, it may need more time in the oven. Just stick it back in, checking every 5-10 minutes until it’s done.

Q: Can I freeze this pie?
A: Yes! Once cooled, tightly wrap it in plastic wrap and aluminum foil and it can be frozen for up to 2 months. Just thaw before serving.


Enjoy this delightful Crustless Pumpkin Pie while creating memories in your own kitchen. Whether you serve it for a family gathering or enjoy it all to yourself—trust me, no one will miss the crust! Let me know how yours turns out, and happy baking!

Print

Crustless Pumpkin Pie

Enjoy a rich and creamy Crustless Pumpkin Pie that combines all your favorite fall flavors without the fuss of a crust.

  • Prep Time: 15 minutes
  • Cook Time: 70 minutes
  • Total Time: 85 minutes
  • Yield: 8 servings 1x
  • Category: Dessert
  • Method: Baking
  • Cuisine: American
  • Diet: Vegetarian

Ingredients

Scale
  • 2 cups pumpkin puree
  • 1 cup evaporated milk
  • 3/4 cup sugar
  • 2 large eggs
  • 1 teaspoon vanilla extract
  • 1 teaspoon ground cinnamon
  • 1/2 teaspoon ground nutmeg
  • 1/2 teaspoon ground ginger
  • 1/4 teaspoon salt

Instructions

  1. Preheat your oven to 350°F (175°C).
  2. Grab a large mixing bowl and combine the pumpkin puree, evaporated milk, and sugar. Mix well until smooth.
  3. Crack in the eggs one at a time, whisking thoroughly after each addition. Then drizzle in the vanilla extract.
  4. Sprinkle in the ground cinnamon, nutmeg, ginger, and salt, mixing until evenly distributed.
  5. Lightly grease a 9-inch pie dish with cooking spray or butter.
  6. Gently pour the pumpkin mixture into the greased pie dish.
  7. Pop your pie in the preheated oven and bake for about 60-70 minutes.
  8. Once baked, let it cool for at least 30 minutes before serving.

Notes

For added indulgence, serve with whipped cream or vanilla ice cream. This pie can be made ahead of time and stores well in the fridge.

Nutrition

  • Serving Size: 1 slice
  • Calories: 280
  • Sugar: 25g
  • Sodium: 150mg
  • Fat: 5g
  • Saturated Fat: 2g
  • Unsaturated Fat: 2g
  • Trans Fat: 0g
  • Carbohydrates: 50g
  • Fiber: 3g
  • Protein: 5g
  • Cholesterol: 50mg

Keywords: pumpkin pie, dessert, fall recipe, Thanksgiving, crustless dessert

Did you make this recipe?

Share a photo and tag us — we can't wait to see what you've made!

June 25, 2026 |

One-Bowl Pumpkin Bread: Quick, Fluffy Fall Favorite

Delicious one-bowl pumpkin bread ready for fall baking

The World’s Best Pumpkin Bread: A Cozy Slice of Fall

Welcome to Clean Plate Cravings! Today, I’m super excited to share with you my take on what I confidently call the World’s Best Pumpkin Bread. Picture this: a warm loaf bursting with the flavors of fall—think spicy cinnamon, rich pumpkin, and a hint of sweetness that dances on your palate. Whether enjoyed for breakfast, as an afternoon snack with your favorite tea, or as a delightful dessert, this pumpkin bread is here to satisfy all your autumn cravings. Let’s dive into this cozy recipe, shall we?

A Slice of Nostalgia

Every time I make this pumpkin bread, I am transported back to my childhood kitchen where the aroma of warm spices wafted in the air. My mom would crank up the oven, and there I was, eagerly waiting for the first slice to come out. The kitchen was our sanctuary, and pumpkin bread was our seasonal treat. We’d pull out an old, dog-eared recipe book filled with notes and stains, each an indication of the love poured into those pages over the years.

As the bread baked, my siblings and I would take turns whisking the batter and sneaking in generous pinches of brown sugar while Mom wasn’t looking. The laughter, the teasing, the anticipation of that first buttery slice—it’s what made every fall so special. Now, as I whip up this recipe in my own kitchen, I can’t help but smile, knowing that I’m continuing that legacy of warmth and flavor. Let’s recreate those memories together with this irresistible pumpkin bread recipe!

Ingredients

To whip up the World’s Best Pumpkin Bread, here’s what you’ll need:

  • 2 cups all-purpose flour
    The foundation of our bread! All-purpose flour gives just the right texture. If you want a whole-grain version, feel free to swap in half whole wheat flour.

  • 1 tsp baking soda
    This is our leavening agent, helping the bread rise and achieve that fluffy texture. Double-check your baking soda’s freshness for the best results!

  • 1/2 tsp baking powder
    A little backup for our leavening process. It ensures that the bread is light and airy.

  • 1/2 tsp salt
    Enhances the flavors in all our ingredients. Don’t skip this; it makes a significant difference!

  • 1 tsp ground cinnamon
    This spice is the heart of the bread’s flavor profile, invoking that classic pumpkin spice essence we all adore. Freshly ground is even better if you can manage it!

  • 1/2 tsp ground nutmeg
    Adds a warm, earthy flavor that beautifully complements the cinnamon. It’s perfect for creating that cozy atmosphere.

  • 1/4 tsp ground cloves
    A dash of clove gives a subtle kick to the bread. If you don’t have this on hand, you can opt out—but it brings extra warmth!

  • 1 cup granulated sugar
    Sweetness at its core! You can reduce this a bit if you prefer a less sweet bread, but I love it as is.

  • 1/2 cup brown sugar
    Adds moisture and that lovely caramel flavor. If you’re out of brown sugar, you can make your own using white sugar and molasses!

  • 1 cup pumpkin puree
    The star of the show! Canned or freshly made, pumpkin puree is what gives this bread its signature flavor and moistness.

  • 1/2 cup vegetable oil
    This keeps our bread moist and delicious. You could also substitute it with melted coconut oil for a bit of a tropical twist.

  • 4 large eggs
    Another key player for fluffiness and binding everything together.

  • 1/4 cup water
    Helps to create the perfect batter consistency. If you prefer, you can replace it with applesauce for an extra touch of sweetness and moisture.

  • 1 tsp vanilla extract
    Because why not? A splash of vanilla takes everything up a notch!

  • 1/2 cup chopped walnuts or pecans (optional)
    For those who enjoy a little crunch in their bread, these nuts add texture and a nutty richness. Go for toasted nuts for an extra flavor boost. If you want to keep it nut-free, simply leave them out!

Step-by-Step Instructions

Now, let’s get cooking! Follow these steps to create the most delightful pumpkin bread you’ll ever taste:

  1. Preheat your oven to 350°F (175°C).
    This ensures your bread starts baking at the perfect temperature right from the get-go. The delightful aroma will soon fill your home!

  2. Prepare your loaf pan.
    Grease a 9×5-inch loaf pan with oil or cooking spray. This step prevents our delicious creation from sticking!

  3. Mix your dry ingredients.
    In a large bowl, whisk together all-purpose flour, baking soda, baking powder, salt, cinnamon, nutmeg, and cloves. Make sure it’s well blended. This step is crucial to have an even distribution of flavors. I usually do this in a separate bowl to avoid lumps later.

  4. Combine the sugars and wet ingredients.
    In another bowl, combine granulated sugar, brown sugar, pumpkin puree, vegetable oil, eggs, water, and vanilla extract. Whisk until smooth. This is where the magic begins! The mixture should be velvety and luscious.

  5. Mix it all together.
    Gradually fold in the dry ingredients into the wet mixture. Be gentle! We want all of that airy goodness to stay intact. Mix until just combined; some lumps are okay, as overmixing can lead to dense bread.

  6. Add in the nuts (if using).
    Gently fold in the chopped walnuts or pecans for that extra texture. If you are nut-sensitive, I promise it’ll still be amazing without them!

  7. Pour into the prepared pan.
    Transfer the batter into the greased loaf pan. Use a spatula to smooth out the top as evenly as possible.

  8. Bake to perfection.
    Place it in your preheated oven and let it bake for 55-65 minutes. You’ll know it’s done when a toothpick inserted into the center comes out clean (or with just a few moist crumbs). Trust me, your kitchen will smell heavenly!

  9. Cool down.
    Once baked, remove from the oven and let it cool in the pan for about 10 minutes. Then, carefully transfer to a wire rack to cool completely. I know, it’s tough to wait, but this cooling process is essential for the perfect slice!

Serving Suggestions

When you’re finally ready to slice into this pumpkin bread, I recommend serving it warm with a pat of butter or a drizzle of honey for an extra indulgent treat. For a fun twist, try topping it off with cream cheese frosting for a dessert-like feel, or serve alongside your favorite herbal tea for a cozy afternoon snack. Slice it up, plate it, and enjoy each bite!

Recipe Variations

  • Chocolate Chip Pumpkin Bread: Fold in 1/2 cup of semi-sweet or dark chocolate chips for a decadent twist!
  • Pumpkin Spice Swirl: Layer your batter with a simple cinnamon-sugar mixture for a beautiful marbled effect.
  • Gluten-Free Version: Substitute the all-purpose flour with a gluten-free baking blend for an equally delicious loaf.
  • Vegan Pumpkin Bread: Replace the eggs with 1/2 cup of applesauce or flaxseed meal (1 Tbsp per egg) and use a plant-based oil.
  • Spiced Pumpkin Bread: Add a pinch of ground cardamom or ginger for an extra layer of flavor that will warm your heart.

Chef’s Notes

I’ve been making this pumpkin bread for years, and it’s slightly evolved along the way. I’ve experimented with different spices, and let me tell you, the blend I use now truly is my favorite! One baking mishap that always makes me chuckle: I once swapped salt for sugar in a hurried attempt to multitask. The outcome was…interesting, to say the least! But that’s the beauty of cooking—each misstep brings a new story and experience to cherish.

FAQs and Troubleshooting

Q: Why is my pumpkin bread dense?
A: Most likely, it’s overmixed. Gently combine your ingredients to maintain the fluffiness. Also, ensure your leavening agents are fresh!

Q: Can I use fresh pumpkin puree instead of canned?
A: Absolutely! Just roast and puree your pumpkin, making sure to drain any excess moisture for the right consistency.

Q: How do I store leftover pumpkin bread?
A: Store it in an airtight container at room temperature for about 3-4 days, or refrigerate for a week. It also freezes beautifully for up to 3 months—just wrap slices tightly!

Q: Can I add other spices?
A: Yes! Feel free to play around with spices. Ground ginger and allspice are excellent options for that warm, festive vibe.

Nutritional Info

This pumpkin bread is packed with nutritious pumpkin and can be enjoyed in moderation as part of a balanced diet. If you want to calculate precise nutritional information, consider using an online recipe calculator based on portion size and the specific ingredients you use.


With this recipe in hand, you’re all set to create the World’s Best Pumpkin Bread in your kitchen, bringing warmth and joy to your home. So, preheat that oven and let the magic unfold! Happy baking! 🍞✨

Print

World’s Best Pumpkin Bread

This warm loaf is bursting with fall flavors like cinnamon, rich pumpkin, and a hint of sweetness, perfect for any occasion.

  • Prep Time: 15 minutes
  • Cook Time: 60 minutes
  • Total Time: 75 minutes
  • Yield: 1 loaf (approximately 10 slices) 1x
  • Category: Bakery
  • Method: Baking
  • Cuisine: American
  • Diet: Vegetarian

Ingredients

Scale
  • 2 cups all-purpose flour
  • 1 tsp baking soda
  • 1/2 tsp baking powder
  • 1/2 tsp salt
  • 1 tsp ground cinnamon
  • 1/2 tsp ground nutmeg
  • 1/4 tsp ground cloves
  • 1 cup granulated sugar
  • 1/2 cup brown sugar
  • 1 cup pumpkin puree
  • 1/2 cup vegetable oil
  • 4 large eggs
  • 1/4 cup water
  • 1 tsp vanilla extract
  • 1/2 cup chopped walnuts or pecans (optional)

Instructions

  1. Preheat your oven to 350°F (175°C).
  2. Prepare your loaf pan by greasing it with oil or cooking spray.
  3. Mix your dry ingredients in a large bowl, whisking flour, baking soda, baking powder, salt, cinnamon, nutmeg, and cloves until well blended.
  4. Combine the sugars and wet ingredients in another bowl, whisking granulated sugar, brown sugar, pumpkin puree, vegetable oil, eggs, water, and vanilla extract until smooth.
  5. Mix it all together by gradually folding the dry ingredients into the wet mixture until just combined.
  6. Add in the nuts (if using) and gently fold them into the batter.
  7. Pour the batter into the prepared pan and smooth out the top.
  8. Bake for 55-65 minutes until a toothpick inserted comes out clean.
  9. Cool the bread for about 10 minutes in the pan, then transfer to a wire rack to cool completely.

Notes

Serve warm with butter, honey, or even cream cheese frosting for a delicious twist. Store leftovers in an airtight container for up to a week.

Nutrition

  • Serving Size: 1 slice
  • Calories: 300
  • Sugar: 20g
  • Sodium: 300mg
  • Fat: 10g
  • Saturated Fat: 1g
  • Unsaturated Fat: 8g
  • Trans Fat: 0g
  • Carbohydrates: 45g
  • Fiber: 2g
  • Protein: 6g
  • Cholesterol: 40mg

Keywords: pumpkin bread, fall recipes, baking, dessert

Did you make this recipe?

Share a photo and tag us — we can't wait to see what you've made!

June 25, 2026 |

One-Bowl Double Chocolate Espresso Muffins (Quick Prep)

Delicious double chocolate espresso muffins in a bowl ready to bake

Double Chocolate Espresso Muffins: A Delicious Indulgence

Welcome, fellow food lovers! If you’re anything like me, there are few things that can brighten up a dreary morning than the intoxicating aroma of baked goods wafting through your kitchen. Picture this: the smell of rich chocolate mingling with the deep, robust scent of freshly brewed espresso. That’s right—today, we’re diving headfirst into the world of Double Chocolate Espresso Muffins! Not only do these muffins promise a delectable bite of chocolate goodness, but they also pack a caffeine punch that’ll kickstart your day. Perfect for breakfast, a midday snack, or even dessert, these muffins are a delightful treat that you’ll be reaching for time and again.

Now, I believe that every recipe comes with its own story, and this one is a sweet chapter from my own kitchen adventures. This muffin recipe didn’t just pop into existence; it evolved over the years in my quest to find the ultimate chocolate muffin. A few years back, I decided to have a little baking competition with myself. The goal? To create the most decadent chocolate muffin that was still easy enough to whip up on a lazy Sunday morning. After a few trial-and-error sessions (not every batch made it out of the oven), I added espresso to the mix, elevating the chocolate flavor to a whole new level. And let me tell you, when I took that first bite of a warm muffin fresh from the oven, I knew I had struck gold!

So let’s roll up our sleeves and make some muffins that are sure to bring smiles and happy tummies to your table. Grab your aprons, and let’s get started!

Ingredients

Here’s what you’ll need for these delicious Double Chocolate Espresso Muffins:

  • 1 cup all-purpose flour
    The foundation of our muffins! You can substitute gluten-free flour for a gluten-free option or try whole wheat flour if you’re looking for a bit more fiber.

  • 1/2 cup unsweetened cocoa powder
    This adds the rich chocolate flavor. Dutch-processed cocoa can be used for a smoother taste, but make sure to adjust your leavening agents if you do!

  • 1 cup sugar
    Sweetness is essential here! Use brown sugar for a more caramel-like flavor, or coconut sugar for a healthier option.

  • 1 teaspoon baking powder
    The magic ingredient that helps our muffins rise. Don’t skip this! Baking soda is sometimes popular, but in this case, we’re sticking with baking powder for best results.

  • 1/2 teaspoon baking soda
    A little boost to ensure our muffins reach fluffy perfection. Remember, don’t confuse it with baking powder—each has its role!

  • 1/4 teaspoon salt
    Essential for balancing flavors. Aim for sea salt or kosher salt for a cleaner taste.

  • 1 cup buttermilk
    Buttermilk brings moisture and tang. If you don’t have any, just mix regular milk with a teaspoon of vinegar to make a quick substitute!

  • 1/4 cup vegetable oil
    This keeps our muffins moist and tender. If you prefer a healthier option, use coconut oil or applesauce for a lower-calorie alternative.

  • 2 large eggs
    Eggs provide structure and stability. You can substitute flax eggs for a vegan version (1 tablespoon of ground flaxseed mixed with 3 tablespoons of water equals 1 egg).

  • 1 teaspoon vanilla extract
    Trust me, this is the secret weapon for adding depth of flavor. It’s like a warm hug for your muffins!

  • 1 cup chocolate chips
    The more, the merrier! Use dark, semi-sweet, or even mint chocolate chips for a fun twist.

  • 1/2 cup brewed espresso or strong coffee
    This ingredient is the star of the show! If you’re not a coffee drinker, you can opt for a strong brewed herbal tea that lends depth without the caffeine.

Step-by-Step Instructions

Now that we have our ingredients lined up, let’s get baking! Ready? Let’s go!

  1. Preheat Your Oven: Start by preheating your oven to 350°F (175°C). You want it nice and warm so that your muffins bake evenly and rise beautifully.

  2. Prepare Your Muffin Pan: Grab a muffin pan and line it with paper liners or grease it lightly with butter or non-stick spray. This will help remove the muffins easily after baking. Your future self will thank you!

  3. Mix the Dry Ingredients: In a large bowl, whisk together the flour, cocoa powder, sugar, baking powder, baking soda, and salt. Make sure no lumps remain—you’re aiming for a smooth and silky mix! This step helps evenly distribute the leavening agents.

  4. Combine the Wet Ingredients: In a separate bowl, whisk together the buttermilk, vegetable oil, eggs, vanilla extract, and brewed espresso. This wet mixture should be smooth and cohesive, with all the ingredients well combined.

  5. Bring It All Together: Pour the wet ingredients into the dry mixture. Using a spatula or wooden spoon, mix until just combined—don’t overdo it! A few lumps are perfectly fine. Overmixing will lead to tough muffins, and we want light and fluffy!

  6. Add in the Chocolate Chips: Gently fold in the chocolate chips. Feel free to throw in a few extra chips for good measure! This is the fun part; you can never have too much chocolate, right?

  7. Scoop into Muffin Pan: Using an ice cream scoop or a tablespoon, scoop the batter into the prepared muffin pan, filling each cup about three-quarters full. This provides enough room for the muffins to rise without overflowing.

  8. Bake: Pop the muffin pan into the preheated oven and bake for about 18-20 minutes. You’ll know they’re done when a toothpick inserted into the center comes out clean (or with just a few crumbs attached).

  9. Cool: Once baked, remove the muffins from the oven and let them cool in the pan for about 5 minutes before transferring them to a wire rack. The cooling process helps set them up nicely, and you want to enjoy them warm but not steaming hot.

  10. Enjoy: These muffins are best enjoyed fresh out of the oven, but they’re also amazing the next day! Pair with a cold glass of milk, a cup of coffee, or even a dollop of whipped cream for extra indulgence.

Serving Suggestions

When it’s time to serve these delightful muffins, presentation matters! Arrange them on a beautiful plate or stand, dust them lightly with powdered sugar for an elegant touch, and offer a small bowl of fresh berries or whipped cream on the side. The color contrast is stunning, and they’ll look as good as they taste!

Recipe Variations

Here are a few creative twists to elevate your Double Chocolate Espresso Muffins even further:

  1. Peanut Butter Swirl: Swirl in a tablespoon of peanut butter in the batter before baking for a delicious chocolate-peanut butter combo.

  2. Minty Fresh: Add a few drops of peppermint extract or chopped fresh mint for a refreshing flavor burst—hello, chocolate mint lovers!

  3. Nutty Crunch: Fold in chopped nuts like walnuts or hazelnuts for an added crunch. They pair beautifully with the chocolate.

  4. Spicy Kick: Want to spice things up? Add a pinch of cayenne pepper or cinnamon for a unique flavor that complements the chocolate.

  5. Gluten-Free Version: Swap the all-purpose flour for a gluten-free all-purpose blend and ensure all other ingredients are gluten-free to suit your dietary needs.

Chef’s Notes

As a passionate home chef, I’ve had my share of kitchen blunders—and let me tell you, that’s where the magic truly happens! I once forgot to add sugar to my muffins while texting a friend, and what came out of the oven were little puffs of chocolate despair. On the flip side, I learned the hard way that experimenting in the kitchen is half the fun! This recipe has grown with me, adapting to different diets and flavor trends, but one thing has remained the same: the joy it brings to every bite.

FAQs and Troubleshooting

1. Why are my muffins flat?
This could be due to expired baking powder or baking soda. Make sure to check the freshness of your leavening agents. Also, avoid overmixing the batter, as that can lead to dense muffins.

2. Can I use milk instead of buttermilk?
Yes, just mix regular milk with a teaspoon of vinegar or lemon juice and let it sit for about 5-10 minutes. This will mimic the acidity in buttermilk, giving your muffins the right texture!

3. How do I store muffins?
Store your muffins in an airtight container at room temperature for up to 3 days. For longer storage, freeze them in a sealed bag, and thaw as needed. They taste just as good, even after some time!

4. Can I double the recipe?
Absolutely! Just remember to adjust your baking time as needed and keep an eye on them in the oven. Sharing is caring, after all!

Nutritional Info

While I like to focus on flavor, I understand that nutrition matters too. Each muffin contains around 200 calories, 3g of protein, and offers a delightful energy boost from the chocolate and espresso. They’re perfect for a balanced treat in your day!


Well, there you have it, my friends! Your very own batch of Double Chocolate Espresso Muffins ready to be baked to perfection. I hope this recipe delights your senses and fills your kitchen with the warm aroma of chocolatey goodness. Remember, cooking is all about joy and creativity—so feel free to make this recipe your own. Happy baking!

Print

Double Chocolate Espresso Muffins

Indulge in these rich and fluffy Double Chocolate Espresso Muffins, infused with coffee for an extra kick. Perfect for breakfast or a sweet snack!

  • Prep Time: 10 minutes
  • Cook Time: 20 minutes
  • Total Time: 30 minutes
  • Yield: 12 servings 1x
  • Category: Dessert
  • Method: Baking
  • Cuisine: American
  • Diet: Vegetarian

Ingredients

Scale
  • 1 cup all-purpose flour
  • 1/2 cup unsweetened cocoa powder
  • 1 cup sugar
  • 1 teaspoon baking powder
  • 1/2 teaspoon baking soda
  • 1/4 teaspoon salt
  • 1 cup buttermilk
  • 1/4 cup vegetable oil
  • 2 large eggs
  • 1 teaspoon vanilla extract
  • 1 cup chocolate chips
  • 1/2 cup brewed espresso or strong coffee

Instructions

  1. Preheat your oven to 350°F (175°C).
  2. Prepare a muffin pan with paper liners or grease it.
  3. Mix the dry ingredients: flour, cocoa powder, sugar, baking powder, baking soda, and salt in a bowl.
  4. Combine the wet ingredients: buttermilk, vegetable oil, eggs, vanilla extract, and brewed espresso in another bowl.
  5. Bring it all together by pouring the wet ingredients into the dry mixture and mixing until just combined.
  6. Add in the chocolate chips and fold gently.
  7. Scoop the batter into the prepared muffin pan, filling each cup about three-quarters full.
  8. Bake for about 18-20 minutes, or until a toothpick comes out clean.
  9. Cool for 5 minutes in the pan before transferring to a wire rack.
  10. Enjoy fresh or the next day, paired with milk or whipped cream!

Notes

For gluten-free muffins, substitute all-purpose flour with a gluten-free blend. Add peanut butter or mint for flavor variations.

Nutrition

  • Serving Size: 1 muffin
  • Calories: 200
  • Sugar: 20g
  • Sodium: 200mg
  • Fat: 8g
  • Saturated Fat: 2g
  • Unsaturated Fat: 5g
  • Trans Fat: 0g
  • Carbohydrates: 30g
  • Fiber: 2g
  • Protein: 3g
  • Cholesterol: 40mg

Keywords: muffins, chocolate, espresso, baking, dessert

Did you make this recipe?

Share a photo and tag us — we can't wait to see what you've made!

June 25, 2026 |

Minute Gluten-Free Baked Pumpkin Donuts (One-Bowl)

Delicious gluten-free baked pumpkin donuts in a one-bowl recipe

Baked Pumpkin Donuts – Gluten Free: A Delightful Fall Treat

Introduction

Hey there, food lovers! It’s Ava Carter here, and I can already smell the warm spices and sweet pumpkin wafting through my virtual kitchen as I write this! Today, I’m so excited to share with you my beloved recipe for Baked Pumpkin Donuts. Not only are these delectable bites gluten-free, but they are also bursting with that quintessential fall flavor that we all crave.

Did you know that donuts don’t have to be fried to be absolutely delicious? These baked pumpkin donuts are incredibly moist, tender, and just sweet enough to satisfy your cravings without feeling overly indulgent. Plus, what’s better than the aroma of fresh-baked donuts filling your home?

This recipe is more than just a treat; it’s an invitation to create experiences. You can whip them up for weekend brunch, cozy gatherings with friends, or even just a comforting snack for yourself after a long day. Trust me, your kitchen will become the star of the show when you serve these beauties!

Baking these pumpkin donuts is a chance to embrace the season, get creative with flavors, and most importantly, indulge in a little self-love through food. So grab your apron, let’s dive into this pumpkin-infused adventure, and don’t forget to save a few for a special someone—if you can resist the temptation!

Personal Story

I still remember the first time I had pumpkin donuts—oh, the bliss! It was a crisp October morning, and I was attending a local harvest festival with my family. There was a buzzing energy in the air, filled with laughter and the scent of cinnamon and nutmeg—a sensory overload! As we wandered through the stalls, one particular booth caught my eye: a charming little stand selling freshly made pumpkin donuts.

Naturally, we had to stop! The stand was adorned with colorful pumpkins and hay bales, creating the perfect autumn atmosphere. I remember taking that first bite of a warm donut, its fluffy texture melting in my mouth, perfectly paired with a sprinkle of cinnamon sugar on top. It was pure joy!

From that day on, pumpkin donuts became a beloved fall tradition in our household. We’d make them every year, creating our own little rituals: picking the freshest pumpkins at the local patch, gathering around the kitchen to bake, and making memories that linger like the flavors of those donuts.

Now, I want to bring that same joyous experience to your kitchen! Let’s create something nostalgic, flavorful, and oh-so-delicious together!

Ingredients

Here’s what you’ll need to whip up these delightful baked pumpkin donuts:

  • 1.5 cups canned pumpkin puree
    Be sure to grab pure pumpkin puree, not pumpkin pie filling! If you want to make your own, you can roast a sugar pumpkin until tender, scoop out the flesh, and blend it until smooth.

  • 4 large eggs (at room temperature)
    Eggs help contribute moisture and structure to the donuts. Let them sit out for about 30 minutes before baking for best results.

  • 1/4 cup melted coconut oil
    This adds a lovely tropical flavor and moisture. You can substitute with melted butter or another neutral oil if you prefer.

  • 1.5 cups granulated sugar
    For sweetness, of course! If you want a healthier option, you can use coconut sugar or a sugar substitute like erythritol.

  • 1.5 teaspoons baking powder
    This is what helps your donuts rise and become fluffy, creating that airy texture we love!

  • 1.5 teaspoons pumpkin pie spice
    A blend of warm spices—including ginger, allspice, and cloves—this adds the unmistakable fall flavor. If you don’t have it on hand, a mix of cinnamon, nutmeg, and ginger works well too.

  • 1/2 teaspoon ground cinnamon
    Cinnamon is a must for that warm, cozy flavor. Feel free to increase this amount if you’re a cinnamon fan!

  • 1/4 teaspoon ground nutmeg
    This elevates the flavor profile, adding depth to your donuts. Just a little goes a long way!

  • 1/4 teaspoon salt
    A pinch of salt enhances all the flavors and balances out the sweetness. Don’t skip it!

  • 1 + 3/4 cups gluten-free all-purpose flour
    Make sure to use a blend that includes xanthan gum for the best texture. If you don’t have gluten-free flour, regular all-purpose works great too!

  • 1/2 teaspoon cornstarch
    This helps create a light, tender crumb in your donuts! You can also use arrowroot powder if you prefer.

  • 1 cup granulated sugar (for cinnamon sugar topping)
    This sugar will add a delicious crunch to your donuts once they’re baked!

  • 1/4 cup ground cinnamon (for cinnamon sugar topping)
    This is the magic dust that takes your donuts to the next level!

  • Melted butter (optional)
    Brushing your donuts with melted butter before dipping in cinnamon sugar creates a beautiful golden glow and adds extra flavor!

Step-by-Step Instructions

Alright, let’s get cooking! Follow these step-by-step instructions, and soon you’ll have a batch of irresistible baked pumpkin donuts waiting to be devoured.

Step 1: Preheat the Oven

First things first, let’s preheat that oven to 350°F (175°C). This ensures that your donuts will bake evenly and perfectly golden brown. While that’s warming up, grease your donut pan or use silicone donut molds for super easy removal!

Step 2: Combine Wet Ingredients

In a large mixing bowl, combine your pumpkin puree, eggs, and melted coconut oil. Mix well until you have a smooth, velvety mixture. Here’s a chef tip: Make sure your eggs are at room temperature! This helps create a fluffier texture in your donuts since they will incorporate better with the other ingredients.

Step 3: Whisk in Sugar and Spices

Add in the granulated sugar, baking powder, pumpkin pie spice, ground cinnamon, ground nutmeg, and salt. Whisk until everything is well blended. The sugar will begin to dissolve, and the spices will create an aromatic hug around your mixture—heavenly!

Step 4: Mix the Dry Ingredients

In another bowl, combine the gluten-free all-purpose flour and cornstarch. Whisk to combine. Gradually fold the dry mixture into the wet ingredients. Use a spatula to gently mix until just combined. Be careful not to overmix, as this can lead to tough donuts. A few lumps are perfectly fine!

Step 5: Fill the Donut Pan

Spoon the batter into your greased donut pan, filling each cavity about 3/4 full to allow for rising. If you want a clean look, consider using a piping bag to fill the molds—it’s a little fun and makes for a beautiful presentation!

Step 6: Bake!

Pop those donuts in your preheated oven and bake for 15 to 18 minutes, or until a toothpick inserted comes out clean. While they’re baking, the kitchen will fill with that irresistible aroma, making the wait totally worth it!

Step 7: Make Cinnamon Sugar

While your donuts cool, mix together the granulated sugar and ground cinnamon in a small bowl for the topping. This is the moment when your kitchen begins to smell like a cozy autumn café!

Step 8: Coat the Donuts

Once the donuts have cooled for about 5 minutes, gently remove them from the pan. If you opted for melted butter, brush them lightly with the butter before rolling them in the cinnamon sugar. This coating adds the perfect sweet crunch, and who doesn’t love a little extra flavor?

Serving Suggestions

To serve these scrumptious baked pumpkin donuts, arrange them on a beautiful platter and consider adding a little drizzle of icing for an extra special touch. Enjoy them warm with a steaming cup of coffee or chai tea—perfect for those chilly fall mornings or any time you need a cozy moment.

Recipe Variations

Feel free to mix things up with these creative twists:

  • Chai Spice Version: Replace pumpkin pie spice with your favorite chai spices for a whole new flavor experience!
  • Chocolate Chip Surprise: Fold in some gluten-free chocolate chips for a delightful surprise in each bite.
  • Maple Glaze: Drizzle a maple glaze over the donuts for an added layer of yumminess.
  • Nutty Crunch: Add chopped pecans or walnuts to the batter for extra texture and a nutty flavor.

Chef’s Notes

As a chef, I believe that recipes are living entities—they evolve with each attempt! This baked pumpkin donut recipe has come a long way since I first started making them. Initially, I used to dip them in plain granulated sugar, but after a few rounds of taste tests, I stumbled upon the magic of cinnamon sugar! Now, it feels like the essence of fall in every bite.

And here’s a funny kitchen story: One year, I accidentally mixed up the all-purpose flour with an unusual gluten-free flour blend that had a strong flavor. Let’s just say, my family dubbed it the "Pumpkin Experiment Gone Wrong" and we all had a good laugh. Sometimes, those flops lead to the best memories!

FAQs and Troubleshooting

1. Can I use fresh pumpkin instead of canned?
Absolutely! Just roast a sugar pumpkin until tender, scoop it out, and blend it until smooth. It will add a lovely homemade touch!

2. My donuts are too dense. What went wrong?
Density often comes from overmixing or using too much flour. Make sure to fold the batter until just combined—lumps are okay!

3. Can I freeze these donuts?
Yes! Once completely cooled, wrap them tightly in plastic wrap and store them in an airtight container in the freezer. Just thaw and enjoy them when you’re ready!

4. What can I use instead of eggs for a vegan version?
You can substitute each egg with 1/4 cup of unsweetened applesauce or a flax egg (1 tablespoon ground flaxseed mixed with 3 tablespoons water).

Nutritional Info

While I don’t calculate nutrition for each recipe, baked donuts generally pack in vitamins from the pumpkin and are a healthier alternative to traditional fried donuts. Enjoy them as an occasional treat, and remember, balance is key!


I hope you enjoy baking these pumpkin donuts as much as I do! If you give them a try, let me know how they turn out and what variations you created. Remember, this is all about enjoying good food and creating lasting memories, so have fun in the kitchen! Happy baking!

Print

Baked Pumpkin Donuts – Gluten Free

Delightful baked pumpkin donuts that are gluten-free and filled with warm autumn spices.

  • Prep Time: 15 minutes
  • Cook Time: 18 minutes
  • Total Time: 33 minutes
  • Yield: 12 servings 1x
  • Category: Dessert
  • Method: Baking
  • Cuisine: American
  • Diet: Gluten-Free

Ingredients

Scale
  • 1.5 cups canned pumpkin puree
  • 4 large eggs (at room temperature)
  • 1/4 cup melted coconut oil
  • 1.5 cups granulated sugar
  • 1.5 teaspoons baking powder
  • 1.5 teaspoons pumpkin pie spice
  • 1/2 teaspoon ground cinnamon
  • 1/4 teaspoon ground nutmeg
  • 1/4 teaspoon salt
  • 1 + 3/4 cups gluten-free all-purpose flour
  • 1/2 teaspoon cornstarch
  • 1 cup granulated sugar (for cinnamon sugar topping)
  • 1/4 cup ground cinnamon (for cinnamon sugar topping)
  • Melted butter (optional)

Instructions

  1. Preheat the oven to 350°F (175°C).
  2. Combine pumpkin puree, eggs, and melted coconut oil in a large bowl.
  3. Whisk in granulated sugar, baking powder, pumpkin pie spice, ground cinnamon, ground nutmeg, and salt.
  4. Mix the gluten-free all-purpose flour and cornstarch in another bowl.
  5. Fold the dry ingredients into the wet ingredients until just combined.
  6. Fill each cavity of the greased donut pan about 3/4 full.
  7. Bake for 15 to 18 minutes, or until a toothpick comes out clean.
  8. Make cinnamon sugar by mixing granulated sugar and ground cinnamon in a bowl.
  9. Coat the cooled donuts in melted butter and then roll them in the cinnamon sugar.

Notes

These donuts can be frozen; just wrap them tightly and thaw when ready to enjoy.

Nutrition

  • Serving Size: 1 donut
  • Calories: 200
  • Sugar: 18g
  • Sodium: 250mg
  • Fat: 7g
  • Saturated Fat: 5g
  • Unsaturated Fat: 2g
  • Trans Fat: 0g
  • Carbohydrates: 28g
  • Fiber: 1g
  • Protein: 3g
  • Cholesterol: 40mg

Keywords: pumpkin donuts, gluten-free donuts, fall recipes, baked donuts

Did you make this recipe?

Share a photo and tag us — we can't wait to see what you've made!

June 25, 2026 |

Autumn Maple Apple Blondies: Cozy Seasonal Comfort

Delicious autumn maple apple blondies topped with caramel drizzle

Maple Glazed Apple Blondies: A Cozy Treat for Every Occasion

Hey there, fellow food lovers! Welcome back to Clean Plate Cravings – your go-to place for fresh, flavorful meals that leave your tastebuds dancing. Today, I’m super excited to share with you a recipe that has a special place in my heart: Maple Glazed Apple Blondies. Trust me, once you whip these up in your kitchen, they’ll become a beloved staple in your dessert repertoire!

Let’s dive into the story behind these delectable treats. Growing up, autumn was always my favorite season. The air became crisp, leaves changed their colors, and my grandmother’s cozy kitchen transformed into a warm haven filled with the comforting aroma of spiced baked goods. Every Sunday, we would gather as a family, and my grandmother would set out bowls filled with chopped apples, cinnamon, and brown sugar—a simple combination that would soon become the heart of our weekend baking rituals.

One of her favorite recipes was an old family treasure: apple blondies. I remember the joyous chaos of our kitchen, filled with laughter, flour-coated countertops, and the sweet anticipation of indulging in something warm and gooey. As we stirred and mixed, I always looked forward to the moment we’d drizzle a maple glaze over the warm blondies, finishing them with a sprinkle of cinnamon. That first bite? Pure heaven! The flavors of sweet apples with buttery, caramel notes and that luscious maple drizzle were truly magical.

Now that I’m in my own kitchen, I love recreating that cherished memory with my Maple Glazed Apple Blondies. They’re perfect for sharing with friends, cozying up with a book, or even just enjoying as a sweet treat after a long day. Ready to get started? Let’s gather those ingredients and bring this nostalgic recipe to life!

Ingredients

To make these scrumptious Maple Glazed Apple Blondies, you’ll need the following ingredients:

  • 2 cups all-purpose flour
    The foundation of our blondies! If you’re looking for a gluten-free option, feel free to swap this out with a 1:1 gluten-free flour blend.

  • 1 tsp baking powder
    This will give our blondies that delightful lift. Always check the expiration date on your baking powder for the best rise!

  • 1/2 tsp salt
    A little salt goes a long way in amplifying flavors. If you’re using salted butter, you might want to reduce this to 1/4 tsp.

  • 1 cup butter (softened)
    Butter makes everything better! Make sure it’s softened to room temperature for easy mixing. Vegan butter or coconut oil can work here, too.

  • 1/4 cup sugar
    A touch of granulated sugar adds sweetness and contributes to browning. You can replace this with coconut sugar for a healthier option.

  • 1 cup dark brown sugar
    This adds rich molasses flavor and moisture. Light brown sugar works, but you’ll miss that deep flavor.

  • 2 large eggs
    Eggs help bind the ingredients and give the blondies that soft, chewy texture. You can substitute with unsweetened applesauce if you’d like to keep it egg-free.

  • 1 1/2 tsp vanilla extract
    Vanilla brings warmth and enhances all the other flavors. Always opt for pure vanilla extract for the best flavor!

  • 1/2 tsp cinnamon
    Cinnamon is a must for that cozy, comforting taste. You can also add a pinch of nutmeg for a little extra warmth if you like!

  • 2 large apples (chopped finely)
    I love using a mix of sweet and tart varieties for the best flavor. Granny Smith and Honeycrisp work wonderfully together.

  • 2 Tbsp brown sugar
    We’ll mix this with the apples to create a sweet caramelized layer that oozes flavor.

  • 1 Tbsp butter
    A touch of butter helps to sauté the apples, enhancing their flavor.

  • 1/4 cup pure maple syrup
    This deliciously sweet glaze is the star of the show! If you need a vegan option, agave syrup makes a great substitute.

  • 1/2 cup powdered sugar
    For thickening the glaze. Make sure it’s sifted for a smooth finish!

  • 1/4 tsp vanilla extract
    Just a splash, but it makes a sweet difference in the glaze!

  • 1/8 tsp ground cinnamon
    Adds an extra hint of warmth to the glaze.

Now that we’ve rounded up all the ingredients, let’s roll up our sleeves and dive into the magic of cooking!

Step-by-Step Instructions

  1. Preheat and Prep
    Preheat your oven to 350°F (175°C) and grease a 9×13 inch baking dish or line it with parchment paper for easy removal. A well-prepped pan means less chance of sticking and a beautiful finish!

  2. Mix Dry Ingredients
    In a medium bowl, whisk together the all-purpose flour, baking powder, salt, and cinnamon. Mixing these dry ingredients first ensures that the leavening agent activates evenly throughout the batter—trust me, that uniformity pays off in fluffy blondies!

  3. Cream Together Butter and Sugars
    In a large mixing bowl, cream the softened butter, granulated sugar, and dark brown sugar together until it’s light and fluffy. You can use a stand mixer or a hand mixer for this part (or even just good ol’ elbow grease!). This step is crucial as it incorporates air into the batter, making your blondies tender.

  4. Add Eggs and Vanilla
    Beat in the eggs, one at a time, ensuring each egg is fully integrated before adding the next, followed by the vanilla extract. The mixture should be well combined and smooth—this is where the flavor really starts to come together!

  5. Combine Wet and Dry Ingredients
    Gradually add the dry ingredients to the creamed mixture. Mix until just combined; a few lumps are perfectly fine! Overmixing at this stage can lead to tough blondies, and we want them soft and chewy.

  6. Fold in Chopped Apples
    Gently fold in the finely chopped apples. You want to distribute them evenly in the batter without overworking it. I love using a spatula for this—it keeps things gentle and effective.

  7. Prepare Apples for Topping
    In a small saucepan, melt the tablespoon of butter over medium heat. Add the chopped apples and sprinkle with the brown sugar and additional cinnamon, sautéing until just softened—about 5 minutes. The goal here is to caramelize the apples slightly. Your kitchen will smell divine!

  8. Layer and Bake
    Spread half of the blondie batter into your prepared baking dish. Top with the sautéed apple mixture, then dollop the remaining batter on top. Don’t worry about covering the apples completely—it’s okay to let some apple peek through! Bake for 25-30 minutes or until a toothpick inserted comes out clean. You want a light golden brown on the edges and a slightly gooey center.

  9. Cool and Prepare the Maple Glaze
    Allow the blondies to cool in the pan for about 10 minutes before transferring them to a wire rack to cool completely. In the meantime, let’s prepare that irresistible maple glaze! In a small bowl, whisk together the powdered sugar, maple syrup, vanilla extract, and ground cinnamon until it’s smooth and pourable. If it’s too thick, add a bit more maple syrup until you reach the desired consistency.

  10. Glaze and Serve
    Drizzle the maple glaze generously over the cooled blondies. Cut them into squares and stack them on a plate, drizzling any extra glaze on top for presentation. You’ll want to share these with friends, but be prepared—no one will want to stop at just one!

Serving Suggestions

These Maple Glazed Apple Blondies are delightful served warm with a scoop of vanilla ice cream or a dollop of whipped cream on top. They also pair beautifully with a warm cup of spiced cider or a cozy mug of hot cocoa. You can even sprinkle a few chopped nuts on top for an extra crunch! The possibilities are endless, and trust me, your friends and family will adore you for it!

Recipe Variations

  1. Nutty Delight: Add 1 cup of chopped walnuts or pecans to the batter for a satisfying crunch and extra richness.
  2. Caramel Drizzle: For a caramel twist, drizzle caramel sauce over the glazed blondies after they cool for a festive treat.
  3. Spooky Version: For Halloween, mix in some chocolate chips and top with crushed candy corn for a fun seasonal twist!
  4. Vegan Option: Swap out the butter for coconut oil, the eggs for applesauce, and use maple syrup instead of granulated sugar for a delicious vegan blondie!
  5. Fruit Fusion: Experiment with different fruits by adding berries, peaches, or pears along with the apples for a twist on flavors.

Chef’s Notes

This Maple Glazed Apple Blondies recipe has evolved from my grandmother’s original version, where she used just plain sugar and no glaze. Over the years, I’ve fallen in love with the caramelized apples and decided that a maple glaze was the perfect finishing touch. Every time I share these with friends, they rave about how soft, chewy, and flavorful they are! And honestly, there’s no better feeling than seeing someone’s eyes light up with that first bite.

Oh, and funny kitchen story: one time I forgot to add the eggs! I was halfway through baking when I realized, and in a panic, I whisked them in quickly, hoping for the best. They turned out a bit denser, but not in a bad way. I called them “emergency blondies.” They still vanished in record time!

FAQs and Troubleshooting

  • Why did my blondies turn out dry?
    Overbaking is often the culprit! Keep an eye on the baking time, and remember that they’ll continue to firm up as they cool.

  • Can I substitute the apples for another fruit?
    Absolutely! Pears or even diced peaches would be delightful additions. Just make sure to keep the fruit to a similar moisture content.

  • What if I don’t have maple syrup?
    You can use honey or agave syrup, although the flavor will differ slightly. For a more robust taste, try a homemade caramel sauce instead!

  • Can I freeze these blondies?
    Yes! Once cooled, wrap them tightly in plastic wrap or foil and store them in an airtight container in the freezer. They’ll stay fresh for up to 3 months. Just thaw at room temperature when you’re ready to enjoy!

Nutritional Info

While I believe in enjoying food without guilt, here’s a quick glance at the nutritional information for a standard piece (1 square):

  • Calories: 210
  • Fat: 8g
  • Carbs: 34g
  • Protein: 2g
  • Sugar: 15g

With a delightful combination of flavors, a hint of nostalgia, and an air of celebration, these Maple Glazed Apple Blondies are sure to become a favorite in your home just as they are in mine. So, grab those ingredients, turn on your favorite tunes, and get ready to bake up some sweet memories. Happy baking! 🍏🍂✨

Print

Maple Glazed Apple Blondies

Warm and gooey apple blondies drizzled with a rich maple glaze, perfect for cozy moments and sharing with loved ones.

  • Prep Time: 15 minutes
  • Cook Time: 30 minutes
  • Total Time: 45 minutes
  • Yield: 12 servings 1x
  • Category: Dessert
  • Method: Baking
  • Cuisine: American
  • Diet: Vegetarian

Ingredients

Scale
  • 2 cups all-purpose flour
  • 1 tsp baking powder
  • 1/2 tsp salt
  • 1 cup butter (softened)
  • 1/4 cup sugar
  • 1 cup dark brown sugar
  • 2 large eggs
  • 1 1/2 tsp vanilla extract
  • 1/2 tsp cinnamon
  • 2 large apples (chopped finely)
  • 2 Tbsp brown sugar
  • 1 Tbsp butter
  • 1/4 cup pure maple syrup
  • 1/2 cup powdered sugar
  • 1/4 tsp vanilla extract
  • 1/8 tsp ground cinnamon

Instructions

  1. Preheat your oven to 350°F (175°C) and grease a 9×13 inch baking dish or line it with parchment paper.
  2. Mix the all-purpose flour, baking powder, salt, and cinnamon in a medium bowl.
  3. Cream the softened butter, granulated sugar, and dark brown sugar together until light and fluffy.
  4. Add the eggs, one at a time, followed by the vanilla extract, mixing until smooth.
  5. Combine the dry ingredients with the creamed mixture, mixing until just combined.
  6. Fold in the finely chopped apples gently.
  7. Prepare the apples for topping by melting 1 tablespoon of butter, adding the chopped apples and brown sugar, and sautéing until softened.
  8. Layer half of the blondie batter in the baking dish, top with the sautéed apples, and dollop the remaining batter on top.
  9. Bake for 25-30 minutes or until a toothpick inserted comes out clean.
  10. Cool the blondies for 10 minutes before transferring them to a wire rack.
  11. Whisk together powdered sugar, maple syrup, vanilla extract, and ground cinnamon for the glaze.
  12. Glaze the cooled blondies and cut them into squares.

Notes

These blondies can be served warm with ice cream or whipped cream. Experiment with different fruits for variations!

Nutrition

  • Serving Size: 1 square
  • Calories: 210
  • Sugar: 15g
  • Sodium: 200mg
  • Fat: 8g
  • Saturated Fat: 5g
  • Unsaturated Fat: 3g
  • Trans Fat: 0g
  • Carbohydrates: 34g
  • Fiber: 1g
  • Protein: 2g
  • Cholesterol: 20mg

Keywords: blondies, dessert, maple glaze, apples, cozy treat

Did you make this recipe?

Share a photo and tag us — we can't wait to see what you've made!

June 25, 2026 |

Fall Apple Cider Cheesecake: Creamy 6-Ingredient Recipe

Delicious fall apple cider cheesecake topped with cinnamon and apple slices.

Apple Cider Cheesecake: A Slice of Fall in Every Bite

Welcome to the cozy world of dessert! There’s something magical about fall—crisp air, vibrant leaves, and of course, the delightful flavors of apples and warm spices. One of my favorite treats that perfectly embodies this season is none other than Apple Cider Cheesecake. If you’re searching for a dessert that embraces the spirit of autumn while making you feel all warm and fuzzy inside, you’re in for a real treat!

Now, cheesecake is often thought of as a heavy, indulgent dessert, but this version blends the rich creaminess of a classic cheesecake with the vibrant zest of apple cider. Can you imagine biting into a creamy slice of cheesecake that brings the taste of freshly pressed apple cider straight to your palate? Trust me, it’s a game-changer!

I remember the first time I made Apple Cider Cheesecake. It was during a chilly October weekend, and I was hosting a small gathering for some friends. As the smell of cinnamon and apples wafted through the air, it felt like a warm hug. I’d just pulled the cheesecake out of the oven, and it looked so glorious, my friends couldn’t help but squeal with delight. The best part? The first bite caused some happy dance moves around my kitchen! That moment solidified my love for this dessert, and it quickly became a staple during the fall months.

Today, I’m sharing my fail-proof recipe with you. Prepare your taste buds for a delicious blend of creaminess and warmth. Let’s make this fall favorite together!

Ingredients

Gather these simple ingredients for your Apple Cider Cheesecake. Each element plays a crucial role in creating that delicious, silky texture and flavorful experience!

  • 1 1/2 cups graham cracker crumbs
    The base of our cheesecake! They add a lovely crunch and subtle sweetness. If you’re feeling adventurous, you can substitute with crushed gingersnaps or vanilla wafers for a fun twist.

  • 1/3 cup sugar
    A little sweetness to balance the tanginess of the cream cheese. If you’re looking for a healthier version, consider using coconut sugar.

  • 1/2 cup unsalted butter, melted
    This creates that luscious, buttery flavor in the crust. Always go for unsalted to control the saltiness—your cheesecake will love you for it!

  • 4 (8-ounce) packages cream cheese, softened
    The star of the show! Cream cheese creates that smooth and creamy texture we crave. If you want a lighter version, feel free to use low-fat cream cheese; just don’t cut it completely out!

  • 1 cup sugar
    More sweetness here! You can use granulated or superfine sugar, the latter dissolves easily, ensuring a smooth filling.

  • 1 teaspoon vanilla extract
    Vanilla rounds out the flavors beautifully. For a gourmet twist, try using vanilla bean paste for those beautiful specks of vanilla throughout your cheesecake.

  • 4 large eggs
    Eggs are binding agents that help your cheesecake maintain its shape. You can use egg substitutes for a vegan option, but the texture will vary slightly.

  • 1 cup reduced fresh apple cider
    This is where the magic happens! The concentrated flavor of apple cider brings the essence of fall directly into each bite. This can also be substituted with apple juice if that’s what you have on hand.

  • 1 teaspoon cinnamon
    The warm spice that evokes memories of cozy autumn afternoons. Feel free to add more if you’re a cinnamon lover!

  • 1/4 teaspoon nutmeg
    This fragrant spice pairs beautifully with cinnamon, adding depth to your cheesecake. Just a pinch goes a long way!

Step-by-Step Instructions

Ready to dive into the cheesecakemaking process? Let’s create some magic!

1. Preheat your oven to 325°F (160°C).
This initial step is crucial! A well-heated oven ensures even cooking. As you get things rolling, let the comforting smell of warm spices fill your kitchen!

2. Prepare the crust.
In a medium bowl, combine the graham cracker crumbs, 1/3 cup sugar, and melted butter. Mix until the crumbs are thoroughly coated and resemble wet sand.
Chef tip: Don’t skimp on mixing! This will ensure a firm crust that holds its shape beautifully.

3. Press the crust into a springform pan.
Evenly spread the crumb mixture into the bottom of your pan, pressing it down firmly with the back of a measuring cup. Bake in the preheated oven for about 10 minutes until golden and fragrant.
Little hack: Let the crust cool while you whip up the filling; this way, you’ll get a perfectly layered cheesecake.

4. Make the filling.
In a large bowl, beat the softened cream cheese until creamy and smooth. Gradually add in 1 cup of sugar, whipping until light and fluffy. If you’re feeling the groove, dance a little while you mix!
Tip: Make sure your cream cheese is at room temperature; cold cream cheese can lead to lumps.

5. Add the eggs, one at a time.
Mixing on low speed, add the eggs, fully incorporating one before adding the next. This ensures a smooth filling!
Chef insight: Avoid overmixing at this stage; you want your cheesecake to be fluffy, not dense.

6. Incorporate the vanilla, apple cider, cinnamon, and nutmeg.
Blend these in until well combined. The aroma will be divine!
Hack: Save a spoonful of apple cider to drizzle on top as a finishing touch before serving—it adds a lovely glaze!

7. Pour the cheesecake filling over the crust.
Gently smooth the surface with a spatula. This is your time to shine—make it pretty!
Tip: If air bubbles form, give the pan a tap on the counter to release them.

8. Bake the cheesecake.
Place it in the oven and bake for about 50-60 minutes or until the edges are set but the center still has a slight jiggle. This slight wobble is your cue for a creamy texture!
Chef’s note: For a perfect cheesecake, consider a water bath—it helps maintain moisture.

9. Cool down.
Let the cheesecake cool slowly in the pan for about an hour before transferring it to the fridge. Chill for at least 4 hours, preferably overnight, to let those flavors meld. Patience is key, but I promise it’s worth it!

Serving Suggestions

When you’re ready to serve your Apple Cider Cheesecake, remove it from the springform pan and place it on a beautiful cake stand. Drizzle a little reduced apple cider glaze and sprinkle some cinnamon or chopped nuts on top for that extra flair. Pair it with a dollop of freshly whipped cream or vanilla ice cream to make it a showstopper!

Recipe Variations

This recipe is versatile and can easily be transformed. Here are some ideas to switch things up:

  1. Caramel Swirl: Drizzle caramel sauce on top before serving for a sweet contrast to the tanginess of the cream cheese.
  2. Nutty Crust: Add finely chopped nuts, like pecans or walnuts, to the crust for added crunch and flavor.
  3. Pumpkin Spice Twist: Replace the apple cider with pumpkin puree and add extra pumpkin spice for a seasonal twist.
  4. Vegan Version: Substitute cream cheese with vegan cream cheese and eggs with a flaxseed meal or chia seed mix combined with water.

Chef’s Notes

This recipe has evolved over the years, starting as a traditional cheesecake and morphing into this apple cider delight. The first time I made it, I made a rookie mistake: I forgot to add the spices! The resulting plain cheesecake was good, but it lacked the autumn warmth I craved. Learning from that, I now encourage everyone to play with flavors!

One of my favorite kitchen stories involves a chaotic Thanksgiving prep where I ended up using spiced cider instead of regular apple cider—it turned the whole cheesecake into a flavor bomb! Lesson learned: sometimes mistakes lead to the best creations.

FAQs and Troubleshooting

  1. Why did my cheesecake crack?
    Cracks can arise from drastic temperature changes. Try cooling your cheesecake gradually and avoid opening the oven door while it bakes.

  2. How can I tell when it’s done?
    Look for a set perimeter with a slightly jiggly center. The cheesecake will continue to firm up as it cools.

  3. Why does my cheesecake feel dense?
    Overmixing the batter or using cold cream cheese can lead to a dense texture. Aim for smooth, but don’t go overboard!

  4. How long does the cheesecake last?
    Your delicious creation can last up to 4-5 days in an airtight container in the fridge. If it lasts that long!

Nutritional Info

Though I aim for balance and flavor, here’s a quick glance at the nutritional info (per slice, based on 12 slices):

  • Calories: ~350
  • Total Fat: 25g
  • Saturated Fat: 15g
  • Cholesterol: 80mg
  • Sodium: 250mg
  • Total Carbohydrates: 28g
  • Dietary Fiber: 1g
  • Sugars: 20g
  • Protein: 6g

And there you have it—your very own Apple Cider Cheesecake recipe! I hope you whip this up in your kitchen, share it with loved ones, and create beautiful, sweet memories. Remember, the best ingredient is always a sprinkle of love. Enjoy every creamy, delicious bite!

Print

Apple Cider Cheesecake

A delightful blend of creamy cheesecake with the flavors of apple cider and warm spices, perfect for autumn.

  • Prep Time: 15 minutes
  • Cook Time: 60 minutes
  • Total Time: 75 minutes
  • Yield: 12 servings 1x
  • Category: Dessert
  • Method: Baking
  • Cuisine: American
  • Diet: Vegetarian

Ingredients

Scale
  • 1 1/2 cups graham cracker crumbs
  • 1/3 cup sugar
  • 1/2 cup unsalted butter, melted
  • 4 (8-ounce) packages cream cheese, softened
  • 1 cup sugar
  • 1 teaspoon vanilla extract
  • 4 large eggs
  • 1 cup reduced fresh apple cider
  • 1 teaspoon cinnamon
  • 1/4 teaspoon nutmeg

Instructions

  1. Preheat your oven to 325°F (160°C).
  2. Prepare the crust by combining the graham cracker crumbs, 1/3 cup sugar, and melted butter.
  3. Press the crust into a springform pan, spreading evenly and baking for about 10 minutes.
  4. Make the filling by beating the softened cream cheese until creamy and smooth.
  5. Add the eggs, one at a time, mixing on low speed.
  6. Incorporate the vanilla, apple cider, cinnamon, and nutmeg until well combined.
  7. Pour the cheesecake filling over the crust.
  8. Bake the cheesecake for about 50-60 minutes or until edges are set.
  9. Cool down for about an hour before refrigerating for at least 4 hours.

Notes

Serve with drizzled apple cider glaze and a dollop of whipped cream.

Nutrition

  • Serving Size: 1 slice
  • Calories: 350
  • Sugar: 20g
  • Sodium: 250mg
  • Fat: 25g
  • Saturated Fat: 15g
  • Unsaturated Fat: 10g
  • Trans Fat: 0g
  • Carbohydrates: 28g
  • Fiber: 1g
  • Protein: 6g
  • Cholesterol: 80mg

Keywords: cheesecake, apple cider, fall dessert, autumn recipe, sweet treat

Did you make this recipe?

Share a photo and tag us — we can't wait to see what you've made!