Cleanplate Cravings

Cleanplate Cravings

May 22, 2026 |

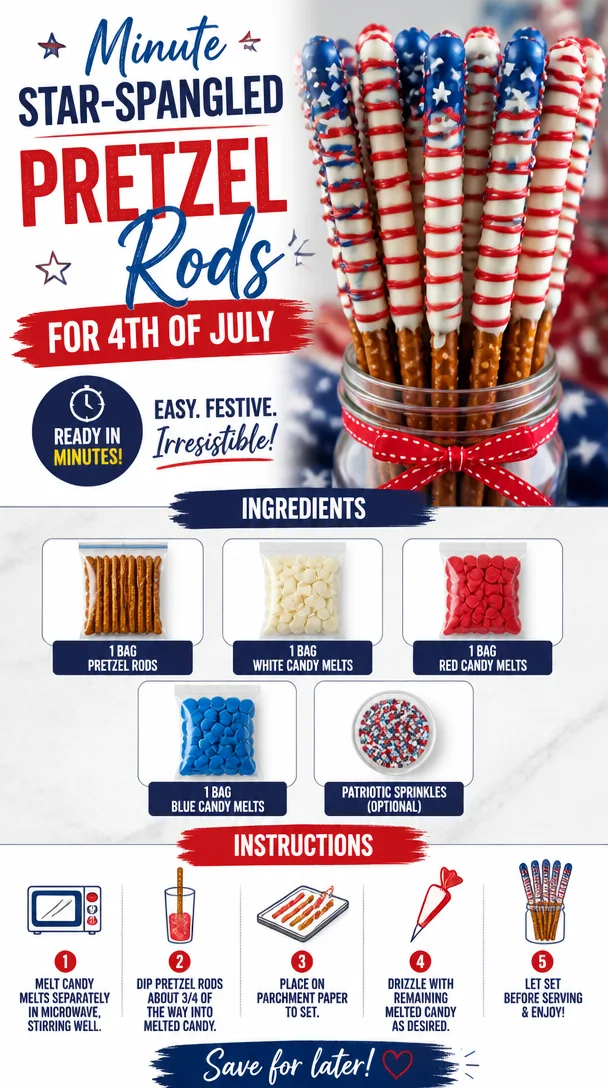
Minute Star-Spangled Pretzel Rods for 4th of July

Star-Spangled Pretzel Rods for 4th of July celebration

Patriotic Pretzel Rods: A Fun and Festive Treat

Welcome to another delicious adventure in the kitchen! Today, we’re diving into a super fun treat that’s perfect for all those festive occasions when you want to show off your patriotic spirit. Think about Fourth of July picnics, Memorial Day barbecues, or just a fun snack to munch on while watching fireworks. We’re making Patriotic Pretzel Rods that are as delightful to eat as they are to look at.

These sweet and salty treats are easy to whip up and are guaranteed to impress your friends and family, whether you’re the host or just bringing a dish to share. Plus, they offer the perfect canvas for your creative side! So let’s get our aprons on and get ready to celebrate with style, flavor, and a little bit of color.

A Special Memory in the Kitchen

Thinking back to my childhood, I remember summer days filled with sunshine and laughter. One particular memory stands out: the Fourth of July back when I was around eight years old. My family would gather at my grandmother’s house, where her backyard transformed into a vibrant hub of red, white, and blue decorations.

I was always fascinated by the bustling kitchen where my grandmother made her famous snacks. The smell of fireworks mixed with the scent of her buttery popcorn wafting through the air was pure magic. One year, she surprised us all with chocolate-dipped pretzel sticks, but instead of wrapping them in chocolate, she used colorful candy melts, making them festive and fun!

We all eagerly dipped pretzel rods into those vibrant melts and decorated them with sprinkles. It became a delightful family tradition that I cherished more than the fireworks. And now, I carry that tradition forward, sharing it through these Patriotic Pretzel Rods, making memories and indulging in sweet nostalgia every time!

Ingredients You’ll Need

To make these fabulous Patriotic Pretzel Rods, gather the following ingredients:

  • 1 bag pretzel rods
    The sturdy base for our treat! You can use traditional pretzel rods or opt for gluten-free ones if you have dietary restrictions.

  • 1 bag white candy melts
    These are perfect for creating a beautiful base layer. If you can’t find candy melts, almond bark or white chocolate can serve as great alternatives.

  • 1 bag red candy melts
    A splash of bold color! You can substitute with dark chocolate dyed with red food coloring for a different flavor profile.

  • 1 bag blue candy melts
    Keep the patriotic theme vibrant! Just like the red, you can swap this for blue chocolate or sprinkles if you’re feeling creative.

  • Patriotic sprinkles (optional)
    These add the finishing touch! If you don’t have themed sprinkles, feel free to use any festive ones you have on hand—they’ll still look fabulous!

Step-by-Step Instructions

Now that we’ve got our ingredients, let’s dive into this fun process!

  1. Prepare Your Workspace
    Start by laying down parchment paper on a baking sheet. This will provide a non-stick surface to place your completed pretzel rods on and make cleanup a breeze!

  2. Melt the Candy
    Divide the candy melts into separate microwave-safe bowls (red, white, and blue). Microwave each bowl separately in 30-second intervals, stirring in between until fully melted. Be cautious not to overheat them! If you find the melts too thick, add a teaspoon of coconut oil or shortening—this helps to create a smoother consistency for dipping.

  3. Dip the Pretzel Rods
    Grab a pretzel rod and dip it into the white candy melts, leaving a few inches at the bottom uncoated for a sturdy handle. Let any excess drip off. Place it carefully on the parchment paper. Repeat this with the remaining rods. Dip half in white for a classic look, or do a third to create fun stripes!

  4. Add Color
    While the white chocolate is still wet, gently swirl in the red or blue candy melts. You can also create colorful zigzag patterns with a piping bag if you’re feeling ambitious. The key is to be creative—this is where you can really have fun!

  5. Sprinkle Away!
    Before the candy melts set, sprinkle your patriotic sprinkles over the dipped pretzels. This is where you can go all out! The more, the merrier when it comes to sprinkles.

  6. Let Them Set
    Allow the pretzel rods to sit for about 30 minutes to an hour, or until the chocolate has hardened. You can speed up the process by placing them in the refrigerator for about 10-15 minutes.

Serving Suggestions

When you’re ready to serve these delightful treats, you can arrange them in a glass jar for a festive centerpiece, or place them casually on a large platter. Pair them with sweet fruit dips or serve alongside other Patriotic-themed snacks for a fun-filled celebration. Trust me—these colorful rods look as good as they taste!

Creative Variations

Bring your own twist to these Patriotic Pretzel Rods with these variations:

  1. Nutty Delight: After dipping the pretzels in candy melts, roll them in finely chopped nuts, like almonds or peanuts, for an added crunch.

  2. Cookie Crumble: Crush some Oreo cookies and sprinkle them over the dipped pretzels for a delightful cookies-and-cream flavor.

  3. Spicier Sweet: Add a dash of cayenne or sea salt to the melted chocolate for a sweet and spicy kick.

  4. Different Colors: Customize the colors to match your team’s colors for that big game day or a birthday celebration!

  5. Doughnut Inspiration: Instead of using sprinkles, use mini doughnuts or cereal (like Fruity Pebbles) to create a unique twist!

Chef’s Notes

Creating these Patriotic Pretzel Rods has been an evolving journey for me. What started as a fun kitchen project with my grandmother has transformed into a joyful tradition I love to share with friends and family. I often experiment by swapping out different flavors of candies or adding unexpected toppings. The laughter and good times shared over these treats remind me that every bite holds a special story.

And let’s not forget—sometimes in the kitchen, things don’t go as planned! I once dipped a rod in green by accident. Guess what? A “Patriotic Alien” rod emerged! It didn’t match the holiday theme, but it sure made for a great snack and a lot of laughs!

Frequently Asked Questions

  1. Can I make these ahead of time?
    Absolutely! You can make Patriotic Pretzel Rods a day in advance. Just store them in an airtight container at room temperature to keep them fresh.

  2. What if my candy melts aren’t melting smoothly?
    If you notice your melts are clumping, it could be due to overheating. Try adding a bit of coconut oil to re-heat and stir until smooth. It’s an excellent trick to help with consistency!

  3. Can I use regular chocolate instead of candy melts?
    Yes! Chocolate can be a tasty alternative. Just make sure to temper it if you want that glossy finish and snap.

  4. What if I don’t have sprinkles?
    No worries! You can use any colorful toppings you have on hand, like crushed cookies, nuts, or even mini chocolate chips.

Nutritional Info (Optional)

While I don’t typically count the calories during summer celebrations, this treat is certainly on the lighter side compared to many desserts. Here’s a rough estimate per pretzel (assuming 1 pretzel rod with toppings):

  • Calories: 100
  • Total Fat: 4g
  • Carbohydrates: 15g
  • Protein: 1g

These numbers depend on how much candy melts and toppings you use, so feel free to adjust according to your preferences!


So there you have it—my love for the kitchen and all things tasty wrapped up in these Patriotic Pretzel Rods. Grab your favorite people, whip up this treat, and make memories that will last a lifetime. It’s all about cooking with joy, sharing, and indulging in the vibrant flavors of summer. Let’s raise our snacks and enjoy the festivities! Happy cooking!

Print

Patriotic Pretzel Rods

Fun and festive pretzel rods decorated with colorful candy melts and sprinkles, perfect for celebrations.

  • Prep Time: 15 minutes
  • Cook Time: 0 minutes
  • Total Time: 45 minutes
  • Yield: 12 servings 1x
  • Category: Dessert
  • Method: No-Cook
  • Cuisine: American
  • Diet: Vegetarian

Ingredients

Scale
  • 1 bag pretzel rods
  • 1 bag white candy melts
  • 1 bag red candy melts
  • 1 bag blue candy melts
  • Patriotic sprinkles (optional)

Instructions

  1. Prepare your workspace by laying down parchment paper on a baking sheet.
  2. Melt the candy melts in separate microwave-safe bowls, heating each in 30-second intervals until fully melted.
  3. Dip a pretzel rod into the white candy melts, leaving a few inches uncoated at the bottom, and place it on parchment paper.
  4. Add red or blue candy melts while the white chocolate is still wet, swirling or piping creatively.
  5. Sprinkle with patriotic sprinkles before the melts set.
  6. Let the pretzel rods sit for 30 minutes to an hour to harden, or refrigerate for a faster setting.

Notes

These pretzel rods can be made a day in advance and stored in an airtight container. Experiment with different toppings for creativity!

Nutrition

  • Serving Size: 1 pretzel rod
  • Calories: 100
  • Sugar: 10g
  • Sodium: 200mg
  • Fat: 4g
  • Saturated Fat: 2g
  • Unsaturated Fat: 2g
  • Trans Fat: 0g
  • Carbohydrates: 15g
  • Fiber: 0g
  • Protein: 1g
  • Cholesterol: 0mg

Keywords: patriotic, pretzel rods, fourth of july, snack, festive treat

Did you make this recipe?

Share a photo and tag us — we can't wait to see what you've made!

May 22, 2026 |

4th of July Monster Cookies: 30-Minute Patriotic Treats

Plate of colorful 4th of July Monster Cookies decorated with red, white, and blue sprinkles

4th of July Monster Cookies: A Sweet Celebration!

Happy 4th of July! It’s that time of year again when we gather with friends and family, fire up the grill, and celebrate our freedom under a sky filled with fireworks. While the hot dogs and burgers might be at the forefront of your July 4th menu, what about dessert? You can’t go wrong with a cookie that packs a punch, not just in flavor but in joy! Today, I’m thrilled to share my recipe for 4th of July Monster Cookies—the perfect sweet treat for your summer festivities.

These cookies are a delightful blend of gooey chocolate chips, vibrant M&M’s, and a hint of nostalgia that will bring you back to childhood days of baking with your parents or grandparents. With each bite, you’ll experience not only the flavors but also the chuckles and sweet memories of past celebrations. They’re easy to make, fun to eat, and visually striking—everything you need for a festive gathering.

Picture this: You and your loved ones lounging outside, the sun setting, laughter ringing through the air, and the aroma of freshly baked cookies wafting from the kitchen. Nothing beats that, right? So, roll up those sleeves, and let’s whip up a batch of these deliciously colorful Monster Cookies that will brighten your holiday and leave everyone asking for seconds.

A Whimsical Cookie Memory

When I think of cookies from my childhood, I am instantly transported to my grandma’s kitchen. Her small, cozy space was filled with the sweet aroma of baked goods, and her kitchen became a haven for creativity. One summer afternoon, I remember her introducing me to the magical world of cookies. Armed with a colorful bowl of sprinkles and a variety of tasty ingredients, we created a cookie explosion that looked like a party itself!

It was on that day—while I illegally snuck handfuls of chocolate chips and M&Ms—that the idea of Monster Cookies was born. Inspired by that spirit of joy, laughter, and indulgence, I developed this recipe that encapsulates all those feelings in one bite. Every time I take a warm cookie out of the oven, I’m flooded with memories of summer fun spent baking and enjoying the company of loved ones. And today, I want to pass that magic along to you!

Ingredients You’ll Need

Here’s what you’ll need to make these hearty, delightful Monster Cookies:

  • 1 cup browned butter

    • Browning the butter gives a nutty flavor that elevates these cookies. You can substitute with regular unsalted butter, but don’t miss out on that toasty goodness if you can help it!
  • 1 cup brown sugar

    • This helps create a chewy texture. You can replace it with coconut sugar for a lighter option, but the flavor will vary slightly.
  • 1/2 cup granulated sugar

    • Adds sweetness and contributes to the crunchy exterior. If you’re looking to cut down on sugar, feel free to reduce the amount but it might affect that crispy edge!
  • 1 cup peanut butter

    • Creamy or crunchy, it adds richness and flavor. Almond or sun butter can be used for a different taste.
  • 2 large eggs

    • They bind everything together and provide moisture. You can swap these with a flaxseed mixture if you want to go egg-free.
  • 2 teaspoons vanilla extract

    • This adds a warm, comforting aroma. Always opt for pure vanilla extract if possible for an authentic flavor.
  • 3 cups all-purpose flour

    • This forms the base of your cookies. Whole wheat flour can be used for a healthier twist but may affect the consistency a bit.
  • 1 teaspoon baking soda

    • A crucial ingredient for that pillowy texture. Make sure it’s fresh to achieve the best rise.
  • 1/2 teaspoon salt

    • Just a pinch balances all the sweetness. Feel free to use sea salt for extra flavor!
  • 1 cup chocolate chips

    • Semi-sweet or dark, they add a melty chocolatey goodness. Swap with white chocolate or butterscotch chips for a fun variation.
  • 1 cup M&Ms

    • These colorful candies bring the festive spirit for the 4th of July! To make them healthier, you can use dark chocolate or yogurt-covered variants.
  • 1/2 cup oats

    • Oats provide texture and a bit of heartiness. You can use quick oats or rolled oats, depending on what you have on hand.

Step-by-Step Instructions

Now let’s roll up our sleeves and get started! Follow these steps to create your own Monster Cookies.

  1. Brown the Butter:

    • In a saucepan over medium heat, melt the butter. Stir it frequently until it turns golden brown and you can smell that delicious nutty aroma. This will take about 5-7 minutes. Once browned, remove it from the heat and allow it to cool slightly. A little tip: don’t walk away from the stove, or your butter may burn!
  2. Mix the Sugars:

    • In a large mixing bowl, combine the browned butter, brown sugar, and granulated sugar. Use a mixer or a whisk and blend until it’s well combined and creamy. The mix should be a pale tan color; this is a good sign!
  3. Add Peanut Butter & Eggs:

    • Stir in the peanut butter until smooth, then add the eggs one at a time. Incorporate the vanilla extract until everything is mixed uniformly. A tip for easier mixing: make sure the peanut butter is at room temperature; it will blend in more easily.
  4. Dry Ingredients:

    • In a separate bowl, whisk together the flour, baking soda, and salt. Gradually add this mixture to your wet ingredients. Mix until just combined—over-mixing can lead to tough cookies, and we want them soft and chewy!
  5. Add the Goodies:

    • Fold in the chocolate chips, M&Ms, and oats gently. I love using a spatula for this step because it makes sure everything is evenly distributed without over-mixing. Trust me; every bite should have a bit of everything!
  6. Chill the Dough:

    • This step is optional but highly recommended! Place your dough in the fridge for at least 30 minutes. This helps the flavors meld together and results in thicker cookies.
  7. Preheat the Oven:

    • Preheat your oven to 350°F (175°C). Line a baking sheet with parchment paper—this will prevent sticking and make clean-up a breeze.
  8. Scoop & Bake:

    • Use a large cookie scoop (or a tablespoon) to portion out the dough onto the prepared baking sheet. Leave space between them as they will spread slightly. Bake for 10-12 minutes or until the edges are golden brown but the centers are still soft.
  9. Cool & Enjoy:

    • Remove from the oven, and let them cool for a few minutes on the baking sheet before transferring them to a wire rack. This allows them to firm up a bit, and you’ll get that perfect texture!

Serving Suggestions

When it comes to serving these Monster Cookies, let your creativity shine! You can stack them high on a decorative platter and place them front and center at your BBQ or picnic. Add in some fresh berries for a pop of color and a little freshness. You can also wrap them in clear cellophane for beautiful party favors that everyone will cherish. Pro tip: Serve them warm with a scoop of vanilla ice cream on top for the ultimate indulgence—think ice cream sandwich meets cookie heaven!

Recipe Variations

Get creative with these Monster Cookies! Here are some fun options:

  • Nut Variations: Swap the peanut butter for almond or cashew butter for a unique twist.
  • Flavor Additions: Add in some cinnamon or nutmeg for a warm, spiced flavor that contrasts beautifully with the chocolate.
  • Dairy-Free Delight: Use dairy-free chocolate chips and nut butter for a tasty vegan option.
  • Fruit Zests: Mix in some dried cranberries or chopped nuts to provide a different texture and flavor.

Chef’s Notes

Since I started baking Monster Cookies, they’ve evolved from simply being for the 4th of July to a year-round favorite at parties, picnics, and family gatherings. I’ve played with different flavor profiles, and each time I whip up a batch, it churns out new memories and laughter around the kitchen. Just the other day, my niece took it upon herself to add sprinkles to the cookie dough, turning these cookies into a rainbow celebration! It’s a reminder that baking is not just about the end product but also about the joy and memories we create along the way.

FAQs and Troubleshooting

Why are my cookies flat?

If your cookies spread too much, consider chilling your dough a bit longer or checking that the butter wasn’t too hot when combined with sugars.

Can I freeze these cookies?

Absolutely! You can freeze the cookies after baking. Make sure they’re completely cooled, then place them in an airtight container. They’ll last for up to three months.

How do I know when my cookies are done?

Look for a slightly golden edge but a soft center. Remember, they’ll continue to bake as they cool!

My dough seems too dry. What should I do?

If you find your dough is too dry, add a splash of milk or another egg to bring it together.

Nutritional Info

If you’re watching your calories, keep in mind that these cookies are rich and loaded with goodness! Each cookie (based on the recipe yielding about 24 cookies) contains roughly:

  • Calories: 210
  • Fat: 10g
  • Carbohydrates: 30g
  • Protein: 4g

Remember, these are indulgent treats meant to be enjoyed, so savor every bite!

Final Thoughts

I hope you’re as excited as I am to whip up a batch of these 4th of July Monster Cookies and create lasting memories with your loved ones. Baking is a beautiful way to share joy, and there’s nothing quite like that first bite of a warm, gooey cookie fresh from the oven. Whether you’re dressing them up for the holiday or enjoying them any old day, these cookies are sure to please. Happy baking, and remember, every day is worth celebrating—so let’s keep it fresh, simple, and seriously delicious!

Print

4th of July Monster Cookies

Delightful cookies packed with chocolate chips and M&Ms, perfect for summer celebrations.

  • Prep Time: 15 minutes
  • Cook Time: 12 minutes
  • Total Time: 45 minutes
  • Yield: 24 cookies 1x
  • Category: Dessert
  • Method: Baking
  • Cuisine: American
  • Diet: Vegetarian

Ingredients

Scale
  • 1 cup browned butter
  • 1 cup brown sugar
  • 1/2 cup granulated sugar
  • 1 cup peanut butter
  • 2 large eggs
  • 2 teaspoons vanilla extract
  • 3 cups all-purpose flour
  • 1 teaspoon baking soda
  • 1/2 teaspoon salt
  • 1 cup chocolate chips
  • 1 cup M&Ms
  • 1/2 cup oats

Instructions

  1. Brown the butter: In a saucepan over medium heat, melt the butter. Stir it frequently until it turns golden brown and you can smell that delicious nutty aroma. This will take about 5-7 minutes. Once browned, remove it from the heat and allow it to cool slightly.
  2. Mix the sugars: In a large mixing bowl, combine the browned butter, brown sugar, and granulated sugar. Use a mixer or a whisk and blend until it’s well combined and creamy.
  3. Add peanut butter & eggs: Stir in the peanut butter until smooth, then add the eggs one at a time. Incorporate the vanilla extract until everything is mixed uniformly.
  4. Mix dry ingredients: In a separate bowl, whisk together the flour, baking soda, and salt. Gradually add this mixture to your wet ingredients. Mix until just combined.
  5. Add the goodies: Fold in the chocolate chips, M&Ms, and oats gently.
  6. Chill the dough: Place your dough in the fridge for at least 30 minutes.
  7. Preheat the oven: Preheat your oven to 350°F (175°C). Line a baking sheet with parchment paper.
  8. Scoop & bake: Use a large cookie scoop (or a tablespoon) to portion out the dough onto the prepared baking sheet. Bake for 10-12 minutes or until the edges are golden brown.
  9. Cool: Remove from the oven, and let them cool for a few minutes on the baking sheet before transferring them to a wire rack.

Notes

Serve with ice cream for an indulgent treat!

Nutrition

  • Serving Size: 1 cookie
  • Calories: 210
  • Sugar: 14g
  • Sodium: 150mg
  • Fat: 10g
  • Saturated Fat: 4g
  • Unsaturated Fat: 6g
  • Trans Fat: 0g
  • Carbohydrates: 30g
  • Fiber: 1g
  • Protein: 4g
  • Cholesterol: 30mg

Keywords: Monster Cookies, 4th of July, Cookies, Dessert, Summer Treat

Did you make this recipe?

Share a photo and tag us — we can't wait to see what you've made!

May 22, 2026 |

Refresh Your Summer: 5-Ingredient Raspberry Mojito

Refreshing raspberry mojito cocktail garnished with fresh raspberries and mint

Refreshing Raspberry Mojito: A Splash of Summer in Every Sip

Welcome back, food lovers! Today, we’re diving into a crowd-pleaser that’s perfect for those sunny afternoons when you want something deliciously refreshing: the Raspberry Mojito. Whether you’re lounging by the pool, hosting a garden party, or simply unwinding after a long day, this drink is your go-to for both hydration and a hint of indulgence. Plus, it’s super easy to whip up, making it a perfect addition to your collection of must-have summer sips.

Now, when I think of mojitos, I can’t help but reminisce about the summer gatherings at my Grandma Lily’s house, where the garden was bursting with color, and laughter was the soundtrack of our afternoons. I remember her mixing up the drinks, with fresh mint sprigs straight from her garden, and the kitchen filled with that irresistible minty aroma. As she muddled the ingredients together, I couldn’t help but feel an air of excitement. Little did I know back then that I’d be crafting my own variations of those delightful summer drinks one day!

So, let’s channel that summer vibe and get started on this Raspberry Mojito! This recipe is not only vibrant and tasty, but it’s also a delightful way to showcase the beauty of fresh ingredients. Trust me; your friends and family will be impressed. Are you ready? Let’s mix it up!

Personal Story

Ah, the Raspberry Mojito. It brings back such cherished memories of summer days spent with my friends at the local park, blankets sprawled out on the grass, laughing and sharing stories over homemade snacks. One particularly unforgettable summer afternoon, my friend Mia showed up with a pitcher of her raspberry mojitos, a recipe she had just perfected. Those drinks were the perfect blend of sweetness and zesty lime, with the fresh mint creating an explosion of flavor. The vibrant color of the raspberries danced in the sunlight, and each sip was more refreshing than the last.

That day marked the beginning of my love affair with mojitos, and it wasn’t long before I found myself experimenting with flavors and ingredients, putting my own twist on this classic beverage. The Raspberry Mojito, however, always holds a special place in my heart and recipe book. It’s more than just a drink; it’s a delicious homage to the joyful times spent with people I love, surrounded by the beauty of nature and good company.

Ingredients

Here’s what you’ll need to create the perfect Raspberry Mojito:

  • 1 cup fresh raspberries
    These juicy gems not only bring a beautiful color to your drink but also offer a nice tangy sweetness. If you can’t find fresh raspberries, feel free to substitute them with frozen ones—just allow them to thaw before use.

  • 10 fresh mint leaves
    Mint is the star of the show in a mojito! For maximum flavor, use fresh mint. If you’re in a pinch, spearmint or peppermint can be used as alternatives, but always go for the freshest option you can find.

  • 2 tablespoons sugar
    This adds a touch of sweetness to balance the tartness of the raspberries and the brightness of the lime. You can substitute regular granulated sugar with coconut sugar or a sugar alternative like stevia or agave syrup if you prefer a healthier option.

  • 1 lime, juiced
    Fresh lime juice is a must for that zesty kick! If you don’t have lime on hand, lemon juice works as a substitute but will impart a different flavor profile.

  • 1 cup soda water
    This adds fizz and helps balance the sweetness of the sugar and raspberries. Don’t have soda water? You can use tonic water or a lemon-lime soda for a sweeter twist.

  • Ice
    Essential for keeping your drink chilled and refreshing on those hot summer days!

  • Mint sprigs for garnish
    A touch of mint on top not only looks beautiful but also enhances the fantastic mint aroma as you sip your drink.

Step-by-Step Instructions

  1. Muddle the Raspberries and Mint
    In a sturdy glass or cocktail shaker, add the fresh raspberries and mint leaves. Using a muddler or the back of a spoon, gently press down to release the juices from the raspberries and the essential oils from the mint. Be careful not to over-muddle; you want to avoid tearing the mint leaves too much, as this can lead to a bitter taste. Just enough pressure to infuse those delightful flavors will do!

  2. Add the Sugar and Lime Juice
    Now it’s time to sprinkle in the sugar and squeeze your lime juice into the glass. Stir everything together gently until the sugar begins to dissolve. The acidity of the lime will help dissolve the sugar, creating a flavorful base for your mojito. If you’re using an alternative sweetener, add it at this point!

  3. Mix in Soda Water
    Pour in your soda water gradually, allowing the fizzy bubbles to combine with the muddled raspberry and mint mixture. Give it a gentle stir to mix everything together without losing too much carbonation. This is where the magic happens! The lightness of the soda water enhances the fresh flavors and keeps your drink refreshing.

  4. Add Ice and Serve
    Fill your glass with ice! I love using crushed ice for mojitos because it looks beautiful and keeps your drink icy cold. Pour the remaining mojito mixture over the ice. If you find your glass isn’t full enough, don’t hesitate to top it off with a splash more soda water.

  5. Garnish and Enjoy!
    Finally, finish your Raspberry Mojito with a couple of mint sprigs on top. You can also add a raspberry or two for an extra pop of color! Serve it with a fun straw or cocktail umbrella to really bring out those summer vibes. Now sit back, take a sip, and enjoy that refreshing burst of flavor!

Serving Suggestions

When it comes to serving your Raspberry Mojito, presentation is key! Pour the vibrant drink into a tall glass, and don’t be shy with the ice. If you’re feeling fancy, you can even rim the glass with sugar for a sweet touch. Pair it with some crunchy, salty snacks like tortilla chips and fresh guacamole, or serve it alongside a light summer salad for a delightful afternoon feast. This drink is perfect for both casual get-togethers and chic gatherings alike.

Recipe Variations

Feeling adventurous? Here are a few creative twists to elevate your Raspberry Mojito experience:

  • Berry Blast: Substitute some of the raspberries with muddled strawberries or blueberries for a mixed berry mojito.
  • Coconut Twist: Add a splash of coconut water for a tropical vibe.
  • Spicy Kick: Throw in a few slices of jalapeño while muddling to add a hint of spice to your drink.
  • Herbal Boost: Experiment with other herbs like basil or even rosemary in place of mint for a unique flavor profile.
  • Sparkling Lavender: Infuse your soda water with a touch of lavender syrup for a floral twist!

Chef’s Notes

Over the years, this Raspberry Mojito recipe has seen its fair share of experimentation in my kitchen! I’ve tried various fruits, sweetness levels, and even different types of mint. I have found that while the classic combo is unbeatable, there’s always room for creativity. Just the other day, I made a blueberry-lime mojito that was simply heavenly! Everyone has their own personal preferences, and that’s the beauty of cooking and mixing drinks. The best part? No matter how you customize it, you’re still left with that same refreshing experience.

FAQs and Troubleshooting

  1. What if I don’t have fresh raspberries?
    If fresh raspberries are out of season or unavailable, frozen raspberries work perfectly fine—just remember to thaw them before muddling.

  2. How do I make my drink less sweet?
    If you’re looking to cut down on the sweetness, reduce the amount of sugar or opt for a natural sweetener that’s less sweet than sugar, like stevia.

  3. Can I make this a non-alcoholic version?
    Absolutely! Simply follow the same recipe but omit any alcohol, and enjoy it as a refreshing mocktail.

  4. My mint leaves turned brown in the muddling process. What happened?
    Over-muddling can bruise mint leaves and make them bitter. Use a gentle touch and apply just enough pressure to release the flavors without breaking them down too much.

Nutritional Info

While I typically focus more on the flavor rather than the numbers, a standard Raspberry Mojito contains roughly:

  • Calories: 120-150 per serving (depending on sugar used)
  • Sugar: 20-25 grams
  • Carbohydrates: 27 grams
  • Fat: 0 grams
  • Protein: 0 grams

These numbers can vary with alternative sweeteners and portion sizes, so keep that in mind as you make adjustments!

Now that you have all the tools and techniques for crafting a delightful Raspberry Mojito, I can’t wait for you to try it out! Remember, healthy and delicious doesn’t have to be complicated. With fresh ingredients and a bit of love, you can create something that not only tastes incredible but also brings joy to your daily life. Cheers to refreshing summer sips and joyful moments! Enjoy!

Print

Refreshing Raspberry Mojito

A vibrant and refreshing Raspberry Mojito, perfect for summer gatherings and relaxation.

  • Prep Time: 10 minutes
  • Cook Time: 0 minutes
  • Total Time: 10 minutes
  • Yield: 2 servings 1x
  • Category: Beverage
  • Method: Mixing
  • Cuisine: Cocktail
  • Diet: Vegan

Ingredients

Scale
  • 1 cup fresh raspberries
  • 10 fresh mint leaves
  • 2 tablespoons sugar
  • 1 lime, juiced
  • 1 cup soda water
  • Ice
  • Mint sprigs for garnish

Instructions

  1. Muddle the raspberries and mint in a sturdy glass or cocktail shaker.
  2. Add the sugar and lime juice, stirring gently until the sugar dissolves.
  3. Mix in soda water gradually, stirring gently.
  4. Add ice to the glass.
  5. Pour the mojito mixture over the ice and top with more soda water if desired.
  6. Garnish with mint sprigs and serve!

Notes

Use fresh mint for the best flavor. Can substitute with frozen raspberries if fresh are unavailable.

Nutrition

  • Serving Size: 1 serving
  • Calories: 150
  • Sugar: 25g
  • Sodium: 0mg
  • Fat: 0g
  • Saturated Fat: 0g
  • Unsaturated Fat: 0g
  • Trans Fat: 0g
  • Carbohydrates: 27g
  • Fiber: 2g
  • Protein: 1g
  • Cholesterol: 0mg

Keywords: Raspberry Mojito, Summer Drinks, Refreshing Cocktail, Non-Alcoholic Drink

Did you make this recipe?

Share a photo and tag us — we can't wait to see what you've made!

May 22, 2026 |

Coconut Pineapple Mojito: 5-Ingredient Summer Cocktail

Refreshing Coconut Pineapple Mojito cocktail with tropical flavors

Refreshing Coconut Mojito with Pineapple: A Taste of Paradise

Ah, the coconut mojito with pineapple—this tropical delight is the perfect way to elevate any gathering, or simply treat yourself after a long day. Picture this: you’re lounging in a hammock, the sun is setting, and a gentle breeze cradles you in bliss. While you might not always find yourself in a tropical paradise, you can definitely bring the essence of one to your kitchen with this easy, refreshing cocktail.

Let’s be honest, the traditional mojito is a classic, but what happens when you infuse it with creamy coconut and sweet pineapple? Pure magic! Kind of like a vacation in a glass. This cocktail is bursting with flavor, combining the tangy brightness of lime with the sweetness of fresh pineapple and a cool minty finish.

And here’s the best part—it’s super easy to make! Whether you’re hosting a summer BBQ, celebrating a birthday, or just unwinding at the end of a busy week, this coconut mojito brings all the feels with none of the fuss. So grab your blender, a few fresh ingredients, and let’s create something that’ll have your taste buds dancing!

A Slice of Nostalgia

I can still remember the first time I enjoyed a mojito on a sun-soaked beach in Costa Rica. The salty breeze contrasted perfectly with the sweetness of the drink, making every sip feel like pure bliss. I was there with friends, lounging under swaying palm trees, laughing and sharing stories as the sun dipped below the horizon.

Not long after returning, I found myself in a cozy kitchen experimenting with cocktails, a newfound tradition of mine, trying to replicate that beachside moment. With my love for coconut and pineapple, I decided to create a fruity twist on the classic mojito. The first time I introduced my Coconut Mojito with Pineapple to friends, their eyes lit up with delight, just like mine did on that beach. And honestly? Every sip takes me back to that unforgettable moment. That’s the magic of food, isn’t it? It transports you back to cherished memories while creating new ones.

Ingredients

Let’s gather our ingredients! This recipe is simple, fresh, and made with ingredients you can easily find. Here’s what you’ll need:

  • 1 cup fresh pineapple chunks

    • Sweet and juicy, fresh pineapple brings the tropical vibe. If fresh isn’t available, you can substitute with unsweetened canned pineapple chunks, but fresh is always better!
  • 1/2 cup fresh mint leaves

    • Cool and refreshing, mint is essential for that classic mojito flair. If you’re out of fresh mint, feel free to use a mint simple syrup as an alternative, though the fresh leaves are a must for that vibrant fragrance.
  • 1 lime, juiced

    • Limes add a zesty kick. If you’re in a pinch, lemon juice will work, but limes offer the unbeatable freshness that makes mojitos sing.
  • 2 oz white rum

    • This is where the party begins! Using white rum keeps the flavor light. If you prefer a non-alcoholic version, you can replace this with extra club soda for a mocktail version.
  • 1 oz coconut cream

    • Rich and creamy, coconut cream adds a dreamy depth. If you’re looking for a lower-calorie option, try coconut milk or a light coconut cream alternative.
  • Club soda

    • Sparkling and bubbly, club soda gives the drink its refreshing effervescence. You can use flavored sparkling water if you want to mix it up!
  • Ice

    • Essential for keeping your drink chilled and refreshing. To cut down on dilution, consider using large ice cubes.
  • Mint sprigs for garnish

    • Not just for looks, these sprigs add an extra burst of aroma to every sip.

Step-by-Step Instructions

Alright, let’s make this Coconut Mojito with Pineapple! Follow these steps, and you’ll have a fabulous drink ready in no time.

  1. Prepare Your Ingredients:

    • Start by gathering all your ingredients and tools. You’ll need a blender, a muddler or wooden spoon, and a glass or cocktail shaker.
  2. Blend the Pineapple and Mint:

    • Toss the pineapple chunks and mint leaves into the blender. Pulse until you have a beautifully smooth mixture. This is where the party starts! If you’re craving more minty goodness, feel free to add a few more leaves.
  3. Add Lime Juice and Rum:

    • Pour in the fresh lime juice and white rum into the blender. Blend again until mixed well. Just a quick blend here—no need to overdo it!
  4. Strain the Mixture (Optional):

    • If you prefer a smoother mojito, strain the mixture into a large glass using a fine mesh strainer or cheesecloth. This will remove any bits of mint leaves or pulp, giving you a clean drink.
  5. Mix with Coconut Cream:

    • In a separate glass, combine the strained mixture with coconut cream. This is where the magic happens! Stir with a spoon until thoroughly mixed. If you’re feeling adventurous, you can use a cocktail shaker to give it a good shake.
  6. Add Club Soda:

    • Top off your glass with club soda to your liking. Stir gently to combine and keep that effervescence! This step is crucial for that refreshing fizz that we all love.
  7. Prepare Your Glass:

    • Fill a serving glass or mason jar with ice. Pour the mixture over the ice, allowing it to cascade through the ice cubes.
  8. Garnish:

    • Finish your drink with fresh mint sprigs for garnish and perhaps a slice of lime or pineapple on the rim. This boosts the presentation and makes your cocktail all the more inviting.
  9. Serve:

    • Serve immediately and enjoy your delicious Coconut Mojito with Pineapple! Sipping this cocktail is sure to transport you to a beach paradise, no packing required.

Serving Suggestions

To elevate your serving game, try using a fun glass like a mason jar or a classic highball glass. Consider pairing your coconut mojito with tropical appetizers like shrimp tacos, fish ceviche, or even a fresh summer salad. You could also set up a DIY cocktail bar, letting friends mix their own mojitos with different fruits and flavors! The more, the merrier.

Recipe Variations

Here are a few fun twists you can try to keep your coconut mojito exciting:

  • Berry Bliss: Add a handful of muddled strawberries or blueberries to bring in some fruity sweetness.

  • Ginger Zing: Incorporate fresh ginger for an added kick. It complements coconut beautifully!

  • Coconut Lime: Use coconut-flavored rum for an extra coconut punch, substituted for regular white rum.

  • Crystal Clear: For a lighter version, swap coconut cream for coconut water—and you’ve got yourself a revitalizing tropical refresher!

  • Minty Green: Feel free to mix in other herbs like basil or lemon verbena for a unique twist.

Chef’s Notes

As a chef, I love exploring flavors and textures in the kitchen, and this coconut mojito has evolved to become one of my staple cocktails. I often find myself swapping in various fruits depending on the season. I’ll never forget the time I made a watermelon mojito variant using the same technique, and it was an instant hit at a summer grill party.

One of my funniest kitchen moments is when I attempted to make a giant batch of these mojitos for a gathering. In my haste, I accidentally added salt instead of sugar! The reactions were priceless—but oh, what a lesson learned! Always taste as you go.

FAQs and Troubleshooting

Q: Can I make this mojito a day in advance?
A: While it’s recommended to serve this drink fresh, you can prepare the pineapple and mint mixture ahead of time, store it in the refrigerator, and mix in the coconut cream and soda right before serving.

Q: What should I do if it’s too sweet?
A: If your mojito turns out a bit sweeter than you like, add a splash of lime juice to balance it out. You can also increase the club soda to dilute it.

Q: Can I use dried mint instead of fresh?
A: Fresh mint is definitely preferable, but in a pinch, you can use dried mint. Just keep in mind that it may not deliver the same bold flavor—opt for about one-third of the amount of dried mint.

Q: How can I make this a non-alcoholic drink?
A: Simply replace the rum with more club soda or some coconut water for a refreshing mocktail. You won’t miss the alcohol with all the fresh flavors!

Nutritional Info

This Coconut Mojito with Pineapple is not only a treat for your taste buds but can also be enjoyed as a moderate indulgence. While the exact nutritional info can vary depending on your ingredient proportions, here’s a rough estimate per serving:

  • Calories: ~220
  • Fat: 5g (from coconut cream)
  • Carbohydrates: 28g
  • Sugar: 19g
  • Fiber: 1g
  • Protein: 0g

Drink responsibly, and enjoy the refreshing essence of the tropics in every sip!

So there you have it! My ultimate Coconut Mojito with Pineapple recipe, filled with flavor, nostalgia, and a dash of fun. Now, who’s ready to whip some up? Let’s toast to good times and even better memories! Cheers!

Print

Coconut Mojito with Pineapple

A refreshing tropical cocktail that combines the sweetness of pineapple with creamy coconut and the classic minty flavor of mojitos.

  • Prep Time: 10 minutes
  • Cook Time: 0 minutes
  • Total Time: 10 minutes
  • Yield: 2 servings 1x
  • Category: Cocktail
  • Method: Blending
  • Cuisine: Tropical
  • Diet: Vegetarian

Ingredients

Scale
  • 1 cup fresh pineapple chunks
  • 1/2 cup fresh mint leaves
  • 1 lime, juiced
  • 2 oz white rum
  • 1 oz coconut cream
  • Club soda
  • Ice
  • Mint sprigs for garnish

Instructions

  1. Prepare your ingredients: Gather all your ingredients and tools such as a blender, a muddler, and a glass.
  2. Blend the pineapple and mint: Toss the pineapple chunks and mint leaves into the blender and pulse until smooth.
  3. Add lime juice and rum: Pour the lime juice and white rum into the blender and mix well.
  4. Strain the mixture (optional): Use a fine mesh strainer to remove bits of mint leaves or pulp.
  5. Mix with coconut cream: Combine the strained mixture with coconut cream in a separate glass and stir until mixed.
  6. Add club soda: Top off with club soda and stir gently to combine.
  7. Prepare your glass: Fill a glass with ice and pour the mixture over the ice.
  8. Garnish: Decorate with fresh mint sprigs and enjoy your drink!

Notes

For a non-alcoholic version, substitute white rum with extra club soda.

Nutrition

  • Serving Size: 1 serving
  • Calories: 220
  • Sugar: 19g
  • Sodium: 10mg
  • Fat: 5g
  • Saturated Fat: 4g
  • Unsaturated Fat: 1g
  • Trans Fat: 0g
  • Carbohydrates: 28g
  • Fiber: 1g
  • Protein: 0g
  • Cholesterol: 0mg

Keywords: cocktail, coconut mojito, pineapple drink, refreshing drink, tropical cocktail

Did you make this recipe?

Share a photo and tag us — we can't wait to see what you've made!

May 22, 2026 |

One-Bowl White Chocolate Raspberry Muffins: Simple & Fluffy

Fluffy white chocolate raspberry muffins baked in a simple one-bowl recipe.

White Chocolate Raspberry Muffins: A Sweet Symphony of Flavor

Welcome back to Clean Plate Cravings, where we whip up delicious dishes that brighten your days! Today, let’s dive into a delightful recipe that’s sure to tickle your taste buds: White Chocolate Raspberry Muffins. These muffins are like a hug in a wrapper, combining the rich sweetness of white chocolate with the tartness of fresh raspberries. Trust me; your morning routine (or snack time) will thank you!

The Perfect Morning Treat

Imagine waking up to the smell of freshly baked muffins wafting through your kitchen—there’s something magical about that scent, isn’t there? These White Chocolate Raspberry Muffins are not just breakfast; they’re an experience that transforms ordinary mornings into something deliciously extraordinary. Whether it’s a lazy Sunday brunch or a quick grab-and-go snack, these muffins bring a splash of joy and tenderness to your day.

I first stumbled upon this combo during a lazy summer afternoon at my grandmother’s house. She would whip up her signature muffins, and I’d help her hunt down the ripe raspberries hidden among the garden vines. After a morning spent picking juicy berries, we would return to the kitchen, where the magic of baking would unfold. The anticipation of blending sweet white chocolate with the more tangy berry made it feel like we were creating a symphony of flavors and memories. I’ve cherished that moment ever since, and I want to share that love and joy through this recipe.

Ingredients

Before we dive into the cooking, let’s get acquainted with our key players—the ingredients that make these muffins sing!

  • 2 cups all-purpose flour (250 grams): Flour is the backbone of our muffins! Make sure to fluff it up, spoon it into your measuring cup, and level it off for accuracy. If you’re feeling adventurous, consider swapping half of it for almond flour for a nutty twist.

  • ½ teaspoon salt: Just a pinch! This tiny ingredient enhances the flavors and balances the sweetness. Don’t skip it!

  • 2 teaspoons baking powder: This little powerhouse ensures your muffins rise beautifully. Make sure it’s fresh to keep your muffins nice and fluffy!

  • ¾ cup granulated sugar: Sweetness is key here. Feel free to reduce it slightly if you prefer a less sweet muffin. You can also try using coconut sugar for a more caramel-like flavor.

  • 2 large eggs (at room temperature): Eggs act as a binder and provide moisture. Room temperature eggs mix more easily into the batter, so take them out of the fridge ahead of time.

  • ½ cup unsalted butter (melted and cooled): Butter adds richness and flavor. It’s essential to let it cool down; otherwise, it can scramble the eggs!

  • ½ cup whole milk (room temperature): Milk contributes to a tender crumb. For a healthier version, swap it out for almond or oat milk!

  • 1½ teaspoons vanilla extract: This is where the magic happens! Vanilla elevates the entire muffin’s flavor profile. Try using pure vanilla extract for the best taste.

  • 6 oz raspberries (approximately 1 1/4 cups): Fresh or frozen raspberries work beautifully. If you’re using frozen, just toss them directly into the batter without thawing, and they’ll delightfully burst as they bake!

  • ⅔ cup white chocolate chips: The star of the show! These sweet morsels melt into pockets of creamy goodness. If you’re feeling daring, you could use dark chocolate chips for a flavor contrast.

  • Coarse sugar for topping (optional): A sprinkle of coarse sugar adds a delightful crunch and sweetness on top. It’s all about that first bite!

Step-by-Step Instructions

Now that we have our ingredients ready, let’s get our hands dirty!

  1. Preheat your oven: This is a crucial step! Set your oven to preheat at 375°F (190°C) and prepare your muffin tin by lining it with paper liners or gently greasing each cup. It’s time to make your kitchen smell amazing!

  2. Mix the dry ingredients: In a medium bowl, whisk together the flour, salt, and baking powder. Whisking aerates the flour, ensuring your muffins will be light and fluffy.

  3. Combine the wet ingredients: In a large bowl, combine the granulated sugar and melted butter. Use a whisk to blend them until smooth—this creates a lovely base! Now add the eggs, milk, and vanilla extract, mixing until everything is well incorporated.

    Chef’s Hack: If you want to reduce dishes, you can also melt the butter in the same bowl used for the sugar. Just allow it to cool before adding the other wet ingredients!

  4. Incorporate the dry ingredients: Gradually fold in the dry mixture into the wet ingredients using a spatula. Be gentle! Overmixing can lead to chewy muffins—yikes!

  5. Add the raspberries and white chocolate chips: Gently fold in your beautiful raspberries and white chocolate chips. If you’re using fresh raspberries, toss them with a little flour beforehand to prevent them from sinking to the bottom. It’s all about those tasty bursts in every muffin!

  6. Scoop and bake: Using an ice cream scoop or a generous spoon, divide the batter evenly among the muffin cups. Fill each cup about ¾ full for perfect rising. If you like, sprinkle the tops with coarse sugar for that extra sparkle. Slide them in the oven and bake for 18-22 minutes, or until they’re golden brown and a toothpick comes out clean from the center.

  7. Cool and enjoy: Once baked, remove the muffins from the oven and allow them to cool in the tin for about 5 minutes before transferring them to a wire rack. Don’t rush this part; the aroma is worth taking a moment to savor!

Serving Suggestions

To serve these muffins, I suggest arranging them on a beautiful platter—maybe dusted with a sprinkle of powdered sugar for an elegant touch. Pair them with a steaming cup of coffee or tea for a cozy breakfast or snack experience. You can also slather a bit of butter or cream cheese on top for an extra indulgence.

Recipe Variations

Ready to jazz things up? Here are a few creative twists:

  • Lemon Zest: Add a tablespoon of lemon zest to the batter for a citrusy pop to complement the raspberries.
  • Oatmeal Crumble: Top your muffins with an oat crumble before baking for a tasty crunchy texture.
  • Nutty Delight: Incorporate ½ cup of chopped nuts (like walnuts or pecans) for extra crunch.
  • Peanut Butter Swirl: Create a delightful swirl by adding a spoonful of peanut butter into the batter before baking.
  • Coconut Flakes: Toss in some unsweetened shredded coconut for a tropical vibe that pairs wonderfully with the raspberry!

Chef’s Notes

These muffins have evolved over the years in my kitchen! Initially, they were just a simple recipe I picked up from a friend. However, as my baking adventure continued, I started adding my personal touches—like fresh raspberries from my garden and fancy white chocolate chips. Each time I make them, I think of that sunny afternoon in my grandma’s kitchen. They’ve become a cherished recipe in my family and now a staple in yours!

FAQs and Troubleshooting

  1. Why are my muffins dense?

    • Dense muffins can often result from overmixing or using too much flour. Always spoon flour into your measuring cup and level it off!
  2. How do I store my muffins?

    • Store in an airtight container at room temperature for up to 3 days. For longer storage, freeze them in a ziplock bag for up to 3 months.
  3. Can I use other berries?

    • Absolutely! Blueberries, strawberries, or even blackberries work beautifully in this recipe. Just adjust the sweetness if needed!
  4. What do I do if my muffins overflow?

    • If this happens, it’s likely that your batter was overfilled. In the future, fill each cup about ¾ full to leave room for rising.

Nutritional Info (Optional)

While the nutritional info may vary based on your ingredient choices, each muffin is likely to contain roughly:

  • Calories: 200
  • Protein: 3g
  • Carbohydrates: 28g
  • Fat: 9g
  • Sugar: 10g

Now that you have the recipe for these drool-worthy White Chocolate Raspberry Muffins, it’s time to gather those ingredients and get baking! I can’t wait for you to experience the joy and nostalgia they bring. Share your muffin-making adventures with me—I love hearing from fellow foodies! Happy baking!

Print

White Chocolate Raspberry Muffins

Delightful muffins that combine the rich sweetness of white chocolate with the tartness of fresh raspberries, perfect for breakfast or snack time.

  • Prep Time: 15 minutes
  • Cook Time: 22 minutes
  • Total Time: 37 minutes
  • Yield: 12 servings 1x
  • Category: Dessert
  • Method: Baking
  • Cuisine: American
  • Diet: Vegetarian

Ingredients

Scale
  • 2 cups all-purpose flour (250 grams)
  • ½ teaspoon salt
  • 2 teaspoons baking powder
  • ¾ cup granulated sugar
  • 2 large eggs (at room temperature)
  • ½ cup unsalted butter (melted and cooled)
  • ½ cup whole milk (room temperature)
  • 1½ teaspoons vanilla extract
  • 6 oz raspberries (approximately 1 1/4 cups)
  • ⅔ cup white chocolate chips
  • Coarse sugar for topping (optional)

Instructions

  1. Preheat your oven to 375°F (190°C) and prepare your muffin tin by lining it with paper liners or greasing each cup.
  2. Mix the dry ingredients: In a medium bowl, whisk together the flour, salt, and baking powder.
  3. Combine the wet ingredients: In a large bowl, whisk the granulated sugar and melted butter until smooth, then add eggs, milk, and vanilla, mixing until incorporated.
  4. Incorporate the dry ingredients: Gradually fold the dry mixture into the wet ingredients using a spatula, being careful not to overmix.
  5. Add the raspberries and white chocolate chips, folding them in gently to avoid breaking the berries.
  6. Scoop the batter into muffin cups, filling each about ¾ full. If desired, sprinkle with coarse sugar.
  7. Bake for 18-22 minutes or until a toothpick comes out clean from the center.
  8. Cool in the tin for 5 minutes, then transfer to a wire rack to cool completely.

Notes

These muffins are best enjoyed fresh but can be stored in an airtight container for up to 3 days or frozen for up to 3 months.

Nutrition

  • Serving Size: 1 muffin
  • Calories: 200
  • Sugar: 10g
  • Sodium: 200mg
  • Fat: 9g
  • Saturated Fat: 5g
  • Unsaturated Fat: 3g
  • Trans Fat: 0g
  • Carbohydrates: 28g
  • Fiber: 1g
  • Protein: 3g
  • Cholesterol: 30mg

Keywords: muffins, dessert, raspberries, white chocolate, baking

Did you make this recipe?

Share a photo and tag us — we can't wait to see what you've made!

May 22, 2026 |

Blueberry Mojito: 5-Minute Summer Cocktail for Busy Nights

Refreshing Blueberry Mojito cocktail garnished with mint leaves and blueberries

Cheers to Summer: The Perfect Blueberry Mojito Recipe

Hey there, fellow food enthusiasts! Today, I’m excited to share a refreshing treat that will brighten up your sunny days and elevate your gatherings: the Blueberry Mojito. This delightful cocktail combines the vibrant sweetness of fresh blueberries, the zesty kick of lime, and the cool aroma of mint. You might even find yourself sipping one while lounging on the patio, feeling like summer never has to end.

I love a good mojito, but there’s something special about this blueberry twist. It’s not just about the flavors; it’s about the memories tied to it—the laughter, the sunshine, the feeling of being carefree. So grab your muddler, and let’s dive into making the best Blueberry Mojito you’ve ever had!

A Taste of Summer: My Blueberry Mojito Story

I’ll never forget that summer afternoon at Grandma’s house, where everything felt alive with excitement. The air was thick with the smell of blooming flowers, and the sound of laughter filled the garden. It was then, surrounded by family and the tantalizing aroma of herb-infused drinks, that I experienced my first mojito. I watched my aunts and uncles as they muddled mint leaves and squeezed limes, creating this magical potion that sparkled in the sunlight.

One day, I decided to join the fun and add a personal touch: blueberries from our garden. I remember plucking the ripest berries, their deep blue hue promising sweetness. When I blended them into the mojitos that day, the flavors exploded! The tangy lime sang harmoniously with the blueberries’ sweetness, and the fresh mint was the icing on the cake. Surrounded by family, with our glasses clinking and laughter spilling into the warm air, that blueberry mojito became the unofficial drink of our summer gatherings. And now? I’m thrilled to share that same joy with you!

Ingredients

Let’s talk about what you’ll need to whip up this refreshing Blueberry Mojito:

  • 1 cup fresh blueberries: Fresh berries are the star of this drink! They provide a natural sweetness and a pop of color. If blueberries aren’t in season, you can use frozen ones, but let them thaw beforehand for best results.

  • 1 lime, juiced: The lime adds the necessary tartness to balance the sweetness of the blueberries. If you’re not a fan of lime, lemon can be a delightful substitute.

  • 2 oz white rum: This is what gives your mojito its kick! Light rum works best, but if you prefer a deeper flavor, a spiced rum can add an interesting twist.

  • 1-2 tablespoons sugar (to taste): Sugar enhances the sweetness of the mint and blueberries. You can also use simple syrup, agave, or honey for a different sweetness profile.

  • Mint leaves: Fresh mint is a must here. It brings that cooling refreshing flavor we love in mojitos. If you can’t find fresh mint, you might try a mint syrup for flavor, but it won’t have the same aromatic delight.

  • Club soda: This adds fizz and lightness to the drink. If you like a stronger kick, feel free to cut back the soda a bit.

  • Ice: Essential for serving the drink cold! The more, the merrier, in my opinion.

Step-by-Step Instructions

Let’s get down to the nitty-gritty of making this lovely Blueberry Mojito!

  1. Muddle the blueberries and mint: In a sturdy glass or cocktail shaker, combine your blueberries and about 10 mint leaves. Using a muddler (or the back of a wooden spoon), gently crush the blueberries and mint together. The goal here is to release the juices of the berries and the oils from the mint without pulverizing everything into a mush. This will create a beautiful, fragrant base for your mojito.

  2. Squeeze in the lime juice: Now, bring some zesty goodness into the mix! Cut your lime in half and squeeze the juice over the muddled blueberries and mint. Give it a slight stir. This will activate the mint even more, allowing it to release its natural oils.

  3. Add your sugar: Sprinkle in the sugar to balance the tart lime and tangy blueberry flavors. Start with 1 tablespoon, stir well, and taste! You can always add more if you like it sweeter.

  4. Pour in the rum: Measure out your white rum and pour it over the muddled ingredients. This is where the magic begins! The rum will blend beautifully with the sweetness of the blueberries and the refreshing mint. Give it a good stir to combine all those luscious flavors.

  5. Fill your glass with ice: Now, grab your favorite glass—whether it’s a mason jar or a cocktail glass—and fill it halfway with ice. Don’t be shy here, ice is your best friend.

  6. Top with club soda: Top your ice-filled glass with club soda. Pour it slowly to keep the fizz alive! Stir gently to combine all ingredients without losing the bubbles.

  7. Garnish and enjoy: Add a few whole blueberries and a sprig of mint for garnish. Maybe throw in a lime wheel for good measure. There you have it! Your gorgeous Blueberry Mojito is ready to be sipped and savored.

Serving Suggestions

Presentation is key! Serve your Blueberry Mojito in a clear glass to show off those vibrant colors. Garnish with fresh mint leaves, a couple of whole blueberries floating atop the drink, and maybe a slice of lime hanging on the rim. This way, every time your guests take a sip, they’ll be reminded of the refreshing flavors packed into this delightful cocktail.

Recipe Variations

Feeling adventurous? Here are a few twists to make this mojito unique:

  • Berry Blend: Swap out or mix different berries like strawberries or raspberries for a berry medley mojito.

  • Herbal Surprise: Experiment by adding basil or cilantro in place of or with mint for a different herbal note.

  • Coconut Twist: Replace some of the club soda with coconut water for a tropical vibe.

  • Zingy Ginger: Add a slice of fresh ginger while muddling the mint and blueberries for a spicy kick.

  • Mocktail Version: Skip the rum for a refreshing non-alcoholic drink. Just amp up the club soda and perhaps add a bit of extra lime juice.

Chef’s Notes

I’ve made this mojito more times than I can count, and you know what? It’s never the same twice! I often switch it up based on what berries are fresh at the market or what’s in season. Each version is like a new memory waiting to happen. I also like to make a big batch for parties, which can be fun! Just multiply the ingredients and have guests serve themselves. Nothing breaks the ice better than a DIY cocktail bar at a summer gathering!

FAQs and Troubleshooting

Q1: Can I use frozen blueberries instead of fresh?
Absolutely! Frozen blueberries work just fine; just be sure to thaw them beforehand, so they blend well with the mint and lime.

Q2: What if I don’t have a muddler?
No problem! You can use the back of a spoon or a sturdy cup to muddle the ingredients. The goal is to release those wonderful flavors, so any tool that can smash the berries gently will do the trick.

Q3: Is it possible to make this drink ahead of time?
You can prepare the muddled base with blueberries, mint, and lime juice ahead of time and store it in the fridge. Just add the rum, ice, and club soda right before serving for the best taste and fizz.

Q4: How do I make it less sweet?
You can reduce the sugar or even ditch it altogether! If you want some sweetness without sugar, try adding a splash of sparkling flavored water or a bit of agave syrup.

Nutritional Info

(If applicable. You may want to include some estimates on calories, sugar content, etc., based on the ingredients used. For a standard serving: approximately 150 calories if made with sugar, but this can vary widely depending on sweetness and serving size.)


So there you have it—my take on the Blueberry Mojito! Bursting with flavors and unforgettable memories, this drink is bound to bring sunshine into any gathering. I hope you enjoy making and sipping it just as much as I do. Cheers to fresh flavors, vibrant gatherings, and the beautiful taste of summer! 🍹

Print

Blueberry Mojito

A refreshing blueberry twist on the classic mojito, perfect for summer gatherings.

  • Prep Time: 10 minutes
  • Cook Time: 0 minutes
  • Total Time: 10 minutes
  • Yield: 1 serving 1x
  • Category: Cocktail
  • Method: Muddling
  • Cuisine: American
  • Diet: Vegetarian

Ingredients

Scale
  • 1 cup fresh blueberries
  • 1 lime, juiced
  • 2 oz white rum
  • 12 tablespoons sugar (to taste)
  • Fresh mint leaves
  • Club soda
  • Ice

Instructions

  1. Muddle the blueberries and mint in a glass or cocktail shaker.
  2. Squeeze in the lime juice and stir.
  3. Add the sugar and adjust to taste.
  4. Pour in the white rum and stir well.
  5. Fill your glass with ice.
  6. Top with club soda and stir gently.
  7. Garnish with whole blueberries and a mint sprig.

Notes

For a non-alcoholic version, skip the rum and add more club soda.

Nutrition

  • Serving Size: 1 serving
  • Calories: 150
  • Sugar: 15g
  • Sodium: 10mg
  • Fat: 0g
  • Saturated Fat: 0g
  • Unsaturated Fat: 0g
  • Trans Fat: 0g
  • Carbohydrates: 38g
  • Fiber: 2g
  • Protein: 1g
  • Cholesterol: 0mg

Keywords: blueberry mojito, summer cocktail, refreshing drinks, easy cocktails

Did you make this recipe?

Share a photo and tag us — we can't wait to see what you've made!

May 22, 2026 |

Summer Creamy Coconut Blackberry Mojito: Minty & Refreshing

Refreshing summer creamy coconut blackberry mojito with mint leaves and berries

The Creamy Coconut Blackberry Mojito: A Tropical Twist on a Classic!

Hey there, fellow food lovers! Welcome back to Clean Plate Cravings, where we craft delectable dishes that leave us feeling energized and excited about food. Today, I have a delightful treat for you that’s perfect for relaxing weekends or sunny days—it’s my Creamy Coconut Blackberry Mojito!

Imagine sipping a refreshing drink, where the subtle sweetness of coconut mingles with the tart zing of blackberries and the aromatic freshness of mint. Ahhh, can you feel the tropical vibes already? This drink is not just about taste; it’s an experience that brings back memories of soft ocean breezes and lively beach parties. Plus, who doesn’t love a mojito, am I right?

A Sip Down Memory Lane

Before we dive into the recipe, let me share a little story that warms my heart every time I make this creamy coconut blackberry mojito. One summer, I found myself in a stunning beachside cottage with some of my closest friends. It was a spontaneous getaway, and the long days were filled with laughter, games, and of course, lots of good food and drinks!

One evening, we decided to experiment with cocktails and create a new twist on the classic mojito. Armed with fresh blackberries picked from a nearby bush and a can of creamy coconut, we mixed it all together, and boy, did we strike gold! Each sip was like a taste of paradise. The blackberries added a pop of color and flavor to the traditional mojito, and the coconut cream made it irresistibly lush. It’s a memory that still makes me smile today!

Ingredients

Now, let’s gather the ingredients. This is where the fun begins!

  • Blackberries: These juicy gems are not only delicious but also packed with antioxidants. If you can’t find fresh blackberries, frozen ones work just as well! They may be slightly mushy, but their taste stays intact.

  • Fresh mint leaves: Essential for that characteristic mojito freshness! You can substitute with mint extract in a pinch, but fresh mint really elevates the drink.

  • White rum: The spirit that brings the party! Feel free to swap it out for coconut rum for an extra tropical kick.

  • Lime juice: Freshly squeezed is always best, but bottled lime juice works in a hurry. Just watch for added sugars if you’re keeping it clean!

  • Cream of coconut: This is the star of our show! It adds creaminess and sweetness. If you’re looking for a lighter option, you can use coconut milk, but it won’t be quite as rich.

  • Ice: Because we need it chilled and refreshing!

  • Sugar: Just a touch to balance the tartness of the blackberries and lime. If you’re watching your sugar intake, try agave syrup or even stevia as alternatives.

  • Lime for rimming: This little detail brings extra flavor to every sip. You can also use coarse salt or sugar for a fun twist!

Step-by-Step Instructions

Ready to shake things up in the kitchen? Here’s how to craft your creamy coconut blackberry mojito step-by-step!

  1. Prepare Your Glasses: Start by rimming your glass with lime juice, then dip it in granulated sugar (or salt, if you prefer). This extra step jazzes up your drink and adds a delightful sweetness to every sip!

  2. Muddle the Blackberries and Mint: In a sturdy glass, toss in a handful of fresh blackberries and a few mint leaves. Using a muddler (or the bottom of a wooden spoon if you don’t have one), gently mash them together. You want to release the blackberry juices and mint oils, but be careful not to shred the mint leaves too much—they can turn bitter if over-muddled.

  3. Add the Sweetness: Now, sprinkle in about a tablespoon of sugar. Muddle it again to help dissolve the sugar into the blackberry-mint mixture. If your blackberries are sweet enough, feel free to skip this step or adjust it to your taste.

  4. Mix in the Rum and Lime Juice: Pour in 2 ounces of white rum and the juice of half a lime (around 1 ounce). Give it a good stir to combine all those beautiful flavors together. The rum should absorb the fruity and minty goodness wonderfully.

  5. Blend in the Cream of Coconut: Now, for the moment of creaminess! Add about 2 ounces of cream of coconut. This transforms your mojito from just refreshing to something truly indulgent. Use a spoon to mix everything together, carefully incorporating the creamy element.

  6. Add Ice: Time to chill it! Fill the glass with ice—don’t be shy, pack it in there! The ice will help to meld all the flavors while keeping your drink cold and refreshing.

  7. Final Touches: Top off your cocktail with club soda for that zesty fizz. Feel free to adjust the amount based on your personal preference for fizz! Stir gently to combine.

  8. Garnish: For the finishing touch, garnish with extra blackberries or a sprig of fresh mint. Not only does it look beautiful, but it also adds a fragrant aroma that’ll entice your senses before your first sip.

Serving Suggestions

Once you’ve completed your creamy coconut blackberry mojito, it’s time to serve it up! I love serving mine in a tall, chilled glass with a fun straw and the beautiful garnish peeking out. You can even pair it with an equally fresh appetizer, like a watermelon salad or shrimp skewers, to complement those tropical flavors!

Recipe Variations

Feeling adventurous? Here are a few creative twists on this classic:

  • Berry Blast: Mix in other berries like strawberries or raspberries for a berry explosion of flavor!

  • Coconut Limeade: Replace blackberries with lime juice for a lighter, more citrusy coconut limeade.

  • Spicy Spin: Add a touch of jalapeño for a spicy kick! Just use a small slice muddled in with the mint.

  • Non-Alcoholic Version: Swap out the rum for coconut water and add a splash of soda water for a refreshing mocktail.

  • Frozen Mojito: Blend all the ingredients with ice for a slushy version that’s perfect for summer parties.

Chef’s Notes

As I share this recipe, I can’t help but smile remembering that spontaneous beachside cocktail experiment. Over time, I’ve refined the balances in this recipe, finding the perfect blend of flavors. If you find yourself wanting to go lighter, just know that each swap you make can lead to delightful new variations. Don’t hesitate to customize the sweetness or creaminess to your liking!

FAQs and Troubleshooting

1. Can I make this mojito ahead of time?
Absolutely! You can prepare the muddled blackberry and mint mixture and store it in the fridge for a few hours before serving. Just add the ice and soda just before serving to keep it fresh.

2. My mojito turned out too sweet. What can I do?
If your drink ends up too sweet, add a splash more lime juice or soda to balance it out. The acidity will cut through the sweetness, giving it that refreshing bite.

3. What if I don’t like blackberries?
No problem! Use your favorite fruits. Watermelon, peaches, or pomegranate would be delicious, just be mindful of adjusting sugar levels based on the fruit’s sweetness.

4. How can I make this a sugar-free drink?
You can use a sugar substitute like stevia or monk fruit sweetener to keep the flavor without the calories. Make sure to adjust according to your taste.

Nutritional Info

While the specific nutritional information will vary based on the specific ingredients used, here’s a rough estimate per serving:

  • Calories: 220
  • Total Fat: 5g
  • Saturated Fat: 4g
  • Carbohydrates: 30g
  • Fiber: 2g
  • Sugars: 24g
  • Protein: 1g

And that’s a wrap, friends! Your creamy coconut blackberry mojito is ready to delight your taste buds and make you feel like you’re lounging on a sun-soaked beach. I can already see you enjoying this drink, maybe with a colorful sunset in the background and good company by your side. Cheers to vibrant flavors, good times, and the joy of clean plate cravings! Enjoy! ☀️🍹

Print

Creamy Coconut Blackberry Mojito

A refreshing drink with the subtle sweetness of coconut mingling with tart blackberries and aromatic mint.

  • Prep Time: 10 minutes
  • Cook Time: 0 minutes
  • Total Time: 10 minutes
  • Yield: 1 serving 1x
  • Category: Beverage
  • Method: Mixing
  • Cuisine: Tropical
  • Diet: Vegetarian

Ingredients

Scale
  • 1 cup Blackberries
  • 10 Fresh mint leaves
  • 2 ounces White rum
  • 1 ounce Lime juice
  • 2 ounces Cream of coconut
  • Ice
  • 1 tablespoon Sugar
  • Lime for rimming

Instructions

  1. Prepare Your Glasses: Rims with lime juice and dip in granulated sugar.
  2. Muddle the Blackberries and Mint: Mash the blackberries and mint leaves in a glass.
  3. Add the Sweetness: Sprinkle in sugar and muddle again.
  4. Mix in the Rum and Lime Juice: Pour in white rum and lime juice, stir to combine.
  5. Blend in the Cream of Coconut: Add cream of coconut and mix well.
  6. Add Ice: Fill the glass with ice.
  7. Final Touches: Top with club soda and stir gently.
  8. Garnish: Add extra blackberries or mint leaves.

Notes

Feel free to customize sweetness and creaminess to your liking. Experiment with different fruits or make it non-alcoholic by swapping rum for coconut water.

Nutrition

  • Serving Size: 1 serving
  • Calories: 220
  • Sugar: 24g
  • Sodium: 0mg
  • Fat: 5g
  • Saturated Fat: 4g
  • Unsaturated Fat: 1g
  • Trans Fat: 0g
  • Carbohydrates: 30g
  • Fiber: 2g
  • Protein: 1g
  • Cholesterol: 0mg

Keywords: mojito, cocktail, coconut, blackberry, refreshing drink

Did you make this recipe?

Share a photo and tag us — we can't wait to see what you've made!

May 22, 2026 |

Ingredient Fig Jam in 15 Minutes: Quick Pantry Spread

Quickly made fig jam in 15 minutes with pantry ingredients for spreading.

3-Ingredient Fig Jam: A Sweet Adventure in Simplicity

Welcome, flavor enthusiasts and curious cooks! Today, we’re diving into a delightful recipe that captures the essence of simplicity while delivering a burst of sweetness and nostalgia—3-Ingredient Fig Jam. If you’re ready to elevate your snacking, topping, or breakfast game, you’re in the right place! Fig jam is not just a treat; it’s a celebration of fresh ingredients that come together to bring a little luxurious sweetness to your everyday meals.

Introduction

When I think about figs, I can’t help but smile. These little gems conjure up memories of sunny afternoons spent in orchards, the trees heavy with ripe fruit, their sweet aroma filling the air. If you’ve ever bitten into a ripe fig, you know the joy that comes from its tender flesh and delightful burst of flavor. And let’s be honest—figs are the ultimate gourmet ingredient that can elevate any dish without breaking a sweat!

Now, making fig jam might sound like a tedious process reserved for the culinary elite, but I’m here to tell you that it’s as easy as can be! With just three simple ingredients—fresh figs, sugar, and lemon juice—you’ll whip up a jar of jam that’s ready to spread, spoon, or savor on whatever your heart desires. This recipe is not just perfect for enhancing your breakfast, but it’s also a wonderful gift for friends and family, bringing a taste of homemade love. So, grab your apron, and let’s embark on this sweet adventure together!

Personal Story

Growing up, my grandmother always had a knack for transforming simple ingredients into something special. I remember summers at her cozy kitchen, filled with the sounds of simmering pots and the sweet scent of fruits bubbling on the stove. One of my fondest memories was the day she taught me how to make fig jam. The figs were plucked fresh from the tree in her backyard—you could almost hear the fruit laughing as you picked them!

As we stood over the stove, I eagerly watched the figs transform into a luscious, thick jam, their vibrant color deepening with every stir. The jam brought us together around the table, slathered on warm homemade bread or spooned atop creamy yogurt. It was those moments of connection and joy that inspired me to create Clean Plate Cravings, a place where I could share those very experiences and help others cultivate their own kitchen memories. So let’s continue this tradition today with a fig jam that is as bright and cheerful as those afternoons with Grandma!

Ingredients

  • Fresh Figs: The star of our show! Fresh figs are naturally sweet and juicy, making them perfect for jam. Look for plump, unblemished figs in varying shades of purple or green. If you can’t find fresh figs, you can use dried figs; just soak them in warm water for a few hours to plump them up before use.

  • Sugar: This ingredient helps to thicken and sweeten our jam. You can use regular granulated sugar, but feel free to switch it up with brown sugar for a deeper caramel flavor or coconut sugar for a healthier twist. Keep in mind that different sugars may affect sweetness levels, so taste as you go!

  • Lemon Juice: A splash of lemon juice brightens the jam and adds balance by cutting through the sweetness. Freshly squeezed is best, but bottled lemon juice can work in a pinch. If you’re feeling adventurous, you could also try other citrus juices, like orange or grapefruit, for a unique flavor profile.

Step-by-Step Instructions

  1. Prepare the Figs: Start by giving your figs a good rinse under cold water. Pat them dry with a clean kitchen towel. Remove the stems and cut the figs in half or quarters, depending on their size. This makes it easier for them to break down during cooking. The exciting part? You can snack on a few while you prep!

  2. Combine Ingredients: In a medium-sized pot, combine your chopped figs, sugar, and lemon juice. Make sure the figs are evenly coated with the sugar; this will help extract their natural juices during cooking.

  3. Cook the Mixture: Place your pot on the stove over medium heat. Stir occasionally until the mixture begins to break down, which should take about 5-10 minutes. As you stir, you can mash the figs with the back of your spoon for a smoother consistency, or leave them chunkier if you prefer.

  4. Simmer: Once your mixture comes to a gentle bubble, reduce the heat to low and let it simmer for about 20-30 minutes. Keep stirring occasionally to prevent sticking. You’ll notice the mixture will thicken and darken in color. Tip: If you want your jam to be a bit thicker, test it by placing a spoonful on a plate and seeing if it sets up to your liking.

  5. Cool and Store: Once cooked, remove your pot from the heat and allow the jam to cool slightly. Then pour it into a clean jar with a tight-fitting lid. If you’re planning to store it long-term, make sure to do this while the jam is still hot to create a vacuum seal. Let it cool completely before refrigerating.

  6. Enjoy: Your fig jam is now ready to be enjoyed! Spread it on toast, dollop it onto cheese plates, or stir it into your morning oats. The possibilities are endless!

Serving Suggestions

When it comes to serving this fig jam, it’s all about presentation and pairing. For an elegant touch, spoon it into a charming jar and tie a pretty ribbon around it for gifting. If you’re enjoying it at home, try serving it on a beautifully arranged charcuterie board alongside some creamy goat cheese, crunchy nuts, and sliced baguette. For breakfast, spread it on warm buttered toast or swirl it into yogurt for a delightful treat.

Recipe Variations

Now, let’s get creative with some variations on this classic fig jam:

  • Spiced Fig Jam: Add a pinch of cinnamon or a dash of vanilla extract to your fig mixture for a warm, cozy flavor.

  • Herb-Infused: Toss in a few sprigs of rosemary or thyme while it simmers for a unique herbal twist. Just remember to remove them before storing!

  • Nutty Addition: Stir in some chopped almonds or walnuts to add a lovely crunch and enhance the texture of the jam.

  • Citrus Zest: Add lemon or orange zest alongside the juice for an extra zing of freshness that brightens the whole dish.

  • Chili Flake Kick: Spice things up by adding a pinch of red chili flakes for a surprising kick in your spread.

Chef’s Notes

One of the things I love most about this recipe is its incredible versatility. It’s evolved over the years as I experimented with different fruits from my local farmer’s market. I’ve had days when the figs were in short supply, and I’ve mixed in some ripe peaches or apples to bulk up the jam, and it turned out amazing! Each jar feels like a little bit of magic and tradition, connecting me back to those sunny summer afternoons in my grandmother’s kitchen.

Another funny kitchen story: I once stored my fig jam in a very cute but very small jar, and it wasn’t long before I found myself wrestling with a sticky mess when trying to scoop some out. Pro tip: always use a clean spoon, and don’t be afraid to go big with your jar!

FAQs and Troubleshooting

  • How do I know if my jam is thick enough? A great test is to place a spoonful on a plate and run your finger through it. If it holds its shape, you’re good to go! If it’s still too runny, continue simmering for a few more minutes.

  • Can I can this jam for long-term storage? Absolutely! Make sure to sterilize your jars, pour in hot jam, seal tightly, and process in a boiling water bath for about 10 minutes to seal them properly.

  • What if I don’t have fresh figs? No worries! Dried figs work in a pinch. Just soak them in warm water first until soft, then chop and follow the same steps in the recipe.

  • Can I reduce the sugar? While sugar helps with preservation and thickness, you can experiment with natural sweeteners like honey or maple syrup—but keep in mind that these may alter the flavor and texture a bit.

Nutritional Info

While the nutritional content can vary based on ingredient brands and the number of servings, here’s a rough estimate per tablespoon serving:

  • Calories: 35
  • Fat: 0g
  • Carbohydrates: 9g
  • Sugar: 8g
  • Fiber: 0.5g

So there you have it—a bright, delicious, and super easy recipe for homemade 3-Ingredient Fig Jam! This jam is not just a spread; it’s a celebration of fresh ingredients and sweet memories waiting to be made. Dive in, enjoy every jar, and remember that the kitchen is the best place to create your own flavor stories. Happy cooking!

Print

3-Ingredient Fig Jam

A simple and delightful recipe for homemade fig jam using just three ingredients: fresh figs, sugar, and lemon juice.

  • Prep Time: 10 minutes
  • Cook Time: 30 minutes
  • Total Time: 40 minutes
  • Yield: 2 cups 1x
  • Category: Condiment
  • Method: Cooking
  • Cuisine: American
  • Diet: Vegan

Ingredients

Scale
  • 2 cups fresh figs, stemmed and chopped
  • 1 cup granulated sugar
  • 2 tablespoons lemon juice

Instructions

  1. Prepare the figs: Rinse under cold water, pat dry, remove stems, and chop.
  2. Combine ingredients: In a pot, mix chopped figs, sugar, and lemon juice.
  3. Cook the mixture: Over medium heat, stir until figs break down (5-10 minutes).
  4. Simmer: Reduce heat to low and simmer for 20-30 minutes, stirring occasionally.
  5. Cool and store: Allow the jam to cool before transferring to a jar.
  6. Enjoy: Spread on toast or use as a topping for desserts.

Notes

Try variations by adding spices like cinnamon or herbs like rosemary for unique flavors.

Nutrition

  • Serving Size: 1 tablespoon
  • Calories: 35
  • Sugar: 8g
  • Sodium: 0mg
  • Fat: 0g
  • Saturated Fat: 0g
  • Unsaturated Fat: 0g
  • Trans Fat: 0g
  • Carbohydrates: 9g
  • Fiber: 0.5g
  • Protein: 0g
  • Cholesterol: 0mg

Keywords: fig jam, homemade jam, easy recipe, condiment, vegan recipe

Did you make this recipe?

Share a photo and tag us — we can't wait to see what you've made!

May 22, 2026 |

Classic Mojito

A refreshing Classic Mojito cocktail served with mint leaves and lime slices.

Refreshing Classic Mojito Recipe: A Taste of Summer in Your Glass!

Welcome to another delightful journey in the kitchen! Today, we’re diving into the world of one of the most refreshing cocktails that’s perfect for warm evenings, sunny afternoons, or anytime you need a little pick-me-up: the classic Mojito! This drink is not just a refreshing thirst-quencher; it’s a celebration of vibrant flavors, a burst of minty goodness, and the zing of fresh lime. Perfectly mixed, it dances on your palate with a light, crisp fizz that makes you feel like you’re lounging on a beach somewhere tropical—even if you’re just in your backyard.

What I love most about Mojitos is how they embody the joyful spirit of summer. They’re the perfect companion to anything life throws your way—whether you’re hosting a backyard barbecue, enjoying a cozy evening on the porch with friends, or simply soaking up the sun after a long day. The beauty of this cocktail lies in its simplicity, using fresh, everyday ingredients that you probably already have on hand. So, grab your muddler, and let’s shake things up!

A Trip Down Memory Lane: The First Mojito

I still remember the first time I made a Mojito. It was a balmy summer night, and I was hosting a small gathering with friends. We were all longing for something to cool us down, and I had this wild idea to try my hand at making cocktails. As I muddled fresh mint and lime, a slight drizzle began—a perfect soundtrack for a cozy evening indoors. There’s something magical about the fragrance of mint releasing its oils, wafting through the air, promising deliciousness.

As I poured the rum and soda into the glass, we all gathered around the table, eager to give my creation a try. With the first sip, laughter erupted. The combination of fresh mint and zesty lime was a delightful surprise, refreshing yet complex. That night became a cherished memory and sparked my love for cocktail crafting. Since then, every summer, I’ve turned to the Mojito as a go-to drink, often experimenting with new flavor twists. To me, making Mojitos is more than just a drink; it’s about sharing good times and celebrating the beauty of fresh, flavorful ingredients.

Ingredients: Gather Your Essentials

Here’s what you need to whip up this refreshing Mojito. Make sure to gather these ingredients before we get started!

  • 2 oz white rum
    A smooth and light spirit that acts as the base of our drink. If you prefer a lighter cocktail, you can use less rum or swap with vodka, but the flavor will change slightly!

  • 1 oz fresh lime juice
    Nothing beats the bright and zesty flavor of freshly squeezed lime juice! Bottled juice can work in a pinch, but trust me, fresh is always better. You can substitute with lemon juice if you’re in a bind, though the taste will differ.

  • 2 teaspoons simple syrup
    This sweetener can be made easily by dissolving sugar in hot water. You can adjust the sweetness to your liking, or use agave syrup or honey as a substitute.

  • 6-8 fresh mint leaves
    Mint is the star of the Mojito! Use fresh leaves for the best flavor, and feel free to experiment with other herbs like basil for a unique twist.

  • Club soda
    This bubbly addition brings the cocktail to life! If you want a more intense flavor, consider using flavored soda water or tonic water.

  • Ice
    The crunch of ice is essential for keeping your Mojito refreshingly chilled. Crushed ice can enhance the drink’s texture!

  • Lime wedge and mint sprig for garnish
    A lovely garnish elevates your drink’s presentation. It’s all about the details, right?

Step-by-Step Instructions to Craft Your Mojito

Ready to mix? Follow these step-by-step instructions for the perfect Mojito, with my little tips along the way!

  1. Muddle the Mint and Lime
    In a sturdy glass (I love using a highball glass for this!), place 6-8 fresh mint leaves and the lime juice. Using a muddler or the back of a spoon, gently press down and twist to release the mint’s essential oils. Tip: Don’t pulverize the mint; just gently muddle it to avoid bitterness.

  2. Add Simple Syrup
    Pour in 2 teaspoons of simple syrup. Adjust to taste! If you want a sweeter Mojito, add more syrup. If you prefer it less sweet, start with a smaller amount. Chef Insight: This is where you can get creative—try flavored simple syrups like ginger or lavender for a twist!

  3. Incorporate the Rum
    Pour in your 2 oz of white rum. That’s where the fun starts! Stir everything gently to combine, allowing the flavors to meld perfectly.

  4. Fill with Ice
    Add ice to the glass—crushed ice is fantastic if you like a slushy texture, but any ice will do! It’ll keep your drink cool and refreshing.

  5. Top with Club Soda
    Gently pour club soda over the ice to fill the glass. The bubbles will add some sparkle and liveliness to your drink!

  6. Garnish and Serve
    Give it a gentle stir to mix everything but preserve the bubbles. Finally, garnish with a lime wedge and a sprig of fresh mint. This is the finishing touch that says, “Cheers!”

Serving Suggestions: How to Present

When it comes to serving your Mojito, presentation matters! Serve it in a tall glass filled with ice, and for added flair, consider using a fun straw. You can even place the mint sprig right on top of the drink so that its refreshing aroma captivates everyone as they sip. Feel free to get creative with your glassware—something colorful can elevate the vibe!

Recipe Variations: Get Creative with Flavors

Why not switch things up a bit? Here are a few fun variations to inspire your Mojito-making journey:

  1. Berry Mojito
    Add muddled strawberries, raspberries, or blueberries for a fruity twist! The sweetness from the berries complements the tart lime perfectly.

  2. Pineapple Mojito
    Replace fresh lime juice with fresh pineapple juice and toss in some pineapple chunks for a tropical flavor that’ll transport you to the beach!

  3. Spicy Mojito
    For the adventurous, add a few slices of jalapeño to your muddling stage for a spicy kick that balances beautifully with the mint and lime.

  4. Coconut Mojito
    Swap out the rum for coconut rum, and add a splash of coconut water for a creamy, dreamy drink!

  5. Herb-Infused Mojito
    Get creative with herbs! Add fresh basil or even sage along with the mint for an aromatic infusion that changes the entire profile of the drink.

Chef’s Notes: A Little Extra Love

Making Mojitos has been a summer tradition in my kitchen for years now. As I mentioned, my first experience crafting them was filled with laughter and good vibes, and every season, it brings me back to that wonderful memory. Over time, I’ve tweaked the recipe and played around with ingredients, discovering that my favorite Mojito of all is the one shared with friends. Remember, each drink is a blank canvas: don’t be afraid to try something new and make it your own!

FAQs and Troubleshooting

Here are some common questions or hiccups you might encounter while making your Mojito:

  1. Why is my Mojito too bitter?
    If you’ve muddled the mint too hard, it can release bitter notes. Use a gentle touch next time to avoid this!

  2. Can I use dried mint?
    Fresh mint is key for the best flavor. Dried mint lacks the oils and freshness, so it’s not recommended for Mojitos.

  3. How can I adjust the sweetness?
    Taste as you go! Use the simple syrup sparingly and adjust according to your sweetness preference.

  4. What can I use instead of rum?
    If you’re looking for a non-alcoholic version, you can substitute with a mix of sparkling water and a hint of rum extract for flavor.

Nutritional Info (Optional)

A classic Mojito contains approximately:

  • Calories: 150-180 (depending on the sweetness)
  • Carbohydrates: 19g
  • Sugars: 14g
  • Fat: 0g
  • Protein: 0g

By using less sweetener or flavored sparkling water, you can make a lighter version without sacrificing any of the flavor!

So there you have it—the classic Mojito recipe bursting with fresh flavors and good vibes! Whether you’re sipping on your porch, hosting a gathering, or simply wanting to cool down, this drink will never disappoint. Get into the kitchen, shake things up, and let the Mojito magic unfold! Cheers!

Print

Classic Mojito

A refreshing classic cocktail perfect for summer with vibrant flavors of mint and lime.

  • Prep Time: 10 minutes
  • Cook Time: 0 minutes
  • Total Time: 10 minutes
  • Yield: 1 serving 1x
  • Category: Cocktail
  • Method: Mixing
  • Cuisine: Cuban
  • Diet: Vegetarian

Ingredients

Scale
  • 2 oz white rum
  • 1 oz fresh lime juice
  • 2 teaspoons simple syrup
  • 68 fresh mint leaves
  • Club soda
  • Ice
  • Lime wedge and mint sprig for garnish

Instructions

  1. Muddle the mint and lime in a sturdy glass to release the mint’s essential oils.
  2. Add simple syrup to adjust sweetness to your liking.
  3. Incorporate the white rum and stir gently.
  4. Fill the glass with ice, preferably crushed.
  5. Top with club soda, pouring gently to preserve the bubbles.
  6. Garnish with a lime wedge and sprig of mint before serving.

Notes

Serve in a tall glass with ice and feel free to experiment with flavors like berries or coconut.

Nutrition

  • Serving Size: 1 cocktail
  • Calories: 150
  • Sugar: 14g
  • Sodium: 10mg
  • Fat: 0g
  • Saturated Fat: 0g
  • Unsaturated Fat: 0g
  • Trans Fat: 0g
  • Carbohydrates: 19g
  • Fiber: 0g
  • Protein: 0g
  • Cholesterol: 0mg

Keywords: Mojito, cocktail, summer drink, refreshing beverage, mint lime drink

Did you make this recipe?

Share a photo and tag us — we can't wait to see what you've made!

May 22, 2026 |

Summer Nectarine Crumb Tart: Crispy Crust, Juicy Filling

Summer nectarine crumb tart with crispy crust and juicy filling on a plate

A Sweet Summertime Treat: Nectarine Crumb Tart

Welcome back, fellow foodies! Today, we’re diving into a delightful kitchen adventure with a recipe that’s perfect for summer gatherings or simply to savor on a lazy afternoon: Nectarine Crumb Tart. Picture this: a buttery, crumbly crust hugging ripe, juicy nectarines, all topped with a crunchy, golden topping. This tart not only looks beautiful on your table but is also bursting with flavor that will make your taste buds sing. Can you feel that summertime vibe already?

"Why nectarines?" you ask. Well, let me tell you, nectarines are the unsung heroes of summer fruits. Their silky skin and sweet, succulent flesh just scream sunshine and happiness. Plus, they’re so versatile! Whether you’re baking, grilling, or just slicing them up for a snack, they fit right into any culinary scenario. So, let’s roll up our sleeves and get baking!

A Fun Kitchen Memory

Before we dive into the details of our Nectarine Crumb Tart, let me share a little story. One of my warmest memories in the kitchen is from a summer spent at my grandmother’s house. Every August, when the nectarines were ripe and overflowing at the local farm stand, she would invite me over for our special baking sessions. We spent countless afternoons laughing and chatting while we made sweet treats—nectarine cobblers, jams, and of course, crumb tarts.

I still remember the moment we pulled a golden-brown tart out of the oven. The buttery aroma wafting through her kitchen was almost magical. We waited for it to cool, but not without sneaking a few bites of the crumb topping. While it was cooling, we’d sit on the porch, sipping iced tea, letting the warm breeze carry our laughter away. That’s the beauty of cooking; it’s not just about the food—it’s about the memories we create along the way. So, let’s recreate a bit of that magic together with this Nectarine Crumb Tart!

Ingredients

Here’s everything you’ll need to whip up this delightful tart, along with some quick chef tips for each ingredient:

  • 4 ripe nectarines, sliced: Choose nectarines that yield slightly to gentle pressure. If you’re in a pinch, peaches work well too!
  • 1 cup all-purpose flour: This will form the base of our crust. For a gluten-free option, substitute with almond flour or a 1:1 gluten-free blend.
  • 1/2 cup granulated sugar: This will sweeten the tart nicely, but feel free to swap out for coconut sugar for a deeper flavor.
  • 1/2 cup unsalted butter, softened: Butter brings rich flavor to our crust. If you’re looking for a dairy-free version, try using coconut oil.
  • 1/2 cup brown sugar: This adds a lovely molasses flavor to the crumb topping. You can substitute it with more granulated sugar if you prefer.
  • 1/2 teaspoon cinnamon: A warm spice that enhances the sweetness of our nectarines. Nutmeg can also be a lovely alternative if that’s what you have on hand.
  • 1/4 teaspoon salt: Balances out the sweetness. Don’t skip this!
  • 1/4 cup rolled oats: These will give our crumb topping a hearty texture. Quick oats can be a convenient substitute if that’s what you have.
  • 1 tablespoon lemon juice: This brightens up the flavor of the nectarines. Lime juice could also work in a pinch!
  • Vanilla ice cream (for serving): Because what’s a tart without a little scoop of ice cream? For a dairy-free option, try coconut or almond milk ice cream!

Step-by-Step Instructions

Now that you’ve gathered your ingredients, let’s get down to the nitty-gritty of making this Nectarine Crumb Tart. Follow these steps, and remember, a little laughter and patience go a long way in the kitchen!

  1. Preheat your oven: First things first, preheat your oven to 350°F (175°C). This is crucial because we want our tart to bake evenly and perfectly golden brown.

  2. Prepare the crust: In a mixing bowl, cream together the softened butter and granulated sugar until it’s light and fluffy. This will take about 2-3 minutes. It’s essential for creating a tender crust! Chef tip: Use a hand mixer for ease, but if you’re feeling nostalgic, a wooden spoon will do just fine!

  3. Add the dry ingredients: Gradually mix in the flour, brown sugar, cinnamon, and salt. It’ll start to resemble a crumbly dough. Don’t stress if it looks a bit dry; we’ll make it work!

  4. Form the crust: Press about two-thirds of this mixture into the bottom of a greased tart pan (9 or 10 inches works great). Use your fingers to create an even layer. Note: Don’t panic if it doesn’t look perfect; it’ll come together beautifully in the oven!

  5. Arrange the nectarines: Evenly distribute the sliced nectarines over the crust. Drizzle with lemon juice for that extra zing.

  6. Make the crumb topping: With the remaining dough mixture, add the rolled oats and give it a quick mix. Then, sprinkle this over the nectarines, creating a rustic crumb layer. Chef hack: To achieve a more even golden color, make sure to break up any large clumps of the topping.

  7. Bake: Place your tart in the preheated oven and bake for about 30-35 minutes, or until the top is golden and the nectarines are bubbly. Ah, that aroma is going to make your kitchen feel like a bakery! Pro tip: If you notice the edges are browning too much, cover them gently with aluminum foil.

  8. Cool down: Once baked, let your tart cool for at least 15-20 minutes before serving. This helps the juices settle and makes slicing a breeze.

Serving Suggestions

Serving this Nectarine Crumb Tart is an art form in itself. Slice it into generous wedges and serve on a beautiful platter. A scoop of vanilla ice cream on the side is a must; the creaminess pairs wonderfully with the tart’s sweetness. You could even garnish with fresh mint leaves for a pop of color and freshness!

Recipe Variations

One of the best things about this recipe is its flexibility! Here are a few ideas to switch things up:

  1. Berry Delight: Swap out half the nectarines for fresh blueberries or raspberries for a mixed berry tart.
  2. Spiced Up: Add a pinch of nutmeg or ginger to the crumb topping for a warm twist.
  3. Nutty Crunch: Incorporate chopped walnuts or pecans into the crumb topping for an added crunch and nutty flavor.
  4. Syrup Drizzle: Drizzle some caramel or honey over the tart before serving for an extra indulgent touch.
  5. Sweet Swaps: Use agave syrup or maple syrup in place of granulated sugar for a different sweetness profile.

Chef’s Notes

Ah, the evolution of recipes! This Nectarine Crumb Tart has gone through many adaptations since that summer with my grandma. I’ve experimented with different fruits, from plums to apples, and each time has been a delightful surprise. The most memorable twist? I once made a savory version with bacon bits and goat cheese—let’s just say that one didn’t last long at my potluck!

FAQs and Troubleshooting

  1. What if my dough is too crumbly?
    If your crumb mixture doesn’t hold together, try adding a teaspoon of water or milk, one at a time, until it’s workable.

  2. Can I prep this in advance?
    Absolutely! You can prepare the tart the night before and store it covered in the refrigerator. Just bake it fresh the next day for a warm treat.

  3. How do I store leftovers?
    Store any leftover tart in an airtight container at room temperature for 2-3 days. You can also refrigerate it if you prefer.

  4. What if my nectarines are hard?
    If you have underripe nectarines, place them in a brown paper bag with an apple or banana for a couple of days. They’ll ripen beautifully!

Nutritional Info (Optional)

While I always recommend enjoying dessert in moderation, it’s good to know what you’re eating! A slice of Nectarine Crumb Tart (without ice cream) contains approximately:

  • Calories: 250
  • Protein: 3g
  • Carbohydrates: 35g
  • Fat: 12g
  • Fiber: 2g

Remember to adjust based on your specific ingredient substitutions!


Alright, my friends! There you have it—a delightful recipe for Nectarine Crumb Tart that promises to bring back joyful memories and create new ones in your kitchen. Share it with family and friends, and don’t forget to leave a comment about your own kitchen adventures with this recipe. Let’s keep the love for food fresh and flowing! Happy baking!

Print

Nectarine Crumb Tart

A delightful summer tart with a buttery crumb crust and juicy nectarines, perfect for gatherings or a lazy afternoon.

  • Prep Time: 15 minutes
  • Cook Time: 35 minutes
  • Total Time: 50 minutes
  • Yield: 8 servings 1x
  • Category: Dessert
  • Method: Baking
  • Cuisine: American
  • Diet: Vegetarian

Ingredients

Scale
  • 4 ripe nectarines, sliced
  • 1 cup all-purpose flour
  • 1/2 cup granulated sugar
  • 1/2 cup unsalted butter, softened
  • 1/2 cup brown sugar
  • 1/2 teaspoon cinnamon
  • 1/4 teaspoon salt
  • 1/4 cup rolled oats
  • 1 tablespoon lemon juice
  • Vanilla ice cream (for serving)

Instructions

  1. Preheat your oven to 350°F (175°C).
  2. Prepare the crust by creaming butter and granulated sugar until light and fluffy.
  3. Add the flour, brown sugar, cinnamon, and salt gradually.
  4. Form the crust by pressing two-thirds of the mixture into a greased tart pan.
  5. Arrange the sliced nectarines over the crust and drizzle with lemon juice.
  6. Make the crumb topping by adding rolled oats to the remaining dough mixture.
  7. Bake for about 30-35 minutes or until golden and bubbly.
  8. Cool for 15-20 minutes before serving.

Notes

Slice and serve with vanilla ice cream for a delightful treat. Garnish with fresh mint leaves for added freshness.

Nutrition

  • Serving Size: 1 slice
  • Calories: 250
  • Sugar: 15g
  • Sodium: 100mg
  • Fat: 12g
  • Saturated Fat: 7g
  • Unsaturated Fat: 3g
  • Trans Fat: 0g
  • Carbohydrates: 35g
  • Fiber: 2g
  • Protein: 3g
  • Cholesterol: 30mg

Keywords: nectarine tart, summer dessert, crumb tart, easy baking, fruity dessert

Did you make this recipe?

Share a photo and tag us — we can't wait to see what you've made!