Cleanplate Cravings

Cleanplate Cravings

June 9, 2026 |

Citrus Arugula Salad: Tangy, Crispy Crunch in 15 Minutes
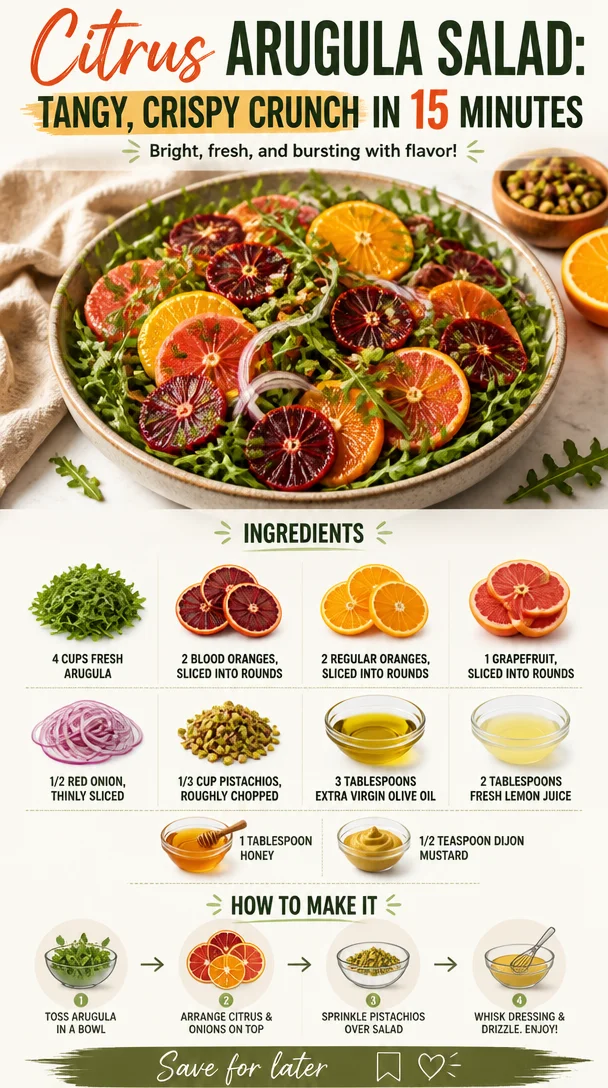
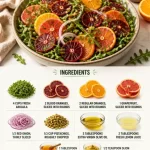
Citrus Arugula Salad with vibrant citrus and fresh greens in a bowl

Citrus Arugula Salad: A Burst of Flavor in Every Bite

Welcome to Clean Plate Cravings! Today, we’re diving into a refreshing dish that is perfect for brightening up your meals: Citrus Arugula Salad. With vibrant colors, an uplifting flavor profile, and a medley of textures, this salad is everything you need to recharge your culinary spirit. Whether you’re hosting a special brunch, prepping for a family dinner, or just craving something zesty and light, this salad packs a punch!

Picture this: it’s a sunny afternoon, and I’m wandering through my local farmers’ market—my happy place. The air is filled with the sweet scent of fresh produce, and my eyes are drawn to the stalls overflowing with colorful citrus fruits. Oranges, grapefruits, and those striking blood oranges glisten like little gems. I can’t resist grabbing them. The idea of a luscious citrus salad forms in my mind, effortlessly combining tartness and sweetness that only citrus can deliver, paired with peppery arugula and a crunch from nuts. And just like that, Citrus Arugula Salad becomes my go-to for those sun-kissed afternoons and beyond!

Personal Story

Ah, one of my fondest food memories! This salad takes me back to a family gathering a few summers ago. We were all gathered in the backyard, laughter bouncing around as they flipped burgers and prepped sides. I decided to whip up my Citrus Arugula Salad, bringing together all the flavors I had fallen in love with at the market. As I layered the vibrant greens with slices of blood oranges and grapefruit, my family gathered around, curious about the colors and enticing aromas.

With every bite, I saw them light up with surprise and delight. The balance of flavors was just perfect—the peppery bite of arugula mingling beautifully with the sweet, tangy citrus, all enhanced by a splash of homemade dressing. It wasn’t just a salad; it was the laughter and conversations around the table that made the moment truly special. That day reinforced my love for this dish—food has an incredible way of bringing people together.

Ingredients

Here’s what you’ll need to create this delightful Citrus Arugula Salad:

  • 4 cups fresh arugula
    This peppery green is the star of our show, bringing that zing. If arugula isn’t available, feel free to swap it with baby spinach or mixed greens.

  • 2 blood oranges, peeled and sliced into rounds
    These gorgeous oranges add not only a beautiful color but also a slight sweetness. If you can’t find blood oranges, navel oranges work perfectly too.

  • 2 regular oranges, peeled and sliced into rounds
    Bright, juicy, and sweet! You can use any orange variety you love—Valencia and Cara Cara are excellent choices.

  • 1 grapefruit, peeled and sliced into rounds
    The tartness of grapefruit perfectly balances the sweetness of the oranges. If you’re looking for something milder, pomelo is a great alternative.

  • 1/2 red onion, thinly sliced
    The sharpness of red onion adds a lovely bite. If you want to tone down the flavor, soak the slices in water for 10 minutes before adding them to the salad.

  • 1/3 cup pistachios, roughly chopped
    These beauties not only enhance the crunch but also add a nutty richness. Almonds or walnuts could also be a fantastic substitute.

  • 3 tablespoons extra virgin olive oil
    A good quality oil brings a wonderful depth of flavor to your dressing. Avocado oil can serve as a good alternative if desired.

  • 2 tablespoons fresh lemon juice
    The acidity from the lemon provides that bright pop of flavor! Lime juice can be swapped in for a different twist.

  • 1 tablespoon honey
    This natural sweetener balances the tartness perfectly. For a vegan option, try maple syrup instead.

  • 1/2 teaspoon Dijon mustard
    This adds a bit of zest to the dressing. If you’re not a fan of mustard, you can leave it out!

Step-by-Step Instructions

Now, let’s get down to the cooking part! Don’t worry; this is super simple and quite fun.

  1. Prep Your Ingredients.
    Start by washing your arugula under cold water and let it dry. You can use a salad spinner or lay it out on a clean kitchen towel. The crispier, the better! Next, peel and slice your blood oranges, regular oranges, and grapefruit. Aim for about ¼-inch thick rounds; they should make gorgeous layers in the salad.

  2. Slice the Red Onion.
    Thinly slice the red onion. The goal is to have delicate ribbons that will blend beautifully with the rest of the salad without overpowering it. If raw onion is too strong for you, remember the soaking trick!

  3. Chop the Pistachios.
    Roughly chop your pistachios. I love to keep them a bit chunky for that satisfying crunch! Just don’t forget to give them a little shake to release any dust—it’ll make them pop even more.

  4. Make the Dressing.
    In a small bowl, whisk together the extra virgin olive oil, fresh lemon juice, honey, and Dijon mustard. This is where the magic happens! Taste it, and if you prefer it sweeter, add a touch more honey. If you want it tangier, a squeeze of more lemon juice works wonders.

  5. Assemble the Salad.
    First, create a bed of arugula on a large serving platter. Layer the orange and grapefruit slices generously over the greens, fanning them out for visual appeal. Scatter the thin red onion slices on top, followed by the chopped pistachios.

  6. Dress the Salad.
    Drizzle the dressing over the salad just before serving. I love to do this to keep the arugula fresh and vibrant! Toss gently with two forks to avoid bruising the fruits too much.

  7. Serve and Enjoy!
    Serve immediately so all the flavors can shine at their best. If you happen to have leftovers, keep the dressing separate until serving to maintain freshness.

Serving Suggestions

Plate the salad on a large, shallow dish or in individual bowls, making each serving a feast for the eyes. A sprinkle of extra pistachios on top will make it all feel fancy without the fuss. You can also add a few fresh herbs like mint or basil for an aromatic finish. A side of crusty bread or a main protein like grilled chicken or shrimp can transform this salad into a complete meal!

Recipe Variations

Feeling adventurous? Here are a few creative twists to elevate your Citrus Arugula Salad:

  • Citrus Avocado Twist: Add sliced avocado for a creamy texture. The buttery richness pairs beautifully with the citrus.

  • Add Some Cheese: Consider crumbling some feta or goat cheese on top for a tangy complement to the salad.

  • Spiced Nuts: Use spiced almonds or walnuts instead of plain pistachios for an extra kick.

  • Add Grains: Toss in some cooked quinoa or farro for a more filling option that elevates the dish.

  • Herb Infusion: Experiment with fresh herbs like cilantro or parsley for an aromatic flair.

Chef’s Notes

Over the years, my Citrus Arugula Salad has evolved wonderfully. In the beginning, I used to add plain sliced almonds, but as I ventured into using more exotic nuts like pistachios, it took the flavor experience to a whole new level. One time, I added fresh mint to the dressing, and let me tell you, it’s a game-changer! That said, I believe this salad is a perfect canvas—add what you love, change it up, and make it your own!

FAQs and Troubleshooting

1. Can I make this salad ahead of time?
Absolutely! You can prep the individual ingredients a few hours in advance, just keep the dressing separate until you’re ready to serve to maintain the freshness of the arugula.

2. What if I can’t find blood oranges?
No worries! Regular oranges or even tangerines will work well. The key is maintaining that citrus zing.

3. How should I store leftovers?
If you have leftovers, store the salad in an airtight container in the fridge but keep the dressing on the side to prevent sogginess. Aim to consume within 24 hours for best freshness.

4. Can I use a different green?
Definitely! If arugula isn’t your thing, try mixing in some baby spinach or kale, or even create a blend for diverse flavors and textures.

Nutritional Info

The beauty of this Citrus Arugula Salad is not only in its taste but also in its nutritional benefits. Loaded with vitamins, healthy fats, and antioxidants, it’s a fantastic option for those aiming to eat cleaner. Keep an eye on portions of the honey and nuts if you’re watching sugar or calorie intake.

So there you have it! A delightful recipe that’s invigorating and oh-so-easy to whip up. Enjoy creating this Citrus Arugula Salad at home, and remember: cooking should be fun, flavorful, and inclusive of what you love. Happy cooking!

Print

Citrus Arugula Salad

A refreshing Citrus Arugula Salad featuring vibrant citrus fruits and peppery arugula, perfect for any gathering.

  • Prep Time: 15 minutes
  • Cook Time: 0 minutes
  • Total Time: 15 minutes
  • Yield: 4 servings 1x
  • Category: Salad
  • Method: No-Cook
  • Cuisine: Mediterranean
  • Diet: Vegetarian

Ingredients

Scale
  • 4 cups fresh arugula
  • 2 blood oranges, peeled and sliced into rounds
  • 2 regular oranges, peeled and sliced into rounds
  • 1 grapefruit, peeled and sliced into rounds
  • 1/2 red onion, thinly sliced
  • 1/3 cup pistachios, roughly chopped
  • 3 tablespoons extra virgin olive oil
  • 2 tablespoons fresh lemon juice
  • 1 tablespoon honey
  • 1/2 teaspoon Dijon mustard

Instructions

  1. Prep your ingredients by washing arugula and slicing the citrus fruits into rounds.
  2. Slice the red onion thinly to avoid overpowering flavors.
  3. Chop the pistachios for a crunchy texture.
  4. Make the dressing by whisking olive oil, lemon juice, honey, and Dijon mustard.
  5. Assemble the salad starting with a bed of arugula and layering the citrus and onions.
  6. Dress the salad with the dressing just before serving to keep it fresh.
  7. Serve immediately and enjoy!

Notes

Create a stunning presentation by plating the salad in a shallow dish and adding extra pistachios or fresh herbs.

Nutrition

  • Serving Size: 1 serving
  • Calories: 250
  • Sugar: 10g
  • Sodium: 100mg
  • Fat: 18g
  • Saturated Fat: 2g
  • Unsaturated Fat: 16g
  • Trans Fat: 0g
  • Carbohydrates: 25g
  • Fiber: 5g
  • Protein: 6g
  • Cholesterol: 0mg

Keywords: salad, citrus, arugula, healthy, vegetarian, summer recipe, fresh produce
Did you make this recipe?

Share a photo and tag us — we can't wait to see what you've made!

June 9, 2026 |

Cherry Sherbet

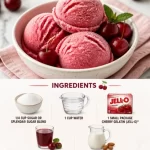
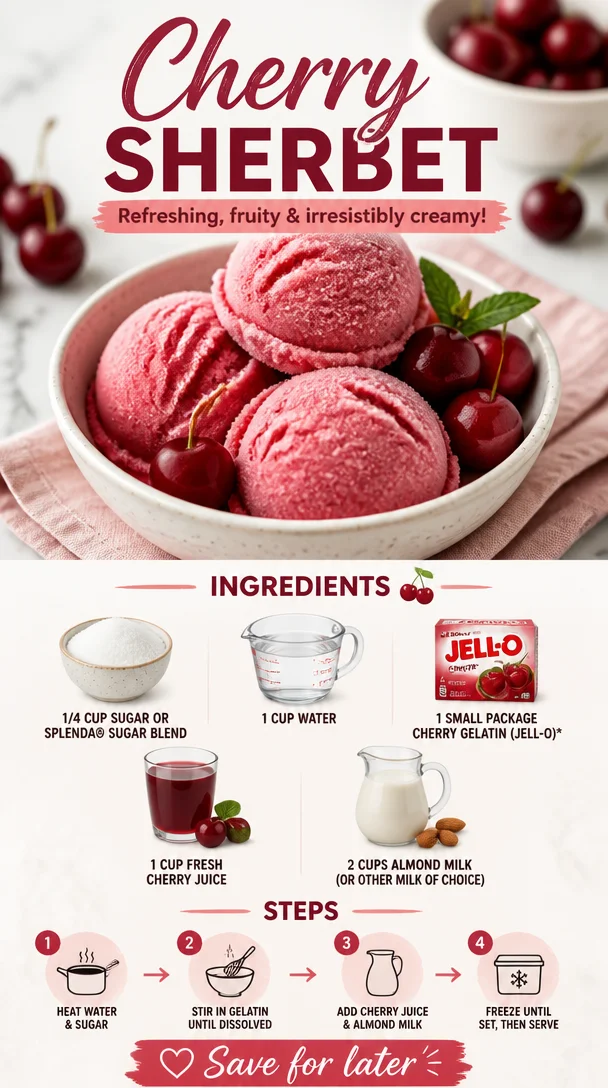
Delicious bowl of homemade Cherry Sherbet with fresh cherries and cream

Cool Down with Homemade Cherry Sherbet

Welcome to another delightful adventure in the kitchen! Today, we’re diving into the refreshing world of cherry sherbet, a treat that will whisk you back to childhood memories and outdoor summer fun. There’s something oh-so-special about enjoying a bowl of homemade sherbet on a hot day, isn’t there? The creamy texture, the vibrant color, and the sweet-tart flavor all come together to create a delicious experience that makes your taste buds dance.

Growing up, my summers were filled with trips to the local ice cream shop with my family, where I would always opt for a scoop (or two) of cherry sherbet. I loved the way the cool, sweet flavor hit my tongue, a burst of cherries combined with that lovely creaminess. It was a simple pleasure in a world that often felt chaotic. As I got older, I realized I could recreate that joy in my own kitchen, and guess what? It’s easier than you might think!

Whether you’re making this to cool off after a long day or to impress your friends at a summer gathering, cherry sherbet is sure to bring smiles all around. So grab your apron, and let’s get started on this delicious journey!

A Cherry Memory

One of my fondest memories tied to cherry sherbet takes me back to summer barbecues at my grandparents’ house. The sun would be shining, the grill sizzling, and the aroma of burgers wafting through the air. After the main course, my grandma would always bring out her homemade cherry sherbet, which she’d churn in her old-fashioned ice cream maker. It was this beautiful pink color that made everyone’s hearts sing.

I can still hear the laughter of my cousins as we raced to the porch, bowls in hand, eager to dig in. My grandma would always say, “It’s made with love and the freshest cherries!” Those words stuck with me, and they inspire the way I create recipes today. That joy, that connection with family, and the simplicity of enjoying good food are what we’re all about here.

Ingredients

Gather up these simple ingredients to create your very own cherry sherbet:

  • 1/4 cup sugar or SPLENDA® Sugar Blend
    This sweetener helps balance the tartness of the cherries. If you’re looking to cut calories, SPLENDA is a great low-calorie option. Feel free to adjust the sweetness according to your taste!

  • 1 cup water
    Water is the base for your syrup, helping dissolve the sugar and infuse flavor into the cherries. You can use sparkling water for an extra fizzy version—fun for gatherings!

  • 1 small package cherry gelatin (Jell-O)
    This adds sweetness and helps create that wonderful sherbet texture. If you can’t find cherry, raspberry gelatin works beautifully as a substitute.

  • 1 cup fresh cherry juice
    Fresh cherry juice packs a powerful punch of flavor! If cherry season isn’t in full swing, you can opt for bottled juice, but make sure it’s 100% juice with no added sugars.

  • 2 cups almond milk (or other milk of choice)
    Almond milk adds creaminess while keeping it light. If you’re a fan of dairy, whole milk or half-and-half will work for a richer sherbet experience.

Step-by-Step Instructions

Ready to whip up this sweet treat? Let’s dive into the cooking steps, where I’ll sprinkle in some tips and tricks along the way!

  1. Prepare the Cherry Syrup:
    In a saucepan, combine the sugar and water over medium heat. Stir until the sugar is fully dissolved. Bring it to a gentle simmer, letting it bubble away for about 5 minutes. Chef’s Tip: Keeping your syrup warm will help the cherry gelatin dissolve more easily later on.

  2. Add the Jell-O:
    Remove the saucepan from heat, and stir in the cherry gelatin. Keep stirring until it’s completely dissolved. This is the moment where that rich cherry aroma will fill your kitchen—you’ll be tempted to taste!

  3. Stir in Cherry Juice:
    Once the gelatin is dissolved, add the fresh cherry juice. Give it a good stir to combine everything. The color should start turning a beautiful shade of pink, reminiscent of summer sunsets! Pro Tip: If you’re unsure about the cherry juice flavor, taste it and adjust the sweetness by adding more sugar if needed.

  4. Mix in the Almond Milk:
    Now, let your mixture cool to room temperature. Once cooled, stir in the almond milk (or your milk of choice). This will give the sherbet its creamy, dreamy texture. Chef Hack: If you’re in a hurry, you can chill your syrup in the fridge for quicker cooling!

  5. Ice Cream Maker Time:
    Pour the mixture into your ice cream maker and churn according to the manufacturer’s instructions. Typically, this should take around 20-30 minutes. If you don’t have an ice cream maker, don’t fret! Pour it into a shallow dish and freeze, stirring every 30 minutes until it reaches your desired consistency.

  6. Final Freeze:
    Once it’s churned to a soft-serve consistency, transfer your cherry sherbet to a lidded container. Freeze for an additional 2-4 hours to firm it up. Side Note: If it’s too hard to scoop after freezing, let it sit at room temperature for a few minutes before serving.

  7. Serve and Enjoy:
    Scoop your homemade cherry sherbet into bowls or cones and enjoy! Consider topping it off with fresh cherries, a sprinkle of coconut flakes, or a drizzle of chocolate sauce. You’ve earned it!

Serving Suggestions

When it comes to serving your cherry sherbet, presentation is key! Serve it in beautiful sundae glasses or waffle cones for that nostalgic ice cream shop feel. Don’t forget to add a few fresh cherries or a sprig of mint for a pop of color! If you’re feeling adventurous, layer it in a glass with some chocolate or vanilla ice cream for a marbled effect—sometimes the best recipes bring a little pizzazz!

Recipe Variations

Here are some fun alternatives to mix things up:

  • Berry Blast: Add a cup of other mixed berry juices (like blueberry or raspberry) for a sherbet mix that’s bursting with flavor.

  • Coconut Cherry: Substitute almond milk with coconut milk for a tropical flair.

  • Cherry Limeade: Mix in some fresh lime juice to brighten up the flavor and give it a zesty kick.

  • Frozen Yogurt Twist: Use yogurt instead of milk for a healthier, tangy version!

  • Alcohol-Infused: For an adult twist, blend in a splash of vodka or rum (just a touch!) when mixing the milk for a refreshing summertime cocktail.

Chef’s Notes

This cherry sherbet recipe has been a beloved staple in my family for years, evolving with each season. I often look back at my grandma’s old ice cream maker sitting in the corner of the kitchen, a beautiful reminder of simpler times. Sometimes, I add a dash of almond extract or vanilla for a more complex flavor profile. The best part? You can customize this recipe endlessly! Whether it’s a summer day with friends or a cozy winter evening, you can always find a reason to whip up a batch of this creamy goodness.

FAQs and Troubleshooting

1. Can I use frozen cherries instead of fresh ones?
Absolutely! Just thaw and juice them before using. You may need to adjust the sugar based on how sweet the cherries are.

2. What if my sherbet is too hard to scoop?
Let it sit out for 5-10 minutes before scooping. You can also blend it with a little milk for a softer texture.

3. How long will the sherbet last in the freezer?
It will keep for about 2-3 weeks in an airtight container, although it’s hard to resist for that long!

4. Is it necessary to use gelatin?
While gelatin helps achieve that scoopable texture, you can omit it if you prefer, though the texture may be a bit icier.

Enjoy this homemade cherry sherbet, and remember that cooking is all about joy, experimentation, and sharing this delicious journey with others. Life is too short not to indulge in vibrant, flavorful food—so let’s keep things fresh, simple, and above all, delicious!

Print

Homemade Cherry Sherbet

A refreshing cherry sherbet that combines sweet-tart cherries with a creamy texture, perfect for hot summer days.

  • Prep Time: 15 minutes
  • Cook Time: 35 minutes
  • Total Time: 50 minutes
  • Yield: 4 servings 1x
  • Category: Dessert
  • Method: Churning
  • Cuisine: American
  • Diet: Vegetarian

Ingredients

Scale
  • 1/4 cup sugar or SPLENDA® Sugar Blend
  • 1 cup water
  • 1 small package cherry gelatin (Jell-O)
  • 1 cup fresh cherry juice
  • 2 cups almond milk (or other milk of choice)

Instructions

  1. Prepare the Cherry Syrup: In a saucepan, combine the sugar and water over medium heat. Stir until the sugar is fully dissolved. Bring to a gentle simmer for about 5 minutes.
  2. Add the Jell-O: Remove the saucepan from heat, and stir in the cherry gelatin until completely dissolved.
  3. Stir in Cherry Juice: Once the gelatin is dissolved, add the fresh cherry juice and stir to combine.
  4. Mix in the Almond Milk: Let the mixture cool to room temperature, then stir in the almond milk.
  5. Pour the mixture into your ice cream maker and churn according to the manufacturer’s instructions, typically around 20-30 minutes.
  6. Transfer the cherry sherbet to a lidded container and freeze for an additional 2-4 hours to firm it up.
  7. Serve and Enjoy: Scoop the homemade cherry sherbet into bowls or cones and enjoy!

Notes

Serve in sundae glasses or waffle cones. Consider topping with fresh cherries or a drizzle of chocolate sauce.

Nutrition

  • Serving Size: 1 serving
  • Calories: 220
  • Sugar: 28g
  • Sodium: 80mg
  • Fat: 4g
  • Saturated Fat: 0g
  • Unsaturated Fat: 4g
  • Trans Fat: 0g
  • Carbohydrates: 42g
  • Fiber: 1g
  • Protein: 3g
  • Cholesterol: 0mg

Keywords: cherry sherbet, homemade dessert, summer treat

Did you make this recipe?

Share a photo and tag us — we can't wait to see what you've made!

June 9, 2026 |

Min Caprese Platter with Burrata & Balsamic Glaze

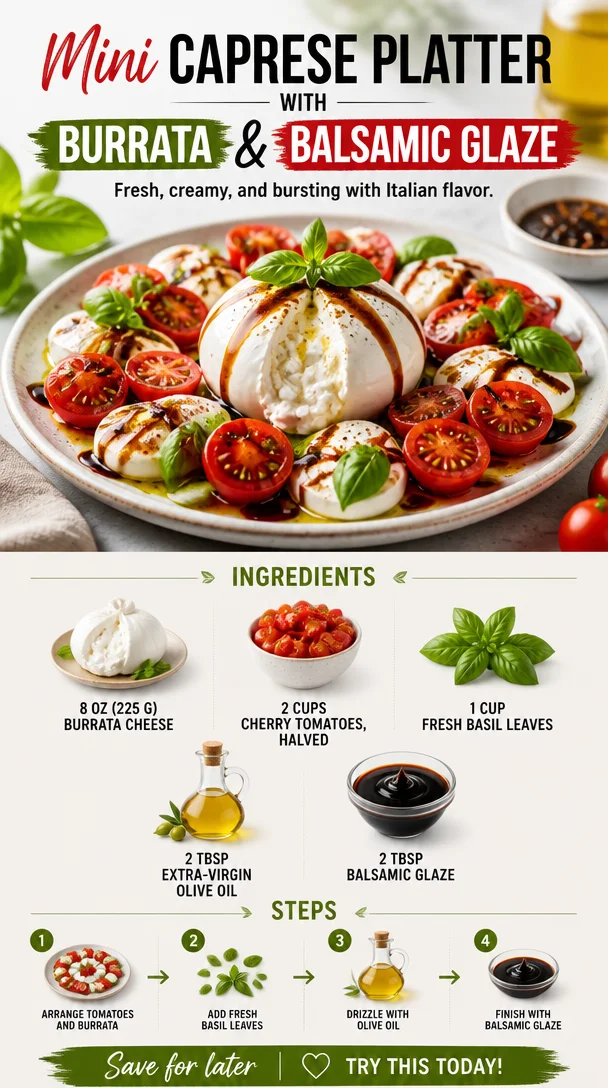
Caprese platter with burrata and balsamic glaze arranged beautifully

Caprese Platter with Burrata & Balsamic Glaze

Welcome to Clean Plate Cravings! Today, we’re diving into a dish that truly expresses the beauty of fresh ingredients and simplicity— the fabulous Caprese Platter with Burrata & Balsamic Glaze. If you’ve never tried burrata, let me tell you, it’s like a creamy hug for your taste buds. Popping these vibrant flavors into your mouth is nothing less than pure joy.

Whether you’re entertaining guests or treating yourself to a refreshing bite, this platter is a show-stopper that takes no time to prepare. With warm days rolling in, it’s the perfect dish to serve at picnics or backyard barbecues. Picture this: a colorful spread featuring succulent cherry tomatoes, rich burrata cheese, and fragrant basil, all drizzled with a luscious balsamic glaze. If that doesn’t get you excited about summer cooking, I don’t know what will!

Personal Story

I remember the first time I had burrata cheese. It was during a trip to a little Italian restaurant tucked away in an alley in Florence. The waiter brought out a simple salad, but oh, what a salad it was! The centerpiece was a big, glistening ball of burrata, surrounded by the ripest tomatoes they could find, fresh basil picked that very morning, and a drizzle of the most incredible balsamic reduction I had ever tasted. The pairing was magical, and with each bite, I felt transported to a place where everything is beautiful and fresh.

This dish has become a staple in my kitchen since that Italian adventure. It brings back such joyous memories every time I prepare it. Plus, it’s incredibly versatile! You can enjoy it as a light meal, an impressive appetizer, or a vibrant snack. Whenever I need to whip up something quick but still want to wow my guests, this is my go-to.

Ingredients

Here’s what you’ll need to create this vibrant Caprese Platter:

  • 8 oz (225 g) burrata cheese
    Creamy, indulgent, and a delightful center when sliced open. If you can’t find burrata, fresh mozzarella can be a good substitute, though it won’t have the same luxurious creaminess.

  • 2 cups cherry tomatoes, halved
    Bursting with flavor, cherry tomatoes add natural sweetness. Use whatever color you can find—red, yellow, or even heirloom cherry tomatoes for a beautiful palette.

  • 1 cup fresh basil leaves
    Basil is the aromatic partner in this dish. Feel free to swap in other fresh herbs like mint or arugula for a unique twist.

  • 2 tbsp extra-virgin olive oil
    A high-quality olive oil elevates any dish. Look for one labeled "first cold press" for the best taste. If you’re in the mood for something different, try a flavored oil, like garlic or lemon.

  • 2 tbsp balsamic glaze
    Sweet and tangy, balsamic glaze is the finishing touch that brings everything together. You can make your own by reducing balsamic vinegar on the stove, or you can purchase a bottle for convenience.

Step-by-Step Instructions

Alright, let’s get into the nitty-gritty! Here’s how you can put this beautiful platter together.

  1. Prep your ingredients
    Start by gathering all your ingredients. Make sure your burrata is at room temperature; it’s creamier and softer this way. Rinse your cherry tomatoes under cool, running water. Gently pat them dry—you want to keep them fresh and ready to shine!

  2. Halve the cherry tomatoes
    Slice each cherry tomato in half. This not only makes them easier to eat but also allows for more surface area to soak in the flavors of the olive oil and balsamic glaze. Plus, look at those vibrant colors!

  3. Prepare the basil leaves
    Take your fresh basil leaves and give them a gentle rinse as well. Pat them dry and then tear larger leaves into smaller pieces. This releases the oils and enhances their aromatic qualities. You can leave smaller leaves whole for added visual appeal!

  4. Arrange the tomatoes
    Grab your serving platter—this is all about presentation! Lay the halved cherry tomatoes on the platter, cut side facing up. Not only is that visually appealing, but it makes adding the burrata easier too!

  5. Add the burrata
    Gently place the burrata in the center of the cherry tomatoes. When you cut into it, that luscious, creamy interior will spill out like a beautiful treasure, inviting everyone to dig in!

  6. Drizzle with olive oil
    Use a spoon (or a drizzle bottle if you’re feeling fancy) to drizzle extra-virgin olive oil over the tomatoes, burrata, and basil. Elevate the flavor and keep things nice and flavorful!

  7. Finish with balsamic glaze
    Finally, don’t skimp on the balsamic glaze! Drizzle it artfully across the whole platter. This transforms the dish into a visual masterpiece and adds that signature sweet-tangy flavor.

  8. Serve immediately!
    Bring your platter to the table as soon as it’s ready; fresh is key here! Encourage everyone to dig in. The combination keeps getting better with every bite.

Serving Suggestions

For serving, you can keep it simple by bringing the platter to the table as-is, allowing guests to help themselves. Pair it with some crusty bread or toasted crostini for a wonderful bite. If you want to turn it into a full meal, serve with grilled chicken or a light pasta on the side. And don’t forget—a chilled glass of white wine pairs beautifully with this dish!

Recipe Variations

Feeling a little adventurous? Here are some fun twists on the classic Caprese Platter:

  1. Mediterranean Mix: Add olives and roasted red peppers for a delightful Mediterranean vibe.
  2. Grilled Addition: Grill the cherry tomatoes for a smoky flavor boost—yum!
  3. Pesto Upgrade: Swap out fresh basil for a dollop of pesto and then drizzle balsamic glaze for a flavor explosion.
  4. Fruit Fusion: Incorporate fresh peaches or strawberries for a refreshing and sweet touch.
  5. Spicy Kick: Sprinkle some crushed red pepper flakes on top for a little heat!

Chef’s Notes

This recipe has been a staple in my kitchen and has evolved over time. I used to make it exactly as outlined, but I’ve found that getting a little creative can keep things exciting! Sometimes, I add a sprinkle of sea salt or even layer in some arugula for an extra peppery bite. One time, I tried incorporating mango slices on a whim, and it turned out to be a delightful surprise!

Remember, cooking is about having fun and experimenting. Don’t be afraid to make this dish truly yours!

FAQs and Troubleshooting

Q: Can I make this Caprese Platter ahead of time?
A: While it’s best enjoyed fresh, you can prep the ingredients a few hours ahead. Just keep everything in separate containers in the fridge, and assemble right before serving.

Q: What if I can’t find burrata?
A: If burrata is unavailable, fresh mozzarella is a suitable substitute. Just make sure it’s high quality; the flavor is key here!

Q: How should I store leftovers?
A: Store any leftovers in an airtight container in the fridge. However, tomatoes can become soggy over time, so enjoy this fresh within a day.

Q: Can I use dried herbs instead of fresh?
A: Fresh herbs are truly the star here, but if you must use dried, remember that dried herbs are more concentrated, so use about one-third of the amount.

Nutritional Info

While nutritional info can vary based on portions and specific ingredients, this dish is generally low in calories but high in flavor and nutrients! The fresh veggies provide vitamins, while burrata adds a cozy dose of protein and healthy fats. Pair this dish with your favorite bread or protein for a balanced meal!

The Caprese Platter with Burrata & Balsamic Glaze is more than a dish; it’s an experience that captures the essence of fresh and approachable cooking. So grab your ingredients, and let’s celebrate the pure joy of food together!

Print

Caprese Platter with Burrata & Balsamic Glaze

A vibrant and fresh Caprese platter featuring creamy burrata, succulent cherry tomatoes, and aromatic basil, all drizzled with balsamic glaze.

  • Prep Time: 15 minutes
  • Cook Time: 0 minutes
  • Total Time: 15 minutes
  • Yield: 4 servings 1x
  • Category: Appetizer
  • Method: No Cooking
  • Cuisine: Italian
  • Diet: Vegetarian

Ingredients

Scale
  • 8 oz (225 g) burrata cheese
  • 2 cups cherry tomatoes, halved
  • 1 cup fresh basil leaves
  • 2 tbsp extra-virgin olive oil
  • 2 tbsp balsamic glaze

Instructions

  1. Prep your ingredients by gathering them and ensuring the burrata is at room temperature.
  2. Halve the cherry tomatoes for easier eating and better flavor absorption.
  3. Prepare the basil leaves by rinsing and tearing them into smaller pieces.
  4. Arrange the halved cherry tomatoes on a serving platter, cut side facing up.
  5. Add the burrata in the center of the tomatoes.
  6. Drizzle extra-virgin olive oil over the fresh ingredients.
  7. Finish with a balsamic glaze drizzle for a sweet-tangy touch.
  8. Serve immediately to enjoy the freshness.

Notes

Serve with crusty bread or grilled chicken for a full meal, and pair with a chilled white wine.

Nutrition

  • Serving Size: 1 serving
  • Calories: 250
  • Sugar: 5g
  • Sodium: 300mg
  • Fat: 18g
  • Saturated Fat: 6g
  • Unsaturated Fat: 10g
  • Trans Fat: 0g
  • Carbohydrates: 10g
  • Fiber: 2g
  • Protein: 12g
  • Cholesterol: 30mg

Keywords: Caprese, Burrata, Summer Salad, Appetizer, Italian

Did you make this recipe?

Share a photo and tag us — we can't wait to see what you've made!

June 9, 2026 |

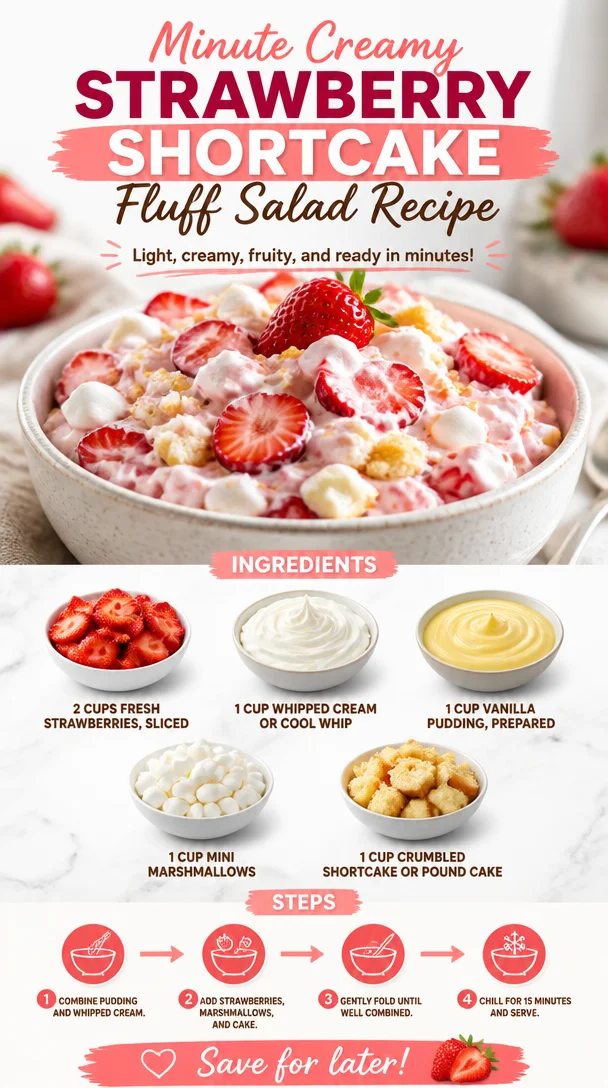
Minute Creamy Strawberry Shortcake Fluff Salad Recipe

Creamy Strawberry Shortcake Fluff Salad in a bowl with fresh strawberries.

Strawberry Shortcake Fluff Salad: A Sweet Symphony of Flavor

Welcome, friends, to a delightful culinary journey where fun flavors and wholesome ingredients come together in perfect harmony! Today, I’m excited to share a recipe that embodies everything I believe about cooking and eating—it’s simple, absolutely delicious, and brings a smile to your face. Say hello to my Strawberry Shortcake Fluff Salad! Perfect for summer gatherings, cozy family dinners, or even a treat for yourself, this dish is all about celebrating fresh, feel-good food.

Picture this: it’s a sun-kissed afternoon, and the tantalizing smell of strawberries wafts through the air. Family and friends are gathered, laughter lingers, and the table is bursting with colors and joyful energy. That’s the essence of summer, isn’t it? When I think back to my childhood summers, one of my fondest memories is the big family picnics in my grandparents’ backyard. My grandmother, a culinary wizard in her own right, would whip up this fluffy, sweet Strawberry Shortcake Fluff Salad that had us all clamoring for seconds. It was a refreshing treat on hot days—a glorious blend of flavors that paired beautifully with sunshine and smiles.

You’ll find this dish captures that nostalgia while adding a modern twist. The sweetness of ripe strawberries, combined with fluffy whipped cream, luscious vanilla pudding, soft mini marshmallows, and buttery shortcake crumbles, creates a delightful dessert that’s not just a feast for the palate but also a visual delight. Trust me, this Strawberry Shortcake Fluff Salad will become a staple in your home, bringing joy and vibrant flavors to your table. Let’s dive into the kitchen and create this masterpiece!

A Sweet Memory to Savor

As I reminisce about those cherished summer picnics, I can almost hear the laughter and see the smiles of my loved ones as they dug into my grandma’s creation. It wasn’t just food; it was a moment—a celebration of unity, love, and summer. She always had a knack for making the simplest ingredients shine. I still remember her saying, “A good dish is all about love and good quality ingredients.” This philosophy inspired me to keep my recipes approachable but flavorful.

One summer, I decided to help her in the kitchen while she prepared the salad. I was responsible for slicing strawberries and sneaking a few into my mouth when I thought she wasn’t looking! The vibrant red of the berries, the fluffy clouds of cream, and the golden shortcake crumbles stuck with me. Every spoonful was a harmony of textures, flavors, and memories, and we both knew that sharing food makes every experience richer and more meaningful. Today, I cherish those moments and hope to pass on that joy and love through my cooking.

Let’s bring a bit of that nostalgia into your home with my rendition of this delightful Strawberry Shortcake Fluff Salad!

Ingredients

Before we roll up our sleeves and get cooking, let’s gather our ingredients. This recipe is as simple as it is delicious. Here’s what you’ll need:

  • 2 cups fresh strawberries, sliced

    • Fresh strawberries are the star of this dish! When choosing berries, look for vibrant, plump ones without any bruises. If you can’t find fresh strawberries, feel free to use frozen strawberries. Just thaw them first and drain excess moisture to avoid a soggy fluff.
  • 1 cup whipped cream or Cool Whip

    • Whipped cream adds a light and airy texture. You can use store-bought Cool Whip for convenience, or make your own by whipping heavy cream until it forms soft peaks. The home-made version will taste fresher!
  • 1 cup vanilla pudding, prepared

    • This ingredient brings creaminess and sweetness. You can use instant pudding, but for a richer flavor, consider preparing it from scratch with milk, sugar, and vanilla.
  • 1 cup mini marshmallows

    • Mini marshmallows add a fun, chewy texture to the fluff salad. If you’re feeling adventurous, swap these out for flavored marshmallows, like strawberry or coconut, for a unique twist.
  • 1 cup crumbled shortcake or pound cake

    • Shortcake or pound cake provides a comforting, buttery base. If you’re looking for a gluten-free version, there are plenty of gluten-free cakes available that will work beautifully!

These ingredients come together to create a dish that not only tastes incredible but also brings back joyful memories of family gatherings and sunny days.

Step-by-Step Instructions

Now that we have our lovely ingredients lined up, let’s get into the fun part—creating our Strawberry Shortcake Fluff Salad! Here’s a step-by-step guide:

  1. Prep the Strawberries:

    • Take your fresh strawberries, remove the green tops, and slice them into thin pieces. Don’t be shy about tasting a few as you go—quality control is a must! Set them aside in a bowl.
    • Tip: For added flavor, sprinkle the sliced strawberries with a little sugar and let them sit for about 15 minutes. This will create a syrupy sweetness that enhances the overall flavor!
  2. Whip the Cream:

    • If you’re making your own whipped cream, use a mixing bowl and an electric mixer to whip the heavy cream until it forms soft peaks. Add a tablespoon of powdered sugar for sweetness and a splash of vanilla extract for flavor.
    • Chef Hack: Make sure your mixing bowl and beaters are cold to ensure the cream whips up perfectly!
  3. Prepare the Pudding:

    • If using instant pudding, follow the package instructions by mixing it with milk. If you’re making your own, combine milk, sugar, and a touch of vanilla in a saucepan, heat until warm, then stir in your cornstarch until thickened.
    • Let the pudding cool slightly before folding it into the whipped cream.
  4. Combine Whipped Cream and Pudding:

    • In a large mixing bowl, gently fold the prepared whipped cream into the vanilla pudding using a spatula. Be gentle; we want to keep that lovely light texture!
    • Pro Tip: Folding involves gently mixing without deflating the whipped cream, rotating the bowl while you scrape along the sides and bottom with the spatula.
  5. Mix in the Marshmallows:

    • Add the mini marshmallows to the cream and pudding mixture, incorporating them subtly. These will be little delightful bites in your salad!
  6. Assemble the Fluff Salad:

    • In a large serving bowl, layer the prepared strawberry slices, followed by a generous layer of the whipped cream and pudding mixture. Then add a layer of crumbled shortcake or pound cake. Repeat until you’ve used all ingredients, finishing with a layer of the whipped cream mixture on top.
    • Presentation Tip: You can also serve this is individual cups for a beautiful display—perfect for parties!
  7. Chill and Serve:

    • Cover the bowl with plastic wrap and let it chill in the refrigerator for at least 1 hour. This step is crucial! Chilling allows the flavors to meld and gives the marshmallows time to soften for that perfect fluffiness.
    • When you’re ready to serve, give it a gentle stir, and enjoy the beautiful blend of flavors and textures!

Serving Suggestions

When it comes to serving Strawberry Shortcake Fluff Salad, the sky’s the limit! The vibrant colors make for a stunning presentation. You can serve it right from the bowl or in individual dessert cups layered elegantly—what a treat!

Consider garnishing each serving with additional sliced strawberries or a sprinkle of crushed shortcake crumbs on top for that extra touch. If you’re feeling a bit indulgent, a drizzle of chocolate or caramel sauce wouldn’t hurt either!

Recipe Variations

Now, if you’re feeling adventurous and want to tweak this recipe, I’ve got some fun suggestions for you:

  1. Berry Medley: Swap out the strawberries for a mix of your favorite berries—blueberries, raspberries, or blackberries can add an exciting twist to the flavor profile.

  2. Chocolate Lovers: Add some mini chocolate chips or a drizzle of chocolate syrup when layering for a rich chocolate-strawberry flavor explosion!

  3. Nutty Delight: Sprinkle a handful of chopped nuts (like pecans or almonds) between the layers for added crunch and flavor.

  4. Cream Cheese Variation: For a richer texture, consider folding in a bit of softened cream cheese into the whipped cream and pudding mixture. It adds a delicious creaminess to the fluff!

  5. Dairy-Free Version: Use coconut cream in place of whipped cream, cashew milk pudding, and gluten-free cake to convert this into a delightful dairy-free treat!

Chef’s Notes

As I reflect on this recipe, I can’t help but think about how it has evolved over time. My grandmother had a knack for making seasonal fruits shine in her desserts, and she effortlessly balanced richness with lightness. I’ve kept her spirit alive by ensuring my recipe is just as simple, yet bursting with flavor.

Funny story: One year, I decided to throw a summer BBQ and whipped this salad up as an impromptu dessert, only to find out that I was also serving it as an appetizer while everyone mingled! Who could resist such a delicious, fluffy treat right from the start?

I love seeing how different families interpret this recipe—each version reflecting personal tastes and memories. It’s what makes cooking so special.

FAQs and Troubleshooting

1. Can I make this salad ahead of time?
Absolutely! This salad actually tastes better after sitting in the fridge for a few hours as the flavors meld. Just be sure to cover it well to keep it fresh.

2. How do I prevent the strawberries from getting mushy?
As mentioned earlier, tossing the sliced strawberries with a little sugar helps them maintain their structure before adding them to the fluff. Also, avoid mixing them in too early.

3. Can I use a different type of cake?
Definitely! Any soft cake will work. Angel food cake is an excellent alternative if you want something lighter, or even a sponge cake!

4. The marshmallows are sticking together; what can I do?
If the mini marshmallows tend to clump up, toss them lightly in a bit of cornstarch before adding them to the mix. This will help keep them fluffy!

Nutritional Info

While this dish falls squarely in the dessert category, it brings with it a medley of fresh fruit. Generally, a serving can provide:

  • Calories: Approximately 250
  • Protein: 2g
  • Fat: 10g
  • Carbohydrates: 36g
  • Dietary Fiber: 1g

Of course, nutritional values will vary based on ingredients and portions, but who’s counting when you’re having this much fun?


And there you have it! The Strawberry Shortcake Fluff Salad, a beautiful dish that brings joy, laughter, and a bit of nostalgia to your table. Whether you serve it at a celebration, family picnic, or simply enjoy it at home, it’s a dessert that’s sure to please everyone. Remember, food is about creating memories—so gather your loved ones and let the magic happen! Enjoy, friends!

Print

Strawberry Shortcake Fluff Salad

A delightful and fluffy dessert that brings together fresh strawberries, whipped cream, vanilla pudding, mini marshmallows, and shortcake crumbles for a refreshing treat perfect for summer.

  • Prep Time: 15 minutes
  • Cook Time: 0 minutes
  • Total Time: 75 minutes
  • Yield: 4 servings 1x
  • Category: Dessert
  • Method: No Cooking
  • Cuisine: American
  • Diet: Vegetarian

Ingredients

Scale
  • 2 cups fresh strawberries, sliced
  • 1 cup whipped cream or Cool Whip
  • 1 cup vanilla pudding, prepared
  • 1 cup mini marshmallows
  • 1 cup crumbled shortcake or pound cake

Instructions

  1. Prep the strawberries: Remove the green tops and slice them thinly. Set aside.
  2. Whip the cream: Whip the heavy cream until soft peaks form, adding powdered sugar and vanilla to taste.
  3. Prepare the pudding: Mix instant pudding with milk or prepare it from scratch and let it cool.
  4. Combine the whipped cream and pudding gently to maintain the texture.
  5. Mix in the mini marshmallows to the cream mixture.
  6. Assemble the salad by layering strawberries, whipped cream mixture, and shortcake in a serving bowl.
  7. Chill in the refrigerator for at least 1 hour before serving.

Notes

Can be made ahead of time and tastes better after chilling. Serve in bowls or individual cups for a beautiful presentation.

Nutrition

  • Serving Size: 1 serving
  • Calories: 250
  • Sugar: 20g
  • Sodium: 200mg
  • Fat: 10g
  • Saturated Fat: 6g
  • Unsaturated Fat: 4g
  • Trans Fat: 0g
  • Carbohydrates: 36g
  • Fiber: 1g
  • Protein: 2g
  • Cholesterol: 30mg

Keywords: dessert, strawberry salad, fluff salad, summer dessert

Did you make this recipe?

Share a photo and tag us — we can't wait to see what you've made!

June 9, 2026 |

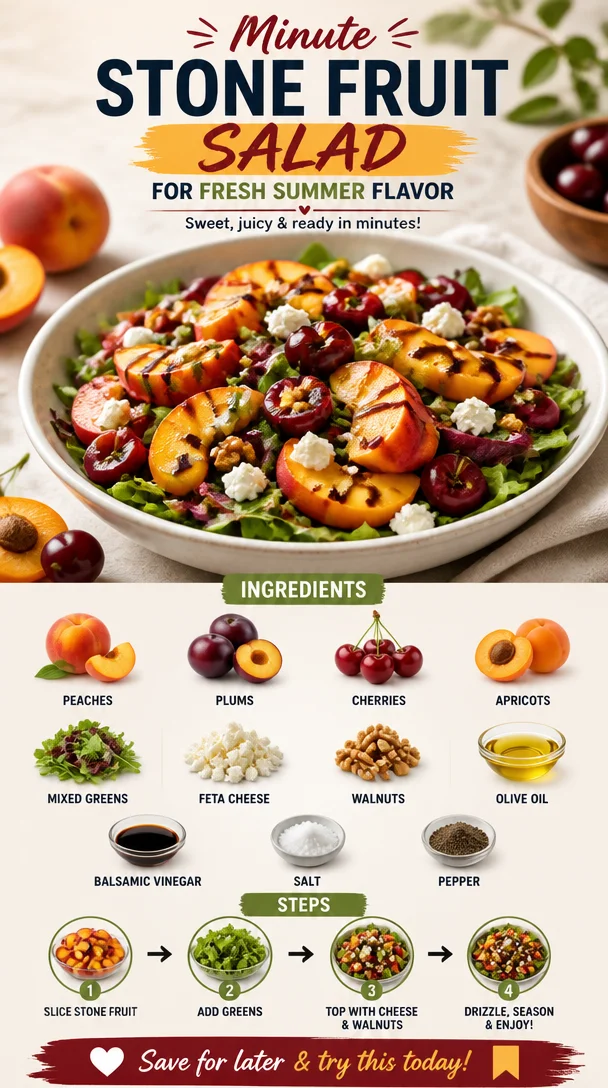
Minute Stone Fruit Salad for Fresh Summer Flavor

Fresh stone fruit salad with peaches, plums, and cherries in a bowl.

Elegant Stone Fruit Salad: A Burst of Summer on Your Plate

Welcome, fellow food lovers! Today, I’m excited to share with you a vibrant and refreshing dish that captures the essence of summer—an Elegant Stone Fruit Salad. Perfect for picnics, barbecues, or even a quiet dinner at home, this salad celebrates the bold, juicy flavors of seasonal stone fruits. Think peaches, plums, cherries, and apricots artfully tossed together with mixed greens, crumbled feta, and toasted walnuts—all brought together with a drizzle of olive oil and balsamic vinegar. Let’s get this delicious journey started!

Imagine walking through a sunlit orchard, warm breezes rustling the leaves overhead, and the sweet scent of ripe stone fruits filling the air. That’s exactly how I feel every time I make this salad. It brings back memories of long summer afternoons spent at my grandparents’ farmhouse, where we would pluck sun-warmed fruit straight from the tree and enjoy it at the picnic table under a sprawling oak. Each bite of this salad evokes that nostalgic bliss, making me feel a bit like a kid again.

Stone fruits, like peaches and plums, are not only delightful to eat but also full of nutrients. Each season, I can’t resist the vibrant colors and shapes they bring to my plate. This salad is a celebration—of flavor, of memories, and of fresh, wholesome food that doesn’t take itself too seriously. Because life is too short for boring meals, right? Let’s dive into this delightful dish and see how it all comes together!

Personal Story

Ah, stone fruits! The very name conjures up memories of sweet summer days. I remember visiting my grandparents during the harvest season, when the air was thick with sunshine and the promise of juicy bites. I’d trudge out to the orchard, eager to fill my basket with the best peaches and plums my small hands could grab. My grandfather would teach me the art of picking—how to choose the ripest ones without damaging the rest. After our harvest, we’d gather to prepare a feast that always included a stone fruit salad. It was a time for laughter, storytelling, and tons of taste-testing.

To this day, I carry those traditions into my kitchen. This Elegant Stone Fruit Salad is more than just a dish—it’s a way to connect with the past and celebrate the present. Every time I make it, I can hear my grandfather’s voice offering cooking tips, and that brings a big smile to my face. So, let’s honor those memories and make something that will create new ones, shall we?

Ingredients

Here’s what you’ll need to whip up this gorgeous salad:

  • Peaches: Sweet and juicy, peaches are the stars of this salad. Choose firm but ripe to give your salad the right texture.
  • Plums: A delightful complement to peaches, they add tartness and brilliant color. Any variety will work, so feel free to experiment!
  • Cherries: Fresh, juicy cherries with a pop of sweetness! Look for bright red, plump ones—these will take your salad to the next level.
  • Apricots: These little gems bring a unique sweetness and a lovely orange hue to the mix—plus, they’re rich in vitamins A and C.
  • Mixed Greens: Any combination of greens works here—arugula, spinach, or even baby kale. The greens provide a refreshing base and balance out the sweetness of the fruits.
  • Feta Cheese: Creamy, tangy, and briny, feta adds an incredible depth of flavor that brightens up the salad.
  • Walnuts: Crunchy, toasty walnuts bring texture and healthy fats. You can roast them lightly for added flavor.
  • Olive Oil: A good quality extra virgin olive oil will elevate your dish, adding richness without overwhelming the fresh flavors.
  • Balsamic Vinegar: This adds a sweet-tart kick. Look for a high-quality balsamic for the best flavor.
  • Salt & Pepper: Simple seasoning helps bring out the natural sweetness of the fruits.

Chef Insight

Keep in mind that fresh ingredients are key to making this salad pop! Always choose ripe, in-season fruits for the best flavor. If a certain stone fruit isn’t available, don’t hesitate to swap it out for whatever juicy fruits you can find.

Step-by-Step Instructions

Let’s bring this beautiful salad to life together! Here’s how to do it:

  1. Gather Your Ingredients: First things first, make sure you have everything ready. This is important, especially with a salad, where you want to maintain the freshness of each component.

  2. Prep the Fruits: Start by washing all your fruits under cool water. Pat them dry before slicing. Next, slice the peaches, plums, and apricots into thin wedges—about 1/4-inch thick—so they can mingle nicely with your greens. Prune cherries can be halved or left whole depending on your preference.

  3. Chop the Greens: Toss the mixed greens into a large salad bowl. Feel free to tear them by hand; it makes for a lovely, rustic look.

  4. Add the Fruits: Gently add the sliced fruits to the bowl. Aim for a visually pleasing arrangement! The more colorful the salad, the more inviting it will be.

  5. Feta & Walnuts Time: Crumble the feta cheese over the top, creating little pockets of creamy goodness. Then, sprinkle in the walnuts for that crispy crunch.

  6. Whisk the Dressing: In a small bowl, whisk together your olive oil and balsamic vinegar. Aim for a ratio of about 3 parts oil to 1 part vinegar, but feel free to adjust based on your taste. Whisk until well combined. Season with salt and pepper to taste.

  7. Dress the Salad: Pour the dressing over the salad, but don’t drown it! You can always add more later, so toss gently to coat everything without bruising the greens or the fruits.

  8. Taste and Adjust: This is where the magic happens! Taste your salad and see if it needs a little more salt, a drizzle of honey, or extra balsamic. Trust your taste buds!

  9. Serve: Once everything is nicely mixed, it’s time to plate. Transfer your Elegant Stone Fruit Salad to a clean serving dish, allowing all the vibrant colors to shine.

Chef Tips

  • Use a variety of stone fruits to provide a range of textures and flavors. Mix in anything else you love—like nectarines or colored cherries.
  • Feel free to add some herbs like mint or basil for an extra flavor kick!
  • Make it ahead of time for meal prep by storing the dressing separately to keep your greens fresh.

Serving Suggestions

How you present this salad can elevate the entire dining experience! I love serving it on a large, beautiful platter; scattering the fruits and greens so that every guest can see each vibrant component. Garnishing with extra feta and walnuts right before serving makes it look like a work of art. You could also serve it alongside grilled chicken or fish for a delightful complete meal.

Recipe Variations

Here are a few fun twists to mix things up:

  1. Herbed Variation: Add fresh herbs like basil or mint for a refreshing twist on your salad.

  2. Grilled Fruits: Fire up the grill! Grilling the fruits intensifies their sweetness and adds a smoky flavor, which is absolutely divine.

  3. Nutty Swap: Switch walnuts for pecans or almonds to discover new textures and flavors.

  4. Vegan Option: Leave the feta cheese out or use a vegan feta substitute to tailor this salad for strict plant-based diets.

  5. Spicy Touch: Add a sprinkle of chili flakes or a drizzle of spicy honey for a sweet and heat combo that’ll awaken your palate!

Chef’s Notes

As I’ve gathered secrets and tips along my cooking journey, this salad has evolved a lot! Originally, I played with boring iceberg lettuce as the base. But along the way, I discovered mixed greens and just how versatile stone fruits can be. Honestly, every season brings in something new—swapping out fruits or adding components based on what’s fresh has made this dish close to my heart. The best part? It’s a recipe that begs for creativity, and that’s what cooking is all about!

FAQs and Troubleshooting

1. Can I make this salad ahead of time?
Absolutely! To keep the greens fresh, prepare the fruits and dressing ahead but wait to combine everything until right before serving. Just store everything separately in the fridge.

2. What if some of the fruits are overripe?
Use slightly softer stone fruits for a sauce or puree instead of raw. They can taste divine in a smoothie or as a topping for yogurt!

3. How do I adjust for a larger crowd?
Scaling this salad up is easy! Just increase the quantities while maintaining the same ratios. A little more fruit, greens, and nuts will go a long way!

4. What if I don’t have balsamic vinegar?
Not a problem! Substitute with apple cider vinegar or a splash of lemon juice mixed with honey for a lovely tangy dressing!

Nutritional Info

While the precise nutrition will vary based on your specific ingredients and portions, this salad is generally low in calories and high in vitamins, antioxidants, and healthy fats, making it a nourishing choice.

With the season’s best fruits at your fingertips, this Elegant Stone Fruit Salad is your ticket to vibrant meals that everyone will love. I invite you to dive into the joy of cooking and create beautiful memories with every delicious bite. Happy cooking, friends!

Print

Elegant Stone Fruit Salad

A vibrant and refreshing stone fruit salad that captures the essence of summer with peaches, plums, cherries, and apricots, tossed with mixed greens, feta, and walnuts.

  • Prep Time: 15 minutes
  • Cook Time: 0 minutes
  • Total Time: 15 minutes
  • Yield: 4 servings 1x
  • Category: Salad
  • Method: No-Cook
  • Cuisine: American
  • Diet: Vegetarian

Ingredients

Scale
  • 2 ripe peaches, sliced
  • 2 plums, sliced
  • 1 cup cherries, halved
  • 4 apricots, sliced
  • 4 cups mixed greens (arugula, spinach, or baby kale)
  • 1/2 cup feta cheese, crumbled
  • 1/4 cup walnuts, toasted
  • 3 tbsp olive oil
  • 1 tbsp balsamic vinegar
  • Salt and pepper to taste

Instructions

  1. Gather your ingredients.
  2. Prep the fruits by washing them and slicing peaches, plums, and apricots into wedges.
  3. Chop the mixed greens into a large salad bowl.
  4. Add the sliced fruits to the bowl, arrange them attractively.
  5. Crumble the feta cheese over the top, then sprinkle in the walnuts.
  6. Whisk the olive oil and balsamic vinegar together in a small bowl.
  7. Dress the salad gently with the dressing, then adjust the seasoning.
  8. Serve the salad on a beautiful platter and enjoy!

Notes

Use ripe, in-season fruits for the best flavor. Feel free to experiment with different stone fruits or add fresh herbs.

Nutrition

  • Serving Size: 1 serving
  • Calories: 250
  • Sugar: 15g
  • Sodium: 250mg
  • Fat: 18g
  • Saturated Fat: 4g
  • Unsaturated Fat: 12g
  • Trans Fat: 0g
  • Carbohydrates: 20g
  • Fiber: 3g
  • Protein: 5g
  • Cholesterol: 10mg

Keywords: salad, stone fruits, summer salad, healthy recipe, picnic recipe

Did you make this recipe?

Share a photo and tag us — we can't wait to see what you've made!

June 9, 2026 |

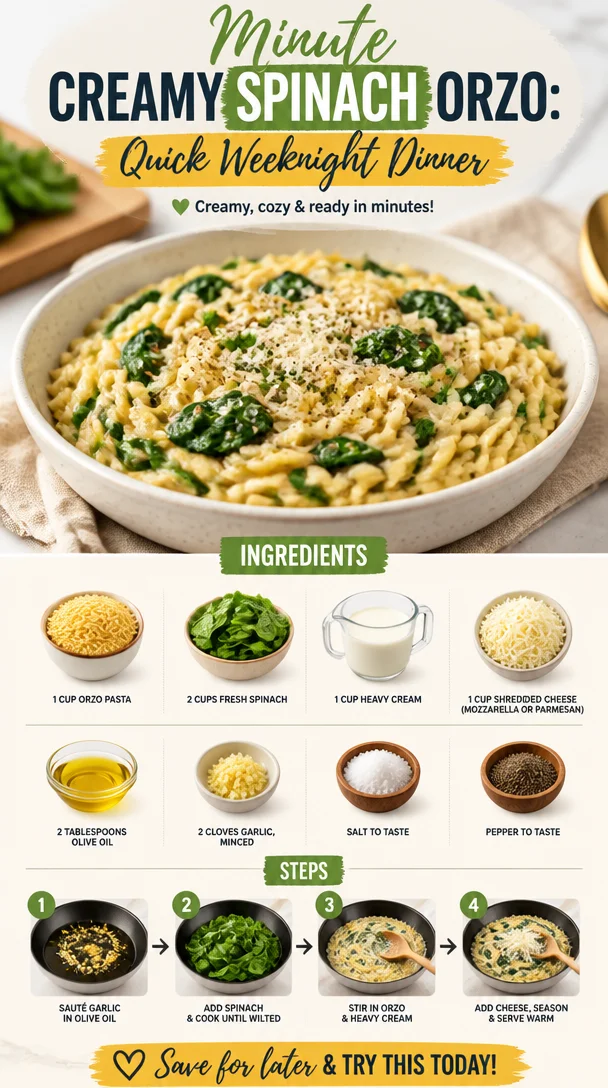
Minute Creamy Spinach Orzo: Quick Weeknight Dinner

Bowl of creamy spinach orzo served as a quick weeknight dinner

Creamy Spinach Orzo: A Soul-Warming Delight

Welcome, fellow foodies! Today, I’m thrilled to share with you a dish that’s as comforting as a warm hug on a chilly day: creamy spinach orzo. This dish is not just about the ingredients—it’s packed with love, nostalgia, and the kind of flavors that’ll turn any meal into a cozy gathering. So grab your apron, and let’s dive right into the delicious world of creamy spinach orzo!

A Taste of Nostalgia

Cooking has always been more than just a way to fill our bellies; it’s a way to create memories. I remember the first time I prepared a dish similar to this creamy spinach orzo in my tiny college kitchen. With my friends gathered around, we were experimenting with whatever we could find in our pantry. We stumbled upon some leftover orzo and a bag of fresh spinach, and the magic began.

As we diced garlic and tossed in cream, laughter filled the air. There was something ridiculously satisfying about turning a handful of ingredients into a dish that not only nourished us but brought us closer together. It was a surefire hit—everyone went back for seconds, and that’s when I knew I had discovered something special.

Years later, I’ve refined the recipe, but the essence remains: comfort, warmth, and a touch of creativity in your own kitchen. Let’s recreate that magic today!

Ingredients

Here’s what you’ll need to make your very own creamy spinach orzo:

  • 1 cup orzo pasta
    Orzo is a delightful rice-shaped pasta that cooks quickly and absorbs flavors beautifully. If you’re out of orzo, you can substitute with any small pasta like ditalini or even quinoa for a gluten-free option.

  • 2 cups fresh spinach
    Spinach is packed with nutrients and adds a wonderful earthiness to the dish. Feel free to swap it out for kale or Swiss chard if you’re in the mood for something different.

  • 1 cup heavy cream
    This is where the creaminess comes from! If you’re looking for a lighter version, you can use half-and-half or even coconut milk for a dairy-free alternative.

  • 1 cup shredded cheese (e.g., mozzarella or parmesan)
    Cheese is the magic ingredient that brings everything together. Mozzarella gives it a mild, creamy flavor, while parmesan adds a nutty richness. A good vegan cheese can also work if you’re avoiding dairy.

  • 2 tablespoons olive oil
    A splash of olive oil not only adds flavor but helps in sautéing our garlic to perfection. For a twist, try using garlic-infused olive oil!

  • 2 cloves garlic, minced
    The aroma of garlic sizzling in olive oil is simply irresistible! Don’t skimp here—garlic brings all the flavors to life. If you’re in a pinch, garlic powder will do, but fresh is always best.

  • Salt and pepper to taste
    Simple seasonings that elevate the dish and allow the other flavors to shine. Always taste as you go to find your perfect balance!

Now that we’ve gathered our ingredients, let’s get cooking!

Step-by-Step Instructions

  1. Cook the Orzo
    Start by boiling a pot of salted water over high heat. Once it’s bubbling, add your orzo and cook until al dente, about 8–10 minutes. Stir occasionally to prevent sticking. Chef’s tip: save a cup of the pasta cooking water before draining! It’s liquid gold for adjusting the creaminess later.

  2. Sauté the Garlic
    In a large skillet, heat the olive oil over medium heat. Once it’s shimmering, toss in the minced garlic. Sauté for about 1-2 minutes until fragrant. Be careful not to burn it—garlic can turn bitter if overcooked! Pro tip: if you’re using minced garlic from a jar, remember that it’s often more potent than fresh garlic, so adjust accordingly.

  3. Add the Spinach
    Toss in your fresh spinach and sauté until wilted, around 3–4 minutes. If the skillet looks a little dry, a splash of your reserved pasta water will help. A touch of moisture will also help the spinach further break down and incorporate flavor.

  4. Introduce the Cream
    Pour in the heavy cream and stir gently. Allow it to come to a gentle simmer. The beautifully rich sauce will start to thicken; this is when the magic happens! Keep an eye on it, stirring often so it doesn’t scorch.

  5. Stir in the Cheese
    Gradually add in your shredded cheese, stirring continuously until it melts and combines thoroughly with the creamy sauce. This is where we build flavor! If the sauce looks too thick, just add a little of that reserved pasta water until it reaches your desired consistency.

  6. Mix in the Orzo
    Now, add the drained orzo into the skillet. Toss everything together until the pasta is evenly coated in the creamy sauce. At this stage, taste it! This is your chance to sprinkle in salt and pepper as needed until it’s just right.

  7. Serve!
    Once everything is beautifully combined and heated through, remove it from the stovetop. You can serve it immediately, garnished with extra cheese or even a sprinkle of fresh herbs for that beautiful touch. What could be simpler?

Serving Suggestions

For that extra flair, consider serving your creamy spinach orzo in individual bowls. Top with a sprinkle of freshly grated parmesan cheese and a drizzle of olive oil for that added gourmet touch. Pair it with a side salad dressed in a lemon vinaigrette, or serve it alongside grilled chicken or shrimp for a heartier meal. The beauty of this dish is it can complement a variety of main courses!

Recipe Variations

Feeling a little adventurous? Here are some fun variations you can try to put your own spin on creamy spinach orzo:

  1. Sun-Dried Tomato Spinach Orzo: Add chopped sun-dried tomatoes for a burst of flavor.

  2. Lemon Zest and Herb Infusion: Incorporate fresh lemon zest and chopped herbs like basil or parsley for a fresh, bright twist.

  3. Mushroom Lover’s Delight: Add sautéed mushrooms to the mix for an earthy, earthy addition.

  4. Protein Power: Toss in some cooked chicken, grilled shrimp, or cannellini beans to boost the protein content and make it a complete meal.

  5. Spicy Kick: Add a pinch of red pepper flakes to the garlic step for a delightful heat!

Chef’s Notes

As I reflect on this creamy spinach orzo, I can’t help but smile at the simplicity and versatility of it all. The recipe has come a long way since those chaotic college days, but the heart remains the same: making feeding yourself—and those you love—an enjoyable experience. Over the years, I’ve played with ingredients, discovered new combinations driving my creativity in the kitchen, and each experience gets me excited to share with all of you!

One of the most rewarding parts of cooking is knowing that each time you make a dish, you have the power to tweak and adjust it to fit your taste. So, don’t be shy—make this creamy spinach orzo your own!

FAQs and Troubleshooting

Q: My orzo is sticky—what did I do wrong?
A: Sticky orzo usually means it was overcooked or lacked enough water during cooking. Make sure to stir occasionally while boiling, and watch the timer!

Q: Can I make this dish in advance?
A: Yes! You can prepare this in advance and store it in the refrigerator. Just be sure to store it in an airtight container. Reheat it in a skillet on medium-low heat, adding a bit of cream or pasta water to loosen it up.

Q: How can I make this dish dairy-free?
A: Swap the heavy cream with a plant-based cream and use a vegan cheese alternative. Almond milk or coconut cream can work for the cream.

Q: How do I prevent the spinach from turning too mushy?
A: Add spinach at the end of the cooking process—just sauté it until wilted. Overcooking makes it lose its vibrant color and nutritional goodness.

Nutritional Info

Now, you may wonder about the nutritional goodness found in this creamy dish. Here’s a general idea (per serving, based on 4 servings):

  • Calories: 450
  • Protein: 12g
  • Carbohydrates: 45g
  • Fat: 25g
  • Fiber: 2g

Keep in mind, these values will vary depending on your specific ingredients and any variations you decide to incorporate!

So there you have it—a beautifully creamy, flavor-packed orzo dish, steeped in memories and flexibility. Let it become a staple in your kitchen, reminding you that every meal is an opportunity to create, share, and enjoy life’s simple pleasures. Happy cooking!

Print

Creamy Spinach Orzo

A comforting creamy spinach orzo dish that brings warmth and nostalgia, perfect for cozy gatherings.

  • Prep Time: 10 minutes
  • Cook Time: 20 minutes
  • Total Time: 30 minutes
  • Yield: 4 servings 1x
  • Category: Main Course
  • Method: Stovetop
  • Cuisine: Italian
  • Diet: Vegetarian

Ingredients

Scale
  • 1 cup orzo pasta
  • 2 cups fresh spinach
  • 1 cup heavy cream
  • 1 cup shredded cheese (e.g., mozzarella or parmesan)
  • 2 tablespoons olive oil
  • 2 cloves garlic, minced
  • Salt and pepper to taste

Instructions

  1. Cook the orzo by boiling a pot of salted water over high heat. Add orzo and cook until al dente, about 8–10 minutes. Save a cup of the cooking water before draining.
  2. Sauté the garlic in a large skillet with olive oil over medium heat for about 1-2 minutes until fragrant, being careful not to burn it.
  3. Add the spinach and sauté until wilted, around 3–4 minutes, adding a splash of reserved pasta water if needed.
  4. Introduce the heavy cream and bring to a gentle simmer, stirring often.
  5. Stir in the shredded cheese until melted and combined with the sauce. Add reserved pasta water if the sauce is too thick.
  6. Mix in the drained orzo, tossing until evenly coated, then season with salt and pepper to taste.
  7. Serve! Garnish with extra cheese or fresh herbs, if desired.

Notes

Consider serving in individual bowls with a sprinkle of parmesan and a drizzle of olive oil. Pairs well with side salads or grilled proteins.

Nutrition

  • Serving Size: 1 serving
  • Calories: 450
  • Sugar: 3g
  • Sodium: 500mg
  • Fat: 25g
  • Saturated Fat: 15g
  • Unsaturated Fat: 8g
  • Trans Fat: 0g
  • Carbohydrates: 45g
  • Fiber: 2g
  • Protein: 12g
  • Cholesterol: 70mg

Keywords: creamy orzo, spinach, comfort food, vegetarian pasta dish, easy recipes

Did you make this recipe?

Share a photo and tag us — we can't wait to see what you've made!

June 9, 2026 |

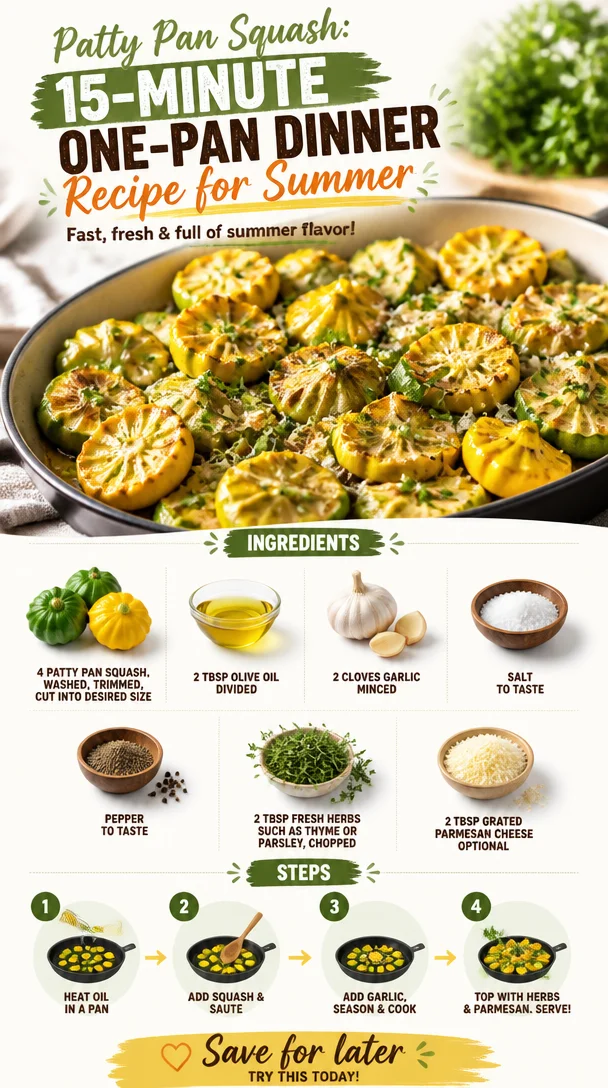
Patty Pan Squash: 15-Minute One-Pan Dinner Recipe for Summer

Colorful Patty Pan Squash in a one-pan dinner recipe for summer

The Sprightly Squash: A Celebration of Patty Pan Delights

Welcome, fellow food aficionados! Today, we’re diving into the wonderfully whimsical world of patty pan squash. If you’re new to this delightful little veggie, you’re in for a treat. These cheerful, scalloped squashes are not only a feast for the eyes but also a canvas for delicious flavors. Let’s discover together how easy—and fun—it is to whip up a meal that will have you dazzling your dinner guests (or treating yourself!).

A Personal Journey with Patty Pan Squash

My love affair with patty pan squash goes way back to summer afternoons in my grandmother’s garden. Her garden was like a treasure trove of fresh produce, and I can still remember the delight on her face as she picked those quirky, sun-kissed squashes. She would hand me a freshly picked patty pan squash, all gleaming and green, and invite me into the kitchen to transform it into something spectacular.

One of my favorite memories is when we turned them into a vibrant roasted dish that filled the house with an irresistible aroma. The way the squash caramelized in the oven was pure magic! Watching her artfully chop fresh herbs and sprinkle them over the shimmering patty pans was both a lesson in cooking and a cherished bonding experience. Those afternoons shaped my journey as a chef and instilled in me the belief that cooking is about joy, sharing, and celebration.

So, gear up as we recreate these beautiful memories and enjoy patty pan squash in the most flavorful way possible!

Ingredients

Here’s what you’ll need for this vibrant dish:

  • 4 patty pan squash: These unique, scalloped squash can vary in color from yellow to green. They have a mild taste that can take on various flavors wonderfully. If unavailable, zucchini can be a good substitute, though the shape won’t be the same.
  • 2 tbsp olive oil, divided: A staple in many kitchens, olive oil not only enhances flavor but also helps achieve that lovely roasted finish. Feel free to swap it out for avocado oil if you prefer something with a higher smoke point.
  • 2 cloves garlic, minced: Fresh garlic is a game changer! It adds depth and flavor to your dish. If you’re in a pinch, garlic powder can serve as a substitute, but nothing beats freshly minced garlic for that aromatic punch.
  • Salt and Pepper to taste: These basics are vital in elevating the overall flavor of your dish. Use sea salt for a pop of flavor, and don’t be shy with the pepper!
  • 2 tbsp fresh herbs: I love using thyme or parsley for brightness. You can also mix it up with basil for a sweeter note or oregano for a more earthy flavor.
  • 2 tbsp grated Parmesan cheese (optional): This optional ingredient adds a nutty, salty touch that can really elevate your dish. For a dairy-free alternative, nutritional yeast works beautifully here.

Step-by-Step Instructions

Now that we’ve gathered our ingredients, let’s jump into making our delicious roasted patty pan squash!

  1. Preheat Your Oven: Set your oven to 400°F (200°C). This heat will help the squash roast perfectly, developing that lovely caramelized exterior while staying tender inside.

  2. Prep the Squash: Start by washing your patty pan squash under cool water to remove any dirt. Trim the tops and bottoms, then cut them into bite-sized pieces. The whimsical shape of these squashes makes for a beautiful presentation, so don’t stress too much about uniformity—let their natural shapes shine.

  3. Toss with Olive Oil and Garlic: In a large bowl, combine the cut squash with 1 tablespoon of olive oil and the minced garlic. Now, here’s a chef hack: Instead of just adding the garlic raw, you can sauté it for a minute in the olive oil before tossing it with the squash. This step brings out that sweet, rich garlic flavor!

  4. Season Generously: Sprinkle in salt and pepper to taste, and mix well. This is your moment to infuse flavor into the squash, so don’t be shy! Remember, salt helps draw out moisture and flavors, while pepper adds the perfect zing.

  5. Add Fresh Herbs: Fold in the fresh herbs, ensuring every piece of squash gets a touch of that herby goodness. The aroma alone will make you feel like you’re walking through a sunlit herb garden.

  6. Roast to Perfection: Spread the squash mixture evenly on a baking sheet lined with parchment paper. This ensures easy cleanup and avoids any sticking. Roast in the preheated oven for about 20-25 minutes. You’ll know they are ready when they’re tender and golden brown, stirring halfway through to ensure even cooking.

  7. Finish with Parmesan: Once they’re beautifully roasted, take them out of the oven and sprinkle with Parmesan cheese, if using. Pop them back in for an additional 2-3 minutes until the cheese is melted and bubbly.

  8. Serve and Enjoy: Once you pull that tray out of the oven, watch out! You’ll instantly be drawn in by the melty cheese and fragrant herbs. Taste a piece, and you might just be transported to those summer afternoons in the garden!

Serving Suggestions

These roasted patty pan squash are best served warm. I love plating them alongside a light salad or some grilled chicken for a complete meal. You can garnish with a few extra fresh herbs for a pop of color and freshness. For a lovely presentation, consider stacking them on a vibrant plate or serving them in a rustic bowl, drizzled with a touch of balsamic reduction. Enjoy every colorful bite!

Recipe Variations

  1. Spicy Kick: Add a pinch of red pepper flakes along with your other seasonings for a touch of heat!
  2. Mediterranean Vibes: Toss in some chopped olives and sun-dried tomatoes before roasting for a burst of Mediterranean flavor.
  3. Sweet Glaze: Drizzle with honey or maple syrup in the last few minutes of roasting for a delightful sweet contrast.
  4. Vegan Version: Skip the cheese or substitute with a nut-based cheese for a deliciously creamy result without dairy.
  5. Stuffed Patty Pan: For a more filling option, you can scoop out the squash and fill them with quinoa and veggies before roasting!

Chef’s Notes

Oh, the stories I have about patty pan squash! Once during a cook-out, I mischievously offered a friend some “exotic” vegetable that they had never tried before. Little did they know it was just good ol’ patty pan squash! Their surprised expression when they found out made my day! These quirky squashes are often overlooked, but they deserve the spotlight—embrace their unique shapes and flavors, and let your creativity flow in the kitchen.

Over the years, my recipe has evolved as I’ve experimented with different herbs and spices. Don’t be afraid to make it your own—add that touch of “you” into every dish!

FAQs and Troubleshooting

  1. Why are my squash mushy?

    • If your squash turned out mushy, it may have been overcooked. Each oven is different, so keep an eye on them, especially in the last few minutes of roasting!
  2. Can I prep these squash in advance?

    • Absolutely! You can chop and season the squash a few hours ahead of time and store it in the refrigerator until you’re ready to roast them.
  3. What can I serve with patty pan squash?

    • These roasted delights pair beautifully with grilled fish, steak, or a simple green salad. They can also be served as a vibrant side dish to any meal.
  4. How do I store leftover patty pan squash?

    • Store unused roasted squash in an airtight container in the fridge for up to 3 days. Reheat gently in the oven or microwave!

Nutritional Info

While specific nutritional data varies based on portion sizes, patty pan squash is low in calories, making it a fantastic option for those looking for lighter meal options. It’s high in vitamins A and C and rich in antioxidant properties, which are great for your skin and immune health!

So there you have it! A fun, flavorful journey into the delightful world of patty pan squash, complete with nostalgia and culinary creativity. I hope this recipe inspires you to bring these charming veggies into your kitchen and creates new food memories of your own! Let’s keep it fresh, simple, and delicious! Happy cooking, food friends!

Print

Roasted Patty Pan Squash

A vibrant and flavorful dish featuring roasted patty pan squash, enhanced with garlic and fresh herbs.

  • Prep Time: 15 minutes
  • Cook Time: 25 minutes
  • Total Time: 40 minutes
  • Yield: 4 servings 1x
  • Category: Side Dish
  • Method: Roasting
  • Cuisine: Vegetarian
  • Diet: Vegetarian

Ingredients

Scale
  • 4 patty pan squash, cut into bite-sized pieces
  • 2 tbsp olive oil, divided
  • 2 cloves garlic, minced
  • Salt and Pepper to taste
  • 2 tbsp fresh herbs (thyme, parsley, or basil)
  • 2 tbsp grated Parmesan cheese (optional)

Instructions

  1. Preheat your oven to 400°F (200°C).
  2. Wash the patty pan squash under cool water, trim the tops and bottoms, and cut into bite-sized pieces.
  3. Toss the cut squash with 1 tablespoon of olive oil and minced garlic.
  4. Season with salt and pepper to taste.
  5. Fold in the fresh herbs.
  6. Spread the mixture evenly on a baking sheet lined with parchment paper and roast for about 20-25 minutes, stirring halfway through.
  7. Sprinkle with Parmesan, if using, and return to the oven for an additional 2-3 minutes.
  8. Serve warm and enjoy!

Notes

For a vegan version, skip the cheese or substitute with a nut-based cheese.

Nutrition

  • Serving Size: 1 serving
  • Calories: 150
  • Sugar: 2g
  • Sodium: 300mg
  • Fat: 10g
  • Saturated Fat: 2g
  • Unsaturated Fat: 8g
  • Trans Fat: 0g
  • Carbohydrates: 12g
  • Fiber: 3g
  • Protein: 3g
  • Cholesterol: 5mg

Keywords: patty pan squash, roasted vegetables, vegetarian recipes

Did you make this recipe?

Share a photo and tag us — we can't wait to see what you've made!

June 9, 2026 |

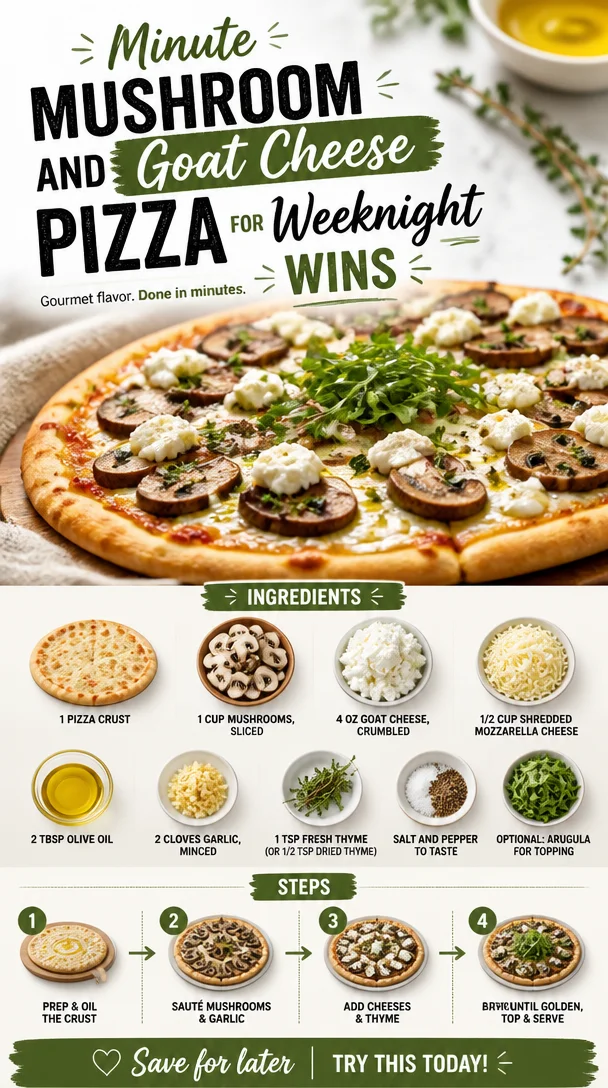
Minute Mushroom and Goat Cheese Pizza for Weeknight Wins

Mouthwatering mushroom pizza topped with goat cheese for a quick dinner

The Irresistible Allure of Mushroom and Goat Cheese Pizza

Welcome to an adventure in flavors that is both delicious and comforting! Today, we’re diving into the earthy, rich world of Mushroom and Goat Cheese Pizza—a dish that beautifully balances vibrant umami flavors with creamy goodness. If you’re dreaming of a quick lunch, a cozy dinner, or a showstopper to impress your friends, this pizza is your answer. Whether you’re gathering around the dinner table or whipping up a late-night snack, I’ve got your back.

Picture this: the aroma of sautéed garlic and mushrooms wafting through your kitchen, the rhythmic sound of dough being stretched, and the anticipation building as you layer the luscious goat cheese atop savory sautéed mushrooms. It’s satisfying, and yes, it’s downright fun! This dish doesn’t just satisfy hunger; it feeds the soul.

Now, let’s take a moment to explore why I love this pizza so much. It’s not only about flavor; it’s about experience. I remember the first time I made this pizza—it was a rainy Sunday afternoon, and I was cozying up indoors with some good music and a handful of fresh ingredients from my local farmer’s market. The moment the garlic hit the pan, I felt that rush of joy that only cooking can provide. It felt like a warm hug from the inside out, and I couldn’t wait to share this experience with you all.

So, grab your apron, and let’s get cooking!

A Slice of Nostalgia

Many of my favorite culinary memories are tied to comfort food, especially pizza. I remember it vividly—school nights spent assembling pizzas with my siblings, where each one of us would claim a corner of the table with our favorite toppings. My brother was all about pepperoni, while my sister piled on veggies, and I, ever the cheese lover, discovered my fascination with goat cheese amidst the chaos.

One particular evening resonated more than others. We decided to create a “fancy pizza night,” which meant no ordinary toppings. Armed with a set of fresh mushrooms and a fresh log of goat cheese, I felt like a gourmet chef! As we piled our creations high with ingredients, the kitchen transformed into our culinary playground, filled with laughter, flour-covered counters, and mischievous debates over which pizza was the best.

I will never forget that first bite—crispy crust, creamy cheese, and the deep flavor of sautéed mushrooms! It was a tiny celebration of family, creativity, and of course, deliciousness! Since that night, I’ve carried the spirit of those pizza-making evenings into my cooking, experimenting and evolving, yet always finding comfort in the flavor combinations that sparked joy.

Ingredients

Here’s what you’ll need to create this culinary masterpiece:

  • 1 pizza crust
    Choose your favorite! You can go with a store-bought option for ease, or make your own from scratch. If you’re looking for a twist, consider using cauliflower crust for a gluten-free alternative.

  • 1 cup mushrooms, sliced
    Button or cremini mushrooms work well here, but feel free to experiment with shiitake or portobello for a bolder flavor. Tired of mushrooms? Swap them for thinly sliced zucchini or bell peppers!

  • 4 oz goat cheese, crumbled
    Goat cheese adds a creamy texture and tangy punch to the pizza. If you’re not a goat cheese fan, try feta or ricotta for a similar creaminess!

  • 1/2 cup shredded mozzarella cheese
    Mozzarella provides that melty, gooey factor we love about pizza. For a dairy-free option, use a plant-based cheese alternative or simply increase the goat cheese amount.

  • 2 tbsp olive oil
    Olive oil is essential for sautéing your mushrooms and garlic, giving them a rich flavor. You can use butter for a creamier option or avocado oil for a higher smoke point.

  • 2 cloves garlic, minced
    Garlic adds an aromatic touch. If you’re in a pinch, garlic powder can do the trick in a flavor emergency, but fresh garlic is where the heart is!

  • 1 tsp fresh thyme (or 1/2 tsp dried thyme)
    Thyme brings an earthy tone that complements the mushrooms beautifully. If thyme isn’t your thing, feel free to swap it out for fresh basil or oregano.

  • Salt and pepper to taste
    Essential seasonings that elevate your dish from good to great!

  • Optional: arugula for topping
    Arugula adds a peppery freshness to the finished pizza. Other options include fresh basil, spinach, or even a drizzle of balsamic glaze for that gourmet touch!

Step-by-Step Instructions

Are you ready to make the magic happen? Let’s get cracking!

  1. Preheat the Oven
    Preheat your oven to 475°F (245°C). This high temperature will lead to a crispy crust that we all crave in our pizza. If you’re using a pizza stone, toss it in the oven as it heats – a hot stone means an even crispier base!

  2. Prepare Your Ingredients
    While the oven is heating up, let’s prep! Slice those mushrooms, crumble the goat cheese, and mince the garlic. Having everything ready will keep you organized and make the cooking process smoother. Trust me, something about prepped ingredients makes you feel like a chef in a five-star restaurant!

  3. Sauté the Mushrooms and Garlic
    In a large skillet, heat 2 tbsp of olive oil over medium heat. Once the oil is shimmering, add the minced garlic and sauté for about 30 seconds until fragrant. Don’t walk away; burnt garlic is not your friend! Next, add the sliced mushrooms, stirring occasionally for about 5-7 minutes until they’re golden brown and tender. Season with salt, pepper, and thyme. This step is crucial for infusing the mushrooms with deep flavor!

  4. Roll Out Your Pizza Dough
    If you’re working with store-bought dough, you can usually just unroll and place it on your baking sheet or pizza stone. If making your own, on a floured surface, roll the dough out to your desired thickness. Stretch it, twirl it, and have fun with it! Your pizza should be 10-12 inches in diameter—thin for that crispiness!

  5. Assemble the Pizza
    Place your rolled-out crust on a parchment-lined baking sheet or the hot pizza stone. Start with the mozzarella cheese as your base for the toppings, followed by the sautéed mushrooms and garlic mixture, and finish with the crumbled goat cheese. Don’t be shy with the cheese—more is more!

  6. Bake the Pizza
    Slide that gorgeous pizza into your preheated oven. Bake it for about 12-15 minutes or until the crust is bubbling and golden. Midway through, keep an eye on it; every oven behaves differently, and you want that perfect crust!

  7. Finish and Garnish
    Once out of the oven, let your pizza rest for a minute or two. If you’re using arugula, scatter it on top just before slicing for that extra fresh kick. Drizzle with a little olive oil or balsamic glaze for sophistication—who says pizza can’t be gourmet?

Serving Suggestions

Cut your Mushroom and Goat Cheese Pizza into generous slices and serve it on a beautiful wooden board or colorful plate for an inviting presentation. Pair it with a light salad, perhaps a simple arugula and cherry tomato salad drizzled with balsamic vinaigrette, to balance out the richness of the cheese.

For drinks, a crisp white wine or a refreshing sparkling water with lemon can complement the earthy flavors beautifully. It’s all about enhancing the experience, folks!

Recipe Variations

Feel like switching things up? Here are a few ideas to try:

  • Pesto Pizza: Spread a thin layer of pesto on the crust before adding the cheese and mushrooms for a burst of herby flavor.
  • Truffle Mushroom Pizza: Drizzle some truffle oil over the finished pizza for a luxurious twist that will elevate your game!
  • Vegan Version: Use plant-based cheese, substitute sautéed tofu or tempeh for the mushrooms, and load it up with veggies like bell peppers and artichokes.
  • Spicy Kick: Sprinkle some red pepper flakes or add jalapeño slices for those who crave a bit of heat.
  • Italian Flair: Top the pizza with prosciutto or salami for a meaty flavor explosion!

Chef’s Notes

This Mushroom and Goat Cheese Pizza has become a staple in my kitchen for a reason! It’s a dish that comes together quickly but tastes like you put in hours of effort. Over time, I’ve experimented with different cheeses, and I’ve discovered that a pinch of nutmeg added to the mushrooms before sautéing adds an unexpected warmth that my tastebuds just can’t resist!

Plus, let’s be real—there’s something utterly satisfying about pulling a freshly baked pizza out of the oven. Feel free to make this pizza your own! Cooking is all about exploring, so don’t hesitate to play with the ingredients and have a blast doing it.

FAQs and Troubleshooting

1. My pizza didn’t get crispy, what went wrong?
Make sure your oven is truly preheated! If you’re using a baking sheet instead of a pizza stone, try preheating the sheet beforehand for an extra crisp.

2. Can I use frozen dough?
Absolutely! Just ensure to thaw it according to package instructions and roll it out as you would fresh dough.

3. What’s the best way to store leftover pizza?
Store it in an airtight container in the fridge for up to 3 days. To reheat, pop it back in the oven at 350°F (175°C) for about 10 minutes for best results—you want that cheese to melt again!

4. How can I make this pizza gluten-free?
Use a gluten-free pizza crust; many great options are available at your local grocery store! Just follow the package instructions for best results.

Nutritional Info

Each serving of this Mushroom and Goat Cheese Pizza should provide a balance of flavors and nutrients to satisfy your cravings while keeping it light and healthy. Ingredients can vary in nutritional values based on portion sizes and brands, but on average, one slice contains approximately:

  • Calories: 250
  • Protein: 10g
  • Carbohydrates: 30g
  • Fat: 12g

This pizza is a delightful balance between satisfaction and nourishment—perfect for any meal of the day!


And there you have it—a Mushroom and Goat Cheese Pizza that’s as delightful to make as it is to eat! Let it bring you the same joy it has brought me, as well as a splash of creativity in your kitchen. Remember, cooking is not just about the end product; it’s about the journey enjoyed along the way. Happy cooking, my fellow foodies! 🥳🍕

Print

Mushroom and Goat Cheese Pizza

A delightful mushroom and goat cheese pizza that combines earthy flavors and creamy goodness for a comforting meal.

  • Prep Time: 15 minutes
  • Cook Time: 15 minutes
  • Total Time: 30 minutes
  • Yield: 4 servings 1x
  • Category: Main Course
  • Method: Baking
  • Cuisine: Italian
  • Diet: Vegetarian

Ingredients

Scale
  • 1 pizza crust
  • 1 cup mushrooms, sliced
  • 4 oz goat cheese, crumbled
  • 1/2 cup shredded mozzarella cheese
  • 2 tbsp olive oil
  • 2 cloves garlic, minced
  • 1 tsp fresh thyme (or 1/2 tsp dried thyme)
  • Salt and pepper to taste
  • Optional: arugula for topping

Instructions

  1. Preheat your oven to 475°F (245°C).
  2. Prepare your ingredients: slice the mushrooms, crumble the goat cheese, and mince the garlic.
  3. Sauté the garlic in olive oil over medium heat for about 30 seconds, then add the mushrooms and cook for 5-7 minutes until golden brown.
  4. Roll out your pizza dough to a thickness of your choice.
  5. Assemble the pizza: place the mozzarella, sautéed mushrooms and garlic, and goat cheese on the crust.
  6. Bake for 12-15 minutes or until the crust is golden and bubbling.
  7. Finish with arugula on top and drizzle with olive oil or balsamic glaze.

Notes

Feel free to experiment with different cheeses and toppings like pesto, truffle oil, or veggies for variations.

Nutrition

  • Serving Size: 1 slice
  • Calories: 250
  • Sugar: 2g
  • Sodium: 350mg
  • Fat: 12g
  • Saturated Fat: 4g
  • Unsaturated Fat: 6g
  • Trans Fat: 0g
  • Carbohydrates: 30g
  • Fiber: 2g
  • Protein: 10g
  • Cholesterol: 20mg

Keywords: pizza, mushroom, goat cheese, vegetarian recipe, comfort food

Did you make this recipe?

Share a photo and tag us — we can't wait to see what you've made!

June 9, 2026 |

Air Fryer Pesto Stuffed Burrata

Air fryer pesto stuffed burrata served on a plate

Air Fryer Pesto Stuffed Burrata: Elevating Your Cheese Game

Welcome to the delicious world of gourmet comfort food! Today, I’m thrilled to share a delightful dish that combines rich, creamy burrata cheese with the vibrant flavors of pesto, all cooked to perfection in your air fryer. Yes, you heard that right! We’re taking a classic culinary favorite and giving it a modern twist that you won’t want to miss. This Air Fryer Pesto Stuffed Burrata recipe is not just about cheese; it’s about creating an experience that’s bursting with flavor and joy.

Imagine this: a gooey, silky interior spilling out as you slice into your burrata, mingling with the herby, nutty essence of pesto. The crispy breadcrumbs add the perfect texture to contrast the creaminess of the cheese. Trust me, it’s a game-changer!

The Birth of an Idea

Every recipe has a story, and this one is close to my heart. A few summers ago, I found myself in a small Italian village, far away from the hustle and bustle of everyday life. It was the kind of place where time seemed to stand still, and the local trattorias had been family-run for generations. One evening, I stumbled upon a rustic, little restaurant serving fresh burrata with a drizzle of homemade pesto. The taste was nothing short of life-changing.

As I savored every bite, I couldn’t help but imagine how I could elevate this dish. Fast forward to today, and I’ve created this air fryer version! It’s quick, it’s easy, and it brings that same tantalizing flavor back home. This dish embodies the joy of transforming simple kitchen staples into something extraordinary. Plus, the air fryer makes it all healthier while adding that satisfying crunch with less oil.

Ingredients

Here’s what you will need to make your very own Air Fryer Pesto Stuffed Burrata:

  • Burrata Cheese
    A fresh Italian cheese, burrata is known for its delicate outer shell containing creamy, luscious curds. If you can’t find burrata, fresh mozzarella can work as a substitute, but the creaminess won’t be quite the same.

  • Pesto Sauce
    This vibrant green sauce is made from basil, garlic, olive oil, pine nuts, and Parmesan cheese. For a quick fix, store-bought pesto works too! If you want to go nut-free, try using sunflower seeds instead of pine nuts in your homemade version.

  • Breadcrumbs
    They’re necessary for achieving a crunchy topping. You can use plain, panko, or seasoned breadcrumbs depending on your preference. If gluten is an issue, gluten-free breadcrumbs are available and work just as well.

  • Olive Oil
    A drizzle of good-quality extra virgin olive oil elevates the flavors. You can also experiment with flavored oils for added depth.

  • Marinara Sauce
    This classic tomato sauce is perfect for dipping or drizzling. You can make it from scratch or grab a jar from the store. If you’re feeling adventurous, a roasted red pepper sauce adds a unique twist!

Step-by-Step Instructions

Let’s get a little hands-on and bring this dish to life!

  1. Prep the Burrata
    Start by carefully slicing into the burrata. You want to create a pocket without cutting all the way through. If your burrata is packed in water, make sure to drain it well to prevent a soggy dish.

  2. Fill with Pesto
    Using a spoon, carefully stuff the pocket you created with pesto. Don’t be shy—this is where the flavor comes from! Feel free to add more than you think; the creaminess of the burrata will balance out the intense flavors.

  3. Coat with Breadcrumbs
    In a bowl, combine your breadcrumbs with a drizzle of olive oil. This will make them crispy when air-fried. Roll the stuffed burrata gently in the breadcrumb mixture, ensuring it’s evenly coated. This step is crucial for that satisfying crunch.

  4. Preheat Your Air Fryer
    Preheat your air fryer to 350°F (175°C). Preheating helps achieve that golden crispiness you’re after. While it warms up, it’s a great time to prepare your marinara sauce—if you’re making it from scratch, now would be the moment!

  5. Air Fry
    Place your breaded burrata in the air fryer basket, making sure not to overcrowd. Air fry for about 6-8 minutes, or until the breadcrumbs are golden brown and crisp. Keep an eye on them since air fryer models can vary in cooking time.

  6. Serve with Marinara
    Once the burrata is cooked to perfection, carefully remove it from the air fryer. Let it cool for a minute, then place it on a serving plate with marinara sauce on the side. You can drizzle a bit more pesto on top for flair!

Serving Suggestions

For a stunning presentation, consider placing the stuffed burrata atop a bed of lightly dressed arugula or spinach, adding a sprinkle of cherry tomatoes for color. Pair it with crusty bread for the perfect vessel to scoop up all that lusciousness. A glass of chilled white wine or sparkling water will complete your dining experience beautifully!

Recipe Variations

  1. Add Some Heat
    Spice things up by adding crushed red pepper flakes to your pesto for a kick.

  2. Herb Infusion
    Blend in different herbs to your pesto, like cilantro or parsley, for a unique flavor twist.

  3. Cheesy Bliss
    Try adding a layer of shredded mozzarella inside the burrata pocket for an extra cheesy experience.

  4. Veggie Medley
    Sauté some spinach or sun-dried tomatoes and mix them into your pesto for a veggie punch.

  5. Make it Sweet
    For a dessert twist, swap out the marinara for a drizzle of balsamic reduction and add fresh figs or strawberries next to your burrata.

Chef’s Notes

You know, as I’ve adapted this recipe through the years, it has become an absolute favorite among my friends! The beauty of the air fryer is that it means you can indulge with less guilt, and it cooks everything so evenly. I remember the first time I made this dish for guests; I was a bundle of nerves. But when they took that first bite and their eyes lit up, I knew I had created something special. Food truly brings people together—and that’s a big part of what keeps me in the kitchen.

FAQs and Troubleshooting

1. My burrata is too watery; what do I do?
Make sure to drain the burrata thoroughly after unpacking it. You want it as dry as possible for that crunchy coating.

2. What if my breadcrumbs aren’t crispy?
If they’re soggy, ensure they’re well-coated with oil before air frying and try increasing the temperature slightly or cooking for a few more minutes.

3. Can I make this ahead of time?
Yes, you can prep your stuffed burrata ahead of time and chill it in the refrigerator. When you’re ready to serve, just pop it in the air fryer. Just know that the breadcrumbs may lose some crispiness if prepped too far in advance.

4. I don’t have an air fryer; can I bake these?
Absolutely! Preheat your oven to 375°F (190°C) and bake them on a lined baking sheet for about 12-15 minutes, or until golden brown.

Nutritional Info

While I won’t get overly technical with numbers, this dish offers a balanced blend of healthy fats, proteins, and flavors without excessive calories. Naturally creamy burrata and herby pesto with some crunch – what’s not to love? Plus, the olive oil adds heart-healthy monounsaturated fats, making this dish as nourishing as it is delicious.

Now that you have the recipe, go gather your ingredients and share a flavorful moment with loved ones—or just indulge by yourself! This Air Fryer Pesto Stuffed Burrata is sure to become a go-to dish in your repertoire. Happy cooking, fellow foodies!

Print

Air Fryer Pesto Stuffed Burrata

A delightful dish that combines rich, creamy burrata cheese with vibrant pesto flavors, all cooked to perfection in an air fryer.

  • Prep Time: 15 minutes
  • Cook Time: 8 minutes
  • Total Time: 23 minutes
  • Yield: 2 servings
  • Category: Appetizer
  • Method: Air Frying
  • Cuisine: Italian
  • Diet: Vegetarian

Ingredients

  • Burrata Cheese
  • Pesto Sauce
  • Breadcrumbs
  • Olive Oil
  • Marinara Sauce

Instructions

  1. Prep the burrata by carefully slicing into it to create a pocket.
  2. Fill the pocket with pesto using a spoon.
  3. Coat the stuffed burrata in a mixture of breadcrumbs and olive oil.
  4. Preheat your air fryer to 350°F (175°C).
  5. Air fry the breaded burrata for 6-8 minutes until golden brown.
  6. Serve with marinara sauce on the side, and drizzle more pesto on top.

Notes

For presentation, place the burrata atop a bed of arugula or spinach and add cherry tomatoes for color.

Nutrition

  • Serving Size: 1 serving
  • Calories: 350
  • Sugar: 6g
  • Sodium: 420mg
  • Fat: 25g
  • Saturated Fat: 6g
  • Unsaturated Fat: 13g
  • Trans Fat: 0g
  • Carbohydrates: 22g
  • Fiber: 1g
  • Protein: 14g
  • Cholesterol: 50mg

Keywords: burrata, pesto, air fryer, vegetarian appetizer, Italian cheese

Did you make this recipe?

Share a photo and tag us — we can't wait to see what you've made!

June 9, 2026 |

Lime Sherbet

Delicious bowl of Lime Sherbet with vibrant green color and refreshing texture

Refreshing Lime Sherbet: A Splash of Citrus Goodness!

Ah, lime sherbet—a dessert that dances on your taste buds, evoking sunny afternoons and carefree days. If you’re like me, you have sweet memories tied to every delightful scoop. Think about it: there’s something magical about a frozen treat that is both creamy and zesty, especially during the warmer months. But who says we have to limit ourselves to just those hot summer days? This lime sherbet can add a refreshing twist to any season, ensuring you savor every bite, no matter the time of year!

When I first tackled the idea of making lime sherbet from scratch, it was because I wanted a vibrant and light dessert that brought joy to the table without weighing you down. Just like you, I appreciate food that not only tastes good but also feels good. Plus, making this dessert at home means we can control every last ingredient. It’s all about keeping our indulgences fresh, flavorful, and oh-so satisfying.

Join me on this cool culinary journey as we whip up a batch of lime sherbet that’s bound to be the star of your dessert lineup! Prepare to indulge in an extraordinary balance of tart lime zest and creamy richness that will leave your taste buds wanting more.

A Sweet Slice of Memory Lane

Let me take you back to that memory from my childhood. I remember spending long summer days at my grandmother’s house, where the air was filled with the fragrance of her garden and the laughter of kids playing on the lawn. She had this signature lime sherbet that she made every year when the limes from her tree burst with ripeness.

The way she scooped out the lime sherbet into cheerful bowls was like watching a performance; her hands moved gracefully, and the bright green color seemed to sparkle in the sunlight. Each bite was a burst of tangy sweetness, creating a joyful harmony that would dance on my tongue as vibrant as her storytelling. I could spend hours sitting on the porch, trying to convince my siblings to share their scoops while my grandmother quietly made her way back to her garden.

Now, as I create this lime sherbet in my own kitchen, I can feel her spirit guiding me. That’s the beauty of food—it brings back the best memories and connects us to those we love. And the recipe? Oh, it has just a few tweaks, making it even more approachable for today’s tastes.

Ingredients

Let’s gather our ingredients and dive into this delicious recipe!

  • 1 cup fresh lime juice (about 6–8 limes)
    Tip: Freshly squeezed is the way to go! Bottled lime juice just doesn’t have that vibrant zing. If you need a substitute, you could use lemon juice, but trust me, you’ll miss the tangy sweetness of the limes!

  • 1 tablespoon lime zest
    Pro Insight: Zesting adds a powerful citrus aroma and amplifies the lime flavor. Remember to zest before you juice! And don’t toss those peels—use them in your smoothies or teas!

  • 1 cup whole milk
    Substitution: For a lighter version, you can use almond milk or oat milk, though the creaminess will differ slightly. Whole milk gives that beautiful creamy texture you crave!

  • ½ cup heavy cream
    Chef’s Note: Heavy cream is your best friend when it comes to making desserts creamy. Don’t skip it! If you prefer a lighter option, full-fat coconut cream works like a charm for a dairy-free version.

  • ¾ cup granulated sugar
    Alternative: If you’re looking for a healthier replacement, try pure maple syrup or a non-caloric sweetener. Adjust the amount based on sweetness preference!

  • 1 teaspoon vanilla extract
    Expert Tip: Vanilla adds a warm note that balances the tanginess of the lime beautifully! Choose pure vanilla extract for the best flavor.

  • Pinch of salt
    Never underestimate salt—it enhances sweetness, bringing out the lime’s natural flavors!

  • Optional: 1–2 drops green food coloring
    Chef’s Choice: While this is totally optional, a drop or two can amp up the visual appeal. But I promise, this sherbet will be just as yummy without it!

Now that we have our vibrant line-up ready, let’s get to the fun part—making the lime sherbet!

Step-by-Step Instructions

  1. Juice those limes! Start by cutting the limes in half and juicing them until you have one cup of fresh lime juice. I highly recommend using a citrus juicer to make this task easier. Trust me, your hands will thank you later!

    Tip: If you roll the limes on the countertop with your palm before cutting, it’ll help release more juice!

  2. Zest it up! Grab a microplane or zester and zest one tablespoon from the lime peels. Remember, you’re just getting the green part—try to avoid the bitter white pith underneath!

  3. Mix the wet ingredients. In a mixing bowl, combine the fresh lime juice, lime zest, whole milk, heavy cream, vanilla extract, and a pinch of salt. Whisk until everything is blended nicely. You want a creamy mixture that smells like a bright summer day!

    Chef’s Insight: Taste your mixture! If it needs more sweetness, now’s the time to add a bit more sugar.

  4. Sweeten to taste. Gradually add in the granulated sugar, whisking until it dissolves completely. This part is crucial. If sugaring it is your main concern, feel free to adjust based on your preference or the tartness of your limes!

  5. Add optional food coloring. If you want a pop of green, add in the optional food coloring, one drop at a time, until you achieve the desired hue. Just remember: A little goes a long way!

  6. Chill the mixture. Once your mixture is well combined, cover the bowl with plastic wrap or a lid and refrigerate it for about an hour. Chilling it helps the flavors meld beautifully!

  7. Churn away! After it’s chilled, transfer your lime mixture to an ice cream maker and churn according to the manufacturer’s instructions. Typically, this takes about 20–30 minutes. But if you don’t have an ice cream maker, no worries!

    (If you’re going the no-churn route: Pour the mixture into a freezer-safe container and freeze for about 1–2 hours, stirring every 30 minutes to break up ice crystals until it reaches a smooth consistency.)

  8. Freeze until firm. Transfer the churned sherbet into a clean container, smoothing it out on top. Cover with a lid or plastic wrap and pop it into the freezer for about 4 hours, or until it’s firm enough to scoop.

Serving Suggestions

Scooping out your homemade lime sherbet is a real treat! Serve it in fun dessert bowls, or go all out and use waffle cones for that extra crunch. You can also elevate your dish with a mint leaf garnish or a sprinkle of zest on top. If you want to get fancy, drizzle some coconut syrup or your favorite fruit compote to add another layer of flavor. No matter how you serve it, this sherbet is bound to brighten up any dessert table!

Recipe Variations

Now, if you’re feeling adventurous and want to mix things up a bit, here are a few creative twists you can try:

  1. Berry Lime Sherbet: Toss in a cup of blended fresh berries (like strawberries or raspberries) to the mixture before churning. The berry and lime combo is out of this world!

  2. Coconut Lime Sherbet: Replace half the milk with coconut milk for a tropical coconut lime sherbet that transports you to an island paradise.

  3. Minty Lime Twist: Add a teaspoon of finely chopped fresh mint to your lime mixture for a refreshing mint lime sherbet that adds a cooling flavor.

  4. Creamy Avocado Lime: For an unexpected twist, blend ripe avocado into your mixture for an ultra-creamy texture and a unique flavor.

Chef’s Notes

When I first started making lime sherbet, I can’t tell you how many batches I went through trying to find that perfect balance of tart and sweet. One time, I decided to experiment with different sugars—I even made a “lime sherbet challenge” with friends to see which version tasted better! (We agreed that the classic granulated sugar still reigns supreme.) Every time I whip up this recipe, it feels like a delightful throwback to those hot summer days and cool treats.

Over the years, this recipe has evolved with my cooking style, becoming more versatile as I embraced natural ingredients and less refined sugar. The best part? Every variation I’ve made feels like an heirloom passed down from my grandmother’s kitchen. Each scoop is filled with love, joy, and nostalgia.

FAQs and Troubleshooting

Q1: My sherbet turned out icy instead of creamy. What happened?

  • This could happen if your mixture freezes too quickly or if the mixture wasn’t well combined. Remember to churn until it’s smooth and creamy, and make sure it’s frozen long enough for that perfect texture!

Q2: How long does homemade lime sherbet last in the freezer?

  • It’s best enjoyed within 1–2 weeks, as it may become icy after that. If you freeze it longer, be sure to let it sit out for a few minutes before scooping!

Q3: Can I make this sherbet without an ice cream maker?

  • Absolutely! Follow the no-churn method mentioned above, stirring every 30 minutes while it freezes to incorporate air and prevent ice crystals from forming.

Q4: What can I do if I don’t have enough lime juice?

  • If you’re short on lime juice, you can substitute with lemon juice or a mixture of lemon and lime! Just remember that the flavor may change slightly.

Nutritional Info (Optional)

While I believe in enjoying life’s sweet moments, I wanted to give you a snapshot of the goodness packed into this lime sherbet:

  • Serving Size: 1/2 cup
  • Calories: Approximately 150 calories
  • Total Fat: 7g
  • Saturated Fat: 4g
  • Cholesterol: 30mg
  • Sodium: 25mg
  • Total Carbohydrates: 20g
  • Sugars: 17g
  • Protein: 2g

And there you have it! Your kitchen is about to be filled with the irresistible aroma of lime sherbet. I can’t wait for you to scoop up a bowl and take that first, refreshing bite. This treat is sure to become a staple in your dessert lineup, just like it is in mine! Happy cooking and even happier indulging! 🍋✨

Print

Refreshing Lime Sherbet

A vibrant and light lime sherbet that’s both creamy and zesty, perfect for any season.

  • Prep Time: 20 minutes
  • Cook Time: 15 minutes
  • Total Time: 60 minutes
  • Yield: 4 servings 1x
  • Category: Dessert
  • Method: Churning
  • Cuisine: American
  • Diet: Vegetarian

Ingredients

Scale
  • 1 cup fresh lime juice (about 6–8 limes)
  • 1 tablespoon lime zest
  • 1 cup whole milk
  • ½ cup heavy cream
  • ¾ cup granulated sugar
  • 1 teaspoon vanilla extract
  • Pinch of salt
  • Optional: 1–2 drops green food coloring

Instructions

  1. Juice those limes! Start by cutting the limes in half and juicing them until you have one cup of fresh lime juice.
  2. Zest it up! Grab a microplane or zester and zest one tablespoon from the lime peels.
  3. Mix the wet ingredients. In a mixing bowl, combine the fresh lime juice, lime zest, whole milk, heavy cream, vanilla extract, and a pinch of salt. Whisk until blended.
  4. Sweeten to taste. Gradually add in the granulated sugar, whisking until it dissolves completely.
  5. Add optional food coloring if desired, one drop at a time, until you achieve the desired hue.
  6. Chill the mixture. Cover the bowl with plastic wrap and refrigerate for about an hour.
  7. Churn away! After it’s chilled, transfer your lime mixture to an ice cream maker and churn according to manufacturer’s instructions.
  8. Freeze until firm. Transfer the churned sherbet into a clean container and freeze for about 4 hours, or until firm enough to scoop.

Notes

This sherbet can be served in dessert bowls or waffle cones. Garnish with mint or a sprinkle of zest for an extra touch.

Nutrition

  • Serving Size: 1/2 cup
  • Calories: 150
  • Sugar: 17g
  • Sodium: 25mg
  • Fat: 7g
  • Saturated Fat: 4g
  • Unsaturated Fat: 3g
  • Trans Fat: 0g
  • Carbohydrates: 20g
  • Fiber: 0g
  • Protein: 2g
  • Cholesterol: 30mg

Keywords: lime sherbet, frozen dessert, citrus treat

Did you make this recipe?

Share a photo and tag us — we can't wait to see what you've made!