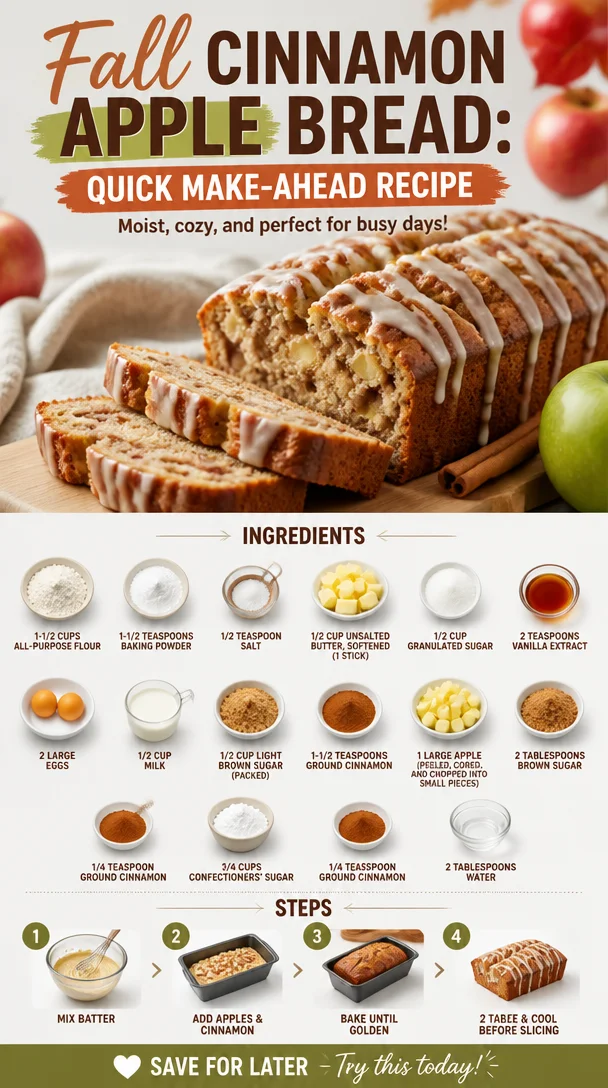
Fall Cinnamon Apple Bread: Quick Make-Ahead Recipe
Warm and Cozy Cinnamon Apple Bread: A Slice of Nostalgia
Welcome back to Clean Plate Cravings! Today, we’re diving into a recipe that wraps you in a warm, sugary hug and fills your home with irresistible aromas—the heartwarming Cinnamon Apple Bread. Whether you’re hosting a cozy breakfast with friends, packing a sweet treat for someone special, or simply indulging in a slice during quiet moments with a cup of tea, this bread feels like a hug from grandma.
But really, what’s better than the wonderful smell of cinnamon wafting through your kitchen? I remember the first time I baked apple bread. I was just a kid, standing on a stool beside my mom in our tiny kitchen. We had just picked fresh apples from a local orchard, and as we chopped them up, my excitement grew, knowing a delicious treat was on the horizon. My mom had a knack for turning everyday ingredients into something extra magical, and this cinnamon apple bread was one of her go-to recipes.
As we mixed the batter and sprinkled in the cinnamon—oh, that heavenly smell!—I realized that something special was happening. This wasn’t just a recipe; it was a special moment shared between us. This bread became our family’s comfort food, perfect for cozying up with a hot cup of cocoa on chilly evenings or gifting to neighbors during the holidays. It was a delicious blend of sweet and spice with a moist, tender crumb that had us all coming back for seconds.
Now, I’m excited to share my own version of this cherished recipe with you! With its balance of flavors and simple ingredients, you too can create a memorable experience with every slice. Let’s jump into the delectable world of Cinnamon Apple Bread!
Ingredients
Here’s what you’ll need to whip up this delightful cinnamon apple bread:
-
1-1/2 cups all-purpose flour
The base of your bread! If you’re looking for a gluten-free version, substitute with gluten-free all-purpose flour. Just make sure it includes xanthan gum for proper texture! -
1-1/2 teaspoons baking powder
This is your leavening agent, helping the bread rise. Be sure it’s fresh; expired baking powder can lead to dense bread. -
1/2 teaspoon salt
A pinch of salt enhances all those lovely flavors. Don’t overlook it! -
1/2 cup unsalted butter, softened (1 stick)
Brings richness and flavor to your bread. If dairy is a concern, coconut oil works as a great substitute! -
1/2 cup granulated sugar
Sweetness factor! You can also use coconut sugar for a lower glycemic index. -
2 teaspoons vanilla extract
Adds a lovely warmth. Use pure vanilla extract for a deeper flavor-profile, though imitation works too in a pinch! -
2 large eggs
These bind everything together and add moisture. For a vegan option, substitute with flax eggs (1 tablespoon of ground flaxseed mixed with 2.5 tablespoons of water per egg). -
1/2 cup milk
Dairy or plant-based milk works! Almond milk, oat milk, or even coconut milk can be excellent choices. -
1/2 cup light brown sugar (packed)
This brings a subtle caramel flavor to the bread. If you run out, you can use dark brown sugar instead—it’ll just give more depth. -
1-1/2 teaspoons ground cinnamon
The flavor star of this recipe! For a twist, consider using fresh ground cinnamon or even a dash of nutmeg or cardamom for added spice. -
1 large apple (peeled, cored, and chopped into small pieces)
The fresh fruit keeps your bread moist and adds a lovely tartness. Granny Smith or Honeycrisp apples work wonderfully here! -
2 tablespoons brown sugar
Great for sprinkling on top for a crunchy finish! -
1/4 teaspoon ground cinnamon
Used here for the topping—because you can never have too much cinnamon! -
3/4 cups confectioners’ sugar
This is for an optional glaze to make your bread extra special. -
1/4 teaspoon ground cinnamon
A final touch for the glaze! -
2 tablespoons water
To achieve the perfect glaze consistency.
Step-by-Step Instructions
Let’s make this cinnamon apple bread shine! Here’s how we do it—step by step:
-
Preheat the oven: Start by preheating your oven to 350°F (175°C). This is crucial for ensuring your bread bakes evenly. While it heats up, you can prepare your loaf pan.
-
Grease your loaf pan: Grab a 9×5-inch loaf pan and grease it with a little butter or line it with parchment paper. This will make it super easy to get your bread out after baking.
-
Mix the dry ingredients: In a medium bowl, whisk together the flour, baking powder, cinnamon, and salt. This is a cool chef hack! Whisking these dry ingredients helps to evenly distribute the leavening agents and ensures there are no flour lumps later.
-
Cream the butter and sugar: In a large bowl, using a hand mixer or a stand mixer, cream the softened butter and granulated sugar together until it’s light and fluffy—about 3 minutes. It’s important to really aerate the mixture here; that’s where the magic happens!
-
Add eggs and vanilla: Add in the eggs one by one, mixing well after each addition. Then, stir in the vanilla extract. This step adds moisture and flavor to your batter.
-
Incorporate the milk: Gradually mix in the milk until it’s well combined. Here’s a little tip: If your batter seems too thick, a splash more milk can help!
-
Combine wet and dry: Gradually add your dry ingredient mixture to the wet ingredients. Fold gently with a spatula until just combined. Avoid overmixing—this helps your bread stay light and fluffy!
-
Add the apples: Gently stir in your chopped apples. This is the fun part! Those little apple bits will caramelize beautifully in the oven, offering pockets of warm, juicy goodness.
-
Pour into the pan: Transfer your batter to the greased loaf pan, smoothing the top down with your spatula.
-
Prepare the topping: In a small bowl, mix together the brown sugar and cinnamon. Sprinkle this mixture evenly over the top of your batter. This little topping gives your bread a crunchy, sweet crust!
-
Bake: Pop your loaf in the preheated oven and bake for 50-60 minutes, or until a toothpick comes out clean from the center. The aroma that fills your kitchen will have you salivating!
-
Cool and glaze: Once it’s baked, let it cool in the pan for about 10 minutes before transferring it to a wire rack. If you’re feeling adventurous, make a quick glaze by whisking together the confectioners’ sugar, cinnamon, and water until smooth. Drizzle it over the cooled bread!
Serving Suggestions
Slice your cinnamon apple bread while it’s still warm for that fresh-out-of-the-oven experience! Serve it on a rustic wooden board with a side of creamy butter or spreadable cream cheese. Cuddle up on the sofa with a generous slice and your favorite hot drink—the perfect pairing for a relaxing afternoon!
Recipe Variations
Here are some fun twists on this classic recipe to keep things exciting:
- Nutty Additions: Fold in 1/2 cup of chopped walnuts or pecans into the batter for a crunchy element.
- Dried Fruits: Add 1/4 cup of raisins or cranberries for a delightful surprise textural contrast.
- Spiced Up: Want more warmth? Toss in a pinch of nutmeg or ginger along with the cinnamon.
- Maple Glaze: Swap the water in the glaze for pure maple syrup for a richer sweetness.
- Mini Loaves: Bake in mini loaf pans for adorable gifts or portion control!
Chef’s Notes
This cinnamon apple bread is a well-loved family recipe that I’ve cherished and adapted over the years. I remember one holiday baking marathon when my family decided to make it with a twist—adding cranberries for a festive flair! It turned out to be a huge hit!
Now, I often use this recipe as a base for other fruity breads too: swap apples for mashed bananas for a banana bread version or try zucchini for a savory twist.
Remember, baking should be fun and adaptable! Don’t stress too much about measurements—cooking is all about flavors and the love you put into it!
FAQs and Troubleshooting
1. My bread is too dense. What did I do wrong?
Overmixing can lead to a denser bread. Mix just until combined. Also, ensure your baking powder is fresh!
2. Can I use frozen apples?
Absolutely! Just make sure to thaw and drain them well to avoid extra moisture. Fresh apples are best, but frozen works in a pinch.
3. How should I store the bread?
Store it in an airtight container at room temperature for up to 3 days. For longer freshness, wrap it tightly and freeze. It tastes great even after thawing!
4. What’s the best way to serve leftovers?
Slicing it and toasting the leftover bread gives it a lovely crispy texture and warms up that cinnamon goodness!
This delightful Cinnamon Apple Bread is more than just a recipe; it’s an opportunity to create fond memories while enjoying scrumptious, homemade goodness. So gather your ingredients, roll up your sleeves, and let’s make some kitchen magic together. Enjoy every bite!
PrintWarm and Cozy Cinnamon Apple Bread
A heartwarming recipe for Cinnamon Apple Bread that fills your home with the irresistible aroma of cinnamon and fresh apples.
- Prep Time: 15 minutes
- Cook Time: 60 minutes
- Total Time: 75 minutes
- Yield: 10 servings 1x
- Category: Dessert
- Method: Baking
- Cuisine: American
- Diet: Vegetarian
Ingredients
- 1–1/2 cups all-purpose flour
- 1–1/2 teaspoons baking powder
- 1/2 teaspoon salt
- 1/2 cup unsalted butter, softened
- 1/2 cup granulated sugar
- 2 teaspoons vanilla extract
- 2 large eggs
- 1/2 cup milk
- 1/2 cup light brown sugar, packed
- 1–1/2 teaspoons ground cinnamon
- 1 large apple, peeled, cored, and chopped
- 2 tablespoons brown sugar
- 1/4 teaspoon ground cinnamon
- 3/4 cups confectioners’ sugar
- 1/4 teaspoon ground cinnamon
- 2 tablespoons water
Instructions
- Preheat the oven: Start by preheating your oven to 350°F (175°C).
- Grease your loaf pan: Use a 9×5-inch loaf pan and grease with butter or line with parchment paper.
- Mix the dry ingredients: In a medium bowl, whisk together flour, baking powder, cinnamon, and salt.
- Cream the butter and sugar: In a large bowl, cream the softened butter and granulated sugar together until light and fluffy, about 3 minutes.
- Add eggs and vanilla: Mix in the eggs one by one, then stir in the vanilla extract.
- Incorporate the milk: Gradually mix in the milk until well combined.
- Combine wet and dry: Gradually add the dry ingredient mixture to the wet ingredients and fold gently until just combined.
- Add the apples: Gently stir in the chopped apples.
- Pour into the pan: Transfer the batter to the greased loaf pan and smooth the top.
- Prepare the topping: Mix the brown sugar and cinnamon, then sprinkle over the top of the batter.
- Bake: Bake for 50-60 minutes, or until a toothpick comes out clean from the center.
- Cool and glaze: Let it cool in the pan for about 10 minutes before transferring to a wire rack.
- Make a glaze (optional): Whisk together confectioners’ sugar, cinnamon, and water until smooth, then drizzle over the cooled bread.
Notes
This bread is perfect for cozying up with a hot drink or gifting during the holidays. Enhance it with nuts or dried fruits for added texture.
Nutrition
- Serving Size: 1 slice
- Calories: 310
- Sugar: 25g
- Sodium: 250mg
- Fat: 12g
- Saturated Fat: 7g
- Unsaturated Fat: 5g
- Trans Fat: 0g
- Carbohydrates: 44g
- Fiber: 1g
- Protein: 4g
- Cholesterol: 50mg
Keywords: cinnamon apple bread, dessert, baking, comfort food, easy recipe
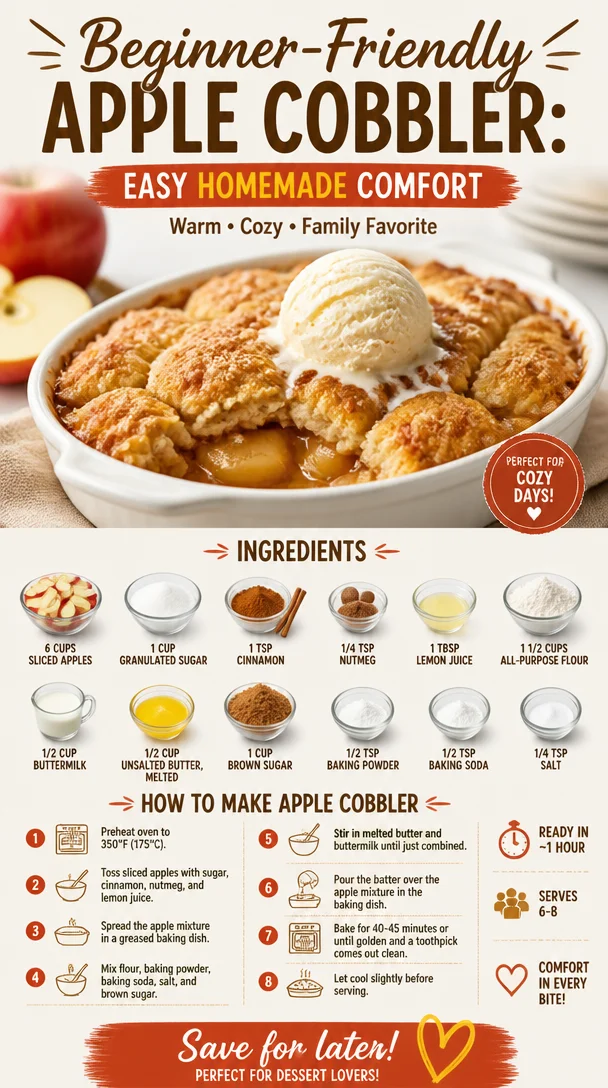
Beginner-Friendly Apple Cobbler: Easy Homemade Comfort
Easy Homemade Apple Cobbler: A Cozy Kitchen Delight
Welcome, fellow food lovers! Today, we’re diving into the scrumptious world of apple cobbler—a delightful dessert that marries the sweetness of baked apples with a warm, buttery topping. If you’re anything like me, the aroma of cinnamon and sugar wafting from the oven brings back cherished memories of kitchen escapades. So grab your apron, let’s roll up our sleeves, and whip up a treat that feels like a hug on a plate!
Personal Story: A Trip Down Memory Lane
Growing up, autumn meant a burst of colorful leaves and, more importantly, endless apple picking adventures with my family. We’d head out to the glistening orchards on crisp Sunday mornings, eagerly selecting bags of the juiciest apples. Those days were magical—filled with laughter, sunshine, and the overwhelming sense of getting lost in nature.
Once we returned home with our load, the kitchen transformed into a buzzing hub of activity. My mom’s famous apple cobbler was on the menu, and I could hardly wait! As we sliced through those shiny apples, my little hands would dabble in flour, sugar, and spice—creating a concoction that was as fun to make as it was to eat. The cobbler emerged from the oven golden-brown, nestled under a sweet, crumbly topping that was just begging for a scoop of vanilla ice cream. That first spoonful of warm, gooey goodness made all the hard work worth it, and the smile on my mom’s face said it all: we had created something truly special together.
Ingredients
Now, let’s gather our ingredients for this mouthwatering homemade apple cobbler. Here’s what you’ll need:
-
6 cups sliced apples
Choose firm apples like Granny Smith or Honeycrisp for the best texture and flavor. If you’re feeling adventurous, mix a couple of varieties! -
1 cup granulated sugar
Sweetness is key! You can adjust the amount up or down based on your taste preference (and the tartness of your apples). -
1 teaspoon cinnamon
A warm, cozy spice that pairs perfectly with apples. Don’t shy away—this is what gives the cobbler its signature flavor! -
1/4 teaspoon nutmeg
A pinch of nutmeg elevates the flavor. If you don’t have it on hand, you can omit it or use a bit more cinnamon. -
1 tablespoon lemon juice
This helps to balance the sweetness and enhance the apple flavor. Fresh-squeezed is best, but bottled juice works too. -
1 1/2 cups all-purpose flour
The foundation of our topping! For a gluten-free alternative, use a 1:1 gluten-free flour blend. -
1/2 cup buttermilk
This adds moisture and a lovely tang. If you don’t have buttermilk, mix regular milk with a tablespoon of vinegar and let it sit for five minutes. -
1/2 cup unsalted butter, melted
Adds richness. If you’re watching your fat intake, consider using coconut oil or a mild flavored vegetable oil. -
1 cup brown sugar
For that delightful caramel flavor! Light or dark brown sugar will work, but dark gives a deeper taste. -
1/2 teaspoon baking powder
This helps our topping rise and become fluffy. -
1/2 teaspoon baking soda
Combined with buttermilk, it creates a light and airy texture. -
1/4 teaspoon salt
A small but essential ingredient that complements the sweetness!
Step-by-Step Instructions
Now that we have everything we need, let’s jump into the cooking process. Trust me, this is going to fill your kitchen with the most enchanting aroma!
-
Preheat Your Oven
Preheat your oven to 350°F (175°C). Get your kitchen ready for some sizzling magic! -
Prepare the Apples
In a large mixing bowl, toss your sliced apples with the granulated sugar, cinnamon, nutmeg, and lemon juice. Let it sit for about 10-15 minutes. This helps the apples release their juices and become extra flavorful.Chef’s tip: If you’re using particularly tart apples, try adding a touch more sugar to balance out the flavors.
-
Make the Topping
In another bowl, combine the flour, brown sugar, baking powder, baking soda, and salt. Whisk it together to ensure the baking powder is well-distributed.Tip: Sifting the dry ingredients together can help prevent clumps, but it’s not essential if you mix well!
-
Add the Wet Ingredients
Pour in the melted butter and buttermilk. Stir gently until just combined; it’s okay if it’s a little lumpy—remember, we want it light and fluffy.Quick hack: If you whisk the buttermilk before mixing it in, it helps to prevent lumps in your batter.
-
Combine
In a greased baking dish (a 9×13 inch or something similar works great), layer the apple mixture evenly first. Then, dollop spoonfuls of the batter over the apples. Don’t worry about covering every inch—some gaps allow the steam to escape and make the edges crispy. -
Bake
Place the baking dish in your preheated oven and bake for about 40-45 minutes, or until the topping is golden brown and the apples are bubbly.Chef tip: If you notice the top browning too quickly, cover it loosely with aluminum foil for the last 10 minutes of baking.
-
Cool and Serve
Once baked, let your cobbler cool for about 10-15 minutes. This gives it a chance to set up a little and makes serving easier.
Serving Suggestions
To serve, scoop out a generous portion of apple cobbler into a bowl or on a plate. A dollop of whipped cream or a scoop of vanilla ice cream on top just takes things to the next level! If you’re feeling indulgent, a sprinkle of crushed pecans or walnuts adds a lovely crunch and extra flavor.
Recipe Variations
Let’s get creative! Here are some fun twists you can try with this basic apple cobbler recipe:
-
Berry Blast: Add a cup of fresh or frozen blueberries or raspberries to the apples for a delightful twist.
-
Spiced Pear Cobbler: Swap out half the apples for pears to give a unique flavor combination.
-
Maple Twist: Replace half of the granulated sugar with pure maple syrup for a distinctive, rich taste.
-
Oat Topping: For a heartier version, stir in half a cup of rolled oats to the topping mixture for added texture.
-
Nutty Addition: Sprinkle some finely chopped nuts like almonds or pecans into the apple mixture for an extra crunch.
Chef’s Notes
Oh, how this recipe has evolved over the years! What started as my mom’s simple concoction has transformed—I’ve added my personal touch through these variations, ever honing in on the perfect balance of flavors. While we can all appreciate the nostalgia that comes with making a classic recipe, I love how every iteration tells a story of its own!
And let me tell you, I can’t count how many times I’ve had to swap out ingredients last minute. Lurking in the back of the pantry? That half-empty jar of honey? You bet your apple cobbler it can get a little creative sometimes!
FAQs and Troubleshooting
Q: Can I make this cobbler ahead of time?
A: Absolutely! You can prep it the day before and store it in the fridge. Just bake it right before serving. It’ll be just as delicious!
Q: Why is my cobbler gooey in the middle?
A: If it’s too gooey, it might need a little more baking time. Ensure you bake until the topping is golden brown, and the fruit is bubbling.
Q: Can I freeze leftover apple cobbler?
A: Definitely! Allow it to cool completely, then wrap it tightly in aluminum foil or plastic wrap and place it in the freezer. When you’re ready to enjoy it again, thaw and reheat gently in the oven.
Q: What’s the best way to store leftovers?
A: Store the cobbler in an airtight container in the fridge for up to five days. Just reheat in the oven to bring back the melty goodness!
Nutritional Info
If you’re keeping track, a standard serving of apple cobbler has approximately:
- Calories: 310
- Total Fat: 15g
- Carbohydrates: 45g
- Fiber: 3g
- Sugar: 25g
- Protein: 3g
Remember, these values can vary based on your specific ingredients, portions, and any tweaks you might make!
So there you have it! An easy homemade apple cobbler that’s sure to delight your taste buds and warm your heart. I can’t wait for you to try this recipe and create your own delicious memories in the kitchen. Happy baking! 🥧✨
PrintEasy Homemade Apple Cobbler
A delightful dessert that marries sweet baked apples with a warm, buttery topping, perfect for cozy gatherings.
- Prep Time: 15 minutes
- Cook Time: 45 minutes
- Total Time: 60 minutes
- Yield: 8 servings 1x
- Category: Dessert
- Method: Baking
- Cuisine: American
- Diet: Vegetarian
Ingredients
- 6 cups sliced apples (Granny Smith or Honeycrisp)
- 1 cup granulated sugar
- 1 teaspoon cinnamon
- 1/4 teaspoon nutmeg
- 1 tablespoon lemon juice
- 1 1/2 cups all-purpose flour
- 1/2 cup buttermilk
- 1/2 cup unsalted butter, melted
- 1 cup brown sugar
- 1/2 teaspoon baking powder
- 1/2 teaspoon baking soda
- 1/4 teaspoon salt
Instructions
- Preheat your oven to 350°F (175°C).
- In a large mixing bowl, toss your sliced apples with the granulated sugar, cinnamon, nutmeg, and lemon juice. Let it sit for about 10-15 minutes.
- In another bowl, combine the flour, brown sugar, baking powder, baking soda, and salt. Whisk it together.
- Pour in the melted butter and buttermilk. Stir gently until just combined.
- In a greased baking dish, layer the apple mixture evenly first. Then, dollop spoonfuls of the batter over the apples.
- Place the baking dish in your preheated oven and bake for about 40-45 minutes, or until the topping is golden brown and the apples are bubbly.
- Once baked, let your cobbler cool for about 10-15 minutes.
Notes
Serve with whipped cream or a scoop of vanilla ice cream for a delightful addition.
Nutrition
- Serving Size: 1 serving
- Calories: 310
- Sugar: 25g
- Sodium: 200mg
- Fat: 15g
- Saturated Fat: 9g
- Unsaturated Fat: 6g
- Trans Fat: 0g
- Carbohydrates: 45g
- Fiber: 3g
- Protein: 3g
- Cholesterol: 30mg
Keywords: apple cobbler, dessert, baking, homemade, fall recipes
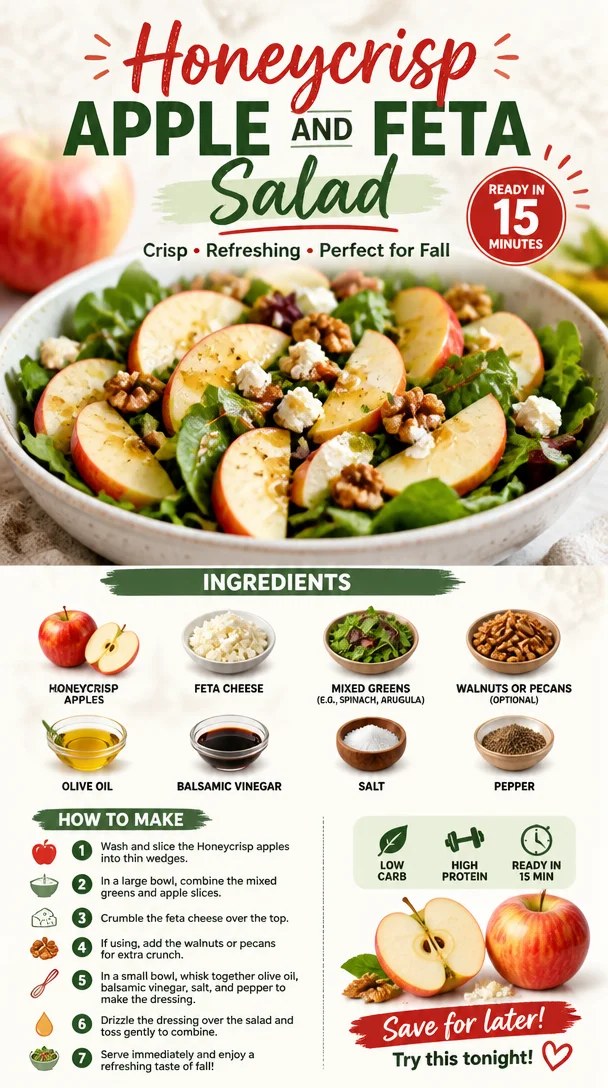
Honeycrisp Apple and Feta Salad
Honeycrisp Apple and Feta Salad: A Crisp and Zesty Delight
Hello, beautiful foodies! Welcome back to Clean Plate Cravings, your go-to spot for fresh, feel-good meals that make everyday cooking a total joy. Today, we’re diving into a dish that perfectly captures the essence of seasonal eating—the delightful Honeycrisp Apple and Feta Salad. Trust me; this salad is not just a side dish; it’s a vibe! Bursting with sweet-and-tangy flavors and a satisfying crunch, it’s perfect for lunch or as a vibrant side at dinner.
Imagine crunching into a crisp, juicy Honeycrisp apple, its natural sweetness dancing with the creamy, salty morsels of feta cheese, all mingling atop a bed of fresh mixed greens. Sounds divine, right? And let’s not forget the crunchy walnuts or pecans for that added texture and a drizzle of olive oil and balsamic vinegar that marries the flavors beautifully. Seriously, this salad is like a hug for your taste buds—light yet filling and oh-so-satisfying!
Now, let’s set the scene. Picture a sunlit kitchen, the aroma of fresh greens filling the air, and the excited chatter of friends gathered around the table. This salad isn’t just about the ingredients; it’s about the experience—the laughter and stories shared, the clinking of glasses, the joy of good food. So, grab your aprons, and let’s whip up a bowl of pure deliciousness!
A Taste of Nostalgia
Every time I make this Honeycrisp Apple and Feta Salad, I’m transported back to my childhood, wandering through the autumn farmer’s market with my grandmother. She’d always insist we pick the glossy, red Honeycrisp apples—the ones that looked like they were plucked straight from a fairy tale. Their crunch always reminded me of the excitement of autumn, with the leaves changing colors and the air getting that perfect chill.
One crisp Saturday, we decided to get adventurous and gather ingredients for a simple salad. We found fresh arugula and some feta cheese from a local dairy farmer. I remember snacking on the apples while we prepped, and the laughter as we tossed everything together became one of those cherished family moments. I can still see her mixing it all in a big bowl, her joy evident as we shared bites. That memory sticks with me, and now, as I create my own versions of this beloved dish, I’m reminded of how food can unite us and create lasting memories.
Ingredients
Let’s gather our ingredients and get ready to whip up some salad magic! Here’s what you’ll need:
-
Honeycrisp Apples (2)
Sweet, crisp, and juicy—Honeycrisp apples add a delightful crunch and natural sweetness to the salad. Not into Honeycrisps? Try Granny Smith for a tart kick or Fuji apples for another sweet option. -
Feta Cheese (1 cup, crumbled)
Creamy and briny, feta is the star that ties this dish together. If you’re looking for a vegan option, crumble some firm tofu and toss it in a little nutritional yeast for a cheesy flavor without dairy. -
Mixed Greens (4 cups, such as spinach and arugula)
Fresh greens form the salad’s base, providing essential nutrients and a lovely peppery kick from the arugula. You can swap in kale or romaine if you’re feeling adventurous! -
Walnuts or Pecans (½ cup, optional)
These nuts provide a delightful crunch. If you’re nut-free, sunflower seeds or pumpkin seeds can be a great alternative. -
Olive Oil (¼ cup)
A good-quality extra virgin olive oil enhances the salad’s flavor. You can use avocado oil for a milder taste or nut oil for a different dimension. -
Balsamic Vinegar (2 tablespoons)
This tangy addition balances the sweetness of the apples beautifully. For a different flavor profile, try apple cider vinegar or red wine vinegar. -
Salt and Pepper (to taste)
Essential for bringing out the flavors in all ingredients. Make sure to season generously, but always taste as you go!
Step-by-Step Instructions
Now that we’ve got our ingredients prepped, let’s bring this salad together. Follow along, and let’s create something magical!
Step 1: Prep the Apples
Begin by washing your Honeycrisp apples thoroughly. Slice them into thin wedges or bite-sized cubes—whatever suits your fancy. Chef’s tip: Leave the skin on! It adds color and additional nutrients.
Step 2: Prep the Greens
Next up, take your mixed greens and give them a nice rinse if they’re not pre-washed. Spin them in a salad spinner to remove excess water. We want those greens to be fresh and vibrant! Chef’s hack: You can mix and match greens—try adding some kale for added texture or some romaine for crunch!
Step 3: Crumble the Feta
Time to take that luscious feta cheese and crumble it into little pieces over your greens. Feel free to use your fingers—food is meant to be touched and enjoyed! Quick tip: If you let the feta come to room temperature before crumbling, it’ll be easier to break up.
Step 4: Add the Nuts
If you’re using nuts, now’s the time to toast them lightly in a dry skillet over medium heat for about 4-5 minutes until they are golden and fragrant. Toasting enhances their flavor immensely! If you prefer softer nuts, you can skip this step, but I highly recommend it!
Step 5: Assemble
In a large salad bowl, toss the greens, apple slices, and crumble feta together. Once combined, sprinkle the toasted nuts on top.
Step 6: Make the Dressing
In a small bowl, whisk together olive oil, balsamic vinegar, salt, and pepper to make your dressing. This step is where you can let your creativity shine—play with the proportions! Chef’s tip: If you love a bit of sweetness, add a teaspoon of honey or maple syrup to the dressing.
Step 7: Dress the Salad
Drizzle your homemade dressing over the salad and toss gently. You want the greens to be lightly coated, not drenched. Chef’s advice: Take a moment to taste and adjust the seasoning. Maybe it needs a little more salt, or perhaps a dash more balsamic?
Step 8: Serve
Now comes the best part—serving! To plate, simply scoop the salad onto individual plates or a large serving platter for sharing. Drizzle a bit more balsamic on top if you wish for a beautiful presentation.
Serving Suggestions
This Honeycrisp Apple and Feta Salad shines as a stand-alone meal, but it pairs beautifully with grilled chicken, fish, or even stuffed bell peppers for a hearty dinner. It also makes for an incredible side at BBQs, potlucks, or family gatherings. A light sprinkling of extra nuts or seeds right before serving adds that final touch of elegance!
Recipe Variations
Love experimenting in the kitchen? Here are a few creative twists to elevate your salad game further:
-
Add Roasted Vegetables: Toss in some roasted sweet potatoes or beets for added depth and flavor.
-
Add Fresh Herbs: Finely chop fresh mint or basil and mix it in for a refreshing herbal note.
-
Use Different Cheeses: Swap feta for goat cheese, blue cheese, or a vegan cheese alternative.
-
Sweeten it Up: Mix in some dried cranberries, raisins, or pomegranate seeds for bursts of sweetness.
-
Spice it Up: A sprinkle of cayenne or chili flakes can give the salad a surprising kick!
Chef’s Notes
This Honeycrisp Apple and Feta Salad has been a staple in my kitchen for years. Each time I make it, I find new ways to bring my personality into the mix. It’s evolved from a simple family recipe to a canvas for my creativity—whether that means experimenting with new nuts or dressing variations. People often forget that salads can be just as exciting as hearty meals.
On a funny note, I once borrowed my grandmother’s recipe, and in a moment of distraction, I accidentally combined the dressing with orange juice instead of balsamic vinegar. Let’s just say the reaction was memorable, and I quickly realized that cooking is all about adapting and finding joy—even in kitchen blunders!
FAQs and Troubleshooting
1. What if my salad wilts quickly?
To keep your salad fresh, keep the dressing separate until you’re ready to serve. Moisture can cause greens to wilt quickly!
2. How can I make this salad more filling?
Add protein! Grilled chicken, chickpeas, or even sliced hard-boiled eggs can make this salad a complete meal.
3. Can I make this ahead of time?
Absolutely! Make the salad ahead, but keep the dressing separate until just before serving for the best freshness.
4. What can I substitute for apples?
If you’re out of Honeycrisp apples or want a change, pears or even peaches can work beautifully in this salad, adding their unique sweetness!
Nutritional Info
This Honeycrisp Apple and Feta Salad is not only delicious but also packed with nutrients. Here’s a quick breakdown per serving (approximate values):
- Calories: 320
- Protein: 10g
- Fat: 22g (mostly healthy fats from olive oil and nuts)
- Carbohydrates: 30g
- Fiber: 5g
Enjoy this energizing, satisfying, and absolutely delicious salad! It’s not just food; it’s a celebration of flavor, fun, and all things fresh. Now, go ahead, get your hands dirty, and whip up this delightful dish! Don’t forget to share your own kitchen stories and variations in the comments below; I can’t wait to hear them! Happy cooking!
PrintHoneycrisp Apple and Feta Salad
A crisp and zesty salad featuring crunchy Honeycrisp apples, creamy feta, and fresh mixed greens, drizzled with olive oil and balsamic vinegar.
- Prep Time: 15 minutes
- Cook Time: 5 minutes
- Total Time: 20 minutes
- Yield: 4 servings
- Category: Salad
- Method: No-Cook
- Cuisine: American
- Diet: Vegetarian
Ingredients
- Honeycrisp Apples (2)
- Feta Cheese (1 cup, crumbled)
- Mixed Greens (4 cups, such as spinach and arugula)
- Walnuts or Pecans (½ cup, optional)
- Olive Oil (¼ cup)
- Balsamic Vinegar (2 tablespoons)
- Salt and Pepper (to taste)
Instructions
- Prep the Apples: Begin by washing your Honeycrisp apples thoroughly. Slice them into thin wedges or bite-sized cubes—whatever suits your fancy. Chef’s tip: Leave the skin on!
- Prep the Greens: Next up, take your mixed greens and give them a nice rinse if they’re not pre-washed. Spin them in a salad spinner to remove excess water.
- Crumble the Feta: Time to take that luscious feta cheese and crumble it into little pieces over your greens.
- Add the Nuts: If you’re using nuts, now’s the time to toast them lightly in a dry skillet over medium heat for about 4-5 minutes.
- Assemble: In a large salad bowl, toss the greens, apple slices, and crumbled feta together. Sprinkle the toasted nuts on top.
- Make the Dressing: In a small bowl, whisk together olive oil, balsamic vinegar, salt, and pepper.
- Dress the Salad: Drizzle your homemade dressing over the salad and toss gently.
- Serve: To plate, scoop the salad onto individual plates or a large serving platter.
Notes
Keep the dressing separate until serving to prevent wilting. Feel free to experiment with different nuts and add protein for a more filling meal.
Nutrition
- Serving Size: 1 serving
- Calories: 320
- Sugar: 15g
- Sodium: 250mg
- Fat: 22g
- Saturated Fat: 5g
- Unsaturated Fat: 14g
- Trans Fat: 0g
- Carbohydrates: 30g
- Fiber: 5g
- Protein: 10g
- Cholesterol: 15mg
Keywords: salad, healthy, Honeycrisp, feta, easy recipe