Honeycrisp Apple and Feta Salad
Honeycrisp Apple and Feta Salad: A Crisp and Zesty Delight
Hello, beautiful foodies! Welcome back to Clean Plate Cravings, your go-to spot for fresh, feel-good meals that make everyday cooking a total joy. Today, we’re diving into a dish that perfectly captures the essence of seasonal eating—the delightful Honeycrisp Apple and Feta Salad. Trust me; this salad is not just a side dish; it’s a vibe! Bursting with sweet-and-tangy flavors and a satisfying crunch, it’s perfect for lunch or as a vibrant side at dinner.
Imagine crunching into a crisp, juicy Honeycrisp apple, its natural sweetness dancing with the creamy, salty morsels of feta cheese, all mingling atop a bed of fresh mixed greens. Sounds divine, right? And let’s not forget the crunchy walnuts or pecans for that added texture and a drizzle of olive oil and balsamic vinegar that marries the flavors beautifully. Seriously, this salad is like a hug for your taste buds—light yet filling and oh-so-satisfying!
Now, let’s set the scene. Picture a sunlit kitchen, the aroma of fresh greens filling the air, and the excited chatter of friends gathered around the table. This salad isn’t just about the ingredients; it’s about the experience—the laughter and stories shared, the clinking of glasses, the joy of good food. So, grab your aprons, and let’s whip up a bowl of pure deliciousness!
A Taste of Nostalgia
Every time I make this Honeycrisp Apple and Feta Salad, I’m transported back to my childhood, wandering through the autumn farmer’s market with my grandmother. She’d always insist we pick the glossy, red Honeycrisp apples—the ones that looked like they were plucked straight from a fairy tale. Their crunch always reminded me of the excitement of autumn, with the leaves changing colors and the air getting that perfect chill.
One crisp Saturday, we decided to get adventurous and gather ingredients for a simple salad. We found fresh arugula and some feta cheese from a local dairy farmer. I remember snacking on the apples while we prepped, and the laughter as we tossed everything together became one of those cherished family moments. I can still see her mixing it all in a big bowl, her joy evident as we shared bites. That memory sticks with me, and now, as I create my own versions of this beloved dish, I’m reminded of how food can unite us and create lasting memories.
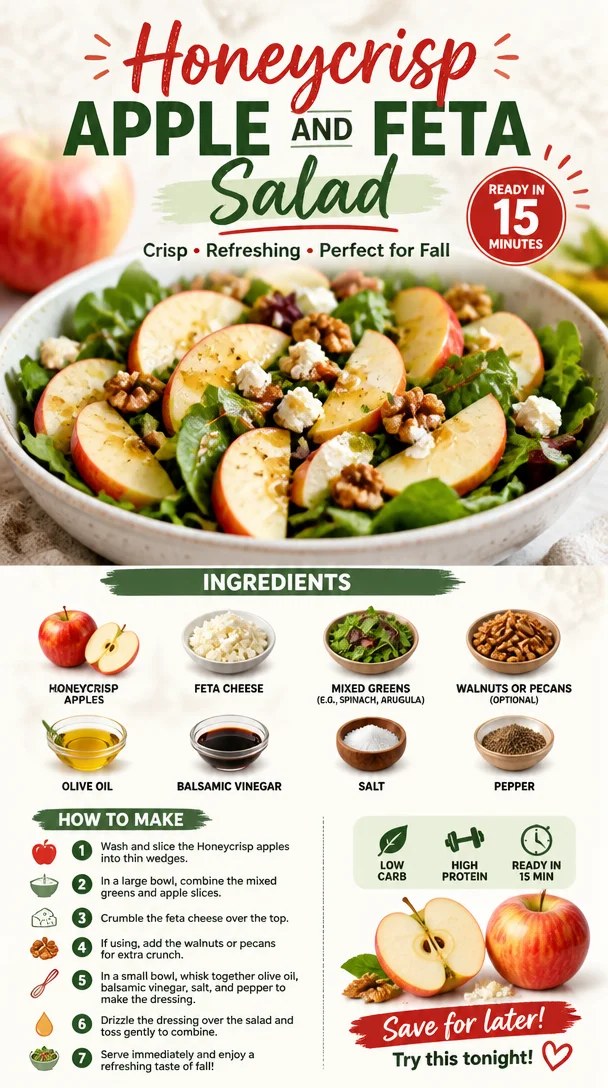
Ingredients
Let’s gather our ingredients and get ready to whip up some salad magic! Here’s what you’ll need:
-
Honeycrisp Apples (2)
Sweet, crisp, and juicy—Honeycrisp apples add a delightful crunch and natural sweetness to the salad. Not into Honeycrisps? Try Granny Smith for a tart kick or Fuji apples for another sweet option. -
Feta Cheese (1 cup, crumbled)
Creamy and briny, feta is the star that ties this dish together. If you’re looking for a vegan option, crumble some firm tofu and toss it in a little nutritional yeast for a cheesy flavor without dairy. -
Mixed Greens (4 cups, such as spinach and arugula)
Fresh greens form the salad’s base, providing essential nutrients and a lovely peppery kick from the arugula. You can swap in kale or romaine if you’re feeling adventurous! -
Walnuts or Pecans (½ cup, optional)
These nuts provide a delightful crunch. If you’re nut-free, sunflower seeds or pumpkin seeds can be a great alternative. -
Olive Oil (¼ cup)
A good-quality extra virgin olive oil enhances the salad’s flavor. You can use avocado oil for a milder taste or nut oil for a different dimension. -
Balsamic Vinegar (2 tablespoons)
This tangy addition balances the sweetness of the apples beautifully. For a different flavor profile, try apple cider vinegar or red wine vinegar. -
Salt and Pepper (to taste)
Essential for bringing out the flavors in all ingredients. Make sure to season generously, but always taste as you go!
Step-by-Step Instructions
Now that we’ve got our ingredients prepped, let’s bring this salad together. Follow along, and let’s create something magical!
Step 1: Prep the Apples
Begin by washing your Honeycrisp apples thoroughly. Slice them into thin wedges or bite-sized cubes—whatever suits your fancy. Chef’s tip: Leave the skin on! It adds color and additional nutrients.
Step 2: Prep the Greens
Next up, take your mixed greens and give them a nice rinse if they’re not pre-washed. Spin them in a salad spinner to remove excess water. We want those greens to be fresh and vibrant! Chef’s hack: You can mix and match greens—try adding some kale for added texture or some romaine for crunch!
Step 3: Crumble the Feta
Time to take that luscious feta cheese and crumble it into little pieces over your greens. Feel free to use your fingers—food is meant to be touched and enjoyed! Quick tip: If you let the feta come to room temperature before crumbling, it’ll be easier to break up.
Step 4: Add the Nuts
If you’re using nuts, now’s the time to toast them lightly in a dry skillet over medium heat for about 4-5 minutes until they are golden and fragrant. Toasting enhances their flavor immensely! If you prefer softer nuts, you can skip this step, but I highly recommend it!
Step 5: Assemble
In a large salad bowl, toss the greens, apple slices, and crumble feta together. Once combined, sprinkle the toasted nuts on top.
Step 6: Make the Dressing
In a small bowl, whisk together olive oil, balsamic vinegar, salt, and pepper to make your dressing. This step is where you can let your creativity shine—play with the proportions! Chef’s tip: If you love a bit of sweetness, add a teaspoon of honey or maple syrup to the dressing.
Step 7: Dress the Salad
Drizzle your homemade dressing over the salad and toss gently. You want the greens to be lightly coated, not drenched. Chef’s advice: Take a moment to taste and adjust the seasoning. Maybe it needs a little more salt, or perhaps a dash more balsamic?
Step 8: Serve
Now comes the best part—serving! To plate, simply scoop the salad onto individual plates or a large serving platter for sharing. Drizzle a bit more balsamic on top if you wish for a beautiful presentation.
Serving Suggestions
This Honeycrisp Apple and Feta Salad shines as a stand-alone meal, but it pairs beautifully with grilled chicken, fish, or even stuffed bell peppers for a hearty dinner. It also makes for an incredible side at BBQs, potlucks, or family gatherings. A light sprinkling of extra nuts or seeds right before serving adds that final touch of elegance!
Recipe Variations
Love experimenting in the kitchen? Here are a few creative twists to elevate your salad game further:
-
Add Roasted Vegetables: Toss in some roasted sweet potatoes or beets for added depth and flavor.
-
Add Fresh Herbs: Finely chop fresh mint or basil and mix it in for a refreshing herbal note.
-
Use Different Cheeses: Swap feta for goat cheese, blue cheese, or a vegan cheese alternative.
-
Sweeten it Up: Mix in some dried cranberries, raisins, or pomegranate seeds for bursts of sweetness.
-
Spice it Up: A sprinkle of cayenne or chili flakes can give the salad a surprising kick!
Chef’s Notes
This Honeycrisp Apple and Feta Salad has been a staple in my kitchen for years. Each time I make it, I find new ways to bring my personality into the mix. It’s evolved from a simple family recipe to a canvas for my creativity—whether that means experimenting with new nuts or dressing variations. People often forget that salads can be just as exciting as hearty meals.
On a funny note, I once borrowed my grandmother’s recipe, and in a moment of distraction, I accidentally combined the dressing with orange juice instead of balsamic vinegar. Let’s just say the reaction was memorable, and I quickly realized that cooking is all about adapting and finding joy—even in kitchen blunders!
FAQs and Troubleshooting
1. What if my salad wilts quickly?
To keep your salad fresh, keep the dressing separate until you’re ready to serve. Moisture can cause greens to wilt quickly!
2. How can I make this salad more filling?
Add protein! Grilled chicken, chickpeas, or even sliced hard-boiled eggs can make this salad a complete meal.
3. Can I make this ahead of time?
Absolutely! Make the salad ahead, but keep the dressing separate until just before serving for the best freshness.
4. What can I substitute for apples?
If you’re out of Honeycrisp apples or want a change, pears or even peaches can work beautifully in this salad, adding their unique sweetness!
Nutritional Info
This Honeycrisp Apple and Feta Salad is not only delicious but also packed with nutrients. Here’s a quick breakdown per serving (approximate values):
- Calories: 320
- Protein: 10g
- Fat: 22g (mostly healthy fats from olive oil and nuts)
- Carbohydrates: 30g
- Fiber: 5g
Enjoy this energizing, satisfying, and absolutely delicious salad! It’s not just food; it’s a celebration of flavor, fun, and all things fresh. Now, go ahead, get your hands dirty, and whip up this delightful dish! Don’t forget to share your own kitchen stories and variations in the comments below; I can’t wait to hear them! Happy cooking!
PrintHoneycrisp Apple and Feta Salad
A crisp and zesty salad featuring crunchy Honeycrisp apples, creamy feta, and fresh mixed greens, drizzled with olive oil and balsamic vinegar.
- Prep Time: 15 minutes
- Cook Time: 5 minutes
- Total Time: 20 minutes
- Yield: 4 servings
- Category: Salad
- Method: No-Cook
- Cuisine: American
- Diet: Vegetarian
Ingredients
- Honeycrisp Apples (2)
- Feta Cheese (1 cup, crumbled)
- Mixed Greens (4 cups, such as spinach and arugula)
- Walnuts or Pecans (½ cup, optional)
- Olive Oil (¼ cup)
- Balsamic Vinegar (2 tablespoons)
- Salt and Pepper (to taste)
Instructions
- Prep the Apples: Begin by washing your Honeycrisp apples thoroughly. Slice them into thin wedges or bite-sized cubes—whatever suits your fancy. Chef’s tip: Leave the skin on!
- Prep the Greens: Next up, take your mixed greens and give them a nice rinse if they’re not pre-washed. Spin them in a salad spinner to remove excess water.
- Crumble the Feta: Time to take that luscious feta cheese and crumble it into little pieces over your greens.
- Add the Nuts: If you’re using nuts, now’s the time to toast them lightly in a dry skillet over medium heat for about 4-5 minutes.
- Assemble: In a large salad bowl, toss the greens, apple slices, and crumbled feta together. Sprinkle the toasted nuts on top.
- Make the Dressing: In a small bowl, whisk together olive oil, balsamic vinegar, salt, and pepper.
- Dress the Salad: Drizzle your homemade dressing over the salad and toss gently.
- Serve: To plate, scoop the salad onto individual plates or a large serving platter.
Notes
Keep the dressing separate until serving to prevent wilting. Feel free to experiment with different nuts and add protein for a more filling meal.
Nutrition
- Serving Size: 1 serving
- Calories: 320
- Sugar: 15g
- Sodium: 250mg
- Fat: 22g
- Saturated Fat: 5g
- Unsaturated Fat: 14g
- Trans Fat: 0g
- Carbohydrates: 30g
- Fiber: 5g
- Protein: 10g
- Cholesterol: 15mg
Keywords: salad, healthy, Honeycrisp, feta, easy recipe
Mango Salad with Lime Dressing: An Incredible Ultimate Recipe
Mango Salad with Lime Dressing: An Incredible Ultimate Recipe
Welcome to Clean Plate Cravings, where today we’re diving headfirst into the vibrant world of a Mango Salad with Lime Dressing! Picture this: the sun is shining, the breeze is light, and you’re enjoying a dish that’s as refreshing as a summer day. Filled with bright, tropical flavors that will make your taste buds dance, this salad is perfect for any occasion. Whether it’s a family barbecue, a picnic in the park, or a simple weeknight dinner, this salad packs a punch of flavor with every bite.
There’s something so magical about a good mango salad, don’t you think? The combination of sweet mango, crunchy bell peppers, and zesty lime dressing creates a fiesta in your mouth, making you forget about the world’s troubles, at least for a little while. It’s not just a side dish; it’s a star player meant to brighten up your day!
Let me tell you, I have a soft spot for mango salads. During my childhood summers, my family would unite at my grandma’s house for big gatherings. And without fail, there’d be a huge bowl of mango salad that dictated the mood of the day. Kids would run around chasing each other, while the adults gathered around the table, laughing and reminiscing. It was bliss. And the best part? The sweet aroma of ripe mangoes mixed with the lime and cilantro was nothing short of sublime.
As I grew older and started dabbling in the kitchen, I was determined to recreate that feeling. I’d start experimenting with different flavors and ingredients, all while trying to bottle up the essence of those carefree summer afternoons. Over the years, this mango salad has become a staple, evolving with my culinary journey, and I’m thrilled to share my ultimate version with you today!
So grab your apron, unleash your inner culinary wizard, and let’s whip up this simple, yet incredible mango salad that will leave you and your guests craving more!
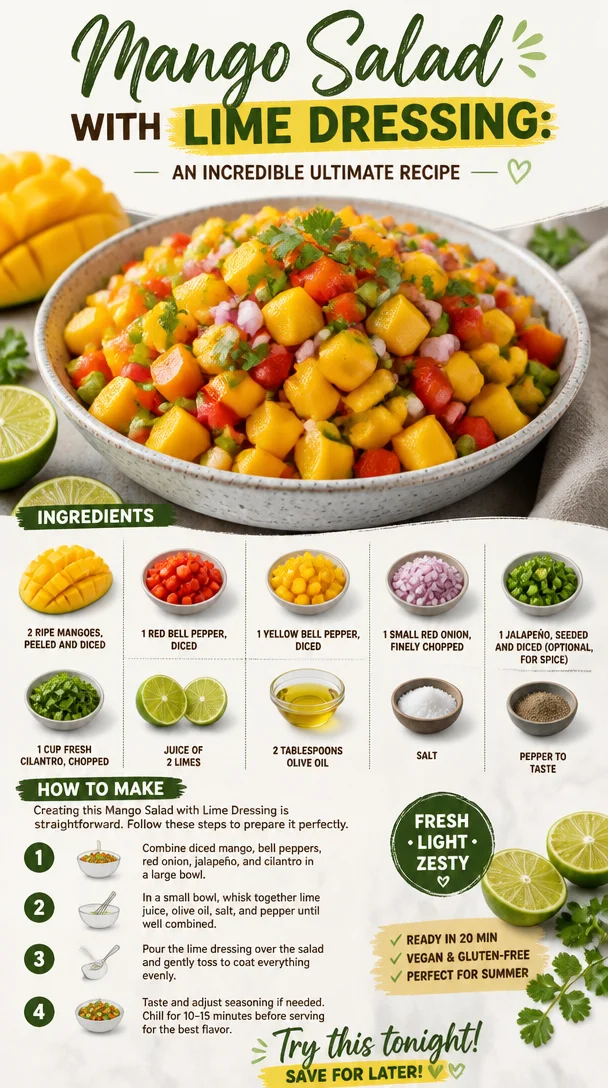
Ingredients
-
2 ripe mangoes, peeled and diced
The star of our show! Choose mangoes that are slightly soft to the touch for optimal sweetness and flavor. If mangoes aren’t in season, you could use diced pineapple as a substitute for a similar tropical vibe. -
1 red bell pepper, diced
This adds a lovely crunch and sweetness to the salad. If you’re in the mood for a bit more heat, you can swap it with a spicier variety, like a poblano pepper. -
1 yellow bell pepper, diced
The yellow pepper is not just for aesthetics; it brings an additional layer of sweetness. Feel free to use whatever color bell pepper you prefer—green, orange, or even a mix! -
1 small red onion, finely chopped
This adds a wonderful zing. For a milder flavor, soak the chopped onion in cold water for a few minutes before adding it to the salad to tone down its sharpness. -
1 jalapeño, seeded and diced (optional, for spice)
A little kick! If you’re not a fan of spice, feel free to leave this out, or substitute with a pinch of cayenne pepper for a gentler warmth. -
1 cup fresh cilantro, chopped
Fresh cilantro brightens the whole dish; its herbs lend a refreshing note. If you’re not a fan of cilantro, you can use fresh parsley or basil as a substitute. -
Juice of 2 limes
The acidic punch from the lime balances out the sweetness of the mangoes beautifully. If limes aren’t available, freshly squeezed lemon juice works just fine too! -
2 tablespoons olive oil
The oil helps to bring everything together, providing richness to the dressing. For a twist, swap it for avocado oil or sesame oil. -
Salt and pepper to taste
Basic, but essential! The right seasonings enhance the vibrant flavors of the salad.
Step-by-Step Instructions
-
Prepare your ingredients.
Start by washing all your fresh produce under cold water. Peel the mangoes and chop them into bite-sized cubes. Use a sharp knife for clean cuts, and make sure to cut around the pit, as it can be tricky to navigate. When you’re chomping down, you want all your ingredients to be effortless to eat. -
Dice those bell peppers.
Grab your red and yellow bell peppers. Slice them in half, remove the seeds, and then chop them into similar-sized pieces as your mangoes. This way, every bite will be harmonious! -
Chop the red onion.
Take your small red onion and finely chop it. It’s best if the pieces are as small as possible so they don’t overwhelm the other flavors. And remember, if the scent of raw onion sends you running, soaking it in cold water for a few minutes can help reduce its intensity. Drain before adding to the salad. -
Handle the heat. (Optional)
If you’re including jalapeño for a kick, carefully slice it in half and remove the seeds (unless you want to unleash the heat!). Dice it finely. If you prefer a milder option, just stick with bell peppers. -
Toss in the herbs.
Next, chop up a cup of fresh cilantro. You’ll want to include both the leaves and the tender stems, as they’re packed with flavor. -
Make the dressing.
In a small bowl, whisk together the lime juice, olive oil, salt, and pepper. You want to achieve a well-balanced dressing that’s tangy but not overpowering. Adjust according to your taste; if you like it a bit sweeter, add a teaspoon of honey or agave syrup. -
Combine everything.
In a large mixing bowl, combine the diced mangoes, bell peppers, red onion, jalapeño, and cilantro. Now, pour over your lime dressing. Using a spatula or large spoon, gently toss everything together, making sure every piece is coated. Taste and adjust seasoning if necessary! -
Chill for a bit.
Let the salad sit for about 15 to 30 minutes. This allows the flavors to meld beautifully, giving it that ideal zesty flavor. Trust me: it’s worth the wait!
Serving Suggestions
When you’re ready to serve, dish out generous portions into colorful bowls. For an added touch, you can sprinkle more cilantro on top or even throw in some extra lime wedges for that visual flair. Not only does this make for a beautiful presentation, but it also invites guests to customize their own dish with a bit more zesty lime if they wish. Enjoy!
Recipe Variations
- Tropical Twist: Add diced avocado for a creamy texture that complements the sweetness of the mango.
- Protein-Packed: Toss in grilled chicken or shrimp for a heartier main dish.
- Nutty Crunch: A handful of roasted peanuts or cashews can add a delightful crunch and depth of flavor.
- Sweet & Spicy: Mix in a tablespoon or two of diced jalapeños with mango chutney for a sweet and spicy version.
- Quinoa Base: Serve the salad over a bed of fluffy quinoa for a nutritious and filling option.
Chef’s Notes
Every time I make this mango salad, I’m transported back to those sun-soaked summer days with my family. It’s funny—what started as just a summer dish has become my go-to for every season and occasion. The beauty of this salad is how it adapts. One day, I might toss in some black beans and corn for a Mexican twist, and the next, I’m serving it alongside grilled fish or tacos.
So here’s a little chef hack: If you want to take your mango salad to the next level, grill the mangoes for a few minutes. The smoky flavor adds a fantastic depth that’s absolutely insane.
FAQs and Troubleshooting
Q: My mangoes are too hard. Can I still use them?
A: Definitely! Just dice them and let them sit in a bit of lime juice for 10 minutes. This will soften them a tad.
Q: How do I keep my avocado from browning?
A: If adding avocado, squeeze a little extra lime juice on it right before serving to keep it fresh and green!
Q: Can I make this salad ahead of time?
A: While you can prep all the ingredients and store them separately for a few days, I recommend combining them just an hour or so before serving to keep everything fresh and crunchy.
Q: What can I do if my salad is too salty?
A: If it turned out too salty, add a little more diced mango or bell pepper to balance it out.
Nutritional Info
While I usually encourage you to focus more on flavor than numbers, if you’re curious, here’s a quick rundown per serving (based on a 4-serving yield):
- Calories: 150
- Protein: 2g
- Carbohydrates: 20g
- Fiber: 4g
- Fats: 7g
There you have it! A refreshing Mango Salad with Lime Dressing that’s bursting with flavor, nostalgia, and pure joy. Remember, it’s about keeping things simple yet satisfying. Enjoy making this salad as much as I enjoyed sharing my story and recipe with you! Happy cooking, my foodie friend! 🍽️
PrintMango Salad with Lime Dressing

A refreshing mango salad with zesty lime dressing, perfect for any occasion.
- Prep Time: 15 minutes
- Cook Time: 0 minutes
- Total Time: 15 minutes
- Yield: 4 servings 1x
- Category: Salad
- Method: No Cooking
- Cuisine: Tropical
- Diet: Vegan
Ingredients
- 2 ripe mangoes, peeled and diced
- 1 red bell pepper, diced
- 1 yellow bell pepper, diced
- 1 small red onion, finely chopped
- 1 jalapeño, seeded and diced (optional)
- 1 cup fresh cilantro, chopped
- Juice of 2 limes
- 2 tablespoons olive oil
- Salt and pepper to taste
Instructions
- Prepare your ingredients.
- Dice those bell peppers.
- Chop the red onion.
- Handle the heat. (Optional)
- Toss in the herbs.
- Make the dressing.
- Combine everything.
- Chill for a bit.
Notes
Enjoy the salad with additional lime wedges and cilantro for a vibrant presentation.
Nutrition
- Serving Size: 1 serving
- Calories: 150
- Sugar: 14g
- Sodium: 150mg
- Fat: 7g
- Saturated Fat: 1g
- Unsaturated Fat: 6g
- Trans Fat: 0g
- Carbohydrates: 20g
- Fiber: 4g
- Protein: 2g
- Cholesterol: 0mg
Keywords: mango salad, lime dressing, refreshing salad, tropical flavors, summer dish
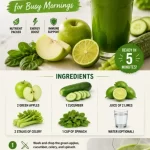
Healthy Green Juice in 5 Minutes for Busy Mornings
Refreshing Green Juice: Your Go-To Guide for a Vibrant Start
Welcome to Clean Plate Cravings, where we’re all about fresh, feel-good food that makes life a tad brighter! Today, I’m going to take you on a juicy journey as we whip up a Refreshing Green Juice. This isn’t just any juice; it’s a delightful blend of crisp green apples, hydrating cucumber, zesty lime, and nutrient-packed greens that not only tastes incredible but also gives you a vibrant boost to kickstart your day!
There’s something about a glass of green juice that feels like a fresh breath of air. Whether you’re easing into a warm summer morning or looking to perk up on that sluggish afternoon, this juice is your perfect companion. It’s like a mini-vacation in a glass, and I’m thrilled to share my recipe with you.
Juicing has become a beloved ritual in my kitchen, rooted in a love for wholesome ingredients and vibrant flavor. I remember the first time I tried fresh green juice at a local café; I was immediately hooked! The refreshing mix of flavors just danced on my taste buds, and I couldn’t wait to replicate it at home. With my trusty juicer by my side, I began experimenting with different fruits and veggies, landing on this winning combination that we’re diving into today.
So, grab your juicer, and let’s get started! Trust me, you’ll fall in love with how easy and satisfying it is to create this beautiful concoction right in your own kitchen.
A Little Backstory on the Green Juice Love Affair
Growing up, my mornings were filled with the exhilarating smell of freshly brewed coffee and the sweet aroma of fruits from our garden. My mom had a knack for blending flavors, and she often handed me a glass of her famous green juice to kickstart my day. The memory of her standing by the juicer, with her hair pulled back and a big smile on her face, always brings a wave of nostalgia. I’d watch the vibrant green liquid flow into the glass, and I’d eagerly take my first sip, feeling the burst of freshness wash over me.
Years later, in my own kitchen, I still embrace those sunny mornings, but I’ve added my own twist. This Refreshing Green Juice has evolved from my childhood memories into a go-to recipe that my friends and family adore. It’s not just a drink; it’s a celebration of the simple pleasures in life — a reminder to nourish ourselves while enjoying every last drop!
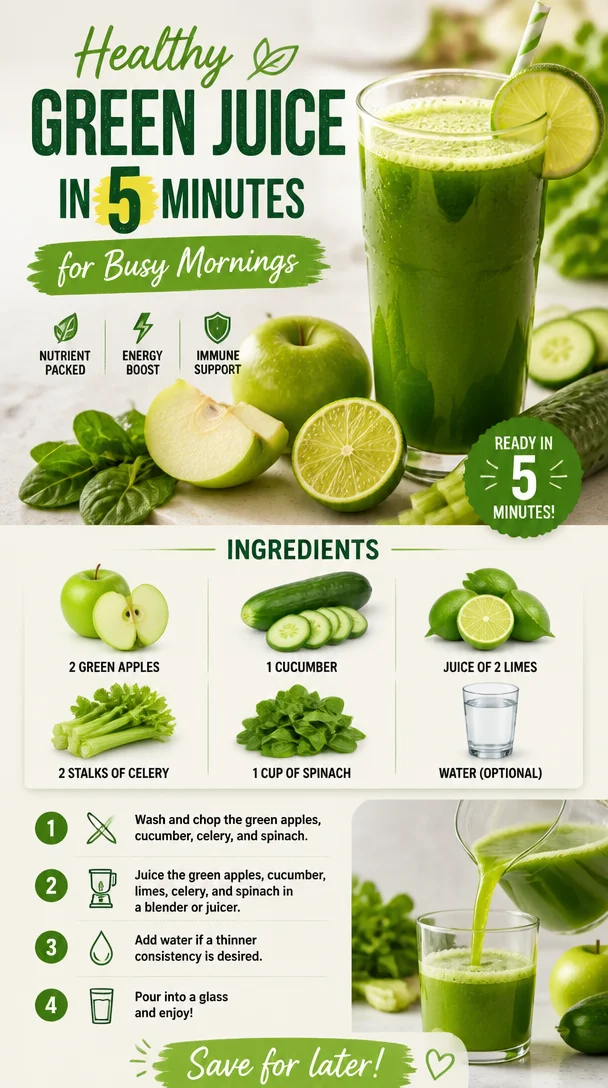
Ingredients: What You’ll Need
Let’s talk about the star players in this refreshing concoction! Here’s what you’ll need:
-
2 Green Apples
These juicy gems provide natural sweetness and a hint of tartness, balancing out the savory flavors in our juice. If you prefer less sweetness, Granny Smith apples work beautifully as a substitute. -
1 Cucumber
Hydrating and refreshing, cucumbers are an essential ingredient to keep this juice light and crisp. You can swap this out for zucchini if you’re in a pinch! -
Juice of 2 Limes
Fresh lime juice adds a pop of acidity that elevates flavors. If limes are out of season, you can use lemons for a similar tang. -
2 Stalks of Celery
Celery is not only packed with vitamins but also brings a subtle saltiness that rounds out our juice perfectly. Feel free to replace this with fennel for a different flavor profile! -
1 Cup of Spinach
Leafy greens are a powerhouse of nutrition, and spinach provides a mild, pleasant taste. You can switch things up with kale for a bolder flavor or if you’re looking for extra nutrients. -
Water (Optional)
Add a touch of water if you prefer a thinner consistency. Use coconut water for a tropical twist or add ice for a chilled refreshment!
Step-by-Step Instructions: Let’s Get Juicing!
Step 1: Prepare Your Ingredients
First things first, let’s prep those delightful ingredients! Rinse the apples and cucumber thoroughly to remove any pesticides or dirt. Core the apples, but you can leave the skin on—it adds extra nutrients and color. For the cucumber, slice it in half lengthwise and chop it into manageable pieces. Don’t forget to wash the spinach, too; we want everything nice and clean!
Step 2: Juicing Time
Next, it’s time to unveil your juicer’s magic! Start by feeding the apples into the juicer; if your juicer has different settings, use the slower one for a better yield of juice. Watch that gorgeous apple juice flow!
Step 3: Add the Veggies
Now, toss in the cucumber and celery. I like to alternate fruits and vegetables while juicing; it really helps to blend those flavors. You may want to use a tamping tool if your juicer comes with one to push down the tougher celery stalks.
Step 4: Infuse Citrus Goodness
Once you’ve juiced the apples, cucumber, and celery, it’s time to squeeze in the fresh lime juice. You can use a citrus juicer to get every last drop. Don’t skip this step! The zesty lime elevates your juice to a whole new level.
Step 5: Add Spinach
Finally, gently feed in the spinach leaves. I recommend doing this last because it blends beautifully. If you’re struggling with your juicer’s output, try massaging the spinach leaves a bit to release those essential juices.
Step 6: Blend It All Together
Now, if you like a finer consistency, you can pour your juice through a fine-mesh sieve or cheesecloth. But if you enjoy the fiber, feel free to skip that step! You can adjust the thickness of your juice by adding a bit of water if desired.
Step 7: Taste and Adjust
Give your green juice a taste! Are you feeling adventurous? Add more lime juice for tartness or a touch of honey if you want it sweeter. Remember, this is all about your personal taste!
Step 8: Serve and Enjoy!
Pour your vibrant juice into a glass, garnish it with a slice of lime or a sprig of mint, and take a moment to admire that gorgeous green shade. You’ve earned it! Sip slowly and embrace that refreshing flavor.
Serving Suggestions
To really make this green juice shine, serve it in a tall, chilled glass. You can add some ice cubes for an extra refreshing kick, or even garnish with a slice of cucumber on the rim or a sprig of fresh mint. Not only does it look fantastic, but it also makes your drink a refreshing oasis, inviting for anyone looking for a pick-me-up!
Recipe Variations: Get Creative!
-
Add a Twist of Fruit: Experiment with adding a small piece of ginger or a dash of fresh pineapple for a tropical flair.
-
Herb It Up: Try tossing in a few fresh mint or basil leaves for an aromatic touch! They’ll provide a refreshing surprise with each sip.
-
Superfood Boost: Add a tablespoon of chia seeds or flaxseeds for an extra nutritional punch and heartiness.
-
Mix the Greens: Substitute spinach with kale or swiss chard for a bolder flavor and added health benefits.
-
Make It a Smoothie: Blend in half a ripe banana or a scoop of Greek yogurt for a more filling, smoothie-style drink!
Chef’s Notes
Ah, the journey of discovering the perfect green juice concoction! It’s been a delightful adventure over the years, often accompanied by trial and error. I remember once I went a bit overboard with ginger—it had me buzzing like I just downed a shot of espresso! But those moments make the kitchen such a joyous environment, filled with laughter and learning.
This recipe has evolved over time to fit the tastes of my family and friends. Each person seems to want their own spin on it, which is precisely why I love sharing it! Feel free to play around and make this your own—even switch up the greens based on what’s in season.
FAQs and Troubleshooting
Q: How can I store leftover green juice?
A: Green juice is best enjoyed fresh, but if you have leftovers, store it in an airtight glass container in the fridge and consume it within 24 hours for optimal freshness.
Q: Can I use a blender instead of a juicer?
A: Absolutely! Just blend all the ingredients with a cup of water until smooth. Then, strain the mixture through a fine-mesh sieve or cheesecloth to remove the pulp if desired.
Q: What can I do if my juice is too thick?
A: Simply add a little more water until you reach your desired consistency!
Q: Is it safe to juice fruit and vegetables together?
A: Yes, juicing fruit and vegetables together is perfectly safe and enhances the flavor profile of your juice. Just make sure all ingredients are washed thoroughly!
Nutritional Information
While I’ve not broken down the precise nutritional info here, you can expect this Refreshing Green Juice to be rich in vitamins A, C, and K. It’s low in calories but high in hydration; a perfect way to revitalize your body with fresh nutrients!
And there you have it—the ultimate guide to crafting a Refreshing Green Juice that’s as delightful to the taste buds as it is to the eyes! I hope you enjoy this vibrant drink as much as I do. Remember, cooking and juicing is all about having fun, experimenting, and finding joy in every sip. Cheers to your health and happy juicing, my friends!
PrintRefreshing Green Juice
A vibrant blend of green apples, cucumber, lime, and spinach for a refreshing start to your day.
- Prep Time: 10 minutes
- Cook Time: 0 minutes
- Total Time: 10 minutes
- Yield: 2 servings 1x
- Category: Beverage
- Method: Juicing
- Cuisine: American
- Diet: Vegetarian
Ingredients
- 2 Green Apples
- 1 Cucumber
- Juice of 2 Limes
- 2 Stalks of Celery
- 1 Cup of Spinach
- Water (Optional)
Instructions
- Prepare Your Ingredients
- Juicing Time
- Add the Veggies
- Infuse Citrus Goodness
- Add Spinach
- Blend It All Together
- Taste and Adjust
- Serve and Enjoy!
Notes
Serve chilled with ice or garnished with a sprig of mint or cucumber slice for a refreshing touch.
Nutrition
- Serving Size: 1 serving
- Calories: 150
- Sugar: 20g
- Sodium: 100mg
- Fat: 0g
- Saturated Fat: 0g
- Unsaturated Fat: 0g
- Trans Fat: 0g
- Carbohydrates: 37g
- Fiber: 3g
- Protein: 2g
- Cholesterol: 0mg
Keywords: green juice, refreshing drink, healthy beverage, juice recipe
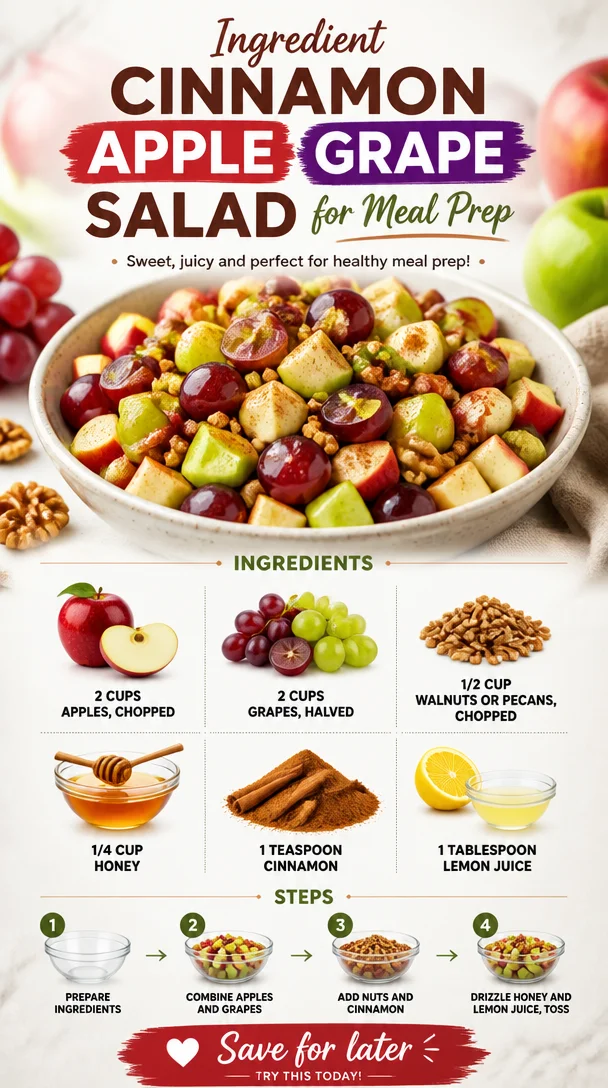
Ingredient Cinnamon Apple Grape Salad for Meal Prep
Discovering the Delight of Cinnamon Apple Grape Salad
Welcome, food lovers! Today, we’re diving into a dish that brings together freshness, sweetness, and a sprinkle of nostalgia—Cinnamon Apple Grape Salad. This vibrant salad is not just a treat for your taste buds; it’s also a celebration of colorful ingredients that make you feel good inside and out. Whether you’re serving it as a refreshing side at a gathering or enjoying it solo as a light lunch, this salad is sure to impress.
Let me share a little secret about myself: I’ve been in love with the marriage of fruits and nuts for as long as I can remember. Growing up, my grandmother would whip up delightful fruit salads during family gatherings. The kitchen would fill with laughter and the sweet aroma of fruit while she tossed together colorful ingredients. There was always a magic moment when she added just the right amount of cinnamon, turning a simple dish into something extraordinary. Fast forward to today, and I’m thrilled to share my own version of this delightful childhood memory with you!
In this Cinnamon Apple Grape Salad, the crunchiness of fresh apples meets the juiciness of grapes, while the warmth of cinnamon adds that cozy feel-good factor. Toss in some walnuts or pecans for a satisfying crunch, and honey for a touch of natural sweetness, and you’re looking at a dish that’s not only good but simply irresistible.
So roll up your sleeves, grab your favorite cutting board, and join me as we create this wholesome delight together. It’s time to transform your kitchen into a hub of flavor, joy, and nourishment!
A Taste of Nostalgia
One of my fondest kitchen memories was spending weekends at my grandmother’s house, where the sun would shine through the kitchen window and illuminate the vibrant colors of her bowls filled with fruits. She was a true artist, always experimenting with different combinations of ingredients. I vividly remember the day she made her infamous fruit salad with a secret twist: a generous sprinkling of cinnamon that instantly elevated the dish.
As we gathered around the table, she would proudly present it, and everyone dove in with laughter and stories flowing just as freely as the deliciousness. It was not just about the food; it was about the joy of sharing, the love infused into every bite, and the sense of community we felt while enjoying her creations.
It’s this spirit of togetherness and joy that inspires me to recreate her beloved recipe with my own twist. Each time I prepare this Cinnamon Apple Grape Salad, I’m transported back to those warm kitchen memories, and I invite you to do the same. Let’s celebrate the simple pleasures of good food and the beautiful memories they bring to our lives.
Ingredients
Here’s what you’ll need to whip up this delightful salad:
-
2 cups apples, chopped
Use your favorite variety—Granny Smith for tartness or Fuji for sweetness! Apples add crunch and freshness to the salad. If you’re short on apples, pears make for a fabulous substitution. -
2 cups grapes, halved
Red, green, or a mix? The choice is yours! Grapes not only provide natural sweetness but also a juicy burst that perfectly balances the dish. No grapes? Try using diced kiwi or berries as tasty alternatives. -
1/2 cup walnuts or pecans, chopped
Nuts add a delightful crunch and healthy fats to the salad. Toast them lightly to enhance their flavor! If you’re nut-free, pumpkin seeds are a fantastic substitute. -
1/4 cup honey
This natural sweetener ties the salad together and adds a lovely gloss. If you’re vegan, swap it out for agave syrup or maple syrup to keep things sweet and sticky. -
1 teaspoon cinnamon
Our secret ingredient! It brings warmth and coziness to the dish. Cardamom or nutmeg can be used for a different yet equally delightful flavor profile. -
1 tablespoon lemon juice
A splash of acidity helps brighten the flavors and keeps your apples from browning. Lime juice works too if you prefer a twist!
Step-by-Step Instructions
Let’s get cooking! Follow these detailed steps to create your own bowl of joy.
-
Prep Your Ingredients:
Start by washing your apples and grapes thoroughly. I always find joy in this initial step; it feels like a clean slate for the deliciousness to come! Chop the apples into bite-sized pieces—aim for about 1-inch cubes. Halve the grapes and set aside. -
Toast Your Nuts:
In a small skillet over medium heat, add your chopped walnuts or pecans. Toast for about 4–5 minutes, stirring frequently until they’re golden and aromatic. Trust me, toasting nuts brings out their nutty flavor and makes them even more delightful. Just keep an eye on them, or they might go from perfectly toasted to burnt in a flash! -
Mix the Dressing:
In a mixing bowl, combine honey, cinnamon, and lemon juice. Whisk until smoothly blended. This dressing is light yet flavorful and coats the fruits beautifully. On particularly busy days, this step is a lifesaver because it can be made ahead of time! -
Combine the Fruits:
In a large serving bowl, combine the chopped apples and halved grapes. Gently fold in the toasted nuts to save that precious crunch. It’s all about balance—each ingredient should be represented in every scoop! -
Dress the Salad:
Pour the dressing over the fruits and nuts, then toss gently to coat. I love to use a wooden spoon for this; it feels rustic and inviting. Take a moment to appreciate the transformation happening in your bowl—vibrant colors and aromas dancing together! -
Chill and Serve:
For the best taste experience, let the salad chill in the refrigerator for about 30 minutes before serving. This allows the flavors to meld beautifully. If you’re in a hurry, serve immediately; I promise, it’ll still be delightful!
Congratulations, you’ve just made a delicious Cinnamon Apple Grape Salad that’s perfect for any occasion!
Serving Suggestions
When it comes to plating, keep it playful! Use a large salad bowl for sharing or individual serving bowls for a more personal touch. Consider garnishing with a sprinkle of additional cinnamon or a few extra nuts for that lovely textured look. Fresh mint leaves can add a pop of color and freshness as well!
This salad would make a beautiful addition to a brunch spread, a summer picnic, or even a light dessert after a heavy meal. Feel free to get creative with presentation—a colorful table is always a feast for the eyes!
Recipe Variations
Looking for some fun tweaks? Here are a few variations on this recipe that will keep things exciting:
-
Add Cheese: Crumbled feta or goat cheese can introduce a tangy flavor that complements the sweetness of the fruits excellently.
-
Yogurt Bliss: Swirl in some Greek yogurt for creaminess. It makes a yummy base for a breakfast parfait!
-
Add Spices: Spice things up by adding a pinch of nutmeg or a dash of vanilla extract to the dressing for an aromatic twist.
-
Add Citrus: Incorporate orange segments or mandarin slices for extra sweetness and flavor complexity.
-
Make it Trail Mix: Turn this salad into a portable snack by tossing all the ingredients into a bag and taking it on the go!
Chef’s Notes
As with many of my recipes, this one has evolved over the years. The original idea came from my grandmother, but experimenting with different nuts and fruits has allowed me to create new versions that I love just as much. There was even a summer when I got adventurous and tried adding sliced strawberries! While that iteration was tasty, I found the classic combo of apples and grapes to be truly unbeatable.
It’s these little tweaks and adventures in the kitchen that remind me how food has a story behind it. With each meal, there’s an opportunity to create new memories—both at the dinner table and within ourselves. That’s what keeps my passion for cooking alive!
FAQs and Troubleshooting
1. Can I use frozen fruits?
While fresh fruits yield the best texture and flavor, you can use frozen if necessary. Just be sure to thaw and drain excess moisture before mixing into your salad.
2. My apples turned brown before serving. How can I prevent that?
The lemon juice helps, but you can also chop the apples right before serving. Another trick is to keep the apple cubes submerged in cold water with a splash of lemon juice until you’re ready to assemble the salad!
3. What can I do if I don’t have enough honey?
If you find yourself a bit low on honey, a mix of honey and maple syrup works wonders, or you can even use a sweeter jam as a dressing base—just blend with a little water!
4. How long will this salad last in the refrigerator?
Enjoy your salad fresh! However, if stored properly in an airtight container, it should keep for 2–3 days in the refrigerator. Just be aware that the nuts may lose some crunch over time.
Nutritional Info
Each serving is packed with delightful nutritional benefits:
- Calories: Approximately 150
- Protein: 2g
- Fat: 8g (mostly from nuts)
- Carbohydrates: 22g
- Fiber: 3g
- Sugar: 10g (natural sugars from fruits and honey)
Embrace this burst of nutrients and let each bowl fill you with joy and health!
So there you have it! A simple yet flavorful Cinnamon Apple Grape Salad that brings together the nostalgic flavors of childhood and the nourishing qualities we all crave. Recreate it with your own unique twists, share it with loved ones, and most of all, enjoy the process of cooking and the joy it brings to your life. Happy cooking, friends!
PrintCinnamon Apple Grape Salad
A refreshing salad combining the crunch of apples, the juiciness of grapes, and the warmth of cinnamon for a delightful and nostalgic dish.
- Prep Time: 15 minutes
- Cook Time: 5 minutes
- Total Time: 50 minutes
- Yield: 4 servings 1x
- Category: Salad
- Method: No-cook
- Cuisine: American
- Diet: Vegetarian
Ingredients
- 2 cups apples, chopped
- 2 cups grapes, halved
- 1/2 cup walnuts or pecans, chopped
- 1/4 cup honey
- 1 teaspoon cinnamon
- 1 tablespoon lemon juice
Instructions
- Prep your ingredients: Wash apples and grapes, chop apples into bite-sized pieces, and halve the grapes.
- Toast your nuts: In a skillet, toast walnuts or pecans over medium heat for 4–5 minutes until golden.
- Mix the dressing: Combine honey, cinnamon, and lemon juice in a bowl and whisk until blended.
- Combine the fruits: In a large bowl, mix chopped apples and halved grapes, then fold in toasted nuts.
- Dress the salad: Pour dressing over the fruit and nut mixture and toss gently to coat.
- Chill and serve: Let the salad chill in the refrigerator for 30 minutes before serving.
Notes
For variations, consider adding cheese, yogurt, or different fruits and nuts for a twist.
Nutrition
- Serving Size: 1 serving
- Calories: 150
- Sugar: 10g
- Sodium: 5mg
- Fat: 8g
- Saturated Fat: 1g
- Unsaturated Fat: 7g
- Trans Fat: 0g
- Carbohydrates: 22g
- Fiber: 3g
- Protein: 2g
- Cholesterol: 0mg
Keywords: cinnamon salad, apple grape salad, fruit salad, refreshing salad, healthy recipe

Easy Kale Salad
Easy Kale Salad: A Fresh Take on a Classic Favorite
Welcome to Clean Plate Cravings! Today, we’re diving into a dish that’s not just healthy but also vibrantly flavorful and oh-so-satisfying—Kale Salad. Now, I know what you might be thinking: "Kale? Really?" But trust me, kale can be the star of the show when dressed with love and creativity. Let’s get ready to whip up a salad that’ll make you swoon and leave you feeling fabulous!
Kale has taken the health world by storm, and with good reason. Packed with nutrients, fiber, and a ton of flavor, it’s a versatile leafy green that can elevate any meal. Whether you’re tossing together a quick lunch or serving a dinner side, this easy kale salad brings the best of fresh, feel-good eating right to your plate.
I’m all about simplicity in the kitchen. My goal is to help you embrace healthy eating without it feeling like a chore. This salad is an excellent example of that philosophy—easy to make, delicious to eat, and flexible enough to personalize according to what you have on hand.
A Nostalgic Kitchen Memory
Growing up, my family had a garden in our backyard where we grew a variety of vegetables. I remember warm summer afternoons spent outdoors, little hands pulling out fresh greens from the earth. It was a family affair: my siblings, my mom, and I would gather the ripe produce, and when we returned indoors, the kitchen transformed into a whirlwind of chopping, mixing, and tasting.
One memory that stands out is when we decided to create a "garden salad" using whatever we had harvested. Kale was one of those greens we always had in abundance, and we’d mix it with cherry tomatoes, crisp cucumber, and big chunks of avocado—tossed with a simple dressing of olive oil, lemon juice, and a sprinkle of sea salt. The freshness of the ingredients paired with the love of family made every bite extraordinary. That kale salad became our summer staple, and the laughter shared around the table still warms my heart today.
Let’s recreate that kind of joy in your kitchen with our Easy Kale Salad recipe!
Ingredients
Here’s what you’ll need to get started:
-
4 cups kale, chopped
Kale is the star of this salad! This nutrient-dense green is full of vitamins A, K, and C. For a tender salad, try massaging the kale with the dressing before serving. If you’re not a fan of kale, Swiss chard or even spinach can make great substitutes. -
1/4 cup olive oil
A good quality olive oil enhances the flavor of your salad and provides healthy fats that make everything more satisfying. If olive oil isn’t your thing, you could use avocado oil or even a light sesame oil for a twist. -
2 tablespoons lemon juice
Fresh lemon juice brightens up the flavors and adds a zesty kick. If you’re lacking lemons, lime juice works beautifully too! -
1 teaspoon Dijon mustard
This adds a subtle tang and a touch of creaminess to the dressing. If you’re looking for a gluten-free option, feel free to use a whole grain mustard or omit it altogether. -
Salt and pepper to taste
Essential seasonings! They make all the flavors pop. Remember: You can always add more, but you can’t take it away, so start with a little and adjust as needed. -
1/4 cup grated Parmesan cheese (optional)
A sprinkling of Parm can give your salad that umami punch. For a dairy-free option, nutritional yeast provides a cheesy flavor without the cheese. -
1/4 cup nuts or seeds (optional)
Chopped walnuts, sunflower seeds, or even some pumpkin seeds add crunch and texture. They amp up the salad with healthy fats and a protein boost, making it more filling. Feel free to skip them or swap them based on your preferences!
Step-by-Step Instructions
Alright, let’s get cooking! Follow these easy steps, and you’ll have a delightful kale salad in no time.
-
Wash and Chop the Kale
- Start with 4 cups of fresh kale. Rinse it thoroughly under cold water to remove any dirt or grit.
- Once washed, remove the tough stems and chop the leaves into bite-sized pieces. You want your kale to be tender, so if you have a bit of time, consider massaging it gently with your hands after chopping to break down the fibers.
-
Prepare the Dressing
- In a small bowl, whisk together 1/4 cup of olive oil, 2 tablespoons of fresh lemon juice, and 1 teaspoon of Dijon mustard.
- Don’t forget to season with salt and pepper to taste! Give it a taste test—adjust if needed. A pinch more salt or a splash more lemon can transform the dressing beautifully.
-
Combine the Ingredients
- In a large bowl, add your chopped kale. Drizzle the dressing over it and toss gently. You want every piece of kale to be coated with that delicious dressing.
- Here’s my little chef hack: Allow the salad to sit for 10-15 minutes before serving. This lets the kale soften and absorb the flavors!
-
Finishing Touches
- If using, sprinkle in 1/4 cup of grated Parmesan cheese and your choice of nuts or seeds.
- Toss once more to ensure everything is well combined. The cheese adds creamy texture and the nuts give a satisfying crunch!
-
Plating Your Salad
- To serve, pile the leafy green goodness onto a large plate or into individual bowls. You can also garnish with extra cheese or a twist of lemon for presentation.
Serving Suggestions
This Easy Kale Salad is perfect as a stand-alone lunch or as a side dish alongside grilled chicken, fish, or even pasta. Pair it with a slice of whole-grain bread for a more hearty meal. It’s versatile enough to grace your table at any occasion—whether it’s a casual lunch or a weekend dinner with friends.
Recipe Variations
Feeling adventurous? Here are some creative twists you could try:
-
Add Fruits: Include some sliced apples or pears for a sweet contrast! Dried cranberries or raisins also work fabulously.
-
Spicy Kick: Add sliced jalapeños or a sprinkle of red pepper flakes for some heat!
-
Protein Boost: Include grilled chicken or chickpeas for a wholesome addition, making it a filling main dish.
-
Herbed Up: Add fresh herbs like chopped cilantro or parsley for an earthy flavor profile.
-
Grain Integration: Toss in some cooked quinoa or farro for a grainy texture that fills you up!
Chef’s Notes
This kale salad has come a long way since my childhood days. As I explored more in the kitchen, I began adding different ingredients based on what’s seasonal or on hand. I once added some leftover roasted sweet potatoes, and the sweet creaminess paired beautifully with the kale and dressing! This recipe is meant to be flexible, so make it your own as you find what you love.
FAQs and Troubleshooting
Q: Can I make this salad ahead of time?
A: Absolutely! Just store the kale and the dressing separately in the fridge. Combine them the day you want to serve it to keep everything fresh.
Q: My kale tastes tough—what do I do?
A: You might need to massage it longer! Don’t be afraid to get your hands in there to really break down the fibers; this makes it noticeably more tender.
Q: Can I use frozen kale?
A: Fresh kale is ideal for this recipe, but if you only have frozen on hand, make sure to thaw it completely and squeeze out excess water before using.
Q: What can I do if I don’t have Dijon mustard?
A: You can replace it with a splash of apple cider vinegar for some tang, or simply omit it entirely if necessary!
Nutritional Info
This salad is not only refreshing but loaded with nutrients! Each serving is high in fiber, vitamins, and healthy fats. Just remember that adding cheese and nuts can increase the calorie count, so adjust according to your dietary needs.
There you have it—your guide to crafting an Easy Kale Salad that’s as fulfilling as it is nourishing. I hope you try it out and fall in love with the deliciousness of fresh ingredients. Keep it simple, fresh, and delightful! Happy cooking, foodies!
PrintEasy Kale Salad

A fresh and flavorful kale salad that’s easy to make and packed with nutrients.
- Prep Time: 15 minutes
- Cook Time: 0 minutes
- Total Time: 15 minutes
- Yield: 4 servings 1x
- Category: Salad
- Method: No-Cook
- Cuisine: American
- Diet: Vegetarian
Ingredients
- 4 cups kale, chopped
- 1/4 cup olive oil
- 2 tablespoons lemon juice
- 1 teaspoon Dijon mustard
- Salt and pepper to taste
- 1/4 cup grated Parmesan cheese (optional)
- 1/4 cup nuts or seeds (optional)
Instructions
- Wash and Chop the Kale: Start with 4 cups of fresh kale. Rinse it thoroughly under cold water to remove any dirt or grit. Remove the tough stems and chop the leaves into bite-sized pieces.
- Prepare the Dressing: In a small bowl, whisk together 1/4 cup of olive oil, 2 tablespoons of fresh lemon juice, and 1 teaspoon of Dijon mustard. Season with salt and pepper to taste and adjust as needed.
- Combine the Ingredients: In a large bowl, add your chopped kale, drizzle the dressing over it, and toss gently to coat every piece.
- Finishing Touches: If using, sprinkle in 1/4 cup of grated Parmesan cheese and your choice of nuts or seeds. Toss to combine.
- Plating Your Salad: Serve the salad on a large plate or in individual bowls. Garnish with extra cheese or a twist of lemon if desired.
Notes
This salad can be made ahead of time by storing the kale and dressing separately until you’re ready to serve.
Nutrition
- Serving Size: 1 serving
- Calories: 220
- Sugar: 1g
- Sodium: 150mg
- Fat: 18g
- Saturated Fat: 2g
- Unsaturated Fat: 14g
- Trans Fat: 0g
- Carbohydrates: 10g
- Fiber: 3g
- Protein: 4g
- Cholesterol: 10mg
Keywords: kale salad, healthy salad, easy salad, vegetarian dish
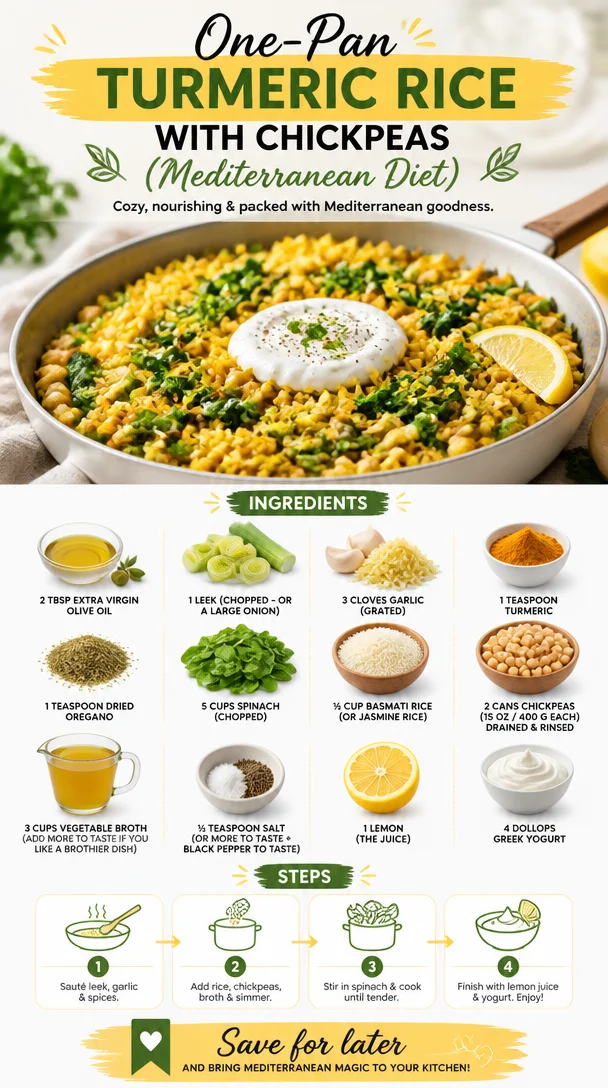
One-Pan Turmeric Rice with Chickpeas (Mediterranean Diet)
Turmeric Rice with Chickpeas: A Flavorful Journey to Healthy Eating
Welcome to another delicious adventure here at Clean Plate Cravings! Today, we’re diving into a vibrant and nutritious dish that’s as satisfying as it is nourishing. Get ready for a recipe that’s not just easy on the palate but also a feast for the eyes—Turmeric Rice with Chickpeas. This dish is inspired by the Mediterranean diet, bursting with flavors and packed with nutrients, making it a fantastic choice for a wholesome meal.
Eating well doesn’t have to be boring or bland, and this dish is a shining example of that philosophy. The warm, aromatic spice of turmeric combined with the creamy texture of chickpeas creates a symphony of flavors that your taste buds will thank you for. Whether you’re looking to eat healthier, explore meatless options, or impress your friends with your culinary skills, you’ve come to the right place.
As we journey through this recipe together, I promise a fun and approachable cooking experience. What’s great about Turmeric Rice with Chickpeas is that it’s adaptable and can easily fit into any busy day. Now, without further ado, let’s get cooking!
Personal Story
Let me take you back in time to my early days in the kitchen, where my love for food truly began. I was a teenager, ardently shadowing my grandmother as she stirred away in her quaint little kitchen, creating magic with such simple ingredients. One dish that particularly caught my eye was her vibrant yellow rice, simmering gently while the golden hues of turmeric filled the room.
“Food should not just nourish; it should delight your senses,” she would say, her eyes twinkling with passion. She introduced me to the wonders of spices, especially turmeric, and the way it could transform an ordinary dish into something extraordinary. I can still remember the comforting aroma wafting through the house with each pot she simmered. Those days laid the foundation for my culinary adventures, inspiring me to create dishes that bring joy, comfort, and nourishment.
Years later, I’ve taken that same essence and created this Turmeric Rice with Chickpeas recipe—a nod to my grandmother and a testament to how food can create lasting memories.
Ingredients
Let’s gather our ingredients, shall we? Here’s what you’ll need for this delightful dish:
-
2 tablespoons extra virgin olive oil
A staple in Mediterranean cooking, this oil is rich in healthy fats and adds a depth of flavor. Feel free to substitute with avocado oil if you want a different take. -
1 leek (chopped, or a large onion)
Leeks bring a subtle sweetness and a unique twist compared to regular onions. If leeks aren’t an option, any onion will work just fine! -
3 cloves garlic (grated)
Garlic is a superstar in just about every recipe! Grated garlic infuses the oil quickly, giving your dish a beautiful aromatic base. -
1 teaspoon turmeric
This golden spice is known for its powerful anti-inflammatory properties, not to mention the stunning color it brings to the dish! If you’re looking for a milder flavor, you can use less. -
1 teaspoon dried oregano
A herb that pairs perfectly with Mediterranean flavors! If you’re out of oregano, thyme can be a lovely substitute. -
5 cups spinach (about 5 cups chopped)
Spinach is nutrient-dense and wilts down beautifully. You can also mix in other greens like kale or Swiss chard for added variety. -
½ cup basmati rice (or jasmine rice — uncooked)
Both rice types give a lovely texture; basmati has a nuttier flavor, while jasmine adds a touch of sweetness. -
2 cans chickpeas (15 oz / 400 g each can — drained and rinsed)
These little legumes are not only filling but also an excellent source of protein and fiber. For a homemade option, 3 cups of cooked chickpeas works too. -
3 cups vegetable broth (add more to taste if you like a brothier dish)
Choosing good quality broth can elevate your dish significantly. If you’re in a pinch, water will do in a pinch, but the flavor will vary! -
½ teaspoon salt (or more to taste) + black pepper to taste
Seasoning is key! Adjust according to your taste preferences. -
1 lemon (the juice)
Fresh lemon juice brightens up the whole dish! If you don’t have any lemons, a splash of vinegar can help achieve a similar effect. -
4 dollops Greek yogurt
A tangy and creamy finish that adds a delightful contrast to the spices. For a dairy-free option, try coconut yogurt or a nut-based alternative.
Step-by-Step Instructions
Now let’s get right into the cooking! Follow these steps, and you’ll have a delicious dish in no time.
-
Sauté the Base
In a large pot or skillet, heat your extra virgin olive oil over medium heat. Add the chopped leeks (or onion) and sauté for about 3–4 minutes until they start to soften. Don’t rush this step; let them turn translucent and fragrant. This will create a beautiful base for your dish. -
Add Garlic & Spices
Toss in the grated garlic along with the turmeric and oregano. Stir continuously for about 1 minute until the garlic becomes fragrant. The aroma will be intoxicating! Remember, burnt garlic can turn your dish bitter; keep an eye on it! -
Incorporate the Spinach
Gradually add in the chopped spinach. It might seem like a lot, but trust me, it wilts down significantly! Stir it into your sauté until it’s bright green and reduces in volume, about 2–3 minutes. -
Stir in the Rice & Broth
Once the spinach is wilted, pour in the uncooked basmati (or jasmine) rice. Stir well to ensure the rice is coated with all the flavorful goodness from the pot. Then, add the vegetable broth. Bring the mixture to a boil. -
Simmer
Once boiling, reduce the heat to low, cover the pot, and let it simmer for about 15–20 minutes, or until the rice is tender and has absorbed most of the liquid. If you prefer it brothier, feel free to taste the broth and add more as needed! -
Add Chickpeas & Final Touches
When the rice is done cooking, stir in the drained chickpeas, salt, and pepper. Let it heat through for another 5 minutes, allowing all the flavors to meld together. Finally, squeeze in the fresh lemon juice—this will elevate the flavors to an entirely new level. -
Serve
Once everything is well combined and heated through, remove from heat. You can let it rest for a moment before serving.
Serving Suggestions
Plating this beautiful Turmeric Rice with Chickpeas is all about showcasing the delightful colors on the plate! I love to serve it in a deep bowl, topped with a generous dollop of Greek yogurt, a sprinkle of fresh herbs like parsley or cilantro, and a few lemon wedges on the side for good measure. The bright hues of yellow and green are sure to impress and make your meal feel special!
Recipe Variations
Feeling adventurous? Here are a few creative twists to elevate your Turmeric Rice with Chickpeas:
-
Spicy Kick: Add some diced jalapeños or a pinch of red chili flakes while sautéing the garlic to give it a nice heat.
-
Nuts & Seeds: For extra crunch, sprinkle roasted pine nuts or toasted sunflower seeds on top before serving.
-
Herb Infusion: Swap out dried oregano for fresh herbs like dill or parsley for a vibrant flavor contrast.
-
Add Protein: If you’re looking for a heartier option, toss in some grilled chicken, shrimp, or sautéed tofu.
-
Different Grains: Substitute your rice with quinoa or farro for a nutty flavor and additional texture.
Chef’s Notes
As I reflect on this recipe, I smile at how it has evolved over the years. Initially, it was simply a quick weeknight dinner, but then it transformed into a family favorite and the star of countless potlucks. Every time I make it, I’m reminded of my grandmother, her kitchen filled with love, and the essence of togetherness that food can create.
Whenever you’re in need of comfort or a burst of flavor without fuss, bookmark this dish! It’s not just a recipe; it’s part of my story and, hopefully, part of yours too.
FAQs and Troubleshooting
-
What if my chickpeas are too hard?
If you’re using dried chickpeas, make sure to soak them overnight and cook them thoroughly before adding to the dish. If they’re canned, check for freshness and proper storage; old cans can lead to firmer beans. -
Can I use a different type of rice?
Absolutely! Just keep in mind that cooking times may vary. Quick-cooking brown rice or quinoa will require adjustments to the broth and cooking time. -
How can I make this dish vegan?
The recipe is already vegan! Simply skip the Greek yogurt and use a plant-based alternative if desired. -
Can I prep this meal ahead of time?
Definitely! You can prepare it a day in advance. Just store it in the fridge and reheat with a splash of broth to regain moisture.
Nutritional Info
While the exact nutrition will depend on specific brands and serving sizes, here’s a general idea of the goodness each serving can offer:
- Calories: ~350
- Protein: ~15g
- Fiber: ~10g
- Healthy Fats: ~8g
There you have it, a delicious journey through Turmeric Rice with Chickpeas! It’s colorful, easy to prepare, and packed with nutrients. Let this dish be your guide to exploring the joys of healthy eating without compromising on flavor. I can’t wait to hear how it turns out for you, so make sure to share your culinary adventures with the hashtag #CleanPlateCravings. Happy cooking!
PrintTurmeric Rice with Chickpeas

A vibrant and nutritious dish combining turmeric rice and chickpeas, inspired by the Mediterranean diet.
- Prep Time: 10 minutes
- Cook Time: 25 minutes
- Total Time: 35 minutes
- Yield: 4 servings 1x
- Category: Main Course
- Method: Stovetop
- Cuisine: Mediterranean
- Diet: Vegan
Ingredients
- 2 tablespoons extra virgin olive oil
- 1 leek (chopped, or a large onion)
- 3 cloves garlic (grated)
- 1 teaspoon turmeric
- 1 teaspoon dried oregano
- 5 cups spinach (about 5 cups chopped)
- ½ cup basmati rice (or jasmine rice — uncooked)
- 2 cans chickpeas (15 oz / 400 g each can — drained and rinsed)
- 3 cups vegetable broth
- ½ teaspoon salt (or more to taste) + black pepper to taste
- 1 lemon (the juice)
- 4 dollops Greek yogurt
Instructions
- Sauté the leeks: In a large pot or skillet, heat the olive oil over medium heat. Add chopped leeks and sauté for about 3–4 minutes until they start to soften.
- Add garlic & spices: Toss in the grated garlic along with turmeric and oregano, stir continuously for about 1 minute until fragrant.
- Incorporate the spinach: Gradually add the chopped spinach and stir until it’s bright green and reduces in volume, about 2–3 minutes.
- Stir in the rice & broth: Pour in the uncooked rice and stir well to coat. Add vegetable broth and bring to a boil.
- Simmer: Reduce heat to low, cover the pot, and let it simmer for about 15–20 minutes until the rice is tender.
- Add chickpeas & final touches: Stir in the drained chickpeas, salt, and pepper. Heat through for another 5 minutes and squeeze in fresh lemon juice.
- Serve: Once combined, remove from heat and rest briefly before serving.
Notes
This dish can be made in advance and reheated with a splash of broth if necessary. Adjust seasoning to taste.
Nutrition
- Serving Size: 1 serving
- Calories: 350
- Sugar: 2g
- Sodium: 600mg
- Fat: 12g
- Saturated Fat: 2g
- Unsaturated Fat: 8g
- Trans Fat: 0g
- Carbohydrates: 45g
- Fiber: 10g
- Protein: 15g
- Cholesterol: 0mg
Keywords: turmeric rice, chickpeas, healthy recipe, vegan meal, Mediterranean diet
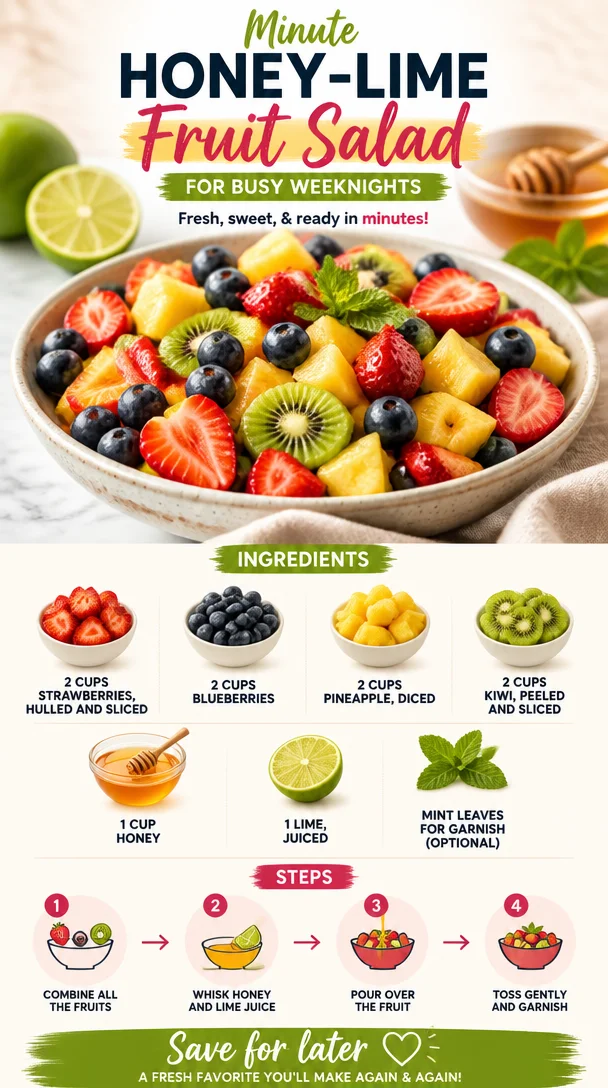
Minute Honey-Lime Fruit Salad for Busy Weeknights
Easy Fruit Salad with Honey Lime Dressing
Introduction
Hey there, fellow food lovers! If you’re like me, there’s just something about fruit that shouts "summer!" It’s vibrant, refreshing, and oh-so-delicious, especially when paired with a little zing from citrus and sweetness from honey. Today, I’m thrilled to share with you my go-to recipe for an Easy Fruit Salad with Honey Lime Dressing.
This dish is seriously perfect for any occasion—you can whip it up for brunch, serve it at a barbecue, or even enjoy a bowl for a light snack during the hot summer days. Believe me, this fruit salad is not your average bowl of chopped fruit. With the honey lime dressing, it transforms from a simple side dish into a flavor explosion that dances on your taste buds!
Growing up, my family had a tradition of making fruit salads during summer picnics. We’d gather around the picnic table, outdoors beneath the shade of giant oaks, laughing and reminiscing as we enjoyed our feast. My mom always encouraged us to get creative with the fruits we used, adding in whatever was fresh and seasonal. I think that’s the best part of this recipe: it’s flexible! You can mix and match or get a little adventurous with whatever’s in your fridge.
The honey lime dressing is the star here! It’s quick to make, and every drizzle brings a burst of brightness to the juicy fruits. Best of all, it’s an amazing way to get in those juicy vitamins and savor the season’s offerings. Ready to dive into the world of color and flavor? Let’s get started!
Personal Story
One of my fondest memories in the kitchen involves a bountiful summer day when my family decided to host a picnic at the local park. My siblings and I were tasked with creating the ultimate fruit salad. We raided our backyard and the local farmers’ market, gathering strawberries, blueberries, and a few things we thought looked "pretty." We threw in all the fruits we could find, of course, and I remember uncovering a hidden stash of ripe kiwis beneath the leaves in our fridge. Each of us had our signature touches—the kids were spread out in a joyous whirlwind of activity.
My job was to make the dressing, which really became the finishing touch! I squeezed fresh lime juice, drizzled honey, and—like a true little chef—tasted it after each addition, trying to find that perfect balance between sweet and tangy. We tossed everything together in a huge bowl, and as we carried it to our picnic spot, the bright colors and tantalizing aromas of our creation turned heads and brought smiles from other park-goers.
That day, we sat sprawled on checkered blankets, laughing and sharing stories, indulging in our creation. The sweet fruit, combined with that zingy dressing, was the highlight of the feast. To this day, I love making this fruit salad not just to relive that sweet nostalgia, but to create new memories with friends and family. Now, it’s your turn to make some fun memories with this delightful dish!
Ingredients
-
2 cups strawberries, hulled and sliced
- These juicy beauties are packed with vitamin C and are the sweetest way to start. If strawberries aren’t in season, feel free to substitute with raspberries or diced apples for a tart twist.
-
2 cups blueberries
- These little gems are like nature’s candy! They add a pop of color and are rich in antioxidants. No blueberries? No worries; think about adding blackberries or even diced peaches!
-
2 cups pineapple, diced
- Pineapple brings a tropical vibe and a sweet-tart flavor. If you don’t have fresh pineapple, drained canned pineapple works too, but fresh is always ideal for the best texture.
-
2 cups kiwi, peeled and sliced
- With its vibrant green color and unique taste, kiwi adds a refreshing twist. Don’t want to deal with peeling? Go ahead and swap it out for other fruits like mango or papaya for a tropical flair!
-
1 cup honey
- Honey is a natural sweetener that elevates the entire dish. If you’re vegan, feel free to swap honey for agave syrup or maple syrup for that same sweetness.
-
1 lime, juiced
- The star of the dressing! Lime juice brings in that necessary acidity to balance the sweetness. If limes aren’t handy, use lemons or even a splash of orange juice as a substitute.
-
Mint leaves for garnish (optional)
- These delicate leaves not only add a fresh aroma but also a lovely finish. If mint isn’t your thing, chopped basil could work just as nicely!
Step-by-Step Instructions
-
Gather Your Ingredients
- Start by gathering all your ingredients and equipment. This is the perfect time to channel your inner chef! You’ll need a large mixing bowl, a cutting board, a knife, and a small bowl if you want to mix the dressing separately.
-
Prep the Fruits
- Begin with the strawberries. Hull them by removing the green tops, then slice them into quarters or halves, depending on their size. Place the sliced strawberries into your mixing bowl. (Tip: If you allow the strawberries to sit a few minutes after slicing them, they’ll release their juices and create their own mini dressing!)
-
Add Blueberries
- Rinse the blueberries in cold water and drain them. No slicing needed—just toss them directly into the bowl with the strawberries. (Chefs Hack: If you’re using frozen blueberries, let them thaw for a bit first—this avoids mushiness!)
-
Cut the Pineapple
- If you’re using a fresh pineapple, carefully cut the top off, remove the skin, and dice the flesh into bite-sized pieces. Add the fresh pineapple to the mix. (Tip: To make this easier, cut the pineapple into rings and then dice through those rings!)
-
Slice the Kiwi
- Peel the kiwi and slice it into rounds or quarters, according to your preference. Toss them into the bowl with the other fruits, throwing in those beautiful green slices! (Pro Tip: Use a spoon to scoop out the kiwi flesh cleanly!)
-
Make the Honey Lime Dressing
- In a small bowl, combine the honey and lime juice. Give it a good stir with a whisk or a fork until fully blended. Want a little zing? You can add a bit more lime juice to suit your taste! (Tip: If it’s a hot day, you can lightly warm the honey for easier mixing!)
-
Combine Everything
- Drizzle the honey lime dressing over your colorful fruit medley. Using a large spoon or spatula, gently toss everything until the fruits are fully coated with that luscious dressing. (Caution: Be gentle! You don’t want to mush the fruits!)
-
Let it Marinate
- For an enhanced flavor experience, let the salad sit in the fridge for about 30 minutes. This allows the fruits to soak up some of that honey lime goodness and meld together beautifully.
Serving Suggestions
Once your fruit salad is nicely chilled and ready to go, grab a pretty bowl and spoon it in! You can serve it directly in individual bowls for guests or pile it high in one large dish for a family-style setting. Finishing touches? Add a few sprigs of fresh mint on top for a gorgeous pop of color and fragrance. This fruit salad also makes a delightful addition to brunch tables or summer feasts, bringing a burst of cheer and freshness to any spread!
Recipe Variations
Feeling adventurous? Here are some fun twists and variations to play around with:
- Tropical Twist: Switch out the kiwi for mango, add some shredded coconut, and maybe throw in a few macadamia nuts for crunch.
- Berry Blast: Use raspberries, blackberries, and sliced strawberries with a splash of orange juice instead of lime for a different citrus profile.
- Nutty Delight: Add a handful of chopped nuts like almonds or walnuts for a bit of crunch, or sprinkle with chia seeds for extra nutrition.
- Creamy Addition: Drizzle with a bit of yogurt on top for a creamy layer that complements the fruits beautifully!
Chef’s Notes
As I look back at those summers spent making fruit salads, I realize that my approach to this dish has changed over time. I’ve played with countless ingredients and combinations! Each evolution brought new friends and flavors, and now, I’m all about keeping it simple yet flexible. I adore taking whatever fruit is in season and transforming it into this delicious medley. And don’t let me forget: the key is all about the dressing! I’ve tried adding spices like cinnamon or ginger when feeling funky, and boy, have those been successful experiments!
FAQs and Troubleshooting
-
Can I use frozen fruits?
- Absolutely! Just be cautious because some fruits might change texture after thawing, especially bananas or and strawberries. Use frozen berries for best results.
-
How long does the fruit salad last?
- This salad is best enjoyed fresh, but you can store it in an airtight container in the fridge for up to 3 days. Just be mindful that it may get watery as it sits!
-
What if I don’t have honey?
- No problem! Agave syrup, maple syrup, or even amber syrup can easily take honey’s place. Just keep adjusting the sweetness to your liking!
-
Is there a way to make this salad ahead of time?
- Sure thing! You can pre-cut the fruits and mix the dressing, but keep them separate. Combine everything right before serving to maintain freshness and color.
Nutritional Info
(Optional, can be personalized based on specific dietary needs or preferences!)
This fruit salad is not just delicious but also nutritious! Each serving is low in calories yet high in vitamins and antioxidants, benefiting your overall health. Enjoy these nutritious powerhouse fruits without guilt, and feel free to get creative to make it even more nourishing!
So there you have it, friends—an Easy Fruit Salad with Honey Lime Dressing that not only tantalizes the taste buds but also brings back warm memories of summer sweetness! Whether for a gathering or a personal treat, this salad is sure to brighten anyone’s day. Happy cooking, and here’s to keeping things fresh, simple, and delicious!
PrintEasy Fruit Salad with Honey Lime Dressing
A vibrant, refreshing fruit salad with a zesty honey lime dressing, perfect for summer picnics and gatherings.
- Prep Time: 15 minutes
- Cook Time: 0 minutes
- Total Time: 15 minutes
- Yield: 6 servings 1x
- Category: Dessert
- Method: Mixing
- Cuisine: American
- Diet: Vegetarian
Ingredients
- 2 cups strawberries, hulled and sliced
- 2 cups blueberries
- 2 cups pineapple, diced
- 2 cups kiwi, peeled and sliced
- 1 cup honey
- 1 lime, juiced
- Mint leaves for garnish (optional)
Instructions
- Gather your ingredients.
- Prep the strawberries by hulling and slicing them, then place in mixing bowl.
- Add the rinsed blueberries directly into the bowl.
- Cut the fresh pineapple and add to the mix.
- Slice the kiwi and toss it into the bowl.
- Make the honey lime dressing by combining honey and lime juice in a small bowl.
- Combine everything by drizzling the dressing over the fruits and gently tossing to coat.
- Let it marinate in the fridge for about 30 minutes.
Notes
Serve chilled; can be garnished with fresh mint. Enjoy fresh for best results.
Nutrition
- Serving Size: 1 serving
- Calories: 100
- Sugar: 20g
- Sodium: 5mg
- Fat: 0g
- Saturated Fat: 0g
- Unsaturated Fat: 0g
- Trans Fat: 0g
- Carbohydrates: 25g
- Fiber: 3g
- Protein: 1g
- Cholesterol: 0mg
Keywords: fruit salad, summer salad, healthy dessert, honey lime dressing
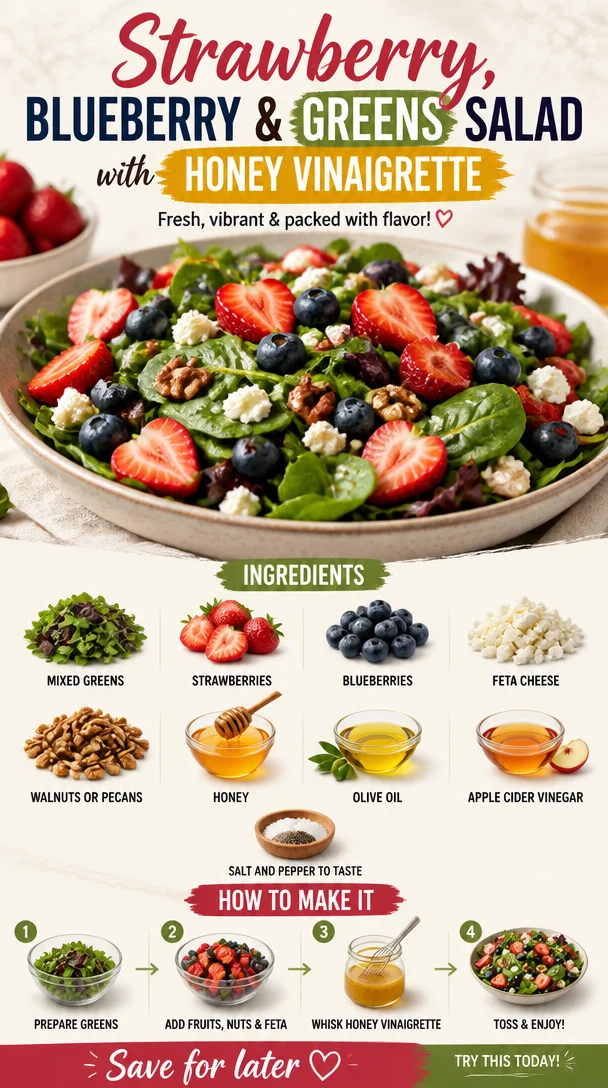
Strawberry, Blueberry & Greens Salad with Honey Vinaigrette
A Fresh Take on Salad: Strawberry, Blueberry & Greens Salad with Honey Vinaigrette
Welcome to Clean Plate Cravings, food lovers! Today, we’re diving into the delightful world of salads with my vibrant and oh-so-satisfying Strawberry, Blueberry & Greens Salad with Honey Vinaigrette. If you’re thinking salads can be boring, think again! This dazzling dish is not only packed with flavor; it’s a celebration of summer’s best bounty. Picture this: a sun-drenched day, a picnic blanket sprawled on the grass, and a bowl full of juicy strawberries and blueberries that burst with flavor. That’s the essence of this salad!
Salads are often seen as a quick meal or a side dish, but trust me when I say they can be show-stoppers in their own right. With the fresh, enticing colors and textures of mixed greens, vibrant fruits, creamy feta, and crunchy nuts, this salad is a feast for the senses. It’s the perfect accompaniment for grilled meats, a light lunch on its own, or even as a stunning side for your next dinner party. Are you ready to embrace fresh, feel-good flavors? Let’s get started!
A Flashback to Family Picnics
Salads have always been a part of my life, but there’s one memory that stands out: family picnics at the park. My grandmother was a true kitchen wizard. She had an endless supply of recipes passed down through the generations, but the one dish she made that we always looked forward to was her fruit salad. It was a colorful mix of seasonal fruits—juicy strawberries, sweet blueberries, and whatever else was ripe and ready from her garden.
I remember her tossing everything together in a big bowl, and as the flavors melded, the entire kitchen lit up with a warm sweetness. Everyone gathered around, the sound of laughter and the smell of fresh fruit mingling in the air. That memory stayed with me, and as I grew older, I realized how much I cherished those flavors. I wanted to create something that evoked that same joy, and thus, this Strawberry, Blueberry & Greens Salad was born—a nod to the past while celebrating fresh ingredients that make our bodies feel good and our taste buds dance!
Ingredients You’ll Need
Let’s gather our ingredients! Here’s what you’ll need to create this fresh and flavorful salad:
-
Mixed greens (spinach, arugula, or your choice): The base of your salad, these greens offer a delightful crunch and a pop of color. Feel free to mix and match various leafy greens for different textures. Want a peppery kick? Arugula is your friend!
-
Fresh strawberries, sliced: Sweet, juicy strawberries bring a vibrant flavor to the dish. Choose ripe, organic strawberries when possible to ensure the best taste.
-
Fresh blueberries: These little nuggets of goodness are packed with antioxidants and add a subtle sweetness. If you can’t find fresh blueberries, frozen ones work in a pinch—just make sure to thaw them first.
-
Feta cheese, crumbled: This tangy cheese adds a creamy texture that balances out the sweetness of the fruits. If you’re looking for a dairy-free option, try a plant-based feta or skip it altogether.
-
Walnuts or pecans, toasted: Adding a lovely crunch, nuts are also a great source of healthy fats. Feel free to roast your nuts on the stove or in the oven for a few minutes for enhanced flavor.
-
Honey: This natural sweetener enhances the dressing and brings everything together. If you prefer a vegan option, agave syrup or maple syrup makes an excellent substitute.
-
Olive oil: A staple in many kitchens, good-quality extra virgin olive oil provides a rich, fruity taste and healthy fats. Choose an oil you enjoy—the better the oil, the tastier the vinaigrette.
-
Apple cider vinegar: This vinegar gives our dressing a tangy kick. If you prefer a milder flavor, try using white wine vinegar as an alternative.
-
Salt and pepper to taste: These basic seasonings enhance all the flavors in your salad. Remember, seasoning is important; it can make or break a dish!
Step-by-Step Instructions
Ready to whip up this delicious salad? Let’s get into the cooking (or assembling, in this case) steps!
-
Prepare the Greens:
Start by washing your mixed greens thoroughly. There’s nothing worse than biting into a salad and finding gritty dirt! I usually rinse them under cold water and then pat them dry with a paper towel or use a salad spinner. The crisp, fresh greens will be the base of our lovely salad, so make sure they’re as clean as can be! -
Slice the Strawberries:
Next, grab your strawberries and slice them! I like to cut them into quarters for a more substantial bite. Lay them out on your cutting board, and let the colors inspire you—it’s all about that vibrant tassel of summer, isn’t it? -
Combine the Fruits:
In a large mixing bowl, add the sliced strawberries and fresh blueberries. Giving these little beauties a gentle toss will create a harmonious blend of sweetness. It’s like creating a fruity canvas for our salad masterpiece! -
Toast the Nuts:
If you’re using walnuts or pecans, now’s the time to toast them. In a skillet over medium-low heat, add the nuts and toast them for about 5-7 minutes, stirring occasionally until they become fragrant and lightly golden. Be careful—once they start to brown, they can burn quickly! The nuttiness will enhance the overall flavor of your salad. -
Make the Vinaigrette:
In a small bowl or jar, add 2 tablespoons of honey, 3 tablespoons of olive oil, and 1 tablespoon of apple cider vinegar. Whisk or shake until everything is combined. Taste it—the sweet and tangy notes should mingle perfectly! Adjust the sweetness or acidity to your liking. -
Assemble the Salad:
Start assembling your salad! Layer the greens at the bottom of a large salad bowl, then add the beautiful fruit mixture on top. Sprinkle with crumbled feta cheese and your toasted nuts. Last but not least, drizzle your honey vinaigrette over the top, making sure to cover all the goodness. -
Toss and Serve:
Using tongs or serving utensils, gently toss your salad until every component is coated in the dressing. Serve it immediately for the freshest bite, although it can sit for a few minutes if you’re not quite ready. Just know that the longer it sits, the softer your greens will become!
Serving Suggestions
This Strawberry, Blueberry & Greens Salad has flexibility written all over it! For a beautiful presentation, consider serving it in individual bowls or on large, rustic platters. A sprinkle of freshly cracked black pepper on top adds an inviting touch and brings out the flavors even more. Pair it with grilled chicken or fish for a hearty meal, or serve it alongside some crusty bread for a delightful lunch.
Recipe Variations
Let’s get creative! Here are some tasty twists you can try for this salad:
-
Add Protein: Toss in grilled chicken, shrimp, or even quinoa for a protein-packed version.
-
Make it Vegan: Swap out feta cheese with a vegan cheese alternative or simply leave it out. You won’t miss it!
-
Herbs Galore: Fresh mint or basil added to the mix gives your salad an aromatic lift. This is especially refreshing in summer.
-
Different Nuts: Swap walnuts for sliced almonds or pistachios for a different crunch.
-
Spicy Kick: If you love spice, throw in some sliced jalapeños or cayenne pepper in your dressing for a fun kick!
Chef’s Notes
Cooking is not just about creating a dish but about cherishing the moments that surround it. There was a time when I couldn’t make a vinaigrette to save my life. I would mix the ingredients and hope for the best! But as I learned from experience, the key is to trust your palate. Taste as you go. Remember, cooking doesn’t have to be perfect; it just needs to be made with love and a dash of creativity! Over the years, this salad has evolved as I’ve played with the ingredients. Sometimes I’ll throw in herbs, or adjust the vinaigrette ratios—cooking is an art, and I’m proud to keep discovering new strokes.
FAQs and Troubleshooting
1. Can I meal prep this salad?
Absolutely! Just keep the dressing separate until you’re ready to eat. The greens and fruits can get soggy if dressed too early.
2. How do I store leftovers?
Any leftovers should be stored in an airtight container in the fridge for up to 24 hours. The fresher, the better!
3. What if I don’t like feta cheese?
No worries! You can replace it with goat cheese, a dairy-free option, or simply leave it out for a lighter take.
4. How can I prevent the fruits from browning?
Keep the fruits in the fridge until you’re ready to serve. If they’re cut, a splash of lemon juice can help prevent browning.
Nutritional Info
While the nutritional values can vary, this Strawberry, Blueberry & Greens Salad is generally low in calories and packed with antioxidants, vitamins, and healthy fats. The addition of nuts adds protein and omega-3s, while fruits bring in fiber and hydration, making this salad a powerhouse of nutrition.
In conclusion, if you’re looking for a vibrant, delicious, and easy-to-make salad that will light up your meals, look no further than this Strawberry, Blueberry & Greens Salad with Honey Vinaigrette. Embrace the freshness, savor the flavors, and above all—enjoy each bite! Happy cooking, friends!
PrintStrawberry, Blueberry & Greens Salad with Honey Vinaigrette

A vibrant salad featuring fresh strawberries, blueberries, mixed greens, and a homemade honey vinaigrette, perfect for summer picnics and light meals.
- Prep Time: 15 minutes
- Cook Time: 10 minutes
- Total Time: 25 minutes
- Yield: 4 servings
- Category: Salad
- Method: Mixing
- Cuisine: American
- Diet: Vegetarian
Ingredients
- Mixed greens (spinach, arugula, or your choice)
- Fresh strawberries, sliced
- Fresh blueberries
- Feta cheese, crumbled
- Walnuts or pecans, toasted
- Honey
- Olive oil
- Apple cider vinegar
- Salt and pepper to taste
Instructions
- Prepare the greens by washing them thoroughly and drying completely.
- Slice the strawberries into quarters.
- Combine the sliced strawberries and fresh blueberries in a large mixing bowl.
- Toast the walnuts or pecans in a skillet over medium-low heat for about 5-7 minutes.
- Make the vinaigrette by whisking together honey, olive oil, and apple cider vinegar in a small bowl.
- Assemble the salad by layering greens and the fruit mixture, then topping with feta and nuts.
- Toss gently with dressing and serve immediately.
Notes
Consider serving in individual bowls or on platters. Pair with grilled chicken or fish for a heartier meal.
Nutrition
- Serving Size: 1 serving
- Calories: 250
- Sugar: 15g
- Sodium: 200mg
- Fat: 8g
- Saturated Fat: 2g
- Unsaturated Fat: 6g
- Trans Fat: 0g
- Carbohydrates: 35g
- Fiber: 5g
- Protein: 7g
- Cholesterol: 10mg
Keywords: salad, summer salad, strawberry salad, blueberry salad, healthy recipe, picnic salad
Minute Honey Garlic Salmon: One-Pan Skillet Dinner
Honey Garlic Salmon: A Delicious Journey to the Heart of Flavor
Welcome to Clean Plate Cravings, where healthy eating meets delicious flavors! Today, I want to take you on a culinary adventure centered around one of my absolute favorite dishes: Honey Garlic Salmon. This recipe is a perfect harmony of sweet and savory that will have your taste buds dancing in delight. Whether you’re a busy professional, a parent juggling kids’ schedules, or just someone who loves good food, this honey garlic salmon dish is here to rescue your weeknight dinners!
Imagine this: it’s a busy Monday evening after a long day, and the thought of cooking feels overwhelming. But fear not! With just a handful of ingredients and a quick cooking method, this honey garlic salmon can transform your mundane Monday into a vibrant food experience. What more could you ask for? It’s quick, it’s easy, and most importantly, it’s absolutely finger-licking good!
Personal Story
Let me share a little story about how honey garlic salmon became a staple in my kitchen. I remember the first time I made this dish. It was a chilly autumn evening, and I had invited a couple of friends over for dinner. Wanting to impress, I scoured through my recipe box and stumbled upon an old family recipe for honey garlic glazed chicken. It was great, but I had salmon sitting in my fridge, and I thought, "Why not give it a whirl?"
I marinated the salmon fillets in a decadent mixture of honey and garlic, letting those flavors mingle and create something magical. When I pulled the salmon out of the oven, my friends were instantly captivated. The aroma enveloped our dining area, luring everyone to the table. We dug in, and I watched as they enjoyed every bite, the sweet and savory glaze perfectly enveloping the succulent salmon.
That night was filled with laughter, stories, and an overwhelming sense of joy around the table as we savored each and every bite of honey garlic salmon. Since then, it has become my go-to recipe for gatherings, weeknight dinners, and even special occasions. It symbolizes warmth and good company, and I can’t wait for you to create your own unforgettable moments around this dish!
Ingredients
Here’s what you’ll need to bring this honey garlic salmon to life:
-
4 salmon fillets
Look for wild-caught salmon if possible; it tends to be fresher and often tastier than farmed. If you’re on a budget, feel free to substitute it with any white fish like cod or tilapia. -
1/4 cup honey
The star ingredient! It adds a natural sweetness that balances beautifully with the savory elements. If you’re looking for a dietary swap, you can use maple syrup or agave nectar for a vegan alternative. -
3 cloves garlic, minced
Garlic not only adds flavor but is also great for heart health. Don’t have fresh garlic? Garlic powder can work in a pinch—about 1 teaspoon will do. -
2 tablespoons soy sauce
It adds depth and umami to the dish. If you’re gluten-free, opt for tamari instead—most brands are a perfect substitute. -
1 tablespoon olive oil
This helps to sear the salmon and ensures a crispy skin while keeping it moist. Avocado oil could be a great alternative as well! -
Salt and pepper to taste
Essential seasoning to enhance the flavors—don’t skip this part! -
Chopped green onions for garnish
This adds a fresh burst of color and flavor at the end. You can also swap these out for sesame seeds or cilantro for a different twist!
Step-by-Step Instructions
Now let’s get cooking! Follow these simple steps to make your honey garlic salmon shine.
-
Preheat the Oven
Set your oven to 400°F (200°C). Preheating your oven is crucial for achieving that perfect cook on your salmon. You want a hot oven to get that lovely caramelization from the honey! -
Prepare the Marinade
In a small bowl, combine honey, minced garlic, and soy sauce. Give it a good stir to mix all those flavors together. Here’s a little tip: taste your marinade! This way, you can adjust sweetness or saltiness to your preference. If it’s too sweet, a splash more soy sauce can balance things out. -
Season the Salmon
Place your salmon fillets on a baking sheet lined with parchment paper (easy cleanup alert!). Drizzle with olive oil, then sprinkle with salt and pepper. If you’re feeling adventurous, a light brush of the marinade on top will give the fish a great start! -
Marinate the Salmon
Pour your honey garlic mixture over the salmon, ensuring each fillet is coated. If you have time, let it marinate for about 15-30 minutes—this truly allows flavors to seep into the fish, but if you’re short on time, you can skip this step. -
Bake
Pop those beauties into your preheated oven and let them bake for about 12-15 minutes, depending on the thickness of your fillets. Check them halfway through, and drizzle some of the marinade on top for extra flavor. You know your salmon is done when it flakes easily with a fork. -
Serve with Style
Once your salmon is perfectly baked, remove it from the oven and let it rest for a couple of minutes. This allows the juices to redistribute, keeping it moist and tasty. Garnish with chopped green onions for a pop of color!
Serving Suggestions
Plating matters, my friends! For a gorgeous presentation, serve your honey garlic salmon on a bed of fluffy rice or quinoa with steamed veggies on the side. Drizzling a little extra marinade over the top can give it that “wow factor!” Add a lemon wedge on the side for that citrusy twist, and watch your guests swoon over this dish.
Recipe Variations
Ready to switch things up? Here are a few fun ways to customize your honey garlic salmon:
-
Spicy Honey Garlic Salmon
Add a teaspoon of chili flakes or sriracha to the marinade for a kick! -
Asian-Inspired Twist
Add a splash of rice vinegar and a teaspoon of sesame oil to your marinade for an even deeper flavor profile. -
Herb-Infused Salmon
Mix in some fresh herbs like dill or basil after baking for an additional flavor burst. -
Roasted Veggie Side
Toss some zucchini, bell peppers, or asparagus on the same baking sheet for a one-pan meal. -
Citrus Garlic Salmon
Squeeze in some fresh orange or lime juice for a bright flavor boost!
Chef’s Notes
You know, cooking is all about experimentation to find what works best for you. This honey garlic salmon recipe has evolved over the years, and I’ve tried countless variations, each time discovering new flavors and combinations that I love. One of my favorite memories is when I mixed in some ginger—talk about a flavor explosion! Keep playing in the kitchen until you find your perfect blend. The more you cook, the more confident you’ll become!
FAQs and Troubleshooting
1. My salmon is dry! What did I do wrong?
Overcooking is the culprit! Always check your salmon a few minutes before the suggested cooking time, and remember that it continues to cook a bit after you take it out.
2. Can I use frozen salmon?
Absolutely! Just make sure to thaw it first in the refrigerator overnight before marinating and cooking.
3. What should I serve with honey garlic salmon?
The world is your oyster! Rice, quinoa, or even cauliflower rice all pair wonderfully. Don’t forget some bright, roasted veggies to balance the meal.
4. Can I make this dish ahead of time?
Yes! You can marinate the salmon in advance and keep it in the fridge for up to 24 hours. Just remember to cook it fresh for the best flavor and texture!
Nutritional Info
While I usually keep my focus on flavor, here’s a little nutrition breakdown for those curious:
- Calories: Approximately 380 per serving (based on one salmon fillet)
- Protein: 34 grams
- Fat: 12 grams
- Carbs: 30 grams (from the honey and soy sauce)
Remember, oh foodie friends, nutrition can vary based on the specific ingredients you choose, so feel free to adapt to your dietary needs!
So there you have it! I hope you’re inspired to make this Honey Garlic Salmon dish—and the best part? It comes together in no time flat! I can’t wait for you to dive into this recipe, and please share your kitchen adventures with me. Happy cooking!
PrintHoney Garlic Salmon
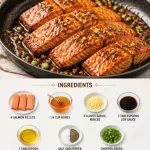
A perfect harmony of sweet and savory, this honey garlic salmon dish transforms mundane weeknight dinners into delightful culinary experiences.
- Prep Time: 15 minutes
- Cook Time: 15 minutes
- Total Time: 30 minutes
- Yield: 4 servings 1x
- Category: Main Course
- Method: Baking
- Cuisine: American
- Diet: Gluten-Free
Ingredients
- 4 salmon fillets
- 1/4 cup honey
- 3 cloves garlic, minced
- 2 tablespoons soy sauce
- 1 tablespoon olive oil
- Salt and pepper to taste
- Chopped green onions for garnish
Instructions
- Preheat the oven to 400°F (200°C).
- Combine honey, minced garlic, and soy sauce in a small bowl to make the marinade.
- Place salmon fillets on a baking sheet lined with parchment paper, drizzle with olive oil, and season with salt and pepper.
- Pour the honey garlic mixture over the salmon to coat.
- Let it marinate for 15-30 minutes if time allows.
- Bake for 12-15 minutes, until the salmon flakes easily with a fork.
- Remove from the oven, let rest, and garnish with chopped green onions before serving.
Notes
Serve with fluffy rice or quinoa and steamed veggies for a complete meal. A lemon wedge adds a nice touch!
Nutrition
- Serving Size: 1 serving
- Calories: 380
- Sugar: 24g
- Sodium: 800mg
- Fat: 12g
- Saturated Fat: 2g
- Unsaturated Fat: 8g
- Trans Fat: 0g
- Carbohydrates: 30g
- Fiber: 0g
- Protein: 34g
- Cholesterol: 70mg
Keywords: honey garlic salmon, easy salmon recipe, healthy dinner

Salmon Patties
Salmon Patties: A Flavorful Delight That’s Good for You
Welcome, food lovers, to another delicious adventure here at Clean Plate Cravings! Today, we’re diving into a dish that is not only packed with flavor but also brings back some sweet nostalgic memories for me—Salmon Patties. These little golden bites are a perfect blend of fresh salmon, crunchy breadcrumbs, and zesty lemon, making them an irresistible option for lunch, dinner, or even as an appetizer. So, grab your apron, and let’s embark on this culinary journey together!
A Trip Down Memory Lane: My First Salmon Patties
Let me take you back to my childhood, where the aroma of salmon patties sizzling in the pan filled our cozy kitchen. My mom was the queen of the kitchen, often whipping up delicious meals with whatever we had on hand. One of my favorites was her salmon patties. On Friday evenings, after a long week, we would gather around the table, buzzing with laughter. Those little patties always brought everyone together, and the best part? They were easy enough for my brothers and me to help mix and form them.
I can still remember the excitement of adding the breadcrumbs, sneaking bites of the crispy edges just as they came off the skillet, and the all-important squeeze of lemon right before taking that crucial first bite. It felt like pure magic. Now, as I share this recipe with you, I hope to evoke those warm memories while inspiring you to create new ones in your kitchen.
Ingredients That Make It Happen
Here’s what you’ll need to whip up these delectable salmon patties:
-
1 pound fresh salmon or 1 can (14.75 oz) canned salmon, drained
- Fresh salmon provides an exceptional flavor and texture; if using canned, look for wild-caught options for a healthier choice.
-
1 cup breadcrumbs
- These give the patties a delightful crunch. You can use store-bought or make your own from stale bread.
-
1/2 cup diced onion
- Onions add sweetness and depth. For a milder taste, use green onions or shallots.
-
1/4 cup chopped parsley
- This brings freshness. Feel free to substitute with dill for an herbaceous twist.
-
2 eggs
- Eggs act as a binder here. If you’re vegan, you can substitute with a flaxseed mixture (1 tablespoon ground flaxseed + 2.5 tablespoons water).
-
1 tablespoon lemon juice
- A splash of bright acidity rounds out the flavors. Use fresh lemon juice for the best zest!
-
Salt and pepper to taste
- Seasoning is key. Don’t shy away from adding a pinch more if you love flavor.
-
Oil for frying
- I prefer olive oil for its health benefits and flavor, but canola or avocado oil works just fine.
Step-by-Step Instructions
Now that we have our ingredients prepped, let’s dive into the cooking process!
-
Prepare the Salmon
- If using fresh salmon, start by poaching it. Place the salmon in a saucepan and cover it with water. Bring it to a gentle simmer and let it cook for about 10-12 minutes or until it flakes easily with a fork. Remove it from the water and let it cool before flaking it into a mixing bowl. If using canned salmon, simply drain it and add it straight to the bowl. Pro Tip: If you have leftover salmon from a previous meal, this is the perfect way to repurpose it!
-
Mix the Ingredients
- In your mixing bowl with the flaked salmon, add the breadcrumbs, diced onion, chopped parsley, eggs, lemon juice, salt, and pepper. Now, here’s where the magic happens—mix everything together until it’s well combined. I like to get in there with my hands; it’s the best way to ensure even distribution. Chef Hack: Wet your hands slightly to prevent the mixture from sticking when you form the patties.
-
Form the Patties
- Grab about 1/4 cup of the mixture and shape it into a patty. You want it to be about 1/2 inch thick. Don’t worry if they aren’t perfect; character is what makes them special! Repeat until all the mixture is used. Bonus Tip: Place them on a plate and refrigerate for about 30 minutes to help them firm up before frying.
-
Heat the Oil
- In a large skillet, heat about 1/4 inch of oil over medium heat. You’ll know it’s ready when a small drop of the mixture sizzles upon contact. Safety Tip: Perfect frying temperature is crucial here; if it’s too hot, the patties will burn!
-
Cook the Patties
- Carefully place a few patties in the skillet, making sure not to overcrowd. Fry for about 4-5 minutes on each side or until they are golden brown. Repeat with remaining patties, adding more oil as necessary. Taste Test: I love to take a tiny piece from the edge while cooking—it helps me gauge if more seasoning is needed!
-
Drain and Serve
- Once fried, transfer the patties to a plate lined with paper towels to drain excess oil. This keeps them crispy!
Serving Suggestions
When serving these salmon patties, I recommend plating them on a beautiful dish, perhaps alongside a fresh green salad or some roasted veggies. You can also dollop some homemade tartar sauce or a zesty cucumber yogurt sauce on the side for that extra zing. Add wedges of lemon and sprigs of parsley for a pop of color—after all, we eat with our eyes first!
Recipe Variations
Feeling adventurous? Here are a few creative twists you can try out:
- Mediterranean Flair: Add feta cheese and chopped olives for a Mediterranean-inspired patty.
- Spicy Kick: Mix in diced jalapeños or a dash of hot sauce to add some heat to your patties.
- Southern Style: Incorporate some creole seasoning and serve with remoulade for a Southern twist.
- Asian Infusion: Add soy sauce and green onions, and serve with a sesame dipping sauce for an Asian flair.
- Vegetarian Option: Swap out the salmon for cooked quinoa or chickpeas to create a satisfying veggie patty!
Chef’s Notes
Every recipe I share has a story, and my salmon patties are no exception. Over the years, I’ve tweaked this recipe to fit different dietary needs and personal tastes—sometimes adding in smoked salmon for a slightly different flavor profile or even throwing in some shredded zucchini for an extra nutritious boost. The essence of my original memory remains, but it’s a comforting reminder that recipes evolve just like we do. I hope these patties bring you as much joy as they have for me throughout the years!
FAQs and Troubleshooting
1. Can I use frozen salmon?
Absolutely! Just make sure to thaw it completely and pat it dry before using. This prevents excess moisture, ensuring a crispy exterior.
2. Why did my patties fall apart?
This can happen if the mixture is too wet or if there aren’t enough binding ingredients. Make sure to use the right amount of breadcrumbs and eggs. Refrigerating the formed patties before frying also helps to hold them together.
3. Can I bake these instead of frying?
Yes! Preheat your oven to 375°F (190°C), place the formed patties on a baking sheet lined with parchment paper, and brush with a little oil. Bake for 20-25 minutes, flipping halfway through, until golden brown.
4. Do they freeze well?
Certainly! You can freeze the uncooked patties by placing them in a single layer on a baking sheet until firm, then transferring them to an airtight container. They’ll keep well for up to three months. Just thaw and fry when you’re ready to enjoy!
Conclusion: Let’s Keep It Fresh and Delicious!
Making salmon patties is not just a meal; it’s a bonding experience, a delightful way to enjoy fresh ingredients, and a venture into nostalgia. I hope you experience the same joy making these at home that I do in my kitchen!
Remember to keep it flexible, have fun, and don’t forget that a dash of love is the secret ingredient to any meal. Now, it’s your turn to make these salmon patties! Get cooking, and let me know how they turn out—I can’t wait to see you thrive in your kitchen journey. Until next time, happy cooking!
PrintSalmon Patties

These flavorful salmon patties are a delightful blend of fresh salmon, crunchy breadcrumbs, and zesty lemon, perfect for lunch, dinner, or as an appetizer.
- Prep Time: 15 minutes
- Cook Time: 20 minutes
- Total Time: 35 minutes
- Yield: 4 servings 1x
- Category: Main Course
- Method: Frying
- Cuisine: American
- Diet: Gluten-Free
Ingredients
- 1 pound fresh salmon or 1 can (14.75 oz) canned salmon, drained
- 1 cup breadcrumbs
- 1/2 cup diced onion
- 1/4 cup chopped parsley
- 2 eggs
- 1 tablespoon lemon juice
- Salt and pepper to taste
- Oil for frying
Instructions
- Prepare the salmon by poaching it or using canned salmon. Flake it into a mixing bowl.
- Mix the breadcrumbs, diced onion, chopped parsley, eggs, lemon juice, salt, and pepper with the flaked salmon.
- Form patties using about 1/4 cup of the mixture, making them about 1/2 inch thick.
- Heat oil in a skillet over medium heat.
- Cook the patties in the skillet for 4-5 minutes on each side until golden brown.
- Drain the patties on paper towels before serving.
Notes
Refrigerating the formed patties for 30 minutes helps them firm up before frying. You can serve with homemade tartar sauce or yogurt sauce.
Nutrition
- Serving Size: 1 patty
- Calories: 300
- Sugar: 1g
- Sodium: 300mg
- Fat: 15g
- Saturated Fat: 2g
- Unsaturated Fat: 12g
- Trans Fat: 0g
- Carbohydrates: 20g
- Fiber: 2g
- Protein: 20g
- Cholesterol: 120mg
Keywords: salmon patties, seafood, appetizers, healthy recipes, quick dinner