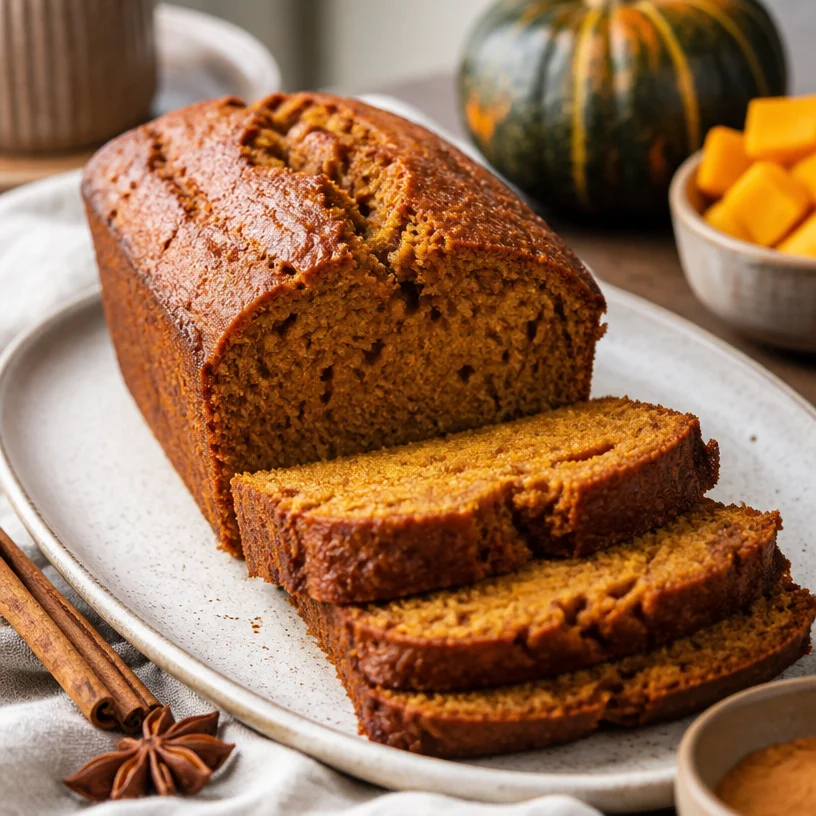
Seasonal Acorn Squash Bread: Cozy Fall Loaf Recipe
The Cozy Comfort of Acorn Squash Bread: A Slice of Fall in Every Bite
Hey there, fellow food lovers! If you’re anything like me, you cherish those little moments in the kitchen. They embody the kind of magic that makes even the busiest days melt away. Today, I want to share a scrumptious recipe that brings all the cozy vibes of fall right into your home: Acorn Squash Bread. Trust me, it’s as delightful as it sounds and will have you feeling all warm and fuzzy inside.
When I think of fall, I think of crisp leaves, comfy sweaters, and the warm scent of baking wafting through the air. Growing up, my grandmother’s kitchen was a haven of soft light and rich aromas. One of my fondest memories was when she introduced me to acorn squash. I was simply fascinated by its unique shape and buttery flavor. “Squash in bread? Really, Nana?” I asked, incredulous. But the moment I sank my teeth into her Acorn Squash Bread, all my doubts faded away. The sweetness of the squash coupled with warm spices created an explosion of flavor that felt like a warm hug. From that day on, squash became my favorite ingredient in everything from soups to pies.
Now that I’ve shared my story, allow me to guide you through this fabulous recipe for Acorn Squash Bread. This bread is perfect for breakfast, an afternoon snack, or even a lovely treat to share with friends. Ready to fill your kitchen with scents reminiscent of autumn? Let’s dive in!
Ingredients
Before we roll up our sleeves, let’s gather our ingredients. Here’s what you’ll need for this delightful Acorn Squash Bread:
-
1 cup acorn squash (mashed or pureed): This is the star of our recipe! If you can’t find acorn squash, you can substitute it with pumpkin or butternut squash for a similar flavor. Just make sure it’s cooked and drained well to avoid excess moisture.
-
1 cup sugar: This adds just the right balance of sweetness. If you’re looking to cut down on refined sugar, consider using coconut sugar or a natural sweetener like maple syrup. Note that the latter will alter the texture slightly.
-
½ cup brown sugar: More depth and moisture here! Dark brown sugar offers a richer flavor, so feel free to experiment with different types.
-
¼ cup vegetable oil: This keeps our bread moist. If you prefer a healthier alternative, you can use applesauce or melted coconut oil. Just remember that the flavor and texture might be a tad different.
-
2 tablespoons butter (melted): For that familiar, comforting taste. Don’t worry if you’re dairy-free—you can use a dairy-free butter substitute without losing out on flavor.
-
½ teaspoon vanilla: A little splash of vanilla enhances all those lovely flavors. You can also use almond extract for a nutty twist if you’re feeling adventurous!
-
2 eggs: These are essential for binding the ingredients together. If you’re vegan or allergic, you can replace each egg with ¼ cup of unsweetened applesauce or a "flax egg" (1 tablespoon of ground flaxseed mixed with 2.5 tablespoons of water).
-
1 ½ cups all-purpose flour: This provides structure. If you want a gluten-free option, feel free to swap it for a 1:1 gluten-free flour blend.
-
1 teaspoon ground cinnamon: Cinnamon is the spice that says "hello autumn" in the best way! Feel free to add a bit more if you like that warm, spiced flavor.
-
½ teaspoon ground cloves: Cloves pack a punch, so add just enough to enhance the warmth. You can also substitute this with allspice for a different profile.
-
½ teaspoon nutmeg: Nutmeg adds that cozy, sweet aroma. Grating fresh nutmeg can elevate the taste.
-
1 teaspoon baking soda: This is our leavening agent. Make sure it’s fresh to ensure your bread rises beautifully.
-
½ teaspoon baking powder: A little extra lift from the baking powder helps balance the reaction with the acidic components in the batter.
-
¼ teaspoon kosher salt: Salt amplifies flavors; it’s a key player in our bread! If you only have table salt, you can use a bit less since it’s more potent.
Step-by-Step Instructions
Alright, it’s time to get cooking! Grab your apron and let’s get to incorporating all that deliciousness.
-
Preheat the Oven: Start off by preheating your oven to 350°F (175°C). This ensures that your bread will bake evenly and get that beautiful golden color.
-
Prepare the Acorn Squash: If you haven’t prepped your acorn squash yet, let’s do that! Cut it in half and scoop out the seeds. Roast the halves cut side down in a baking dish for about 30-40 minutes until tender. Let it cool, then scoop out the flesh and mash it. If you’ve done this ahead of time, you’re golden!
-
Mix Wet Ingredients: In a large mixing bowl, combine the mashed acorn squash, sugar, brown sugar, vegetable oil, melted butter, and vanilla. Whisk these ingredients together until they’re well blended. You’ll love how vibrant and colorful it looks!
-
Add the Eggs: Crack in the eggs one by one, whisking well after each addition. This step helps to incorporate air, which will make your bread fluffy and light.
-
Combine the Dry Ingredients: In a separate bowl, whisk together the all-purpose flour, cinnamon, cloves, nutmeg, baking soda, baking powder, and salt. This helps to distribute the leavening agents evenly through the flour mixture.
-
Mix Everything Together: Gradually add the dry ingredients to the wet mixture, stirring until just combined. Don’t overmix it—lumps are totally okay! This will keep our bread nice and tender. Use a spatula to scrape the sides of your bowl and fold in any extra flour.
-
Pour and Bake: Grease a 9×5-inch loaf pan (or line it with parchment paper) and pour in the batter. Make sure it spreads out evenly; you can give the pan a shake to level it. Pop it in the oven and bake for about 60-70 minutes. When it’s done, a toothpick inserted into the center should come out clean—no batter clinging to it!
-
Cool and Serve: Once baked, remove the bread from the oven and let it cool in the pan for about 15 minutes before transferring it to a wire rack. This will ensure it doesn’t get soggy on the bottom. Leave it to cool fully before slicing—if you can wait that long!
Serving Suggestions
Now that your Acorn Squash Bread is cooled and ready to go, the real fun begins! You can serve it as is, or add a pat of butter or a smear of cream cheese on top for a deliciously creamy contrast. If you’re feeling festive, sprinkle a bit of powdered sugar on the top to elevate the presentation, or even drizzle with a simple glaze made of powdered sugar and a splash of milk.
Recipe Variations
Here are a few tasty ways to remix this Acorn Squash Bread:
- Nutty Twist: Add ½ cup of chopped walnuts or pecans for a delightful crunch.
- Chocolate Lovers: Mix in ½ cup of chocolate chips to satisfy your sweet tooth—oh yes!
- Dried Fruits: Fold in ½ cup of dried cranberries or raisins for a fruity touch.
- Spicy Flavor: Try adding ⅛ teaspoon of cayenne pepper for a surprising kick!
- Banana Squash Bread: Swap out half the acorn squash for mashed banana for an unexpected flavor combo.
Chef’s Notes
This recipe has evolved over time as I experimented with different spices and add-ins. The memory of my grandmother baking is what drives me to add little twists and flavors that fit today’s palate. I once accidentally added an extra tablespoon of cinnamon because I was distracted by my daughter’s cookie crumbling contest. The result? A fragrant, spiced delight that set off a whole new love for creative baking!
One of my favorite memories is sharing this recipe with friends at a potluck. I still remember the joyous laughter that filled the air as we sliced into this fluffy bread, each bite taking us back to cozy fall afternoons. It’s one of those recipes that just brings people together—don’t you love that?
FAQs and Troubleshooting
-
Why did my bread sink in the middle?
- This can happen if there’s too much moisture or if the batter was overmixed. Make sure you don’t add too much squash, and stop mixing once your dry ingredients are just incorporated.
-
Can I freeze this bread?
- Absolutely! Wrap your cooled bread tightly in plastic wrap, then place it in a zip-top bag. It can last up to 3 months in the freezer. Thaw it overnight in the fridge or on the counter for a few hours when you’re ready to enjoy!
-
What if I don’t have all the spices?
- No worries! You can stick to the essentials (cinnamon and nutmeg is a classic duo) or mix in a packet of pumpkin spice if you have that on hand.
-
It tastes too sweet; what did I do wrong?
- Different squash can have varying sweetness. If you find the bread too sweet, reduce the sugar by ¼ cup next time. You can also balance it out with a tart topping, like yogurt or cream cheese.
Nutritional Info
While everyone loves a good slice of bread, it’s always nice to know what you’re consuming. Here’s a rough estimate per slice (assuming 12 slices per loaf):
- Calories: 180
- Total Fat: 7g
- Saturated Fat: 2g
- Cholesterol: 43mg
- Sodium: 92mg
- Total Carbohydrates: 28g
- Dietary Fiber: 1g
- Sugars: 11g
- Protein: 2g
Remember, these are estimates and vary based on ingredient brands and servings!
There you have it, my friends! A complete, cozy guide to making Acorn Squash Bread that’s not only delicious but rich in memories and warmth. I hope you try it with loved ones and share in that joyful experience, just like I did with my grandmother. Happy baking, and may your days be filled with good food and great memories!
PrintAcorn Squash Bread
A deliciously cozy Acorn Squash Bread that captures the essence of fall with its warm spices and sweetness.
- Prep Time: 15 minutes
- Cook Time: 70 minutes
- Total Time: 85 minutes
- Yield: 12 slices 1x
- Category: Bread
- Method: Baking
- Cuisine: American
- Diet: Vegetarian
Ingredients
- 1 cup acorn squash (mashed or pureed)
- 1 cup sugar
- ½ cup brown sugar
- ¼ cup vegetable oil
- 2 tablespoons butter (melted)
- ½ teaspoon vanilla
- 2 eggs
- 1 ½ cups all-purpose flour
- 1 teaspoon ground cinnamon
- ½ teaspoon ground cloves
- ½ teaspoon nutmeg
- 1 teaspoon baking soda
- ½ teaspoon baking powder
- ¼ teaspoon kosher salt
Instructions
- Preheat the oven to 350°F (175°C).
- Prepare the acorn squash by cutting it in half and roasting it until tender.
- Mix the wet ingredients in a bowl until well blended.
- Add the eggs one at a time, whisking well after each addition.
- Combine the dry ingredients in a separate bowl.
- Mix everything together until just combined, being careful not to overmix.
- Pour the batter into a greased loaf pan.
- Bake for about 60-70 minutes until a toothpick comes out clean.
- Cool in the pan for 15 minutes before transferring to a wire rack.
Notes
For a nutty twist, add chopped walnuts or pecans. You can also use pumpkin or butternut squash instead of acorn squash.
Nutrition
- Serving Size: 1 slice
- Calories: 180
- Sugar: 11g
- Sodium: 92mg
- Fat: 7g
- Saturated Fat: 2g
- Unsaturated Fat: 3g
- Trans Fat: 0g
- Carbohydrates: 28g
- Fiber: 1g
- Protein: 2g
- Cholesterol: 43mg
Keywords: bread, fall recipes, acorn squash, cozy recipes
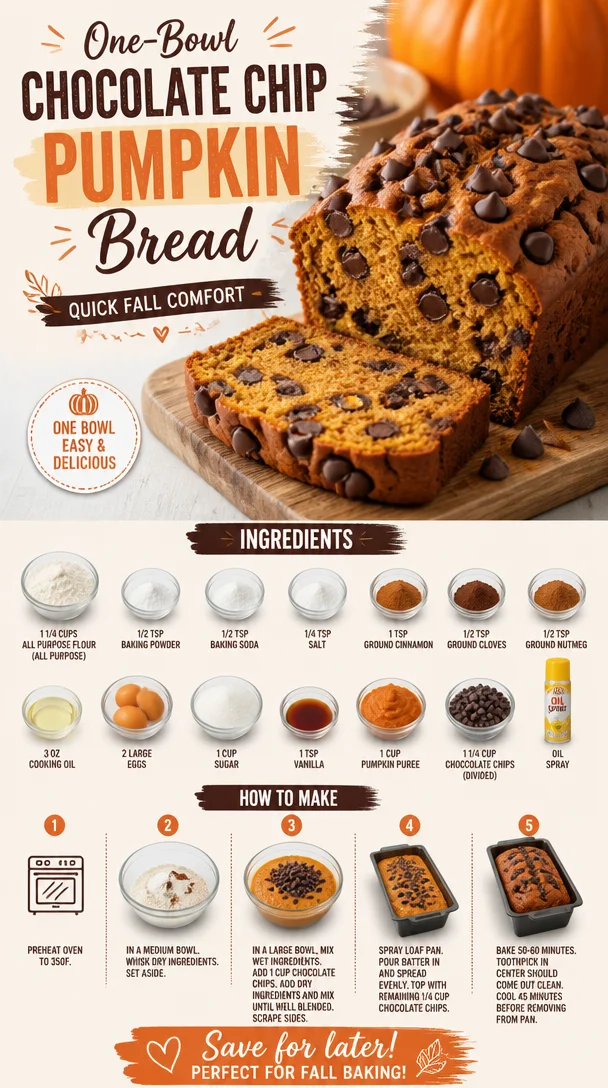
One-Bowl Chocolate Chip Pumpkin Bread: Quick Fall Comfort
Best Chocolate Chip Pumpkin Bread: A Cozy Fall Favorite
Welcome, fellow foodies! Today, we’re diving into one of my all-time favorite autumn treats: Chocolate Chip Pumpkin Bread. Here at Clean Plate Cravings, we believe that the change of seasons means it’s time to cozy up in the kitchen and whip up some delightful eats that make you feel good. Trust me, this pumpkin bread is about to become a staple in your fall repertoire!
Imagine this: the leaves are turning, there’s a crisp chill in the air, and your favorite sweater is just begging to be worn. There’s no better way to celebrate the harvest season than with the warm, comforting aroma of pumpkin spice wafting through your home. And just when you think it can’t get any better, you add chocolate chips to the mix. Yes, please! This chocolate chip pumpkin bread is not just a recipe; it’s a hug in a loaf.
But wait—let’s remember: enjoying food should be about balance and joy, not just the seasonal requirement. That’s why I’m sharing a recipe that combines wholesome ingredients with that sweet, indulgent treat we all crave. So grab your apron, and let’s get cozy in the kitchen!
A Slice of Nostalgia
Growing up, my grandmother was the queen of baking delicious foods. Her secret weapon? Pumpkin bread! Each fall, my family would gather in her kitchen, and the sound of her mixing bowl filled the house—a cheerful sound that echoed warmth and love. I’d stand on my tiptoes, peering over the counter, trying to catch a glimpse of her mixing the vibrant orange pumpkin puree with the rich springtime spices.
But it was the chocolate chips that took the cake—or should I say, the bread! That delightful surprise melted into the loaf, creating a perfect blend of sweet and savory. There was something magical about each slice—crispy on the outside, rich and fluffy on the inside, with chocolate chips peeking out like little treasures.
Now, every time I make this chocolate chip pumpkin bread, I’m transported back in time, cherishing those moments with my grandma. It’s more than just a recipe; it’s a beloved tradition that I hope captures the hearts of my readers as well.
Ingredients
Let’s talk about the ingredients that make this pumpkin bread truly special. Here’s what you’ll need:
-
1 1/4 cups all-purpose flour
All-purpose flour provides the structure of our bread. If you need a gluten-free option, feel free to swap it out for gluten-free flour blends. -
1/2 tsp baking powder
This ingredient helps our bread rise a bit while keeping it moist. A must-have for that soft, fluffy texture! -
1/2 tsp baking soda
Using both baking soda and baking powder balances the leavening and ensures your bread is light and airy. -
1/4 tsp salt
A pinch of salt amplifies the flavor without making the bread taste salty. Trust me; it’s essential! -
1 tsp ground cinnamon
Cinnamon is the heart and soul of fall baking. It adds warmth and a cozy aroma that fills your home with happiness. -
1/2 tsp ground cloves
Cloves pack an aromatic punch! They also balance the sweetness of the chocolate. -
1/2 tsp ground nutmeg
Nutmeg enhances the depth of flavor in your pumpkin bread and brings that classic autumn vibe. -
3 oz cooking oil
Oil keeps our cake moist and tender. You can switch it out for applesauce to cut calories or use melted coconut oil for a tropical twist. -
2 large eggs
Eggs help bind the ingredients while providing richness. Vegan? Substitute with flax eggs (1 tablespoon flaxseed meal mixed with 2.5 tablespoons water per egg). -
1 cup sugar
Sweetness is essential! You can use brown sugar for added moisture and a deeper flavor. -
1 tsp vanilla
A splash of vanilla rounds out all the flavors and adds to the delightful aroma of pumpkin bread. -
1 cup pumpkin puree
Pure pumpkin purée brings moisture and the classic autumn flavor. Use canned for convenience or make your own if you’re feeling adventurous! -
1 1/4 cup chocolate chips (divided)
Chocolate chips are the surprise that everyone looks forward to! Use semi-sweet, dark chocolate, or even white chocolate for a fun twist. -
Oil spray
For greasing your pan. Don’t skip this step, or you might end up with stuck bread!
Step-by-Step Instructions
Now that we’ve got our ingredients ready, let’s dive into the process of making this heavenly chocolate chip pumpkin bread!
1. Preheat Your Oven
Preheat your oven to 350°F (175°C). This is an essential step, folks! We want our bread to bake evenly and rise to perfection.
2. Prepare Your Loaf Pan
Grab a 9×5-inch loaf pan and spray it lightly with oil or grease it with butter. This will ensure that your beautiful loaf slides right out when it’s done.
3. Mix the Dry Ingredients
In a medium bowl, whisk together the all-purpose flour, baking powder, baking soda, salt, cinnamon, cloves, and nutmeg. This step helps evenly distribute the leavening agents and spices throughout the flour.
4. Combine the Wet Ingredients
In a large bowl, whisk together the oil, eggs, sugar, vanilla, and pumpkin purée until smooth. Take your time with this step—it’s where you’re capturing all those cozy fall flavors.
5. Combine Gently
Gradually add the dry mixture to the wet, folding gently with a spatula or wooden spoon until just combined. Don’t overmix! Overmixing can lead to tough bread, and we want tenderness, remember?
6. Fold in the Chocolate Chips
Gently fold in 1 cup of the chocolate chips. It’s okay to sneak a few for yourself while you’re at it!
7. Pour into the Pan
Pour the batter into the prepared loaf pan and sprinkle the remaining chocolate chips on top. This makes for a beautiful presentation and ensures it looks as decadently delicious as it tastes!
8. Bake
Place your loaf pan in the preheated oven and bake for 50-60 minutes, or until a toothpick inserted into the center comes out clean. Keep an eye on it the last 10 minutes—every oven is different, and you want that golden brown crust!
9. Cool Down
Once your bread is baked, let it cool in the pan for about 10 minutes. Then, carefully transfer it to a wire rack to cool completely. The smell in your kitchen will be utterly irresistible!
10. Slice and Enjoy!
Once cooled, slice your pumpkin bread into generous portions. Serve it fresh, or toast it with a bit of butter for an extra indulgent treat.
Serving Suggestions
I love to serve this chocolate chip pumpkin bread with a hot cup of coffee or tea for a cozy afternoon snack. You could also add a dollop of whipped cream cheese on top or serve it with a scoop of vanilla ice cream for dessert—hello, fall flavors!
Recipe Variations
Feeling creative? Here are a few fun twists on this classic recipe:
- Spice it Up: Add in some chopped nuts like walnuts or pecans for added crunch.
- Sweet Swaps: Substitute half the sugar with maple syrup for a deeper flavor.
- Choco-Loaded: Mix in white chocolate chips or butterscotch chips for different flavor profiles.
- Gluten-Free: Swap out all-purpose flour for gluten-free flour blends for a gluten-free option!
- Pumpkin & Banana: Add 1 ripe mashed banana to the batter for an added fruity twist!
Chef’s Notes
Every time I make this pumpkin bread, I think back to the conversation I had with my grandma about baking. She taught me about the little things—like how a pinch of love can make a dish taste infinitely better. Over the years, I’ve tweaked this recipe to fit my evolving taste, introducing chocolate chips and experimenting with spices. It’s a reminder that cooking is a beautiful journey of growth and discovery.
Funny story: one time, I decided to double the chocolate chips in a rush while chatting with my friend on the phone. It turned out to be a happy accident; we ended up calling it “Chocopotamus Bread” because it was so loaded with chocolate! It’s definitely one of those sweet kitchen mishaps that turned into a cherished memory.
FAQs and Troubleshooting
1. My bread is too dense. What did I do wrong?
Overmixing can be a culprit! When mixing your batter, just combine until the wet and dry ingredients are incorporated. A little flour here and there is okay!
2. Can I use fresh pumpkin instead of canned?
Absolutely! Just roast and purée your pumpkin until smooth. Be sure to drain any excess liquid to avoid a soggy bread.
3. How do I store the leftovers?
You can keep your pumpkin bread wrapped tightly at room temperature for up to 3 days or in the fridge for about a week. For longer storage, you can freeze slices in an airtight container for up to 3 months.
4. Why did my loaf sink in the middle?
This can happen due to too much humidity, underbaking, or opening the oven door too soon. Make sure you let your bread bake fully and resist the temptation to check on it until the last 10-15 minutes!
Nutritional Info
If you’re curious, one slice of this delightful chocolate chip pumpkin bread contains approximately:
- Calories: 250
- Protein: 3g
- Carbohydrates: 35g
- Total Fat: 10g
(Nutritional values will vary based on ingredients used; this is an estimate!)
And there you have it! Your ultimate guide to baking the best Chocolate Chip Pumpkin Bread—complete with memories, tips, tricks, and a few stories to hold close. I hope this fills your kitchen with warmth and brings joy to your table this fall. Remember, cooking is about having fun and sharing great food with the people you love. Happy baking, friends!
PrintBest Chocolate Chip Pumpkin Bread
A cozy fall favorite, this Chocolate Chip Pumpkin Bread combines rich pumpkin flavor with sweet chocolate chips for a delightful treat.
- Prep Time: 15 minutes
- Cook Time: 60 minutes
- Total Time: 75 minutes
- Yield: 8 servings 1x
- Category: Dessert
- Method: Baking
- Cuisine: American
- Diet: Vegetarian
Ingredients
- 1 1/4 cups all-purpose flour
- 1/2 tsp baking powder
- 1/2 tsp baking soda
- 1/4 tsp salt
- 1 tsp ground cinnamon
- 1/2 tsp ground cloves
- 1/2 tsp ground nutmeg
- 3 oz cooking oil
- 2 large eggs
- 1 cup sugar
- 1 tsp vanilla
- 1 cup pumpkin puree
- 1 1/4 cups chocolate chips (divided)
- Oil spray for greasing
Instructions
- Preheat your oven to 350°F (175°C).
- Prepare a 9×5-inch loaf pan by spraying it lightly with oil.
- Mix the dry ingredients: flour, baking powder, baking soda, salt, cinnamon, cloves, and nutmeg in a medium bowl.
- Combine the wet ingredients: oil, eggs, sugar, vanilla, and pumpkin purée in a large bowl until smooth.
- Add the dry mixture to the wet mixture, folding gently until just combined.
- Fold in 1 cup of chocolate chips.
- Pour the batter into the prepared loaf pan and sprinkle the remaining chocolate chips on top.
- Bake for 50-60 minutes, or until a toothpick comes out clean.
- Cool the bread in the pan for about 10 minutes, then transfer to a wire rack.
- Slice and enjoy!
Notes
Serve with coffee or tea for a cozy snack, or add whipped cream cheese on top for an indulgent treat. Store leftovers tightly wrapped at room temperature or in the fridge.
Nutrition
- Serving Size: 1 slice
- Calories: 250
- Sugar: 15g
- Sodium: 150mg
- Fat: 10g
- Saturated Fat: 1g
- Unsaturated Fat: 7g
- Trans Fat: 0g
- Carbohydrates: 35g
- Fiber: 1g
- Protein: 3g
- Cholesterol: 30mg
Keywords: pumpkin bread, chocolate chip, fall baking, autumn recipes
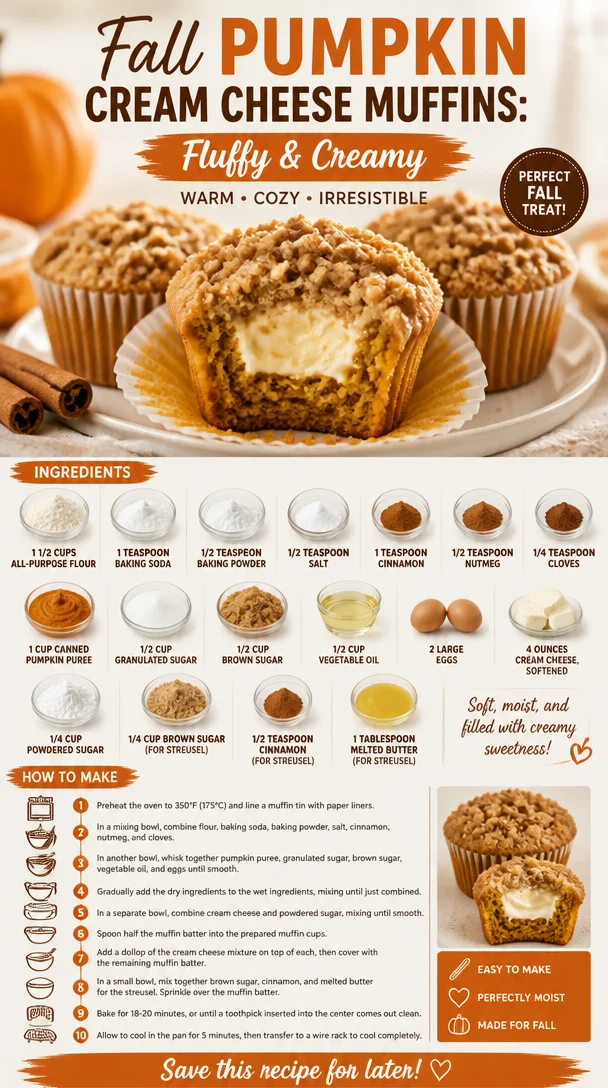
Fall Pumpkin Cream Cheese Muffins: Fluffy & Creamy
Pumpkin Cream Cheese Muffins: A Warm Autumn Delight
Welcome to my kitchen, where the tantalizing aroma of freshly baked muffins fills the air, and every bite feels like a warm hug! Today, we’re diving into one of my absolute favorite autumn recipes—Pumpkin Cream Cheese Muffins. There’s just something magical about the blend of spiced pumpkin and creamy, decadent cream cheese, making these muffins a perfect treat for breakfast, brunch, or a cozy afternoon snack.
Fall is a season of change, and with it comes the excitement of autumn flavors. Pumpkin is the star of the show, and when it’s paired with cream cheese, the result is a delightful mélange of textures and tastes. I can’t wait to share my tips, tricks, and a heartfelt story behind these scrumptious muffins!
Personal Story
Let me take you back to my childhood, when the leaves would start to change, and the air turned crisp. My grandmother had a way of making everything feel special, especially during the fall. One of my fondest memories is of her kitchen filled with laughter, the warmth of the oven, and the intoxicating smell of pumpkin muffins baking.
On weekends, I would wake up to the sweet scent wafting through the house, tugging me out of bed like a cozy blanket calling me to start the day. My favorite part? Helping Grandma swirl the cream cheese filling into the muffins—an art form in itself! We’d sneak bites of the unbaked batter and giggle as the kitchen turned into a flour-dusted wonderland.
Those muffins not only filled our bellies but also created lasting memories, and to this day, I make them often, recalling those moments fondly. So, in the spirit of nostalgia and yummy flavors, let’s jump into these Pumpkin Cream Cheese Muffins!
Ingredients
Here’s what you’ll need to whip up these delightful muffins:
-
1 1/2 cups all-purpose flour: The base of our muffins. If you prefer a lighter texture, consider using cake flour.
-
1 teaspoon baking soda: This gives our muffins a nice rise. Don’t skip it!
-
1/2 teaspoon baking powder: Works alongside the baking soda to help the muffins fluff up.
-
1/2 teaspoon salt: Balances all the flavors, enhancing the sweetness of the pumpkin.
-
1 teaspoon cinnamon: A warm spice that brings out the cozy, autumn vibes.
-
1/2 teaspoon nutmeg: Adds a hint of earthiness—totally essential for that pumpkin experience.
-
1/4 teaspoon cloves: Just a pinch brings depth to our flavor profile.
-
1 cup canned pumpkin puree: Use 100% pure pumpkin puree. Don’t confuse it with pumpkin pie filling, which has added spices and sugars.
-
1/2 cup granulated sugar: Sweetens the mix without overwhelming the pumpkin flavor.
-
1/2 cup brown sugar: Brown sugar adds a deeper flavor and moisture to our muffins.
-
1/2 cup vegetable oil: Keeps the muffins moist and tender. You can substitute with melted coconut oil for a healthier option.
-
2 large eggs: These bind the ingredients and help create a lovely texture.
-
4 ounces cream cheese, softened: The star of our filling! Use full-fat cream cheese for the best results.
-
1/4 cup powdered sugar: Sweetens our cream cheese filling—it’s all about balance!
-
1/4 cup brown sugar (for streusel): Adds a delightful crunch and sweetness on top.
-
1/2 teaspoon cinnamon (for streusel): Just like before, enhances the flavor.
-
1 tablespoon melted butter (for streusel): Holds everything together and brings a buttery richness.
Step-by-Step Instructions
Alright, let’s get our hands a little messy and bake these muffins together!
-
Preheat your oven to 350°F (175°C) and line a muffin tin with paper liners or grease it with non-stick spray. This is key to getting those muffins out in one piece!
-
In a medium bowl, whisk together the flour, baking soda, baking powder, salt, cinnamon, nutmeg, and cloves. This ensures even distribution of the dry ingredients—nobody likes a mouthful of baking soda!
-
In a large bowl, combine the canned pumpkin puree, granulated sugar, brown sugar, vegetable oil, and eggs. Mix well with a spatula or a hand mixer until creamy and smooth. Look at that vibrant orange color—it screams fall!
-
Gradually add the dry ingredients into the pumpkin mixture, being careful not to overmix. Stir until just combined; a few lumps are totally okay. This is a classic chef trick—overmixing leads to dense muffins, and nobody wants that!
-
Prepare the cream cheese filling: In a separate bowl, beat the softened cream cheese with powdered sugar until smooth and fluffy. You can add a dash of vanilla extract for an extra flavor kick.
-
Make the streusel topping: In a small bowl, combine the brown sugar, cinnamon, and melted butter. Add in flour until you get a crumbly mixture. You want it to hold together but still be crumbly.
-
Divide the muffin batter equally among the liners, filling each about halfway. Then, drop a spoonful of the cream cheese mixture into the center of each muffin. Don’t be shy—generous is the name of the game!
-
Top off with the remaining muffin batter, covering the cream cheese filling entirely. Finally, sprinkle the streusel topping over each muffin.
-
Bake in the preheated oven for 20 to 25 minutes, or until a toothpick inserted comes out clean (though a little cream cheese on it is okay!). Your kitchen will smell heavenly!
-
Let them cool in the pan for about 5 minutes before transferring to a wire rack—this allows the muffins to set and makes them easier to handle.
Serving Suggestions
These Pumpkin Cream Cheese Muffins are best served warm, fresh from the oven. I love to eat them just as they are, but a light dusting of powdered sugar adds a special touch. Serve them alongside a steaming cup of coffee or chai latte for a perfect morning treat or cozy afternoon snack.
Recipe Variations
Want to switch things up? Here are some creative tweaks you can try:
-
Add-ins: Toss in some chocolate chips or chopped nuts for added texture and flavor.
-
Gluten-Free Option: Swap the all-purpose flour for a gluten-free flour blend.
-
Spiced Up: Increase the spice levels by adding more cinnamon or a pinch of cayenne for a little heat.
-
Dairy-Free: Use vegan cream cheese instead of regular cream cheese for a dairy-free version.
-
Mini Muffins: Make mini muffins for bite-sized snacks—just reduce the baking time by about 5 minutes!
Chef’s Notes
These muffins have been a staple in my kitchen for years, and I love how they evolve with each batch. I remember one time, I got a little too excited with the spices, and they turned out almost too spiced! But my family loved them and declared them "Boom Boom Muffins!" Now, I always leave a little room for experimentation.
If you’re in the mood to switch up the filling, try cream cheese mixed with orange zest or cranberry for a festive twist; you won’t be disappointed!
FAQs and Troubleshooting
1. Why are my muffins dense?
Overmixing the batter can lead to dense muffins. Try mixing until just combined for lighter, fluffier results.
2. Can I freeze these muffins?
Absolutely! Once completely cooled, wrap them individually in plastic wrap and store them in an airtight bag. They can last for up to three months in the freezer.
3. How can I tell when my muffins are done?
Insert a toothpick in the center of a muffin. If it comes out clean or with a few moist crumbs, they’re done!
4. My streusel topping didn’t crisp up. What did I do wrong?
Ensure the butter is melted just enough to combine with the sugars and flour properly. If it’s too melted, it won’t hold its shape!
Nutritional Info (per muffin)
- Calories: 180
- Protein: 4g
- Carbohydrates: 25g
- Fat: 8g
- Fiber: 1g
- Sugar: 10g (includes natural and added sugars)
So there you have it! A delightful recipe for Pumpkin Cream Cheese Muffins that’s sure to warm your heart and fill your belly. Whether you’re reminiscing about your grandma’s kitchen or blending your own unique flavors, these muffins will always hit the spot. Enjoy baking (and eating!) them, and remember—good food is all about the joy it brings, not just the taste! Let’s savor each moment and keep those cravings coming!
PrintPumpkin Cream Cheese Muffins
Delicious muffins featuring spiced pumpkin and creamy cream cheese, perfect for breakfast or snacks during autumn.
- Prep Time: 15 minutes
- Cook Time: 25 minutes
- Total Time: 40 minutes
- Yield: 12 servings 1x
- Category: Dessert
- Method: Baking
- Cuisine: American
- Diet: Vegetarian
Ingredients
- 1 1/2 cups all-purpose flour
- 1 teaspoon baking soda
- 1/2 teaspoon baking powder
- 1/2 teaspoon salt
- 1 teaspoon cinnamon
- 1/2 teaspoon nutmeg
- 1/4 teaspoon cloves
- 1 cup canned pumpkin puree
- 1/2 cup granulated sugar
- 1/2 cup brown sugar
- 1/2 cup vegetable oil
- 2 large eggs
- 4 ounces cream cheese, softened
- 1/4 cup powdered sugar
- 1/4 cup brown sugar (for streusel)
- 1/2 teaspoon cinnamon (for streusel)
- 1 tablespoon melted butter (for streusel)
Instructions
- Preheat your oven to 350°F (175°C) and line a muffin tin with paper liners or grease it.
- Whisk together the flour, baking soda, baking powder, salt, cinnamon, nutmeg, and cloves in a medium bowl.
- Combine the pumpkin puree, granulated sugar, brown sugar, vegetable oil, and eggs in a large bowl and mix until creamy.
- Add the dry ingredients gradually into the pumpkin mixture, stirring until just combined.
- Prepare the cream cheese filling by beating the cream cheese with powdered sugar until smooth.
- Make the streusel topping by mixing brown sugar, cinnamon, and melted butter, then incorporating flour until crumbly.
- Divide the muffin batter among the liners, adding cream cheese mixture on top, then cover with more muffin batter.
- Sprinkle the streusel topping over each muffin.
- Bake for 20 to 25 minutes, or until a toothpick comes out clean.
- Cool in the pan for 5 minutes before transferring to a wire rack.
Notes
These muffins are best enjoyed warm and can be frozen individually for up to three months.
Nutrition
- Serving Size: 1 muffin
- Calories: 180
- Sugar: 10g
- Sodium: 200mg
- Fat: 8g
- Saturated Fat: 2g
- Unsaturated Fat: 5g
- Trans Fat: 0g
- Carbohydrates: 25g
- Fiber: 1g
- Protein: 4g
- Cholesterol: 40mg
Keywords: pumpkin muffins, fall baking, cream cheese filling
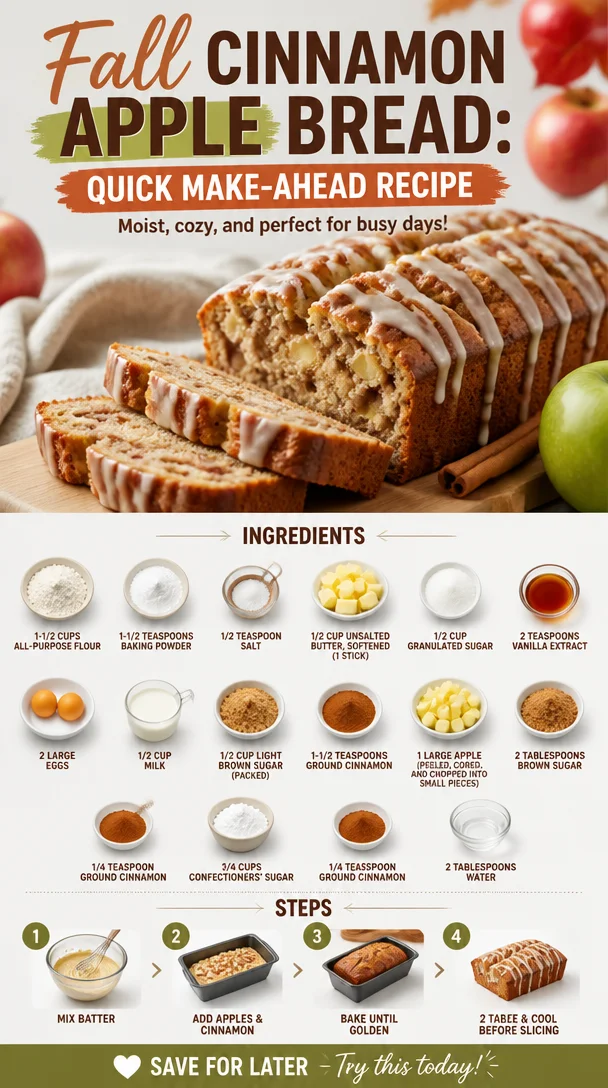
Fall Cinnamon Apple Bread: Quick Make-Ahead Recipe
Warm and Cozy Cinnamon Apple Bread: A Slice of Nostalgia
Welcome back to Clean Plate Cravings! Today, we’re diving into a recipe that wraps you in a warm, sugary hug and fills your home with irresistible aromas—the heartwarming Cinnamon Apple Bread. Whether you’re hosting a cozy breakfast with friends, packing a sweet treat for someone special, or simply indulging in a slice during quiet moments with a cup of tea, this bread feels like a hug from grandma.
But really, what’s better than the wonderful smell of cinnamon wafting through your kitchen? I remember the first time I baked apple bread. I was just a kid, standing on a stool beside my mom in our tiny kitchen. We had just picked fresh apples from a local orchard, and as we chopped them up, my excitement grew, knowing a delicious treat was on the horizon. My mom had a knack for turning everyday ingredients into something extra magical, and this cinnamon apple bread was one of her go-to recipes.
As we mixed the batter and sprinkled in the cinnamon—oh, that heavenly smell!—I realized that something special was happening. This wasn’t just a recipe; it was a special moment shared between us. This bread became our family’s comfort food, perfect for cozying up with a hot cup of cocoa on chilly evenings or gifting to neighbors during the holidays. It was a delicious blend of sweet and spice with a moist, tender crumb that had us all coming back for seconds.
Now, I’m excited to share my own version of this cherished recipe with you! With its balance of flavors and simple ingredients, you too can create a memorable experience with every slice. Let’s jump into the delectable world of Cinnamon Apple Bread!
Ingredients
Here’s what you’ll need to whip up this delightful cinnamon apple bread:
-
1-1/2 cups all-purpose flour
The base of your bread! If you’re looking for a gluten-free version, substitute with gluten-free all-purpose flour. Just make sure it includes xanthan gum for proper texture! -
1-1/2 teaspoons baking powder
This is your leavening agent, helping the bread rise. Be sure it’s fresh; expired baking powder can lead to dense bread. -
1/2 teaspoon salt
A pinch of salt enhances all those lovely flavors. Don’t overlook it! -
1/2 cup unsalted butter, softened (1 stick)
Brings richness and flavor to your bread. If dairy is a concern, coconut oil works as a great substitute! -
1/2 cup granulated sugar
Sweetness factor! You can also use coconut sugar for a lower glycemic index. -
2 teaspoons vanilla extract
Adds a lovely warmth. Use pure vanilla extract for a deeper flavor-profile, though imitation works too in a pinch! -
2 large eggs
These bind everything together and add moisture. For a vegan option, substitute with flax eggs (1 tablespoon of ground flaxseed mixed with 2.5 tablespoons of water per egg). -
1/2 cup milk
Dairy or plant-based milk works! Almond milk, oat milk, or even coconut milk can be excellent choices. -
1/2 cup light brown sugar (packed)
This brings a subtle caramel flavor to the bread. If you run out, you can use dark brown sugar instead—it’ll just give more depth. -
1-1/2 teaspoons ground cinnamon
The flavor star of this recipe! For a twist, consider using fresh ground cinnamon or even a dash of nutmeg or cardamom for added spice. -
1 large apple (peeled, cored, and chopped into small pieces)
The fresh fruit keeps your bread moist and adds a lovely tartness. Granny Smith or Honeycrisp apples work wonderfully here! -
2 tablespoons brown sugar
Great for sprinkling on top for a crunchy finish! -
1/4 teaspoon ground cinnamon
Used here for the topping—because you can never have too much cinnamon! -
3/4 cups confectioners’ sugar
This is for an optional glaze to make your bread extra special. -
1/4 teaspoon ground cinnamon
A final touch for the glaze! -
2 tablespoons water
To achieve the perfect glaze consistency.
Step-by-Step Instructions
Let’s make this cinnamon apple bread shine! Here’s how we do it—step by step:
-
Preheat the oven: Start by preheating your oven to 350°F (175°C). This is crucial for ensuring your bread bakes evenly. While it heats up, you can prepare your loaf pan.
-
Grease your loaf pan: Grab a 9×5-inch loaf pan and grease it with a little butter or line it with parchment paper. This will make it super easy to get your bread out after baking.
-
Mix the dry ingredients: In a medium bowl, whisk together the flour, baking powder, cinnamon, and salt. This is a cool chef hack! Whisking these dry ingredients helps to evenly distribute the leavening agents and ensures there are no flour lumps later.
-
Cream the butter and sugar: In a large bowl, using a hand mixer or a stand mixer, cream the softened butter and granulated sugar together until it’s light and fluffy—about 3 minutes. It’s important to really aerate the mixture here; that’s where the magic happens!
-
Add eggs and vanilla: Add in the eggs one by one, mixing well after each addition. Then, stir in the vanilla extract. This step adds moisture and flavor to your batter.
-
Incorporate the milk: Gradually mix in the milk until it’s well combined. Here’s a little tip: If your batter seems too thick, a splash more milk can help!
-
Combine wet and dry: Gradually add your dry ingredient mixture to the wet ingredients. Fold gently with a spatula until just combined. Avoid overmixing—this helps your bread stay light and fluffy!
-
Add the apples: Gently stir in your chopped apples. This is the fun part! Those little apple bits will caramelize beautifully in the oven, offering pockets of warm, juicy goodness.
-
Pour into the pan: Transfer your batter to the greased loaf pan, smoothing the top down with your spatula.
-
Prepare the topping: In a small bowl, mix together the brown sugar and cinnamon. Sprinkle this mixture evenly over the top of your batter. This little topping gives your bread a crunchy, sweet crust!
-
Bake: Pop your loaf in the preheated oven and bake for 50-60 minutes, or until a toothpick comes out clean from the center. The aroma that fills your kitchen will have you salivating!
-
Cool and glaze: Once it’s baked, let it cool in the pan for about 10 minutes before transferring it to a wire rack. If you’re feeling adventurous, make a quick glaze by whisking together the confectioners’ sugar, cinnamon, and water until smooth. Drizzle it over the cooled bread!
Serving Suggestions
Slice your cinnamon apple bread while it’s still warm for that fresh-out-of-the-oven experience! Serve it on a rustic wooden board with a side of creamy butter or spreadable cream cheese. Cuddle up on the sofa with a generous slice and your favorite hot drink—the perfect pairing for a relaxing afternoon!
Recipe Variations
Here are some fun twists on this classic recipe to keep things exciting:
- Nutty Additions: Fold in 1/2 cup of chopped walnuts or pecans into the batter for a crunchy element.
- Dried Fruits: Add 1/4 cup of raisins or cranberries for a delightful surprise textural contrast.
- Spiced Up: Want more warmth? Toss in a pinch of nutmeg or ginger along with the cinnamon.
- Maple Glaze: Swap the water in the glaze for pure maple syrup for a richer sweetness.
- Mini Loaves: Bake in mini loaf pans for adorable gifts or portion control!
Chef’s Notes
This cinnamon apple bread is a well-loved family recipe that I’ve cherished and adapted over the years. I remember one holiday baking marathon when my family decided to make it with a twist—adding cranberries for a festive flair! It turned out to be a huge hit!
Now, I often use this recipe as a base for other fruity breads too: swap apples for mashed bananas for a banana bread version or try zucchini for a savory twist.
Remember, baking should be fun and adaptable! Don’t stress too much about measurements—cooking is all about flavors and the love you put into it!
FAQs and Troubleshooting
1. My bread is too dense. What did I do wrong?
Overmixing can lead to a denser bread. Mix just until combined. Also, ensure your baking powder is fresh!
2. Can I use frozen apples?
Absolutely! Just make sure to thaw and drain them well to avoid extra moisture. Fresh apples are best, but frozen works in a pinch.
3. How should I store the bread?
Store it in an airtight container at room temperature for up to 3 days. For longer freshness, wrap it tightly and freeze. It tastes great even after thawing!
4. What’s the best way to serve leftovers?
Slicing it and toasting the leftover bread gives it a lovely crispy texture and warms up that cinnamon goodness!
This delightful Cinnamon Apple Bread is more than just a recipe; it’s an opportunity to create fond memories while enjoying scrumptious, homemade goodness. So gather your ingredients, roll up your sleeves, and let’s make some kitchen magic together. Enjoy every bite!
PrintWarm and Cozy Cinnamon Apple Bread
A heartwarming recipe for Cinnamon Apple Bread that fills your home with the irresistible aroma of cinnamon and fresh apples.
- Prep Time: 15 minutes
- Cook Time: 60 minutes
- Total Time: 75 minutes
- Yield: 10 servings 1x
- Category: Dessert
- Method: Baking
- Cuisine: American
- Diet: Vegetarian
Ingredients
- 1–1/2 cups all-purpose flour
- 1–1/2 teaspoons baking powder
- 1/2 teaspoon salt
- 1/2 cup unsalted butter, softened
- 1/2 cup granulated sugar
- 2 teaspoons vanilla extract
- 2 large eggs
- 1/2 cup milk
- 1/2 cup light brown sugar, packed
- 1–1/2 teaspoons ground cinnamon
- 1 large apple, peeled, cored, and chopped
- 2 tablespoons brown sugar
- 1/4 teaspoon ground cinnamon
- 3/4 cups confectioners’ sugar
- 1/4 teaspoon ground cinnamon
- 2 tablespoons water
Instructions
- Preheat the oven: Start by preheating your oven to 350°F (175°C).
- Grease your loaf pan: Use a 9×5-inch loaf pan and grease with butter or line with parchment paper.
- Mix the dry ingredients: In a medium bowl, whisk together flour, baking powder, cinnamon, and salt.
- Cream the butter and sugar: In a large bowl, cream the softened butter and granulated sugar together until light and fluffy, about 3 minutes.
- Add eggs and vanilla: Mix in the eggs one by one, then stir in the vanilla extract.
- Incorporate the milk: Gradually mix in the milk until well combined.
- Combine wet and dry: Gradually add the dry ingredient mixture to the wet ingredients and fold gently until just combined.
- Add the apples: Gently stir in the chopped apples.
- Pour into the pan: Transfer the batter to the greased loaf pan and smooth the top.
- Prepare the topping: Mix the brown sugar and cinnamon, then sprinkle over the top of the batter.
- Bake: Bake for 50-60 minutes, or until a toothpick comes out clean from the center.
- Cool and glaze: Let it cool in the pan for about 10 minutes before transferring to a wire rack.
- Make a glaze (optional): Whisk together confectioners’ sugar, cinnamon, and water until smooth, then drizzle over the cooled bread.
Notes
This bread is perfect for cozying up with a hot drink or gifting during the holidays. Enhance it with nuts or dried fruits for added texture.
Nutrition
- Serving Size: 1 slice
- Calories: 310
- Sugar: 25g
- Sodium: 250mg
- Fat: 12g
- Saturated Fat: 7g
- Unsaturated Fat: 5g
- Trans Fat: 0g
- Carbohydrates: 44g
- Fiber: 1g
- Protein: 4g
- Cholesterol: 50mg
Keywords: cinnamon apple bread, dessert, baking, comfort food, easy recipe
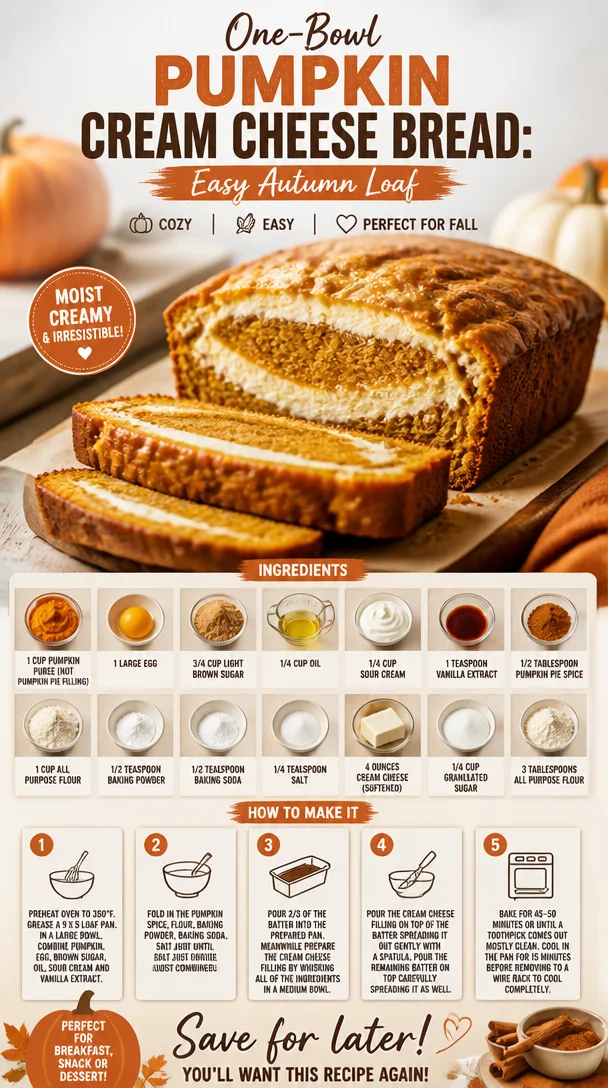
One-Bowl Pumpkin Cream Cheese Bread: Easy Autumn Loaf
Indulge in Comfort: Pumpkin Cream Cheese Bread
Welcome to my cozy kitchen where fall flavors are crafting magic! My name is Ava Carter, and today, I’m excited to share a quintessential autumn treat that’s bursting with warmth and nostalgia: Pumpkin Cream Cheese Bread. This delightful loaf is the perfect blend of tender pumpkin spice and rich cream cheese swirls, ensuring each bite feels like a warm hug on a crisp fall day.
With the leaves turning golden and the aroma of pumpkin spice wafting through the air, there’s no better time to dive into this easy-to-make bread! Imagine biting into a slice, where the fluffy pumpkin bread meets a luscious cream cheese filling that dances on your taste buds. It’s the kind of treat that’ll make your kitchen feel like the heart of your home, where friends gather, stories are shared, and the world slows down just a little. Let’s embrace these comforting times together.
A Slice of Nostalgia
Let me take you back to a childhood memory that embodies the spirit of this recipe. When I was younger, my mom would always make a special pumpkin bread each fall as soon as those first leaves turned. The entire house would be filled with the warm, spicy aroma, and I would sit eagerly at the kitchen counter, waiting for it to bake. I remember how she would let me help her mix the ingredients, guiding my small hands as we combined the pumpkin, spices, and sugars. It felt like pure alchemy.
Once the bread was out of the oven, it was tradition to have a slice with a pat of butter while sipping hot cocoa. As we gathered around the table, her soft laugh blended with stories about her childhood. It was in those moments that I learned the power of food as a connector, nourishing not just the body but the soul as well. This Pumpkin Cream Cheese Bread reflects those sweet memories, offering the same comforting flavors while adding a little twist with the creamy filling.
Ingredients
Let’s talk about what you’ll need to whip up this lovely bread. Here’s the list of ingredients along with some insightful tidbits to take your baking to the next level:
-
1 cup pumpkin puree (not pumpkin pie filling)
Fresh or canned – both work beautifully! Make sure it’s puree, though, for the right texture. -
1 large egg
This helps bind all the ingredients together, ensuring a perfect rise. For a vegan option, you can use a flax egg (1 tablespoon ground flaxseed mixed with 2.5 tablespoons water). -
3/4 cup light brown sugar
It gives the bread a lovely depth of flavor and moisture. If you prefer less sweetness, feel free to cut back or use coconut sugar. -
1/4 cup oil
Use a neutral oil like canola or vegetable. You can sneak in some melted coconut oil for a delightful hint of flavor! -
1/4 cup sour cream
Adds a velvety richness that keeps the bread nice and moist. Greek yogurt is a good substitute if you’ve run out of sour cream. -
1 teaspoon vanilla extract
A kitchen staple that enhances all the other flavors! Choose real vanilla extract for the best taste. -
1/2 tablespoon pumpkin pie spice
A blend of cinnamon, nutmeg, ginger, and allspice. You can make your own mix or substitute with a more straightforward blend of cinnamon and nutmeg if needed. -
1 cup all-purpose flour
Using all-purpose gives the perfect balance of structure and fluffiness. Substitute with a 1:1 gluten-free flour blend if desired. -
1/2 teaspoon baking powder
Helps the bread to rise beautifully. -
1/2 teaspoon baking soda
Works together with the acidic sour cream to create a soft, tender crumb. -
1/4 teaspoon salt
Enhances all the flavors—it’s a magical ingredient! -
4 ounces cream cheese (softened)
The star of the show! Soften it well for easy swirling. Neufchâtel cheese can be used for a lighter version. -
1/4 cup granulated sugar
Balances the tanginess of the cream cheese. You can reduce the sugar if you’re looking for a less sweet filling. -
3 tablespoons all-purpose flour
This helps stabilize the cream cheese filling.
Step-by-Step Instructions
Ready to bake? Let’s make this tantalizing Pumpkin Cream Cheese Bread together! Grab your apron, and let’s get started!
-
Preheat Your Oven
Start by preheating your oven to 350°F (175°C). This is a crucial step to ensure even baking. While the oven heats up, prepare your loaf pan by greasing it or lining it with parchment paper for easy removal later. -
Mix the Pumpkin Batter
In a large mixing bowl, combine the pumpkin puree, egg, light brown sugar, oil, sour cream, and vanilla extract. Whisk until everything is smooth and creamy. The colors should be warm and inviting! Chef’s Tip: Use a whisk for a fluffier texture, but a spatula will also work if you prefer. Just make sure everything is well combined! -
Incorporate Dry Ingredients
In a separate bowl, whisk together the flour, pumpkin pie spice, baking powder, baking soda, and salt. Gradually add this dry mixture into the pumpkin mixture, stirring gently until just combined. Take care not to overmix; a few lumps are perfectly fine! Little hacks: Overmixing can lead to a dense loaf—nobody wants that! -
Prepare Cream Cheese Filling
In another bowl, beat the softened cream cheese until smooth. Then add the granulated sugar and 3 tablespoons of flour, mixing until well combined. Tip: If you’re fighting with cold cream cheese, microwave it for about 10 seconds to make blending easier! -
Layering
Pour half of the pumpkin batter into your prepared loaf pan. Next, spoon dollops of cream cheese mixture evenly over the batter. Follow this by pouring the remaining pumpkin batter over the top. Use a butter knife or skewer to swirl the cream cheese into the batter gently! Pro tip: Don’t overdo the swirling! A few gentle swirls are enough to create a beautiful marbled effect. -
Bake
Place your loaf pan in the preheated oven and bake for 50-60 minutes. It’s ready when a toothpick inserted into the center comes out clean (a few crumbs are okay, just no wet batter!). Keep an eye on it! Ovens vary, so make adjustments as needed! -
Cool and Serve
Once baked, let the bread cool in the pan for about 10 minutes before transferring it to a wire rack to cool completely. This will help maintain its shape. Don’t rush this step! Slicing too soon might lead to a crumbly mess. Patience is key!
Serving Suggestions
Now, let’s talk presentation! Slice your Pumpkin Cream Cheese Bread into generous pieces and serve it warm or at room temperature. Dust the top with a sprinkle of powdered sugar for a chic finish, or spread a little extra cream cheese frosting on top for the ultimate indulgence. Pair with a steaming cup of spiced chai or your favorite Fall latte, and let the flavors dance on your palate. Trust me, this is the kind of comforting treat you’ll want to share!
Recipe Variations
-
Nutty Delight: Add 1/2 cup of chopped walnuts or pecans to the pumpkin batter for an added crunch.
-
Chocolate Swirl: Mix in some chocolate chips or make a chocolate cream cheese filling instead of plain cream cheese.
-
Spicy Twist: Increase the pumpkin pie spice to 1 tablespoon for an extra punch of flavor.
-
Gluten-Free: Substitute regular flour with a 1:1 gluten-free baking blend to make this bread gluten-free without sacrificing taste.
-
Vegan Version: Use a flax egg, coconut oil, and dairy-free cream cheese for a vegan take on this delicious treat.
Chef’s Notes
This recipe has been a labor of love over the years, evolving as I’ve experimented and adapted it for different tastes and dietary needs. I’ve received feedback from friends insisting that the frosting is a must, while others rave about the nutty version. Every time I bake this bread, it brings back beautiful memories of my childhood, mixed with the joy of sharing it with my own loved ones. I’ve enjoyed adding new twists and have even made mini-loaves as gifts during the fall season!
FAQs and Troubleshooting
1. Why did my bread come out dense?
This can happen if you overmix the batter or if you added too much flour. Try being gentle with the mixing and measuring flour accurately.
2. Can I store this bread?
Yes, once completely cooled, wrap it tightly in plastic wrap, and keep it in an airtight container at room temperature for up to 3 days. For longer storage, refrigerate it or freeze it for up to 3 months!
3. How do I know when my bread is done?
The toothpick test is key! Insert a toothpick into the center – it should come out clean or with a few moist crumbs. If it’s wet batter, give it more time. Remember: a little caution goes a long way!
4. Can I substitute pumpkin with another puree?
Absolutely! While pumpkin is traditional, you can try using butternut squash puree or carrot puree for a different flavor profile. Just ensure the consistency is similar.
Nutritional Info
While I believe in enjoying food fully, if you or your guests have specific dietary concerns, it’s worth noting that Pumpkin Cream Cheese Bread is rich in flavor, thanks to the wholesome ingredients. A slice (approximately 1/12 of the loaf) generally contains around 220 calories, with 7g of fat and 32g of carbohydrates. It’s a delightful treat but remember to savor it in moderation!
And there you have it! Your kitchen is about to be filled with the aroma of autumn. I hope this recipe for Pumpkin Cream Cheese Bread brings as much joy to your table as it has to mine. Whether you’re enjoying a slice on a cool morning or sharing it with friends, remember that cooking is all about love and connection. Happy baking!
PrintPumpkin Cream Cheese Bread
A quintessential autumn treat featuring tender pumpkin spice and rich cream cheese swirls, perfect for cozy gatherings.
- Prep Time: 15 minutes
- Cook Time: 60 minutes
- Total Time: 75 minutes
- Yield: 12 servings 1x
- Category: Bread
- Method: Baking
- Cuisine: American
- Diet: Vegetarian
Ingredients
- 1 cup pumpkin puree
- 1 large egg
- 3/4 cup light brown sugar
- 1/4 cup oil
- 1/4 cup sour cream
- 1 teaspoon vanilla extract
- 1/2 tablespoon pumpkin pie spice
- 1 cup all-purpose flour
- 1/2 teaspoon baking powder
- 1/2 teaspoon baking soda
- 1/4 teaspoon salt
- 4 ounces cream cheese (softened)
- 1/4 cup granulated sugar
- 3 tablespoons all-purpose flour
Instructions
- Preheat your oven to 350°F (175°C) and prepare your loaf pan.
- Mix the pumpkin puree, egg, light brown sugar, oil, sour cream, and vanilla extract until smooth.
- Incorporate the flour, pumpkin pie spice, baking powder, baking soda, and salt into the wet mixture until just combined.
- Prepare the cream cheese filling by beating it until smooth, then mix in granulated sugar and flour.
- Layer half of the pumpkin batter in the pan, then dollops of cream cheese mixture, followed by the remaining pumpkin batter, swirling gently.
- Bake for 50-60 minutes or until a toothpick comes out clean.
- Cool in the pan for 10 minutes before transferring to a wire rack.
Notes
Consider adding nuts or chocolate chips for variations. Serve warm or at room temperature with a sprinkle of powdered sugar.
Nutrition
- Serving Size: 1 slice
- Calories: 220
- Sugar: 15g
- Sodium: 200mg
- Fat: 7g
- Saturated Fat: 3g
- Unsaturated Fat: 4g
- Trans Fat: 0g
- Carbohydrates: 32g
- Fiber: 1g
- Protein: 3g
- Cholesterol: 30mg
Keywords: pumpkin bread, cream cheese, autumn recipe, fall flavors, baking
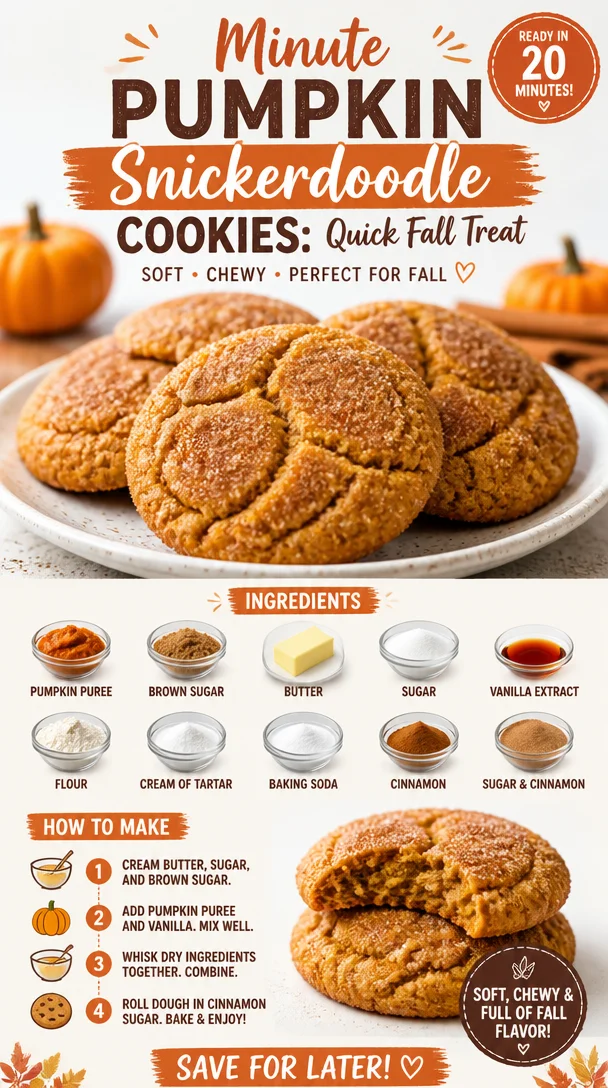
Minute Pumpkin Snickerdoodle Cookies: Quick Fall Treat
Easy Pumpkin Snickerdoodle Cookies: A Flavorful Fall Treat
As the leaves turn and a cool breeze whispers through the air, the scent of pumpkin spice seems to waft through every corner of our kitchens. It’s that magical time of year again when everything feels more connected to the earth, and cozy flavors become the highlight of our gatherings. That’s right—fall is here, and so is my favorite excuse to bake! Today, I’m thrilled to share with you a delightful twist on a classic favorite: Easy Pumpkin Snickerdoodle Cookies! These cookies are soft, chewy, and bursting with that irresistible pumpkin flavor, making them the perfect treat for any autumn occasion—whether it’s a cozy night in or a festive gathering with friends.
You might be wondering, “What’s a snickerdoodle, and why are we adding pumpkin?” Good question! Traditional snickerdoodles are those warm, cinnamon-sugar-dusted cookies that carry a slightly tangy flavor from cream of tartar. They’re comforting, nostalgic, and oh-so-satisfying. By adding pumpkin, we keep all of that cozy goodness while introducing a new layer of flavor that’s as vibrant as the colors of the season. Plus, pumpkin adds moisture, making these cookies even more tender and delicious.
So grab your mixing bowl, put on your favorite playlist, and let’s whip up a batch of these Pumpkin Snickerdoodles that’ll have you feeling all kinds of fall vibes! Whether you’re enjoying them with a cup of steaming cider or sharing them at a potluck, these pumpkin-infused delights are sure to be a hit!
A Whiff of Nostalgia: My Pumpkin Cookie Memory
Let me take you back to my childhood for a second. I remember every fall, my grandma would invite all the grandkids over for a Saturday of baking. The kitchen was our playground as we flourished our hands in the dough, beat eggs with enthusiastic chatter, and debated if we could sneak a spoonful of the cookie dough (spoiler alert: we always did!).
One year, she decided to switch things up and introduced us to pumpkin cookies. I can still smell the warm, spicy aroma that filled the house as they baked, drawing us in like a sweet siren song. The moment we took that first bite, it felt like an embrace from autumn itself! My grandma’s recipe wasn’t for snickerdoodles, but it sparked something in me that yearned for the seasonal flavors. Mixing in the comforting notes of cinnamon with the smooth richness of pumpkin felt groundbreaking. It ignited my passion for baking goodies that brought joy and connection—just like it did for me as a child.
From that day forward, pumpkin cookies became a staple in our fall festivities. And as I grew older and started experimenting in the kitchen, those cherished moments inspired my own take on those pumpkin cookies, transforming them into these creamy, dreamy Pumpkin Snickerdoodle Cookies!
Ingredients: What You’ll Need
Here’s a rundown of delicious ingredients you’ll need to create these delightful cookies. Each element plays a key role in achieving that amazing flavor and texture:
-
1 cup unsalted butter, softened
Butter adds richness and moisture to the cookies. If you’re in a pinch, you can substitute with coconut oil or a vegan butter. -
1 cup granulated sugar
This brings sweetness and helps the cookies lift perfectly. You can swap it with brown sugar for a deeper flavor or even coconut sugar for a healthier alternative. -
1 cup packed brown sugar
This is where the caramel notes come into play! If you don’t have brown sugar, you can mix granulated sugar with a tablespoon of molasses. -
1 cup pumpkin puree
Use canned pumpkin puree for convenience, or make your own by roasting and blending fresh pumpkin. Either way, it’s a moisturizing agent and brings that fall flavor we love! -
2 large eggs
Eggs bind the mixture together, providing a fluffy texture. For an egg-free version, bananas or flax eggs can work in a pinch. -
3 cups all-purpose flour
Flour is the foundation of any great cookie. For gluten-free options, try a 1:1 gluten-free flour blend. -
2 teaspoons cream of tartar
This ingredient gives snickerdoodles that signature tangy flavor. If you don’t have any, you can substitute with baking powder (just skip the baking soda). -
1 teaspoon baking soda
Baking soda is crucial for leavening. Make sure it’s fresh for the best rise! -
½ teaspoon salt
This enhances all the other flavors. Don’t skip it! -
2 teaspoons ground cinnamon
A quintessential autumn spice that gives warmth and depth. Feel free to mix in some nutmeg or ginger for a spice kick! -
¼ teaspoon ground nutmeg (optional)
Nutmeg adds warmth and that cozy fall spice. Use it according to your taste preference. -
2 tablespoons of cinnamon-sugar mixture
A mix of granulated sugar and cinnamon for rolling! It’s the finishing touch that makes these cookies pop.
Step-by-Step Instructions: Let’s Get Baking!
Now that you have all your ingredients prepped and ready, it’s time to turn up the heat and create some kitchen magic! Follow these detailed steps to achieve the perfect Pumpkin Snickerdoodle Cookies.
-
Preheat the Oven
Begin by preheating your oven to 350°F (175°C). This is crucial for even baking! While your oven warms up, you can get started on your dough. -
Cream the Butter and Sugars
In a large mixing bowl, add the softened butter, granulated sugar, and brown sugar. Using an electric mixer or a good old-fashioned whisk, beat them together until light and fluffy. This step is essential as it will incorporate air into the mixture, making your cookies tender. Don’t rush it; it should take about 3–5 minutes. -
Add in the Pumpkin and Eggs
Next, add the pumpkin puree and eggs to the mix. Beat together until well-combined. You’ll notice this beautiful, creamy orange swirl come together! Trust me—it will smell heavenly. -
Mix the Dry Ingredients
In a separate bowl, whisk together the flour, cream of tartar, baking soda, salt, cinnamon, and nutmeg. Gradually add the dry ingredients to the wet mixture, mixing just until combined. Be careful not to overmix; you want your cookies to be soft and chewy! -
Chill the Dough (Optional but Recommended)
If you have time, cover the dough and chill it in the refrigerator for at least 30 minutes. Chilling helps the cookies hold their shape and enhances the flavors. But if you’re in a rush, you can skip this step! -
Form the Cookies
Use a cookie scoop or your hands to roll even-sized balls of dough about 1.5 inches in diameter. This will ensure they bake uniformly. -
Cinnamon-Sugar Coating
In a small bowl, mix together the cinnamon-sugar mixture. Roll each dough ball in this mixture until fully coated. It will clump together, creating that crave-worthy crispy crust! -
Bake ‘Em Up
Place the coated cookie balls onto lined baking sheets, spacing them about 2 inches apart. Bake for 10–12 minutes, or until the edges are lightly golden. The centers may look slightly underbaked, but that’s perfect! Remember, cookies continue to cook on the baking sheet after being pulled from the oven. -
Cool and Enjoy
After baking, let your cookies cool on the baking sheet for a few minutes before transferring them to a wire rack to cool completely. -
Savor the Moment
Finally, grab a cup of your favorite coffee, cider, or warm milk, and take a moment to enjoy these delicious cookies. Perhaps share a few with friends and family (if you’re feeling generous)!
Serving Suggestions: Plating Your Treats
These Pumpkin Snickerdoodle Cookies are super versatile. You can serve them as part of a delightful autumn dessert spread alongside caramel dipping sauce or slice them up and create an adorable cookie sandwich with cream cheese frosting in the middle! Simple white plates with a sprinkle of cinnamon or fall-themed dishware can elevate your presentation. A fun tip? Place some cookies in a mason jar with a little twine; they make for a sweet gift or charming table decoration!
Recipe Variations: Get Creative!
If you’re feeling adventurous, here are some fun ways to mix things up with your Pumpkin Snickerdoodle Cookies:
-
Add Chocolate Chips: For a delightful contrast, mix in some semi-sweet or dark chocolate chips. Pumpkin and chocolate are a match made in heaven!
-
Walnuts or Pecans: For some crunch, toss in some chopped nuts. They provide a lovely texture and added flavor!
-
Oatmeal Pumpkin Snickerdoodles: Stir in some oats for a hearty twist. It adds healthy fiber and makes them a great breakfast treat!
-
Spicy Variation: Experiment with additional spices like allspice, cardamom, or even a dash of cayenne for a warming kick!
-
Vegan Option: Swap in vegan butter, replace eggs with flax eggs, and use dairy-free chocolate chips if desired!
Chef’s Notes: A Dash of Love
Every recipe tells a story, and this one has a special place in my heart. I’ve played around with countless cookie recipes over the years, but none bring me back quite like these Pumpkin Snickerdoodles. They are a perfect homage to my grandma’s essence, reminding me that baking is not just about food—it’s about memories, love, and connections. Plus, each time I make these cookies, I can’t help but feel gratitude for all those joyful baking sessions with my family. Who knew that a simple pumpkin could spark such delightful memories?
FAQs and Troubleshooting: Your Baking Concerns Addressed
Q: Why are my cookies flat and not rising?
A: Flat cookies can be caused by a few things: make sure your baking soda is fresh (an expired product won’t work), and double-check that you’re measuring your flour properly—too little can lead to flattening.
Q: Can I use pumpkin pie filling instead of pumpkin puree?
A: Technically, you can. However, pumpkin pie filling contains added sugars and spices, which might alter the final taste and sweetness of your cookies. I recommend using pure pumpkin puree for the best results.
Q: How do I store leftover cookies?
A: Store your cookies in an airtight container at room temperature for up to a week. To keep them even fresher, you can put parchment paper between layers to prevent them from sticking together!
Q: Can I freeze the dough for later use?
A: Absolutely! You can scoop dough balls and freeze them on a baking sheet before transferring them to a freezer-safe bag. When you’re ready to bake, just pop them into the oven straight from the freezer—adjust the baking time by a couple of minutes little if needed!
Nutritional Info (Optional)
While enjoying these treats, consider their benefits! Each Pumpkin Snickerdoodle Cookie contains good amounts of fiber, vitamins A and C from pumpkin, and the comforting essence of whole ingredients. Just remember to savor in moderation!
I hope you give these Pumpkin Snickerdoodle Cookies a try! They’re not just cookies; they’re little bites of nostalgia and warmth that remind us why the kitchen should be the heart of our home. So roll up those sleeves and create some sweet memories—you’ll thank yourself later! Enjoy every bite, and happy baking!
PrintEasy Pumpkin Snickerdoodle Cookies
Delicious and tender Pumpkin Snickerdoodle Cookies, perfect for fall gatherings.
- Prep Time: 15 minutes
- Cook Time: 12 minutes
- Total Time: 27 minutes
- Yield: 24 servings 1x
- Category: Dessert
- Method: Baking
- Cuisine: American
- Diet: Vegetarian
Ingredients
- 1 cup unsalted butter, softened
- 1 cup granulated sugar
- 1 cup packed brown sugar
- 1 cup pumpkin puree
- 2 large eggs
- 3 cups all-purpose flour
- 2 teaspoons cream of tartar
- 1 teaspoon baking soda
- ½ teaspoon salt
- 2 teaspoons ground cinnamon
- ¼ teaspoon ground nutmeg (optional)
- 2 tablespoons of cinnamon-sugar mixture for rolling
Instructions
- Preheat the oven to 350°F (175°C).
- Cream the butter, granulated sugar, and brown sugar until light and fluffy.
- Add the pumpkin puree and eggs, mixing until well-combined.
- Mix the dry ingredients in a separate bowl, then gradually add to the wet mixture.
- Chill the dough in the refrigerator for at least 30 minutes (optional).
- Form cookie balls about 1.5 inches in diameter.
- Roll each ball in the cinnamon-sugar mixture.
- Bake for 10-12 minutes until edges are lightly golden.
- Cool on the baking sheet for a few minutes before transferring to a wire rack.
Notes
Chilling the dough helps enhance flavors and maintain cookie shape.
Nutrition
- Serving Size: 1 cookie
- Calories: 150
- Sugar: 10g
- Sodium: 150mg
- Fat: 7g
- Saturated Fat: 4g
- Unsaturated Fat: 3g
- Trans Fat: 0g
- Carbohydrates: 20g
- Fiber: 1g
- Protein: 2g
- Cholesterol: 30mg
Keywords: pumpkin cookies, snickerdoodle, fall baking, autumn treats, dessert recipes
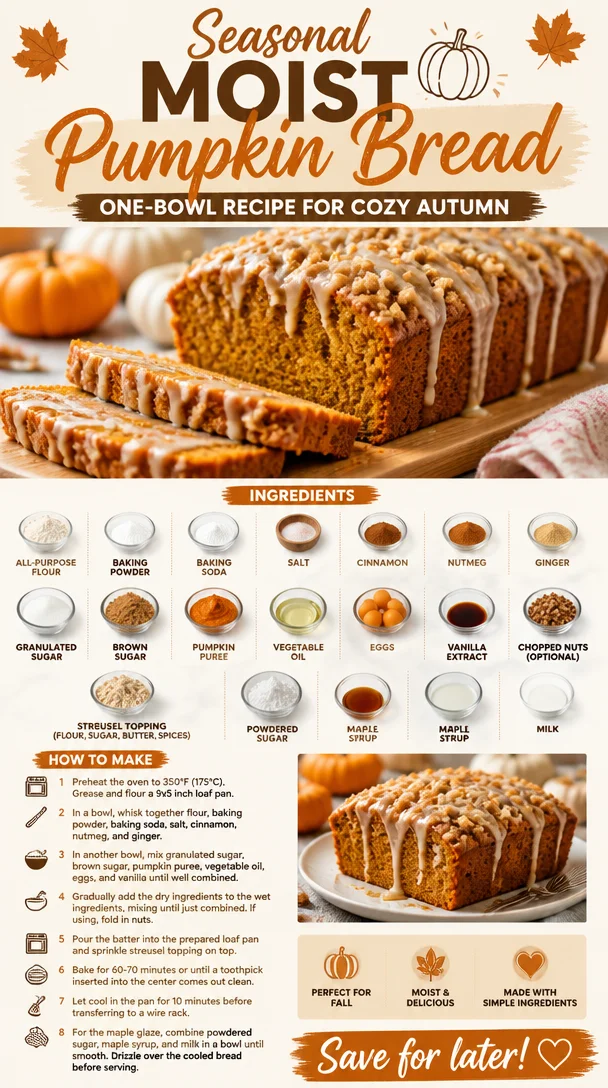
Seasonal Moist Pumpkin Bread: One-Bowl Recipe for Cozy Autumn
The Ultimate Moist Pumpkin Bread Recipe: Fall’s Favorite Treat
Ah, pumpkin bread! It’s that cozy slice of nostalgia that makes you feel all warm and fuzzy inside, as if you’re wrapped in a blanket next to a crackling fire. With the aromatic blend of spices and that oh-so-satisfying moist texture, it’s no wonder this delicious treat has become a beloved staple, especially in the fall. Whether you spread a bit of butter on a fresh slice, savor it with your morning coffee, or whip it up for a last-minute gathering, pumpkin bread is a versatile and delightful addition to any menu.
When I think of pumpkin bread, I’m transported back to my childhood kitchen, where the sweet, earthy scent of spices wafted through the air, inviting us to come and taste what my mom was baking. There was something magical about the sound of the mixer whirring, the sight of vibrant orange pumpkin puree spilling into the mixing bowl, and the excitement of sprinkling in the fragrant cinnamon and nutmeg. Those weekday afternoons, with my siblings and I hovering around the oven, eagerly awaiting the golden-brown loaf to emerge, were some of my favorite moments.
And now, I’m thrilled to share my version of this classic recipe with you! It’s moist, flavorful, and oh-so-satisfying—perfect for sharing, gifting, or simply indulging in all by yourself. So, let’s roll up our sleeves and dive into the wonderful world of baking moist pumpkin bread!
Ingredients You’ll Need
Here’s a complete list of ingredients you’ll need for this scrumptious pumpkin bread. Each one plays a vital role in creating that perfect loaf you’ll crave all fall long.
-
2 cups all-purpose flour: The foundation of our bread. For a gluten-free option, you can substitute with a gluten-free all-purpose blend or almond flour.
-
1 teaspoon baking powder: This helps our bread rise and gives it that light, airy texture. Make sure it’s fresh for the best effect!
-
1 teaspoon baking soda: Another essential leavening agent that works alongside the baking powder for optimal rise.
-
1 teaspoon salt: Balances the sweetness and enhances the flavors—don’t skimp on this!
-
1 teaspoon ground cinnamon: The quintessential spice in pumpkin bread, adding warmth and depth to each bite.
-
1/2 teaspoon ground nutmeg: A warm and slightly sweet spice that complements the pumpkin perfectly.
-
1/2 teaspoon ground ginger: For a little extra zing! If you want to tone it down, you can replace it with an equal amount of allspice.
-
1 cup granulated sugar: The primary sweetener for this recipe. You can reduce the amount for a less sweet result or use coconut sugar for a healthier alternative.
-
1/2 cup brown sugar: Adds moisture and a rich flavor. You can use all granulated sugar if you’re out of brown sugar.
-
1 cup pumpkin puree: The star ingredient! You can use canned puree or make your own by roasting and pureeing a sugar pumpkin.
-
1/2 cup vegetable oil: Keeps the bread moist. If you prefer a healthier swap, try using applesauce.
-
4 large eggs: Helps bind the ingredients together and adds richness.
-
1 teaspoon vanilla extract: A touch of vanilla brings everything together, enhancing the flavor profile.
-
1 cup chopped nuts (optional): A delightful crunch! You can use walnuts or pecans; if you want it nut-free, just omit them.
-
1/2 cup streusel topping: This adds a delightful crunch on top, made from flour, sugar, butter, and spices—totally worth it!
-
Maple glaze: Optional, but highly recommended! Made with powdered sugar, maple syrup, and a splash of milk, it adds a sweet finish.
Step-by-Step Instructions
Ready to bring this fragrant pumpkin bread to life? Let’s get baking!
-
Preheat your oven: Preheat your oven to 350°F (175°C). This step is crucial, so don’t skip it! A hot oven will help our bread achieve that perfect rise and golden color.
-
Prepare your loaf pans: Grease two 9×5-inch loaf pans with butter or cooking spray to ensure your bread slides out smoothly when cooked. For an extra layer of protection, you can line the bottoms with parchment paper.
-
Mix dry ingredients: In a large mixing bowl, whisk together the flour, baking powder, baking soda, salt, cinnamon, nutmeg, and ginger. This ensures that everything is evenly distributed. A little chef hack: Use a sifter if you have one—this will aerate your dry ingredients and give your bread a lighter texture!
-
Combine wet ingredients: In another bowl, whisk the granulated sugar, brown sugar, pumpkin puree, oil, eggs, and vanilla extract until well combined. The mixture will be thick and creamy, so whip it good!
-
Combine dry and wet ingredients: Gradually add the dry mixture into the wet mixture. Stir gently with a spatula until just combined. Be careful not to overmix—this could make your bread dense instead of light and fluffy.
-
Add nuts (if using): Fold in the chopped nuts gently. If you’re not a nut person, feel free to skip this step, and the bread will still be delicious!
-
Prepare the streusel topping (optional): In a small bowl, mix together flour, sugar, butter, and spices until crumbly. Sprinkle this mixture generously on top of your unbaked batter in the pans.
-
Bake: Pour the batter evenly into the prepared loaf pans, filling each about 2/3 full. Bake in the preheated oven for 50-60 minutes, or until a toothpick inserted into the center comes out clean. Every oven is different, so keep an eye on it in the last few minutes!
-
Cool: Once baked, remove from the oven and let the loaves cool in the pans for about 10 minutes. Then, transfer them to a wire rack to cool completely.
-
Prepare the glaze (optional): While the bread cools, whisk together the powdered sugar, maple syrup, and milk until smooth. Drizzle it over the cooled bread for an added sweet touch!
Serving Suggestions
Now that you’ve baked a gorgeous loaf of pumpkin bread, it’s time to serve! Slice it up as thick or as thin as you like—there’s no wrong way to enjoy this treat. You can serve it warm with a pat of butter for an irresistible melt-in-your-mouth experience. Or, go ahead and top it with a dollop of cream cheese for a delightful combo. It’s also lovely alongside a steaming cup of coffee or chai tea for the perfect midday pick-me-up.
Recipe Variations
Want to shake things up? Here are a few creative twists you might consider:
-
Chocolate Chip Pumpkin Bread: Add 1 cup of semi-sweet or dark chocolate chips to the batter for a decadent treat.
-
Pumpkin Spice Swirl: Add a swirl of cream cheese filling by mixing 8 oz. cream cheese with 1/4 cup sugar and a little vanilla before swirling it into the batter.
-
Dried Fruit Addition: Toss in 1 cup of raisins or dried cranberries for a pop of color and natural sweetness.
-
Vegan Version: Substitute eggs with flaxseed meal (1 tablespoon ground flaxseed + 3 tablespoons water for each egg) and use an oil like coconut or melt-in-your-mouth vegan butter.
-
Savory Pumpkin Bread: Reduce sugars and add herbs like rosemary or thyme for a savory bread that’s fantastic with meals.
Chef’s Notes
This pumpkin bread recipe has evolved beautifully over time. I started off with a basic version, and over the years, I’ve played with different spices and added toppings. I’ve learned that the key to a consistently moist loaf is the balance of wet to dry ingredients, and I’m always experimenting with flavor combinations. And let me tell you, I’ve had my fair share of kitchen disasters—like the time I forgot to add sugar. Let’s just say, it was a very…interesting loaf. But that’s all part of the fun and learning that happens in the kitchen!
FAQs and Troubleshooting
1. Why is my pumpkin bread too dense?
Overmixing the batter is usually the culprit. Mix just until combined to keep it light and airy.
2. How do I know when my pumpkin bread is done?
Insert a toothpick into the center; if it comes out clean or with a few moist crumbs (not wet batter), it’s done!
3. Can I freeze pumpkin bread?
Absolutely! Wrap the cooled loaves tightly in plastic wrap and then in aluminum foil. They can last for up to 3 months in the freezer. Just thaw at room temperature when you’re ready to enjoy.
4. What should I do if my bread sinks in the middle?
This can happen if there’s too much leavening agent or if the batter is under-mixed. Make sure to measure accurately and mix until just combined.
Nutritional Info (Optional)
While I always encourage everyone to enjoy their food mindfully, here’s a rough breakdown for a standard slice of moist pumpkin bread (without glaze):
- Calories: ~180
- Fat: 7g
- Carbohydrates: 29g
- Fiber: 1g
- Sugar: 14g
- Protein: 3g
If you’re looking to make it lighter, you can easily reduce the sugar and oil without compromising taste!
So there you have it—the ultimate moist pumpkin bread recipe! I hope you enjoy making (and devouring) it as much as I do. Remember, the kitchen is all about joy and creativity, so have fun experimenting and making it your own. Happy baking!
PrintThe Ultimate Moist Pumpkin Bread
A cozy and flavorful pumpkin bread perfect for fall, moist with an aromatic blend of spices.
- Prep Time: 15 minutes
- Cook Time: 60 minutes
- Total Time: 75 minutes
- Yield: 2 loaves 1x
- Category: Dessert
- Method: Baking
- Cuisine: American
- Diet: Vegetarian
Ingredients
- 2 cups all-purpose flour
- 1 teaspoon baking powder
- 1 teaspoon baking soda
- 1 teaspoon salt
- 1 teaspoon ground cinnamon
- 1/2 teaspoon ground nutmeg
- 1/2 teaspoon ground ginger
- 1 cup granulated sugar
- 1/2 cup brown sugar
- 1 cup pumpkin puree
- 1/2 cup vegetable oil
- 4 large eggs
- 1 teaspoon vanilla extract
- 1 cup chopped nuts (optional)
- 1/2 cup streusel topping
- Maple glaze (optional)
Instructions
- Preheat your oven to 350°F (175°C).
- Prepare two 9×5-inch loaf pans by greasing them.
- Mix the dry ingredients in a bowl.
- Combine the wet ingredients in another bowl.
- Combine the wet and dry mixtures, stirring gently.
- Add chopped nuts if using.
- Prepare the streusel topping if desired.
- Bake the batter in the prepared pans for 50-60 minutes.
- Cool the loaves in the pans for 10 minutes before transferring to a wire rack.
- Prepare the glaze if desired and drizzle over the cooled bread.
Notes
Serve warm with butter or cream cheese, or enjoy with coffee or chai tea.
Nutrition
- Serving Size: 1 slice
- Calories: 180
- Sugar: 14g
- Sodium: 400mg
- Fat: 7g
- Saturated Fat: 1g
- Unsaturated Fat: 6g
- Trans Fat: 0g
- Carbohydrates: 29g
- Fiber: 1g
- Protein: 3g
- Cholesterol: 30mg
Keywords: pumpkin bread, fall recipes, moist pumpkin bread, baking, dessert