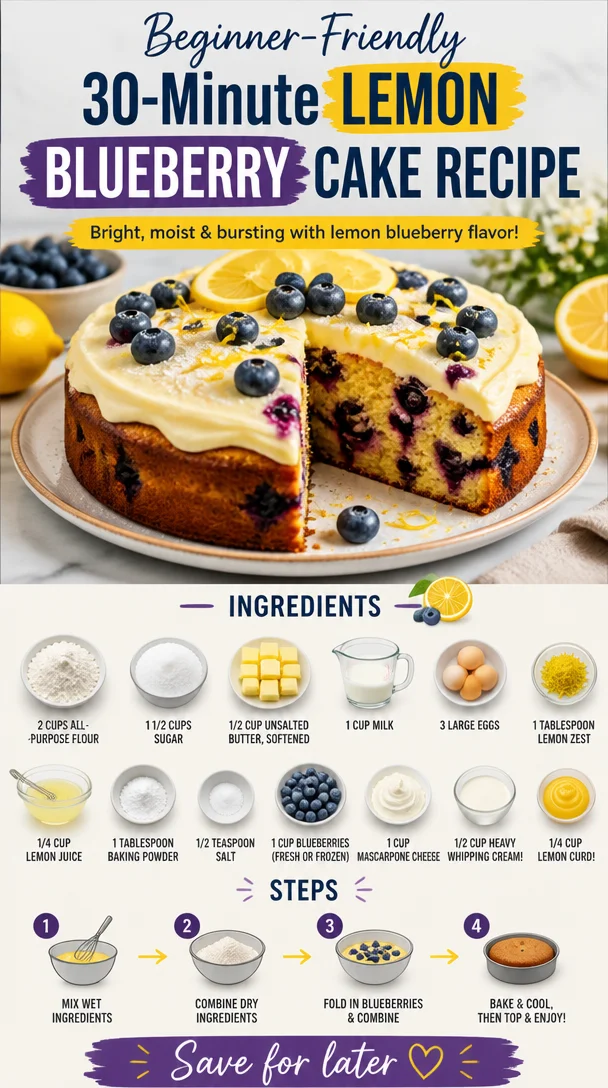
Beginner-Friendly 30-Minute Lemon Blueberry Cake Recipe
The Best Lemon Blueberry Cake: A Zesty Delight for Every Occasion
Welcome back, my fellow food lovers! Today, I’m bursting with excitement to share with you a truly heavenly recipe that perfectly marries the bright, cheerful flavor of lemon with the sweet, juicy burst of blueberries. Whether you’re celebrating a special occasion, hosting a brunch, or simply treating yourself to an indulgent dessert, this Best Lemon Blueberry Cake is going to be your new go-to.
Lemon blueberry cake is not just a dessert; it’s a slice of sunshine on your plate! With a light and fluffy texture combined with a tangy lemon twist, this cake is sure to become a family favorite. Trust me; each bite will make your taste buds dance with joy. And the best part? It’s surprisingly easy to whip up right in your cozy kitchen, which means you can indulge your sweet tooth without spending all day baking. So, grab your apron, and let’s get baking!
A Slice of Nostalgia
Ah, nostalgia! It has a way of transporting us back to simpler times, doesn’t it? One of my fondest memories of baking this cake dates back to my childhood. I remember running into the kitchen one sunny Saturday morning, all excited because my grandmother was visiting. She always brought with her the most delightful recipes and stories of her youth. I can still hear her cheerful laughter as she mixed butter and sugar in a bowl, filling the air with that sweet aroma of baked goodies.
That day, she decided we would make a lemon blueberry cake, using the fresh blueberries that we had just picked from the local farm. As we squeezed the lemons and mixed in the vibrant blueberries, my grandmother shared stories of how she used to bake with her mother. Little did we know we were creating not just a delicious cake but also cherished memories that would last a lifetime. Now, every time I bake this cake, I remember those sunny days spent in the kitchen with her, and it fills my heart with warmth.
Ingredients
Let’s gather our ingredients! Here’s what you’ll need to create this delectable cake:
-
2 cups all-purpose flour: The backbone of any good cake! This gives the cake structure and a tender crumb. For a gluten-free option, you can substitute with a 1:1 gluten-free flour blend.
-
1 1/2 cups sugar: Sweetness is essential! Feel free to use coconut sugar for a healthier twist or even a sugar substitute like stevia for a lower-calorie alternative.
-
1/2 cup unsalted butter, softened: This rich addition helps create a moist and fluffy cake. If you’re dairy-free, opt for coconut oil or a dairy-free butter substitute.
-
1 cup milk: This adds moisture and richness. You can use almond milk or oat milk for a dairy-free version.
-
3 large eggs: Eggs provide structure and stability. For a vegan option, try substituting each egg with a tablespoon of ground flaxseed mixed with three tablespoons of water.
-
1 tablespoon lemon zest: This is where the magic begins! The zest brings an intense citrus flavor that will elevate your cake. Don’t skip this step!
-
1/4 cup lemon juice: Freshly squeezed lemon juice is the star of the show, imparting that zesty kick. Bottled lemon juice will do in a pinch, but fresh is always best.
-
1 tablespoon baking powder: This helps our cake rise and become fluffy. Make sure it’s fresh for the best results.
-
1/2 teaspoon salt: A touch of salt balances the sweetness and enhances flavor.
-
1 cup blueberries (fresh or frozen): Bursting with sweetness, these little gems add a pop of flavor and color to the cake. If using frozen, no need to thaw—just toss them in straight from the freezer!
-
1 cup mascarpone cheese: This creamy addition makes for an indulgent frosting. If you can’t find mascarpone, cream cheese is a great alternative.
-
1/2 cup heavy whipping cream: This creates a light and fluffy texture in the frosting. You can use coconut cream if you’re dairy-free.
-
1/4 cup lemon curd: For an extra burst of lemon flavor in the frosting! You can buy this or, if you’re feeling adventurous, make your own.
Step-by-Step Instructions
Now, let’s dive into the fun part—baking the cake! Follow these simple steps:
-
Preheat Your Oven: Start by preheating your oven to 350°F (175°C). This is crucial to ensure our cake bakes evenly.
-
Prepare Your Baking Pans: Grease and flour two 9-inch round cake pans. You don’t want your cake to stick! Alternatively, you can line the bottoms with parchment paper for easy removal.
-
Mix the Dry Ingredients: In a medium bowl, whisk together the flour, baking powder, and salt. Mixing them in a separate bowl helps to evenly distribute the baking powder and salt throughout the flour.
-
Cream the Butter and Sugar: In a large mixing bowl, beat the softened butter and sugar together using an electric mixer on medium speed until it’s light and fluffy (about 3–4 minutes). This crucial step incorporates air into the butter, giving your cake a light texture.
-
Add the Eggs and Mix: One by one, add in the eggs, mixing well after each addition. Scrape down the sides of the bowl to make sure everything is well combined. This is where our cake starts to become a beautiful batter!
-
Incorporate the Zest and Juice: Mix in the lemon zest and lemon juice. The batter will smell divine, and you’ll be tempted to keep tasting it. (I won’t tell if you do!)
-
Combine Dry and Wet Mixtures: Gradually add the dry ingredients to the butter mixture, alternating with the milk. Start and end with the dry ingredients, mixing until just combined. Overmixing can lead to a dense cake, so mix gently!
-
Fold in the Blueberries: Gently fold in the blueberries using a spatula, being careful not to crush them. This will give our cake those iconic pops of juicy fruit.
-
Divide and Pour: Pour the batter evenly between the prepared cake pans, smoothing the tops with a spatula.
-
Bake the Cakes: Bake in your preheated oven for 25-30 minutes, or until a toothpick inserted into the center comes out clean. Keep an eye on them towards the end!
-
Cool the Cakes: Once done, remove the cakes from the oven and let them cool in the pans for about 10 minutes. Then, turn them out onto a wire rack to cool completely. Patience is key here; we don’t want to frost a warm cake!
-
Make the Frosting: In a mixing bowl, beat together the mascarpone cheese, heavy cream, and lemon curd until smooth and fluffy. You can add a pinch of sugar here if you like your frosting sweeter.
-
Assemble the Cake: Place one cake layer on a serving plate. Spread a generous layer of frosting on top, then place the other cake layer on top and frost the top and sides of the cake.
-
Decorate: For an extra touch, garnish with fresh blueberries and additional lemon zest. This adds a beautiful pop of color and a fresh touch!
Serving Suggestions
To present this luscious cake, I recommend slicing it into generous pieces and serving it on fun, vibrant plates. A sprig of mint or a dusting of powdered sugar on top works wonders for an appealing presentation. You can pair it with a dollop of whipped cream or a scoop of vanilla ice cream for that extra indulgence. Trust me; everyone will be begging for the recipe!
Recipe Variations
Feeling adventurous? Here are a few delightful twists to switch things up:
-
Berry Medley: Swap out blueberries for raspberries or strawberries for a mixed berry flavor fest.
-
Lemon Lavender: Add a teaspoon of dried culinary lavender to the batter for a touch of floral elegance.
-
Gluten-Free: Replace all-purpose flour with a gluten-free flour blend for a delicious gluten-free version.
-
Vegan Delight: Use flax eggs, coconut milk, and a dairy-free alternative for frosting to make it vegan-friendly.
-
Zesty Citrus Addition: Experiment by incorporating orange or lime zest in addition to lemon for a citrus explosion!
Chef’s Notes
You know, every time I bake this cake, it reminds me of how food has an extraordinary power to bring people together. Whether it’s for birthdays, Sunday brunch with the family, or just treating a friend, this cake has a way of creating smiles. I’ve adapted this recipe over time, playing around with different combinations of fruits and flavors, making it a perfect blank canvas for your creative touch.
Oh, and here’s a fun little kitchen story: once, I tried to bake this cake while multitasking and completely forgot to add the baking powder! Let’s just say it turned out to be a very dense but still tasty "lemon blueberry pancake" that my friends and family lovingly still talk about to this day!
FAQs and Troubleshooting
-
Why did my cake turn out dense?
Dense cakes are often a result of overmixing the batter or not incorporating enough air. Remember to mix until just combined and not to skimp on cream time! -
Can I make this cake ahead of time?
Absolutely! You can bake the cakes in advance and freeze them. Just wrap them well in plastic wrap after they’ve cooled completely. Thaw and frost on the day of serving. -
How do I store leftovers?
Store any leftover cake in an airtight container at room temperature for up to 2 days or in the fridge for about a week. It’s always best enjoyed fresh! -
Can I use frozen blueberries?
Yes! Frozen blueberries work just as well as fresh ones. Just toss them in the batter straight from the freezer, and you’ll be good to go!
Conclusion
So there you have it! The Best Lemon Blueberry Cake is not just an ordinary cake; it’s a celebration of flavors, memories, and love. With its delightful airy texture and zesty taste, it’s perfect for any occasion, be it a summer picnic or a cozy family gathering. I know you’re going to love it just as much as I do.
Now, get into that kitchen and let your creativity shine. I can’t wait for you to bake this beauty and share your slices of happiness. Remember, cooking should always be a joyful experience. Let’s keep it fresh, simple, and seriously delicious! 🍰
PrintThe Best Lemon Blueberry Cake
A delightful lemon blueberry cake that combines zesty lemon flavor with sweet blueberries, perfect for any occasion.
- Prep Time: 15 minutes
- Cook Time: 30 minutes
- Total Time: 45 minutes
- Yield: 8 servings 1x
- Category: Dessert
- Method: Baking
- Cuisine: American
- Diet: Vegetarian
Ingredients
- 2 cups all-purpose flour
- 1 1/2 cups sugar
- 1/2 cup unsalted butter, softened
- 1 cup milk
- 3 large eggs
- 1 tablespoon lemon zest
- 1/4 cup lemon juice
- 1 tablespoon baking powder
- 1/2 teaspoon salt
- 1 cup blueberries (fresh or frozen)
- 1 cup mascarpone cheese
- 1/2 cup heavy whipping cream
- 1/4 cup lemon curd
Instructions
- Preheat your oven to 350°F (175°C).
- Prepare two 9-inch round cake pans by greasing and flouring them.
- Mix the flour, baking powder, and salt in a medium bowl.
- Cream the butter and sugar together until light and fluffy.
- Add the eggs one at a time, mixing well after each addition.
- Incorporate the lemon zest and lemon juice.
- Combine the dry ingredients with the butter mixture, alternating with milk.
- Fold in the blueberries gently.
- Divide the batter evenly between the prepared cake pans.
- Bake for 25-30 minutes until a toothpick comes out clean.
- Cool the cakes in pans for 10 minutes, then transfer to a wire rack to cool completely.
- Make the frosting by beating mascarpone, heavy cream, and lemon curd until smooth and fluffy.
- Assemble the cake by layering frosting between the cake layers and on the outside.
- Decorate with fresh blueberries and lemon zest before serving.
Notes
For vegan options, substitute eggs with flaxseed and milk with non-dairy alternatives.
Nutrition
- Serving Size: 1 slice
- Calories: 350
- Sugar: 26g
- Sodium: 200mg
- Fat: 18g
- Saturated Fat: 9g
- Unsaturated Fat: 7g
- Trans Fat: 0g
- Carbohydrates: 48g
- Fiber: 1g
- Protein: 5g
- Cholesterol: 70mg
Keywords: lemon cake, blueberry cake, dessert recipe, baking, easy cake recipe
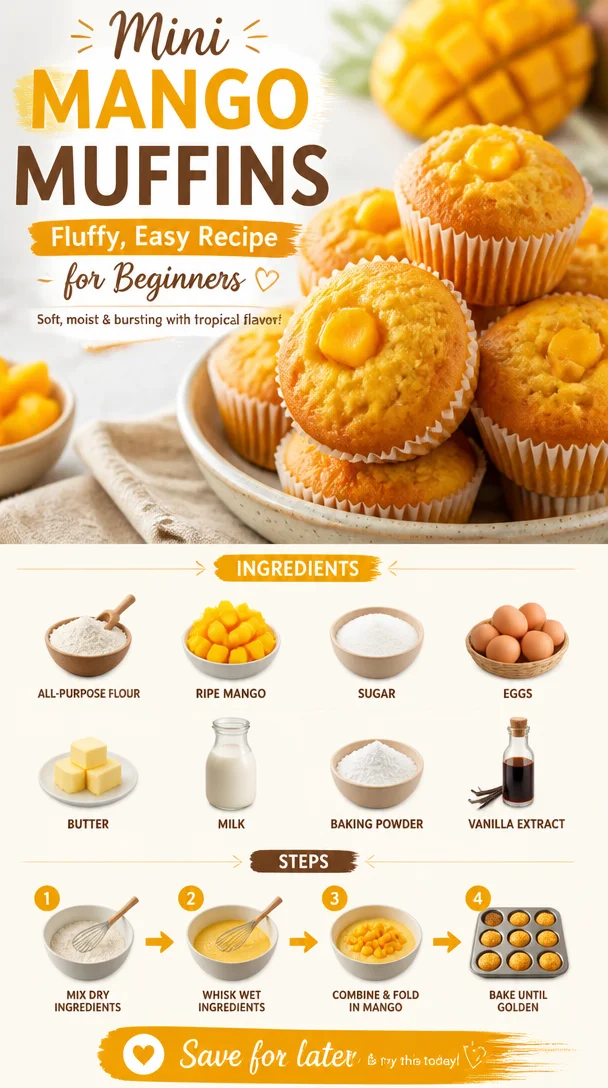
Min Mango Muffins: Fluffy, Easy Recipe for Beginners
The Best Ever Mango Muffin Recipe: A Tropical Delight
Welcome to another exciting culinary adventure here at Clean Plate Cravings! Today, I’m thrilled to share with you my Best Ever Mango Muffin recipe. If you’re anything like me, the scent and taste of ripe tropical mango can instantly transport you to paradise—even if it’s just your kitchen! These muffins are not only bursting with juicy mango goodness but also so easy to whip up. Trust me; they will become a staple in your breakfast routine and an instant hit at brunch gatherings!
A Burst of Sunshine in Every Bite
Picture this: it’s a warm Sunday morning, and you’re seated at the kitchen table, sunlight streaming through the window, casting a golden hue over everything it touches. You take a bite of one of these delightful mango muffins, and suddenly, you’re on a mini-vacation. That’s exactly the magic I want to create with this recipe.
Growing up, my grandmother had a luscious mango tree in her backyard. Some of my fondest memories are of plucking those ripe mangoes, the sweet fragrance filling the air as we dashed back inside, hands sticky with juice, ready to bake together. She had this exceptional way of transforming simple ingredients into the most heavenly treats. The best part? Her recipes, much like mine today, were all about keeping it simple and approachable.
In her honor, I’ve refined this mango muffin recipe to echo those warm, sun-soaked mornings. Light and fluffy with the perfect crumb, these muffins will make your kitchen feel like a tropical haven. Enough reminiscing—let’s dive into making these beauties!
Ingredients
Here’s what you’ll need to bake these delightful mango muffins that scream sunshine:
- 2 ripe mangoes: Fresh, juicy mangoes at peak ripeness are key for maximum flavor. If you can’t find fresh ones, you can use frozen mango chunks (thaw them first).
- 1 ½ cups all-purpose flour: The base for our muffins. For a healthier spin, whole wheat flour can be used, just make sure to adjust the moisture as needed.
- ½ cup granulated sugar: Sweetens our muffins perfectly. You can replace half of it with brown sugar for a caramel undertone, or try coconut sugar for a more natural option.
- 1 teaspoon baking soda: This is our leavening agent that makes the muffins rise and stay fluffy. Ensure it’s fresh for the best results!
- ½ teaspoon baking powder: Adds extra lift to the muffins. It’s crucial not to confuse these two!
- ½ teaspoon salt: Enhances the flavors—don’t skip it!
- 1 large egg: Binds everything together. You can use a flax egg (1 tablespoon ground flaxseeds mixed with 2.5 tablespoons water) for a vegan option.
- ½ cup vegetable oil: Keeps the muffins moist and tender. You can also substitute it with melted coconut oil for a tropical twist!
- ½ cup milk: Use any milk you prefer—almond, soy, or coconut milk works just as well.
- 1 teaspoon vanilla extract: Adds depth to our muffins—a non-negotiable ingredient!
- Zest of 1 lime: This brightens the muffin, giving them a zing that pairs wonderfully with the mango. You can also use lemon zest if you prefer.
These ingredients come together seamlessly to create a muffin that not only tastes amazing but is also simple to make.
Step-by-Step Instructions
Alright, foodies! Let’s get our hands a little messy and make these mango muffins step-by-step. It’s going to be super fun, I promise!
-
Preheat Your Oven: Begin by preheating your oven to 350°F (175°C). This ensures that your muffins bake evenly. While it’s warming up, you can gather the rest of the ingredients.
-
Prepare Your Muffin Tin: Line a 12-cup muffin tin with paper liners or lightly grease it with cooking spray. This step is essential to prevent those adorable muffins from getting stuck.
-
Mix Dry Ingredients: In a large bowl, whisk together the flour, sugar, baking soda, baking powder, and salt until everything is well combined. This is a great time to inhale that sweet aroma—baking is all about the senses!
-
Prep the Mangoes: While your dry ingredients are hanging out together, peel and dice your ripe mangoes. Make sure to reserve a few small chunks for topping the muffins later on.
-
Combine Wet Ingredients: In another bowl, whisk together the egg, vegetable oil, milk, vanilla extract, and lime zest until smooth. You can feel free to dance a little while mixing—nothing lifts the spirit like a good groove in the kitchen!
-
Combine Wet and Dry: Pour the wet mixture into the dry ingredients and mix gently until just combined. Be careful not to overmix; we want those muffins light and fluffy!
-
Fold in Mango: Delicately fold in the diced mango, ensuring they are evenly distributed throughout the batter. And I mean gently here—think of yourself as a graceful ballerina, not a bulldozer!
-
Fill Muffin Cups: Scoop the batter into the prepared muffin tin, filling each cup about ¾ full. And remember those reserved mango chunks? Place a few on top of each muffin for a burst of color and texture!
-
Bake: Pop the muffin tin into your preheated oven and bake for 20-25 minutes or until a toothpick inserted in the center comes out clean. While they bake, your kitchen will start to smell incredible!
-
Cool and Enjoy: Once baked, let the muffins cool in the pan for about 5 minutes before transferring them to a wire rack to cool completely. Try to resist the temptation of diving in right away (I know it’s hard)!
Serving Suggestions
These mango muffins are delicious as-is, but if you want to elevate them even further, try serving them warm with a dollop of whipped cream or a smear of coconut butter. Pair them with a fruit smoothie for a refreshing breakfast or serve them alongside a cup of coffee for the ultimate brunch treat. They also make for a fantastic afternoon snack!
Recipe Variations
To keep your mango muffin game fresh, here are a few variations you can try:
- Coconut Mango Muffins: Add shredded coconut to the batter for added texture and tropical flavor.
- Mango Macadamia Nut Muffins: Fold in chopped macadamia nuts for a nutty crunch.
- Spicy Mango Muffins: Add a pinch of cayenne pepper or ginger for a surprising kick!
- Chocolate Chip Mango Muffins: Stir in some semi-sweet chocolate chips for those chocoholics out there.
- Mango Oat Muffins: Replace half of the flour with oats for a heartier muffin.
Chef’s Notes
This mango muffin recipe has evolved over the years from my grandmother’s original version, which was packed with butter and sugar. I’ve swapped in healthier alternatives to make them lighter without sacrificing taste. One time, I experimented by tossing in some leftover quinoa, and while they turned out alright, I think I’ll stick to the classic mango goodness for now!
Each bite of these muffins carries a little piece of my childhood, reminding me of hot summer days and baking alongside my grandma. I’m thrilled to pass this joy on to you!
FAQs and Troubleshooting
-
My muffins turned out dense. What did I do wrong?
- Overmixing is a common culprit! Make sure you only mix until the ingredients are combined. A few lumps are completely fine.
-
Can I use other fruits instead of mango?
- Absolutely! These muffins are versatile. Try adding blueberries, peaches, or even mashed bananas!
-
How do I store leftovers?
- Once cooled, store any uneaten muffins in an airtight container at room temperature for up to 3 days or in the refrigerator for up to a week. You can also freeze them for longer-lasting treats.
-
What if I don’t have a muffin tin?
- No muffin tin? No problem! You can use a cupcake tin or even bake the batter in a loaf pan, adjusting the baking time accordingly.
Nutritional Info
(Optional but helpful; consider adding approximate values for serving size, calories, fats, carbohydrates, and protein.)
So there you have it, my Best Ever Mango Muffin recipe! I hope this delectable treat will inspire you to bring a little sunshine into your kitchen. Remember, cooking should be fun, relaxing, and filled with love. Stay adventurous, keep experimenting, and share your delicious results with family and friends. Happy baking!
PrintBest Ever Mango Muffin

Light and fluffy mango muffins that bring a burst of tropical flavor to your breakfast or brunch gatherings.
- Prep Time: 15 minutes
- Cook Time: 25 minutes
- Total Time: 40 minutes
- Yield: 12 muffins 1x
- Category: Breakfast
- Method: Baking
- Cuisine: Tropical
- Diet: Vegetarian
Ingredients
- 2 ripe mangoes
- 1 ½ cups all-purpose flour
- ½ cup granulated sugar
- 1 teaspoon baking soda
- ½ teaspoon baking powder
- ½ teaspoon salt
- 1 large egg
- ½ cup vegetable oil
- ½ cup milk
- 1 teaspoon vanilla extract
- Zest of 1 lime
Instructions
- Preheat your oven to 350°F (175°C).
- Prepare your muffin tin with liners or grease it to prevent sticking.
- Mix dry ingredients in a large bowl until combined.
- Prep the mangoes by peeling and dicing them, reserving some for topping.
- Combine wet ingredients in another bowl and whisk until smooth.
- Pour the wet mixture into the dry ingredients and mix gently.
- Fold in the diced mango, being careful not to overmix.
- Fill each muffin cup about ¾ full and top with reserved mango pieces.
- Bake for 20-25 minutes or until a toothpick comes out clean.
- Cool in the pan for 5 minutes before transferring to a wire rack.
Notes
These muffins can be served warm with whipped cream or coconut butter.
Nutrition
- Serving Size: 1 muffin
- Calories: 180
- Sugar: 9g
- Sodium: 250mg
- Fat: 7g
- Saturated Fat: 1g
- Unsaturated Fat: 6g
- Trans Fat: 0g
- Carbohydrates: 28g
- Fiber: 1g
- Protein: 3g
- Cholesterol: 30mg
Keywords: mango muffin, tropical muffins, breakfast recipe, easy muffin recipe, summer baking
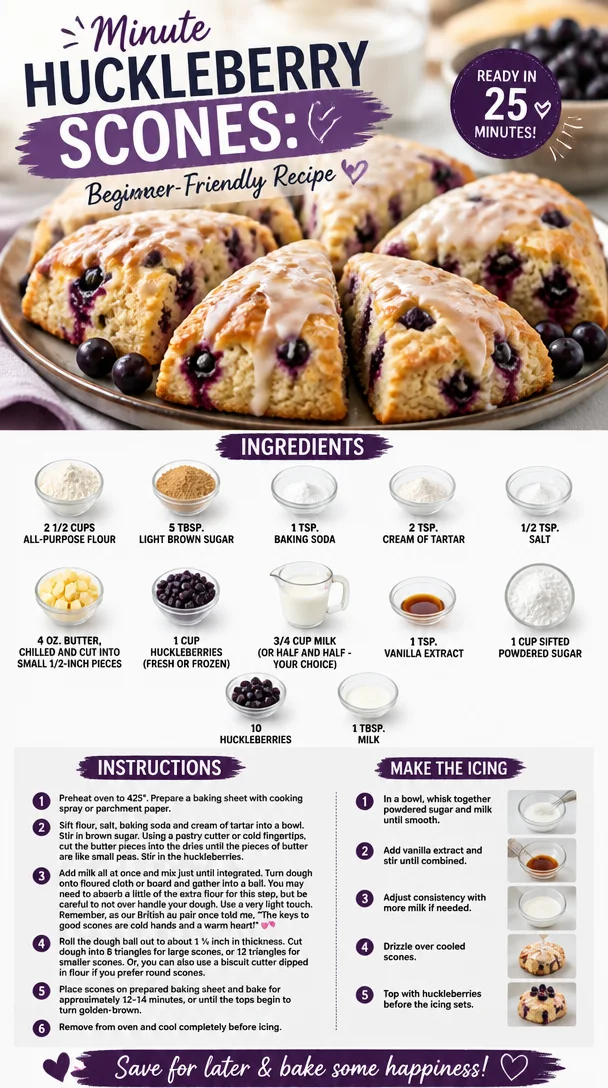
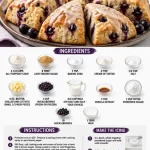
Minute Huckleberry Scones: Beginner-Friendly Recipe
Indulge Your Senses with Huckleberry Scones: A Whimsical Baking Adventure
Welcome to my kitchen! Today, we’re diving into an aromatic adventure that’ll fill your home with delicious smells, bring a smile to your face, and make your taste buds dance. Have you ever heard of huckleberry scones? Whether you’re a seasoned home baker or just getting started, these delightful treats are perfect for breakfast, brunch, or even a comforting afternoon snack. Let’s stick around, because I promise you’ll love the magic that fresh huckleberries bring to these flaky delights!
A Sprinkle of Nostalgia
Let me take you back to my childhood, where wild huckleberry bushes grew in abundance near my family’s summer cabin. It was one of our favorite family traditions to set off on berry-picking adventures. My siblings and I would race each other, buckets in tow, trying to see who could gather the most berries—though let’s be honest, a fair bit of huckleberry snacking happened along the way! There was something truly enchanting about plucking those sweet, tiny berries right off the bush, their deep purple hues glowing like jewels against the lush greenery.
After our berry-picking escapades, we’d return home joyfully, sticky-fingered and bursting with excitement. My mom would whip up a batch of huckleberry scones that quickly became a family favorite. The aroma wafting from the oven would lure us into the kitchen, and before long, there were scones cooling on the counter, adorned with a drizzled glaze and bursting with flavor. Today, I’m bringing that cherished memory to life with my own huckleberry scone recipe, and I can’t wait to share it with you!
Ingredients You’ll Need
Before we dive into the kitchen, let’s gather everything we need. Here’s what you’ll need for these scrumptious huckleberry scones:
-
2 1/2 cups all-purpose flour
This serves as the base of our scones. To make them gluten-free, you can substitute with a gluten-free all-purpose flour blend. -
5 tbsp light brown sugar
It adds a lovely warm sweetness. If you’re out of brown sugar, you can substitute with granulated sugar with a sprinkle of molasses to mimic that deep flavor. -
1 tsp baking soda
This ingredient helps the scones rise. If you’re lacking baking soda, you can double the baking powder in the recipe instead. -
2 tsp cream of tartar
It works with the baking soda to create a light, fluffy texture. If you don’t have cream of tartar, you can use lemon juice or white vinegar as a replacement (1/2 tsp per 1 tsp cream of tartar). -
1/2 tsp salt
Enhances all the flavors. A pinch of sea salt will work just as well too! -
4 oz butter (chilled and cut into small 1/2-inch pieces)
Cold butter is essential for flaky scones! You can use vegan butter or margarine if you’re looking for a dairy-free option. -
1 cup huckleberries (fresh or frozen)
The star of our show! If you can’t find huckleberries, blueberries make a delicious substitute. -
3/4 cup milk (or half and half – your choice)
Milk brings moisture to the dough. Use almond or oat milk for a dairy-free alternative. -
1 tsp vanilla extract
Adds a beautiful depth of flavor. You can also try almond extract for a different twist. -
1 cup sifted powdered sugar
This will be used for our glaze, adding sweetness. If you need a healthier option, try using coconut sugar and water for a rustic glaze. -
10 additional huckleberries
These are for garnishing, but don’t hesitate to toss a handful into the dough for extra flavor! -
1 tbsp milk
For thinning the glaze to the perfect pourable consistency.
Now that our ingredients are assembled, let’s move on to the fun part—making these lovely scones!
Step-by-Step Instructions
-
Preheat the Oven
Preheat your oven to 400°F (200°C). You want your oven nice and hot to ensure those scones rise beautifully! -
Mix Dry Ingredients
In a large mixing bowl, whisk together the flour, brown sugar, baking soda, cream of tartar, and salt until well combined. This is where your scones begin their journey—so get that whisk moving! -
Cut in the Butter
Add in the chilled, diced butter. Using a pastry cutter or your fingers, rub the butter into the dry mixture until it resembles coarse crumbs. This is where the magic happens; the cold butter creates flaky layers! If it starts to feel too warm, pop it in the fridge for a few minutes. -
Mix in Huckleberries
Gently fold in the huckleberries—be careful not to crush them too much. You want those little bursts of flavor intact! If you’re using frozen huckleberries, there’s no need to thaw them. -
Make the Dough
In a separate bowl, combine the milk and vanilla extract. Pour this mixture into the dry ingredients and stir until just combined. Don’t overmix—some lumps are perfectly fine. Overmixing can lead to tough scones, and who wants that? -
Form the Scones
Turn the dough out onto a floured surface. Gently pat it into a rectangle about 1-inch thick. Using a sharp knife or pizza cutter, slice it into squares or triangles. -
Prep for Baking
Line a baking sheet with parchment paper and place your scone pieces on it. Give them a little space to breathe; they’ll grow as they bake! -
Bake
Bake for about 15-20 minutes, or until the tops are golden brown and a toothpick inserted into the center comes out clean. You’ll know they’re done when your kitchen smells like heaven! -
Cool and Glaze
Allow the scones to cool on a wire rack. While they’re cooling, mix the powdered sugar with 1 tablespoon of milk to make a glaze. Once the scones are cool, drizzle the glaze over the tops, and garnish with a few additional huckleberries for visual appeal.
Serving Suggestions
When it comes time to serve your huckleberry scones, I suggest pairing them with a dollop of fresh whipped cream or a pat of creamy butter. Beautifully dust them with a sprinkle of powdered sugar for extra sweetness, and serve them with your favorite tea or coffee. These scones are also delightful next to a bowl of fresh fruit or yogurt for a more balanced breakfast.
Recipe Variations
-
Lemon Zest: Add the zest of one lemon to the dough for a refreshing citrus twist.
-
Totally Berry: Mix in a variety of berries—raspberries, blueberries, and blackberries—along with the huckleberries for a mixed-berry scone.
-
Nutty Delight: Add chopped walnuts or pecans for an extra crunch.
-
Maple Glaze: Swap out the powdered sugar glaze for a maple syrup glaze for a fun flavor change.
-
Vegan-Friendly: Substitute the butter with coconut oil and use a plant-based milk for an entirely vegan treat!
Chef’s Notes
As I bake these huckleberry scones, I can’t help but reminisce about Family Berry Sundays, where everyone gathered at our kitchen table, chattering excitedly while I whipped up a batch. Over the years, I’ve learned to experiment with different flavor combos and techniques, from trying crispy edges to tender bottoms. It’s all part of the journey! Don’t be surprised if you find a few crumbly bits left over after your first taste—they’re inevitably irresistible.
FAQs and Troubleshooting
Q: My scones turned out hard. What happened?
A: The most likely culprit is overmixing. Mix the dough just until everything comes together. Also, ensure your butter is cold; no warm butter here!
Q: How can I store my scones?
A: Store leftover scones in an airtight container at room temperature for up to two days. You can also freeze them before baking—just bake them straight from the freezer, adding a minute or two to the baking time.
Q: Can I use frozen huckleberries?
A: Absolutely! Just toss them in frozen; there’s no need to thaw. It will add a lovely color and flavor to your scones.
Q: What if I don’t have huckleberries?
A: No problem! Substitute with blueberries or even cranberries for a tart twist.
Conclusion
I hope you enjoyed this little escapade into the world of huckleberry scones! These treats are not just delicious, but they also bundle up fond memories of simple times and happy places. So grab your apron and get baking, because the delightful aroma of huckleberry scones will fill your kitchen with warmth and joy. And remember, no matter how they turn out, the most important ingredient is always love! Happy baking, friends!
PrintHuckleberry Scones
Delicious huckleberry scones that are flaky, sweet, and perfect for breakfast or brunch.
- Prep Time: 15 minutes
- Cook Time: 20 minutes
- Total Time: 35 minutes
- Yield: 8 servings 1x
- Category: Baked Goods
- Method: Baking
- Cuisine: American
- Diet: Vegetarian
Ingredients
- 2 1/2 cups all-purpose flour
- 5 tbsp light brown sugar
- 1 tsp baking soda
- 2 tsp cream of tartar
- 1/2 tsp salt
- 4 oz butter (chilled and cut into small 1/2-inch pieces)
- 1 cup huckleberries (fresh or frozen)
- 3/4 cup milk (or half and half)
- 1 tsp vanilla extract
- 1 cup sifted powdered sugar
- 10 additional huckleberries (for garnishing)
- 1 tbsp milk (for thinning the glaze)
Instructions
- Preheat your oven to 400°F (200°C).
- Mix together the flour, brown sugar, baking soda, cream of tartar, and salt until well combined.
- Cut in the chilled, diced butter until it resembles coarse crumbs.
- Fold in the huckleberries gently.
- Combine the milk and vanilla extract, then pour it into the dry ingredients and stir until just combined.
- Turn the dough out onto a floured surface and pat it into a rectangle about 1-inch thick.
- Slice the dough into squares or triangles.
- Line a baking sheet with parchment paper and place your scone pieces on it.
- Bake for about 15-20 minutes until golden brown.
- Cool on a wire rack and drizzle with glaze made from powdered sugar and milk.
Notes
Serve with fresh whipped cream or a pat of butter. Can add mix-ins like lemon zest or nuts for variation.
Nutrition
- Serving Size: 1 scone
- Calories: 250
- Sugar: 8g
- Sodium: 200mg
- Fat: 10g
- Saturated Fat: 6g
- Unsaturated Fat: 4g
- Trans Fat: 0g
- Carbohydrates: 32g
- Fiber: 1g
- Protein: 3g
- Cholesterol: 30mg
Keywords: scones, huckleberry, baking, breakfast, brunch
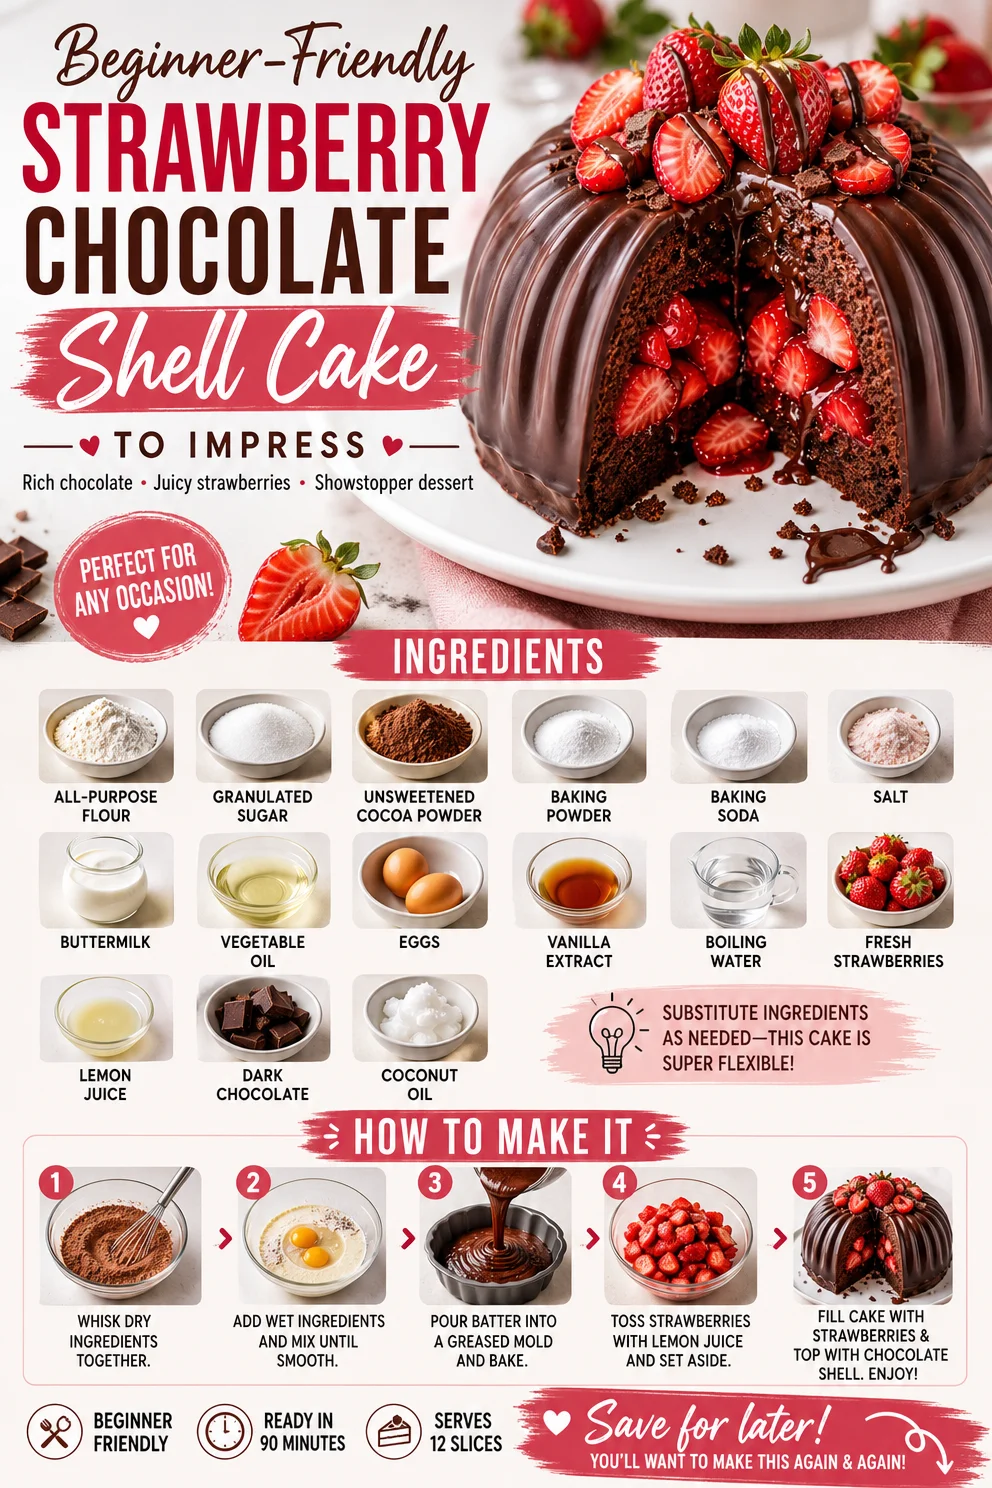
Beginner-Friendly Strawberry Chocolate Shell Cake to Impress
Indulgent Strawberry Chocolate Shell Cake That Wows Every Time
Introduction
Hey there, fellow foodies! Today, I am super excited to share a recipe that is not only a feast for the eyes but also a taste sensation that will make your heart skip a beat—my Indulgent Strawberry Chocolate Shell Cake! If you’re anything like me, you know that certain desserts take you back to sweet memories and sun-soaked moments. This cake, with its rich chocolate layers and a glossy strawberry chocolate shell, is nothing short of a celebration on a plate.
Picture this: it’s a sunny afternoon, and I’m in my grandma’s kitchen, surrounded by the warm aroma of baking cakes and hearty laughter. Grandma is mixing that velvety chocolate cake batter while I’m sneaking glances at the delicious strawberries she’s washed, ready to create something magical. That fond memory has inspired this very recipe, a little nod to my childhood and a reminder that food is not just about sustenance—it’s intertwined with love, nostalgia, and the joy of sharing.
This cake is perfect for birthdays, anniversaries, or simply when you want to indulge in something that feels fancy yet approachable. Trust me when I say, your friends and family will be wowed just by the presentation! Not only is it gorgeous, but it’s also surprisingly easy to whip up. So let’s roll up our sleeves and get cooking!
Personal Story
I remember the first time I attempted to make this cake; I was maybe around 12 years old, and there was an epic family gathering on the horizon. I wanted to create something that would impress everyone—and to be honest, I just wanted an excuse to eat all the chocolate and strawberries in the house! With my grandma’s guidance by my side, we transformed a simple recipe into a masterpiece that had everyone raving about my baking skills.
As we pulled the cake from the oven, the warm, chocolatey aroma enveloped the kitchen, and the little kid in me couldn’t wait to dive in. We layered it high, topped it with fresh strawberries, and finished off with that glorious glossy strawberry chocolate shell. The smiles on my family’s faces as they took their first bites were worth all the flour dust and the moments of chaos! That day, I learned that cooking is about connection—sharing recipes and memories simultaneously—an experience I cherish to this day.
Ingredients
Here’s what you’ll need to create this irresistible cake:
-
2 cups All-Purpose Flour
Perfectly versatile! If you’re looking for a gluten-free option, you can substitute it with a gluten-free flour blend. -
2 cups Granulated Sugar
This brings sweetness to the cake. You can also use brown sugar for added flavor and a slight molasses kick! -
3/4 cup Unsweetened Cocoa Powder
Choose Dutch-process cocoa for a smoother, richer chocolate flavor. -
1 tablespoon Baking Powder
Always check that it’s fresh! Leavening agents can lose potency over time. -
1 teaspoon Baking Soda
Omit this if you’re using self-rising flour, which already has it included. -
1 teaspoon Salt
Sea salt is an excellent alternative—just a pinch brings out all the flavors beautifully! -
1 cup Buttermilk
Adds moisture and richness; if you don’t have any, use yogurt or milk mixed with a little vinegar. -
1/2 cup Vegetable Oil
This keeps the cake moist. You can switch it out for melted coconut oil for a tropical kick! -
2 large Eggs
Eggs help bind the ingredients; for a vegan alternative, a flaxseed meal mixed with water works wonders. -
2 teaspoons Vanilla Extract
A classic flavor booster! Swap it for almond extract if you want a new twist. -
1 cup Boiling Water
This ingredient is vital for creating a tender crumb—there’s no substitute! -
2 cups Fresh Strawberries
These add natural sweetness and a fresh pop! Feel free to use any berries you fancy. -
1 tablespoon Lemon Juice
A little acidity enhances the strawberry flavor; lime juice can work just as well. -
8 ounces Dark Chocolate
Use semi-sweet chocolate if you prefer a sweeter profile. -
2 tablespoons Coconut Oil
This will help the dark chocolate melt beautifully; vegetable oil can be an option too, but it may change the texture slightly.
Step-by-Step Instructions
Now that we have all our ingredients gathered, let’s get started on making your new favorite cake!
-
Preheat Your Oven: Start by preheating your oven to 350°F (175°C). This ensures a perfectly baked cake from the get-go!
-
Mix Dry Ingredients: In a large mixing bowl, whisk together your all-purpose flour, granulated sugar, cocoa powder, baking powder, baking soda, and salt. This helps to ensure even distribution of the leavening agents and cocoa, which is key for a fluffy cake.
-
Combine Wet Ingredients: In another bowl, mix together the buttermilk, vegetable oil, eggs, and vanilla extract. I usually whisk this until it’s nice and smooth, breaking up the eggs fully. This mixture will infuse moisture into your batter!
-
Combine Both Mixtures: Gradually add the wet mixture into the dry ingredients. Stir with a spatula or wooden spoon until just combined—be careful not to overmix; a few lumps are perfectly fine!
-
Add Boiling Water: Here’s the magic touch! Slowly pour in the boiling water, mixing gently as you go. The batter will be quite thin, which is exactly what you’re aiming for. This step helps make your cake moist and tender.
-
Bake: Grease your cake pans (two 9-inch round pans will do beautifully!) with butter or cooking spray, pour in your batter, and pop them into the oven for about 30-35 minutes. Keep an eye on them; you want a toothpick inserted into the center to come out clean.
-
Cool: Once baked, remove the cakes from the oven and allow them to cool in the pans for 10 minutes before transferring them to wire racks to cool completely. This prevents sogginess—nobody wants that!
-
Prepare the Strawberry Filling: While your cake is cooling, chop those beautiful strawberries and toss them in a bowl with lemon juice. This brightens their flavor and draws out the juices, making a delicious filling!
-
Create the Chocolate Shell: Melt the dark chocolate with coconut oil in a microwave-safe bowl or over a double boiler. Stir until smooth, and let it cool slightly before pouring.
-
Assemble Your Cake: On a serving plate, place the first layer of your cooled cake. Spread a generous layer of the sweetened strawberries over the top, then place the second layer on top.
-
Pour the Chocolate Shell: Finally, pour that delicious chocolate shell over the cake. Allow it to drip down the sides. The sight alone is enough to make anyone swoon!
Serving Suggestions
When it’s time to serve, slice up generous pieces of this stunning cake and plate it with fresh strawberries or a dollop of whipped cream for an extra touch of flair. A sprinkle of cocoa powder or chocolate shavings can elevate it even further. Lighting a few candles and serving it with a smile? Pure bliss.
Recipe Variations
Here are some creative twists you can try with this indulgent cake:
-
Add Mint: Infuse your chocolate shell with a few drops of mint extract for a refreshing mint chocolate vibe.
-
Layered Flavors: For an added dimension, layer in some raspberry jam or a different berry between the cake layers.
-
Nutty Crunch: Incorporate chopped walnuts or almonds into the batter for a delightful texture contrast.
-
Vegan Delight: Go fully plant-based by using flax eggs and a dairy-free chocolate for the shell.
-
Tropical Retreat: Swap out the strawberries for fresh pineapple for a fun tropical twist!
Chef’s Notes
This recipe holds a special place in my heart, as it has evolved over the years. From that fun day in Grandma’s kitchen to impressing friends at dinner parties, it truly is a crowd-pleaser. I once attempted to make a version with raspberry, and while it was delicious, it was a bit too runny for the shell to set properly. But hey, the best part of cooking is learning through trial and error!
This cake is perfect for sharing, and honestly, there’s something magical about gathering around a beautifully decorated dessert. So don’t be shy—slice it up and gather your loved ones to enjoy!
FAQs and Troubleshooting
-
My cake sunk in the middle! What went wrong?
This can happen for a few reasons; the oven temperature might have been too low or the cake was underbaked. Always ensure your oven is properly preheated and check for doneness before removing. -
How can I make the cake more chocolatey?
For extra rich flavor, try adding a bit more cocoa powder, or using a mix of dark chocolate and milk chocolate for the ganache. -
My chocolate shell isn’t setting! What did I do wrong?
Make sure to let your melted chocolate cool slightly before pouring it over the cake. If it’s too hot, it won’t set properly! -
Can I make this cake in advance?
Absolutely! You can bake the cake a day ahead. Just store it wrapped in plastic wrap in the refrigerator. The flavors will actually deepen overnight.
Nutritional Info
While indulgent, remember that this cake is meant for special occasions! Here’s a rough breakdown per slice (based on 12 servings):
- Calories: 350
- Protein: 4g
- Carbs: 58g
- Fats: 12g
- Fiber: 3g
Life is all about balance, right? So go ahead and indulge!
And there you have it! An indulgent Strawberry Chocolate Shell Cake that will leave everyone wanting more. Remember, cooking is all about having fun and sharing joy—so don’t forget to enjoy yourselves in the kitchen! Until next time, happy baking!
PrintIndulgent Strawberry Chocolate Shell Cake
A beautiful cake with rich chocolate layers and a glossy strawberry chocolate shell, perfect for celebrations.
- Prep Time: 20 minutes
- Cook Time: 35 minutes
- Total Time: 55 minutes
- Yield: 12 servings 1x
- Category: Dessert
- Method: Baking
- Cuisine: American
- Diet: Vegetarian
Ingredients
- 2 cups All-Purpose Flour
- 2 cups Granulated Sugar
- 3/4 cup Unsweetened Cocoa Powder
- 1 tablespoon Baking Powder
- 1 teaspoon Baking Soda
- 1 teaspoon Salt
- 1 cup Buttermilk
- 1/2 cup Vegetable Oil
- 2 large Eggs
- 2 teaspoons Vanilla Extract
- 1 cup Boiling Water
- 2 cups Fresh Strawberries
- 1 tablespoon Lemon Juice
- 8 ounces Dark Chocolate
- 2 tablespoons Coconut Oil
Instructions
- Preheat your oven to 350°F (175°C).
- Mix together your dry ingredients in a large mixing bowl.
- Combine the wet ingredients in another bowl.
- Gradually add the wet mixture into the dry ingredients.
- Add the boiling water slowly to the batter.
- Bake the cake in greased pans for 30-35 minutes.
- Cool the cakes for 10 minutes before transferring them to wire racks.
- Prepare the strawberry filling by tossing chopped strawberries with lemon juice.
- Create the chocolate shell by melting dark chocolate and coconut oil.
- Assemble your cake by layering and pouring the chocolate shell over.
Notes
Serve with fresh strawberries or whipped cream for an extra touch.
Nutrition
- Serving Size: 1 slice
- Calories: 350
- Sugar: 30g
- Sodium: 400mg
- Fat: 12g
- Saturated Fat: 6g
- Unsaturated Fat: 4g
- Trans Fat: 0g
- Carbohydrates: 58g
- Fiber: 3g
- Protein: 4g
- Cholesterol: 30mg
Keywords: cake, dessert, chocolate, strawberries, celebration, baking