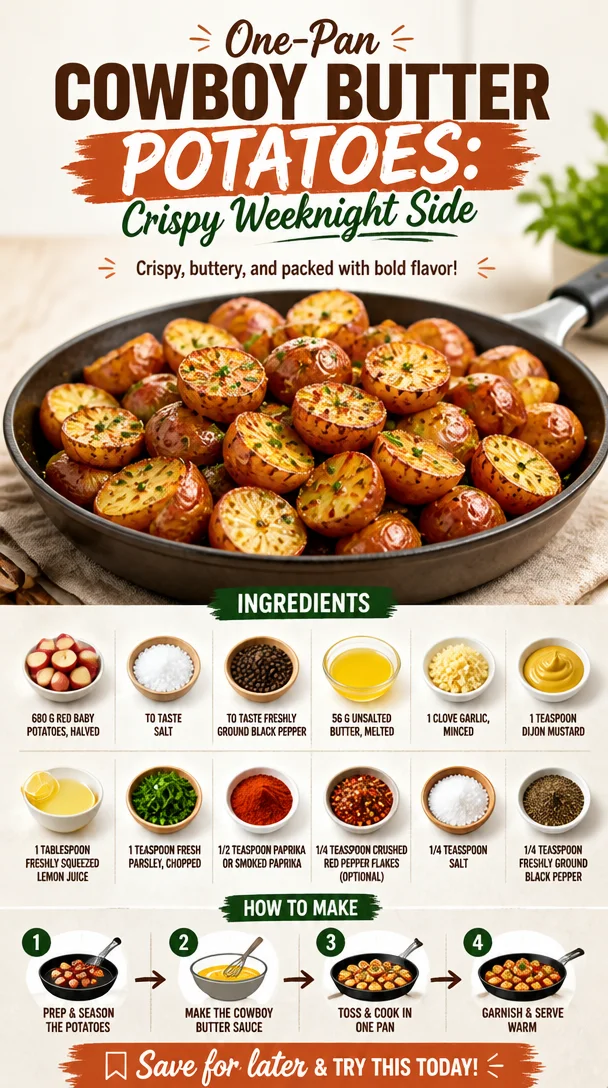
One-Pan Cowboy Butter Potatoes: Crispy Weeknight Side
Cowboy Butter Potatoes: A Deliciously Simple Dish
Hello, fellow food lovers! Today, I’m thrilled to share a recipe that reminds me of laid-back evenings, cowboy tales, and that warm feeling you get when you dig into a bowl of buttery goodness. Introducing Cowboy Butter Potatoes—a delightful dish that’s as vibrant as a sunset over the prairie and as comforting as a warm hug from an old friend.
When I first discovered these little red gems, I was astounded by how such simple ingredients could create something truly spectacular. I mean, who doesn’t love baby potatoes slathered in a garlicky, buttery sauce? The combination of flavors takes your tastebuds for a ride, creating a meal that’s not just filling but downright exhilarating.
Whether you’re hosting a backyard barbeque, enjoying a cozy family dinner, or simply looking to elevate your weeknight meal, Cowboy Butter Potatoes will steal the show every time. Let’s roll up our sleeves and get cooking!
A Taste of Nostalgia
Let me take you back for a moment. I remember vividly the first time I tried Cowboy Butter Potatoes at a rustic lodge during a family getaway when I was a kid. We were surrounded by the majestic mountains, with an open fire crackling nearby, and the tantalizing aroma of home-cooked meals wafting through the air.
After a day of hiking and exploring, we all gathered around a long wooden table, and that’s when I spotted the Cowboy Butter Potatoes. They were glistening, each bite-sized piece promising a burst of flavor. I couldn’t resist! One bite led to another, and soon I found myself going back for seconds, completely captivated by the combination of rich butter mingled with hints of garlic and spice.
That moment was more than just about the food; it was about connection, warmth, and the spirit of gathering around a table. Now, every time I make these potatoes, I’m transported back to that cozy lodge, surrounded by family, laughter, and love. This dish carries that spirit with it, and it’s now one of my go-to sides for any occasion. Let’s make your tastebuds dance with joy!
Ingredients
Gather up the following ingredients to create your own Cowboy Butter Potatoes:
-
680 g red baby potatoes, perfectly halved
These beautifully colored potatoes are not only cute but packed with flavor. Their thin skins mean you don’t have to peel them. If you can’t find red baby potatoes, you can use yellow or even Yukon Gold potatoes for a similar result. -
Salt, to taste
This is a flavor enhancer! Don’t be shy; great dishes always have the right amount of seasoning. Try sea salt or kosher salt for a different texture and taste. -
Freshly ground black pepper, to taste
You’ll want to use freshly ground for the best flavor kick! If you’re in a pinch, pre-ground pepper works but may lack the same intensity. -
56 g unsalted butter, melted
Oh, the richness! Unsalted butter allows you to control the saltiness of the dish. You can also substitute with ghee or olive oil for a twist. -
1 clove garlic, minced
Fresh garlic truly elevates this dish. If you don’t have fresh, 1/4 teaspoon of garlic powder will do the trick. -
1 teaspoon Dijon mustard
This adds a subtle tang that brightens every bite. If you prefer a milder taste, you can swap it for yellow mustard. -
1 tablespoon freshly squeezed lemon juice
The acidity from lemon juice balances the richness of the butter beautifully. Lime juice is a nice alternative if you want to mix it up! -
1 teaspoon fresh parsley, chopped
Fresh herbs bring a pop of color and flavor. If you’re short on time or fresh ingredients, use 1 teaspoon of dried parsley. -
1/2 teaspoon paprika or smoked paprika
This introduces warmth and depth of flavor. If you prefer a smokier taste, definitely opt for the smoked variety. -
1/4 teaspoon crushed red pepper flakes (optional)
Add this for a spicy kick! If you want to keep it mild, feel free to omit it. -
1/4 teaspoon salt
Just a touch more to bring it all together. -
1/4 teaspoon freshly ground black pepper
Just like the salt, this helps round out the flavor profile.
Step-by-Step Instructions
Now that you’ve gathered your ingredients, let’s dive right into the cooking process. Follow these easy steps:
-
Prep the Potatoes:
Start by washing those adorable red baby potatoes. You want them clean and ready to shine. Once they’re washed, carefully halve each potato so we can ensure they soak up that delicious Cowboy butter goodness. -
Boil the Potatoes:
Place the halved potatoes in a large pot, fill it with cold water (enough to cover them by about an inch), and add a generous pinch of salt. Bring the pot to a boil over medium-high heat. Once boiling, reduce to a simmer and cook for about 15-20 minutes, or until fork-tender. You want them soft but not falling apart.Chef’s tip: To check if they’re done, simply poke one with a fork—the fork should easily slide in without resistance!
-
Drain and Dry:
Once the potatoes are perfectly tender, drain them in a colander. Let them sit for a few minutes to dry out a bit—this will help caramelize the cut sides when you pan-sear them later. -
Make the Cowboy Butter Sauce:
In a medium bowl, mix together the melted butter, minced garlic, Dijon mustard, lemon juice, chopped parsley, paprika, crushed red pepper flakes, salt, and black pepper. Stir well to ensure the flavors meld together beautifully.Quick note: Don’t be afraid to taste and adjust! The best part of cooking is personalizing it to your liking.
-
Sear the Potatoes:
Heat a large skillet over medium heat, and add a splash of oil (olive or avocado work great). Once hot, carefully place the drained potatoes cut-side down onto the skillet. Give them a good sear for about 3-4 minutes until browned.Little Chef Hack: If you want extra crispiness, don’t overcrowd the skillet. Leave some space between the potatoes so they can brown nicely!
-
Coat the Potatoes:
Once they’re golden and delicious, turn the potatoes over and pour the Cowboy butter sauce over the top. Cook for another 2-3 minutes, allowing the potatoes to soak up all that flavor. -
Final Flavors:
Give everything a gentle toss to coat each potato in the buttery sauce, making sure that garlicky goodness gets everywhere. Cook for just another minute to make sure everything is heated through. -
Plate Up:
Transfer the Cowboy Butter Potatoes to a serving dish and drizzle any remaining sauce over top.
And there you have it! Cowboy Butter Potatoes, ready for everyone to dive in.
Serving Suggestions
These Cowboy Butter Potatoes are a stunning addition to any meal. Serve them warm, garnished with a sprinkle of extra parsley for a pop of color. They pair beautifully with grilled meats, roasted vegetables, or even just a fresh salad on the side. And trust me, everyone will be coming back for seconds!
Recipe Variations
Looking to shake things up a bit? Here are a few fun twists you might consider:
-
Herb-Infused Option:
Swap the parsley for fresh rosemary or thyme for a fragrant variation. -
Cheesy Delight:
Add a sprinkle of grated parmesan or crumbled feta on top just before serving for a creamy finish. -
Maple Glaze:
Replace half of the butter with maple syrup for a sweet-and-savory twist. It’s surprisingly delightful! -
Spicy Chipotle:
Use chipotle in adobo sauce instead of garlic for a smoky, spicy kick. -
Vegan Version:
Substitute the butter with vegan margarine or coconut oil and use a spoonful of nutritional yeast for that cheesy flavor.
Chef’s Notes
As much as I adore this recipe in its classic form, I’ve had my fair share of kitchen experiments with it over the years! There was that one epic barbecue where I thought I’d throw in some bacon bits for extra indulgence; let’s just say, that was a hit and a half.
I’ve even swapped out the Dijon mustard for whole grain mustard on a whim, and it added this delightful texture and flavor that I can’t stop thinking about. Cooking is all about exploration, so feel free to make it your own!
FAQs and Troubleshooting
Q1: My potatoes turned mushy; what did I do wrong?
A: Over-boiling can lead to mushy potatoes. Aim for fork-tender, and remember, you want them soft, not falling apart!
Q2: Can I use other types of potatoes?
A: Absolutely! Yukon golds, fingerlings, or even small russets will work. Just keep an eye on the cooking time as sizes may vary.
Q3: The sauce seemed too oily; how can I fix it?
A: If the butter sauce feels a bit heavy, consider using less butter next time, or be sure to balance it with more lemon juice and spices for brightness.
Q4: Can I prepare this ahead of time?
A: Totally! You can boil the potatoes a day in advance and toss them in the refrigerator. When you’re ready, just give them a quick sear and coat with the sauce.
Nutritional Info
Here’s a quick nutritional breakdown per serving (based on 6 servings):
- Calories: 180
- Fat: 8g
- Carbohydrates: 26g
- Protein: 3g
- Fiber: 2g
Now you’re armed with everything you need to whip up these Cowboy Butter Potatoes. Trust me, they’ll be a hit at your table just like they were at that cozy lodge all those years ago. Happy cooking, friends!
PrintCowboy Butter Potatoes

A deliciously simple dish of red baby potatoes slathered in a garlicky, buttery sauce, perfect for any gathering.
- Prep Time: 15 minutes
- Cook Time: 30 minutes
- Total Time: 45 minutes
- Yield: 6 servings 1x
- Category: Side Dish
- Method: Boiling and Searing
- Cuisine: American
- Diet: Vegetarian
Ingredients
- 680 g red baby potatoes, halved
- Salt, to taste
- Freshly ground black pepper, to taste
- 56 g unsalted butter, melted
- 1 clove garlic, minced
- 1 teaspoon Dijon mustard
- 1 tablespoon freshly squeezed lemon juice
- 1 teaspoon fresh parsley, chopped
- 1/2 teaspoon paprika or smoked paprika
- 1/4 teaspoon crushed red pepper flakes (optional)
- 1/4 teaspoon salt
- 1/4 teaspoon freshly ground black pepper
Instructions
- Prep the potatoes: Start by washing the red baby potatoes and halving each one.
- Boil the potatoes: Place the halved potatoes in a pot, cover with cold water, add salt, and bring to a boil. Simmer until fork-tender.
- Drain and dry: Drain the potatoes in a colander and let them sit for a few minutes.
- Make the Cowboy Butter sauce: In a bowl, mix melted butter, garlic, mustard, lemon juice, parsley, paprika, red pepper flakes, salt, and pepper.
- Sear the potatoes: Heat a skillet, add oil, and sear the cut-side of the potatoes until browned.
- Coat the potatoes: Turn the potatoes and pour the Cowboy butter sauce over them. Cook for another few minutes.
- Final flavors: Toss the potatoes to coat in the sauce and heat through.
- Plate up: Transfer the potatoes to a serving dish and drizzle with remaining sauce.
Notes
These potatoes can be served warm with a sprinkle of parsley and pair beautifully with grilled meats or salad.
Nutrition
- Serving Size: 1 serving
- Calories: 180
- Sugar: 1g
- Sodium: 500mg
- Fat: 8g
- Saturated Fat: 5g
- Unsaturated Fat: 3g
- Trans Fat: 0g
- Carbohydrates: 26g
- Fiber: 2g
- Protein: 3g
- Cholesterol: 15mg
Keywords: Cowboy Butter Potatoes, side dish, potatoes, buttery sauce, easy recipe
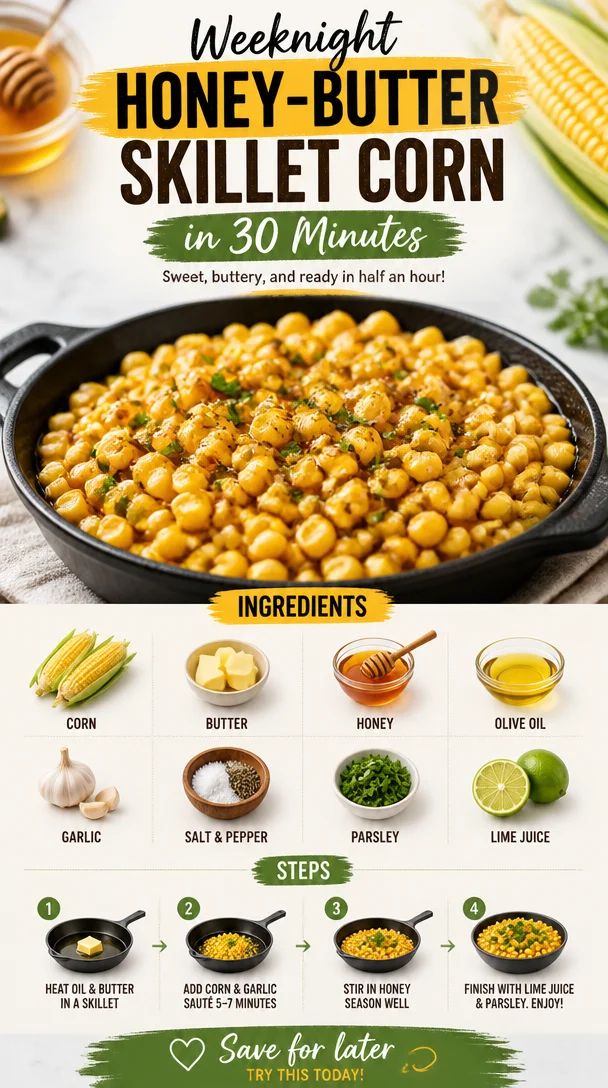
Weeknight Honey-Butter Skillet Corn in 30 Minutes
Honey Butter Skillet Corn: Sweet, Savory, and Totally Satisfying
Welcome to Clean Plate Cravings, where fresh, feel-good food meets real life—and trust me, today’s recipe is a game changer! If you’re looking for a dish that’s bursting with sweet and savory flavors, then let me introduce you to Honey Butter Skillet Corn. This dish is not just a side—it’s a full-on celebration of fresh corn, buttery goodness, and a touch of sweetness. It’s the kind of dish that makes you happy to be in the kitchen and even happier to be sitting down at the table.
Imagine this: a warm summer evening, the sun setting behind the trees, and a family gathering where laughter fills the air. The aroma of charred corn wafting from the kitchen brings everyone together, and all you can think about is diving into that succulent, buttery goodness. That’s the essence of Honey Butter Skillet Corn! Not only is it delicious, but it also has a nostalgic charm that makes it a staple in my home.
Cooking has always been a journey filled with vibrant memories, and this dish certainly takes me back. I still remember those afternoons spent in my grandma’s kitchen, where the rich smell of melting butter combined with the sweet scent of corn made my mouth water. Grandma would whip up her famous skillet corn as a side dish for family barbecues or holiday feasts, and we could never get enough of it.
Fast forward to my own culinary adventures, and I can’t help but recreate that magic in my home today. I love how simple and approachable this dish is, yet it carries bursts of flavor that will keep everyone coming back for seconds (or thirds!). So, grab your skillet, and let’s bring those sweet memories back to life with a fresh twist. Your taste buds are about to go on a delightful ride!
Personal Story
Ah, the power of food to stir up memories! One of my favorite memories associated with Honey Butter Skillet Corn is from a summer reunion at my grandparents’ house. It was one of those idyllic days where everything seemed just right—the sun was shining, and the backyard was filled with laughter and chatter from cousins, aunts, and uncles. As we gathered around the grill, my grandma was at her culinary magic station, adding the final touches to her skillet corn.
She always said that the secret was in the honey—“it brings out the sweetness of the corn, darling!”—and I’ve come to realize just how true that is. As each mouthful brought smiles to our faces, I watched everyone savor the flavors. It was more than just food; it was a way of connecting with each other, sharing stories, and creating lasting memories. These moments have shaped my passion for cooking and my joy in sharing recipes that bring people together. Now, I strive to recreate that same magic in my own family, adding my own touches while keeping the heart of the dish intact.
Ingredients
Here’s what you’ll need to create your own Honey Butter Skillet Corn:
-
Fresh Corn (4-5 ears)
The star of the dish! Fresh corn on the cob brings a burst of sweetness and texture. Look for ears with bright green husks and plump kernels. If fresh corn isn’t available, you can substitute with frozen corn. Just make sure to thaw and drain it beforehand. -
Unsalted Butter (4 tablespoons)
The essential base for that buttery goodness! Unsalted butter allows you to control the salt level in your dish. Feel free to use vegan butter or ghee for a dairy-free alternative. -
Honey (2 tablespoons)
Adds a delightful sweetness! Try local honey for an extra touch of flavor and a potential health benefit. For a vegan option, substitute maple syrup. -
Salt (to taste)
A pinch of salt enhances all the flavors. Use sea salt or kosher salt for the best results. -
Black Pepper (to taste)
Just a dash will add a nice contrast to the sweetness of the corn. Experiment with fresh ground pepper for an extra kick! -
Chopped Fresh Herbs (optional, such as cilantro or chives)
Fresh herbs brightens up the dish and adds a pop of color! If you’re not a fan of cilantro, consider basil or parsley instead.
Step-by-Step Instructions
Ready to bring this beautiful dish to life? Follow these steps, and don’t forget to sprinkle in some laughter along the way!
-
Prep Your Corn
Start by shucking the corn. Remove the husks and silk, then rinse the ears under cool water. Use a sharp knife to cut the kernels off the cob, making sure to slice down until you feel the cob at the bottom, collecting the corn in a big bowl. This is a great opportunity to involve kids or family, so they can join in the fun! -
Heat Your Skillet
Grab a large, heavy-bottom skillet and place it over medium heat. Let it warm up for a few minutes until it’s nice and hot. A well-heated skillet will help achieve that lovely sautéing effect. -
Melt the Butter
Once the skillet is heated, add the unsalted butter and let it melt gently. As it starts to foam, get ready for that ultra-rich buttery aroma! Make sure not to let it brown; we’re looking for a decadent melt, not browned butter for this recipe. -
Add the Corn
Toss in the freshly cut corn kernels and give everything a good stir to combine. Let the corn cook for about 5-7 minutes, stirring occasionally. You want the kernels to soften slightly, but you also want some bits to caramelize for that wonderful sweet and savory balance. -
Mix in Honey
Drizzle the honey over the corn while stirring. Let it mingle with the buttery corn and watch how it transforms the dish. Taste and adjust with salt and pepper to suit your palate; this is where the magic happens! The goal is to balance that sweetness with a little salty zing. -
Add Fresh Herbs
If you’re using herbs, now’s the time! Toss in your chopped cilantro or chives and stir them through just before serving. They’ll add a fresh burst of flavor alongside the sweetness of the corn. -
Serve and Enjoy
Turn off the heat and transfer the Honey Butter Skillet Corn to a serving bowl. Enjoy it warm alongside your favorite proteins, or just scoop into bowls for a light, satisfying meal.
Serving Suggestions
Honey Butter Skillet Corn is as lovely to present as it is to eat! Serve it in a rustic bowl garnished with a sprinkle of fresh herbs or a light dusting of smoked paprika for a pop of color and flavor. It pairs beautifully with grilled chicken, fish, or as an addition to summer salads. For a cozy dinner, serve a big scoop alongside some fluffy rice or your favorite quinoa for a hearty meal.
Recipe Variations
Let your creativity shine with these delicious twists on Honey Butter Skillet Corn:
- Spicy Kick: Add a pinch of cayenne pepper or some diced jalapeños for a spicy variation.
- Cheesy Delight: Stir in grated Parmesan or crumbled feta cheese for a creamy, savory element.
- Lime Zing: Squeeze in fresh lime juice for an added level of brightness that perfectly complements the sweetness.
- Bacon Treat: Cook some diced bacon in the skillet first, then remove it and proceed with the corn and butter. Stir the bacon bits back in for a smoky flavor.
- Seasonal Twists: Toss in seasonal vegetables like diced bell peppers or zucchini for a burst of color and extra nutrition.
Chef’s Notes
This Honey Butter Skillet Corn recipe originally came from my grandma’s handwritten recipe book, which is a treasure trove of family traditions and culinary wisdom. Over the years, I’ve enhanced it with my own creative flair and added twists while keeping the core deliciousness intact! I love experimenting with flavors and textures, and every time I cook this dish, I’m reminded of Grandma’s warm hugs and her love for family gatherings.
When making this dish, I always remember to keep it flexible. Whether you need to swap ingredients or want to scale it up for a big crowd, this is one of those forgiving recipes that always delivers delight.
FAQs and Troubleshooting
1. Can I use frozen corn instead of fresh?
Absolutely! Just make sure to thaw and drain the frozen corn well before using it. You won’t lose any delicious flavor, and it’s super convenient!
2. My corn didn’t caramelize! What should I do?
If your corn isn’t caramelizing, it might be that the skillet wasn’t hot enough. Make sure to preheat your skillet well and keep a close eye on the heat. Adjust as necessary!
3. How do I store leftovers?
Leftover Honey Butter Skillet Corn can be stored in an airtight container in the refrigerator for up to 3 days. Just reheat gently on the stove or in the microwave before serving again.
4. I want it dairy-free—what should I use?
Great question! Substitute unsalted butter with a vegan butter alternative and swap honey with maple syrup to keep the dish dairy-free but equally delicious.
Nutritional Info
While I don’t typically focus on rigid nutritional guidelines, here’s a quick overview: serving Honey Butter Skillet Corn provides a delightful mix of carbohydrates from the corn, healthy fats from the butter, and natural sugars from the honey—making for a balanced side that will surely energize!
And there you have it! A comforting, nostalgic dish that brings friends and family together around the table. Ready to dive in? I hope you enjoy making and sharing this Honey Butter Skillet Corn as much as I do! Happy cooking!
PrintHoney Butter Skillet Corn
A delightful dish of sweet and savory Honey Butter Skillet Corn made with fresh corn, butter, and honey, perfect for summer gatherings.
- Prep Time: 10 minutes
- Cook Time: 15 minutes
- Total Time: 25 minutes
- Yield: 4 servings
- Category: Side Dish
- Method: Sautéing
- Cuisine: American
- Diet: Vegetarian
Ingredients
- Fresh Corn (4-5 ears)
- Unsalted Butter (4 tablespoons)
- Honey (2 tablespoons)
- Salt (to taste)
- Black Pepper (to taste)
- Chopped Fresh Herbs (optional, such as cilantro or chives)
Instructions
- Prep Your Corn: Shuck the corn, rinse it, and cut the kernels off the cob.
- Heat Your Skillet: Warm a large skillet over medium heat for a few minutes.
- Melt the Butter: Add unsalted butter to the skillet and let it melt gently.
- Add the Corn: Toss in the corn kernels and stir to combine; cook for about 5-7 minutes.
- Mix in Honey: Drizzle honey over the corn while stirring, and adjust salt and pepper to taste.
- Add Fresh Herbs: If using, stir in chopped herbs just before serving.
- Serve and Enjoy: Transfer to a serving bowl and enjoy warm.
Notes
This recipe allows for flexibility with ingredient substitutions, and you can easily scale it up for larger gatherings.
Nutrition
- Serving Size: 1 serving
- Calories: 200
- Sugar: 10g
- Sodium: 50mg
- Fat: 12g
- Saturated Fat: 7g
- Unsaturated Fat: 3g
- Trans Fat: 0g
- Carbohydrates: 25g
- Fiber: 3g
- Protein: 3g
- Cholesterol: 30mg
Keywords: Honey Butter, Skillet Corn, Side Dish, Summer Recipe, Vegetarian
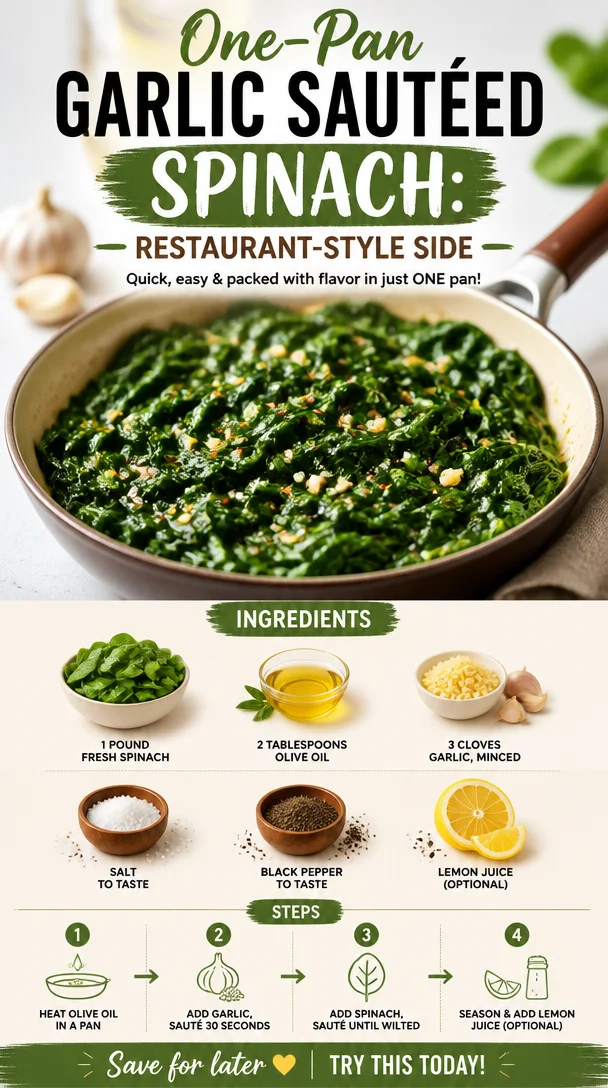
One-Pan Garlic Sautéed Spinach: Restaurant-Style Side
Easy Restaurant-Style Sautéed Spinach: Fresh, Fast, and Flavorful!
Welcome to the vibrant world of sautéed spinach! If you’re looking for a dish that’s super simple yet packed with flavor, you’re in the right place. Sautéed spinach is one of those side dishes that can turn a boring meal into something special in a flash. Plus, it’s a fantastic way to add nutrients and taste to your plate! Whether you’re whipping it up for a casual weeknight dinner or fancying it up for company, this quick and easy recipe is a true crowd-pleaser.
The beauty of sautéed spinach lies in its simplicity. With just a handful of fresh ingredients and a few minutes on the stove, you can create a delightful dish that shines both in flavor and nutrition. Plus, it’s SO versatile—you can serve it alongside practically anything! So roll up your sleeves, and let’s dive into this delicious recipe that’s sure to impress your taste buds and guests alike.
A Personal Story: The Spinach Serendipity
Growing up, my family’s dinner table was always a whirlwind of flavors. My mom was a culinary wizard, and she ensured we had a balanced meal every night. I remember one evening in particular when she made sautéed spinach as a side for our grilled salmon. She walked into the kitchen with a big, unimpressed bunch of spinach and my initial reaction was, "Ugh, spinach again?" But boy, did that change quickly!
She tossed the vibrant greens into a hot pan with olive oil and minced garlic as her signature background music played—Van Morrison’s soothing tunes wafting in the air. Within minutes, the kitchen transformed, filling with that intoxicating garlicky aroma. The once dull spinach turned into a glossy, emerald dish, and not only was it beautiful, but it also tasted divine!
From that day on, sautéed spinach quickly became a staple in our house. I saw firsthand how such a simple dish could elevate a meal. It was a delicious lesson in the fact that even the humblest ingredients can become extraordinary with just a little love and creativity.
Ingredients
Let’s gather our ingredients and get started! Here’s what you’ll need:
-
1 pound fresh spinach: Opt for vibrant, green leaves. If you can’t find fresh, you can use frozen spinach—just be sure to squeeze out excess water!
-
2 tablespoons olive oil: Not only does it add a lovely flavor, but it’s also packed with healthy fats. If you’re looking for a different taste, try avocado oil or butter for a richer finish.
-
3 cloves garlic, minced: Fresh garlic makes all the difference! If you’re in a pinch, garlic powder works too—just remember to use less since it’s concentrated.
-
Salt to taste: A little sprinkle enhances all the flavors. Feel free to experiment with various salts, such as sea salt or Himalayan pink salt.
-
Black pepper to taste: Freshly cracked black pepper elevates the dish nicely. White pepper can also work if you’re looking for a subtler flavor.
-
Lemon juice (optional): A squeeze of lemon at the end brightens everything up! If you don’t have fresh lemons, vinegar can also add that zesty kick.
Step-by-Step Instructions
Now that we have our ingredients ready, let’s sauté our way to deliciousness!
-
Prep the spinach: Start by rinsing the spinach thoroughly under cold water to remove any grit. Shake off excess water, but it’s okay to leave a little—it helps with steaming!
-
Heat the oil: In a large sauté pan or skillet, heat the olive oil over medium heat. You want the oil to shimmer but not smoke. This is when the magic begins!
-
Sauté the garlic: Toss in the minced garlic and sauté for about 30 seconds, or until fragrant. Keep an eye on it; garlic can go from golden to burned in a blink. Stir it gently, letting the aroma fill your kitchen.
-
Add the spinach: Gradually add in your fresh spinach. This allows you to stir it easily without overcrowding the pan. You’ll see it start to wilt almost instantly!
-
Toss and season: As the spinach wilts, use your tongs or spatula to toss it gently. Sprinkle in salt and black pepper to taste. You want to season as you go, letting all those flavors soak into the greens.
-
Finish with lemon: Once the spinach is wilted—this takes about 3-4 minutes—remove it from the heat. If you’re feeling fancy, squeeze some lemon juice over the top for a fresh finish.
-
Taste and adjust: Give it a final taste! Add more salt, pepper, or lemon juice as desired. Your sautéed spinach should be flavorful and vibrant.
Serving Suggestions
Now, how to plate this masterpiece? For a beautiful presentation, transfer your sautéed spinach to a serving bowl or plate and drizzle a little extra olive oil on top. If you’re feeling extra fancy, a sprinkle of grated Parmesan cheese or a few toasted pine nuts will elevate it even more! Serve it alongside grilled meats, pasta, or even as a bed for an egg dish for an irresistible brunch option.
Recipe Variations
Feel like switching it up? Here are a few creative twists for your sautéed spinach:
-
Add nuts: Toss in some toasted almonds or walnuts for a satisfying crunch.
-
Spicy kick: A pinch of red pepper flakes during cooking will add a delightful heat.
-
Cheesy delight: Stir in some feta or goat cheese right before serving for a creamy touch.
-
Herbs: Fresh herbs like basil, parsley, or dill make a lovely addition for summer flavors.
-
Balsamic reduction: Drizzle a balsamic glaze over the finished spinach for a sweet, tangy twist.
Chef’s Notes
Over the years, I’ve learned that this sautéed spinach recipe is forgiving and allows for lots of personal touches. There have been times I’ve thrown in leftover veggies or herbs to use them up, and they’ve only enhanced the flavor. It’s become one of my staple go-to sides, whether for an elegant dinner party or a quick weeknight meal at home. The comfort of nostalgia is always there—with each bite reminding me of those joyful family dinners with my mom.
FAQs and Troubleshooting
Q: Why did my spinach turn soggy?
A: Overcooking or using too much water can cause sogginess. Make sure to remove the spinach from the heat as soon as it wilts. If you rinse it, shake off excess water but don’t dry it completely.
Q: Can I use frozen spinach?
A: Absolutely! Just be sure to thaw it and squeeze out any excess water. You might need to sauté it a bit longer to ensure it’s heated through.
Q: How do I avoid burning garlic?
A: Keep your heat to medium and stir constantly. As soon as the garlic becomes fragrant and starts to turn golden, it’s time to add the spinach.
Q: Can I make this ahead of time?
A: While sautéed spinach is best fresh, you can sauté it ahead and warm it up shortly before serving. Just be mindful not to overcook it again!
Nutritional Info
While the nutritional info can vary based on how you serve this dish, sautéed spinach is generally low in calories but high in vitamins A and K, along with iron and calcium. It makes for a nutrient-packed addition to any meal!
Sautéed spinach may seem simple, but it’s all about bringing those flavors to life—with a touch of love and creativity. I hope this recipe inspires you to incorporate more greens into your meals without compromising on taste. Let’s embrace those fresh, feel-good flavors and make every meal a joy! Happy cooking!
PrintEasy Restaurant-Style Sautéed Spinach

A quick and flavorful side dish that elevates any meal using fresh spinach, garlic, and olive oil.
- Prep Time: 5 minutes
- Cook Time: 10 minutes
- Total Time: 15 minutes
- Yield: 4 servings 1x
- Category: Side Dish
- Method: Sautéing
- Cuisine: American
- Diet: Vegetarian
Ingredients
- 1 pound fresh spinach
- 2 tablespoons olive oil
- 3 cloves garlic, minced
- Salt to taste
- Black pepper to taste
- Lemon juice (optional)
Instructions
- Prep the spinach: Rinse thoroughly under cold water, shaking off excess water.
- Heat the oil: In a large sauté pan, heat olive oil over medium heat until shimmering.
- Sauté the garlic: Add minced garlic and sauté for about 30 seconds until fragrant.
- Add the spinach gradually, allowing it to wilt without overcrowding the pan.
- Toss and season: Gently toss the spinach, adding salt and black pepper to taste.
- Finish with lemon juice if desired, then remove from heat once wilted (about 3-4 minutes).
- Taste and adjust seasoning as needed.
Notes
Serve with a drizzle of olive oil, grated Parmesan, or toasted pine nuts for an extra touch.
Nutrition
- Serving Size: 1 serving
- Calories: 70
- Sugar: 1g
- Sodium: 180mg
- Fat: 5g
- Saturated Fat: 1g
- Unsaturated Fat: 4g
- Trans Fat: 0g
- Carbohydrates: 6g
- Fiber: 4g
- Protein: 3g
- Cholesterol: 0mg
Keywords: sautéed spinach, quick side dish, healthy vegetables
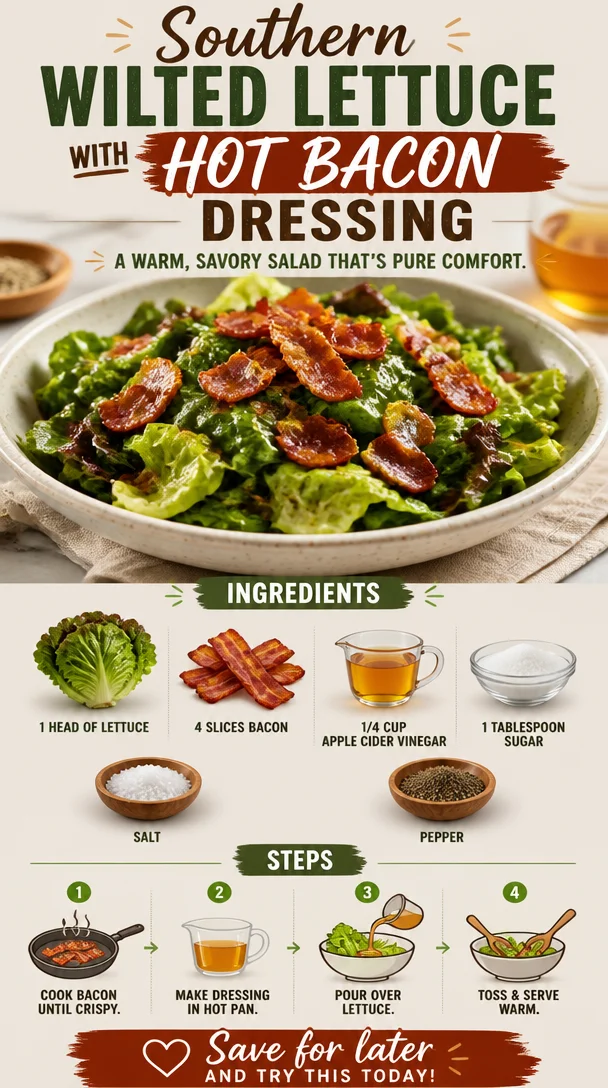
Southern Wilted Lettuce With Hot Bacon Dressing
Southern Wilted Lettuce With Hot Bacon Dressing
Welcome to Clean Plate Cravings! Today we’ll be diving into a dish that’s a staple in Southern kitchens: Wilted Lettuce with Hot Bacon Dressing. This simple yet tantalizing recipe combines crisp greens with a smoky, tangy dressing that makes every bite a flavorful adventure. It’s all about bringing freshness, flavor, and a touch of nostalgia to your table, and I can’t wait to share my secrets with you!
Growing up in the South, mealtime was more than just about feeding the family—it was about gathering, storytelling, and rich culinary traditions. The aroma of cooking bacon and apple cider vinegar would waft through my grandmother’s kitchen, drawing us all in like bees to honey. I remember watching her skillfully prepare this dish, her hands moving with practiced ease as she wilted the greens just enough—a perfect balance of crisp freshness and warm, savory magic. It wasn’t just a salad; it was a heartfelt embrace on a plate, reminding us all of the beauty of simple, honest food that unites loved ones.
As I share this recipe with you, I hope to capture that same feeling of warmth and belonging. Let’s create memories around this dish together—we might even discover a few of our own along the way!
Ingredients
Here’s what you’ll need to whip up this delightful Southern classic:
-
1 head of lettuce (leaf or red romaine)
This is the star of our dish! Leafy greens add a fresh, crisp texture. Leaf lettuce is tender and delicate, while red romaine brings a pop of color. If you’re looking for a different texture, feel free to substitute with spinach or arugula for a spicier flavor. -
4 slices of bacon
The heart and soul of the hot dressing! Bacon lends a smoky richness that’s just irresistible. If you’re looking for a healthier option, turkey bacon or a plant-based alternative will also work beautifully, although the flavor profile will change slightly. -
1/4 cup apple cider vinegar
This tangy ingredient adds brightness to the dish and balances the richness of the bacon. You can swap this out for red wine vinegar or white balsamic vinegar if you want to switch it up but still keep that zing. -
1 tablespoon sugar
Just a touch of sugar helps mellow the acidity of the vinegar and enhances the flavors of the dressing. If you’re steering clear of sugar, consider using honey or maple syrup for a more natural sweetness. -
Salt and pepper to taste
These everyday staples elevate every dish! A good sprinkle of freshly cracked black pepper and sea salt will enhance the flavors, but remember to add them gradually and taste as you go.
Step-by-Step Instructions
Now, let’s get cooking! Follow these steps and incorporate some of my chef hacks along the way.
-
Prep the Lettuce:
Start by washing your lettuce thoroughly. You want to make sure to remove any dirt or grit. After rinsing, pat it dry gently with a clean kitchen towel or use a salad spinner. This step is crucial because excess water can dilute the dressing. -
Cook the Bacon:
In a large skillet over medium heat, lay down those glorious bacon slices. Let them cook for about 5-7 minutes. You want them nice and crispy—this is where all that smoky goodness comes from! Once crisp, use tongs to transfer the bacon to a paper towel-lined plate, letting it drain. Keep about 2 tablespoons of the bacon fat in the skillet. Don’t throw this liquid gold away; it’s the base for our dressing! -
Make the Dressing:
With the skillet still warm but not hot, pour in the apple cider vinegar and sprinkle in the tablespoon of sugar. This part is where the magic happens! As you stir, watch how the hot bacon fat mingles with the vinegar, creating that luxuriously thick dressing. Let it warm through for about a minute, allowing the vinegar and sugar to marry into one delightful blend. Season with a good pinch of salt and freshly cracked pepper to taste. -
Wilt the Lettuce:
Now, here comes the fun part! Toss your dry lettuce into the skillet. Use tongs to mix and coat the greens with the dressing. You’re aiming for just wilting the lettuce without making it mushy—this should take about 1-2 minutes. You’ll notice the leaves turning vibrant and beautiful. -
Add the Bacon:
Crumble your crispy bacon into the bowl with the wilted lettuce, making sure to reserve a few pieces for garnish. Mix everything until well combined. Let that warm dressing soak into the greens while keeping a little crunch in the beautiful lettuce leaves.
Serving Suggestions
When it comes to serving, a rustic bowl or platter works well here! You can pile the wilted lettuce high and top it with the reserved crumbled bacon for that eye-catching finish. For an extra pop, add some sliced cherry tomatoes or hard-boiled eggs if you’re feeling fancy. This dish pairs beautifully with grilled chicken or fish, or it can stand alone as a fresh, light meal.
Recipe Variations
- Add nuts or seeds: Consider adding toasted pecans or sunflower seeds for an extra crunch!
- Incorporate herbs: Fresh herbs like dill or chives can add another layer of flavor and freshness that complements the bacon beautifully.
- Make it a meal: Add diced grilled chicken or quinoa to transform this side dish into a satisfying entrée.
- Spice it up: For those looking for a kick, a pinch of red pepper flakes in the dressing can heat things up!
- Try different greens: Spinach or kale can change the whole flavor profile while still delivering that hearty bite.
Chef’s Notes
As a chef, I often find myself reminiscing about the meals of my childhood—the ones that tasted of home and comfort. This Southern Wilted Lettuce is definitely among them. Over the years, I’ve tried countless variations; sometimes I’ve tossed in a dash of Worcestershire sauce for an umami twist or even a splash of lemon juice to brighten things up. You can infuse your personal touch into this dish as well! Cooking should always be a reflection of what you love.
FAQs and Troubleshooting
Q: Why is my lettuce too wilted?
A: If your lettuce turns mushy, it’s likely that it cooked too long. Aim to sauté just until the leaves begin to soften, usually around 1-2 minutes.
Q: Can I make the dressing ahead of time?
A: Absolutely! You can prepare the dressing in advance, but I recommend heating it up just before serving to refresh those flavors.
Q: What if I don’t have bacon?
A: No bacon? No problem! Try using cooked pancetta for a similar flavor, or for a vegetarian option, sauté some mushrooms for a rich, savory element without the meat.
Q: How long will leftovers last?
A: While this dish is best enjoyed fresh, you can store leftovers in an airtight container in the fridge for about 1-2 days. Just remember the lettuce will continue to release moisture, so it might get a bit soggy.
Nutritional Info (optional)
While I won’t dive deep into numbers, I can tell you that this dish offers some fantastic nutrients thanks to the fresh greens and healthy fats from the bacon. Just keep in mind that moderation is key, especially when it comes to the dressing!
So, there you have it! A beautiful recipe to bring warmth and flavor to your table. I hope this Southern Wilted Lettuce with Hot Bacon Dressing becomes a favorite in your kitchen, just like it is in mine. Get ready to savor the simple pleasure of good food made with love, and let’s keep those cravings fresh and delicious! Happy cooking!
PrintSouthern Wilted Lettuce With Hot Bacon Dressing

A classic Southern dish combining crisp greens with a smoky, tangy dressing for a flavorful experience.
- Prep Time: 10 minutes
- Cook Time: 10 minutes
- Total Time: 20 minutes
- Yield: 4 servings 1x
- Category: Side Dish
- Method: Sautéing
- Cuisine: Southern
- Diet: Paleo
Ingredients
- 1 head of lettuce (leaf or red romaine)
- 4 slices of bacon
- 1/4 cup apple cider vinegar
- 1 tablespoon sugar
- Salt and pepper to taste
Instructions
- Prep the lettuce: Wash and dry thoroughly to remove any dirt.
- Cook the bacon: In a skillet, cook bacon until crispy, about 5-7 minutes. Drain on paper towels, keeping 2 tablespoons of bacon fat.
- Make the dressing: In the skillet, pour apple cider vinegar and add sugar. Stir and warm for about a minute, seasoning to taste.
- Wilt the lettuce: Toss the dry lettuce in the skillet until just wilted, about 1-2 minutes.
- Add the bacon: Crumble crispy bacon into the bowl with wilted greens, mix well, reserving some for garnish.
Notes
Serve in a rustic bowl, topped with reserved bacon and optional cherry tomatoes or hard-boiled eggs.
Nutrition
- Serving Size: 1 serving
- Calories: 180
- Sugar: 3g
- Sodium: 300mg
- Fat: 12g
- Saturated Fat: 4g
- Unsaturated Fat: 7g
- Trans Fat: 0g
- Carbohydrates: 10g
- Fiber: 2g
- Protein: 8g
- Cholesterol: 25mg
Keywords: southern, wilted lettuce, hot bacon dressing, salad, healthy side dish