Thai Peanut Chicken Crunch Slaw Salad
Thai Peanut Chicken Crunch Slaw Salad: A Fresh and Flavorful Feast
Introduction
Hey there, food lovers! Today, we’re diving into a dish that’s as colorful as it is delicious: Thai Peanut Chicken Crunch Slaw Salad. If you’re like me and believe that salads should be exciting and satisfying, then you’re in for a treat. This salad is a vibrant festival of flavors and textures, guaranteed to tickle your taste buds while leaving you feeling fresh and energized.
Now, let’s be real: how many times have you been stuck at a boring old salad bar, feeling uninspired by limp greens and a drizzle of bland dressing? Blech! That’s not how we do things around here. Cooking should be fun, and salads should be more than just rabbit food. That’s where my Thai Peanut Chicken Crunch Slaw Salad comes in: it’s crunchy, creamy, tangy, and oh-so-delicious!
Imagine this: fresh, crisp veggies mingled with tender, juicy chicken all coated in a luscious peanut sauce that’s bursting with flavor. Plus, it’s super easy to whip up, so you can enjoy it on busy nights or impress that special someone at your next dinner party. Let’s unpack the magic of this salad and create something extraordinary together!
Personal Story
Let me take you down memory lane for a moment. Growing up, my family and I would visit a little Thai restaurant that was tucked away in our neighborhood. It was one of those hidden gems where the flavors were as vibrant as the decor. I still remember the aroma that greeted us as we stepped inside, a delightful blend of spices that felt like a warm hug.
One summer evening, I decided to test my culinary skills by trying to recreate one of their most popular dishes: a spicy peanut chicken salad. I had no idea what I was doing, but the whole process felt like an adventure! I chopped away at those veggies like a pro (or at least I thought so) and mixed my ingredients with abandon, all the while imagining the smiles on my family’s faces when they tasted it.
The end result was deliciously satisfying—a chaotic, colorful bowl of goodness that elicited happy sighs all around. It quickly became a family favorite, and soon enough, I was experimenting with even more vibrant ingredients and flavors. It was that evening that sparked my passion for bringing fresh, fun recipes to the world. Fast forward to today, and now I’m excited to share one of my all-time favorites with you: the Thai Peanut Chicken Crunch Slaw Salad!
Ingredients
Here’s what you’ll need to create this mouthwatering dish:
-
2 cups coleslaw mix: A crunchy base that adds great texture. You can substitute with shredded cabbage if you’re in a pinch!
-
2 cups broccoli slaw: Packed with nutrients and a bit more crunch. If you can’t find this, a julienned carrot or bell pepper works well too.
-
1 cup matchstick carrots: For added color and sweetness. Shredded carrots can be used as a quick substitute.
-
1 bunch green onions (chopped): Adds a fresh, mild onion flavor. Feel free to swap for shallots if you like a bolder bite.
-
1/2 red bell pepper (chopped): Sweet and crunchy. Any color bell pepper can work here—get creative!
-
1/2 cup cilantro (chopped): Freshness overload! If cilantro isn’t your thing, fresh parsley or mint could also be delightful.
-
1 1/2 cups rotisserie chicken (shredded): Perfect for saving time and adding flavor. You can also use grilled chicken for a smoky touch.
-
2 cucumbers (seeded & chopped): Refreshing and hydrating! You can replace them with zucchini for a fun twist.
-
1 cup Thai peanut sauce: The star of the show! If you’re up for it, making your own sauce is a cinch, and I can share a quick recipe if you’d like!
-
1 lime (juiced): Brightens everything up! Lemon adds a similar zing if you don’t have lime on hand.
-
1/2 cup chopped peanuts: For that satisfying crunch. Feel free to substitute with sunflower seeds or almonds if you want to mix it up.
Step-by-Step Instructions
Let’s get cooking! Follow these easy steps to make your Thai Peanut Chicken Crunch Slaw Salad.
-
Prepare the Veggies: Start by rinsing and chopping all your veggies. Get them looking as vibrant as possible—your salad should be a feast for the eyes! Take a moment to admire that rainbow of colors in your bowl. Pro tip: a sharp knife will make chopping a breeze and keep all those beautiful colors intact.
-
Shred the Chicken: If you’re using a rotisserie chicken, shred it into bite-sized pieces. It should be tender and juicy, ready to mingle with those veggies. If you want to add an extra layer of flavor, toss the chicken in a bit of the peanut sauce before adding it to the salad. Trust me, this little hack elevates the dish!
-
Mixing it Up: In a large mixing bowl, combine the coleslaw mix, broccoli slaw, matchstick carrots, green onions, red bell pepper, cilantro, cucumbers, and chicken. Gently toss everything together, ensuring a lovely blend of colors and textures. Don’t worry if it looks a little chaotic; that’s the beauty of a good slaw!
-
Drizzle the Dressing: Time to add the star—a generous drizzle of that creamy Thai peanut sauce! Now, this is where you can really customize it to your taste; start with about 3/4 of a cup and add more if you like it extra saucy. Toss again until everything is nicely coated.
-
The Citrus Kick: Squeeze the lime juice over the salad and toss once more. The lime adds a zing that cuts through the richness of the peanut sauce, taking your salad to the next level.
-
Nuts About It: Finish off with the chopped peanuts. You can either sprinkle them on top for a beautiful presentation or mix them right in for an all-around crunch.
Serving Suggestions
Time to dig in! Serve your Thai Peanut Chicken Crunch Slaw Salad in a large bowl for a family-style meal or plate it individually for a more elegant touch. Dress it up with additional peanuts or cilantro on top for that extra pop. This salad thrives as a light lunch or a delightful side dish at dinner—and it pairs beautifully with grilled shrimp or fish!
Recipe Variations
Feeling adventurous? Here are some fun twists on this recipe to keep things interesting:
-
Spicy Kick: Add sliced jalapeños or a dash of sriracha to the peanut sauce for a spicy kick that will wake up your taste buds!
-
Protein Packed: Swap out the chicken for cooked tofu or chickpeas if you want to make a vegetarian or vegan version.
-
Sweet Surprise: Toss in some diced mango or pineapple for a touch of sweetness that pairs wonderfully with the savory peanut sauce.
-
Herb Swap: Experiment with different herbs. Mint, basil, or even dill can add a completely different flavor profile to your salad.
-
Grain Add-In: For extra heartiness, serve your salad on a bed of quinoa or add cooked rice noodles for a filling, complete meal.
Chef’s Notes
Over the years, this salad has become a staple in my kitchen! I love how versatile it is—you can honestly throw in whatever you have in the fridge! There was one time I decided to clean out my pantry and found some neglected bell peppers and a bit of cabbage. I tossed it all together, and that version ended up being a huge hit among my friends at a potluck!
And let’s be honest, the fun of cooking is trying new things, right? So don’t shy away from experimenting. Who knows what delicious combinations you’ll come up with?
FAQs and Troubleshooting
Q: Can I prepare this salad in advance?
A: Absolutely! You can pre-cut the veggies and store them in the fridge. However, I’d recommend waiting to dress the salad until just before serving to keep everything crunchy.
Q: How do I store leftovers?
A: Store any leftovers in an airtight container in the fridge for up to 2-3 days. The peanuts may lose some crunch, but the flavors will still be fantastic!
Q: What if I can’t find rotisserie chicken?
A: No worries! You can easily cook and shred your own chicken at home, or use any leftover protein you have on hand.
Q: Can I use bottled peanut sauce?
A: Sure thing! Just choose a good-quality peanut sauce that you love. You’ll enjoy a shortcut without sacrificing flavor.
Nutritional Info
This Thai Peanut Chicken Crunch Slaw Salad is not only delicious but also packed with nutrients:
- Calories: Approximately 400 per serving (depending on portion sizes and dressing usage)
- Protein: A good source of protein from the chicken and peanuts
- Fiber: The veggies provide a nice boost of fiber, keeping you full and satisfied
- Vitamins: Rich in vitamins A, C, and K from all the fresh produce
So, there you have it! A fresh, flavorful Thai Peanut Chicken Crunch Slaw Salad that’s bursting with color and nutrition. No matter the occasion, I hope you give this recipe a try and make it your own! Remember, good food should be fun—so grab your whisk, put on your favorite tunes, and let’s cook up some love! Happy eating!
PrintThai Peanut Chicken Crunch Slaw Salad

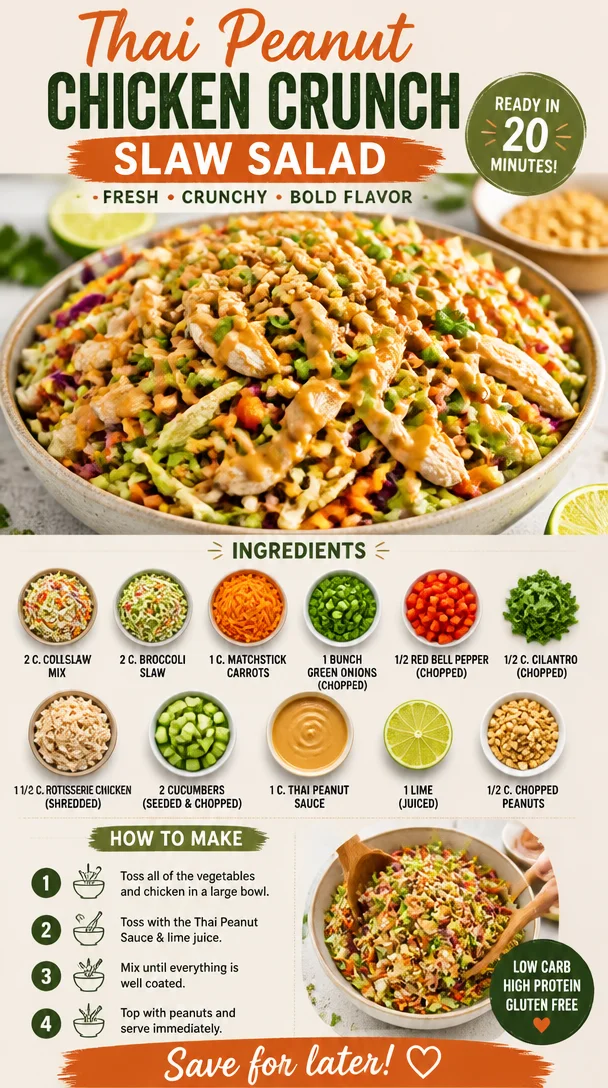
A vibrant and flavorful salad featuring crunchy veggies and juicy chicken, all coated in a luscious peanut sauce.
- Prep Time: 15 minutes
- Cook Time: 15 minutes
- Total Time: 30 minutes
- Yield: 4 servings 1x
- Category: Salad
- Method: Mixing
- Cuisine: Thai
- Diet: Gluten-Free
Ingredients
- 2 cups coleslaw mix
- 2 cups broccoli slaw
- 1 cup matchstick carrots
- 1 bunch green onions (chopped)
- 1/2 red bell pepper (chopped)
- 1/2 cup cilantro (chopped)
- 1 1/2 cups rotisserie chicken (shredded)
- 2 cucumbers (seeded & chopped)
- 1 cup Thai peanut sauce
- 1 lime (juiced)
- 1/2 cup chopped peanuts
Instructions
- Prepare the Veggies: Start by rinsing and chopping all your veggies.
- Shred the Chicken: If you’re using a rotisserie chicken, shred it into bite-sized pieces.
- Mixing it Up: In a large mixing bowl, combine the coleslaw mix, broccoli slaw, matchstick carrots, green onions, red bell pepper, cilantro, cucumbers, and chicken.
- Drizzle the Dressing: Add the creamy Thai peanut sauce and toss to coat.
- The Citrus Kick: Squeeze lime juice over the salad and toss.
- Nuts About It: Finish off with chopped peanuts sprinkled on top.
Notes
This salad is versatile; feel free to add other vegetables or proteins based on your preference.
Nutrition
- Serving Size: 1 serving
- Calories: 400
- Sugar: 6g
- Sodium: 500mg
- Fat: 20g
- Saturated Fat: 3g
- Unsaturated Fat: 15g
- Trans Fat: 0g
- Carbohydrates: 30g
- Fiber: 5g
- Protein: 25g
- Cholesterol: 60mg
Keywords: salad, Thai, chicken salad, healthy, quick recipe, peanut sauce
Snickers Salad
Snickers Salad: A Sweet, Crunchy Treat You’ll Love!
Are you ready to take your taste buds on a delightful adventure? Welcome to the world of Snickers Salad—a scrumptiously sweet dish that will have everyone asking for seconds! When I first stumbled upon this recipe as a kid during a family gathering, I thought it was too good to be true. This isn’t your ordinary salad; it’s sweet, crunchy, and absurdly easy to make. I remember watching my aunt whip this up, tossing Snickers, apples, and whipped cream together like it was the most natural thing in the world. I mean, who wouldn’t want a salad where candy is a star player?
You might be wondering—salad? Candy? Apples? This delightful concoction is often served as a dessert, and it’s incredibly versatile, making it perfect for every occasion. Whether you’re potlucking, celebrating a birthday, or just treating yourself on a Wednesday, Snickers Salad fits the bill. It’s like a scoop of happiness in a bowl, combining creamy textures with a crunch from the apples and a delightful surprise from the chocolatey Snickers bars.
What I love most about this Snickers Salad is how approachable it is. You don’t have to be a master chef to impress your friends with this recipe—trust me! The combination of flavors, simplicity of preparation, and nostalgia wrapped up in one dish make it a crowd-pleaser every time. Plus, it’s a great way to sneak in some fruit into your dessert (let’s pretend those apples are the healthy part, shall we?). So grab your apron (or your favorite comfy shirt) and let’s jump into making this sensational dish together!
A Sweet Memory with Snickers Salad
Before we dive into the recipe, I want to share a sweet memory about my first encounter with Snickers Salad. It was a summer barbecue hosted by my parents in our backyard. The sun was shining, burgers were sizzling, and the tantalizing aroma of grilled veggies wafted through the air. My cousins were running around with the energy only kids could muster, while the adults were busy discussing—the weather? I don’t know!
And then, my aunt Michelle arrived with a giant bowl of Snickers Salad. She had this beaming smile on her face, and I could tell she knew she was about to steal the show. As soon as she set it down on the table, it was like a magnet for everyone. I remember peeking into the bowl and thinking, “Is that…Snickers? In a salad?” The mix of crunchy apples, velvety pudding, and sweet caramel sauce created a beautiful clash of flavors I had never experienced.
After that day, Snickers Salad became a staple at our family get-togethers. Every time I take a bite of that creamy, sweet goodness, I’m transported back to those sunny afternoons, surrounded by laughter and love. It’s amazing how food can connect us to memories, isn’t it? Now, let’s create our own memories and dive into making this fantastic dish.
Ingredients
Here’s everything you’ll need to whip up your own delicious Snickers Salad:
-
1 cup vanilla pudding
This is the creamy base of your salad. The vanilla flavor complements the chocolate in the Snickers beautifully. If you want a lighter option, you can use vanilla Greek yogurt instead! -
4 Snickers candy bars, chopped
The hero of the dish! Feel free to get creative with other chocolate bars like Milky Ways or Twix if you’re feeling adventurous, but trust me, the classic Snickers here is hard to beat. -
2 Granny Smith apples, diced
The tartness of these apples balances the rich sweetness of the Snickers. If you’re looking for a sweeter alternative, Fuji or Honeycrisp apples work perfectly. -
1 cup Cool Whip or whipped cream
The light and fluffy texture of whipped cream is what brings everything together, giving it that dreamy effect. For a lower-calorie option, you could use whipped coconut cream. -
Caramel sauce for drizzling
Because let’s be honest, everything is better with caramel. You can buy this pre-made or, if you’re up for it, make your own! A sprinkle of sea salt over the warm caramel takes it to another level.
Step-by-Step Instructions
Ready to bring your Snickers Salad to life? Here we go—follow these simple steps for a fantastic treat:
-
Prepare the Pudding
In a mixing bowl, prepare the vanilla pudding as per the package instructions. If you’re using instant pudding, mix it with milk until it thickens, usually about 2 minutes of whisking. Looking to save time? You can make this ahead of time—just cover it and refrigerate until you’re ready to mix everything together. -
Chop the Snickers
Take your Snickers bars and chop them into bite-sized pieces. It’s best if you chill the bars in the freezer for a bit—they’re much easier to chop when cold! The extra crunch when biting into them is absolute heaven. -
Dice the Apples
Wash and dice the Granny Smith apples. You’re aiming for around half-inch pieces. No need to be too particular; a rustic look adds charm! If you want to keep them from browning, toss them in a tiny bit of lemon juice—it doesn’t alter the flavor, just keeps them looking fresh. -
Combine Ingredients
In a large mixing bowl, combine the prepared pudding, chopped Snickers, and diced apples. Gently fold everything together until the apples and Snickers are evenly coated with the pudding. Get in there with your spatula; it’s okay to be a little rough—just be gentle with those apples! -
Add the Whipped Cream
Now it’s time to fold in the Cool Whip or whipped cream. This step adds a lovely lightness to the salad. Keep it gentle! You want to combine everything without losing that airiness. -
Chill Time
Once all the ingredients are mixed together, cover the bowl with plastic wrap and let it chill in the refrigerator for at least 30 minutes. This allows the flavors to meld together perfectly. Trust me; it’s worth the wait! -
Drizzle and Serve
When you’re ready to serve, spoon the salad into bowls, and drizzle with caramel sauce. If you’re feeling extra fancy, you can even sprinkle some crushed peanuts on top for an added crunch. Voilà! A masterpiece made with love and the perfect balance of flavors.
Serving Suggestions
Serve your Snickers Salad in individual bowls or in a large glass dish for that retro dessert vibe! Garnish with extra chopped Snickers and a light drizzle of caramel sauce on top. A sprinkle of crushed nuts can add an appetizing crunch and elegant touch. Voila! You’ve got yourself a presentation that not only tastes amazing but looks fantastic, too!
Recipe Variations
Why not get a little creative and switch things up? Here are some variations you can try:
-
Nutty Addition: Add in some chopped walnuts or pecans for a nutty crunch that complements the sweetness beautifully.
-
Chocolate Lovers Delight: Mix in mini chocolate chips along with the Snickers for an extra chocolaty treat!
-
Healthier Option: Replace the Snickers with dark chocolate-covered almonds for a healthier twist, while still delivering that chocolatey satisfaction.
-
Fruity Fusion: Trade in some of the apples for diced bananas or pears—both are fabulous and will add a yummier sweetness!
-
Dairy-Free Version: Swap out the Cool Whip for coconut whipped cream and use almond milk for the pudding. Delicious and dairy-free!
Chef’s Notes
I still remember the first time I made this for my friends. I was nervous they’d think it was weird—an unconventional salad, right? But to my surprise, they devoured it like it was the best thing ever. We all laughed as we tried to determine if we were having dessert or snack time! This recipe has stuck with me over the years, reminding me that food is all about joy and connection. Plus, my friends now expect it at every get-together, so it’s become a beloved tradition!
FAQs and Troubleshooting
Q: Can I make this ahead of time?
Absolutely! You can prepare it a day in advance. Just splash some lemon juice on the apples before mixing them in to keep them fresh.
Q: What if I can’t find Snickers?
No problem! Swap them for any chocolate candy bars you love—Milky Way, Twix, or even Reese’s peanut butter cups. Get creative!
Q: My pudding isn’t thickening; what did I do wrong?
Sometimes, it’s all about the milk. Make sure to use cold milk as indicated. If it continues to stay runny, check the expiration date—old pudding mix can be temperamental.
Q: Can I make this vegan?
Great question! You can use plant-based pudding, coconut cream, and dairy-free chocolate bars to create a delicious vegan version that everyone can enjoy!
Nutritional Info (Optional)
- Serving Size: 1 cup
- Calories: 350
- Total Fat: 18g
- Saturated Fat: 8g
- Carbohydrates: 42g
- Sugars: 27g
- Protein: 3g
Snickers Salad is a fabulous mix of flavors that is sure to ignite joy in your kitchen—and in your tummy. So, whether you’re whipping it up for a special occasion or cozying up on the couch to indulge, remember to savor not just the taste, but the memories it brings along. Happy cooking, friends!
PrintSnickers Salad

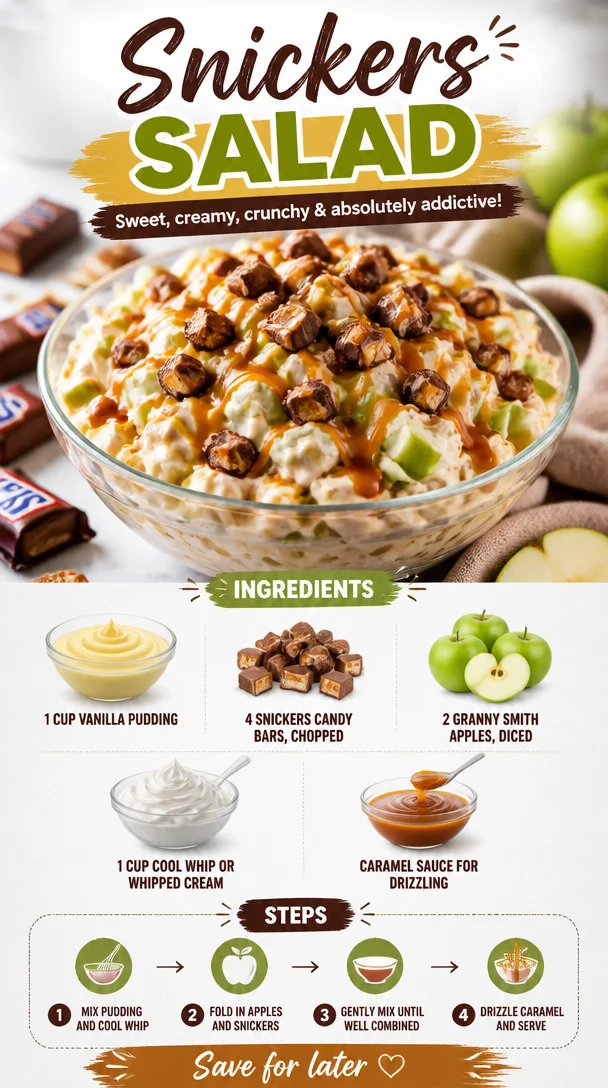
A scrumptiously sweet dish combining Snickers, apples, and whipped cream for a delightful dessert experience.
- Prep Time: 15 minutes
- Cook Time: 0 minutes
- Total Time: 45 minutes
- Yield: 4 servings 1x
- Category: Dessert
- Method: No-Cook
- Cuisine: American
- Diet: Vegetarian
Ingredients
- 1 cup vanilla pudding
- 4 Snickers candy bars, chopped
- 2 Granny Smith apples, diced
- 1 cup Cool Whip or whipped cream
- Caramel sauce for drizzling
Instructions
- Prepare the pudding by mixing it with milk as per package instructions, then refrigerate.
- Chop the Snickers bars into bite-sized pieces.
- Dice the Granny Smith apples into half-inch pieces.
- Combine the prepared pudding, chopped Snickers, and diced apples in a large mixing bowl.
- Add the Cool Whip or whipped cream and gently fold to combine.
- Chill the salad in the refrigerator for at least 30 minutes.
- Drizzle with caramel sauce before serving.
Notes
You can prepare this a day in advance by keeping the apples coated in lemon juice to prevent browning.
Nutrition
- Serving Size: 1 cup
- Calories: 350
- Sugar: 27g
- Sodium: 100mg
- Fat: 18g
- Saturated Fat: 8g
- Unsaturated Fat: 8g
- Trans Fat: 0g
- Carbohydrates: 42g
- Fiber: 1g
- Protein: 3g
- Cholesterol: 0mg
Keywords: Snickers Salad, dessert, easy salad, sweet treat
Minute Spinach Blueberry Salad for Busy Weeknights
20-Minute Spinach Blueberry Salad: A Fresh Take on a Classic Delight
Hey there, food lovers! Welcome to my kitchen, where the aromas are mouthwatering, the colors are vibrant, and the stories are just as delicious as the dishes we whip up. Today, we’re diving into the wonderful world of salads, specifically my quick and fabulous Spinach Blueberry Salad. It’s that delightful blend of sweet and savory, and trust me when I say it’s bursting with flavor!
Picture this: You’ve had a long day, and you’re craving something fresh and vibrant that won’t take ages to prepare. Enter this salad! With just 20 minutes of your time, you’ll create a dish that not only tastes like sunshine but also nourishes your body. The combination of baby spinach, juicy blueberries, creamy avocado, and crunchy walnuts makes this salad a feast for your taste buds—and don’t even get me started on the dressing! It’s a heavenly concoction of olive oil, balsamic vinegar, and a hint of garlic that pulls everything together beautifully.
Salads often get a bad rap, right? People think they’re bland or boring, but I’m here to change that perception. This Spinach Blueberry Salad will have you doing a happy dance in the kitchen! Plus, it’s easily customizable, meaning you can tweak it based on what you have on hand. Whether you’re having it as a light lunch, a side dish at dinner, or prepping for meal prep for the week, this salad is super versatile. So grab your apron and let’s get cooking!
Personal Story
I’ll never forget the first time I whipped up a blueberry salad. It was a sunny afternoon at my grandmother’s house—she had a garden brimming with fresh produce, and blueberries were in peak season. I remember her handing me a basket and sending me into the garden to gather the ripest fruit. The excitement of plucking those plump, sweet berries off the bush had me feeling like a treasure hunter.
Later, we tossed them with some spinach from her garden and a simple dressing she taught me. The first bite was like the sun bursting through the clouds. The sweetness of the blueberries perfectly contrasted the earthiness of the spinach. It became our little tradition to make that salad together every summer, sharing stories about our days while enjoying the simple yet unforgettable flavors. This recipe takes me back to that joyful time, reminding me of the importance of fresh ingredients and good company.
Ingredients
Here’s what you’ll need for this vibrant spinach blueberry salad:
-
4 cups baby spinach: Fresh, tender, and just the right base for our salad. Baby spinach is packed with nutrients and has a mild flavor. If you can’t find baby spinach, regular spinach works, too—just be sure to chop it into smaller pieces.
-
2 cups fresh blueberries: Sweet and juicy, these little gems bring a burst of flavor. Blueberries are also packed with antioxidants! Don’t have fresh? Frozen blueberries can work in a pinch; just be sure to thaw and drain them first.
-
1 cup raw walnuts: They add a delightful crunch and a dose of healthy fats. If walnuts aren’t your favorite, try pecans or almonds instead. Toast them lightly in a pan for extra flavor!
-
1 medium-large avocado: Creamy and nourishing, avocado brings richness to this salad. You can substitute with diced cucumber if you want a lighter crunch.
-
1/2 cup goat cheese: Adding a tangy note to the salad, goat cheese takes it to the next level! If you’re not a fan, feta can work beautifully, or you can skip the cheese for a dairy-free option.
-
1/4 cup fresh mint: Slightly sweet and refreshing, mint adds a delightful twist. Feel free to switch it up with basil or even parsley if you prefer.
-
Salt + pepper, to taste: Always a must for seasoning!
For the Dressing:
-
1/4 cup olive oil: A staple in any kitchen. It provides a rich base. If you need a lighter option, avocado oil is a great substitute.
-
2 Tbsp balsamic vinegar: Adds depth and sweetness to the dressing. Apple cider vinegar can be a delicious alternative if that’s what you have on hand.
-
1/2 a lemon, juice only: A splash of acidity brightens everything up. Lime juice works, too, if you’re feeling adventurous.
-
1 tsp garlic powder: A hint of garlic elevates the flavor. If you prefer fresh, minced garlic is fabulous—just use about 2 cloves.
-
1 tsp honey: A touch of sweetness to balance out the acidity and bitterness. Agave syrup can be used for a vegan alternative.
-
Salt + pepper, to taste: Always essential for bringing flavors together!
Step-by-Step Instructions
Now, let’s get our hands a little dirty and bring this beautiful salad to life! The steps are simple and quick, so follow along:
-
Prep Your Ingredients: First things first, wash and dry your baby spinach and blueberries. Dry spinach helps the dressing stick, and we want all that tasty goodness in every bite.
-
Chop and Slice: Next, it’s time to dice your avocado and crumble your goat cheese. To easily cut an avocado, slice it in half, remove the pit, and use a spoon to scoop out chunks—or you can slice it while it’s still in the skin and then scoop it out!
-
Toast the Walnuts (Optional): If you like extra flavor, this is the perfect time to toast your walnuts! Place them in a dry skillet over medium heat, tossing frequently for about 3–5 minutes until they’re golden and fragrant. Watch closely; they can burn quickly!
-
Make the Dressing: In a small bowl or a jar with a lid, whisk together the olive oil, balsamic vinegar, lemon juice, garlic powder, honey, salt, and pepper. If you’re using jar, just shake it until everything is combined. Easy peasy!
-
Assemble the Salad: In a large bowl, add the baby spinach, followed by the blueberries, walnuts, avocado, and goat cheese. Drizzle about half of the dressing over the salad so it’s not swimming, and give it a gentle toss to combine—be careful not to mash the avocado!
-
Adjust and Serve: Taste your salad. If it needs more salt, pepper, or dressing, now’s the time to adjust. Once you’re happy, it’s ready to serve!
-
Garnish with Fresh Mint: Sprinkle the torn mint leaves right before serving for a fresh burst of flavor.
And voilà, you’ve got yourself a gorgeous Spinach Blueberry Salad that’s ready to impress!
Serving Suggestions
To serve this dish beautifully, plate it in a large bowl to showcase the colorful ingredients or portion it into smaller bowls for individual servings. Drizzle a little extra dressing over the top and garnish with a few additional blueberries and mint leaves. This salad is fantastic on its own, but you can pair it with grilled chicken or shrimp for a heartier meal, or enjoy it as a side dish alongside your favorite protein.
Recipe Variations
Feeling adventurous? Here are some fun variations to shake things up!
-
Add Protein: Toss in grilled chicken, shrimp, or chickpeas for a protein boost. This makes it a more filling option!
-
Swap the Cheese: If you’re looking for different flavors, try crumbled feta or even sliced strawberries for a sweet twist.
-
Change the Nuts: Use pumpkin seeds instead if you have a nut allergy or want a different crunch.
-
Go Tropical: Add in diced mango or papaya for a vibrant fruit salad twist!
-
Vegan Version: Skip the cheese and swap honey with maple syrup for a completely plant-based dish.
Chef’s Notes
This salad is close to my heart, but it’s also a blank canvas! I love that I can swap in whatever ingredients I have on hand, often leading to delicious surprises. One time, I ended up tossing in leftover grilled chicken from dinner, and it transformed the salad into a satisfying meal.
An embarrassing kitchen moment? Let’s just say I mistook garlic powder for cinnamon once—yikes! But that mistake taught me always to double-check my spices, and the learning continues every day in the kitchen!
FAQs and Troubleshooting
-
Can I make this salad ahead of time?
While the salad is best fresh, you can prep the ingredients in advance. Keep the dressing separate until you’re ready to serve to prevent the spinach from wilting. -
What if I don’t like blueberries?
No worries! You can substitute with any seasonal fruit such as strawberries, raspberries, or even sliced apples. -
What should I do if the salad feels too bland?
Always taste as you go! You can add more dressing, a sprinkle of lemon juice, or more seasoning. A pinch of sea salt can elevate everything! -
How do I store leftovers?
Store any leftover salad in an airtight container for up to 2 days, but be aware that the spinach will wilt. If possible, keep the dressing separate until serving.
Nutritional Info
This Spinach Blueberry Salad not only packs a punch of flavor but is also nutrient-dense. A rough estimate for one serving includes:
- Calories: ~280
- Protein: ~6g
- Fat: ~20g (mostly from healthy sources)
- Carbohydrates: ~24g
It’s a delightful dish that provides a well-rounded meal or side full of vitamins and minerals!
Let’s wrap it up here, friends—this Spinach Blueberry Salad is all about fresh ingredients coming together to create a beautiful dish that can brighten any meal. So gather your ingredients, roll up your sleeves, and let’s get cooking! Enjoy the flavors, and remember to share your creations! Happy eating!
Print20-Minute Spinach Blueberry Salad
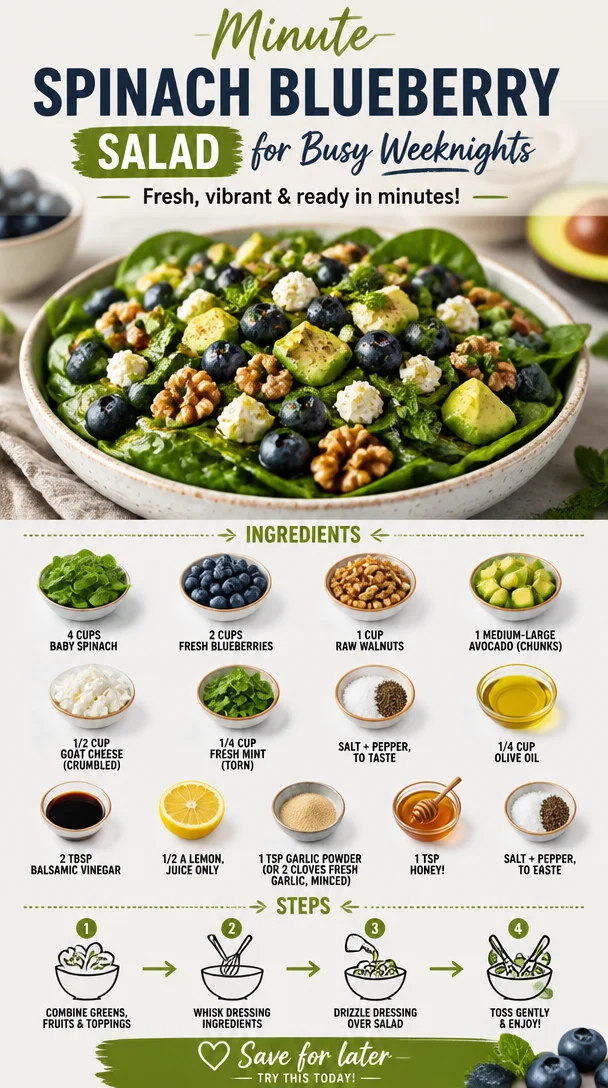
A fresh and vibrant salad combining baby spinach, juicy blueberries, creamy avocado, and crunchy walnuts, drizzled with a delicious homemade dressing.
- Prep Time: 10 minutes
- Cook Time: 10 minutes
- Total Time: 20 minutes
- Yield: 4 servings 1x
- Category: Salad
- Method: No cooking required
- Cuisine: American
- Diet: Vegetarian
Ingredients
- 4 cups baby spinach
- 2 cups fresh blueberries
- 1 cup raw walnuts
- 1 medium-large avocado
- 1/2 cup goat cheese
- 1/4 cup fresh mint
- Salt and pepper, to taste
- 1/4 cup olive oil
- 2 Tbsp balsamic vinegar
- 1/2 a lemon, juice only
- 1 tsp garlic powder
- 1 tsp honey
- Salt and pepper, to taste
Instructions
- Prep your ingredients: Wash and dry spinach and blueberries.
- Chop and slice the avocado and crumble the goat cheese.
- Toast the walnuts in a dry skillet over medium heat for 3–5 minutes (optional).
- Make the dressing by whisking together olive oil, balsamic vinegar, lemon juice, garlic powder, honey, salt, and pepper.
- Assemble the salad in a large bowl and drizzle with half the dressing.
- Adjust the seasoning with more salt, pepper, or dressing to taste.
- Garnish with torn mint leaves before serving.
Notes
This salad is quick to prepare and can be customized with various proteins or fruits.
Nutrition
- Serving Size: 1 serving
- Calories: 280
- Sugar: 10g
- Sodium: 200mg
- Fat: 20g
- Saturated Fat: 3g
- Unsaturated Fat: 17g
- Trans Fat: 0g
- Carbohydrates: 24g
- Fiber: 4g
- Protein: 6g
- Cholesterol: 10mg
Keywords: salad, spinach, blueberry, healthy, quick, fresh, vegetarian
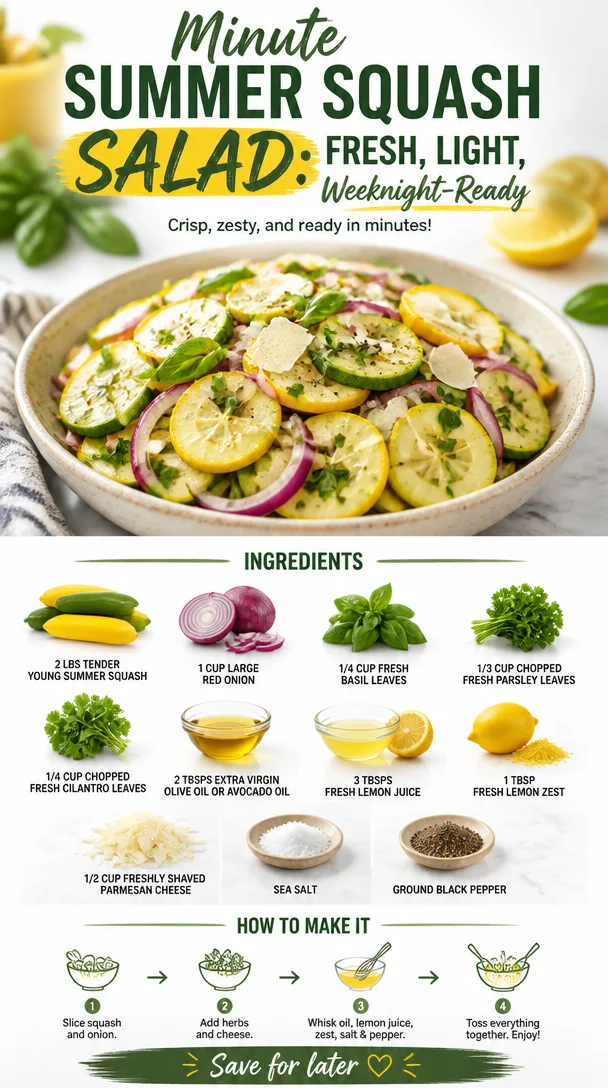
Minute Summer Squash Salad: Fresh, Light, Weeknight-Ready
Welcome to the Summer Squash Salad: A Quick and Fresh Delight!
Summer is a magical season, full of vibrant colors, sun-kissed days, and, of course, an abundance of fresh produce. There’s something about this time of year that puts a little skip in your step and a whole lot of flavor on your plate! Today, I’m excited to share with you a dish that perfectly embodies all the joys of summer: my Quick and Fresh Summer Squash Salad. This salad is not just a side; it’s a celebration of summer’s bounty in every bite!
Imagine biting into tender young squash, mingled with the crispness of red onion and the aromatic freshness of herbs. The vibrant colors and the fragrant scents will transport you to a sunny farmers market, even if you’re just at home! This salad is perfect for those backyard BBQs, picnics in the park, or simply as a light meal to enjoy on a warm summer evening.
But here’s the kicker: this salad is incredibly easy to whip up. In under 30 minutes, you’ll have a radiant dish that is healthy, satisfying, and oh-so-delicious. It’s all about keeping it fresh, simple, and fun! So, roll up your sleeves, grab your favorite cutting board, and let’s dive into this heavenly summer creation.
A Slice of Nostalgia
Growing up, summer meant spending lazy days at my grandma’s house, where the garden was bursting with life. Her prized possession? An incredible array of summer squash. I can still picture those golden zucchinis and vibrant yellow squash stacked in the kitchen, ready to be transformed into something amazing. One warm afternoon, I remember her teaching me how to make a simple salad that showcased all that garden goodness. It was the first time I realized how a few fresh ingredients could sing on your taste buds! We tossed the squash with herbs she’d just picked, drizzled in the best olive oil, and topped it with a generous helping of Parmesan cheese.
We hardly needed anything else—just that fresh salad, a few slices of crusty bread, and laughter as we recounted stories from her youth. I knew then that summer squash wasn’t just a vegetable; it was a bridge to memories, flavors, and happiness. That spirit is what I aim to capture in this recipe, and I can’t wait for you to create your own beautiful memories around the table with this salad!
Ingredients
Let’s gather our stars—the ingredients that make this salad shine:
-
2 lbs tender young summer squash
Perfectly fresh squash should be tender and lightly firm. Look for ones that are shiny and vibrant in color. You can use zucchini or yellow squash (or a mix of both!) for an eye-catching and delightful salad. -
1 cup large red onion
Red onion adds a sweet crunch to the salad. If you’re sensitive to the sharpness of raw onions, soak the slices in cold water for a bit, then drain to mellow their flavor. -
1/4 cup fresh basil leaves
Basil offers a fragrant aromatic note. If you don’t have basil, fresh mint or parsley can also lend a delightful freshness. -
1/3 cup chopped fresh parsley leaves
Parsley is like nature’s seasoning. Trust me, it adds zest! You can substitute it with arugula or even some microgreens for a peppery kick. -
1/4 cup chopped fresh cilantro leaves
A burst of cilantro really brightens this dish. If cilantro isn’t your thing, try swapping it out with dill for another herbal dimension. -
2 Tbsps extra virgin olive oil or avocado oil
I love the smooth richness of good olive oil. Alternatively, avocado oil has a neutral flavor while still delivering healthy fats. -
3 Tbsps fresh lemon juice
This acidity balances the richness of the squash. Fresh is a must! If you’re out of lemons, a splash of white wine vinegar can also do the trick. -
1 Tbsps fresh lemon zest
Zest adds that punch of citrus flavor perfectly! Don’t skip it; it’s where the real flavor lies. -
1/2 cup freshly shaved parmesan cheese
Adding a hit of umami, fresh Parm enhances the flavor of the salad. You can replace it with nutritional yeast for a vegan option or Pecorino for a different cheese angle! -
Sea salt and ground black pepper
Essential for seasoning! Be generous but taste as you go. Adding a pinch can elevate the flavors beautifully.
Step-by-Step Instructions
Are you ready to dive into the joyous task of creating this salad? Let’s break it down step by step!
-
Prep Your Squash
Start by washing your summer squash under cool running water. Pat them dry and slice them into thin rounds—about 1/4 inch thick. This allows for even cooking and a delightful crunch. If you want a twist, try spiralizing the squash to create “noodles.” It adds a fun texture! -
Slice The Onions
Grab your red onion and slice it into thin crescents. Aim for uniform pieces; this way, they mix evenly throughout the salad. If you prefer a milder flavor, I suggest soaking them in cold water while you prepare the other ingredients. -
Chop The Herbs
Now, onto the herbs! Stack a few basil leaves, parsley, and cilantro atop each other, roll them tightly, and slice them into ribbons (this technique is called chiffonade). It creates a beautiful presentation! -
Whisk Your Dressing
In a small bowl, combine the olive oil, fresh lemon juice, lemon zest, sea salt, and black pepper. Whisk them together until well blended. This dressing will add brightness and flavor, bringing the salad’s ingredients to life! -
Combine Everything
In a large mixing bowl, add your sliced squash, red onion, chopped herbs, and the dressing. Toss everything gently but thoroughly; you want every piece of squash to be coated with that delicious dressing—so no one is left out! -
Plate & Finishing Touches
Now comes the fun part! Transfer the salad to a beautiful serving platter or large bowls. Finally, sprinkle the shaved parmesan on top. Alternatively, you can mix it in before plating if you prefer a more thorough distribution.
And voilà! Your summer squash salad is ready to be savored!
Serving Suggestions
When serving this refreshing salad, consider pairing it with grilled chicken or fish for a wholesome meal. It’s also fantastic alongside crusty artisan bread for soaking up that delectable dressing! For an extra touch, garnish with a few extra herb leaves or a sprinkle of additional Parmesan on top right before serving. This will make it pop visually, turning it into a feast for the eyes as well as the palate.
Recipe Variations
Feeling adventurous? Here are a few fun and creative twists you can try:
- Add Color: Include diced cherry tomatoes or bell peppers for extra color and sweetness.
- Whole Grains: Toss in cooked quinoa or farro for a heartier salad that packs a nutritional punch.
- Spicy Kick: Add a sprinkle of red pepper flakes or diced jalapeños for those who enjoy a little heat!
- Nuts & Seeds: For added texture, throw in some toasted sunflower seeds or slivered almonds.
- Creamy Version: Mix in a dollop of Greek yogurt or a vegan option for a creamy, tangy twist.
Chef’s Notes
This summer squash salad is one of those recipes that’s evolved with me over the years. What started as a simple mix with grandma in her kitchen has transformed into something I create for friends, family, and everyone who shares a meal with me. I love how versatile this salad is; every summer, I find new ways to make it my own, adjusting it based on what’s fresh and seasonal.
And let’s be honest—there’s something satisfying about throwing together whatever vegetables are lingering in the fridge to create a stunning dish. I want you to feel that same joy in your kitchen, knowing there are no rigid rules here—only delicious flavors waiting to be explored!
FAQs and Troubleshooting
-
Can I make this salad ahead of time?
Absolutely! The salad holds up well in the refrigerator. However, I’d recommend adding the cheese just before serving to keep it from getting soggy. -
What if I can’t find fresh herbs?
While fresh herbs are best, you can use dried versions. Just remember that dried herbs are more concentrated, so reduce the quantity to about one-third of what the recipe calls for. -
How do I choose the best summer squash?
Look for squash that is firm to the touch and free of blemishes or soft spots. Smaller squash often have better flavor and texture! -
Can I use cooked squash?
For this recipe, fresh squash is best to retain its crunch, but if you prefer cooked squash, consider briefly sautéing it for a warm salad experience!
Nutritional Info
This vibrant salad packs a nutritional punch, filled with vitamins and minerals from fresh veggies and herbs. It is low in calories and high in fiber, making it a fantastic option for those looking to incorporate more wholesome ingredients into their diets.
I hope you’re as excited to make this Quick and Fresh Summer Squash Salad as I am to share it with you! Remember, cooking should be enjoyable and rewarding, so have fun with it and make it your own. Here’s to delicious, fresh meals that bring us together and create lasting memories—cheers!
PrintQuick and Fresh Summer Squash Salad

A vibrant summer salad featuring tender young squash, fresh herbs, and a zesty dressing, perfect for warm weather meals.
- Prep Time: 15 minutes
- Cook Time: 0 minutes
- Total Time: 15 minutes
- Yield: 4 servings 1x
- Category: Salad
- Method: Mixing
- Cuisine: American
- Diet: Vegetarian
Ingredients
- 2 lbs tender young summer squash
- 1 cup large red onion
- 1/4 cup fresh basil leaves
- 1/3 cup chopped fresh parsley leaves
- 1/4 cup chopped fresh cilantro leaves
- 2 Tbsps extra virgin olive oil or avocado oil
- 3 Tbsps fresh lemon juice
- 1 Tbsps fresh lemon zest
- 1/2 cup freshly shaved parmesan cheese
- Sea salt and ground black pepper
Instructions
- Prep your squash: Wash and slice the summer squash into thin rounds.
- Slice the onions: Cut the red onion into thin crescents.
- Chop the herbs: Stack the basil, parsley, and cilantro, roll, and slice into ribbons.
- Whisk your dressing: Combine olive oil, lemon juice, lemon zest, salt, and pepper in a small bowl.
- Combine everything: In a large mixing bowl, add squash, onion, herbs, and dressing; toss to coat.
- Plate & finishing touches: Transfer to a serving platter and sprinkle with parmesan.
Notes
Add cherry tomatoes or cooked quinoa for variations. Can be made ahead; add cheese just before serving.
Nutrition
- Serving Size: 1 serving
- Calories: 250
- Sugar: 4g
- Sodium: 200mg
- Fat: 15g
- Saturated Fat: 3g
- Unsaturated Fat: 7g
- Trans Fat: 0g
- Carbohydrates: 20g
- Fiber: 4g
- Protein: 6g
- Cholesterol: 10mg
Keywords: summer salad, fresh salad, quick salad, vegetarian salad, healthy salad
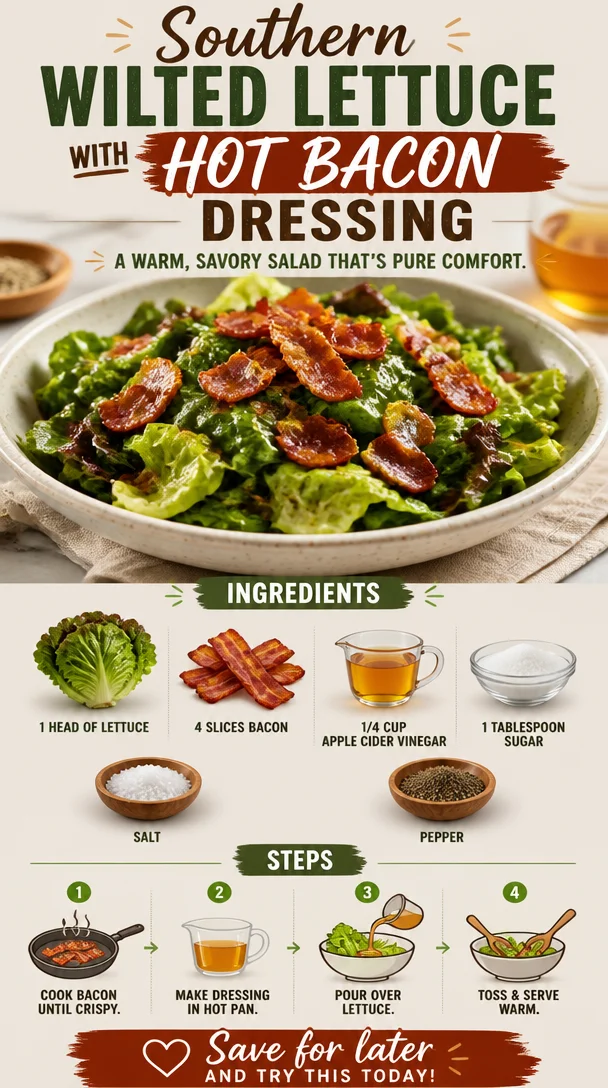
Southern Wilted Lettuce With Hot Bacon Dressing
Southern Wilted Lettuce With Hot Bacon Dressing
Welcome to Clean Plate Cravings! Today we’ll be diving into a dish that’s a staple in Southern kitchens: Wilted Lettuce with Hot Bacon Dressing. This simple yet tantalizing recipe combines crisp greens with a smoky, tangy dressing that makes every bite a flavorful adventure. It’s all about bringing freshness, flavor, and a touch of nostalgia to your table, and I can’t wait to share my secrets with you!
Growing up in the South, mealtime was more than just about feeding the family—it was about gathering, storytelling, and rich culinary traditions. The aroma of cooking bacon and apple cider vinegar would waft through my grandmother’s kitchen, drawing us all in like bees to honey. I remember watching her skillfully prepare this dish, her hands moving with practiced ease as she wilted the greens just enough—a perfect balance of crisp freshness and warm, savory magic. It wasn’t just a salad; it was a heartfelt embrace on a plate, reminding us all of the beauty of simple, honest food that unites loved ones.
As I share this recipe with you, I hope to capture that same feeling of warmth and belonging. Let’s create memories around this dish together—we might even discover a few of our own along the way!
Ingredients
Here’s what you’ll need to whip up this delightful Southern classic:
-
1 head of lettuce (leaf or red romaine)
This is the star of our dish! Leafy greens add a fresh, crisp texture. Leaf lettuce is tender and delicate, while red romaine brings a pop of color. If you’re looking for a different texture, feel free to substitute with spinach or arugula for a spicier flavor. -
4 slices of bacon
The heart and soul of the hot dressing! Bacon lends a smoky richness that’s just irresistible. If you’re looking for a healthier option, turkey bacon or a plant-based alternative will also work beautifully, although the flavor profile will change slightly. -
1/4 cup apple cider vinegar
This tangy ingredient adds brightness to the dish and balances the richness of the bacon. You can swap this out for red wine vinegar or white balsamic vinegar if you want to switch it up but still keep that zing. -
1 tablespoon sugar
Just a touch of sugar helps mellow the acidity of the vinegar and enhances the flavors of the dressing. If you’re steering clear of sugar, consider using honey or maple syrup for a more natural sweetness. -
Salt and pepper to taste
These everyday staples elevate every dish! A good sprinkle of freshly cracked black pepper and sea salt will enhance the flavors, but remember to add them gradually and taste as you go.
Step-by-Step Instructions
Now, let’s get cooking! Follow these steps and incorporate some of my chef hacks along the way.
-
Prep the Lettuce:
Start by washing your lettuce thoroughly. You want to make sure to remove any dirt or grit. After rinsing, pat it dry gently with a clean kitchen towel or use a salad spinner. This step is crucial because excess water can dilute the dressing. -
Cook the Bacon:
In a large skillet over medium heat, lay down those glorious bacon slices. Let them cook for about 5-7 minutes. You want them nice and crispy—this is where all that smoky goodness comes from! Once crisp, use tongs to transfer the bacon to a paper towel-lined plate, letting it drain. Keep about 2 tablespoons of the bacon fat in the skillet. Don’t throw this liquid gold away; it’s the base for our dressing! -
Make the Dressing:
With the skillet still warm but not hot, pour in the apple cider vinegar and sprinkle in the tablespoon of sugar. This part is where the magic happens! As you stir, watch how the hot bacon fat mingles with the vinegar, creating that luxuriously thick dressing. Let it warm through for about a minute, allowing the vinegar and sugar to marry into one delightful blend. Season with a good pinch of salt and freshly cracked pepper to taste. -
Wilt the Lettuce:
Now, here comes the fun part! Toss your dry lettuce into the skillet. Use tongs to mix and coat the greens with the dressing. You’re aiming for just wilting the lettuce without making it mushy—this should take about 1-2 minutes. You’ll notice the leaves turning vibrant and beautiful. -
Add the Bacon:
Crumble your crispy bacon into the bowl with the wilted lettuce, making sure to reserve a few pieces for garnish. Mix everything until well combined. Let that warm dressing soak into the greens while keeping a little crunch in the beautiful lettuce leaves.
Serving Suggestions
When it comes to serving, a rustic bowl or platter works well here! You can pile the wilted lettuce high and top it with the reserved crumbled bacon for that eye-catching finish. For an extra pop, add some sliced cherry tomatoes or hard-boiled eggs if you’re feeling fancy. This dish pairs beautifully with grilled chicken or fish, or it can stand alone as a fresh, light meal.
Recipe Variations
- Add nuts or seeds: Consider adding toasted pecans or sunflower seeds for an extra crunch!
- Incorporate herbs: Fresh herbs like dill or chives can add another layer of flavor and freshness that complements the bacon beautifully.
- Make it a meal: Add diced grilled chicken or quinoa to transform this side dish into a satisfying entrée.
- Spice it up: For those looking for a kick, a pinch of red pepper flakes in the dressing can heat things up!
- Try different greens: Spinach or kale can change the whole flavor profile while still delivering that hearty bite.
Chef’s Notes
As a chef, I often find myself reminiscing about the meals of my childhood—the ones that tasted of home and comfort. This Southern Wilted Lettuce is definitely among them. Over the years, I’ve tried countless variations; sometimes I’ve tossed in a dash of Worcestershire sauce for an umami twist or even a splash of lemon juice to brighten things up. You can infuse your personal touch into this dish as well! Cooking should always be a reflection of what you love.
FAQs and Troubleshooting
Q: Why is my lettuce too wilted?
A: If your lettuce turns mushy, it’s likely that it cooked too long. Aim to sauté just until the leaves begin to soften, usually around 1-2 minutes.
Q: Can I make the dressing ahead of time?
A: Absolutely! You can prepare the dressing in advance, but I recommend heating it up just before serving to refresh those flavors.
Q: What if I don’t have bacon?
A: No bacon? No problem! Try using cooked pancetta for a similar flavor, or for a vegetarian option, sauté some mushrooms for a rich, savory element without the meat.
Q: How long will leftovers last?
A: While this dish is best enjoyed fresh, you can store leftovers in an airtight container in the fridge for about 1-2 days. Just remember the lettuce will continue to release moisture, so it might get a bit soggy.
Nutritional Info (optional)
While I won’t dive deep into numbers, I can tell you that this dish offers some fantastic nutrients thanks to the fresh greens and healthy fats from the bacon. Just keep in mind that moderation is key, especially when it comes to the dressing!
So, there you have it! A beautiful recipe to bring warmth and flavor to your table. I hope this Southern Wilted Lettuce with Hot Bacon Dressing becomes a favorite in your kitchen, just like it is in mine. Get ready to savor the simple pleasure of good food made with love, and let’s keep those cravings fresh and delicious! Happy cooking!
PrintSouthern Wilted Lettuce With Hot Bacon Dressing

A classic Southern dish combining crisp greens with a smoky, tangy dressing for a flavorful experience.
- Prep Time: 10 minutes
- Cook Time: 10 minutes
- Total Time: 20 minutes
- Yield: 4 servings 1x
- Category: Side Dish
- Method: Sautéing
- Cuisine: Southern
- Diet: Paleo
Ingredients
- 1 head of lettuce (leaf or red romaine)
- 4 slices of bacon
- 1/4 cup apple cider vinegar
- 1 tablespoon sugar
- Salt and pepper to taste
Instructions
- Prep the lettuce: Wash and dry thoroughly to remove any dirt.
- Cook the bacon: In a skillet, cook bacon until crispy, about 5-7 minutes. Drain on paper towels, keeping 2 tablespoons of bacon fat.
- Make the dressing: In the skillet, pour apple cider vinegar and add sugar. Stir and warm for about a minute, seasoning to taste.
- Wilt the lettuce: Toss the dry lettuce in the skillet until just wilted, about 1-2 minutes.
- Add the bacon: Crumble crispy bacon into the bowl with wilted greens, mix well, reserving some for garnish.
Notes
Serve in a rustic bowl, topped with reserved bacon and optional cherry tomatoes or hard-boiled eggs.
Nutrition
- Serving Size: 1 serving
- Calories: 180
- Sugar: 3g
- Sodium: 300mg
- Fat: 12g
- Saturated Fat: 4g
- Unsaturated Fat: 7g
- Trans Fat: 0g
- Carbohydrates: 10g
- Fiber: 2g
- Protein: 8g
- Cholesterol: 25mg
Keywords: southern, wilted lettuce, hot bacon dressing, salad, healthy side dish