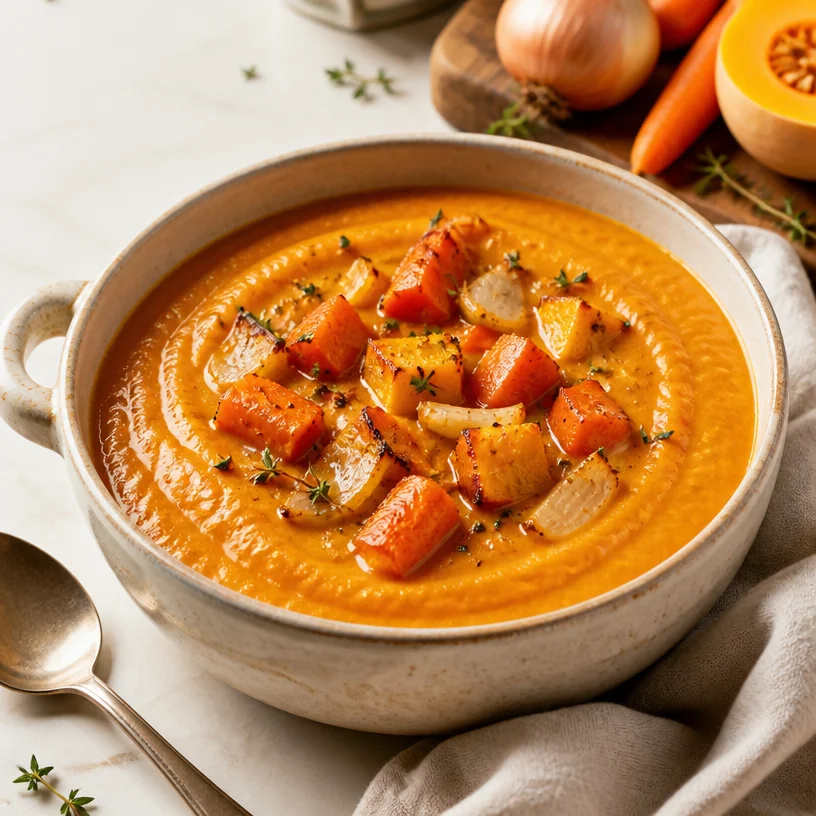
One-Pot Roasted Veggie Soup for Busy Weeknights (30-Min)
Wholesome Roasted Veggie Soup: A Warm Hug in a Bowl
Welcome to the cozy corner of Clean Plate Cravings! Today, I’m inviting you on a soul-warming journey as we dive into the delightful world of Roasted Veggie Soup. The moment the weather turns crisp and the leaves start to fall, there’s nothing quite like a hearty bowl of soup to wrap your hands around and savor every comforting spoonful.
I believe that food is more than just fuel; it’s a way of connecting with our past, our loved ones, and ourselves. A steaming bowl of Roasted Veggie Soup is not just nourishing; it’s a tradition, a memory, and a celebration of the changing seasons. As we cook together, I want you to feel the anticipation of the aromas wafting from your kitchen, promising a meal that’s as satisfying for your soul as it is for your taste buds.
This soup is the definition of feel-good food: creamy yet light, rich in flavor, and utterly comforting. Each sip is a blend of earthy roasted vegetables, gently kissed by the warm spice of your favorite herbs, and enveloped in a luscious broth that sings with depth and character. So grab your apron, and let’s get roasting!
A Memory of Comfort
Roasted Veggie Soup holds a special place in my heart because it takes me back to my childhood kitchen. I remember those chilly autumn afternoons spent with my grandmother, who always made the most comforting soups. She had a magical way of transforming simple, leftover bits of veggies into a heartwarming feast. We’d gather around the stove, the air thick with fragrances of garlic, thyme, and roasted carrots. It was a ritual—one where we not only prepared a meal but bonded over tales of our day.
One particular evening stands out: a playful mix-up where I accidentally added too much garlic, thinking it would be "extra delicious." Rather than a scolding, my grandmother threw her head back and laughed, calling it "extra love." That laughter filled the room, and even though we ended up toning down the garlic for the soup’s final bowl, the memory of that day stays with me. It was a reminder that cooking should be joyful, free-spirited, and a little messy—much like life itself.
Ingredients You’ll Need
Let’s gather our ingredients for this nourishing Roasted Veggie Soup. Each one brings something unique, both in flavor and health:
-
Carrots: Sweet, earthy, and packed with vitamins, carrots add a lovely natural sweetness to the soup. If you’re out of carrots, you can substitute them with sweet potatoes for a similar texture and flavor.
-
Squash: Butternut or acorn squash works wonders in this recipe, lending a creamy texture and a hint of sweetness. If you’re looking for a lighter option, zucchini can be a great swap!
-
Onion: A cornerstone of flavor, onions add depth and sweetness when roasted. Yellow onions are a reliable choice, but you can also use red onions for a slightly sharper taste or shallots for a more delicate flavor.
-
Broth: Vegetable or chicken broth forms the base of your soup, helping to infuse all the flavors. Homemade is always best, but feel free to use store-bought for convenience. Want to boost the flavor? A dash of miso can enhance the umami notes.
Step-by-Step Instructions
Now that we have our ingredients, let’s transform them into a hearty Roasted Veggie Soup. Follow along with these simple steps and some chef tips along the way!
-
Preheat Your Oven: Fire up your oven to 425°F (220°C). A hot oven helps caramelize the veggies, bringing out their natural sweetness.
-
Prepare the Vegetables: Wash and peel the carrots and squash. Cut the carrots into thick rounds and the squash into cubes (about 1-inch pieces). For the onions, slice them into wedges. Happy chopping! Remember, uneven sizes can lead to uneven cooking, so keep it consistent.
-
Seasoning Time: Toss the prepared veggies in a large bowl with some olive oil, salt, and pepper. You can add in dried herbs like thyme or rosemary for more flavor—don’t be shy, season generously! Our goal here is to amplify the flavor at every step.
-
Roasting: Spread the seasoned veggies out on a parchment-lined baking sheet. This helps with easy cleanup and ensures even roasting. Roast them for about 25-30 minutes or until they’re golden brown and tender. Turn them halfway through to make sure they roast evenly.
-
Blend and Cook: Once the veggies are beautifully roasted, transfer them to a large pot. Pour in the broth and bring it to a simmer over medium heat. If you have an immersion blender, blend until smooth! If you prefer a chunky texture, reserve some roasted veggies for later.
-
Taste and Adjust: This step is crucial. Taste your soup and adjust the seasoning as needed. Don’t forget a splash of lemon juice for brightness—it can really elevate the flavor!
-
Serve it Up: Ladle your roasted veggie soup into bowls. Drizzle with good-quality olive oil or a dollop of yogurt or cream for richness. A sprinkle of fresh herbs or croutons on top adds a beautiful finishing touch.
Serving Suggestions
There’s nothing like serving a bowl of soup with a side that complements its flavors. Consider pairing your Roasted Veggie Soup with a slice of crusty sourdough bread or a light arugula salad tossed with lemon vinaigrette. You can also elevate the meal with homemade croutons, adding a delightful crunch to each spoonful.
Recipe Variations
Feeling adventurous? Here are some fun twists on the classic Roasted Veggie Soup:
-
Spicy Kick: Add a pinch of crushed red pepper flakes when you’re roasting the veggies for a spicy surprise.
-
Herby Infusion: Experiment with fresh herbs like basil, cilantro, or parsley when blending for a fresher flavor profile.
-
Protein Boost: Stir in shredded rotisserie chicken or chickpeas for added heartiness and protein.
-
Coconut Cream Twist: For a creamy, tropical flavor, stir in a can of coconut milk right before blending.
-
Nutty Crunch: Top with toasted pumpkin seeds or pine nuts for a bit of crunch and a boost of nutrition.
Chef’s Notes
Each time I make this Roasted Veggie Soup, I’m reminded of the power of simple ingredients coming together to create something nourishing and satisfying. This recipe has evolved over the years as I’ve experimented with various veggies and spices. Some days I toss in leftover veggies from the fridge, while others, I stick to the classic combination. The beauty of soup is its flexibility—it invites creativity and experimentation.
One of the funniest kitchen moments was when I accidentally grabbed cinnamon instead of nutmeg for a particular batch. Trust me, pumpkin spice soup was not the intended vibe! But it turned out to be a hit at a casual dinner party, proving that even "mistakes" can lead to delicious discoveries. So don’t be afraid to have fun in the kitchen!
FAQs and Troubleshooting
-
What if my soup is too thick?
- Simply add more broth or water until you reach your desired consistency.
-
Can I freeze this soup?
- Absolutely! This soup freezes beautifully. Just let it cool completely, then place it in an airtight container. It can last up to three months in the freezer.
-
How can I make it vegan?
- Just stick to vegetable broth and skip any dairy toppings. You can also add tofu for protein if you like!
-
What if I don’t have an immersion blender?
- No problem! You can use a regular blender but let the soup cool slightly before blending in batches to avoid splattering.
Nutritional Info
While exact nutritional values can vary based on specific ingredients, here’s a general idea of what you’ll find in a hearty serving of Roasted Veggie Soup:
- Calories: Approximately 150-200
- Protein: 3-5g
- Fat: 5-8g
- Carbohydrates: 25-30g
- Fiber: 4-6g
Note: These values are estimates and depend on specific ingredient brands and quantities.
So there you have it, my friend! A delicious Roasted Veggie Soup that’s not just comforting and tasty but also a fantastic canvas for creativity in the kitchen. I hope this inspires you to make it your own and enjoy every moment, from preparation to the final bite. Remember, cooking is a journey, not a destination—so let’s savor every step!
PrintWholesome Roasted Veggie Soup

A comforting Roasted Veggie Soup made with earthy roasted vegetables in a luscious broth, perfect for chilly autumn days.
- Prep Time: 15 minutes
- Cook Time: 30 minutes
- Total Time: 45 minutes
- Yield: 4 servings 1x
- Category: Main Course
- Method: Roasting and Blending
- Cuisine: Vegetarian
- Diet: Vegetarian
Ingredients
- 4 medium Carrots, peeled and cut into thick rounds
- 1 medium Butternut or Acorn Squash, cubed
- 1 large Yellow Onion, sliced into wedges
- 4 cups Vegetable or Chicken Broth
- 2 tablespoons Olive Oil
- Salt and Pepper to taste
- Dried herbs (Thyme or Rosemary) to taste
- Optional: Lemon juice, for brightness
Instructions
- Preheat your oven to 425°F (220°C).
- Prepare the vegetables by washing and peeling them.
- Toss the prepared veggies in a large bowl with olive oil, salt, pepper, and herbs.
- Spread the veggies on a parchment-lined baking sheet and roast for 25-30 minutes until golden brown and tender.
- Transfer the roasted veggies to a large pot, pour in the broth, and bring to a simmer over medium heat.
- Blend until smooth with an immersion blender or reserve some for a chunky texture.
- Taste and adjust seasoning as needed, adding lemon juice for brightness.
- Serve the soup in bowls, drizzled with olive oil or topped with yogurt, and garnish with fresh herbs or croutons.
Notes
This soup can be customized with different veggies, spices, or protein additions such as chicken or chickpeas.
Nutrition
- Serving Size: 1 serving
- Calories: 200
- Sugar: 5g
- Sodium: 300mg
- Fat: 8g
- Saturated Fat: 1g
- Unsaturated Fat: 7g
- Trans Fat: 0g
- Carbohydrates: 30g
- Fiber: 6g
- Protein: 5g
- Cholesterol: 0mg
Keywords: soup, roasted vegetables, cozy meal, autumn recipe, healthy soup
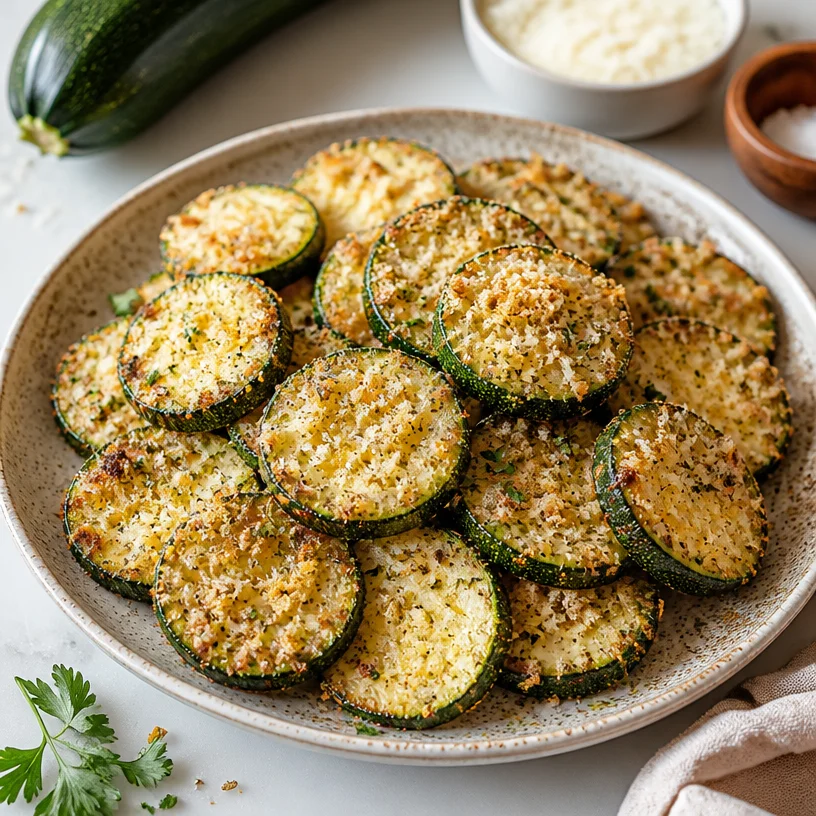
Minute Crispy Air Fryer Zucchini Parmesan, Weeknight Side
Crispy Air Fryer Zucchini Parmesan: A Flavorful Crunch in Every Bite
Welcome, fellow food enthusiasts! Are you ready to bring a little extra crunch to your next meal? Today, we’re diving into the wonderful world of air frying, and I’ll be sharing one of my all-time favorite recipes: Crispy Air Fryer Zucchini Parmesan. This dish is not just a side; it’s a delicious way to celebrate vibrant summer zucchini while keeping things light and wholesome. Flavorful, satisfying, and super easy to whip up—this recipe embodies everything Clean Plate Cravings stands for!
I remember the first time I tried crispy zucchini. It was at a little Italian bistro where I spent many summer evenings with friends, laughing, chatting, and indulging in the freshest of dishes. The zucchini came out golden and crispy, paired perfectly with a tangy marinara that just made my taste buds dance. I was mesmerized by its simple perfection—who would have thought that humble zucchini could transform into a dish so delightful? I promised myself I would try to recreate that crispy goodness in my kitchen one day. And here we are!
Using an air fryer is an absolute game-changer; it gives you the satisfying crunch of frying but retains a healthy twist. By the end of this blog post, you’ll learn how to make these crispy bites and create lasting memories around the dinner table. So grab that zucchini, and let’s get cooking!
A Nostalgic Kitchen Memory
Let’s take a moment to rewind to my childhood kitchen, where culinary adventures sparked my love for cooking. I can vividly remember the summer evenings with my family gathered in our cozy kitchen, the scent of garlic wafting through the air. One of my mom’s go-to recipes was her crispy vegetable fritters, which always included zucchini when they were in season. My siblings and I would eagerly help her grate the zucchini, and we often ended up in a playful fight over who got to use the biggest grater.
Once the batter was mixed, it was an exercise in patience (and restraint) to wait for them to finish cooking. The crazy anticipation turned into joyful laughter as we devoured those crispy bites, dipping them into homemade marinara sauce. Those memories of warmth, sharing, and delicious food inspired my love of cooking. It’s that feeling of connection that always drives me to create meals that not only taste great but also make you feel good.
Ingredients
Here’s what you will need to create these delightful air-fried zucchini bites:
-
1 medium-sized zucchini: Fresh and versatile, zucchini adds a mild flavor while soaking up seasoning beautifully. If you can’t find zucchini, yellow squash works great too!
-
1 tablespoon olive oil: A healthy fat that helps achieve that crispy texture we all love. Feel free to substitute with avocado oil if you’re looking for a neutral flavor or a high smoke point.
-
1 teaspoon Italian seasoning: A blend of herbs that brings a delicious Italian flair—and it’s super convenient! You can use a homemade mix or switch it up with your favorite herbs like oregano or basil.
-
2 tablespoons Parmesan cheese: This adds a savory depth and an irresistible umami kick to the zucchini. If you’re vegan or dairy-free, consider using nutritional yeast for a cheesy flavor without the dairy!
-
Salt and black pepper to taste: Essential for enhancing all the flavors. Sea salt or Himalayan salt can provide nice crunch and flavor, while freshly cracked black pepper adds a delightful spiciness.
Step-by-Step Instructions
Now, let’s get into the delicious details of whipping up these crispy delights!
-
Prep the Zucchini: Start by washing your zucchini under cold water and patting it dry. Trim off both ends, then slice it into rounds or stick shapes, around ½ inch thick. The thicker the slice, the longer it will take to cook, and you want it crispy! If you prefer, you can also spiralize the zucchini for an interesting shape.
-
Mix the Coating: In a mixing bowl, whisk together the olive oil, Italian seasoning, salt, and pepper. You can do this by hand or use a whisk for a quick mix. This step is essential—so don’t skip it! The oil will help the spices coat the zucchini evenly and aid in that delightful crunch.
-
Coat the Zucchini: Add your zucchini slices into the bowl and give them a gentle toss, ensuring each piece is coated well. This is where you might want to get your hands in there! Make sure they’re nicely coated but not drenched in oil.
-
Add the Parmesan: Once your zucchini is coated, sprinkle the Parmesan on top and give it another gentle toss. The cheese will crank up the deliciousness factor, and who doesn’t love a bit of cheesy goodness?
-
Preheat the Air Fryer: Preheat your air fryer to 400°F (200°C) for about 5 minutes. This step isn’t just a formality; preheating ensures that your zucchini gets that golden crisp right from the start!
-
Air Fry the Zucchini: Place the coated zucchini pieces in the air fryer basket in a single layer, making sure not to overcrowd them—let them breathe! You may need to work in batches depending on your air fryer’s capacity. Cook them for about 8-10 minutes, flipping halfway through, until they are crispy and golden brown.
-
Serve and Enjoy: Once they’re done, remove them carefully (they’ll be hot!) and let them cool for a minute. Serve with marinara sauce for dipping or enjoy them plain. Either way, you’re in for a treat!
Serving Suggestions
To plate these crispy bites, you can arrange them on a beautiful platter with a small bowl of warm marinara nestled in the center for dipping. A sprinkle of fresh parsley on top adds a pop of color and freshness. These little beauties are perfect for sharing as an appetizer, alongside a salad, or even as a healthy snack during movie night!
Recipe Variations
While the classic Crispy Air Fryer Zucchini Parmesan is a surefire winner, here are a few variations to keep things exciting:
-
Spicy Crunch: Add a pinch of red pepper flakes to the coating for an extra kick!
-
Herbed Delight: Substitute Italian seasoning with a mix of fresh herbs like dill or cilantro for a fresh twist.
-
Cheesy Italian Trio: Mix Parmesan with a little mozzarella and cheddar for a cheesier layer of flavor.
-
Balsamic Glaze Drizzle: After air frying, drizzle some balsamic glaze over the zucchini for a tangy finish.
-
Sweet Potato Zucchini Bake: Layer slices of zucchini with sweet potatoes, some cheese, and bake for a tasty casserole version!
Chef’s Notes
Creating this recipe has been a journey! Over the years, I experimented with various seasonings, and different cooking methods (including pan-frying!). The air fryer truly delivers on the promise of crispy without the guilt, making it my go-to method for veggie cooking. One of those times, I accidentally grabbed smoked paprika instead of regular paprika, and I have to say—the smoky flavor added a whole new dimension! Play around and make it your own—kitchen experiments lead to delightful discoveries.
FAQs and Troubleshooting
Can I make this recipe gluten-free?
Absolutely! This recipe is naturally gluten-free. However, if you want some extra crunch, you can use gluten-free breadcrumbs instead of Parmesan cheese.
My zucchini turned out soggy. What happened?
Soggy zucchini can happen if they were too wet before cooking. Make sure to pat them dry after washing. Additionally, ensure they’re not crowded in the air fryer; space them out for optimal crispiness!
Can I store leftovers?
While these zucchini bites are best enjoyed fresh, you can store leftovers in an airtight container in the fridge for up to two days. They might lose some crispiness, but you can pop them back in the air fryer for a few minutes to revive that crunch!
What other vegetables can I air fry?
Oh, the possibilities are endless! You can try this technique with eggplant, bell peppers, or even asparagus. Just adjust your cooking time as needed, and enjoy creating a whole platter of air-fried veggies!
Nutritional Info
While exact nutritional info might depend on specifics like brand and measurements, rest assured that this dish is low in calories, rich in fiber, and packed with vitamins A and C from the zucchini.
I hope this recipe inspires you to embrace your inner chef and whip up these Crispy Air Fryer Zucchini Parmesan bites! Food is an adventure, and I’m thrilled to share this one with you. Happy cooking, and don’t forget to savor every delightful bite!
PrintCrispy Air Fryer Zucchini Parmesan
A deliciously crispy air-fried zucchini dish that celebrates summer flavors while keeping things light and wholesome.
- Prep Time: 10 minutes
- Cook Time: 10 minutes
- Total Time: 20 minutes
- Yield: 4 servings 1x
- Category: Appetizer
- Method: Air Frying
- Cuisine: Italian
- Diet: Vegetarian
Ingredients
- 1 medium-sized zucchini
- 1 tablespoon olive oil
- 1 teaspoon Italian seasoning
- 2 tablespoons Parmesan cheese
- Salt and black pepper to taste
Instructions
- Prep the zucchini: Wash under cold water and pat dry. Trim off both ends and slice into rounds or sticks, around ½ inch thick.
- Mix the coating: Whisk together olive oil, Italian seasoning, salt, and pepper in a mixing bowl.
- Coat the zucchini: Toss zucchini slices in the bowl, ensuring each piece is well-coated.
- Add the Parmesan: Sprinkle Parmesan on top and toss gently to coat.
- Preheat the air fryer: Set to 400°F (200°C) for about 5 minutes.
- Air fry the zucchini: Place coated zucchini in a single layer in the air fryer basket. Cook for 8-10 minutes, flipping halfway.
- Serve and enjoy: Remove carefully and serve with marinara sauce for dipping.
Notes
Store leftovers in an airtight container in the fridge for up to two days. To revive crispiness, reheat in the air fryer for a few minutes.
Nutrition
- Serving Size: 1 serving
- Calories: 180
- Sugar: 3g
- Sodium: 200mg
- Fat: 10g
- Saturated Fat: 3g
- Unsaturated Fat: 5g
- Trans Fat: 0g
- Carbohydrates: 12g
- Fiber: 3g
- Protein: 5g
- Cholesterol: 10mg
Keywords: zucchini, air fryer, crispy snacks, vegetarian appetizer, healthy eating
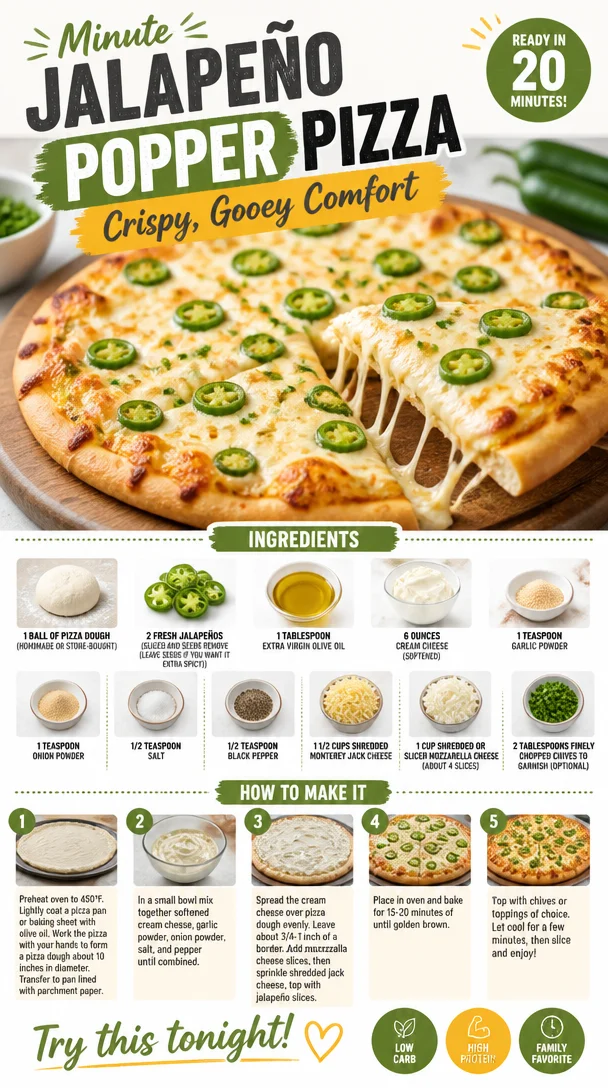
Minute Jalapeño Popper Pizza: Crispy, Gooey Comfort
Jalapeño Popper Pizza: A Flavorful Twist on a Classic Favorite
Welcome back to Clean Plate Cravings, my kitchen-loving friends! If you’re looking for a dish that combines the cheesy dreams of pizza with the spicy, creamy delight of jalapeño poppers, you’ve hit the jackpot! Today, we’re diving into the world of Jalapeño Popper Pizza, where every bite is an explosion of flavor. Whether you’re hosting friends for game night or just craving a comforting evening meal, this recipe is sure to impress without being overly complicated.
Imagine sinking your teeth into a crispy crust topped with a luscious layer of cream cheese, fresh jalapeños, and mountains of gooey cheese. Friends, it’s the perfect fusion of both worlds—a pizza you’ll want to make again and again. I find that cooking should be an adventure filled with joy and excitement, so let’s gear up and get cooking!
A Walk Down Memory Lane
Growing up, my family had a tradition of Friday night pizza parties. As a kid, I looked forward to it each week. We’d gather in the kitchen, and my dad would roll out the dough while the aroma of bubbling cheese filled the air. It was the kind of cozy chaos that caused laughter and a few flour-covered kitchen disasters. He had this knack for experimenting with flavors and toppings, and one night, he introduced us to the blissful experience of jalapeño poppers.
Flash-forward a few years, and I can still remember the crunch of that first bite. You know the one where the spicy, creamy goodness sends your taste buds on a joyride? That memory stayed with me, and it inspired me to create this Jalapeño Popper Pizza. It’s a celebration of flavors, nostalgia, and family traditions rolled into one fantastic pie that you can enjoy in the comfort of your own home.
Ingredients
Here’s what you’ll need to whip up this delicious Jalapeño Popper Pizza.
-
1 ball of pizza dough
You can use store-bought or make your own! If you’re using store-bought, look for a quality brand, or if you’re feeling adventurous, try my homemade dough recipe from earlier posts. -
2 fresh jalapeños (sliced and seeds removed)
If you like the heat, feel free to leave some seeds in! They bring a lovely depth of flavor. You can also substitute with roasted red peppers for a milder option. -
1 tablespoon extra virgin olive oil
This will help create a crispy crust and infuse flavor into the dough. You could also use melted butter for a richer taste. -
6 ounces cream cheese (softened)
The star of our popper-inspired topping! Be sure it’s softened—nothing’s worse than firm cream cheese trying to spread out. You can swap it with vegan cream cheese for a dairy-free version. -
1 teaspoon garlic powder
For that extra punch of flavor without biting into garlic chunks. Fresh minced garlic can also be used—just a little less than a teaspoon for the same effect! -
1 teaspoon onion powder
This brings a lovely sweetness to balance the heat from the jalapeños. Fresh onions can be used here; just make sure to sauté them first until they’re translucent. -
1/2 teaspoon salt
Essential for elevating all those delicious flavors! -
1/2 teaspoon black pepper
A must to add a bit of warmth. -
1 1/2 cups shredded Monterey Jack Cheese
This cheese melts beautifully and has a wonderful mild flavor. Pepper Jack could also add a little kick! -
1 cup shredded or sliced mozzarella cheese (about 4 slices)
Classic pizza cheese! You can experiment with provolone or gouda for something a bit different. -
2 tablespoons finely chopped chives (to garnish, optional)
Chives add a fresh burst of flavor on top! You could use green onions or even cilantro for a twist.
Step-by-Step Instructions
Now that we’ve snagged our ingredients, let’s jump into making our amazing Jalapeño Popper Pizza—step by step!
-
Preheat your oven: Start by preheating your oven to 475°F (245°C). This ensures your pizza crust gets that perfect golden-brown finish.
-
Prepare your pizza dough: If you’re using homemade dough, this is the time to roll it out! Lightly flour your work surface and roll your dough into your desired shape—be it round or rectangular. If you’re working with store-bought dough, follow the instructions on the packaging for the best results. Trust me, a good dough is the backbone of any pizza!
-
Brush with olive oil: After shaping your dough, transfer it to a baking sheet lined with parchment paper (or a pizza stone if you have one). Drizzle a tablespoon of extra virgin olive oil onto the surface of the dough, using a pastry brush or your fingers to spread it evenly across the top. This will give it a beautiful crust!
-
Soften the cream cheese: In a small bowl, combine your softened cream cheese, garlic powder, onion powder, salt, and black pepper. Mix well with a spatula or fork until smooth. This luscious mixture is the “popper” part of our pizza!
-
Spread the cream cheese mixture: Using a spatula, evenly spread the cream cheese mixture over the rolled-out dough, leaving a small border around the edges for the crust.
-
Add jalapeños: Scatter the freshly sliced jalapeños over the cream cheese layer. Use as few or as many as your heat tolerance allows. If you’re feeling bold, I’d say go for it—load it up!
-
Top with cheese: Now it’s time for cheese heaven! Sprinkle the shredded Monterey Jack cheese evenly over the jalapeños, then layer the mozzarella on top. Seriously, what’s pizza without a generous amount of ooey-gooey cheese?
-
Bake it up: Slide the pizza into the preheated oven and bake for about 12-15 minutes, or until the crust is golden brown and the cheese is bubbly and slightly caramelized. Keep an eye on it! Ovens can vary so make adjustments accordingly.
-
Garnish: In the last minute of baking, chop up your chives, so they’re ready to top your finished pizza.
-
Cool and serve: Once the pizza is out of the oven, let it cool for just a moment. This way, you’ll avoid burning your tongue on that molten cheese! Then, sprinkle the chopped chives on top for a pop of color and freshness.
Serving Suggestions
When it comes to serving up this Jalapeño Popper Pizza, keeping it casual is key! Slice it into wedges and serve with a side of ranch or blue cheese dressing for dipping. If you’re feeling generous, you can even whip up a quick and refreshing side salad to balance out that cheesy goodness. A simple arugula salad with lemon olive oil dressing or a classic Caesar salad would complement this dish perfectly!
Recipe Variations
Now that you’ve mastered the classic version, here are some fun ways to change it up:
-
BBQ Chicken Jalapeño Pizza: Add shredded cooked chicken and some BBQ sauce to the cream cheese mixture for an exciting twist!
-
Vegetarian Delight: Replace the jalapeños with bell peppers, mushrooms, or spinach for a veggie-packed version.
-
Spicy Sausage: Top with some crumbled spicy Italian sausage for a flavorful kick!
-
Double Cheese: Layer more creamy cheese like ricotta under the toppings for an extra indulgent pizza.
-
Gluten-Free Option: Use a gluten-free pizza crust to make this recipe friendly for everyone!
Chef’s Notes
This recipe brings back so many memories of my Friday night pizza nights, and it has evolved quite a bit over the years! Initially, I used very standard toppings until I discovered combining jalapeño poppers with pizza was an absolute game changer. Now, I love experimenting with different cheeses and toppings to see what new flavors I can create. One time I added a drizzle of honey after baking, and let me tell you, it took things to a whole new sweet-savory level!
FAQs and Troubleshooting
-
What if my dough doesn’t rise?
Make sure your yeast is fresh! If you’re using store-bought dough, follow the package’s instructions closely. If it’s homemade, double-check that your environment is warm enough for the dough to rise. -
My crust is soggy! What did I do wrong?
This could happen if you overload the toppings or don’t bake it long enough. Make sure to bake thoroughly and remove excess moisture from toppings, like patting the jalapeños dry. -
Can I make this ahead of time?
Absolutely! You can prepare the cream cheese mixture and slice your jalapeños ahead of time. Assemble the pizza just before baking for optimal freshness. -
How do I store leftovers?
Store leftover slices in an airtight container in the fridge for up to three days. Reheat in the oven for that freshly baked taste!
Nutritional Info
While I won’t dive deep into the nitty-gritty—because, hey, it’s pizza!—you can expect this Jalapeño Popper Pizza to be a delightful treat. Each slice combined with fresh ingredients provides a balance of fats, carbs, and proteins that can make your taste buds sing!
So there you have it! A culinary journey fueled by love, nostalgia, and a few spicy peppers. I hope you feel inspired to roll up your sleeves and create your own version of this Jalapeño Popper Pizza. It’s time to gather your friends, put on some fun music, and dig into some delicious homemade pies! Until next time, keep it fresh, simple, and seriously delicious!
PrintJalapeño Popper Pizza

A delicious fusion of pizza and jalapeño poppers with a crispy crust, creamy cheese, and a spicy kick.
- Prep Time: 15 minutes
- Cook Time: 15 minutes
- Total Time: 30 minutes
- Yield: 4 servings 1x
- Category: Main Course
- Method: Baking
- Cuisine: American
- Diet: Vegetarian
Ingredients
- 1 ball of pizza dough
- 2 fresh jalapeños (sliced and seeds removed)
- 1 tablespoon extra virgin olive oil
- 6 ounces cream cheese (softened)
- 1 teaspoon garlic powder
- 1 teaspoon onion powder
- 1/2 teaspoon salt
- 1/2 teaspoon black pepper
- 1 1/2 cups shredded Monterey Jack Cheese
- 1 cup shredded or sliced mozzarella cheese
- 2 tablespoons finely chopped chives (to garnish, optional)
Instructions
- Preheat your oven to 475°F (245°C).
- Prepare your pizza dough by rolling it out into your desired shape.
- Brush the shaped dough with olive oil.
- Soften the cream cheese and mix it with garlic powder, onion powder, salt, and black pepper.
- Spread the cream cheese mixture over the dough.
- Add sliced jalapeños over the cream cheese layer.
- Top with shredded Monterey Jack cheese and mozzarella cheese.
- Bake for about 12-15 minutes until the crust is golden brown and cheese is bubbly.
- Garnish with chopped chives before serving.
- Cool for a moment and then slice to serve.
Notes
Feel free to experiment with different toppings like BBQ chicken or bell peppers. Serve with ranch or blue cheese dressing for dipping.
Nutrition
- Serving Size: 1 slice
- Calories: 400
- Sugar: 2g
- Sodium: 450mg
- Fat: 22g
- Saturated Fat: 10g
- Unsaturated Fat: 8g
- Trans Fat: 0g
- Carbohydrates: 35g
- Fiber: 2g
- Protein: 15g
- Cholesterol: 40mg
Keywords: pizza, jalapeño poppers, creamy cheese, spicy pizza, comfort food
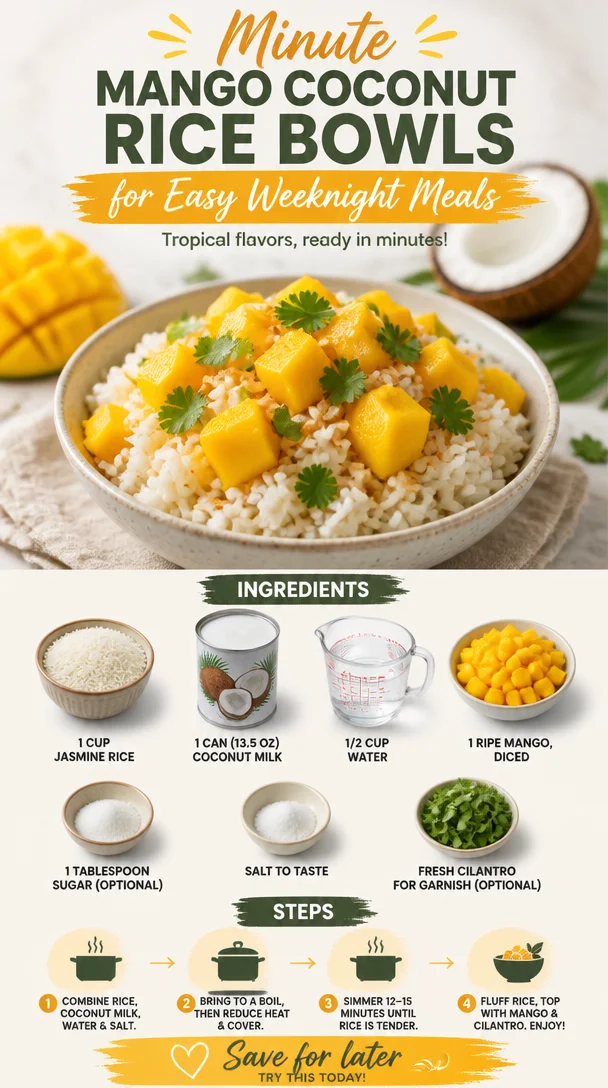
Minute Mango Coconut Rice Bowls for Easy Weeknight Meals
Mango Coconut Rice: A Tropical Treat That’ll Take You to Paradise
Hey there, food lover! If you’re anything like me, a good meal is more than just fuel; it’s an experience, a memory, and a celebration of flavors. Today, I’m super excited to share a dish that not only takes your taste buds on a tropical vacation but is also incredibly easy to whip up—Mango Coconut Rice! Picture this: velvety coconut-infused jasmine rice paired with sweet, luscious mango. It’s a dish that transports you straight to a sun-soaked beach, even if you’re just enjoying it on your kitchen table.
Eating well shouldn’t feel like a chore or a complicated assignment. The best meals are the ones that awaken your senses, spark joy, and leave you feeling great inside and out. That’s exactly what this dish does. Plus, it’s a fantastic way to enjoy the deliciousness of ripe mangoes while basking in the creamy goodness of coconut milk. The vibrant colors and flavors are perfect for any occasion—whether you’re hosting a dinner party or simply treating yourself on a quiet weekday evening.
So grab your apron, and let’s dive into this culinary adventure together! You’ll be impressing friends and family with a dish that’s simple yet bursting with flavor in no time.
A Spoonful of Nostalgia
When I think about mango coconut rice, I’m taken back to my childhood. I remember summers spent at my grandparents’ cozy beach cottage, where the salty sea breeze mingled with the sweet scent of blooming hibiscus. My grandmother would often prepare a similar dish, serving coconut rice alongside fresh mangoes we would pick from the trees in their backyard. Each bite was like summer itself—sweet, warm, and bursting with joy.
One particular afternoon, beneath the shade of a palm tree, we feasted on bowls of rice topped with juicy mango. I still remember my grandmother’s infectious laughter as she encouraged me to eat as much as I wanted. “The secret,” she’d wink, “is to keep it simple and use the freshest ingredients.” That’s a lesson I’ve carried with me into my kitchen. The combination of creamy coconut milk and sweet mango is not just a nostalgic memory for me; it’s also a reminder of the uncomplicated pleasures in life. This Mango Coconut Rice is an homage to those sunny days and shared moments, and I can’t wait for you to make your own memories with it!
Ingredients
Here’s what you’ll need to create this delightful tropical dish:
-
1 cup jasmine rice
A fragrant and fluffy rice variety, jasmine is perfect for absorbing the coconut milk’s rich flavor. For a different touch, you can substitute it with basmati or even brown rice for a nuttier taste, but remember that cooking times may vary! -
1 can (13.5 oz) coconut milk
This is the star of the show! Rich and creamy, coconut milk lends an irresistible flavor to the rice. If you’re watching your calories, you can choose light coconut milk or even unsweetened almond milk as a substitute, though it will alter the texture a bit. -
1/2 cup water
This helps in cooking the rice to the perfect consistency. Adjust according to your preference for softer or firmer rice. -
1 ripe mango (diced)
Look for mangoes that give slightly when pressed. You can replace them with any seasonal fruit, such as peaches or pineapples, to breathe new life into the dish. -
1 tablespoon sugar (optional)
While not mandatory, a touch of sweetness can enhance the flavors. Feel free to skip this if you prefer natural sweetness from the mango! -
Salt to taste
A pinch of salt helps balance the sweetness and enhances the dish’s overall flavor. -
Fresh cilantro for garnish (optional)
A sprinkle of cilantro adds a lovely freshness. If you’re not a fan, swap it for mint or simply leave it out!
Step-by-Step Instructions
Now that we have our ingredients ready, let’s get cooking! Follow these easy steps to whip up your delicious Mango Coconut Rice:
-
Rinse the Jasmine Rice
Start by rinsing the jasmine rice under cold water in a fine-mesh sieve or bowl. This helps to remove excess starch, resulting in fluffier rice. You want to rinse until the water runs clear. It should only take a few minutes, so don’t skip this step! -
Combine with Coconut Milk and Water
In a medium saucepan, combine the rinsed rice, coconut milk, and water. Add a pinch of salt to the mix. Give it a gentle stir to combine. This rich liquid is what makes the rice taste so heavenly! -
Bring to a Boil
Place the saucepan over medium-high heat. Keep an eye on it and let it come to a gentle boil. Once you see it bubbling, it’s time to reduce the heat. -
Simmer
Reduce the heat to low, cover the saucepan with a lid, and let the rice simmer for about 15 minutes. Here’s a little chef hack: resist the temptation to lift the lid too often; letting steam escape can result in undercooked rice. -
Fluff and Sweeten
After 15 minutes, remove the saucepan from the heat but leave the lid on for another 5 minutes. This will continue cooking the rice perfectly! Once time’s up, remove the lid and fluff the rice gently with a fork. If desired, sprinkle in the tablespoon of sugar at this point, mixing well. -
Add the Mango
Gently fold in the diced mango, being careful not to mash the fruit. You want those beautiful chunks to maintain their shape and sweetness! -
Serve
Time to enjoy! Scoop the Mango Coconut Rice into bowls and finish off with a sprinkle of fresh cilantro if using. This dish is best warm, but it can also be enjoyed chilled, so feel free to make it ahead of time!
Serving Suggestions
To serve, I love using beautiful, shallow bowls to showcase the vibrant colors of the mango against the creamy coconut rice. A sprinkle of fresh cilantro adds an aromatic touch and a pop of color. Pair it with grilled chicken or shrimp for a complete meal, or enjoy it as a refreshing side dish at picnics or barbecues. The versatility is part of what makes this dish so fantastic!
Recipe Variations
Want to mix things up? Here are a few creative twists you can try:
- Tropical Twist: Add diced pineapple or shredded coconut for extra texture and flavor.
- Spicy Kick: For a spicy kick, toss in finely chopped jalapeños or a dash of hot sauce while cooking the rice.
- Nutty Addition: Incorporate toasted cashews or almonds for some crunch. Just sprinkle them on top before serving!
- Vegan Delight: This recipe is already vegan-friendly, but add a splash of lime or lemon juice for a zesty twist.
- Herb-Infused: Infuse the rice with fresh basil or mint for an exciting herbal flavor.
Chef’s Notes
Over the years, this recipe has evolved into a go-to comfort food for me. Initially, I would keep it simple with just rice and mango, but my taste buds have led me to experiment with various additions and substitutions. One of my favorite variations is adding a sprinkle of lime zest! Trust me; it’s a game changer. And don’t even get me started on how delightful it is to serve this dish at gatherings. Watching friends and family dive into a tropical experience brings me so much joy.
Cooking is all about exploration, so don’t be afraid to make this recipe your own!
FAQs and Troubleshooting
1. Why did my rice come out mushy?
If the rice is mushy, it may have been overcooked or too much liquid was added. Make sure to measure the rice and liquids accurately, and be cautious with cooking times.
2. Can I make this recipe without coconut milk?
Absolutely! You can use almond milk or even regular milk, but be aware that the taste and creaminess will differ significantly.
3. How do I store leftovers?
Store any leftovers in an airtight container in the refrigerator for up to 3 days. Reheat gently in the microwave, adding a splash of water or coconut milk for moisture.
4. Where can I find ripe mangoes?
Most grocery stores carry ripe mangoes in season. Look for those that are slightly soft to the touch and have a pleasant aroma. If they aren’t ripe yet, you can let them sit at room temperature for a few days until they reach the desired ripeness.
Nutritional Info (Optional)
While I encourage you to focus on the joy of cooking and eating, here’s a quick nutritional overview (per serving):
- Calories: Approximately 290
- Protein: 4g
- Fat: 12g
- Carbohydrates: 44g
- Fiber: 2g
- Sugar: 6g
Conclusion
Mango Coconut Rice is more than just a recipe; it’s an invitation to relish the simple joys in life, just like my grandmother taught me all those years ago. So, whether you whip this dish up for a special occasion or as a weekday treat, I hope it brings you as much happiness as it does for me. The combination of creamy coconut, sweet mango, and warm jasmine rice creates an unforgettable culinary experience. Happy cooking, my friend—let’s keep those plates clean and cravings satisfied!
PrintMango Coconut Rice

A delightful tropical dish featuring velvety coconut-infused jasmine rice paired with sweet mango.
- Prep Time: 10 minutes
- Cook Time: 20 minutes
- Total Time: 30 minutes
- Yield: 4 servings 1x
- Category: Side Dish
- Method: Cooking
- Cuisine: Tropical
- Diet: Vegan
Ingredients
- 1 cup jasmine rice
- 1 can (13.5 oz) coconut milk
- 1/2 cup water
- 1 ripe mango (diced)
- 1 tablespoon sugar (optional)
- Salt to taste
- Fresh cilantro for garnish (optional)
Instructions
- Rinse the jasmine rice under cold water until the water runs clear.
- Combine the rinsed rice, coconut milk, and water in a medium saucepan. Add a pinch of salt and stir gently.
- Bring the saucepan to a gentle boil over medium-high heat.
- Simmer by reducing heat to low, cover, and let cook for about 15 minutes.
- Fluff the rice gently with a fork and let it sit covered for another 5 minutes.
- Add the diced mango and fold gently into the rice.
- Serve warm in bowls, garnished with fresh cilantro if desired.
Notes
For added flavor, a sprinkle of lime zest can be included. Adjust water according to preference for softer or firmer rice.
Nutrition
- Serving Size: 1 serving
- Calories: 290
- Sugar: 6g
- Sodium: 80mg
- Fat: 12g
- Saturated Fat: 10g
- Unsaturated Fat: 2g
- Trans Fat: 0g
- Carbohydrates: 44g
- Fiber: 2g
- Protein: 4g
- Cholesterol: 0mg
Keywords: Mango, Coconut, Rice, Tropical, Vegan, Easy Recipes
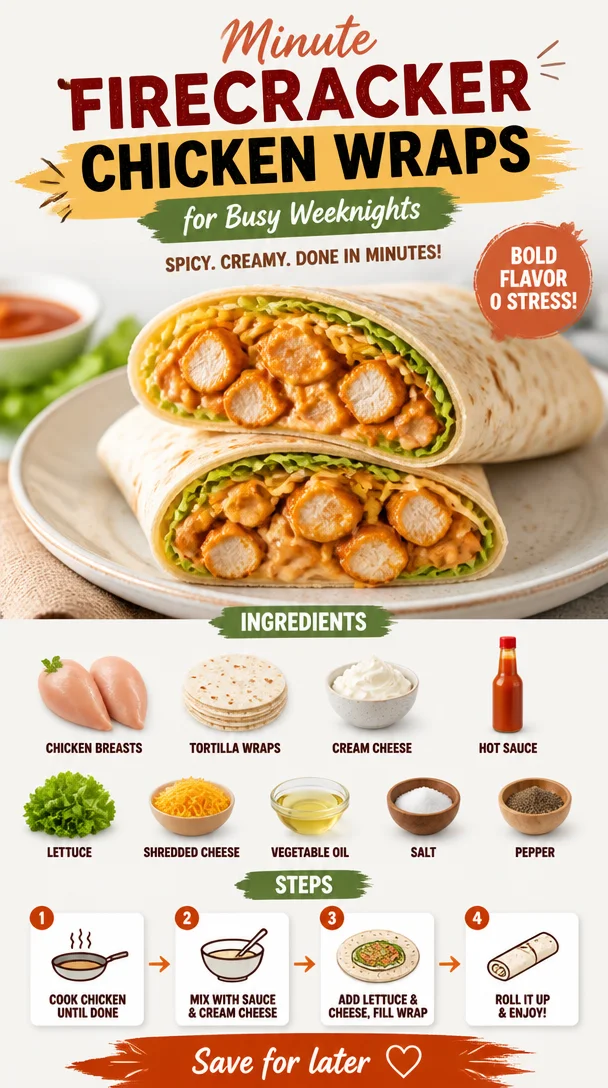
Minute Firecracker Chicken Wraps for Busy Weeknights
Firecracker Chicken Wraps: A Delicious Clash of Flavors
Welcome to another food adventure at Clean Plate Cravings! Today, I’m thrilled to share a recipe that’s not only tantalizing for your taste buds but also fun to make and perfect for any day of the week. Say hello to Firecracker Chicken Wraps! These wraps bring a sweet and spicy explosion of flavor wrapped up in a delightful tortilla. Whether you’re cooking for a family meal, hosting friends for game night, or just whipping up something quick after a long day, these wraps will tick all the boxes.
Just imagine biting into a tantalizing wrap filled with tender, spicy chicken, smooth cream cheese, and crunchy lettuce — it’s a combination that’s impossible to resist! So, grab your apron and let’s dive into the deliciousness together!
Personal Story: Cooking with My Grandma
As a child, there was nothing quite like spending time in my grandma’s kitchen. She had this magical ability to transform ordinary ingredients into extraordinary dishes. One of my fondest memories was when she’d make her famous spicy chicken wraps for family gatherings. The kitchen would be filled with the delightful aroma of sautéing chicken and spices, and my siblings and I would wiggle with excitement, eagerly waiting for the first bite.
I remember one summer afternoon when the family came over, and Grandma decided to spice things up a bit—literally! She added a touch of her homemade hot sauce to the chicken, and it was a game-changer. It was fiery, sweet, and packed full of flavor. Standing on a stool next to her, she taught me the importance of balancing flavors, and those lessons stuck with me through my culinary journey. Today’s Firecracker Chicken Wraps are an homage to those cherished memories and a tribute to Grandma’s fiery spirit in the kitchen.
Ingredients
-
Chicken Breasts: The star of our wraps! Boneless, skinless chicken breasts work best. You can substitute with turkey breast or even tofu for a vegetarian option.
-
Tortilla Wraps: I prefer whole wheat tortillas for added fiber, but any tortilla (corn, spinach, or gluten-free) will do! Play around with different types!
-
Cream Cheese: This creamy goodness adds a rich, smooth texture that balances the heat. Don’t have cream cheese? Try Greek yogurt or hummus for a lighter twist.
-
Hot Sauce: Bring on the heat! Use your favorite hot sauce; I like a blend of sweet and spicy. For less heat, a mild salsa can be a great substitution.
-
Lettuce: Crisp lettuce provides a refreshing crunch. Romaine or iceberg work well, but feel free to swap with spinach or kale for added nutrients.
-
Shredded Cheese: Cheddar or Monterey Jack are great choices. For a healthier version, try a dairy-free cheese or skip it altogether for a lighter wrap.
-
Vegetable Oil: For cooking the chicken and preventing sticking. You can use olive oil or avocado oil for additional flavor and health benefits.
-
Salt and Pepper: Essential seasonings to enhance flavor. Freshly ground black pepper and sea salt can elevate your dish!
Step-by-Step Instructions
-
Prep the Chicken: Start by slicing your chicken breasts into thin strips. This allows for quicker cooking and absorption of flavors. Give them a good sprinkle of salt and pepper to season.
-
Heat the Pan: Grab a large skillet and drizzle in a little vegetable oil. Heat over medium-high heat until the oil shimmers. This is the magic moment when your chicken will sear beautifully!
-
Sauté the Chicken: Add the seasoned chicken strips to the skillet in a single layer. Sauté for about 5-7 minutes, or until the chicken is cooked through and has a lovely golden color. Don’t forget to stir occasionally! Chef hint: Letting the chicken sit for a minute before stirring develops a lovely crust.
-
Fire it Up: Once the chicken is cooked, reduce the heat to low and stir in a generous splash of hot sauce. You can crank it up or tone it down depending on your spice preference! Cook for another minute to let the chicken soak up that spicy goodness.
-
Prepare the Tortilla: While the chicken is finishing up, take your tortillas and spread a layer of cream cheese on each one. It creates a nice barrier that keeps the wrap from getting soggy.
-
Assemble Your Wraps: Layer the spicy chicken mixture down the center of the tortilla. Next, add some crisp lettuce and a sprinkle of shredded cheese. Feel free to be generous or go light, depending on your taste!
-
Wrap It Up: Fold the sides of the tortilla over the filling, then roll from the bottom up. Tuck it in as you roll to ensure nothing spills out. Chef tip: If your tortilla feels stiff, give it a quick 20-second zap in the microwave to make it more pliable.
-
Slice and Serve: Slice the wrap in half diagonally, and voilà! You’re ready to enjoy these Firecracker Chicken Wraps!
Serving Suggestions
To serve these wraps, plate them up on a colorful dish for an inviting look. You could drizzle an extra touch of hot sauce or a dollop of sour cream on top for that extra zing. Pair them with a fresh garden salad or some crunchy veggie sticks for a complete meal.
Recipe Variations
-
Veggie Firecracker Wrap: Swap the chicken for roasted veggies like bell peppers, zucchini, and eggplant for a vibrant vegetarian option.
-
Buffalo Style: Mix in some blue cheese dressing for a classic Buffalo chicken vibe.
-
Asian Twist: Add a splash of soy sauce and sprinkle sesame seeds over the chicken for an Asian-inspired wrap!
-
Southwestern Flair: Mix in black beans and corn with a sprinkle of taco seasoning for a hearty, Southwestern version.
-
Breakfast Wrap: Use scrambled eggs instead of chicken, with a dash of hot sauce for a spicy breakfast kick!
Chef’s Notes
This recipe has evolved over the years, initially inspired by my grandma’s spicy chicken but adding my creative spin brought new life to it. I love experimenting with different sauces and toppings based on what’s available in my fridge. One memorable evening, I tried adding pineapple to the chicken, and it gave the wraps a sweet twist that my friends raved about!
Cooking is all about exploration, and I encourage you to make this recipe your own. Don’t hesitate to tweak and adjust ingredients to fit your taste—after all, that’s what makes home cooking so special!
FAQs and Troubleshooting
1. Can I use frozen chicken breasts?
Absolutely! Just make sure to thaw them thoroughly before cutting and cooking. Quick tip: The microwave can work in a pinch, but for best results, let them thaw in the fridge overnight.
2. My chicken is tough; what went wrong?
If the chicken is overcooked or cooked on high heat for too long, it can dry out. To avoid this, try using a meat thermometer; the internal temperature should reach 165°F for perfect juiciness.
3. How do I store leftovers?
Wrap the leftovers in plastic wrap or foil and store them in an airtight container in the fridge for up to 2 days. Reheat in the microwave or a skillet before enjoying again!
4. What if I can’t find hot sauce?
No worries! You can substitute it with sriracha, chili paste, or a homemade mixture with vinegar and crushed red pepper flakes. Experiment away!
Nutritional Info
While exact nutrition can vary based on your ingredients, a typical Firecracker Chicken Wrap contains approximately 400 calories per wrap, offering a nice balance of protein, fats, and carbs.
There you have it! Firecracker Chicken Wraps that’ll light up your meal any day of the week. I hope you enjoy this recipe as much as I do. Let’s keep the kitchen fun and full of flavors! Happy cooking!
PrintFirecracker Chicken Wraps

These Firecracker Chicken Wraps bring a sweet and spicy explosion of flavor wrapped up in a delightful tortilla. Perfect for any day of the week!
- Prep Time: 15 minutes
- Cook Time: 15 minutes
- Total Time: 30 minutes
- Yield: 4 servings 1x
- Category: Main Course
- Method: Sautéing
- Cuisine: American
- Diet: Non-Vegetarian
Ingredients
- 1 lb boneless, skinless chicken breasts
- 4 whole wheat tortilla wraps
- 4 oz cream cheese
- 2–4 tbsp hot sauce
- 1 cup lettuce (romaine or iceberg)
- 1 cup shredded cheese (cheddar or Monterey Jack)
- 2 tbsp vegetable oil
- Salt and pepper to taste
Instructions
- Prep the chicken by slicing it into thin strips and seasoning with salt and pepper.
- Heat a large skillet over medium-high heat and add vegetable oil.
- Sauté the chicken strips until cooked through, about 5-7 minutes.
- Fire it up by lowering the heat, adding hot sauce, and cooking for another minute.
- Prepare the tortillas by spreading cream cheese on each one.
- Assemble the wraps with chicken, lettuce, and shredded cheese.
- Wrap the tortillas securely around the filling.
- Slice the wraps in half and serve.
Notes
Feel free to customize these wraps with different proteins or toppings based on your preference!
Nutrition
- Serving Size: 1 wrap
- Calories: 400
- Sugar: 3g
- Sodium: 600mg
- Fat: 20g
- Saturated Fat: 9g
- Unsaturated Fat: 6g
- Trans Fat: 0g
- Carbohydrates: 25g
- Fiber: 3g
- Protein: 25g
- Cholesterol: 70mg
Keywords: chicken wraps, spicy wraps, easy dinner, quick meal
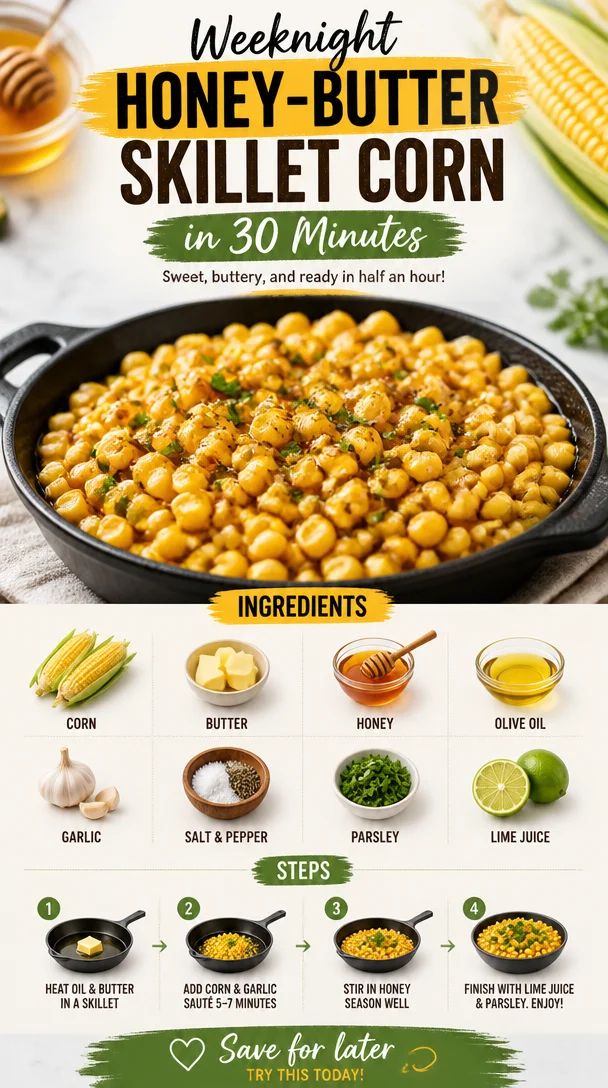
Weeknight Honey-Butter Skillet Corn in 30 Minutes
Honey Butter Skillet Corn: Sweet, Savory, and Totally Satisfying
Welcome to Clean Plate Cravings, where fresh, feel-good food meets real life—and trust me, today’s recipe is a game changer! If you’re looking for a dish that’s bursting with sweet and savory flavors, then let me introduce you to Honey Butter Skillet Corn. This dish is not just a side—it’s a full-on celebration of fresh corn, buttery goodness, and a touch of sweetness. It’s the kind of dish that makes you happy to be in the kitchen and even happier to be sitting down at the table.
Imagine this: a warm summer evening, the sun setting behind the trees, and a family gathering where laughter fills the air. The aroma of charred corn wafting from the kitchen brings everyone together, and all you can think about is diving into that succulent, buttery goodness. That’s the essence of Honey Butter Skillet Corn! Not only is it delicious, but it also has a nostalgic charm that makes it a staple in my home.
Cooking has always been a journey filled with vibrant memories, and this dish certainly takes me back. I still remember those afternoons spent in my grandma’s kitchen, where the rich smell of melting butter combined with the sweet scent of corn made my mouth water. Grandma would whip up her famous skillet corn as a side dish for family barbecues or holiday feasts, and we could never get enough of it.
Fast forward to my own culinary adventures, and I can’t help but recreate that magic in my home today. I love how simple and approachable this dish is, yet it carries bursts of flavor that will keep everyone coming back for seconds (or thirds!). So, grab your skillet, and let’s bring those sweet memories back to life with a fresh twist. Your taste buds are about to go on a delightful ride!
Personal Story
Ah, the power of food to stir up memories! One of my favorite memories associated with Honey Butter Skillet Corn is from a summer reunion at my grandparents’ house. It was one of those idyllic days where everything seemed just right—the sun was shining, and the backyard was filled with laughter and chatter from cousins, aunts, and uncles. As we gathered around the grill, my grandma was at her culinary magic station, adding the final touches to her skillet corn.
She always said that the secret was in the honey—“it brings out the sweetness of the corn, darling!”—and I’ve come to realize just how true that is. As each mouthful brought smiles to our faces, I watched everyone savor the flavors. It was more than just food; it was a way of connecting with each other, sharing stories, and creating lasting memories. These moments have shaped my passion for cooking and my joy in sharing recipes that bring people together. Now, I strive to recreate that same magic in my own family, adding my own touches while keeping the heart of the dish intact.
Ingredients
Here’s what you’ll need to create your own Honey Butter Skillet Corn:
-
Fresh Corn (4-5 ears)
The star of the dish! Fresh corn on the cob brings a burst of sweetness and texture. Look for ears with bright green husks and plump kernels. If fresh corn isn’t available, you can substitute with frozen corn. Just make sure to thaw and drain it beforehand. -
Unsalted Butter (4 tablespoons)
The essential base for that buttery goodness! Unsalted butter allows you to control the salt level in your dish. Feel free to use vegan butter or ghee for a dairy-free alternative. -
Honey (2 tablespoons)
Adds a delightful sweetness! Try local honey for an extra touch of flavor and a potential health benefit. For a vegan option, substitute maple syrup. -
Salt (to taste)
A pinch of salt enhances all the flavors. Use sea salt or kosher salt for the best results. -
Black Pepper (to taste)
Just a dash will add a nice contrast to the sweetness of the corn. Experiment with fresh ground pepper for an extra kick! -
Chopped Fresh Herbs (optional, such as cilantro or chives)
Fresh herbs brightens up the dish and adds a pop of color! If you’re not a fan of cilantro, consider basil or parsley instead.
Step-by-Step Instructions
Ready to bring this beautiful dish to life? Follow these steps, and don’t forget to sprinkle in some laughter along the way!
-
Prep Your Corn
Start by shucking the corn. Remove the husks and silk, then rinse the ears under cool water. Use a sharp knife to cut the kernels off the cob, making sure to slice down until you feel the cob at the bottom, collecting the corn in a big bowl. This is a great opportunity to involve kids or family, so they can join in the fun! -
Heat Your Skillet
Grab a large, heavy-bottom skillet and place it over medium heat. Let it warm up for a few minutes until it’s nice and hot. A well-heated skillet will help achieve that lovely sautéing effect. -
Melt the Butter
Once the skillet is heated, add the unsalted butter and let it melt gently. As it starts to foam, get ready for that ultra-rich buttery aroma! Make sure not to let it brown; we’re looking for a decadent melt, not browned butter for this recipe. -
Add the Corn
Toss in the freshly cut corn kernels and give everything a good stir to combine. Let the corn cook for about 5-7 minutes, stirring occasionally. You want the kernels to soften slightly, but you also want some bits to caramelize for that wonderful sweet and savory balance. -
Mix in Honey
Drizzle the honey over the corn while stirring. Let it mingle with the buttery corn and watch how it transforms the dish. Taste and adjust with salt and pepper to suit your palate; this is where the magic happens! The goal is to balance that sweetness with a little salty zing. -
Add Fresh Herbs
If you’re using herbs, now’s the time! Toss in your chopped cilantro or chives and stir them through just before serving. They’ll add a fresh burst of flavor alongside the sweetness of the corn. -
Serve and Enjoy
Turn off the heat and transfer the Honey Butter Skillet Corn to a serving bowl. Enjoy it warm alongside your favorite proteins, or just scoop into bowls for a light, satisfying meal.
Serving Suggestions
Honey Butter Skillet Corn is as lovely to present as it is to eat! Serve it in a rustic bowl garnished with a sprinkle of fresh herbs or a light dusting of smoked paprika for a pop of color and flavor. It pairs beautifully with grilled chicken, fish, or as an addition to summer salads. For a cozy dinner, serve a big scoop alongside some fluffy rice or your favorite quinoa for a hearty meal.
Recipe Variations
Let your creativity shine with these delicious twists on Honey Butter Skillet Corn:
- Spicy Kick: Add a pinch of cayenne pepper or some diced jalapeños for a spicy variation.
- Cheesy Delight: Stir in grated Parmesan or crumbled feta cheese for a creamy, savory element.
- Lime Zing: Squeeze in fresh lime juice for an added level of brightness that perfectly complements the sweetness.
- Bacon Treat: Cook some diced bacon in the skillet first, then remove it and proceed with the corn and butter. Stir the bacon bits back in for a smoky flavor.
- Seasonal Twists: Toss in seasonal vegetables like diced bell peppers or zucchini for a burst of color and extra nutrition.
Chef’s Notes
This Honey Butter Skillet Corn recipe originally came from my grandma’s handwritten recipe book, which is a treasure trove of family traditions and culinary wisdom. Over the years, I’ve enhanced it with my own creative flair and added twists while keeping the core deliciousness intact! I love experimenting with flavors and textures, and every time I cook this dish, I’m reminded of Grandma’s warm hugs and her love for family gatherings.
When making this dish, I always remember to keep it flexible. Whether you need to swap ingredients or want to scale it up for a big crowd, this is one of those forgiving recipes that always delivers delight.
FAQs and Troubleshooting
1. Can I use frozen corn instead of fresh?
Absolutely! Just make sure to thaw and drain the frozen corn well before using it. You won’t lose any delicious flavor, and it’s super convenient!
2. My corn didn’t caramelize! What should I do?
If your corn isn’t caramelizing, it might be that the skillet wasn’t hot enough. Make sure to preheat your skillet well and keep a close eye on the heat. Adjust as necessary!
3. How do I store leftovers?
Leftover Honey Butter Skillet Corn can be stored in an airtight container in the refrigerator for up to 3 days. Just reheat gently on the stove or in the microwave before serving again.
4. I want it dairy-free—what should I use?
Great question! Substitute unsalted butter with a vegan butter alternative and swap honey with maple syrup to keep the dish dairy-free but equally delicious.
Nutritional Info
While I don’t typically focus on rigid nutritional guidelines, here’s a quick overview: serving Honey Butter Skillet Corn provides a delightful mix of carbohydrates from the corn, healthy fats from the butter, and natural sugars from the honey—making for a balanced side that will surely energize!
And there you have it! A comforting, nostalgic dish that brings friends and family together around the table. Ready to dive in? I hope you enjoy making and sharing this Honey Butter Skillet Corn as much as I do! Happy cooking!
PrintHoney Butter Skillet Corn
A delightful dish of sweet and savory Honey Butter Skillet Corn made with fresh corn, butter, and honey, perfect for summer gatherings.
- Prep Time: 10 minutes
- Cook Time: 15 minutes
- Total Time: 25 minutes
- Yield: 4 servings
- Category: Side Dish
- Method: Sautéing
- Cuisine: American
- Diet: Vegetarian
Ingredients
- Fresh Corn (4-5 ears)
- Unsalted Butter (4 tablespoons)
- Honey (2 tablespoons)
- Salt (to taste)
- Black Pepper (to taste)
- Chopped Fresh Herbs (optional, such as cilantro or chives)
Instructions
- Prep Your Corn: Shuck the corn, rinse it, and cut the kernels off the cob.
- Heat Your Skillet: Warm a large skillet over medium heat for a few minutes.
- Melt the Butter: Add unsalted butter to the skillet and let it melt gently.
- Add the Corn: Toss in the corn kernels and stir to combine; cook for about 5-7 minutes.
- Mix in Honey: Drizzle honey over the corn while stirring, and adjust salt and pepper to taste.
- Add Fresh Herbs: If using, stir in chopped herbs just before serving.
- Serve and Enjoy: Transfer to a serving bowl and enjoy warm.
Notes
This recipe allows for flexibility with ingredient substitutions, and you can easily scale it up for larger gatherings.
Nutrition
- Serving Size: 1 serving
- Calories: 200
- Sugar: 10g
- Sodium: 50mg
- Fat: 12g
- Saturated Fat: 7g
- Unsaturated Fat: 3g
- Trans Fat: 0g
- Carbohydrates: 25g
- Fiber: 3g
- Protein: 3g
- Cholesterol: 30mg
Keywords: Honey Butter, Skillet Corn, Side Dish, Summer Recipe, Vegetarian
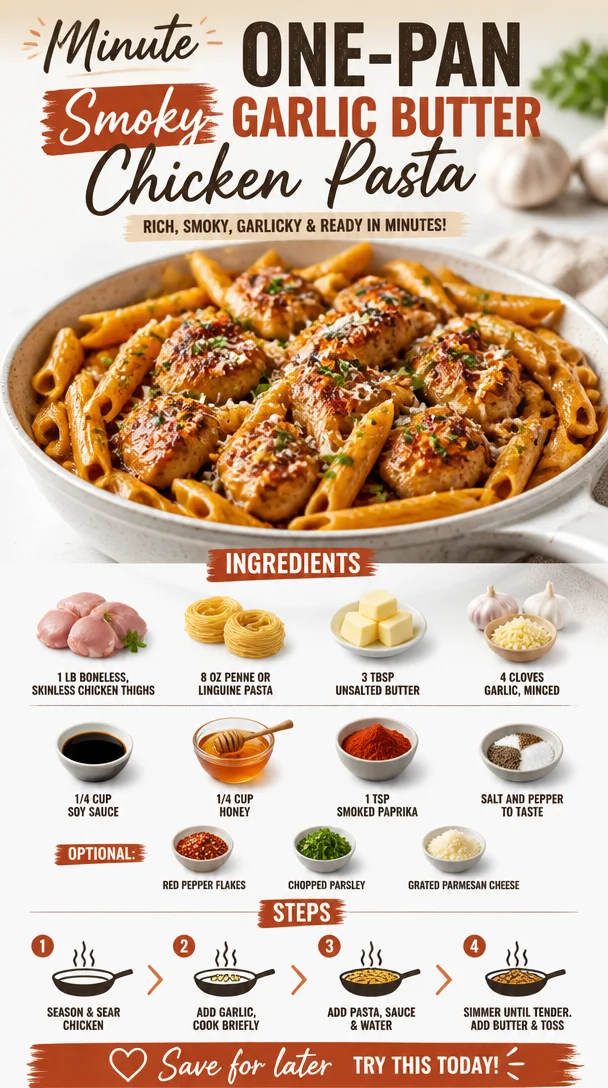
Minute One-Pan Smoky Garlic Butter Chicken Pasta
Sticky Smoky Garlic Butter Chicken Pasta: A Flavor Explosion for Your Dinner Table
Hey food lovers! Welcome to another delicious adventure in the kitchen with me, Ava Carter. Today, I’m absolutely thrilled to share a recipe that not only satisfies those midweek cravings, but also brings a burst of flavor that can transform your dinner into a culinary delight. Say hello to Sticky Smoky Garlic Butter Chicken Pasta!
Imagine golden-brown chicken thighs coated in a rich, sticky garlic buttery sauce that’s so good, you’ll want to lick the plate clean. And let’s not forget the pasta, soaking up all those smokey, garlicky flavors—the perfect vehicle to carry this indulgent goodness straight to your taste buds. If you’re ready to elevate your weeknight dinners and impress your family or guests, then grab your apron and let’s dive in!
Personal Story: A Flavorful Memory
Let me take you back to one of my fondest childhood memories. It was a crisp autumn evening, and my family was gathered in the kitchen, the aroma of garlic and butter wafting through the air. My mom—a powerhouse in the kitchen—was teaching me how to make a simple pasta dish. I vividly recall her laughter, the clinking of pots and pans, and the anticipation of that first bite.
She always said that cooking is an act of love, and I couldn’t agree more. As we stirred the sauce together, she shared stories of her own childhood, showing me how food can transport us to cherished moments. Fast forward years later, I’ve taken that simple dish and given it a sticky, smoky spin, creating this memorable Sticky Smoky Garlic Butter Chicken Pasta recipe. Just like my mom, I want to fill your kitchen with love, laughter, and mouthwatering flavors!
Ingredients
Let’s talk about what you’ll need for this showstopper dish. Here’s a handy checklist:
-
1 lb boneless, skinless chicken thighs: These are juicy and flavorful, perfect for absorbing the sticky sauce. If you’re a fan of leaner cuts, you can substitute with chicken breast, but tender thighs truly shine here.
-
8 oz penne or linguine pasta: Both options work beautifully. Penne holds onto the sauce better with its tubular shape, while linguine adds a delicate touch. Feel free to choose your favorite!
-
3 tbsp unsalted butter: This is what gives our dish that luscious, buttery richness. If you’re wanting a dairy-free option, coconut oil works well too.
-
4 cloves garlic, minced: Garlic is the MVP in this dish, bringing aroma and flavor. Freshly minced garlic is best, though garlic powder in a pinch will do.
-
1/4 cup soy sauce: This brings umami and depth to our sauce. If you need a gluten-free option, use tamari instead.
-
1/4 cup honey: It adds sweetness and balances the saltiness of the soy sauce. Maple syrup or agave can stand in if you prefer a vegan option.
-
1 tsp smoked paprika: It adds a subtle smokiness that really elevates the dish. If you don’t have it, regular paprika will work, although it won’t have that smoky kick.
-
Salt and pepper to taste: Essential for rounding out all the flavors. Always taste as you go!
-
Optional:
- Red pepper flakes: For a spicy kick.
- Chopped parsley: For a fresh touch and color.
- Grated Parmesan cheese: Because who doesn’t love a sprinkle of cheesy goodness?
Step-by-Step Instructions
Okay, are you ready to create some kitchen magic? Let’s get cooking!
-
Cook the Pasta:
In a large pot of boiling salted water, cook your pasta according to package instructions until al dente. Make sure to add salt—this is your chance to flavor the pasta itself! Remember, it’ll keep cooking a bit after you drain it. Once ready, reserve about 1/2 cup of pasta water, then drain and set aside. Little chef tip: toss it with a bit of olive oil to prevent sticking! -
Sear the Chicken:
In a large skillet over medium-high heat, melt 1 tablespoon of the butter. Season the chicken thighs with salt and pepper. Once the butter is sizzling, lay the chicken in the pan and sear until golden brown and cooked through, about 6-7 minutes per side depending on thickness. Here’s a pro chef hack: don’t crowd the pan; work in batches if necessary to get that beautiful sear! -
Create the Sauce:
Once the chicken is done, remove it from the skillet and let it rest for a few minutes. In the same skillet, melt the remaining butter. Add the minced garlic and sauté for about a minute, just until it’s fragrant (but not burned!). Then, pour in the soy sauce and honey, stirring until they blend together. -
Add the Smoky Flavor:
Sprinkle in the smoked paprika and stir. You’ll see the sauce begin to thicken slightly. Lower the heat to medium and return the chicken thighs to the skillet. Let them swim in that glorious sauce for 3-4 minutes, turning them to coat nicely. -
Combine with Pasta:
Now for the exciting part! Toss the cooked pasta into the skillet with the chicken and sauce. Gently mix everything together until the pasta is thoroughly coated. If the sauce seems too thick, add a little reserved pasta water until you reach your desired consistency. Keep tasting and adjusting the seasoning to your liking! -
Serve and Enjoy:
Once everything is well mixed, remove from heat. For the grand presentation, serve it hot right from the skillet or portion it onto individual plates. Top with red pepper flakes (if you like it spicy), a sprinkle of chopped parsley, and freshly grated Parmesan cheese. Each bite is sure to be sticky, smoky, and absolutely scrumptious.
Serving Suggestions
For a beautiful presentation, serve the pasta in wide, shallow bowls for a casual feel, or on a large platter for family-style dining. You can also complement your meal with a fresh green salad or some roasted veggies on the side to balance the richness of the dish. Grab a glass of chilled white wine, and you’ve got yourself a perfect dinner date at home!
Recipe Variations
Feeling adventurous? Here are a few ideas to put a fun twist on this recipe:
-
Vegetarian Delight: Swap the chicken for sautéed mushrooms or chickpeas for a hearty plant-based option.
-
Add More Veggies: Toss in some spinach, cherry tomatoes, or bell peppers for added nutrition and flavor.
-
Different Flavors: Replace soy sauce with teriyaki sauce for a sweeter version, or use a spicy stir-fry sauce for an Asian flair.
-
Nutty Addition: Toss in some toasted sesame seeds before serving for a crunchy surprise.
Chef’s Notes
This recipe has become a family favorite for a reason! I love how simple ingredients can come together to create such a bold, mouthwatering dish. Over the years, I’ve tweaked the recipe here and there—adding more garlic on some days and experimenting with different pasta shapes. But one thing remains constant: the joy it brings to the table. Every time I cook my Sticky Smoky Garlic Butter Chicken Pasta, it reminds me of those cozy family meals from my childhood, and I hope it does the same for you.
FAQs and Troubleshooting
1. Can I use chicken breast instead of thighs?
Absolutely! Chicken breast is a leaner option, but it may dry out if overcooked. Just keep a close eye on it and check for that juicy tenderness.
2. My sauce turned out too salty. What can I do?
If your sauce is too salty, you can balance it out with a pinch of sugar or honey. Another option is to add more pasta or even a splash of cream to tone it down.
3. Can I make this dish in advance?
Yes! You can cook the chicken and sauce ahead of time and just reheat when you’re ready to serve. Just be sure to cook the pasta fresh to avoid it getting mushy.
4. What can I substitute for honey?
If you’re looking for a vegan alternative, agave nectar or maple syrup works wonderfully. If you prefer, you can even try brown sugar for a deeper flavor!
Nutritional Info
While I always suggest enjoying your meals in moderation, here’s a quick nutritional breakdown:
- Calories: Approximately 450-500 per serving (depending on portion size and additional toppings)
- Protein: 30-35g (primarily from chicken)
- Carbohydrates: 50-60g (thanks to the pasta)
- Fats: 20-25g (mainly from butter)
So, there you have it—my Sticky Smoky Garlic Butter Chicken Pasta, a dish that not only delivers on flavor but also evokes sweet memories and warms your heart. I hope you give this recipe a try and create your own kitchen stories! Let me know how it goes, and as always, keep it fresh, simple, and seriously delicious! Happy cooking!
PrintSticky Smoky Garlic Butter Chicken Pasta

A flavor-packed dish featuring tender chicken thighs coated in a rich garlic butter sauce, served with pasta that absorbs all the smokey goodness.
- Prep Time: 15 minutes
- Cook Time: 30 minutes
- Total Time: 45 minutes
- Yield: 4 servings 1x
- Category: Main Course
- Method: Searing
- Cuisine: Italian
- Diet: Non-Vegetarian
Ingredients
- 1 lb boneless, skinless chicken thighs
- 8 oz penne or linguine pasta
- 3 tbsp unsalted butter
- 4 cloves garlic, minced
- 1/4 cup soy sauce
- 1/4 cup honey
- 1 tsp smoked paprika
- Salt and pepper to taste
- Red pepper flakes (optional)
- Chopped parsley (optional)
- Grated Parmesan cheese (optional)
Instructions
- Cook the Pasta: In a large pot of boiling salted water, cook your pasta according to package instructions until al dente. Reserve about 1/2 cup of pasta water, then drain and set aside.
- Sear the Chicken: In a large skillet over medium-high heat, melt 1 tablespoon of the butter. Season the chicken thighs with salt and pepper. Lay the chicken in the pan and sear until golden brown, about 6-7 minutes per side.
- Create the Sauce: Remove the chicken and let it rest. In the same skillet, melt the remaining butter. Add the minced garlic and sauté for about a minute. Pour in the soy sauce and honey, stirring until blended.
- Add the Smoky Flavor: Sprinkle in the smoked paprika and stir. Return the chicken thighs to the skillet and let them coat in the sauce for 3-4 minutes.
- Combine with Pasta: Toss the cooked pasta into the skillet with the chicken and sauce. Mix until the pasta is coated, adding reserved pasta water if needed for consistency.
- Serve and Enjoy: Plate the pasta hot, topped with red pepper flakes, parsley, and Parmesan cheese if desired.
Notes
Feel free to customize with veggies or different sauces to suit your taste preferences!
Nutrition
- Serving Size: 1 serving
- Calories: 475
- Sugar: 15g
- Sodium: 700mg
- Fat: 22g
- Saturated Fat: 10g
- Unsaturated Fat: 8g
- Trans Fat: 0g
- Carbohydrates: 50g
- Fiber: 3g
- Protein: 32g
- Cholesterol: 80mg
Keywords: chicken pasta, garlic butter, smoky flavor, comfort food
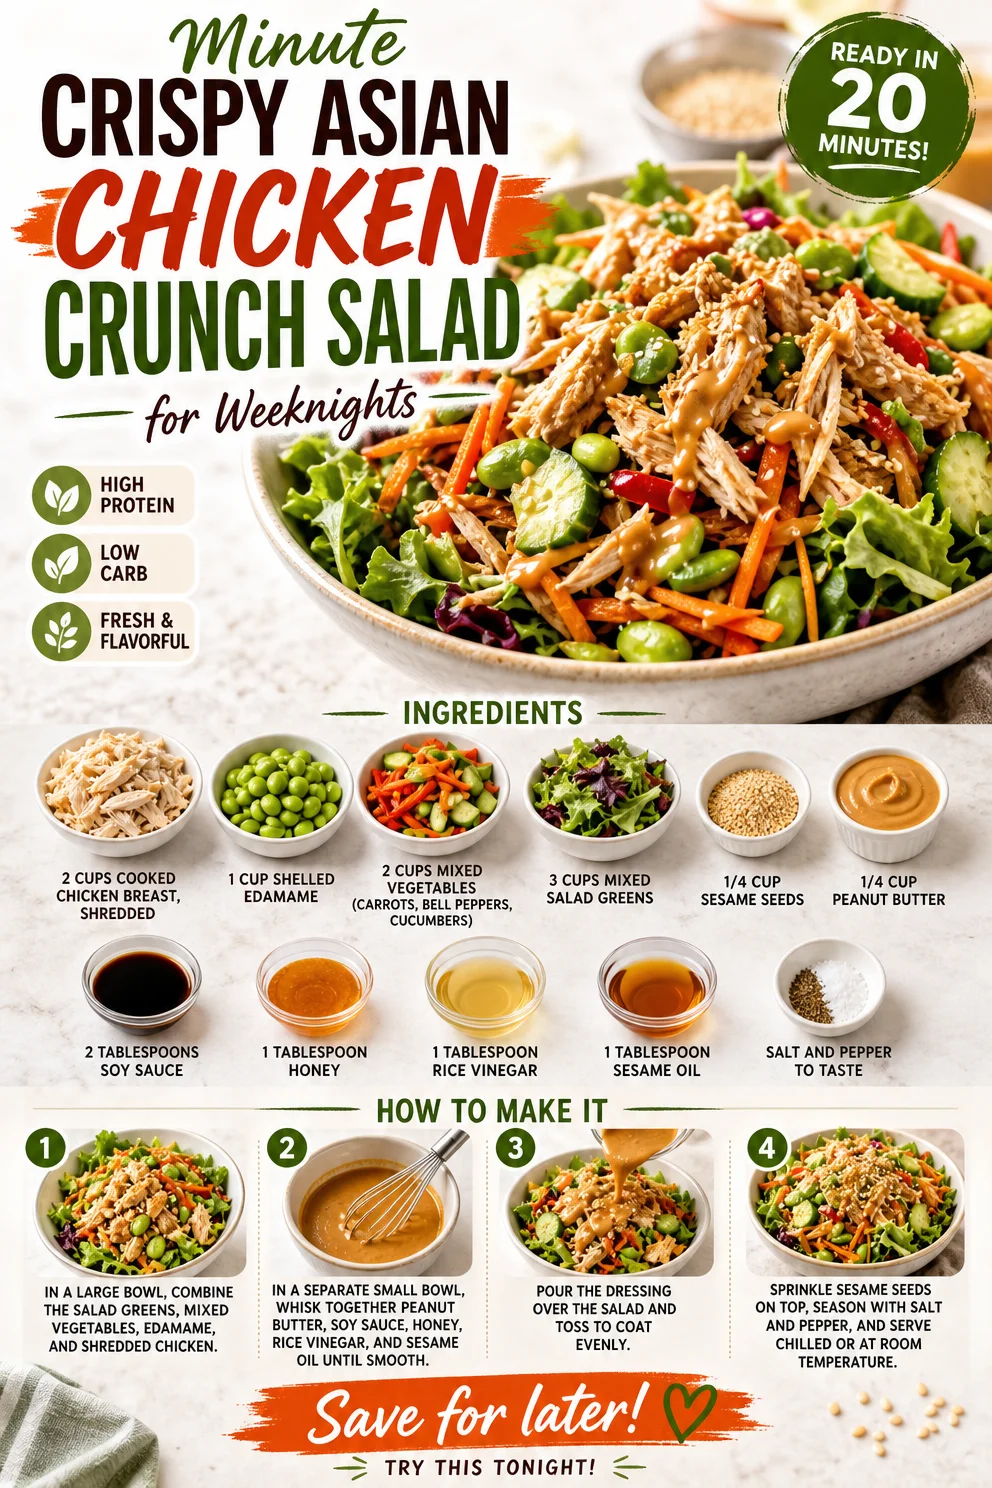
Minute Crispy Asian Chicken Crunch Salad for Weeknights
Crunch into Freshness with Asian Chicken Crunch Salad
Hey there, fellow food enthusiasts! Welcome back to Clean Plate Cravings, where flavor meets feel-good eating. Today, I’m excited to share one of my all-time favorite recipes—the Asian Chicken Crunch Salad. It’s vibrant, loaded with fresh ingredients, and just bursting with flavor. This dish isn’t just a salad; it’s a celebration of wholesome eating that’s as fun to make as it is to devour!
A Fresh Twist on a Classic
Now, let’s rewind to a fond memory—years ago, I was a rookie in the kitchen, still mastering the basics. My culinary skills were put to the test when I decided to host a small gathering for friends. I wanted to impress them with a delightful meal, and honestly, I had no clue what I was doing. That’s when I stumbled upon a recipe for an Asian chicken salad. I took that simple dish and made it my own, adding crunchy ingredients and a tantalizing dressing that had everyone reaching for seconds.
As we munched away and shared stories, I realized that food is so much more than just a meal; it’s a way to connect, to celebrate, and to create lasting memories. That night sparked my love for bringing fresh, nourishing food into people’s lives, and the Asian Chicken Crunch Salad holds a special place in my heart. Now, it’s your turn to make this dish, whether it’s for a cozy dinner or a fun gathering. Let’s dive into the ingredients!
Ingredients
Here’s what you’ll need to whip up this colorful masterpiece:
-
2 cups cooked chicken breast, shredded
Use leftover rotisserie chicken for a time-saver or grill up some fresh chicken if you prefer that homemade touch. This protein is perfect for packing in flavor and keeping you full. -
1 cup shelled edamame
These little green gems are packed with protein and fiber. If you don’t have edamame, feel free to swap with green peas or chickpeas for a different twist. -
2 cups mixed vegetables (carrots, bell peppers, cucumbers)
Fresh, crunchy, and colorful—these veggies are the epitome of salad goodness! Play around with whatever you have on hand. Snap peas, radishes, or even shredded cabbage work wonderfully too. -
3 cups mixed salad greens
A mixture of spinach, kale, or romaine will give your salad a hearty base. If you’re feeling adventurous, throw in some arugula for a peppery kick! -
1/4 cup sesame seeds
These little seeds add a delightful crunch and a hint of nuttiness. Don’t have sesame seeds? Chopped nuts like almonds or peanuts make a great substitute. -
1/4 cup peanut butter
A creamy dressing star! For a nut-free option, try tahini or sunflower seed butter. -
2 tablespoons soy sauce
This ingredient packs a savory punch. For a gluten-free version, use tamari or coconut aminos. -
1 tablespoon honey
It brings a touch of natural sweetness. If you’re avoiding sugar, maple syrup or agave would do just fine. -
1 tablespoon rice vinegar
A light acidity to balance flavors. Apple cider vinegar can be a great substitute if you’re in a pinch. -
1 tablespoon sesame oil
A little goes a long way with this aromatic oil! Olive oil makes a decent alternative, but you’ll lose that lovely sesame flavor. -
Salt and pepper to taste
Essential for bringing all the flavors together. Don’t forget to taste as you go!
Step-by-Step Instructions
Ready to create a masterpiece? Let’s get cooking!
-
Prep Your Ingredients:
Start by gathering all your ingredients. This makes the cooking process seamless and prevents any last-minute scrambling. Chop your vegetables into bite-sized pieces, shred your chicken if you haven’t done so already, and measure out all other ingredients. It’s like prepping for a masterpiece painting—super fun! -
Mix the Dressing:
Grab a medium bowl and add the peanut butter, soy sauce, honey, rice vinegar, sesame oil, and a pinch of salt and pepper. Whisk it all together until it’s smooth and creamy. Here’s a hack: if your peanut butter is too thick, you can microwave it for about 10-15 seconds to make it easier to whisk. Plus, the warm dressing will infuse even more subtly wonderful flavors! -
Toss the Salad Base:
In a large mixing bowl, combine your mixed salad greens, chopped vegetables, and shelled edamame. Toss them together gently to distribute everything evenly—kind of like a dance party in a bowl! -
Add the Chicken:
Toss in your shredded chicken, mixing it gently with the veggies. This is where the magic starts to happen—the colors and textures come together beautifully! -
Drizzle the Dressing:
Pour that luscious peanut dressing all over your salad and toss it like you mean it! Ensure every piece is coated, as the dressing is what ties all those flavors together. -
Sprinkle with Sesame Seeds:
Finally, add the sesame seeds on top before serving. They not only add crunch but also a lovely visual appeal—who doesn’t love a gorgeous salad, right? -
Serve Immediately:
This salad is best enjoyed fresh, but if you have leftovers, store the dressing separately to keep the salad from becoming soggy. When ready to eat, just give it a good toss again!
Serving Suggestions
Alright, it’s showtime! Plate your beautiful Asian Chicken Crunch Salad in a large bowl or individual serving plates. You can garnish with a few extra sesame seeds or some chopped green onions for a pop of color and extra flavor. Serve it as a light lunch, a refreshing side dish, or a delightful entrée. Pair it with some steamed dumplings or a side of spring rolls for an Asian-inspired feast!
Recipe Variations
Feeling creative? Here are some fun twists you can try:
-
Spicy Kick: Add some sliced jalapeños or a drizzle of sriracha to your dressing for a spicy version.
-
Fruit Fusion: Toss in some diced mango or mandarin oranges for a burst of sweetness that complements the savory flavors.
-
Herb Infusion: Add fresh cilantro or mint for a fragrant lift.
-
Swap Proteins: Instead of chicken, use shredded tofu or grilled shrimp for a different protein option.
-
Crunch Factor: Experiment with crunchy toppings like fried onions or chow mein noodles for extra texture.
Chef’s Notes
This recipe has come a long way since that little gathering back in the day! I’ve tinkered with it over time, swapping ingredients and adding different flavors as I learned more about food and nutrition. One time, I accidentally mixed up sugar and salt when I was making the dressing. Let me tell you, that resulted in quite the funny—and salty—salad! Mistakes happen, but the key is to have fun and embrace the creativity of cooking.
FAQs and Troubleshooting
Q: Can I make this salad ahead of time?
A: Absolutely! Just store the dressing separately so the salad doesn’t get soggy. When you’re ready to eat, combine it all!
Q: What can I use instead of peanut butter?
A: If you need a nut-free option, tahini or sunflower seed butter works great!
Q: How do I keep my salad from getting soggy?
A: Keep the dressing stored separately until you’re ready to enjoy it. Fresh salads are the way to go!
Q: Can I add other vegetables?
A: For sure! Feel free to toss in whatever veggies you love or have on hand—just remember to keep everything roughly the same size for a nice crunch in every bite.
Nutritional Info
Note: Nutritional information is an estimate and can vary based on specific ingredients used and portion sizes.
Calories: ~350 per serving
Protein: 30g
Carbohydrates: 30g
Fat: 15g
Fiber: 8g
There you have it—a delicious, colorful, and nourishing Asian Chicken Crunch Salad that’s as easy to make as it is to love. I hope you enjoy creating this dish as much as I do! Let’s keep that kitchen vibe fresh, fun, and oh-so-delicious. Happy cooking, friend!
PrintAsian Chicken Crunch Salad
A vibrant and crunchy salad loaded with fresh ingredients and a creamy peanut dressing, perfect for a light meal or a gathering.
- Prep Time: 15 minutes
- Cook Time: 15 minutes
- Total Time: 30 minutes
- Yield: 4 servings 1x
- Category: Salad
- Method: Mixing
- Cuisine: Asian
- Diet: Gluten-Free
Ingredients
- 2 cups cooked chicken breast, shredded
- 1 cup shelled edamame
- 2 cups mixed vegetables (carrots, bell peppers, cucumbers)
- 3 cups mixed salad greens
- 1/4 cup sesame seeds
- 1/4 cup peanut butter
- 2 tablespoons soy sauce
- 1 tablespoon honey
- 1 tablespoon rice vinegar
- 1 tablespoon sesame oil
- Salt and pepper to taste
Instructions
- Prep your ingredients: Gather and prepare all your ingredients, chop vegetables, and shred chicken.
- Mix the dressing: Whisk peanut butter, soy sauce, honey, rice vinegar, sesame oil, and seasoning in a bowl until smooth.
- Toss the salad base: In a large mixing bowl, combine mixed greens, chopped vegetables, and shelled edamame. Toss gently.
- Add the chicken: Mix in shredded chicken with the vegetables gently.
- Drizzle the dressing: Pour the prepared dressing over the salad and toss to coat evenly.
- Sprinkle with sesame seeds: Add sesame seeds on top before serving for additional crunch.
- Serve immediately: Enjoy fresh, or store dressing separately for later use.
Notes
Use leftover rotisserie chicken for a time-saver, and store dressing separately to keep salad fresh.
Nutrition
- Serving Size: 1 serving
- Calories: 350
- Sugar: 5g
- Sodium: 400mg
- Fat: 15g
- Saturated Fat: 3g
- Unsaturated Fat: 10g
- Trans Fat: 0g
- Carbohydrates: 30g
- Fiber: 8g
- Protein: 30g
- Cholesterol: 70mg
Keywords: salad, chicken salad, Asian salad, healthy recipe, crunchy salad