
Minute Creamy Spinach Orzo: Quick Weeknight Dinner
Creamy Spinach Orzo: A Soul-Warming Delight
Welcome, fellow foodies! Today, I’m thrilled to share with you a dish that’s as comforting as a warm hug on a chilly day: creamy spinach orzo. This dish is not just about the ingredients—it’s packed with love, nostalgia, and the kind of flavors that’ll turn any meal into a cozy gathering. So grab your apron, and let’s dive right into the delicious world of creamy spinach orzo!
A Taste of Nostalgia
Cooking has always been more than just a way to fill our bellies; it’s a way to create memories. I remember the first time I prepared a dish similar to this creamy spinach orzo in my tiny college kitchen. With my friends gathered around, we were experimenting with whatever we could find in our pantry. We stumbled upon some leftover orzo and a bag of fresh spinach, and the magic began.
As we diced garlic and tossed in cream, laughter filled the air. There was something ridiculously satisfying about turning a handful of ingredients into a dish that not only nourished us but brought us closer together. It was a surefire hit—everyone went back for seconds, and that’s when I knew I had discovered something special.
Years later, I’ve refined the recipe, but the essence remains: comfort, warmth, and a touch of creativity in your own kitchen. Let’s recreate that magic today!
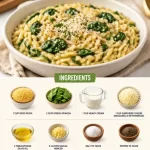
Ingredients
Here’s what you’ll need to make your very own creamy spinach orzo:
-
1 cup orzo pasta
Orzo is a delightful rice-shaped pasta that cooks quickly and absorbs flavors beautifully. If you’re out of orzo, you can substitute with any small pasta like ditalini or even quinoa for a gluten-free option. -
2 cups fresh spinach
Spinach is packed with nutrients and adds a wonderful earthiness to the dish. Feel free to swap it out for kale or Swiss chard if you’re in the mood for something different. -
1 cup heavy cream
This is where the creaminess comes from! If you’re looking for a lighter version, you can use half-and-half or even coconut milk for a dairy-free alternative. -
1 cup shredded cheese (e.g., mozzarella or parmesan)
Cheese is the magic ingredient that brings everything together. Mozzarella gives it a mild, creamy flavor, while parmesan adds a nutty richness. A good vegan cheese can also work if you’re avoiding dairy. -
2 tablespoons olive oil
A splash of olive oil not only adds flavor but helps in sautéing our garlic to perfection. For a twist, try using garlic-infused olive oil! -
2 cloves garlic, minced
The aroma of garlic sizzling in olive oil is simply irresistible! Don’t skimp here—garlic brings all the flavors to life. If you’re in a pinch, garlic powder will do, but fresh is always best. -
Salt and pepper to taste
Simple seasonings that elevate the dish and allow the other flavors to shine. Always taste as you go to find your perfect balance!
Now that we’ve gathered our ingredients, let’s get cooking!
Step-by-Step Instructions
-
Cook the Orzo
Start by boiling a pot of salted water over high heat. Once it’s bubbling, add your orzo and cook until al dente, about 8–10 minutes. Stir occasionally to prevent sticking. Chef’s tip: save a cup of the pasta cooking water before draining! It’s liquid gold for adjusting the creaminess later. -
Sauté the Garlic
In a large skillet, heat the olive oil over medium heat. Once it’s shimmering, toss in the minced garlic. Sauté for about 1-2 minutes until fragrant. Be careful not to burn it—garlic can turn bitter if overcooked! Pro tip: if you’re using minced garlic from a jar, remember that it’s often more potent than fresh garlic, so adjust accordingly. -
Add the Spinach
Toss in your fresh spinach and sauté until wilted, around 3–4 minutes. If the skillet looks a little dry, a splash of your reserved pasta water will help. A touch of moisture will also help the spinach further break down and incorporate flavor. -
Introduce the Cream
Pour in the heavy cream and stir gently. Allow it to come to a gentle simmer. The beautifully rich sauce will start to thicken; this is when the magic happens! Keep an eye on it, stirring often so it doesn’t scorch. -
Stir in the Cheese
Gradually add in your shredded cheese, stirring continuously until it melts and combines thoroughly with the creamy sauce. This is where we build flavor! If the sauce looks too thick, just add a little of that reserved pasta water until it reaches your desired consistency. -
Mix in the Orzo
Now, add the drained orzo into the skillet. Toss everything together until the pasta is evenly coated in the creamy sauce. At this stage, taste it! This is your chance to sprinkle in salt and pepper as needed until it’s just right. -
Serve!
Once everything is beautifully combined and heated through, remove it from the stovetop. You can serve it immediately, garnished with extra cheese or even a sprinkle of fresh herbs for that beautiful touch. What could be simpler?
Serving Suggestions
For that extra flair, consider serving your creamy spinach orzo in individual bowls. Top with a sprinkle of freshly grated parmesan cheese and a drizzle of olive oil for that added gourmet touch. Pair it with a side salad dressed in a lemon vinaigrette, or serve it alongside grilled chicken or shrimp for a heartier meal. The beauty of this dish is it can complement a variety of main courses!
Recipe Variations
Feeling a little adventurous? Here are some fun variations you can try to put your own spin on creamy spinach orzo:
-
Sun-Dried Tomato Spinach Orzo: Add chopped sun-dried tomatoes for a burst of flavor.
-
Lemon Zest and Herb Infusion: Incorporate fresh lemon zest and chopped herbs like basil or parsley for a fresh, bright twist.
-
Mushroom Lover’s Delight: Add sautéed mushrooms to the mix for an earthy, earthy addition.
-
Protein Power: Toss in some cooked chicken, grilled shrimp, or cannellini beans to boost the protein content and make it a complete meal.
-
Spicy Kick: Add a pinch of red pepper flakes to the garlic step for a delightful heat!
Chef’s Notes
As I reflect on this creamy spinach orzo, I can’t help but smile at the simplicity and versatility of it all. The recipe has come a long way since those chaotic college days, but the heart remains the same: making feeding yourself—and those you love—an enjoyable experience. Over the years, I’ve played with ingredients, discovered new combinations driving my creativity in the kitchen, and each experience gets me excited to share with all of you!
One of the most rewarding parts of cooking is knowing that each time you make a dish, you have the power to tweak and adjust it to fit your taste. So, don’t be shy—make this creamy spinach orzo your own!
FAQs and Troubleshooting
Q: My orzo is sticky—what did I do wrong?
A: Sticky orzo usually means it was overcooked or lacked enough water during cooking. Make sure to stir occasionally while boiling, and watch the timer!
Q: Can I make this dish in advance?
A: Yes! You can prepare this in advance and store it in the refrigerator. Just be sure to store it in an airtight container. Reheat it in a skillet on medium-low heat, adding a bit of cream or pasta water to loosen it up.
Q: How can I make this dish dairy-free?
A: Swap the heavy cream with a plant-based cream and use a vegan cheese alternative. Almond milk or coconut cream can work for the cream.
Q: How do I prevent the spinach from turning too mushy?
A: Add spinach at the end of the cooking process—just sauté it until wilted. Overcooking makes it lose its vibrant color and nutritional goodness.
Nutritional Info
Now, you may wonder about the nutritional goodness found in this creamy dish. Here’s a general idea (per serving, based on 4 servings):
- Calories: 450
- Protein: 12g
- Carbohydrates: 45g
- Fat: 25g
- Fiber: 2g
Keep in mind, these values will vary depending on your specific ingredients and any variations you decide to incorporate!
So there you have it—a beautifully creamy, flavor-packed orzo dish, steeped in memories and flexibility. Let it become a staple in your kitchen, reminding you that every meal is an opportunity to create, share, and enjoy life’s simple pleasures. Happy cooking!
PrintCreamy Spinach Orzo
A comforting creamy spinach orzo dish that brings warmth and nostalgia, perfect for cozy gatherings.
- Prep Time: 10 minutes
- Cook Time: 20 minutes
- Total Time: 30 minutes
- Yield: 4 servings 1x
- Category: Main Course
- Method: Stovetop
- Cuisine: Italian
- Diet: Vegetarian
Ingredients
- 1 cup orzo pasta
- 2 cups fresh spinach
- 1 cup heavy cream
- 1 cup shredded cheese (e.g., mozzarella or parmesan)
- 2 tablespoons olive oil
- 2 cloves garlic, minced
- Salt and pepper to taste
Instructions
- Cook the orzo by boiling a pot of salted water over high heat. Add orzo and cook until al dente, about 8–10 minutes. Save a cup of the cooking water before draining.
- Sauté the garlic in a large skillet with olive oil over medium heat for about 1-2 minutes until fragrant, being careful not to burn it.
- Add the spinach and sauté until wilted, around 3–4 minutes, adding a splash of reserved pasta water if needed.
- Introduce the heavy cream and bring to a gentle simmer, stirring often.
- Stir in the shredded cheese until melted and combined with the sauce. Add reserved pasta water if the sauce is too thick.
- Mix in the drained orzo, tossing until evenly coated, then season with salt and pepper to taste.
- Serve! Garnish with extra cheese or fresh herbs, if desired.
Notes
Consider serving in individual bowls with a sprinkle of parmesan and a drizzle of olive oil. Pairs well with side salads or grilled proteins.
Nutrition
- Serving Size: 1 serving
- Calories: 450
- Sugar: 3g
- Sodium: 500mg
- Fat: 25g
- Saturated Fat: 15g
- Unsaturated Fat: 8g
- Trans Fat: 0g
- Carbohydrates: 45g
- Fiber: 2g
- Protein: 12g
- Cholesterol: 70mg
Keywords: creamy orzo, spinach, comfort food, vegetarian pasta dish, easy recipes
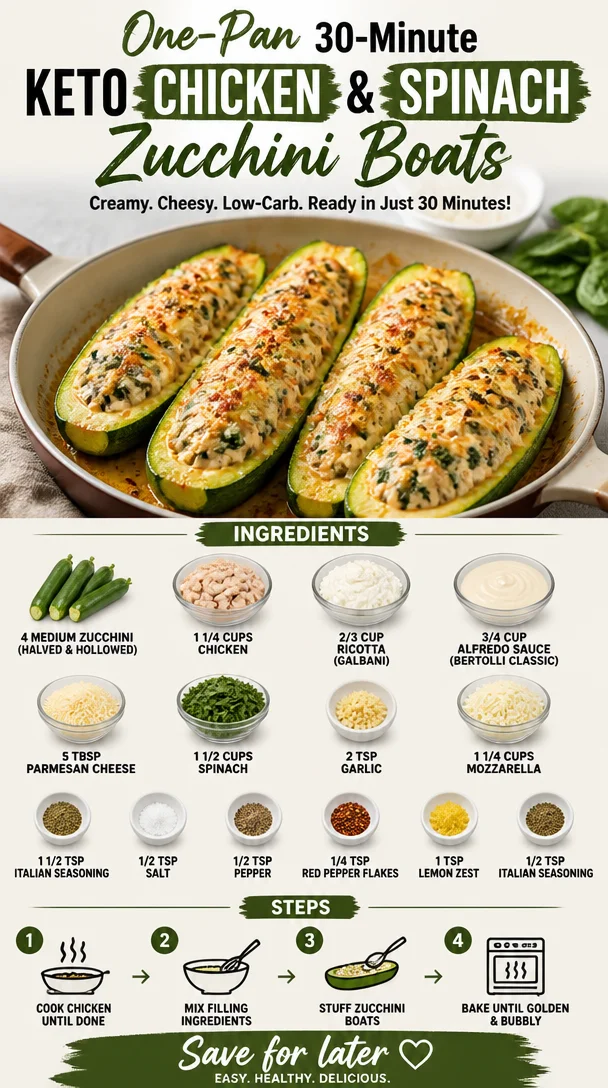
One-Pan 30-Minute Keto Chicken & Spinach Zucchini Boats
Keto Chicken and Spinach Stuffed Zucchini Boats: A Modern Classic
Welcome to Clean Plate Cravings! Today, I’m thrilled to share a recipe that’s not only delicious but also a culinary adventure back to my kitchen roots. If you’re looking for a tasty and guilt-free meal that you can whip up in a jiffy, you’re in the right place. Today, we’re diving into the world of Keto Chicken and Spinach Stuffed Zucchini Boats. These vibrant, flavor-packed boats are not just eye-candy; they’re also a fantastic way to incorporate more vegetables into your diet while keeping things low-carb.
Introduction: The Love Affair with Zucchini
Ah, zucchini! This humble summer squash holds a special place in my heart (and kitchen). It’s versatile, healthy, and practically begs to be stuffed. Growing up, my grandmother would have us assist her in the garden, and every summer, we’d harvest a seemingly endless supply of zucchini. I remember our family’s weekly summertime tradition—zucchini cooking contests. Who could create the most delicious dish? The stakes were high, and creativity soared!
The zucchini boats we enjoyed at those contests inspired this recipe. Combining fresh, wholesome ingredients like chicken, spinach, and cheese, these stuffed zucchini are like warm hugs on a plate—satisfying, without the carbs! Whether you’re hosting friends, pulling together a healthy weeknight dinner, or simply craving something comforting, these keto-friendly boats tick all the boxes. Plus, what’s more fun than digging into a delicious meal that comes in its own natural vessel? So let’s roll up our sleeves and get started—we’ve got some exciting culinary magic to create!
Personal Story: A Family Tradition
One of my fondest memories is from a summer picnic, where my family gathered in our backyard under a canopy of twinkling fairy lights. My aunt was in charge of the food, and to everyone’s delight, she brought her famous stuffed zucchini. I remember taking my first bite and savoring the creamy cheese and savory chicken bursting with flavor. It felt like summer on a plate! That night, laughter filled the air as we swapped stories and reminisced over our filling meal.
From that moment, I knew that zucchini would always be a part of my life. Fast forward to today, and I’m still head-over-heels for this adaptable veggie. Making these Keto Chicken and Spinach Stuffed Zucchini Boats is my way of keeping that tradition alive. They may not be the exact recipe my aunt made, but they carry the same heartfelt joy and camaraderie—and of course, they are super delicious!
Ingredients
Here’s what you’ll need to bring these scrumptious zucchini boats to life:
-
4 medium zucchini: Halved lengthwise and hollowed (1/4-inch shells). Look for firm, shiny zucchinis! They’ll hold up better in the oven.
-
1 1/4 cups chicken: Shredded or cut into 1/2-inch cubes. Rotisserie chicken is an excellent shortcut here if you’re short on time or want to keep it super easy.
-
2/3 cup ricotta cheese: I recommend Galbani for its creamy texture. Ricotta adds a delightful richness. If you’re dairy-free, try using cashew cream as a substitute.
-
3/4 cup Alfredo sauce: Bertolli classic is my go-to for convenience, but you can make your own to control the ingredients.
-
5 tbsp parmesan cheese: This adds a nutty, salty kick. Freshly grated is always superior, but in a pinch, pre-grated works too.
-
1 1/2 cups spinach: Roughly chopped into 1/2-inch ribbons. Fresh is best for a vibrant flavor, but in the off-season, you can use thawed frozen spinach—just make sure to drain excess moisture!
-
2 tsp garlic: Minced. Garlic is a superstar flavor enhancer! If you love garlic, feel free to add more!
-
1 1/2 tsp Italian seasoning: This mix of herbs elevates the dish. You can make your own blend with dried basil, oregano, and thyme if you prefer.
-
1/2 tsp salt: To taste. This balances the flavors—you can always adjust if needed.
-
1/2 tsp pepper: Freshly cracked is best for depth of flavor.
-
1/4 tsp red pepper flakes: For a kick! Adjust this based on your spice tolerance.
-
1 tsp lemon zest: Adds brightness that works wonders with the dish’s creamy elements!
-
1 1/4 cups mozzarella: Shredded from a block for melting perfection. Avoid pre-shredded cheese, as it doesn’t melt as smoothly.
-
1/2 tsp Italian seasoning: Just a sprinkle for that second layer of flavor on top.
Step-by-Step Instructions
Alright, ready to dive in? Follow these straightforward steps, and you’ll be savoring your delicious creation in no time!
-
Preheat Your Oven: Begin by preheating your oven to 375°F (190°C). This ensures an even cook and perfect caramelization.
-
Prepare the Zucchini: Slice each zucchini in half lengthwise and scoop out the insides using a spoon to create “boats.” Aim for about 1/4-inch shell thickness for stability. Save those scooped-out bits! You can chop them finely and add them to the stuffing or use them in another dish.
-
Cook Your Chicken: If you’re using raw chicken, sauté it in a pan over medium heat until fully cooked (about 6-8 minutes). Season with salt and pepper. If using rotisserie chicken, skip this step!
-
Sauté the Spinach: In the same skillet, add a splash of olive oil. Once hot, throw in the minced garlic and sauté for about 30 seconds until fragrant (careful not to burn!). Add the chopped spinach and cook just until wilted. Remove from heat and let it cool slightly.
-
Mix the Filling: In a large bowl, combine the shredded chicken, wilted spinach, ricotta cheese, Alfredo sauce, 5 tbsp parmesan cheese, lemon zest, 1 1/2 tsp Italian seasoning, salt, pepper, and red pepper flakes. Stir until everything is well blended. Don’t be afraid to get your hands in there!
-
Stuff the Zucchini Boats: Generously fill each zucchini half with the mixture. Don’t skimp on this step; the more stuffing, the better!
-
Add More Cheese: Top each boat with shredded mozzarella and a sprinkle of Italian seasoning. You can really pile it on here—who doesn’t love cheesy goodness?
-
Bake: Place the stuffed zucchini boats in a baking dish, cover with foil, and bake in the preheated oven for 25-30 minutes. This will steam them and help cook through the filling. Remove the foil and bake for an additional 10 minutes, or until the cheese is bubbling and golden.
-
Garnish: Once they’re out of the oven, let them rest for a few minutes. You can garnish with fresh basil or a sprinkle of extra parmesan if you like.
Serving Suggestions
When it comes time to serve, I recommend placing your stuffed zucchini boats on a big, vibrant plate. Adding a sprinkle of fresh herbs on top can enhance the visual appeal. Pair them with a light green salad dressed with lemon vinaigrette to round out your meal. The zesty salad complements the creamy boats perfectly!
Recipe Variations
Feel like switching it up? Here are a few fun variations to keep things exciting:
-
Spicy Mexican Twist: Add taco seasoning to the filling and top with jalapeños.
-
Mediterranean Flair: Mix in some sun-dried tomatoes and olives for a zesty Mediterranean vibe.
-
Meatless Version: Swap the chicken for mushrooms or lentils to keep it plant-based!
-
Add Herbs: Mix in fresh basil, parsley, or dill for a fresh flavor boost.
-
Cauliflower Rice: Try adding riced cauliflower for bulk and even more nutrient density.
Chef’s Notes
I cherish how this recipe has come to life. Initially, I was skeptical about stuffing veggies, but once I tried it, I realized that this method is just an avenue to bring flavors together in the most delightful way! This dish has become a staple in my kitchen, thanks to its adaptability. Sometimes I even find myself experimenting with leftover ingredients hanging out in my fridge. It’s funny how cooking evolves, isn’t it? You start with a classic dish, and before you know it, it’s a creative canvas for your culinary whims!
FAQs and Troubleshooting
1. Why do my zucchini boats get mushy?
Zucchini can release moisture while cooking. Make sure to hollow them out well and consider roasting them for a few minutes before stuffing to release some water.
2. Can I make this ahead of time?
Absolutely! Prep the zucchini and filling in advance, then assemble and bake when you’re ready. Just extend the bake time for chilled zucchini.
3. What can I use instead of Alfredo sauce?
You can replace it with a homemade cheese sauce, tomato sauce, or even a light pesto for a fresh twist.
4. How do I store leftovers?
Store any leftovers in an airtight container in the fridge for 3-4 days. They reheat beautifully in the oven or microwave.
Nutritional Info
While the nutritional content may vary, here’s a quick glance at what you might expect per serving (assuming 8 servings):
- Calories: 250
- Protein: 20g
- Carbs: 7g
- Fats: 15g
Get ready to enjoy these colorful Keto Chicken and Spinach Stuffed Zucchini Boats! They’re not just a feast for the stomach but also for the eyes, and I promise they’ll become a staple in your home, just like they have in mine. Here’s to fresh, feel-good meals that bring us together! Happy cooking, foodies!
PrintKeto Chicken and Spinach Stuffed Zucchini Boats

A delicious and keto-friendly meal featuring zucchini stuffed with chicken, spinach, and cheese.
- Prep Time: 15 minutes
- Cook Time: 40 minutes
- Total Time: 55 minutes
- Yield: 4 servings 1x
- Category: Main Course
- Method: Baking
- Cuisine: American
- Diet: Keto
Ingredients
- 4 medium zucchini, halved lengthwise and hollowed
- 1 1/4 cups chicken, shredded or cubed
- 2/3 cup ricotta cheese
- 3/4 cup Alfredo sauce
- 5 tbsp parmesan cheese
- 1 1/2 cups spinach, roughly chopped
- 2 tsp garlic, minced
- 1 1/2 tsp Italian seasoning
- 1/2 tsp salt
- 1/2 tsp pepper
- 1/4 tsp red pepper flakes
- 1 tsp lemon zest
- 1 1/4 cups mozzarella, shredded
- 1/2 tsp Italian seasoning, for topping
Instructions
- Preheat your oven to 375°F (190°C).
- Prepare the zucchini by slicing in half lengthwise and scooping out the insides to create boats.
- Cook the chicken if using raw, sautéing in a pan until fully cooked (about 6-8 minutes).
- Sauté the spinach in a skillet with olive oil and minced garlic until wilted.
- Mix the filling ingredients in a large bowl until well combined.
- Stuff each zucchini half with the chicken and spinach mixture.
- Add shredded mozzarella and Italian seasoning on top.
- Bake in a covered dish for 25-30 minutes, then uncover and bake for an additional 10 minutes.
- Garnish with fresh basil or parmesan if desired and let cool slightly before serving.
Notes
Feel free to vary the filling with different spices or add vegetables to suit your taste!
Nutrition
- Serving Size: 1 serving
- Calories: 250
- Sugar: 4g
- Sodium: 600mg
- Fat: 15g
- Saturated Fat: 8g
- Unsaturated Fat: 5g
- Trans Fat: 0g
- Carbohydrates: 7g
- Fiber: 2g
- Protein: 20g
- Cholesterol: 70mg
Keywords: Keto, Zucchini Boats, Chicken, Spinach, Low Carb
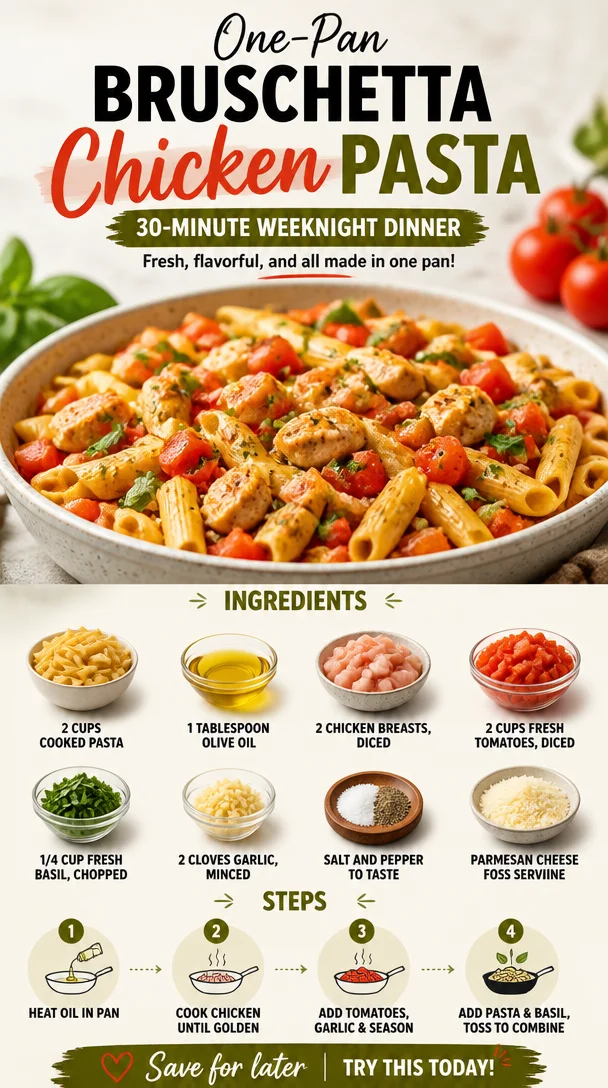
One-Pan Bruschetta Chicken Pasta: 30-Minute Weeknight Dinner
Bruschetta Chicken Pasta: A Delicious Twist on a Classic Dish
Welcome to Clean Plate Cravings! Today, we’re diving into the world of flavors with a dish that perfectly marries the freshness of Italian bruschetta with the wholesome comfort of pasta. Think juicy chicken, vibrant tomatoes, and fragrant basil all tossed together to create one scrumptious meal. Grab your apron, and let’s get cooking!
There are few things in life that can lift your spirits quite like a plate of pasta. It’s comforting, it’s satisfying, and when you load it up with fresh, wholesome ingredients, it transforms into something truly special. That’s precisely what we’re doing today with my Bruschetta Chicken Pasta—a recipe that’s not just delicious, but it also packs a healthy punch.
What I love about this dish is its versatility. You’ll find yourself returning to it time and again, whether it’s for a cozy weeknight dinner, a potluck, or when you want to impress your friends with your mad culinary skills! Plus, it’s super easy to make, meaning anyone, from the novice cook to the seasoned chef, can whip it up in no time.
The best part? It captures the essence of summer with fresh tomatoes and basil, making it a perfect symbol for those sun-soaked days spent with good friends and great food. So, let’s lace up our cooking shoes and get ready to create a dish that is not only mouthwateringly delicious but also all about fresh flavors. Well, my friend, I guarantee you’ll be craving this again and again!
Personal Story
Ah, the nostalgia of food! Whenever I make Bruschetta Chicken Pasta, I can’t help but think back to the unforgettable summer I spent in a quaint little village in Italy. You can almost picture it: sun-drenched streets, warm smiles, and the luscious scent of herbs wafting from every kitchen. Each evening, we’d gather at local trattorias, where rustic dishes were paired with hearty laughter and clinking glasses.
One night, we were treated to an extraordinary meal that inspired this very recipe. Plump chicken, ripe tomatoes, and fresh basil mingled together in a pasta dish that made my heart sing. I could barely put my fork down, enamored by the explosion of flavors and the simplicity that made it so special. Fast-forward a few years, and here I am, sharing my own twist on that magical dish with you!
Ingredients
Let’s gather our vibrant ingredients to make this delicious dish shine. Here’s what you’ll need:
-
2 cups cooked pasta: Any pasta shape works here! From penne to spaghetti, just make sure it’s al dente. If you’re gluten-free, opt for your favorite gluten-free pasta, or even use zucchini noodles for a lighter option.
-
1 tablespoon olive oil: This adds a depth of flavor and helps in sautéing. For a twist, consider infused olive oils like garlic or chili for an added kick!
-
2 chicken breasts, diced: The lean protein in this dish. If you’re vegetarian, substitute with chickpeas or your favorite plant-based protein!
-
2 cups fresh tomatoes, diced: Juicy, ripe tomatoes are the stars here. Heirloom, Roma, or vine-ripened all make fantastic choices. If you’re in a pinch, canned tomatoes work too—just drain them well!
-
1/4 cup fresh basil, chopped: Fresh basil embodies that summery goodness. If you can’t find fresh basil, try using a teaspoon of dried basil, though the flavor won’t be as vibrant.
-
2 cloves garlic, minced: Garlic adds a wonderful aroma and taste. You can substitute with shallots or garlic powder if needed, but fresh is always best!
-
Salt and pepper to taste: Essential for bringing all the flavors together.
-
Parmesan cheese for serving: Shredded or grated, this savory cheese perfectly complements the dish. For a dairy-free option, try nutritional yeast for a cheesy flavor without the dairy.
Step-by-Step Instructions
Now that we’ve got our ingredients sorted, let’s dive into the cooking process. Trust me, this is easier than it looks!
Step 1: Prepare the Chicken
- In a large skillet, heat that tablespoon of olive oil over medium heat.
- Add the diced chicken breasts to the skillet, seasoning them with a pinch of salt and pepper.
- Chef’s hack: Allow the chicken to sear without moving it around too much. This helps develop a lovely golden crust, adding flavor to your dish.
Step 2: Cook the Chicken Through
- Stir occasionally to ensure the chicken cooks evenly. It should take about 5-7 minutes to fully cook.
- Once cooked through (internal temperature of 165°F), transfer the chicken to a plate and cover it loosely with foil to keep it warm.
Step 3: Sauté the Garlic and Tomatoes
- In the same skillet (no need to clean it!), add the minced garlic and cook for about 30 seconds until fragrant. Gorgeous smell alert!
- Toss in the diced tomatoes and cook for about 2 minutes until they start to soften. The tomatoes will release their juices, creating a delightful sauce.
Step 4: Combine the Pasta and Chicken
- Add the cooked pasta and the sautéed chicken back into the skillet. Combine everything gently, making sure the pasta is well coated with the tomato-garlic mixture.
- Toss in the freshly chopped basil, giving it a good stir to incorporate all those beautiful flavors.
Step 5: Add the Finishing Touch
- Let everything cook together for about 1-2 minutes, allowing it to warm through and the flavors to meld.
- Taste and adjust your seasoning if needed—don’t be shy, add more salt or pepper to elevate those flavors.
Step 6: Serve and Enjoy
- Divide the pasta into bowls and top with a sprinkle of grated Parmesan cheese.
- Quick tip: Add an extra drizzle of olive oil for a restaurant-worthy finish!
Serving Suggestions
When serving this Bruschetta Chicken Pasta, consider plating it in shallow bowls for a modern touch. Garnish with an additional sprinkle of fresh basil and some freshly cracked pepper for a pop of color and flavor. Pair it with a simple side salad or crusty bread to soak up any remaining sauce. This dish is perfect for family gatherings, casual get-togethers, or a romantic dinner for two!
Recipe Variations
Want to mix things up a little? Here are some fun variations you can try:
-
Pesto Twist: Stir in a couple of tablespoons of your favorite pesto for a burst of flavor.
-
Veggie Delight: Add sautéed spinach, zucchini, or bell peppers to amp up the veggie intake.
-
Spicy Kick: Sprinkle in some red pepper flakes while cooking for a little heat.
-
Creamy Finish: Stir in a tablespoon or two of cream cheese or goat cheese for a rich, creamy texture.
-
Lemon Zing: A splash of freshly squeezed lemon juice brightens up the flavors beautifully!
Chef’s Notes
This Bruschetta Chicken Pasta has evolved over the years as I experimented with different herbs and ingredients. Originally, I made it with just tomatoes and basil, but as my love for cooking grew, I started adding chicken to make it heartier. I remember a night when I forgot to buy chicken and replaced it with garbanzo beans—talk about a culinary happy accident! That served as a delicious reminder that cooking is all about creativity and making it work with what you have.
FAQs and Troubleshooting
Here are some common questions I get about this recipe:
Q1: Can I use frozen chicken for this dish?
A1: Absolutely! Just make sure to thaw it completely before cooking. If you’re short on time, you can also use pre-cooked rotisserie chicken—just add it in during the last few minutes to warm through.
Q2: What if I can’t find fresh tomatoes?
A2: Canned tomatoes will work in a pinch! Just ensure to drain them and add them at the same stage you would fresh ones. Their concentrated flavor will still shine!
Q3: The pasta is too sticky, what went wrong?
A3: If your pasta is sticky, it might have been overcooked or not tossed with enough oil right after draining. To prevent this in the future, rinse cooked pasta with cold water to stop the cooking process.
Q4: Can I make this dish ahead of time?
A4: Yes! Cooked pasta can be stored in the fridge, and the chicken and sauce can be prepared a few hours in advance. Just combine everything right before serving and reheat gently.
Nutritional Info
This recipe is not only tasty; it’s packed with nutrients! Each serving boasts protein from the chicken, healthy fats from olive oil, and a good dose of vitamins from those fresh tomatoes and basil. Here’s a rough estimate for one serving (one-fourth of the recipe):
- Calories: 450
- Protein: 30g
- Carbohydrates: 55g
- Fat: 15g
- Fiber: 5g
And there you have it, a delicious and delightful Bruschetta Chicken Pasta that brings a taste of Italy to your kitchen. I hope you’re inspired to whip this up for your next meal—it’s a dish that celebrates both flavor and freshness, proving that healthy eating can truly be satisfying. Happy cooking, foodies!
PrintBruschetta Chicken Pasta
A delicious twist on a classic dish that combines juicy chicken, vibrant tomatoes, and fragrant basil with pasta for a wholesome meal.
- Prep Time: 15 minutes
- Cook Time: 15 minutes
- Total Time: 30 minutes
- Yield: 4 servings 1x
- Category: Main Course
- Method: Sautéing
- Cuisine: Italian
- Diet: Gluten-Free option available
Ingredients
- 2 cups cooked pasta
- 1 tablespoon olive oil
- 2 chicken breasts, diced
- 2 cups fresh tomatoes, diced
- 1/4 cup fresh basil, chopped
- 2 cloves garlic, minced
- Salt and pepper to taste
- Parmesan cheese for serving
Instructions
- Prepare the Chicken: In a large skillet, heat that tablespoon of olive oil over medium heat. Add the diced chicken breasts to the skillet, seasoning them with a pinch of salt and pepper. Allow the chicken to sear without moving it around too much.
- Cook the Chicken Through: Stir occasionally to ensure the chicken cooks evenly. It should take about 5-7 minutes to fully cook. Transfer the chicken to a plate and cover it loosely with foil to keep it warm.
- Sauté the Garlic and Tomatoes: In the same skillet, add the minced garlic and cook for about 30 seconds until fragrant. Toss in the diced tomatoes and cook for about 2 minutes until they start to soften.
- Combine the Pasta and Chicken: Add the cooked pasta and the sautéed chicken back into the skillet. Combine everything gently and toss in the freshly chopped basil.
- Add the Finishing Touch: Let everything cook together for about 1-2 minutes. Taste and adjust your seasoning if needed.
- Serve and Enjoy: Divide the pasta into bowls and top with a sprinkle of grated Parmesan cheese.
Notes
Feel free to customize this dish with your favorite vegetables or add a splash of lemon juice for extra brightness.
Nutrition
- Serving Size: 1 serving
- Calories: 450
- Sugar: 6g
- Sodium: 350mg
- Fat: 15g
- Saturated Fat: 3g
- Unsaturated Fat: 10g
- Trans Fat: 0g
- Carbohydrates: 55g
- Fiber: 5g
- Protein: 30g
- Cholesterol: 70mg
Keywords: pasta, chicken, bruschetta, Italian, healthy, easy dinner