Patriotic 4th of July Charcuterie Board in 15 Minutes
Celebrate Independence Day with a Festive 4th of July Charcuterie Board
The 4th of July isn’t just another day on the calendar—it’s a celebration of freedom, friendship, and fun! It’s that magical time of year when the sun shines bright, the skies explode with fireworks, and families gather for backyard BBQs, potlucks, and picnics. And what better way to bring people together than with a stunning, eye-catching charcuterie board that pays homage to the red, white, and blue?
Alright, friends! Today, I’m really excited to share my crowd-pleasing 4th of July Charcuterie Board that’s not only packed with vibrant flavors but also super easy to whip up. Picture this: a delightful array of cheeses, meats, fresh fruits, and veggies that offer something for everyone. And let’s not forget the added fun of shaping some of these ingredients into festive stars! So, put on your apron and get ready to impress your guests with a showstopper of a platter.
Now, let me take you down memory lane for a moment.
A Nostalgic Kitchen Memory
Growing up, the 4th of July was a big deal in my family. We would gather at my grandparents’ house every year for what felt like the ultimate family reunion. My grandma, who had a green thumb like no other, would always have her famous garden bursting with colorful veggies—those crisp cucumbers and juicy tomatoes were the stars of the show, but what I loved most were her charcuterie boards.
While my cousins were busy deciding who would take the first swing at the piñata, I found myself captivated by the way my grandma arranged the food. With a simple wooden board, she created an edible tapestry, artfully placing slices of cheese and salami next to an explosion of fresh berries. There was something magical about those platters—every bite was a tribute to summer and laughter.
Now, as an adult, I channel that same enthusiasm whenever I create a charcuterie board for my friends and family. It’s not just about the food but about the connections we make over the dining table and the memories we share. So let’s dive right in!
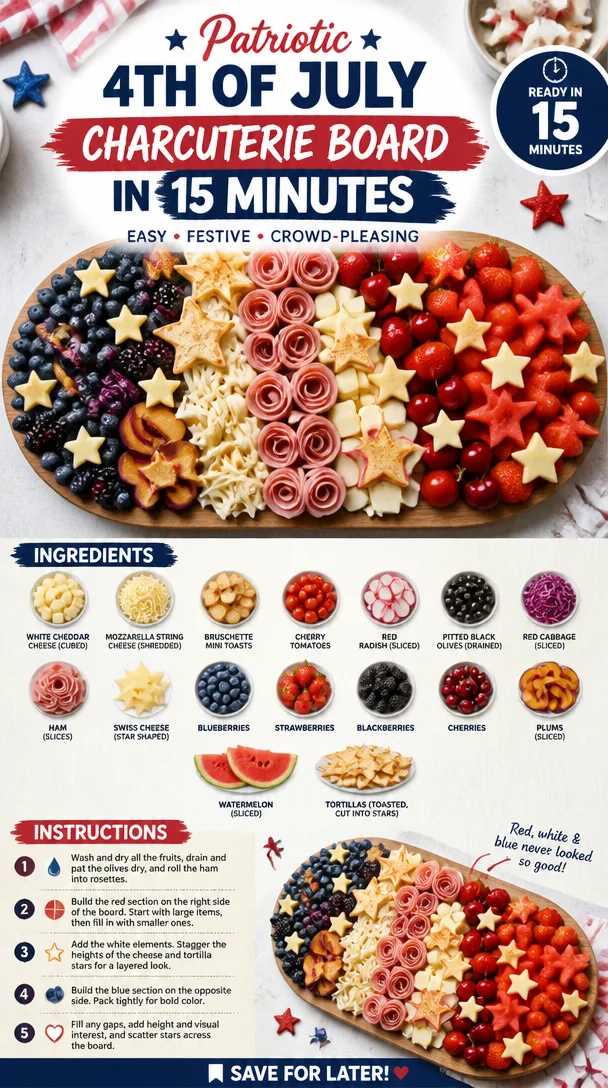
Ingredients
To bring my festive vision to life, here’s what you’ll need to create a dazzling 4th of July Charcuterie Board:
-
1 cup white cheddar cheese (cubed)
A classic favorite that’s creamy and slightly sharp. You can substitute with mild cheddar or even a pepper jack if you’re looking for a kick! -
1/2 cup mozzarella string cheese sticks (shredded)
Great for that pull-apart goodness! If you’re feeling adventurous, fresh mozzarella balls are a delightful alternative. -
1/2 cup Bruschette mini toasts
Crispy and crunchy—these are perfect for spreading toppings. If you can’t find mini toasts, try using pita chips or your favorite crackers. -
1 cup cherry tomatoes
Juicy and full of flavor. Use grape tomatoes as an alternative, or even roasted sun-dried tomatoes for a twist. -
1/2 cup red radish (sliced)
Adds a crisp texture and a little peppery zing. If you’re not a fan, consider using cucumber slices for a milder crunch. -
1/2 cup pitted black olives (drained)
A savory snack that balances the sweetness of fruits. Kalamata olives would also be fantastic in this mix. -
1/2 cup red cabbage (sliced)
Adds vibrant color and crunch. In a pinch, feel free to swap it for green cabbage or finely shredded kale. -
8 slices ham
Smoky and hearty—perfect for meat lovers. Turkey bacon or roasted vegetables work for those seeking a lighter option. -
7 Swiss cheese slices (cut into stars)
Mild and nutty, Swiss is perfect for shaping into fun emblems of celebration. Alternatively, any semi-soft cheese like Gouda will do the trick. -
1 cup blueberries
Tart and sweet—these little gems scream 4th of July! If needed, blackberries can serve as an equally delicious substitute. -
1 cup strawberries
Fresh and vibrant, they add a pop of red! Swap with raspberries if you prefer something a little different. -
1 cup blackberries
Sweet and juicy, a great contrast to the cheddar. If you’re missing these, feel free to add more blueberries instead! -
1 cup cherries
Juicy and sweet, they elevate your board to a whole new level! Pitted plums can also take their place beautifully. -
3 plums (sliced)
Perfectly sweet and a bit tangy—use any seasonal stone fruit like peaches or nectarines in their place. -
1/4 watermelon (sliced)
Refreshing and hydrating, a must-have during summer gatherings. For a different take, make a fruit salsa with pineapple or cantaloupe! -
5 tortillas (toasted, cut into stars)
A whimsical addition that adds crunch! If you want a gluten-free version, use corn tortillas instead.
Step-by-Step Instructions
Now that we’ve gathered our ingredients, let’s get started on assembling this beautiful charcuterie board! Follow these easy steps and note my chef hacks along the way:
-
Choose Your Board:
Grab your favorite serving platter or wooden board. I recommend using something spacious enough to fit all your goodies. Just imagine how stunning it will look! -
Start with the Cheese:
Begin by placing your cubed white cheddar in a cluster on one end of the board. Make sure to leave some space for meats and fruits. My tip? Vary the sizes of the cheese cubes to create visual interest! -
Add the Meat:
Next to the cheese, lay out your slices of ham. I like to fold the slices to create little "florals" or pinwheels. It adds a gourmet touch—without the effort! -
Incorporate the Veggies:
Now it’s time to sprinkle in the veggies. Scatter your sliced radishes and cherry tomatoes around the board. And don’t forget the red cabbage! You can create a small pile in the center of the board—it adds great height! -
Layer on the Fun Shapes:
Get those star-shaped Swiss cheese pieces on there! Use a small star cutter for fun shapes, and let your inner artist shine! Nestle these in between the meats and cheeses for a festive flair. -
Introduce the Crunch:
Next, strategically place the Bruschette mini toasts around the edges of the board or in a small bowl if you prefer. This gives guests a great place to scoop their delicious toppings! -
Fruity Burst of Flavor:
Now let’s get colorful! Create little clusters of blueberries, strawberries, blackberries, cherries, and sliced plums. Toss them gently so they don’t get bruised. Use their vibrant hues to balance out the board visually! -
Watermelon Wonder:
Lastly, squeeze in those watermelon slices. They provide a refreshing contrast to the other flavors, and they look absolutely stunning! If you cut them into star shapes too, you’ll really blow everyone away. -
Finishing Touches:
As a final touch, fill in any empty gaps with the olives and toasted tortillas. You want your board to be abundant and inviting!
And there you have it! An Instagram-worthy 4th of July Charcuterie Board that showcases the best of summer’s flavors.
Serving Suggestions
To serve your charcuterie board, simply place it on a large table or picnic blanket and let your guests dig in! Pair it with some festive beverages like refreshing lemonade, sparkling water, or perhaps a nice glass of rosé! Encourage everyone to mix and match flavors; there’s no wrong way to enjoy this platter. And remember—sharing is caring!
Recipe Variations
Looking to switch it up? Here are a few creative twists, flavor options, and dietary swaps for your charcuterie board:
-
Mediterranean Twist:
Swap out the mozzarella and ham for some feta cheese and prosciutto. Add some hummus for dipping, and serve alongside pita! -
Spicy Kick:
Add jalapeño-flavored cheeses or spicy salami for those who like a little heat! -
All-Vegan Version:
Replace all meats and cheeses with plant-based alternatives like cashew cheese and roasted veggies. Load up on different nuts and seeds too! -
Tropical Mix:
Incorporate tropical fruits like mango, pineapple, and kiwi—perfect for a summer fiesta! -
Dessert Board:
Swap out the savory elements with chocolate-covered pretzels, mini cupcakes, and a selection of your favorite cookies!
Chef’s Notes
Creating a themed charcuterie board is one of my favorite ways to celebrate special occasions. It’s so rewarding to watch my friends and family gather around it, creating their pairings! Over the years, I’ve learned that what’s important is to use quality ingredients you love—don’t feel pressured to stick to any strict rules.
Make it your own! Trust me; your guests will appreciate the effort, and you’ll have some fun connecting over food!
FAQs and Troubleshooting
1. Can I prepare the charcuterie board in advance?
Absolutely! You can prep all the ingredients a few hours ahead of time. Just cover the board tightly with plastic wrap to keep things fresh and vibrant.
2. What if I don’t have a large enough board?
No problem! Use multiple smaller boards or even large plates to spread everything out. A bit of creativity goes a long way!
3. How do I keep fruit from browning?
To keep things looking fresh, toss your apple slices or any fruit that browns quickly in lemon juice or a little sparkling water just before serving.
4. Can I use leftover ingredients?
Of course! This is a fantastic way to use up leftover cheese, meat, or even veggies lurking in your fridge. Don’t let good food go to waste—let your inner chef shine!
Nutritional Info
While these ingredients can vary, a typical serving of this charcuterie board includes a delightful balance of protein, healthy fats, and carbohydrates, making it not just delicious but also quite satisfying!
And there you have it—a cheerful, mouth-watering 4th of July Charcuterie Board that’s sure to become a staple at your summer gatherings! Remember, the focus here is on fun, flavor, and creating connections. Here’s to delicious food that brings us all together! Enjoy and celebrate with love, laughter, and of course, plenty of yummy bites!
Print4th of July Charcuterie Board
Celebrate Independence Day with a vibrant and delicious charcuterie board that showcases festive red, white, and blue ingredients. Perfect for summer gatherings!
- Prep Time: 30 minutes
- Cook Time: 0 minutes
- Total Time: 30 minutes
- Yield: 8 servings 1x
- Category: Appetizer
- Method: No-Cook
- Cuisine: American
- Diet: Vegetarian
Ingredients
- 1 cup white cheddar cheese (cubed)
- 1/2 cup mozzarella string cheese sticks (shredded)
- 1/2 cup Bruschette mini toasts
- 1 cup cherry tomatoes
- 1/2 cup red radish (sliced)
- 1/2 cup pitted black olives (drained)
- 1/2 cup red cabbage (sliced)
- 8 slices ham
- 7 Swiss cheese slices (cut into stars)
- 1 cup blueberries
- 1 cup strawberries
- 1 cup blackberries
- 1 cup cherries
- 3 plums (sliced)
- 1/4 watermelon (sliced)
- 5 tortillas (toasted, cut into stars)
Instructions
- Choose your board: Grab your favorite serving platter or wooden board.
- Start with the cheese: Place your cubed white cheddar in a cluster on one end of the board.
- Add the meat: Lay out your slices of ham next to the cheese.
- Incorporate the veggies: Scatter your sliced radishes and cherry tomatoes around the board.
- Layer on the fun shapes: Get those star-shaped Swiss cheese pieces on the board.
- Introduce the crunch: Place the Bruschette mini toasts around the edges.
- Fruity burst of flavor: Create clusters of blueberries, strawberries, blackberries, cherries, and sliced plums.
- Watermelon wonder: Squeeze in the watermelon slices.
- Finishing touches: Fill in any empty gaps with olives and toasted tortillas.
Notes
Prep ingredients a few hours ahead of time and cover tightly to keep fresh. Use quality ingredients you love for the best results.
Nutrition
- Serving Size: 1 serving
- Calories: 450
- Sugar: 18g
- Sodium: 700mg
- Fat: 28g
- Saturated Fat: 10g
- Unsaturated Fat: 12g
- Trans Fat: 0g
- Carbohydrates: 35g
- Fiber: 5g
- Protein: 15g
- Cholesterol: 45mg
Keywords: 4th of July, charcuterie board, summer party, appetizer, festive food
Patriotic Pretzel Rods
Patriotic Pretzel Rods: A Perfect Treat for Any Celebration!
Welcome, foodies! Today, we’re diving into a fun and festive treat that’s not only tasty but also incredibly easy to whip up. If you’re looking to add a splash of color and crunch to your next gathering, look no further than these delightful Patriotic Pretzel Rods! Whether it’s the Fourth of July, Memorial Day, or any day you want to feel that star-spangled spirit, these treats are sure to impress.
So, what makes these pretzel rods so special? First off, let’s talk about texture. You’ve got the satisfying crunch of the pretzel paired with the smooth, creamy coating of candy melts. And then there’s the color! Striking red, white, and blue hues make these treats a visual feast—perfect for snapping a quick photo before they disappear! They’re easy to make, easy to customize, and even the kiddos can join in on the fun.
But wait—let’s not get ahead of ourselves! Before we jump into the kitchen to start dipping and decorating, let me share a little story about how these delightful snacks came to be one of my go-to treats for any Americana-themed celebration.
A Sweet Memory with Patriotic Vibes
I’ll never forget the first time I made these Patriotic Pretzel Rods. It was a warm summer evening, and my family was gearing up for our annual Fourth of July barbecue. My mom was busy grilling and my dad was flipping burgers while I rummaged through our pantry. I wanted to bring something fun to the table, something that would jazz up the dessert spread. That’s when I spotted a bag of pretzel rods peeking out from behind a box of old recipes.
With a flash of inspiration and a little bit of nostalgia, I pulled out the candy melts I had left over from a birthday party last year and decided to play around. I melted the white candy melts first, dipping the pretzel rods in smoothly and letting them cool before using red and blue candy melts to create fun designs. Then came the sprinkles—a must for that adorable festive flair!
As I presented my creation to my family, I felt a wave of excitement as we all gathered around the dessert table. Those crunchy, colorful rods quickly became a hit! Everyone loved the combination of sweet and salty, and the laughter and smiles that filled the air made it a memory I cherish to this day. And ever since then, these Patriotic Pretzel Rods have become a staple at all our summer get-togethers.
Now, it’s your turn to create that same joy! Let’s get our hands a little messy and dive into making these adorable snacks. Ready? Let’s go!
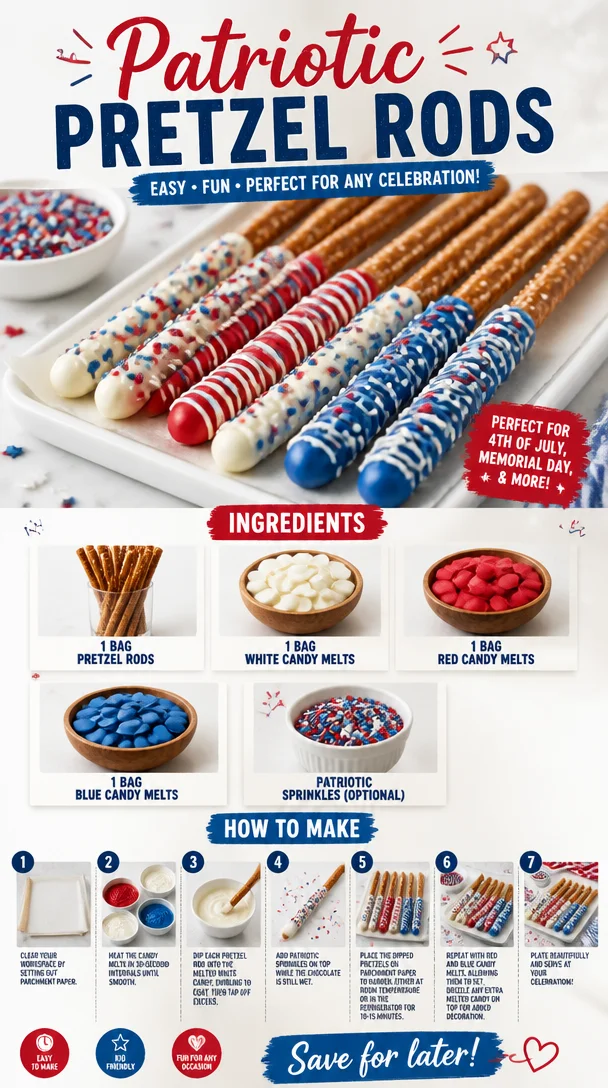
Ingredients
For this delicious and colorful treat, you’ll need just a handful of ingredients. Here’s what you’ll need:
-
1 bag pretzel rods
- These are the star of our show! Their long, crunchy shape makes them perfect for dipping and decorating. If you can’t find pretzel rods, you can use pretzel twists for a fun twist on this recipe.
-
1 bag white candy melts
- These creamy morsels serve as the base for our colorful designs. White chocolate will work in a pinch if you don’t have candy melts. Just be careful not to overheat it when melting!
-
1 bag red candy melts
- Because what’s a celebration without a little red? These sweet candies will give your pretzel rods that festive flair! You can substitute with red icing if you’re in a hurry.
-
1 bag blue candy melts
- The other half of our patriotic color trio! Again, white or dark chocolate tinted with food coloring can be a fun alternative if candy melts are hard to find.
-
Patriotic sprinkles (optional)
- These are the cherry on top—or should I say the sprinkle on the side? They add that extra pop of color and fun! Feel free to use any sprinkles you have on hand; you’re the artist here!
Step-by-Step Instructions
Alright, it’s time to work some kitchen magic! Follow these steps, and you’ll have beautiful Patriotic Pretzel Rods ready in no time.
-
Prep Your Workspace:
- Before you start dipping, I recommend laying out some parchment paper on your kitchen counter or a baking sheet. This will help the chocolate set up nicely without sticking. Get a small bowl of warm, soapy water to wash your utensils and a clean towel nearby—let’s keep things tidy!
-
Melt the Candy Melts:
- Divide your candy melts into microwavable bowls (one for each color). Heat them according to the package instructions—typically 30 seconds at a time, stirring in between until smooth. If you find your candy melts too thick, add a teaspoon of vegetable oil to thin them out. Trust me—this little hack makes all the difference!
-
Dip the Pretzel Rods:
- Take a pretzel rod and dip it into your melted white candy melts, swirling gently to fully coat the lower two-thirds. Let any excess dribble off. Trust your instincts here; you want enough coverage but don’t worry about making it perfect!
-
Let It Set:
- Place the dipped rod on your parchment paper and repeat the process for as many pretzel rods as you like. Once you’ve got a good number ready, let them cool for about 10-15 minutes, or until they’re fully set.
-
Get Colorful:
- Now for the fun part! Melt your red and blue candy melts the same way, then take your cooled white-dipped pretzel rods and dip them halfway into the red and blue melts to create a striped effect. Alternatively, you can drizzle the colored melts on top for a more artistic flair.
-
Add the Sprinkles:
- While the colored candy melts are still wet, generously sprinkle your patriotic sprinkles over the tops. This is where you can really let your creativity shine—mix and match!
-
Let Them Cool (Again!):
- Once all your pretzel rods are decorated, let them cool completely until the candy is hardened. This will only take about 20 minutes if you’re patient!
And there you have it—your completed Patriotic Pretzel Rods! The colors, the textures, the flavors…it’s a treat that’s impossible to resist!
Serving Suggestions
When it comes to serving your Patriotic Pretzel Rods, it’s all about presentation! Arrange them upright in a mason jar, or lay them side by side on a decorative platter. You can even tie a little ribbon around the jar for an extra festive touch. Grab your favorite napkins and watch as your friends and family dive right in!
Recipe Variations
Feel free to get creative with this recipe! Here are a few delightful variations to try:
- Chocolate Drizzle: Instead of using colored candy melts alone, drizzle some dark or milk chocolate over your dipped pretzel rods for an added layer of flavor.
- Nutty Inspiration: Before the candy coating sets, sprinkle chopped nuts, like almonds or peanuts, for a delightful crunch.
- Seasonal Sprinkles: Change up the sprinkles by using seasonal colors—think orange and black for Halloween or green and red for Christmas!
- Spicy Twist: Add a pinch of cayenne or chili powder to your melted white chocolate for a sweet and spicy combo—perfect for those who lean toward unique flavors.
Chef’s Notes
I’ve made these Patriotic Pretzel Rods for countless occasions, and every time they’re gobbled up in no time! One funny incident I remember was when I tried adding edible glitter to the mix and got carried away—let’s just say my kitchen was sparkling for days, but the pretzels turned into glitter bombs! Lesson learned: moderation is key. Over the years, I’ve cherished the evolution of this recipe, from my first attempts with only white chocolate to now creating vibrant hues that reflect the spirit of the occasions we celebrate. The best part? Each batch is made with love, which is the secret ingredient I always say!
FAQs and Troubleshooting
-
Why did my candy melts seize up?
- A common cooking hiccup! Candy melts can seize if they come into contact with water, so make sure your bowls and utensils are completely dry. If your melts get too thick, adding a little vegetable oil can smooth things out.
-
How do I store leftover pretzel rods?
- Store your pretzel rods in an airtight container at room temperature. They’ll stay fresh for about a week, though I’ll be surprised if they last that long!
-
Can I use chocolate instead of candy melts?
- Absolutely! Just be cautious while melting real chocolate to avoid burning it. Use a double boiler or microwave at lower power intervals.
-
The candy coating isn’t sticking well. What did I do wrong?
- This might happen if the pretzels aren’t fully cooled or if they were dipped in the melts when they were too hot. Allow them to cool completely before dipping, and make sure your melts aren’t too thick.
Nutritional Info
While these treats are meant for fun, it’s always good to be mindful of portion sizes! Each pretzel rod, once coated and topped, contains roughly 100 calories (depending on how much candy you use for the coating), along with carbohydrates and sugars. Enjoy in moderation and make them a special treat for your celebrations!
So there you have it, friends—your complete guide to making delicious, colorful, and fun Patriotic Pretzel Rods! I hope you feel inspired to get creative in your kitchen and whip up a batch for your next celebration. Remember, it’s all about joy and connection, and what better way to celebrate than with these delightful treats? Happy cooking!
PrintPatriotic Pretzel Rods
These delightful Patriotic Pretzel Rods are a fun and colorful treat perfect for any celebration, combining the satisfying crunch of pretzels with a creamy candy melt coating.
- Prep Time: 15 minutes
- Cook Time: 30 minutes
- Total Time: 45 minutes
- Yield: 12 pretzel rods 1x
- Category: Dessert
- Method: Dipping
- Cuisine: American
- Diet: Vegetarian
Ingredients
- 1 bag pretzel rods
- 1 bag white candy melts
- 1 bag red candy melts
- 1 bag blue candy melts
- Patriotic sprinkles (optional)
Instructions
- Prep your workspace: Lay out parchment paper and have a bowl of warm, soapy water ready.
- Melt the candy melts: Divide candy melts into bowls and heat according to package instructions.
- Dip the pretzel rods: Dip each rod in white candy melts, covering the lower two-thirds.
- Let it set: Place dipped rods on parchment paper and let cool for about 10-15 minutes.
- Get colorful: Dip the white-dipped rods into red and blue melts to create stripes, or drizzle the melts on top.
- Add the sprinkles: While melts are wet, sprinkle on your patriotic sprinkles.
- Let them cool completely for about 20 minutes until hardened.
Notes
Store leftover pretzel rods in an airtight container at room temperature for about a week. Try adding nuts or chocolate drizzle for variation.
Nutrition
- Serving Size: 1 pretzel rod
- Calories: 100
- Sugar: 10g
- Sodium: 200mg
- Fat: 5g
- Saturated Fat: 3g
- Unsaturated Fat: 2g
- Trans Fat: 0g
- Carbohydrates: 15g
- Fiber: 0g
- Protein: 1g
- Cholesterol: 0mg
Keywords: Patriotic, Pretzel Rods, Celebration, Dessert, Easy Recipe