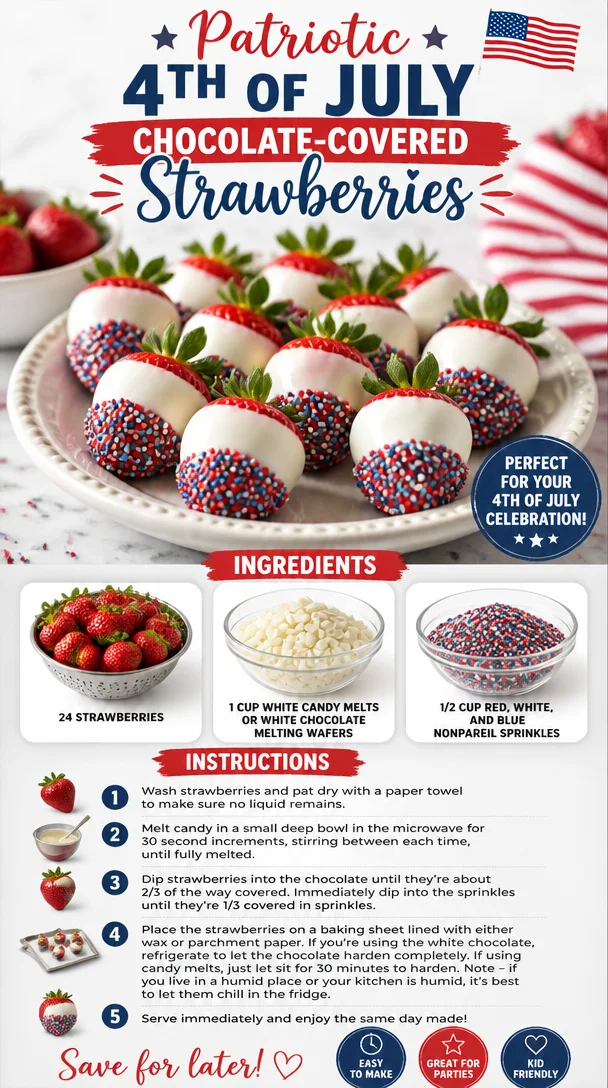
Patriotic 4th of July Chocolate-Covered Strawberries
Celebrate Independence Day with Festive Chocolate Covered Strawberries
When it comes to 4th of July festivities, nothing screams summer quite like a table laden with vibrant fruits and colorful treats. This year, I’m taking the celebration to the next level with a simple, yet stunning dessert: chocolate-covered strawberries! These berries are not only a delightful treat but they also embody the spirit of independence with their red, white, and blue decor—perfect for your summer gatherings or backyard barbecues.
What makes these chocolate-covered strawberries truly special isn’t just their picture-perfect presentation; it’s the fun that comes with making them. I have fond memories of preparing festive desserts with my family as a kid. I remember my mom melting chocolate in a double boiler while we’d eagerly await our turn to dip the strawberries in that luscious goodness. The kitchen would be filled with laughter and sweet scents, while our creativity flowed as we decorated them—tossing sprinkles like confetti. Those joyous moments are what inspired this recipe. They perfectly encapsulate the flavors of summer, as well as the spirit of togetherness. So let’s dive into this simple, healthy treat that will elevate your holiday gathering.
Here’s the beauty of chocolate-covered strawberries: they’re incredibly versatile and can be tailored to fit any celebration, but when they sport the colors of our flag? Pure magic! Your guests will love them, and you’ll love how easy they are to whip up. So, roll up your sleeves, and let’s savor the spirit of summer with these gorgeous, sweet bites!
Ingredients
To create the most delectable 4th of July chocolate-covered strawberries, you’ll need the following ingredients:
-
24 strawberries
Fresh strawberries are a must! Look for ones that are bright red, plump, and free of blemishes. If strawberries aren’t in season, you can substitute with other berries like blueberries or raspberries for their vibrant colors. Just remember that the dipping process may vary slightly based on the berry you use. -
1 cup white candy melts or white chocolate melting wafers
These sweet, creamy melts make for an easy and tasty coating. White chocolate can be a little finicky, so the melting wafers tend to provide a smoother finish that’s easier to work with. If you’re feeling extra adventurous, you can substitute with milk chocolate or dark chocolate for a twist on flavor. -
1/2 cup red, white, and blue nonpareil sprinkles
Sprinkles add that festive touch we all adore! Feel free to switch things up with any colored sprinkles, or even coconut flakes for a tropical vibe. Just keep in mind that coconut flakes won’t have the same colorful effect but will definitely bring some texture.
Step-by-Step Instructions
Ready to create some mouthwatering treats? Let’s get started! Here’s a step-by-step guide to making your chocolate-covered strawberries:
-
Prep Your Strawberries
Start by rinsing your strawberries gently under cold water. Pat them dry with a paper towel, making sure they’re completely dry before dipping. One little chef hack—avoid dipping wet strawberries in chocolate as it can lead to clumping and uneven coating. A dry berry means smooth chocolate bliss! -
Melt the Candy Melts
In a microwave-safe bowl, pour in your white candy melts or chocolate wafers. Heat in the microwave for 30 seconds at a time, stirring after each interval until smooth and completely melted. It’s crucial to keep an eye on your mixture—burnt chocolate is a no-go! If you’re using a double boiler, place the chocolate over simmering water and stir until melted. If it starts to seize, add a teaspoon of coconut oil or shortening to regain that silky texture. -
Dip the Strawberries
Hold a strawberry by its leafy green top and dip it into the melted chocolate, swirling gently to coat it evenly. Let the excess chocolate drip back into the bowl. It’s all about that perfect coating! If you find the chocolate thickening while you dip, just reheat it for a few seconds. -
Add the Sprinkles
Now comes the fun part! Before the chocolate sets, sprinkle your red, white, and blue nonpareils over the chocolate-covered strawberries. This is where you can really let your creativity shine. Don’t be shy! The more sprinkles, the better. You could even set up an assembly line and have your friends or kids help out. -
Let Them Set
Place your decorated strawberries on a baking sheet lined with parchment paper. Once all the strawberries are dipped and sprinkled, pop them into the fridge for about 30 minutes. This will help the chocolate firm up nicely, resulting in that satisfying crunch when you bite in.
Serving Suggestions
These chocolate-covered strawberries are not just delicious; they’re a visual delight too! When it’s time to serve, arrange them artfully on a platter or cake stand. You can even line them up in a flag pattern for that extra festive touch. For added elegance, you could drape a few mint leaves around the strawberries for a pop of green. Trust me, your guests will be snapping pictures before digging in!
Recipe Variations
Looking to add your unique twist? Here are a few variations to consider:
-
Chocolate Drizzle: After setting, melt some dark or milk chocolate and drizzle it over the white chocolate-covered strawberries for an elegant touch.
-
Nutty Delight: After dipping in chocolate, roll the strawberries in crushed nuts or shredded coconut for extra texture and flavor.
-
Flavor Explosion: Mix a few drops of mint or almond extract into your melted chocolate for a different flavor profile that will wow your guests.
-
Caramel Surprise: Before dipping in chocolate, drizzle melted caramel over the strawberries to offer a sweet surprise.
-
Fruit Medley: Experiment with other fruits like pretzel rods or bananas! Dip them in chocolate and decorate them in the same festive way.
Chef’s Notes
Over the years, my journey with chocolate-covered strawberries has evolved—from the clumsy, chocolate-smeared hands of childhood to being a weekend favorite at summer parties. I once had a mishap where I completely overlooked a berry’s wetness and ended up with a chocolate blob instead of that glossy finish I wanted. Instead of feeling defeated, we turned it into a game—how messy could we get while making desserts? That’s the joy of cooking: it’s full of surprises and laughter.
These strawberries represent more than just a treat. They symbolize good times, sharing, and delicious adventures in the kitchen with family and friends. So even if they don’t turn out picture-perfect, remember: it’s all about the fun you have along the way!
FAQs and Troubleshooting
-
What if my chocolate thickens or seizes?
This often happens when it overheats. If it thickens, try stirring in a little coconut oil or shortening to smooth it out. For seized chocolate, you can sometimes salvage it with a bit of cream, adding it slowly until you restore that melt-in-your-mouth texture. -
Can I use frozen strawberries?
It’s best to use fresh strawberries for this particular recipe, as frozen strawberries can release water and lead to a messy dipping situation. If you only have frozen on hand, thaw them thoroughly and dry them before dipping. -
How can I store leftover chocolate-covered strawberries?
Store them in an airtight container in the refrigerator for up to 2 days. Keep them in a single layer if possible; layering can lead to squished chocolate on the bottoms. If you notice any condensation, it might be best to let them sit at room temperature for a little while before serving. -
What if I can’t find the right sprinkles?
No worries! You can create your colorful mix using any sprinkles you have—just think outside the box. Crushed candies, colored sugar, or even edible glitter can work wonders!
Nutritional Info
While dessert isn’t usually a focus on nutrition, it’s good to know something like chocolate-covered strawberries has its advantages. Strawberries are rich in vitamins, especially Vitamin C, and antioxidants, and they’re low in calories. Keep in mind that the chocolate and sprinkles will add some sweetness and calories, so enjoy them in moderation!
So there you have it—a delicious recipe for chocolate-covered strawberries that will make your 4th of July celebration even more memorable! With minimal effort, you can impress your friends and family with this stunning dessert that captures the spirit of summer. Happy eating, and may your holiday be filled with laughter and joy!
PrintFestive Chocolate Covered Strawberries
Celebrate Independence Day with these vibrant and delicious chocolate-covered strawberries, perfect for summer gatherings.
- Prep Time: 15 minutes
- Cook Time: 10 minutes
- Total Time: 25 minutes
- Yield: 4 servings 1x
- Category: Dessert
- Method: No-Cook
- Cuisine: American
- Diet: Vegetarian
Ingredients
- 24 strawberries
- 1 cup white candy melts or white chocolate melting wafers
- 1/2 cup red, white, and blue nonpareil sprinkles
Instructions
- Prep your strawberries by rinsing gently under cold water and patting dry.
- Melt the candy melts in a microwave-safe bowl, heating in 30-second intervals, stirring until smooth.
- Dip the strawberries into the melted chocolate, holding by the leafy green tops.
- Add the sprinkles over the chocolate-covered strawberries before the chocolate sets.
- Let them set on a lined baking sheet in the fridge for about 30 minutes.
Notes
Experiment with different types of chocolate and toppings, such as crushed nuts or flavored extracts.
Nutrition
- Serving Size: 1 serving
- Calories: 150
- Sugar: 20g
- Sodium: 30mg
- Fat: 7g
- Saturated Fat: 4g
- Unsaturated Fat: 2g
- Trans Fat: 0g
- Carbohydrates: 20g
- Fiber: 2g
- Protein: 1g
- Cholesterol: 0mg
Keywords: chocolate-covered strawberries, festive dessert, 4th of July, summer treats, easy dessert
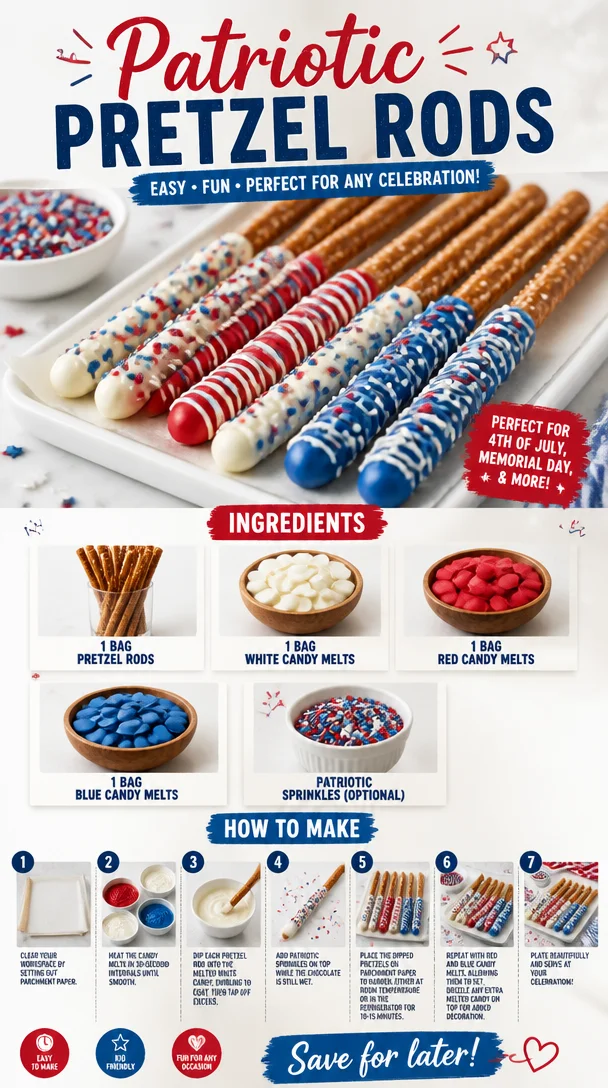
Patriotic Pretzel Rods
Patriotic Pretzel Rods: A Perfect Treat for Any Celebration!
Welcome, foodies! Today, we’re diving into a fun and festive treat that’s not only tasty but also incredibly easy to whip up. If you’re looking to add a splash of color and crunch to your next gathering, look no further than these delightful Patriotic Pretzel Rods! Whether it’s the Fourth of July, Memorial Day, or any day you want to feel that star-spangled spirit, these treats are sure to impress.
So, what makes these pretzel rods so special? First off, let’s talk about texture. You’ve got the satisfying crunch of the pretzel paired with the smooth, creamy coating of candy melts. And then there’s the color! Striking red, white, and blue hues make these treats a visual feast—perfect for snapping a quick photo before they disappear! They’re easy to make, easy to customize, and even the kiddos can join in on the fun.
But wait—let’s not get ahead of ourselves! Before we jump into the kitchen to start dipping and decorating, let me share a little story about how these delightful snacks came to be one of my go-to treats for any Americana-themed celebration.
A Sweet Memory with Patriotic Vibes
I’ll never forget the first time I made these Patriotic Pretzel Rods. It was a warm summer evening, and my family was gearing up for our annual Fourth of July barbecue. My mom was busy grilling and my dad was flipping burgers while I rummaged through our pantry. I wanted to bring something fun to the table, something that would jazz up the dessert spread. That’s when I spotted a bag of pretzel rods peeking out from behind a box of old recipes.
With a flash of inspiration and a little bit of nostalgia, I pulled out the candy melts I had left over from a birthday party last year and decided to play around. I melted the white candy melts first, dipping the pretzel rods in smoothly and letting them cool before using red and blue candy melts to create fun designs. Then came the sprinkles—a must for that adorable festive flair!
As I presented my creation to my family, I felt a wave of excitement as we all gathered around the dessert table. Those crunchy, colorful rods quickly became a hit! Everyone loved the combination of sweet and salty, and the laughter and smiles that filled the air made it a memory I cherish to this day. And ever since then, these Patriotic Pretzel Rods have become a staple at all our summer get-togethers.
Now, it’s your turn to create that same joy! Let’s get our hands a little messy and dive into making these adorable snacks. Ready? Let’s go!
Ingredients
For this delicious and colorful treat, you’ll need just a handful of ingredients. Here’s what you’ll need:
-
1 bag pretzel rods
- These are the star of our show! Their long, crunchy shape makes them perfect for dipping and decorating. If you can’t find pretzel rods, you can use pretzel twists for a fun twist on this recipe.
-
1 bag white candy melts
- These creamy morsels serve as the base for our colorful designs. White chocolate will work in a pinch if you don’t have candy melts. Just be careful not to overheat it when melting!
-
1 bag red candy melts
- Because what’s a celebration without a little red? These sweet candies will give your pretzel rods that festive flair! You can substitute with red icing if you’re in a hurry.
-
1 bag blue candy melts
- The other half of our patriotic color trio! Again, white or dark chocolate tinted with food coloring can be a fun alternative if candy melts are hard to find.
-
Patriotic sprinkles (optional)
- These are the cherry on top—or should I say the sprinkle on the side? They add that extra pop of color and fun! Feel free to use any sprinkles you have on hand; you’re the artist here!
Step-by-Step Instructions
Alright, it’s time to work some kitchen magic! Follow these steps, and you’ll have beautiful Patriotic Pretzel Rods ready in no time.
-
Prep Your Workspace:
- Before you start dipping, I recommend laying out some parchment paper on your kitchen counter or a baking sheet. This will help the chocolate set up nicely without sticking. Get a small bowl of warm, soapy water to wash your utensils and a clean towel nearby—let’s keep things tidy!
-
Melt the Candy Melts:
- Divide your candy melts into microwavable bowls (one for each color). Heat them according to the package instructions—typically 30 seconds at a time, stirring in between until smooth. If you find your candy melts too thick, add a teaspoon of vegetable oil to thin them out. Trust me—this little hack makes all the difference!
-
Dip the Pretzel Rods:
- Take a pretzel rod and dip it into your melted white candy melts, swirling gently to fully coat the lower two-thirds. Let any excess dribble off. Trust your instincts here; you want enough coverage but don’t worry about making it perfect!
-
Let It Set:
- Place the dipped rod on your parchment paper and repeat the process for as many pretzel rods as you like. Once you’ve got a good number ready, let them cool for about 10-15 minutes, or until they’re fully set.
-
Get Colorful:
- Now for the fun part! Melt your red and blue candy melts the same way, then take your cooled white-dipped pretzel rods and dip them halfway into the red and blue melts to create a striped effect. Alternatively, you can drizzle the colored melts on top for a more artistic flair.
-
Add the Sprinkles:
- While the colored candy melts are still wet, generously sprinkle your patriotic sprinkles over the tops. This is where you can really let your creativity shine—mix and match!
-
Let Them Cool (Again!):
- Once all your pretzel rods are decorated, let them cool completely until the candy is hardened. This will only take about 20 minutes if you’re patient!
And there you have it—your completed Patriotic Pretzel Rods! The colors, the textures, the flavors…it’s a treat that’s impossible to resist!
Serving Suggestions
When it comes to serving your Patriotic Pretzel Rods, it’s all about presentation! Arrange them upright in a mason jar, or lay them side by side on a decorative platter. You can even tie a little ribbon around the jar for an extra festive touch. Grab your favorite napkins and watch as your friends and family dive right in!
Recipe Variations
Feel free to get creative with this recipe! Here are a few delightful variations to try:
- Chocolate Drizzle: Instead of using colored candy melts alone, drizzle some dark or milk chocolate over your dipped pretzel rods for an added layer of flavor.
- Nutty Inspiration: Before the candy coating sets, sprinkle chopped nuts, like almonds or peanuts, for a delightful crunch.
- Seasonal Sprinkles: Change up the sprinkles by using seasonal colors—think orange and black for Halloween or green and red for Christmas!
- Spicy Twist: Add a pinch of cayenne or chili powder to your melted white chocolate for a sweet and spicy combo—perfect for those who lean toward unique flavors.
Chef’s Notes
I’ve made these Patriotic Pretzel Rods for countless occasions, and every time they’re gobbled up in no time! One funny incident I remember was when I tried adding edible glitter to the mix and got carried away—let’s just say my kitchen was sparkling for days, but the pretzels turned into glitter bombs! Lesson learned: moderation is key. Over the years, I’ve cherished the evolution of this recipe, from my first attempts with only white chocolate to now creating vibrant hues that reflect the spirit of the occasions we celebrate. The best part? Each batch is made with love, which is the secret ingredient I always say!
FAQs and Troubleshooting
-
Why did my candy melts seize up?
- A common cooking hiccup! Candy melts can seize if they come into contact with water, so make sure your bowls and utensils are completely dry. If your melts get too thick, adding a little vegetable oil can smooth things out.
-
How do I store leftover pretzel rods?
- Store your pretzel rods in an airtight container at room temperature. They’ll stay fresh for about a week, though I’ll be surprised if they last that long!
-
Can I use chocolate instead of candy melts?
- Absolutely! Just be cautious while melting real chocolate to avoid burning it. Use a double boiler or microwave at lower power intervals.
-
The candy coating isn’t sticking well. What did I do wrong?
- This might happen if the pretzels aren’t fully cooled or if they were dipped in the melts when they were too hot. Allow them to cool completely before dipping, and make sure your melts aren’t too thick.
Nutritional Info
While these treats are meant for fun, it’s always good to be mindful of portion sizes! Each pretzel rod, once coated and topped, contains roughly 100 calories (depending on how much candy you use for the coating), along with carbohydrates and sugars. Enjoy in moderation and make them a special treat for your celebrations!
So there you have it, friends—your complete guide to making delicious, colorful, and fun Patriotic Pretzel Rods! I hope you feel inspired to get creative in your kitchen and whip up a batch for your next celebration. Remember, it’s all about joy and connection, and what better way to celebrate than with these delightful treats? Happy cooking!
PrintPatriotic Pretzel Rods
These delightful Patriotic Pretzel Rods are a fun and colorful treat perfect for any celebration, combining the satisfying crunch of pretzels with a creamy candy melt coating.
- Prep Time: 15 minutes
- Cook Time: 30 minutes
- Total Time: 45 minutes
- Yield: 12 pretzel rods 1x
- Category: Dessert
- Method: Dipping
- Cuisine: American
- Diet: Vegetarian
Ingredients
- 1 bag pretzel rods
- 1 bag white candy melts
- 1 bag red candy melts
- 1 bag blue candy melts
- Patriotic sprinkles (optional)
Instructions
- Prep your workspace: Lay out parchment paper and have a bowl of warm, soapy water ready.
- Melt the candy melts: Divide candy melts into bowls and heat according to package instructions.
- Dip the pretzel rods: Dip each rod in white candy melts, covering the lower two-thirds.
- Let it set: Place dipped rods on parchment paper and let cool for about 10-15 minutes.
- Get colorful: Dip the white-dipped rods into red and blue melts to create stripes, or drizzle the melts on top.
- Add the sprinkles: While melts are wet, sprinkle on your patriotic sprinkles.
- Let them cool completely for about 20 minutes until hardened.
Notes
Store leftover pretzel rods in an airtight container at room temperature for about a week. Try adding nuts or chocolate drizzle for variation.
Nutrition
- Serving Size: 1 pretzel rod
- Calories: 100
- Sugar: 10g
- Sodium: 200mg
- Fat: 5g
- Saturated Fat: 3g
- Unsaturated Fat: 2g
- Trans Fat: 0g
- Carbohydrates: 15g
- Fiber: 0g
- Protein: 1g
- Cholesterol: 0mg
Keywords: Patriotic, Pretzel Rods, Celebration, Dessert, Easy Recipe
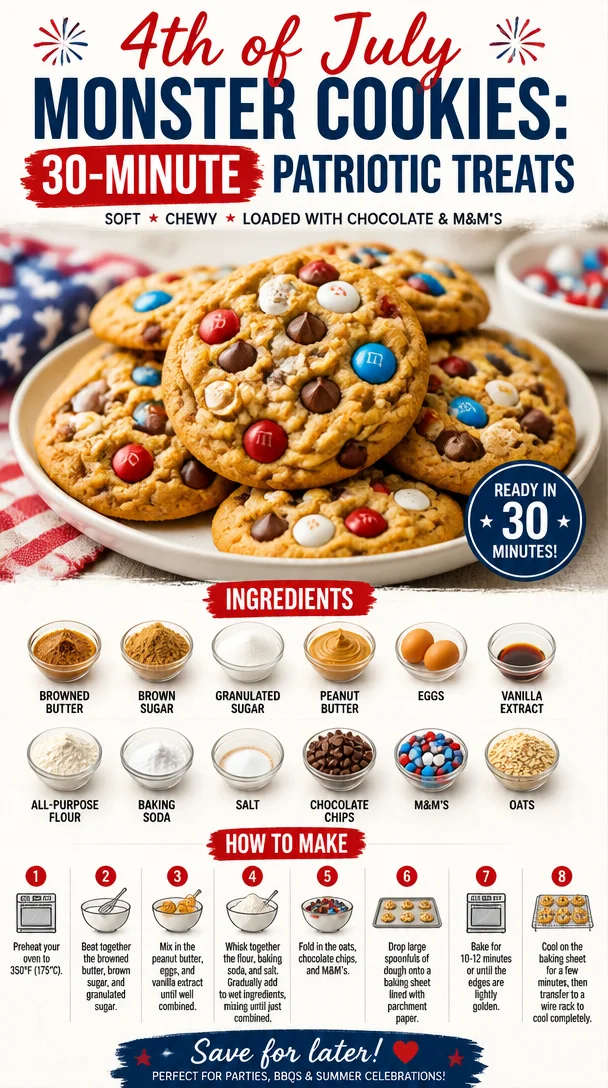
4th of July Monster Cookies: 30-Minute Patriotic Treats
4th of July Monster Cookies: A Sweet Celebration!
Happy 4th of July! It’s that time of year again when we gather with friends and family, fire up the grill, and celebrate our freedom under a sky filled with fireworks. While the hot dogs and burgers might be at the forefront of your July 4th menu, what about dessert? You can’t go wrong with a cookie that packs a punch, not just in flavor but in joy! Today, I’m thrilled to share my recipe for 4th of July Monster Cookies—the perfect sweet treat for your summer festivities.
These cookies are a delightful blend of gooey chocolate chips, vibrant M&M’s, and a hint of nostalgia that will bring you back to childhood days of baking with your parents or grandparents. With each bite, you’ll experience not only the flavors but also the chuckles and sweet memories of past celebrations. They’re easy to make, fun to eat, and visually striking—everything you need for a festive gathering.
Picture this: You and your loved ones lounging outside, the sun setting, laughter ringing through the air, and the aroma of freshly baked cookies wafting from the kitchen. Nothing beats that, right? So, roll up those sleeves, and let’s whip up a batch of these deliciously colorful Monster Cookies that will brighten your holiday and leave everyone asking for seconds.
A Whimsical Cookie Memory
When I think of cookies from my childhood, I am instantly transported to my grandma’s kitchen. Her small, cozy space was filled with the sweet aroma of baked goods, and her kitchen became a haven for creativity. One summer afternoon, I remember her introducing me to the magical world of cookies. Armed with a colorful bowl of sprinkles and a variety of tasty ingredients, we created a cookie explosion that looked like a party itself!
It was on that day—while I illegally snuck handfuls of chocolate chips and M&Ms—that the idea of Monster Cookies was born. Inspired by that spirit of joy, laughter, and indulgence, I developed this recipe that encapsulates all those feelings in one bite. Every time I take a warm cookie out of the oven, I’m flooded with memories of summer fun spent baking and enjoying the company of loved ones. And today, I want to pass that magic along to you!
Ingredients You’ll Need
Here’s what you’ll need to make these hearty, delightful Monster Cookies:
-
1 cup browned butter
- Browning the butter gives a nutty flavor that elevates these cookies. You can substitute with regular unsalted butter, but don’t miss out on that toasty goodness if you can help it!
-
1 cup brown sugar
- This helps create a chewy texture. You can replace it with coconut sugar for a lighter option, but the flavor will vary slightly.
-
1/2 cup granulated sugar
- Adds sweetness and contributes to the crunchy exterior. If you’re looking to cut down on sugar, feel free to reduce the amount but it might affect that crispy edge!
-
1 cup peanut butter
- Creamy or crunchy, it adds richness and flavor. Almond or sun butter can be used for a different taste.
-
2 large eggs
- They bind everything together and provide moisture. You can swap these with a flaxseed mixture if you want to go egg-free.
-
2 teaspoons vanilla extract
- This adds a warm, comforting aroma. Always opt for pure vanilla extract if possible for an authentic flavor.
-
3 cups all-purpose flour
- This forms the base of your cookies. Whole wheat flour can be used for a healthier twist but may affect the consistency a bit.
-
1 teaspoon baking soda
- A crucial ingredient for that pillowy texture. Make sure it’s fresh to achieve the best rise.
-
1/2 teaspoon salt
- Just a pinch balances all the sweetness. Feel free to use sea salt for extra flavor!
-
1 cup chocolate chips
- Semi-sweet or dark, they add a melty chocolatey goodness. Swap with white chocolate or butterscotch chips for a fun variation.
-
1 cup M&Ms
- These colorful candies bring the festive spirit for the 4th of July! To make them healthier, you can use dark chocolate or yogurt-covered variants.
-
1/2 cup oats
- Oats provide texture and a bit of heartiness. You can use quick oats or rolled oats, depending on what you have on hand.
Step-by-Step Instructions
Now let’s roll up our sleeves and get started! Follow these steps to create your own Monster Cookies.
-
Brown the Butter:
- In a saucepan over medium heat, melt the butter. Stir it frequently until it turns golden brown and you can smell that delicious nutty aroma. This will take about 5-7 minutes. Once browned, remove it from the heat and allow it to cool slightly. A little tip: don’t walk away from the stove, or your butter may burn!
-
Mix the Sugars:
- In a large mixing bowl, combine the browned butter, brown sugar, and granulated sugar. Use a mixer or a whisk and blend until it’s well combined and creamy. The mix should be a pale tan color; this is a good sign!
-
Add Peanut Butter & Eggs:
- Stir in the peanut butter until smooth, then add the eggs one at a time. Incorporate the vanilla extract until everything is mixed uniformly. A tip for easier mixing: make sure the peanut butter is at room temperature; it will blend in more easily.
-
Dry Ingredients:
- In a separate bowl, whisk together the flour, baking soda, and salt. Gradually add this mixture to your wet ingredients. Mix until just combined—over-mixing can lead to tough cookies, and we want them soft and chewy!
-
Add the Goodies:
- Fold in the chocolate chips, M&Ms, and oats gently. I love using a spatula for this step because it makes sure everything is evenly distributed without over-mixing. Trust me; every bite should have a bit of everything!
-
Chill the Dough:
- This step is optional but highly recommended! Place your dough in the fridge for at least 30 minutes. This helps the flavors meld together and results in thicker cookies.
-
Preheat the Oven:
- Preheat your oven to 350°F (175°C). Line a baking sheet with parchment paper—this will prevent sticking and make clean-up a breeze.
-
Scoop & Bake:
- Use a large cookie scoop (or a tablespoon) to portion out the dough onto the prepared baking sheet. Leave space between them as they will spread slightly. Bake for 10-12 minutes or until the edges are golden brown but the centers are still soft.
-
Cool & Enjoy:
- Remove from the oven, and let them cool for a few minutes on the baking sheet before transferring them to a wire rack. This allows them to firm up a bit, and you’ll get that perfect texture!
Serving Suggestions
When it comes to serving these Monster Cookies, let your creativity shine! You can stack them high on a decorative platter and place them front and center at your BBQ or picnic. Add in some fresh berries for a pop of color and a little freshness. You can also wrap them in clear cellophane for beautiful party favors that everyone will cherish. Pro tip: Serve them warm with a scoop of vanilla ice cream on top for the ultimate indulgence—think ice cream sandwich meets cookie heaven!
Recipe Variations
Get creative with these Monster Cookies! Here are some fun options:
- Nut Variations: Swap the peanut butter for almond or cashew butter for a unique twist.
- Flavor Additions: Add in some cinnamon or nutmeg for a warm, spiced flavor that contrasts beautifully with the chocolate.
- Dairy-Free Delight: Use dairy-free chocolate chips and nut butter for a tasty vegan option.
- Fruit Zests: Mix in some dried cranberries or chopped nuts to provide a different texture and flavor.
Chef’s Notes
Since I started baking Monster Cookies, they’ve evolved from simply being for the 4th of July to a year-round favorite at parties, picnics, and family gatherings. I’ve played with different flavor profiles, and each time I whip up a batch, it churns out new memories and laughter around the kitchen. Just the other day, my niece took it upon herself to add sprinkles to the cookie dough, turning these cookies into a rainbow celebration! It’s a reminder that baking is not just about the end product but also about the joy and memories we create along the way.
FAQs and Troubleshooting
Why are my cookies flat?
If your cookies spread too much, consider chilling your dough a bit longer or checking that the butter wasn’t too hot when combined with sugars.
Can I freeze these cookies?
Absolutely! You can freeze the cookies after baking. Make sure they’re completely cooled, then place them in an airtight container. They’ll last for up to three months.
How do I know when my cookies are done?
Look for a slightly golden edge but a soft center. Remember, they’ll continue to bake as they cool!
My dough seems too dry. What should I do?
If you find your dough is too dry, add a splash of milk or another egg to bring it together.
Nutritional Info
If you’re watching your calories, keep in mind that these cookies are rich and loaded with goodness! Each cookie (based on the recipe yielding about 24 cookies) contains roughly:
- Calories: 210
- Fat: 10g
- Carbohydrates: 30g
- Protein: 4g
Remember, these are indulgent treats meant to be enjoyed, so savor every bite!
Final Thoughts
I hope you’re as excited as I am to whip up a batch of these 4th of July Monster Cookies and create lasting memories with your loved ones. Baking is a beautiful way to share joy, and there’s nothing quite like that first bite of a warm, gooey cookie fresh from the oven. Whether you’re dressing them up for the holiday or enjoying them any old day, these cookies are sure to please. Happy baking, and remember, every day is worth celebrating—so let’s keep it fresh, simple, and seriously delicious!
Print4th of July Monster Cookies
Delightful cookies packed with chocolate chips and M&Ms, perfect for summer celebrations.
- Prep Time: 15 minutes
- Cook Time: 12 minutes
- Total Time: 45 minutes
- Yield: 24 cookies 1x
- Category: Dessert
- Method: Baking
- Cuisine: American
- Diet: Vegetarian
Ingredients
- 1 cup browned butter
- 1 cup brown sugar
- 1/2 cup granulated sugar
- 1 cup peanut butter
- 2 large eggs
- 2 teaspoons vanilla extract
- 3 cups all-purpose flour
- 1 teaspoon baking soda
- 1/2 teaspoon salt
- 1 cup chocolate chips
- 1 cup M&Ms
- 1/2 cup oats
Instructions
- Brown the butter: In a saucepan over medium heat, melt the butter. Stir it frequently until it turns golden brown and you can smell that delicious nutty aroma. This will take about 5-7 minutes. Once browned, remove it from the heat and allow it to cool slightly.
- Mix the sugars: In a large mixing bowl, combine the browned butter, brown sugar, and granulated sugar. Use a mixer or a whisk and blend until it’s well combined and creamy.
- Add peanut butter & eggs: Stir in the peanut butter until smooth, then add the eggs one at a time. Incorporate the vanilla extract until everything is mixed uniformly.
- Mix dry ingredients: In a separate bowl, whisk together the flour, baking soda, and salt. Gradually add this mixture to your wet ingredients. Mix until just combined.
- Add the goodies: Fold in the chocolate chips, M&Ms, and oats gently.
- Chill the dough: Place your dough in the fridge for at least 30 minutes.
- Preheat the oven: Preheat your oven to 350°F (175°C). Line a baking sheet with parchment paper.
- Scoop & bake: Use a large cookie scoop (or a tablespoon) to portion out the dough onto the prepared baking sheet. Bake for 10-12 minutes or until the edges are golden brown.
- Cool: Remove from the oven, and let them cool for a few minutes on the baking sheet before transferring them to a wire rack.
Notes
Serve with ice cream for an indulgent treat!
Nutrition
- Serving Size: 1 cookie
- Calories: 210
- Sugar: 14g
- Sodium: 150mg
- Fat: 10g
- Saturated Fat: 4g
- Unsaturated Fat: 6g
- Trans Fat: 0g
- Carbohydrates: 30g
- Fiber: 1g
- Protein: 4g
- Cholesterol: 30mg
Keywords: Monster Cookies, 4th of July, Cookies, Dessert, Summer Treat