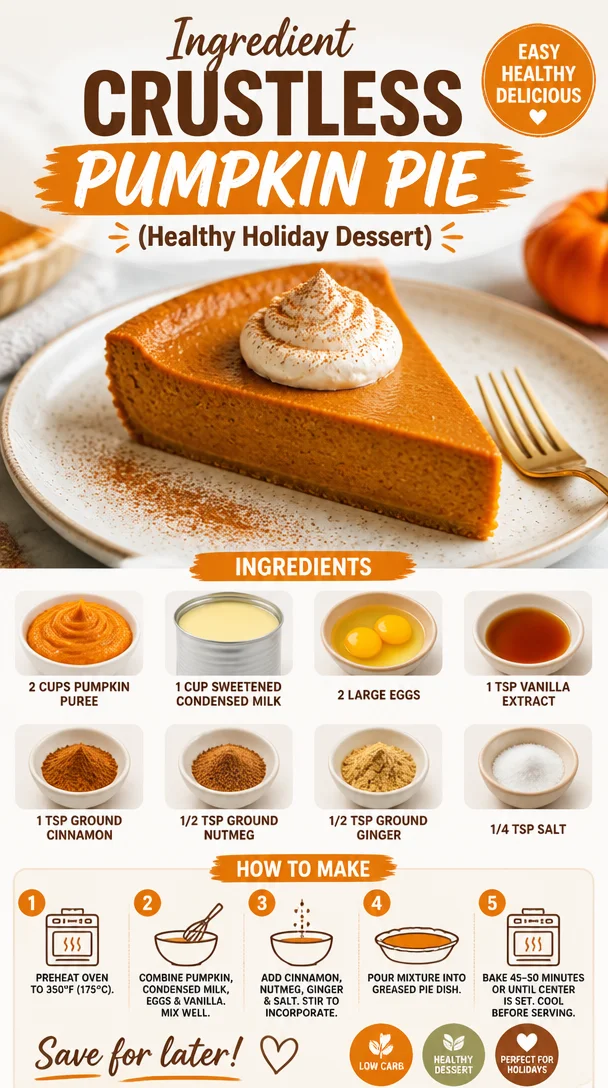
Ingredient Crustless Pumpkin Pie (Healthy Holiday Dessert)
Crustless Pumpkin Pie: A Cozy Slice of Autumn
Ah, the cozy embrace of autumn! There’s nothing quite like the crisp air, vibrant leaves, and the warm spices that fill our kitchens this time of year. When I think of fall, my mind goes directly to pumpkin pie—a classic that brings a nostalgic smile and an undeniable comfort. However, in my quest for simplicity and deliciousness, I’ve fallen head over heels for the marvel that is crustless pumpkin pie. Yes, you heard me right! It’s all the creamy, spiced goodness we love about traditional pumpkin pie, minus the fuss of a crust. That means more time enjoying every delicious bite and less time worrying about whether that crust is flaky enough!
Imagine this: a chilly October evening, gathering around the table with loved ones, the flicker of candlelight casting a warm glow while the rich aroma of spices wafts through the air. That’s when this crustless pumpkin pie comes into play, transforming your kitchen into a cozy haven. It’s a dessert that’s not just easy to whip up but also a show-stopper when served.
Now, you might be thinking, "But Ava, what about the crust?" Here’s the beauty of this recipe: the filling is so flavorful and satisfying that it stands on its own! Plus, it’s a wonderful option for those who might be gluten-free or looking to cut back on carbs. Let’s dive deeper into this recipe, shall we? Grab your apron and let’s get baking!
My Pumpkin Pie Journey
Let’s rewind to my childhood for a moment—thanksgiving dinners full of family, laughter, and an overwhelmingly delicious spread. My grandmother would whip up her famous pumpkin pie every year. I remember peeking over the countertop, the warm, spicy scent making my mouth water, and my tummy rumble with excitement. The pie would emerge golden-brown from the oven, and as we gathered around the table, every slice served held a piece of tradition and joy.
Fast forward to my early 20s, as I began experimenting with baking in my small kitchen. After a few epic fails with pastry, I realized that the crust was what was holding me back. The desire to recreate my grandma’s pumpkin pie was strong, but I needed a way to simplify the process. Thus, the crustless pumpkin pie was born! It was a revelation. Just like my grandmother’s recipe, it had a rich texture, but now it was effortless to make. And while it may not have that traditional crust, it still brings back fond memories and, most importantly, it tastes divine!
Ingredients
Here’s what you’ll need for this delightful crustless pumpkin pie, along with some chef insights:
-
2 cups pumpkin puree
You can use canned pumpkin puree for convenience, but if you’re feeling adventurous, roast and blend your own pumpkin for a fresher taste! Just be sure to use pure pumpkin, not pumpkin pie filling. -
1 cup sweetened condensed milk
This ingredient adds the perfect amount of sweetness and creaminess. If you’re looking for a non-dairy option, try coconut cream or a homemade nut milk with a touch of sugar. -
2 large eggs
These act as the binding agents, giving your pie that lovely custardy texture. If you’re vegan, you could substitute with flax eggs (2 tablespoons of flaxseed meal mixed with 6 tablespoons of water per egg). -
1 tsp vanilla extract
A dash of vanilla rounds out the flavors beautifully. If you want to mix things up, use almond extract for a unique twist. -
1 tsp ground cinnamon
The epitome of fall spice! Cinnamon not only adds warmth but also elevates the flavors in pumpkin. If you love spices, consider adding a bit more. -
1/2 tsp ground nutmeg
This aromatic spice complements pumpkin perfectly. Freshly grated nutmeg is a game-changer if you have it on hand! -
1/2 tsp ground ginger
Ginger brings a subtle kick that enhances your pie’s flavor profile. If you’d like more heat, go for a teaspoon! -
1/4 tsp salt
A pinch of salt intensifies sweetness. Don’t skip it—balance is key!
Step-by-Step Instructions
Ready to roll up your sleeves and get started? Let’s make this pie happen!
-
Preheat Your Oven
Preheat your oven to 350°F (175°C). This is a crucial step because a properly warmed oven helps your pie bake evenly and rise beautifully. -
Mixing the Filling
In a large mixing bowl, add the pumpkin puree, sweetened condensed milk, eggs, vanilla extract, cinnamon, nutmeg, ginger, and salt. Start whisking until everything is well combined and smooth. Pro tip: Use a hand mixer for an extra fluffy filling! -
Prepare Your Baking Dish
Grease a 9-inch pie dish with a little butter or cooking spray. This helps the pie come out easily once it’s finished baking. I like using a glass dish because you can see the lovely color of the pie! -
Pour the Mixture
Carefully pour the pumpkin mixture into the prepared pie dish. Don’t worry if it seems runny; it will firm up beautifully during baking! -
Bake in the Oven
Place your pie in the preheated oven and bake for about 55-60 minutes. You’ll know it’s done when the center is set and a toothpick inserted comes out clean. Keep an eye on it; ovens can vary! -
Cool Down
Once out of the oven, let it cool on a wire rack for at least 30 minutes. This helps the filling set further and makes it easier to slice. -
Serve and Enjoy!
This is the best part! You can serve it warm or chilled. For an extra touch, top it with whipped cream or a sprinkle of cinnamon, and watch your guests’ faces light up.
Serving Suggestions
Now that your crustless pumpkin pie is ready, how should you present it? Slice it into wedges and serve it on a beautiful plate. A dollop of freshly whipped cream on the side adds a lovely touch. If you’re feeling festive, you can even garnish with a sprinkle of crushed gingersnap cookies or toasted pecans for added texture and flavor. This pie is perfect for any celebration or casual gathering, and trust me—it’s a slice of comfort everyone will appreciate!
Recipe Variations
Want to shake things up a bit? Here are a few fun variations you can try with your crustless pumpkin pie:
- Spiced Up: Add a touch of cayenne pepper for a gentle heat that pairs beautifully with pumpkin.
- Nutty Delight: Stir in some toasted pecans or walnuts into the mixture for added crunch.
- Chocolate Lover’s Dream: Mix in a handful of mini chocolate chips for a decadent twist.
- Dairy-Free Version: Substitute the sweetened condensed milk with coconut cream for a rich, non-dairy option.
- Maple Syrup Sweetener: Swap out the sweetened condensed milk for a mix of maple syrup and coconut milk for a healthier alternative.
Chef’s Notes
This crustless pumpkin pie has been a game-changer in my kitchen. It’s versatile yet simple—perfect for home cooks of all levels. I love how it reminds me of my grandmother while allowing me to add my personal touch. Over the years, I’ve experimented with different spices and variations, and each time, it turns into a fun culinary adventure. And believe me, the smiles on people’s faces as they take their first bite is worth every minute spent in the kitchen!
FAQs and Troubleshooting
Here are a few common questions you might have as you embark on your crustless pumpkin pie journey:
-
What if my pie is too runny?
Ensure your pumpkin puree is well-drained and you’ve whisked the ingredients thoroughly. If it’s too runny, it might need a little more time in the oven. -
Can I make it ahead of time?
Absolutely! This dessert keeps well in the fridge for about 3-4 days—just cover it tightly with plastic wrap or foil after it cools. -
How do I know when it’s done?
When the center is just set and a toothpick comes out clean! It might puff up a little during baking and settle as it cools. -
Can I freeze it?
Yes! You can freeze slices of the pie. Just wrap them tightly in plastic wrap and aluminum foil before placing them in the freezer. Thaw in the fridge before serving.
Nutritional Info (Optional)
Just for your reference, a slice of crustless pumpkin pie (1 slice assuming 8 servings) has approximately:
- Calories: 180
- Protein: 4g
- Carbohydrates: 23g
- Fat: 8g
- Dietary Fiber: 2g
Final Thoughts
In the end, a crustless pumpkin pie is more than just a dessert; it’s a symbol of warmth, nostalgia, and the cozy spirit of fall. Simple, delicious, and easy to make, it’s sure to become a staple in your kitchen just as it is in mine. So why wait? Gather your ingredients, invite some friends over, and enjoy a slice of comfort food that brings everyone together. Just remember to savor each bite—it’s all about the experience and the love you put into it! Happy baking!
PrintCrustless Pumpkin Pie
A deliciously easy pumpkin pie without the hassle of a crust, perfect for fall gatherings.
- Prep Time: 15 minutes
- Cook Time: 60 minutes
- Total Time: 75 minutes
- Yield: 8 servings 1x
- Category: Dessert
- Method: Baking
- Cuisine: American
- Diet: Vegetarian
Ingredients
- 2 cups pumpkin puree
- 1 cup sweetened condensed milk
- 2 large eggs
- 1 tsp vanilla extract
- 1 tsp ground cinnamon
- 1/2 tsp ground nutmeg
- 1/2 tsp ground ginger
- 1/4 tsp salt
Instructions
- Preheat your oven to 350°F (175°C).
- In a large mixing bowl, add the pumpkin puree, sweetened condensed milk, eggs, vanilla extract, cinnamon, nutmeg, ginger, and salt. Start whisking until everything is well combined and smooth.
- Grease a 9-inch pie dish with butter or cooking spray.
- Carefully pour the pumpkin mixture into the prepared pie dish.
- Place your pie in the preheated oven and bake for about 55-60 minutes.
- Once out of the oven, let it cool on a wire rack for at least 30 minutes.
- Serve warm or chilled with whipped cream or a sprinkle of cinnamon.
Notes
For added texture, consider garnishing with crushed gingersnap cookies or toasted pecans.
Nutrition
- Serving Size: 1 slice
- Calories: 180
- Sugar: 12g
- Sodium: 100mg
- Fat: 8g
- Saturated Fat: 3g
- Unsaturated Fat: 5g
- Trans Fat: 0g
- Carbohydrates: 23g
- Fiber: 2g
- Protein: 4g
- Cholesterol: 75mg
Keywords: pumpkin pie, crustless pie, fall dessert, easy dessert
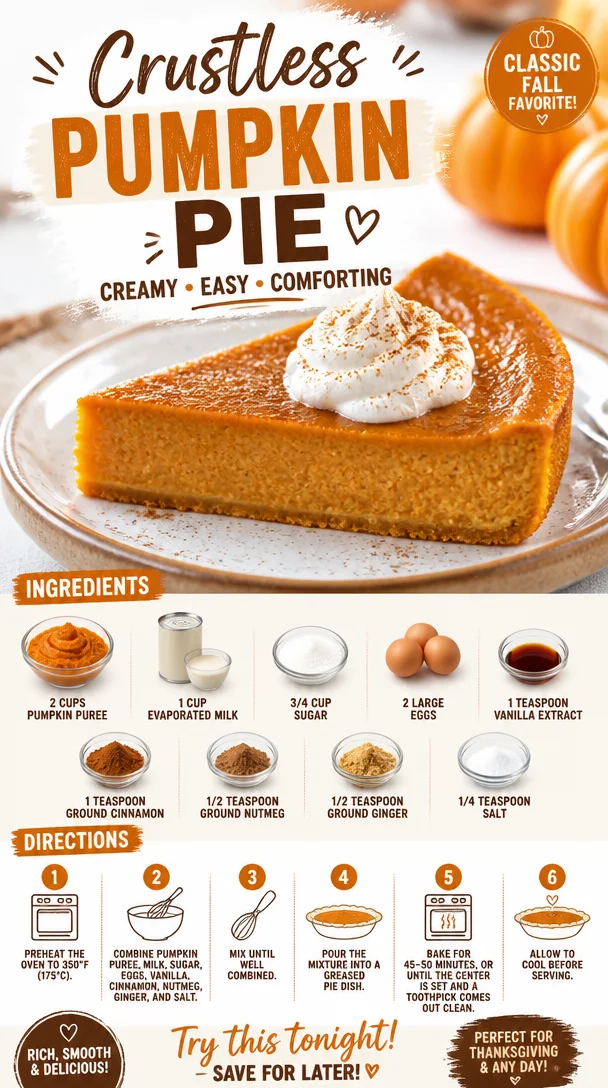
Crustless Pumpkin Pie
Crustless Pumpkin Pie: A Flavorful & Easy Fall Treat
Ah, fall. The air turns crisp, leaves don brilliant hues, and everywhere you turn, pumpkin spice reigns supreme. But let’s talk about something even better than a pumpkin spice latte—Crustless Pumpkin Pie! If you’re thinking, “Wait, no crust? How will that work?”—trust me, my friend, this pie is like a warm hug during the chilly season. It’s rich, creamy, and boasts all the delightful flavors of traditional pumpkin pie, sans the fuss of making a crust.
Now, I know what you might be imagining—is it really pumpkin pie without that flaky, buttery crust? Absolutely! It’s all the flavor you love with none of the heavy lifting. Imagine the ease of whipping up a delicious dessert that not only tastes divine but also accommodates your friends who might be counting calories or avoiding gluten. Consider this recipe as your secret weapon for holiday gatherings or cozy nights in. Get ready for a slice of pumpkin paradise!
Personal Story
Let me take you back to my grandmother’s kitchen during the autumn months. The scent of cinnamon and nutmeg would dance around the room like the falling leaves outside. Grandma would pull out her vintage mixing bowl and gather her ingredients like it was a ritual—a sprinkle of this, a dash of that—always with a twinkle in her eye.
It was the one time of year when nothing else mattered but that magical pie made from her secret recipe. She never liked fussing with crusts; to her, the filling was the star of the show. I remember one particular Thanksgiving when she decided to try making her crustless pumpkin pie for the first time, and despite my initial skepticism, as soon as I tasted it, I was a believer. The creaminess of the pumpkin mingling with the warm spices? Instant bliss! We devoured it, and it became an instant family favorite, proving that sometimes, simplicity brings the most joy.
Now, every time I whip up this crustless pumpkin pie, I can’t help but smile and think of those warm, cozy memories. This recipe is not just a dish—it’s a celebration of comfort food and nostalgia.
Ingredients
-
2 cups pumpkin puree
This is the star of the show! Canned pumpkin puree is convenient and consistent. If you’re feeling adventurous, you can make your own by roasting sugar pumpkins—just scoop out the flesh and blend until smooth! -
1 cup evaporated milk
This ingredient adds creaminess without the heaviness of heavy cream. If you’re dairy-free, try using coconut milk for a tropical twist or almond milk for a lighter version. -
3/4 cup sugar
Regular granulated sugar works perfectly. If you’re looking for a lower-calorie option, you can try using coconut sugar or a sugar substitute like Stevia. -
2 large eggs
Eggs help bind everything together. If you’re looking for an egg-free version, you can use flaxseed meal (1 tablespoon of flaxseed mixed with 2.5 tablespoons of water for each egg) or a commercial egg replacer. -
1 teaspoon vanilla extract
Always opt for pure vanilla extract for the best flavor. If you want a hint of something unique, try almond extract for a delightful twist. -
1 teaspoon ground cinnamon
A must-have spice that brings warmth to the pie. If you’re feeling spicy, mix in some cardamom for an unexpected flavor profile. -
1/2 teaspoon ground nutmeg
Nutmeg adds a nutty, slightly sweet flavor that’s synonymous with pumpkin pie. Freshly grated nutmeg is even more aromatic, so if you have some, go for it! -
1/2 teaspoon ground ginger
Ginger enhances the pie’s overall warmth. For a spicier kick, you can add a touch of fresh grated ginger instead. -
1/4 teaspoon salt
A pinch of salt elevates the sweetness and balances the flavors beautifully.
Step-by-Step Instructions
-
Preheat Your Oven
Preheat your oven to 350°F (175°C). This will ensure your pie bakes evenly, giving you that perfect texture. -
Prepare the Mixing Bowl
Grab a large mixing bowl—this is where the magic happens! Combine the pumpkin puree, evaporated milk, and sugar. Mix well until everything is smooth. Using a whisk will help incorporate air, making your pie light and fluffy. -
Add the Eggs and Vanilla
Crack in the eggs one at a time, whisking them in thoroughly after each addition. You want to ensure everything is well combined. Then, drizzle in the vanilla extract—this will enhance the overall flavor profile beautifully! -
Incorporate the Spices
Sprinkle in the ground cinnamon, nutmeg, ginger, and salt. The aroma here is divine! Mix until everything is evenly distributed. You want all those warm spices singing together in harmony! -
Grease Your Baking Dish
Lightly grease a 9-inch pie dish or an equivalent baking dish with cooking spray or butter. This will help the pie slide out easily once it’s baked—nobody likes a stuck pie! -
Pour It All In
Gently pour the pumpkin mixture into the greased pie dish, making sure to spread it evenly. Don’t worry about making it perfect; the magic happens in the oven! -
Bake Your Pie
Pop your pie in the preheated oven and bake for about 60-70 minutes. You’ll know it’s done when the edges are set, and the center has a slight jiggle but isn’t runny. -
Cool and Serve
Once baked, take it out of the oven and let it cool for at least 30 minutes. This cooling time helps it set—plus, you want to avoid burning your tongue, right? Serve it at room temperature or refrigerate it for later; it’s just as delicious chilled!
Serving Suggestions
To serve this delightful crustless pumpkin pie, slice it into wedges and dust a little powdered sugar on top for a fancy finish. For an extra touch of decadence, add a dollop of whipped cream or a scoop of vanilla ice cream on the side. Drizzle a bit of caramel sauce over it, and you have an irresistible treat that everyone will love!
Recipe Variations
- Spiced Rum Variation: Add a splash of spiced rum to the mixture for an adult twist.
- Chocolate Chip Twist: Fold in some dark chocolate chips to the batter for a sweet surprise.
- Nuts & Seeds: Add chopped pecans or walnuts on top before baking for a crunchy contrast.
- Maple Sweetened: Substitute the sugar with maple syrup for a richer flavor.
- Coconut Crust: Press shredded coconut at the bottom of the dish before pouring in the filling for a unique texture.
Chef’s Notes
Reflecting back on my first attempts at making this pie, I recall a not-so-funny moment when I mistakenly grabbed salt instead of sugar. The taste was… well, let’s say it’s a family joke now! I learned quickly that not all ingredients can afford to be swapped. Over the years, though, I’ve refined this recipe, adapting it based on what I have on hand or the tastes of those around my table. It’s a testament to how adaptable recipes can be, and how each pie can tell a different story.
FAQs and Troubleshooting
Q: My pie is too watery. What went wrong?
A: This can happen if the pumpkin puree you used was too watery. Always check the label to ensure you’re using 100% pumpkin.
Q: Can I make this pie ahead of time?
A: Absolutely! This pie holds up wonderfully in the fridge for up to a week. Just cover it tightly with plastic wrap or foil.
Q: Why did my pie not set?
A: If it’s not set in the center after baking, it may need more time in the oven. Just stick it back in, checking every 5-10 minutes until it’s done.
Q: Can I freeze this pie?
A: Yes! Once cooled, tightly wrap it in plastic wrap and aluminum foil and it can be frozen for up to 2 months. Just thaw before serving.
Enjoy this delightful Crustless Pumpkin Pie while creating memories in your own kitchen. Whether you serve it for a family gathering or enjoy it all to yourself—trust me, no one will miss the crust! Let me know how yours turns out, and happy baking!
PrintCrustless Pumpkin Pie
Enjoy a rich and creamy Crustless Pumpkin Pie that combines all your favorite fall flavors without the fuss of a crust.
- Prep Time: 15 minutes
- Cook Time: 70 minutes
- Total Time: 85 minutes
- Yield: 8 servings 1x
- Category: Dessert
- Method: Baking
- Cuisine: American
- Diet: Vegetarian
Ingredients
- 2 cups pumpkin puree
- 1 cup evaporated milk
- 3/4 cup sugar
- 2 large eggs
- 1 teaspoon vanilla extract
- 1 teaspoon ground cinnamon
- 1/2 teaspoon ground nutmeg
- 1/2 teaspoon ground ginger
- 1/4 teaspoon salt
Instructions
- Preheat your oven to 350°F (175°C).
- Grab a large mixing bowl and combine the pumpkin puree, evaporated milk, and sugar. Mix well until smooth.
- Crack in the eggs one at a time, whisking thoroughly after each addition. Then drizzle in the vanilla extract.
- Sprinkle in the ground cinnamon, nutmeg, ginger, and salt, mixing until evenly distributed.
- Lightly grease a 9-inch pie dish with cooking spray or butter.
- Gently pour the pumpkin mixture into the greased pie dish.
- Pop your pie in the preheated oven and bake for about 60-70 minutes.
- Once baked, let it cool for at least 30 minutes before serving.
Notes
For added indulgence, serve with whipped cream or vanilla ice cream. This pie can be made ahead of time and stores well in the fridge.
Nutrition
- Serving Size: 1 slice
- Calories: 280
- Sugar: 25g
- Sodium: 150mg
- Fat: 5g
- Saturated Fat: 2g
- Unsaturated Fat: 2g
- Trans Fat: 0g
- Carbohydrates: 50g
- Fiber: 3g
- Protein: 5g
- Cholesterol: 50mg
Keywords: pumpkin pie, dessert, fall recipe, Thanksgiving, crustless dessert
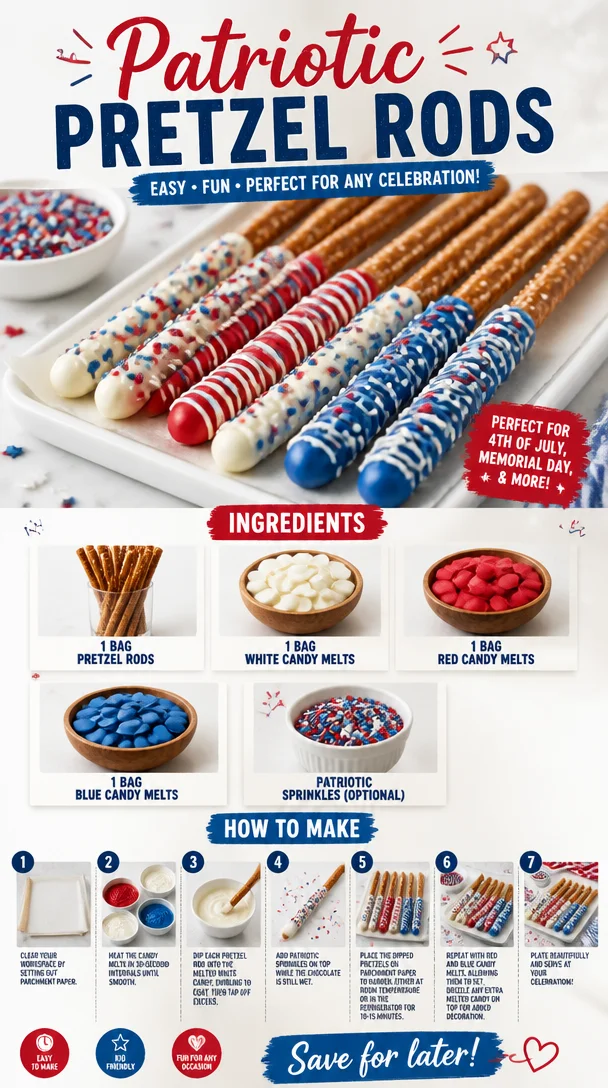
Patriotic Pretzel Rods
Patriotic Pretzel Rods: A Perfect Treat for Any Celebration!
Welcome, foodies! Today, we’re diving into a fun and festive treat that’s not only tasty but also incredibly easy to whip up. If you’re looking to add a splash of color and crunch to your next gathering, look no further than these delightful Patriotic Pretzel Rods! Whether it’s the Fourth of July, Memorial Day, or any day you want to feel that star-spangled spirit, these treats are sure to impress.
So, what makes these pretzel rods so special? First off, let’s talk about texture. You’ve got the satisfying crunch of the pretzel paired with the smooth, creamy coating of candy melts. And then there’s the color! Striking red, white, and blue hues make these treats a visual feast—perfect for snapping a quick photo before they disappear! They’re easy to make, easy to customize, and even the kiddos can join in on the fun.
But wait—let’s not get ahead of ourselves! Before we jump into the kitchen to start dipping and decorating, let me share a little story about how these delightful snacks came to be one of my go-to treats for any Americana-themed celebration.
A Sweet Memory with Patriotic Vibes
I’ll never forget the first time I made these Patriotic Pretzel Rods. It was a warm summer evening, and my family was gearing up for our annual Fourth of July barbecue. My mom was busy grilling and my dad was flipping burgers while I rummaged through our pantry. I wanted to bring something fun to the table, something that would jazz up the dessert spread. That’s when I spotted a bag of pretzel rods peeking out from behind a box of old recipes.
With a flash of inspiration and a little bit of nostalgia, I pulled out the candy melts I had left over from a birthday party last year and decided to play around. I melted the white candy melts first, dipping the pretzel rods in smoothly and letting them cool before using red and blue candy melts to create fun designs. Then came the sprinkles—a must for that adorable festive flair!
As I presented my creation to my family, I felt a wave of excitement as we all gathered around the dessert table. Those crunchy, colorful rods quickly became a hit! Everyone loved the combination of sweet and salty, and the laughter and smiles that filled the air made it a memory I cherish to this day. And ever since then, these Patriotic Pretzel Rods have become a staple at all our summer get-togethers.
Now, it’s your turn to create that same joy! Let’s get our hands a little messy and dive into making these adorable snacks. Ready? Let’s go!
Ingredients
For this delicious and colorful treat, you’ll need just a handful of ingredients. Here’s what you’ll need:
-
1 bag pretzel rods
- These are the star of our show! Their long, crunchy shape makes them perfect for dipping and decorating. If you can’t find pretzel rods, you can use pretzel twists for a fun twist on this recipe.
-
1 bag white candy melts
- These creamy morsels serve as the base for our colorful designs. White chocolate will work in a pinch if you don’t have candy melts. Just be careful not to overheat it when melting!
-
1 bag red candy melts
- Because what’s a celebration without a little red? These sweet candies will give your pretzel rods that festive flair! You can substitute with red icing if you’re in a hurry.
-
1 bag blue candy melts
- The other half of our patriotic color trio! Again, white or dark chocolate tinted with food coloring can be a fun alternative if candy melts are hard to find.
-
Patriotic sprinkles (optional)
- These are the cherry on top—or should I say the sprinkle on the side? They add that extra pop of color and fun! Feel free to use any sprinkles you have on hand; you’re the artist here!
Step-by-Step Instructions
Alright, it’s time to work some kitchen magic! Follow these steps, and you’ll have beautiful Patriotic Pretzel Rods ready in no time.
-
Prep Your Workspace:
- Before you start dipping, I recommend laying out some parchment paper on your kitchen counter or a baking sheet. This will help the chocolate set up nicely without sticking. Get a small bowl of warm, soapy water to wash your utensils and a clean towel nearby—let’s keep things tidy!
-
Melt the Candy Melts:
- Divide your candy melts into microwavable bowls (one for each color). Heat them according to the package instructions—typically 30 seconds at a time, stirring in between until smooth. If you find your candy melts too thick, add a teaspoon of vegetable oil to thin them out. Trust me—this little hack makes all the difference!
-
Dip the Pretzel Rods:
- Take a pretzel rod and dip it into your melted white candy melts, swirling gently to fully coat the lower two-thirds. Let any excess dribble off. Trust your instincts here; you want enough coverage but don’t worry about making it perfect!
-
Let It Set:
- Place the dipped rod on your parchment paper and repeat the process for as many pretzel rods as you like. Once you’ve got a good number ready, let them cool for about 10-15 minutes, or until they’re fully set.
-
Get Colorful:
- Now for the fun part! Melt your red and blue candy melts the same way, then take your cooled white-dipped pretzel rods and dip them halfway into the red and blue melts to create a striped effect. Alternatively, you can drizzle the colored melts on top for a more artistic flair.
-
Add the Sprinkles:
- While the colored candy melts are still wet, generously sprinkle your patriotic sprinkles over the tops. This is where you can really let your creativity shine—mix and match!
-
Let Them Cool (Again!):
- Once all your pretzel rods are decorated, let them cool completely until the candy is hardened. This will only take about 20 minutes if you’re patient!
And there you have it—your completed Patriotic Pretzel Rods! The colors, the textures, the flavors…it’s a treat that’s impossible to resist!
Serving Suggestions
When it comes to serving your Patriotic Pretzel Rods, it’s all about presentation! Arrange them upright in a mason jar, or lay them side by side on a decorative platter. You can even tie a little ribbon around the jar for an extra festive touch. Grab your favorite napkins and watch as your friends and family dive right in!
Recipe Variations
Feel free to get creative with this recipe! Here are a few delightful variations to try:
- Chocolate Drizzle: Instead of using colored candy melts alone, drizzle some dark or milk chocolate over your dipped pretzel rods for an added layer of flavor.
- Nutty Inspiration: Before the candy coating sets, sprinkle chopped nuts, like almonds or peanuts, for a delightful crunch.
- Seasonal Sprinkles: Change up the sprinkles by using seasonal colors—think orange and black for Halloween or green and red for Christmas!
- Spicy Twist: Add a pinch of cayenne or chili powder to your melted white chocolate for a sweet and spicy combo—perfect for those who lean toward unique flavors.
Chef’s Notes
I’ve made these Patriotic Pretzel Rods for countless occasions, and every time they’re gobbled up in no time! One funny incident I remember was when I tried adding edible glitter to the mix and got carried away—let’s just say my kitchen was sparkling for days, but the pretzels turned into glitter bombs! Lesson learned: moderation is key. Over the years, I’ve cherished the evolution of this recipe, from my first attempts with only white chocolate to now creating vibrant hues that reflect the spirit of the occasions we celebrate. The best part? Each batch is made with love, which is the secret ingredient I always say!
FAQs and Troubleshooting
-
Why did my candy melts seize up?
- A common cooking hiccup! Candy melts can seize if they come into contact with water, so make sure your bowls and utensils are completely dry. If your melts get too thick, adding a little vegetable oil can smooth things out.
-
How do I store leftover pretzel rods?
- Store your pretzel rods in an airtight container at room temperature. They’ll stay fresh for about a week, though I’ll be surprised if they last that long!
-
Can I use chocolate instead of candy melts?
- Absolutely! Just be cautious while melting real chocolate to avoid burning it. Use a double boiler or microwave at lower power intervals.
-
The candy coating isn’t sticking well. What did I do wrong?
- This might happen if the pretzels aren’t fully cooled or if they were dipped in the melts when they were too hot. Allow them to cool completely before dipping, and make sure your melts aren’t too thick.
Nutritional Info
While these treats are meant for fun, it’s always good to be mindful of portion sizes! Each pretzel rod, once coated and topped, contains roughly 100 calories (depending on how much candy you use for the coating), along with carbohydrates and sugars. Enjoy in moderation and make them a special treat for your celebrations!
So there you have it, friends—your complete guide to making delicious, colorful, and fun Patriotic Pretzel Rods! I hope you feel inspired to get creative in your kitchen and whip up a batch for your next celebration. Remember, it’s all about joy and connection, and what better way to celebrate than with these delightful treats? Happy cooking!
PrintPatriotic Pretzel Rods

These delightful Patriotic Pretzel Rods are a fun and colorful treat perfect for any celebration, combining the satisfying crunch of pretzels with a creamy candy melt coating.
- Prep Time: 15 minutes
- Cook Time: 30 minutes
- Total Time: 45 minutes
- Yield: 12 pretzel rods 1x
- Category: Dessert
- Method: Dipping
- Cuisine: American
- Diet: Vegetarian
Ingredients
- 1 bag pretzel rods
- 1 bag white candy melts
- 1 bag red candy melts
- 1 bag blue candy melts
- Patriotic sprinkles (optional)
Instructions
- Prep your workspace: Lay out parchment paper and have a bowl of warm, soapy water ready.
- Melt the candy melts: Divide candy melts into bowls and heat according to package instructions.
- Dip the pretzel rods: Dip each rod in white candy melts, covering the lower two-thirds.
- Let it set: Place dipped rods on parchment paper and let cool for about 10-15 minutes.
- Get colorful: Dip the white-dipped rods into red and blue melts to create stripes, or drizzle the melts on top.
- Add the sprinkles: While melts are wet, sprinkle on your patriotic sprinkles.
- Let them cool completely for about 20 minutes until hardened.
Notes
Store leftover pretzel rods in an airtight container at room temperature for about a week. Try adding nuts or chocolate drizzle for variation.
Nutrition
- Serving Size: 1 pretzel rod
- Calories: 100
- Sugar: 10g
- Sodium: 200mg
- Fat: 5g
- Saturated Fat: 3g
- Unsaturated Fat: 2g
- Trans Fat: 0g
- Carbohydrates: 15g
- Fiber: 0g
- Protein: 1g
- Cholesterol: 0mg
Keywords: Patriotic, Pretzel Rods, Celebration, Dessert, Easy Recipe