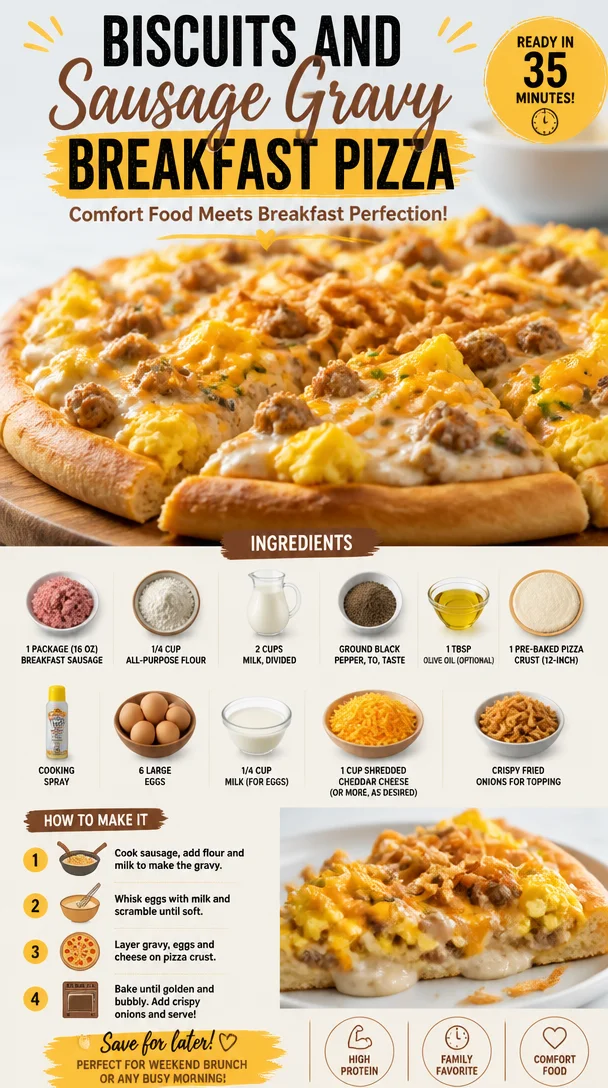
Biscuits and Sausage Gravy Breakfast Pizza
Biscuits and Sausage Gravy Breakfast Pizza: Start Your Day with a Flavor Punch!
Welcome back, food lovers! Today, we’re flipping the script on breakfast with a dish that’s destined to become your new favorite morning treat: Biscuits and Sausage Gravy Breakfast Pizza. Imagine fluffy biscuits, rich and creamy sausage gravy, and cheesy goodness—all on a perfectly crispy pizza crust. It’s breakfast reimagined, and it’s every bit as delicious as it sounds!
As you may know, breakfast is often dubbed the most important meal of the day, but let’s be real: it’s also the meal that sets the tone for everything that follows. When you start your day with something hearty and full of flavor, it not only fuels your body but makes your spirit soar. And this breakfast pizza packs all those punchy flavors into every delectable bite.
Now, I won’t sugarcoat it—this recipe may seem a bit indulgent, but it’s entirely approachable and oh-so-rewarding. Plus, it’s perfect for breakfast gatherings, lazy Sunday mornings, or any day when you need a sprinkle of joy right from the get-go. So let’s get cooking; I promise you’ll want this in your breakfast rotation after just one bite!
Personal Story: The Breakfast Tradition
I’ll never forget the first time I tried sausage gravy. My grandma, bless her heart, would whip up a massive pan of it every Sunday morning, and the aroma would waft through the house as we were still snuggled up in our blankets. I remember rolling out of bed, feeling the chill of the morning air, and being greeted by that warm embrace of rich, savory breakfast goodness. Of course, she’d serve it over freshly baked biscuits, and somehow, it always tasted like love.
Fast forward to today, and I wanted to capture that nostalgia but put a fun twist on it. The idea of transforming my childhood favorite into a breakfast pizza was born on a particularly busy morning when I was craving something hearty but didn’t want to miss out on the classic flavors. And let me tell you—it turned out to be a hit! Now, every bite takes me back to those cozy Sundays, bringing comfort and satisfaction to my mornings.
Ingredients
Here’s what you’ll need to whip up this delicious breakfast pizza:
-
1 package (16 oz) breakfast sausage
Look for a quality sausage that’s seasoned well. If you prefer turkey or plant-based sausage, those work just as well! -
1/4 cup all-purpose flour
This will help thicken our gravy. If you’re gluten-free, feel free to substitute with a gluten-free flour blend. -
2 cups milk, divided
Whole milk gives you a richer flavor, but you can also use 2% or even a dairy-free milk option, like almond or oat milk, if needed. -
Ground black pepper, to taste
A key seasoning to enhance the flavors. Feel free to experiment with different kinds of pepper, like white pepper for a subtle heat. -
1 tbsp olive oil (optional)
Use this if you want to give your sausage a little extra flavor and help it crisp up beautifully. -
1 pre-baked pizza crust (12-inch)
I love using a ready-made crust for convenience, but if you’re feeling adventurous, you can make your own! -
Cooking spray
This will help avoid any sticking. You could also use a touch of olive oil here instead. -
6 large eggs
These will be scrambled and added to the top of our pizza, giving it that extra protein punch! -
1/4 cup milk (for eggs)
This makes your scrambled eggs fluffier! You can skip it, but trust me, you won’t regret adding it. -
1 cup shredded Cheddar cheese (or more, as desired)
I’m a firm believer that you can never go wrong with extra cheese! Feel free to mix in other cheese varieties like Monterey Jack or Pepper Jack for a spicy kick. -
Crispy fried onions for topping
They add a nice crunch and flavor. If you’d like, you can also use fresh herbs like chives for a pop of color and taste.
Step-by-Step Instructions
Let’s dive into the cooking process! Here’s how to transform those simple ingredients into a savory masterpiece that will have everyone flocking to your breakfast table.
Step 1: Prepare the Sausage Gravy
-
Cook the sausage: In a large skillet over medium heat, add the breakfast sausage. If you’re using olive oil, pour that in first. Cook the sausage until it’s browned and cooked through, breaking it up with a spatula. This usually takes about 5-7 minutes.
Chef Tip: If you like a bit of spice, consider adding some red pepper flakes during the last minute of cooking!
-
Make the roux: Once the sausage is nicely browned, sprinkle in the all-purpose flour. Stir it into the sausage, allowing it to cook for about 1 minute. This helps to cook off the raw flour taste.
A golden brown roux will give your gravy a richer flavor!
-
Add the milk: Slowly pour in 1.5 cups of milk while continuously stirring. This ensures there are no lumps. The mixture will start to thicken. Sprinkle in some black pepper according to your taste, and let it simmer on low for about 3-5 minutes.
Chef Insight: If it’s too thick for your liking, add a splash more milk until you get a creamy consistency.
Step 2: Scramble the Eggs
-
Whisk the eggs: In a separate bowl, whisk together the eggs and 1/4 cup of milk until well combined. Add a pinch of salt and pepper to the mixture.
Fun Fact: Adding milk to your scrambled eggs not only makes them fluffier but also adds creaminess!
-
Cook the eggs: In a non-stick skillet over medium-low heat, add a little oil or butter. Pour in the egg mixture, and gently stir with a spatula to create soft curds. After 2-3 minutes, remove from heat when they’re just set—remember, they’ll continue cooking even after you take them off the burner!
Chef Tip: For creamy eggs, remove them from heat just before they look fully cooked.
Step 3: Assemble the Pizza
-
Get the crust ready: Preheat your oven to the temperature indicated on your pizza crust packaging. Lightly spray your pizza crust with cooking spray—this will help get a nice crunch as it bakes.
Love a little garlic flavor? Sprinkle some garlic powder on the crust for an exciting twist!
-
Spread the gravy: Pour the sausage gravy evenly over your prepared pizza crust, spreading it out to cover it evenly.
-
Add the eggs: Gently spoon the scrambled eggs over the gravy, ensuring even distribution.
-
Sprinkle on the cheese: Top the pizza with shredded cheddar cheese (or more, if you’re like me and love extra cheesy goodness).
Did you know? Mixing different cheese types can create a uniquely delicious flavor profile!
Step 4: Bake and Serve
-
Pop it in the oven: Bake according to the crust instructions, usually around 12-15 minutes, or until the cheese is melted and bubbly.
Pro Tip: If you want that perfect cheese pull, place on broil for the last 1-2 minutes, but keep an eye on it!
-
Top it off: Once the pizza is out of the oven, sprinkle crispy fried onions over the top for that delightful crunch.
For a fresh twist, you can also add diced green onions or chives here!
Step 5: Slice and Enjoy
- Slice and serve: Let the pizza cool for a minute, slice it up, and serve it hot! Watch as everyone digs into breakfast bliss!
Pair it with fresh fruit or a side salad for an extra vibrant breakfast spread!
Serving Suggestions
When it comes to plating, simplicity is key. Serve your Biscuits and Sausage Gravy Breakfast Pizza on a wooden board or a large platter to create a relaxed dining vibe. You can add a side of fresh fruit, like sliced strawberries or juicy oranges, to balance out the richness of the pizza. A sprinkle of fresh herbs or an extra dash of black pepper can bring your dish to the next level. And don’t forget to pour a cup of coffee or tea to wash it all down!
Recipe Variations
Want to shake things up a bit? Here are some fun twists you could try:
- Vegetarian Version: Swap out the breakfast sausage for your favorite plant-based sausage or a sautéed veggie mix, such as mushrooms and bell peppers.
- Spicy Kick: Add diced jalapeños or your favorite hot sauce to the sausage gravy for those who like it spicy!
- Southwestern Flair: Top with black beans and corn, and try mixing pepper jack cheese for a zesty twist.
- Mediterranean Style: Incorporate feta cheese, spinach, and sun-dried tomatoes for a fresh Mediterranean breakfast experience.
- Herbed Delight: Add fresh herbs like basil or cilantro in the scrambled eggs for a fresh, aromatic touch.
Chef’s Notes
This Biscuits and Sausage Gravy Breakfast Pizza has become a family favorite and a comfort dish for many. I love how it marries my childhood memories with a modern twist, allowing me to enjoy that nostalgic flavor while experimenting with new ideas. And guess what? You can make the gravy ahead of time and store it in the fridge—easy meal prep for those busy mornings! Just reheat it before you pour it over your pizza crust, and you’re good to go.
Oh, and I have to share my funniest kitchen story about this recipe! The first time I attempted it, I was excited and didn’t notice my oven was set to broil. Let’s just say the first pizza turned into an unexpected charred creation. But hey, now I make sure to double-check oven settings! Lesson learned.
FAQs and Troubleshooting
1. My gravy is too thick—what should I do?
If your sausage gravy turns out too thick, simply whisk in a little more milk over low heat until it reaches your desired consistency.
2. Can I make this ahead of time?
Absolutely! You can prepare the sausage gravy and scramble the eggs ahead of time. Just reheat them before assembling the pizza.
3. What if my eggs are dry?
To prevent dry scrambled eggs, cook them on low heat and remove them just before they’re fully set. The residual heat will finish cooking them without drying them out.
4. How do I store leftovers?
Store any leftover pizza in an airtight container in the fridge for up to 3 days. Reheat in the oven or microwave for best results.
Nutritional Info (Optional)
Although I didn’t cover specific nutritional info in this post, I encourage you to look up approximate values based on your ingredient choices. Enjoying a hearty breakfast like this can be balanced with lighter meals throughout the day!
So there you have it! A delightful blend of nostalgia and innovation—all packed into a Biscuits and Sausage Gravy Breakfast Pizza that promises to fuel your morning with flavor and joy. I hope you enjoy making this dish as much as I do, and don’t forget to come back and share your own stories from the kitchen! Happy cooking!
PrintBiscuits and Sausage Gravy Breakfast Pizza
A delicious blend of fluffy biscuits and creamy sausage gravy topped on a crispy pizza crust, perfect for a hearty breakfast.
- Prep Time: 15 minutes
- Cook Time: 30 minutes
- Total Time: 45 minutes
- Yield: 4 servings 1x
- Category: Breakfast
- Method: Baking
- Cuisine: American
- Diet: None
Ingredients
- 1 package (16 oz) breakfast sausage
- 1/4 cup all-purpose flour
- 2 cups milk, divided
- Ground black pepper, to taste
- 1 tbsp olive oil (optional)
- 1 pre-baked pizza crust (12-inch)
- Cooking spray
- 6 large eggs
- 1/4 cup milk (for eggs)
- 1 cup shredded Cheddar cheese (or more, as desired)
- Crispy fried onions for topping
Instructions
- Cook the sausage: In a large skillet over medium heat, add the breakfast sausage. If you’re using olive oil, pour that in first. Cook until browned and cooked through, breaking it up with a spatula, about 5-7 minutes.
- Make the roux: Sprinkle in the all-purpose flour once the sausage is browned and stir, cooking for about 1 minute.
- Add the milk: Slowly pour in 1.5 cups of milk while continuously stirring. Let it simmer on low for about 3-5 minutes.
- Whisk the eggs: In a separate bowl, whisk together the eggs and 1/4 cup of milk. Season with salt and pepper.
- Cook the eggs: In a non-stick skillet over medium-low heat, pour in the egg mixture, gently stirring until soft curds form. Remove from heat just before fully cooked.
- Preheat oven: Preheat your oven according to the crust instructions. Lightly spray your pizza crust with cooking spray.
- Spread the gravy: Pour the sausage gravy over the prepared pizza crust.
- Add the eggs: Spoon the scrambled eggs over the gravy.
- Sprinkle on cheese: Top with shredded cheddar cheese.
- Bake: Bake according to crust instructions, about 12-15 minutes, or until cheese is melted. Optionally, broil for 1-2 minutes for a perfect cheese pull.
- Top it off: Sprinkle crispy fried onions over the top when done.
- Slice and serve: Let cool for a minute, slice, and serve hot!
Notes
Feel free to substitute with turkey or plant-based sausage. You can also prep the gravy ahead of time for convenience.
Nutrition
- Serving Size: 1 slice
- Calories: 450
- Sugar: 3g
- Sodium: 600mg
- Fat: 25g
- Saturated Fat: 10g
- Unsaturated Fat: 10g
- Trans Fat: 0g
- Carbohydrates: 35g
- Fiber: 2g
- Protein: 20g
- Cholesterol: 200mg
Keywords: breakfast pizza, sausage gravy, biscuits, comfort food
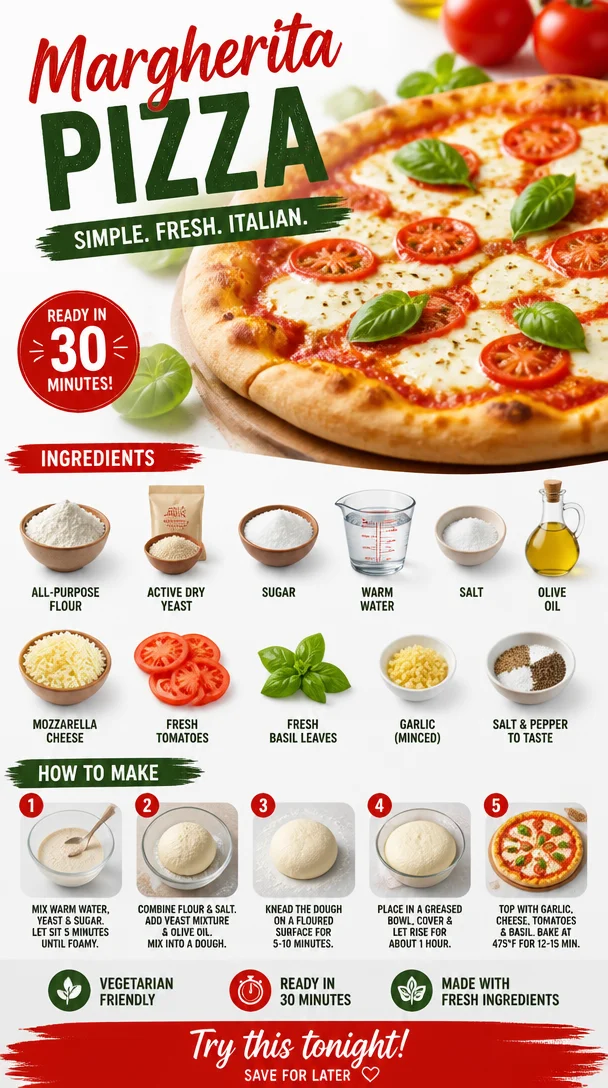
Margherita Pizza
Margherita Pizza: A Slice of Italy Right at Home!
Ah, pizza! The quintessential comfort food that sparks joy in millions around the globe. Today, we’re diving into one of the most celebrated varieties—the classic Margherita pizza. Picture this: a crispy golden crust topped with sweet, succulent tomatoes, creamy mozzarella, and fragrant basil. It’s simple yet sublime, and somehow, it feels just right whether you’re having a cozy night in or hosting friends for a weekend feast.
Why Margherita pizza, you ask? Well, there’s a rich history behind it, tied to the vibrant Italian culture. Legend has it that this pizza was created in honor of Queen Margherita of Savoy during her visit to Naples in the late 1800s. The colors of the ingredients—red tomatoes, white mozzarella, and green basil—symbolize the Italian flag. Eating it is like savoring a bite of Italian heritage!
But you don’t need to hop on a flight to Italy to enjoy a slice. You can create this masterpiece in your very own kitchen, filled with radiant flavors that celebrate fresh, quality ingredients. So grab your apron, roll up your sleeves, and let’s embark on a culinary adventure that turns your home into a pizzeria!
Ready? Let’s make some magic with the simple yet delightful Margherita pizza that’s bound to become a favorite in your home!
A Slice of Nostalgia: My First Margherita Pizza
I can still picture the first time I made a Margherita pizza. I was a wide-eyed culinary student, and my chef instructor handed out a sheet of dough, ingredients laid out like a painter’s palette. With my heart racing, I rolled out my dough, kneading and stretching it until it felt just right.
Then came the toppings—the fresh tomatoes, still warm from the summer sun, the mozzarella that glistened like tiny cheese diamonds, and the fragrant basil that filled the room with its herbal aroma. As I slid that pizza into the oven and waited anxiously, I couldn’t help but feel a mix of excitement and nervousness.
When it emerged, bubbling and golden, I tasted it as if I were experiencing magic for the first time. Each bite transported me to the cobblestone streets of Naples. From that day on, Margherita pizza has held a special place in my heart and my kitchen. It’s not just about the recipe; it’s a reminder of the joy and connection that cooking brings.
Essential Ingredients for Margherita Pizza
Let’s break down the ingredients you’ll need to create your own Margherita pizza masterpiece!
-
2 cups all-purpose flour: The backbone of your pizza crust! You can use bread flour for a chewier texture, or whole wheat flour for a nuttier flavor. Just remember, adjusting the water might be necessary depending on the flour type you choose.
-
1 packet active dry yeast: This tiny powerhouse is responsible for making your dough rise and giving it that delightful airy texture. Make sure your water is warm (not hot!) to help activate the yeast in the best way.
-
1 teaspoon sugar: Just a pinch to feed the yeast and promote fermentation. If you’re avoiding refined sugar, you can substitute honey or agave syrup.
-
3/4 cup warm water: The liquid love that brings all the dry ingredients together. Ensure it’s at about 110°F (43°C) for optimal yeast activation.
-
1 teaspoon salt: Essential for flavor enhancing! Feel free to experiment with sea salt or Himalayan pink salt for a unique twist.
-
2 tablespoons olive oil: Adds richness to your dough and helps achieve that lovely golden crust. Extra virgin olive oil is great for its fruity, vibrant flavor.
-
1 cup mozzarella cheese, shredded: The star of the show! Fresh mozzarella is preferred for its creaminess, but pre-shredded varieties work too. If you’re feeling adventurous, try burrata for a luscious touch.
-
1 cup fresh tomatoes, sliced: Go for ripe, seasonal tomatoes or even cherry tomatoes for a sweeter flavor. You can also use a delicious tomato sauce if you’re short on fresh produce.
-
1/4 cup fresh basil leaves: The aromatic touch that brightens up the dish! If basil isn’t available, consider using arugula or spinach for a different flavor profile.
-
1 clove garlic, minced: A hint of garlic adds depth to the flavor. If you’re not a fan, you can skip it or substitute with garlic powder.
-
Salt and pepper to taste: Essential for bringing all the flavors together. A sprinkle of freshly cracked black pepper elevates the dish beautifully!
Step-by-Step Instructions to Craft Your Margherita Pizza
Step 1: Mix It Up
In a large mixing bowl, combine the warm water, sugar, and yeast. Stir gently and let it sit for about 5-10 minutes until frothy. This means your yeast is alive and ready to work its magic! 🥳
Step 2: Create the Dough
Once the yeast mixture is frothy, it’s time to add in your flour, salt, and olive oil. Mix with a wooden spoon or your hands until a shaggy dough forms. Don’t stress about having a perfectly smooth dough at this stage—we just want it to come together!
Step 3: Knead and Flour Power
Flour a clean surface and transfer the dough onto it. Knead the dough for about 6-8 minutes until it’s smooth and elastic. You can even channel your inner chef and use a dough scraper to help! If the dough sticks too much, sprinkle a bit more flour on the surface—listening to your dough is key.
Step 4: Rise and Shine
Place the kneaded dough into a lightly oiled bowl, cover it with a damp cloth, and set it in a warm spot to rise for about 1 hour. Look for it to double in size—that’s the sign you’ve got a happy yeast.
Step 5: Shape Your Pizza
Once your dough has risen, preheat your oven to the highest setting (around 475°F or 245°C). Punch down the dough to release any air bubbles and turn it out onto your floured surface. Using your hands or a rolling pin, shape it into your desired pizza size. Thin crust? Go for it! A thicker crust? Absolutely!
Step 6: Assemble the Masterpiece
Transfer your shaped dough onto a baking sheet or a pizza stone. Now, spread a thin layer of tomato sauce (or your fresh tomato slices!) over the base. Scatter the shredded mozzarella generously atop the sauce, followed by sliced tomatoes, minced garlic, and a sprinkle of salt and pepper.
Step 7: Bake and Enjoy
Slide that beauty into the oven and bake for about 10-15 minutes, or until the crust is golden and the cheese is bubbly. There’s nothing quite like the aroma wafting through your kitchen at this point—pure bliss.
Step 8: The Fresh Finish
As soon as your pizza comes out, sprinkle it with fresh basil leaves. This brightens up the dish immensely and adds a pop of vibrant color. Let it set for a minute before slicing it up to share. Sigh There’s always something gratifying about slicing into a freshly made pizza!
Serving Suggestions: Let’s Plate It Up!
To serve, I love using a wooden pizza board for that rustic pizzeria feel. Arrange your sliced pizza on the board, and consider adding a small dish of balsamic glaze or olive oil for dipping. Pair with a simple arugula salad on the side drizzled in a light lemon vinaigrette for an extra fresh touch.
Recipe Variations: Make It Yours!
-
Add Your Favorite Toppings: Feel free to get creative! Go ahead and throw on some sautéed mushrooms, olives, or even prosciutto!
-
Veggie Delight: Use roasted vegetables like bell peppers, zucchini, or artichokes for a colorful twist.
-
Spicy Kick: Add red pepper flakes to your sauce for a spicy version that’ll warm you up.
-
Cheeseboard Style: Try mixing different cheeses—fontina or gouda could bring a delightful twist!
-
Gluten-Free: Substitute all-purpose flour with a gluten-free blend to enjoy a gluten-free take on this classic recipe.
Chef’s Notes: From My Kitchen to Yours
Over the years, my Margherita pizza has seen plenty of evolution! Initially, I stuck to the classic ingredients, but as I grew in my culinary journey, I started adding personal touches like a hint of honey in the dough for a touch of sweetness. One of my funniest moments in the kitchen was when I accidentally grabbed a bag of powdered sugar thinking it was flour. Let’s just say the sweetness was not the vibe for the pizza I was going for! But hey, every mistake taught me something valuable—and today, I embrace those little mishaps as part of the journey.
FAQs and Troubleshooting
1. Why didn’t my pizza crust rise?
If your crust didn’t rise, your yeast may have been inactive or the water was too hot. Always check the temperature and freshness of your yeast!
2. My pizza got soggy—what did I do wrong?
Sogginess can happen due to too many toppings or undercooked dough. Try pre-baking the crust for a few minutes before adding your toppings to ensure a crisp base.
3. Can I make the dough ahead of time?
Absolutely! You can make the dough a day in advance. Just let it rise, then refrigerate it after punching it down. Bring it back to room temperature before shaping it.
4. What if I want a thicker crust?
To achieve a thicker crust, after shaping the dough, allow it to rise again for about 30 minutes before topping it. You can also roll it out to be slightly thicker than usual.
Nutritional Info (if applicable)
- Serving Size: 1 slice (1/8 of pizza)
- Calories: Approx. 250
- Fat: 10g
- Carbohydrates: 30g
- Protein: 10g
Pizza is all about balance; enjoying a slice every now and then can certainly add joy to your meal!
So there you have it—your very own guide to crafting a delightful Margherita pizza from scratch. This isn’t just cooking; it’s a celebration, a story, a connection. I can’t wait for you to gather around the table with family and friends, digging into your freshly baked pizza, savoring each bite together. Let’s keep the kitchen adventures alive—happy cooking! 🍕✨
PrintMargherita Pizza
A classic Margherita pizza featuring a crispy crust topped with fresh tomatoes, mozzarella cheese, and fragrant basil.
- Prep Time: 15 minutes
- Cook Time: 15 minutes
- Total Time: 30 minutes
- Yield: 4 servings 1x
- Category: Main Course
- Method: Baking
- Cuisine: Italian
- Diet: Vegetarian
Ingredients
- 2 cups all-purpose flour
- 1 packet active dry yeast
- 1 teaspoon sugar
- 3/4 cup warm water
- 1 teaspoon salt
- 2 tablespoons olive oil
- 1 cup mozzarella cheese, shredded
- 1 cup fresh tomatoes, sliced
- 1/4 cup fresh basil leaves
- 1 clove garlic, minced
- Salt and pepper to taste
Instructions
- Mix the warm water, sugar, and yeast in a large mixing bowl, then let it sit for 5-10 minutes until frothy.
- Create the dough by adding flour, salt, and olive oil. Mix until a shaggy dough forms.
- Knead the dough for 6-8 minutes on a floured surface until smooth and elastic.
- Place the dough in a lightly oiled bowl, cover it, and let it rise in a warm spot for about 1 hour.
- Preheat your oven to 475°F (245°C).
- Shape the dough by punching it down and rolling it out on a floured surface.
- Assemble by spreading tomato sauce or fresh tomato slices, adding mozzarella, sliced tomatoes, minced garlic, and seasoning.
- Bake for 10-15 minutes until the crust is golden and the cheese is bubbly.
- Sprinkle fresh basil on top and let it set before slicing.
Notes
Creative variations include adding your favorite toppings, using roasted vegetables, or a gluten-free blend.
Nutrition
- Serving Size: 1 slice
- Calories: 250
- Sugar: 1g
- Sodium: 400mg
- Fat: 10g
- Saturated Fat: 3g
- Unsaturated Fat: 5g
- Trans Fat: 0g
- Carbohydrates: 30g
- Fiber: 2g
- Protein: 10g
- Cholesterol: 15mg
Keywords: pizza, Margherita pizza, Italian recipe
Pickle Pizza
Welcome to the Zesty World of Pickle Pizza!
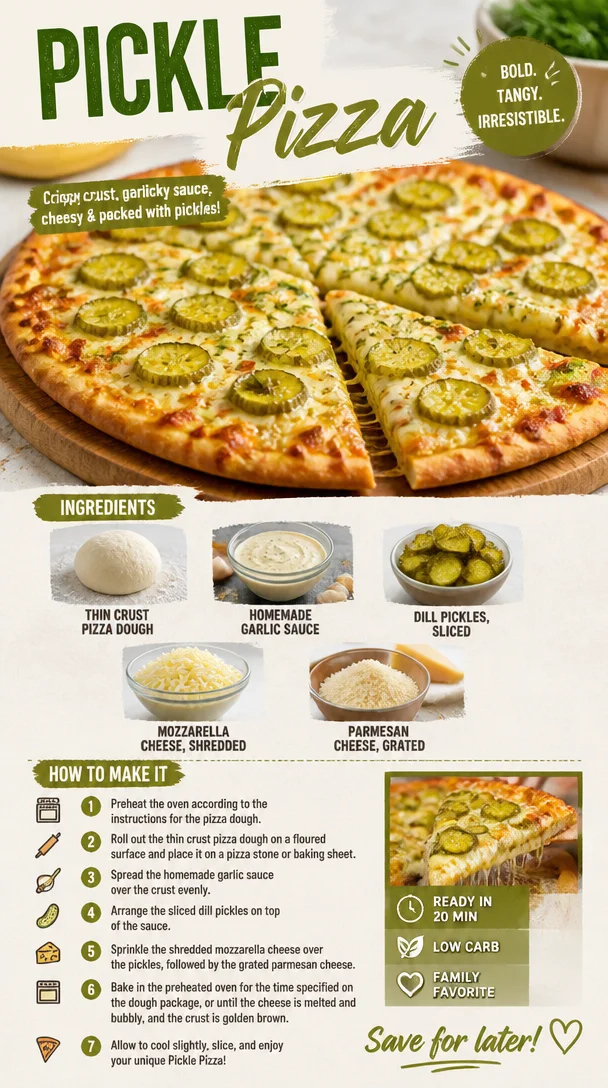
Hey there, fellow food lovers! If you’ve stumbled upon this blog, you’re in for a treat—a slice of something truly unique and utterly delicious: Pickle Pizza! This quirky combination might just be the surprise hit at your next pizza night. With the perfect balance of tangy, creamy, and savory flavors, it’s a celebration of bold tastes that will keep your taste buds dancing.
I can almost hear your questions: “Really, pickles on pizza?” Yes, my friends! This culinary adventure is not only inspired by the growing trend of unexpected toppings but also by childhood memories wrapped in the comforting aroma of homemade pizza. There’s something about pizza that unites us all; it’s like a canvas where you can paint your own flavor masterpiece. And believe me, this Pickle Pizza will become a cherished addition to your rotation, whether you share it with family, friends, or simply keep it to yourself (I won’t tell!).
As we dive into the recipe, I want to make sure we embrace the fresh, feel-good vibe of cooking. Let me guide you through this easy, approachable recipe that celebrates both the playful aspect of food and the joy of creating something that nourishes and excites.
A Slice of Nostalgia
Ah, pickles! They may not be everyone’s favorite, but for me, they represent carefree summer days spent at picnics and backyard barbecues. I remember running around, catching fireflies with friends while our parents flipped burgers and set out potato salad piled high with lovingly sliced pickles. At those gatherings, I could always count on someone bringing a jar of pickles, and when they were offered as a topping on our pizza, it was like discovering a secret ingredient that made everything better.
That first bite of Pickle Pizza was mesmerizing. It was savory, crispy, and just the right amount of tangy. I couldn’t believe how well the flavor of the pickles complemented the warm, gooey cheese and the fragrant garlic sauce. It felt like I was unlocking a whole new world of pizza possibilities. With ingredients that burst with flavor and nostalgia, I knew then that this recipe had to be shared. So let’s roll up our sleeves and get cooking!
Ingredients You’ll Need
Here’s what you’ll need to whip up your own Pickle Pizza masterpiece:
-
Thin crust pizza dough: This provides a crispy base that allows the toppings to shine. You can go for homemade or store-bought. If you’re short on time, pre-made dough is a great shortcut.
-
Homemade garlic sauce: Made from scratch, this sauce is creamy and packed with flavor. You can easily switch it up with store-bought garlic sauce if time is tight.
-
Dill pickles, sliced: These are the star of the show! Use your favorite brand or even homemade pickles if you have them. If you’re not into dill, try bread-and-butter pickles for a sweeter twist.
-
Mozzarella cheese, shredded: The classic pizza cheese! Opt for fresh mozzarella for creaminess or good ol’ shredded mozzarella for convenience. You could also switch this for dairy-free cheese for a lactose-free option.
-
Parmesan cheese, grated: This adds a punch of salty flavor and enhances the overall taste of the pizza. You can substitute it with nutritional yeast for a dairy-free alternative.
Each ingredient is key to creating that burst of flavor with every bite. Feel free to make substitutions based on what you have on hand or your dietary preferences!
Step-by-Step Instructions
Let’s get cooking! Here’s how to assemble this delightful Pickle Pizza in a few easy steps:
-
Preheat Your Oven: Preheat your oven to 475°F (245°C). A hot oven is crucial for achieving that perfect crispy crust.
-
Prepare the Dough: If you’re using store-bought dough, follow the package instructions for resting. If you’re making your dough from scratch, roll it out on a lightly floured surface to your desired thickness—thin crust is the goal!
-
Make the Garlic Sauce: In a small bowl, mix together a couple of tablespoons of mayonnaise, minced garlic (fresh or powdered), a squeeze of lemon juice, and a pinch of salt. Adjust to taste. This creamy sauce will elevate your pizza game!
-
Assemble the Pizza: Transfer your rolled-out dough onto a pizza stone or baking sheet. Spread a generous layer of the garlic sauce evenly over the crust, leaving a little room at the edges for that golden crust. Remember, this sauce is packed with flavor, so don’t skimp on it!
-
Layer on the Cheese: Sprinkle a generous amount of shredded mozzarella cheese over the garlic sauce. The more cheese, the merrier!
-
Add Those Pickles: Now for the fun part—top your pizza with the deliciously sliced dill pickles. Arrange them evenly over the cheese; feel free to go wild with the placement!
-
Sprinkle Parmesan: Finish off with a sprinkle of grated Parmesan cheese. This layer adds a touch of depth and exquisite flavor to every bite.
-
Bake to Perfection: Place the pizza in the preheated oven and bake for 12-15 minutes or until the crust is golden and the cheese is bubbly and delicious. Keep an eye on it, because every oven is different!
-
Slice and Serve: Once baked to perfection, remove from the oven and let cool for a couple of minutes. Slice it up with a pizza cutter and get ready to dig in!
Serving Suggestions
To give your Pickle Pizza a visually appealing lift, consider garnishing it with fresh dill or parsley. It adds a pop of color and freshness. Serve the slices on a rustic wooden cutting board or a bright pizza plate for an appetizing display. Pair it with a light side salad or some garlic knots for a complete meal that’ll impress everyone!
Recipe Variations
Here are a few creative twists you might love to try:
-
Spicy Kick: Add jalapeños or crushed red pepper flakes for a spicy twist that complements the tanginess of the pickles.
-
Sweet & Savory: Swap out dill pickles for bread-and-butter pickles to create a sweet and savory flavor profile.
-
Caprese Style: Add fresh tomatoes and basil along with the pickles for a Caprese-inspired twist.
-
Vegan Version: Use vegan cheese and a plant-based mayonnaise for a scrumptious vegan friendly solution.
-
BBQ Lovin’: Drizzle a bit of barbecue sauce on top of the pizza before baking for an unexpected smoky flavor that pairs wonderfully with pickles.
Chef’s Notes
Oh, how this recipe has evolved! I remember when I first brought Pickle Pizza to a potluck, and the looks I got from my friends! Most were skeptical, but curiosity (and my enthusiastic encouragement) got the best of them. To my surprise, everyone left with seconds. Insert chef fist-pump here! This dish has transformed into a beloved staple in my kitchen because it blends nostalgia with creativity—and who doesn’t love that?
Cooking is about experimentation, so don’t hesitate to make this your own. Some of the best kitchen stories come from a bit of bravery!
FAQs and Troubleshooting
1. What if my dough is too sticky?
If your pizza dough is sticking to your hands or the counter, don’t fret! Sprinkle a little more flour both on your hands and the surface to make it easier to handle.
2. Can I make the garlic sauce in advance?
Absolutely! You can prepare the garlic sauce a day ahead. Just store it in the refrigerator in an airtight container. The flavors will meld beautifully while storing!
3. My pizza crust isn’t crispy; what did I do wrong?
Ensure your oven is fully preheated before baking. If you’re still facing issues, try baking on a preheated pizza stone or a metal baking sheet, which can help maintain heat.
4. What if I don’t have any parmesan cheese?
If you’re missing Parmesan, you can skip it or substitute with your favorite hard cheese. Nutritional yeast is also a fantastic dairy-free alternative that adds a cheesy flavor.
Nutritional Info
While the specifics can vary, here’s a rough estimate for one slice of Pickle Pizza (assuming 8 slices total):
- Calories: 280
- Protein: 12g
- Carbs: 30g
- Fat: 12g
As always, be sure to adjust based on the exact ingredients you use!
There you have it, my delightful foodie friends! Pickle Pizza is ready to become a fun new favorite with its nostalgic ties and bold flavors. Whether you make it for yourself or gather friends around the table, this recipe promises laughter, good vibes, and—of course—deliciousness. So grab your ingredients, let your creativity shine, and let’s make some magic in the kitchen together! Happy cooking! 🍕✨
PrintPickle Pizza
A unique and delicious pizza topped with tangy dill pickles, creamy garlic sauce, and gooey cheese.
- Prep Time: 15 minutes
- Cook Time: 15 minutes
- Total Time: 30 minutes
- Yield: 8 servings
- Category: Main Course
- Method: Baking
- Cuisine: American
- Diet: Vegetarian
Ingredients
- Thin crust pizza dough
- Homemade garlic sauce
- Dill pickles, sliced
- Mozzarella cheese, shredded
- Parmesan cheese, grated
Instructions
- Preheat your oven to 475°F (245°C).
- Prepare the dough by following package instructions or rolling it out to desired thickness.
- Make the garlic sauce by mixing mayonnaise, minced garlic, lemon juice, and salt.
- Assemble the pizza by spreading garlic sauce over the rolled-out dough.
- Layer on shredded mozzarella cheese.
- Add sliced dill pickles evenly on top.
- Sprinkle with grated Parmesan cheese.
- Bake for 12-15 minutes or until the crust is golden and cheese is bubbly.
- Slice and serve warm.
Notes
Garnish with fresh dill or parsley for extra flavor and color. Pair with a side salad or garlic knots.
Nutrition
- Serving Size: 1 slice
- Calories: 280
- Sugar: 2g
- Sodium: 500mg
- Fat: 12g
- Saturated Fat: 4g
- Unsaturated Fat: 6g
- Trans Fat: 0g
- Carbohydrates: 30g
- Fiber: 1g
- Protein: 12g
- Cholesterol: 20mg
Keywords: pickle pizza, unique pizza, garlic sauce, vegetarian recipes, comfort food