Ingredient Strawberry Pineapple Sorbet: Quick Summer Treat
Delicious Strawberry Pineapple Sorbet Recipe for Refreshing Bliss
Introduction
Hey there, fellow food lovers! If you’re anything like me, there’s nothing quite as satisfying on a warm day as a scoop of sweet, refreshing sorbet. Today, I’m thrilled to share with you my Delicious Strawberry Pineapple Sorbet Recipe—a little slice of heaven that’s not only easy to make but also bursts with tropical flavor! There’s something magical about the combination of strawberries and pineapple; it’s like a fruity hug in every bite.
Picture this: It’s a sunny afternoon, the kids are playing in the yard, and my friends and I are lounging on the patio, sipping lemonade. The air is filled with laughter and the sweet scent of summer blooms. To top off the day, I bring out a bowl of this vibrant, homemade sorbet, and suddenly, it feels like a mini vacation! That’s the kind of bliss we all need in our lives, right?
The best part about making sorbet at home? You control the sweetness and flavors. This recipe is a great starting point, and you can even get creative with the ingredients. Are you ready to create some icy, fruity magic in your kitchen? Let’s dive in!
Personal Story
Growing up in a small town, summer was always synonymous with fresh fruit. We would often visit the local farmer’s market where the air was heavy with the aroma of ripe strawberries and pineapples. I remember one particular summer when my grandma decided to host a backyard barbecue. Amidst the burgers and hotdogs sizzling on the grill, she pulled out her old ice cream maker and announced that we were making sorbet. I still have that image in my mind—my cousins and I were on juice patrol, squeezing lemons and tasting the concoction at every stage while Grandma spun the machine like a pro.
That day, we made the most fantastic strawberry pineapple sorbet. The sweet, tangy flavor was the highlight of the meal, and it instantly cooled us down after hours of playing in the sun. It didn’t just stay as a treat; it became a family tradition, enjoyed at every gathering and barbecue. Now, as I share this recipe with you, I can’t help but smile, knowing that I’m passing down a little piece of my childhood.
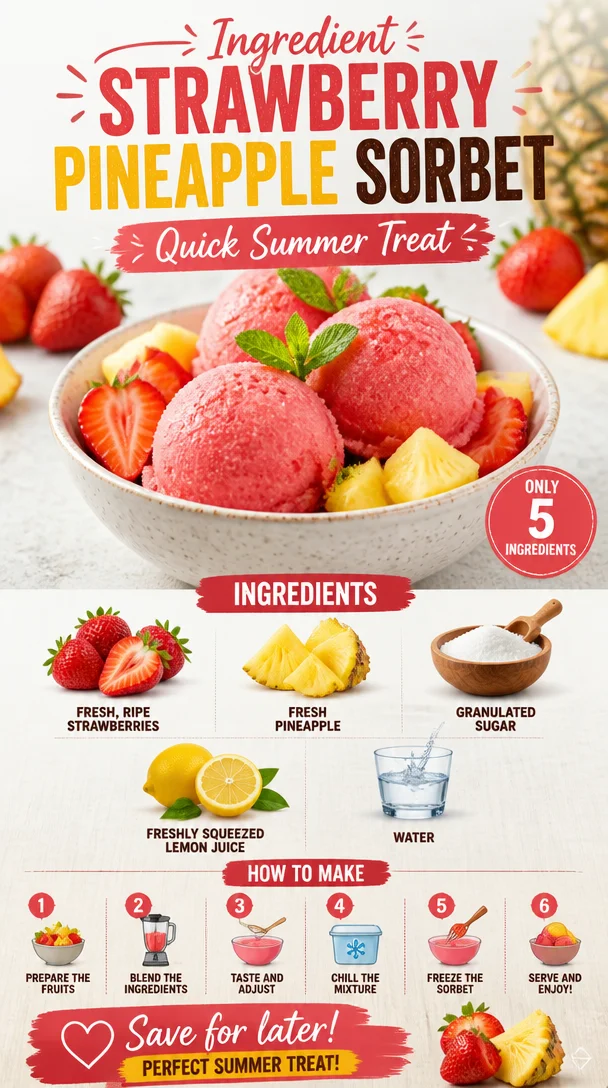
Ingredients
Let’s gather our ingredients! For this Delicious Strawberry Pineapple Sorbet, you’ll need:
-
Fresh, Ripe Strawberries: The star of our sorbet! Choose bright red, fragrant strawberries. Look for ones that are firm and shiny. You can substitute with frozen strawberries in a pinch, but fresh ones bring that unbeatable flavor.
-
Fresh Pineapple: Sweet, juicy, and tropical, fresh pineapple enhances the flavor profile of this sorbet. Prioritize ripe pineapples; they should smell fragrant at the base and feel slightly soft when pressed. Canned pineapple can work, but drain the syrup for best results.
-
Granulated Sugar: This sweetens the sorbet and helps achieve that creamy texture. You can substitute with honey or agave to make it a bit healthier, but keep in mind that it may alter the flavor slightly.
-
Freshly Squeezed Lemon Juice: This brightens the overall flavor of your sorbet and balances the sweetness. Fresh is key—bottled lemon juice just doesn’t compare in taste.
-
Water: Used for blending and creating the desired consistency. If you’d like to swap out plain water, using coconut water can elevate the tropical taste!
Step-by-Step Instructions
Now let’s roll up our sleeves and get down to business. Here’s how you’ll make the Delicious Strawberry Pineapple Sorbet!
-
Prepare the Fruit: Start by washing 2 cups of fresh strawberries. Remove the stems and cut them in half. Dice 2 cups of fresh pineapple, making sure to remove the skin and core. Place the fruit bits in separate bowls.
Chef’s Tip: Use overripe fruit for extra sweetness. If your strawberries are a little past their prime, they’ll still shine in this sorbet!
-
Blend the Strawberries: In a blender or food processor, combine the halved strawberries along with 1/2 cup of sugar and 2 tablespoons of freshly squeezed lemon juice. Blend until smooth and creamy.
Chef Hack: Give the mixture a quick taste. If your berries are sweet enough, you may not need the entire amount of sugar!
-
Blend the Pineapple: Next, combine the diced pineapple with another 1/2 cup of sugar and 2 tablespoons of freshly squeezed lemon juice. Blend until you achieve a smooth mixture.
Insider Tip: You can also add a pinch of salt to enhance the flavor of the fruit. Salt works wonders in sweets!
-
Mix it Together: Now comes the fun part! In a large bowl, fold together the strawberry and pineapple mixtures.
Chef’s Note: For a little extra zing, a splash of coconut rum can be added here—this is optional, of course, but oh-so-delicious!
-
Icy Magic Time: Transfer the mixture to a shallow container (like a baking dish) for faster freezing. Cover it with plastic wrap or a lid, and pop it in the freezer for about 4-6 hours until it’s firm.
Freezing Tip: If you’ve got a little ice cream maker, feel free to use it! Follow the manufacturer’s instructions for churning this mixture for an ultra-smooth texture.
-
Scoop and Enjoy: Once your sorbet is frozen, let it sit at room temperature for a few minutes before scooping. This helps to soften it slightly for easier serving.
Serving Note: For an elegant touch, serve your sorbet in a chilled glass and garnish with a sprig of mint or a slice of fresh fruit!
Serving Suggestions
This Delicious Strawberry Pineapple Sorbet is perfect for sunny days, barbecues, or simply as a sweet treat after dinner. Serve it in charming little bowls, topped with fresh mint or a drizzle of coconut milk for an extra tropical vibe. You can even scoop it into a waffle cone for a delightful twist!
Recipe Variations
Let’s get creative! Here are some fun variations you can try:
-
Berry Blast Sorbet: Add a cup of blueberries or raspberries to the mix for an even fruitier flavor.
-
Mango Magic: Substitute fresh mango for the pineapple for a creamy tropical delight.
-
Coconut Swirl: Mix in a little coconut cream for a richer, creamier texture and beachy flavor.
-
Herb Infusion: Experiment by muddling fresh basil or mint before blending for a refreshing herbal note.
-
Citrus Zing: Add a tablespoon of orange zest to your mixture for an extra citrus kick!
Chef’s Notes
Making this sorbet has become a summer ritual in my house, just like it was with my grandma so many years ago. I love to throw my friends into the mix for a fun afternoon of chatting and creating. Over the years, I’ve added various fruits and flavors that have marked special occasions—like turning it into a "happy birthday" treat with rainbow sprinkles or enjoying it as the perfect refreshing snack after a heat wave.
Remember, the key to a great sorbet is using ripe, fresh fruits, so always choose the best you can find. Don’t hesitate to make this recipe your own!
FAQs and Troubleshooting
Here are some common questions I often hear about making sorbet:
-
My sorbet turned out icy! What did I do wrong?
- If your sorbet has icy crystals, it may have been stored in the freezer for too long or not blended thoroughly enough. To fix it, let it soften slightly, then blend it again until smooth.
-
Can I make this sorbet without an ice cream maker?
- Absolutely! This recipe is designed to work without one. Just freeze it in a shallow dish and stir it every hour for the first three hours to break up any ice crystals.
-
How long does this sorbet last in the freezer?
- If stored properly in an airtight container, your sorbet can last up to two weeks in the freezer.
-
Can I use frozen fruit instead?
- Yes! Frozen fruit can work well, but it’s best to thaw it a bit beforehand to ensure a smooth blend.
Nutritional Info
While this recipe is a treat, it’s also light and refreshing! Each serving is naturally low in calories and packed with vitamin C from the fruit. Enjoy in moderation as part of a balanced diet—after all, life is about indulging every now and then!
And there you have it—a refreshing, delicious Strawberry Pineapple Sorbet recipe that’s brimming with flavor and summertime nostalgia. I hope you enjoy making this treat as much as I do! Cheers to sweet and sunny days ahead!
PrintDelicious Strawberry Pineapple Sorbet
A refreshing and fruity Strawberry Pineapple Sorbet, perfect for warm days and summer gatherings.
- Prep Time: 15 minutes
- Cook Time: 360 minutes
- Total Time: 375 minutes
- Yield: 4 servings 1x
- Category: Dessert
- Method: Freezing
- Cuisine: American
- Diet: Vegan
Ingredients
- 2 cups fresh, ripe strawberries
- 2 cups fresh pineapple, diced
- 1/2 cup granulated sugar
- 1/2 cup granulated sugar (for pineapple)
- 4 tablespoons freshly squeezed lemon juice
- Water (for blending)
Instructions
- Prepare the fruit: Wash strawberries, remove stems, and cut in half. Dice fresh pineapple, removing skin and core. Place in separate bowls.
- Blend the strawberries: In a blender, combine strawberries with 1/2 cup sugar and 2 tablespoons lemon juice. Blend until smooth.
- Blend the pineapple: Combine diced pineapple with 1/2 cup sugar and 2 tablespoons lemon juice. Blend until smooth.
- Mix it together: Fold strawberry and pineapple mixtures in a large bowl.
- Icy magic time: Transfer the mixture to a shallow container and freeze for about 4-6 hours until firm.
- Scoop and enjoy: Let sit at room temperature for a few minutes before scooping.
Notes
For added flavor, try mixing in a splash of coconut rum or serving with fresh mint.
Nutrition
- Serving Size: 1 serving
- Calories: 120
- Sugar: 25g
- Sodium: 5mg
- Fat: 0g
- Saturated Fat: 0g
- Unsaturated Fat: 0g
- Trans Fat: 0g
- Carbohydrates: 31g
- Fiber: 1g
- Protein: 1g
- Cholesterol: 0mg
Keywords: sorbet, strawberry, pineapple, dessert, summer treat
Ingredient Peach Sorbet in 10 Minutes: Creamy Summer Treat
The Best Peach Sorbet: A Summer Delight
As the sun begins to warm the days and the sweet scent of summer fills the air, there’s nothing quite like the juicy burst of a ripe peach. For me, peaches are the quintessential summer fruit—a nostalgic reminder of childhood summers spent roaming orchards and indulging in sweet, messy peach slices. That’s why I’m thrilled to share my simple, dreamy Peach Sorbet recipe with you.
Imagine this: you’ve just spent a sun-soaked day at the beach, and the golden hour is painting the sky in shades of pink and orange. You come home and whip up this refreshing sorbet that not only cools you down but also brings the fresh flavors of summer right to your kitchen. This is the magic of making your own sorbet! Best of all, it’s incredibly easy and uses just a handful of simple ingredients.
The beauty of this recipe is that it captures the sweet, fragrant essence of fresh peaches without any fuss—no ice cream maker required! Whether you’re looking for a delightful dessert to impress your friends, a refreshing treat for kids, or a simple way to utilize those juicy peaches before they spoil, this Peach Sorbet checks all the boxes. Plus, it’s a great way to enjoy a lighter dessert without sacrificing flavor.
So grab those peaches from your local farmers’ market (or your backyard tree if you’re lucky!) and let’s dive into this deliciously fresh adventure. I promise you; this sorbet will become your go-to summer treat!
A Nostalgic Memory with Peaches
Let me take you back to my grandmother’s backyard in the heart of summer. It was a riot of color—vibrant flowers blooming, grass so green it almost felt electric underfoot, and those charmingly crooked peach trees laden with fruit. My cousins and I spent endless hours climbing those trees, trying to reach the highest peaches. How many times did we tumble, giggling, into the grass, red juice dripping down our chins? Too many to count!
One memorable day, my grandmother decided it was time to put our peach-picking spoils to good use. She gathered us into the kitchen, where the aromas of vanilla and citrus filled the air. Together, we sliced up the peaches and made a simple sorbet that would cool us down after our adventures. It became a family tradition—a sweet way to celebrate summer while passing down wisdom and laughter.
This memory stayed with me, fueling my love for fresh, light desserts. Today, every spoonful of that peach sorbet takes me right back to those blissful summer afternoons spent in my grandmother’s kitchen.
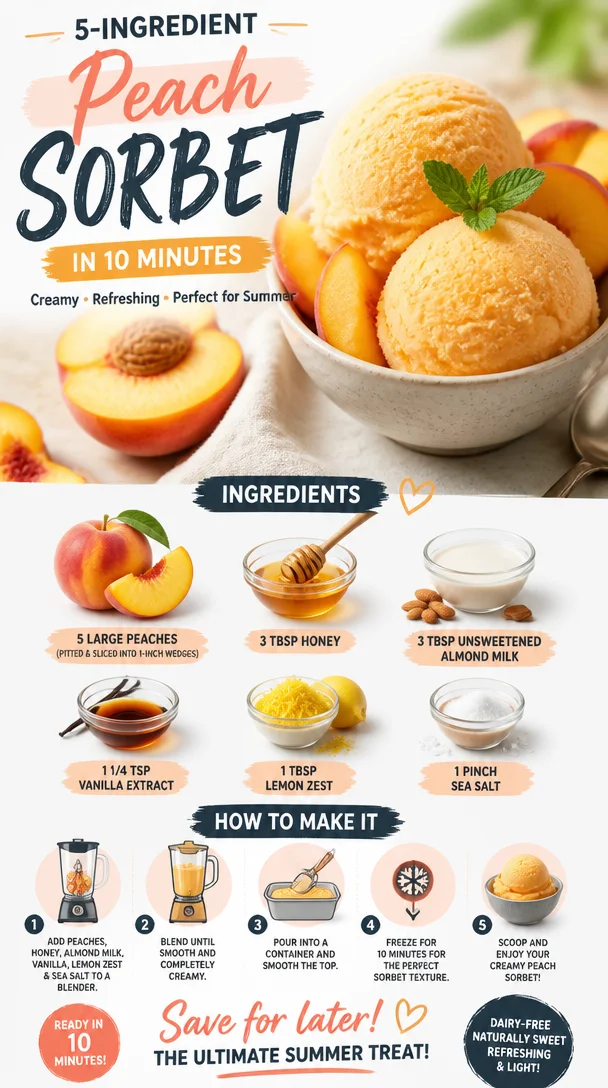
Ingredients You’ll Need
-
5 large peaches: The star of the show! Opt for ripe, juicy peaches for the best flavor. If peaches are out of season, feel free to substitute with nectarines or frozen peaches for a brisk flavor.
-
3 tbsp honey: A natural sweetener that enhances the peach’s natural sugars. Agave syrup or maple syrup works as an excellent alternative.
-
3 tbsp unsweetened almond milk: This keeps things creamy while keeping it dairy-free. If you prefer, you can substitute with coconut milk or regular milk for a richer texture.
-
1 1/4 tsp vanilla extract: Adds a lovely depth of flavor. If you’re feeling adventurous, try using a splash of almond extract for a different twist.
-
1 tbsp lemon zest: This ingredient brings brightness to the dessert and balances the sweetness of the peaches. If you don’t have lemon, lime zest adds a fun twist!
-
1 pinch sea salt: Just a touch to enhance all the flavors. Never underestimate the power of salt in sweet dishes!
Step-by-Step Instructions
-
Prepare the Peaches: Start by washing the peaches thoroughly. Using a sharp knife, slice them into wedges and remove the pits. This is the time to get your hands a little sticky! The more ripe the peaches, the easier they’ll slice.
-
Sweeten It Up: Place the peach wedges into a blender or food processor. Add the honey, almond milk, vanilla extract, lemon zest, and sea salt. Blend until incredibly smooth. Think of this as peach purée magic!
-
Taste and Adjust: Here’s a little chef’s hack—always taste the mixture! If you feel it needs a tad more sweetness, add a bit more honey. If you want more zesty flavor, go ahead and add a squeeze of lemon juice.
-
Chill It Down: Once blended, pour the mixture into a shallow dish or a freezer-safe container. This will help it freeze faster and more evenly.
-
Freeze: Pop the container into the freezer for about 2-3 hours. Every 30 minutes, give it a gentle stir with a fork to break up any ice crystals and create a smoother texture. This step is key to a creamy sorbet!
-
Serve and Enjoy: After 2-3 hours, your sorbet should have firmed up beautifully. Now it’s time to scoop! Use an ice cream scoop to serve it up in bowls or cones. If the sorbet is too hard after freezing, let it sit at room temperature for a few minutes to soften before serving.
Serving Suggestions
Scoop your gorgeous peach sorbet into a pretty bowl or a fun ice cream cone. Drizzle a little extra honey over the top for an elegant touch, or garnish with fresh mint leaves for a pop of color. You could also serve it alongside a slice of almond cake or as a topping for yogurt for a refreshing breakfast treat.
Recipe Variations
-
Raspberry Peach Sorbet: Mix in a cup of fresh raspberries to add a bright tartness to your peach sorbet. This duo is juicy and vibrant!
-
Peach Basil Sorbet: For a unique twist, incorporate freshly chopped basil into the mixture before freezing. The result? A refreshing garden-inspired treat.
-
Peach Mango Magic: Substitute half of the peaches with ripe mangoes for a tropical take on this classic recipe.
-
Spicy Ginger Peach: For a kick, add a teaspoon of finely grated ginger. It elevates the flavors to a whole new level, and you’ll love the zing!
-
Coconut Peach Sorbet: Use coconut milk instead of almond milk for a creamy, tropical flavor that’s reminiscent of vacations by the beach.
Chef’s Notes
This recipe is one of those delightful concoctions that has evolved with me over the years. I started with a basic sorbet recipe years ago and have tinkered with it to create my version that is not only scrumptious but also healthy, relying on natural ingredients.
Oh, and here’s a funny little kitchen story: the first time I tried making it, I was too impatient and didn’t stir it enough while freezing. I ended up with a solid block of ice! Lesson learned: patience is key when it comes to creating the perfect sorbet!
FAQs and Troubleshooting
Can I use frozen peaches?
Absolutely! Frozen peaches work wonderfully; just let them thaw for a bit before blending. The flavor will still be delightful, just like summer!
Why is my sorbet icy instead of smooth?
If you didn’t stir it enough while freezing, ice crystals can form, leading to a grainy texture. To avoid this, remember to break it up with a fork every 30 minutes.
How can I store leftovers?
Keep any leftover sorbet in a tightly sealed container. If it hardens too much, let it sit at room temperature for a few minutes before scooping.
Can I make this ahead of time?
Definitely! You can make this up to a week in advance. Just make sure to store it properly in the freezer.
Nutritional Info
This delightful sorbet is not only refreshing but also packed with nutrients. Each serving is low in calories, contains natural sugars from the peaches, and is free from dairy and artificial additives. Enjoy guilt-free!
In conclusion, this Peach Sorbet is a fresh, delicious, and easy way to celebrate summer’s bounty. I hope it brings back sweet memories for you, just as it does for me. So grab those peaches, blend away, and treat yourself—summer is waiting! Enjoy every flavorful spoonful!
PrintThe Best Peach Sorbet
A refreshing peach sorbet that captures the sweet essence of summer with just a handful of simple ingredients.
- Prep Time: 15 minutes
- Cook Time: 180 minutes
- Total Time: 195 minutes
- Yield: 4 servings 1x
- Category: Dessert
- Method: Freezing
- Cuisine: American
- Diet: Vegan
Ingredients
- 5 large peaches, sliced
- 3 tbsp honey
- 3 tbsp unsweetened almond milk
- 1 1/4 tsp vanilla extract
- 1 tbsp lemon zest
- 1 pinch sea salt
Instructions
- Prepare the peaches by washing and slicing them into wedges.
- Sweeten it up by placing the peach wedges into a blender and adding honey, almond milk, vanilla, lemon zest, and salt.
- Taste and adjust as needed for sweetness or zestiness.
- Chill the blended mixture in a shallow dish or freezer-safe container.
- Freeze for about 2-3 hours, stirring every 30 minutes to break up ice crystals.
- Serve and enjoy scooping it into bowls or cones.
Notes
For extra elegance, drizzle honey or garnish with mint leaves before serving. This recipe is versatile with variations like Raspberry Peach or Spicy Ginger Peach.
Nutrition
- Serving Size: 1 serving
- Calories: 150
- Sugar: 20g
- Sodium: 5mg
- Fat: 2g
- Saturated Fat: 0g
- Unsaturated Fat: 2g
- Trans Fat: 0g
- Carbohydrates: 35g
- Fiber: 2g
- Protein: 1g
- Cholesterol: 0mg
Keywords: peach, sorbet, summer dessert, fruity dessert, vegan
Grilled Pineapple with Ice Cream: Summer Dessert in Minutes
The Sweet Simplicity of Grilled Pineapple with Ice Cream
Welcome back, food lovers! Today, we’re going to embark on a delightful culinary adventure that marries sweet and savory—think backyard barbecues and warm, sun-drenched days. I’m talking about Grilled Pineapple with Ice Cream! If you’ve never tried this indulgent treat, you are in for a real surprise. Whether you’re throwing a summer bash or just craving a sweet bite after dinner, this dish is about to become your new best friend.
Picture this: It’s a sunny Saturday afternoon, and the grill is sizzling with a mix of aromas—burgers, veggies, and of course, pineapple. As the fragrant, caramelized fruit comes off the grill, it’s drizzled with honey and topped with a perfect scoop of creamy ice cream. Ah, bliss! It’s a dessert that feels incredibly easy yet impressively gourmet. Plus, it’s gluten-free and can be made vegan, too! Let’s dive into the juicy details of crafting this refreshing dish.
A Family Tradition
Growing up, summer always meant family BBQs. My parents made a killer spread that could please any palate, but it was my grandma’s grilled pineapple that stole the show. I still remember helping her in the kitchen, excitedly peeling and cutting the pineapple as she regaled me with stories about her childhood in Hawaii, where fresh fruit was always in abundance. She introduced me to the magic of caramelizing pineapple over the grill—how the heat transforms it from ordinary to extraordinary, enhancing its sweetness and adding a smoky depth.
One afternoon, in the haze of laughter and sizzling food, Grandma surprised us by serving the grilled pineapple alongside a scoop of creamy vanilla ice cream. The contrast of temperatures and flavors was heavenly! That moment stuck with me and became a cherished memory—a simple, joyful celebration of summer and family. Fast forward to today, where I find myself recreating this beloved dessert, and I can’t wait to share it with you!
Ingredients
To whip up this delightful dessert, you’ll need just a few simple ingredients. Here’s what you’ll need:
-
1 ripe pineapple
Choose a pineapple that’s slightly soft to the touch and gives off a sweet aroma. This ensures maximum ripeness and sweetness! -
1 tablespoon brown sugar
This adds a wonderful caramel flavor! You can substitute with coconut sugar for a more health-conscious option. -
1 tablespoon honey
Honey enhances the sweetness and helps create a gorgeous glaze. If you prefer, maple syrup works well too for a vegan-friendly swap. -
1 teaspoon cinnamon
Cinnamon brings warmth and a touch of spice to the dish. Feel free to swap it with nutmeg for a more exotic flavor. -
Ice cream (any flavor)
The traditional choice is vanilla, but feel free to go wild! Coconut, mango, or even a rich chocolate will elevate this dish.
Step-by-Step Instructions
Ready to get grilling? Let’s break down the steps to create this fruit-forward delight.
-
Prepare Your Pineapple
Begin by slicing off the top and bottom of the pineapple, creating flat surfaces. This will help stabilize it while you cut. Stand it upright and slice it vertically into quarters, then remove the core. Cut each quarter into thick slices (about an inch)—think of them like steak cuts for grilling! The thicker, the better for those lovely grill marks! -
Make the Glaze
In a small bowl, mix together your brown sugar, honey, and cinnamon. This mixture will be the star of the show! It adds both a sweet glaze and a deep, smoky flavor when grilled. Make sure to mix until it’s smooth and the sugar begins to dissolve slightly. -
Preheat the Grill
Fire up your grill! You want it to be nice and hot. A charcoal grill can provide that smoky flavor, but a gas grill works fine too. Preheat to medium-high heat (around 400°F) for the best results. If you’re indoors, a stovetop grill pan will also do the trick! -
Brush and Grill
Now it’s time to get those pineapples sizzling! Brush one side of the pineapple slices generously with the sugar-honey glaze. Place them on the grill, cut side down. Let them cook for about 3-4 minutes until you see those beautiful grill marks developing—not to mention that fantastic smell! -
Flip and Glaze Again
After 3-4 minutes, flip the pineapple slices and brush the other side with more glaze. This step is crucial; the caramelization will enhance the flavors! Grill for another 3-4 minutes until the pineapple is tender and golden. You should have a nice char without burning it—just a little patience pays off here! -
Serve with Ice Cream
Once perfectly grilled, take your pineapple off the grill and let it cool for a minute (though it’s hard to wait!). Scoop your desired flavor of ice cream and place it right on top. Allow it to melt slightly over the warm pineapple for that beautiful contrast—a divine experience!
Serving Suggestions
To serve, arrange your grilled pineapple slices on a quaint plate, drizzle with a little extra honey if desired, and add that scoop of ice cream right in the middle. Garnish with fresh mint leaves for a pop of color. This isn’t just a dessert; it’s a feast for the eyes! Whether it’s after dinner or as a special treat at a summer gathering, your guests will be tantalized.
Recipe Variations
This dish is beautifully versatile! Here are a few fun twists to consider:
-
Tropical Twist: Add a layer of toasted coconut on top of your ice cream for more crunch and flavor.
-
Spicy Kick: Sprinkle some chili powder or cayenne pepper over the glaze for a sweet-heat combo that pops!
-
Nutty Delight: Top your ice cream with crushed nuts, such as pecans or almonds, for added crunch and protein.
-
Ice Cream Sandwich: Sandwich the grilled pineapple between two cookies or brownies for a messy, but incredibly delicious dessert!
-
Alcohol Infusion: Drizzle with a touch of dark rum or coconut rum over the pineapple before grilling, adding an adult twist!
Chef’s Notes
Over the years, this recipe has taken on many forms, evolving alongside my culinary journey. Sometimes I’ve added spices like cardamom or vanilla for depth and variety. And let’s not forget the countless times I’ve accidentally burnt a piece or two, but hey, that’s the beauty of cooking—learning from those crispy mistakes! You never know what flavor magic can happen! This dish is about living, laughing, and loving food—all while making our taste buds dance!
FAQs and Troubleshooting
Q1: My pineapple turned out too mushy; what did I do wrong?
A: It’s likely that the pineapple was overripe. Look for pineapples that feel just slightly soft and smell sweet.
Q2: Can I make this ahead of time?
A: While grilled pineapple is best fresh, you can prep your pineapple slices and glaze in advance. Grill them right before serving!
Q3: I don’t have a grill. Can I use the oven?
A: Absolutely! You can broil the pineapple slices in the oven on high for about 5-7 minutes, flipping halfway. Just keep an eye on it!
Q4: Can I use canned pineapple?
A: While fresh pineapple is best, you can use canned. Just make sure to drain and pat them dry to avoid too much liquid while grilling.
Nutritional Info
For a serving of Grilled Pineapple with Vanilla Ice Cream, you’re looking at:
- Calories: Approx. 300 per serving
- Protein: 3g
- Carbohydrates: 50g
- Fat: 10g (varies based on ice cream choice)
- Fiber: 2g
Enjoy this light and refreshing treat guilt-free and embrace the sweetness of the moment!
Grilled Pineapple with Ice Cream isn’t just a recipe; it’s an experience, a taste of nostalgia, and the perfect ending to any meal or summer evening. Whether it’s the accent of cinnamon, the sweetness of the honey, or the warmth of the grill, allow this dessert to transport you to a sun-kissed, carefree day. So fire up that grill, and let’s savor every bite together! Happy grilling! 🍍✨
PrintGrilled Pineapple with Ice Cream
A delightful dessert featuring caramelized grilled pineapple topped with creamy ice cream, perfect for summer gatherings.
- Prep Time: 10 minutes
- Cook Time: 8 minutes
- Total Time: 18 minutes
- Yield: 4 servings 1x
- Category: Dessert
- Method: Grilling
- Cuisine: American
- Diet: Vegetarian
Ingredients
- 1 ripe pineapple
- 1 tablespoon brown sugar
- 1 tablespoon honey
- 1 teaspoon cinnamon
- Ice cream (any flavor)
Instructions
- Prepare your pineapple by slicing off the top and bottom, then cutting it into thick slices.
- Make the glaze by mixing brown sugar, honey, and cinnamon in a small bowl.
- Preheat your grill to medium-high heat (around 400°F).
- Brush one side of the pineapple slices with the glaze and place them on the grill.
- Flip the pineapple after 3-4 minutes and glaze the other side.
- Serve your grilled pineapple warm with a scoop of ice cream on top.
Notes
Drizzle with extra honey and garnish with mint for serving.
Nutrition
- Serving Size: 1 serving
- Calories: 300
- Sugar: 25g
- Sodium: 10mg
- Fat: 10g
- Saturated Fat: 5g
- Unsaturated Fat: 5g
- Trans Fat: 0g
- Carbohydrates: 50g
- Fiber: 2g
- Protein: 3g
- Cholesterol: 30mg
Keywords: grilled pineapple, dessert, summer recipe, ice cream, barbecue, easy dessert, nostalgic recipe