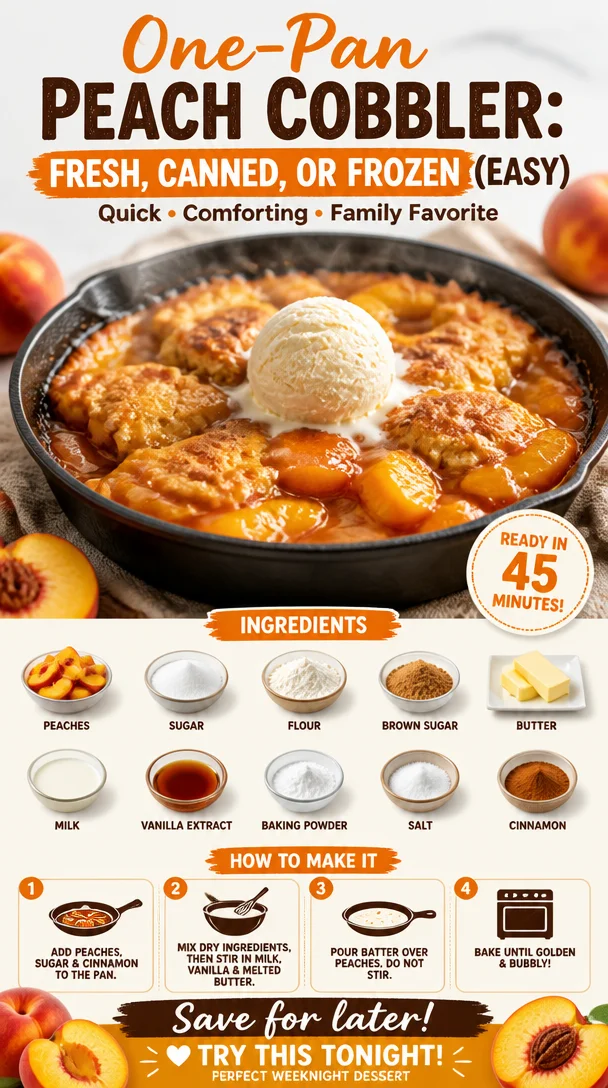
One-Pan Peach Cobbler: Fresh, Canned, or Frozen (Easy)
The Ultimate Homemade Peach Cobbler Recipe: A Sweet Slice of Nostalgia
Ah, peach cobbler. The very mention of it can transport you back to those sunny afternoons of your childhood, where the air was thick with laughter, sweet summer breezes, and the tantalizing aroma of baked peaches wafting through the kitchen. If your mouth is already watering, you’re in good company! Whether you’re using fresh, canned, or frozen peaches, this homemade peach cobbler recipe is a delightful way to embrace that nostalgia while creating a dish that will have everyone swooning.
Now, I can’t emphasize enough how this recipe is not just about throwing some peaches in a dish and slapping a crust on top. Oh no, my friends, this is about crafting a love letter to summer. My journey with peach cobbler started in my grandmother’s kitchen, where she would pull out her old, worn cookbook and remind me that the secret to a perfect cobbler is all about balance—sweetness, warmth, and that irresistible flaky crust that crumbles just right.
Some of my fondest memories are tied to helping her prepare this dish, learning the art of patience as we let those peaches marinate with a sprinkle of sugar, and watching them transform into a bubbling, golden masterpiece in the oven. So, while you’re mixing, baking, and savoring, know that you’re not just whipping up dessert; you’re creating memories, just like I did with my beloved grandma.
And here’s the best part: You can enjoy this peach cobbler no matter the season! Using fresh peaches in summer or those frozen gems straight out of your freezer makes it a year-round staple. Ready to dig into this deliciousness? Let me share the simple steps you need to create your own peach cobbler masterpiece!
Ingredients
-
Peaches (fresh, canned, or frozen): Use about 4 cups for this recipe. Fresh peaches are amazing in summer, but if you have canned or frozen on hand, they work just as well. If using frozen, let them thaw but don’t drain the juices—who doesn’t love a little extra peachy goodness?
-
Granulated sugar: About ¾ cup for sweetening the peaches and enhancing their natural flavors. You can adjust this based on the sweetness of your peaches or swap for coconut sugar for a healthier twist.
-
All-purpose flour: You’ll need 1 cup for the cobbler topping. Gluten-free flour blends can substitute here. Just be sure to check that they have xanthan gum for proper binding!
-
Baking powder: 2 teaspoons is what we’ll need to give our crust a nice rise. Make sure it’s fresh for the best results!
-
Salt: A pinch (about ¼ teaspoon) will enhance the flavors in both the peaches and the topping. It’s magic, I tell you!
-
Milk: ½ cup of milk (dairy or plant-based) will bring everything together in our cobbler batter. Almond or oat milk works beautifully if you’re dairy-free.
-
Butter: ½ cup (1 stick), melted. Butter makes everything better! If you prefer oil, coconut oil is a great alternative, just be sure it’s melted too.
-
Vanilla extract: 1 teaspoon adds that extra layer of flavor. Feel free to get creative with other extracts like almond or even a hint of cinnamon.
Step-by-Step Instructions
-
Preheat your oven: Start by preheating your oven to 375°F (190°C). This allows the peach cobbler to bake evenly and ensures you get that golden-brown crust.
-
Prepare the peaches: In a mixing bowl, toss your prepared peaches with ½ cup of sugar. If you’re using fresh peaches, peel, slice, and dice them. For frozen peaches, just let them thaw until they can be cut into manageable slices. Let this mixture sit while the sugar works its magic to draw out the juices—about 15 minutes is perfect.
-
Make the batter: In another bowl, whisk together the flour, remaining sugar, baking powder, and salt. This dry mix is the base of your topping. Then, gradually whisk in the milk and melted butter (and vanilla extract if you’re using it) until everything is smooth and combined. Don’t overmix; it’s okay if there are a few lumps!
-
Combine fruit and batter: Pour the peach mixture into a greased baking dish (about 9×13 inches works great) and then gently spoon your batter over the top. You want those bubbling juices to peek through the batter without completely mixing.
-
Bake it up: Slide your cobbler into the oven, and bake for about 30-40 minutes, or until the topping is golden brown and a toothpick inserted comes out clean. Keep an eye on it—if the edges start to darken too quickly, you can tent it with foil.
-
Cool and serve: Once it’s out of the oven, let it cool for about 15 minutes before serving. This helps the juices set a bit, but let’s be real—it’s hard to resist digging in right away!
Serving Suggestions
Serve this peach cobbler warm with a generous scoop of vanilla ice cream or a dollop of whipped cream for the ultimate indulgence. If you’re feeling fancy, sprinkle some toasted almonds or pecans on top for a lovely crunch. It’s also delightful with a drizzle of caramel sauce or a sprinkle of cinnamon for extra warmth!
Recipe Variations
-
Berry Peach Cobbler: Mix in some fresh or frozen blueberries or raspberries for a delightful burst of flavor.
-
Spicy Peach Cobbler: Add a teaspoon of cinnamon and a pinch of nutmeg to the peach mixture for a seasonal twist that warms up those cozy evenings.
-
Coconut Peach Cobbler: Substitute half the milk for coconut milk, and sprinkle shredded coconut on top for a tropical vibe.
-
Oat Topping: Swap half of the flour for rolled oats to create a chewy, hearty topping that adds texture and nutrition.
Chef’s Notes
This peach cobbler recipe has seen its fair share of evolution in my kitchen over the years. What started as a classic dish has transformed into a vehicle for creativity. I can’t tell you how many times I’ve mixed fruits or added unexpected spices just to see what would happen! Some experiments turned into instant favorites.
My funniest kitchen story with peach cobbler involves using lavender instead of vanilla once—I thought I was being inventive but ended up with a very floral dessert! It was a polite "no, thank you" from my friends that day. Now I stick with beloved flavors but still keep that spirit of experimentation alive.
FAQs and Troubleshooting
1. My cobbler topping is too dense. What went wrong?
- This could be due to overmixing the batter. Aim for a lumpy but uniform batter—mix just until you combine. Too much mixing can lead to gluten development, making your topping dense.
2. How do I know when it’s done?
- The cobbler is finished when the top is golden brown, and the juices are bubbling around the edges. A toothpick inserted into the center of the topping should come out clean or with a few moist crumbs (not wet batter).
3. Can I make this ahead?
- Yes! You can prepare it a few hours in advance and keep it covered in the fridge before baking. Just add about 5-10 minutes to the baking time if baking straight from the fridge.
4. What if I don’t have any peaches?
- No problem! You can substitute with almost any fruit you like, such as apples, cherries, or even mixed frozen berries. Just adjust the sugar according to the sweetness of the fruit.
Nutritional Info
While peach cobbler is definitely a treat, it can be made a bit healthier without losing any of its deliciousness! Each serving (assuming 9 servings from the above recipe) contains approximately:
- Calories: 250
- Protein: 3g
- Carbohydrates: 38g
- Fat: 10g
- Fiber: 2g
And there you have it—a sweet slice of nostalgia that’s easy to recreate no matter the time of year. So gather up those peaches, call your friends and family, and make some memories with this fabulous peach cobbler! Happy cooking! 🍑✨
PrintUltimate Homemade Peach Cobbler

A delightful and nostalgic peach cobbler recipe, perfect for any season using fresh, canned, or frozen peaches.
- Prep Time: 15 minutes
- Cook Time: 40 minutes
- Total Time: 55 minutes
- Yield: 9 servings 1x
- Category: Dessert
- Method: Baking
- Cuisine: American
- Diet: Vegetarian
Ingredients
- 4 cups peaches (fresh, canned, or frozen)
- ¾ cup granulated sugar
- 1 cup all-purpose flour
- 2 teaspoons baking powder
- ¼ teaspoon salt
- ½ cup milk (dairy or plant-based)
- ½ cup butter, melted
- 1 teaspoon vanilla extract
Instructions
- Preheat your oven to 375°F (190°C).
- Prepare the peaches by tossing them with ½ cup of sugar in a mixing bowl.
- Make the batter by whisking together flour, remaining sugar, baking powder, and salt, then gradually whisk in milk and melted butter.
- Combine the peach mixture with the batter by pouring the peaches into a greased baking dish and spooning the batter over the top.
- Bake for about 30-40 minutes or until the topping is golden brown.
- Cool for about 15 minutes before serving.
Notes
Serve warm with vanilla ice cream or whipped cream for the ultimate treat. Feel free to mix in other fruits or spices for variations.
Nutrition
- Serving Size: 1 serving
- Calories: 250
- Sugar: 10g
- Sodium: 150mg
- Fat: 10g
- Saturated Fat: 6g
- Unsaturated Fat: 3g
- Trans Fat: 0g
- Carbohydrates: 38g
- Fiber: 2g
- Protein: 3g
- Cholesterol: 30mg
Keywords: peach cobbler, dessert, summer recipe, baked dessert, nostalgic dessert
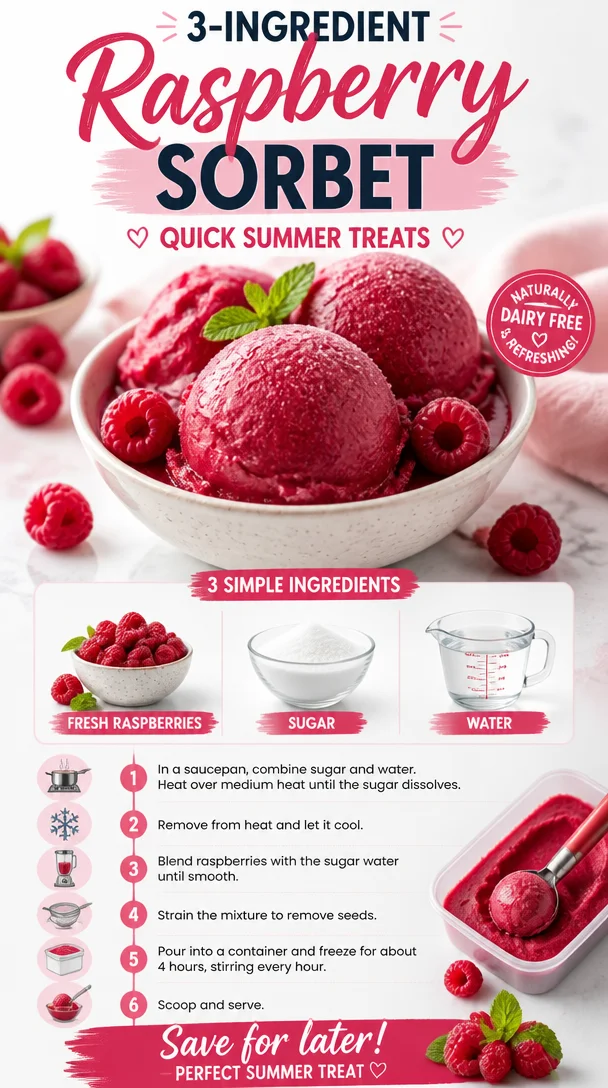
Ingredient Raspberry Sorbet: Quick Summer Treats
Refreshed and Revitalized: How to Make Perfect Raspberry Sorbet
Nothing screams summer like a refreshing scoop of homemade raspberry sorbet. It’s that perfect treat that strikes a balance between indulgent and guilt-free, and the best part? You can whip it up in your own kitchen with just a few simple ingredients. Today, we’re diving into the juicy world of raspberry sorbet—trust me, this recipe will soon become your go-to for cooling off on warm days or impressing guests at summer gatherings.
But first, let’s talk about why raspberry sorbet holds a special place in my heart. Picture this: it’s a sunny afternoon, the kind of day where the air feels light and the sun casts a golden glow over everything. As a child, I spent those days at my grandma’s house, where she always managed to have the best treats stashed away in her freezer. One of my favorites? Her homemade raspberry sorbet. It was vibrant, so bright in color, and equally bursting with flavor. Each spoonful transported me to berry fields, where I could imagine myself picking ripe, juicy raspberries under the warm sun.
When I asked her how she made it, she chuckled and said, “Oh dear, it’s much simpler than you think! Just fresh raspberries, some sugar, and a little bit of water. It’s all about letting the fresh fruit shine.” And shine it did! The moments spent savoring her sorbet with the laughter and joy of family surrounding me made those summers unforgettable. Now, I’m excited to share her simple yet delightful recipe with all of you so that you can create your own sweet memories!
Ingredients
Here’s what you need to make this delightful raspberry sorbet:
-
2 cups fresh raspberries
Raspberries are the star of the show! These little gems are not only delicious, but they’re also packed with antioxidants and vitamins. If fresh raspberries are unavailable, you can substitute with frozen raspberries—just thaw them before blending. -
1 cup sugar
Sugar helps extract the sweetness from the berries and gives the sorbet its signature texture. If you’re looking for a healthier option, consider using honey or agave syrup, though you may need to adjust the quantity based on taste. -
1 cup water
The water helps create a smoother texture in the sorbet. If you’re feeling adventurous, you could use coconut water or a splash of fruit juice to introduce a hint of extra flavor.
Step-by-Step Instructions
Ready to get started? Let’s whip up some raspberry sorbet!
-
Prepare the Raspberries
Start by rinsing the fresh raspberries gently under cool water. Be careful not to squish them! Pat them dry with a paper towel or clean kitchen cloth. Fresh berries are the heart of this recipe, so starting with quality fruit is key. -
Make the Simple Syrup
In a saucepan, combine 1 cup of sugar and 1 cup of water over medium heat. Stir until the sugar is completely dissolved. This will only take a few minutes. Gently simmer if you want to bring out the flavors, but there’s no need to boil. Once the syrup is clear and has thickened slightly, remove it from the heat and let it cool for about 10 minutes.Chef’s Tip: You can infuse your simple syrup with a splash of lemon juice or mint leaves for an added twist!
-
Blend it Up
Once your syrup has cooled, combine the fresh raspberries in a blender or food processor. Pour the cooled syrup over the raspberries and blend until you achieve a smooth mixture. It should look luscious and bright!Chef’s Insight: If you prefer a chunkier texture, you can pulse the blender instead of blending continuously. This will retain some raspberry seeds that give the sorbet a delightful crunch.
-
Strain the Mixture
For a super smooth sorbet, strain the blended mixture through a fine-mesh sieve into a bowl. This will help remove the seeds, resulting in a creamy texture that’s perfect for scooping. Use a spatula to press the mixture, getting every last drop of sorbet goodness. -
Chill Out Time
Pour the strained mixture into an airtight container and place it in the freezer. Allow it to freeze for about 4-6 hours, or until it’s firm yet scoopable. If you plan ahead, you can prep this the night before for a really easy dessert the next day.Pro Tip: Stir the mixture every hour during freezing to help break up any ice crystals and achieve that silky sorbet texture.
-
Scoop and Serve
Once the sorbet is frozen and ready to be enjoyed, take it out and let it sit at room temperature for a few minutes before attempting to scoop. It’ll be more pliable, making it easier to dish out into bowls or cones.
Serving Suggestions
When it comes to serving raspberry sorbet, a little creativity goes a long way! I love serving it in chilled bowls garnished with fresh mint leaves or a sprinkle of lemon zest. If you’re feeling fancy, consider creating a sorbet float by layering it with sparkling water or lemonade—talk about a refreshing treat!
Recipe Variations
- Berry Blast: Swap out some of the raspberries for other berries like strawberries, blueberries, or blackberries for a mixed berry sorbet.
- Citrus Burst: Add a squeeze of fresh lemon or lime juice into the mix for a zesty kick that brightens up those raspberry flavors.
- Tropical Twist: Incorporate some coconut milk for added creaminess, transforming your sorbet into a tropical delight.
- Herbaceous Infusion: A hint of basil or rosemary can elevate the flavors, making for a sophisticated sorbet perfect for dinner parties.
- Chocolate Drizzle: Once served, drizzle some melted dark chocolate on top for an indulgent treat that balances the tartness of the raspberries.
Chef’s Notes
Every time I make raspberry sorbet, I’m reminded of my grandma and her wisdom—keeping recipes simple and letting the natural flavors shine. What I love about this sorbet is that it’s not just a sweet snack; it’s an experience to enjoy with loved ones. Over the years, I’ve played with this basic recipe, infusing fresh herbs or creating flavors that evoke special moments. No matter how you choose to make it, the joy of creating and sharing it is what truly matters.
FAQs and Troubleshooting
Q: My sorbet turned out too icy. What happened?
A: If your sorbet is icy, this often happens because it hasn’t been stirred enough while freezing. Next time, be sure to stir every hour or consider using an ice cream maker for a creamier texture.
Q: Can I use frozen raspberries instead of fresh?
A: Absolutely! Just be sure to thaw them slightly before blending. Frozen fruit can often yield even more intense flavor!
Q: How can I store leftover sorbet?
A: Store any leftover sorbet in an airtight container in the freezer. To prevent ice crystals from forming, ensure it’s tightly sealed.
Q: Can I use a different type of sweetener?
A: Yes! Honey or agave syrup works well, but remember to adjust the quantity to your desired sweetness level since they are sweeter than sugar.
Nutritional Info
(Serving Size: 1/2 cup, Approximate values)
- Calories: 120
- Total Fat: 0g
- Saturated Fat: 0g
- Cholesterol: 0mg
- Sodium: 0mg
- Total Carbohydrates: 31g
- Dietary Fiber: 3g
- Sugars: 27g
- Protein: 1g
Raspberry sorbet is not just a dessert; it’s a celebration of flavors and memories that we create in the kitchen. So roll up those sleeves, grab your ingredients, and let your culinary adventure begin. Here’s to creating fresh, flavorful moments—one scoop at a time!
PrintPerfect Raspberry Sorbet
A refreshing homemade raspberry sorbet that balances indulgence with guilt-free enjoyment, perfect for summer days.
- Prep Time: 10 minutes
- Cook Time: 10 minutes
- Total Time: 360 minutes
- Yield: 4 servings 1x
- Category: Dessert
- Method: Freezing
- Cuisine: American
- Diet: Vegan
Ingredients
- 2 cups fresh raspberries
- 1 cup sugar
- 1 cup water
Instructions
- Prepare the raspberries by rinsing them gently under cool water and patting them dry.
- Make the simple syrup by combining 1 cup of sugar and 1 cup of water in a saucepan over medium heat until dissolved.
- Blend the cooled syrup with the fresh raspberries until smooth.
- Strain the mixture through a fine-mesh sieve into a bowl to remove seeds.
- Chill the strained mixture in an airtight container in the freezer for about 4-6 hours.
- Scoop the sorbet and serve in chilled bowls, garnished as desired.
Notes
Stir the mixture every hour during freezing to prevent ice crystallization.
Nutrition
- Serving Size: 1/2 cup
- Calories: 120
- Sugar: 27g
- Sodium: 0mg
- Fat: 0g
- Saturated Fat: 0g
- Unsaturated Fat: 0g
- Trans Fat: 0g
- Carbohydrates: 31g
- Fiber: 3g
- Protein: 1g
- Cholesterol: 0mg
Keywords: raspberry, sorbet, summer dessert, easy dessert, vegan dessert
Ingredient Peach Sorbet in 10 Minutes: Creamy Summer Treat
The Best Peach Sorbet: A Summer Delight
As the sun begins to warm the days and the sweet scent of summer fills the air, there’s nothing quite like the juicy burst of a ripe peach. For me, peaches are the quintessential summer fruit—a nostalgic reminder of childhood summers spent roaming orchards and indulging in sweet, messy peach slices. That’s why I’m thrilled to share my simple, dreamy Peach Sorbet recipe with you.
Imagine this: you’ve just spent a sun-soaked day at the beach, and the golden hour is painting the sky in shades of pink and orange. You come home and whip up this refreshing sorbet that not only cools you down but also brings the fresh flavors of summer right to your kitchen. This is the magic of making your own sorbet! Best of all, it’s incredibly easy and uses just a handful of simple ingredients.
The beauty of this recipe is that it captures the sweet, fragrant essence of fresh peaches without any fuss—no ice cream maker required! Whether you’re looking for a delightful dessert to impress your friends, a refreshing treat for kids, or a simple way to utilize those juicy peaches before they spoil, this Peach Sorbet checks all the boxes. Plus, it’s a great way to enjoy a lighter dessert without sacrificing flavor.
So grab those peaches from your local farmers’ market (or your backyard tree if you’re lucky!) and let’s dive into this deliciously fresh adventure. I promise you; this sorbet will become your go-to summer treat!
A Nostalgic Memory with Peaches
Let me take you back to my grandmother’s backyard in the heart of summer. It was a riot of color—vibrant flowers blooming, grass so green it almost felt electric underfoot, and those charmingly crooked peach trees laden with fruit. My cousins and I spent endless hours climbing those trees, trying to reach the highest peaches. How many times did we tumble, giggling, into the grass, red juice dripping down our chins? Too many to count!
One memorable day, my grandmother decided it was time to put our peach-picking spoils to good use. She gathered us into the kitchen, where the aromas of vanilla and citrus filled the air. Together, we sliced up the peaches and made a simple sorbet that would cool us down after our adventures. It became a family tradition—a sweet way to celebrate summer while passing down wisdom and laughter.
This memory stayed with me, fueling my love for fresh, light desserts. Today, every spoonful of that peach sorbet takes me right back to those blissful summer afternoons spent in my grandmother’s kitchen.
Ingredients You’ll Need
-
5 large peaches: The star of the show! Opt for ripe, juicy peaches for the best flavor. If peaches are out of season, feel free to substitute with nectarines or frozen peaches for a brisk flavor.
-
3 tbsp honey: A natural sweetener that enhances the peach’s natural sugars. Agave syrup or maple syrup works as an excellent alternative.
-
3 tbsp unsweetened almond milk: This keeps things creamy while keeping it dairy-free. If you prefer, you can substitute with coconut milk or regular milk for a richer texture.
-
1 1/4 tsp vanilla extract: Adds a lovely depth of flavor. If you’re feeling adventurous, try using a splash of almond extract for a different twist.
-
1 tbsp lemon zest: This ingredient brings brightness to the dessert and balances the sweetness of the peaches. If you don’t have lemon, lime zest adds a fun twist!
-
1 pinch sea salt: Just a touch to enhance all the flavors. Never underestimate the power of salt in sweet dishes!
Step-by-Step Instructions
-
Prepare the Peaches: Start by washing the peaches thoroughly. Using a sharp knife, slice them into wedges and remove the pits. This is the time to get your hands a little sticky! The more ripe the peaches, the easier they’ll slice.
-
Sweeten It Up: Place the peach wedges into a blender or food processor. Add the honey, almond milk, vanilla extract, lemon zest, and sea salt. Blend until incredibly smooth. Think of this as peach purée magic!
-
Taste and Adjust: Here’s a little chef’s hack—always taste the mixture! If you feel it needs a tad more sweetness, add a bit more honey. If you want more zesty flavor, go ahead and add a squeeze of lemon juice.
-
Chill It Down: Once blended, pour the mixture into a shallow dish or a freezer-safe container. This will help it freeze faster and more evenly.
-
Freeze: Pop the container into the freezer for about 2-3 hours. Every 30 minutes, give it a gentle stir with a fork to break up any ice crystals and create a smoother texture. This step is key to a creamy sorbet!
-
Serve and Enjoy: After 2-3 hours, your sorbet should have firmed up beautifully. Now it’s time to scoop! Use an ice cream scoop to serve it up in bowls or cones. If the sorbet is too hard after freezing, let it sit at room temperature for a few minutes to soften before serving.
Serving Suggestions
Scoop your gorgeous peach sorbet into a pretty bowl or a fun ice cream cone. Drizzle a little extra honey over the top for an elegant touch, or garnish with fresh mint leaves for a pop of color. You could also serve it alongside a slice of almond cake or as a topping for yogurt for a refreshing breakfast treat.
Recipe Variations
-
Raspberry Peach Sorbet: Mix in a cup of fresh raspberries to add a bright tartness to your peach sorbet. This duo is juicy and vibrant!
-
Peach Basil Sorbet: For a unique twist, incorporate freshly chopped basil into the mixture before freezing. The result? A refreshing garden-inspired treat.
-
Peach Mango Magic: Substitute half of the peaches with ripe mangoes for a tropical take on this classic recipe.
-
Spicy Ginger Peach: For a kick, add a teaspoon of finely grated ginger. It elevates the flavors to a whole new level, and you’ll love the zing!
-
Coconut Peach Sorbet: Use coconut milk instead of almond milk for a creamy, tropical flavor that’s reminiscent of vacations by the beach.
Chef’s Notes
This recipe is one of those delightful concoctions that has evolved with me over the years. I started with a basic sorbet recipe years ago and have tinkered with it to create my version that is not only scrumptious but also healthy, relying on natural ingredients.
Oh, and here’s a funny little kitchen story: the first time I tried making it, I was too impatient and didn’t stir it enough while freezing. I ended up with a solid block of ice! Lesson learned: patience is key when it comes to creating the perfect sorbet!
FAQs and Troubleshooting
Can I use frozen peaches?
Absolutely! Frozen peaches work wonderfully; just let them thaw for a bit before blending. The flavor will still be delightful, just like summer!
Why is my sorbet icy instead of smooth?
If you didn’t stir it enough while freezing, ice crystals can form, leading to a grainy texture. To avoid this, remember to break it up with a fork every 30 minutes.
How can I store leftovers?
Keep any leftover sorbet in a tightly sealed container. If it hardens too much, let it sit at room temperature for a few minutes before scooping.
Can I make this ahead of time?
Definitely! You can make this up to a week in advance. Just make sure to store it properly in the freezer.
Nutritional Info
This delightful sorbet is not only refreshing but also packed with nutrients. Each serving is low in calories, contains natural sugars from the peaches, and is free from dairy and artificial additives. Enjoy guilt-free!
In conclusion, this Peach Sorbet is a fresh, delicious, and easy way to celebrate summer’s bounty. I hope it brings back sweet memories for you, just as it does for me. So grab those peaches, blend away, and treat yourself—summer is waiting! Enjoy every flavorful spoonful!
PrintThe Best Peach Sorbet
A refreshing peach sorbet that captures the sweet essence of summer with just a handful of simple ingredients.
- Prep Time: 15 minutes
- Cook Time: 180 minutes
- Total Time: 195 minutes
- Yield: 4 servings 1x
- Category: Dessert
- Method: Freezing
- Cuisine: American
- Diet: Vegan
Ingredients
- 5 large peaches, sliced
- 3 tbsp honey
- 3 tbsp unsweetened almond milk
- 1 1/4 tsp vanilla extract
- 1 tbsp lemon zest
- 1 pinch sea salt
Instructions
- Prepare the peaches by washing and slicing them into wedges.
- Sweeten it up by placing the peach wedges into a blender and adding honey, almond milk, vanilla, lemon zest, and salt.
- Taste and adjust as needed for sweetness or zestiness.
- Chill the blended mixture in a shallow dish or freezer-safe container.
- Freeze for about 2-3 hours, stirring every 30 minutes to break up ice crystals.
- Serve and enjoy scooping it into bowls or cones.
Notes
For extra elegance, drizzle honey or garnish with mint leaves before serving. This recipe is versatile with variations like Raspberry Peach or Spicy Ginger Peach.
Nutrition
- Serving Size: 1 serving
- Calories: 150
- Sugar: 20g
- Sodium: 5mg
- Fat: 2g
- Saturated Fat: 0g
- Unsaturated Fat: 2g
- Trans Fat: 0g
- Carbohydrates: 35g
- Fiber: 2g
- Protein: 1g
- Cholesterol: 0mg
Keywords: peach, sorbet, summer dessert, fruity dessert, vegan
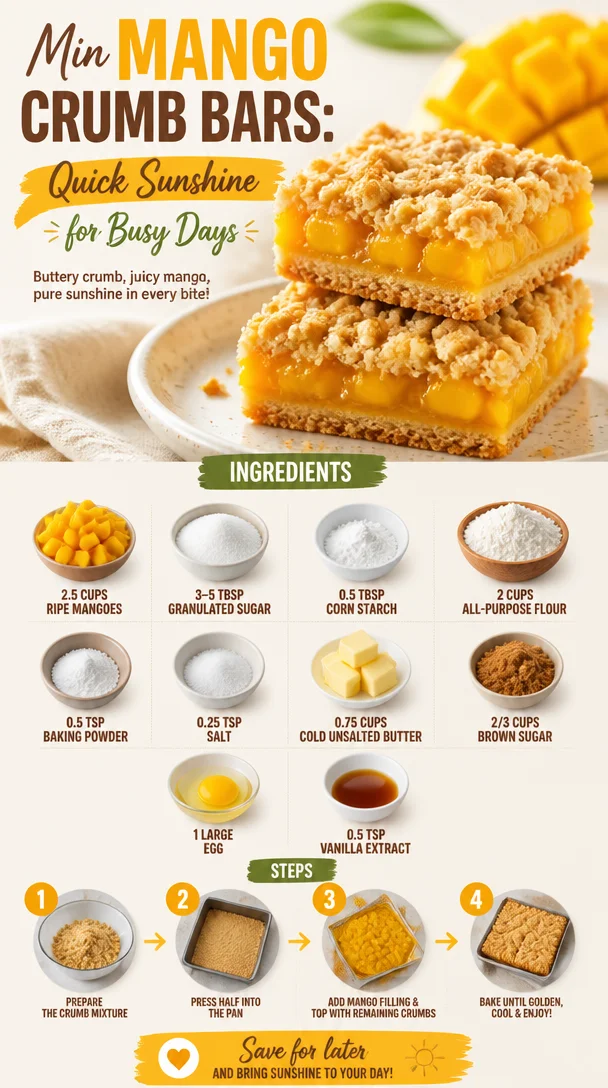
Min Mango Crumb Bars: Quick Sunshine for Busy Days
Irresistible Mango Crumb Bars That Brighten Your Day
Welcome to a slice of sunshine right in your kitchen! Today, we’re diving into a delightful treat that’s as vibrant as a day at the beach: Mango Crumb Bars. Picture this: a buttery, crumbly crust holding a luscious mango filling that dances on your taste buds with a burst of tropical goodness. It’s such a joy to bake with ripe, sweet mangoes, and when you combine them with a crumbly topping, you get a dessert that’s perfect for any occasion—be it a picnic, a potluck, or just a cozy afternoon at home.
These bars capture the essence of summer in every bite. They’re easy to make, and I promise you’ll want to whip them up over and over again! There’s nothing quite like that first bite—the sweetness of the mango combined with the buttery crust is simply heavenly. Whether you’re savoring them with your morning coffee or serving them at a gathering, these bars will brighten up your day.
So grab your apron, put on your favorite playlist, and let’s create something that will not only tantalize your taste buds but also warm your heart. Ready to make some mango magic? Let’s get started!
Personal Story
Let me take you back to my childhood. Every summer, my family would head to the local farmer’s market, and I would eagerly await the moment I could dive into a delicious mango. My mom would always buy a basketful of these golden gems, and she had this incredible knack for selecting the ripest ones. We’d sit in the backyard with the sun shining down, juices dripping from our fingers as we devoured those sweet, juicy mangoes.
One day, my mom and I decided to get creative and turned our favorite fruits into a dessert. We mixed the mango with some sugar and a touch of flour, and poured it over a crumbly base. Let me tell you, it was magic! That random kitchen adventure became a cherished memory and the spark for my love of baking. Every time I make these Mango Crumb Bars, I’m reminded of those lazy summer afternoons filled with laughter, family, and the irresistible aroma of fresh mangoes. It’s funny how one simple recipe can carry so much nostalgia and joy!
Ingredients
Here’s what you’ll need to make your own irresistible Mango Crumb Bars:
-
2.5 cups ripe mangoes
(The sweeter the mangoes, the more delightful the filling! Look for those soft, fragrant fruits for the best flavor.) -
3-5 tbsp granulated sugar
(Adjust based on the ripeness of your mangoes for a perfect sweet balance. Riper mangoes will need less sugar, while firmer ones may require a touch more.) -
0.5 tbsp corn starch
(This helps thicken the filling, ensuring it doesn’t run when baked. It’s like magic in your baking!) -
2 cups all-purpose flour
(The base for a sturdy yet soft crumb that holds everything together. For a gluten-free option, try using almond flour but adjust the liquid slightly.) -
0.5 tsp baking powder
(This ingredient gives your crust a light and airy texture—because who wants a dense crust?) -
0.25 tsp salt
(Salt enhances the overall flavor profile of the Mango Crumb Bars. Don’t skip it!) -
0.75 cups cold unsalted butter
(Cold butter creates that irresistibly flaky texture we all love. Try to keep it chilled until it’s time to mix!) -
2/3 cups brown sugar
(Adds a rich, caramel flavor that perfectly complements the mango filling. It’s the secret sauce of scrumptiousness!) -
1 large egg
(Binds the ingredients together while contributing to that tender crumb—no dry bars here!) -
0.5 tsp vanilla extract
(A touch of vanilla elevates the flavor to new heights. Because really, who can resist vanilla?)
Step-by-Step Instructions
-
Preheat your oven: Start by preheating your oven to 350°F (175°C). This way, when you’re done mixing, your oven is ready to bake those bars to golden perfection!
-
Prepare your pan: Line an 8×8 square baking pan with parchment paper, allowing some overhang on the sides. This makes for easy removal later—trust me, you’ll thank yourself!
-
Mix the filling: In a mixing bowl, combine your chopped ripe mangoes, 3 tablespoons of granulated sugar, and corn starch. Stir gently until the mangoes are well coated. Let this sit while you prepare the crust. This step ensures the fruit releases just a bit of juice, setting the stage for a delicious filling.
-
Make the crust: In a large bowl, whisk together the all-purpose flour, baking powder, and salt. In another bowl, cream the cold unsalted butter and brown sugar until light and fluffy—about 2 minutes. Adding the egg and vanilla extract, mix until combined.
-
Combine wet and dry: Add your flour mixture to the wet ingredients, stirring until crumbly and just combined. You want to retain some texture—overmixing can lead to tough bars!
-
Assemble the bars: Press about two-thirds of the crumb mixture into the prepared baking pan to form a crust. Use your hands and make sure it’s evenly distributed.
-
Pour in the filling: Carefully pour your mango mixture over the crust. Then sprinkle the remaining crumb mixture on top—it should be clumpy and not completely uniform for that lovely rustic look!
-
Bake: Bake in the preheated oven for about 30-35 minutes, or until the top is golden brown and the filling is bubbly. You’ll know they’re ready when your kitchen smells heavenly!
-
Cool and slice: Allow the bars to cool in the pan for at least 10 minutes before using the parchment overhang to lift them out. Transfer to a wire rack and let cool completely before slicing. Trust me, this will prevent the filling from oozing out.
Serving Suggestions
To serve these delightful Mango Crumb Bars, cut them into squares and dust a bit of powdered sugar on top for an elegant finish. Pair them with a scoop of vanilla ice cream or a dollop of whipped cream for an indulgent treat! A sprig of fresh mint as a garnish will add a pop of color and a fresh aroma. Enjoy them with a cup of tea or coffee, and let the flavors transport you to a tropical paradise!
Recipe Variations
-
Coconut Mango Crumb Bars: Incorporate shredded coconut into the crumb topping for a beachy twist.
-
Spicy Mango Crumb Bars: Add a pinch of cayenne pepper to the mango filling for a surprising kick that balances the sweetness.
-
Mixed Fruit Crumb Bars: Swap half of the mango for other fruit like peaches or berries for a delightful fruit medley.
-
Gluten-Free Option: Use an all-purpose gluten-free flour blend in place of regular flour for a gluten-free delight.
Chef’s Notes
As I’ve honed this recipe over time, I’ve played around with different fruits and toppings. You wouldn’t believe the fun I’ve had experimenting! One time, while brainstorming, I accidentally mixed in some cinnamon, and it became a family favorite! If you ever have an “oops” moment in the kitchen, embrace it! Some of my best recipes have come from happy accidents, so don’t be afraid to make this your own.
FAQs and Troubleshooting
1. Why are my crumb bars too crumbly?
If your crumb mixture is too dry, it could be that the butter wasn’t cold enough or you accidentally added too much flour. Always measure flour accurately—spoon it into your cup and level it off!
2. My mango filling is too runny. What’s wrong?
Make sure to use corn starch and allow the filling to sit for a few minutes before baking. If your mangoes are very juicy, you might need to adjust the amount of corn starch or try a thicker fruit next time.
3. Can I use frozen mangoes?
Yes, you can! Just ensure you thaw them, drain excess liquid, and chop them before use. Frozen mangoes can be a great backup when you don’t have fresh ones!
4. How do I store the leftover bars?
Keep them in an airtight container in the refrigerator for up to a week. They can also be frozen for up to three months, but let them cool completely before freezing.
Now that you have everything you need, it’s your turn to create these Mango Crumb Bars that are sure to brighten any day. Happy baking, and may your kitchen be filled with love and laughter!
PrintIrresistible Mango Crumb Bars
Delightful Mango Crumb Bars featuring a buttery crust and luscious mango filling, perfect for any occasion.
- Prep Time: 15 minutes
- Cook Time: 35 minutes
- Total Time: 50 minutes
- Yield: 16 servings 1x
- Category: Dessert
- Method: Baking
- Cuisine: American
- Diet: Vegetarian
Ingredients
- 2.5 cups ripe mangoes
- 3–5 tbsp granulated sugar
- 0.5 tbsp corn starch
- 2 cups all-purpose flour
- 0.5 tsp baking powder
- 0.25 tsp salt
- 0.75 cups cold unsalted butter
- 2/3 cups brown sugar
- 1 large egg
- 0.5 tsp vanilla extract
Instructions
- Preheat your oven to 350°F (175°C).
- Line an 8×8 square baking pan with parchment paper.
- Combine chopped ripe mangoes, 3 tablespoons of granulated sugar, and corn starch in a mixing bowl.
- Whisk together all-purpose flour, baking powder, and salt in a large bowl.
- Cream cold unsalted butter and brown sugar until light and fluffy.
- Add the egg and vanilla extract, mixing until combined.
- Stir the flour mixture into the wet ingredients until crumbly and just combined.
- Press two-thirds of the crumb mixture into the prepared baking pan to form a crust.
- Pour your mango mixture over the crust, then sprinkle the remaining crumb mixture on top.
- Bake for 30-35 minutes or until the top is golden brown and the filling is bubbly.
- Cool in the pan for at least 10 minutes before using the parchment overhang to lift them out.
- Let cool completely before slicing.
Notes
For a sweet twist, dust with powdered sugar before serving. Pair with vanilla ice cream for an extra treat!
Nutrition
- Serving Size: 1 square
- Calories: 250
- Sugar: 12g
- Sodium: 150mg
- Fat: 10g
- Saturated Fat: 6g
- Unsaturated Fat: 4g
- Trans Fat: 0g
- Carbohydrates: 33g
- Fiber: 2g
- Protein: 3g
- Cholesterol: 30mg
Keywords: Mango Crumb Bars, dessert recipe, summer treat, baking recipe
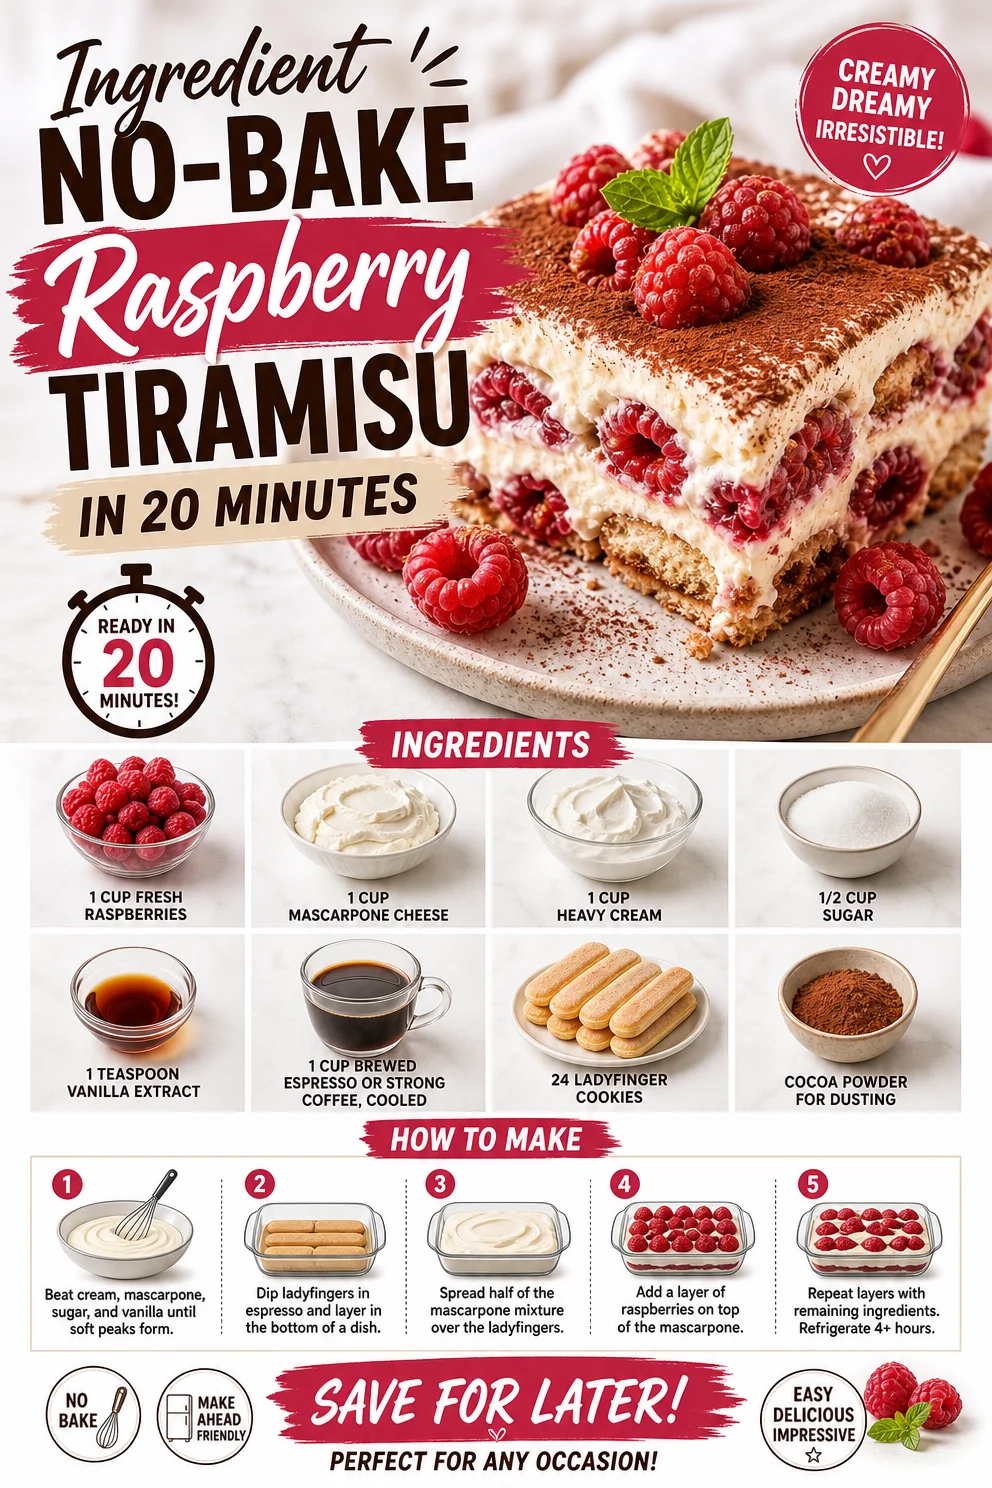
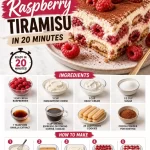
Ingredient No-Bake Raspberry Tiramisu in 20 Minutes
Raspberry Tiramisu: A Delightful Twist on a Classic
Hey there, food lovers! Ava here, ready to dive into one of the most delicious desserts you’ll ever make—Raspberry Tiramisu! If you’re like me and believe that indulgence can be both light and refreshing, then you’re in for a treat. This unique dessert takes the classic Italian Tiramisu and gives it a vibrant twist with fresh, juicy raspberries. Perfect for gatherings or simply treating yourself after a long day, this dessert is bound to impress your friends and satisfy your cravings.
So let’s take a stroll down memory lane, shall we? My first encounter with Tiramisu was at a little Italian café tucked in the heart of my hometown. The moment I took a bite, I was transported to a world of creamy mascarpone, rich espresso, and that glorious cocoa dusting on top. But let’s be real, I’ve always been a fan of fruits in desserts—it balances sweetness and adds a refreshing zing. That’s when I thought, “Why not infuse this classic with the tartness of raspberries?” And just like that, my Raspberry Tiramisu was born.
Picture this: a generous layer of creamy mascarpone laced with whipped cream and raspberries, delicately sandwiched between ladyfingers soaked in aromatic espresso. Can you taste it? Let’s get into the details so you can whip up this masterpiece in your kitchen!
A Sweet Memory in Every Bite
Growing up, my grandmother had a special place in her heart for Italian cuisine. Each Sunday, our family would gather at her cozy kitchen, where the aroma of freshly baked pastries filled the air. One day she surprised us all with Tiramisu, her version, of course, which was a labor of love involving layers upon layers of espresso-soaked goodness. As we dug in, my cousin and I decided to sneak in some fresh berries we had picked from the garden. The resulting combination was magic!
The tartness of the berries danced beautifully against the creamy layers, creating a flavor explosion that left us grinning from ear to ear. Although traditionalists may frown upon fruit in Tiramisu, I believe in breaking the rules when it comes to flavor! My Raspberry Tiramisu is a nod to that playful spirit and a reminder that cooking is all about experimenting and having fun.
Ingredients
Let’s gather our ingredients! Here’s what you’ll need:
-
1 cup fresh raspberries
Sweet and slightly tart, raspberries bring a burst of freshness to the dish. Feel free to use mixed berries if you want to switch things up! -
1 cup mascarpone cheese
This creamy Italian cheese is the heart of Tiramisu. If you can’t find mascarpone, you can substitute it with cream cheese mixed with a bit of sour cream for a similar texture. -
1 cup heavy cream
Whipped to perfection, heavy cream adds volume and richness. If you prefer a lighter version, you can use half-and-half, but the texture won’t be quite the same. -
1/2 cup sugar
Sweeten to taste! You can use coconut sugar or a sugar alternative like stevia if you’re looking to cut calories. -
1 teaspoon vanilla extract
This enhances the flavors beautifully. For a twist, try almond extract instead! -
1 cup brewed espresso or strong coffee, cooled
This gives Tiramisu its characteristic flavor. Make sure it’s strong so it doesn’t get overpowered by the other ingredients! -
24 ladyfinger cookies
These delightful sponge cookies soak up the coffee like nobodies’ business. If you’re gluten-free, look for gluten-free ladyfingers or make your own. -
Cocoa powder for dusting
A classic finishing touch that adds a nice bitter contrast to the sweetness.
Step-by-Step Instructions
Alright, let’s get cooking! Here’s how to assemble your Raspberry Tiramisu step-by-step.
-
Prepare Your Espresso
Brew a strong cup of espresso or coffee. Once it’s ready, set it aside to cool while you prep the cream. This helps retain the ladyfingers’ texture when they’re dipped. -
Whip the Cream
In a large mixing bowl, add the heavy cream and sugar. Using an electric mixer, whip until stiff peaks form. This will add air and create a delightful lightness that’s essential for Tiramisu. Make sure not to over-whip it; you don’t want butter! -
Mix in the Mascarpone
Gently fold in the mascarpone cheese and vanilla extract into your whipped cream. Use a rubber spatula and be careful not to deflate the whipped cream—this step is all about keeping that airy texture! -
Incorporate Fresh Raspberries
Now for the fun part! Stir in about 3/4 of your fresh raspberries gently into the mascarpone mixture. Reserve the rest for garnishing later. The vibrant color and tanginess will bring the whole dessert to life! -
Dip Ladyfingers in Coffee
Quickly dip each ladyfinger into the cooled espresso, ensuring they’re soaked but not soggy. Lay them side by side in a 9×13 inch dish, covering the bottom completely. Feel free to get a little creative with your layering! -
Layer the Cream Mixture
Once the ladyfingers are ready, spread half of the mascarpone-raspberry cream over the top. Use an offset spatula for a smooth finish—it’s all in the presentation! -
Repeat the Process
Layer another set of dipped ladyfingers on top of the cream, followed by the remaining raspberry cream mixture. Smooth it out nicely for a beautiful appearance. -
Chill, Chill, Chill!
Cover the dish with plastic wrap and let it chill in the refrigerator for at least 4-6 hours, or ideally overnight. This allows the flavors to meld together and the cream to firm up. -
Dust with Cocoa Powder
Just before serving, dust the top with cocoa powder. This step adds a bit of elegance and an inviting look that will have everyone excited to dive in! -
Garnish and Serve
Top with the remaining fresh raspberries for a pop of color and a delightful touch.
Serving Suggestions
To serve the Raspberry Tiramisu, cut into squares and plate on dessert plates. Add a few extra raspberries to the side for a beautiful pop of color and a sprig of mint for that extra touch of finesse. You might want to keep a dusting of cocoa powder on the table for guests to sprinkle on their servings!
Recipe Variations
Here are a few fun twists you can try:
-
Chocolate Raspberry Tiramisu: Add a layer of chocolate ganache between the cream layers for a rich, indulgent version.
-
Vegan Version: Substitute mascarpone with a mixture of soaked cashews blended with coconut cream. Use homemade vegan ladyfingers or sponge cake!
-
Citrus Twist: Add a tablespoon of lemon zest to the mascarpone mixture for a bright, zesty flavor.
-
Nutty Delight: Sprinkle crushed nuts, such as hazelnuts or almonds, between layers for added texture and flavor.
-
Berry Medley: Swap out raspberries for your fave berries or a mix; strawberries, blueberries, and blackberries all work wonderfully!
Chef’s Notes
As with all my favorite recipes, this Raspberry Tiramisu has evolved. In my early attempts, I was overly cautious about using fruit, but then I realized how complementary it can be. I’ve had friends tell me they prefer this fruity version to the classic! Just goes to show, there’s beauty in bending the rules.
And here’s a little tip: if you have any leftover mascarpone mixture, it makes an incredible fruit dip! Just store it in an airtight container in the fridge.
FAQs and Troubleshooting
Q: Can I make this Tiramisu in advance?
Absolutely! It’s best when made ahead of time, letting it develop all those wonderful flavors. Just keep it covered in the fridge.
Q: My ladyfingers fell apart?
If your ladyfingers are too soggy, try a quicker dip in the espresso next time. They should absorb the liquid but retain enough structure to hold layers.
Q: Can I use decaf coffee?
Of course! Decaf coffee works perfectly for a caffeine-free dessert without sacrificing flavor.
Q: How long can I store leftovers?
You can store leftovers in the fridge for up to 3 days. Just make sure to cover them well to keep the moisture in!
Nutritional Info
This delightful treat might just earn a place in your heart! Here’s the approximate nutritional info per serving (based on 8 servings):
- Calories: 350
- Protein: 5g
- Fat: 22g
- Carbohydrates: 30g
- Sugar: 20g
Remember, it’s all about balance. Enjoy in moderation, and savor every layer of this Raspberry Tiramisu!
So there you have it! A fresh, vibrant twist on Tiramisu that’s perfect for any occasion. This dessert is not just about the taste; it’s about sharing moments with loved ones. Get ready to wow your guests with this deliciously simple yet elegant dish—happy baking!
PrintRaspberry Tiramisu
A delightful twist on the classic Italian dessert, featuring fresh raspberries and creamy mascarpone layered with espresso-soaked ladyfingers.
- Prep Time: 30 minutes
- Cook Time: 10 minutes
- Total Time: 540 minutes
- Yield: 8 servings 1x
- Category: Dessert
- Method: No-Cook
- Cuisine: Italian
- Diet: Vegetarian
Ingredients
- 1 cup fresh raspberries
- 1 cup mascarpone cheese
- 1 cup heavy cream
- 1/2 cup sugar
- 1 teaspoon vanilla extract
- 1 cup brewed espresso or strong coffee, cooled
- 24 ladyfinger cookies
- Cocoa powder for dusting
Instructions
- Prepare your espresso. Brew a strong cup of espresso or coffee and set aside to cool.
- Whip the cream. In a bowl, add the heavy cream and sugar, and whip until stiff peaks form.
- Mix in the mascarpone. Gently fold in the mascarpone cheese and vanilla extract into your whipped cream.
- Incorporate fresh raspberries. Stir in 3/4 of the fresh raspberries into the mascarpone mixture.
- Dip ladyfingers in coffee. Quickly dip each ladyfinger into the cooled espresso and lay them side by side in a 9×13 inch dish.
- Layer the cream mixture. Spread half of the mascarpone-raspberry cream over the ladyfingers.
- Repeat the process. Layer another set of dipped ladyfingers followed by the remaining raspberry cream mixture.
- Chill in the refrigerator for at least 4-6 hours or ideally overnight.
- Dust with cocoa powder just before serving.
- Garnish with remaining fresh raspberries.
Notes
For a lighter version, you can use half-and-half instead of heavy cream. Experiment with different fruits for a unique flavor.
Nutrition
- Serving Size: 1 serving
- Calories: 350
- Sugar: 20g
- Sodium: 100mg
- Fat: 22g
- Saturated Fat: 13g
- Unsaturated Fat: 5g
- Trans Fat: 0g
- Carbohydrates: 30g
- Fiber: 2g
- Protein: 5g
- Cholesterol: 60mg
Keywords: tiramisu, raspberry dessert, Italian dessert, easy dessert, creamy dessert