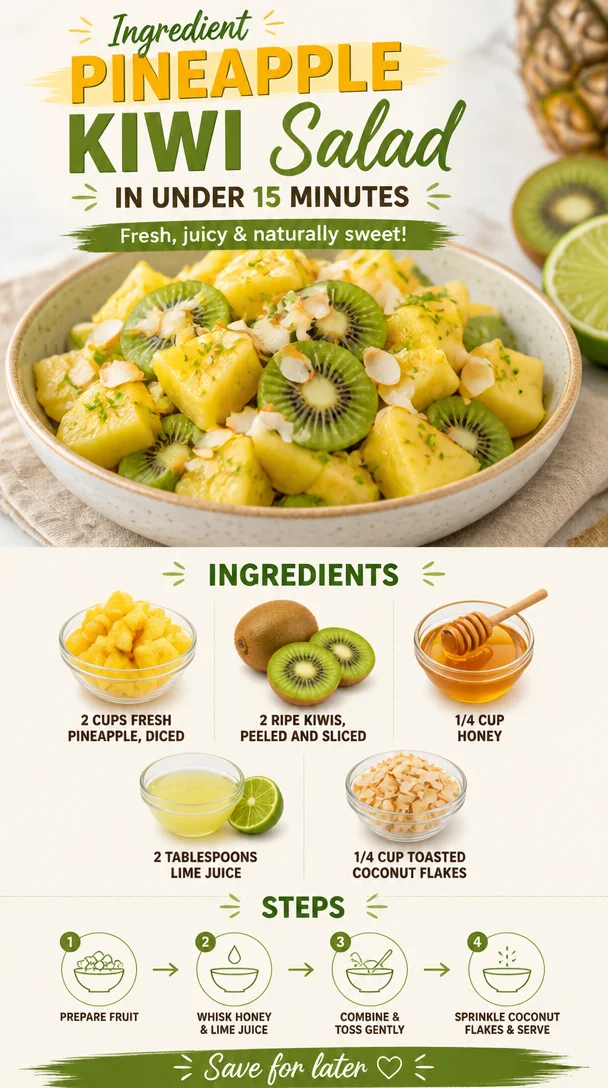
Ingredient Pineapple Kiwi Salad in Under 15 Minutes
The Ultimate Pineapple Kiwi Salad: A Refreshing Taste of Summer
Welcome to another delicious adventure at Clean Plate Cravings! Today, I’m excited to share a dish that embodies the joy of fresh, vibrant flavors—Pineapple Kiwi Salad. This salad is not just a simple side; it’s a celebration of sunshine, sweetness, and a little tropical zing that will awaken your taste buds and perk up your day!
Fresh fruit salads are a classic favorite, but there’s something truly magical about the luscious pairing of juicy pineapple and tangy kiwis. This stunning combo not only looks delightful on your plate but also fills you with that warm, happy feeling—like a mini-vacation in a bowl.
When I think about sweet, ripe pineapples and the crunchy texture of kiwi, I can’t help but drift back to lazy summer afternoons spent at my grandma’s house. She used to whip up the most incredible fruit salads, each bite bursting with sunshine and laughter. One particular memory stands out, where we were sitting on her porch, enjoying a simple meal that included her rendition of a tropical fruit salad. It was a hit not just for its taste, but also for the joy it brought to our family gatherings. That moment ignited my love for creative cooking, particularly with fresh ingredients that make our bodies feel good.
So, let’s dive into this refreshing Pineapple Kiwi Salad that’s sure to transport you straight into those carefree summer days!
Personal Story
It was one of those picture-perfect summer days, where the sun was shining, and the birds were singing. We were all gathered at Grandma’s house for our annual family barbecue. As the grill was fired up, I could smell the delightful mix of smoky and savory wafting through the air. Grandma was in the kitchen, deftly slicing fruit as she prepped a feast.
After a hearty meal of grilled meats and colorful veggie skewers, Grandma presented her colorful fruit salad like it was a trophy. The vibrant yellow of the pineapple and the electric green of the kiwis seemed to glow under the afternoon sun. “A little sweet surprise just for you all!” she smiled, urging us to dig in.
Each bite came with a hint of nostalgia; it reminded me of sun-kissed beaches, sandy toes, and laughter echoing off the waves. Grandma’s fruit salad wasn’t just a dish—it was a memory, a hug from the past that we could taste and savor. So, with that cherished memory tucked away, let’s create our own version of this delightful fruit salad that pays homage to those sunny days!
Ingredients
Here’s what you’ll need and a little insight into why these ingredients work so well together:
-
2 cups fresh pineapple, diced
Fresh pineapple adds a juicy sweetness and vibrant color. If you don’t have fresh, use canned pineapple in juice—just make sure to drain it well! -
2 ripe kiwis, peeled and sliced
Kiwis provide a tangy kick and a unique texture. For a fun twist, try substituting with star fruit or even green grapes! -
1/4 cup honey
Honey acts as our natural sweetener, enhancing the flavors without overpowering them. You can substitute with agave syrup or maple syrup if you’re looking for a vegan option. -
2 tablespoons lime juice
This adds a delightful tang that balances the sweetness of the fruit. Lemon juice can be replaced if that’s what you have on hand. -
1/4 cup toasted coconut flakes
Toasting the coconut adds a nutty crunch and an extra layer of flavor. If you prefer a nut-free version, you can leave this out or substitute with sliced almonds.
Step-by-Step Instructions
Now that we’ve gathered our ingredients, let’s get cooking! Here’s how to make this easy and refreshing Pineapple Kiwi Salad:
-
Prep Your Ingredients
Start by gathering all your ingredients on the counter. This brings everything to your reach and keeps the kitchen organized. It’s also a good time to reminisce about summertime! -
Dice the Pineapple
Take your fresh pineapple and slice it into quarters. Remove the core and chop it into bite-sized cubes. Chef Hack: If fresh pineapples intimidate you, look for pre-diced options at your local grocery store to save time! -
Slice the Kiwis
Carefully peel the kiwis and slice them into rounds. If you’re feeling fancy, you can cut them into stars! Chef Insight: The riper the kiwi, the sweeter it is; look for ones that yield slightly to pressure but aren’t mushy! -
Mix the Honey and Lime Juice
In a small bowl, whisk together the honey and lime juice until they’re combined. This dressing will elevate your fruit salad with a fresh burst of flavor. Tip: If you want a thicker sauce, consider adding a sprinkle of chia seeds for added texture and nutrition. -
Combine the Fruit
In a large mixing bowl, gently combine the diced pineapple and sliced kiwis. Drizzle the honey-lime dressing over the top and toss carefully to coat all the fruit without mashing them. Chef Tip: The dressing can be made ahead of time and stored in the fridge to allow the flavors to meld a bit more! -
Toast the Coconut
In a dry skillet over medium heat, toast the coconut flakes for a few minutes until they are golden brown. Keep an eye on them, as they can burn quickly! Once toasted, allow them to cool. Note: Don’t skip this step; the toasty flavor makes a big difference! -
Serve & Enjoy
Transfer your Pineapple Kiwi Salad to a serving dish or individual bowls. Top with the toasted coconut flakes and an extra squeeze of lime juice if desired. Enjoy immediately for the best texture and flavor!
Serving Suggestions
Serving this refreshing salad can be as fun as making it. I love to present it in a clear glass bowl, showcasing all those beautiful colors, or in halved pineapple shells for an extra festive touch—talk about an Instagram-worthy moment! You can also serve it alongside grilled chicken or fish as a bright and zesty accompaniment, or simply as a vibrant centerpiece for any summer gathering.
Recipe Variations
Feeling creative? Here are some twists you can try with your Pineapple Kiwi Salad:
- Minty Fresh Twist: Add a handful of chopped fresh mint to provide a refreshing herbal note.
- Berry Blast: Mix in some strawberries or blueberries for an added burst of color and sweetness.
- Nutty Delight: Toss in a handful of chopped walnuts or pecans for some crunch and a protein boost.
- Spicy Kick: Add a pinch of cayenne pepper or finely diced jalapeño for a surprising kick that contrasts nicely with the sweetness.
- Citrusy Zing: Swap out lime juice for orange juice for a sweeter, citrusy twist.
Chef’s Notes
This Pineapple Kiwi Salad has become a staple in my household, especially for potluck gatherings and summer picnics! I love how flexible it is—there’s really no wrong way to put it together. Over time, I’ve experimented with various fruit combinations, and I’ve even served it as a dessert by pairing it with a scoop of coconut ice cream. As with all recipes, this salad has evolved, but the heart of it—celebrating fresh ingredients and sharing joy—remains constant.
I also remember a time when I forgot to toast the coconut! Trust me, the next batch was perfectly toasted because no one ever wants a redo on a fruit salad presentation—it’s all about those little details!
FAQs and Troubleshooting
-
Q: Can I make this salad ahead of time?
A: Yes, you can, but I recommend making the salad no more than a couple of hours in advance. If you anticipate leftovers, store the dressing separately to prevent the fruit from getting mushy. -
Q: My pineapple isn’t sweet enough; what can I do?
A: If your pineapple isn’t sweet, you can add a touch more honey or even a sprinkle of sugar to enhance the flavor. Make sure it’s ripe next time, though! -
Q: How do I choose the right kiwi?
A: Look for kiwis that are slightly soft when squeezed gently. Avoid overly hard or mushy kiwis; they should feel just right! -
Q: Can I use frozen fruit?
A: While fresh is best for texture, frozen fruits work in a pinch. Just let them thaw and drain well; however, be prepared for a different texture!
Nutritional Info (Optional)
This Pineapple Kiwi Salad is not just delicious; it’s also packed with nutrients. Each serving provides a healthy dose of vitamin C, potassium, and dietary fiber. It’s light, refreshing, and makes for a guilt-free treat!
So, grab those vibrant ingredients and let’s whip up this delightful Pineapple Kiwi Salad! Whether it’s a side dish for your next barbecue or simply a refreshing snack on a hot day, this salad is sure to bring smiles to your table. Happy cooking!
PrintPineapple Kiwi Salad
A refreshing salad that combines juicy pineapple and tangy kiwis, perfect for summer gatherings.
- Prep Time: 10 minutes
- Cook Time: 5 minutes
- Total Time: 15 minutes
- Yield: 4 servings 1x
- Category: Salad
- Method: No cooking required
- Cuisine: Tropical
- Diet: Vegan
Ingredients
- 2 cups fresh pineapple, diced
- 2 ripe kiwis, peeled and sliced
- 1/4 cup honey
- 2 tablespoons lime juice
- 1/4 cup toasted coconut flakes
Instructions
- Prep your ingredients by gathering them on the counter for easy access.
- Dice the pineapple into bite-sized cubes after removing the core.
- Slice the kiwis into rounds.
- Mix the honey and lime juice in a small bowl until combined.
- Combine the pineapple and kiwi gently in a large bowl and drizzle with the honey-lime dressing.
- Toast the coconut flakes in a dry skillet until golden brown.
- Serve the salad topped with toasted coconut and enjoy immediately.
Notes
This salad can be made ahead of time, but store the dressing separately to prevent fruit from getting mushy.
Nutrition
- Serving Size: 1 serving
- Calories: 180
- Sugar: 25g
- Sodium: 5mg
- Fat: 3g
- Saturated Fat: 1g
- Unsaturated Fat: 2g
- Trans Fat: 0g
- Carbohydrates: 42g
- Fiber: 3g
- Protein: 2g
- Cholesterol: 0mg
Keywords: Pineapple salad, Kiwi salad, Summer recipes, Fruit salad, Refreshing salad
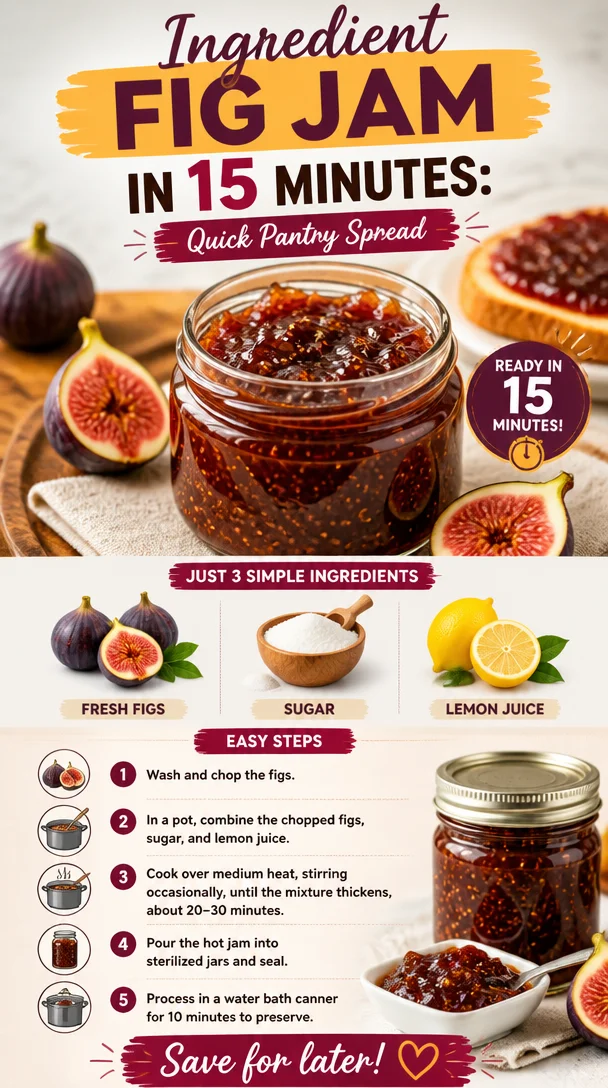
Ingredient Fig Jam in 15 Minutes: Quick Pantry Spread
3-Ingredient Fig Jam: A Sweet Adventure in Simplicity
Welcome, flavor enthusiasts and curious cooks! Today, we’re diving into a delightful recipe that captures the essence of simplicity while delivering a burst of sweetness and nostalgia—3-Ingredient Fig Jam. If you’re ready to elevate your snacking, topping, or breakfast game, you’re in the right place! Fig jam is not just a treat; it’s a celebration of fresh ingredients that come together to bring a little luxurious sweetness to your everyday meals.
Introduction
When I think about figs, I can’t help but smile. These little gems conjure up memories of sunny afternoons spent in orchards, the trees heavy with ripe fruit, their sweet aroma filling the air. If you’ve ever bitten into a ripe fig, you know the joy that comes from its tender flesh and delightful burst of flavor. And let’s be honest—figs are the ultimate gourmet ingredient that can elevate any dish without breaking a sweat!
Now, making fig jam might sound like a tedious process reserved for the culinary elite, but I’m here to tell you that it’s as easy as can be! With just three simple ingredients—fresh figs, sugar, and lemon juice—you’ll whip up a jar of jam that’s ready to spread, spoon, or savor on whatever your heart desires. This recipe is not just perfect for enhancing your breakfast, but it’s also a wonderful gift for friends and family, bringing a taste of homemade love. So, grab your apron, and let’s embark on this sweet adventure together!
Personal Story
Growing up, my grandmother always had a knack for transforming simple ingredients into something special. I remember summers at her cozy kitchen, filled with the sounds of simmering pots and the sweet scent of fruits bubbling on the stove. One of my fondest memories was the day she taught me how to make fig jam. The figs were plucked fresh from the tree in her backyard—you could almost hear the fruit laughing as you picked them!
As we stood over the stove, I eagerly watched the figs transform into a luscious, thick jam, their vibrant color deepening with every stir. The jam brought us together around the table, slathered on warm homemade bread or spooned atop creamy yogurt. It was those moments of connection and joy that inspired me to create Clean Plate Cravings, a place where I could share those very experiences and help others cultivate their own kitchen memories. So let’s continue this tradition today with a fig jam that is as bright and cheerful as those afternoons with Grandma!
Ingredients
-
Fresh Figs: The star of our show! Fresh figs are naturally sweet and juicy, making them perfect for jam. Look for plump, unblemished figs in varying shades of purple or green. If you can’t find fresh figs, you can use dried figs; just soak them in warm water for a few hours to plump them up before use.
-
Sugar: This ingredient helps to thicken and sweeten our jam. You can use regular granulated sugar, but feel free to switch it up with brown sugar for a deeper caramel flavor or coconut sugar for a healthier twist. Keep in mind that different sugars may affect sweetness levels, so taste as you go!
-
Lemon Juice: A splash of lemon juice brightens the jam and adds balance by cutting through the sweetness. Freshly squeezed is best, but bottled lemon juice can work in a pinch. If you’re feeling adventurous, you could also try other citrus juices, like orange or grapefruit, for a unique flavor profile.
Step-by-Step Instructions
-
Prepare the Figs: Start by giving your figs a good rinse under cold water. Pat them dry with a clean kitchen towel. Remove the stems and cut the figs in half or quarters, depending on their size. This makes it easier for them to break down during cooking. The exciting part? You can snack on a few while you prep!
-
Combine Ingredients: In a medium-sized pot, combine your chopped figs, sugar, and lemon juice. Make sure the figs are evenly coated with the sugar; this will help extract their natural juices during cooking.
-
Cook the Mixture: Place your pot on the stove over medium heat. Stir occasionally until the mixture begins to break down, which should take about 5-10 minutes. As you stir, you can mash the figs with the back of your spoon for a smoother consistency, or leave them chunkier if you prefer.
-
Simmer: Once your mixture comes to a gentle bubble, reduce the heat to low and let it simmer for about 20-30 minutes. Keep stirring occasionally to prevent sticking. You’ll notice the mixture will thicken and darken in color. Tip: If you want your jam to be a bit thicker, test it by placing a spoonful on a plate and seeing if it sets up to your liking.
-
Cool and Store: Once cooked, remove your pot from the heat and allow the jam to cool slightly. Then pour it into a clean jar with a tight-fitting lid. If you’re planning to store it long-term, make sure to do this while the jam is still hot to create a vacuum seal. Let it cool completely before refrigerating.
-
Enjoy: Your fig jam is now ready to be enjoyed! Spread it on toast, dollop it onto cheese plates, or stir it into your morning oats. The possibilities are endless!
Serving Suggestions
When it comes to serving this fig jam, it’s all about presentation and pairing. For an elegant touch, spoon it into a charming jar and tie a pretty ribbon around it for gifting. If you’re enjoying it at home, try serving it on a beautifully arranged charcuterie board alongside some creamy goat cheese, crunchy nuts, and sliced baguette. For breakfast, spread it on warm buttered toast or swirl it into yogurt for a delightful treat.
Recipe Variations
Now, let’s get creative with some variations on this classic fig jam:
-
Spiced Fig Jam: Add a pinch of cinnamon or a dash of vanilla extract to your fig mixture for a warm, cozy flavor.
-
Herb-Infused: Toss in a few sprigs of rosemary or thyme while it simmers for a unique herbal twist. Just remember to remove them before storing!
-
Nutty Addition: Stir in some chopped almonds or walnuts to add a lovely crunch and enhance the texture of the jam.
-
Citrus Zest: Add lemon or orange zest alongside the juice for an extra zing of freshness that brightens the whole dish.
-
Chili Flake Kick: Spice things up by adding a pinch of red chili flakes for a surprising kick in your spread.
Chef’s Notes
One of the things I love most about this recipe is its incredible versatility. It’s evolved over the years as I experimented with different fruits from my local farmer’s market. I’ve had days when the figs were in short supply, and I’ve mixed in some ripe peaches or apples to bulk up the jam, and it turned out amazing! Each jar feels like a little bit of magic and tradition, connecting me back to those sunny summer afternoons in my grandmother’s kitchen.
Another funny kitchen story: I once stored my fig jam in a very cute but very small jar, and it wasn’t long before I found myself wrestling with a sticky mess when trying to scoop some out. Pro tip: always use a clean spoon, and don’t be afraid to go big with your jar!
FAQs and Troubleshooting
-
How do I know if my jam is thick enough? A great test is to place a spoonful on a plate and run your finger through it. If it holds its shape, you’re good to go! If it’s still too runny, continue simmering for a few more minutes.
-
Can I can this jam for long-term storage? Absolutely! Make sure to sterilize your jars, pour in hot jam, seal tightly, and process in a boiling water bath for about 10 minutes to seal them properly.
-
What if I don’t have fresh figs? No worries! Dried figs work in a pinch. Just soak them in warm water first until soft, then chop and follow the same steps in the recipe.
-
Can I reduce the sugar? While sugar helps with preservation and thickness, you can experiment with natural sweeteners like honey or maple syrup—but keep in mind that these may alter the flavor and texture a bit.
Nutritional Info
While the nutritional content can vary based on ingredient brands and the number of servings, here’s a rough estimate per tablespoon serving:
- Calories: 35
- Fat: 0g
- Carbohydrates: 9g
- Sugar: 8g
- Fiber: 0.5g
So there you have it—a bright, delicious, and super easy recipe for homemade 3-Ingredient Fig Jam! This jam is not just a spread; it’s a celebration of fresh ingredients and sweet memories waiting to be made. Dive in, enjoy every jar, and remember that the kitchen is the best place to create your own flavor stories. Happy cooking!
Print3-Ingredient Fig Jam
A simple and delightful recipe for homemade fig jam using just three ingredients: fresh figs, sugar, and lemon juice.
- Prep Time: 10 minutes
- Cook Time: 30 minutes
- Total Time: 40 minutes
- Yield: 2 cups 1x
- Category: Condiment
- Method: Cooking
- Cuisine: American
- Diet: Vegan
Ingredients
- 2 cups fresh figs, stemmed and chopped
- 1 cup granulated sugar
- 2 tablespoons lemon juice
Instructions
- Prepare the figs: Rinse under cold water, pat dry, remove stems, and chop.
- Combine ingredients: In a pot, mix chopped figs, sugar, and lemon juice.
- Cook the mixture: Over medium heat, stir until figs break down (5-10 minutes).
- Simmer: Reduce heat to low and simmer for 20-30 minutes, stirring occasionally.
- Cool and store: Allow the jam to cool before transferring to a jar.
- Enjoy: Spread on toast or use as a topping for desserts.
Notes
Try variations by adding spices like cinnamon or herbs like rosemary for unique flavors.
Nutrition
- Serving Size: 1 tablespoon
- Calories: 35
- Sugar: 8g
- Sodium: 0mg
- Fat: 0g
- Saturated Fat: 0g
- Unsaturated Fat: 0g
- Trans Fat: 0g
- Carbohydrates: 9g
- Fiber: 0.5g
- Protein: 0g
- Cholesterol: 0mg
Keywords: fig jam, homemade jam, easy recipe, condiment, vegan recipe
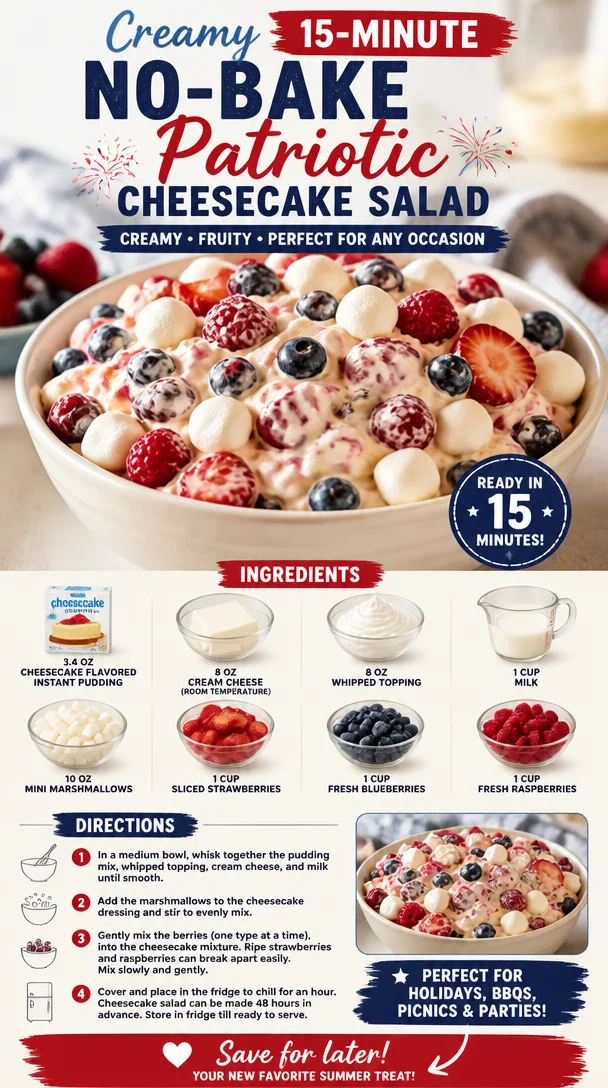
Creamy 15-Minute No-Bake Patriotic Cheesecake Salad
Red, White, and Blue Cheesecake Salad: A Festive Delight
Welcome to another exciting culinary journey with me, Ava Carter, here at Clean Plate Cravings! Today, we’re diving into a dish that’s not just a feast for your taste buds but also a delightful treat for the eyes. You guessed it—we’re making a Red, White, and Blue Cheesecake Salad! Perfect for all your summer gatherings, barbecues, and patriotic celebrations, this dessert combines the creamy goodness of cheesecake with the fresh, vibrant flavors of strawberries, blueberries, and raspberries.
Imagine a dish that has the richness of cheesecake yet feels light and refreshing. This salad is not just a dessert; it’s an experience that brings all the nostalgic flavors you love together in one colorful bowl. And the best part? It’s super easy to whip up! So grab your apron and let’s get started!
A Bite of Nostalgia
Growing up, my family took summer barbecues very seriously. One dish that almost always made an appearance was an eye-catching jello salad layered with fruit, whipped cream, and, of course, lots of love. Fast forward to my culinary adventures as an adult, and I realized that I wanted to capture that nostalgic summer magic but with a twist. Enter the Red, White, and Blue Cheesecake Salad!
I remember the first time I made it for a Fourth of July picnic. The sun was shining, the grill was sizzling, and I was feeling adventurous in the kitchen. As I mixed the creamy cheesecake filling, it brought back memories of my grandmother whisking up her iconic desserts. The laughter, the joy, and the aroma of good food filled my heart. When I laid it out on the picnic table, it was like I had created a work of art. The vibrant red, white, and blue colors sparkled in the sunlight, and I knew I had stumbled upon something special. It was an instant hit! Everyone dove in, and it felt amazing to share something that not only tasted good but also sparked happy memories. So let’s recreate that magic together today!
Ingredients
Here’s what you’ll need to make this delicious Red, White, and Blue Cheesecake Salad:
-
3.4 oz Cheesecake flavored instant pudding
This is the magic ingredient that gives our salad that rich cheesecake flavor without all the hassle of baking. If you can’t find cheesecake-flavored pudding, vanilla works well too! -
8 oz Cream Cheese (room temperature)
The creaminess of cream cheese is essential for achieving that dreamy texture. Make sure it’s softened to avoid lumps. You can substitute with a dairy-free cream cheese if you prefer. -
8 oz Whipped Topping
This brings the salad together and adds a light, airy feel. If you prefer a healthier alternative, you can use Greek yogurt or homemade whipped cream. -
1 cup Milk
Milk helps combine everything smoothly. Almond or soy milk can be a great substitute if you’re dairy-free. -
10 oz Mini Marshmallows
These little bites of fluffiness add a fun texture. You can opt for sugar-free marshmallows if you’re looking to cut down on sugar. -
1 cup Sliced Strawberries
Juicy and vibrant, strawberries offer that fresh sweetness. Feel free to swap out for cherries for a similar tangy-sweet flavor. -
1 cup Fresh Blueberries
They’re not just pretty; blueberries pack a nutritional punch too! If you can’t get fresh blueberries, frozen ones will work—just thaw them first. -
1 cup Fresh Raspberries
These tart beauties provide a lovely contrast to the sweetness of the cheesecake flavor. Blackberries are a suitable alternative if you prefer.
Step-by-Step Instructions
Now that we have our ingredients, let’s dive into the making of our Red, White, and Blue Cheesecake Salad! Follow these easy steps, and remember to have fun along the way.
-
Mix the Cheesecake Filling:
In a large mixing bowl, combine the room-temperature cream cheese and the cheesecake-flavored pudding mix. Using a hand mixer, beat them together on medium speed until smooth. This is where the magic begins! A tip: make sure your cream cheese is really soft so you don’t end up with lumps. Nobody wants a chunky cheesecake salad! -
Add the Milk:
Gradually pour in the milk while continuing to beat the mixture. This is going to make it nice and creamy. You want to achieve a smooth, pourable consistency. If you find it too thick, a splash more milk won’t hurt! -
Fold in the Whipped Topping:
Here comes the fun part! Carefully fold in the whipped topping using a spatula or wooden spoon to keep it light and fluffy. Think of this as adding air to your dessert—a light and airy cheesecakey hug! -
Incorporate the Marshmallows:
Next, stir in the mini marshmallows, allowing that delightful fluffiness to blend with the creamy filling. You’ll love the way they pop in your mouth! -
Add the Fresh Berries:
Throw in your sliced strawberries, blueberries, and raspberries. Fold them in gently to maintain their shape. The vibrant colors are essential for that stunning presentation! -
Chill:
Transfer your mixture to a large serving bowl or individual dessert cups. Cover it with plastic wrap and chill for at least 1 hour in the refrigerator. This helps the flavors meld together and gives you a refreshing salad! -
Serve and Admire:
Once it’s chilled and set, it’s time to dig in! Grab a big scoop—don’t be shy—and enjoy this beautiful cheesecake salad that’s sure to impress!
Serving Suggestions
Presentation is key, my friends! To take it up a notch, you can layer the salad in individual parfait glasses or jars for an extra touch. Drizzle with honey or sprinkle some crushed graham crackers on top for added crunch and a nod to traditional cheesecake crust. Garnish with a mint leaf or sprinkle a little extra fruit on top to make it look absolutely delectable!
Recipe Variations
Want to get creative? Here are some fun twists on this classic dessert:
-
Add Citrus: A splash of lemon or lime juice can brighten up the flavors beautifully—just be mindful to add it gradually!
-
Chocolate Drizzle: Drizzle some melted chocolate or chocolate sauce on top for a fudgey twist that pairs excellently with the cheesecake flavor.
-
Nutty Crunch: Toss in some chopped nuts like pecans or walnuts for a delightful crunch and added texture.
-
Different Pudding Flavors: Experiment with different pudding flavors like vanilla or chocolate for a unique take on the salad.
-
Vegan Version: Substitute all dairy ingredients with dairy-free alternatives to make this salad vegan-friendly while keeping it delicious!
Chef’s Notes
Oh, the joy of creating in the kitchen! This cheesecake salad was born from trial and error and a touch of whimsy. I remember the first time I plated it for a family gathering—the looks on everyone’s faces when they took their first bite was priceless. It’s delightful when a recipe becomes a family favorite, and it warms my heart to see it shared at gatherings year after year. Over time, I’ve adapted this recipe to accommodate dairy-free folks and to include even more vibrant fruits. It’s all about flexibility and making it your own!
FAQs and Troubleshooting
Q: My cheesecake salad turned out too runny; what went wrong?
A: The most common culprit is not using enough instant pudding mix. Make sure to stick to the recipe for the right texture or let it chill longer in the fridge to firm up.
Q: Can I prepare this salad in advance?
A: Absolutely! You can make it a day ahead; just make sure to store it in the fridge to keep it fresh. Just give it a light stir before serving; it might settle a bit.
Q: How long does this salad last in the fridge?
A: Typically, it stays fresh for about 3 days. But I doubt it will last that long—it’s too delicious to resist!
Q: Can I use frozen berries?
A: Yes! Just make sure to thaw and drain excess liquid before adding them to avoid making the salad watery.
Nutritional Info
For those curious about the nutritional aspect, here’s a quick breakdown per serving (based on 8 servings):
- Calories: 210
- Protein: 3g
- Fat: 9g
- Carbohydrates: 29g
- Fiber: 1g
- Sugars: 15g
This is a rough estimate, and variations can occur based on the specific ingredients used.
So there you have it, my culinary friends—a vibrant, creamy, delicious Red, White, and Blue Cheesecake Salad that’s perfect for any occasion! Remember to enjoy the process, have fun in the kitchen, and keep it fresh and fabulous. Until next time, happy cooking!
PrintRed, White, and Blue Cheesecake Salad
A festive and refreshing cheesecake salad perfect for summer gatherings and patriotic celebrations.
- Prep Time: 15 minutes
- Cook Time: 60 minutes
- Total Time: 75 minutes
- Yield: 8 servings 1x
- Category: Dessert
- Method: No-Bake
- Cuisine: American
- Diet: Vegetarian
Ingredients
- 3.4 oz Cheesecake flavored instant pudding
- 8 oz Cream Cheese (room temperature)
- 8 oz Whipped Topping
- 1 cup Milk
- 10 oz Mini Marshmallows
- 1 cup Sliced Strawberries
- 1 cup Fresh Blueberries
- 1 cup Fresh Raspberries
Instructions
- Mix the Cheesecake Filling: In a large mixing bowl, combine the room-temperature cream cheese and the cheesecake-flavored pudding mix. Using a hand mixer, beat them together on medium speed until smooth.
- Add the Milk: Gradually pour in the milk while continuing to beat the mixture until smooth and creamy.
- Fold in the Whipped Topping: Carefully fold in the whipped topping using a spatula to keep it light and fluffy.
- Incorporate the Marshmallows: Stir in the mini marshmallows until evenly mixed.
- Add the Fresh Berries: Gently fold in the sliced strawberries, blueberries, and raspberries.
- Chill: Transfer the mixture to a large serving bowl or individual cups and refrigerate for at least 1 hour.
- Serve and Admire: Once chilled, serve and enjoy your beautiful cheesecake salad!
Notes
Presentation can be enhanced by layering in parfait glasses and garnishing with mint.
Nutrition
- Serving Size: 1 serving
- Calories: 210
- Sugar: 15g
- Sodium: 300mg
- Fat: 9g
- Saturated Fat: 4g
- Unsaturated Fat: 4g
- Trans Fat: 0g
- Carbohydrates: 29g
- Fiber: 1g
- Protein: 3g
- Cholesterol: 30mg
Keywords: cheesecake salad, summer dessert, patriotic dessert, easy salad, no-bake dessert