Minute Vegan Pumpkin Pasta: Creamy Weeknight Dinner
10-Minute Vegan Pumpkin Pasta: A Cozy Fall Delight
Welcome to my kitchen, friends! Today, we’re diving into a dish that’s perfect for those busy days when you want a meal that’s quick but still feels like a warm hug. If you’re anything like me, you’re always on the lookout for recipes that are not only easy but also packed with flavor. Enter this delightful 10-Minute Vegan Pumpkin Pasta!
Imagine this: a chilly autumn evening, the leaves outside are turning a vibrant orange, and the air is filled with the scent of spices. Nothing quite warms the soul like a bowl of creamy pumpkin pasta. This dish is a celebration of fall’s best flavors, and it comes together in a flash. With just a handful of ingredients and less than 10 minutes in the kitchen, you’ll be twirling your fork in a comforting bowl of pasta before you know it.
When I first experimented with this dish, I wanted to create something that evoked nostalgia while being really accessible. The creaminess of the pumpkin puree plays beautifully with the spices, which remind me of my grandma’s kitchen during Thanksgiving. She would make a pumpkin pie that was heavenly—and trust me, this pasta gives me all those warm, fuzzy feelings while being completely plant-based. It’s a meal that feels indulgent but is actually nourishing for your body. So, let’s get cooking!
A Nostalgic Kitchen Memory
As I mentioned, my love for pumpkin dishes stems from my childhood, where the scent of cinnamon, nutmeg, and freshly baked pies filled my grandparents’ home every fall. I remember pulling up a chair to help Grandma in her kitchen, surrounded by mismatched dishware, seasonal decorations, and the warmth of her ever-present smile. That place felt magical, and the dining table was a gathering spot for family and stories to unfold.
One specific memory stands out while making pumpkin puree for her famous pies. Grandma would always let me taste the puree, declaring it "liquid gold." I can hear her laughing now as I threw in a pinch of cinnamon, a dash of nutmeg, and swirled in the palpable excitement of the upcoming holiday feasts. While we were all about the pies then, I’ve taken that same energy and transformed it into a savory vegan pasta that has quickly become a staple in my recipe repertoire.
There’s something so special about cooking with ingredients that evoke those warm memories. Pumpkins have a way of bringing people together, creating not just meals but meaningful moments. So grab your favorite apron, and let’s whip up a dish that not only tantalizes your taste buds but also warms your heart.
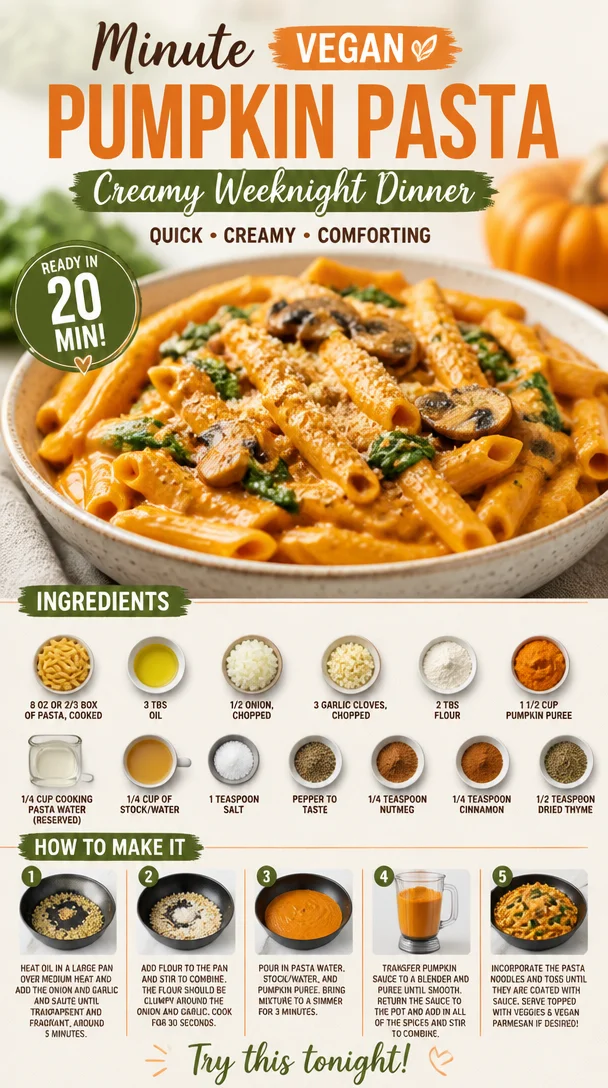
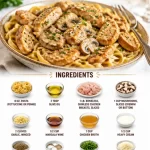
Ingredients
Here’s what you’ll need to create this flavorful dish:
-
8 oz or 2/3 box of pasta, cooked
Any pasta works! I love using whole wheat or gluten-free options for a healthy twist. Just make sure to cook it al dente; it will continue cooking in the sauce! -
3 tablespoons oil
Extra virgin olive oil is my go-to for its robust flavor, but avocado oil or even a hint of flavored oil (like garlic-infused) can work wonders too! A little goes a long way! -
1/2 onion, chopped
A sweet onion adds depth to the flavor. If you’re in a pinch, shallots or even leeks can be an exciting substitute. -
3 garlic cloves, chopped
Fresh garlic imparts incredible flavor. If you’re in a hurry, garlic powder can work too, but fresh is always best! -
2 tablespoons flour
This helps thicken the sauce. You can use all-purpose flour, gluten-free flour, or nutritional yeast for a cheesy flavor. -
1 1/2 cups pumpkin puree
Look for canned pumpkin puree for ease, but if you’re feeling adventurous, roast fresh pumpkin to make your own! -
1/4 cup cooking pasta water
This starchy water will help bind your sauce and pasta together perfectly. Don’t forget to save some before draining! -
1/4 cup of stock/water
Vegetable stock works great here, adding even more flavor to the dish. You can also use plain water if you’re in a pinch. -
1 teaspoon salt
Adjust to your liking, but remember that the stock might already contain some salt, so you may want to start lightly. -
Pepper to taste
Freshly cracked black pepper is the best! If you want a kick, consider adding red pepper flakes. -
1/4 teaspoon nutmeg
Nutmeg adds warmth, perfect for fall. A little goes a long way; you don’t want it to overpower the dish. -
1/4 teaspoon cinnamon
Just a hint for that cozy factor. If you want a more robust flavor, go ahead and add more! -
1/2 teaspoon dried thyme
This herb adds an earthy note that complements the pumpkin beautifully. Fresh thyme is lovely as well if you have it on hand!
Step-by-Step Instructions
Ready to get cooking? Let’s do this!
-
Boil the Pasta: Start by bringing a large pot of salted water to a boil. Add your pasta and cook according to package instructions until al dente. Remember to reserve 1/4 cup of that starchy pasta water before draining! Trust me on this one; it’s liquid magic.
-
Sauté the Onions and Garlic: In a large skillet, heat the olive oil over medium heat. Add the chopped onions and sauté them for about 3-4 minutes until they start to soften and become translucent. You want to hear that sizzle! Then, add in the garlic and cook for an additional minute. The aroma will be irresistible!
-
Create the Roux: Next, sprinkle in the flour while whisking constantly to avoid clumps. You’re creating a roux that will thicken our sauce. Cook for about 1-2 minutes until lightly golden. This is when your kitchen will start to smell like something magical is happening!
-
Add the Pumpkin: Stir in the pumpkin puree, cooking for another 2 minutes. This step helps develop the flavors. Then pour in the reserved pasta water and stock. We want a smooth and creamy consistency, so keep stirring!
-
Season It Up: Now’s the time to add the salt, pepper, nutmeg, cinnamon, and thyme. Taste as you go! If it needs a little more spice or salt, don’t be shy. This dish should sing with flavor!
-
Combine Pasta and Sauce: Toss your cooked pasta into the skillet and stir until every strand is coated with that dreamy pumpkin goodness. If it’s too thick, add a touch more stock or water to loosen it up.
-
Serve and Enjoy: Once everything is well combined and heated through, it’s time to plate up! You can garnish with fresh herbs, a sprinkle of chili flakes, or even some vegan parmesan if you’re feeling fancy.
Serving Suggestions
This dish is best served warm, right from the stove! I love plating it up in a large, rustic bowl, garnishing with freshly cracked black pepper and a sprinkle of dried thyme on top. You might also want to pair it with a side of crispy garlic bread or a fresh, leafy salad to balance out the richness of the pumpkin. Trust me, this comforting dish is perfect for cozy nights in or entertaining friends!
Recipe Variations
Want to switch things up? Here are a few exciting variations to keep things fresh:
-
Add Greens: Toss in some fresh spinach or kale during the last minute of cooking for a boost of color and nutrients.
-
Nutty Flavor: Add a handful of toasted walnuts or pine nuts for a delightful crunch.
-
Spicy Twist: Mix in some sautéed bell peppers or a dash of hot sauce to give your pasta a kick!
-
Creamy Vegan Option: Stir in a tablespoon of coconut cream or cashew cream for an extra creamy texture.
-
Herb Swap: Try fresh sage instead of thyme for an earthy flavor that complements the pumpkin perfectly.
Chef’s Notes
As I’ve played around with this recipe, I’ve swapped out ingredients and even tried different pasta shapes. While the original is undeniably comforting, I’ve found that whole grain or chickpea pasta can elevate the dish with additional nutrients. Plus, I’ve discovered that seasoning can truly make or break a dish—don’t be scared to add a little extra spice or herbs until it feels just right. Once, I forgot to save the pasta water and had to improvise. Let’s just say, the result wasn’t as silky as usual! Lesson learned—always save that liquid gold!
FAQs and Troubleshooting
1. What type of pasta should I use?
Feel free to use any type you have on hand! Whole wheat, gluten-free, or even chickpea pasta are fabulous options!
2. Can I substitute fresh pumpkin for canned?
Absolutely! Just roast the pumpkin until soft, scoop the flesh, and blend until smooth before adding it to the dish.
3. How can I make this dish more filling?
Adding protein to your plate can make it heartier. Consider white beans or lentils tossed in at the end!
4. What if my sauce is too thick?
No worries! Simply add a little more pasta water or stock, stirring until you reach your desired creamy consistency.
Nutritional Info
This dish is not only comforting but also loaded with nutrients! With pumpkin as the star, you get a great source of vitamins A and C, fiber, and antioxidants. Pair that with whole grain pasta for a filling meal that energizes you. If you want specifics, I recommend looking up the nutritional content of your specific ingredients used!
And there you have it—your new go-to 10-Minute Vegan Pumpkin Pasta! Cooking should feel fun and accessible, and this recipe is a beautiful testament to that. Enjoy this cozy fall dish, make some magical memories in your kitchen, and, as always, keep your plates clean and your cravings satisfied!
Print10-Minute Vegan Pumpkin Pasta
A quick and flavorful vegan pasta dish featuring creamy pumpkin, perfect for cozy fall evenings.
- Prep Time: 5 minutes
- Cook Time: 5 minutes
- Total Time: 10 minutes
- Yield: 2 servings 1x
- Category: Main Course
- Method: Stovetop
- Cuisine: Italian
- Diet: Vegan
Ingredients
- 8 oz pasta, cooked (whole wheat or gluten-free)
- 3 tablespoons extra virgin olive oil
- 1/2 onion, chopped
- 3 garlic cloves, chopped
- 2 tablespoons flour
- 1 1/2 cups pumpkin puree
- 1/4 cup cooking pasta water
- 1/4 cup vegetable stock or water
- 1 teaspoon salt
- Pepper to taste
- 1/4 teaspoon nutmeg
- 1/4 teaspoon cinnamon
- 1/2 teaspoon dried thyme
Instructions
- Boil the pasta: Bring a large pot of salted water to a boil and cook pasta according to package instructions until al dente, reserving 1/4 cup pasta water.
- Sauté the onions and garlic: In a skillet, heat olive oil over medium heat, sauté onions for 3-4 minutes, then add garlic for an additional minute.
- Create the roux: Sprinkle in flour while whisking to avoid clumps and cook for 1-2 minutes until lightly golden.
- Add the pumpkin: Stir in pumpkin puree and cook for another 2 minutes, then add reserved pasta water and stock.
- Season it up: Add salt, pepper, nutmeg, cinnamon, and thyme, adjusting to taste.
- Combine pasta and sauce: Toss cooked pasta in the skillet until well coated, adding more stock if too thick.
- Serve and enjoy: Plate up the pasta, garnishing with herbs or vegan parmesan if desired.
Notes
This dish pairs beautifully with crispy garlic bread or a fresh salad. You can also add greens or nuts for extra flavor and nutrition.
Nutrition
- Serving Size: 1 serving
- Calories: 350
- Sugar: 3g
- Sodium: 600mg
- Fat: 15g
- Saturated Fat: 2g
- Unsaturated Fat: 10g
- Trans Fat: 0g
- Carbohydrates: 45g
- Fiber: 5g
- Protein: 10g
- Cholesterol: 0mg
Keywords: vegan pasta, pumpkin pasta, fall recipes, quick meals, comfort food
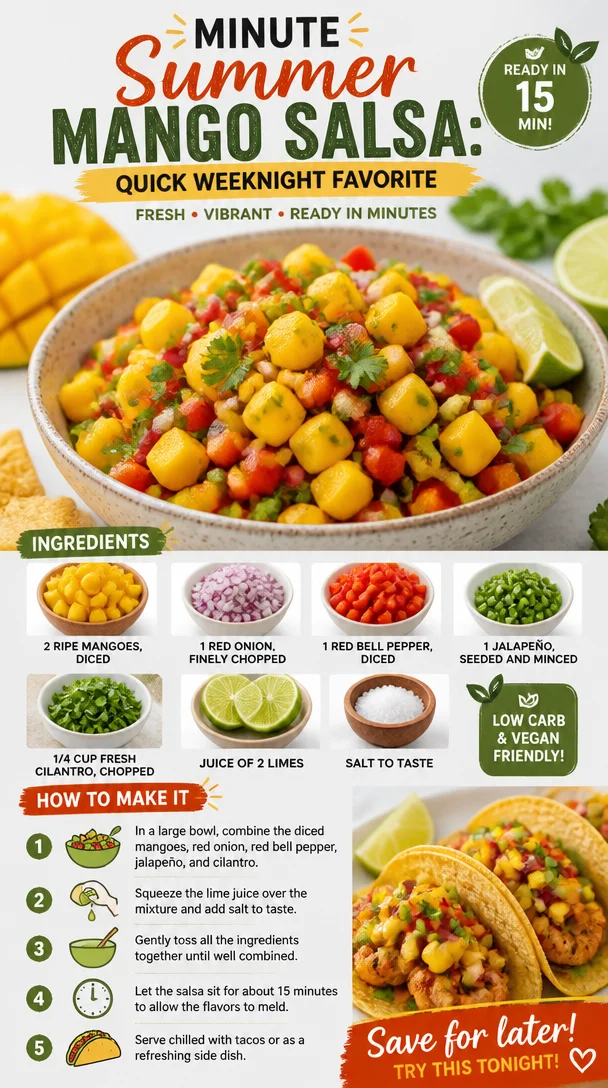
Minute Summer Mango Salsa: Quick Weeknight Favorite
Summer Mango Salsa: Fresh, Vibrant, and Oh-So-Delicious!
Welcome to another exciting culinary adventure here at Clean Plate Cravings! Today, we’re diving into the world of summer flavors with a dish that’s bound to make your taste buds dance with joy—Summer Mango Salsa! This vibrant, colorful salsa is perfect for those sunny days when you want to feel refreshed and energized. Whether you’re hosting a backyard barbecue, just chilling on the patio, or prepping a week’s worth of clean meals, this salsa is a versatile powerhouse that adds a pop of flavor to just about anything.
Picture this: The sun is shining, the birds are chirping, and you’re surrounded by friends, laughter, and the delicious aroma of grilled goodness wafting through the air. That’s what summer is all about, right? And what better way to complement a summer feast than with a fresh, zesty mango salsa that elevates everything from grilled chicken to fish tacos? Plus, it’s super easy to make, packed with nutrients, and utterly satisfying. Who wouldn’t want a bowl of this brilliant dish at their table?
As I embarked on my cooking journey, salsa was one of those magical creations that stole my heart. Growing up, my family had a tradition of making salsa together during summer gatherings. We would sit around the kitchen counter, chopping and mixing, as laughter and stories were shared. It was more than just a recipe; it was a bonding experience. Each ingredient contributed not just to the flavor but also to the love and joy that enveloped those summer afternoons. So, whether you’re reliving fond memories or creating new ones, this Summer Mango Salsa will become a staple in your kitchen!
Now let’s roll up those sleeves and get to the fun part! Here’s everything you need to whip up this gorgeous salsa.
Ingredients
-
2 ripe mangoes, diced
- The star of the show! Look for mangoes that yield slightly to pressure—this means they’re ripe and ready to be enjoyed. Not enough mangoes? Try substituting with peaches or nectarines for a similar sweetness!
-
1 red onion, finely chopped
- This brings a touch of sharpness that pairs beautifully with the sweetness of the mangoes. If red onion isn’t your thing, you could swap it out with green onions or shallots for a milder flavor.
-
1 red bell pepper, diced
- Adds crunch and a hint of sweetness. Feel free to swap it with yellow or orange bell peppers for a slightly different taste while keeping that vibrant color!
-
1 jalapeño, seeded and minced
- Here’s where you get to play with spice! Don’t be shy, but remove the seeds if you want to dial down the heat. If you prefer, you can use a different pepper like a serrano for a bolder kick, or skip it altogether for a milder salsa.
-
1/4 cup fresh cilantro, chopped
- This herb is essential for that fresh, bright flavor! If you’re not a fan of cilantro (I know, it’s a controversial herb!), feel free to substitute with fresh parsley or basil for a unique twist.
-
Juice of 2 limes
- The acidity brings everything together! The lime juice cuts through the sweetness and adds that zing we all crave. In a pinch, lemon juice can work too.
-
Salt to taste
- A little salt enhances all those beautiful flavors. Don’t skip it! If you’re watching your sodium intake, consider using a pinch of Himalayan pink salt for added mineral content.
Step-by-Step Instructions
-
Prepare your ingredients: Begin by gathering all your ingredients on the countertop. This is the best way to streamline your process and make sure you have everything you need. Organize your cutting board, and don’t forget to put on your favorite tunes to create an uplifting kitchen atmosphere!
-
Dice the mangoes: Grab those ripe mangoes and slice them down the sides of the pit. Extract the flesh and make some crisscross cuts with your knife before scooping it out with a spoon. The result? Perfectly diced mango pieces that are bursting with flavor!
-
Chop the onion and bell pepper: Next, finely chop the red onion and dice the red bell pepper. These colors alone will brighten up any kitchen! When chopping onions, I recommend using a sharp knife to avoid tearing up, but if you do find yourself sniffling, a quick rinse with cold water can help.
-
Mince the jalapeño: Take your jalapeño and carefully slice it open. Use a spoon to scrape out the seeds (unless you like it spicy—then leave some in!). Finely mince the jalapeño to distribute just the right amount of heat throughout your salsa.
-
Chop the cilantro: Give your fresh cilantro a rough chop to release those delightful oils. If you’re using parsley or basil instead, go ahead and do the same. Herb freshness is key!
-
Mix it all together: In a large mixing bowl, combine your diced mangoes, chopped red onion, bell pepper, jalapeño, and cilantro. Now, here’s your chef hack: use a gentle folding motion to combine the ingredients, preserving their texture and avoiding mushiness.
-
Add lime juice and salt: Squeeze the juice of the two limes directly into the bowl, making sure to catch any seeds (those slippery little critters!). Then, sprinkle salt to taste. Give everything a good stir and taste as you go. Adjust the lime and salt until it’s just how you like it.
-
Chill and serve: Allow the mango salsa to chill in the refrigerator for at least 30 minutes to let those flavors meld together. Trust me; it’s worth the wait. Serve it chilled or at room temperature with your favorite chips or as a topping for your grilled recipes!
Serving Suggestions
Ready to impress your guests? Here’s how to serve your delicious Summer Mango Salsa: scoop it into a bright, beautiful serving bowl and unleash its colorful charms. Garnish with a sprig of cilantro on top for that professional touch. Pair it with crispy tortilla chips or spoon it generously over grilled fish, chicken, tacos, or even salads for a refreshing upgrade. The possibilities are truly endless, and the smiles will be contagious!
Recipe Variations
-
Add Avocado: Dice up some ripe avocado to add creaminess—this will make your salsa richer and texturally diverse. Plus, who can resist avocado?
-
Pineapple Twist: Swap out some of the mango for fresh pineapple! This will add a tangy sweetness that pairs perfectly with the savory elements in your meal.
-
Black Beans for Protein: Want to make this salsa a full meal? Toss in some drained canned black beans. This will boost the fiber and protein content, making it even more satisfying.
-
Coconut Flakes: For a fun tropical twist, mix in some unsweetened coconut flakes. This will give that exotic flair and an interesting texture.
-
Spicy Garlic Kick: Add minced garlic for an extra layer of flavor, or toss in some chopped fresh ginger for an unexpected zing!
Chef’s Notes
This Summer Mango Salsa recipe has beautifully evolved over the years as I played with different ingredients based on what was available or in season. I fondly remember making it in my tiny apartment kitchen, with all sorts of concoctions that would sometimes go hilariously wrong (mesquite mango salsa, anyone?). But each error taught me something new, and now I’m thrilled to share this tried-and-true version with you! Salsas can be so personal, really reflective of each person’s palate. It’s an exciting journey where we can all celebrate our unique flavor preferences.
FAQs and Troubleshooting
1. What if my mangoes are too firm?
- If your mangoes aren’t quite ripe, let them sit at room temperature for a few days until they yield slightly to pressure. You can also speed up the ripening process by placing them in a paper bag with an apple or banana!
2. Can I make this salsa ahead of time?
- Absolutely! Just keep in mind that the longer it sits, the softer the ingredients will become. It’s best if consumed within 2-3 days. Just give it a good stir before serving.
3. How can I adjust the spiciness?
- You can control the heat by adjusting the amount of jalapeño based on your taste preference. You can also add a pinch of cayenne pepper for a unique kick if you want more spice without more bulk.
4. Can I freeze the salsa?
- While it’s not recommended to freeze the salsa due to the fresh ingredients losing their texture, you can freeze the mangoes separately and make a fresh batch later!
Nutritional Info
While I won’t overload you with numbers, rest assured this Summer Mango Salsa is packed with vitamins, potassium, and antioxidants—making it a healthy choice for snacking or a side dish. Pair it with whole-grain chips or on top of a bed of leafy greens for a nutritious boost!
So, what do you think? Are you ready to dive into this delightful Summer Mango Salsa recipe? Gather your ingredients, don your apron, and let’s make those summer days even sweeter! Happy cooking, my fellow foodies! 🌟
PrintSummer Mango Salsa
A vibrant and refreshing salsa made with fresh mangoes and colorful veggies, perfect for summer gatherings.
- Prep Time: 15 minutes
- Cook Time: 0 minutes
- Total Time: 15 minutes
- Yield: 4 servings 1x
- Category: Appetizer
- Method: Mixing
- Cuisine: Mexican
- Diet: Vegan
Ingredients
- 2 ripe mangoes, diced
- 1 red onion, finely chopped
- 1 red bell pepper, diced
- 1 jalapeño, seeded and minced
- 1/4 cup fresh cilantro, chopped
- Juice of 2 limes
- Salt to taste
Instructions
- Prepare your ingredients: Begin by gathering all your ingredients on the countertop.
- Dice the mangoes: Grab those ripe mangoes and slice them down the sides of the pit.
- Chop the onion and bell pepper: Next, finely chop the red onion and dice the red bell pepper.
- Mince the jalapeño: Take your jalapeño and carefully slice it open.
- Chop the cilantro: Give your fresh cilantro a rough chop to release those delightful oils.
- Mix it all together: In a large mixing bowl, combine your diced mangoes, chopped red onion, bell pepper, jalapeño, and cilantro.
- Add lime juice and salt: Squeeze the juice of the two limes directly into the bowl.
- Chill and serve: Allow the mango salsa to chill in the refrigerator for at least 30 minutes.
Notes
This salsa can be made ahead of time but is best enjoyed within 2-3 days for optimal freshness.
Nutrition
- Serving Size: 1/4 cup
- Calories: 150
- Sugar: 18g
- Sodium: 50mg
- Fat: 1g
- Saturated Fat: 0g
- Unsaturated Fat: 1g
- Trans Fat: 0g
- Carbohydrates: 37g
- Fiber: 3g
- Protein: 2g
- Cholesterol: 0mg
Keywords: salsa, mango, summer recipes, healthy snacks, fresh salsa
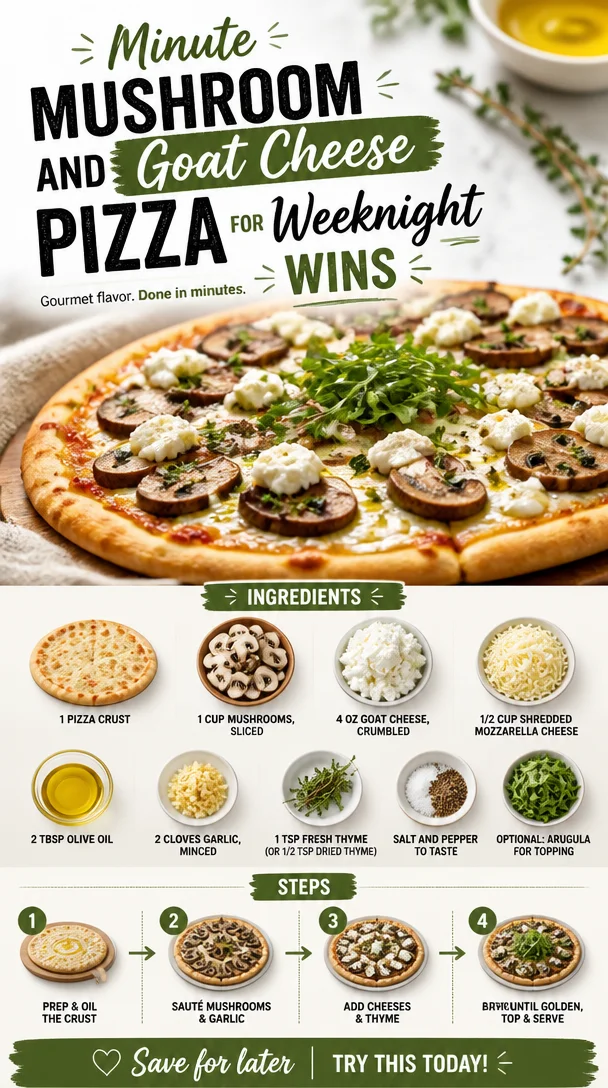
Minute Mushroom and Goat Cheese Pizza for Weeknight Wins
The Irresistible Allure of Mushroom and Goat Cheese Pizza
Welcome to an adventure in flavors that is both delicious and comforting! Today, we’re diving into the earthy, rich world of Mushroom and Goat Cheese Pizza—a dish that beautifully balances vibrant umami flavors with creamy goodness. If you’re dreaming of a quick lunch, a cozy dinner, or a showstopper to impress your friends, this pizza is your answer. Whether you’re gathering around the dinner table or whipping up a late-night snack, I’ve got your back.
Picture this: the aroma of sautéed garlic and mushrooms wafting through your kitchen, the rhythmic sound of dough being stretched, and the anticipation building as you layer the luscious goat cheese atop savory sautéed mushrooms. It’s satisfying, and yes, it’s downright fun! This dish doesn’t just satisfy hunger; it feeds the soul.
Now, let’s take a moment to explore why I love this pizza so much. It’s not only about flavor; it’s about experience. I remember the first time I made this pizza—it was a rainy Sunday afternoon, and I was cozying up indoors with some good music and a handful of fresh ingredients from my local farmer’s market. The moment the garlic hit the pan, I felt that rush of joy that only cooking can provide. It felt like a warm hug from the inside out, and I couldn’t wait to share this experience with you all.
So, grab your apron, and let’s get cooking!
A Slice of Nostalgia
Many of my favorite culinary memories are tied to comfort food, especially pizza. I remember it vividly—school nights spent assembling pizzas with my siblings, where each one of us would claim a corner of the table with our favorite toppings. My brother was all about pepperoni, while my sister piled on veggies, and I, ever the cheese lover, discovered my fascination with goat cheese amidst the chaos.
One particular evening resonated more than others. We decided to create a “fancy pizza night,” which meant no ordinary toppings. Armed with a set of fresh mushrooms and a fresh log of goat cheese, I felt like a gourmet chef! As we piled our creations high with ingredients, the kitchen transformed into our culinary playground, filled with laughter, flour-covered counters, and mischievous debates over which pizza was the best.
I will never forget that first bite—crispy crust, creamy cheese, and the deep flavor of sautéed mushrooms! It was a tiny celebration of family, creativity, and of course, deliciousness! Since that night, I’ve carried the spirit of those pizza-making evenings into my cooking, experimenting and evolving, yet always finding comfort in the flavor combinations that sparked joy.
Ingredients
Here’s what you’ll need to create this culinary masterpiece:
-
1 pizza crust
Choose your favorite! You can go with a store-bought option for ease, or make your own from scratch. If you’re looking for a twist, consider using cauliflower crust for a gluten-free alternative. -
1 cup mushrooms, sliced
Button or cremini mushrooms work well here, but feel free to experiment with shiitake or portobello for a bolder flavor. Tired of mushrooms? Swap them for thinly sliced zucchini or bell peppers! -
4 oz goat cheese, crumbled
Goat cheese adds a creamy texture and tangy punch to the pizza. If you’re not a goat cheese fan, try feta or ricotta for a similar creaminess! -
1/2 cup shredded mozzarella cheese
Mozzarella provides that melty, gooey factor we love about pizza. For a dairy-free option, use a plant-based cheese alternative or simply increase the goat cheese amount. -
2 tbsp olive oil
Olive oil is essential for sautéing your mushrooms and garlic, giving them a rich flavor. You can use butter for a creamier option or avocado oil for a higher smoke point. -
2 cloves garlic, minced
Garlic adds an aromatic touch. If you’re in a pinch, garlic powder can do the trick in a flavor emergency, but fresh garlic is where the heart is! -
1 tsp fresh thyme (or 1/2 tsp dried thyme)
Thyme brings an earthy tone that complements the mushrooms beautifully. If thyme isn’t your thing, feel free to swap it out for fresh basil or oregano. -
Salt and pepper to taste
Essential seasonings that elevate your dish from good to great! -
Optional: arugula for topping
Arugula adds a peppery freshness to the finished pizza. Other options include fresh basil, spinach, or even a drizzle of balsamic glaze for that gourmet touch!
Step-by-Step Instructions
Are you ready to make the magic happen? Let’s get cracking!
-
Preheat the Oven
Preheat your oven to 475°F (245°C). This high temperature will lead to a crispy crust that we all crave in our pizza. If you’re using a pizza stone, toss it in the oven as it heats – a hot stone means an even crispier base! -
Prepare Your Ingredients
While the oven is heating up, let’s prep! Slice those mushrooms, crumble the goat cheese, and mince the garlic. Having everything ready will keep you organized and make the cooking process smoother. Trust me, something about prepped ingredients makes you feel like a chef in a five-star restaurant! -
Sauté the Mushrooms and Garlic
In a large skillet, heat 2 tbsp of olive oil over medium heat. Once the oil is shimmering, add the minced garlic and sauté for about 30 seconds until fragrant. Don’t walk away; burnt garlic is not your friend! Next, add the sliced mushrooms, stirring occasionally for about 5-7 minutes until they’re golden brown and tender. Season with salt, pepper, and thyme. This step is crucial for infusing the mushrooms with deep flavor! -
Roll Out Your Pizza Dough
If you’re working with store-bought dough, you can usually just unroll and place it on your baking sheet or pizza stone. If making your own, on a floured surface, roll the dough out to your desired thickness. Stretch it, twirl it, and have fun with it! Your pizza should be 10-12 inches in diameter—thin for that crispiness! -
Assemble the Pizza
Place your rolled-out crust on a parchment-lined baking sheet or the hot pizza stone. Start with the mozzarella cheese as your base for the toppings, followed by the sautéed mushrooms and garlic mixture, and finish with the crumbled goat cheese. Don’t be shy with the cheese—more is more! -
Bake the Pizza
Slide that gorgeous pizza into your preheated oven. Bake it for about 12-15 minutes or until the crust is bubbling and golden. Midway through, keep an eye on it; every oven behaves differently, and you want that perfect crust! -
Finish and Garnish
Once out of the oven, let your pizza rest for a minute or two. If you’re using arugula, scatter it on top just before slicing for that extra fresh kick. Drizzle with a little olive oil or balsamic glaze for sophistication—who says pizza can’t be gourmet?
Serving Suggestions
Cut your Mushroom and Goat Cheese Pizza into generous slices and serve it on a beautiful wooden board or colorful plate for an inviting presentation. Pair it with a light salad, perhaps a simple arugula and cherry tomato salad drizzled with balsamic vinaigrette, to balance out the richness of the cheese.
For drinks, a crisp white wine or a refreshing sparkling water with lemon can complement the earthy flavors beautifully. It’s all about enhancing the experience, folks!
Recipe Variations
Feel like switching things up? Here are a few ideas to try:
- Pesto Pizza: Spread a thin layer of pesto on the crust before adding the cheese and mushrooms for a burst of herby flavor.
- Truffle Mushroom Pizza: Drizzle some truffle oil over the finished pizza for a luxurious twist that will elevate your game!
- Vegan Version: Use plant-based cheese, substitute sautéed tofu or tempeh for the mushrooms, and load it up with veggies like bell peppers and artichokes.
- Spicy Kick: Sprinkle some red pepper flakes or add jalapeño slices for those who crave a bit of heat.
- Italian Flair: Top the pizza with prosciutto or salami for a meaty flavor explosion!
Chef’s Notes
This Mushroom and Goat Cheese Pizza has become a staple in my kitchen for a reason! It’s a dish that comes together quickly but tastes like you put in hours of effort. Over time, I’ve experimented with different cheeses, and I’ve discovered that a pinch of nutmeg added to the mushrooms before sautéing adds an unexpected warmth that my tastebuds just can’t resist!
Plus, let’s be real—there’s something utterly satisfying about pulling a freshly baked pizza out of the oven. Feel free to make this pizza your own! Cooking is all about exploring, so don’t hesitate to play with the ingredients and have a blast doing it.
FAQs and Troubleshooting
1. My pizza didn’t get crispy, what went wrong?
Make sure your oven is truly preheated! If you’re using a baking sheet instead of a pizza stone, try preheating the sheet beforehand for an extra crisp.
2. Can I use frozen dough?
Absolutely! Just ensure to thaw it according to package instructions and roll it out as you would fresh dough.
3. What’s the best way to store leftover pizza?
Store it in an airtight container in the fridge for up to 3 days. To reheat, pop it back in the oven at 350°F (175°C) for about 10 minutes for best results—you want that cheese to melt again!
4. How can I make this pizza gluten-free?
Use a gluten-free pizza crust; many great options are available at your local grocery store! Just follow the package instructions for best results.
Nutritional Info
Each serving of this Mushroom and Goat Cheese Pizza should provide a balance of flavors and nutrients to satisfy your cravings while keeping it light and healthy. Ingredients can vary in nutritional values based on portion sizes and brands, but on average, one slice contains approximately:
- Calories: 250
- Protein: 10g
- Carbohydrates: 30g
- Fat: 12g
This pizza is a delightful balance between satisfaction and nourishment—perfect for any meal of the day!
And there you have it—a Mushroom and Goat Cheese Pizza that’s as delightful to make as it is to eat! Let it bring you the same joy it has brought me, as well as a splash of creativity in your kitchen. Remember, cooking is not just about the end product; it’s about the journey enjoyed along the way. Happy cooking, my fellow foodies! 🥳🍕
PrintMushroom and Goat Cheese Pizza

A delightful mushroom and goat cheese pizza that combines earthy flavors and creamy goodness for a comforting meal.
- Prep Time: 15 minutes
- Cook Time: 15 minutes
- Total Time: 30 minutes
- Yield: 4 servings 1x
- Category: Main Course
- Method: Baking
- Cuisine: Italian
- Diet: Vegetarian
Ingredients
- 1 pizza crust
- 1 cup mushrooms, sliced
- 4 oz goat cheese, crumbled
- 1/2 cup shredded mozzarella cheese
- 2 tbsp olive oil
- 2 cloves garlic, minced
- 1 tsp fresh thyme (or 1/2 tsp dried thyme)
- Salt and pepper to taste
- Optional: arugula for topping
Instructions
- Preheat your oven to 475°F (245°C).
- Prepare your ingredients: slice the mushrooms, crumble the goat cheese, and mince the garlic.
- Sauté the garlic in olive oil over medium heat for about 30 seconds, then add the mushrooms and cook for 5-7 minutes until golden brown.
- Roll out your pizza dough to a thickness of your choice.
- Assemble the pizza: place the mozzarella, sautéed mushrooms and garlic, and goat cheese on the crust.
- Bake for 12-15 minutes or until the crust is golden and bubbling.
- Finish with arugula on top and drizzle with olive oil or balsamic glaze.
Notes
Feel free to experiment with different cheeses and toppings like pesto, truffle oil, or veggies for variations.
Nutrition
- Serving Size: 1 slice
- Calories: 250
- Sugar: 2g
- Sodium: 350mg
- Fat: 12g
- Saturated Fat: 4g
- Unsaturated Fat: 6g
- Trans Fat: 0g
- Carbohydrates: 30g
- Fiber: 2g
- Protein: 10g
- Cholesterol: 20mg
Keywords: pizza, mushroom, goat cheese, vegetarian recipe, comfort food
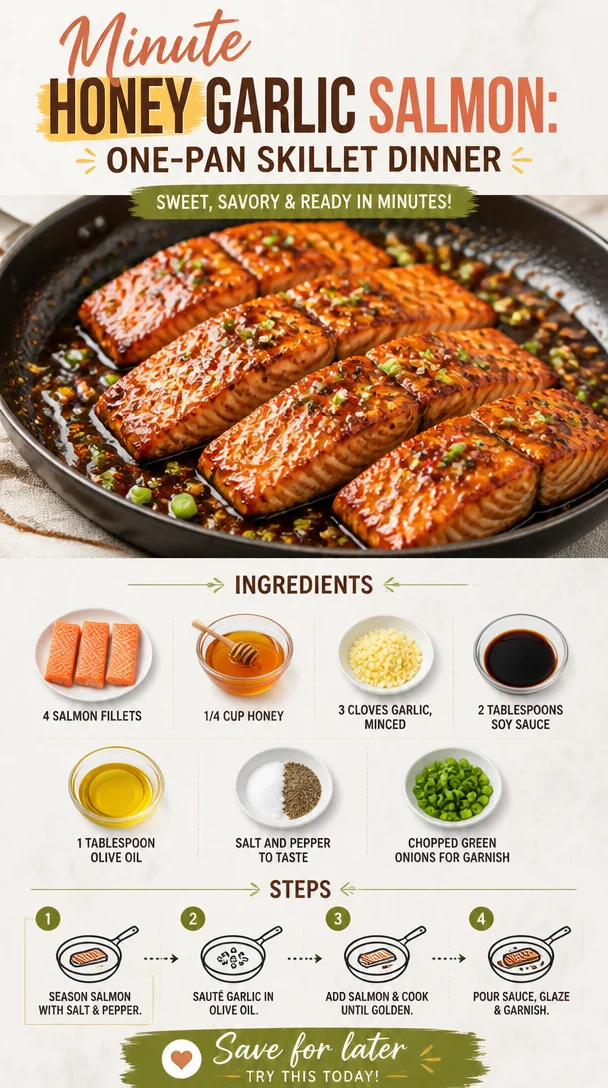
Minute Honey Garlic Salmon: One-Pan Skillet Dinner
Honey Garlic Salmon: A Delicious Journey to the Heart of Flavor
Welcome to Clean Plate Cravings, where healthy eating meets delicious flavors! Today, I want to take you on a culinary adventure centered around one of my absolute favorite dishes: Honey Garlic Salmon. This recipe is a perfect harmony of sweet and savory that will have your taste buds dancing in delight. Whether you’re a busy professional, a parent juggling kids’ schedules, or just someone who loves good food, this honey garlic salmon dish is here to rescue your weeknight dinners!
Imagine this: it’s a busy Monday evening after a long day, and the thought of cooking feels overwhelming. But fear not! With just a handful of ingredients and a quick cooking method, this honey garlic salmon can transform your mundane Monday into a vibrant food experience. What more could you ask for? It’s quick, it’s easy, and most importantly, it’s absolutely finger-licking good!
Personal Story
Let me share a little story about how honey garlic salmon became a staple in my kitchen. I remember the first time I made this dish. It was a chilly autumn evening, and I had invited a couple of friends over for dinner. Wanting to impress, I scoured through my recipe box and stumbled upon an old family recipe for honey garlic glazed chicken. It was great, but I had salmon sitting in my fridge, and I thought, "Why not give it a whirl?"
I marinated the salmon fillets in a decadent mixture of honey and garlic, letting those flavors mingle and create something magical. When I pulled the salmon out of the oven, my friends were instantly captivated. The aroma enveloped our dining area, luring everyone to the table. We dug in, and I watched as they enjoyed every bite, the sweet and savory glaze perfectly enveloping the succulent salmon.
That night was filled with laughter, stories, and an overwhelming sense of joy around the table as we savored each and every bite of honey garlic salmon. Since then, it has become my go-to recipe for gatherings, weeknight dinners, and even special occasions. It symbolizes warmth and good company, and I can’t wait for you to create your own unforgettable moments around this dish!
Ingredients
Here’s what you’ll need to bring this honey garlic salmon to life:
-
4 salmon fillets
Look for wild-caught salmon if possible; it tends to be fresher and often tastier than farmed. If you’re on a budget, feel free to substitute it with any white fish like cod or tilapia. -
1/4 cup honey
The star ingredient! It adds a natural sweetness that balances beautifully with the savory elements. If you’re looking for a dietary swap, you can use maple syrup or agave nectar for a vegan alternative. -
3 cloves garlic, minced
Garlic not only adds flavor but is also great for heart health. Don’t have fresh garlic? Garlic powder can work in a pinch—about 1 teaspoon will do. -
2 tablespoons soy sauce
It adds depth and umami to the dish. If you’re gluten-free, opt for tamari instead—most brands are a perfect substitute. -
1 tablespoon olive oil
This helps to sear the salmon and ensures a crispy skin while keeping it moist. Avocado oil could be a great alternative as well! -
Salt and pepper to taste
Essential seasoning to enhance the flavors—don’t skip this part! -
Chopped green onions for garnish
This adds a fresh burst of color and flavor at the end. You can also swap these out for sesame seeds or cilantro for a different twist!
Step-by-Step Instructions
Now let’s get cooking! Follow these simple steps to make your honey garlic salmon shine.
-
Preheat the Oven
Set your oven to 400°F (200°C). Preheating your oven is crucial for achieving that perfect cook on your salmon. You want a hot oven to get that lovely caramelization from the honey! -
Prepare the Marinade
In a small bowl, combine honey, minced garlic, and soy sauce. Give it a good stir to mix all those flavors together. Here’s a little tip: taste your marinade! This way, you can adjust sweetness or saltiness to your preference. If it’s too sweet, a splash more soy sauce can balance things out. -
Season the Salmon
Place your salmon fillets on a baking sheet lined with parchment paper (easy cleanup alert!). Drizzle with olive oil, then sprinkle with salt and pepper. If you’re feeling adventurous, a light brush of the marinade on top will give the fish a great start! -
Marinate the Salmon
Pour your honey garlic mixture over the salmon, ensuring each fillet is coated. If you have time, let it marinate for about 15-30 minutes—this truly allows flavors to seep into the fish, but if you’re short on time, you can skip this step. -
Bake
Pop those beauties into your preheated oven and let them bake for about 12-15 minutes, depending on the thickness of your fillets. Check them halfway through, and drizzle some of the marinade on top for extra flavor. You know your salmon is done when it flakes easily with a fork. -
Serve with Style
Once your salmon is perfectly baked, remove it from the oven and let it rest for a couple of minutes. This allows the juices to redistribute, keeping it moist and tasty. Garnish with chopped green onions for a pop of color!
Serving Suggestions
Plating matters, my friends! For a gorgeous presentation, serve your honey garlic salmon on a bed of fluffy rice or quinoa with steamed veggies on the side. Drizzling a little extra marinade over the top can give it that “wow factor!” Add a lemon wedge on the side for that citrusy twist, and watch your guests swoon over this dish.
Recipe Variations
Ready to switch things up? Here are a few fun ways to customize your honey garlic salmon:
-
Spicy Honey Garlic Salmon
Add a teaspoon of chili flakes or sriracha to the marinade for a kick! -
Asian-Inspired Twist
Add a splash of rice vinegar and a teaspoon of sesame oil to your marinade for an even deeper flavor profile. -
Herb-Infused Salmon
Mix in some fresh herbs like dill or basil after baking for an additional flavor burst. -
Roasted Veggie Side
Toss some zucchini, bell peppers, or asparagus on the same baking sheet for a one-pan meal. -
Citrus Garlic Salmon
Squeeze in some fresh orange or lime juice for a bright flavor boost!
Chef’s Notes
You know, cooking is all about experimentation to find what works best for you. This honey garlic salmon recipe has evolved over the years, and I’ve tried countless variations, each time discovering new flavors and combinations that I love. One of my favorite memories is when I mixed in some ginger—talk about a flavor explosion! Keep playing in the kitchen until you find your perfect blend. The more you cook, the more confident you’ll become!
FAQs and Troubleshooting
1. My salmon is dry! What did I do wrong?
Overcooking is the culprit! Always check your salmon a few minutes before the suggested cooking time, and remember that it continues to cook a bit after you take it out.
2. Can I use frozen salmon?
Absolutely! Just make sure to thaw it first in the refrigerator overnight before marinating and cooking.
3. What should I serve with honey garlic salmon?
The world is your oyster! Rice, quinoa, or even cauliflower rice all pair wonderfully. Don’t forget some bright, roasted veggies to balance the meal.
4. Can I make this dish ahead of time?
Yes! You can marinate the salmon in advance and keep it in the fridge for up to 24 hours. Just remember to cook it fresh for the best flavor and texture!
Nutritional Info
While I usually keep my focus on flavor, here’s a little nutrition breakdown for those curious:
- Calories: Approximately 380 per serving (based on one salmon fillet)
- Protein: 34 grams
- Fat: 12 grams
- Carbs: 30 grams (from the honey and soy sauce)
Remember, oh foodie friends, nutrition can vary based on the specific ingredients you choose, so feel free to adapt to your dietary needs!
So there you have it! I hope you’re inspired to make this Honey Garlic Salmon dish—and the best part? It comes together in no time flat! I can’t wait for you to dive into this recipe, and please share your kitchen adventures with me. Happy cooking!
PrintHoney Garlic Salmon
A perfect harmony of sweet and savory, this honey garlic salmon dish transforms mundane weeknight dinners into delightful culinary experiences.
- Prep Time: 15 minutes
- Cook Time: 15 minutes
- Total Time: 30 minutes
- Yield: 4 servings 1x
- Category: Main Course
- Method: Baking
- Cuisine: American
- Diet: Gluten-Free
Ingredients
- 4 salmon fillets
- 1/4 cup honey
- 3 cloves garlic, minced
- 2 tablespoons soy sauce
- 1 tablespoon olive oil
- Salt and pepper to taste
- Chopped green onions for garnish
Instructions
- Preheat the oven to 400°F (200°C).
- Combine honey, minced garlic, and soy sauce in a small bowl to make the marinade.
- Place salmon fillets on a baking sheet lined with parchment paper, drizzle with olive oil, and season with salt and pepper.
- Pour the honey garlic mixture over the salmon to coat.
- Let it marinate for 15-30 minutes if time allows.
- Bake for 12-15 minutes, until the salmon flakes easily with a fork.
- Remove from the oven, let rest, and garnish with chopped green onions before serving.
Notes
Serve with fluffy rice or quinoa and steamed veggies for a complete meal. A lemon wedge adds a nice touch!
Nutrition
- Serving Size: 1 serving
- Calories: 380
- Sugar: 24g
- Sodium: 800mg
- Fat: 12g
- Saturated Fat: 2g
- Unsaturated Fat: 8g
- Trans Fat: 0g
- Carbohydrates: 30g
- Fiber: 0g
- Protein: 34g
- Cholesterol: 70mg
Keywords: honey garlic salmon, easy salmon recipe, healthy dinner
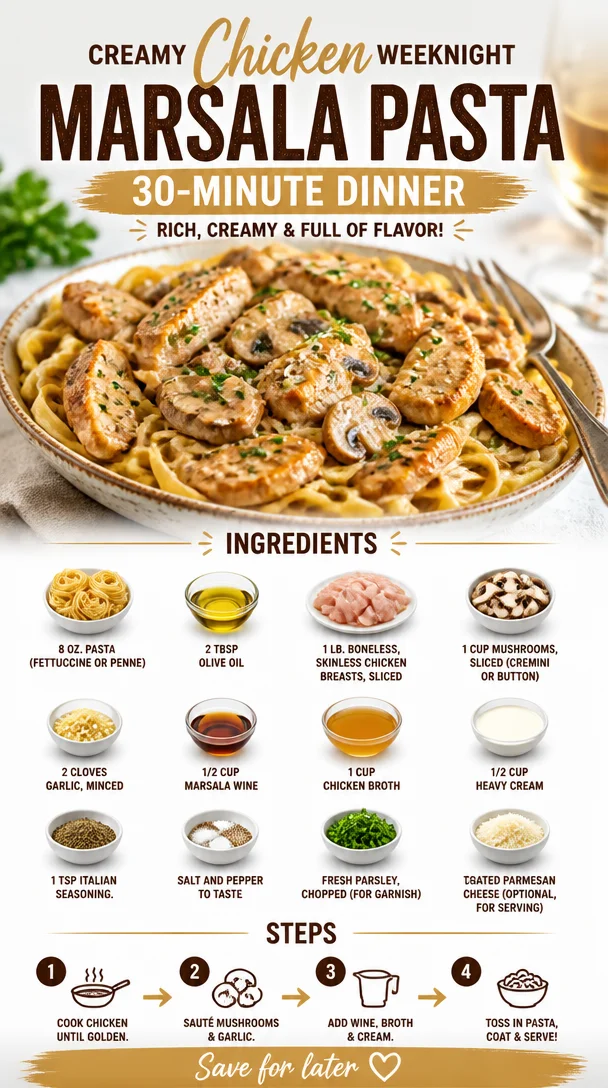
Creamy Weeknight Chicken Marsala Pasta: 30-Minute Dinner
Chicken Marsala Pasta: An Amazing Ultimate Recipe
Welcome back to Clean Plate Cravings, food lovers! Today, we’re diving into a bowl of comfort that will transport your taste buds straight to Italy: Chicken Marsala Pasta. This dish masterfully combines the tender, juicy flavors of chicken with the earthiness of mushrooms, all wrapped in a luscious, creamy Marsala sauce that clings lovingly to each strand of pasta. Trust me, this isn’t just a meal; it’s an experience.
When creating this recipe, I thought about how food has this incredible power to evoke memories and feelings. It’s not just about the ingredients but also about the stories they tell and the moments they create. And let me tell you, this dish has the power to sweep you off your feet and make any night feel special. So, whether you’re looking to impress a significant other or simply want to whip up something delicious for yourself after a long day, this easy Chicken Marsala Pasta is going to become a staple in your kitchen.
Personal Story
I remember my first time making Chicken Marsala. It was a rainy Saturday afternoon, and I was flipping through one of my favorite cookbooks while my partner was lounging on the couch, enthralled by the latest series on Netflix. I was inspired by a recipe on the page, and on a whim, I decided that tonight we’d have an Italian-inspired feast. I ventured to the grocery store and carefully selected each ingredient, feeling like a true chef on a mission.
What stands out to me the most about that day was how simple sounds of chopping, sizzling, and the familiar aroma of garlic wafting through the house created a warmth that transcended the gloomy weather outside. By the time dinner was served, we were both smiling, and as we shared bites of that perfectly creamy, wine-infused pasta, I knew I had discovered something special. Fast forward to today, and I’ve made this dish countless times, refining it each time to get it just right. Each bowl reminds me of that cozy afternoon and the joy of sharing food with someone you love.
Ingredients
To recreate this delightful Chicken Marsala Pasta, gather the following ingredients:
-
8 oz. pasta (fettuccine or penne): Choose your favorite shape! Fettuccine hugs the sauce beautifully, while penne captures it, making each bite delightful. You can also substitute whole wheat or gluten-free pasta if you prefer.
-
2 tablespoons olive oil: This brings richness and flavor to our dish. Extra virgin olive oil is preferred for its robust taste but feel free to use any oil you have on hand!
-
1 lb. boneless, skinless chicken breasts, sliced: Chicken breasts are lean and cook quickly, making them perfect for weeknight dinners. Feel free to swap them for thighs for deeper flavor or even tofu for a vegetarian option.
-
1 cup mushrooms, sliced (preferably cremini or button): These add an earthy undertone that pairs perfectly with the Marsala wine. If you want a twist, try portobello mushrooms for a heartier texture.
-
2 cloves garlic, minced: Garlic is an essential flavor enhancer that brings everything together. If you love garlic (who doesn’t?), feel free to double the amount!
-
1/2 cup Marsala wine: The star of the show! Marsala wine adds a sweet, rich depth to the sauce. If unavailable, a dry sherry or Madeira wine works as a good substitute.
-
1 cup chicken broth: This adds moisture and flavor to our sauce. Low-sodium broth is a great choice to control the saltiness of the dish.
-
1/2 cup heavy cream: This creates a velvety texture that transforms the sauce into a creamy dream. For a lighter option, you could substitute it with half-and-half or a non-dairy alternative.
-
1 teaspoon Italian seasoning: A blend of herbs like oregano, basil, and thyme adds extra flavor. If you have fresh herbs, use them! Just increase the amount to taste.
-
Salt and pepper to taste: A little seasoning goes a long way, enhancing all the flavors in the dish.
-
Fresh parsley, chopped (for garnish): This adds a pop of color and freshness to the finished plate, elevating the presentation.
-
Grated Parmesan cheese (optional, for serving): A touch of cheese always brings a luxurious feel to pasta dishes, but feel free to skip it if you’re looking to keep it lighter.
Step-by-Step Instructions
Now that you’ve gathered your ingredients, let’s dive into the cooking process! Here’s how to whip up this Chicken Marsala Pasta like a pro:
-
Cook the Pasta: In a large pot of boiling salted water, add the pasta. Cook according to the package instructions until al dente. Remember to reserve about 1 cup of the pasta water before draining; it’s liquid gold for our sauce. Set aside the drained pasta.
Chef Note: Stir the pasta occasionally to prevent sticking. Add a drizzle of olive oil to the water for good measure!
-
Sauté the Chicken: In a large skillet, heat the olive oil over medium-high heat. Add the sliced chicken breasts in batches, ensuring not to overcrowd the pan. Season with salt and pepper. Cook for about 4-5 minutes on each side or until cooked through and beautifully golden brown. Remove the chicken from the skillet and set aside.
Chef Hack: If your chicken seems to stick to the pan, allow it to cook a bit longer before flipping. Patience is key for that perfect sear!
-
Cook the Mushrooms: In the same skillet, add the sliced mushrooms. Sauté for about 4 minutes until the mushrooms are soft and lightly browned. Add the minced garlic and cook for an additional minute until fragrant.
Tip: The pan drippings left from the chicken will add fantastic flavor to the mushrooms, so don’t skip this step!
-
Deglaze with Marsala: Pour in the Marsala wine, scraping up any brown bits from the bottom of the pan. Let it simmer for about 2-3 minutes until the wine has reduced slightly.
Chef Insight: This step is crucial as it incorporates all those flavors into your sauce! The wine also adds a unique sweetness that complements the earthiness of the mushrooms.
-
Create the Sauce: Add the chicken broth and bring it to a gentle simmer. Stir in the heavy cream and Italian seasoning. Continue to simmer for 3-5 minutes, allowing the sauce to thicken slightly.
Tip: If you prefer a thinner sauce, feel free to add a splash of chicken broth or that reserved pasta water!
-
Combine Everything: Return the cooked chicken to the skillet, and allow it to warm through in the sauce for about 2 minutes. Add the drained pasta to the skillet, tossing to coat everything in that luscious sauce. If needed, adjust the consistency with more pasta water.
Note: Tossing the pasta in the sauce rather than pouring the sauce over it makes sure every piece is coated with deliciousness!
-
Final Touches and Serve: Remove from heat and serve immediately, garnishing with chopped parsley and a sprinkle of grated Parmesan cheese if desired.
Serving Tip: For a restaurant-quality presentation, twirl the pasta onto the plate with a pair of tongs, and add a few chicken pieces and mushrooms on top. Voilà!
Serving Suggestions
Serve this delightful Chicken Marsala Pasta warm, garnished with fresh parsley and a sprinkle of Parmesan for that extra touch. Pair it with a side salad or some crusty garlic bread to soak up that heavenly sauce. A glass of Chardonnay or Pinot Grigio would complement it beautifully.
Recipe Variations
Here are a few creative twists to shake things up in your kitchen:
-
Mushroom Medley: Use a variety of mushrooms (shiitake, oyster, portobello) for more complex flavors.
-
Add Veggies: Toss in some spinach or cherry tomatoes during the final cooking steps for a pop of color and nutrition.
-
Herb-Infused: Fresh herbs like basil or thyme can be used instead of Italian seasoning for a bright, fresh flavor.
-
Lemon Zest: Adding some lemon zest and juice right before serving can brighten the dish beautifully.
Chef’s Notes
As a passionate home cook, I love experimenting, and this Chicken Marsala Pasta has seen its fair share of tweaks over the years. I remember adding too much wine one time—turns out I made a great sauce, just not enough pasta to go around! But hey, that’s the beauty of cooking! Each mistake leads to new flavors and combinations.
Over time, I’ve discovered that simplicity often reigns supreme in the kitchen. The fewer processed ingredients you use, the more vibrant and fresh your final dish will taste. Trust your palate, and don’t hesitate to adjust flavors and ingredients to fit your preferences.
FAQs and Troubleshooting
-
What if my sauce is too thick?
No problem! Start by adding a splash of reserved pasta water or chicken broth until you reach your desired consistency. -
Can I use frozen chicken?
Absolutely, but make sure to fully thaw it first before cooking. Cooking from frozen can lead to uneven cooking. -
My mushrooms aren’t browning. What should I do?
Make sure not to overcrowd the pan. Give them enough space to release moisture and develop that beautiful caramelization. -
How can I make it dairy-free?
Swap heavy cream for coconut cream or a non-dairy alternative. Just note that it may impart a slight flavor variation.
Nutritional Info
While nutritional information can vary based on specific brands and measurements, here’s a rough estimate for one serving of Chicken Marsala Pasta:
- Calories: 600
- Protein: 35g
- Carbohydrates: 58g
- Fat: 25g
- Fiber: 3g
And there you have it — my ultimate Chicken Marsala Pasta recipe! I hope this dish brings as much joy to your kitchen as it has to mine. Remember, cooking is all about experimenting and enjoying the process, so don’t be afraid to make it your own. Let’s gather around the table, share some laughs, and delight in the miracle of good food. Happy cooking!
PrintChicken Marsala Pasta
A creamy and comforting Chicken Marsala Pasta dish that combines tender chicken, earthy mushrooms, and a luscious Marsala sauce.
- Prep Time: 15 minutes
- Cook Time: 30 minutes
- Total Time: 45 minutes
- Yield: 4 servings 1x
- Category: Main Course
- Method: Sautéing
- Cuisine: Italian
- Diet: Non-Vegetarian
Ingredients
- 8 oz. pasta (fettuccine or penne)
- 2 tablespoons olive oil
- 1 lb. boneless, skinless chicken breasts, sliced
- 1 cup mushrooms, sliced (preferably cremini or button)
- 2 cloves garlic, minced
- 1/2 cup Marsala wine
- 1 cup chicken broth
- 1/2 cup heavy cream
- 1 teaspoon Italian seasoning
- Salt and pepper to taste
- Fresh parsley, chopped (for garnish)
- Grated Parmesan cheese (optional, for serving)
Instructions
- Cook the pasta in a large pot of boiling salted water according to package instructions until al dente. Reserve about 1 cup of the pasta water before draining; set aside.
- Sauté the sliced chicken in a large skillet with olive oil over medium-high heat, seasoning with salt and pepper. Cook for about 4-5 minutes on each side until cooked through. Remove and set aside.
- Cook the sliced mushrooms in the same skillet for about 4 minutes until softened, then add minced garlic for an additional minute.
- Deglaze the skillet with Marsala wine, scraping up any browned bits. Let simmer for 2-3 minutes.
- Create the sauce by adding chicken broth, heavy cream, and Italian seasoning. Simmer for 3-5 minutes to thicken.
- Combine the cooked chicken and drained pasta into the skillet, tossing to coat everything in the sauce.
- Serve immediately, garnished with fresh parsley and grated Parmesan, if desired.
Notes
For a lighter option, substitute heavy cream with half-and-half or a non-dairy alternative. Adjust the sauce consistency with reserved pasta water if necessary.
Nutrition
- Serving Size: 1 serving
- Calories: 600
- Sugar: 4g
- Sodium: 800mg
- Fat: 25g
- Saturated Fat: 12g
- Unsaturated Fat: 10g
- Trans Fat: 0g
- Carbohydrates: 58g
- Fiber: 3g
- Protein: 35g
- Cholesterol: 70mg
Keywords: Chicken Marsala Pasta, Italian dinner, creamy pasta, comfort food

Minute Asian Chicken Wraps with Peanut Sauce (Meal Prep)
Asian Chicken Wraps with Peanut Sauce: A Flavorful Journey
Welcome back to Clean Plate Cravings! Today, we’re diving into a dish that’s not only delicious but also packed with vibrant flavors and textures: Asian Chicken Wraps with Peanut Sauce. This recipe is perfect for those busy weeknights or lazy weekends when you want something that’s light, satisfying, and oh-so-tasty. Let’s get into it!
A Nostalgic Kitchen Memory
Growing up, my family had a tradition of making wrap-style dinners on Friday nights. There was something about rolling up your own meal that made it feel like a party! My mom would lay out all the fillings, from seasoned meats to fresh veggies, and we would gather around the table to create our own concoctions. One of my favorites was always anything with chicken and a mouthwatering peanut sauce. The crunchy texture of the coleslaw mixed with tender chicken wrapped in a warm tortilla is something I still crave today.
Fast forward to now, and I’ve created my own version, inspired by those fantastic family memories. Each time I make these Asian Chicken Wraps, I’m reminded of the joy of assembling my food, the laughter shared around the table, and the delightful crunch of the fresh ingredients. Plus, the peanut sauce? Oh, it just brings everything together in a way that puts a smile on your face. So, get ready to embrace your inner wrap artist and let’s create something fantastic together!
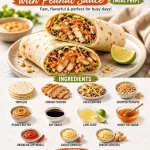
Ingredients
Here’s what you’ll need to whip up these tasty wraps:
-
Tortillas: The foundation of our wraps! Flour tortillas provide a soft and pliable base, but feel free to swap for whole wheat or even gluten-free tortillas if needed.
-
Cooked Chicken (sliced or shredded): The star protein! You can use rotisserie chicken, grilled, or roasted chicken. Need a vegetarian option? Sub with crispy tofu!
-
Coleslaw Mix (cabbage and carrots): This adds a wonderful crunch! You can buy pre-packaged coleslaw mix or make your own—just thinly slice green cabbage and shred some carrots.
-
Chopped Peanuts: They add a delightful texture and nutty flavor. If you’re allergic to peanuts, try sunflower seeds or toasted sesame seeds as alternatives.
-
Peanut Butter: Creamy or crunchy, it’s up to you! Natural peanut butter gives the best flavor, but any variety will do. If you want less nutty flavor, sunflower butter is a great alternative.
-
Soy Sauce: This provides a savory kick! If you’re watching your sodium, opt for low-sodium soy sauce or tamari for a gluten-free option.
-
Lime Juice: Fresh lime juice lifts the dish with brightness. You can substitute with lemon juice if that’s what you have on hand.
-
Honey or Sugar: To balance the flavors and add a hint of sweetness. Agave nectar works too for a vegan alternative!
-
Sriracha (optional): For those who love a little heat! You can adjust the amount according to your spice level preference.
-
Garlic (minced): A must-have for flavor! You can also use garlic powder in a pinch.
-
Ginger (grated): Fresh ginger brings a unique warmth and aroma to the sauce. Ground ginger can work in a pinch, but fresh is always best!
Step-by-Step Instructions
Alright! Let’s get into the nitty-gritty of making these wraps. Follow these steps, and you’ll be enjoying a delicious meal in no time!
-
Prepare the Chicken:
- If you’re using rotisserie chicken, simply shred or slice it into bite-sized pieces. For grilled chicken, cook it up with your favorite seasonings. The key here is to ensure it’s juicy and easily bite-sized!
-
Make the Peanut Sauce:
- In a bowl, whisk together:
- 1/2 cup of peanut butter
- 3 tablespoons of soy sauce
- 2 tablespoons of lime juice
- 1 tablespoon of honey or sugar
- 1 clove of minced garlic
- 1 teaspoon of grated ginger
- Add sriracha here if you like it spicy!
- Adjust the consistency with a splash of hot water if it’s too thick. You want it smooth but pourable!
- In a bowl, whisk together:
-
Prepare Your Coleslaw:
- In a large mixing bowl, combine your coleslaw mix. You can add a bit of lime juice, salt, and pepper for extra flavor. Toss it all together and let it sit for a few minutes so the flavors meld together.
-
Warm Your Tortillas:
- Heat a non-stick skillet over medium heat. Place one tortilla in for about 30 seconds on each side, just until warm and pliable. Repeat with all tortillas. This step makes them easier to roll and prevents tears.
-
Assemble Your Wraps:
- Lay a warm tortilla on a plate. Add a generous portion of sliced chicken, a handful of coleslaw, a drizzle of peanut sauce, and a sprinkle of chopped peanuts.
-
Roll It Up:
- Fold in the sides of the tortilla and then roll from the bottom up, tucking in the filling as you go. Secure it with a toothpick if needed, but I find just holding it together works when enjoying immediately!
-
Serve:
- Slice the wraps in half for easier eating. You can serve these with extra peanut sauce on the side for dipping, because who wouldn’t want more of that goodness?!
Serving Suggestions
To plate these wraps beautifully, try arranging them on a colorful platter. You can drizzle some extra peanut sauce over the top for a touch of elegance, and maybe some lime wedges for a pop of color. Garnish with fresh cilantro or green onions to elevate the experience! Serve alongside a chilled cucumber salad for a refreshing contrast.
Recipe Variations
Want to mix things up? Here are a few variations that keep it exciting:
- Spicy Thai Chicken Wraps: Add crushed red pepper flakes to the peanut sauce for an extra kick.
- Vegan Delight: Use marinated tofu instead of chicken, and maple syrup instead of honey for a fully plant-based version.
- Tropical Twist: Include sliced mango or pineapple for a sweet and fruity bite in your wraps.
- Crunchy Additions: Throw in some sliced bell peppers or snap peas for added texture and flavor!
- Zesty Lime: Mix lime zest into the peanut sauce to amplify that zesty flavor!
Chef’s Notes
These wraps hold a special place in my heart. I remember the first time I tried to make them on my own. The peanut sauce turned out way too thick, and I may have underestimated the amount of ginger! But it was hilarious experimenting, and I learned the value of adjusting flavors as I went. This recipe has evolved so much since then—it’s become a weeknight staple. Every time I’m in a pinch for a quick meal, I can count on this dish to satisfy my cravings.
FAQs and Troubleshooting
-
What if my peanut sauce is too thick?
- No worries! Just add a bit of warm water, a teaspoon at a time, until you reach the desired consistency.
-
Can I make these wraps ahead of time?
- Absolutely! Assemble your wraps and keep them wrapped in plastic wrap in the fridge for a few hours before serving. Just add fresh sauce right before eating!
-
How can I make this allergen-friendly?
- Substitute peanut butter with sunflower butter, and ensure your soy sauce is gluten-free. Always read labels for hidden allergens.
-
What’s the best way to store leftovers?
- Store any unassembled components separately in airtight containers. The wraps can get soggy if left combined for too long.
Nutritional Info
(Note: This section can vary greatly depending on specific ingredients and brands used. Here’s a general idea: For one wrap, you might find around 350 calories, 15g protein, 45g carbs, and 15g fat. For precise nutritional information, you might consider using a recipe calculator!)
And there you have it! Whip up these delightful Asian Chicken Wraps with Peanut Sauce and enjoy the experience of rolling your dinner. Thank you for joining me in the kitchen today—happy cooking, and don’t forget to savor every bite!
PrintAsian Chicken Wraps with Peanut Sauce
Delicious and vibrant Asian Chicken Wraps with a creamy peanut sauce, perfect for busy weeknights or leisurely weekends.
- Prep Time: 20 minutes
- Cook Time: 10 minutes
- Total Time: 30 minutes
- Yield: 4 servings
- Category: Main Course
- Method: Wrapping
- Cuisine: Asian
- Diet: Gluten-Free
Ingredients
- Flour Tortillas
- Cooked Chicken (sliced or shredded)
- Coleslaw Mix (cabbage and carrots)
- Chopped Peanuts
- Peanut Butter
- Soy Sauce
- Lime Juice
- Honey or Sugar
- Sriracha (optional)
- Garlic (minced)
- Ginger (grated)
Instructions
- Prepare the Chicken: If you’re using rotisserie chicken, simply shred or slice it into bite-sized pieces. For grilled chicken, cook it up with your favorite seasonings. The key here is to ensure it’s juicy and easily bite-sized!
- Make the Peanut Sauce: In a bowl, whisk together: 1/2 cup of peanut butter, 3 tablespoons of soy sauce, 2 tablespoons of lime juice, 1 tablespoon of honey or sugar, 1 clove of minced garlic, 1 teaspoon of grated ginger. Add sriracha here if you like it spicy! Adjust the consistency with a splash of hot water if it’s too thick.
- Prepare Your Coleslaw: In a large mixing bowl, combine your coleslaw mix. You can add a bit of lime juice, salt, and pepper for extra flavor. Toss it all together and let it sit for a few minutes.
- Warm Your Tortillas: Heat a non-stick skillet over medium heat. Place one tortilla in for about 30 seconds on each side, just until warm and pliable. Repeat with all tortillas.
- Assemble Your Wraps: Lay a warm tortilla on a plate, add a generous portion of sliced chicken, a handful of coleslaw, a drizzle of peanut sauce, and a sprinkle of chopped peanuts.
- Roll It Up: Fold in the sides of the tortilla and then roll from the bottom up, tucking in the filling. Secure it with a toothpick if needed.
- Serve: Slice the wraps in half for easier eating and serve with extra peanut sauce on the side.
Notes
These wraps can be made ahead of time and stored separately to maintain crispness. Use sunflower butter if allergic to peanuts.
Nutrition
- Serving Size: 1 wrap
- Calories: 350
- Sugar: 5g
- Sodium: 600mg
- Fat: 15g
- Saturated Fat: 3g
- Unsaturated Fat: 9g
- Trans Fat: 0g
- Carbohydrates: 45g
- Fiber: 4g
- Protein: 15g
- Cholesterol: 30mg
Keywords: chicken wraps, peanut sauce, Asian cuisine, quick meal, healthy wraps