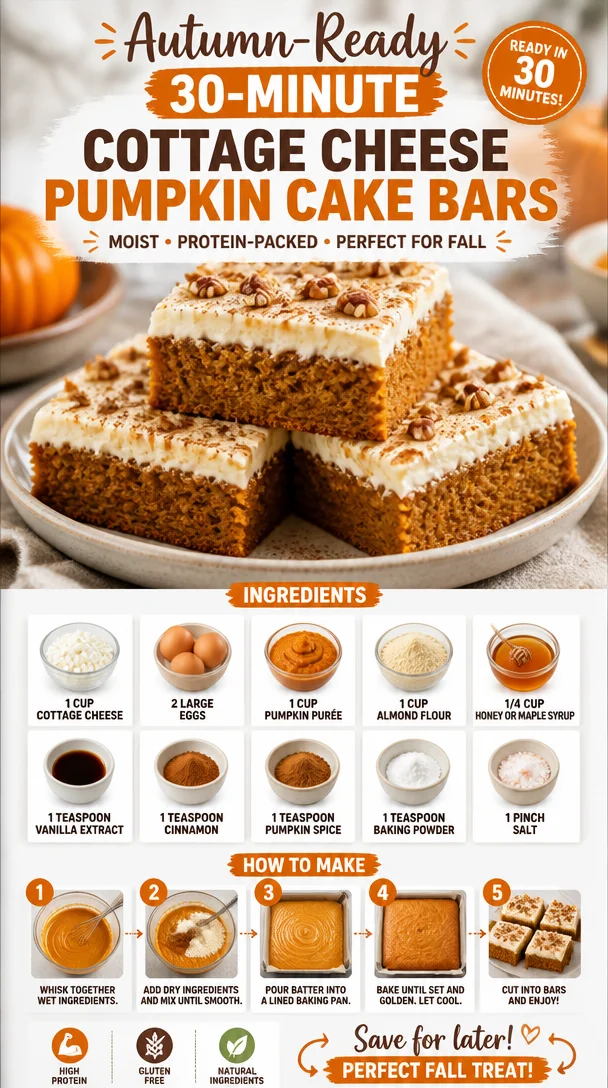
Autumn-Ready 30-Minute Cottage Cheese Pumpkin Cake Bars
Irresistibly Easy Cottage Cheese Pumpkin Cake Bars
Welcome, food lovers! Today, we’re diving into something truly delightful—Cottage Cheese Pumpkin Cake Bars. As the cooler months roll in and the leaves start to change, I can’t help but think about all the comfort foods that come into play. These cake bars are the perfect blend of cozy pumpkin flavors and the smoothness of cottage cheese, making them a must-try for anyone who appreciates a little sweetness in their life without straying too far from the healthy lane.
So let’s roll up those sleeves, turn on some tunes, and let’s bake together! Trust me; by the end of this post, you’ll be swiping the last piece off the pan and thinking, “How can something this healthy taste so fabulous?”
A Slice of Nostalgia
Growing up, autumn was always special in my family. The air would turn crisp, and the kitchen would transform into a haven filled with the scents of cinnamon and nutmeg. My mom had this magical ability to turn the simplest ingredients into unforgettable treats. One of my favorite memories is when she introduced us to pumpkin anything. Whether it was a hearty soup or fluffy muffins, pumpkin was the star of the show.
But it wasn’t until I stumbled upon the idea of adding cottage cheese to a pumpkin dessert that the magic truly happened. I remember the first time I tried making pumpkin bars with cottage cheese. The end result was a revelation. They were moist, packed with protein, and had that rich, comforting flavor. It felt like that warm hug from my childhood, but somehow lighter.
The ease and versatility of the recipe quickly made it a staple in my kitchen, and it’s become a family favorite. Now, I’m thrilled to share this gem with you so you, too, can recreate those cozy autumn vibes all year long!
Ingredients
Here’s what you’ll need for these delicious Cottage Cheese Pumpkin Cake Bars:
-
1 cup Cottage cheese
Provides moisture and protein. It’s creamy and contributes to the fluffiness of the bars. If you want a dairy-free option, try Greek yogurt or silken tofu! -
2 large Eggs
Acts as a binder to hold everything together. If you need an egg substitute, you can use flax eggs (1 tablespoon flaxseed meal mixed with 2.5 tablespoons water per egg). -
1 cup Pumpkin purée
Adds that quintessential pumpkin flavor and moisture. Canned pumpkin is great for convenience, but feel free to roast your own for a fresh taste! -
1 cup Almond flour
A gluten-free option that gives a nice texture to the bars. You can swap it for whole wheat flour or oat flour for a different flavor and texture. -
1/4 cup Honey or maple syrup
Adds optional sweetness, although the pumpkin is naturally sweet as well! Use your favorite sweetener—agave or coconut sugar work nicely too. -
1 teaspoon Vanilla extract
Enhances all the flavors. Freshly scraped vanilla bean will take it to the next level if you’re feeling fancy! -
1 teaspoon Cinnamon
This warm spice is the essence of fall. You can also mix in a bit of cardamom for a unique twist. -
1 teaspoon Pumpkin spice
A blend of spices that brings complexity. If you don’t have it, a mix of nutmeg and ginger will do the trick. -
1 teaspoon Baking powder
Helps the bars rise and get that nice fluffy texture. -
1 pinch Salt
Balances the sweetness, making everything taste better.
Step-by-Step Instructions
Now, let’s get cooking! Here’s how to whip up these delightful cake bars, step by step.
-
Preheat your oven
Preheat your oven to 350°F (175°C). This ensures your batter cooks evenly. While it warms up, you can gather your ingredients and prep the pans. -
Grease your baking dish
Use a butter or non-stick spray to coat an 8×8 inch baking dish. If you want easy cleanup, consider lining it with parchment paper—just leave some overhang for easy lifting later. -
Blend the cottage cheese
In a mixing bowl or blender, add your cottage cheese. If you want a smoother texture, blend it until creamy. Trust me, this makes a difference in the final product! -
Add the eggs and pumpkin
Crack the eggs into the bowl with your cottage cheese and add the pumpkin purée. Mix it all together until smooth. You want these ingredients to be well incorporated. -
Stir in the sweetener and vanilla
Pour in your honey (or maple syrup) and vanilla extract. Give it a good stir to combine all those lovely flavors. -
Combine the dry ingredients
In another bowl, whisk together the almond flour, cinnamon, pumpkin spice, baking powder, and salt. This step helps distribute the leavening evenly. -
Merge wet and dry ingredients
Gradually fold the dry mixture into your pumpkin mixture. Use a spatula to carefully combine until just mixed—don’t overdo it! A few lumps are okay. -
Pour and spread the batter
Scoop your thick batter into the prepared baking dish. Use the spatula to spread it out evenly. You can sprinkle a dash of cinnamon on top for that extra cozy touch! -
Bake!
Pop your dish in the preheated oven and bake for about 25-30 minutes. It’s ready when a toothpick inserted into the center comes out clean (or with a few moist crumbs). -
Cool and cut
Let the bars cool in the pan for about 10 minutes, then carefully lift them out using the parchment paper. Cut them into squares and enjoy!
Serving Suggestions
These Cottage Cheese Pumpkin Cake Bars can be enjoyed warm from the oven, or let them cool down for a portable treat. Serve them with a dollop of Greek yogurt or a sprinkle of nuts for added crunch. A drizzle of honey or maple syrup also makes for an excellent finishing touch!
Recipe Variations
Feel free to get creative with this recipe! Here are some fun variations:
-
Chocolate Chip Twist: Add 1/2 cup of dark chocolate chips to the batter for a sweet surprise.
-
Nutty Delight: Mix in a handful of chopped walnuts or pecans for an added crunch.
-
Dairy-Free Version: Use almond or coconut yogurt in place of cottage cheese and adjust the sweetener to taste.
-
Spice it Up: Swap traditional pumpkin spice with chai spice or even gingerbread spice for a festive flair!
-
Fruit Infusion: Toss in 1/2 cup of cranberries or raisins for a burst of fruity flavor.
Chef’s Notes
I can’t help but chuckle every time I think about the first time I made these bars; I forgot to add the eggs! Can you imagine my surprise when they turned out more like a dense cake than bars? But hey, even those dense cakes ended up being a hit in the family, so there’s always room for happy accidents in the kitchen!
Over time, I’ve tweaked this recipe to strike the perfect balance between taste and nutrition. It’s evolved into a go-to, not just in the fall but any time I crave something sweet yet wholesome. It just goes to show—never stop experimenting, because you might stumble upon something delicious.
FAQs and Troubleshooting
1. Can I make these bars ahead of time?
Absolutely! These bars keep well in an airtight container in the fridge for up to a week. Just reheat them slightly in the microwave if you prefer them warm!
2. What if I don’t have almond flour?
No problem! You can use all-purpose flour or oat flour if gluten isn’t an issue. Just be cautious with quantities, as different flours absorb moisture differently.
3. How do I know when they’re done?
Insert a toothpick in the center of the bars. If it comes out clean or with a few moist crumbs, they’re perfect! If you see wet batter, continue baking for a few more minutes.
4. My batter is too thick; what can I do?
If your batter feels dense, don’t fret! You can mix in a tablespoon of milk or dairy-free milk to loosen it up. Sometimes, especially with almond flour, the absorption can vary.
Nutritional Info
These Cottage Cheese Pumpkin Cake Bars pack a nutritious punch! Each bar is rich in protein thanks to the cottage cheese and eggs while being lower in carbohydrates compared to traditional cake. Plus, the pumpkin adds fiber and essential vitamins!
So there you have it, friends! Irresistibly easy Cottage Cheese Pumpkin Cake Bars that not only satisfy your sweet tooth but also keep things on the healthy side. I honestly can’t wait for you to try these out! They’re perfect for breakfast, a snack, or even dessert. Happy baking, and remember: keep it simple, keep it fresh, and always keep it delicious!
PrintIrresistibly Easy Cottage Cheese Pumpkin Cake Bars
A delightful blend of cozy pumpkin flavors and smooth cottage cheese, perfect for a healthy treat.
- Prep Time: 10 minutes
- Cook Time: 30 minutes
- Total Time: 40 minutes
- Yield: 16 servings 1x
- Category: Dessert
- Method: Baking
- Cuisine: American
- Diet: Vegetarian
Ingredients
- 1 cup Cottage cheese
- 2 large Eggs
- 1 cup Pumpkin purée
- 1 cup Almond flour
- 1/4 cup Honey or maple syrup
- 1 teaspoon Vanilla extract
- 1 teaspoon Cinnamon
- 1 teaspoon Pumpkin spice
- 1 teaspoon Baking powder
- 1 pinch Salt
Instructions
- Preheat your oven to 350°F (175°C).
- Grease an 8×8 inch baking dish.
- Blend the cottage cheese until creamy.
- Add the eggs and pumpkin purée, mixing until smooth.
- Stir in the honey and vanilla extract.
- Combine the dry ingredients in another bowl.
- Merge the wet and dry ingredients carefully.
- Pour the batter into the prepared dish.
- Bake for about 25-30 minutes.
- Cool for 10 minutes, cut into squares, and enjoy!
Notes
These bars can be made ahead of time and stored in an airtight container in the fridge for up to a week.
Nutrition
- Serving Size: 1 bar
- Calories: 200
- Sugar: 8g
- Sodium: 150mg
- Fat: 6g
- Saturated Fat: 2g
- Unsaturated Fat: 4g
- Trans Fat: 0g
- Carbohydrates: 28g
- Fiber: 2g
- Protein: 6g
- Cholesterol: 50mg
Keywords: cottage cheese pumpkin cake, healthy dessert, pumpkin bars
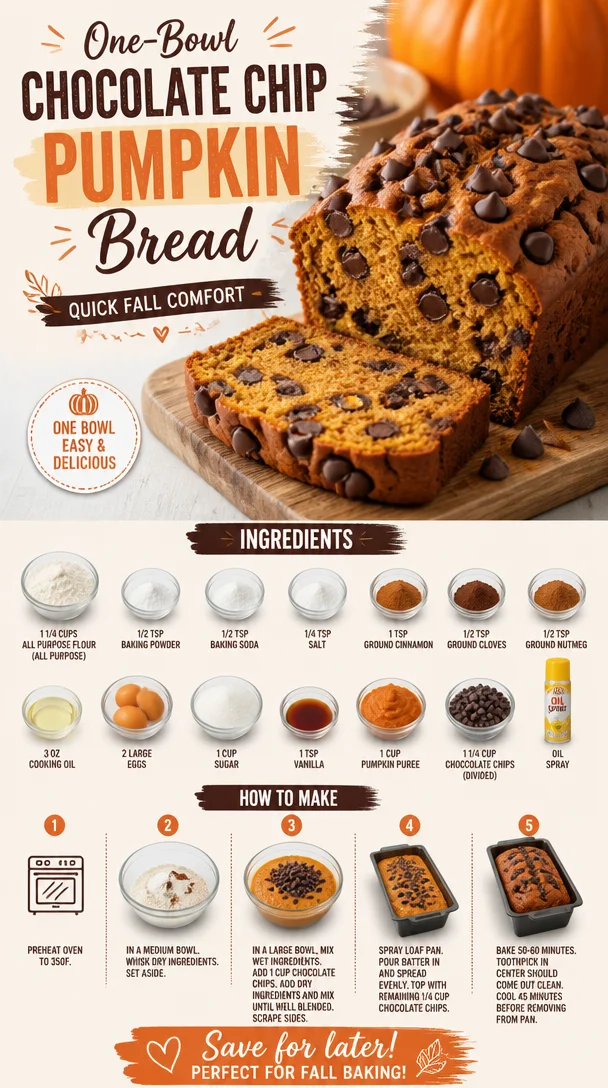
One-Bowl Chocolate Chip Pumpkin Bread: Quick Fall Comfort
Best Chocolate Chip Pumpkin Bread: A Cozy Fall Favorite
Welcome, fellow foodies! Today, we’re diving into one of my all-time favorite autumn treats: Chocolate Chip Pumpkin Bread. Here at Clean Plate Cravings, we believe that the change of seasons means it’s time to cozy up in the kitchen and whip up some delightful eats that make you feel good. Trust me, this pumpkin bread is about to become a staple in your fall repertoire!
Imagine this: the leaves are turning, there’s a crisp chill in the air, and your favorite sweater is just begging to be worn. There’s no better way to celebrate the harvest season than with the warm, comforting aroma of pumpkin spice wafting through your home. And just when you think it can’t get any better, you add chocolate chips to the mix. Yes, please! This chocolate chip pumpkin bread is not just a recipe; it’s a hug in a loaf.
But wait—let’s remember: enjoying food should be about balance and joy, not just the seasonal requirement. That’s why I’m sharing a recipe that combines wholesome ingredients with that sweet, indulgent treat we all crave. So grab your apron, and let’s get cozy in the kitchen!
A Slice of Nostalgia
Growing up, my grandmother was the queen of baking delicious foods. Her secret weapon? Pumpkin bread! Each fall, my family would gather in her kitchen, and the sound of her mixing bowl filled the house—a cheerful sound that echoed warmth and love. I’d stand on my tiptoes, peering over the counter, trying to catch a glimpse of her mixing the vibrant orange pumpkin puree with the rich springtime spices.
But it was the chocolate chips that took the cake—or should I say, the bread! That delightful surprise melted into the loaf, creating a perfect blend of sweet and savory. There was something magical about each slice—crispy on the outside, rich and fluffy on the inside, with chocolate chips peeking out like little treasures.
Now, every time I make this chocolate chip pumpkin bread, I’m transported back in time, cherishing those moments with my grandma. It’s more than just a recipe; it’s a beloved tradition that I hope captures the hearts of my readers as well.
Ingredients
Let’s talk about the ingredients that make this pumpkin bread truly special. Here’s what you’ll need:
-
1 1/4 cups all-purpose flour
All-purpose flour provides the structure of our bread. If you need a gluten-free option, feel free to swap it out for gluten-free flour blends. -
1/2 tsp baking powder
This ingredient helps our bread rise a bit while keeping it moist. A must-have for that soft, fluffy texture! -
1/2 tsp baking soda
Using both baking soda and baking powder balances the leavening and ensures your bread is light and airy. -
1/4 tsp salt
A pinch of salt amplifies the flavor without making the bread taste salty. Trust me; it’s essential! -
1 tsp ground cinnamon
Cinnamon is the heart and soul of fall baking. It adds warmth and a cozy aroma that fills your home with happiness. -
1/2 tsp ground cloves
Cloves pack an aromatic punch! They also balance the sweetness of the chocolate. -
1/2 tsp ground nutmeg
Nutmeg enhances the depth of flavor in your pumpkin bread and brings that classic autumn vibe. -
3 oz cooking oil
Oil keeps our cake moist and tender. You can switch it out for applesauce to cut calories or use melted coconut oil for a tropical twist. -
2 large eggs
Eggs help bind the ingredients while providing richness. Vegan? Substitute with flax eggs (1 tablespoon flaxseed meal mixed with 2.5 tablespoons water per egg). -
1 cup sugar
Sweetness is essential! You can use brown sugar for added moisture and a deeper flavor. -
1 tsp vanilla
A splash of vanilla rounds out all the flavors and adds to the delightful aroma of pumpkin bread. -
1 cup pumpkin puree
Pure pumpkin purée brings moisture and the classic autumn flavor. Use canned for convenience or make your own if you’re feeling adventurous! -
1 1/4 cup chocolate chips (divided)
Chocolate chips are the surprise that everyone looks forward to! Use semi-sweet, dark chocolate, or even white chocolate for a fun twist. -
Oil spray
For greasing your pan. Don’t skip this step, or you might end up with stuck bread!
Step-by-Step Instructions
Now that we’ve got our ingredients ready, let’s dive into the process of making this heavenly chocolate chip pumpkin bread!
1. Preheat Your Oven
Preheat your oven to 350°F (175°C). This is an essential step, folks! We want our bread to bake evenly and rise to perfection.
2. Prepare Your Loaf Pan
Grab a 9×5-inch loaf pan and spray it lightly with oil or grease it with butter. This will ensure that your beautiful loaf slides right out when it’s done.
3. Mix the Dry Ingredients
In a medium bowl, whisk together the all-purpose flour, baking powder, baking soda, salt, cinnamon, cloves, and nutmeg. This step helps evenly distribute the leavening agents and spices throughout the flour.
4. Combine the Wet Ingredients
In a large bowl, whisk together the oil, eggs, sugar, vanilla, and pumpkin purée until smooth. Take your time with this step—it’s where you’re capturing all those cozy fall flavors.
5. Combine Gently
Gradually add the dry mixture to the wet, folding gently with a spatula or wooden spoon until just combined. Don’t overmix! Overmixing can lead to tough bread, and we want tenderness, remember?
6. Fold in the Chocolate Chips
Gently fold in 1 cup of the chocolate chips. It’s okay to sneak a few for yourself while you’re at it!
7. Pour into the Pan
Pour the batter into the prepared loaf pan and sprinkle the remaining chocolate chips on top. This makes for a beautiful presentation and ensures it looks as decadently delicious as it tastes!
8. Bake
Place your loaf pan in the preheated oven and bake for 50-60 minutes, or until a toothpick inserted into the center comes out clean. Keep an eye on it the last 10 minutes—every oven is different, and you want that golden brown crust!
9. Cool Down
Once your bread is baked, let it cool in the pan for about 10 minutes. Then, carefully transfer it to a wire rack to cool completely. The smell in your kitchen will be utterly irresistible!
10. Slice and Enjoy!
Once cooled, slice your pumpkin bread into generous portions. Serve it fresh, or toast it with a bit of butter for an extra indulgent treat.
Serving Suggestions
I love to serve this chocolate chip pumpkin bread with a hot cup of coffee or tea for a cozy afternoon snack. You could also add a dollop of whipped cream cheese on top or serve it with a scoop of vanilla ice cream for dessert—hello, fall flavors!
Recipe Variations
Feeling creative? Here are a few fun twists on this classic recipe:
- Spice it Up: Add in some chopped nuts like walnuts or pecans for added crunch.
- Sweet Swaps: Substitute half the sugar with maple syrup for a deeper flavor.
- Choco-Loaded: Mix in white chocolate chips or butterscotch chips for different flavor profiles.
- Gluten-Free: Swap out all-purpose flour for gluten-free flour blends for a gluten-free option!
- Pumpkin & Banana: Add 1 ripe mashed banana to the batter for an added fruity twist!
Chef’s Notes
Every time I make this pumpkin bread, I think back to the conversation I had with my grandma about baking. She taught me about the little things—like how a pinch of love can make a dish taste infinitely better. Over the years, I’ve tweaked this recipe to fit my evolving taste, introducing chocolate chips and experimenting with spices. It’s a reminder that cooking is a beautiful journey of growth and discovery.
Funny story: one time, I decided to double the chocolate chips in a rush while chatting with my friend on the phone. It turned out to be a happy accident; we ended up calling it “Chocopotamus Bread” because it was so loaded with chocolate! It’s definitely one of those sweet kitchen mishaps that turned into a cherished memory.
FAQs and Troubleshooting
1. My bread is too dense. What did I do wrong?
Overmixing can be a culprit! When mixing your batter, just combine until the wet and dry ingredients are incorporated. A little flour here and there is okay!
2. Can I use fresh pumpkin instead of canned?
Absolutely! Just roast and purée your pumpkin until smooth. Be sure to drain any excess liquid to avoid a soggy bread.
3. How do I store the leftovers?
You can keep your pumpkin bread wrapped tightly at room temperature for up to 3 days or in the fridge for about a week. For longer storage, you can freeze slices in an airtight container for up to 3 months.
4. Why did my loaf sink in the middle?
This can happen due to too much humidity, underbaking, or opening the oven door too soon. Make sure you let your bread bake fully and resist the temptation to check on it until the last 10-15 minutes!
Nutritional Info
If you’re curious, one slice of this delightful chocolate chip pumpkin bread contains approximately:
- Calories: 250
- Protein: 3g
- Carbohydrates: 35g
- Total Fat: 10g
(Nutritional values will vary based on ingredients used; this is an estimate!)
And there you have it! Your ultimate guide to baking the best Chocolate Chip Pumpkin Bread—complete with memories, tips, tricks, and a few stories to hold close. I hope this fills your kitchen with warmth and brings joy to your table this fall. Remember, cooking is about having fun and sharing great food with the people you love. Happy baking, friends!
PrintBest Chocolate Chip Pumpkin Bread
A cozy fall favorite, this Chocolate Chip Pumpkin Bread combines rich pumpkin flavor with sweet chocolate chips for a delightful treat.
- Prep Time: 15 minutes
- Cook Time: 60 minutes
- Total Time: 75 minutes
- Yield: 8 servings 1x
- Category: Dessert
- Method: Baking
- Cuisine: American
- Diet: Vegetarian
Ingredients
- 1 1/4 cups all-purpose flour
- 1/2 tsp baking powder
- 1/2 tsp baking soda
- 1/4 tsp salt
- 1 tsp ground cinnamon
- 1/2 tsp ground cloves
- 1/2 tsp ground nutmeg
- 3 oz cooking oil
- 2 large eggs
- 1 cup sugar
- 1 tsp vanilla
- 1 cup pumpkin puree
- 1 1/4 cups chocolate chips (divided)
- Oil spray for greasing
Instructions
- Preheat your oven to 350°F (175°C).
- Prepare a 9×5-inch loaf pan by spraying it lightly with oil.
- Mix the dry ingredients: flour, baking powder, baking soda, salt, cinnamon, cloves, and nutmeg in a medium bowl.
- Combine the wet ingredients: oil, eggs, sugar, vanilla, and pumpkin purée in a large bowl until smooth.
- Add the dry mixture to the wet mixture, folding gently until just combined.
- Fold in 1 cup of chocolate chips.
- Pour the batter into the prepared loaf pan and sprinkle the remaining chocolate chips on top.
- Bake for 50-60 minutes, or until a toothpick comes out clean.
- Cool the bread in the pan for about 10 minutes, then transfer to a wire rack.
- Slice and enjoy!
Notes
Serve with coffee or tea for a cozy snack, or add whipped cream cheese on top for an indulgent treat. Store leftovers tightly wrapped at room temperature or in the fridge.
Nutrition
- Serving Size: 1 slice
- Calories: 250
- Sugar: 15g
- Sodium: 150mg
- Fat: 10g
- Saturated Fat: 1g
- Unsaturated Fat: 7g
- Trans Fat: 0g
- Carbohydrates: 35g
- Fiber: 1g
- Protein: 3g
- Cholesterol: 30mg
Keywords: pumpkin bread, chocolate chip, fall baking, autumn recipes
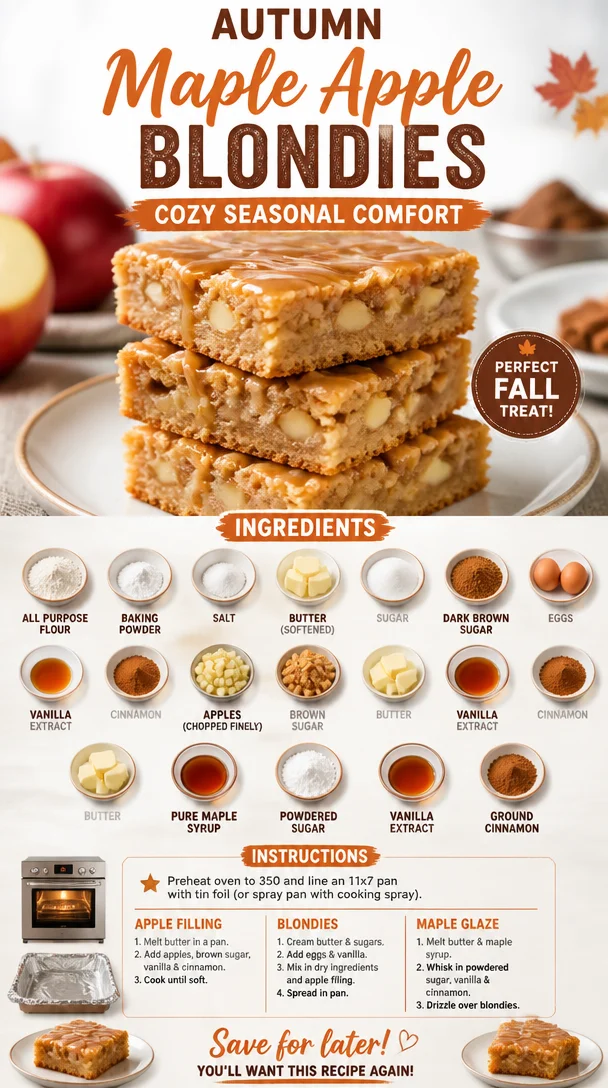
Autumn Maple Apple Blondies: Cozy Seasonal Comfort
Maple Glazed Apple Blondies: A Cozy Treat for Every Occasion
Hey there, fellow food lovers! Welcome back to Clean Plate Cravings – your go-to place for fresh, flavorful meals that leave your tastebuds dancing. Today, I’m super excited to share with you a recipe that has a special place in my heart: Maple Glazed Apple Blondies. Trust me, once you whip these up in your kitchen, they’ll become a beloved staple in your dessert repertoire!
Let’s dive into the story behind these delectable treats. Growing up, autumn was always my favorite season. The air became crisp, leaves changed their colors, and my grandmother’s cozy kitchen transformed into a warm haven filled with the comforting aroma of spiced baked goods. Every Sunday, we would gather as a family, and my grandmother would set out bowls filled with chopped apples, cinnamon, and brown sugar—a simple combination that would soon become the heart of our weekend baking rituals.
One of her favorite recipes was an old family treasure: apple blondies. I remember the joyous chaos of our kitchen, filled with laughter, flour-coated countertops, and the sweet anticipation of indulging in something warm and gooey. As we stirred and mixed, I always looked forward to the moment we’d drizzle a maple glaze over the warm blondies, finishing them with a sprinkle of cinnamon. That first bite? Pure heaven! The flavors of sweet apples with buttery, caramel notes and that luscious maple drizzle were truly magical.
Now that I’m in my own kitchen, I love recreating that cherished memory with my Maple Glazed Apple Blondies. They’re perfect for sharing with friends, cozying up with a book, or even just enjoying as a sweet treat after a long day. Ready to get started? Let’s gather those ingredients and bring this nostalgic recipe to life!
Ingredients
To make these scrumptious Maple Glazed Apple Blondies, you’ll need the following ingredients:
-
2 cups all-purpose flour
The foundation of our blondies! If you’re looking for a gluten-free option, feel free to swap this out with a 1:1 gluten-free flour blend. -
1 tsp baking powder
This will give our blondies that delightful lift. Always check the expiration date on your baking powder for the best rise! -
1/2 tsp salt
A little salt goes a long way in amplifying flavors. If you’re using salted butter, you might want to reduce this to 1/4 tsp. -
1 cup butter (softened)
Butter makes everything better! Make sure it’s softened to room temperature for easy mixing. Vegan butter or coconut oil can work here, too. -
1/4 cup sugar
A touch of granulated sugar adds sweetness and contributes to browning. You can replace this with coconut sugar for a healthier option. -
1 cup dark brown sugar
This adds rich molasses flavor and moisture. Light brown sugar works, but you’ll miss that deep flavor. -
2 large eggs
Eggs help bind the ingredients and give the blondies that soft, chewy texture. You can substitute with unsweetened applesauce if you’d like to keep it egg-free. -
1 1/2 tsp vanilla extract
Vanilla brings warmth and enhances all the other flavors. Always opt for pure vanilla extract for the best flavor! -
1/2 tsp cinnamon
Cinnamon is a must for that cozy, comforting taste. You can also add a pinch of nutmeg for a little extra warmth if you like! -
2 large apples (chopped finely)
I love using a mix of sweet and tart varieties for the best flavor. Granny Smith and Honeycrisp work wonderfully together. -
2 Tbsp brown sugar
We’ll mix this with the apples to create a sweet caramelized layer that oozes flavor. -
1 Tbsp butter
A touch of butter helps to sauté the apples, enhancing their flavor. -
1/4 cup pure maple syrup
This deliciously sweet glaze is the star of the show! If you need a vegan option, agave syrup makes a great substitute. -
1/2 cup powdered sugar
For thickening the glaze. Make sure it’s sifted for a smooth finish! -
1/4 tsp vanilla extract
Just a splash, but it makes a sweet difference in the glaze! -
1/8 tsp ground cinnamon
Adds an extra hint of warmth to the glaze.
Now that we’ve rounded up all the ingredients, let’s roll up our sleeves and dive into the magic of cooking!
Step-by-Step Instructions
-
Preheat and Prep
Preheat your oven to 350°F (175°C) and grease a 9×13 inch baking dish or line it with parchment paper for easy removal. A well-prepped pan means less chance of sticking and a beautiful finish! -
Mix Dry Ingredients
In a medium bowl, whisk together the all-purpose flour, baking powder, salt, and cinnamon. Mixing these dry ingredients first ensures that the leavening agent activates evenly throughout the batter—trust me, that uniformity pays off in fluffy blondies! -
Cream Together Butter and Sugars
In a large mixing bowl, cream the softened butter, granulated sugar, and dark brown sugar together until it’s light and fluffy. You can use a stand mixer or a hand mixer for this part (or even just good ol’ elbow grease!). This step is crucial as it incorporates air into the batter, making your blondies tender. -
Add Eggs and Vanilla
Beat in the eggs, one at a time, ensuring each egg is fully integrated before adding the next, followed by the vanilla extract. The mixture should be well combined and smooth—this is where the flavor really starts to come together! -
Combine Wet and Dry Ingredients
Gradually add the dry ingredients to the creamed mixture. Mix until just combined; a few lumps are perfectly fine! Overmixing at this stage can lead to tough blondies, and we want them soft and chewy. -
Fold in Chopped Apples
Gently fold in the finely chopped apples. You want to distribute them evenly in the batter without overworking it. I love using a spatula for this—it keeps things gentle and effective. -
Prepare Apples for Topping
In a small saucepan, melt the tablespoon of butter over medium heat. Add the chopped apples and sprinkle with the brown sugar and additional cinnamon, sautéing until just softened—about 5 minutes. The goal here is to caramelize the apples slightly. Your kitchen will smell divine! -
Layer and Bake
Spread half of the blondie batter into your prepared baking dish. Top with the sautéed apple mixture, then dollop the remaining batter on top. Don’t worry about covering the apples completely—it’s okay to let some apple peek through! Bake for 25-30 minutes or until a toothpick inserted comes out clean. You want a light golden brown on the edges and a slightly gooey center. -
Cool and Prepare the Maple Glaze
Allow the blondies to cool in the pan for about 10 minutes before transferring them to a wire rack to cool completely. In the meantime, let’s prepare that irresistible maple glaze! In a small bowl, whisk together the powdered sugar, maple syrup, vanilla extract, and ground cinnamon until it’s smooth and pourable. If it’s too thick, add a bit more maple syrup until you reach the desired consistency. -
Glaze and Serve
Drizzle the maple glaze generously over the cooled blondies. Cut them into squares and stack them on a plate, drizzling any extra glaze on top for presentation. You’ll want to share these with friends, but be prepared—no one will want to stop at just one!
Serving Suggestions
These Maple Glazed Apple Blondies are delightful served warm with a scoop of vanilla ice cream or a dollop of whipped cream on top. They also pair beautifully with a warm cup of spiced cider or a cozy mug of hot cocoa. You can even sprinkle a few chopped nuts on top for an extra crunch! The possibilities are endless, and trust me, your friends and family will adore you for it!
Recipe Variations
- Nutty Delight: Add 1 cup of chopped walnuts or pecans to the batter for a satisfying crunch and extra richness.
- Caramel Drizzle: For a caramel twist, drizzle caramel sauce over the glazed blondies after they cool for a festive treat.
- Spooky Version: For Halloween, mix in some chocolate chips and top with crushed candy corn for a fun seasonal twist!
- Vegan Option: Swap out the butter for coconut oil, the eggs for applesauce, and use maple syrup instead of granulated sugar for a delicious vegan blondie!
- Fruit Fusion: Experiment with different fruits by adding berries, peaches, or pears along with the apples for a twist on flavors.
Chef’s Notes
This Maple Glazed Apple Blondies recipe has evolved from my grandmother’s original version, where she used just plain sugar and no glaze. Over the years, I’ve fallen in love with the caramelized apples and decided that a maple glaze was the perfect finishing touch. Every time I share these with friends, they rave about how soft, chewy, and flavorful they are! And honestly, there’s no better feeling than seeing someone’s eyes light up with that first bite.
Oh, and funny kitchen story: one time I forgot to add the eggs! I was halfway through baking when I realized, and in a panic, I whisked them in quickly, hoping for the best. They turned out a bit denser, but not in a bad way. I called them “emergency blondies.” They still vanished in record time!
FAQs and Troubleshooting
-
Why did my blondies turn out dry?
Overbaking is often the culprit! Keep an eye on the baking time, and remember that they’ll continue to firm up as they cool. -
Can I substitute the apples for another fruit?
Absolutely! Pears or even diced peaches would be delightful additions. Just make sure to keep the fruit to a similar moisture content. -
What if I don’t have maple syrup?
You can use honey or agave syrup, although the flavor will differ slightly. For a more robust taste, try a homemade caramel sauce instead! -
Can I freeze these blondies?
Yes! Once cooled, wrap them tightly in plastic wrap or foil and store them in an airtight container in the freezer. They’ll stay fresh for up to 3 months. Just thaw at room temperature when you’re ready to enjoy!
Nutritional Info
While I believe in enjoying food without guilt, here’s a quick glance at the nutritional information for a standard piece (1 square):
- Calories: 210
- Fat: 8g
- Carbs: 34g
- Protein: 2g
- Sugar: 15g
With a delightful combination of flavors, a hint of nostalgia, and an air of celebration, these Maple Glazed Apple Blondies are sure to become a favorite in your home just as they are in mine. So, grab those ingredients, turn on your favorite tunes, and get ready to bake up some sweet memories. Happy baking! 🍏🍂✨
PrintMaple Glazed Apple Blondies
Warm and gooey apple blondies drizzled with a rich maple glaze, perfect for cozy moments and sharing with loved ones.
- Prep Time: 15 minutes
- Cook Time: 30 minutes
- Total Time: 45 minutes
- Yield: 12 servings 1x
- Category: Dessert
- Method: Baking
- Cuisine: American
- Diet: Vegetarian
Ingredients
- 2 cups all-purpose flour
- 1 tsp baking powder
- 1/2 tsp salt
- 1 cup butter (softened)
- 1/4 cup sugar
- 1 cup dark brown sugar
- 2 large eggs
- 1 1/2 tsp vanilla extract
- 1/2 tsp cinnamon
- 2 large apples (chopped finely)
- 2 Tbsp brown sugar
- 1 Tbsp butter
- 1/4 cup pure maple syrup
- 1/2 cup powdered sugar
- 1/4 tsp vanilla extract
- 1/8 tsp ground cinnamon
Instructions
- Preheat your oven to 350°F (175°C) and grease a 9×13 inch baking dish or line it with parchment paper.
- Mix the all-purpose flour, baking powder, salt, and cinnamon in a medium bowl.
- Cream the softened butter, granulated sugar, and dark brown sugar together until light and fluffy.
- Add the eggs, one at a time, followed by the vanilla extract, mixing until smooth.
- Combine the dry ingredients with the creamed mixture, mixing until just combined.
- Fold in the finely chopped apples gently.
- Prepare the apples for topping by melting 1 tablespoon of butter, adding the chopped apples and brown sugar, and sautéing until softened.
- Layer half of the blondie batter in the baking dish, top with the sautéed apples, and dollop the remaining batter on top.
- Bake for 25-30 minutes or until a toothpick inserted comes out clean.
- Cool the blondies for 10 minutes before transferring them to a wire rack.
- Whisk together powdered sugar, maple syrup, vanilla extract, and ground cinnamon for the glaze.
- Glaze the cooled blondies and cut them into squares.
Notes
These blondies can be served warm with ice cream or whipped cream. Experiment with different fruits for variations!
Nutrition
- Serving Size: 1 square
- Calories: 210
- Sugar: 15g
- Sodium: 200mg
- Fat: 8g
- Saturated Fat: 5g
- Unsaturated Fat: 3g
- Trans Fat: 0g
- Carbohydrates: 34g
- Fiber: 1g
- Protein: 2g
- Cholesterol: 20mg
Keywords: blondies, dessert, maple glaze, apples, cozy treat
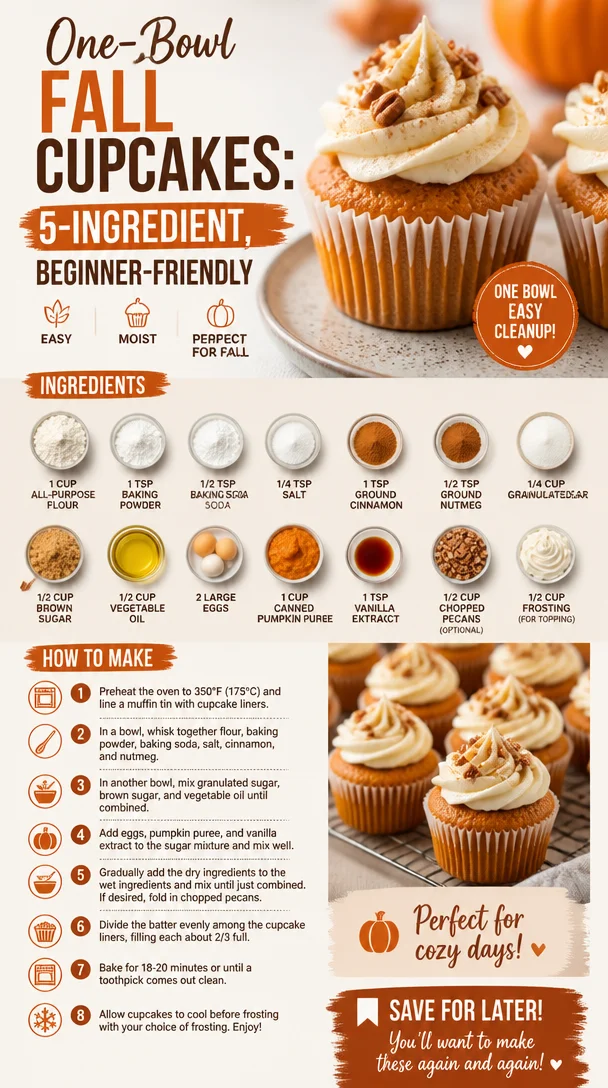
One-Bowl Fall Cupcakes: 5-Ingredient, Beginner-Friendly
Impossible Perfect Fall Cupcakes: A Celebration of Autumn Flavors
Welcome to another delightful food journey at Clean Plate Cravings! If there’s one thing I adore about fall, it’s the abundance of warm spices, cozy gatherings, and the simple joy of baking something that wraps around you like a hug. Today, I’m thrilled to share my recipe for Impossible Perfect Fall Cupcakes. These little treats capture the essence of autumn with every bite—think soft, moist, and warmly spiced pumpkin flavor that feels like a nostalgic walk through fallen leaves.
The leaves are changing color, and there’s a crispness in the air, making it the perfect time to whip up these delightful cupcakes. So grab your apron, turn on your favorite playlist, and let’s create something that not only tastes incredible but brings a smile to everyone’s face.
There’s something magical about baking. It transforms simple ingredients into something special, a tangible, edible piece of love. Whether you’re serving them at a cozy family gathering, a festive potluck, or just savoring them at home with a cup of tea, these cupcakes will make your heart happy. Plus, what could be better than sharing them with friends and family and enjoying the aroma of freshly baked goods wafting through your kitchen? You’re in for a treat!
A Personal Touch
Let me take you on a little journey back in time. Picture this: I’m just a kid, standing on a stool in my grandmother’s kitchen. The warm, buttery smell fills the air as she mixes her famous pumpkin spice batter. She turns to me with a twinkle in her eye, says we’re making “magical muffins,” and you know what? They really felt like magic as we watched them rise in the oven.
Years later, I realized that those little moments, standing on tiptoes, pouring flour, and sneaking raw batter, weren’t just about the treats we were making; they were about the bonds we were building. Today, every time I whip up these Impossible Perfect Fall Cupcakes, I think of my grandma and the love she poured into every recipe. It’s not just a cupcake. It’s a slice of nostalgia, an invitation to create new memories, and a delicious way to celebrate the flavors of fall.
Ingredients
Let’s get into the nitty-gritty of what makes these cupcakes truly special. Here’s what you’ll need:
-
1 cup all-purpose flour
Your base ingredient! For a gluten-free option, swap with a 1:1 gluten-free flour blend. -
1 tsp baking powder
This helps our cupcakes rise to perfection, giving them that lovely fluffiness. -
1/2 tsp baking soda
Along with the baking powder, this ensures we achieve that light texture we crave. -
1/4 tsp salt
A pinch of salt amplifies all the flavors—trust me, it’s essential! -
1 tsp ground cinnamon
This magic spice is synonymous with fall, adding warmth and a hint of sweetness. -
1/2 tsp ground nutmeg
Nutmeg has a slightly sweet and woody flavor. Just a dash will elevate our cupcakes. -
1/4 cup granulated sugar
For that classic sweetness! You can use coconut sugar for a deeper taste. -
1/2 cup brown sugar
The molasses in brown sugar adds moisture and a rich flavor—so good! -
1/2 cup vegetable oil
Keeps our cupcakes moist and tender. You can use melted coconut oil for a subtler flavor. -
2 large eggs
Eggs act as a binder, adding richness to the batter. -
1 cup canned pumpkin puree
This is the star of the show! It brings moisture and that delicious fall flavor. -
1 tsp vanilla extract
Enhances the sweetness and rounds out the flavors beautifully. -
1/2 cup chopped pecans (optional)
These add a delightful crunch. If you’re nut-free, feel free to skip or replace them with sunflower seeds! -
1/2 cup frosting (for topping)
Use your favorite cream cheese frosting or get adventurous with a maple buttercream!
Step-by-Step Instructions
Ready to bring these fall vibes to life? Let’s dive into the baking process!
-
Preheat the Oven
Preheat your oven to 350°F (175°C). This step is crucial, as a hot oven ensures your cupcakes rise beautifully. Don’t forget to line your cupcake pan with cupcake liners—these will make cleanup a breeze! -
Whisk Dry Ingredients
In a medium bowl, whisk together the flour, baking powder, baking soda, salt, cinnamon, and nutmeg until well combined. Whisking ensures an even distribution of the leavening agents and spices. And it’s a great way to get those lovely aromas wafting around your kitchen! -
Mix Sugars and Wet Ingredients
In a large mixing bowl, combine the granulated sugar, brown sugar, and vegetable oil. With a whisk, mix until well combined. Then add your eggs, pumpkin puree, and vanilla extract. Mix until everything is smooth and creamy. Here’s a quick chef tip: If your pumpkin puree is super thick, give it a quick stir before adding it to help it blend seamlessly. -
Combine Wet and Dry Mixtures
Add the dry ingredients to the wet mixture in batches. Gently fold using a spatula, mixing just until combined. Avoid overmixing to ensure your cupcakes remain tender—think fluffy clouds rather than dense bricks! -
Add Pecans
If you’re using pecans, fold them into the batter at this stage. Want to get adventurous? Toss in some chocolate chips or dried cranberries for an extra flavor kick! -
Fill the Liners
Spoon the batter into the lined cupcake pan, filling each cup about two-thirds full. This allows space for the cupcakes to rise without overflowing. -
Bake
Pop the cupcake pan into your preheated oven and bake for 18-20 minutes or until a toothpick inserted in the center comes out clean. Halfway through baking, you can rotate the pan to ensure even cooking. -
Cool Down
Remove the cupcakes from the oven and let them cool in the pan for about 5 minutes. Then, transfer them to a wire rack to cool completely. Patience is key here—frosting warm cupcakes can lead to melty messes! -
Frost and Serve!
Once cooled, frost generously with your choice of frosting. A cream cheese frosting is a classic match! To add a special touch, sprinkle some chopped pecans or a dash of cinnamon on top. Just like that, you’ve transformed simple ingredients into an autumn masterpiece!
Serving Suggestions
Serve your Impossible Perfect Fall Cupcakes on a beautiful platter, dusted with a sprinkle of powdered sugar or a light coating of cinnamon. Pair them with steaming mugs of cider, creamy hot chocolate, or even a spiced chai latte for a heartwarming gathering. Add a few cinnamon sticks or decorative autumn leaves to the platter for a festive touch!
Recipe Variations
- Pumpkin Spice Latte Cupcakes: Add a tablespoon of instant coffee granules to the batter for that coffee kick!
- Chocolate Chip Pumpkin Cupcakes: Sprinkle chocolate chips throughout for an unexpected melty surprise.
- Vegan Version: Swap eggs for flax eggs (1 tbsp flaxseed meal + 2.5 tbsp water per egg) and substitute vegetable oil with applesauce.
- Gluten-Free Delight: Use a gluten-free flour blend for a safe and scrumptious option that everyone can enjoy.
- Savory Twist: Incorporate feta and spinach into the batter for a unique savory variation!
Chef’s Notes
These cupcakes have become a staple in my home, evolving with each season. I’ve tried countless iterations, from adding applesauce for extra moisture to experimenting with different frostings. One of my fondest memories is making these cupcakes during a family gathering, where everyone brought their own takes on toppings. Let me tell you, nothing beats a table full of desserts made with love!
Remember, cooking is a flowing journey, and while a recipe serves as a guide, add your flair! You might just create your own kitchen masterpiece.
FAQs and Troubleshooting
Q: My cupcakes came out dense—what went wrong?
A: Overmixing the batter can lead to dense cupcakes. Mix until just combined and check the freshness of your leavening agents (baking powder and baking soda).
Q: How do I store leftovers?
A: Store in an airtight container at room temperature for up to 2 days or in the refrigerator for about a week.
Q: Can I freeze these cupcakes?
A: Absolutely! Freeze unfrosted cupcakes in a single layer on a baking sheet, then transfer to a zip-top bag once frozen. They can be frozen for up to 3 months.
Q: Will using fresh pumpkin make a difference?
A: Fresh pumpkin can add a richer flavor, but make sure to cook and puree it until smooth before using. Canned pumpkin is consistent and convenient, but fresh can elevate it!
Nutritional Info
While these cupcakes are as delicious as they are comforting, keep in mind that enjoyment is equally essential as nutrition. A single cupcake has a decent dose of pumpkin goodness, providing vitamin A and fiber. Enjoy these treats in moderation and share them with others to spread the love!
So there you have it—the impossible perfect fall cupcakes that will warm your heart, nourish your soul, and make every guest at your table feel cherished. Let’s create memories one cupcake at a time—happy baking!
PrintImpossible Perfect Fall Cupcakes
Celebrate autumn with these soft, moist cupcakes infused with pumpkin and warm spices, perfect for cozy gatherings.
- Prep Time: 15 minutes
- Cook Time: 20 minutes
- Total Time: 35 minutes
- Yield: 12 servings 1x
- Category: Dessert
- Method: Baking
- Cuisine: American
- Diet: Vegetarian
Ingredients
- 1 cup all-purpose flour
- 1 tsp baking powder
- 1/2 tsp baking soda
- 1/4 tsp salt
- 1 tsp ground cinnamon
- 1/2 tsp ground nutmeg
- 1/4 cup granulated sugar
- 1/2 cup brown sugar
- 1/2 cup vegetable oil
- 2 large eggs
- 1 cup canned pumpkin puree
- 1 tsp vanilla extract
- 1/2 cup chopped pecans (optional)
- 1/2 cup frosting (for topping)
Instructions
- Preheat your oven to 350°F (175°C).
- Whisk together the flour, baking powder, baking soda, salt, cinnamon, and nutmeg in a medium bowl.
- Combine the granulated sugar, brown sugar, and vegetable oil in a large mixing bowl; mix until smooth. Add eggs, pumpkin puree, and vanilla extract; mix until creamy.
- Add the dry ingredients to the wet mixture in batches and fold until combined.
- Fold in chopped pecans if using.
- Spoon the batter into cupcake liners, filling each about two-thirds full.
- Bake for 18-20 minutes or until a toothpick comes out clean.
- Cool for 5 minutes in the pan, then transfer to a wire rack to cool completely.
- Frost with your choice of frosting and enjoy!
Notes
These cupcakes can be customized with chocolate chips or made vegan by substituting eggs with flax eggs and oil with applesauce.
Nutrition
- Serving Size: 1 cupcake
- Calories: 200
- Sugar: 14g
- Sodium: 250mg
- Fat: 10g
- Saturated Fat: 1g
- Unsaturated Fat: 9g
- Trans Fat: 0g
- Carbohydrates: 28g
- Fiber: 2g
- Protein: 3g
- Cholesterol: 25mg
Keywords: cupcakes, fall recipes, pumpkin spice, cozy desserts, baking