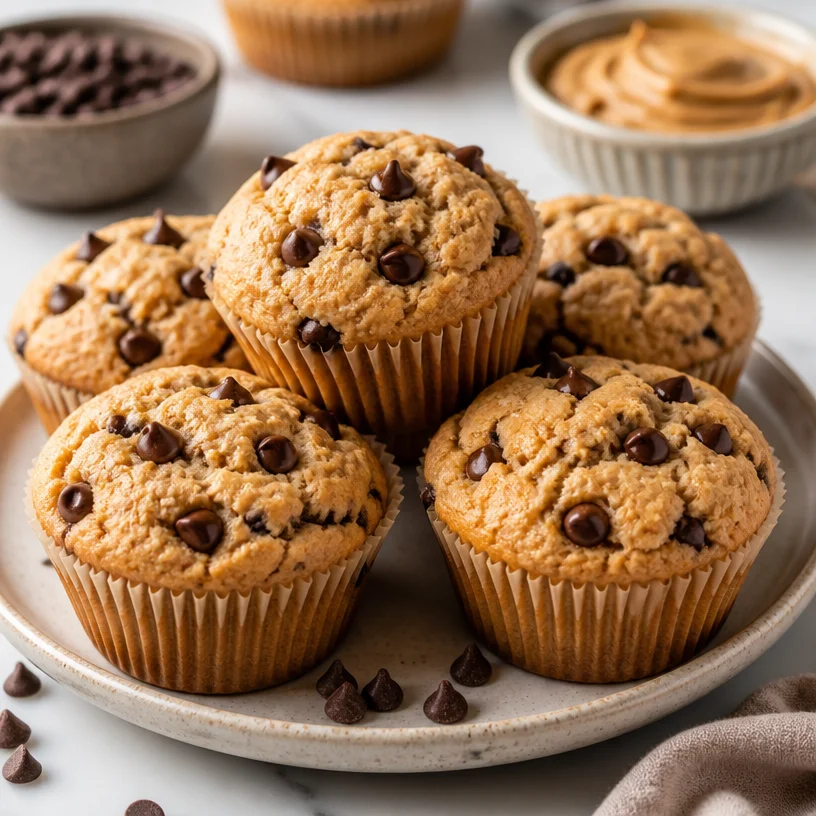
Ingredient Easy Peanut Butter Muffins for Busy Mornings
Peanut Butter Muffins: A Deliciously Nutty Treat to Savor
Welcome, fellow food lovers! If you’ve ever found yourself staring at a crowded pantry, wondering what culinary magic you can create with a few simple ingredients, you’re in for a real treat today. Let’s talk about one of my all-time favorite snacks: peanut butter muffins. These fluffy, nutty delights are bursting with flavor, and I can assure you they’ll quickly become a staple in your kitchen repertoire.
I first stumbled upon a recipe for peanut butter muffins when I was a weekend baker, eager to impress my family with something beyond the usual cookies and brownies. I remember whipping up the batter, not entirely sure how they’d turn out. The sweet, nutty aroma filled the kitchen, wrapping around me like a warm hug. When I pulled those golden-brown muffins out of the oven, I knew I had struck gold. The rich, velvety taste of peanut butter blended perfectly with chocolate chips, and each bite was like a warm embrace, reminding me of cozy afternoons spent with loved ones.
In this blog post, I’m excited to guide you through my peanut butter muffin recipe. You’ll find that it’s as simple as it is delicious. So, grab your apron, and let’s embark on this scrumptious adventure together!
A Trip Down Memory Lane
As a child, my afternoons were often filled with the delightful aroma of cookies baking in the oven, thanks to my lovely mom. She had a knack for transforming everyday ingredients into incredible treats that brought the family together. One memorable day, while searching through the cupboards for the usual chocolate chip cookies, I came across a forgotten jar of peanut butter. Inspired by the idea of something new, I decided to mix things up.
With my mom’s guiding hand, we began experimenting with peanut butter, flour, and a few other pantry staples. The muffins that emerged from that endeavor were an instant hit! They were softer and more indulgent than any cookie I had previously tasted. Each muffin was like a mini celebration of childhood, infused with memories of laughter, shared stories, and, of course, delicious flavors. That day, I learned that sometimes the best recipes come from a mix of spontaneity and love. It’s a lesson I carry with me every time I step into the kitchen, especially when making these irresistible peanut butter muffins.
Ingredients: What You’ll Need
Let’s dive into the ingredients you’ll need to create these delectable peanut butter muffins. Each ingredient plays a crucial role in crafting the perfect texture and flavor. Here’s what we’re using:
-
1 cup peanut butter: The star of the show! Go with creamy for a smooth texture or crunchy for added dimension. If you’re feeling adventurous, almond butter works as a tasty swap!
-
1 cup sugar: This sweetens the muffins. You can use granulated sugar, but feel free to experiment with brown sugar for a deeper flavor or coconut sugar for a healthier alternative.
-
2 eggs: These bind everything together and help the muffins rise. For a vegan version, try flax eggs (1 tablespoon ground flaxseed mixed with 2.5 tablespoons water equals 1 egg).
-
1 teaspoon vanilla extract: This adds a lovely depth of flavor. Use pure vanilla extract for the best taste, but imitation works in a pinch.
-
1 teaspoon baking soda: This is our leavening agent, giving the muffins their beautiful dome shape. Make sure it’s fresh—old baking soda can result in dense muffins.
-
1/2 teaspoon salt: A pinch of salt accentuates the sweetness and rounds out the flavors. If you’re watching sodium intake, you can reduce it but not eliminate it entirely.
-
1 cup flour: All-purpose flour works best for a nice rise, but substitute it with whole wheat flour for a heartier muffin or gluten-free flour if needed.
-
1 cup chocolate chips: Because chocolate makes everything better! Semi-sweet, dark, or even white chocolate chips can all be used, depending on your preference.
Step-by-Step Instructions: Let’s Bake!
Now that you have your ingredients ready, it’s time to transform them into something magical. Here’s how to make these incredible peanut butter muffins:
Step 1: Preheat Your Oven
Start by preheating your oven to 350°F (175°C). This will ensure that your muffins bake evenly and get that lovely golden-brown color. Pro tip: Place your oven rack in the center to achieve consistent heat.
Step 2: Prepare Your Muffin Tin
Line a muffin tin with paper liners or spray it lightly with non-stick cooking spray. No one likes a stuck muffin! If you have silicone muffin molds, those work wonders too! They’re easy to clean and often don’t need any grease.
Step 3: Mix the Peanut Butter and Sugar
In a large mixing bowl, combine the peanut butter and sugar. You can use a hand mixer or a wooden spoon—just make sure it’s well blended, creamy, and smooth. This will create the perfect base for your muffins.
Step 4: Add the Eggs and Vanilla
Crack in the two eggs and pour in the vanilla extract. Beat them well into the peanut butter-sugar mixture until it’s light and fluffy. You want to see a little bit of air incorporated here, as that will help with the muffins’ texture.
Step 5: Combine Dry Ingredients
In a separate bowl, whisk together the flour, baking soda, and salt. This step ensures that your leavening agent is evenly distributed throughout the flour, leading to uniform muffins.
Step 6: Bring It All Together
Gradually add the dry mixture to the wet peanut butter mixture, stirring gently until just combined. Be careful not to overmix! Muffins thrive on a light touch. A few lumps are perfectly fine.
Step 7: Fold in the Chocolate Chips
Now for the fun part! Gently fold in the chocolate chips. This is where those little bursts of chocolate decadence will shine through. If you can’t get enough chocolate goodness, feel free to add a bit more!
Step 8: Scoop It In
Using a spoon or a cookie scoop, evenly distribute the batter among the muffin cups. Fill each cup about 2/3 full to allow for rising without overflowing.
Step 9: Bake ’Em Up
Pop your muffin tin into the preheated oven and let the magic happen. Bake for about 15-18 minutes or until a toothpick inserted in the center comes out clean or with just a few moist crumbs. The smell filling your kitchen at this point will be nothing short of heavenly!
Step 10: Cool and Enjoy!
Once they’re out of the oven, let the muffins cool in the tin for about 5 minutes before transferring them to a wire rack. This helps them maintain that perfect texture. Enjoy them warm or at room temperature, and don’t forget to share with family and friends for some extra love!
Serving Suggestions: How to Present Your Muffins
These peanut butter muffins are fantastic on their own, but a little creativity can elevate your serving experience! Try placing the muffins on a pretty plate or serving them in a rustic basket lined with a cloth. A drizzle of honey or maple syrup on top before serving can bring an extra touch of sweetness, and a side of fresh fruit or yogurt adds freshness. Perfect for brunch or an afternoon snack!
Recipe Variations: Get Creative!
Now let’s mix things up a bit! Here are some creative twists and variations you can try with your peanut butter muffins:
-
Banana Peanut Butter Muffins: Mash a ripe banana and fold it into the batter for a moist, fruity surprise.
-
Oatmeal Peanut Butter Muffins: Add 1/2 cup of rolled oats for added texture and nutrition.
-
Nutty Surprise: Incorporate chopped nuts like walnuts or almonds for extra crunch and flavor.
-
Spiced Delight: Add a teaspoon of cinnamon or even a hint of nutmeg for a spiced muffin that feels festive and cozy.
-
Peanut Butter Cup Variation: Instead of chocolate chips, place a mini peanut butter cup in the center of each muffin before baking for a melty surprise!
Chef’s Notes: A Personal Touch
Cooking, to me, is more than just following a recipe; it’s about sharing and creating memories. These peanut butter muffins have been a beloved staple in my family since my childhood. There was a time when I had a little mishap—I accidentally swapped baking powder for baking soda, leading to a batch of dense, flat muffins. But instead of tossing them, we transformed them into a trifle by layering them with yogurt and berries, and guess what? They became an instant hit as a make-do dessert!
Life in the kitchen is all about embracing little mistakes and making them your own. And each time I whip up these muffins, it’s a reminder that food, along with laughter and good company, nourishes both the body and soul.
FAQs and Troubleshooting: Common Questions Answered
1. Why did my muffins come out too dense?
This can happen if you overmix the batter. Mixing too much develops gluten in the flour, leading to denser muffins. Mixing gently just until ingredients combine is key to keeping them light and fluffy.
2. Can I use natural peanut butter?
Absolutely! Just keep in mind that natural peanut butter tends to be a little runnier. You may need to adjust the flour slightly to get the right batter consistency.
3. How can I store leftover muffins?
Store any leftovers in an airtight container at room temperature for up to 3 days or in the fridge for about a week. You can freeze them as well—just pop them in a zip-top bag after they’ve cooled, and they’ll be good for a couple of months!
4. Can I make these muffins ahead of time?
Definitely! You can make the batter the night before and store it in the fridge, then bake them fresh in the morning. They can also be baked ahead, cooled, and reheated in the microwave for a quick snack or breakfast!
Nutritional Info (if applicable)
While I haven’t included specific nutritional information in this write-up, these peanut butter muffins are packed with protein and healthy fats from the peanut butter, making them a satisfying option. Just keep an eye on the added sugar if you’re monitoring your intake.
There you have it, friends! A delightful journey into the world of peanut butter muffins. I hope these cozy, flavorful treats bring as much joy to your kitchen as they have in mine. Happy baking, and remember: life is too short for boring food!
PrintPeanut Butter Muffins
Deliciously nutty peanut butter muffins that are light, fluffy, and perfect for any time of day.
- Prep Time: 10 minutes
- Cook Time: 18 minutes
- Total Time: 28 minutes
- Yield: 12 muffins 1x
- Category: Snack
- Method: Baking
- Cuisine: American
- Diet: Vegetarian
Ingredients
- 1 cup peanut butter
- 1 cup sugar
- 2 eggs
- 1 teaspoon vanilla extract
- 1 teaspoon baking soda
- 1/2 teaspoon salt
- 1 cup flour
- 1 cup chocolate chips
Instructions
- Preheat your oven to 350°F (175°C).
- Prepare your muffin tin with paper liners or non-stick spray.
- Mix the peanut butter and sugar in a large bowl until creamy and smooth.
- Add the eggs and vanilla, beating until light and fluffy.
- Combine the flour, baking soda, and salt in a separate bowl.
- Bring the dry mixture into the wet batter gradually, stirring gently.
- Fold in the chocolate chips.
- Scoop the batter into the muffin cups, filling about 2/3 full.
- Bake for 15-18 minutes or until a toothpick comes out clean.
- Cool for 5 minutes before transferring to a wire rack.
Notes
For variations, try adding bananas, oats, or nuts. Store in an airtight container for up to 3 days.
Nutrition
- Serving Size: 1 muffin
- Calories: 250
- Sugar: 10g
- Sodium: 200mg
- Fat: 10g
- Saturated Fat: 2g
- Unsaturated Fat: 7g
- Trans Fat: 0g
- Carbohydrates: 30g
- Fiber: 2g
- Protein: 6g
- Cholesterol: 35mg
Keywords: peanut butter, muffins, snacks, baking, easy recipe
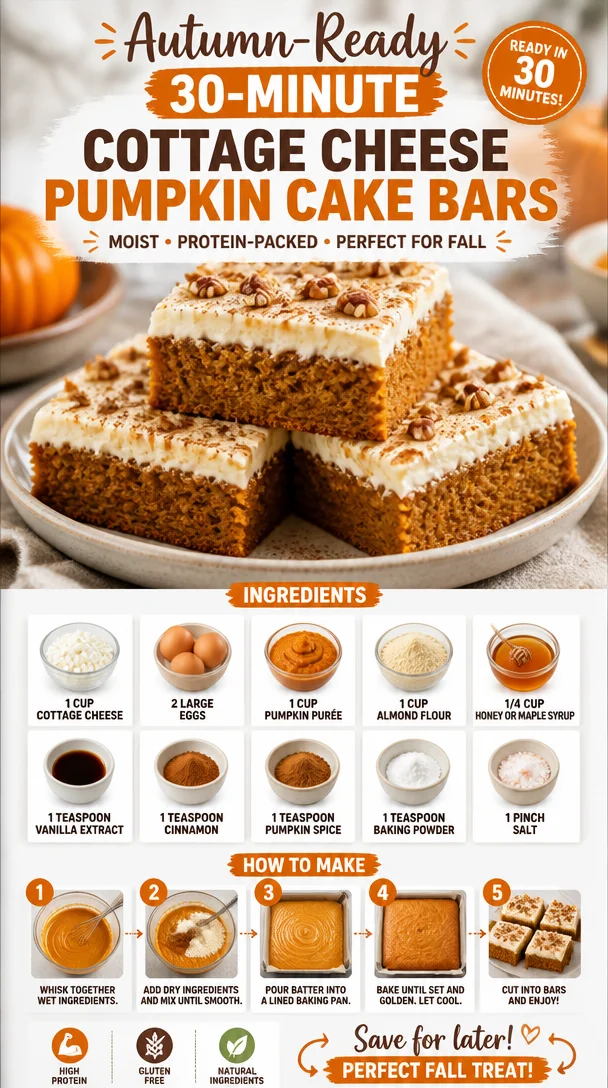
Autumn-Ready 30-Minute Cottage Cheese Pumpkin Cake Bars
Irresistibly Easy Cottage Cheese Pumpkin Cake Bars
Welcome, food lovers! Today, we’re diving into something truly delightful—Cottage Cheese Pumpkin Cake Bars. As the cooler months roll in and the leaves start to change, I can’t help but think about all the comfort foods that come into play. These cake bars are the perfect blend of cozy pumpkin flavors and the smoothness of cottage cheese, making them a must-try for anyone who appreciates a little sweetness in their life without straying too far from the healthy lane.
So let’s roll up those sleeves, turn on some tunes, and let’s bake together! Trust me; by the end of this post, you’ll be swiping the last piece off the pan and thinking, “How can something this healthy taste so fabulous?”
A Slice of Nostalgia
Growing up, autumn was always special in my family. The air would turn crisp, and the kitchen would transform into a haven filled with the scents of cinnamon and nutmeg. My mom had this magical ability to turn the simplest ingredients into unforgettable treats. One of my favorite memories is when she introduced us to pumpkin anything. Whether it was a hearty soup or fluffy muffins, pumpkin was the star of the show.
But it wasn’t until I stumbled upon the idea of adding cottage cheese to a pumpkin dessert that the magic truly happened. I remember the first time I tried making pumpkin bars with cottage cheese. The end result was a revelation. They were moist, packed with protein, and had that rich, comforting flavor. It felt like that warm hug from my childhood, but somehow lighter.
The ease and versatility of the recipe quickly made it a staple in my kitchen, and it’s become a family favorite. Now, I’m thrilled to share this gem with you so you, too, can recreate those cozy autumn vibes all year long!
Ingredients
Here’s what you’ll need for these delicious Cottage Cheese Pumpkin Cake Bars:
-
1 cup Cottage cheese
Provides moisture and protein. It’s creamy and contributes to the fluffiness of the bars. If you want a dairy-free option, try Greek yogurt or silken tofu! -
2 large Eggs
Acts as a binder to hold everything together. If you need an egg substitute, you can use flax eggs (1 tablespoon flaxseed meal mixed with 2.5 tablespoons water per egg). -
1 cup Pumpkin purée
Adds that quintessential pumpkin flavor and moisture. Canned pumpkin is great for convenience, but feel free to roast your own for a fresh taste! -
1 cup Almond flour
A gluten-free option that gives a nice texture to the bars. You can swap it for whole wheat flour or oat flour for a different flavor and texture. -
1/4 cup Honey or maple syrup
Adds optional sweetness, although the pumpkin is naturally sweet as well! Use your favorite sweetener—agave or coconut sugar work nicely too. -
1 teaspoon Vanilla extract
Enhances all the flavors. Freshly scraped vanilla bean will take it to the next level if you’re feeling fancy! -
1 teaspoon Cinnamon
This warm spice is the essence of fall. You can also mix in a bit of cardamom for a unique twist. -
1 teaspoon Pumpkin spice
A blend of spices that brings complexity. If you don’t have it, a mix of nutmeg and ginger will do the trick. -
1 teaspoon Baking powder
Helps the bars rise and get that nice fluffy texture. -
1 pinch Salt
Balances the sweetness, making everything taste better.
Step-by-Step Instructions
Now, let’s get cooking! Here’s how to whip up these delightful cake bars, step by step.
-
Preheat your oven
Preheat your oven to 350°F (175°C). This ensures your batter cooks evenly. While it warms up, you can gather your ingredients and prep the pans. -
Grease your baking dish
Use a butter or non-stick spray to coat an 8×8 inch baking dish. If you want easy cleanup, consider lining it with parchment paper—just leave some overhang for easy lifting later. -
Blend the cottage cheese
In a mixing bowl or blender, add your cottage cheese. If you want a smoother texture, blend it until creamy. Trust me, this makes a difference in the final product! -
Add the eggs and pumpkin
Crack the eggs into the bowl with your cottage cheese and add the pumpkin purée. Mix it all together until smooth. You want these ingredients to be well incorporated. -
Stir in the sweetener and vanilla
Pour in your honey (or maple syrup) and vanilla extract. Give it a good stir to combine all those lovely flavors. -
Combine the dry ingredients
In another bowl, whisk together the almond flour, cinnamon, pumpkin spice, baking powder, and salt. This step helps distribute the leavening evenly. -
Merge wet and dry ingredients
Gradually fold the dry mixture into your pumpkin mixture. Use a spatula to carefully combine until just mixed—don’t overdo it! A few lumps are okay. -
Pour and spread the batter
Scoop your thick batter into the prepared baking dish. Use the spatula to spread it out evenly. You can sprinkle a dash of cinnamon on top for that extra cozy touch! -
Bake!
Pop your dish in the preheated oven and bake for about 25-30 minutes. It’s ready when a toothpick inserted into the center comes out clean (or with a few moist crumbs). -
Cool and cut
Let the bars cool in the pan for about 10 minutes, then carefully lift them out using the parchment paper. Cut them into squares and enjoy!
Serving Suggestions
These Cottage Cheese Pumpkin Cake Bars can be enjoyed warm from the oven, or let them cool down for a portable treat. Serve them with a dollop of Greek yogurt or a sprinkle of nuts for added crunch. A drizzle of honey or maple syrup also makes for an excellent finishing touch!
Recipe Variations
Feel free to get creative with this recipe! Here are some fun variations:
-
Chocolate Chip Twist: Add 1/2 cup of dark chocolate chips to the batter for a sweet surprise.
-
Nutty Delight: Mix in a handful of chopped walnuts or pecans for an added crunch.
-
Dairy-Free Version: Use almond or coconut yogurt in place of cottage cheese and adjust the sweetener to taste.
-
Spice it Up: Swap traditional pumpkin spice with chai spice or even gingerbread spice for a festive flair!
-
Fruit Infusion: Toss in 1/2 cup of cranberries or raisins for a burst of fruity flavor.
Chef’s Notes
I can’t help but chuckle every time I think about the first time I made these bars; I forgot to add the eggs! Can you imagine my surprise when they turned out more like a dense cake than bars? But hey, even those dense cakes ended up being a hit in the family, so there’s always room for happy accidents in the kitchen!
Over time, I’ve tweaked this recipe to strike the perfect balance between taste and nutrition. It’s evolved into a go-to, not just in the fall but any time I crave something sweet yet wholesome. It just goes to show—never stop experimenting, because you might stumble upon something delicious.
FAQs and Troubleshooting
1. Can I make these bars ahead of time?
Absolutely! These bars keep well in an airtight container in the fridge for up to a week. Just reheat them slightly in the microwave if you prefer them warm!
2. What if I don’t have almond flour?
No problem! You can use all-purpose flour or oat flour if gluten isn’t an issue. Just be cautious with quantities, as different flours absorb moisture differently.
3. How do I know when they’re done?
Insert a toothpick in the center of the bars. If it comes out clean or with a few moist crumbs, they’re perfect! If you see wet batter, continue baking for a few more minutes.
4. My batter is too thick; what can I do?
If your batter feels dense, don’t fret! You can mix in a tablespoon of milk or dairy-free milk to loosen it up. Sometimes, especially with almond flour, the absorption can vary.
Nutritional Info
These Cottage Cheese Pumpkin Cake Bars pack a nutritious punch! Each bar is rich in protein thanks to the cottage cheese and eggs while being lower in carbohydrates compared to traditional cake. Plus, the pumpkin adds fiber and essential vitamins!
So there you have it, friends! Irresistibly easy Cottage Cheese Pumpkin Cake Bars that not only satisfy your sweet tooth but also keep things on the healthy side. I honestly can’t wait for you to try these out! They’re perfect for breakfast, a snack, or even dessert. Happy baking, and remember: keep it simple, keep it fresh, and always keep it delicious!
PrintIrresistibly Easy Cottage Cheese Pumpkin Cake Bars
A delightful blend of cozy pumpkin flavors and smooth cottage cheese, perfect for a healthy treat.
- Prep Time: 10 minutes
- Cook Time: 30 minutes
- Total Time: 40 minutes
- Yield: 16 servings 1x
- Category: Dessert
- Method: Baking
- Cuisine: American
- Diet: Vegetarian
Ingredients
- 1 cup Cottage cheese
- 2 large Eggs
- 1 cup Pumpkin purée
- 1 cup Almond flour
- 1/4 cup Honey or maple syrup
- 1 teaspoon Vanilla extract
- 1 teaspoon Cinnamon
- 1 teaspoon Pumpkin spice
- 1 teaspoon Baking powder
- 1 pinch Salt
Instructions
- Preheat your oven to 350°F (175°C).
- Grease an 8×8 inch baking dish.
- Blend the cottage cheese until creamy.
- Add the eggs and pumpkin purée, mixing until smooth.
- Stir in the honey and vanilla extract.
- Combine the dry ingredients in another bowl.
- Merge the wet and dry ingredients carefully.
- Pour the batter into the prepared dish.
- Bake for about 25-30 minutes.
- Cool for 10 minutes, cut into squares, and enjoy!
Notes
These bars can be made ahead of time and stored in an airtight container in the fridge for up to a week.
Nutrition
- Serving Size: 1 bar
- Calories: 200
- Sugar: 8g
- Sodium: 150mg
- Fat: 6g
- Saturated Fat: 2g
- Unsaturated Fat: 4g
- Trans Fat: 0g
- Carbohydrates: 28g
- Fiber: 2g
- Protein: 6g
- Cholesterol: 50mg
Keywords: cottage cheese pumpkin cake, healthy dessert, pumpkin bars
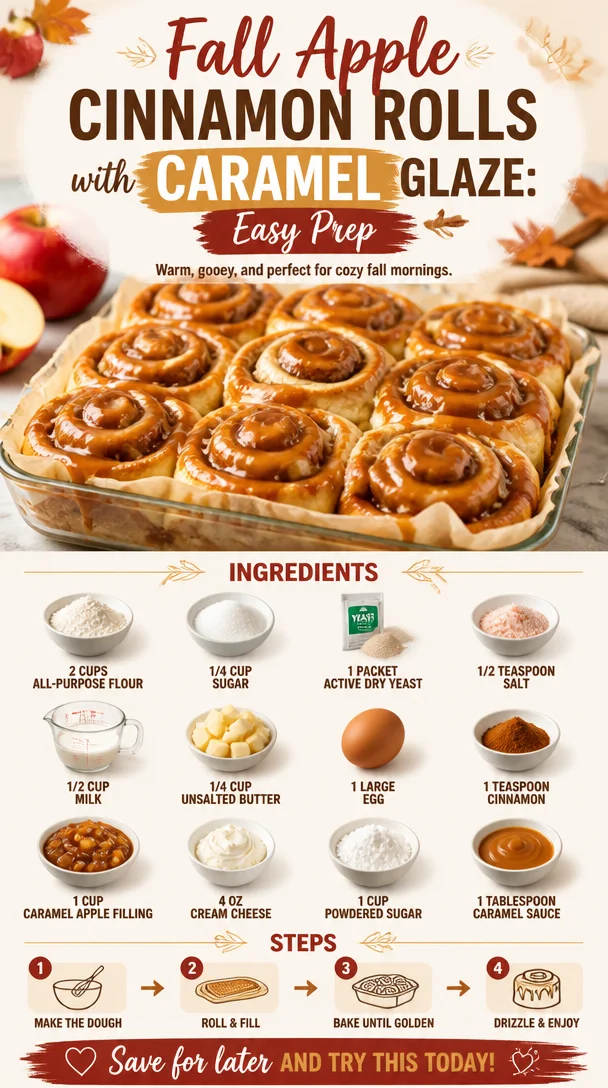
Fall Apple Cinnamon Rolls with Caramel Glaze: Easy Prep
Caramel Apple Cinnamon Rolls: A Sweet Slice of Nostalgia
When the chill of fall blows in and the leaves start to change, my heart starts to crave all those cozy flavors that remind me of home. There’s something truly enchanting about the combination of caramel, apple, and cinnamon—especially when it’s all rolled up in soft, fluffy dough. Ladies and gentlemen, welcome to my kitchen where we’re about to embark on a delightful journey to make Caramel Apple Cinnamon Rolls!
This dish isn’t just about satisfying your taste buds; it’s about evoking cherished memories that connect us with loved ones through food. I can vividly recall my grandmother’s kitchen filled with the tantalizing aroma of cinnamon swirling in the air as she baked batch after batch of cinnamon rolls every Sunday morning. We would all gather around the table, barefoot and still in our pajamas, ready to dig into those warm rolls topped with a generous drizzle of homemade caramel sauce. It’s those moments of laughter and love that inspired me to create my own take on this classic dish.
So grab your apron and let’s dive into a recipe that’s guaranteed to become a staple in your home, bringing warmth and comfort to your table, just like it did in mine!
Personal Story
Growing up, Sundays were sacred in my house. They were all about family, love, and—most importantly—food. My beloved grandmother was the queen of baked goods, and no one could resist the charm of her warm cinnamon rolls. I remember early mornings spent in her sunlit kitchen, patiently waiting while she rolled out dough and sprinkled heaps of cinnamon and sugar across the surface. My job? To be her assistant, hand her ingredients, and sample as much of the caramel as I could manage without her noticing!
Those Sunday mornings were filled with chatter, the clinking of coffee cups, and the laughter of family. As we all sat down together around that old oak table, it felt like time stood still. It’s amazing how a simple dish can hold so many memories and emotions—food truly brings people together.
Now, every time I whip up these Caramel Apple Cinnamon Rolls in my own kitchen, I can’t help but smile as I think about my grandmother. This recipe might be inspired by her, but I’ve added my twist with a luscious caramel apple filling that makes each roll even more decadent and delightful, just like those sweet Sundays of my youth.
Ingredients
Let’s take a look at what we need to create these mouthwatering Caramel Apple Cinnamon Rolls:
-
2 cups all-purpose flour
The foundation of our roll! You can substitute with whole wheat flour or a gluten-free blend, if preferred. The amount may vary slightly depending on the flour type, so keep an eye on your dough consistency as you mix! -
1/4 cup sugar
This not only sweetens the dough but also nourishes the yeast. If you want to cut down on sugar, honey or maple syrup can work, but be sure to adjust the liquid in your recipe accordingly. -
1 packet active dry yeast
Yeast makes the dough rise, creating that fluffy texture we all adore. Make sure it’s fresh for the best rise! If you only have instant yeast, you can use that without proofing it in water. -
1/2 teaspoon salt
Salt enhances all the flavors in the rolls; don’t skip it! If you use unsalted butter, this is especially important. -
1/2 cup milk
Warm milk helps activate the yeast and makes the dough pleasantly soft. You can substitute with nut milk or any dairy-free alternative, but warm it gently before adding. -
1/4 cup unsalted butter
Butter creates richness in flavor. If you’re looking for a healthier option, you can swap half of this with applesauce for less fat. -
1 large egg
Eggs add richness, moisture, and act as a binding agent. For an egg-free version, use a flax egg (1 tablespoon ground flaxseed mixed with 2.5 tablespoons water). -
1 teaspoon cinnamon
This is the star spice that brings warmth! Feel free to add a touch of nutmeg or allspice for an extra flavor kick. -
1 cup caramel apple filling
This is where the magic happens! You can use store-bought caramel apple filling or make your own using diced apples sautéed in butter and caramel sauce. -
4 oz cream cheese
This adds a creamy, decadent element to your frosting. You can use a vegan cream cheese alternative or Greek yogurt for a lighter version. -
1 cup powdered sugar
Sweetness for our frosting! If you prefer, you can use stevia or a powdered sugar substitute to cut down on sugar. -
1 tablespoon caramel sauce
A drizzle of caramel on top adds that finishing touch! Use store-bought or homemade—either way, it’s simply irresistible.
Step-by-Step Instructions
Ready to get your bake on? Let’s follow these step-by-step instructions to create your very own Caramel Apple Cinnamon Rolls!
Step 1: Proof the Yeast
In a small bowl, combine the warm milk (about 110°F or 43°C) and the packet of yeast along with a pinch of the sugar. Let it sit for about 5-10 minutes until it becomes foamy. This is proof that your yeast is ready to work its magic! If it doesn’t foam, you might want to start over with new yeast.
Step 2: Make the Dough
In a large mixing bowl, whisk together the flour, remaining sugar, and salt. Once your yeast is foamy and bubbly, pour it into the flour mixture along with the melted butter and egg. Mix until combined—here’s where a wooden spoon comes in handy! If you have a stand mixer with a dough hook, you can use that for an even easier experience.
Step 3: Knead the Dough
Turn the dough out onto a lightly floured surface and start kneading! This should take about 5-7 minutes. If the dough is sticky, add a little bit more flour, a tablespoon at a time, until it’s smooth and elastic. Kneading is a great workout; don’t skimp on it!
Step 4: Let it Rise
Form the dough into a ball and place it in a greased bowl. Cover it with a clean kitchen towel and let it rise in a warm spot for 1-2 hours, or until it’s doubled in size. This step is essential for fluffy rolls, so be patient!
Step 5: Roll it Out
Once risen, punch the dough down (no really, this is a fun part!) and turn it out onto a floured surface. Roll it out into a rectangle about 1/2 inch thick. The shape doesn’t have to be perfect—as long as it’s big enough to spread the filling, you’re golden!
Step 6: Spread the Caramel Apple Filling
Spread your caramel apple filling evenly over the dough, leaving a little border around the edges. This is where the lusciousness begins! Feel free to sprinkle a bit more cinnamon over the top for added flavor.
Step 7: Roll it Up
Starting from one edge, roll the dough tightly into a log. When you reach the end, pinch the seam to seal. Now slice the log into 1–2 inch pieces—this is where those gorgeous rolls begin to take shape!
Step 8: Second Rise
Place the sliced rolls in a greased baking dish, leaving a little space between each for them to expand. Cover again and let rise for another 30-45 minutes until puffy.
Step 9: Bake the Rolls
Preheat your oven to 350°F (175°C). Once the rolls have risen, pop them in the oven for about 20–25 minutes or until golden brown on top. The smell wafting through your kitchen will be absolutely mouthwatering!
Step 10: Make the Frosting
While the rolls are baking, whip up your cream cheese frosting. In a mixing bowl, beat the softened cream cheese and powdered sugar together until smooth. Add a splash of milk if needed to reach your desired consistency. Drizzle in a tablespoon of caramel sauce for an added touch of sweetness!
Step 11: Frost and Serve
As soon as the rolls come out of the oven (and while they’re still warm!), slather that cream cheese frosting on top. Allow it to melt slightly into the crevices. Finish off with a light drizzle of extra caramel sauce—and there you have it!
Serving Suggestions
These Caramel Apple Cinnamon Rolls are best enjoyed fresh out of the oven! Serve them warm, dusted with a sprinkle of cinnamon or topped with some chopped nuts for an added crunch. Pair them with a steaming cup of coffee or spiced apple cider—perfect for those chilly mornings with family or friends.
Recipe Variations
Feel free to let your creativity shine with these variations:
- Nutty Delight: Sprinkle in some chopped pecans or walnuts into the filling for a delightful crunch.
- Spiced Pumpkin Version: Substitute half of the apple filling for pumpkin puree and add pumpkin spice for a fall twist.
- Creamy Apple Pie Rolls: Add diced fresh apples along with the caramel apple filling for a more fruity texture.
- Chocolate Drizzle: Replace the caramel sauce with melted chocolate for a decadent variation.
- Vegan Twist: Use plant-based milk, dairy-free butter, and flax eggs to make this recipe vegan-friendly!
Chef’s Notes
Every time I make these Caramel Apple Cinnamon Rolls, I think back to those kitchen adventures with my grandmother. She would always tell me, "Cooking is about sharing love through food," and I carry that tradition with me today. This recipe has evolved over time, and while it’s inspired by my childhood, I’ve infused it with my own unique spin that makes it even more special.
Remember, the kitchen is a place for experimentation and fun—so don’t hesitate to make it your own!
FAQs and Troubleshooting
1. Why didn’t my rolls rise?
If your dough didn’t rise, it might be due to inactive yeast. Always check the expiration date and make sure the milk isn’t too hot or too cold when proofing.
2. How can I make these rolls ahead of time?
You can prepare the dough and filling the night before. Assemble everything, cover, and place in the fridge overnight. The next morning, let them rise for 1 hour at room temperature before baking.
3. Can I freeze these rolls?
Absolutely! Once fully baked and cooled, wrap them tightly in plastic wrap and foil before freezing. When you’re ready to indulge, pop them in the oven at 350°F (175°C) for about 10-15 minutes to warm through.
4. They turned out too dry—what happened?
Overbaking can cause dryness! Keep an eye on them during the last few minutes of baking. If you do end up with a dry batch, consider soaking them with a little milk before topping with frosting.
Nutritional Info
While these rolls are undeniably a treat and meant to be enjoyed in moderation, here’s a rough estimate of the nutritional info per roll (without frosting):
- Calories: 250
- Protein: 4g
- Fat: 8g
- Carbohydrates: 40g
- Sugar: 8g
Indulging in a warm Caramel Apple Cinnamon Roll is more than just treating yourself—it’s about savoring the memories and the flavors that connect us with each other. I hope you enjoy creating (and sharing!) these delicious rolls just as much as I do. Remember, cooking is all about happiness and connection, so keep it fun and full of craving! Happy baking!
PrintCaramel Apple Cinnamon Rolls
Soft and fluffy cinnamon rolls filled with decadent caramel apple filling and topped with creamy frosting, perfect for fall mornings.
- Prep Time: 20 minutes
- Cook Time: 30 minutes
- Total Time: 50 minutes
- Yield: 12 servings 1x
- Category: Dessert
- Method: Baking
- Cuisine: American
- Diet: Vegetarian
Ingredients
- 2 cups all-purpose flour
- 1/4 cup sugar
- 1 packet active dry yeast
- 1/2 teaspoon salt
- 1/2 cup milk
- 1/4 cup unsalted butter
- 1 large egg
- 1 teaspoon cinnamon
- 1 cup caramel apple filling
- 4 oz cream cheese
- 1 cup powdered sugar
- 1 tablespoon caramel sauce
Instructions
- Proof the yeast by combining warm milk with yeast and sugar; let it sit until foamy.
- Make the dough by mixing flour, remaining sugar, and salt; add yeast mixture, butter, and egg.
- Knead the dough on a floured surface for 5-7 minutes until smooth.
- Let it rise in a greased bowl, covered, for 1-2 hours or until doubled in size.
- Roll out the dough into a rectangle about 1/2 inch thick.
- Spread caramel apple filling over the dough, leaving a border.
- Roll the dough tightly into a log and cut into 1-2 inch pieces.
- Place in a greased baking dish and let rise for another 30-45 minutes.
- Bake at 350°F (175°C) for 20-25 minutes until golden brown.
- Make the frosting by beating cream cheese and powdered sugar together; add caramel sauce.
- Frost the warm rolls and drizzle with extra caramel.
Notes
These rolls are best enjoyed fresh out of the oven and can be paired with coffee or spiced apple cider.
Nutrition
- Serving Size: 1 roll
- Calories: 250
- Sugar: 8g
- Sodium: 300mg
- Fat: 8g
- Saturated Fat: 4g
- Unsaturated Fat: 2g
- Trans Fat: 0g
- Carbohydrates: 40g
- Fiber: 1g
- Protein: 4g
- Cholesterol: 30mg
Keywords: cinnamon rolls, caramel, apple, dessert, fall baking
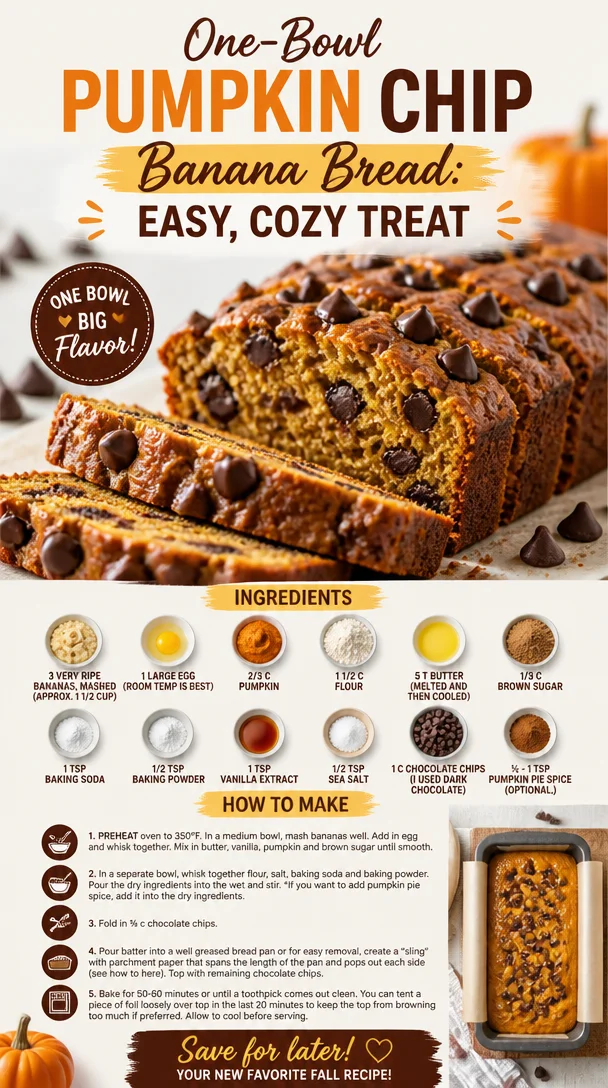
One-Bowl Pumpkin Chip Banana Bread: Easy, Cozy Treat
The Ultimate Pumpkin Chip Banana Bread: A Cozy Delicacy
Ah, the sweet smell of freshly baked banana bread wafting through the kitchen! Nothing warms the heart quite like the aroma of sweet bananas mingling with cozy autumn spices and rich chocolate. Today, I am thrilled to share one of my most beloved recipes—Pumpkin Chip Banana Bread. Picture yourself snuggling up with a warm slice of this delightful bread, coffee in hand, as the crisp autumn leaves fall outside.
When I think about pumpkin chip banana bread, it takes me back to my childhood. Growing up, my family had a tradition of baking together on Sunday afternoons. We would gather in the kitchen, laughter filling the air as we mixed, measured, and created culinary masterpieces. One particular September, my grandma decided it was time to add a seasonal twist to our banana bread, incorporating pumpkin and chocolate chips for a treat that was beyond delicious! That first bite of her warm, soft creation left a lasting impression and soon became a family favorite.
So here we are, blending those sweet memories with simple ingredients to create an incredible treat that’s perfect for any gathering—or just your cozy afternoon snack. Let’s get started!
Ingredients
Here’s what you’ll need to whip up this scrumptious Pumpkin Chip Banana Bread:
-
3 very ripe bananas, mashed (approx. 1 ½ cup): The riper, the better! Use overripe bananas to add natural sweetness and moisture. If you’re in a pinch, unsweetened applesauce can serve as a replacement—just note it may change the bread’s flavor slightly.
-
1 large egg (room temp is best): Eggs bind our ingredients together. For a vegan twist, you could try flaxseed meal (1 tablespoon ground flax + 2.5 tablespoons water = 1 egg) or a store-bought egg replacer.
-
2/3 cup pumpkin puree: Canned pumpkin works wonders here. And if you’re adventurous, use fresh pumpkin for a more authentic taste—just roast and puree it! Make sure not to confuse pumpkin puree with pumpkin pie filling, as the latter contains added spices and sugars.
-
1 ½ cups all-purpose flour: This recipe is super forgiving! You can swap in whole wheat flour for a nuttier flavor, or even gluten-free flour if you need to—just check the conversion ratios.
-
5 tablespoons butter (melted and then cooled): Butter brings richness to our loaf. If you prefer dairy-free, coconut oil works like a charm!
-
1/3 cup brown sugar: This adds a lovely caramelized sweetness. Feel free to use coconut sugar or maple syrup in place of brown sugar for a different nuance.
-
1 teaspoon baking soda: Our leavening agent that gives the bread a lovely rise!
-
1/2 teaspoon baking powder: Adds some extra fluffiness—perfect for that tender crumb.
-
1 teaspoon vanilla extract: A dash of vanilla elevates the flavors beautifully. Don’t skip it!
-
1/2 teaspoon sea salt: Balances the sweetness. Always use fine sea salt for even distribution; it’s a kitchen must!
-
1 cup chocolate chips (I used dark chocolate): Because who doesn’t love chocolate? You can use semi-sweet, milk chocolate, or even white chocolate for a fun twist.
-
1/2-1 teaspoon pumpkin pie spice (optional): This adds warm, cozy flavors reminiscent of fall. If you don’t have it on hand, a combination of cinnamon and nutmeg will work just fine.
Now that we have our ingredients all lined up, let me take you through the fun part—the cooking process!
Step-by-Step Instructions
Step 1: Preheat Your Oven
Preheat your oven to 350°F (175°C). This is crucial! We want your oven nice and toasty for our banana bread to rise perfectly.
Step 2: Prepare Pan
Grab a loaf pan (9×5 inches is perfect), and grease it with butter or line it with parchment paper for easy removal. Nothing’s worse than your gorgeous loaf sticking to the pan!
Step 3: Mash The Bananas
In a large mixing bowl, mash those ripe bananas using a fork or a potato masher until smooth. Leave a few lumps for texture if you like it rustic. This is where the magic starts—smell that banana goodness?
Step 4: Mix The Wet Ingredients
Add the egg, pumpkin puree, lactose-free butter, brown sugar, and vanilla extract to the mashed bananas. Beat until well combined. The mixture should be creamy and inviting. A little secret: at this stage, you can sneak a taste—just a tiny one, promise!
Step 5: Combine Dry Ingredients
In another bowl, whisk together flour, baking soda, baking powder, pumpkin pie spice (if using), and sea salt. This ensures even distribution of those dry ingredients, avoiding any baking surprises.
Step 6: Merge Wet and Dry
Gently fold the dry ingredients into the wet mixture using a spatula or wooden spoon. Mix until just combined—it’s okay to have a few lumps in the batter. Overmixing can lead to dense bread, and we want it fluffy!
Step 7: Chocolate Chips
Now for the fun part: fold in your chocolate chips. Ensure they’re evenly distributed without overmixing. Remember, every bite should be a chocolatey dream!
Step 8: Pour and Bake
Transfer your batter to the prepared loaf pan. Smooth the top with a spatula and pop it in the oven on the middle rack. Bake for 55-65 minutes, or until a toothpick inserted into the center comes out clean or with just a few crumbs.
Step 9: Cool It Down
Once baked, remove your loaf from the oven and let it cool in the pan for about 10 minutes. Then, transfer it to a wire rack to cool completely. This is the hardest part—waiting for that first heavenly slice!
Serving Suggestions
Slice your Pumpkin Chip Banana Bread thick, and serve it warm with a pat of butter or a drizzle of maple syrup for added decadence. For a delightful brunch item, pair it with a side of fruit or a dollop of yogurt. Or, if you’re feeling adventurous, toast slices and top them with cream cheese for a luxurious twist!
Recipe Variations
-
Nutty Surprise: Add 1/2 cup of chopped walnuts or pecans for an added crunch.
-
Spiced Up: Blend in some chopped candied ginger or additional spices like nutmeg for a complex flavor profile.
-
Fruit Fusion: Throw in some dried cranberries or raisins to give it a fruity finish.
-
Coconut Twist: Replace 1/4 cup of flour with unsweetened shredded coconut for added richness.
-
Frosted Delight: Once cooled, frost the top with vanilla or cream cheese icing for a sweet treat!
Chef’s Notes
I’ve been making this recipe for years now, and it’s evolved through my personal adventures in the kitchen. Each autumn, I play around with different spices and chocolate varieties, and you know what? Every loaf tells a different story. A family friend once asked me to add a pinch of chili flakes for a surprising kick; I was skeptical, but oh boy, was I amazed at the flavor explosion!
FAQs and Troubleshooting
Q: Why did my pumpkin banana bread sink in the middle?
A: A common culprit is underbaking. Make sure you test it with a toothpick before removing it from the oven. Also, avoid opening the oven door while it’s baking!
Q: Can I freeze this banana bread?
A: Absolutely! Wrap it tightly in plastic wrap then again in foil. It can last up to 3 months in the freezer—perfect for those future cravings.
Q: How do I know when my banana bread is done?
A: Look for a golden top and a toothpick test—insert it in the center, and if it comes out clean or with a few crumbs, you are all set!
Q: What should I do if my bread is too dense?
A: Overmixing the batter can lead to dense bread. Be gentle as you combine your wet and dry ingredients!
Nutritional Info
While every slice of this bread is a delightful indulgence, it has some wholesome elements. Each slice (roughly 1/10 of your loaf) comes in at around 180 calories, with healthy fats, fiber, and potassium from bananas. Adding nuts or using whole grain flour can increase the fiber content!
There you have it! Your journey to creating the perfect Pumpkin Chip Banana Bread is just a few steps away. Whether it’s sharing with loved ones, savoring a slice with coffee, or gifting someone a delicious treat, this recipe is sure to warm hearts and fill bellies. So grab your apron, gather those ingredients, and let’s create some kitchen magic together! Happy baking!
PrintPumpkin Chip Banana Bread
A delightful blend of ripe bananas, pumpkin, and chocolate chips, baked into a cozy bread, perfect for autumn afternoons.
- Prep Time: 15 minutes
- Cook Time: 60 minutes
- Total Time: 75 minutes
- Yield: 10 servings 1x
- Category: Dessert
- Method: Baking
- Cuisine: American
- Diet: Vegetarian
Ingredients
- 3 very ripe bananas, mashed (approx. 1 ½ cup)
- 1 large egg
- 2/3 cup pumpkin puree
- 1 ½ cups all-purpose flour
- 5 tablespoons butter, melted and cooled
- 1/3 cup brown sugar
- 1 teaspoon baking soda
- 1/2 teaspoon baking powder
- 1 teaspoon vanilla extract
- 1/2 teaspoon sea salt
- 1 cup chocolate chips
- 1/2–1 teaspoon pumpkin pie spice (optional)
Instructions
- Preheat your oven to 350°F (175°C).
- Prepare a loaf pan (9×5 inches) by greasing it with butter or lining it with parchment paper.
- Mash the ripe bananas in a large mixing bowl until smooth.
- Add the egg, pumpkin puree, melted butter, brown sugar, and vanilla extract to the mashed bananas and mix until well combined.
- Whisk together the flour, baking soda, baking powder, pumpkin pie spice, and sea salt in another bowl.
- Fold the dry ingredients into the wet mixture until just combined.
- Gently fold in the chocolate chips.
- Transfer the batter to the prepared loaf pan and smooth the top.
- Bake for 55-65 minutes, or until a toothpick inserted comes out clean.
- Cool the bread in the pan for about 10 minutes, then transfer it to a wire rack to cool completely.
Notes
Serve warm with butter or maple syrup. Can be frozen for up to 3 months.
Nutrition
- Serving Size: 1 slice
- Calories: 180
- Sugar: 10g
- Sodium: 200mg
- Fat: 8g
- Saturated Fat: 4g
- Unsaturated Fat: 4g
- Trans Fat: 0g
- Carbohydrates: 25g
- Fiber: 2g
- Protein: 3g
- Cholesterol: 30mg
Keywords: pumpkin bread, banana bread, autumn baking, dessert, cozy treat