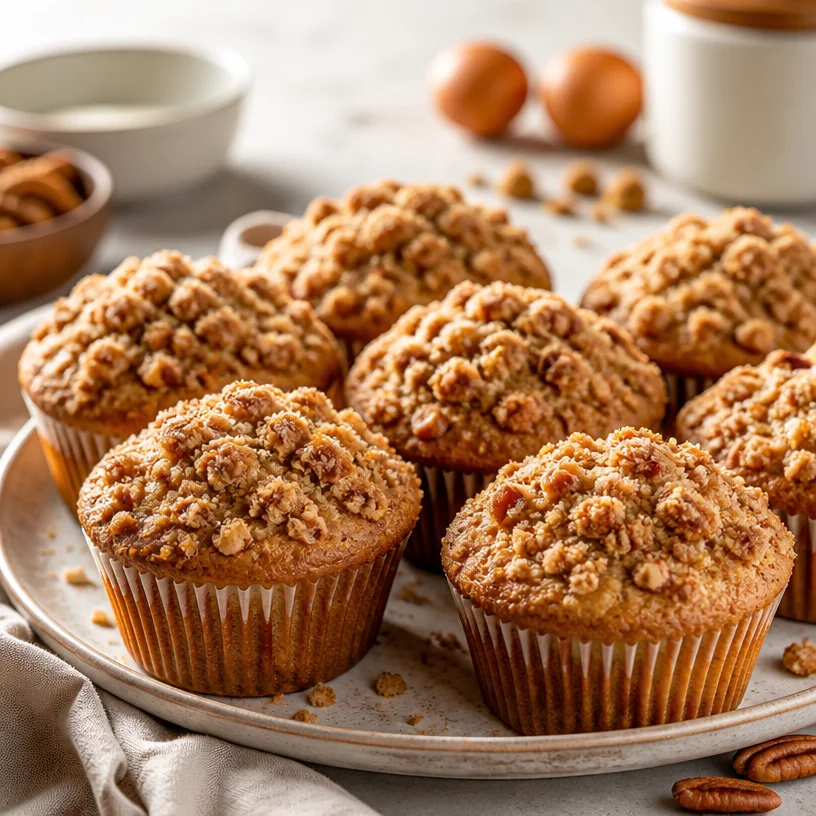
Crumble Coffee Cake Muffins: Quick 30-Minute Breakfast
Coffee Cake Muffins with Crumble Magic
Welcome to the cozy, aromatic world of Coffee Cake Muffins with Crumble Magic! If you’re looking for a delightful treat that perfectly marries the comfort of traditional coffee cake with the convenience of a muffin, you’re in for a real treat. These muffins are just the right amount of sweet, buttery, and utterly satisfying—ideal for breakfast, brunch, or a mid-afternoon snack.
As a self-proclaimed muffin aficionado, I’ve spent countless Saturday mornings experimenting with flavors, textures, and, of course, that irresistible crumb topping. There’s something incredibly comforting about the smell of warm muffins wafting through the kitchen, and I can’t wait to share this recipe with you. So, grab your apron, preheat that oven, and let’s dive into a delicious adventure that not only fills our bellies but warms our hearts!
Personal Story
Ah, the memories of my grandmother’s kitchen! When I think of comfort food, I can’t help but remember those Sunday mornings spent with her, concocting buttery cakes and muffins while the sun peeked through the kitchen window. The aroma of fresh coffee brewing alongside her signature coffee cake would lure me from my room and straight into that warm embrace of flour, sugar, and love.
One particular day, we decided to experiment. With only a few ingredients on hand and a hefty dose of creativity, we turned a classic coffee cake into muffins—each with a generous topping of crumble magic. The sheer joy of biting into those fluffy, tender muffins, topped with that crunchy sweetness, felt like a warm hug. From then on, these muffins became a staple in my family! It was in those moments, side by side with my grandmother, that I fell in love not just with baking but with the memories that delicious food can create. So, let’s make some muffin magic together!
Ingredients
Here’s what you’ll need to whip up a batch of these delightful Coffee Cake Muffins:
-
2 cups all-purpose flour: The base for our muffins! It provides structure. You can substitute with whole wheat flour for a heartier version.
-
1 cup granulated sugar: For sweetness! If you prefer, you could use coconut sugar for a lower glycemic option.
-
1 tablespoon baking powder: This is our leavening agent, making the muffins rise and giving them that light texture. Always check the expiration date!
-
1/2 teaspoon salt: Enhances flavor and balances the sweetness. You can use sea salt or kosher salt as alternatives.
-
1/2 cup unsalted butter, softened: Adds richness and tenderness. If you want to make it dairy-free, coconut oil works wonderfully here!
-
1 cup milk: Provides moisture. For a dairy-free option, almond or oat milk will be just as delicious.
-
2 large eggs: They bind everything together. You can replace them with flax eggs if you want a vegan alternative (1 tablespoon of flaxseed meal mixed with 2.5 tablespoons of water per egg).
-
1 teaspoon vanilla extract: A must-have for flavor depth! Homemade vanilla extract is super easy to make and adds a lovely touch.
-
1/2 cup brown sugar: We’ll use this for the crumb topping, as it creates that gooey, caramelized crunch. For a lighter option, leave it out or substitute with an unrefined sugar.
-
1 teaspoon cinnamon: The magical spice that perfectly complements the flavors. You could also use nutmeg for a unique twist.
-
1/2 cup chopped nuts (optional): Pecans or walnuts are fantastic for adding texture. If nuts aren’t your thing, feel free to leave them out.
-
1/2 cup granulated sugar for the crumble: This will give us that sweet, crumbly topping! You can also swap this with brown sugar for an extra depth of flavor in the crumb.
Step-by-Step Instructions
-
Prep Your Oven and Muffin Pan: Preheat your oven to 350°F (175°C). While it warms up, grease your muffin tin or line it with paper liners. These muffins love to stick, so don’t skip this step!
-
Mix the Dry Ingredients: In a large mixing bowl, whisk together the all-purpose flour, granulated sugar, baking powder, and salt. This ensures even distribution throughout the muffins, giving each bite that perfect taste!
-
Cream the Butter and Sugar: In a separate bowl, beat the softened unsalted butter and brown sugar until light and fluffy. This is where your cakes get that delightful airy quality. Don’t rush this; a few extra minutes can make a huge difference!
-
Add the Eggs and Vanilla: Incorporate the eggs one at a time, ensuring each is fully mixed in before the next addition. Add in the vanilla extract here. The mothership of flavor is happening!
-
Combine Wet and Dry Ingredients: Slowly add the flour mixture to the wet ingredients, alternating with the milk. Start and end with the flour mix (dry-wet-dry). This method prevents lumps and keeps everything silky smooth.
-
Prepare the Crumble Magic: In a separate bowl, mix together the granulated sugar, brown sugar, cinnamon, and chopped nuts (if using). Add in a tablespoon of melted butter if you like your crumble a tad stickier—this is where the magic happens!
-
Fill the Muffin Tin: Scoop the batter into the muffin cups—fill them about two-thirds full for that perfect dome shape. Don’t stress over the exact amount; a little inconsistency makes for character!
-
Top with Crumble Magic: Generously sprinkle the crumble topping over each muffin. You want a glorious crown of crunchy goodness!
-
Bake: Slide the muffin tin into your preheated oven, and bake for 18-22 minutes, or until a toothpick comes out clean. Your kitchen will smell heavenly at this point—try not to eat them all before they cool!
-
Cool and Enjoy: Let the muffins cool in the pan for about 5 minutes before transferring them to a wire rack. This helps them maintain their shape while cooling.
Serving Suggestions
The beauty of these Coffee Cake Muffins is their versatility. Serve them warm with a pat of butter for an indulgent treat, or drizzle a bit of honey on top for added sweetness. Pair them with a hot cup of coffee or tea, and you’ve got yourself the perfect cozy moment. For a fun twist, dust them lightly with powdered sugar right before serving for that delightful bakery finish!
Recipe Variations
-
Berry Bliss: Add 1 cup of fresh blueberries or raspberries into the batter for a fruity twist—so good!
-
Chocolate Chip Delight: Stir in 1/2 cup of chocolate chips for an irresistible chocolatey version.
-
Spiced Twist: Experiment with different spices like cardamom or pumpkin pie spice for a seasonal flair.
-
Zesty Lemon: Add a teaspoon of lemon zest to the batter for a refreshing, tangy bite.
-
Nut-Free: Simply leave out the nuts or substitute crushed graham crackers for a different texture!
Chef’s Notes
These Coffee Cake Muffins are a fantastic reminder of how cooking is a living, evolving art form. I often find new flavors and ingredients inspiring me to switch up this beloved recipe. One of my favorite adaptations is seasonal—the addition of pumpkin puree in the fall, making it cozy and festive! Plus, no matter how many times I make them, there’s still something magical about watching them rise and puff up in the oven. Who doesn’t love witnessing a kitchen miracle?
FAQs and Troubleshooting
1. Why did my muffins sink?
Muffins can sink for a few reasons: either the batter was too heavy or the leavening agent (baking powder) is expired. Make sure to give your baking powder a little shake before using it.
2. Can I store these muffins?
Absolutely! Let them cool completely, then store them in an airtight container. They’ll last for up to 3 days at room temperature or a week in the fridge. For longer storage, freeze them—just warm them in the oven for a few minutes before enjoying!
3. How do I ensure even baking?
To promote even baking and a perfect muffin dome, remember to not overmix your batter once you add in the dry ingredients. Mixing until just combined is the key!
4. What if my crumble topping gets too hard?
If your crumble topping is too crunchy, it likely had too much sugar or wasn’t mixed with enough fat. Adjust next time by using melted butter or adding a hint more nut flour for that gooey texture!
Nutritional Info
(Consider adding nutritional info based on your personal calculations or reference)
And there you have it—your guide to delicious Coffee Cake Muffins with Crumble Magic! Remember, food is all about the experience, the memories you create, and the joy you share. So get in that kitchen, have fun, and most importantly, enjoy every bite! Happy baking!
PrintCoffee Cake Muffins with Crumble Magic

Delightful Coffee Cake Muffins perfectly marrying the comfort of traditional coffee cake with the convenience of a muffin, topped with a sweet and crunchy crumble.
- Prep Time: 15 minutes
- Cook Time: 22 minutes
- Total Time: 37 minutes
- Yield: 12 muffins 1x
- Category: Dessert
- Method: Baking
- Cuisine: American
- Diet: Vegetarian
Ingredients
- 2 cups all-purpose flour
- 1 cup granulated sugar
- 1 tablespoon baking powder
- 1/2 teaspoon salt
- 1/2 cup unsalted butter, softened
- 1 cup milk
- 2 large eggs
- 1 teaspoon vanilla extract
- 1/2 cup brown sugar
- 1 teaspoon cinnamon
- 1/2 cup chopped nuts (optional)
- 1/2 cup granulated sugar for the crumble
Instructions
- Preheat your oven to 350°F (175°C) and grease your muffin tin or line it with paper liners.
- Mix the dry ingredients: whisk together the flour, granulated sugar, baking powder, and salt.
- Cream the butter and brown sugar until light and fluffy.
- Add the eggs one at a time and incorporate the vanilla extract.
- Combine the wet and dry ingredients, alternating with the milk.
- Prepare the crumb topping by mixing the granulated sugar, brown sugar, cinnamon, and chopped nuts.
- Fill the muffin tin, filling each cup about two-thirds full.
- Top each muffin with the crumble mix.
- Bake for 18-22 minutes, or until a toothpick comes out clean.
- Cool in the pan for about 5 minutes before transferring to a wire rack.
Notes
These muffins can be stored in an airtight container for 3 days at room temperature or up to a week in the fridge.
Nutrition
- Serving Size: 1 muffin
- Calories: 250
- Sugar: 20g
- Sodium: 200mg
- Fat: 10g
- Saturated Fat: 5g
- Unsaturated Fat: 4g
- Trans Fat: 0g
- Carbohydrates: 35g
- Fiber: 1g
- Protein: 3g
- Cholesterol: 40mg
Keywords: Coffee Cake, Muffins, Crumble, Dessert, Baking, Breakfast

Biscuits and Sausage Gravy Breakfast Pizza
Biscuits and Sausage Gravy Breakfast Pizza: Start Your Day with a Flavor Punch!
Welcome back, food lovers! Today, we’re flipping the script on breakfast with a dish that’s destined to become your new favorite morning treat: Biscuits and Sausage Gravy Breakfast Pizza. Imagine fluffy biscuits, rich and creamy sausage gravy, and cheesy goodness—all on a perfectly crispy pizza crust. It’s breakfast reimagined, and it’s every bit as delicious as it sounds!
As you may know, breakfast is often dubbed the most important meal of the day, but let’s be real: it’s also the meal that sets the tone for everything that follows. When you start your day with something hearty and full of flavor, it not only fuels your body but makes your spirit soar. And this breakfast pizza packs all those punchy flavors into every delectable bite.
Now, I won’t sugarcoat it—this recipe may seem a bit indulgent, but it’s entirely approachable and oh-so-rewarding. Plus, it’s perfect for breakfast gatherings, lazy Sunday mornings, or any day when you need a sprinkle of joy right from the get-go. So let’s get cooking; I promise you’ll want this in your breakfast rotation after just one bite!
Personal Story: The Breakfast Tradition
I’ll never forget the first time I tried sausage gravy. My grandma, bless her heart, would whip up a massive pan of it every Sunday morning, and the aroma would waft through the house as we were still snuggled up in our blankets. I remember rolling out of bed, feeling the chill of the morning air, and being greeted by that warm embrace of rich, savory breakfast goodness. Of course, she’d serve it over freshly baked biscuits, and somehow, it always tasted like love.
Fast forward to today, and I wanted to capture that nostalgia but put a fun twist on it. The idea of transforming my childhood favorite into a breakfast pizza was born on a particularly busy morning when I was craving something hearty but didn’t want to miss out on the classic flavors. And let me tell you—it turned out to be a hit! Now, every bite takes me back to those cozy Sundays, bringing comfort and satisfaction to my mornings.
Ingredients
Here’s what you’ll need to whip up this delicious breakfast pizza:
-
1 package (16 oz) breakfast sausage
Look for a quality sausage that’s seasoned well. If you prefer turkey or plant-based sausage, those work just as well! -
1/4 cup all-purpose flour
This will help thicken our gravy. If you’re gluten-free, feel free to substitute with a gluten-free flour blend. -
2 cups milk, divided
Whole milk gives you a richer flavor, but you can also use 2% or even a dairy-free milk option, like almond or oat milk, if needed. -
Ground black pepper, to taste
A key seasoning to enhance the flavors. Feel free to experiment with different kinds of pepper, like white pepper for a subtle heat. -
1 tbsp olive oil (optional)
Use this if you want to give your sausage a little extra flavor and help it crisp up beautifully. -
1 pre-baked pizza crust (12-inch)
I love using a ready-made crust for convenience, but if you’re feeling adventurous, you can make your own! -
Cooking spray
This will help avoid any sticking. You could also use a touch of olive oil here instead. -
6 large eggs
These will be scrambled and added to the top of our pizza, giving it that extra protein punch! -
1/4 cup milk (for eggs)
This makes your scrambled eggs fluffier! You can skip it, but trust me, you won’t regret adding it. -
1 cup shredded Cheddar cheese (or more, as desired)
I’m a firm believer that you can never go wrong with extra cheese! Feel free to mix in other cheese varieties like Monterey Jack or Pepper Jack for a spicy kick. -
Crispy fried onions for topping
They add a nice crunch and flavor. If you’d like, you can also use fresh herbs like chives for a pop of color and taste.
Step-by-Step Instructions
Let’s dive into the cooking process! Here’s how to transform those simple ingredients into a savory masterpiece that will have everyone flocking to your breakfast table.
Step 1: Prepare the Sausage Gravy
-
Cook the sausage: In a large skillet over medium heat, add the breakfast sausage. If you’re using olive oil, pour that in first. Cook the sausage until it’s browned and cooked through, breaking it up with a spatula. This usually takes about 5-7 minutes.
Chef Tip: If you like a bit of spice, consider adding some red pepper flakes during the last minute of cooking!
-
Make the roux: Once the sausage is nicely browned, sprinkle in the all-purpose flour. Stir it into the sausage, allowing it to cook for about 1 minute. This helps to cook off the raw flour taste.
A golden brown roux will give your gravy a richer flavor!
-
Add the milk: Slowly pour in 1.5 cups of milk while continuously stirring. This ensures there are no lumps. The mixture will start to thicken. Sprinkle in some black pepper according to your taste, and let it simmer on low for about 3-5 minutes.
Chef Insight: If it’s too thick for your liking, add a splash more milk until you get a creamy consistency.
Step 2: Scramble the Eggs
-
Whisk the eggs: In a separate bowl, whisk together the eggs and 1/4 cup of milk until well combined. Add a pinch of salt and pepper to the mixture.
Fun Fact: Adding milk to your scrambled eggs not only makes them fluffier but also adds creaminess!
-
Cook the eggs: In a non-stick skillet over medium-low heat, add a little oil or butter. Pour in the egg mixture, and gently stir with a spatula to create soft curds. After 2-3 minutes, remove from heat when they’re just set—remember, they’ll continue cooking even after you take them off the burner!
Chef Tip: For creamy eggs, remove them from heat just before they look fully cooked.
Step 3: Assemble the Pizza
-
Get the crust ready: Preheat your oven to the temperature indicated on your pizza crust packaging. Lightly spray your pizza crust with cooking spray—this will help get a nice crunch as it bakes.
Love a little garlic flavor? Sprinkle some garlic powder on the crust for an exciting twist!
-
Spread the gravy: Pour the sausage gravy evenly over your prepared pizza crust, spreading it out to cover it evenly.
-
Add the eggs: Gently spoon the scrambled eggs over the gravy, ensuring even distribution.
-
Sprinkle on the cheese: Top the pizza with shredded cheddar cheese (or more, if you’re like me and love extra cheesy goodness).
Did you know? Mixing different cheese types can create a uniquely delicious flavor profile!
Step 4: Bake and Serve
-
Pop it in the oven: Bake according to the crust instructions, usually around 12-15 minutes, or until the cheese is melted and bubbly.
Pro Tip: If you want that perfect cheese pull, place on broil for the last 1-2 minutes, but keep an eye on it!
-
Top it off: Once the pizza is out of the oven, sprinkle crispy fried onions over the top for that delightful crunch.
For a fresh twist, you can also add diced green onions or chives here!
Step 5: Slice and Enjoy
- Slice and serve: Let the pizza cool for a minute, slice it up, and serve it hot! Watch as everyone digs into breakfast bliss!
Pair it with fresh fruit or a side salad for an extra vibrant breakfast spread!
Serving Suggestions
When it comes to plating, simplicity is key. Serve your Biscuits and Sausage Gravy Breakfast Pizza on a wooden board or a large platter to create a relaxed dining vibe. You can add a side of fresh fruit, like sliced strawberries or juicy oranges, to balance out the richness of the pizza. A sprinkle of fresh herbs or an extra dash of black pepper can bring your dish to the next level. And don’t forget to pour a cup of coffee or tea to wash it all down!
Recipe Variations
Want to shake things up a bit? Here are some fun twists you could try:
- Vegetarian Version: Swap out the breakfast sausage for your favorite plant-based sausage or a sautéed veggie mix, such as mushrooms and bell peppers.
- Spicy Kick: Add diced jalapeños or your favorite hot sauce to the sausage gravy for those who like it spicy!
- Southwestern Flair: Top with black beans and corn, and try mixing pepper jack cheese for a zesty twist.
- Mediterranean Style: Incorporate feta cheese, spinach, and sun-dried tomatoes for a fresh Mediterranean breakfast experience.
- Herbed Delight: Add fresh herbs like basil or cilantro in the scrambled eggs for a fresh, aromatic touch.
Chef’s Notes
This Biscuits and Sausage Gravy Breakfast Pizza has become a family favorite and a comfort dish for many. I love how it marries my childhood memories with a modern twist, allowing me to enjoy that nostalgic flavor while experimenting with new ideas. And guess what? You can make the gravy ahead of time and store it in the fridge—easy meal prep for those busy mornings! Just reheat it before you pour it over your pizza crust, and you’re good to go.
Oh, and I have to share my funniest kitchen story about this recipe! The first time I attempted it, I was excited and didn’t notice my oven was set to broil. Let’s just say the first pizza turned into an unexpected charred creation. But hey, now I make sure to double-check oven settings! Lesson learned.
FAQs and Troubleshooting
1. My gravy is too thick—what should I do?
If your sausage gravy turns out too thick, simply whisk in a little more milk over low heat until it reaches your desired consistency.
2. Can I make this ahead of time?
Absolutely! You can prepare the sausage gravy and scramble the eggs ahead of time. Just reheat them before assembling the pizza.
3. What if my eggs are dry?
To prevent dry scrambled eggs, cook them on low heat and remove them just before they’re fully set. The residual heat will finish cooking them without drying them out.
4. How do I store leftovers?
Store any leftover pizza in an airtight container in the fridge for up to 3 days. Reheat in the oven or microwave for best results.
Nutritional Info (Optional)
Although I didn’t cover specific nutritional info in this post, I encourage you to look up approximate values based on your ingredient choices. Enjoying a hearty breakfast like this can be balanced with lighter meals throughout the day!
So there you have it! A delightful blend of nostalgia and innovation—all packed into a Biscuits and Sausage Gravy Breakfast Pizza that promises to fuel your morning with flavor and joy. I hope you enjoy making this dish as much as I do, and don’t forget to come back and share your own stories from the kitchen! Happy cooking!
PrintBiscuits and Sausage Gravy Breakfast Pizza

A delicious blend of fluffy biscuits and creamy sausage gravy topped on a crispy pizza crust, perfect for a hearty breakfast.
- Prep Time: 15 minutes
- Cook Time: 30 minutes
- Total Time: 45 minutes
- Yield: 4 servings 1x
- Category: Breakfast
- Method: Baking
- Cuisine: American
- Diet: None
Ingredients
- 1 package (16 oz) breakfast sausage
- 1/4 cup all-purpose flour
- 2 cups milk, divided
- Ground black pepper, to taste
- 1 tbsp olive oil (optional)
- 1 pre-baked pizza crust (12-inch)
- Cooking spray
- 6 large eggs
- 1/4 cup milk (for eggs)
- 1 cup shredded Cheddar cheese (or more, as desired)
- Crispy fried onions for topping
Instructions
- Cook the sausage: In a large skillet over medium heat, add the breakfast sausage. If you’re using olive oil, pour that in first. Cook until browned and cooked through, breaking it up with a spatula, about 5-7 minutes.
- Make the roux: Sprinkle in the all-purpose flour once the sausage is browned and stir, cooking for about 1 minute.
- Add the milk: Slowly pour in 1.5 cups of milk while continuously stirring. Let it simmer on low for about 3-5 minutes.
- Whisk the eggs: In a separate bowl, whisk together the eggs and 1/4 cup of milk. Season with salt and pepper.
- Cook the eggs: In a non-stick skillet over medium-low heat, pour in the egg mixture, gently stirring until soft curds form. Remove from heat just before fully cooked.
- Preheat oven: Preheat your oven according to the crust instructions. Lightly spray your pizza crust with cooking spray.
- Spread the gravy: Pour the sausage gravy over the prepared pizza crust.
- Add the eggs: Spoon the scrambled eggs over the gravy.
- Sprinkle on cheese: Top with shredded cheddar cheese.
- Bake: Bake according to crust instructions, about 12-15 minutes, or until cheese is melted. Optionally, broil for 1-2 minutes for a perfect cheese pull.
- Top it off: Sprinkle crispy fried onions over the top when done.
- Slice and serve: Let cool for a minute, slice, and serve hot!
Notes
Feel free to substitute with turkey or plant-based sausage. You can also prep the gravy ahead of time for convenience.
Nutrition
- Serving Size: 1 slice
- Calories: 450
- Sugar: 3g
- Sodium: 600mg
- Fat: 25g
- Saturated Fat: 10g
- Unsaturated Fat: 10g
- Trans Fat: 0g
- Carbohydrates: 35g
- Fiber: 2g
- Protein: 20g
- Cholesterol: 200mg
Keywords: breakfast pizza, sausage gravy, biscuits, comfort food
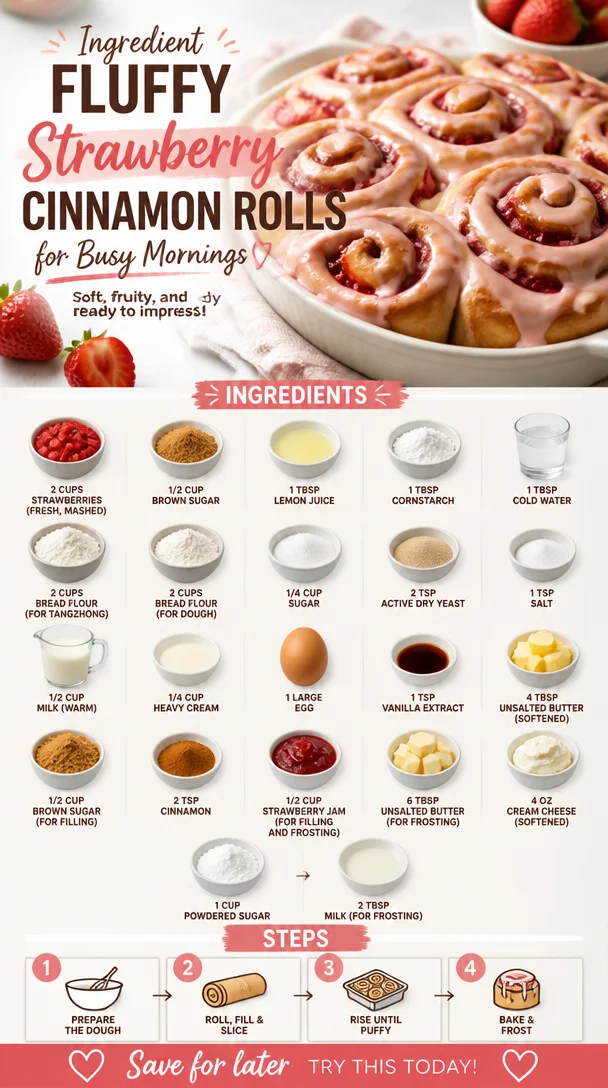
Ingredient Fluffy Strawberry Cinnamon Rolls for Busy Mornings
Irresistibly Fluffy Strawberry Cinnamon Rolls for Breakfast Bliss
There’s something undeniably magical about the scent of freshly baked cinnamon rolls wafting through the house. Picture this: it’s a cozy morning, sunlight is streaming in through the windows, and you can hear the birds chirping outside. You step into the kitchen, the smell of warm strawberries and cinnamon fills the air, and your mouth begins to water in anticipation. That’s the bliss I want to share with you today: irresistibly fluffy strawberry cinnamon rolls that’ll turn any breakfast into a special occasion!
These rolls are more than just a sweet treat; they evoke nostalgic memories of lazy Sunday mornings spent with family, laughter echoing around the kitchen as we waited impatiently for the timer to ding. It wasn’t uncommon for my grandmother to whip up a fresh batch of cinnamon rolls, and as kids, we were all too eager to help—pushing flour all over the counter and attempting to create the perfect roll. Now, I see those moments as a delicious blend of love and a little bit of chaos in the kitchen, something I strive to recreate every time I bake.
With these strawberry cinnamon rolls, I’m inviting you to bring that same joy into your home. They’re fluffy, flavorful, and feature luscious, fresh strawberries that not only elevate the taste but also make for an eye-catching presentation. You don’t need to reserve these golden delights only for special occasions—they are just as delightful on a regular Tuesday morning as they are on a holiday.
Let’s dive into the fun, fluffy, and fruity world of these strawberry cinnamon rolls. You’ll see just how easy it is to change up your breakfast routine and elevate those cozy kitchen moments. Grab your apron, and let’s make these scrumptious rolls!
Personal Story
You know, every recipe has a story, and this one is no different. I remember the first time I decided to mix strawberries into a classic cinnamon roll recipe. I was in college, sitting in my tiny kitchen with a couple of friends, and we had a basket of strawberries that were just on the brink of becoming too ripe. Instead of letting them go to waste, we got a wild idea—let’s make cinnamon rolls!
After some playful banter and laughter, we quickly mashed up those strawberries and folded them into the dough instead of the usual brown sugar filling. As the rolls baked, the sweet aroma filled every corner of the kitchen. And when we pulled those golden beauties out of the oven, we couldn’t wait to dig in. One bite and we were hooked! The burst of strawberry flavor combined perfectly with the warm, buttery cinnamon—it was pure bliss. We spent the rest of the afternoon reminiscing about family breakfasts and making plans for many more roll-baking sessions. That day was not just the birth of my strawberry cinnamon rolls; it sparked a love for combining classic recipes with delightful twists.
Craving nostalgia? Let’s recreate those memories together!
Ingredients
To whip up your own batch of these heavenly strawberry cinnamon rolls, here’s what you’ll need:
-
2 cups strawberries (fresh, mashed)
- Fresh strawberries will give you the best flavor. If you can’t find fresh, frozen strawberries also work—just make sure to thaw and drain excess liquid.
-
1/2 cup brown sugar
- This sugar adds a deeper flavor compared to white sugar. Light or dark brown sugar can both be used for a caramel-like sweetness.
-
1 tbsp lemon juice
- A little acidity balances the sweetness of the strawberries beautifully. You can substitute it with lime juice if that’s what you have on hand.
-
1 tbsp cornstarch
- This thickens the strawberry filling so it doesn’t run out of the rolls. Alternatively, you can use arrowroot starch for a similar effect.
-
1 tbsp cold water
- Helps in mixing the cornstarch to create the filling.
-
2 cups bread flour (for tangzhong)
- Using bread flour instead of all-purpose flour gives the rolls their fluffy, chewy texture, and makes for an extra soft crumb.
-
2 cups bread flour (for dough)
- Again, stick with bread flour for the fluffiest rolls.
-
1/4 cup sugar
- Just a bit to sweeten the dough.
-
2 tsp active dry yeast
- Proofing the yeast ensures it’s active and ready to help the rolls rise. If you have instant yeast, you can use that directly without proofing.
-
1 tsp salt
- Enhances overall flavor.
-
1/2 cup milk (warm)
- This helps activate the yeast. Make sure it’s warm to the touch but not scalding!
-
1/4 cup heavy cream
- Adds richness to the dough and helps keep it moist.
-
1 large egg
- Acts as a binder and contributes to the rolls’ tenderness.
-
1 tsp vanilla extract
- A little dash of vanilla adds a lovely depth of flavor.
-
4 tbsp unsalted butter (softened)
- Essential for a rich dough. Always use unsalted butter to maintain control over the saltiness.
-
1/2 cup brown sugar (for filling)
- Sweetens the cinnamon filling; you can use coconut sugar for a healthier option.
-
2 tsp cinnamon
- Ground cinnamon is classic in this recipe, but feel free to try other spices like cardamom for a unique twist.
-
1/2 cup strawberry jam (for filling and frosting)
- You can either make homemade strawberry jam or buy your favorite store brand.
-
6 tbsp unsalted butter (for frosting)
- Softened butter is best for blending.
-
4 oz cream cheese (softened)
- Adds a creamy, tangy flavor to the frosting.
-
1 cup powdered sugar
- Sweetens the frosting and gives it that smooth, spreadable consistency.
-
2 tbsp milk (for frosting)
- Adjust the amount of milk depending on how thick or thin you prefer your frosting.
Step-by-Step Instructions
Ready to bring this recipe to life? Let’s get rolling!
Step 1: Prepare the Strawberry Filling
-
Mash the Strawberries: In a bowl, mash the 2 cups of fresh strawberries. You want a chunky texture—this way, you’ll get those delightful bursts of fruit in every bite.
-
Cook the Filling: In a small saucepan, combine the mashed strawberries, ½ cup brown sugar, 1 tablespoon lemon juice, 1 tablespoon cornstarch, and 1 tablespoon cold water. Cook over medium heat, stirring occasionally, until the mixture thickens (about 5-7 minutes). Then, set it aside to cool as we move onto the dough.
Step 2: Make the Dough
-
Mix Your Yeast: In a small bowl, add the warm milk (make sure it’s warm, not hot) and sprinkle the 2 teaspoons of active dry yeast on top. Let it sit for about 5-10 minutes until it becomes frothy. This step is critical—if you don’t see bubbles, your yeast might be dead!
-
Combine Dry Ingredients: In a large bowl, whisk together the 2 cups of bread flour for the dough, ¼ cup sugar, and 1 teaspoon salt. This will help distribute the ingredients evenly.
-
Bring it All Together: Make a well in the center of the dry mix and add the frothy yeast mixture, the large egg, 1 teaspoon vanilla extract, 4 tablespoons softened butter, and the remaining 2 cups of bread flour for the tangzhong. Mix until a dough forms.
-
Knead Away: Transfer the dough to a lightly floured surface and knead for about 10 minutes until it’s smooth and elastic. This is such an important step—your dough will thank you later with that incredible fluffiness.
Step 3: First Rise
- Time to Rise: Place the dough in a greased bowl, cover it with a clean kitchen towel, and let it rise in a warm spot until it doubles in size (about 1-2 hours). This is where the magic happens!
Step 4: Roll Out the Dough
- Roll It Out: Once your dough has risen, punch it down to release the air. Transfer it to a floured surface and roll it out into a rectangle about 12×18 inches in size.
Step 5: Fill and Roll
-
Spread the Goodness: Spread the cooled strawberry filling evenly over the rolled-out dough. Leave a little border around the edges so it doesn’t spill out when you roll it.
-
Cinnamon Time: In a small bowl, mix the ½ cup brown sugar and 2 teaspoons cinnamon together. Sprinkle this mixture generously over the strawberry filling.
-
Roll It Up: Starting from one long edge, roll the dough tightly into a log. I recommend going slow and steady to keep it even!
Step 6: Slice and Second Rise
-
Cut the Rolls: Using a sharp knife or a kitchen string, slice the rolled dough into 12 equal portions. Place them cut side up in a greased 9×13 inch baking dish.
-
Second Rise: Cover the dish with a clean kitchen towel and let the rolls rise again until they puff up (approximately 30-45 minutes).
Step 7: Bake Those Rolls!
-
Preheat Your Oven: Preheat your oven to 350°F (175°C) while your rolls rise.
-
Bake: Bake the rolls for 25-30 minutes until golden brown and delicious. Your kitchen will smell heavenly—trust me!
Step 8: Prepare the Frosting
- Frosting Prep: While the rolls are baking, make the frosting! In a medium bowl, beat together the 6 tablespoons of softened unsalted butter, 4 oz softened cream cheese, 1 cup powdered sugar, and 2 tablespoons of milk until smooth and spreadable.
Step 9: Cool and Frost
- Cool Down: Once the rolls are out of the oven, let them cool for about 10-15 minutes before generously spreading the cream cheese frosting over the top.
Serving Suggestions
Serving these fluffy strawberry cinnamon rolls is all about presentation! Place them on a beautiful platter and dust with a little extra powdered sugar for that bakery-style finish. You can even drizzle with some more strawberry jam for that added fruity delight. Pair them with a steaming cup of coffee or a refreshing glass of fresh orange juice, and you have yourself a breakfast you won’t soon forget.
Recipe Variations
If you’re in the mood to be adventurous, here are a few variations to try:
- Berry Bliss: Swap the strawberries for raspberries or blueberries, or mix a couple of berries together for an explosion of color and flavor!
- Nutty Crunch: Add chopped walnuts or pecans into the filling for an extra crunch. They add a lovely texture that complements the softness of the rolls.
- Spicy Twist: Combine the cinnamon with a pinch of nutmeg or ginger to spice things up a notch!
- Vegan Option: Replace the egg with flaxseed meal mixed with water, use plant-based milk, and substitute the butter for vegan alternatives.
Chef’s Notes
Every time I bake these strawberry cinnamon rolls, they remind me of the love and laughter I experienced in my grandmother’s kitchen. This recipe has evolved—I’ve shared it with friends, tweaked it with new ideas, and, over time, perfected my frosting to achieve an undeniable, creamy finish. One of my funniest memories is when I tried to impress a date by baking these for breakfast; let’s just say I had more flour on my face than I did on the table! But that little kitchen disaster turned out to be the best icebreaker.
FAQs and Troubleshooting
1. Why are my rolls dense?
- A dense roll could mean your dough wasn’t kneaded enough to develop the gluten structure, or the yeast might not have been activated properly. Make sure to proof your yeast and knead the dough until it’s silky smooth.
2. What if my filling oozes out while baking?
- If you notice excess filling leaking out, don’t fret! Make sure you leave that small border when spreading your filling. Snugly rolling the dough helps reduce the overflow, too.
3. Can I make these ahead of time?
- Absolutely! You can prepare the rolls up to the second rise, cover them well, and pop them in the fridge overnight. In the morning, let them come to room temperature before baking.
4. What can I substitute for heavy cream?
- If you’re looking for a lighter option, you can use half-and-half or even whole milk in a pinch. It won’t be as rich, but still delicious!
Nutritional Info
While these delightful strawberry cinnamon rolls are a treat that shouldn’t be indulged in every day, balance is key! Generally, each roll contains around 280-330 calories. Just remember, they’re made with love and lots of wholesome ingredients that make breakfast feel extra special.
I hope this recipe inspires you to whip up a warm batch of strawberry cinnamon rolls, creating your own kitchen memories filled with laughter and joy. So gather your loved ones, add a splash of creativity, and let’s bake our way to deliciousness! Happy cooking—eat well and live well!
PrintIrresistibly Fluffy Strawberry Cinnamon Rolls

Delightful strawberry cinnamon rolls that are fluffy and filled with fresh strawberries, perfect for any breakfast occasion.
- Prep Time: 30 minutes
- Cook Time: 30 minutes
- Total Time: 60 minutes
- Yield: 12 servings 1x
- Category: Breakfast
- Method: Baking
- Cuisine: American
- Diet: Vegetarian
Ingredients
- 2 cups strawberries (fresh, mashed)
- 1/2 cup brown sugar
- 1 tbsp lemon juice
- 1 tbsp cornstarch
- 1 tbsp cold water
- 2 cups bread flour (for tangzhong)
- 2 cups bread flour (for dough)
- 1/4 cup sugar
- 2 tsp active dry yeast
- 1 tsp salt
- 1/2 cup milk (warm)
- 1/4 cup heavy cream
- 1 large egg
- 1 tsp vanilla extract
- 4 tbsp unsalted butter (softened)
- 1/2 cup brown sugar (for filling)
- 2 tsp cinnamon
- 1/2 cup strawberry jam (for filling and frosting)
- 6 tbsp unsalted butter (for frosting)
- 4 oz cream cheese (softened)
- 1 cup powdered sugar
- 2 tbsp milk (for frosting)
Instructions
- Mash the strawberries in a bowl until chunky.
- Cook the filling in a saucepan with brown sugar, lemon juice, cornstarch, and cold water over medium heat until thickened.
- Mix the yeast with warm milk and let it sit until frothy.
- Combine dry ingredients for the dough in a large bowl.
- Add the yeast mixture, egg, vanilla extract, butter, and flour into the dry mix and combine until a dough forms.
- Knead the dough on a floured surface until smooth and elastic.
- Place the dough in a greased bowl, cover it, and let it rise until doubled in size.
- Roll out the dough into a rectangle after the first rise.
- Spread the cooled strawberry filling on the dough.
- Sprinkle the cinnamon and brown sugar mixture over the filling.
- Roll the dough tightly from one edge to form a log.
- Cut the log into 12 equal portions and place them in a greased baking dish.
- Let the rolls rise again until puffy.
- Preheat the oven and bake the rolls until golden brown.
- Beat together the frosting ingredients until smooth while the rolls are baking.
- Cool the rolls before frosting them.
Notes
Add chopped nuts for extra crunch, or try different berries for variation.
Nutrition
- Serving Size: 1 roll
- Calories: 300
- Sugar: 15g
- Sodium: 300mg
- Fat: 14g
- Saturated Fat: 8g
- Unsaturated Fat: 4g
- Trans Fat: 0g
- Carbohydrates: 45g
- Fiber: 2g
- Protein: 5g
- Cholesterol: 30mg
Keywords: strawberry, cinnamon rolls, breakfast, baking, fluffy
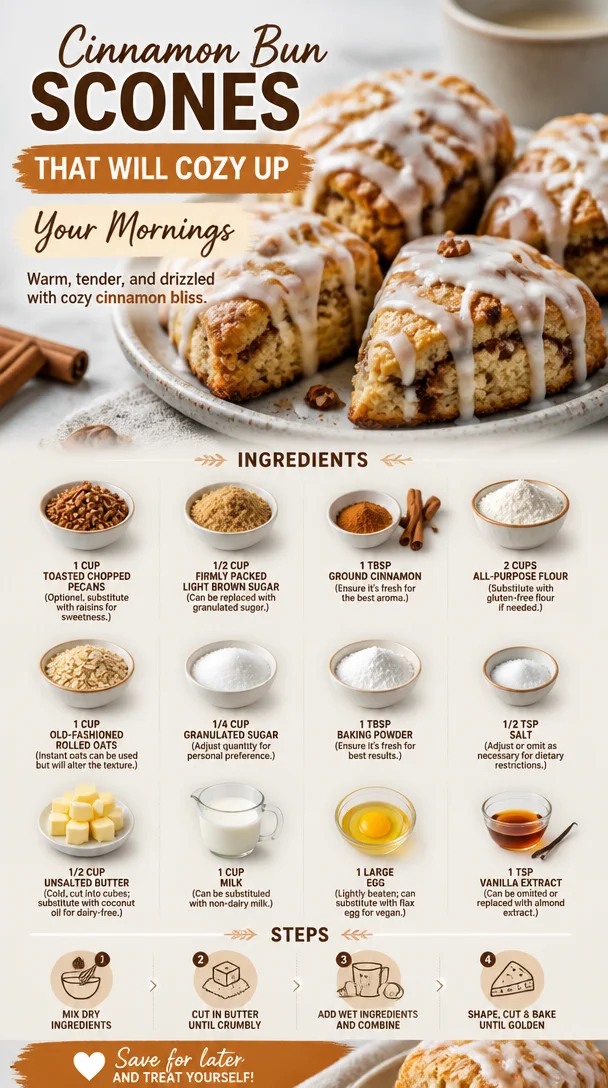
Cinnamon Bun Scones That Will Cozy Up Your Mornings
Cozy Up Your Mornings with Cinnamon Bun Scones
Hey there, fellow foodies! If you’re like me, there’s just something about the scent of cinnamon wafting through your kitchen that instantly turns any ordinary morning into a special occasion. You can practically hear the “oohs” and “aahs” as you bring these beauties out of the oven. Today, we’re diving into the delightful world of Cinnamon Bun Scones! These fluffy treats bring all the cozy vibes of classic cinnamon buns but in a much simpler form. Perfect for brunch, a cozy breakfast, or even as a sweet afternoon snack—they’re incredibly versatile!
Imagine this: it’s early Sunday morning, the sun is just peeking through the clouds, and you’ve got your favorite playlist softly lilting in the background. You pull a tray of scones from the oven, and the moment is just blissful. You take that first bite—flaky, warm, and oh-so-cinnamony—and everything feels right in the world. Are you ready to embark on this baking journey with me? Let’s go!
My Connection to Cinnamon Bun Scones
Growing up, Sundays were sacred in our household. They were always a blend of lazy mornings and a bit of culinary magic. My mom had this adorable vintage cookbook filled with recipes from the 1970s, most of which featured a ton of baking—and you guessed it, cinnamon buns were in there! I fondly remember waking up to the sweet aroma of cinnamon and sugar wafting up the stairs as my mom whipped up a batch. There was a certain joy in rolling that dough, sprinkling the cinnamon mixture all over, and then waiting with sheer anticipation for them to rise and bake.
But, let’s be honest—life can be busy, and sometimes those delightful cinnamon buns feel far too complicated for an everyday treat. That’s where these Cinnamon Bun Scones come into play! They capture that nostalgic flavor without requiring hours of kneading and rising. Each bite is a hug in pastry form that takes me back to those carefree Sunday mornings. Let’s create that experience for you, shall we?
Ingredients
Here’s what you’ll need to whip up these fabulous scones, along with some chef tips for each ingredient:
-
1 cup Toasted Chopped Pecans (Optional)
These nutty gems add a lovely crunch! If you’re not a nut fan, feel free to swap them out for sweet raisins instead. Just be careful with the substitutions to maintain that lovely texture! -
1/2 cup Firmly Packed Light Brown Sugar
This is where the sweetness comes from! You could swap it with granulated sugar for a simpler flavor, but I find that brown sugar gives a deeper, richer taste that pairs perfectly with cinnamon. -
1 tbsp Ground Cinnamon
Make sure to use fresh cinnamon for the best aroma! A little tip: store your cinnamon in a cool, dark place to keep it potent. -
2 cups All-Purpose Flour
If you’re gluten-free, no worries! You can use a gluten-free flour blend here. Just ensure it contains xanthan gum for that fluffy texture. -
1 cup Old-Fashioned Rolled Oats
These oats provide a chewier texture that complements the scones beautifully! If you’re in a pinch, you can use instant oats, but keep in mind the texture will be different. -
1/4 cup Granulated Sugar
Adjust the amount based on your sweetness preference. You can play with this if your sweet tooth is feeling particularly bold! -
1 tbsp Baking Powder
Make sure it’s fresh; nothing is worse than flat scones. Trust me; this ingredient is essential for achieving that delightful rise! -
1/2 tsp Salt
A little pinch of salt balances out the sweetness, making the flavors pop! Feel free to adjust or omit it depending on dietary restrictions. -
1/2 cup Unsalted Butter
Use cold butter here, cut into cubes for the perfect flaky textures! If you’re dairy-free, coconut oil works like a charm. -
1 cup Milk
Cow’s milk is great, but non-dairy options like almond or oat milk work beautifully too—keeping it rich and creamy! -
1 large Egg
This is lightly beaten to help bind the ingredients. You can use a flax egg as a vegan alternative (1 tbsp flaxseed meal + 2.5 tbsp water), and it works just as well! -
1 tsp Vanilla Extract
This adds a depth of flavor that makes your scones sing! If you’re after a more robust flavor, try almond extract instead.
Step-by-Step Instructions
Ready to bake? Let’s get started with our Cinnamon Bun Scones! Here’s how you can bring these delicate treats to life, step-by-step.
-
Preheat Your Oven
Start by preheating your oven to 400°F (200°C). This warm embrace will help your scones bake perfectly and turn golden brown! -
Prep the Baking Sheet
While that oven is warming up, line a baking sheet with parchment paper. This prevents the scones from sticking and makes for an easier clean-up! -
Mix Dry Ingredients
In a large mixing bowl, combine the flour, oats, baking powder, salt, brown sugar, granulated sugar, and ground cinnamon. Use a whisk to mix everything together evenly. It’s so satisfying to watch those ingredients come to life! -
Cut in the Butter
Now, take your cold butter cubes and add them to the dry ingredients. Using a pastry cutter (or your fingers), work the butter into the flour mixture until it resembles coarse crumbs. This step is crucial for those flaky layers! Don’t overmix; we want those tiny pockets of butter to stay intact. -
Combine Wet Ingredients
In a separate bowl, whisk together the egg, milk, and vanilla extract. This is where the magic begins! What’s a scone without that creamy richness? -
Bring Mixtures Together
Gradually pour the wet mixture into the dry mixture. Gently stir until just combined. The dough might seem a tad sticky—don’t worry; that’s exactly what we want! -
Add the Fun Stuff
Fold in those toasted pecans (or raisins if you’re swapping). This is also a great time to get creative—think about adding chocolate chips or dried fruit! -
Shape the Scones
On a floured surface, turn the dough out and shape it into a circle about 1-inch thick. Cut into wedges or use a biscuit cutter for round scones. I like to use a bench scraper to make clean cuts! -
Bake
Place scones onto your prepared baking sheet and bake for 15-18 minutes until they’re golden brown. The smell that envelops your home during this time is pure bliss—you’ll be counting down the minutes! -
Cool and Enjoy
Once they’re baked, let them cool for a few minutes on the baking sheet before transferring them to a wire rack. This ensures they won’t steam and stay perfect.
Serving Suggestions
These scones are perfect served warm, straight out of the oven! I love to plate them up with a drizzle of maple glaze, a sprinkle of chopped pecans, or even a dollop of whipped cream cheese. Pair them with your favorite morning beverage—coffee, tea, or even a refreshing fruit smoothie—and you’ve got yourself a cozy breakfast situation that’s sure to impress!
Recipe Variations
Feeling adventurous? Here are a few fun twists to make these scones your own:
- Pumpkin Spice Scones: Swap out some of the flour for pumpkin puree and add pumpkin spice!
- Chocolate Chip Scones: For a sweet twist, fold in mini chocolate chips.
- Maple Pecan Scones: Drizzle with maple syrup instead of traditional icing!
- Dried Fruit Scones: Consider adding chopped dried apricots or cranberries for a tart and sweet contrast.
- Lemon Zest Scones: A hint of lemon zest perks up the cinnamon flavors beautifully.
Chef’s Notes
Oh, and here’s a little tidbit from my kitchen: I once tried to make these scones in a “then-what-was-I-thinking” health kick, subbing out ingredients left and right. Let’s just say, while the effort was commendable, it turned my scones into something that resembled a shy pancake instead! So, my friends, while it’s wonderful to experiment, sometimes sticking to the basics is what keeps these scones truly magical. Trust the ingredients and techniques!
FAQs and Troubleshooting
-
Why are my scones dry?
This can happen if you overmix the dough or add too much flour. Gently fold your ingredients, and remember that cold ingredients help create the flakiness! -
Can I freeze these scones?
Absolutely! Freeze them before baking on a parchment-lined baking sheet and transfer them to a zip-seal bag. When ready to enjoy, bake from frozen, adding a couple of extra minutes to the bake time. -
How do I store left-over scones?
Store them in an airtight container at room temperature for 1-2 days. For longevity, consider refrigerating them in a sealed container. -
Can I make these scones vegan?
Yes! Use plant-based milk, coconut oil instead of butter, and a flax egg instead of the egg. They’ll be just as delicious!
Nutritional Info
While cooking, I focus on food that’s both delicious and nourishing. Depending on your chosen variations and ingredient swaps, the nutritional details will vary. It’s all about balance, and I encourage you to personalize your scones to suit your diet!
Alright, my dear food enthusiasts, it’s time to get into your kitchens and whip up a batch of these Cinnamon Bun Scones! Enjoy the process, savor the aromas, and most importantly, relish every bite. Here’s to cozy mornings and flavor-packed adventures! Happy baking!
PrintCinnamon Bun Scones

Fluffy scones that capture the cozy vibes of classic cinnamon buns, perfect for brunch or a sweet afternoon snack.
- Prep Time: 15 minutes
- Cook Time: 18 minutes
- Total Time: 33 minutes
- Yield: 8 servings 1x
- Category: Breakfast
- Method: Baking
- Cuisine: American
- Diet: Vegetarian
Ingredients
- 1 cup Toasted Chopped Pecans (Optional)
- 1/2 cup Firmly Packed Light Brown Sugar
- 1 tbsp Ground Cinnamon
- 2 cups All-Purpose Flour
- 1 cup Old-Fashioned Rolled Oats
- 1/4 cup Granulated Sugar
- 1 tbsp Baking Powder
- 1/2 tsp Salt
- 1/2 cup Unsalted Butter
- 1 cup Milk
- 1 large Egg
- 1 tsp Vanilla Extract
Instructions
- Preheat your oven to 400°F (200°C).
- Prep a baking sheet with parchment paper.
- Mix dry ingredients in a large bowl.
- Cut in the cold butter until it resembles coarse crumbs.
- Combine wet ingredients in a separate bowl and whisk together.
- Bring the wet mixture into the dry mixture and stir until just combined.
- Add the toasted pecans (or raisins) to the mixture.
- Shape the dough into a circle about 1-inch thick and cut into wedges.
- Bake for 15-18 minutes until golden brown.
- Cool for a few minutes before transferring to a wire rack.
Notes
Serve warm with a drizzle of maple glaze or a dollop of whipped cream cheese.
Nutrition
- Serving Size: 1 scone
- Calories: 250
- Sugar: 12g
- Sodium: 200mg
- Fat: 10g
- Saturated Fat: 5g
- Unsaturated Fat: 4g
- Trans Fat: 0g
- Carbohydrates: 32g
- Fiber: 2g
- Protein: 4g
- Cholesterol: 30mg
Keywords: scones, cinnamon, breakfast, easy recipe, baking
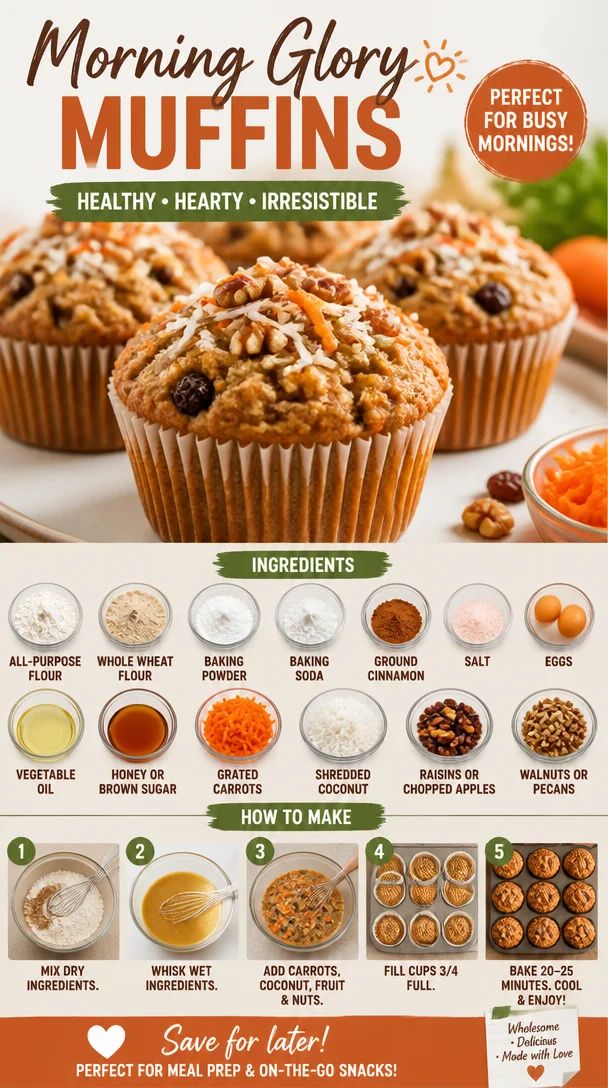
Morning Glory Muffins
Morning Glory Muffins: A Delicious Start to Your Day
Welcome to another delightful journey in the kitchen! Today, we’re baking something that might just become your new breakfast favorite: Morning Glory Muffins. These little gems are not only bursting with flavor, but they also pack a nutritional punch, making them perfect for busy mornings or cozy weekend brunches. So, grab your apron, and let’s dive into a recipe that’s as comforting as it is energizing!
A Breakfast Memory to Treasure
I can still remember the first time I tasted morning glory muffins. It was a chilly autumn morning, and my grandmother had a tradition of baking these muffins every Sunday. The warm aroma of cinnamon and carrots wafted through the house, drawing everyone to the kitchen like bees to honey. My siblings and I would gather around the table, eagerly waiting for that first warm muffin to land on our plates. As we dug in, our smiles were as bright as the golden autumn leaves outside.
That first bite was a blend of sweet and spicy, with just the right crunch from the nuts and the delightful chewiness of raisins. It was an experience that went beyond just eating; it was about family, warmth, and the joy of sharing food. Those muffins were a staple of my childhood, and now I love sharing this recipe, keeping that cherished memory alive and welcoming you into the fold of deliciousness!
Ingredients
Let’s talk about what you’ll need to make these super scrumptious morning glory muffins. Here’s the lineup:
-
1 cup all-purpose flour: This is your base for the muffins, giving them structure. You can substitute with a 1:1 gluten-free flour blend if you want a gluten-free version.
-
1 cup whole wheat flour: This adds nutrition and a delightful nutty flavor. If you don’t have whole wheat, feel free to use more all-purpose flour.
-
1 teaspoon baking powder: This is your leavening agent, helping the muffins rise and become fluffy.
-
1/2 teaspoon baking soda: A little extra lift here—plus, it balances the acidity of the honey or brown sugar.
-
1 teaspoon ground cinnamon: This warm spice is what gives our muffins that cozy flavor. You can swap it out for nutmeg if you’re feeling adventurous!
-
1/2 teaspoon salt: A must for enhancing all the other flavors; it’s the secret ingredient!
-
2 large eggs: These provide moisture and act as a binder. For a vegan option, consider using flaxseed mixed with water as a substitute.
-
1/2 cup vegetable oil: This keeps the muffins moist. You can also use melted coconut oil for a tropical twist.
-
1/2 cup honey or brown sugar: Sweetness is key! Honey brings a lovely floral note, while brown sugar adds a caramel-like depth.
-
2 cups grated carrots: This is where the "morning glory" shines, adding natural sweetness and moisture.
-
1/2 cup shredded coconut: A tropical flair! Unsweetened coconut works great if you’re looking for a healthier option.
-
1/2 cup raisins or chopped apples: Both options add sweetness and texture. If you’re not a fan, you can leave them out altogether or use dried cranberries instead.
-
1/2 cup walnuts or pecans, chopped: They give these muffins a satisfying crunch. Feel free to swap for sunflower seeds if you have nut allergies.
Step-by-Step Instructions
Now that you have your ingredients laid out, let’s get started on making these incredible muffins!
-
Preheat Your Oven: First things first, preheat your oven to 350°F (175°C). This step ensures that the muffins start to bake immediately when you put them in, giving you those perfect domes!
-
Prepare Your Muffin Tin: Grease a standard muffin tin or line it with paper liners for easy removal. I always prefer using liners as it makes cleanup a breeze, plus it adds a pop of color!
-
Mix Dry Ingredients: In a large mixing bowl, combine the all-purpose flour, whole wheat flour, baking powder, baking soda, ground cinnamon, and salt. This is where the magic starts! Whisk them together until well blended—this helps ensure that your leavening agents are evenly distributed.
-
Whisk Wet Ingredients: In another bowl, beat the eggs, then add in the vegetable oil and honey (or brown sugar). Whisk these together until everything is nicely combined. You’ll want it to be smooth and creamy. It’s my little ritual to smile at this point, knowing deliciousness awaits!
-
Combine Wet and Dry Ingredients: Pour the wet ingredients into the dry ingredients. Using a spatula (or a wooden spoon), gently fold the mixture. Be careful not to overmix; a few lumps are totally okay! This keeps your muffins nice and fluffy.
-
Add the Goodness: Now it’s time to add in your grated carrots, coconut, raisins (or apples), and nuts. This is where the colors and textures really come to life—in a rainbow of health!
-
Scoop Into Muffin Tin: Using an ice cream scoop or two spoons, fill each muffin cup about 2/3 full. This allows room for the muffins to rise beautifully!
-
Bake Amazonian Muffins: Slide your muffin tin into the preheated oven and bake for about 20-25 minutes. The muffins should be golden brown, and a toothpick inserted into the center should come out clean. But keep an eye on them; ovens can be sneaky!
-
Cool Down: Once baked, let the muffins cool in the tin for a few minutes, then transfer them to a wire rack to cool completely. This prevents them from getting soggy and lets them set perfectly!
Serving Suggestions
There’s nothing better than warming up a muffin, slathering it with a bit of butter (or coconut oil for dairy-free), and enjoying it with your morning coffee or tea. Serve these muffins slightly warm, perhaps with a side of fresh fruit or yogurt for a wholesome breakfast that feels like a treat. Want a fancy touch? Top them with a dollop of whipped cream cheese for an indulgent twist!
Recipe Variations
Feeling like getting creative? Here are some delicious variations you can try:
-
Tropical Twist: Substitute the raisins with pineapple and add macadamia nuts for a lush island flavor.
-
Chocolate Chip Delight: Fold in dark chocolate chips instead of nuts for a sweet, gooey surprise.
-
Apple Cinnamon: Swap out the grated carrots for grated apples and increase the cinnamon for an irresistible apple-cinnamon combo.
-
Savory Spin: Add some sautéed spinach or zucchini for a savory muffin that’s packed with veggies—perfect for brunch!
-
Vegan Version: Use flax eggs and unsweetened applesauce in place of eggs and half the oil, and you’re all set for a vegan treat!
Chef’s Notes
As I’ve been making these muffins over the years, each batch carries a little story. One time, I decided to make a double batch for a brunch gathering. I was feeling pretty proud until I realized I had accidentally grabbed baking soda instead of baking powder! The result was an incredibly dense muffin that had everyone laughing—at least they were delicious!
They’ve evolved as I’ve experimented with adding various spices and flavors, but the classic version remains my favorite. Baking is all about love and learning, after all, and I can’t wait for you to create your own memories with these delightful muffins.
FAQs and Troubleshooting
1. My muffins came out flat. What happened?
- This can happen if the leavening agents (baking powder and soda) are old or if the batter is overmixed. Make sure these ingredients are fresh, and fold gently!
2. Can I freeze the muffins?
- Absolutely! These muffins freeze well. Let them cool completely, wrap them tightly in plastic wrap, and store them in an airtight container. They’ll last up to three months. Just pop them in the microwave or toaster oven when you’re ready to enjoy!
3. How do I keep my muffins moist?
- Ensure you’re using enough moisture in the recipe. Don’t skip the oil, and consider adding in a bit of applesauce for added moisture. Also, be careful not to overbake!
4. Can I use other sweeteners?
- Yes! Maple syrup or agave nectar can be great substitutes for honey or brown sugar. Just make sure to adjust the liquid content slightly as needed.
Nutritional Info
Here’s a quick look at the nutritional benefits of our Morning Glory Muffins (per muffin, approx.):
- Calories: 180
- Protein: 3g
- Fat: 7g
- Carbohydrates: 27g
- Fiber: 2g
- Sugar: 7g
So, there you have it! Morning Glory Muffins that are as joyful to make as they are to eat. I hope you’ll bring this recipe into your home, creating memories and delicious moments just like my grandmother did with me. Happy baking, friends! Let’s make every bite full of love and flavor!
PrintMorning Glory Muffins

These delightful muffins are bursting with flavor and packed with nutrition, perfect for busy mornings or cozy weekend brunches.
- Prep Time: 15 minutes
- Cook Time: 25 minutes
- Total Time: 40 minutes
- Yield: 12 servings 1x
- Category: Breakfast
- Method: Baking
- Cuisine: American
- Diet: Vegetarian
Ingredients
- 1 cup all-purpose flour
- 1 cup whole wheat flour
- 1 teaspoon baking powder
- 1/2 teaspoon baking soda
- 1 teaspoon ground cinnamon
- 1/2 teaspoon salt
- 2 large eggs
- 1/2 cup vegetable oil
- 1/2 cup honey or brown sugar
- 2 cups grated carrots
- 1/2 cup shredded coconut
- 1/2 cup raisins or chopped apples
- 1/2 cup walnuts or pecans, chopped
Instructions
- Preheat your oven to 350°F (175°C).
- Prepare a standard muffin tin by greasing it or lining it with paper liners.
- Mix together the all-purpose flour, whole wheat flour, baking powder, baking soda, ground cinnamon, and salt in a large mixing bowl.
- Whisk the eggs, then add the vegetable oil and honey (or brown sugar) in another bowl and mix until well combined.
- Combine the wet ingredients with the dry ingredients and gently fold until just combined.
- Add in the grated carrots, coconut, raisins (or apples), and nuts.
- Scoop the batter into the muffin tin, filling each cup about 2/3 full.
- Bake for about 20-25 minutes until golden brown and a toothpick comes out clean.
- Cool the muffins in the tin for a few minutes, then transfer to a wire rack to cool completely.
Notes
These muffins are best enjoyed warm with a bit of butter or coconut oil and pair nicely with coffee or tea. Variations include using chocolate chips or apples instead of carrots.
Nutrition
- Serving Size: 1 muffin
- Calories: 180
- Sugar: 7g
- Sodium: 200mg
- Fat: 7g
- Saturated Fat: 1g
- Unsaturated Fat: 5g
- Trans Fat: 0g
- Carbohydrates: 27g
- Fiber: 2g
- Protein: 3g
- Cholesterol: 30mg
Keywords: morning glory muffins, breakfast muffins, healthy muffins
Coffee Cake Muffins
Coffee Cake Muffins: A Sweet Start to Your Day
Welcome to the cozy world of Clean Plate Cravings! Today, we’re diving into a delightful dish that brings joy to breakfast tables everywhere—Coffee Cake Muffins! These muffins encapsulate the perfect balance of flavor and texture, making them a beloved choice for those lazy Sunday mornings or a quick grab-and-go breakfast during the week.
What’s amazing about these muffins is how they echo that childhood nostalgia of enjoying something sweet with your morning brew. When I think about coffee cake, I can’t help but remember the times I’d visit my grandmother’s kitchen, watching her whip up a batch of fluffy muffins that would fill the house with the warm aroma of cinnamon and sugar. She always said her secret was to “fold in a little love” in every bite, and boy, did it work!
With rich buttery goodness, a hint of vanilla, and a crunchy cinnamon-sugar topping, these Coffee Cake Muffins are not just easy to make but also incredibly satisfying. Let’s get our aprons on and create these little delights that are sure to be a staple in your kitchen!
A Sweet Memory with Coffee Cake
Every food has a story, and mine with coffee cake muffins goes back to my childhood. I remember the sound of the mixer whirring in my grandmother’s cozy kitchen, a place filled with warmth and laughter. My siblings and I would race there every Saturday morning, eager to help and snack on the delicious treats that my Grandma made.
One of my fondest memories was the day we chose to experiment a little. We decided we’d make “the ultimate coffee cake,” which led us to raid her pantry for an array of spices, nuts, and chocolate chips. We ended up with this glorious, slightly messy creation that was less about perfection and more about joy. I can still picture Grandma watching us with a smile, her eyes twinkling with amusement as we debated whether to call it a “muffin” or “cake.” Whatever we decided, it was exactly what we needed—sweet, comforting, and made with a whole lot of love.
Let’s channel that nostalgic energy as we create our Coffee Cake Muffins, perfect for sharing or savoring all on your own!
Ingredients to Bring These Muffins to Life
Here’s what you’ll need for these Coffee Cake Muffins. Each ingredient plays a crucial role in developing the flavor and texture, so let’s break it down:
-
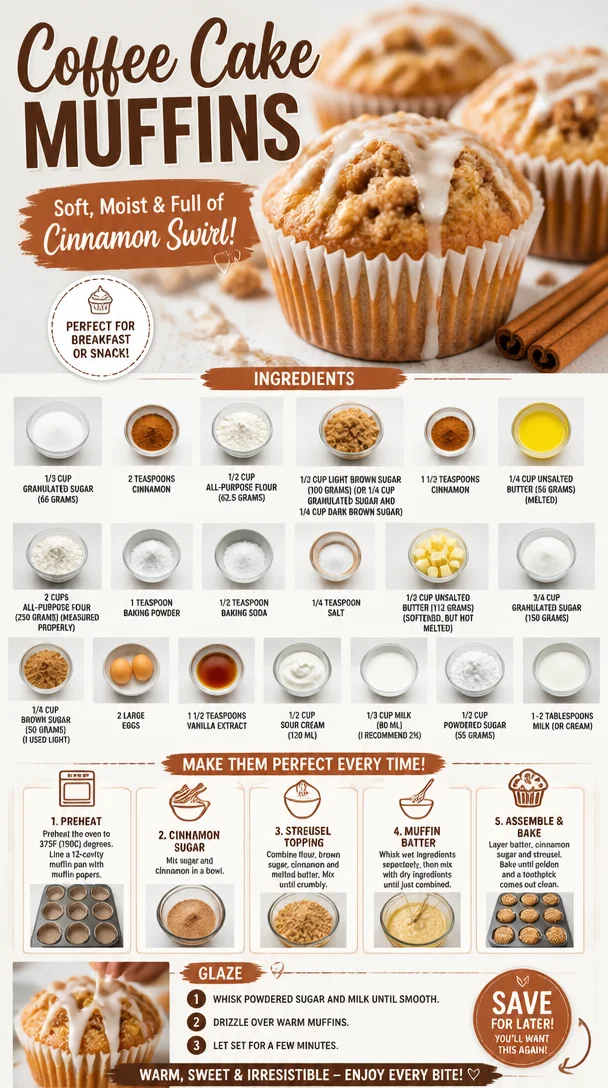
1/3 cup granulated sugar (66 grams): This adds sweetness to the muffins. You can substitute with coconut sugar for a healthier option!
-
2 teaspoons cinnamon: The warm spice that will fill your kitchen with a heavenly aroma. You can also try nutmeg or pumpkin spice for a twist!
-
1/2 cup all-purpose flour (62.5 grams): This is part of the crumb topping. Use whole wheat flour if you want a nuttier flavor and added health benefits.
-
1/2 cup light brown sugar (100 grams): It lends a rich, caramel-like flavor to both the muffins and the crumb topping. You can mix equal parts dark brown sugar for a deeper flavor profile.
-
1 1/2 teaspoons cinnamon (for topping): More of that glorious spice!
-
1/4 cup unsalted butter (56 grams, melted): Adds moisture and richness to the crumb topping. If you’re dairy-free, coconut oil works wonderfully here.
-
2 cups all-purpose flour (250 grams): The base for the muffin’s structure. If you’re gluten-free, you can use a 1:1 gluten-free flour blend.
-
1 teaspoon baking powder: This is your leavening agent that helps the muffins rise.
-
1/2 teaspoon baking soda: An additional leavening agent.
-
1/4 teaspoon salt: Balances the sweetness and enhances the overall flavor.
-
1/2 cup unsalted butter (112 grams, softened, not melted): A key player in creating that soft, fluffy texture. You can replace this with applesauce for a lighter option.
-
3/4 cup granulated sugar (150 grams): The main sweetener for the muffins.
-
1/4 cup brown sugar (50 grams, light): Further contributes to the moistness and flavor.
-
2 large eggs: They provide structure and moisture. If you want a vegan option, you can replace them with flaxseed meal or unsweetened applesauce.
-
1 1/2 teaspoons vanilla extract: This adds warmth and depth to the muffins.
-
1/2 cup sour cream (120 ml): This makes for incredibly moist muffins. Greek yogurt could be a great substitute!
-
1/3 cup milk (80 ml, I recommend 2%): Helps to incorporate all the ingredients smoothly; almond milk also works great for a dairy-free version.
-
1/2 cup powdered sugar (55 grams): For a final touch of sweetness on top!
-
1–2 tablespoons milk (or cream): For adjusting the consistency of your icing.
Step-by-Step Instructions for Deliciously Fluffy Muffins
1. Preheat Your Oven
Start by preheating your oven to 350°F (175°C). This is essential for a good bake. While the oven’s heating up, let’s set the scene for muffin magic!
2. Prepare Your Muffin Pan
Grease or line a muffin pan with paper liners. This will make it easier to get those muffins out after they’re baked without losing a crumb!
3. Make the Crumb Topping
In a medium bowl, mix together the 1/2 cup flour, 1/2 cup light brown sugar, 1/3 cup granulated sugar, and 2 teaspoons cinnamon. Melt 1/4 cup of unsalted butter and pour it into the dry ingredients. Use a fork or your hands to combine until crumbly. Set this aside while we whip up the muffin batter.
4. Whisk the Dry Ingredients
In a large bowl, whisk together 2 cups of all-purpose flour, 1 teaspoon baking powder, 1/2 teaspoon baking soda, and 1/4 teaspoon salt. Mixing these dry ingredients first ensures an even rise.
5. Cream the Butters and Sugars
In a separate large bowl, beat the 1/2 cup softened unsalted butter, 3/4 cup granulated sugar, and 1/4 cup brown sugar until it’s creamy and light. Don’t rush through this step—creaming your butter and sugars well incorporates air, making your muffins fluffy.
6. Add Eggs and Vanilla
Once your sugars and butter are creamy, add in 2 large eggs, one at a time, mixing well after each addition. Follow this with the 1 1/2 teaspoons vanilla extract—let that sweet aroma whisk you away!
7. Mix in the Sour Cream and Milk
Now it’s time to add the 1/2 cup sour cream and 1/3 cup milk to your mixture. Mix until just combined; the batter will be thick and luscious.
8. Combine Wet and Dry Ingredients
Carefully fold the dry ingredients into the wet. Do this gently with a spatula to avoid overmixing, which can lead to dense muffins. You want a few lumps—trust me!
9. Fill Your Muffin Pan
Spoon the batter into your prepared muffin pan, filling each cup about 2/3 full. This gives them room to rise without overflowing.
10. Crumble It Up!
Now, sprinkle that glorious crumb topping generously over each muffin. Don’t be shy; this is where the magic happens!
11. Bake to Perfection
Pop the muffin pan into your preheated oven and bake for about 18-22 minutes or until a toothpick inserted into the center comes out clean. You’ll know they’re ready when your kitchen is filled with the irresistible aroma of cinnamon!
12. Cool and Glaze
Once baked, allow the muffins to cool in the pan for about 5-10 minutes before transferring them to a wire rack. For an added touch of sweetness, mix 1/2 cup powdered sugar with 1-2 tablespoons milk to create a simple glaze and drizzle it over the muffins once cooled.
Serving Suggestions
These Coffee Cake Muffins are wonderful served warm out of the oven or at room temperature. They’re perfect for breakfast alongside a hot cup of coffee or tea. Feel free to present them on a rustic wooden board or in a cute muffin basket for a brunch vibe that guests (or your family) will adore!
Recipe Variations
Here are some fun variations to keep your muffins exciting every time:
-
Nutty Crunch: Add 1/2 cup chopped walnuts or pecans to the batter for an extra crunch.
-
Fruity Twist: Toss in 1/2 cup of blueberries or diced apples for a fruity version.
-
Chocolate Lovers: Replace half a cup of flour with cocoa powder for a chocolatey coffee cake experience.
-
Spiced Up: Add a dash of nutmeg or cardamom to the spices for a warm twist.
Chef’s Notes
Over the years, my Coffee Cake Muffins have evolved as I’ve experimented in the kitchen. I remember the early days, where they would sometimes be too dry or not rise enough. Come to find out, perfecting the right balance of wet and dry ingredients makes all the difference!
And of course, the greatest lesson? Don’t take it too seriously! Cooking should be fun, and if your muffins come out looking a little wonky, just call them “rustic”!
FAQs and Troubleshooting
1. Why are my muffins dense?
If your muffins are denser than expected, they might have been overmixed. Remember, only mix until just combined!
2. How do I know when my muffins are done?
Use a toothpick; if it comes out clean or with just a few crumbs, they are ready to come out.
3. Can I freeze these muffins?
Absolutely! Once cooled, store them in an airtight container or freezer bag, and they’ll be perfect for up to three months. Just pop them in the microwave or oven for a quick warm-up!
4. What if I don’t have sour cream?
Greek yogurt is a great alternative, or you can make your own by mixing plain yogurt with a splash of vinegar for tanginess.
Nutritional Info
While I am not providing the specific nutritional breakdown, these muffins are made with wholesome ingredients that balance enjoyment with nourishment.
There you have it—your guide to creating the most delightful Coffee Cake Muffins! Not only do they capture the essence of my cherished memories, but they also offer a sweet treat for your mornings. So, roll up your sleeves and get ready to unleash that love into your kitchen. Happy baking!
PrintCoffee Cake Muffins
Deliciously fluffy Coffee Cake Muffins filled with rich buttery goodness and topped with crunchy cinnamon-sugar, perfect for breakfast or a snack.
- Prep Time: 15 minutes
- Cook Time: 22 minutes
- Total Time: 37 minutes
- Yield: 12 muffins 1x
- Category: Snack
- Method: Baking
- Cuisine: American
- Diet: Vegetarian
Ingredients
- 1/3 cup granulated sugar (66 grams)
- 2 teaspoons cinnamon
- 1/2 cup all-purpose flour (62.5 grams)
- 1/2 cup light brown sugar (100 grams)
- 1 1/2 teaspoons cinnamon (for topping)
- 1/4 cup unsalted butter (56 grams, melted)
- 2 cups all-purpose flour (250 grams)
- 1 teaspoon baking powder
- 1/2 teaspoon baking soda
- 1/4 teaspoon salt
- 1/2 cup unsalted butter (112 grams, softened)
- 3/4 cup granulated sugar (150 grams)
- 1/4 cup brown sugar (50 grams, light)
- 2 large eggs
- 1 1/2 teaspoons vanilla extract
- 1/2 cup sour cream (120 ml)
- 1/3 cup milk (80 ml, 2% recommended)
- 1/2 cup powdered sugar (55 grams)
- 1–2 tablespoons milk (or cream)
Instructions
- Preheat your oven to 350°F (175°C).
- Prepare your muffin pan by greasing or lining it with paper liners.
- Make the crumb topping by mixing 1/2 cup flour, 1/2 cup light brown sugar, 1/3 cup granulated sugar, and 2 teaspoons cinnamon. Add melted butter and combine until crumbly. Set aside.
- Whisk together 2 cups of all-purpose flour, 1 teaspoon baking powder, 1/2 teaspoon baking soda, and 1/4 teaspoon salt.
- Cream the softened unsalted butter, 3/4 cup granulated sugar, and 1/4 cup brown sugar until creamy and light.
- Add in the eggs one at a time, mixing well after each addition, then add the vanilla extract.
- Mix in the sour cream and milk until just combined.
- Fold the dry ingredients into the wet mixture gently with a spatula.
- Fill each muffin cup about 2/3 full with the batter.
- Sprinkle the crumb topping generously over each muffin.
- Bake for about 18-22 minutes until a toothpick comes out clean.
- Cool in the pan for 5-10 minutes, then transfer to a wire rack. Drizzle glaze made of powdered sugar and milk on top.
Notes
Use whole wheat flour for a nuttier flavor or coconut sugar for a healthier alternative.
Nutrition
- Serving Size: 1 muffin
- Calories: 320
- Sugar: 20g
- Sodium: 300mg
- Fat: 14g
- Saturated Fat: 8g
- Unsaturated Fat: 4g
- Trans Fat: 0g
- Carbohydrates: 45g
- Fiber: 1g
- Protein: 4g
- Cholesterol: 60mg
Keywords: coffee cake, muffins, breakfast, dessert, cinnamon, sweet