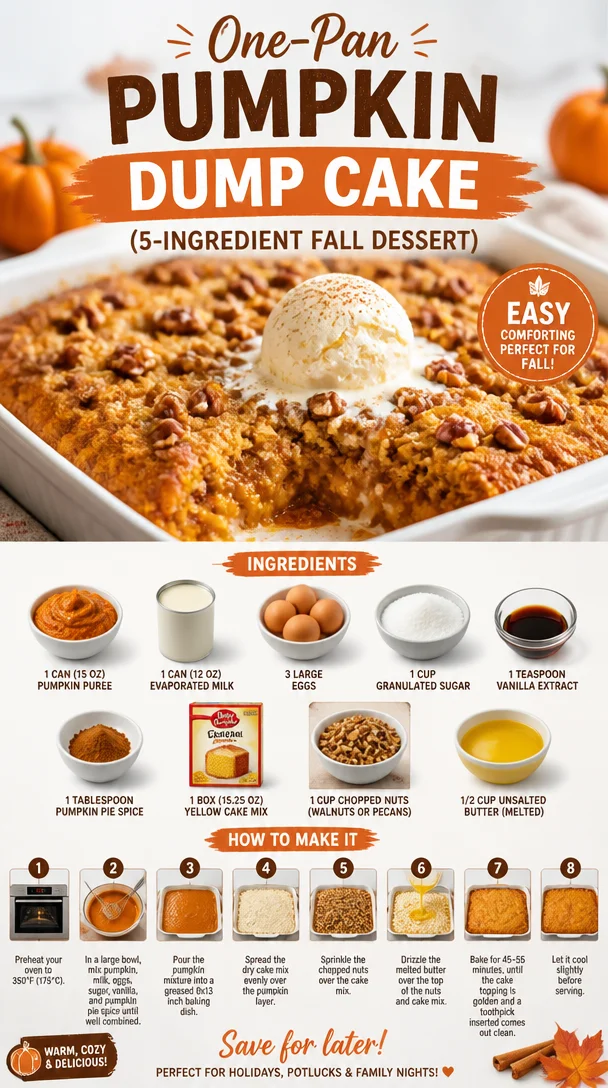
One-Pan Pumpkin Dump Cake (5-Ingredient Fall Dessert)
Pumpkin Dump Cake: A Slice of Autumn
Welcome to my cozy corner of Clean Plate Cravings! Today, we’re diving into a delightful dessert that embodies the essence of fall—Pumpkin Dump Cake. Picture the rich, comforting flavors of pumpkin spice wafting through your kitchen, enveloping you in warm nostalgia as if a beloved memory just walked through the door.
Now, you might be thinking, “Ava, what’s the deal with a ‘dump cake’?” Well, let me tell you—this isn’t just any cake. It’s a no-fuss, throw-it-all-together kind of creation that delivers on taste while being incredibly simple to make. The best part? It’s chocolatey, custardy, and the perfect way to celebrate autumn’s bounty without spending hours in the kitchen.
A Nostalgic Twist
Let me take you back to a crisp October afternoon in my childhood. My family would gather in the kitchen, ready to dive into a pumpkin-carving frenzy, with one eye on the pumpkins and the other on the warm treats waiting to be savored. My mom’s enchanting pumpkin dump cake was the star of our fall family gatherings. The sweet aroma of spices and pumpkin filled the air as it baked in the oven for what felt like an eternity.
I vividly remember peeking through the oven door, watching the golden top bubble and rise, excitement buzzing in the air. When it finally came out, warm and gooey, we would devour it with dollops of whipped cream and steaming cups of cider. It felt like magic back then—and trust me, it still does! This dish holds so many sweet memories, and I’m thrilled to share this gem with you today.
Ingredients
For this delightful Pumpkin Dump Cake, you’ll need the following ingredients:
-
1 can (15 oz) pumpkin puree: Pure pumpkin puree brings that authentic fall flavor. If fresh pumpkin is available, roast and puree it for an even richer taste!
-
1 can (12 oz) evaporated milk: This ingredient gives the cake its creamy texture. In a pinch, you can substitute with regular milk or a non-dairy alternative like almond milk, but note it may slightly alter the consistency.
-
3 large eggs: Eggs create the structure and add richness. If you need an egg substitute, try using flax eggs (1 tablespoon ground flaxseed + 2.5 tablespoons water) for each egg.
-
1 cup granulated sugar: Sugar adds sweetness to balance the pumpkin’s earthiness. Feel free to use brown sugar for a deeper caramel flavor, or a sugar alternative like stevia if you want it to be lighter.
-
1 teaspoon vanilla extract: This extrudes a lovely aroma. Always opt for pure vanilla for the best flavor; imitation vanilla just doesn’t cut it in the flavor department!
-
1 tablespoon pumpkin pie spice: The essence of fall! If you don’t have premade pumpkin spice, mix 1 teaspoon cinnamon, 1/2 teaspoon nutmeg, 1/2 teaspoon ginger, and 1/4 teaspoon cloves.
-
1 box (15.25 oz) yellow cake mix: The base of our dump cake. You can use a gluten-free cake mix if needed, or even make your own if you’re feeling adventurous!
-
1 cup chopped nuts (walnuts or pecans): I love adding these for crunch! But if you prefer a nut-free version, simply skip this step or substitute with crispy oats.
-
1/2 cup unsalted butter (melted): Butter adds richness and moisture. You can substitute with coconut oil for a dairy-free version.
With these wholesome ingredients, we’re ready to create a cake that’s bursting with flavor and memories!
Step-by-Step Instructions
Let’s turn that fall dream into a reality with this easy-to-follow recipe. Ready? Let’s cook!
-
Preheat Your Oven: Preheat your oven to 350°F (175°C). This temperature will create the perfect environment for your cake to bake evenly and rise beautifully.
-
Prepare the Baking Dish: Grab a 9×13-inch baking dish and grease it lightly with butter or non-stick spray. This cute little technique will ensure your cake comes out perfectly and doesn’t stick!
-
Mix the Wet Ingredients: In a large bowl, combine the pumpkin puree, evaporated milk, eggs, sugar, vanilla extract, and pumpkin pie spice. Whisk until everything is beautifully blended. Don’t forget to taste it! This is your opportunity to get a sneak peek at how creamy and sweet it’ll be.
-
Pour the Mixture: Pour this luscious pumpkin mixture into your prepared baking dish, spreading it evenly across the bottom.
-
Add the Cake Mix: Take your box of yellow cake mix and sprinkle it evenly over the pumpkin mixture. No need to stir or mix; just let it sit there looking gorgeous! This is where the "dump" in dump cake comes from—easy peasy, right?
-
Sprinkle the Nuts: Grab your chopped nuts and sprinkle them over the cake mix. This adds that scrumptious crunch to each bite, elevating the texture perfectly.
-
Pour the Butter: Drizzle the melted butter over the top. It’s okay if it doesn’t cover every nook and cranny—this helps create a crispy, golden crust. Don’t skimp on the butter for those incredibly rich flavors!
-
Bake to Perfection: Pop it in your preheated oven and bake for about 50-60 minutes, or until the top is golden brown and the edges are bubbly. The aroma will make it hard not to eat the whole thing before it cools!
-
Cool Before Serving: Let it cool for at least 15 minutes before digging in. This allows the filling to set beautifully, ensuring that glorious gooey texture.
Serving Suggestions
Once your cake has cooled a bit, it’s time for the fun part—serving! Cut generous squares and plate them with a dollop of freshly whipped cream (or a scoop of vanilla ice cream if you’re feeling extra). For some added flair, sprinkle a touch more pumpkin pie spice on top or even a drizzle of caramel sauce.
You could even go full fall-mode with a sprinkle of cinnamon or a sprig of mint for color. Whatever your heart desires! It’s also a fantastic dish to serve at gatherings. Your friends and family will think you’ve been slaving away all day, when in reality, you whipped it up in no time!
Recipe Variations
Want to mix things up? Here are a few fun variations to consider:
-
Chocolate Pumpkin Dump Cake: Add a packet of chocolate cake mix instead of yellow for a decadent twist!
-
Spicy Kick: Add a pinch of cayenne pepper or chipotle powder to the pumpkin mixture for a sweet-and-spicy flavor profile.
-
Nut-Free Version: Omit the chopped nuts and consider adding chopped up chocolate bars instead for some gooey chocolate goodness!
-
Coconut Lover’s Delight: Top it with shredded coconut before drizzling the butter for a tropical vibe!
-
Gluten-Free Cake: Swap out the yellow cake mix for a gluten-free variant, and you’ve got a dish everyone can enjoy!
Chef’s Notes
As I’ve developed this recipe over time, I’ve learned the importance of balance. Once, I tried to add an extra can of pumpkin puree and neglected the other ingredients, thinking I could create a super pumpkin-flavored cake. Spoiler alert: it turned out gummy and sad! I promise that the tried-and-true recipe below leads to consistently heavenly results.
Over the years, I’ve also learned to embrace the messiness of cooking—and I mean that in the most joyful way! The sprinkle of flour on my cheek, the flour explosion when I accidentally dumped too much in—these moments make cooking so much fun! So don’t fret about looking perfect; embrace the chaos, enjoy the creative process, and let the love for food shine through in every dish.
FAQs and Troubleshooting
Can I prepare this ahead of time?
Absolutely! You can mix everything together the night before and bake it before serving. Just don’t pour the butter until you’re ready to bake; it keeps everything fresh!
What if my cake isn’t setting?
If it’s still gooey in the middle after the baking time, keep it in the oven for an additional 5-10 minutes. Keep an eye on the edges—they should start to brown nicely while the center firms up. Use a toothpick to check for a “clean” pull.
Can I freeze the leftovers?
You can freeze this beauty! Just ensure it’s properly cooled, then wrap it tightly in foil or plastic wrap and freeze for up to 3 months. When you’re ready to indulge again, simply defrost in the fridge overnight and reheat in the oven.
How do I ensure my cake mix doesn’t dry out?
Be sure not to overbake it. Every oven is different, so check for doneness a few minutes before the suggested time. Moistness is the name of the game here!
Nutritional Info
Nutritional info is approximate and varies based on specific ingredients used:
- Serving Size: 1 slice (1/12 of cake)
- Calories: 290
- Protein: 5g
- Carbohydrates: 42g
- Fat: 12g
- Sugar: 22g
There you have it, friends! Pumpkin Dump Cake—a delightful blend of flavors and memories that will surely uplift your fall gatherings. I hope you enjoy making this dish as much as I do (and remember to get a little messy in the process). Happy baking! 🍂✨
PrintPumpkin Dump Cake
A delightful dessert that embodies the essence of fall with rich pumpkin spice flavors, perfect for autumn gatherings.
- Prep Time: 15 minutes
- Cook Time: 60 minutes
- Total Time: 75 minutes
- Yield: 12 servings 1x
- Category: Dessert
- Method: Baking
- Cuisine: American
- Diet: Vegetarian
Ingredients
- 1 can (15 oz) pumpkin puree
- 1 can (12 oz) evaporated milk
- 3 large eggs
- 1 cup granulated sugar
- 1 teaspoon vanilla extract
- 1 tablespoon pumpkin pie spice
- 1 box (15.25 oz) yellow cake mix
- 1 cup chopped nuts (walnuts or pecans)
- 1/2 cup unsalted butter (melted)
Instructions
- Preheat your oven to 350°F (175°C).
- Prepare a 9×13-inch baking dish and grease it lightly with butter or non-stick spray.
- Mix the pumpkin puree, evaporated milk, eggs, sugar, vanilla extract, and pumpkin pie spice in a large bowl until blended.
- Pour the pumpkin mixture into your prepared baking dish, spreading it evenly.
- Add the yellow cake mix by sprinkling it evenly over the pumpkin mixture.
- Sprinkle the chopped nuts over the cake mix.
- Pour the melted butter over the top.
- Bake for about 50-60 minutes, or until the top is golden brown and edges are bubbly.
- Cool for at least 15 minutes before serving.
Notes
Serve with whipped cream or vanilla ice cream for extra deliciousness.
Nutrition
- Serving Size: 1 slice
- Calories: 290
- Sugar: 22g
- Sodium: 100mg
- Fat: 12g
- Saturated Fat: 7g
- Unsaturated Fat: 5g
- Trans Fat: 0g
- Carbohydrates: 42g
- Fiber: 2g
- Protein: 5g
- Cholesterol: 120mg
Keywords: pumpkin, dump cake, fall dessert, easy dessert, holiday baking
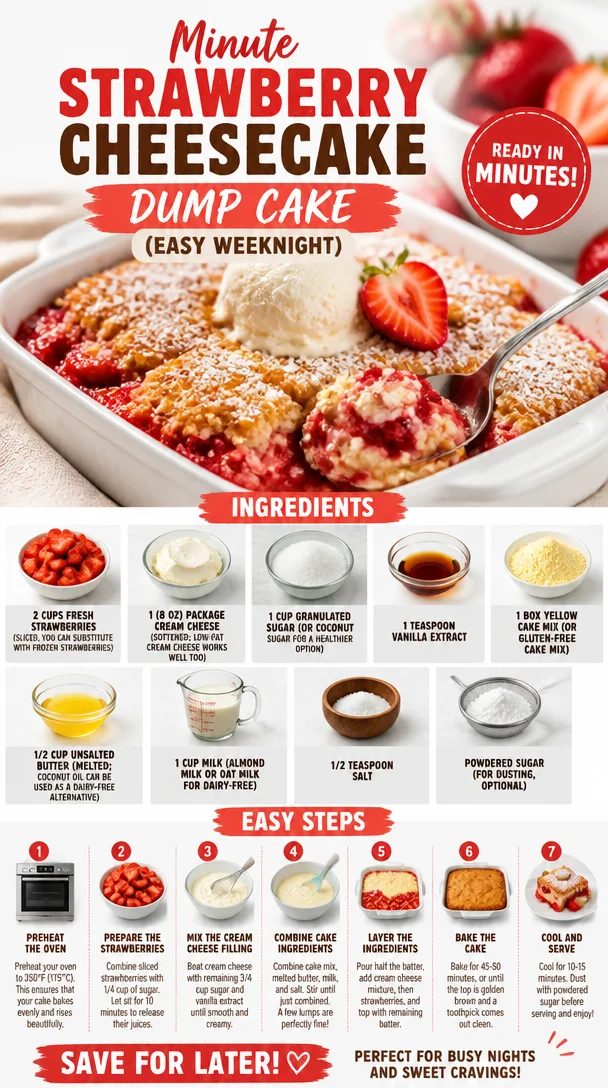
Minute Strawberry Cheesecake Dump Cake (Easy Weeknight)
Strawberry Cheesecake Dump Cake Recipe: A Deliciously Simple Treat
Welcome back to Clean Plate Cravings, where we turn fresh ingredients into feel-good dishes that satisfy both the heart and the taste buds! Today, I’m thrilled to share one of my all-time favorite desserts: the Strawberry Cheesecake Dump Cake. If you’ve never had a dump cake, you’re in for a treat! This beautiful dessert blends the creamy richness of cheesecake with the fresh sweetness of strawberries, all while being ridiculously easy to whip up.
Now, let’s talk about why I love this dessert so much! First of all, it’s perfect for those days when life gets a little hectic and you need something delicious with minimal effort. What’s better than a dessert that requires just a few ingredients and a simple mix? Plus, it’s a crowd-pleaser—whether you’re serving a small family gathering or a big backyard barbecue, you can rest assured everyone will love it.
A Taste of Nostalgia
Growing up, summer meant family picnics in the park, where my grandma would always bring her famous strawberry cheesecake. I remember running around with my cousins, the scent of barbecued burgers filling the air, and my grandma, with her trademark sun hat, carefully arranging her desserts on a colorful picnic blanket. When it came time for dessert, there was always a race to get a slice before it disappeared! Fast forward to today, and I’ve taken those cherished memories and turned them into a dessert that captures all that joy without all the fuss. This Strawberry Cheesecake Dump Cake brings the essence of those picnics right to your kitchen and ensures each bite is as heartwarming as my grandma’s original.
Ingredients
Let’s gather our ingredients for this scrumptious dessert! Here’s what you’ll need:
-
2 cups fresh strawberries (sliced): If strawberries are out of season or you prefer convenience, feel free to substitute with frozen strawberries. Just make sure to thaw and drain them before using.
-
1 (8 oz) package cream cheese (softened): Cream cheese adds that luscious cheesecake texture. Want a healthier option? Low-fat cream cheese works beautifully too!
-
1 cup granulated sugar: This sweetener marries the cheesecake layer and cake. For a healthier twist, use coconut sugar—it has a lovely caramel flavor!
-
1 teaspoon vanilla extract: A splash of vanilla elevates the flavor profile. You can also use almond extract for a different note.
-
1 box yellow cake mix: The base of our cake! If gluten is a concern, there are gluten-free options available; just make sure to check the packaging.
-
1/2 cup unsalted butter (melted): Butter leads to a moist cake; coconut oil is a fantastic dairy-free alternative if that’s your preference.
-
1 cup milk: It can be any kind—whole, almond milk, or oat milk all work wonderfully.
-
1/2 teaspoon salt: A pinch of salty goodness offsets the sweetness for a balanced flavor.
-
Powdered sugar (for dusting, optional): This adds a lovely finishing touch. Feel free to skip it for a less sweet option!
Step-by-Step Instructions
Now that our ingredients are ready, let’s dive into the kitchen and create this delightful dessert!
-
Preheat the Oven: Preheat your oven to 350°F (175°C). This ensures that our cake bakes evenly from the moment it goes in.
-
Prepare the Baking Dish: Grab a 9×13 inch baking dish. Lightly grease it with cooking spray or butter; this helps prevent any sticking, ensuring we can serve our cake without any fuss.
-
Mix the Cheesecake Layer: In a medium bowl, beat the softened cream cheese, granulated sugar, and vanilla extract together until smooth and creamy. If you have a hand mixer, it’s a lifesaver for this step! Make sure there are no lumps. You’ll want this layer to be velvety and dreamy.
-
Layer the Strawberries: Spread the sliced strawberries evenly over the bottom of your prepared baking dish. This fruity layer is the heart of our dessert, so take your time arranging them.
-
Add the Cheesecake Layer: Pour the cream cheese mixture over the strawberries, spreading it evenly with a spatula. Just imagine those strawberries soaking up all that creamy goodness!
-
Prepare the Cake Layer: In a separate bowl, combine the cake mix and salt. Next, sprinkle the cake mixture evenly over the cheesecake layer—don’t worry about getting it perfect! The magic happens when it bakes.
-
Melt the Butter: Drizzle the melted butter evenly over the top of the cake mix. This step is crucial; the butter will help to create a golden crust as the cake bakes.
-
Add Milk: Finally, pour the milk over everything. Don’t mix—this is a dump cake, after all! The milk will create a beautiful texture once it’s baked.
-
Bake: Place the dish in the oven and bake for about 40–45 minutes or until the top is golden brown and the center is set. Your kitchen will fill with the heavenly aroma of strawberries and sweet cake—trust me, it’s hard to wait!
-
Cool: Once baked, bring the cake out and let it cool for about 10–15 minutes. This cooling time is essential for the layers to settle and come together.
Serving Suggestions
To serve this gorgeous Strawbery Cheesecake Dump Cake, scoop generous portions into dessert bowls or plates. If you’re feeling a bit fancy, top with a dollop of whipped cream and a sprinkle of powdered sugar for that café-style presentation! Fresh mint leaves or a few extra strawberry slices on top make it look even more irresistible. Your guests will be impressed, and you know what? They won’t even have to know how simple it was to make!
Recipe Variations
Want to switch things up? Here are a few creative twists on this recipe:
-
Berry Blast: Swap out strawberries for blueberries, raspberries, or mixed berries for a berry medley dump cake.
-
Chocolate Chip Variation: Add a cup of chocolate chips in the cheesecake layer for a deliciously rich contrast.
-
Nutty Crunch: Stir in some chopped nuts, like pecans or walnuts, with the cake mix for added texture.
-
Coconut Delight: Sprinkle shredded coconut on top of the cake mix for a tropical touch.
-
Lemon Zing: Add a tablespoon of lemon juice and some zest to the cheesecake layer for a refreshing citrus twist.
Chef’s Notes
As with any recipe, it’s fun to play around and make it your own! I’ve made this dump cake countless times, and each version brings back those summer memories. The best part? You can whip it up with whatever fruit is in season or even your favorite frozen options in the freezer.
I once experimented with peaches and a hint of cinnamon, and let me tell you, it was a new summer favorite! The recipe continues to evolve with my cravings and the seasons—and it never fails to impress.
FAQs and Troubleshooting
Can I make this ahead of time?
Absolutely! You can prepare it a day in advance and store it in the fridge. Just let it sit at room temperature for a bit before serving.
What if my cake mix clumps?
If you notice lumps while sprinkling the cake mix, simply break them up gently with a fork. Do not worry about it being perfectly layered; it’ll bake beautifully regardless!
Can I use another type of cheese?
You can try ricotta or mascarpone as alternatives to cream cheese. The texture will change slightly, but it’ll still deliver a delicious flavor!
Why is my dump cake too soggy?
If your fruit was too wet, you might need to drain them a bit before using. Also, ensure that your oven temperature is accurate—an oven thermometer can help if you have any doubts.
Nutritional Info
Although this recipe’s main focus is indulgence, incorporating fresh strawberries does provide some nutritional benefits. Strawberries are rich in antioxidants, vitamins, and fiber!
So, there you have it! My go-to recipe for a Strawberry Cheesecake Dump Cake that’s as scrumptious as it is simple. I hope you enjoy making this delightful dessert just as much as I do. Now grab your ingredients and get ready to create sweet, joyful moments in your kitchen. Happy baking!
PrintStrawberry Cheesecake Dump Cake
A deliciously simple dessert that combines creamy cheesecake and fresh strawberries in an easy dump cake.
- Prep Time: 15 minutes
- Cook Time: 45 minutes
- Total Time: 60 minutes
- Yield: 8 servings 1x
- Category: Dessert
- Method: Baking
- Cuisine: American
- Diet: Vegetarian
Ingredients
- 2 cups fresh strawberries (sliced)
- 1 (8 oz) package cream cheese (softened)
- 1 cup granulated sugar
- 1 teaspoon vanilla extract
- 1 box yellow cake mix
- 1/2 cup unsalted butter (melted)
- 1 cup milk
- 1/2 teaspoon salt
- Powdered sugar (for dusting, optional)
Instructions
- Preheat the oven to 350°F (175°C).
- Prepare a 9×13 inch baking dish by lightly greasing it.
- Mix the cream cheese, granulated sugar, and vanilla extract until smooth.
- Layer the sliced strawberries evenly in the baking dish.
- Add the cheesecake mixture over the strawberries.
- Prepare the cake mix with salt and sprinkle it over the cheesecake layer.
- Melt the butter and drizzle it over the cake mix.
- Add the milk over everything without mixing.
- Bake for 40–45 minutes or until golden brown and set.
- Cool for 10–15 minutes before serving.
Notes
Top with whipped cream and powdered sugar before serving. For variations, try different berries or add chocolate chips!
Nutrition
- Serving Size: 1 serving
- Calories: 350
- Sugar: 25g
- Sodium: 300mg
- Fat: 16g
- Saturated Fat: 8g
- Unsaturated Fat: 6g
- Trans Fat: 0g
- Carbohydrates: 45g
- Fiber: 2g
- Protein: 5g
- Cholesterol: 30mg
Keywords: strawberry, cheesecake, dump cake, dessert, easy dessert