Minute Mushroom and Goat Cheese Pizza for Weeknight Wins
The Irresistible Allure of Mushroom and Goat Cheese Pizza
Welcome to an adventure in flavors that is both delicious and comforting! Today, we’re diving into the earthy, rich world of Mushroom and Goat Cheese Pizza—a dish that beautifully balances vibrant umami flavors with creamy goodness. If you’re dreaming of a quick lunch, a cozy dinner, or a showstopper to impress your friends, this pizza is your answer. Whether you’re gathering around the dinner table or whipping up a late-night snack, I’ve got your back.
Picture this: the aroma of sautéed garlic and mushrooms wafting through your kitchen, the rhythmic sound of dough being stretched, and the anticipation building as you layer the luscious goat cheese atop savory sautéed mushrooms. It’s satisfying, and yes, it’s downright fun! This dish doesn’t just satisfy hunger; it feeds the soul.
Now, let’s take a moment to explore why I love this pizza so much. It’s not only about flavor; it’s about experience. I remember the first time I made this pizza—it was a rainy Sunday afternoon, and I was cozying up indoors with some good music and a handful of fresh ingredients from my local farmer’s market. The moment the garlic hit the pan, I felt that rush of joy that only cooking can provide. It felt like a warm hug from the inside out, and I couldn’t wait to share this experience with you all.
So, grab your apron, and let’s get cooking!
A Slice of Nostalgia
Many of my favorite culinary memories are tied to comfort food, especially pizza. I remember it vividly—school nights spent assembling pizzas with my siblings, where each one of us would claim a corner of the table with our favorite toppings. My brother was all about pepperoni, while my sister piled on veggies, and I, ever the cheese lover, discovered my fascination with goat cheese amidst the chaos.
One particular evening resonated more than others. We decided to create a “fancy pizza night,” which meant no ordinary toppings. Armed with a set of fresh mushrooms and a fresh log of goat cheese, I felt like a gourmet chef! As we piled our creations high with ingredients, the kitchen transformed into our culinary playground, filled with laughter, flour-covered counters, and mischievous debates over which pizza was the best.
I will never forget that first bite—crispy crust, creamy cheese, and the deep flavor of sautéed mushrooms! It was a tiny celebration of family, creativity, and of course, deliciousness! Since that night, I’ve carried the spirit of those pizza-making evenings into my cooking, experimenting and evolving, yet always finding comfort in the flavor combinations that sparked joy.
Ingredients
Here’s what you’ll need to create this culinary masterpiece:
-
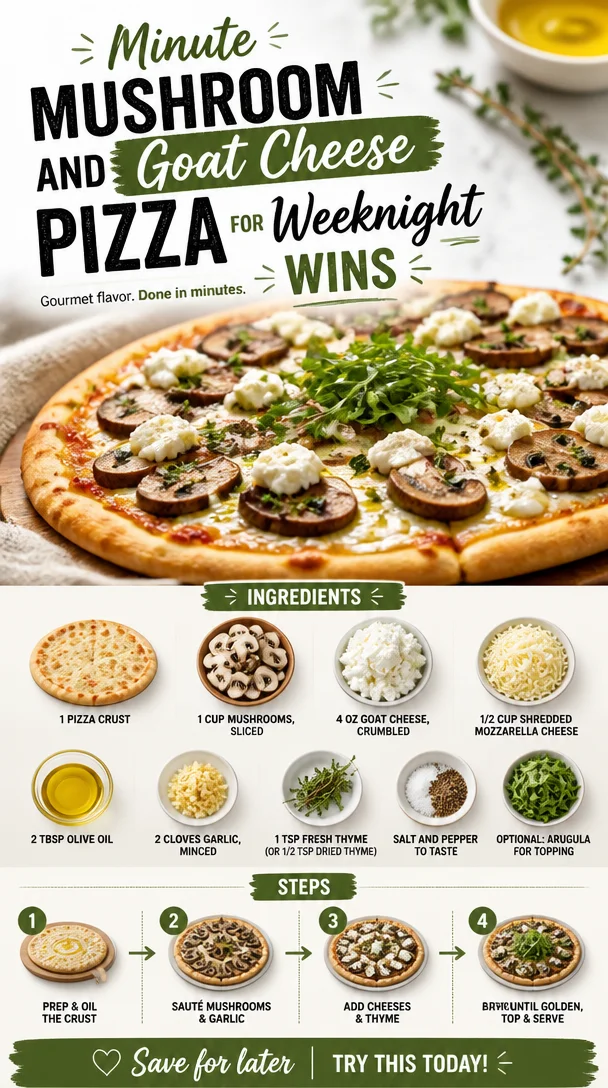
1 pizza crust
Choose your favorite! You can go with a store-bought option for ease, or make your own from scratch. If you’re looking for a twist, consider using cauliflower crust for a gluten-free alternative. -
1 cup mushrooms, sliced
Button or cremini mushrooms work well here, but feel free to experiment with shiitake or portobello for a bolder flavor. Tired of mushrooms? Swap them for thinly sliced zucchini or bell peppers! -
4 oz goat cheese, crumbled
Goat cheese adds a creamy texture and tangy punch to the pizza. If you’re not a goat cheese fan, try feta or ricotta for a similar creaminess! -
1/2 cup shredded mozzarella cheese
Mozzarella provides that melty, gooey factor we love about pizza. For a dairy-free option, use a plant-based cheese alternative or simply increase the goat cheese amount. -
2 tbsp olive oil
Olive oil is essential for sautéing your mushrooms and garlic, giving them a rich flavor. You can use butter for a creamier option or avocado oil for a higher smoke point. -
2 cloves garlic, minced
Garlic adds an aromatic touch. If you’re in a pinch, garlic powder can do the trick in a flavor emergency, but fresh garlic is where the heart is! -
1 tsp fresh thyme (or 1/2 tsp dried thyme)
Thyme brings an earthy tone that complements the mushrooms beautifully. If thyme isn’t your thing, feel free to swap it out for fresh basil or oregano. -
Salt and pepper to taste
Essential seasonings that elevate your dish from good to great! -
Optional: arugula for topping
Arugula adds a peppery freshness to the finished pizza. Other options include fresh basil, spinach, or even a drizzle of balsamic glaze for that gourmet touch!
Step-by-Step Instructions
Are you ready to make the magic happen? Let’s get cracking!
-
Preheat the Oven
Preheat your oven to 475°F (245°C). This high temperature will lead to a crispy crust that we all crave in our pizza. If you’re using a pizza stone, toss it in the oven as it heats – a hot stone means an even crispier base! -
Prepare Your Ingredients
While the oven is heating up, let’s prep! Slice those mushrooms, crumble the goat cheese, and mince the garlic. Having everything ready will keep you organized and make the cooking process smoother. Trust me, something about prepped ingredients makes you feel like a chef in a five-star restaurant! -
Sauté the Mushrooms and Garlic
In a large skillet, heat 2 tbsp of olive oil over medium heat. Once the oil is shimmering, add the minced garlic and sauté for about 30 seconds until fragrant. Don’t walk away; burnt garlic is not your friend! Next, add the sliced mushrooms, stirring occasionally for about 5-7 minutes until they’re golden brown and tender. Season with salt, pepper, and thyme. This step is crucial for infusing the mushrooms with deep flavor! -
Roll Out Your Pizza Dough
If you’re working with store-bought dough, you can usually just unroll and place it on your baking sheet or pizza stone. If making your own, on a floured surface, roll the dough out to your desired thickness. Stretch it, twirl it, and have fun with it! Your pizza should be 10-12 inches in diameter—thin for that crispiness! -
Assemble the Pizza
Place your rolled-out crust on a parchment-lined baking sheet or the hot pizza stone. Start with the mozzarella cheese as your base for the toppings, followed by the sautéed mushrooms and garlic mixture, and finish with the crumbled goat cheese. Don’t be shy with the cheese—more is more! -
Bake the Pizza
Slide that gorgeous pizza into your preheated oven. Bake it for about 12-15 minutes or until the crust is bubbling and golden. Midway through, keep an eye on it; every oven behaves differently, and you want that perfect crust! -
Finish and Garnish
Once out of the oven, let your pizza rest for a minute or two. If you’re using arugula, scatter it on top just before slicing for that extra fresh kick. Drizzle with a little olive oil or balsamic glaze for sophistication—who says pizza can’t be gourmet?
Serving Suggestions
Cut your Mushroom and Goat Cheese Pizza into generous slices and serve it on a beautiful wooden board or colorful plate for an inviting presentation. Pair it with a light salad, perhaps a simple arugula and cherry tomato salad drizzled with balsamic vinaigrette, to balance out the richness of the cheese.
For drinks, a crisp white wine or a refreshing sparkling water with lemon can complement the earthy flavors beautifully. It’s all about enhancing the experience, folks!
Recipe Variations
Feel like switching things up? Here are a few ideas to try:
- Pesto Pizza: Spread a thin layer of pesto on the crust before adding the cheese and mushrooms for a burst of herby flavor.
- Truffle Mushroom Pizza: Drizzle some truffle oil over the finished pizza for a luxurious twist that will elevate your game!
- Vegan Version: Use plant-based cheese, substitute sautéed tofu or tempeh for the mushrooms, and load it up with veggies like bell peppers and artichokes.
- Spicy Kick: Sprinkle some red pepper flakes or add jalapeño slices for those who crave a bit of heat.
- Italian Flair: Top the pizza with prosciutto or salami for a meaty flavor explosion!
Chef’s Notes
This Mushroom and Goat Cheese Pizza has become a staple in my kitchen for a reason! It’s a dish that comes together quickly but tastes like you put in hours of effort. Over time, I’ve experimented with different cheeses, and I’ve discovered that a pinch of nutmeg added to the mushrooms before sautéing adds an unexpected warmth that my tastebuds just can’t resist!
Plus, let’s be real—there’s something utterly satisfying about pulling a freshly baked pizza out of the oven. Feel free to make this pizza your own! Cooking is all about exploring, so don’t hesitate to play with the ingredients and have a blast doing it.
FAQs and Troubleshooting
1. My pizza didn’t get crispy, what went wrong?
Make sure your oven is truly preheated! If you’re using a baking sheet instead of a pizza stone, try preheating the sheet beforehand for an extra crisp.
2. Can I use frozen dough?
Absolutely! Just ensure to thaw it according to package instructions and roll it out as you would fresh dough.
3. What’s the best way to store leftover pizza?
Store it in an airtight container in the fridge for up to 3 days. To reheat, pop it back in the oven at 350°F (175°C) for about 10 minutes for best results—you want that cheese to melt again!
4. How can I make this pizza gluten-free?
Use a gluten-free pizza crust; many great options are available at your local grocery store! Just follow the package instructions for best results.
Nutritional Info
Each serving of this Mushroom and Goat Cheese Pizza should provide a balance of flavors and nutrients to satisfy your cravings while keeping it light and healthy. Ingredients can vary in nutritional values based on portion sizes and brands, but on average, one slice contains approximately:
- Calories: 250
- Protein: 10g
- Carbohydrates: 30g
- Fat: 12g
This pizza is a delightful balance between satisfaction and nourishment—perfect for any meal of the day!
And there you have it—a Mushroom and Goat Cheese Pizza that’s as delightful to make as it is to eat! Let it bring you the same joy it has brought me, as well as a splash of creativity in your kitchen. Remember, cooking is not just about the end product; it’s about the journey enjoyed along the way. Happy cooking, my fellow foodies! 🥳🍕
PrintMushroom and Goat Cheese Pizza

A delightful mushroom and goat cheese pizza that combines earthy flavors and creamy goodness for a comforting meal.
- Prep Time: 15 minutes
- Cook Time: 15 minutes
- Total Time: 30 minutes
- Yield: 4 servings 1x
- Category: Main Course
- Method: Baking
- Cuisine: Italian
- Diet: Vegetarian
Ingredients
- 1 pizza crust
- 1 cup mushrooms, sliced
- 4 oz goat cheese, crumbled
- 1/2 cup shredded mozzarella cheese
- 2 tbsp olive oil
- 2 cloves garlic, minced
- 1 tsp fresh thyme (or 1/2 tsp dried thyme)
- Salt and pepper to taste
- Optional: arugula for topping
Instructions
- Preheat your oven to 475°F (245°C).
- Prepare your ingredients: slice the mushrooms, crumble the goat cheese, and mince the garlic.
- Sauté the garlic in olive oil over medium heat for about 30 seconds, then add the mushrooms and cook for 5-7 minutes until golden brown.
- Roll out your pizza dough to a thickness of your choice.
- Assemble the pizza: place the mozzarella, sautéed mushrooms and garlic, and goat cheese on the crust.
- Bake for 12-15 minutes or until the crust is golden and bubbling.
- Finish with arugula on top and drizzle with olive oil or balsamic glaze.
Notes
Feel free to experiment with different cheeses and toppings like pesto, truffle oil, or veggies for variations.
Nutrition
- Serving Size: 1 slice
- Calories: 250
- Sugar: 2g
- Sodium: 350mg
- Fat: 12g
- Saturated Fat: 4g
- Unsaturated Fat: 6g
- Trans Fat: 0g
- Carbohydrates: 30g
- Fiber: 2g
- Protein: 10g
- Cholesterol: 20mg
Keywords: pizza, mushroom, goat cheese, vegetarian recipe, comfort food
One-Bowl Chocolate Zucchini Cake: Quick Weeknight Bake
A Decadent Delight: Chocolate Zucchini Cake Recipe
Welcome back, fellow foodies! Today, we’re diving into an absolute gem of a recipe that’s not only a feast for your taste buds but also a sneaky way to sneak in some nutrition – we’re talking about Chocolate Zucchini Cake! Yes, you heard that right. This luscious cake combines rich chocolatey goodness with the moisture of zucchini, making it incredibly moist and fluffy. Whether you’re trying to use up some surplus zucchini from your garden (or your next-door neighbor’s garden), or you just have a craving for something sweet and delicious, this cake is here to satisfy.
So, let’s roll up our sleeves and get baking! But first, let me share a little backstory that makes this recipe even more special.
A Slice of Nostalgia
This Chocolate Zucchini Cake recipe brings back fond memories from my childhood when my grandmother would whip it up on lazy summer afternoons. I can still see her in the kitchen, apron tied snugly around her waist, a mischievous twinkle in her eye as she beckoned me closer to the counter. The smell of chocolate wafted through the air, an intoxicating blend of sweetness and warmth that made my heart flutter.
“Trust me, my dear,” she would say, sliding a slice of still-warm cake in front of me. “You’ll never know there’s zucchini in it!” I often wondered how she pulled off this chocolate magic trick. As a kid, I was skeptical, but one bite into that cake and I was convinced! The rich flavor and moist texture were utterly irresistible.
Those afternoons were filled with laughter, flour-covered countertops, and the pure joy of creating something together. Now, as I share this recipe with you, I feel connected to those memories every time I bake it. It’s a reminder that cooking is about love, creativity, and, of course, a touch of sweetness.
Ingredients
Let’s check out the ingredients you’ll need for this decadent Chocolate Zucchini Cake!
-
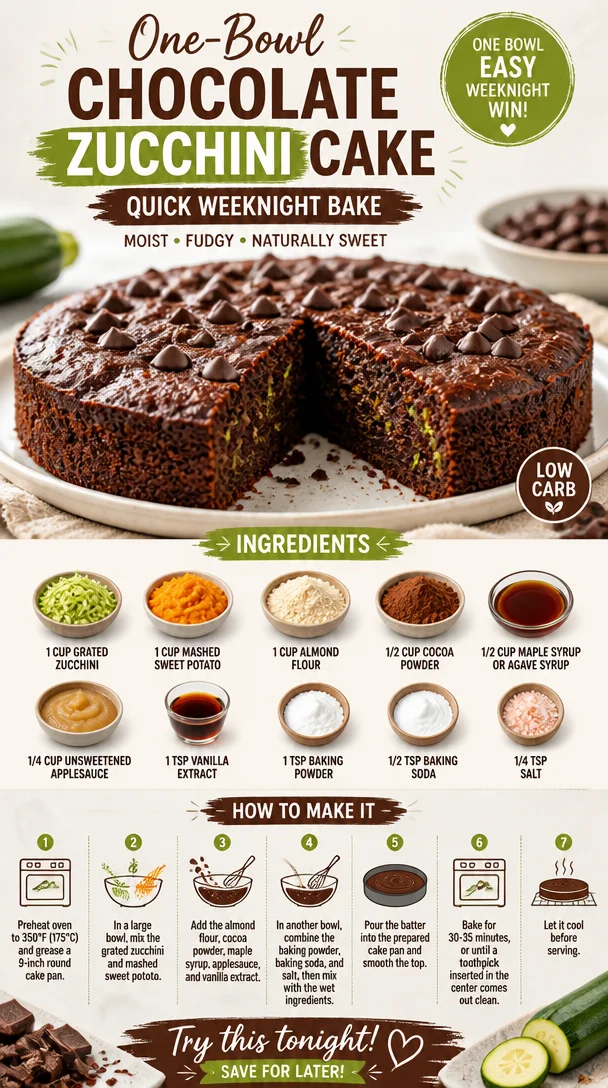
1 cup grated zucchini: Zucchini adds moisture and a subtle sweetness. You can use yellow squash as a fun substitute if you’re looking for a little variety! Just be sure to squeeze out any excess moisture beforehand to avoid a soggy batter.
-
1 cup mashed sweet potato: This natural sweetener adds creaminess and depth of flavor. Canned sweet potato works perfectly here but feel free to roast and mash your own if you’re looking for that homemade touch!
-
1 cup almond flour: Almond flour gives this cake a lovely nutty flavor and keeps it gluten-free. If you need a substitution, oat flour or a gluten-free all-purpose blend can do the trick.
-
1/2 cup cocoa powder: You can’t have a chocolate cake without cocoa powder! For a deeper flavor, opt for Dutch-processed cocoa. But if you’re going for an intense chocolate hit, feel free to use a mix of cocoa and dark chocolate.
-
1/2 cup maple syrup or agave syrup: This natural sweetener elevates the cake while keeping it moist. Honey can work too, but it’s a bit sweeter, so adjust to taste.
-
1/4 cup unsweetened applesauce: Applesauce adds moisture with a subtle sweet flavor. You can substitute it with more mashed banana or additional sweet potato if you wish.
-
1 tsp vanilla extract: This aromatic ingredient amplifies flavors and gives the cake a warm, inviting essence. Make sure to go for real vanilla extract – your taste buds will thank you!
-
1 tsp baking powder: This leavening agent helps the cake rise beautifully. Always double-check its freshness for the best results!
-
1/2 tsp baking soda: A little extra oomph for rising! If you’re out of baking soda, you can replace it with more baking powder at a 1:3 ratio.
-
1/4 tsp salt: A pinch of salt enhances all the flavors; it’s like a secret weapon in baking! Feel free to use sea salt for a more robust taste.
Step-by-Step Instructions
Now that we have our ingredients lined up like a culinary dream team, let’s get into the magic of making this cake!
-
Preheat Your Oven
Preheat your oven to 350°F (175°C). This is crucial, as it allows your cake to rise and bake evenly. It’s like a warm-up for your batter! -
Prepare Your Baking Pan
Grab an 8-inch square cake pan (or round if you prefer) and grease it lightly with oil or cooking spray. You can also line it with parchment paper for easy removal. Trust me; you don’t want a beautiful cake stuck in the pan! -
Grate the Zucchini
Using a box grater or food processor, grate your zucchini finely. Once you’ve got a cup, place it in a clean kitchen towel and wring out any excess moisture. This step is super important for achieving that perfect cake consistency. -
Mash the Sweet Potato
If using fresh sweet potatoes, roast them until tender, then scoop the flesh into a bowl and mash. If you prefer the canned version, make sure it’s unsweetened and mash it up until smooth. -
Mix the Wet Ingredients
In a large mixing bowl, combine the grated zucchini, mashed sweet potato, maple syrup (or agave), applesauce, and vanilla extract. Use a whisk or spatula to combine until the mixture is smooth and well-combined. I love getting my hands in here too – the texture is so satisfying! -
Combine the Dry Ingredients
In another bowl, sift together the almond flour, cocoa powder, baking powder, baking soda, and salt. Sifting helps remove lumps and guarantees a lighter cake. Just think of it as a mini workout! -
Combine Wet and Dry
Gradually incorporate the dry mixture into the wet ingredients. Gently fold them together using a spatula or wooden spoon, taking care not to overmix. You want a beautifully blended batter, not a tough one! -
Pour and Bake
Pour the batter into your prepared cake pan, smoothing the top with a spatula. Pop it in the preheated oven and bake for about 25-30 minutes, or until a toothpick inserted in the center comes out clean. The smell wafting through your kitchen will be pure bliss! -
Cool Down
Once done, remove the cake from the oven and let it cool in the pan for about 10 minutes. Then, carefully turn it out onto a wire rack to cool completely – if you can resist not diving in right away!
Serving Suggestions
When it comes to serving this chocolatey creation, presentation is key! Dust the top with a sprinkle of powdered sugar for a fancy touch, or drizzle with a little melted dark chocolate. For an extra indulgent treat, serve a slice warm with a dollop of whipped coconut cream or your favorite ice cream. Your friends and family will be in chocolate heaven!
Recipe Variations
Here are a few delicious twists to keep this Chocolate Zucchini Cake vibrant and exciting:
- Add Mix-Ins: Toss in a handful of chocolate chips or chopped walnuts for added texture.
- Nut Butter Swirl: Dollop some almond or peanut butter into the batter before baking for a surprise creamy center.
- Spiced Delight: Add a pinch of cinnamon or espresso powder to the batter to deepen the flavors.
- Frosting Options: Top with a light frosting made from Greek yogurt and cocoa powder for a yogurt-based treat, or keep it simple with a vegan cream cheese frosting.
Chef’s Notes
This recipe has evolved over time, and I can’t help but smile every time I bake it. Initially, I made it just for myself during my health-conscious foodie phase, but soon my friends caught wind of this chocolate delight. It became an instant favorite at gatherings, and I love seeing the surprised expressions when I reveal the star ingredient: zucchini!
There was one time I forgot to strain the zucchini, and let’s just say it was a very "moist" cake! But hey, those moments are what make cooking so adventurous, right? Each time I bake, I remember my grandmother’s laughter and love infusing each bite.
FAQs and Troubleshooting
1. Why is my cake too dense?
If your cake is dense, it might be due to overmixing the batter or not measuring the ingredients accurately. Make sure to fold gently and use the right measurements, especially with the flour!
2. Can I freeze this cake?
Absolutely! This Chocolate Zucchini Cake freezes beautifully. Wrap it tightly in plastic wrap and foil to prevent freezer burn. When you’re ready, thaw it in the fridge overnight.
3. What if I don’t have almond flour?
No worries! You can substitute almond flour with any other nut flour, or a gluten-free all-purpose flour work perfectly if you’re aiming for a gluten-free alternative.
4. Can I use other vegetables?
Definitely! Carrots are a fantastic swap if you want to try a veggie twist. Just prepare them similarly by grating, and you’ll end up with a deliciously moist cake.
Nutritional Info
While I won’t delve too deeply into numbers, I will say this Chocolate Zucchini Cake is a delightful treat that provides a nice serving of fiber thanks to the veggies! It’s a little less sweet and heavy than traditional cakes, making it a great guilt-free indulgence.
So there you have it! A fun and fabulous recipe for Chocolate Zucchini Cake that’s sure to impress and delight. Let me know when you try it and if you make any variations! Happy baking, and remember to keep it fresh and delicious.
PrintChocolate Zucchini Cake
A decadent and moist chocolate zucchini cake that is both delicious and nutritious.
- Prep Time: 15 minutes
- Cook Time: 30 minutes
- Total Time: 45 minutes
- Yield: 8 servings 1x
- Category: Dessert
- Method: Baking
- Cuisine: American
- Diet: Vegetarian
Ingredients
- 1 cup grated zucchini
- 1 cup mashed sweet potato
- 1 cup almond flour
- 1/2 cup cocoa powder
- 1/2 cup maple syrup or agave syrup
- 1/4 cup unsweetened applesauce
- 1 tsp vanilla extract
- 1 tsp baking powder
- 1/2 tsp baking soda
- 1/4 tsp salt
Instructions
- Preheat your oven to 350°F (175°C).
- Prepare an 8-inch square or round cake pan by greasing it lightly with oil or cooking spray.
- Grate the zucchini finely and squeeze out excess moisture using a clean kitchen towel.
- Mash the sweet potato until smooth.
- Mix the wet ingredients: zucchini, sweet potato, maple syrup (or agave), applesauce, and vanilla extract in a large bowl.
- Combine the dry ingredients: almond flour, cocoa powder, baking powder, baking soda, and salt in another bowl.
- Combine the wet and dry mixtures gently without overmixing.
- Pour the batter into the prepared pan and smooth the top.
- Bake for about 25-30 minutes, or until a toothpick comes out clean.
- Cool in the pan for 10 minutes, then transfer to a wire rack to cool completely.
Notes
Top with powdered sugar or melted dark chocolate for serving. Can add chocolate chips or nuts for extra texture.
Nutrition
- Serving Size: 1 slice
- Calories: 250
- Sugar: 14g
- Sodium: 180mg
- Fat: 9g
- Saturated Fat: 1g
- Unsaturated Fat: 5g
- Trans Fat: 0g
- Carbohydrates: 38g
- Fiber: 4g
- Protein: 4g
- Cholesterol: 0mg
Keywords: Chocolate Zucchini Cake, Healthy Dessert, Moist Cake, Baking, Zucchini Recipes
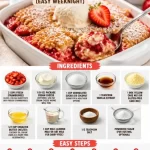
Minute Strawberry Cheesecake Dump Cake (Easy Weeknight)
Strawberry Cheesecake Dump Cake Recipe: A Deliciously Simple Treat
Welcome back to Clean Plate Cravings, where we turn fresh ingredients into feel-good dishes that satisfy both the heart and the taste buds! Today, I’m thrilled to share one of my all-time favorite desserts: the Strawberry Cheesecake Dump Cake. If you’ve never had a dump cake, you’re in for a treat! This beautiful dessert blends the creamy richness of cheesecake with the fresh sweetness of strawberries, all while being ridiculously easy to whip up.
Now, let’s talk about why I love this dessert so much! First of all, it’s perfect for those days when life gets a little hectic and you need something delicious with minimal effort. What’s better than a dessert that requires just a few ingredients and a simple mix? Plus, it’s a crowd-pleaser—whether you’re serving a small family gathering or a big backyard barbecue, you can rest assured everyone will love it.
A Taste of Nostalgia
Growing up, summer meant family picnics in the park, where my grandma would always bring her famous strawberry cheesecake. I remember running around with my cousins, the scent of barbecued burgers filling the air, and my grandma, with her trademark sun hat, carefully arranging her desserts on a colorful picnic blanket. When it came time for dessert, there was always a race to get a slice before it disappeared! Fast forward to today, and I’ve taken those cherished memories and turned them into a dessert that captures all that joy without all the fuss. This Strawberry Cheesecake Dump Cake brings the essence of those picnics right to your kitchen and ensures each bite is as heartwarming as my grandma’s original.
Ingredients
Let’s gather our ingredients for this scrumptious dessert! Here’s what you’ll need:
-
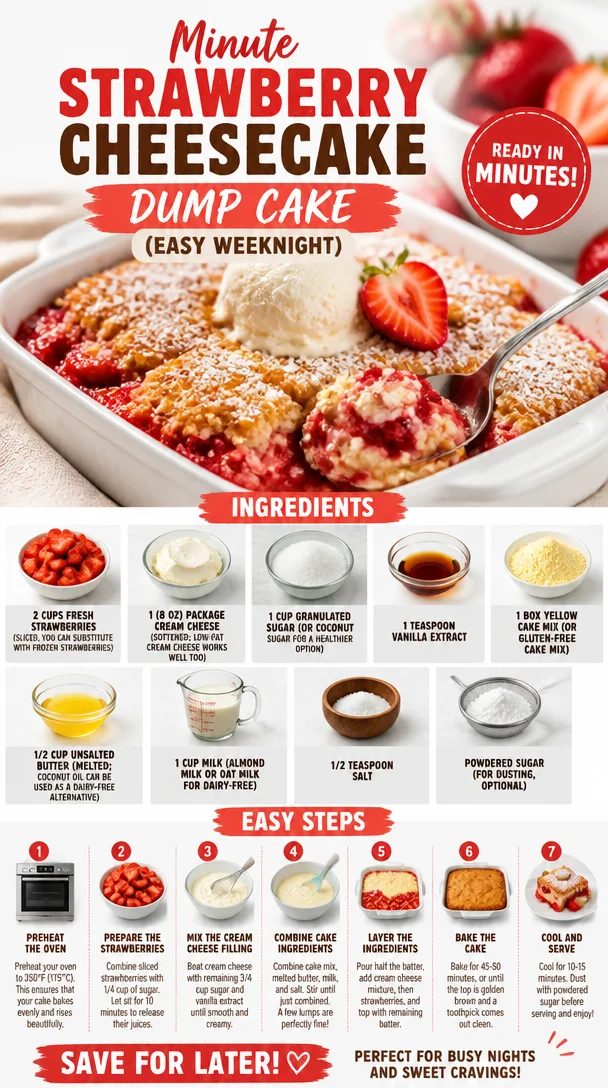
2 cups fresh strawberries (sliced): If strawberries are out of season or you prefer convenience, feel free to substitute with frozen strawberries. Just make sure to thaw and drain them before using.
-
1 (8 oz) package cream cheese (softened): Cream cheese adds that luscious cheesecake texture. Want a healthier option? Low-fat cream cheese works beautifully too!
-
1 cup granulated sugar: This sweetener marries the cheesecake layer and cake. For a healthier twist, use coconut sugar—it has a lovely caramel flavor!
-
1 teaspoon vanilla extract: A splash of vanilla elevates the flavor profile. You can also use almond extract for a different note.
-
1 box yellow cake mix: The base of our cake! If gluten is a concern, there are gluten-free options available; just make sure to check the packaging.
-
1/2 cup unsalted butter (melted): Butter leads to a moist cake; coconut oil is a fantastic dairy-free alternative if that’s your preference.
-
1 cup milk: It can be any kind—whole, almond milk, or oat milk all work wonderfully.
-
1/2 teaspoon salt: A pinch of salty goodness offsets the sweetness for a balanced flavor.
-
Powdered sugar (for dusting, optional): This adds a lovely finishing touch. Feel free to skip it for a less sweet option!
Step-by-Step Instructions
Now that our ingredients are ready, let’s dive into the kitchen and create this delightful dessert!
-
Preheat the Oven: Preheat your oven to 350°F (175°C). This ensures that our cake bakes evenly from the moment it goes in.
-
Prepare the Baking Dish: Grab a 9×13 inch baking dish. Lightly grease it with cooking spray or butter; this helps prevent any sticking, ensuring we can serve our cake without any fuss.
-
Mix the Cheesecake Layer: In a medium bowl, beat the softened cream cheese, granulated sugar, and vanilla extract together until smooth and creamy. If you have a hand mixer, it’s a lifesaver for this step! Make sure there are no lumps. You’ll want this layer to be velvety and dreamy.
-
Layer the Strawberries: Spread the sliced strawberries evenly over the bottom of your prepared baking dish. This fruity layer is the heart of our dessert, so take your time arranging them.
-
Add the Cheesecake Layer: Pour the cream cheese mixture over the strawberries, spreading it evenly with a spatula. Just imagine those strawberries soaking up all that creamy goodness!
-
Prepare the Cake Layer: In a separate bowl, combine the cake mix and salt. Next, sprinkle the cake mixture evenly over the cheesecake layer—don’t worry about getting it perfect! The magic happens when it bakes.
-
Melt the Butter: Drizzle the melted butter evenly over the top of the cake mix. This step is crucial; the butter will help to create a golden crust as the cake bakes.
-
Add Milk: Finally, pour the milk over everything. Don’t mix—this is a dump cake, after all! The milk will create a beautiful texture once it’s baked.
-
Bake: Place the dish in the oven and bake for about 40–45 minutes or until the top is golden brown and the center is set. Your kitchen will fill with the heavenly aroma of strawberries and sweet cake—trust me, it’s hard to wait!
-
Cool: Once baked, bring the cake out and let it cool for about 10–15 minutes. This cooling time is essential for the layers to settle and come together.
Serving Suggestions
To serve this gorgeous Strawbery Cheesecake Dump Cake, scoop generous portions into dessert bowls or plates. If you’re feeling a bit fancy, top with a dollop of whipped cream and a sprinkle of powdered sugar for that café-style presentation! Fresh mint leaves or a few extra strawberry slices on top make it look even more irresistible. Your guests will be impressed, and you know what? They won’t even have to know how simple it was to make!
Recipe Variations
Want to switch things up? Here are a few creative twists on this recipe:
-
Berry Blast: Swap out strawberries for blueberries, raspberries, or mixed berries for a berry medley dump cake.
-
Chocolate Chip Variation: Add a cup of chocolate chips in the cheesecake layer for a deliciously rich contrast.
-
Nutty Crunch: Stir in some chopped nuts, like pecans or walnuts, with the cake mix for added texture.
-
Coconut Delight: Sprinkle shredded coconut on top of the cake mix for a tropical touch.
-
Lemon Zing: Add a tablespoon of lemon juice and some zest to the cheesecake layer for a refreshing citrus twist.
Chef’s Notes
As with any recipe, it’s fun to play around and make it your own! I’ve made this dump cake countless times, and each version brings back those summer memories. The best part? You can whip it up with whatever fruit is in season or even your favorite frozen options in the freezer.
I once experimented with peaches and a hint of cinnamon, and let me tell you, it was a new summer favorite! The recipe continues to evolve with my cravings and the seasons—and it never fails to impress.
FAQs and Troubleshooting
Can I make this ahead of time?
Absolutely! You can prepare it a day in advance and store it in the fridge. Just let it sit at room temperature for a bit before serving.
What if my cake mix clumps?
If you notice lumps while sprinkling the cake mix, simply break them up gently with a fork. Do not worry about it being perfectly layered; it’ll bake beautifully regardless!
Can I use another type of cheese?
You can try ricotta or mascarpone as alternatives to cream cheese. The texture will change slightly, but it’ll still deliver a delicious flavor!
Why is my dump cake too soggy?
If your fruit was too wet, you might need to drain them a bit before using. Also, ensure that your oven temperature is accurate—an oven thermometer can help if you have any doubts.
Nutritional Info
Although this recipe’s main focus is indulgence, incorporating fresh strawberries does provide some nutritional benefits. Strawberries are rich in antioxidants, vitamins, and fiber!
So, there you have it! My go-to recipe for a Strawberry Cheesecake Dump Cake that’s as scrumptious as it is simple. I hope you enjoy making this delightful dessert just as much as I do. Now grab your ingredients and get ready to create sweet, joyful moments in your kitchen. Happy baking!
PrintStrawberry Cheesecake Dump Cake
A deliciously simple dessert that combines creamy cheesecake and fresh strawberries in an easy dump cake.
- Prep Time: 15 minutes
- Cook Time: 45 minutes
- Total Time: 60 minutes
- Yield: 8 servings 1x
- Category: Dessert
- Method: Baking
- Cuisine: American
- Diet: Vegetarian
Ingredients
- 2 cups fresh strawberries (sliced)
- 1 (8 oz) package cream cheese (softened)
- 1 cup granulated sugar
- 1 teaspoon vanilla extract
- 1 box yellow cake mix
- 1/2 cup unsalted butter (melted)
- 1 cup milk
- 1/2 teaspoon salt
- Powdered sugar (for dusting, optional)
Instructions
- Preheat the oven to 350°F (175°C).
- Prepare a 9×13 inch baking dish by lightly greasing it.
- Mix the cream cheese, granulated sugar, and vanilla extract until smooth.
- Layer the sliced strawberries evenly in the baking dish.
- Add the cheesecake mixture over the strawberries.
- Prepare the cake mix with salt and sprinkle it over the cheesecake layer.
- Melt the butter and drizzle it over the cake mix.
- Add the milk over everything without mixing.
- Bake for 40–45 minutes or until golden brown and set.
- Cool for 10–15 minutes before serving.
Notes
Top with whipped cream and powdered sugar before serving. For variations, try different berries or add chocolate chips!
Nutrition
- Serving Size: 1 serving
- Calories: 350
- Sugar: 25g
- Sodium: 300mg
- Fat: 16g
- Saturated Fat: 8g
- Unsaturated Fat: 6g
- Trans Fat: 0g
- Carbohydrates: 45g
- Fiber: 2g
- Protein: 5g
- Cholesterol: 30mg
Keywords: strawberry, cheesecake, dump cake, dessert, easy dessert
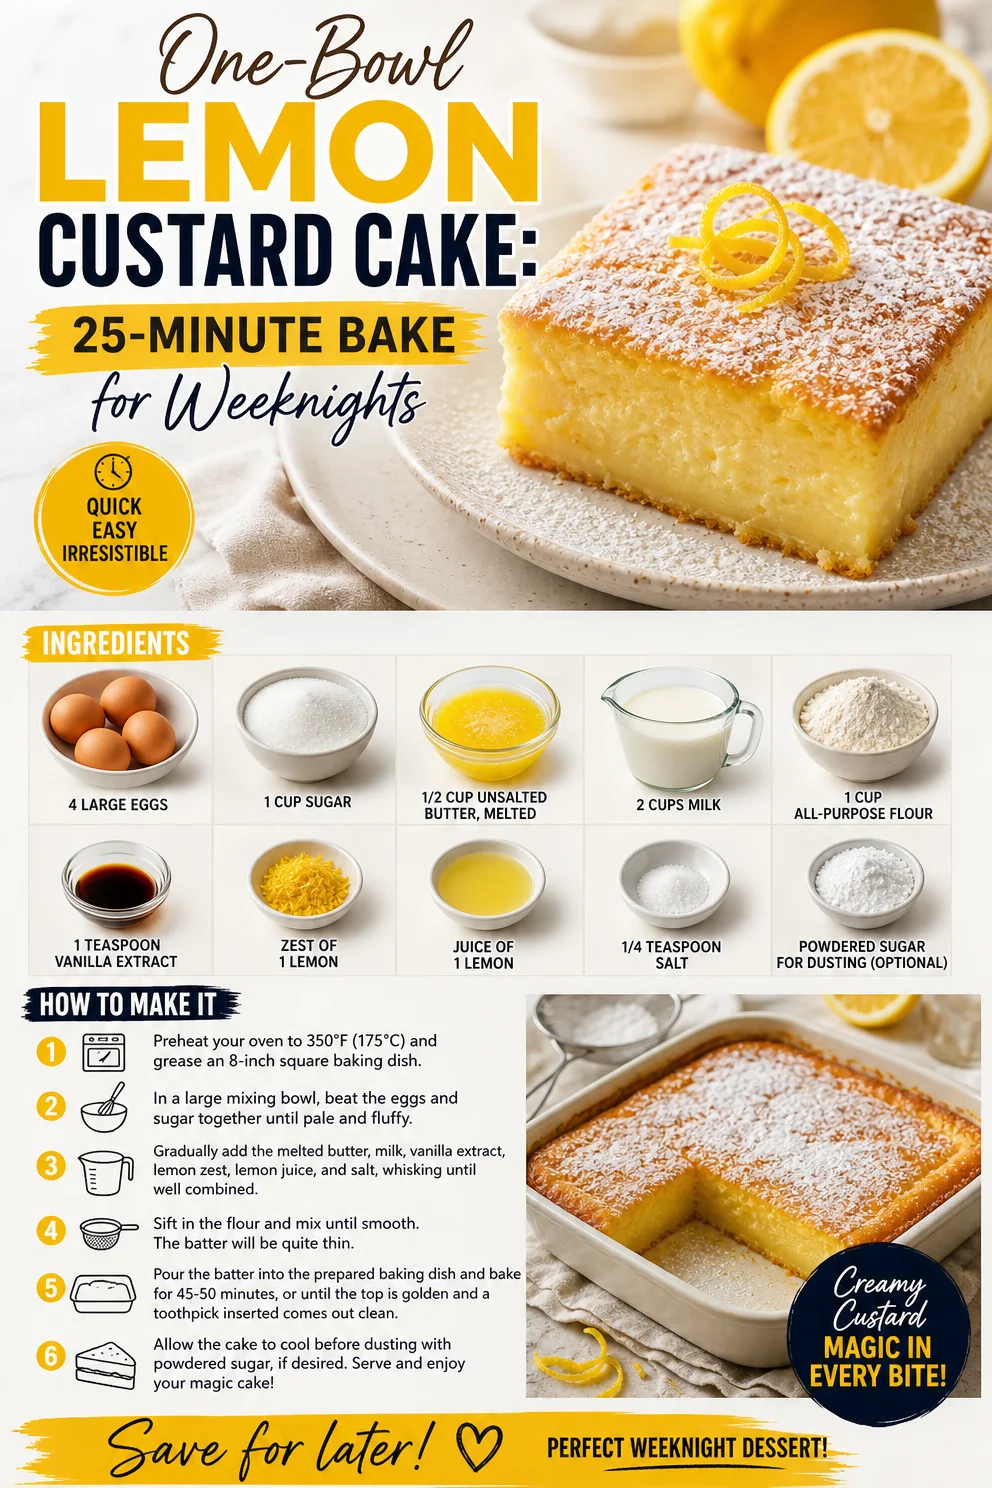
One-Bowl Lemon Custard Cake: 25-Minute Bake for Weeknights
Discover the Magic of Lemon Custard Cake
Hello, fellow food lovers! Today, I’m thrilled to share a little slice of sunshine with you—my beloved Magic Lemon Custard Cake. This isn’t just any dessert; it’s a delightful fusion of tangy lemon flavors and creamy custard that magically transforms as it bakes. If you’re looking for that perfect balance of sweet and tart, this cake is your ticket to flavor town!
Picture this: it’s a lazy Sunday afternoon, and the light filtering through the kitchen window illuminates a gathering of friends around the table. Each person is eagerly discussing everything from weekend plans to travel escapades while the scent of something fresh and lemony wafts through the air. That magical moment when cake comes out of the oven and the anticipation builds—it’s this experience that inspired me to craft this recipe. Cooking is more than just nutrition; it’s about creating memories and enjoying the vibrant tapestry of life through food.
As the custard cake cools, something incredible happens. The top layer becomes light and airy, while the bottom sinks into a rich, creamy custard. It’s a delicious surprise in every bite, and I just know you and your loved ones will savor every moment together with this delightful dish!
A Slice of Nostalgia
You know, food has this amazing ability to take you back to special moments in the past. For me, that moment happened in my grandmother’s cozy kitchen every summer. She would whip up her famous lemon meringue pie, and the family would gather around her as she squeezed fresh lemons and whisked egg whites into pristine peaks. The smell of citrus would dance through the air, and we’d talk about everything from her childhood stories to the best ways to slice a lemon.
One summer, after a particularly sticky day, my grandmother decided to try something a little different—a lemon custard cake. As she explained her recipe, I could see the joy in her eyes. “It’s all about balancing sour and sweet,” she told me. That idea stuck with me all these years, and I promise, this Magic Lemon Custard Cake is an homage to those cherished moments and flavors. Let’s create some magic in your kitchen!
Ingredients
Here’s what you’ll need to bring this enchanting dessert to life:
-
4 large eggs: These help create a fluffy, airy texture for the cake. If you’re looking for a vegan version, you can use flax eggs (1 tablespoon flaxseed meal + 3 tablespoons water = 1 egg).
-
1 cup sugar: Sweetness is key! You can substitute with coconut sugar or use a sugar alternative like stevia; just adjust according to the product’s sweetness level.
-
1/2 cup unsalted butter, melted: This adds richness, but if you’re avoiding dairy, try using coconut oil or a vegan butter spread.
-
2 cups milk: Whole milk gives the best texture, but feel free to use almond milk or oat milk for a non-dairy option.
-
1 cup all-purpose flour: This is vital for structure. Gluten-free all-purpose flour can be used for a gluten-free version.
-
1 teaspoon vanilla extract: This enhances the flavors. Consider using almond extract for a twist!
-
Zest of 1 lemon: A zingy addition! Use a microplane for fine zest, but if you’re in a bind, lemon peel can work too.
-
Juice of 1 lemon: Fresh is best! Bottled lemon juice lacks the same vibrancy, so opt for freshly squeezed.
-
1/4 teaspoon salt: This is essential to balance the sweetness and highlight the lemon flavor.
-
Powdered sugar for dusting (optional): Just a light sprinkle elevates the cake visually and adds a touch of sweetness!
Step-by-Step Instructions
Ready to dive in? Let’s get baking!
-
Preheat the Oven: Preheat your oven to 350°F (175°C). This is crucial for achieving that magical bake.
-
Prepare the Baking Dish: Grease an 8-inch square baking dish or a similar size with butter or any cooking spray. This will prevent sticking and ensure easy removal.
-
Whisk the Eggs: In a large mixing bowl, crack 4 large eggs. Whisk vigorously until they turn pale and frothy—this will add air to your batter, which creates fluffiness!
-
Mix in Sugar and Butter: Slowly add 1 cup of sugar to the frothy eggs while continuing to whisk. Once combined, pour in the 1/2 cup of melted butter and mix until smooth.
-
Incorporate Milk and Vanilla: Gently stir in 2 cups of milk and 1 teaspoon of vanilla extract. This is where the magic begins! The mixture may appear a bit thin—that’s perfect!
-
Add Flour and Lemon: Next, sift in 1 cup of all-purpose flour, zest of 1 lemon, juice of 1 lemon, and 1/4 teaspoon salt. Use a spatula to fold everything together until just combined. Be careful not to overmix; we want to keep it light!
-
Pour and Bake: Pour the batter into the prepared baking dish. Place it in the preheated oven and bake for about 35-40 minutes, or until the top is golden and a toothpick inserted in the center comes out clean. Keep an eye on it towards the end; all ovens vary!
-
Cool and Dust: Let the cake cool in the pan for about 10-15 minutes before transferring it to a wire rack. Once completely cool, dust the top with powdered sugar for that perfect finishing touch!
Serving Suggestions
To plate this delightful Lemon Custard Cake, slice it into squares, and serve each piece on individual plates. If you want to elevate the presentation, add a dollop of whipped cream or a scoop of vanilla ice cream on the side. Garnish with fresh mint or additional lemon zest for that extra pop of color. Trust me, it’ll make your dessert not just delicious but visually appealing too!
Recipe Variations
Feel like getting creative? Here are some scrumptious twists to this classic recipe:
-
Berry Bliss: Add 1 cup of fresh blueberries or raspberries to the batter for a burst of color and flavor.
-
Coconut Dream: Substitute half the milk for coconut milk and add shredded coconut for a tropical flair.
-
Spiced Lemon: Incorporate 1/2 teaspoon of ground ginger or a pinch of cinnamon for a warm, cozy twist.
-
Chocolate Chip Delight: Mix in some mini chocolate chips for an indulgent contrast to the tangy lemon.
-
Herb-Infused: Add a sprinkle of finely chopped rosemary or thyme to the batter for an herbal twist that will surprise your taste buds.
Chef’s Notes
I must confess—my journey with this recipe hasn’t always been smooth sailing. I once made it for a dinner party and forgot the flour (yikes!). My friends still devoured it, claiming it tasted like a lemon soup! It was a funny mishap that turned into a cherished memory. Over time, I’ve perfected it, and now it’s a crowd-pleaser at any gathering. Remember, every misstep in the kitchen is just a new adventure waiting to unfold, so don’t stress—enjoy the process!
FAQs and Troubleshooting
Here are some common questions and potential missteps you might encounter while making your Magic Lemon Custard Cake:
-
Why did my cake not set?
- If your cake came out runny, it may need more cooking time. Make sure to check it towards the end of the baking time. Every oven is different!
-
Can I make this ahead of time?
- Absolutely! This cake stores well. Just keep it in an airtight container in the fridge for up to 3 days. Make sure to dust with powdered sugar just before serving for the best look.
-
Why does my cake have a weird texture?
- Overmixing can lead to a dense texture, so gently fold in the ingredients. Another tip is to avoid opening the oven too soon, as this can cause it to deflate.
-
Can I substitute the lemon?
- Yes! You can use lime juice or even orange for a different flavor profile, but adjust the sugar content slightly since limes tend to be tart.
Nutritional Info
While the nutrition can vary depending on the specific ingredients used, here’s a rough estimate per slice (assuming you cut the cake into 12 pieces):
- Calories: 210
- Protein: 4g
- Fat: 7g
- Carbohydrates: 33g
- Fiber: 1g
- Sugar: 12g
Conclusion
And there you have it—a journey through the delightful world of Magic Lemon Custard Cake! I hope you find as much joy in making and sharing this cake as I do. So roll up your sleeves, savor the process, and enjoy every unforgettable slice alongside the loved ones in your life. Remember, the best part of cooking isn’t just the final dish; it’s the memories we create along the way. Happy baking!
PrintMagic Lemon Custard Cake
A delightful fusion of tangy lemon flavors and creamy custard that creates a magical treat for any occasion.
- Prep Time: 15 minutes
- Cook Time: 40 minutes
- Total Time: 55 minutes
- Yield: 12 servings 1x
- Category: Dessert
- Method: Baking
- Cuisine: American
- Diet: Vegetarian
Ingredients
- 4 large eggs
- 1 cup sugar
- 1/2 cup unsalted butter, melted
- 2 cups milk
- 1 cup all-purpose flour
- 1 teaspoon vanilla extract
- Zest of 1 lemon
- Juice of 1 lemon
- 1/4 teaspoon salt
- Powdered sugar for dusting (optional)
Instructions
- Preheat your oven to 350°F (175°C).
- Grease an 8-inch square baking dish with butter or cooking spray.
- Whisk the eggs in a large mixing bowl until pale and frothy.
- Mix in the sugar and melted butter until smooth.
- Incorporate the milk and vanilla extract gently into the mixture.
- Add the flour, lemon zest, lemon juice, and salt, and fold until just combined.
- Pour the batter into the prepared baking dish.
- Bake for about 35-40 minutes, or until golden and a toothpick comes out clean.
- Cool the cake in the pan for 10-15 minutes before transferring to a wire rack.
- Dust with powdered sugar before serving.
Notes
This cake can be stored in an airtight container in the fridge for up to 3 days. Dust with powdered sugar just before serving.
Nutrition
- Serving Size: 1 slice
- Calories: 210
- Sugar: 12g
- Sodium: 150mg
- Fat: 7g
- Saturated Fat: 4g
- Unsaturated Fat: 2g
- Trans Fat: 0g
- Carbohydrates: 33g
- Fiber: 1g
- Protein: 4g
- Cholesterol: 100mg
Keywords: lemon cake, custard cake, dessert, baking, easy recipe